LG Electronics USA 9QKE40520 VCR/DVD Recorder User Manual LH EC950SB NA1ULLS
LG Electronics USA VCR/DVD Recorder LH EC950SB NA1ULLS
UserManual.wiki
>
LG Electronics USA
>
9QKE40520 User Manual
Users Manual
Navigation menu
Upload a User Manual
Namespaces
Wiki Guide
HTML
PDF
Info
Views
User Manual
Discussion / Help
Navigation
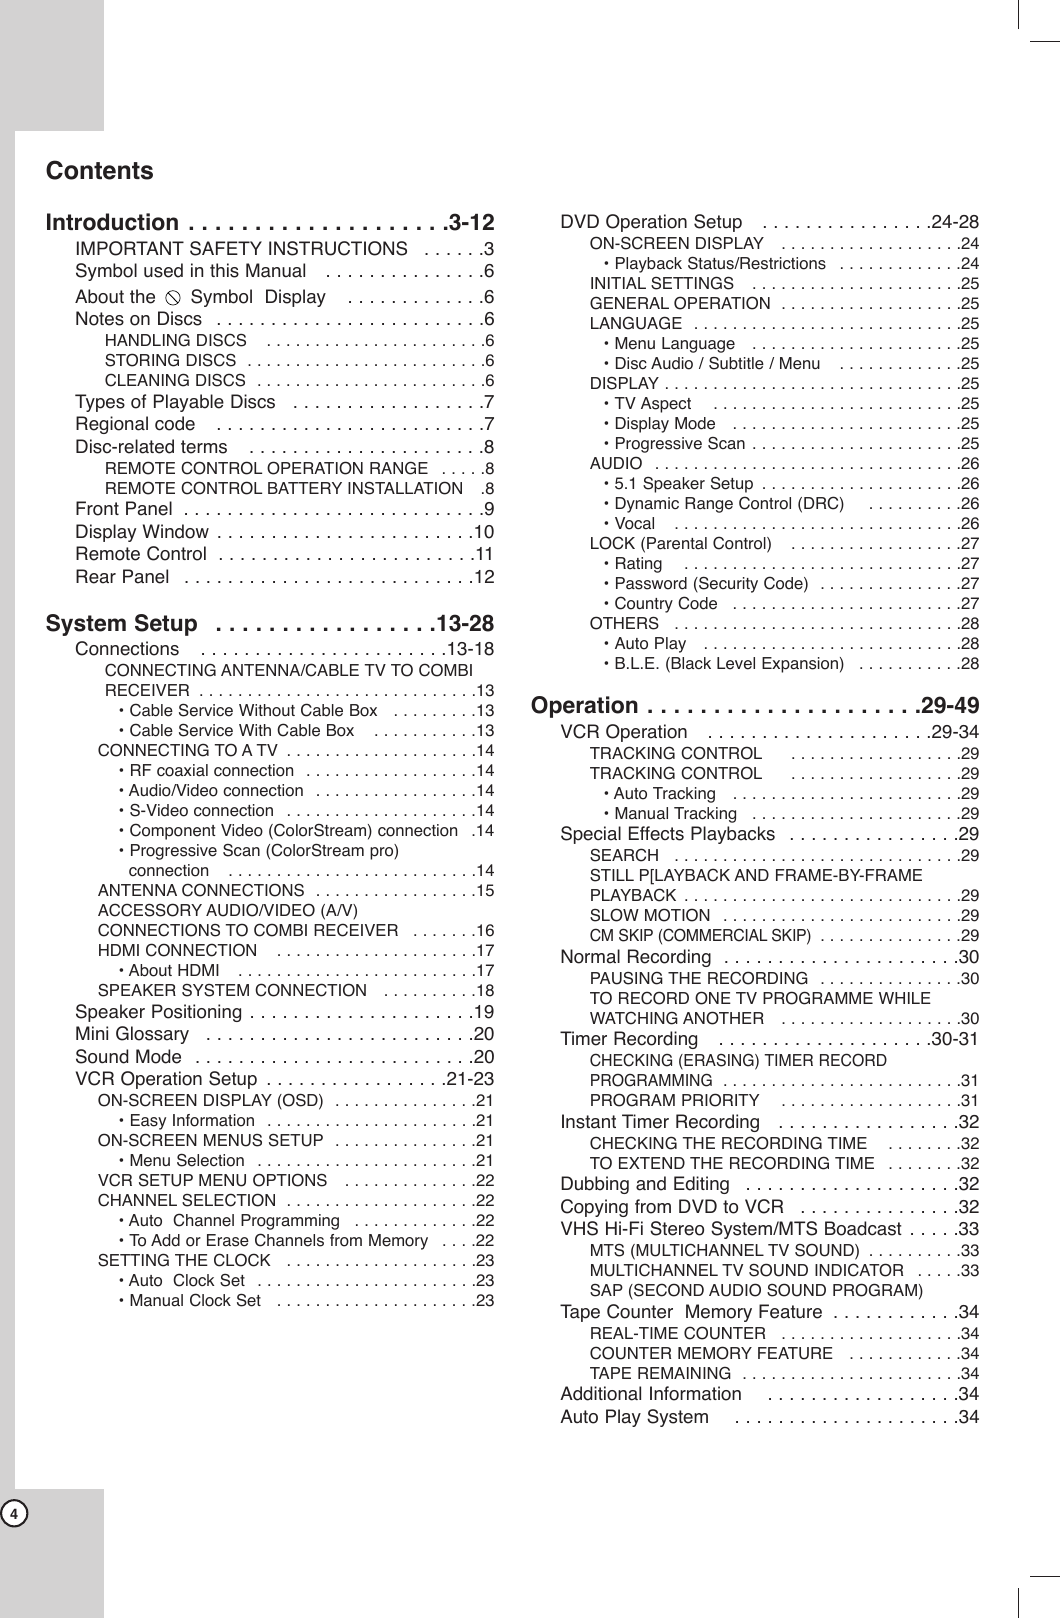

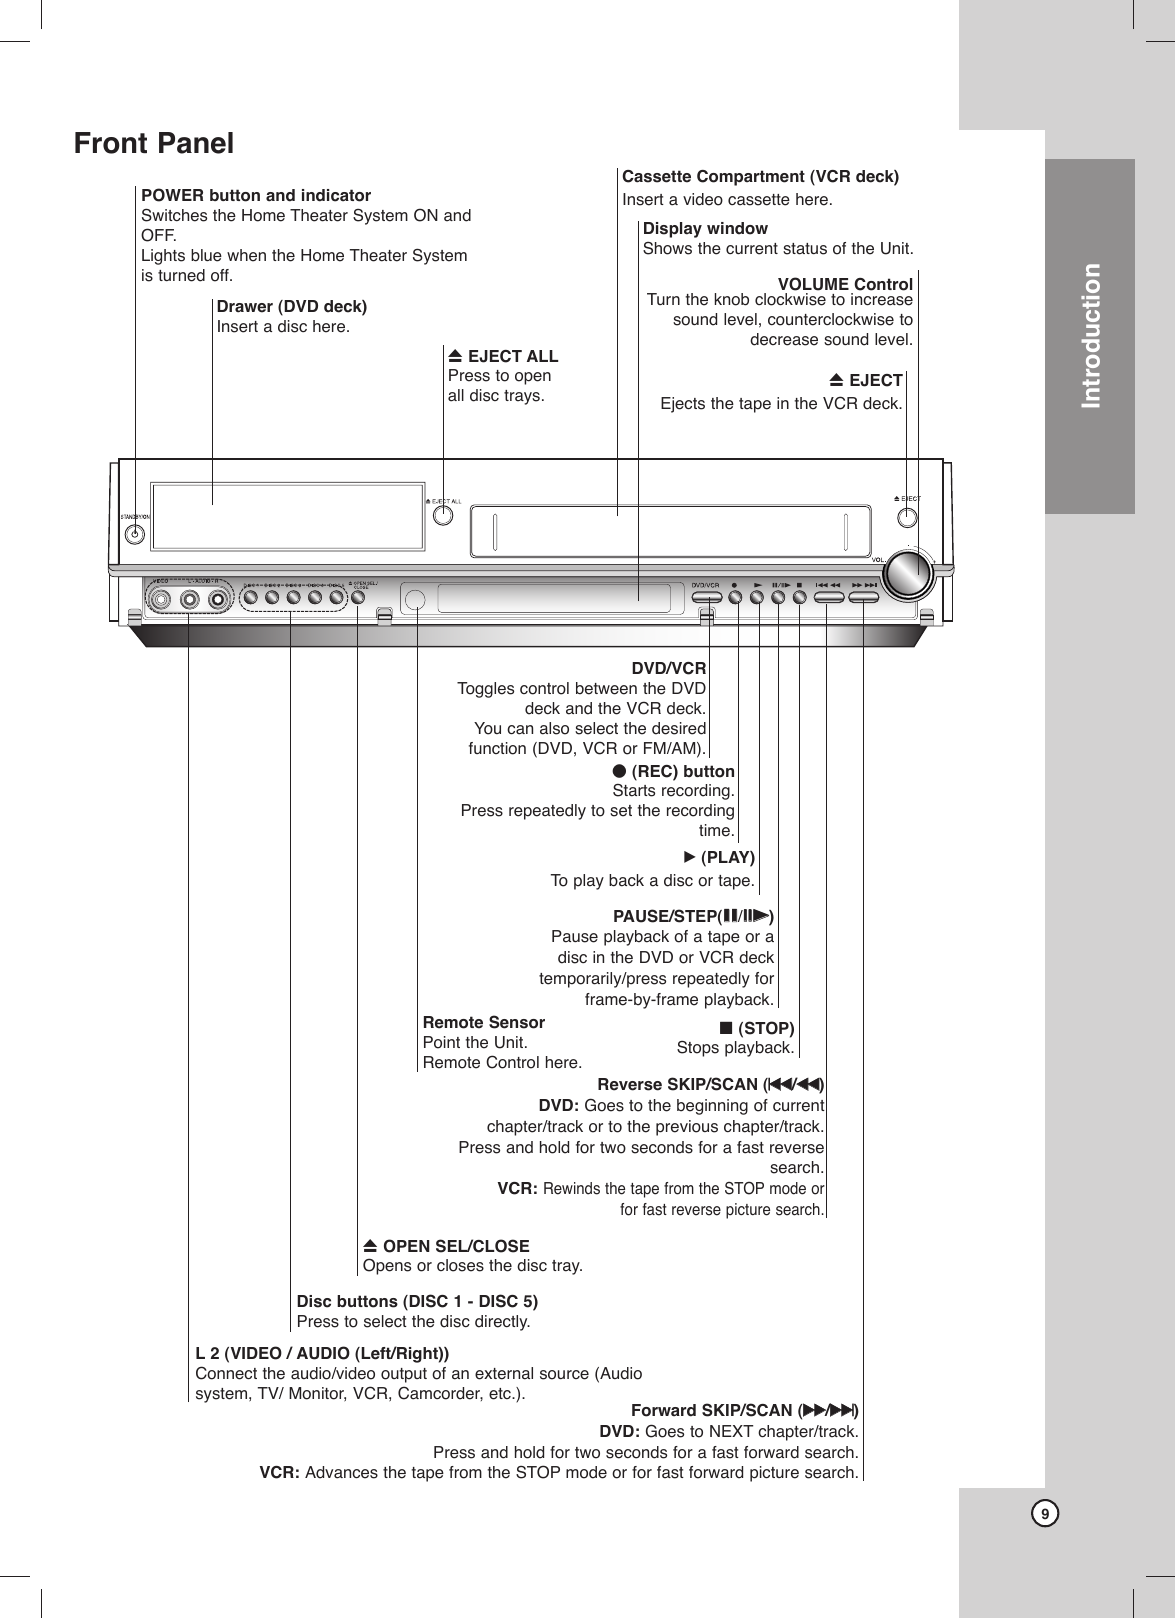
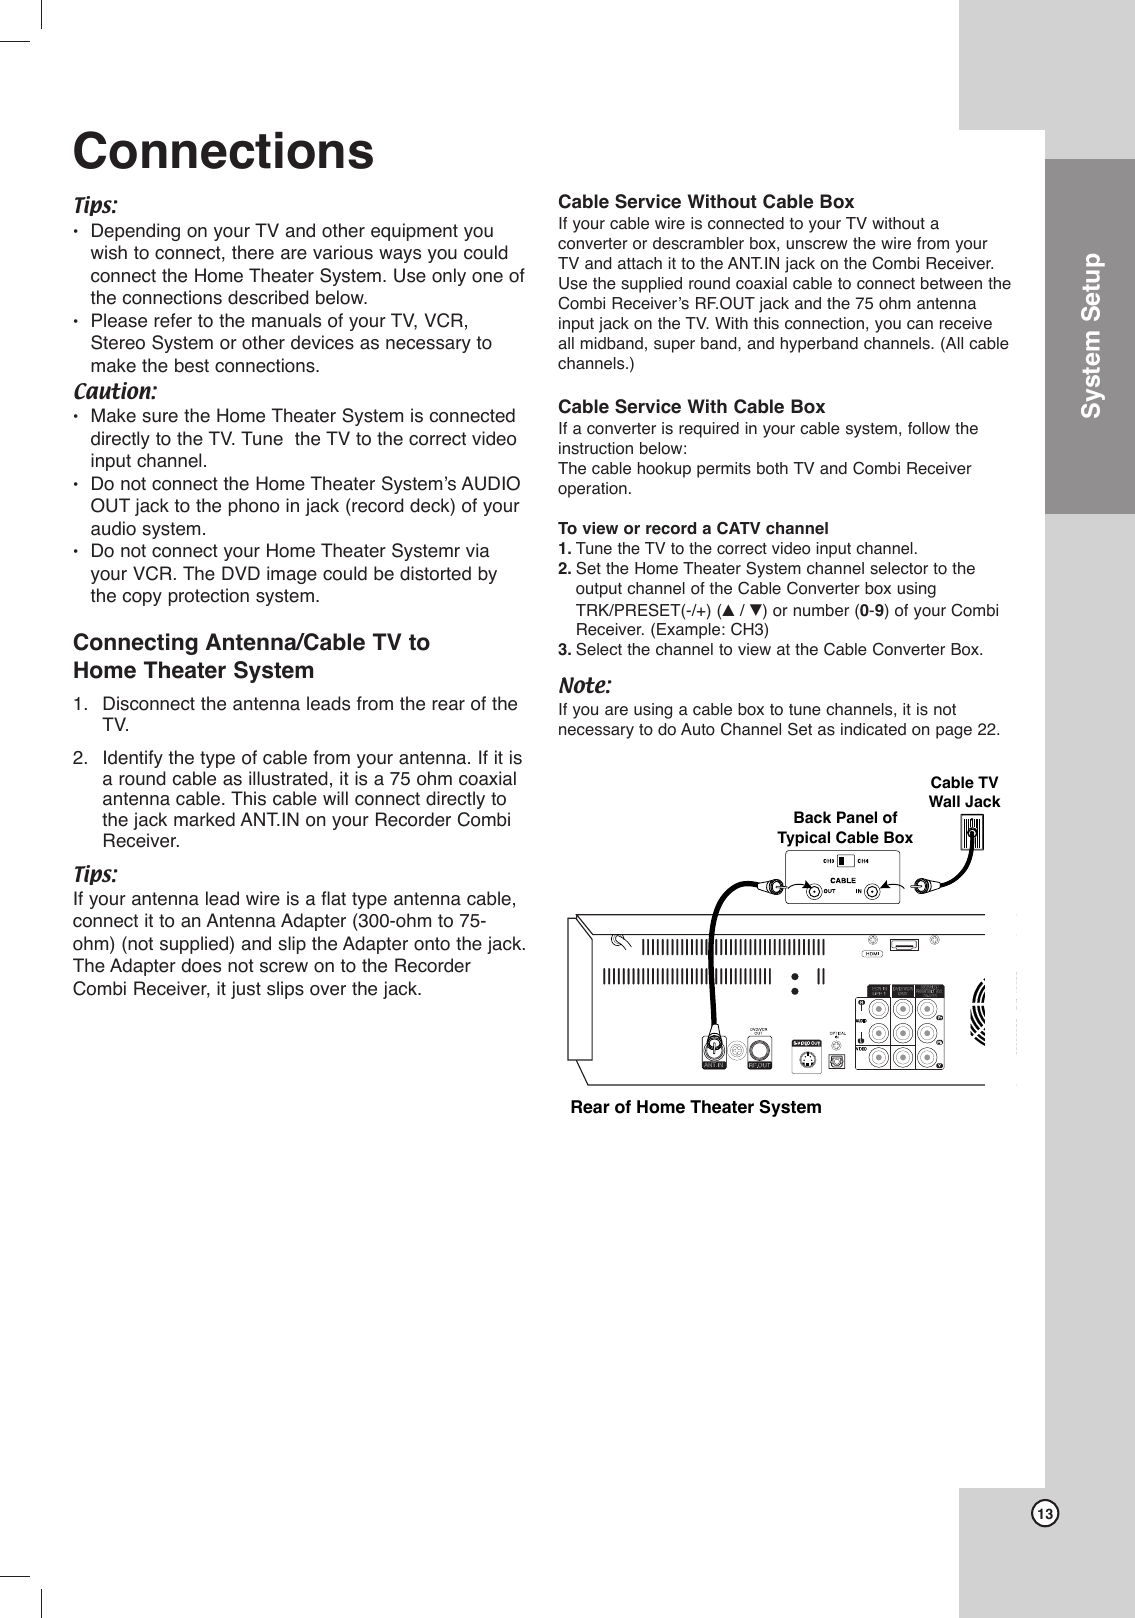
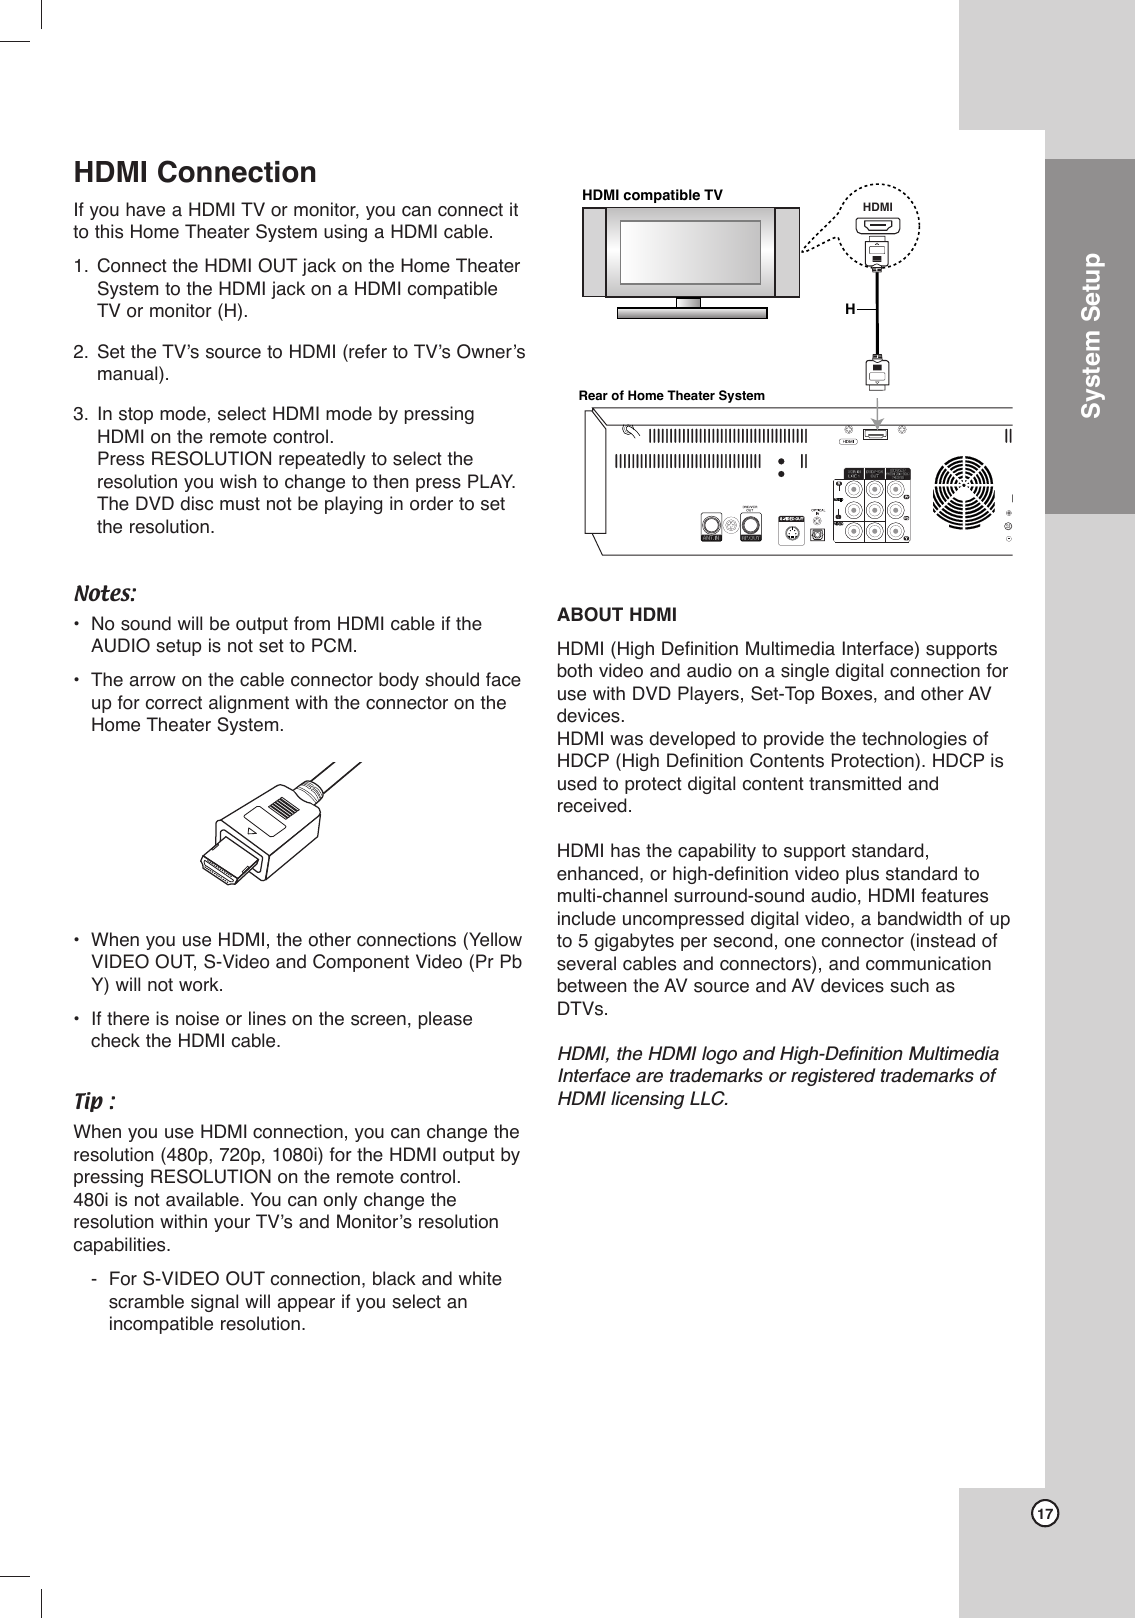
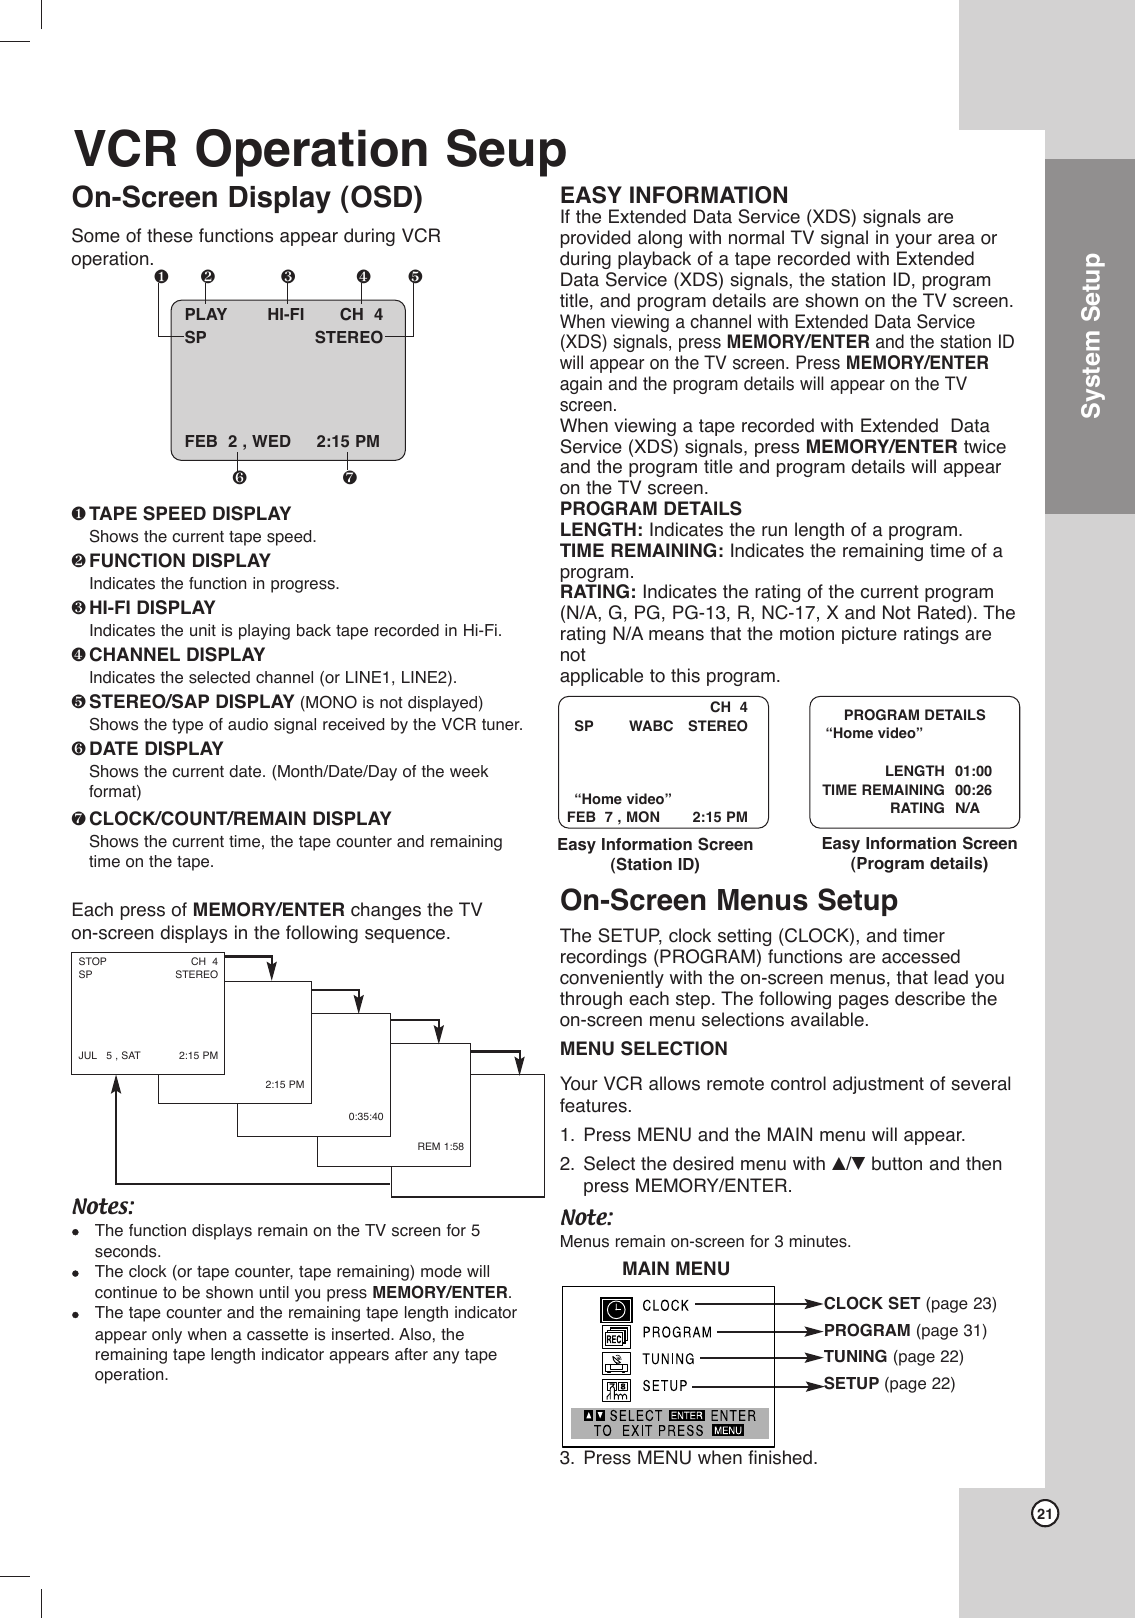
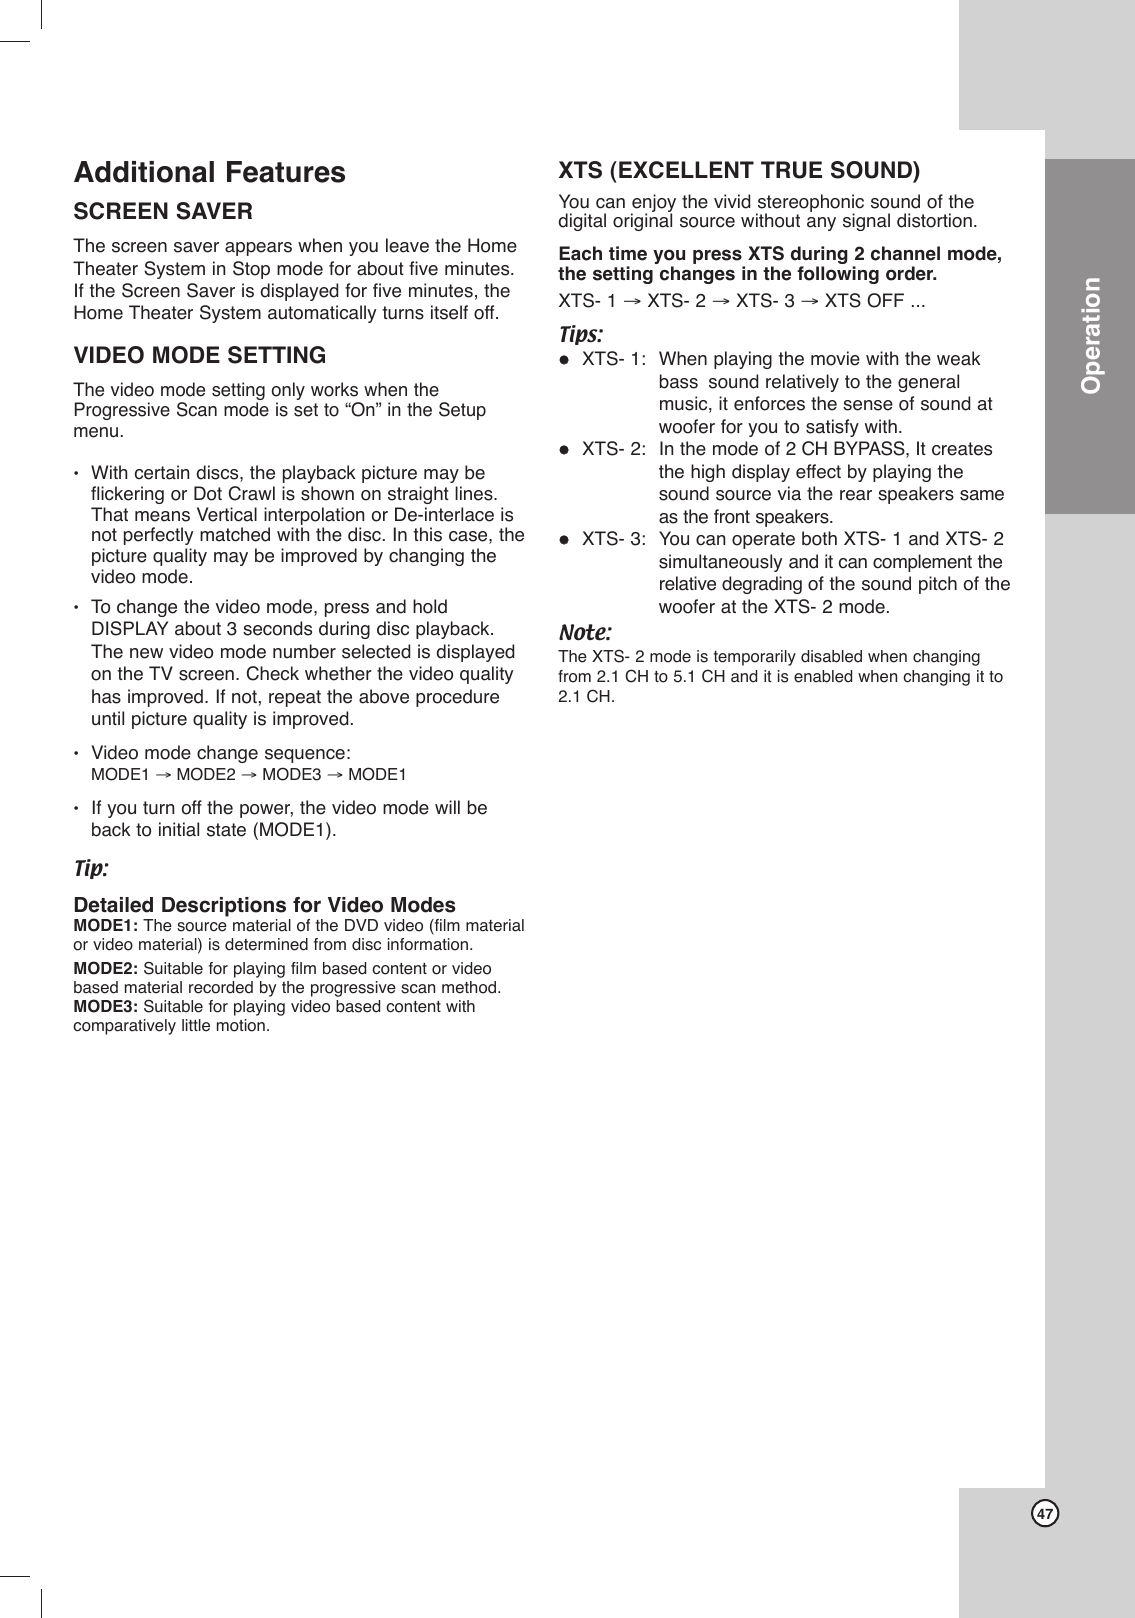
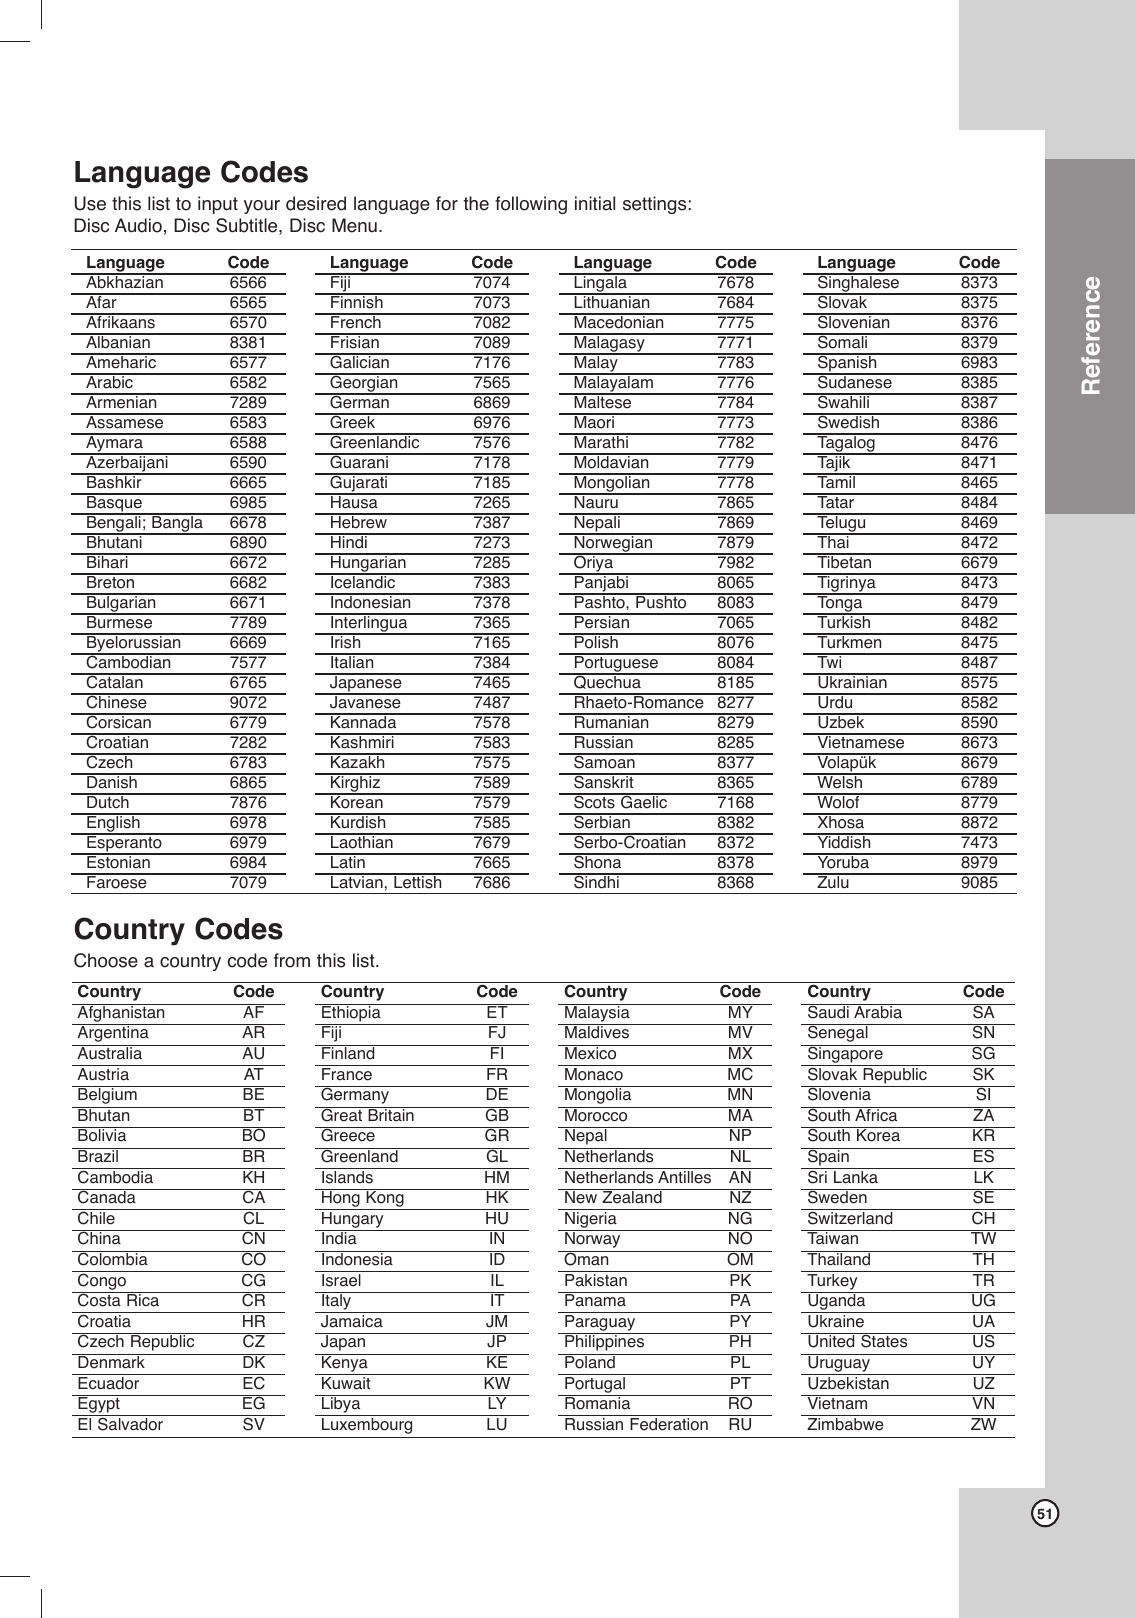
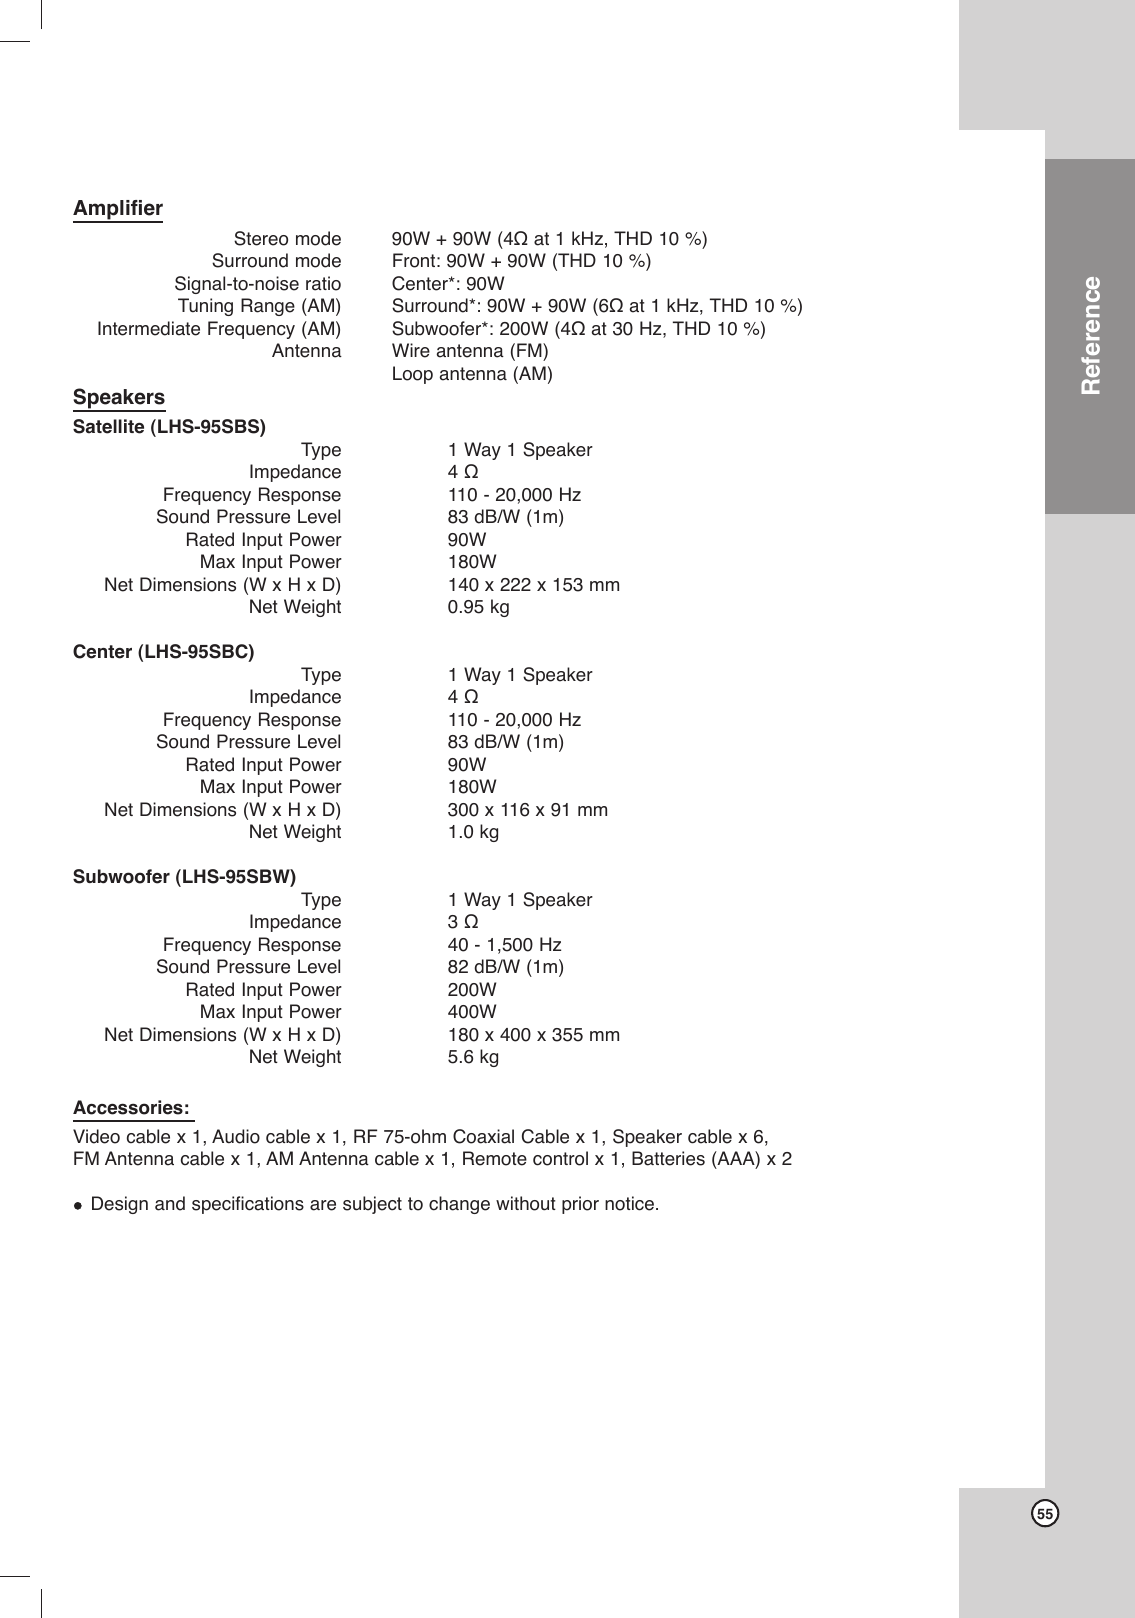
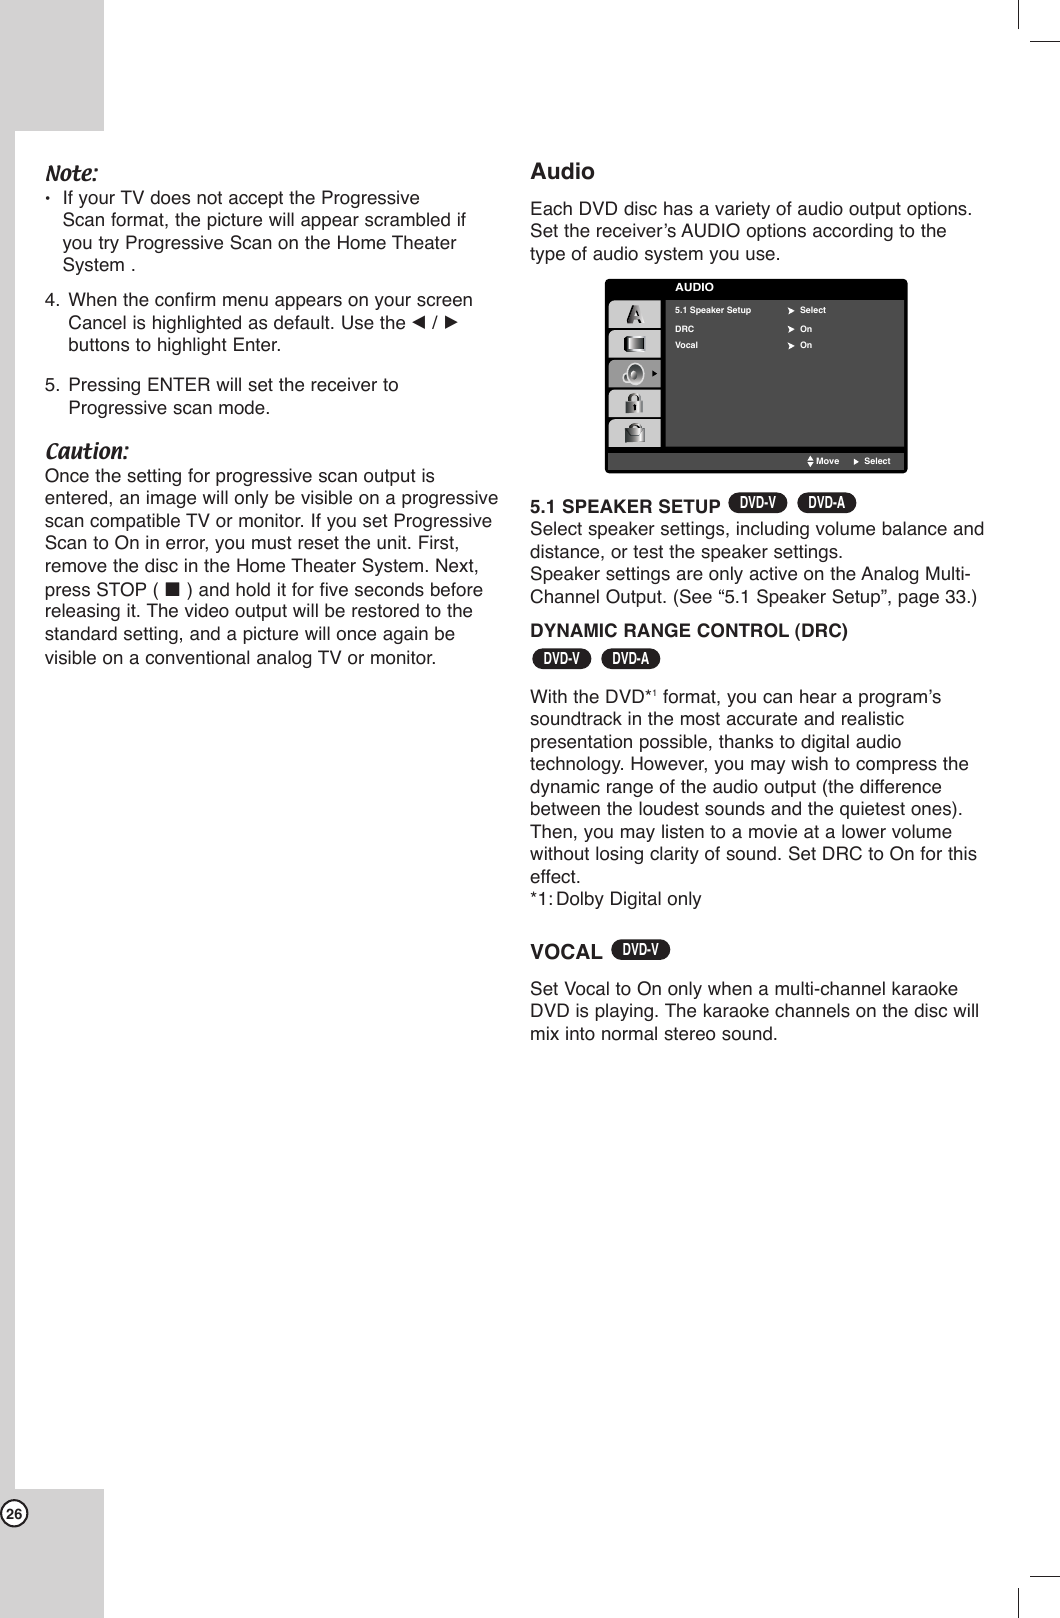
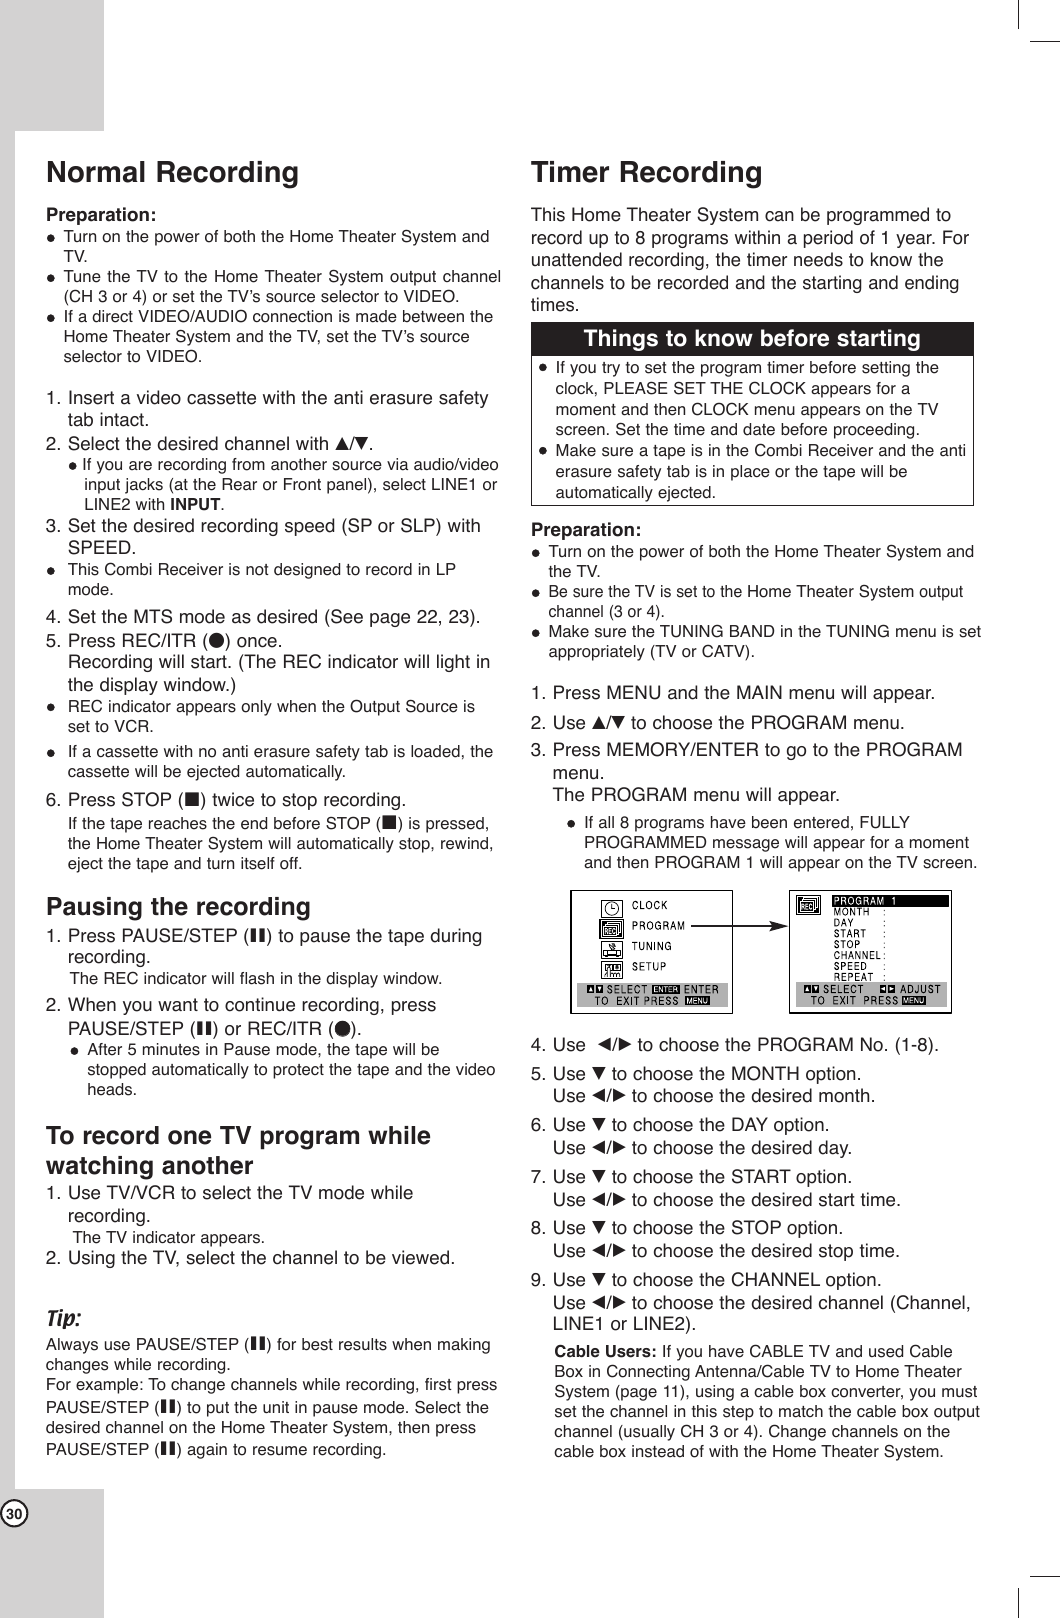
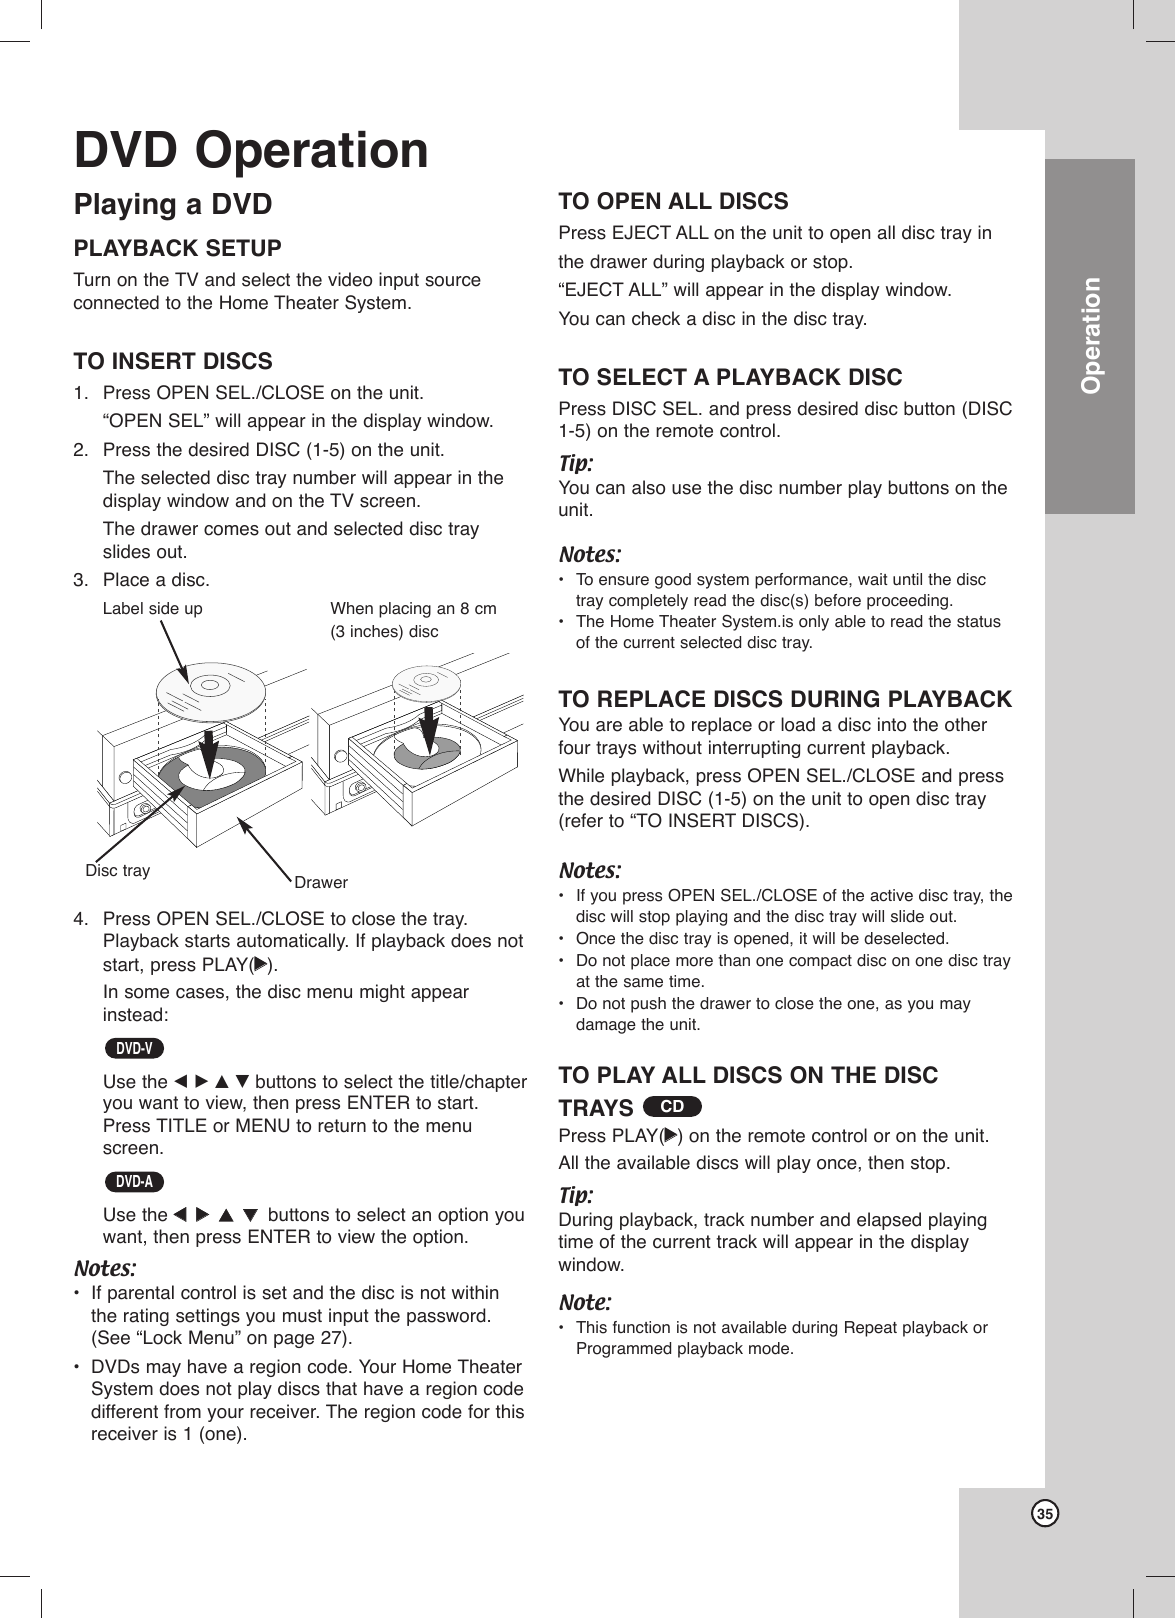
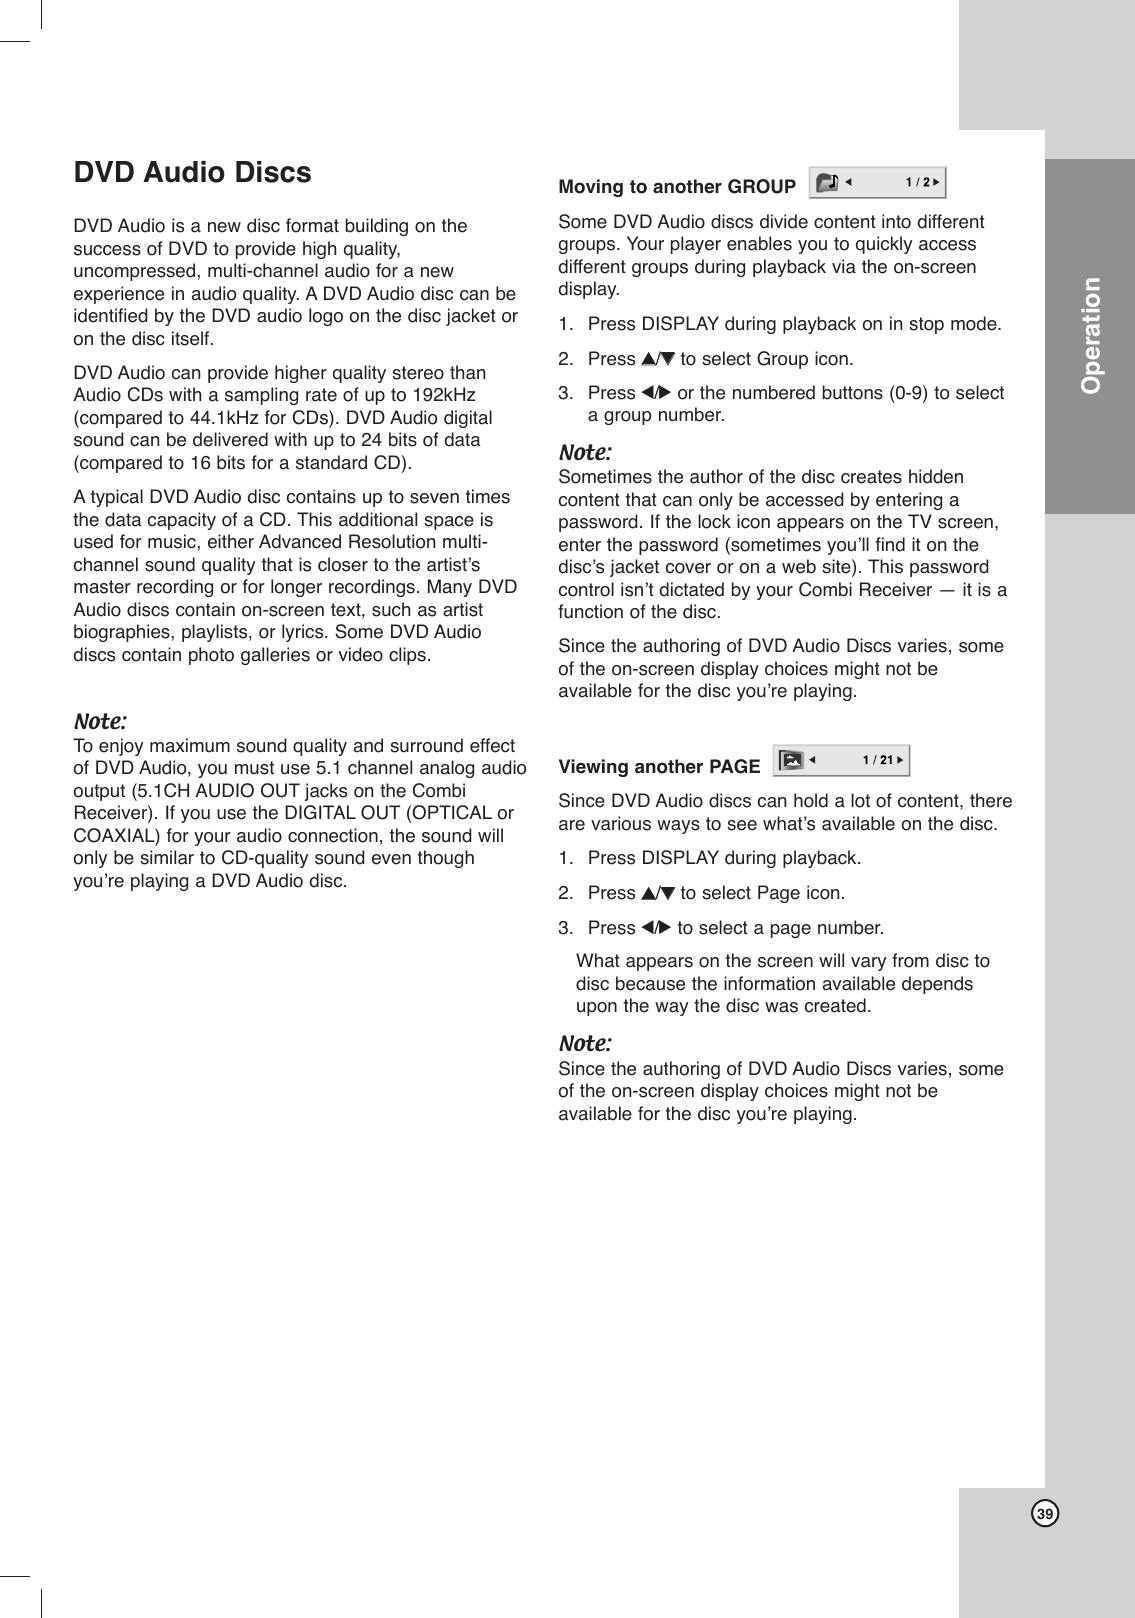
![22VCR Setup Menu Options1. Press MENU and the MAIN menu will appear.2. Use v/Vto select the SETUP menu, then pressMEMORY/ENTER. The SETUP menu will appear.3. Use v/Vto choose a desired option on the SETUPmenu. Then use b/Bto choose a desired setting.FUNCTION OSDThe on-screen display of this Combi Receiver can be turned onor off.FUNCTION OSD: Choose ON and OFF with b/B.LANGUAGE SELECTThe on-screen programming of this Combi Receiver can be displayed in either English, Spanish, or French.LANGUAGE SELECT: Choose ENGLISH, SPANISH, orFRENCH with b/B.AUDIO MODEThe Home Theater System has two separate audio playbacksystems, the high quality VHS Hi-Fi system and standardNORMAL mono system. The same audio is generallyrecorded on both systems. The VHS Hi-Fi system plays onseparate (left and right) channels, and the NORMAL systemplays monaural sound. The normal track is always played sothe cassette can be played on a Combi Receiver that doesnot have VHS Hi-Fi.AUDIO MODE: Choose Hi-Fi or NORMAL with b/B.BROADCAST TYPE (STEREO/SAP/MONO)Multichannel Television Sound (MTS) carries stereo and/orSecond Audio Program (SAP) bilingual signals. Set this displayto the desired position when both MTS stereo and SAP signalsare received. When only one of the MTS signal is received, theCombi Receiver automatically selects the correspondingreceiving mode (Stereo or SAP) regardless of the selectedposition. For normal operation, the display should be in theSTEREO position. The Combi Receiver will then record aSTEREO program when available, and record a mono program IF the program is NOT IN STEREO.For weak STEREO and/or SAP broadcasts, changing thedisplay to mono may give clearer sound.BROADCAST TYPE: Choose STEREO, SAP, or MONOwith b/B.AUDIO OUTPUT (STEREO/LEFT/RIGHT)Used during playback [when AUDIO MODE (HI-FI/NORMAL)is in HI-FI position] for selecting the audio output signalsfrom the AUDIO OUT terminals (L ch and R ch), andRF.OUT.This display setting should normally be left in the stereoposition, so that when a stereo tape is played, the stereosound will be heard through the left and right channels. If amono tape is played and the audio output is set to stereo,the same mono sound will be heard from both left and rightchannels.AUDIO OUTPUT: Choose STEREO, LEFT, or RIGHT withb/B.POWER SAVE MODESet POWER SAVE MODE to ON to your Home TheaterSystem into an economic power saving mode.The display turns off when the unit is in standby mode.4.Press MENU when finished.Channel SelectionThis Home Theater System is equipped with afrequency synthesized tuner capable of receiving upto 181 channels. These include VHF channels 2-13, UHFchannels 14-69 and CATV channels 1-125. Preparation:Connect the Home Theater System to the desired type ofantenna or cable TV system, as shown in ConnectingAntenna/Cable TV to Home Theater System on page 13.AUTO CHANNEL PROGRAMMING1. Press MENU and the MAIN menu will appear.2. Use v/Vto select the TUNING menu, then pressMEMORY/ENTER. The TUNING menu will appear.3. Use Vto choose the SOURCE SELECT option,then use b/Bto select TUNER.Press b/Brepeatedly to switch among TUNER, LINE1 orLINE2.4. Use v/Vto choose the AUTO CHANNEL SEToption, then use b/Bto search for channels.The tuner will automatically cycle through all available channels in the area and place them inthe tuner’s memory.5. After the AUTO CHANNEL SET PROCEEDING iscomplete, make sure the TUNING BAND is setappropriately (TV or CATV). Choose the correctTUNING BAND (TV or CATV) with b/Bwhile in theTUNING menu.Remember, TV is for the air antenna reception,CATV is for cable or wireless cable connection.6. Press MENU to return to the TV screen.7. Use TRK/PRESET(-/+) (v/V) on the remote controlto cycle the Home Theater System through thechannels in memory. TO ADD OR ERASE CHANNELS FROMMEMORYThis feature allows you to add or erase channels frommemory manually.1Use Vto choose the CH. ADD/DEL option on theTUNING menu. Use b/Bto select a channel toadd or erase.2Use MEMORY/ENTER to add or erase thechannel.Repeat steps 1 and 2 to add or erase channels.3Press MENU to remove menu.](https://usermanual.wiki/LG-Electronics-USA/9QKE40520/User-Guide-521934-Page-22.png)
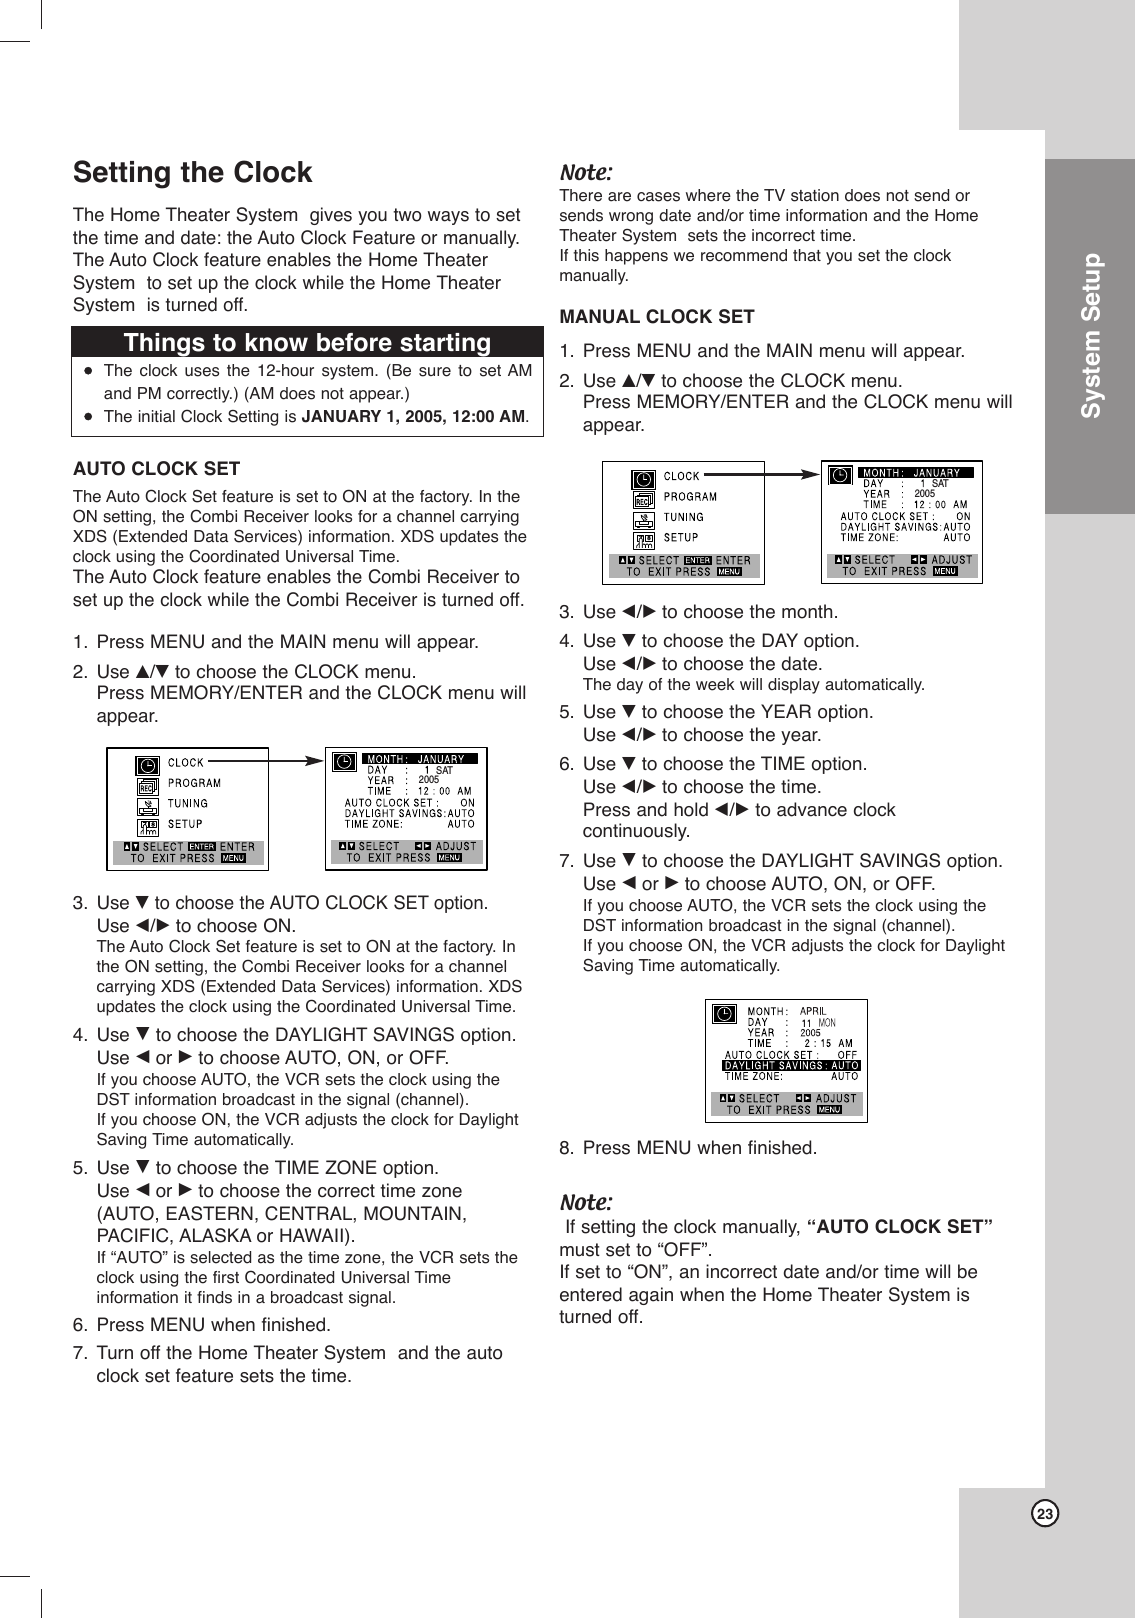
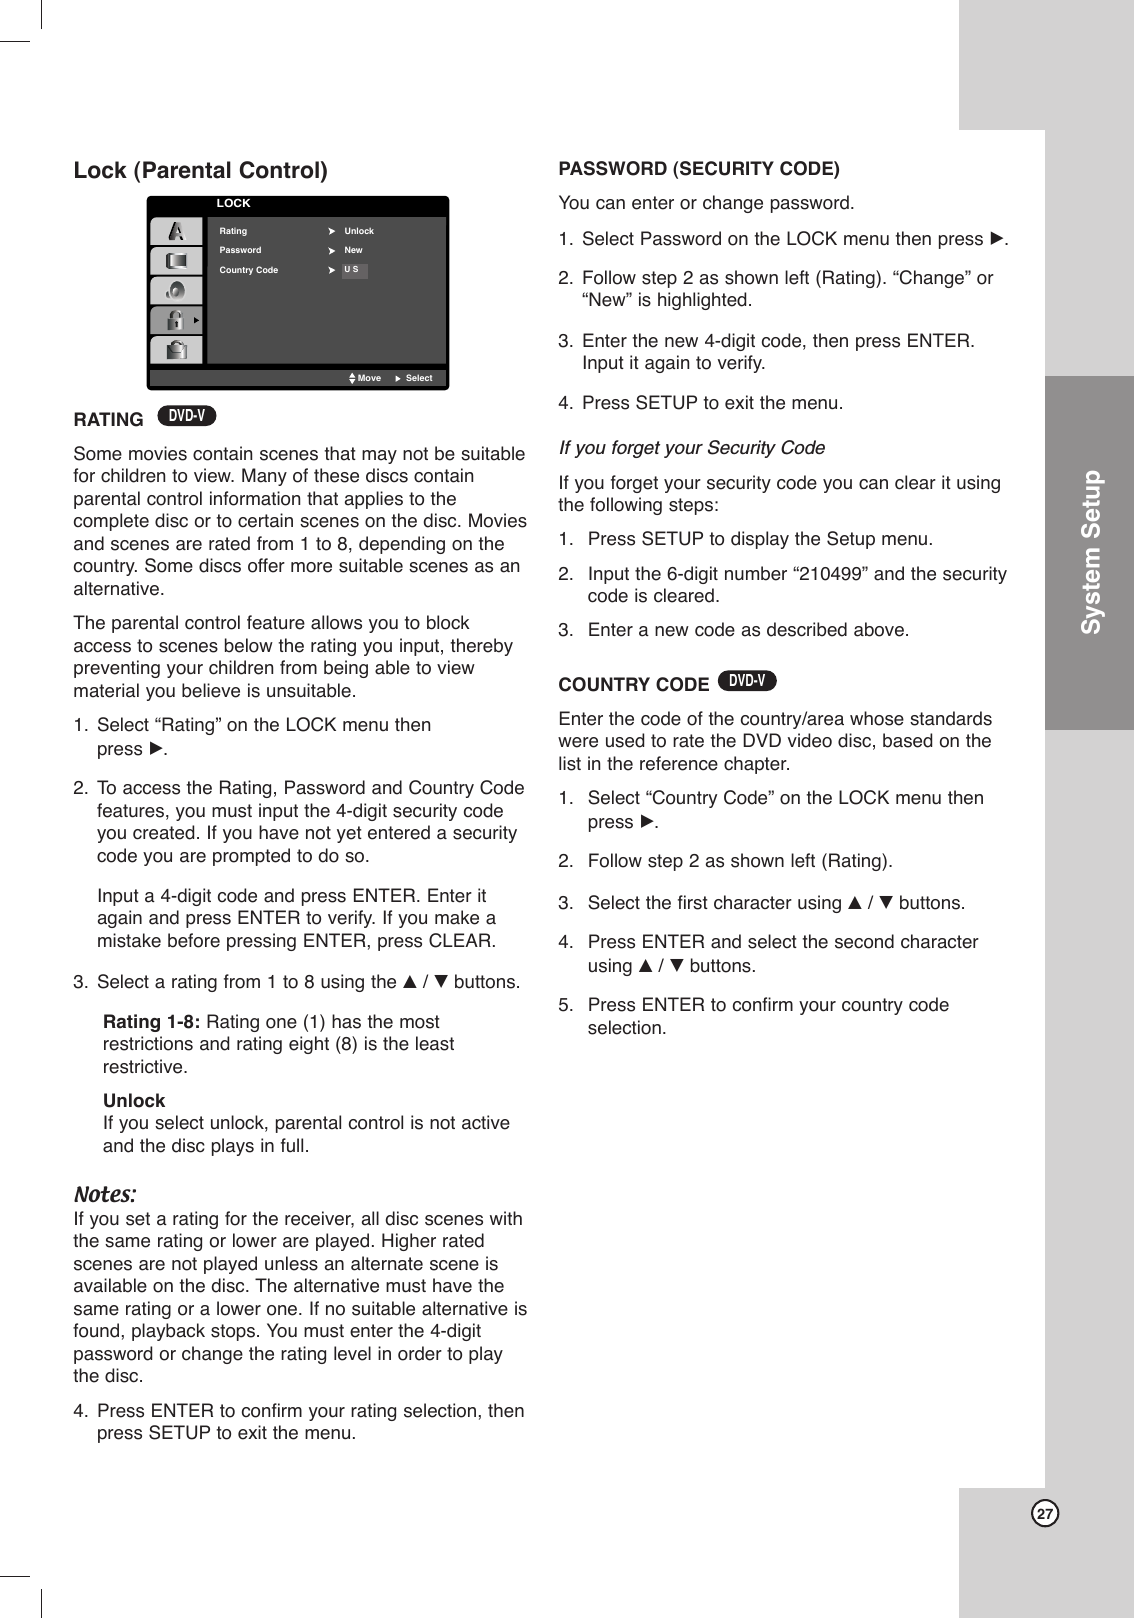
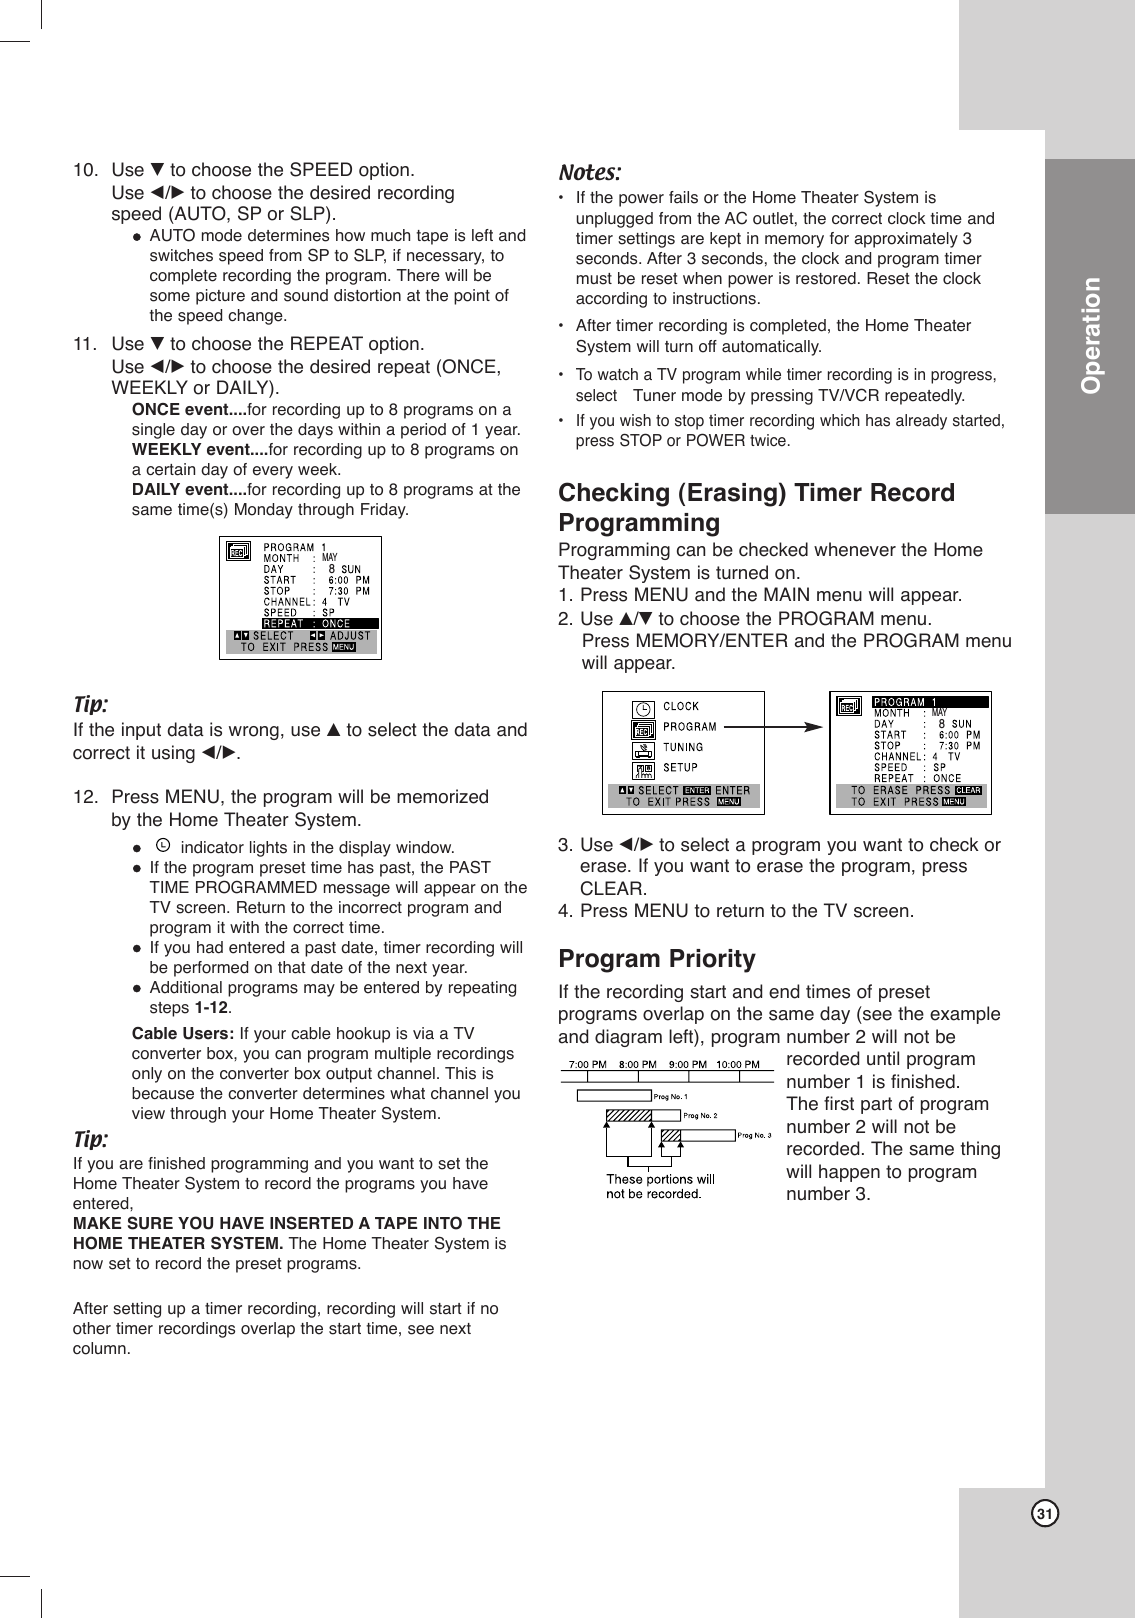

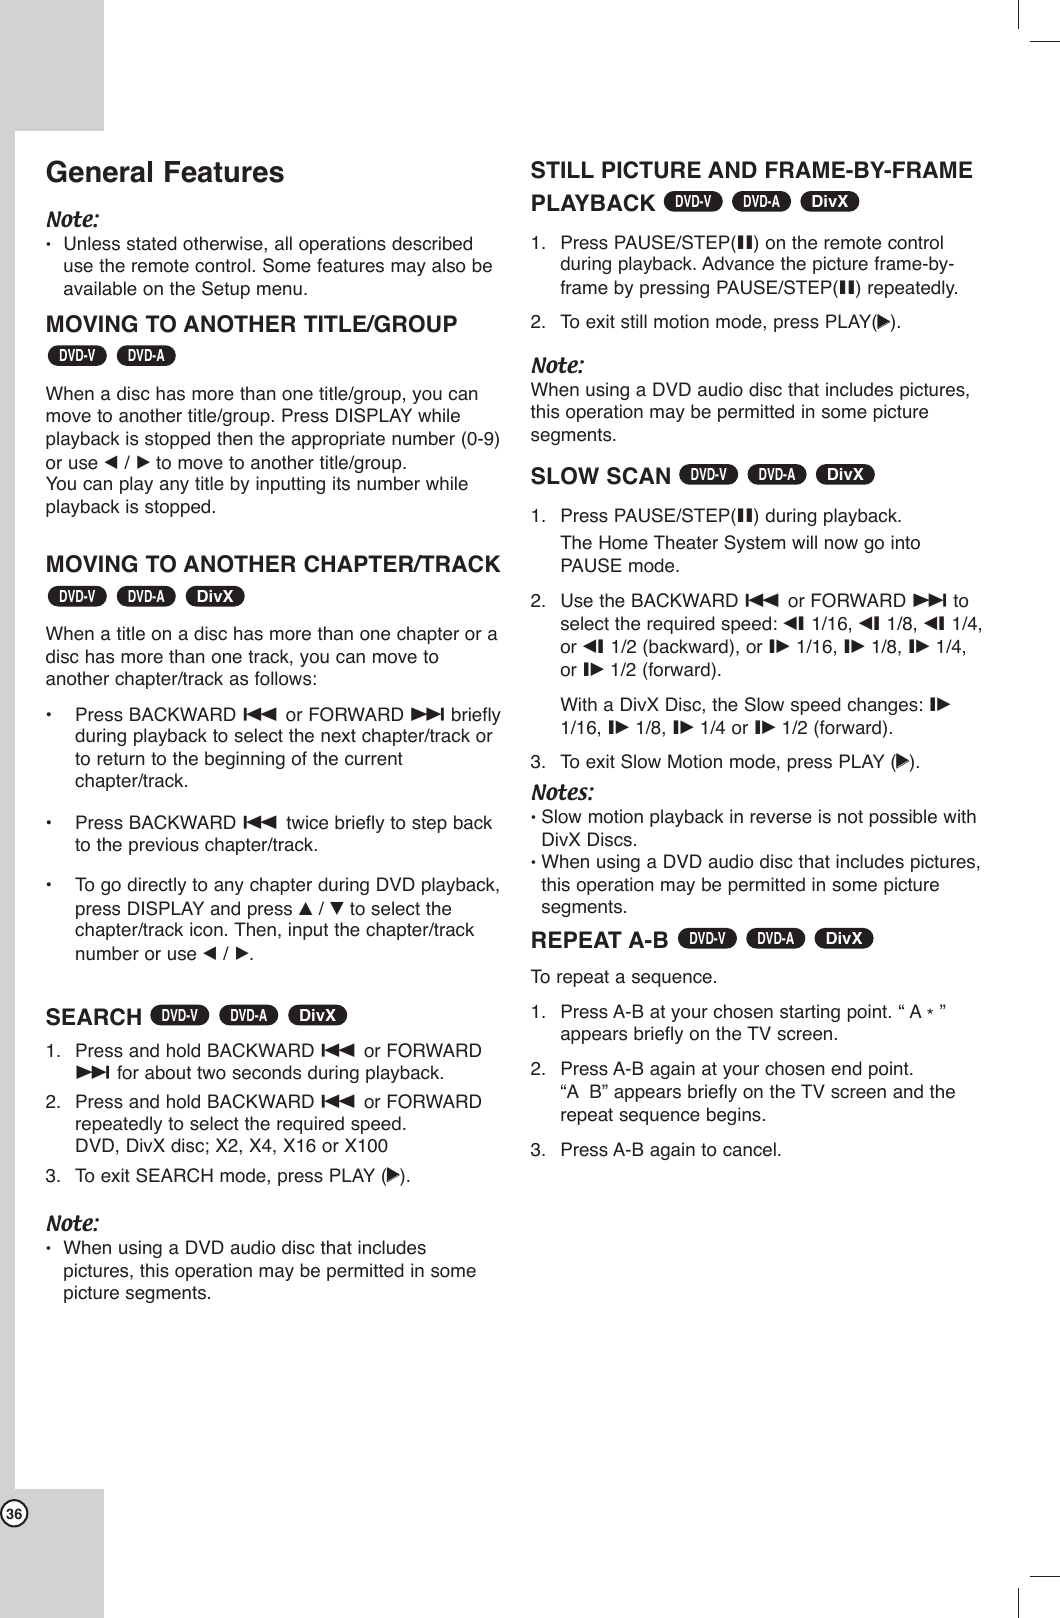
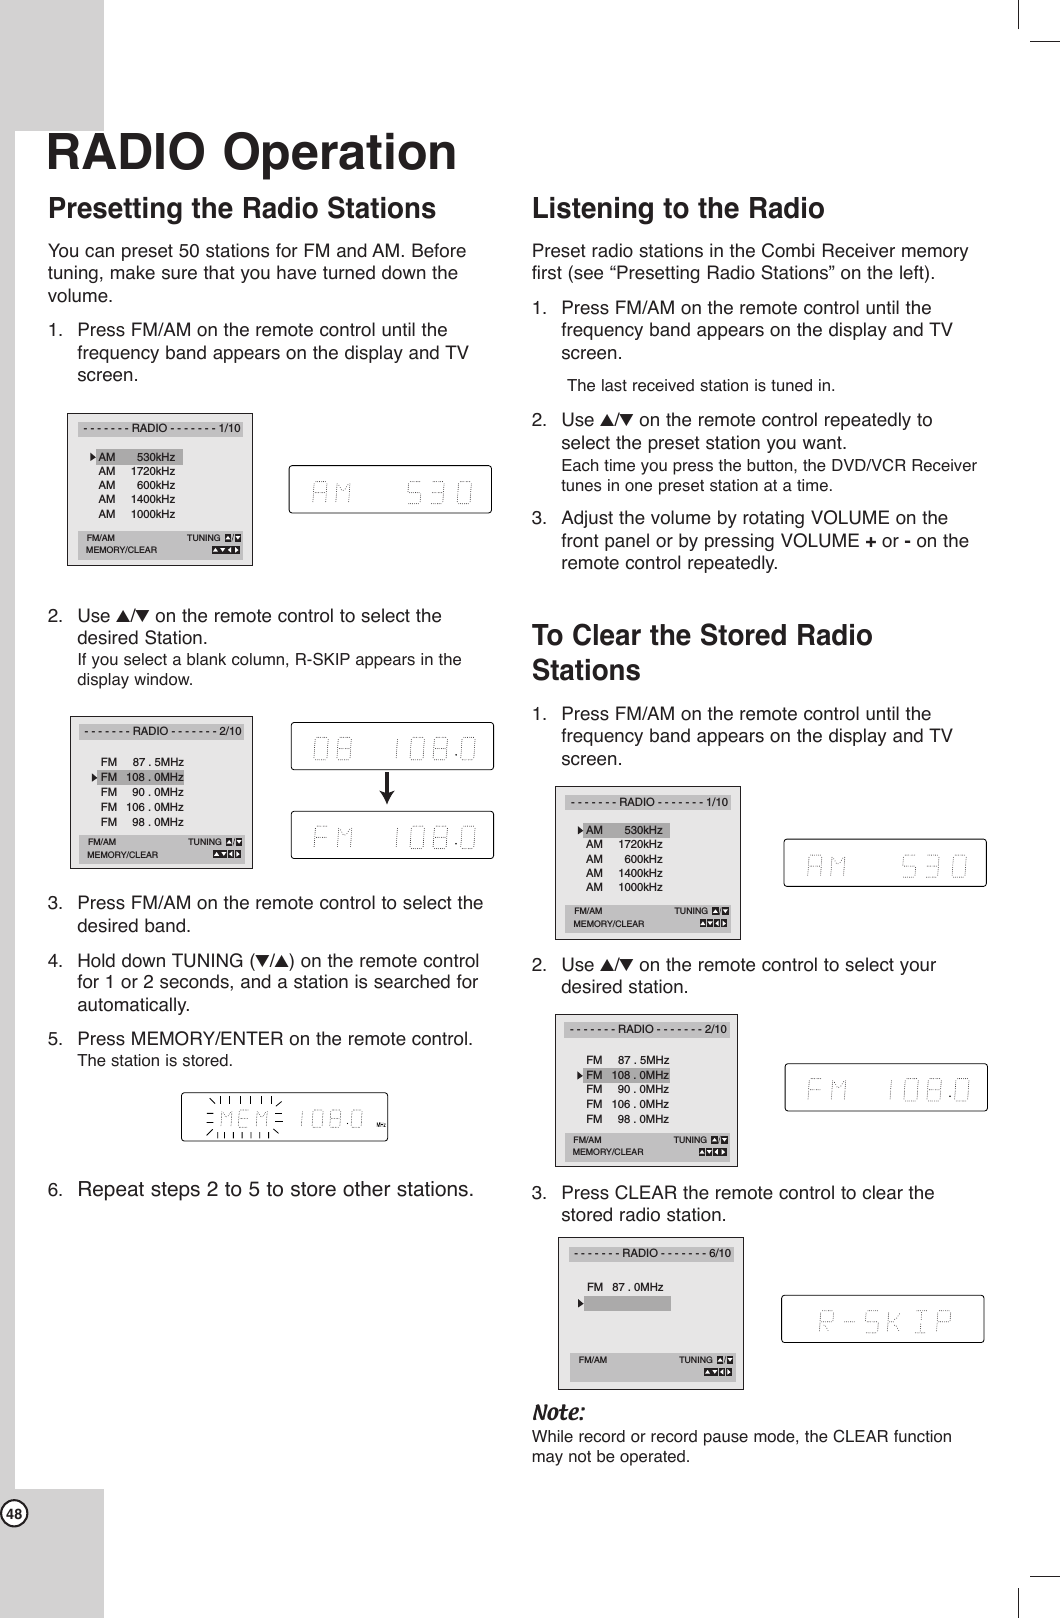
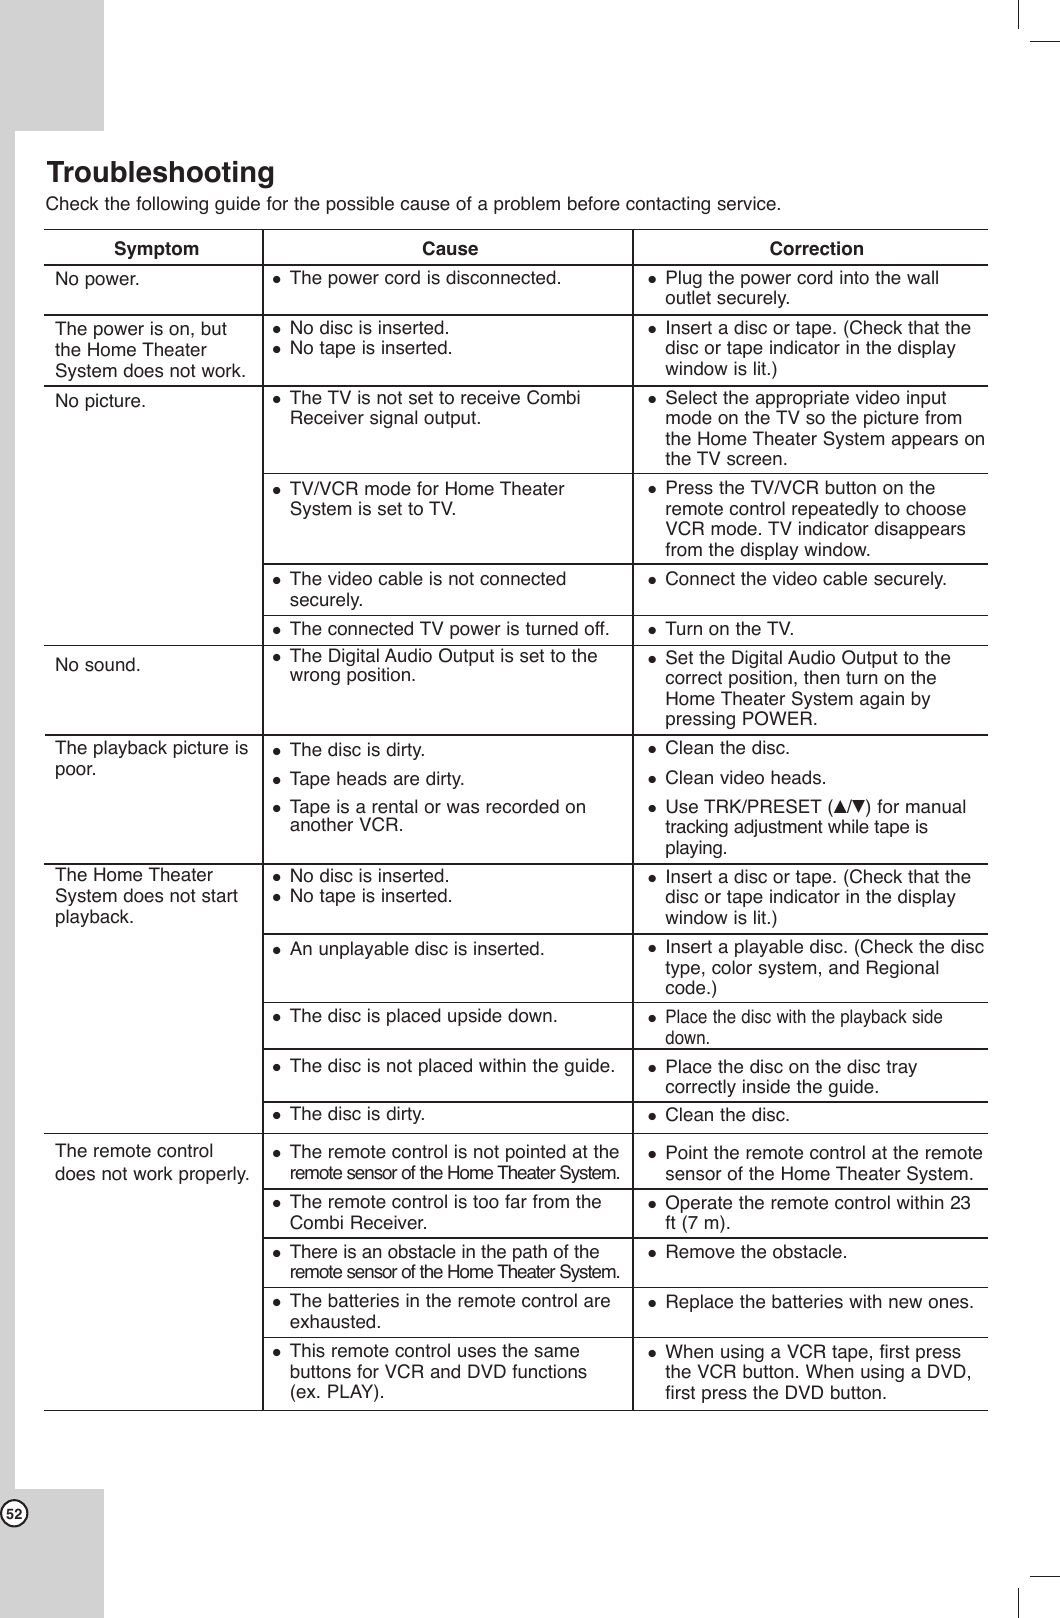
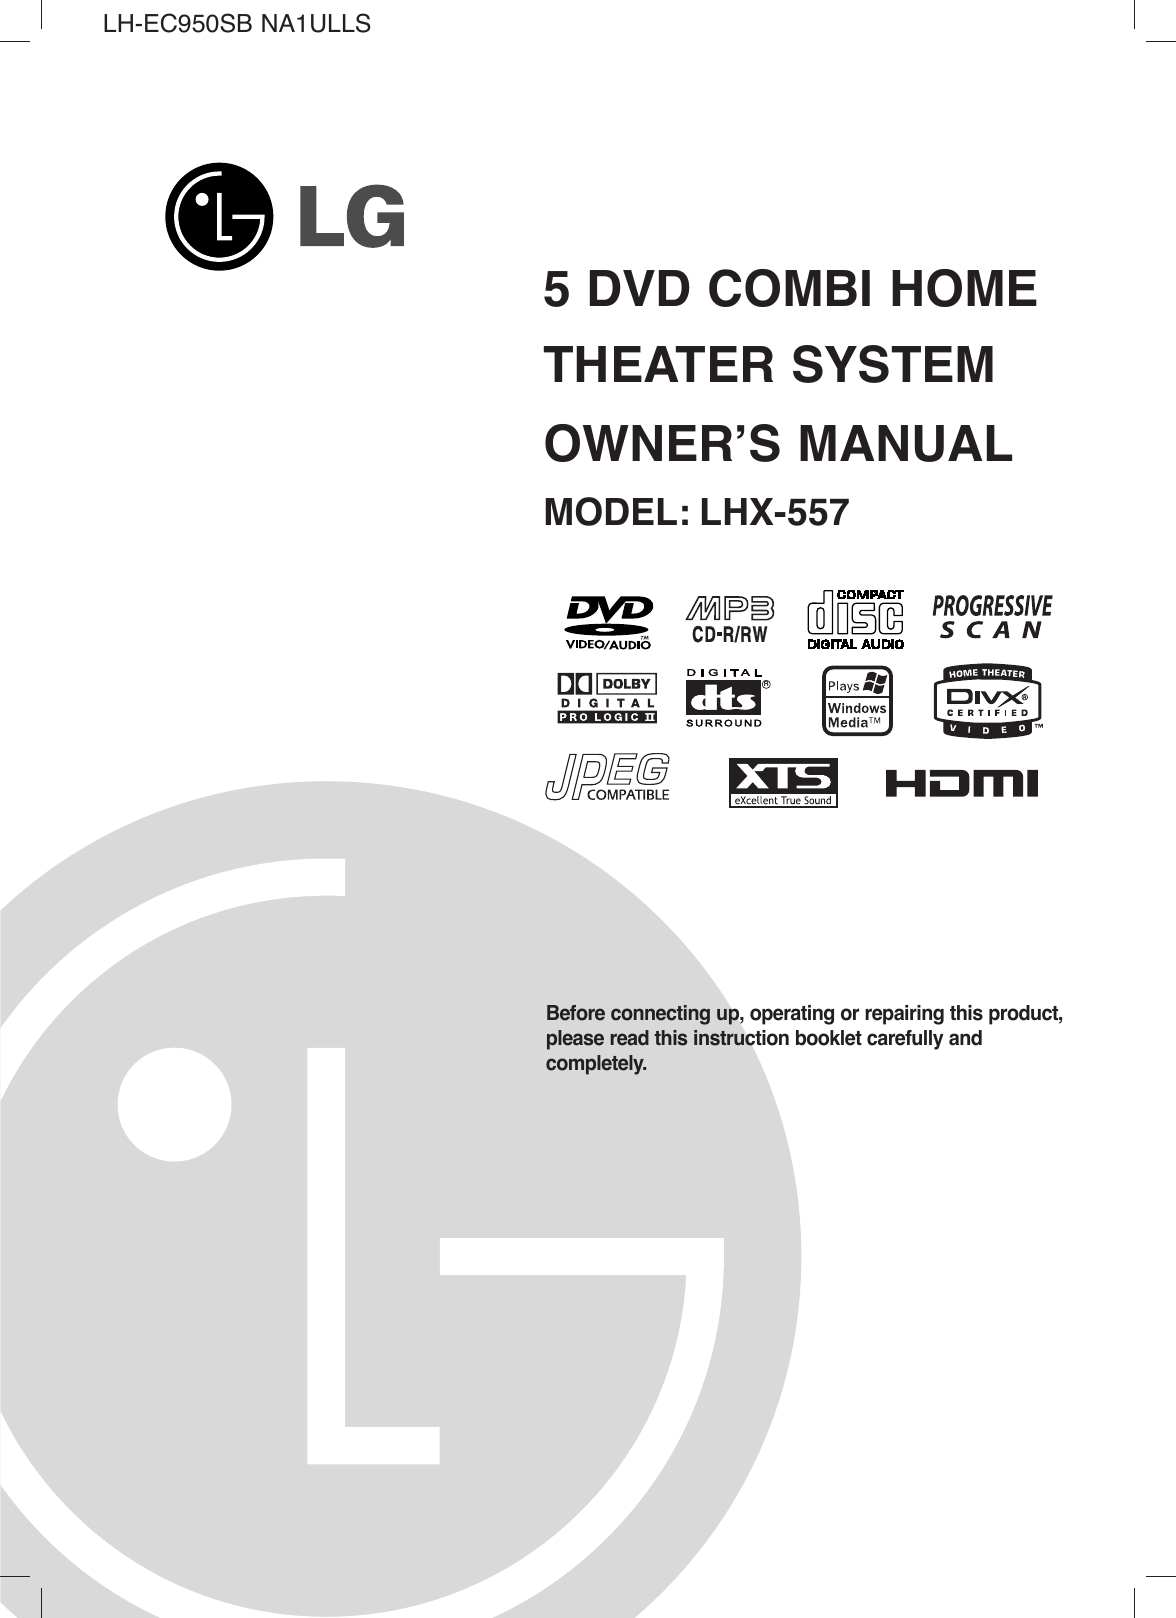
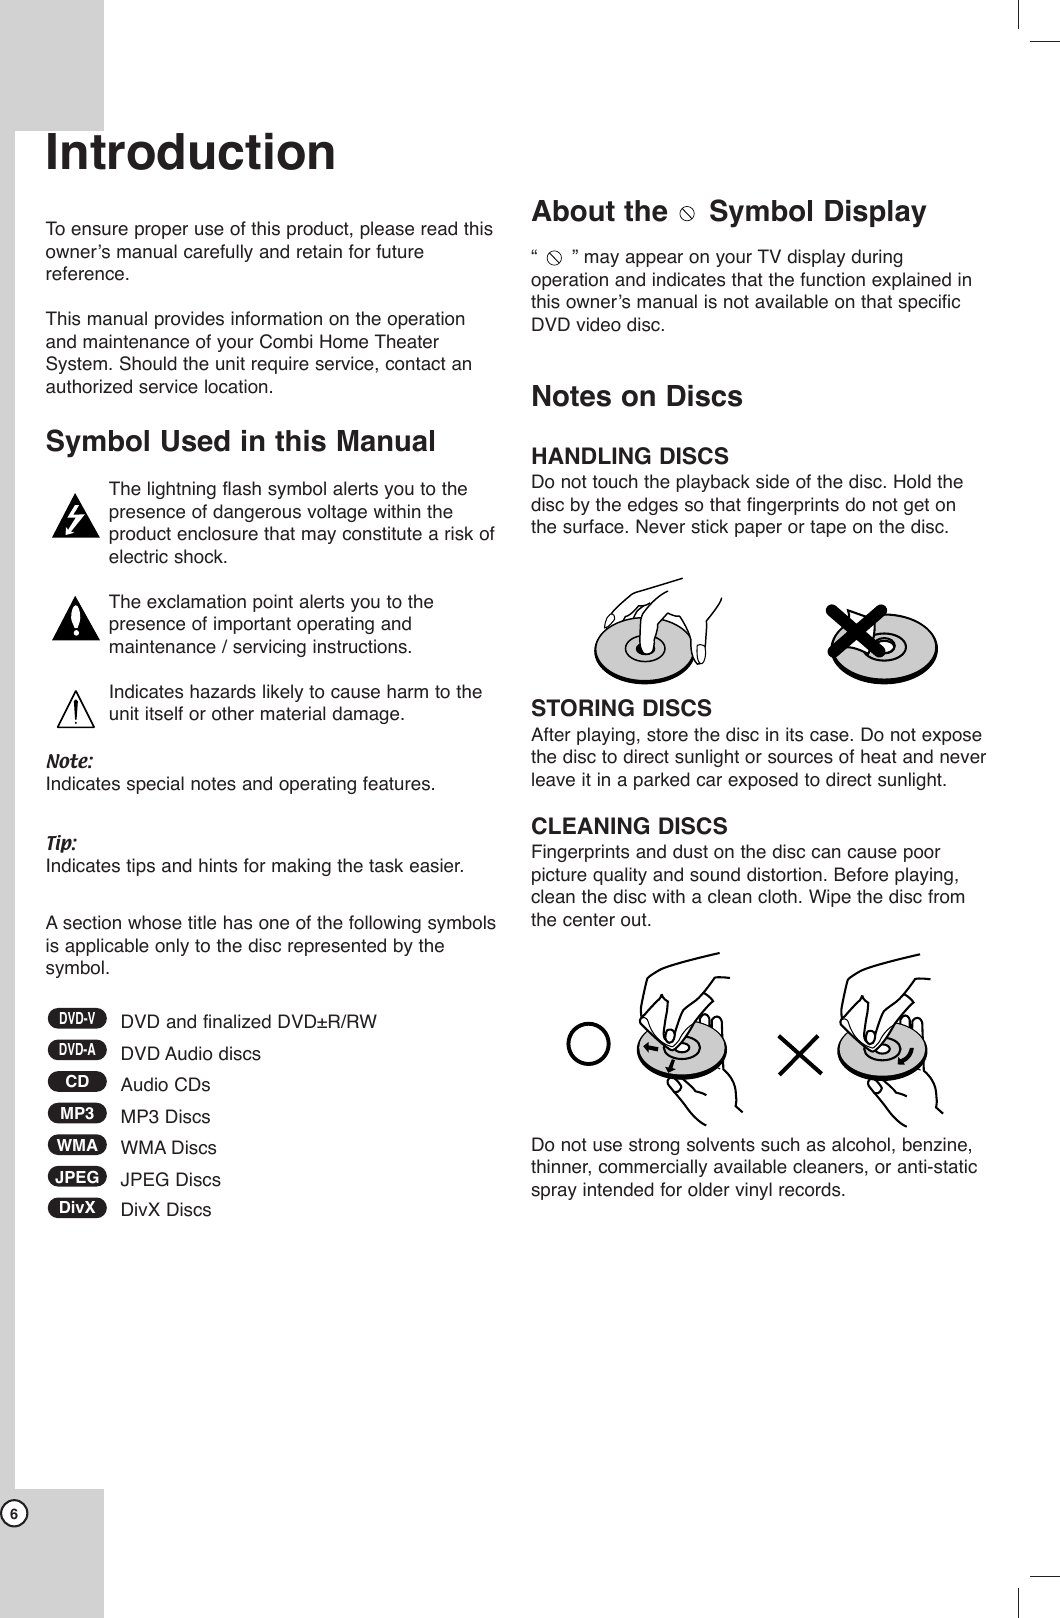
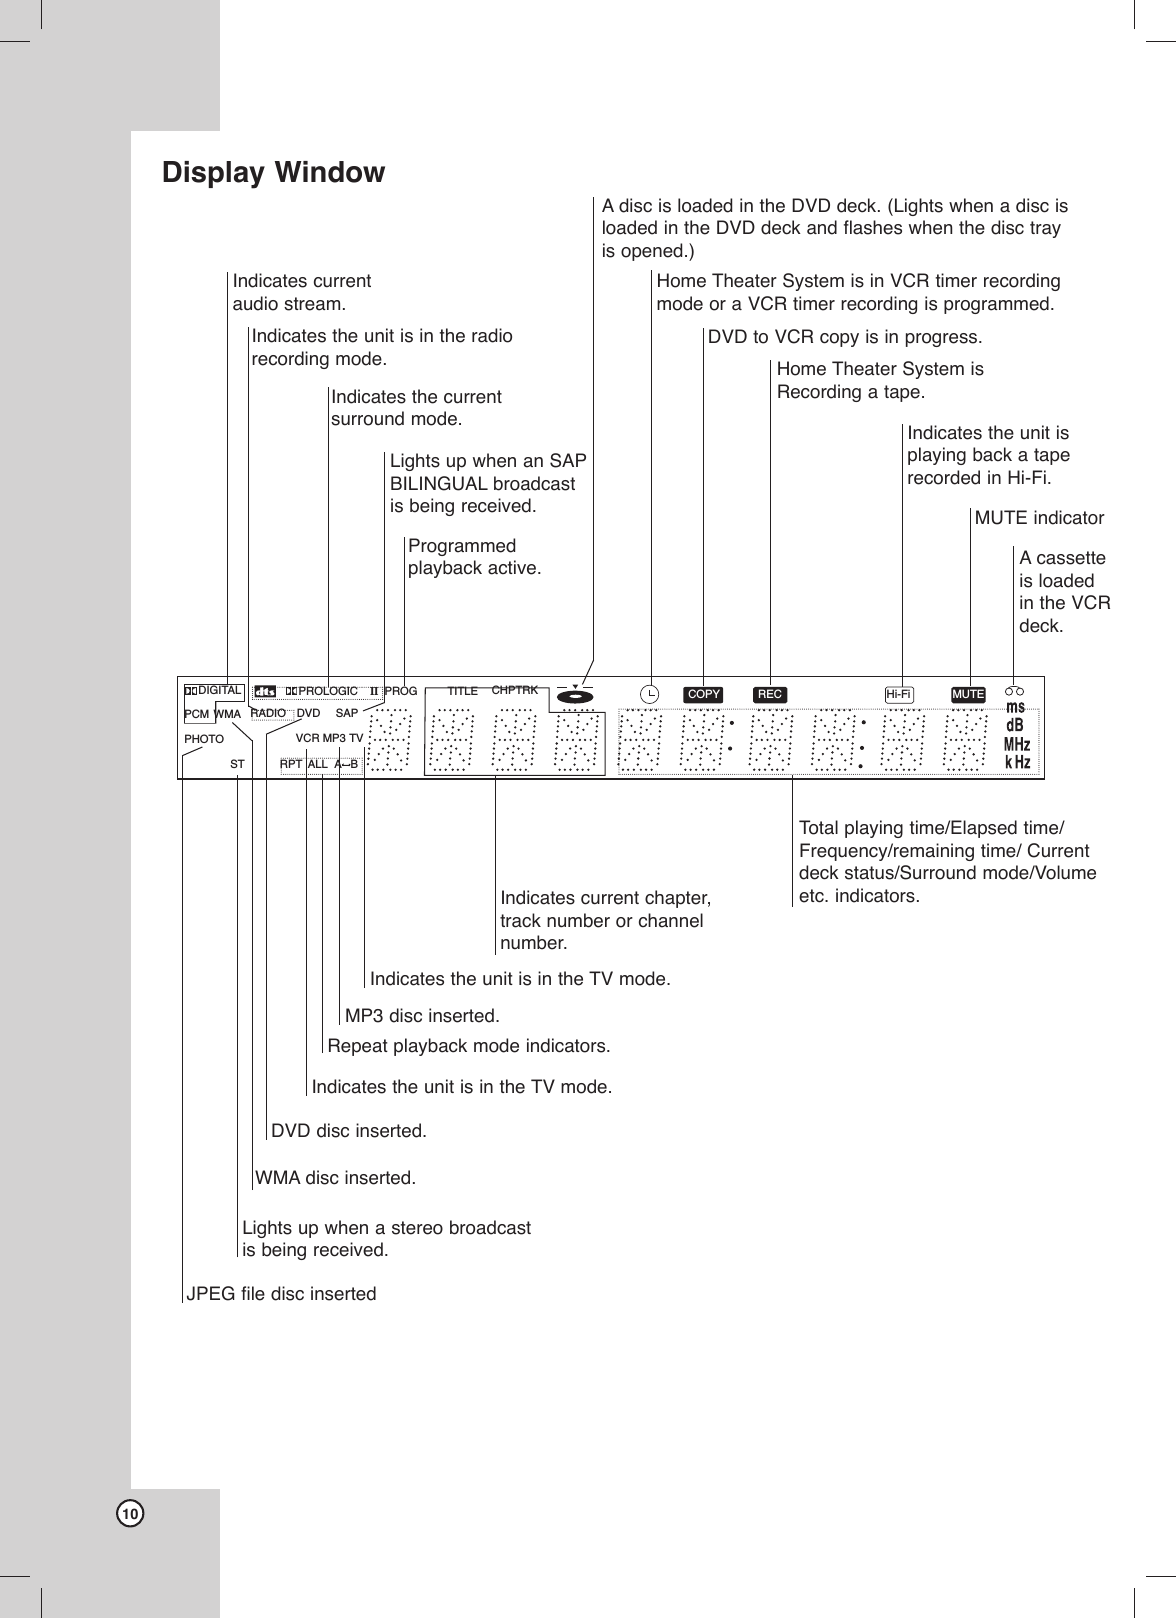
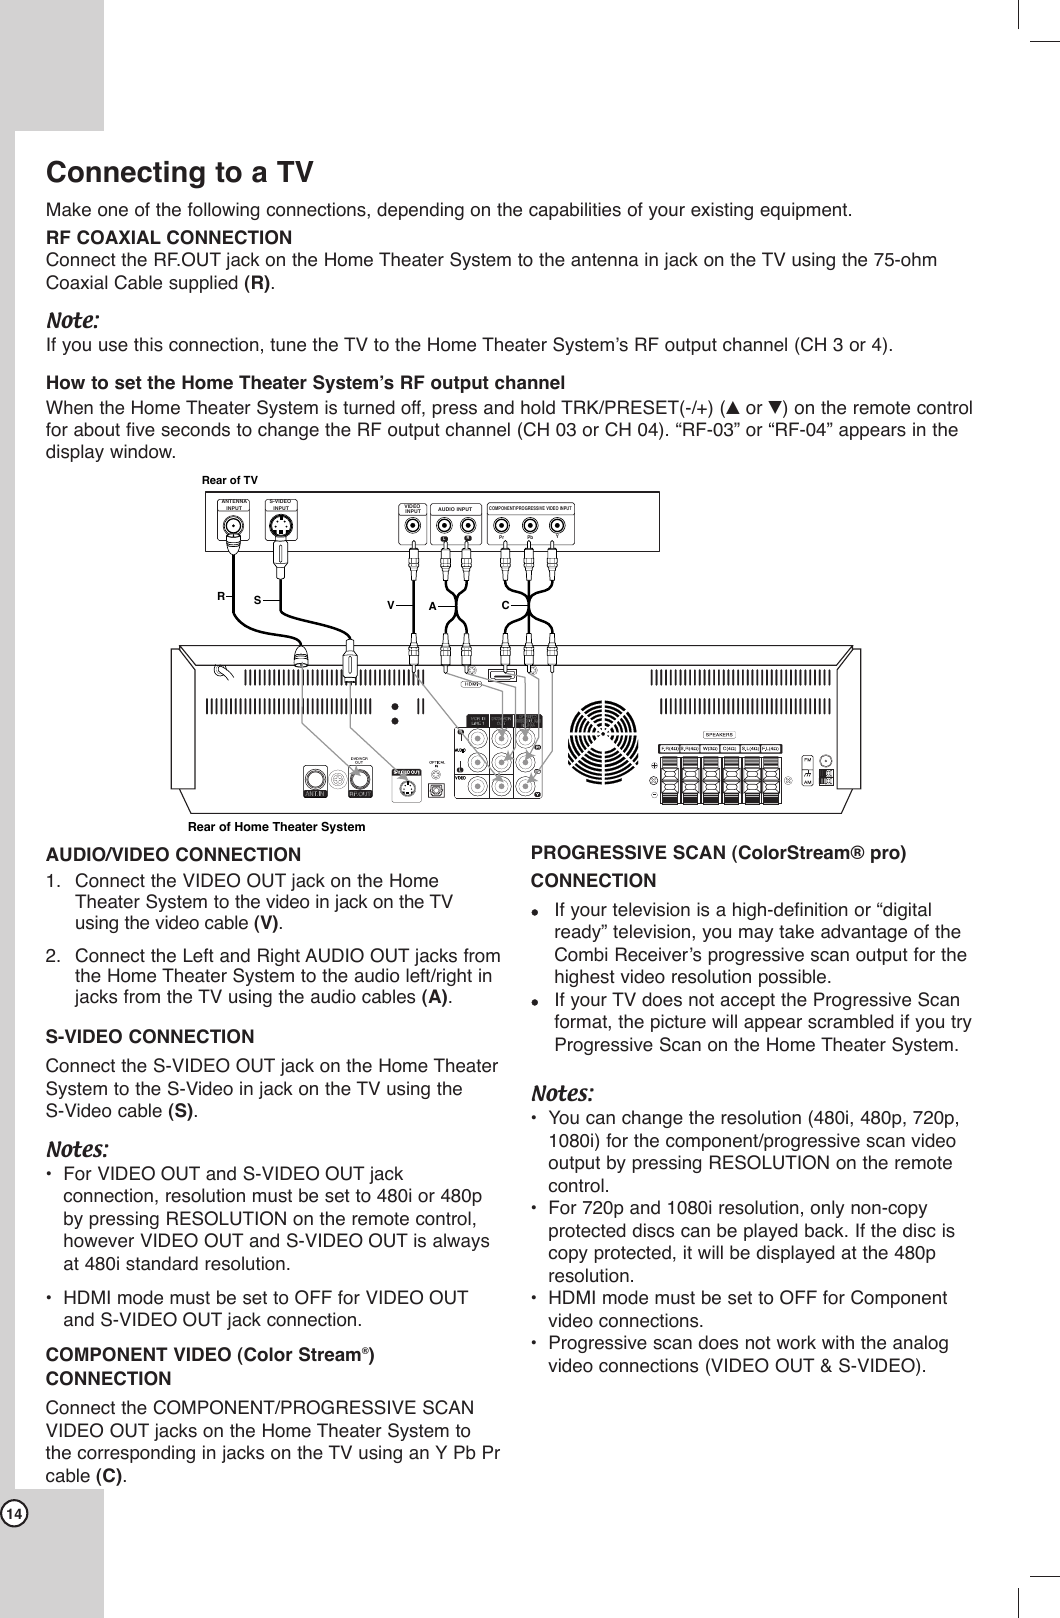
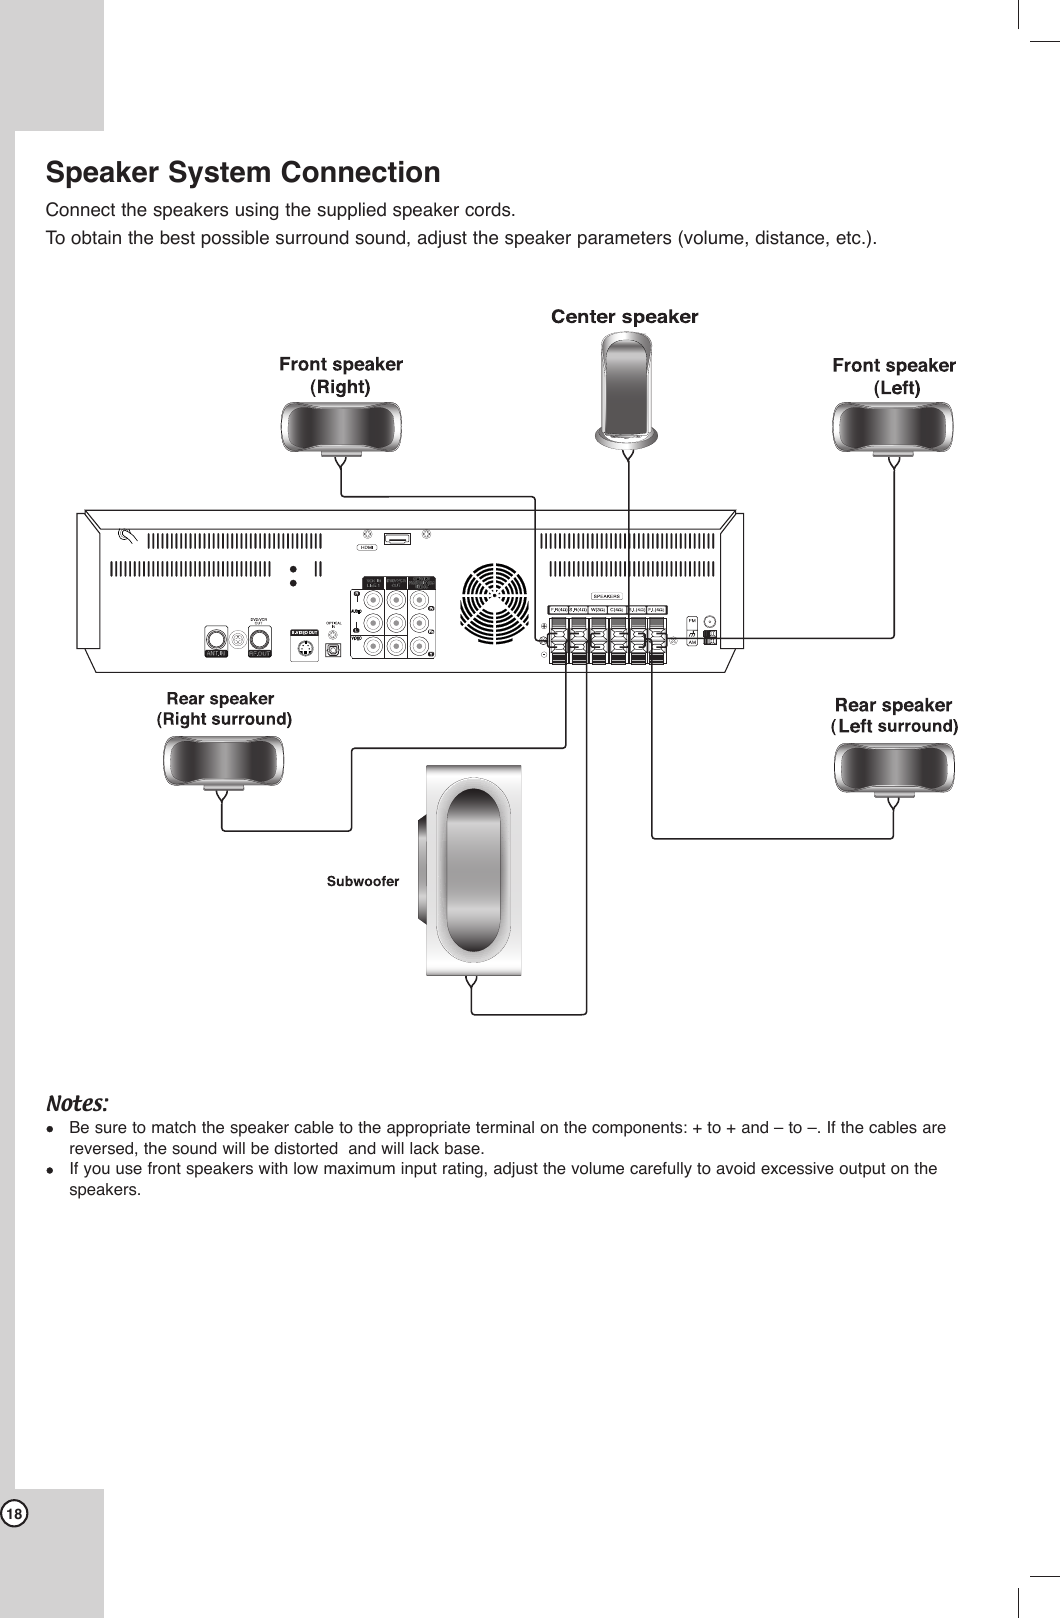
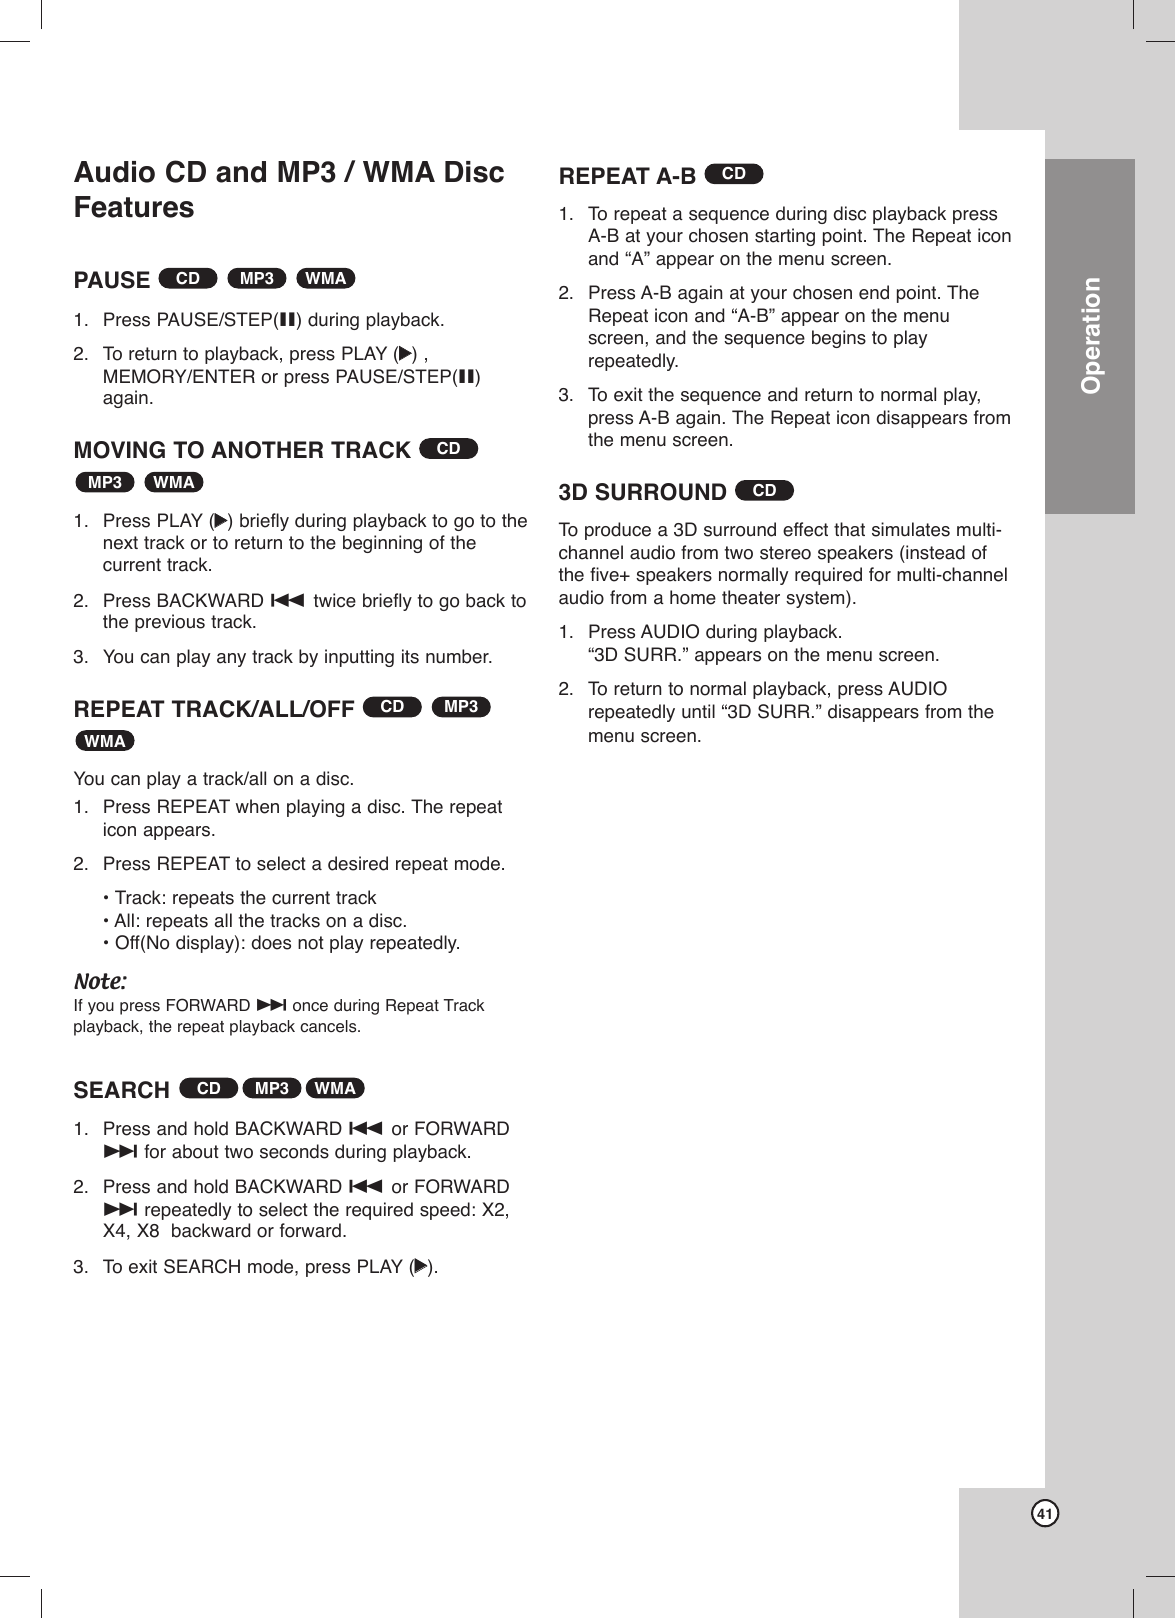
![40Playing an Audio CD or MP3/WMADiscThe Home Theater System can play MP3/WMAformatted recordings on CD-ROM, CD-R, or CD-RWdiscs.Audio CDOnce you insert an audio CD a menu appears on theTV screen. Press v/Vto select a track then pressPLAY (22)or MEMORY/ENTER and playback starts. MP3/WMA1. Press v/Vto select a folder, and press ENTERto see the folder contents.2. Press v/Vto select a track then press PLAY (22)or MEMORY/ENTER and playback starts.ID3 TAG•When playing a file containing information such as tracktitles, you can see the information by pressing DISPLAY.[ Title, Artist, Album, Year, Comment ]•If there is no information, “NO ID3 TAG” appear on thedisplay.Tip:•If you are in a file list on the MUSIC menu and want toreturn to the Folder list, use the v/Vto highlight andpress MEMORY/ENTER.•Press MENU to move to the next page.•On a CD with MP3/WMA and JPEG you can switchMP3/WMA and JPEG. Press TITLE and MUSIC orPHOTO word on top of the menu is highlighted.ProgramListTrack1Track2Track3Track4Track5Track6Track7Track8AUDIO CD0:52:071 / 12Clear AllPROGRAMEditProgramList0:00:001 / 12Clear AllPROGRAMEditDISPLAYInfoMUSIC2-Music21-Music13-Music34-Music45-Music56-Music67-Music7MP3 / WMA disc compatibility with this receiveris limited as follows:•Sampling frequency: within 8 - 48 kHz (MP3),within 32 - 48kHz (WMA)•Bit rate: within 8 - 320kbps (MP3), 32 - 192kbps (WMA)•The player cannot read an MP3/WMA file that hasa file extension other than “.mp3” / “.wma”.•CD-R physical format should be ISO 9660•If you record MP3 / WMA files using software thatcannot create a file system (eg. Direct-CD) it isimpossible to playback MP3 / WMA files. Werecommend that you use Easy-CD Creator, whichcreates an ISO 9660 file system.•File names should have a maximum of 8 lettersand must incorporate an .mp3 or .wma extension. •They should not contain special letters such as /? * : “ < > l etc.•The total number of files on the disc should beless than 650.This Home Theater System requires discs andrecordings to meet certain technical standards inorder to achieve optimal playback quality. Pre-recorded DVDs are automatically set to thesestandards. There are many different types ofrecordable disc formats (including CD-R containingMP3 or WMA files) and these require certain pre-existing conditions (see above) to ensurecompatible playback.Customers should note that permission isrequired in order to download MP3 / WMA filesand music from the Internet. Our company hasno right to grant such permission. Permissionshould always be sought from the copyrightowner.](https://usermanual.wiki/LG-Electronics-USA/9QKE40520/User-Guide-521934-Page-40.png)
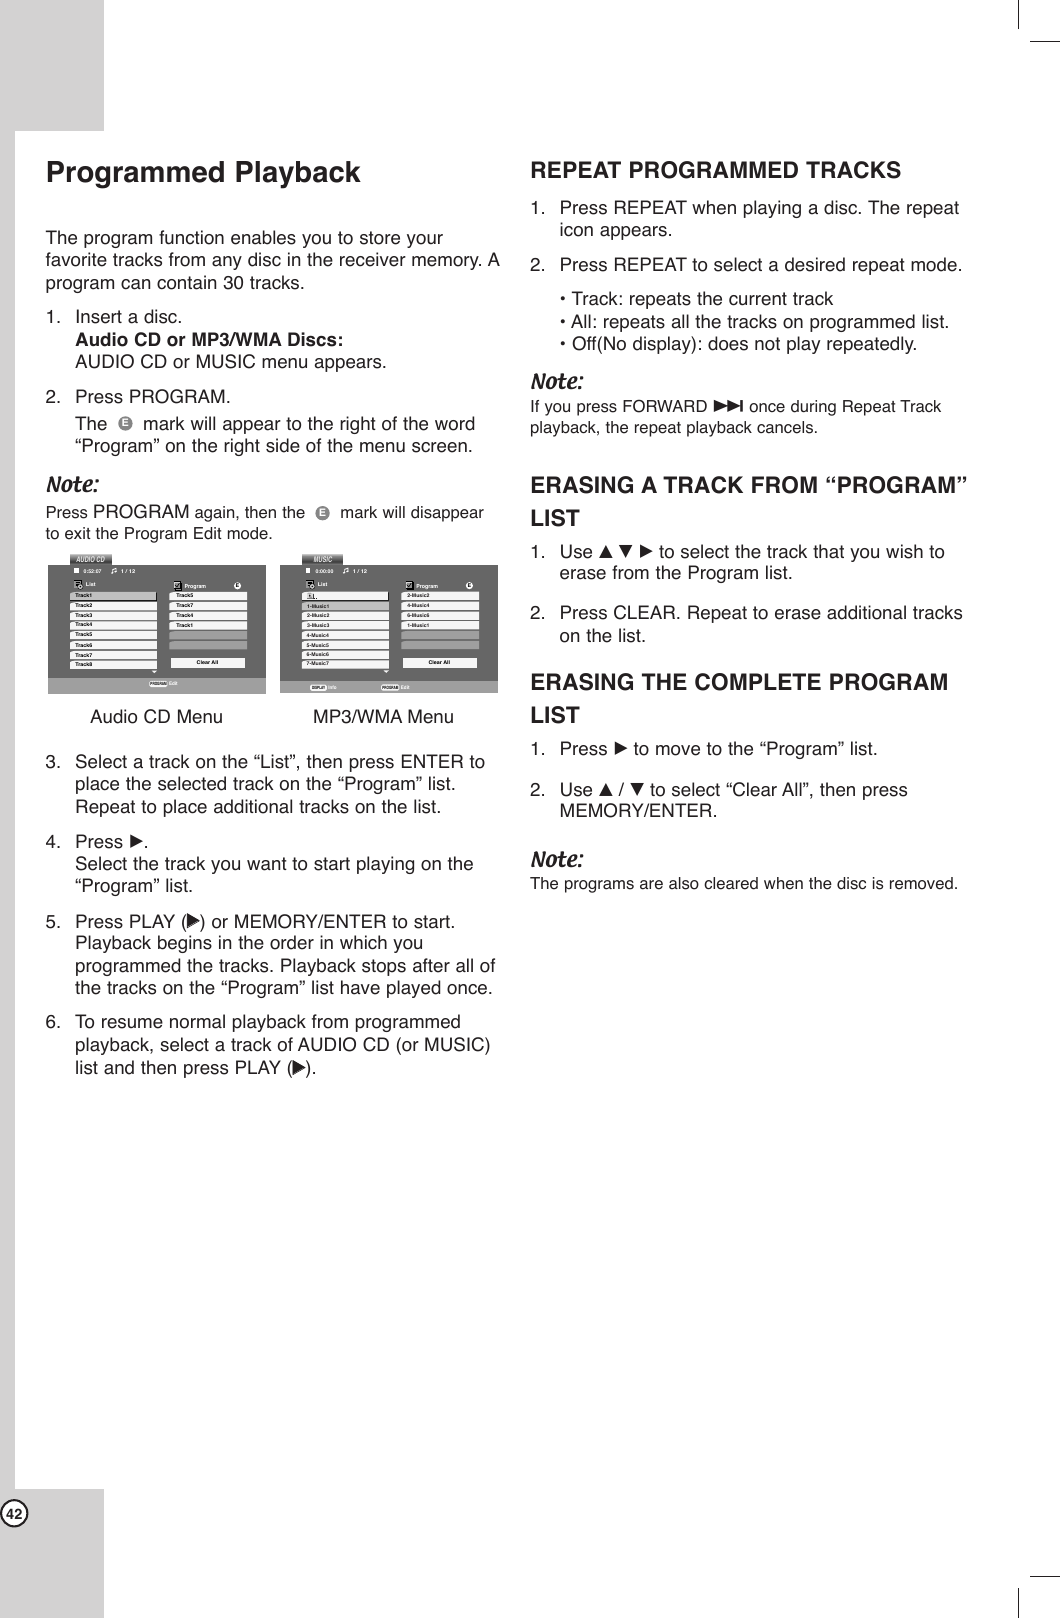

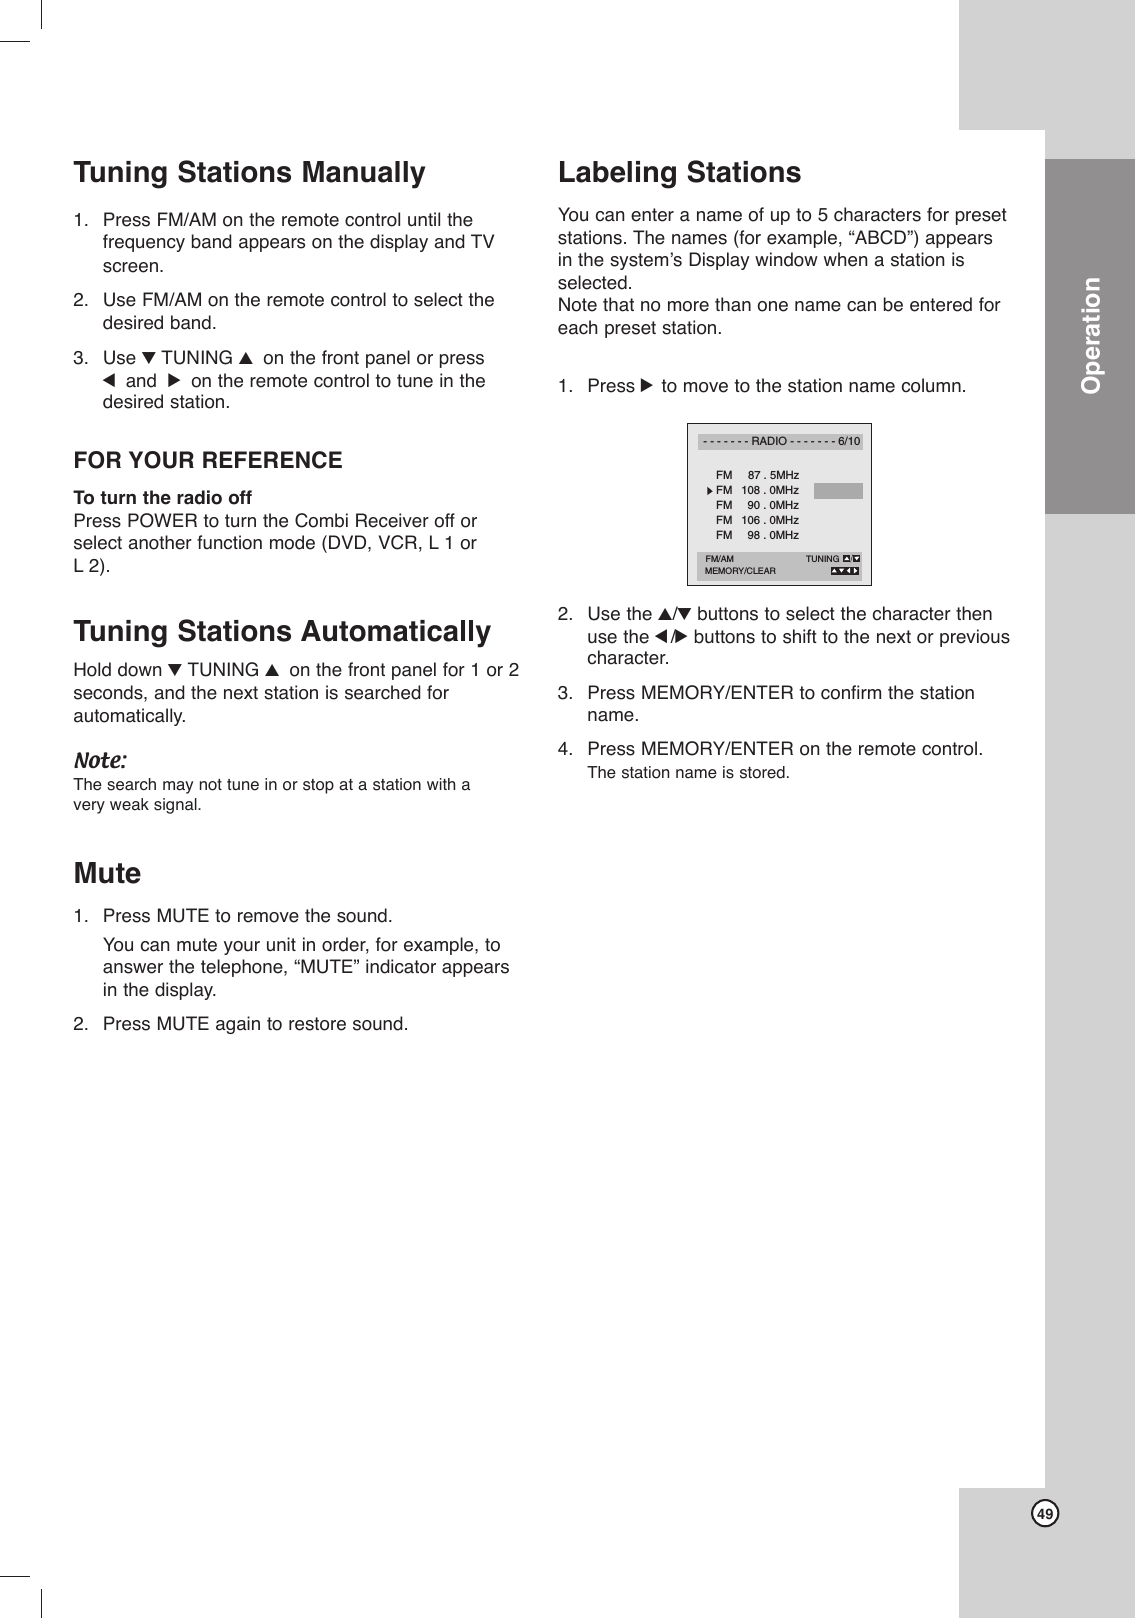
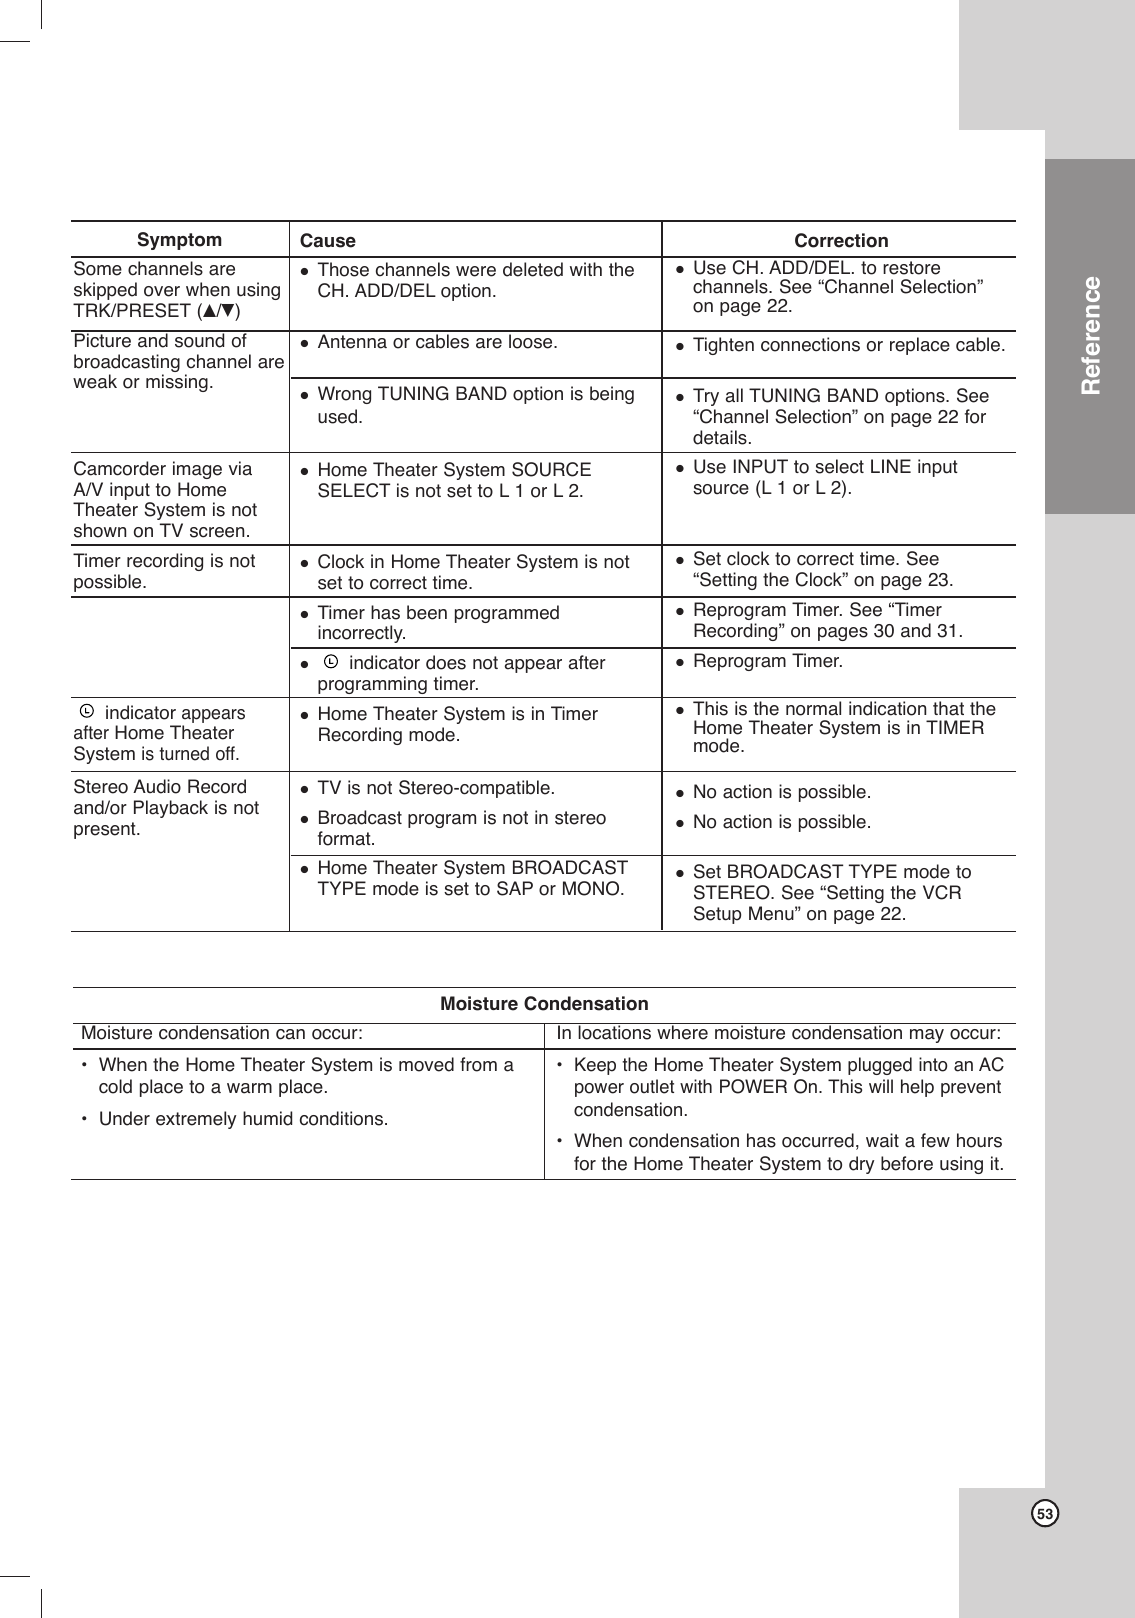
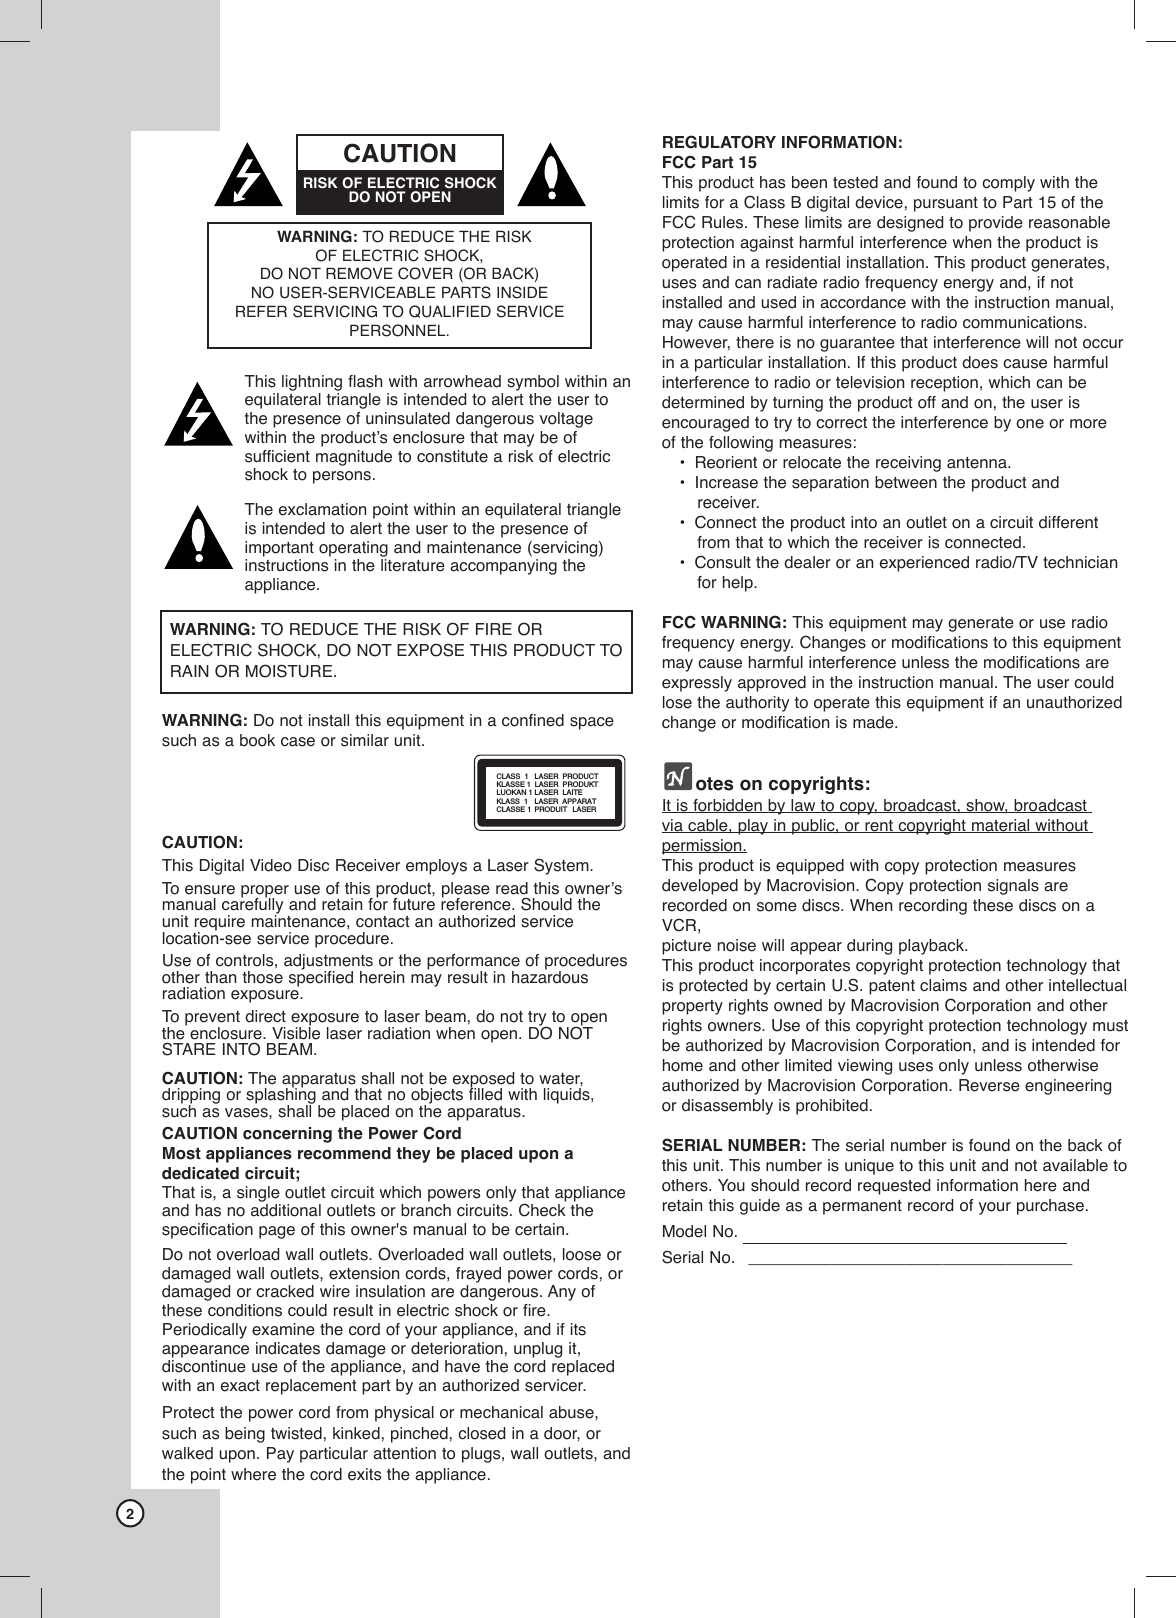
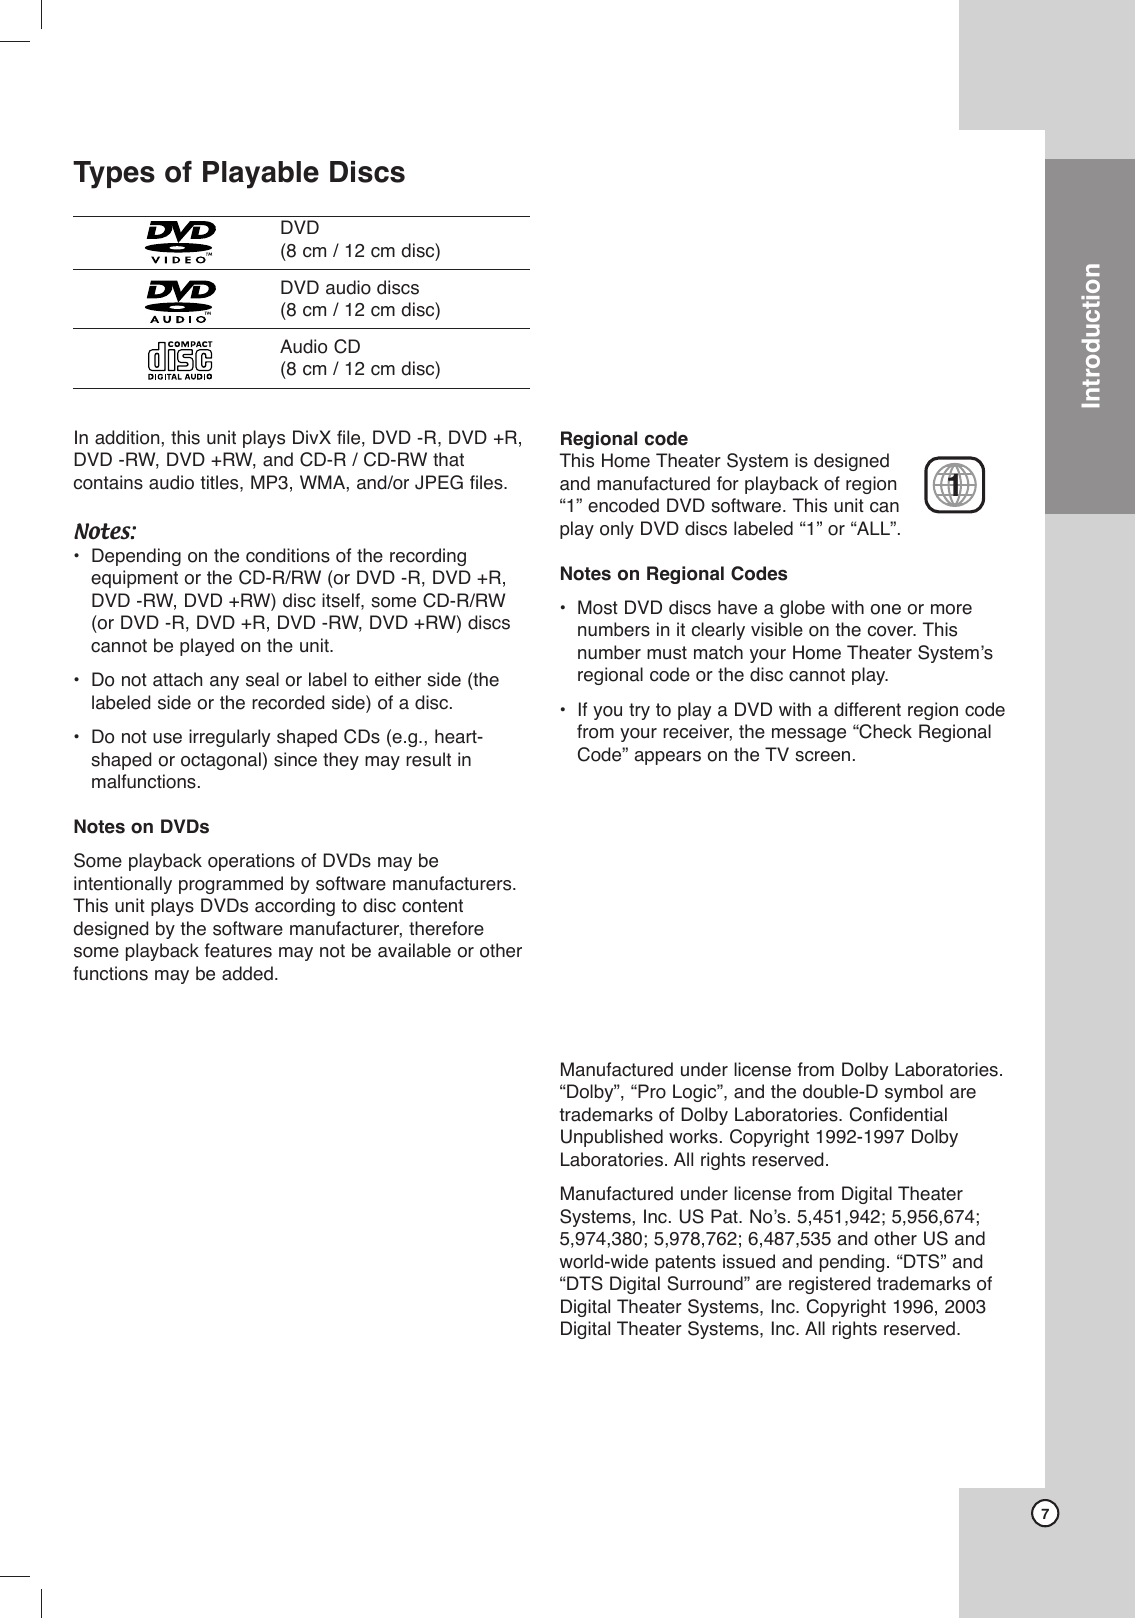
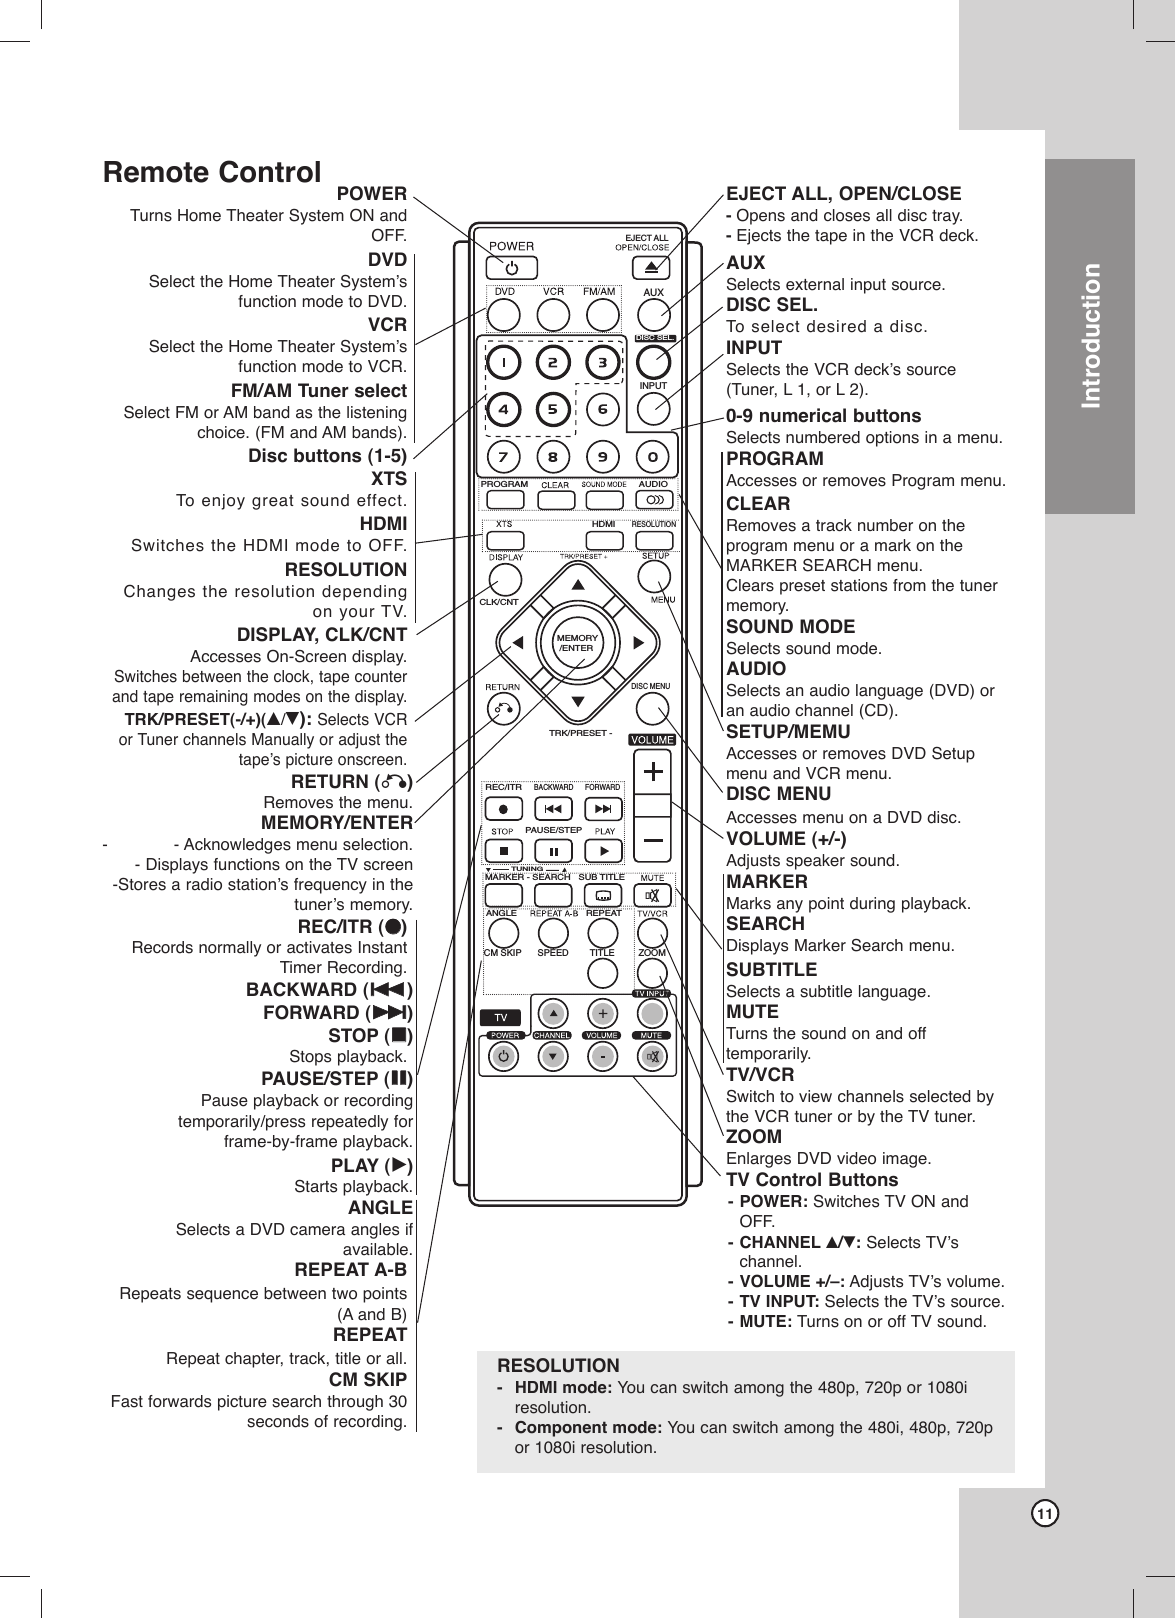
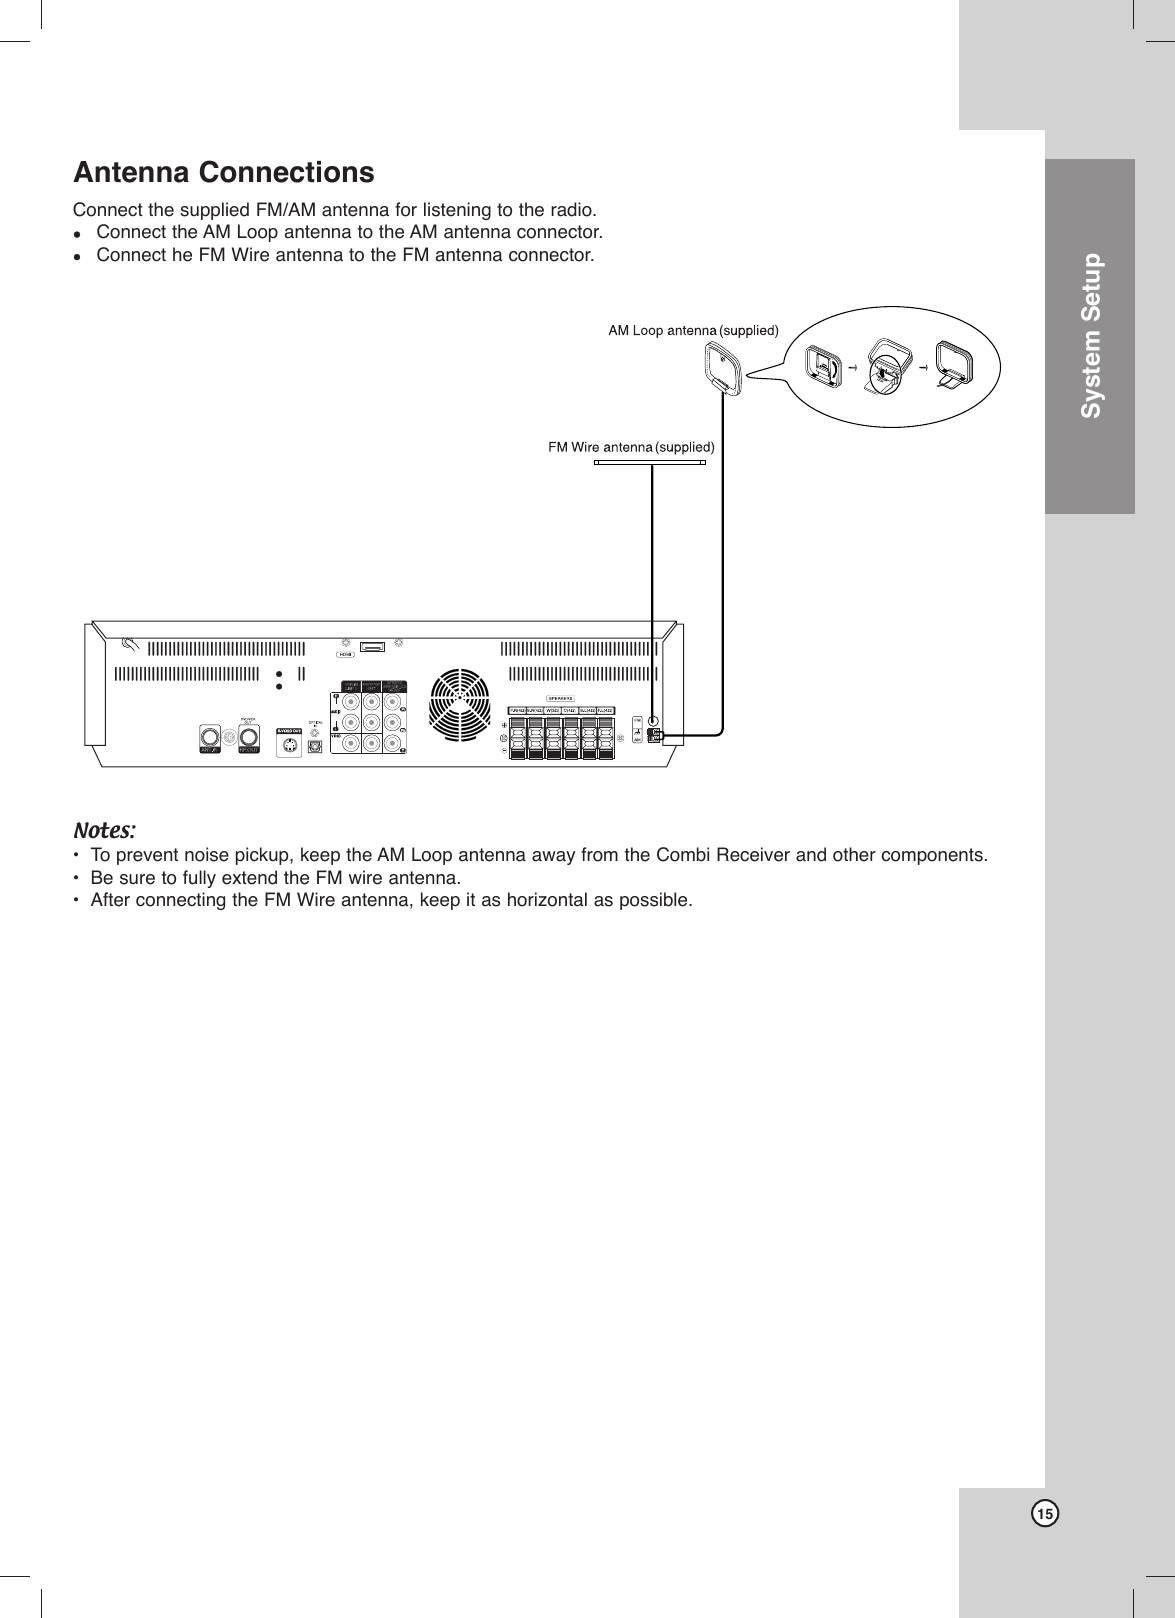
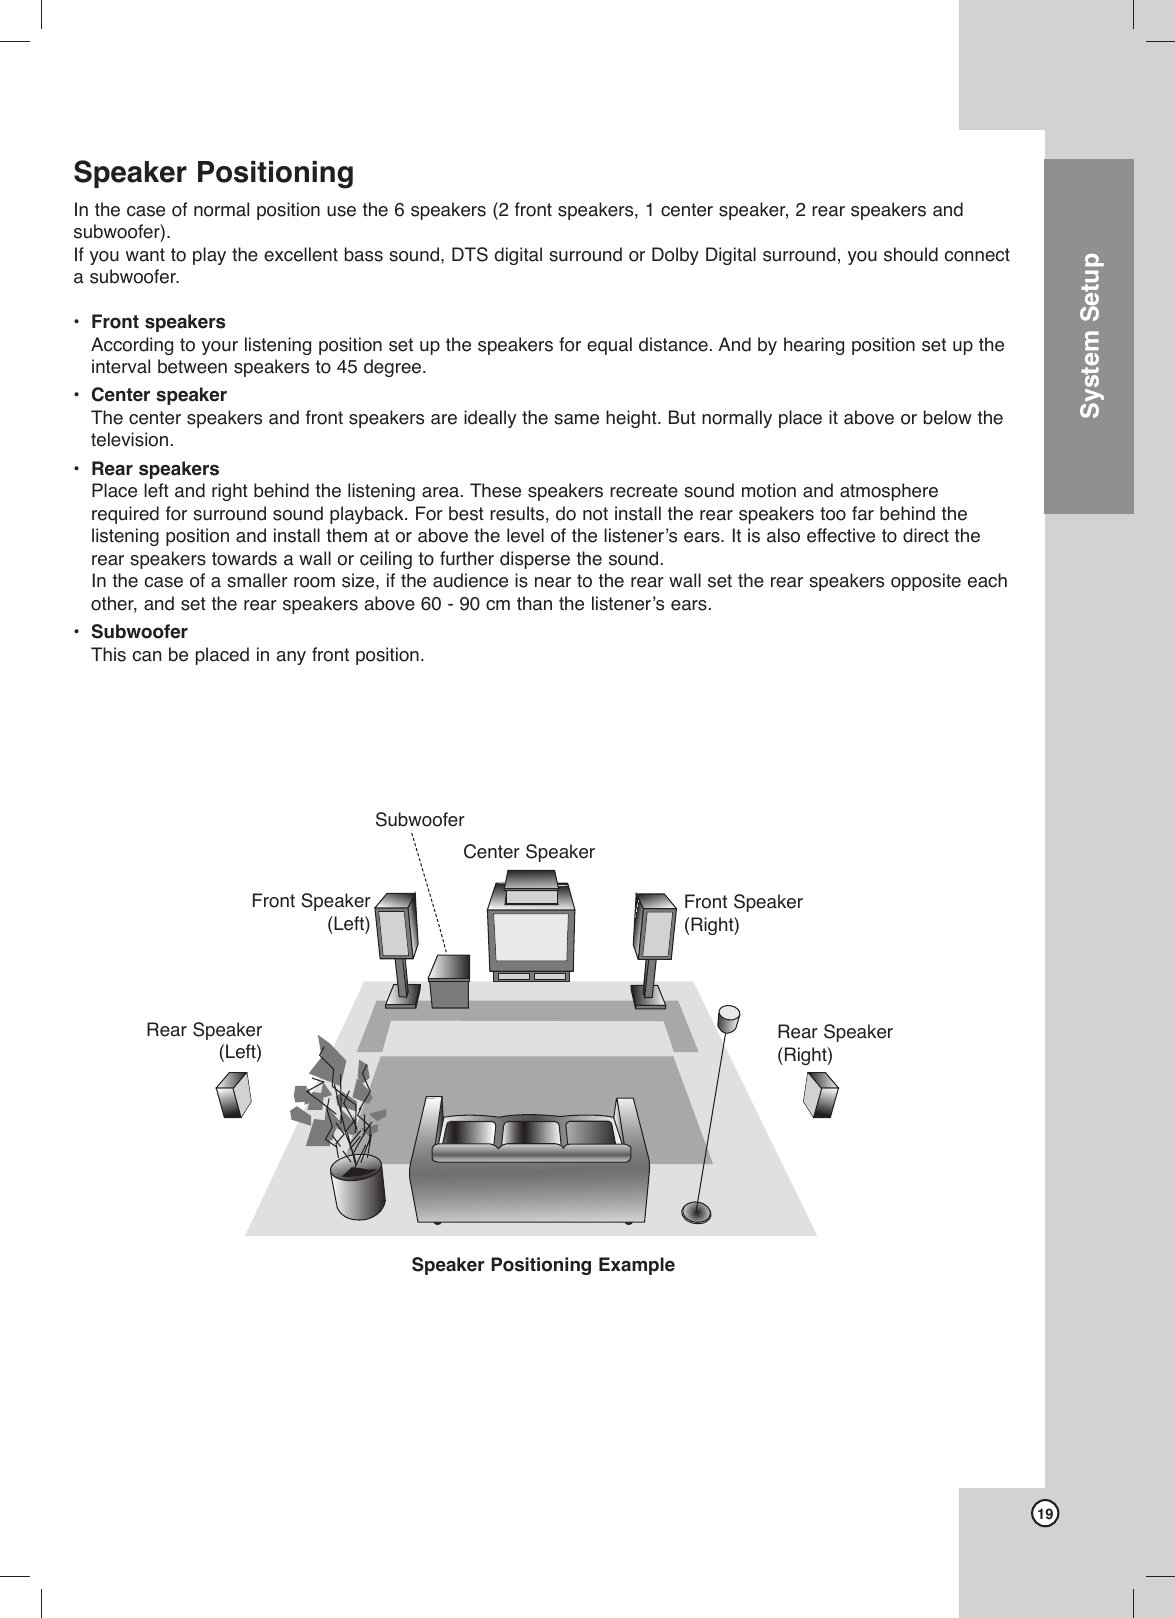
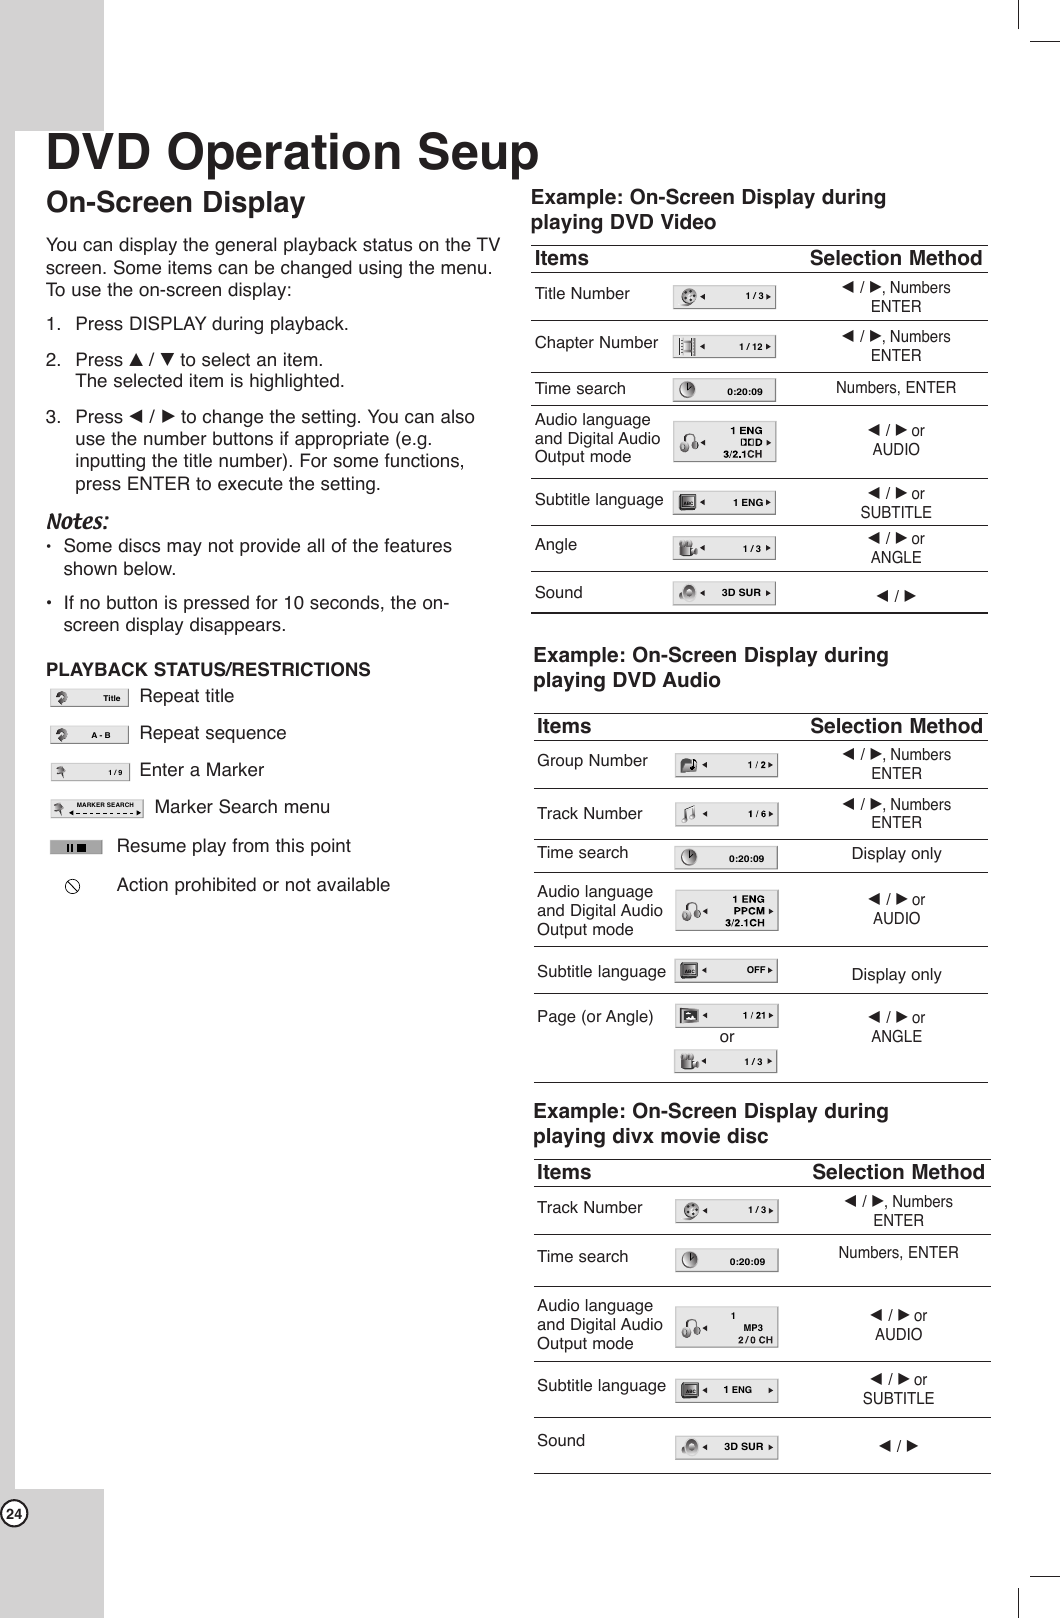
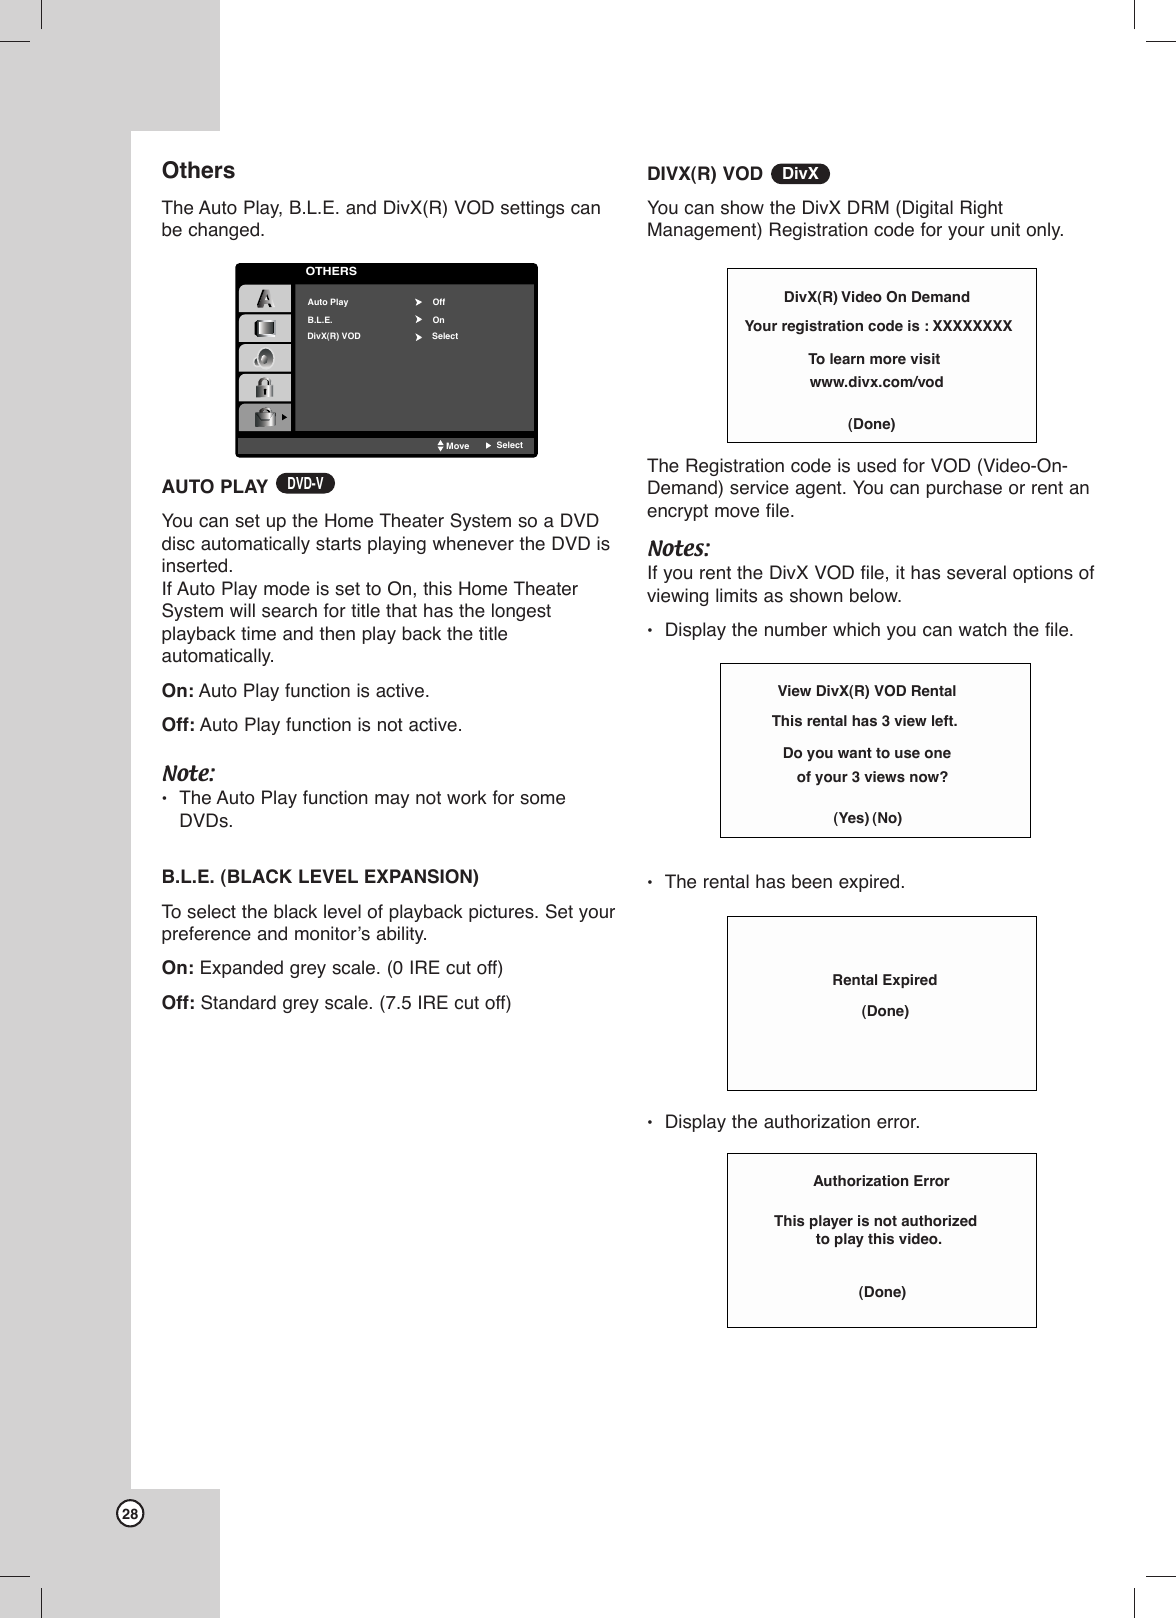
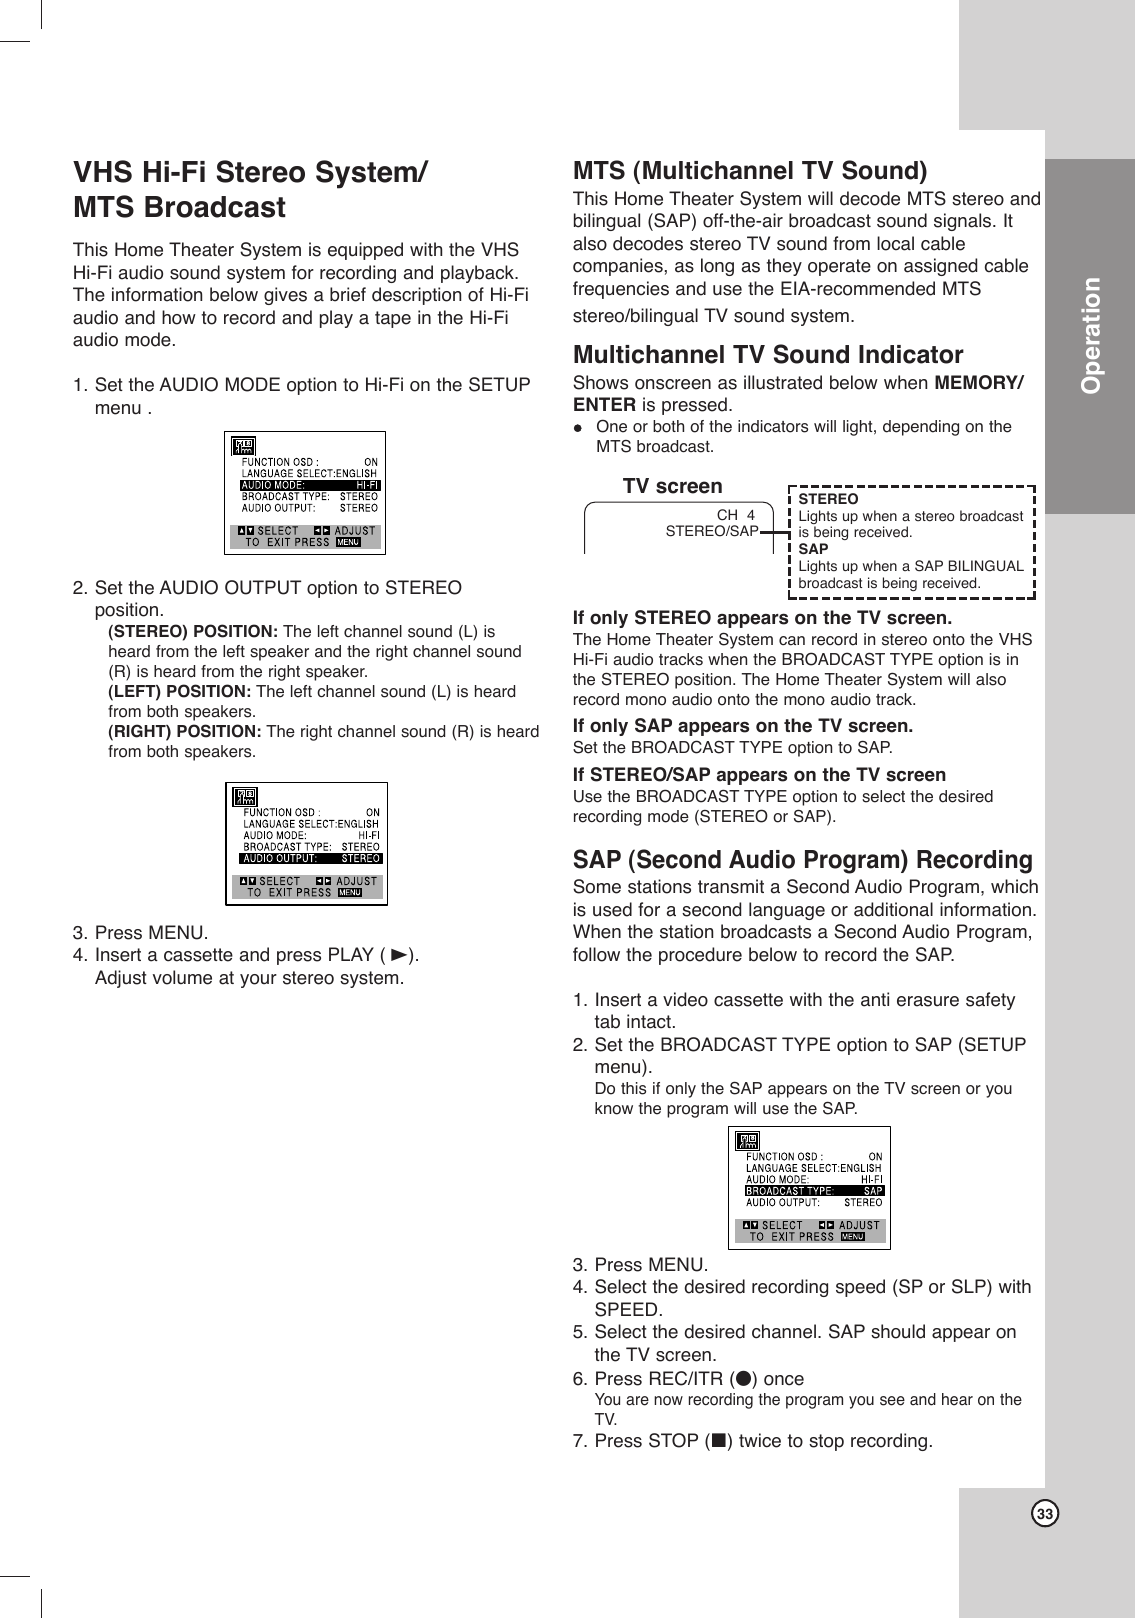
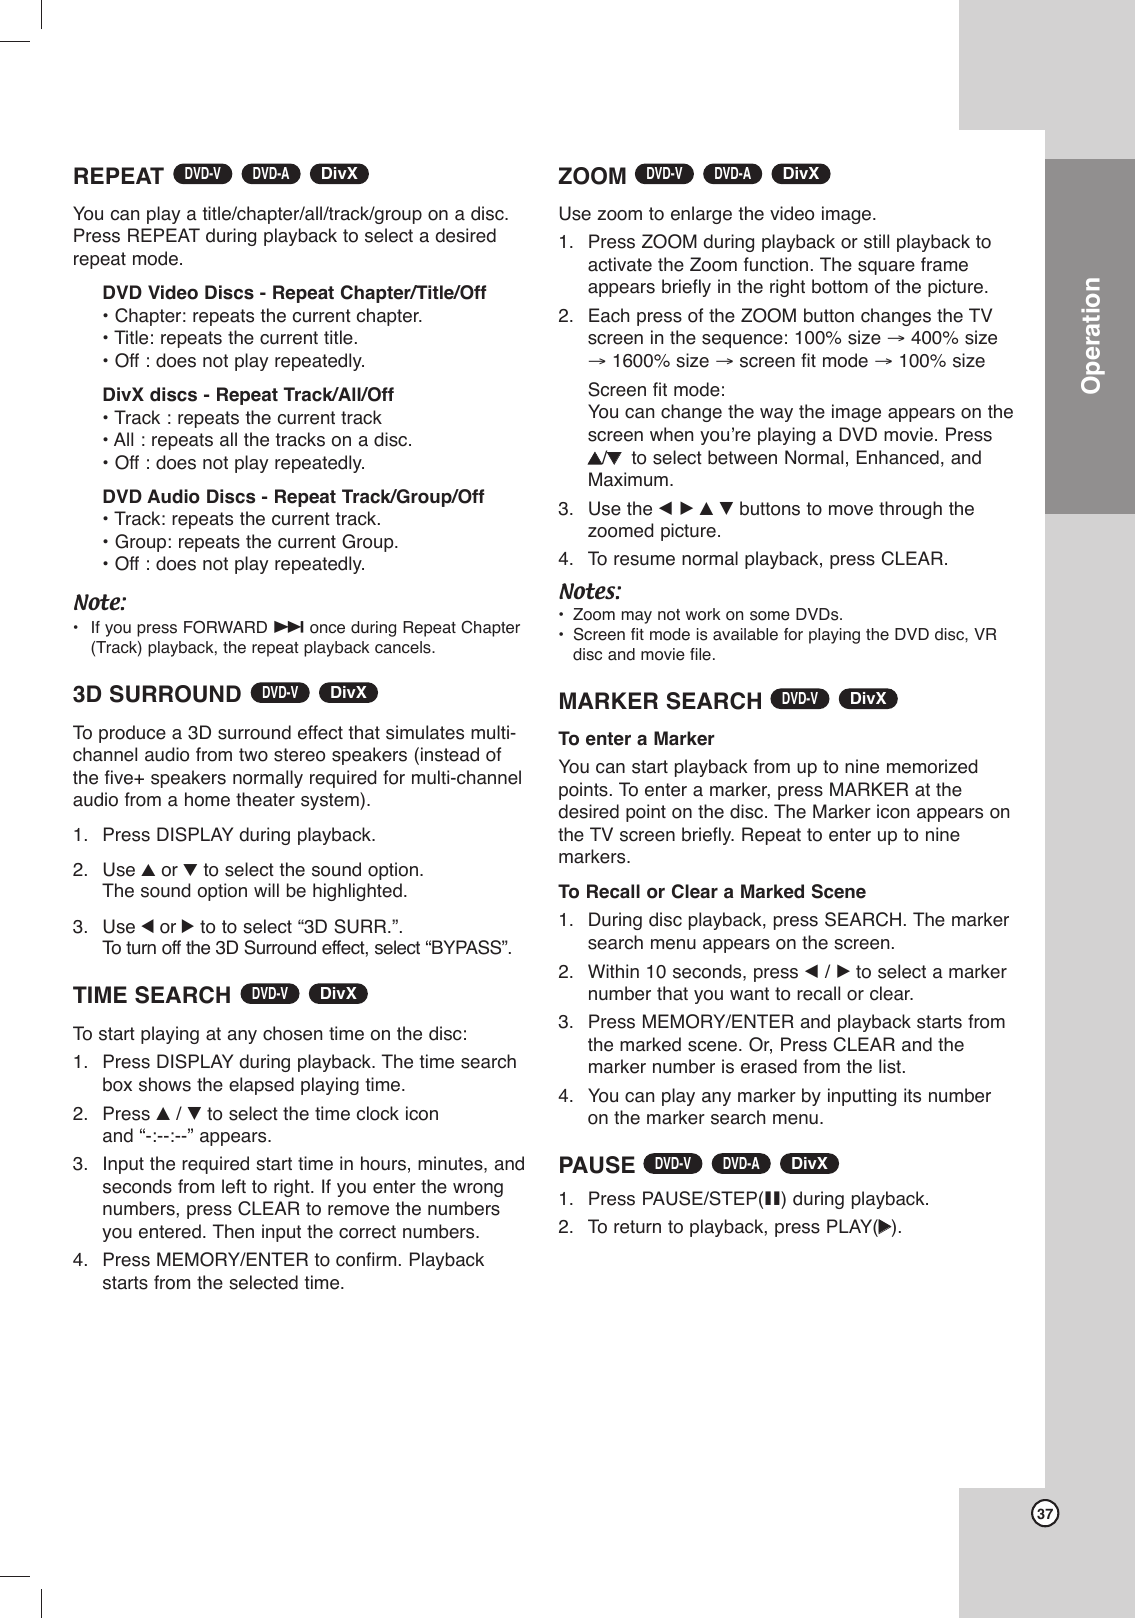
![465.1 Speaker SetupThis chapter includes important reference informationto help you set your Home Theater System.Speaker SetupMake the following settings for the built-in 5.1 channelsurround decoder.1. Press SETUP. The setup menu appears.2. Use v/Vto select the AUDIO option then pressBto move to the second level.3. Use v/Vto select the Speaker Setup option thenpress Bto move to the third level. “Select” ishighlighted.4. Press MEMORY/ENTER and 5.1 Speaker Setupmenu appears.5. Use b/Bto select the desired speaker.6. Adjust options using v/V/b/Bbuttons.7. Press ENTER to confirm your selection. Returns tothe previous menu.Speaker selectionSelect a speaker that you want to adjust. (Frontspeakers (Left), Center Speaker, Front speakers(Right), Rear speakers (Right), Rear speakers (Left),or SubWoofer)Note:Certain speaker settings are prohibited by the DolbyDigital licensing agreement.SizeSince the speaker settings are fixed, you cannotchange the settings.VolumePress b/Bto adjust the output level of the selectedspeaker. (-6dB ~ +6dB)DistanceIf you connected speakers to your Home TheaterSystem, setting the Distance lets the speakers knowhow far the sound has to travel to reach your setlistening point. This allows the sound from eachspeaker to reach the listener at the same time. Press b/Bto adjust the Distance of the selectedspeaker. [0.3(1)m(ft) - 6.0(20)m(ft)]Test Press b/Bto test the signals of each speaker. Adjustthe volume to match the volume of test signalsmemorized in the system.Front Left (L) →Center →Front Right (R) →Rear Right (R) →Rear Left (L) →SubWooferYou can adjust the volume during operating the testtone, first use v/Vto select Volume or Speakeroption then use b/Bbuttons to select volume orspeaker, so that all speaker’s volume is same fromthe listener’s position.During operating the test tone, if you adjust thevolume, it will be paused in the current speakerchannel.AUDIOSpeakerVolumeDistanceTestMove ReturnSelectSizeFront LSmall0dBm(ft)0.6(2)OffEnter](https://usermanual.wiki/LG-Electronics-USA/9QKE40520/User-Guide-521934-Page-46.png)