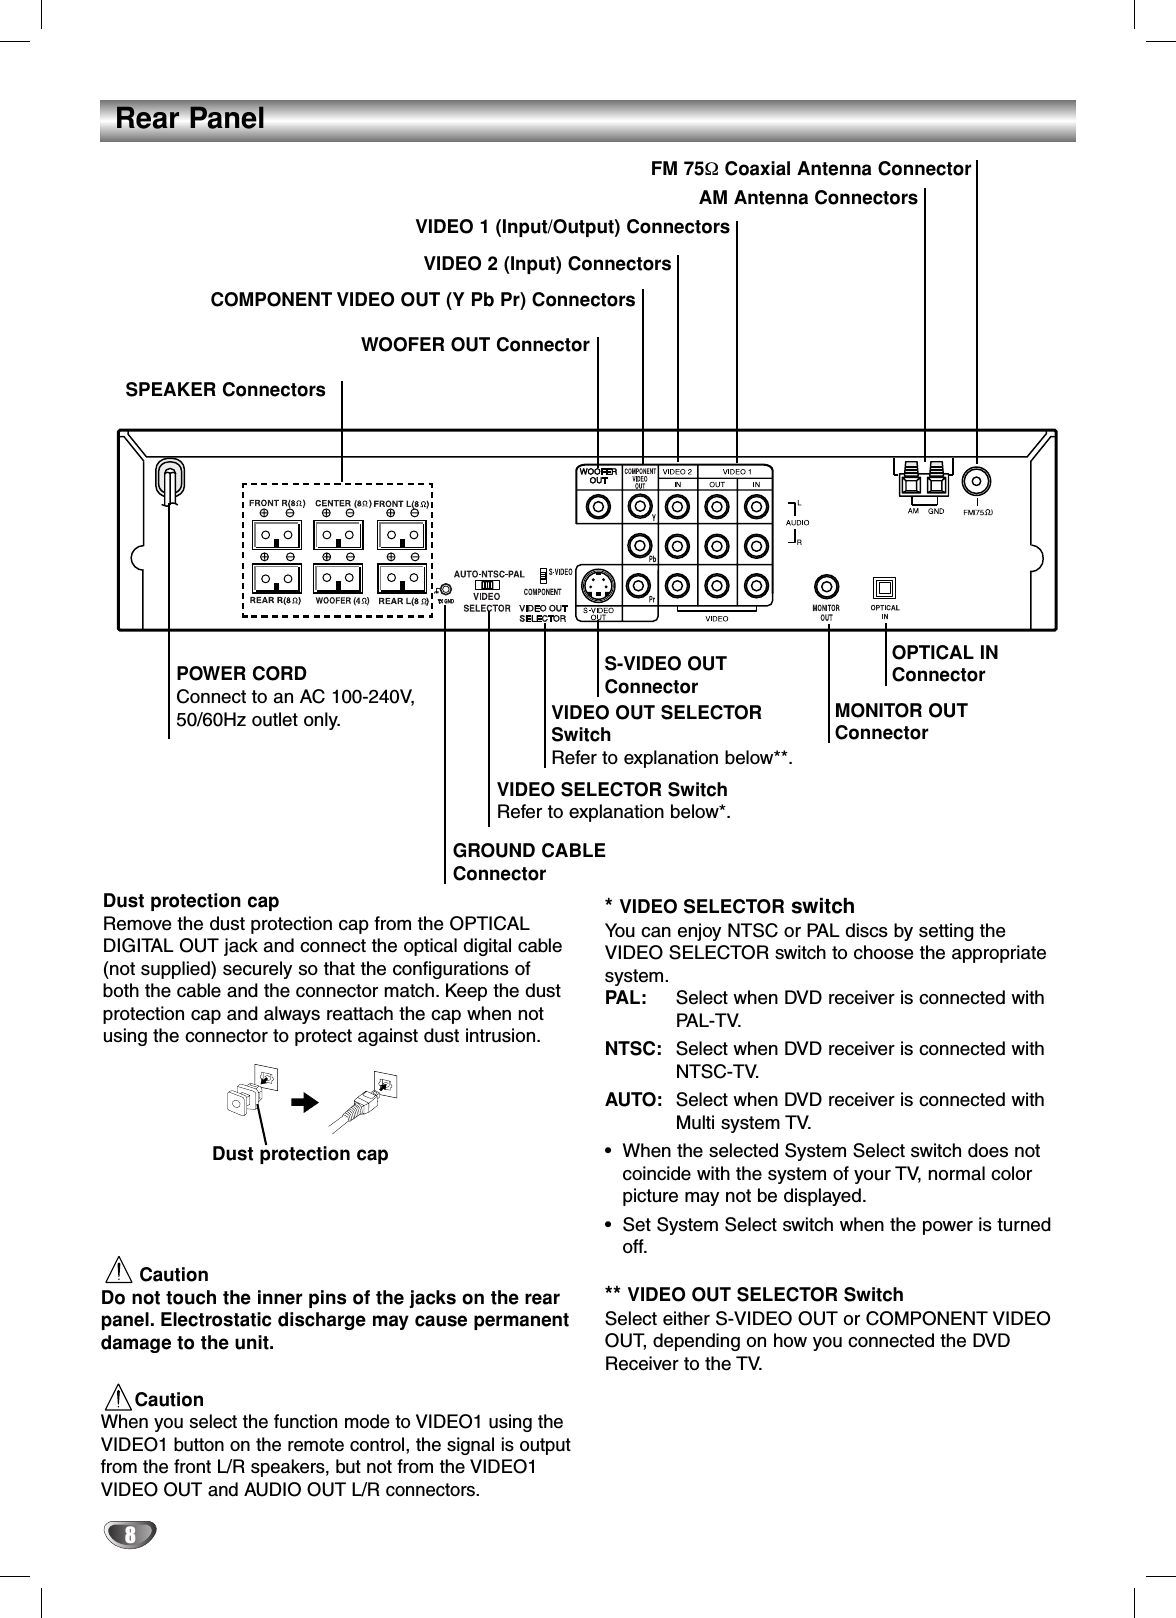
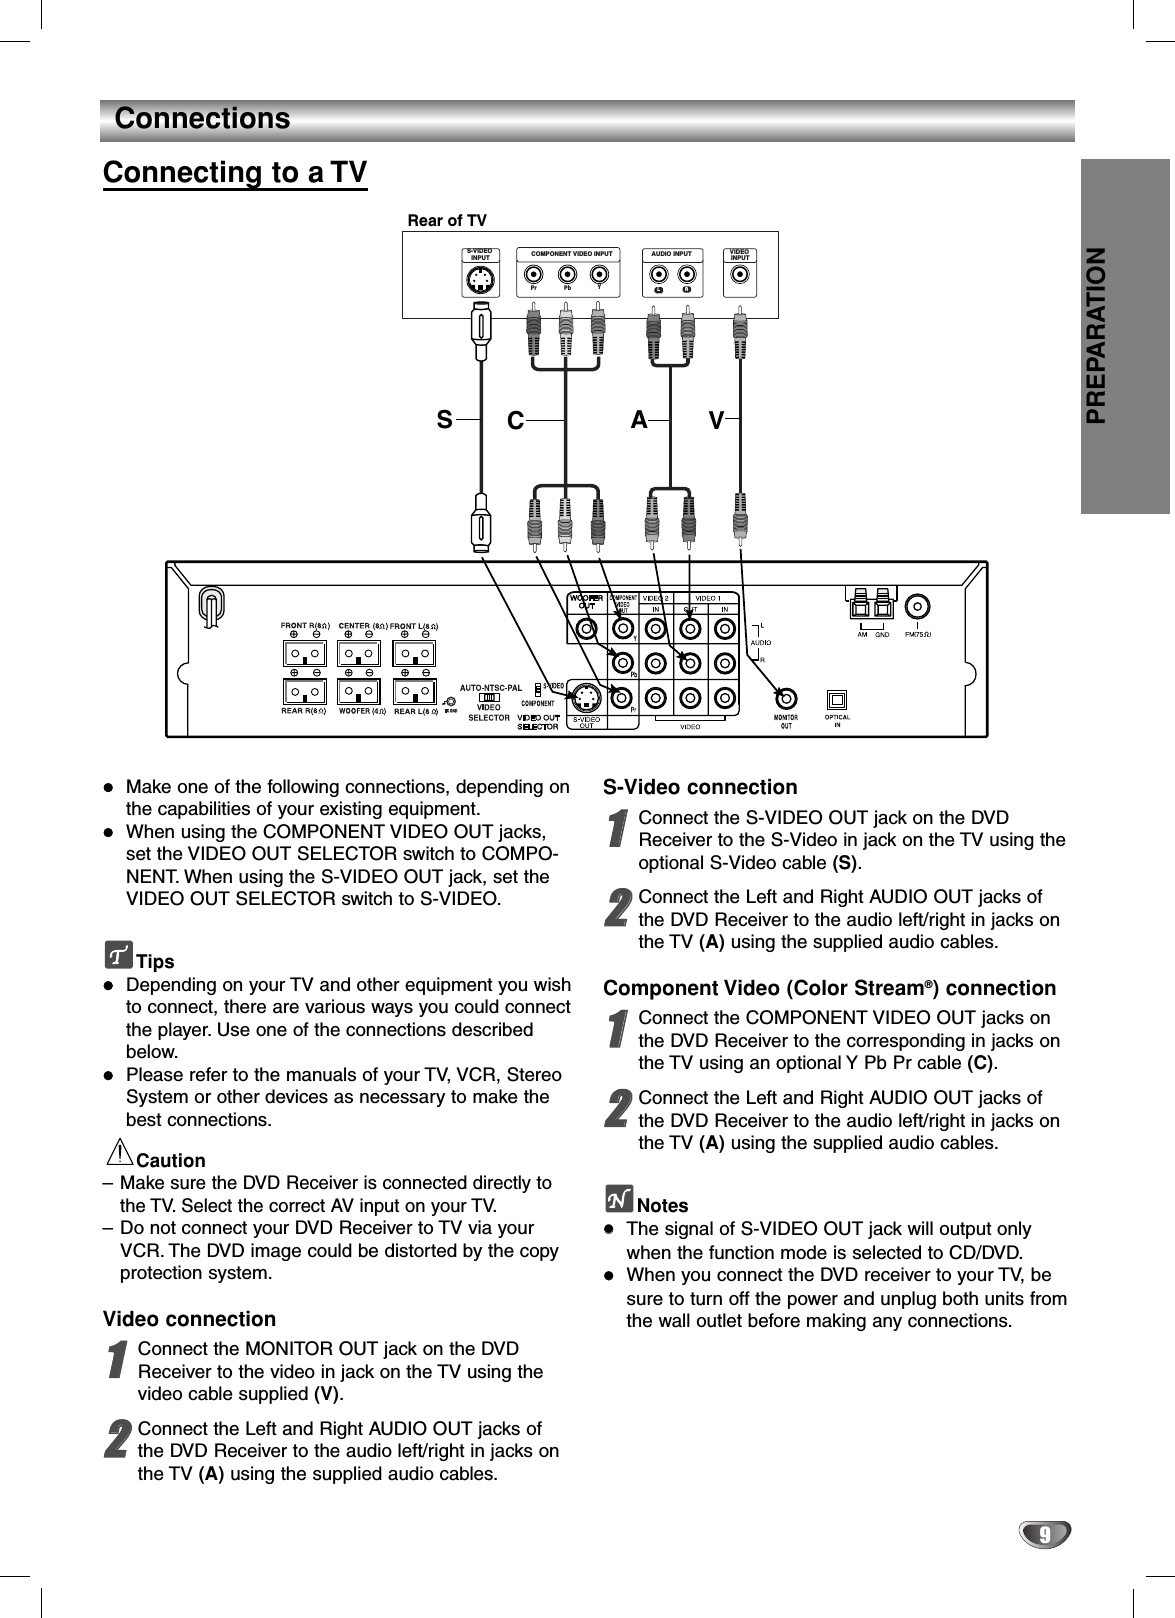
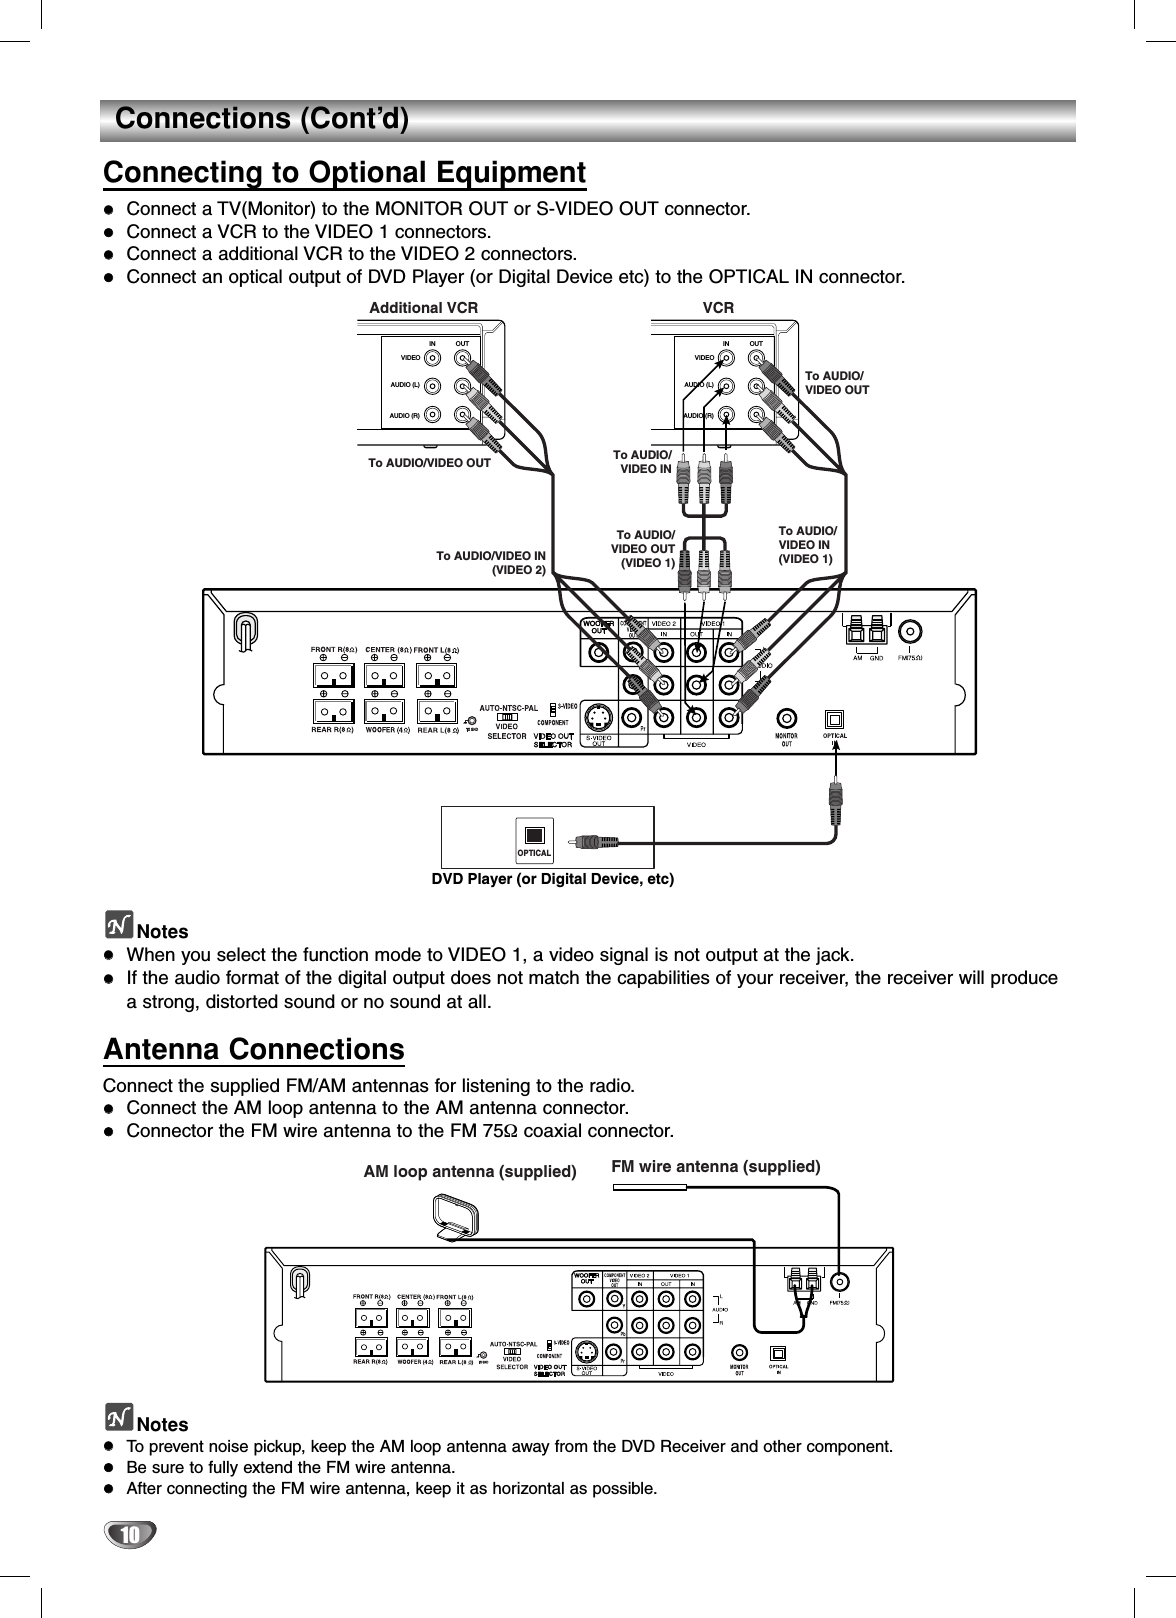
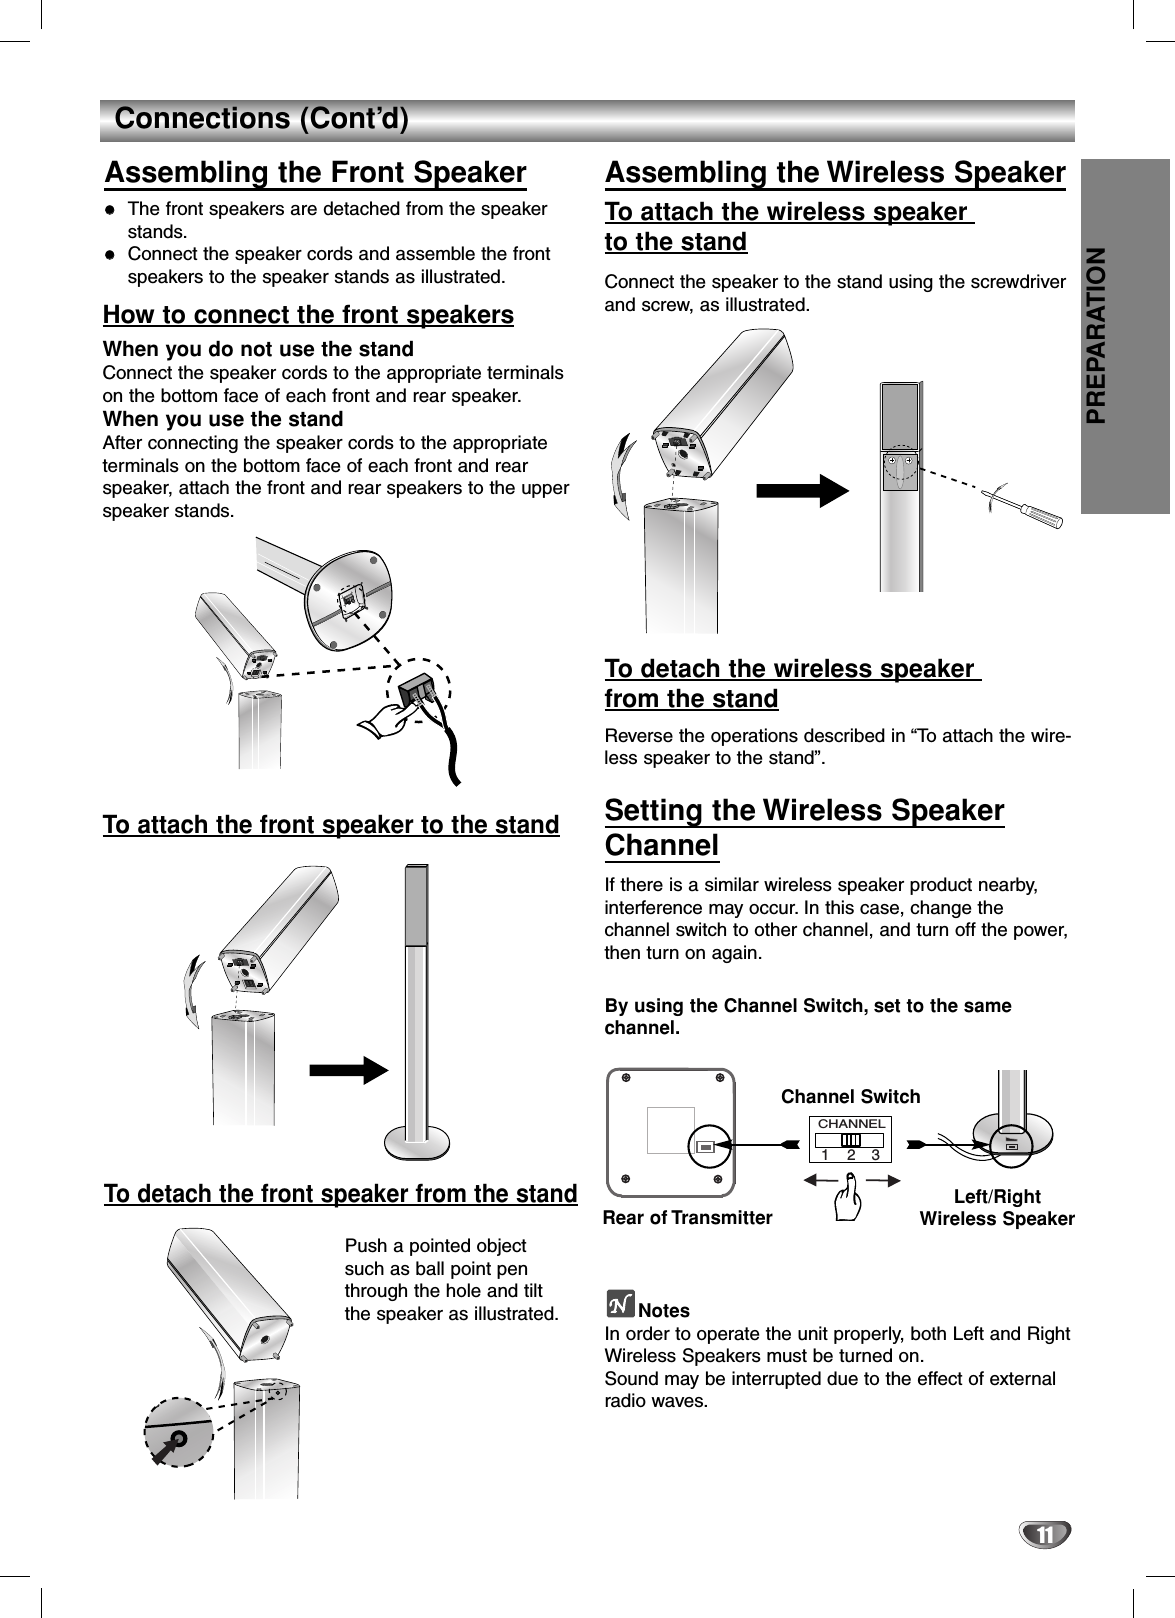
LG Electronics USA 9QKW61TX Wireless Speaker Base User Manual CASA DA SW6100 Eng D029U

LG Electronics USA Wireless Speaker Base CASA DA SW6100 Eng D029U

Users Manual

DVD HOME CINEMAWIRELESS SPEAKERSYSTEMOWNER’S MANUALMODEL : DA-SW6100DA-W6100A, FE-6100TE, FE-6100CVE, FE-6100WE,ACC-W6100, FA-W6100SL, FA-W6100SRCD-R/RWCASA_DA-SW6100(Eng)-D029MBefore connecting, operating or adjusting this product,please read this instruction booklet carefully and completely.
2Safety PrecautionsThis lightning flash with arrowhead symbol within anequilateral triangle is intended to alert the user tothe presence of uninsulated dangerous voltagewithin the product’s enclosure that may be of sufficient magnitude to constitute a risk of electricshock to persons. The exclamation mark within an equilateral triangleis intended to alert the user to the presence ofimportant operating and maintenance (servicing)instructions in the instructions accompanying the product.WARNING: Do not install this equipment in a confined spacesuch as a book case or similar unit.CAUTION:This DVD/CD receiver employs a Laser System.To ensure proper use of this product, please read this owner’smanual carefully and retain it for future reference. Should theunit require maintenance, contact an authorized service loca-tion (see service procedure).Performing controls, adjustments, or carrying out proceduresother than those specified herein may result in hazardous radi-ation exposure.To prevent direct exposure to laser beam, do not try to openthe enclosure. Visible laser radiation when open. DO NOTSTARE INTO BEAM.CAUTION: The apparatus should not be exposed to water (dripping or splashing) and no objects filled with liquids, suchas vases, should be placed on the apparatus.REGULATORY INFORMATION: FCC Part 15This product has been tested and found to comply with thelimits for a Class B digital device, pursuant to Part 15 of theFCC Rules. These limits are designed to provide reasonableprotection against harmful interference when the product isoperated in a residential installation. This product generates,uses and can radiate radio frequency energy and, if notinstalled and used in accordance with the instruction manual,may cause harmful interference to radio communications.However, there is no guarantee that interference will not occurin a particular installation. If this product does cause harmfulinterference to radio or television reception, which can bedetermined by turning the product off and on, the user isencouraged to try to correct the interference by one or moreof the following measures: • Reorient or relocate the receiving antenna. • Increase the separation between the product and receiv-er. • Connect the product into an outlet on a circuit differentfrom that to which the receiver is connected. • Consult the dealer or an experienced radio/TV technicianfor help. FCC WARNING: This equipment may generate or use radiofrequency energy. Changes or modifications to this equipmentmay cause harmful interference unless the modifications areexpressly approved in the instruction manual. The user couldlose the authority to operate this equipment if an unauthorizedchange or modification is made.OTES ON COPYRIGHTS:It is forbidden by law to copy, broadcast, show, broadcast via cable, play in public, or rent copyrighted material without permission.This product features the copy protection function developedby Macrovision. Copy protection signals are recorded on somediscs. When recording and playing the pictures of these discson a VCR, picture noise will appear.This product incorporates copyright protection technology thatis protected by method claims of certain U.S. patents and otherintellectual property rights owned by Macrovision Corporationand other rights owners. Use of this copyright protection tech-nology must be authorized by Macrovision Corporation, and isintended for home and other limited viewing uses only unlessotherwise authorized by Macrovision Corporation. Reverseengineering or disassembly is prohibited.SERIAL NUMBER: The serial number is located on the backof this unit. This number is unique to this unit and not availableto others. You should record requested information here andretain this guide as a permanent record of your purchase.Model No. ___________________________________Serial No. ___________________________________WARNING: TO PREVENT FIRE OR ELECTRIC SHOCKHAZARD, DO NOT EXPOSE THIS PRODUCT TO RAIN ORMOISTURE.CAUTIONRISK OF ELECTRIC SHOCK DO NOT OPENCAUTION: TO REDUCE THE RISK OF ELECTRIC SHOCKDO NOT REMOVE COVER (OR BACK)NO USER-SERVICEABLE PARTS INSIDEREFER SERVICING TO QUALIFIED SERVICEPERSONNEL.
INTRODUCTION31. Read these instructions. - All these safety andoperating instructions should be read before theproduct is operated.2. Keep these instructions. - The safety, operatingand use instructions should be retained for futurereference.3. Heed all warnings. - All warnings on the productand in the operating instructions should be adheredto.4. Follow all instructions. - All operating and useinstructions should be followed.5. Do not use this apparatus near water. – Forexample: near a bath tub, wash bowl, kitchen sink,laundry tub, in a wet basement; or near a swimmingpool; and like.6. Clean only with dry cloth. – Unplug this productfrom the wall outlet before cleaning. Do not use liquid cleaners.7.Do not block any ventilation openings. Install inaccordance with the manufacturer’s instructions. -Slots and openings in the cabinet are provided forventilation and to ensure reliable operation of theproduct and to protect it from over- heating. The openings should never be blocked by placingthe product on a bed, sofa, rug or other similarsurface. This product should not be placed in abuilt-in installation such as a bookcase or rackunless proper ventilation is provided or themanufacturer’s instructions have been adhered to.8. Do not install near any heat sources such asradiators, heat registers, stoves, or other apparatus (including amplifiers) that produceheat.9.Do not defeat the safety purpose of the polarizedor grounding-type plug. A polarized plug has twoblades with one wider than the other. A ground-ingtype plug has two blades and a third ground-ing prong. The wide blade or the third prong areprovided for your safety. If the provided plugdoes not fit into your outlet, consult an electri-cian for replacement of the obsolete outlet.10. Protect the power cord from being walked on orpinched particularly at plugs, conveniencereceptacles, and the point where they exit fromthe apparatus.11. Only use attachments/accessories specified bythe manufacturer.12. Use only with the cart, stand, tripod, bracket, ortable specified by the manufacturer, or sold withapparatus. When a cart is used, use cautionwhen moving the cart/apparatus combination toavoid injury from tip-over.13. Unplug this apparatus during lightning stormsor when unused for long periods of time.14.Refer all servicing to qualified service personnel.Servicing is required when the apparatus hasbeen damaged in any way, such as power-supply cord or plug is damaged, liquid hasbeen spilled or objects have fallen into theapparatus, the apparatus has been exposed torain or moisture, does not operate normally, orhas been dropped.CAUTION: PLEASE READ AND OBSERVE ALL WARNINGS AND INSTRUCTIONS IN THIS OWNER’S MANU-AL AND THOSE MARKED ON THE UNIT. RETAIN THIS BOOKLET FOR FUTURE REFERENCE.This set has been designed and manufactured to assure personal safety. Improper use can result in electric shockor fire hazard. The safeguards incorporated in this unit will protect you if you observe the following procedures forinstallation, use, and servicing.This unit does not contain any parts that can be repaired by the user.DO NOT REMOVE THE CABINET COVER, OR YOU MAY BE EXPOSED TO DANGEROUS VOLTAGE. REFERSERVICING TO QUALIFIED SERVICE PERSONNEL ONLY.IMPORTANT SAFETY INSTRUCTIONS
INTRODUCTION3Table of ContentsIntroductionSafety Precautions . . . . . . . . . . . . . . . . . . . . . . . . . 2Table of Contents . . . . . . . . . . . . . . . . . . . . . . . . . . 3Before Use . . . . . . . . . . . . . . . . . . . . . . . . . . . . . . 4-5Playable Discs . . . . . . . . . . . . . . . . . . . . . . . . . . . 4Precautions . . . . . . . . . . . . . . . . . . . . . . . . . . . . . 5Notes on Discs . . . . . . . . . . . . . . . . . . . . . . . . . . 5About Symbols . . . . . . . . . . . . . . . . . . . . . . . . . . 5Front Panel and Display Window . . . . . . . . . . . . . . 6Remote Control . . . . . . . . . . . . . . . . . . . . . . . . . . . . 7Rear Panel . . . . . . . . . . . . . . . . . . . . . . . . . . . . . . . . 8PreparationConnections . . . . . . . . . . . . . . . . . . . . . . . . . . . . 9-13Connecting to a TV  . . . . . . . . . . . . . . . . . . . . . . . 9Connecting to Optional Equipment . . . . . . . . . . . 10Antenna Connections. . . . . . . . . . . . . . . . . . . . . 10Assembling the Front Speaker . . . . . . . . . . . . . . 11Assembling the Wireless Speaker . . . . . . . . . . . 11Setting the Wireless Speaker Channel . . . . . . . . 11Speaker System Connection . . . . . . . . . . . . . 12-13Before Operation . . . . . . . . . . . . . . . . . . . . . . . 14-19Speaker Positioning . . . . . . . . . . . . . . . . . . . . . . 14Mini Glossary for Sound Mode . . . . . . . . . . . . . . 14Sound Mode (Except AM) . . . . . . . . . . . . . . . . . 15Sound Level. . . . . . . . . . . . . . . . . . . . . . . . . . . . 15Test Tone . . . . . . . . . . . . . . . . . . . . . . . . . . . . . . 15Delay Time Setting. . . . . . . . . . . . . . . . . . . . . . . 16Setting the delay time in the Dolby Digital and Dolby Pro Logic (II) mode . . . . . . . . . . . . . . 16General Explanation. . . . . . . . . . . . . . . . . . . . . . 17On-Screen Display . . . . . . . . . . . . . . . . . . . . . . . 17Initial Settings . . . . . . . . . . . . . . . . . . . . . . . . 18-19Initial Settings General Operation. . . . . . . . . 18Language . . . . . . . . . . . . . . . . . . . . . . . . . . 18Picture. . . . . . . . . . . . . . . . . . . . . . . . . . . . . 18PBC . . . . . . . . . . . . . . . . . . . . . . . . . . . . . . 18Parental Control. . . . . . . . . . . . . . . . . . . . . . 19OperationOperation with Radio . . . . . . . . . . . . . . . . . . . . 20-21Presetting the radio stations . . . . . . . . . . . . . . . . 20Listening to the radio . . . . . . . . . . . . . . . . . . . . . 20Sleep Timer Setting . . . . . . . . . . . . . . . . . . . . . . 21Dimmer . . . . . . . . . . . . . . . . . . . . . . . . . . . . . . . 21Mute . . . . . . . . . . . . . . . . . . . . . . . . . . . . . . . . . 21Using Headphone Jack . . . . . . . . . . . . . . . . . . . 21Selecting input source . . . . . . . . . . . . . . . . . . . . 21Operation with DVD and Video CD. . . . . . . . . . 22-24Playing a DVD and Video CD . . . . . . . . . . . . . . . 22General Features . . . . . . . . . . . . . . . . . . . . . . . . 22Moving to another TITLE . . . . . . . . . . . . . . . 22Moving to another CHAPTER/TRACK . . . . . 22Slow Motion. . . . . . . . . . . . . . . . . . . . . . . . . 22Still Picture and Frame-by-Frame Playback . 23Search. . . . . . . . . . . . . . . . . . . . . . . . . . . . . 23Repeat . . . . . . . . . . . . . . . . . . . . . . . . . . . . 23Repeat A-B . . . . . . . . . . . . . . . . . . . . . . . . . 23Time Search . . . . . . . . . . . . . . . . . . . . . . . . 23Zoom. . . . . . . . . . . . . . . . . . . . . . . . . . . . . . 24Marker Search. . . . . . . . . . . . . . . . . . . . . . . 24Special DVD Features . . . . . . . . . . . . . . . . . . . . 24Title Menu . . . . . . . . . . . . . . . . . . . . . . . . . . 24Disc Menu . . . . . . . . . . . . . . . . . . . . . . . . . . 24Camera Angle . . . . . . . . . . . . . . . . . . . . . . . 24Changing the Audio Language . . . . . . . . . . . 24Subtitles . . . . . . . . . . . . . . . . . . . . . . . . . . . 24Operation with Audio CD and MP3 Disc. . . . . . . . 25Playing an Audio CD and MP3 Disc . . . . . . . . . . 25Pause . . . . . . . . . . . . . . . . . . . . . . . . . . . . . 25Moving to another Track. . . . . . . . . . . . . . . . 25Repeat Track/All/Off . . . . . . . . . . . . . . . . . . . 25Search. . . . . . . . . . . . . . . . . . . . . . . . . . . . . 25Repeat A-B . . . . . . . . . . . . . . . . . . . . . . . . . 25Changing the Audio Channel . . . . . . . . . . . . 25Programmed Playback . . . . . . . . . . . . . . . . . . . . . 26Programmed Playback with Audio CD and MP3 Disc . . . . . . . . . . . . . . . . . . . . . . . . . . 26Programmed Playback with Video CD . . . . . . . . 26Additional Information. . . . . . . . . . . . . . . . . . . . . . 27Last Condition Memory . . . . . . . . . . . . . . . . . . . 27Screen Saver . . . . . . . . . . . . . . . . . . . . . . . . . . . 27Video Mode Setting . . . . . . . . . . . . . . . . . . . . . . 27Notes on MP3 Discs . . . . . . . . . . . . . . . . . . . . . 27ReferenceTroubleshooting . . . . . . . . . . . . . . . . . . . . . . . . 28-29Language Code List . . . . . . . . . . . . . . . . . . . . . . . 30Country Code List . . . . . . . . . . . . . . . . . . . . . . . . . 31SpecificationAbout the symbols for instructionsIndicates hazards likely to cause harm to the unititself or other material damage.Indicates special operating features of this unit.Indicates tips and hints for making the task easier.Manufactured under license from Dolby Laboratories.“Dolby”, “Pro Logic”, and the double-D symbol are trade-marks of Dolby Laboratories. Confidential Unpublishedworks. Copyright 1992-1997 Dolby Laboratories. All rightsreserved.Manufactured under license from Digital Theater Systems,Inc. US Pat. No. 5,451,942 and other worldwide patentsissued and pending. “DTS”and “DTS Digital Surround”aretrademarks of Digital Theater Systems, Inc. Copyright 1996Digital Theater Systems, Inc. All rights reserved.
4Before UsePlayable DiscsDVD (8 cm / 12 cm disc)Video CD (VCD) (8 cm / 12 cm disc)Audio CD (8 cm / 12 cm disc)In addition, this unit can play a CD-R or CD-RW thatcontains audio titles or MP3 files.Notes–Depending on the conditions of the recording equip-ment or the CD-R/RW disc itself, some CD-R/RWdiscs cannot be played on the unit.–The unit cannot play the CD-R/RW discs that containno data, or contain different kinds of formatted dataother than MP3 and CD-DA data.–Do not attach any seal or label to either side (thelabeled side or the recorded side) of a disc.–Do not use irregular shaped CDs (e.g., heart-shapedor octagonal). It may result in malfunctions.Notes on DVDs and Video CDsSome playback operations of DVDs and Video CDs maybe intentionally fixed by software manufacturers. As thisunit plays DVDs and Video CDs according to disc con-tent designed by the software manufacturer, some play-back features of the unit may not be available, or otherfunctions may be added.Refer also to the instructions supplied with the DVDsand Video CDs. Some DVDs made for business purpos-es may not be played on the unit.Regional code of the DVD receiver and DVDsThis DVD receiver is designed and manufactured forplayback of region “3”encoded DVD software.The region code on the labels of some DVDdiscs indicates which type of receiver can playthose discs. This unit can play only DVD discslabeled “3”or “ALL”. If you try to play any other discs, themessage “Check Regional Code”will appear on the TVscreen. Some DVD discs may not have a region codelabel even though their playback is prohibited by arealimits.Note on DTS-encoded CDsWhen playing DTS-encoded CD’s, an excessive audiolevel may be heard from the analog stereo output. Toavoid possible damage to the audio system, turn downthe volume before playing back such discs, adjust thevolume gradually, and keep the volume level low. Toenjoy DTS Digital SurroundTM playback, an external 5.1channel DTS Digital SurroundTM decoder system mustbe connected to the digital output of the unit.Disc-related termsTitle (DVD only)The main film content or accompanying feature contentor additional feature content, or  music album.Each title is assigned a title reference number enablingyou to locate it easily.Chapter (DVD only)Sections of a picture or a musical piece that are smallerthan titles.A title is composed of one or several chapters. Eachchapter is assigned a chapter number, enable you tolocate the chapter you want. Depending on the disc, nochapters may be recorded.Track (Video CD and Audio CD only)Sections of a picture or a musical piece on a Video CDor an Audio CD. Each track is assigned a track number,enabling you to locate the track you want.SceneOn a Video CD with PBC (Playback control) functions,moving pictures and still pictures are divided into sec-tions called “Scenes”. Each scene is displayed in themenu screen and assigned a scene number, enablingyou to locate the scene you want.A scene is composed of one or several tracks.Types of Video CDsThere are two types of Video CDs:Video CDs equipped with PBC (Version 2.0)PBC (Playback control) functions allow you to interactwith the system via menus, search functions, or othertypical computer-like operations. Moreover, still picturesof high resolution can be played if they are included inthe disc.Video CDs not equipped with PBC (Version 1.1)Operated in the same way as Audio CDs, these discsallow playback of video pictures as well as sound, butthey are not equipped with PBC.3
5INTRODUCTIONBefore Use (Cont’d)PrecautionsHandling the unitWhen shipping the unitThe original shipping carton and packing materialscome in handy. For maximum protection, re-pack theunit as it was originally packed at the factory.When setting the unitThe picture and sound of a nearby TV, VCR, or radiomay be distorted during playback. In this case, positionthe unit away from the TV, VCR, or radio, or turn off theunit after removing the disc.To keep the surface cleanDo not use volatile liquids, such as insecticide spray,near the unit. Do not leave rubber of plastic products incontact with the unit for a long period of time. They willleave marks on the surface.InstallingDo not install the unit in a confined space, such as a bookcase or built-in cabinet.Allow adequate air circulation to prevent internal heat buildup.Do not place the unit on surfaces (rugs, blankets, etc.) or near materials (curtains, draperies) that may block the ventilation slots.Do not install the unit near heat sources such as radi-ators or air ducts, or in a place subject to direct sun-light, excessive dust, mechanical vibration or shock.Do not place heavy objects on the unit.Cleaning the unitTo clean the cabinetUse a soft, dry cloth. If the surfaces are extremely dirty,use a soft cloth lightly moistened with a mild detergentsolution. Do not use strong solvents, such as alcohol,benzine, or thinner, as these might damage the surfaceof the unit.To obtain a clear pictureThe DVD receiver is a high-tech, precision device. If theoptical pick-up lens and disc drive parts are dirty orworn down, the picture quality will be poor.Regular inspection and maintenance are recommendedafter every 1,000 hours of use. (This depends on theoperating environment.)For details, please contact your nearest dealer.Notes on DiscsHandling discsDo not touch the playback side of the disc.Hold the disc by the edges so that fingerprints will notget on the surface.Do not stick paper or tape on the disc.Storing discsAfter playing, store the disc in its case.Do not expose the disc to direct sunlight or sources ofheat, or leave it in a parked car exposed to direct sun-light, as there may be a considerable temperatureincrease inside the car.Cleaning discsFingerprints and dust on the disc can cause poor pic-ture quality and sound distortion. Before playing, cleanthe disc with a clean cloth. Wipe the disc from the cen-ter out.Do not use strong solvents such as alcohol, benzine,thinner, commercially available cleaners, or anti-staticspray intended for older vinyl records.About SymbolsAbout the symbol display“ ”may appear on the TV screen during operation.This icon means the function explained in this owner’smanual is not available on that specific DVD video disc.About the disc symbols for instructionsA section whose title has one of the following symbols isapplicable only to the disc represented by the symbol.DVD Video CDs with the PBC (playback control)functionVideo CDs without the PBC (playback control) functionAudio CDsMP3 discMP3CDVCD1.1VCD2.0DVD
6Front Panel and Display WindowSTOP (MEMORY/CLEAR) buttonPOWER button and indicatorFM/AM buttonMONO/STEREO buttonENTER buttonOPEN/CLOSE buttonFUNCTION buttonSKIP/SEARCH (TUNING/SKIP) buttonsPLAY buttonSLEEP indicatorTUNED indicatorSTEREO indicatorMUTE indicatorMEMORY indicatorPROGRAM indicatorRepeat playback mode indicatorsSound modeindicatorChapter/Track number indicatorTitle number indicatorPLAY/PAUSE indicatorAngle icon indicatorDisc indicatorTotal playing time/Elapsed time/Frequency/Delay time/Volume etc.indicatorsPAUSE buttonPHONES connectorVOLUME controller
7INTRODUCTIONRemote ControlRemote Control Operation RangePoint the remote control at the remote sensor and pressthe buttons.Distance: About 23 ft (7 m) from the front of theremote sensorAngle: About 30°in each direction of the front of theremote sensorRemote control battery installationDetach the battery cover on the rear ofthe remote control, and insert two R03(size AAA) batteries with  and aligned correctly.CautionDo not mix old and new batteries. Never mix differenttypes of batteries (standard, alkaline, etc.).AAAAAAMUTE buttonFM/AM buttonARROW buttonsFor use in highlighting a selectionon a GUI menu screen, TITLE andMENU screen.SETUP buttonSLOW SCAN(+/-) buttonsSEARCH buttonREPEAT buttonNUMERICAL buttonsMARKER buttonOPEN/CLOSE buttonTEST TONE  buttonCD/DVD buttonENTER buttonDIMMER buttonPRESET -/+ (QQ / RR) buttonsSUBTITLE(S-TITLE) button •STOP button •RETURN buttonTITLE buttonUse the TITLE button to display the title screen includ-ed on DVD video discs.POWER button• PROGRAM button• SLEEP button• CLEAR button• REPEAT A-B buttonDOLBY PROLOGIC II buttonSOUND MODE buttonBY-PASS button• LEVEL button• DELAY buttonVIDEO 1/2 buttons PAUSE buttonPLAY buttonDISPLAY buttonAUDIO buttonZOOM buttonMENU buttonUse the MENU button todisplay the menu screenincluded on DVD videodiscs.VOLUME (+/-) buttonsSKIP ( /) buttonsPress and hold button forabout two seconds forsearch function.ANGLE button
Rear Panel8CautionDo not touch the inner pins of the jacks on the rearpanel. Electrostatic discharge may cause permanentdamage to the unit.CautionWhen you select the function mode to VIDEO1 using theVIDEO1 button on the remote control, the signal is outputfrom the front L/R speakers, but not from the VIDEO1VIDEO OUT and AUDIO OUT L/R connectors.* VIDEO SELECTOR switchYou can enjoy NTSC or PAL discs by setting theVIDEO SELECTOR switch to choose the appropriatesystem.PAL: Select when DVD receiver is connected withPAL-TV.NTSC: Select when DVD receiver is connected withNTSC-TV.AUTO: Select when DVD receiver is connected withMulti system TV.•When the selected System Select switch does notcoincide with the system of your TV, normal color picture may not be displayed.•Set System Select switch when the power is turnedoff.Dust protection capRemove the dust protection cap from the OPTICALDIGITAL OUT jack and connect the optical digital cable(not supplied) securely so that the configurations ofboth the cable and the connector match. Keep the dustprotection cap and always reattach the cap when notusing the connector to protect against dust intrusion.Dust protection cap** VIDEO OUT SELECTOR SwitchSelect either S-VIDEO OUT or COMPONENT VIDEOOUT, depending on how you connected the DVDReceiver to the TV.S-VIDEO OUTConnectorFM 75ΩCoaxial Antenna ConnectorAM Antenna ConnectorsWOOFER OUT ConnectorVIDEO 2 (Input) ConnectorsVIDEO 1 (Input/Output) ConnectorsSPEAKER ConnectorsPOWER CORDConnect to an AC 100-240V,50/60Hz outlet only.VIDEO SELECTOR SwitchRefer to explanation below*.COMPONENT VIDEO OUT (Y Pb Pr) ConnectorsVIDEO OUT SELECTORSwitchRefer to explanation below**.MONITOR OUTConnectorOPTICAL INConnectorGROUND CABLE Connector
9PREPARATIONConnectionsS-VIDEO INPUTLRYPbPrCOMPONENT VIDEO INPUT AUDIO INPUTLVIDEO INPUTRear of TVSCAVMake one of the following connections, depending onthe capabilities of your existing equipment.When using the COMPONENT VIDEO OUT jacks,set the VIDEO OUT SELECTOR switch to COMPO-NENT. When using the S-VIDEO OUT jack, set theVIDEO OUT SELECTOR switch to S-VIDEO.TipsDepending on your TV and other equipment you wishto connect, there are various ways you could connectthe player. Use one of the connections describedbelow.Please refer to the manuals of your TV, VCR, StereoSystem or other devices as necessary to make thebest connections.Caution–Make sure the DVD Receiver is connected directly tothe TV. Select the correct AV input on your TV.–Do not connect your DVD Receiver to TV via yourVCR. The DVD image could be distorted by the copyprotection system.Video connection 11Connect the MONITOR OUT jack on the DVDReceiver to the video in jack on the TV using thevideo cable supplied (V).22Connect the Left and Right AUDIO OUT jacks ofthe DVD Receiver to the audio left/right in jacks onthe TV (A) using the supplied audio cables.S-Video connection 11Connect the S-VIDEO OUT jack on the DVDReceiver to the S-Video in jack on the TV using theoptional S-Video cable (S).22Connect the Left and Right AUDIO OUT jacks ofthe DVD Receiver to the audio left/right in jacks onthe TV (A) using the supplied audio cables.Component Video (Color Stream®) connection11Connect the COMPONENT VIDEO OUT jacks onthe DVD Receiver to the corresponding in jacks onthe TV using an optional Y Pb Pr cable (C).22Connect the Left and Right AUDIO OUT jacks ofthe DVD Receiver to the audio left/right in jacks onthe TV (A) using the supplied audio cables.NotesThe signal of S-VIDEO OUT jack will output onlywhen the function mode is selected to CD/DVD.When you connect the DVD receiver to your TV, besure to turn off the power and unplug both units fromthe wall outlet before making any connections.Connecting to a TV
10Connections (Cont’d)Connecting to Optional EquipmentConnect a TV(Monitor) to the MONITOR OUT or S-VIDEO OUT connector.Connect a VCR to the VIDEO 1 connectors.Connect a additional VCR to the VIDEO 2 connectors.Connect an optical output of DVD Player (or Digital Device etc) to the OPTICAL IN connector.VIDEOOUTIN AUDIO (L) AUDIO (R)VIDEOOUTIN AUDIO (L) AUDIO (R)VCRAdditional VCRTo AUDIO/VIDEO IN(VIDEO 2)To AUDIO/VIDEO IN(VIDEO 1)To AUDIO/VIDEO OUTTo AUDIO/VIDEO INTo AUDIO/VIDEO OUT(VIDEO 1)To AUDIO/VIDEO OUTDVD Player (or Digital Device, etc)OPTICALNotesWhen you select the function mode to VIDEO 1, a video signal is not output at the jack.If the audio format of the digital output does not match the capabilities of your receiver, the receiver will producea strong, distorted sound or no sound at all.FM wire antenna (supplied)AM loop antenna (supplied)Antenna ConnectionsConnect the supplied FM/AM antennas for listening to the radio.Connect the AM loop antenna to the AM antenna connector.Connector the FM wire antenna to the FM 75Ωcoaxial connector.NotesTo prevent noise pickup, keep the AM loop antenna away from the DVD Receiver and other component.Be sure to fully extend the FM wire antenna.After connecting the FM wire antenna, keep it as horizontal as possible.
Connections (Cont’d)PREPARATION11Assembling the Front SpeakerThe front speakers are detached from the speakerstands.Connect the speaker cords and assemble the frontspeakers to the speaker stands as illustrated.To attach the front speaker to the standHow to connect the front speakersWhen you do not use the stand  Connect the speaker cords to the appropriate terminalson the bottom face of each front and rear speaker.When you use the standAfter connecting the speaker cords to the appropriateterminals on the bottom face of each front and rearspeaker, attach the front and rear speakers to the upperspeaker stands.To detach the front speaker from the standPush a pointed objectsuch as ball point penthrough the hole and tiltthe speaker as illustrated.12CHANNEL3Assembling the Wireless SpeakerTo attach the wireless speaker to the standConnect the speaker to the stand using the screwdriverand screw, as illustrated.To detach the wireless speaker from the standReverse the operations described in “To attach the wire-less speaker to the stand”.Setting the Wireless SpeakerChannelIf there is a similar wireless speaker product nearby,interference may occur. In this case, change the channel switch to other channel, and turn off the power,then turn on again.By using the Channel Switch, set to the samechannel.Rear of TransmitterChannel SwitchLeft/RightWireless SpeakerNotesIn order to operate the unit properly, both Left and RightWireless Speakers must be turned on.Sound may be interrupted due to the effect of externalradio waves.
12Connections (Cont’d)Speaker System ConnectionConnect the speakers to the front (right, left) or center speaker connectors.Connect the subwoofer to the woofer connector.Connect the power cord of the wireless speaker to the outlet, then press the power button on the wirelessspeaker.Connect the adaptor (DC 7V)  to the outlet and transmitter.Connect the ground cable to the transmitter and rear (right, left) speaker connectors.Set the distance between this unit and wireless speaker (right, left) within 10m.Front Speaker (Right)FE-6100TEFront Speaker (Left)FE-6100TECenter SpeakerFE-6100CVEWireless Speaker (Right)FA-W6100SRWireless Speaker (Left)FA-W6100SLSubwooferFE-6100WETransmitterACC-W6100Adaptor (DC 7V)NotesIt takes about five seconds (and may take longer) for the transmitter and wireless speaker (left, right) to communicate with each other.When the unit is turned off, the transmitter is also turned off automatically after about twenty seconds.If either wireless speaker (left. right) is turned off, the wireless speaker will not function.Be sure to connect the groundcable to the ground cable con-nector of this unit by using thesupplied hand screw. If this isnot connected, the transmitterwill not function.
PREPARATION13Connections (Cont’d)If you feel lack of bass frequencyConnect an active subwoofer to the WOOFEROUT connector using a monaural audio cord(not supplied). When you connect an active subwoofer, disconnect the woofer from theWOOFER speaker connector.Red BlackConnect the speakers using the supplied speaker cords.To obtain the best possible surround sound, adjust the speaker parameters (distance, level, etc.).NoteIf you use front speakers with low maximum input rating, adjust the volume carefully to avoid excessive output on the speakers.If you connect the wireless speakers using speakercords, be sure to match the speaker cord to theappropriate terminal on the components: + to + and –to –. If the cords are reversed, the sound will be dis-torted and lack bass.Speaker System Connection (Cont’d)Front Speaker (Right)FE-6100TEFront Speaker (Left)FE-6100TECenter SpeakerFE-6100CVEWireless Speaker (Right)FA-W6100SRWireless Speaker (Left)FA-W6100SLSubwooferFE-6100WE
14Before OperationSpeaker PositioningIn the case of normal position use the 6 speakers (2 frontspeakers, center speaker, 2 rear speakers and subwoofer).If you want to play the excellent bass sound, DTS digitalsurround or Dolby Digital surround, you should connect asubwoofer.• Front speakersAccording to your listening position set up the speakers forequal distance. And by hearing position set up the intervalbetween speakers to 45 degree.• Center speakerIt is ideal that the center speakers and front speakers aresame height. But normally place it above or below the televi-sion.• Rear speakersPlace left and right behind the listening area. These speakersrecreate sound motion and atmosphere required for surroundplayback. For best results, do not install the rear speakerstoo far behind the listening position and install them at orabove the level of the listener’s ears. It is also effective todirect the rear speakers towards a wall or ceiling to furtherdisperse the sound.In the case of a smaller room size, if the audience is near tothe rear wall set the rear speakers opposite each other, andset the rear speakers above 60 - 90 cm than the listener’sears.• SubwooferThis can be placed in any front position.Mini Glossary for Sound ModeAllows you to enjoy 5.1(or 6) discrete channels of high quality digitalaudio from DTS program sources bearing the trademark such asdiscs, DVD and compact discs, etc. DTS Digital Surround deliversup to 6 channels of transparent audio(which means identical to theoriginal masters) and results in exceptional clarity throughout a true360 degree sound field. The term DTS is a trademark of DTSTechnology, LLC. Manufactured under license from DTSTechnology, LLC.The Dolby Digital surround format lets you enjoy up to 5.1 channelsof digital surround sound from a Dolby Digital program source. Ifyou play DVDs with “”mark, you can enjoy even better soundquality, greater spatial accuracy, and improved dynamic range.When playing recordings of live music and classic, this mode pro-vides a feeling similar to actually being in a small concert hall.When playing recordings of live music and classic, this mode providesa feeling similar to actually being in a large concert hall.This mode provides a three dimensional effect similar to that ofmovie theater.(II)Dolby Pro Logic II creates five full-bandwidth output channels fromtwo-channel sources. This is done using an advanced, high-puritymatrix surround decoder that extracts the spatial properties of theoriginal recording without adding any new sounds or tonal col-orations.EMULATION mode:The Pro Logic Emulation mode offers users the same robust sur-round processing as original Pro Logic, in case the source con-tent is not of optimum quality, or if there is a desire to hear theprogram more “as it used to be.”When this mode is used, it iscalled Pro Logic, as before. There is no “Pro Logic I”mode. ThePro Logic emulation mode is optional. Dolby does not requirePLII products to use the original Pro Logic decoding algorithm.However, if the DSP contains the original Pro Logic code, and ifthe product maker would like to use it, this is quite acceptableand even encouraged. A product must not offer both original ProLogic and the Pro Logic emulation mode.MOVIE mode:The Movie mode is for use with stereo television shows and allprograms encoded in Dolby Surround. The result is enhancedsoundfield directionality that approaches the quality of discrete5.1-channel sound.MUSIC mode:The Music mode is for use with any stereo music recordings, andprovides a wide and deep sound space. The Music modeincludes controls that allow the sound to be tailored to individuallistening tastes.VIRTUAL mode:The Virtual mode is usually used when Pro Logic II is connectedto a virtual process for speaker use. However, there might besome virtualizers for which this mode does not produce theintended result. For those virtualizers, Movie mode may give thebest surround effect. Virtual mode is designed to be used withthe virtual process developed by Dolby Laboratories. The ProLogic II mode should be called only “Pro Logic II”so the Virtualname can be reserved to describe the speaker virtualizationprocess itself.MATRIX mode:The Matrix mode is the same as the Music mode except that thedirectional enhancement logic is turned off. It may be used toenhance mono signals by making them seem “larger.”The Matrixmode may also find use in auto systems, where the fluctuationsfrom poor FM stereo reception can otherwise cause disturbingsurround signals from a logic decoder. The ultimate “cure”forpoor FM stereo reception may be simply to force the audio tomono.SURROUND OFF (2CH STEREO)Outputs the sound from the front left and right speakers and sub-woofer. Standard two channel (stereo) sources completely bypassthe sound field processing. This allows you to play any source usingonly the front left and right speakers and subwoofer. You canselect SURROUND OFF by pressing BY-PASS on the remotecontrol.Center SpeakerFrontSpeaker(Left)Speaker Positioning ExampleRearSpeaker(Left)RearSpeaker(Right)FrontSpeaker(Right)Subwoofer
PREPARATION15Before Operation (Cont’d)Sound Mode (Except AM)You can enjoy surround sound simply by selecting oneof the pre-programmed sound fields according to theprogram you want to listen to.When PCM indicator is only displayed in thedisplay window:Each time you press SOUND MODE button,  the soundmode is changed as the following order;PRO LOGIC →HALL1 →HALL2 →THEATEREach time you press  button, the sound mode of ProLogic II is changed as the following order;PRO LOGIC →MOVIE →MUSIC →VIRTUAL → MATRIXTipYou can select SURROUND OFF (2CH STEREO) mode bypressing BY-PASS button.When DVD is inserted.You can change the sound mode of DVD (Dolby Digital, DTS,PRO LOGIC, etc) by pressing the AUDIO button on the remote during playback.Although the DVD contents differ from disc to disc, the follow-ing explains the basic operation when this feature is used.Each time you press AUDIO button, the sound mode of DVD ischanged as the following order;→→ andWhen DVD is inserted and PRO LOGIC indicator lights.Each time you press  button, the sound mode of ProLogic is changed as the following order;PRO LOGIC →PLIIMOVIE →PLIIMUSIC →PLIIVIRTUAL → PLIIMATRIXTipYou can set PRO LOGIC mode to Off (2CH STEREO) bypressing BY-PASS button and the PRO LOGIC indicator disap-pears.For your reference•The DVD Receiver memorizes the last mode set-tings for each source individually.•You can identify the encoding format of program software by looking at its packaging.- Dolby Digital discs are labeled with the  logo.- Dolby Surround encoded programs are labeled withthe logo.- DTS Digital Surround discs are marked with DTS.NoteWhen you play sound tracks with 96kHz sampling frequency,the output signals will be converted to 48kHz (sampling fre-quency).Sound LevelYou can set the sound level of the desired channel.11Press LEVEL.The level indicator will appear in the display window.22Press /to select a desired speaker to set.Each time you press the /button, it is changed as thefollowing order;FL (Front Left) →C (Center) →FR (Front Right) →SR (Surround Right) →SL (Surround Left) →SW (Subwoofer) →FL (Front Left)•On the 2 channel stereo mode, you can only selectthe SW (Subwoofer).33Press /to adjust the sound level of theselected channel. (-6dB ~ +6dB)44Repeat step 2-3 and adjust the sound level ofthe other channels.55If setting is complete, press LEVEL.Test ToneThis function allows you can easily adjust the soundbalance of the speakers from the listener's position.11Select the test tone mode by pressing TESTTONE.•A hiss noise comes out for 2 seconds from each speak-ers in the following order;FL (Front Left) →C (Center) →FR (Front Right) →SR (Surround Right) →SL (Surround Left) →SW (Subwoofer) →FL (Front Left)22You can adjust the sound level during operatingthe test tone, first press LEVEL then press /buttons, so that all speaker’s sound level issame from the listener’s position.•During operating the test tone, if you adjust the soundlevel, it will be paused in the current speaker channel.33If setting is complete, press TEST TONE.
Before Operation (Cont’d)16Delay Time SettingIn Dolby Digital or Dolby Pro Logic mode it is assumedthat the distance from the listener to each of the speak-ers is equal. If not then setting the delay times of thecenter or rear speakers the sound will be heard simulta-neously by the listener.The interval from the speakers to the listener. If the dis-tance from the listener to each speakers is same, in theDolby Digital and Dolby Pro Logic mode the delay timeof each speakers is as following.In Dolby Digital modeCenter delay time : 0 ~ 5msRear delay time: 0 ~ 15msIn Dolby Pro Logic modeCenter delay time : cannot settingRear delay time : 15-30msIf the rear delay time is set in Dolby Digital mode, in theDolby Pro Logic mode the delay time will be automatical-ly set.The delay time is 1 msec per 30 cm.If the center and rear speakers are further than the frontspeakers from the listener, the delay time will be at min-imum.Surround delay time settingIf the distance of DSis equal to or longer than the DFinthe left figure, set the Surround Delay Time as 0ms.Otherwise, change the setting according to the below.Ex) If the distance from front speakers to the listener is3 m and from rear speakers from the listener is 1.5 m,in the Dolby Digital mode the rear delay time is 5 msec.3m (DF) - 1.5m (DS) = 1.5m (B) 1.5m (B) = 150cm / 30cm = 5msecIn Dolby Pro Logic II (Surround delay time):Emulation: 10 ~ 25msecMovie: 10 ~ 25msecMusic: 0 ~ 15msecVirtual: cannot settingMatrix: 0 ~ 15msecCenter delay time setting (Dolby Digital mode only)If the distance of DF is equal to the distance of DC inthe left figure, set the Center Delay Time as 0ms.Otherwise, change the setting according to the tablebelow.Ex) If the distance from the front speakers to the listen-er is 3m and from the center speaker to the listener is2.4m, the center delay time is 2msec.3m (DF) - 2.4m (DC) = 60cm (A)60cm (A) / 30cm = 2msecSetting the delay time in the Dolby Digital and Dolby Pro Logic (II) mode11Press DELAY.The current surround delay time appears in the dis-play window.You can select center delay time by pressing /in the Dolby Digital mode only.22Press /to change the delay time.33If setting is complete, press DELAY.NoteYou can adjust the center delay time only in the Dolby Digitalmode and its delay time appears.Center Width (MUSIC mode of Dolby Pro Logic II only)This control allows center-channel sounds to be posi-tioned between the center speaker and the left/rightspeakers over a range of eight steps. Step “3”uses acombination of all three front speakers to give the bestvocal imaging and most seamless soundstage presen-tation, and is recommended for most recordings. Step“0”places all center sound in the center speaker. Step“7”places all center sound equally in the left/rightspeakers, just as in conventional stereo.DIMENSE (MUSIC mode of Dolby Pro Logic II only)This control allows the user to gradually adjust thesoundfield either towards the front or the rear. This canbe useful to help achieve the desired balance from allthe speakers with certain recordings that may containeither too much or too little spatial effect. Step “0”is therecommended setting, which has no effect on thesound. Steps 1, 2, and 3 gradually move the sound for-ward, and steps –1, –2, and –3 move the soundtowards the surrounds.PANORAMA (MUSIC mode of Dolby Pro Logic II only)This control extends the front stereo image to includethe surround speakers for an exciting “wraparound”effect with side-wall imaging. It is particularly effectivefor recordings which have strong left- or right-channelelements in the mix, as these are detected and accen-tuated by the Panorama process.LSL SRRCDCDFDS(A)(B)SW
PREPARATION17Before Operation (Cont’d)Caution:Before using the remote control, press the DVD or TVbutton to select the device to be operated.General ExplanationThis manual gives the basic instructions for operatingthe DVD Receiver. Some DVDs require specific opera-tion or allow only limited operation during playback.When this occurs, the symbol  appears on the TVscreen, indicating that the operation is not permitted bythe DVD Receiver or is not available on the disc.On-Screen DisplayThe general playback status can be displayed on the TVscreen. Some items can be changed on the menu.On-screen display operation11Press DISPLAY during playback.22Press  or  to select an item.The selected item will be highlighted.33Press  or  to change the setting of an item.The number buttons can be also be used for settingnumbers (e.g., title number). For some functions,press ENTER to execute the setting.Temporary Feedback Field IconsRepeat TitleRepeat ChapterRepeat Track (non-PBC Video CDs only)Repeat All Tracks (non-PBC Video CDs only)Repeat A-BRepeat OffResume play from this pointAction prohibited or not availableNotesSome discs may not provide all of the features on theon-screen display example shown below.If no button is pressed for 10 seconds, the on-screendisplay disappears.OFF A     BALLTRACKCHAPTTITLEItemsTitle NumberChapter NumberTime searchAudio language and Digital Audio Output modeSubtitle languageAngleFunction (Press /to select desired item)Shows the current title number and total number oftitles, and skip to the desired title number.Shows the current chapter number and total number ofchapters, and skips to the desired chapter number.Shows the elapsed playing time, andsearch the point by the elapsed time directly.Shows the current audio soundtrack language,encoding method and channel number, andchanges the setting.Shows the current subtitles language, andchanges the setting.Shows the current angle number and total number ofangles, and changes the angle number.Selection Method/ , orNumeric, ENTER/ , orNumeric, ENTER, SKIPNumeric, ENTER/ AUDIO1/31/120:16:57 1   ENGD5.1  CHOFF1/1ItemsTrack NumberTimeAudio ChannelFunction (Press /to select desired item)Shows the current track number, total number of tracksand PBC On mode, and to the desired track number.Shows the elapsed playing time (Display only)Shows the audio channel, andchanges the audio channel.Selection Method/ , orNumeric, ENTER, SKIP–PBC0:16:57STER.VCD2.0 VCD1.1DVD/ S-TITLE/ ANGLE/ AUDIO
18Initial SettingsYou can set your own Personal Preferences on thereceiver.Initial Settings General Operation11Press SETUP.The setup menu appears.22Press /to select the desired item.The screen will show the current setting for theselected item, as well as alternate setting(s).33While the desired item is selected, press  , then/to select the desired setting.44Press ENTER to confirm your selection.Some items require additional steps.55Press SETUP, RETURN or PLAY to exit the setupmenu.LanguageDisc Language Select a language for the disc’s Menu, Audio andSubtitle.Original : The original language set for the disc is selected.Other : To select another language, press number buttons toenter the corresponding 4-digit number according to the lan-guage code list on page 30. If you enter the wrong languagecode, press CLEAR.Menu LanguageSelect a language for the setup menu. This is the menuyou see when you press SETUP.PictureTV Aspect 4:3 Letterbox: Select when a standard 4:3 TV is con-nected. Displays theatrical images with masking barsabove and below the picture.4:3 Panscan: Select when a standard 4:3 TV is con-nected. Displays pictures cropped to fill your TV screen.Either sides of the picture are cut off.16:9 Wide: Select when a 16:9 wide TV is connected.PBC PBC On/OffSet Playback Control (PBC) to On or OffOn: Video CDs with PBC are played back according to the PBC.Off: Video CDs with PBC are played back in the same way Audio CDs.VCD2.0DVDDVDDisc SubtitleDisc MenuRatingCountry CodeTV AspectMenu LanguagePBCDisc Audio OriginalSpanishEnglishChinesePolishHungarianRussianFrenchGermanItalianOther  – – – –Disc SubtitleDisc MenuRatingCountry CodeTV AspectMenu LanguagePBCDisc Audio EnglishChineseDisc SubtitleDisc MenuRatingCountry CodeTV AspectMenu LanguagePBCDisc Audio 4:3 Letterbox4:3 Panscan16:9 WideDisc SubtitleDisc MenuRatingCountry CodeTV AspectMenu LanguagePBCDisc Audio OriginalSpanishEnglishChinesePolishHungarianRussianFrenchGermanItalianOther  – – – –Before Operation (Cont’d)Disc SubtitleDisc MenuRatingCountry CodeTV AspectMenu LanguagePBCDisc Audio OffOn
PREPARATION19Before Operation (Cont’d)Parental ControlRating Movies on DVDs may contain scenes not suitable forchildren. Therefore, discs may contain Parental Controlinformation that applies to the complete disc or to certain scenes on the disc. These scenes are rated from1 to 8, and alternatively, more suitable scenes are avail-able for selection on some discs. Ratings are country dependent. The Parental Control feature allowsyou to prevent discs from being played by your childrenor to have certain discs played with alternative scenes.11Select “Rating” on the Setup menu using the and buttons.22While “Rating” is selected, press  .33When you have not entered a password yet;Enter a 4-digit password using the numerical buttonsto create a personal 4-digit security password, thenpress ENTER. And enter the 4-digit password againand press ENTER to verify.When you have already entered a password;Enter a 4-digit password using the numerical but-tons to confirm the personal 4-digit security pass-word, then press ENTER.If you make a mistake before pressing ENTER, pressCLEAR and enter 4-digit security password again.44Select a rating from 1 to 8 using the  / but-tons. One (1) has the least playback restrictions.Eight (8) has the most playback restrictions.Unlock: If you select Unlock, Parental Control is notactive. The disc will play in full.Ratings 1 to 8: Some discs contain scenes notsuitable for children. If you set a rating for the play-er, all disc scenes with the same rating or lower willbe played. Higher rated scenes will not be playedunless an alternative scene is available on the disc.The alternative must have the same rating or alower one. If no suitable alternative is found, play-back will stop. You must enter the 4-digit passwordor change the rating level in order to play the disc.55Press ENTER to confirm your rating selection,then press SETUP to exit the menu.Country Code Enter the code of a country/area whose standards wereused to rate the DVD video disc, referring to the list(See “Country Code List”, page 31.).11Select Country Code using the /  buttons on the setup menu.22While Country Code is selected, press  .33Follow step 3 of “Rating” on left.44Select the first character using the  / buttons.55Shift the cursor using  / buttons and selectthe second character using  / buttons.66Press ENTER to confirm your country codeselection, then press SETUP to exit the menu.NoteConfirmation of the 4-digit password is necessary whenthe code is changed (see “Changing the 4-digit code”below ).Changing the 4-digit code1Follow steps 1-2 as shown above to the left (Rating).2Enter the old code, then press ENTER.3Select Change using the  /buttons then pressENTER.4Enter the new 4-digit code, then press ENTER.5Enter exactly the same code a second time and veri-fy by pressing ENTER.6Press SETUP to exit the menu.If you forget your 4-digit codeIf you forget your password, to clear the current pass-word, follow the procedure below.1Press SETUP to display the setup menu.2Use the Number buttons to enter the 6-digit number“210499.”The 4-digit password is cleared.3Enter a new code as shown above to the left (Rating).DVDDVDDisc SubtitleDisc MenuRatingCountry CodeTV AspectMenu LanguageDisc Audio Code SetS   GPBCDisc SubtitleDisc MenuRatingCountry CodeTV AspectMenu LanguagePBCDisc Audio 87654321UnlockChange
Operation with RadioPresetting the radio stationsYou can preset 30 stations for FM and AM. Before tun-ing, make sure that you have tuned down the volume tothe minimum.11Press FUNCTION on the front panel repeatedlyor FM/AM on the remote control until the FM orAM appears in the display window.22And then every time you press FM/AM, FM andAM changes alternately.33Press and hold TUNING/SKIP  or on the front panel for about two seconds until the frequency indication starts to change, then release.Scanning stops when the DVD Receiver tunes in a station. “TUNED”and “STEREO”(for stereo program) appear in the display window.Note“Tuned”only appears when the signal is FM and stereo.44Press MEMORY.A preset number will flash in the display window.55Press TUNING/SKIP  or  on thefront panel to select the preset number youwant.66Press MEMORY again.The station is stored.77Repeat steps 3 to 6 to store other stations.To tune in a station with a weak signal Press TUNING/SKIP or repeatedly instep 3 to tune in the station manually.To clear all the memorized stations Press and hold MEMORY for about three seconds and“CLEAR ALL”appears in the display window and thenpress MEMORY again, the stations are cleared.NoteIf all stations have already been entered, FULL mes-sage will appear in the display window for a momentand then a preset number will flash. To change the pre-set number, follow the steps 5-6 as above.Listening to the radioPreset radio stations in the DVD receiver’s memory first(see “Presetting radio stations”on the left side).11Press FM/AM until AM or FM appears in the dis-play window.The last received station is tuned in.22Press PRESET  /repeatedly to select thepreset station you want.Each time you press the button, the DVD receiver tunes inone preset station at a time.33Adjust the volume by rotating VOLUME on thefront panel or by pressing VOLUME + or - on theremote control repeatedly.To turn off the radio Press POWER to turn the DVD receiver off or selectanother function mode (DVD/CD, VIDEO 1 or VIDEO 2).To listen to non-preset radio stations Use manual or automatic tuning in step 2.For manual tuning, press TUNING/SKIP  oron the front panel repeatedly.For automatic tuning, press and hold TUNING/SKIPor  for about two seconds on the frontpanel.For your referenceIf an FM program is noisyPress MONO/ST. on the front panel so that“STEREO”disappears in the display window. Therewill be no stereo effect, but the reception willimprove. Press the button again to restore the stereoeffect.To improve receptionRealign the antenna.20
OPERATION21Operation with Radio (Cont’d)Sleep Timer SettingYou can set the DVD receiver to turn off automatically ata specified time.11Press SLEEP to set the desired sleep time.The SLEEP indicator and sleep time appears in the dis-play window.22Each time you press SLEEP the setting changesin the following order.SLEEP 120 →90 →60 →50 →40 →30 →20 →10 →OFFNote You can check the time remaining before the DVDreceiver turns off.Press SLEEP. The remaining time appears in the display window.DimmerThis function will appear in the display window and vol-ume LED in power-on status.Press the DIMMER repeatedly.MutePress MUTE to mute your unit.You can mute your unit in order, for example, to answerthe telephone, “MUTE”indicator flashes in the displaywindow.Using Headphone JackConnect a stereo headphone plug ( 3.5mm) into thePHONES connector.The speakers are automatically disconnected when youplug in the headphones (not supplied).Selecting input sourceYou can use VCRs or other units connected to theVIDEO1, VIDEO2 connectors or Optical connector.Refer to the owner’s manual supplied with the unit forfurther information on the operation.Press VIDEO1 or VIDEO2 repeatedly on the remotecontrol to select the desired input source.Each time you press this button, the mode of the func-tion changes in the following sequence:VIDEO1 ANA: for selecting the analog signal from VIDEO1AUDIO IN (L/R) & VIDEO IN Connectors.VIDEO1 DIG: for selecting the digital signal from OPTICALIN Connector.VIDEO2 ANA: for selecting the analog signal from VIDEO2AUDIO IN (L/R) & VIDEO IN Connectors.VIDEO2 DIG: for selecting the digital signal from OPTICALIN Connector.NoteThe Optical input function is available only when theother unit’s Sampling Frequency is 32 ~ 48kHz.
Operation with DVD and Video CDPlaying a DVD and Video CDGetting to play Switch on the TV and select the AV input source con-nected to the DVD receiver.When you want to enjoy the sound of discs or fromthe audio system, turn on the audio system andselect the input source connected to the DVD receiver.11Press OPEN/CLOSE to open the disc tray.22Load your chosen disc in the tray, with the labelfacing up.When a double-sided DVD is inserted, make surethe side you want to play is facing up.33Press OPEN/CLOSE to close the tray.READING appears on the TV screen, and playbackstarts automatically. If playback does not start,press PLAY.In some cases, the disc menu might appearinstead.When the menu screen is displayedThe menu screen may be displayed first after loading aDVD or Video CD which contains a menu.Use the  buttons to select the title/chapter youwant to view, then press ENTER to start playback.Press TITLE or MENU to return to the menu screen.Use the number buttons to select the track you wantto view.Press RETURN to return to the menu screen.Menu setting and the exact operating procedures forusing the menu may differ depending on the disc.Follow the instructions on the each menu screen.You also may set PBC to Off under setup. See page18.Notes–If Parental Control is set and the disc is not within theRating settings (not authorized), the 4-digit code mustbe entered and/or the disc must be authorized (see“Parental Control”, on page 19).–DVDs may have a region code.–Your receiver will not play discs that have a regioncode different from your receiver. The region code forthis receiver is 3 (three).General FeaturesNoteUnless stated, all operations described are based onremote control use. Some operations can be carried outusing the setup menu.Moving to another TITLE When a disc has more than one title, you can move toanother title as follows:Press DISPLAY when playback is stopped, thenpress the appropriate numerical button (0-9) to selecta title number.Moving to another CHAPTER/TRACK When a title on a disc has more than one chapter or adisc has more than one track, you can move to anotherchapter/track as follows:Press SKIP .or >briefly during playback to select the next chapter/track or to returnto the beginning of the current chapter/track.Press .twice briefly to step back to the previouschapter/track.To go directly to any chapter during DVD playback,press DISPLAY. Then, press  / to select C (chapter) (or for a Video CD, select T for track). Then,enter the chapter/track number using the numericalbuttons (0-9).NoteFor two-digit numbers, press the buttons in rapid succession.Slow Motion 1Press SLOW SCAN + or - during playback.The player will enter SLOW mode.2Use the SLOW SCAN + or - to select the requiredspeed: t 1/16, t 1/8, t 1/4 or t 1/2 (backward),or T1/16, T1/8, T1/4 or T1/2 (forward).3To exit slow motion mode, press PLAY.NoteSlow motion playback in reverse is not applicable forVideo CD.VCD1.1VCD2.0DVD1/31/12VCD1.1DVD1/3DVDVCD2.0DVDVCD1.1VCD2.0DVD22
OPERATION23Operation with DVD and Video CD (Cont’d)General Features (cont’d)Still Picture and Frame-by-frame playback1Press PAUSE during playback.The player will now go into PAUSE mode.2You can advance the picture frame by frame by press-ing PAUSE repeatedly on the remote control.Search 1Press and hold SKIP .or >for about two sec-onds during playback.The player will now go into SEARCH mode.2Press and hold SKIP .or >repeatedly to selectthe required speed: mX2, mX4, mX16, mX100(backward) or MX2, MX4, MX16, MX100 (for-ward).With a Video CD, the Search speed changes: mX2,mX4, mX8 (backward) or MX2, MX4, MX8(forward).3To exit SEARCH mode, press PLAY.Repeat DVD Video Discs - Repeat Chapter/Title/Off1To repeat the currently playing chapter, pressREPEAT.The Repeat Chapter icon appears on the TV screen.2To repeat the title currently playing, press REPEAT asecond time.The Repeat Title icon appears on the TV screen.3To exit Repeat mode, press REPEAT a third time.The Repeat Off icon appears on the TV screen.Video CDs - Repeat Track/All/Off1To repeat the track currently playing, press REPEAT.The Repeat Track icon appears on the TV screen.2To repeat the disc currently playing, press REPEAT asecond time.The Repeat All icon appears on the TV screen.3To exit Repeat mode, press REPEAT a third time.The Repeat Off icon appears on the TV screen.NoteOn a Video CD with PBC, you must set PBC to Off on thesetup menu to use the Repeat function. See page 18.Repeat A-B To repeat a sequence in a title:1Press REPEAT A-B at your chosen starting point.A- appears briefly on the TV screen.2Press REPEAT A-B again at your chosen end point.A-B appears briefly on the TV screen, and the repeat sequencebegins (a-b repeat appears on the receiver’s display).3To cancel the sequence, press REPEAT A-B.Time Search The Time Search function allows you to start playing atany chosen time on the disc.1Press DISPLAY during playback. The on-screen dis-play appears on the screen.The Time Search box shows the elapsed playing time of thecurrent disc.2Within 10 seconds, press  / to select the TimeSearch icon in the on-screen display.The “-:--:--”appears in the Time Search box.3Within 10 seconds, use the numerical buttons to enterthe required start time. Enter hours, minutes and sec-onds from left to right in the box.If you enter the wrong numbers, press CLEAR to remove thenumbers you entered. Then enter the correct numbers.4Within 10 seconds, press ENTER to confirm the starttime.Playback starts from the selected time on the disc. If you enteran invalid time, playback will continue from the current point.-:--:--0:16:57DVDOFF A     BA      *VCD1.1VCD2.0DVDOFFALLTRACKTITLECHAPTVCD1.1VCD2.0DVDVCD1.1VCD2.0DVDVCD1.1VCD2.0DVD
24Operation with DVD and Video CD (Cont’d)General Features (cont’d)Zoom The Zoom function allows you to enlarge the videoimage and to move through the enlarged image.1Press ZOOM during playback or still playback to acti-vate the Zoom function.If you press ZOOM repeatedly, the magnification levelincreases up to six times.2Use the  buttons to move through thezoomed picture.3Press CLEAR to resume normal playback or return tothe paused image.NotesThe zoom function may not work for some DVDs.The zoom function may not work on multi-anglescenes.Marker Search You can start playback from a memorized point. Up tonine points can be memorized.To enter a mark, follow these steps.1During disc playback, press MARKER when playback reaches the spot that you want to memorize.The Marker icon will appear on the TV screen briefly.2Repeat step 1 to enter up to nine Marker points on adisc.To Recall a Marked Scene1During disc playback, press SEARCH.The MARKER SEARCH menu will appear on the screen.2Within 10 seconds, press  / to select a Markernumber that you want to recall.3Press ENTER.Playback will start from the Marked scene.4To remove the MARKER SEARCH menu, pressSEARCH.To clear a Marked Scene1During disc playback, press SEARCH.The MARKER SEARCH menu will appear on the screen.2Press  / to select the Marker number that youwant to erase.3Press CLEAR.The Marker number will be erased from the list.4Repeat steps 2 and 3 to erase additional Markernumbers.5To remove the MARKER SEARCH menu, pressSEARCH.Special DVD FeaturesChecking the contents of DVD Video discs: MenusDVDs may contain menus that allow you to access spe-cial features. To use the disc menu, press MENU. Then,press the appropriate numerical button to select anitem. Or, use the  buttons to highlight yourselection, then press ENTER.Title Menu 1Press TITLE.If the current title has a menu, the menu will appear on thescreen. Otherwise, the disc menu may appear.2The menu can list camera angles, spoken languageand subtitle options, and chapters for the title.3To remove the title menu, press TITLE again.Disc Menu 1Press MENU.The disc menu is displayed.2To remove the disc menu, press MENU again.Camera Angle If the disc contains sequences recorded from differentcamera angles, the angle icon blinks on the display. Youcan then change the camera angle if you wish.Press ANGLE repeatedly during playback to select adesired angle.The number of the current angle appears on the display.Changing the Audio Language Press AUDIO repeatedly during playback to hear a dif-ferent audio language or audio track.Subtitles Press S-TITLE repeatedly during playback to see thedifferent subtitle languages.NoteIf  appears, the feature is not available on the disc.1   ENGDVD1   ENGD   6  CHDVD1/1DVDDVDDVDDVDMARKER SEARCH1/9VCD1.1VCD2.0DVDVCD1.1VCD2.0DVD
OPERATION25Operation with Audio CD and MP3 DiscPlaying an Audio CD and MP3 discThe DVD Receiver can play MP3 format recordings onCD-ROM, CD-R or CD-RW discs.Before playing MP3 recordings, read the notes of MP3Recordings on page 27.11Insert a disc and close the tray.The menu appears on the TV screen.Audio CD menu MP3 menu22Press  /to select a track then press PLAY.Playback starts.During playback, the current track’s elapsed playingtime will appear on the display.Playback will stop at the end of the disc.33To stop playback at any other time, press STOP.Pause 1Press PAUSE during playback.2To return to playback, press PLAY or press PAUSEagain.Moving to another Track Press SKIP .or >briefly during playback to go to the next track or to return to thebeginning of the current track.Press SKIP .twice briefly to step back to the pre-vious track.In case of audio CD, to go directly to any track, enterthe track number using the numerical buttons (0-9)during playback.Repeat TRACK/ALL/OFF1To repeat the track currently playing, press REPEAT.The Repeat Track icon appears on the menu screen.2To repeat all tracks of disc in the unit, press REPEATa second time.The Repeat All icon appears on the menu screen.3To exit Repeat mode, press REPEAT a third time.The Repeat Off icon appears on the menu screen.Search 1Press and hold SKIP .or >for about two sec-onds during playback.The player will now go into SEARCH mode.2Press and hold SKIP .or >repeatedly to selectthe required speed: mX2, mX4, mX8 (backward)or MX2, MX4, MX8 (forward).3Search speed and direction are indicated on themenu screen.4To exit SEARCH mode, press PLAY.NoteThe sound is muted during SEARCH mode.Repeat A-B To repeat a sequence.1During disc playback, press REPEAT A-B at your chosen starting point.The Repeat icon and “A -”appears on the menu screen.2Press REPEAT A-B again at your chosen end point.The Repeat icon and “A B”appears on the menu screen,and the sequence begins to play repeatedly.3To exit the sequence and return to normal play, pressREPEAT A-B again.The Repeat icon and “OFF”appears on the menu screen.Changing the Audio Channel Press AUDIO repeatedly during playback to hear a dif-ferent audio channel (STEREO, LEFT or RIGHT).CDCDCDMP3CDMP3CDMP3CDProgramCDClear AllTRACK 1TRACK 2TRACK 3TRACK 4TRACK 5TRACK 6TRACK 7TRACK 80:56:35 STER.ProgramMP3Clear AllTRACK 1.MP3TRACK 2.MP3TRACK 3.MP3TRACK 4.MP3TRACK 5.MP3TRACK 6.MP3TRACK 7.MP3TRACK 8.MP300:00 1 OFF
Programmed Playback VCD1.1VCD2.0MP3CDProgrammed Playback with Audio CDand MP3 DiscProgram allows you to store your favorite tracks for aparticular disc in the receiver memory.Program can contain 32 tracks (Audio CD) or 60 tracks(MP3 disc).11Insert the disc and close the tray.The menu is displayed on the TV screen.22Press PROGRAM during playback or in the stopmode to enter the Program Edit mode.The  mark will appear to the right of the word Programon the right side of the menu screen.NotePress PROGRAM to exit the Program Edit mode;the  mark will disappear.33Press  / to select a track then press ENTERto place the selected track on the Program list.44Repeat step 3 to place additional tracks on theProgram list.Audio CD menu MP3 menu55Press .The programmed track you selected last is highlighted onthe program list.66Press  / to select the track you want to startplaying.Press TITLE to move to the next page.Press MENU to move to the previous page.77Press PLAY to start.Playback begins in the order in which you programmedthe tracks and “PROGRAM”appears on the menu screen.Playback stops after all of the tracks on the Program listhave played once.Programmed Playback with Video CDNoteOn a Video CD with PBC, you must set PBC to Off on thesetup menu to use the Program function. See page 18.11Insert Video CD and close the tray.22Press PROGRAM while playback is stopped.The VCD Program menu will appear.NotePress RETURN or PROGRAM to exit the Program menu.33Follow steps 3-7 of “Programmed Playback withAudio CD and MP3 Disc” on left.Repeat Programmed Tracks To repeat the track currently playing, press REPEAT.The Repeat Track icon appears on the menu screen.To repeat all tracks of program list, press REPEAT asecond time.The Repeat All icon appears on the menu screen.To exit Repeat mode, press REPEAT a third time.The Repeat Off icon appears on the menu screen.Erasing a Track from Program List1Press PROGRAM during playback or in the stopmode to enter the Program Edit mode.The  mark will appear.2Press  to move to the Program list.3Use  /to select the track that you wish to erasefrom the Program list.4Press CLEAR.The track will be erased from the Program list.Erasing the Complete Program List1Follow steps 1-2 of “Erasing a Track from ProgramList”as above.2Use  /to select “Clear All”, then press ENTER.The complete Program for the disc will be erased.The programs are also cleared when the disc is removed.To resume normal playback from programmedplaybackPress and hold PROGRAM for 3 seconds until “PROGRAM”indicator disappears in the display window.EEEProgramCDClear AllTRACK 1TRACK 2TRACK 3TRACK 4TRACK 12TRACK 8TRACK 10TRACK 3TRACK 5TRACK 6TRACK 7TRACK 8STER.E0:56:35ProgramMP3Clear AllTRACK 1.MP3TRACK 2.MP3TRACK 3.MP3TRACK 4.MP3TRACK 8.MP3TRACK 2.MP3TRACK 4.MP3TRACK 3.MP3TRACK 5.MP3TRACK 6.MP3TRACK 7.MP3TRACK 8.MP300:00 1 OFFEVCDClear AllTRACK 1TRACK 2TRACK 3TRACK 4TRACK 5TRACK 6TRACK 7TRACK 8ProgramE26
OPERATION27Last Condition MemoryThis DVD receiver memorizes the last condition for thelast disc you have watched. Settings remain in memoryeven if you remove the disc from the DVD-receiver orswitch off the player. If you load a disc that has its set-tings memorized, the latest stop position is automatical-ly recalled.Notes–Settings are stored in memory for use any time.–This player does not memorize settings of a disc ifyou switch off the player before commencing to playit.Screen Saver The screen saver picture appears when you leave theDVD Receiver in stop mode for about five minutes.Video Mode Setting With certain discs, the playback picture may be flick-ering or Dot Crawl is shown on straight lines. Thatmeans Vertical interpolation or De-interlace is not perfectly matched with the disc. In that case, the picture quality can be improved with changing videomode.To change the video mode, press and hold DISPLAYfor 3 seconds during playback of a disc. Changedvideo mode number is displayed on the TV screen.Check whether video quality is improved. You canrepeat above procedure until desired picture qualityappears.Procedure of video mode is changed;MODE1 → MODE2 →MODE3 →MODE4 → MODE5 → MODE1If you turn off the the power, the video mode will beback to initial state (MODE1).Notes on MP3 DiscsAbout MP3An MP3 file is audio data compressed by using MPEG1,the audio layer-3 file-coding scheme. We call files thathave the “.mp3”file extension “MP3 files”.The DVD receiver can not read an MP3 file that hasa file extension other than “.mp3”.The DVD receiver player can not read a fake MP3 filethat has a file extension “.mp3”.MP3 disc compatible with this player is limitedas follows:1. Sampling Frequency / only at 44.1kHz2. Bit rate / within 96 - 192kbps3. CD-R physical format should be “ISO 9660”4. If you record MP3 files using the software whichcannot create a FILE SYSTEM, for example “Direct-CD”etc., it is impossible to playback MP3 files. Wetherefore recommend that you use “Easy-CDCreator”, which creates an ISO9660 file system.5. A single session disc requires MP3 files in the firsttrack. If there is no MP3 file in the 1st track, it cannotplayback MP3 files. If you wish to playback MP3files, format all the data in the disc or use a newone.6. We do not recommend using CD-RW discs. Pleaseuse finished CD-R discs only.7. File names should be named using 8 letters or lessand must incorporate “.mp3”extension e.g. “********.MP3”.8. Do not use special letters such as “_?!><+*}{`[@]:;\/.,”etc.9. Total number of files on the disc should be less than200.10. Use 74 minute CD-R discs (650M), Do not use 80minute CD-R (700M) softwareThis DVD receiver requires discs/recordings to meet certain technical standards in order to achieve optimalplayback quality. Pre-recorded DVDs are automaticallyset to these standards. There are many different typesof recordable disc formats (including CD-R containingMP3 files).Customers should also note that permission is requiredin order to download MP3 files and music from theInternet. Our company has no right to grant such per-mission. Permission should always be sought from thecopyright owner.VCD1.1VCD2.0DVDDVDVCD1.1CDDVDAdditional Information
Troubleshooting28Check the following guide for the possible cause of a problem before contacting service.SymptomNo power.The power is on, butthe DVD receiver doesnot work.No picture.There is no sound oronly a very low-levelsound is heard.The playback picture is  poor.The DVD receiver doesnot start playback.Severe hum or noise isheard.Cause•The power cord is disconnected.•No disc is inserted.•The TV is not set to receive DVD signaloutput.•The video cable is not connectedsecurely.•The connected TV power is turned off.•The equipment connected with theaudio cable is not set to receive DVDsignal output.•The audio cables are not connectedsecurely.•The power of the equipment connectedwith the audio cable is turned off.•The audio connecting cord is damaged.•The disc is dirty.•No disc is inserted.•An unplayable disc is inserted.•The disc is placed upside down.•The disc is not placed within the guide.•The disc is dirty.•A menu is on the TV screen.•The Rating level is set.•The plugs and jacks are dirty.•The disc is dirty.•The speakers and components are connected poorly.•The DVD receiver is located too close tothe TV.Correction•Plug the power cord into the wall outletsecurely.•Insert a disc. (Check that the DVD or,audio CD indicator in the DVD display islit.) •Select the appropriate video input modeon the TV so the picture from the DVDreceiver appears on the TV screen.•Connect the video cable into the jackssecurely.•Turn on the TV.•Select the correct input mode of theaudio receiver so you can listen to thesound from the DVD receiver.•Connect the audio cable into the jackssecurely.•Turn on the equipment connected withthe audio cable.•Replace it with new one.•Clean the disc.•Insert a disc. (Check that the DVD, oraudio CD indicator in the DVD display islit.)•Insert a playable disc. (Check the disctype, color system and Regional code.)•Place the disc with the playback sidedown.•Place the disc on the disc tray correctlyinside the guide.•Clean the disc.•Press the SET-UP button to turn off themenu screen.•Cancel the Rating function or changethe rating level.•Wipe them with a cloth slightly mois-tened with alcohol.•Clean the disc.•Connect the speakers and componentssecurely.•Move your TV away from the audio com-ponents.
REFERENCE29Troubleshooting (Cont’d)SymptomRecording is not possi-bleRadio stations cannotbe tuned in.The remote controldoes not work properly.Cause•The components are connected incorrectly.•The source is selected in correctly.•The antenna is positioned or  connectedpoorly.•The signal strength of the stations is tooweak (when tuning in with automatictuning).•No stations have been preset or presetstations have been cleared (when tuning by scanning preset stations).•The remote control is not pointed at theremote sensor of the DVD receiver.•The remote control is too far from theDVD receiver.•There is an obstacle in the path of theremote control and the DVD receiver.•The batteries in the remote control areexhausted.Correction•Connect the components correctly.•Select the source with FUNCTION but-ton (CD/DVD, VIDEO 1, VIDEO 2 orTuner).•Connect the antenna securely.•Adjust the antennas and connect anexternal antenna if necessary.•Tune in the station manually.•Preset the stations (page 20).•Point the remote control at the remotesensor of the DVD receiver.•Operate the remote control within about23 ft (7 m).•Remove the obstacle.•Replace the batteries with new ones.
Language Code List30Code Language 6565 Afar6566 Abkhazian6570 Afrikaans6577 Ameharic6582 Arabic6583 Assamese6588 Aymara6590 Azerbaijani6665 Bashkir6669 Byelorussian6671 Bulgarian6672 Bihari6678 Bengali; Bangla6679 Tibetan6682 Breton6765 Catalan6779 Corsican6783 Czech6789 Welsh6865 Danish6869 German6890 Bhutani6976 Greek6978 English6979 Esperanto6983 Spanish6984 Estonian6985 Basque7065 Persian7073 Finnish7074 FijianCode Language 7079 Faroese7082 French7089 Frisian7165 Irish7168 Scots Gaelic7176 Galician7178 Guarani7185 Gujarati7265 Hausa7273 Hindi7282 Croatian7285 Hungarian7289 Armenian7365 Interlingua7378 Indonesian7383 Icelandic7384 Italian7387 Hebrew7465 Japanese7473 Yiddish7487 Javanese7565 Georgian7575 Kazakh7576 Greenlandic7577 Cambodian7578 Kannada7579 Korean7583 Kashmiri7585 Kurdish7589 Kirghiz7665 LatinCode Language 7678 Lingala7679 Laothian7684 Lithuanian7686 Latvian, Lettish7771 Malagasy7773 Maori7775 Macedonian7776 Malayalam7778 Mongolian7779 Moldavian7782 Marathi7783 Malay7784 Maltese7789 Burmese7865 Nauru7869 Nepali7876 Dutch7879 Norwegian7982 Oriya8065 Panjabi8076 Polish8083 Pashto, Pushto8084 Portuguese8185 Quechua8277 Rhaeto-Romance8279 Rumanian8285 Russian8365 Sanskrit8368 Sindhi8372 Serbo-Croatian8373 SinghaleseCode Language 8375 Slovak8376 Slovenian8377 Samoan8378 Shona8379 Somali8381 Albanian8382 Serbian8385 Sudanese8386 Swedish8387 Swahili8465 Tamil8469 Telugu8471 Tajik8472 Thai8473 Tigrinya8475 Turkmen8476 Tagalog8479 Tonga8482 Turkish8484 Tatar8487 Twi8575 Ukrainian8582 Urdu8590 Uzbek8673 Vietnamese8679 Volapük8779 Wolof8872 Xhosa8979 Yoruba9072 Chinese9085 ZuluEnter the appropriate code number for the initial settings “Disc Audio”, “Disc Subtitle”and/or “Disc Menu”(See page 18).
REFERENCE31Code CountryAD AndorraAE United Arab EmiratesAF AfghanistanAG Antigua and BarbudaAI AnguillaAL AlbaniaAM ArmeniaAN Netherlands AntillesAO AngolaAQ AntarcticaAR ArgentinaAS American SamoaAT AustriaAU AustraliaAW ArubaAZ AzerbaidjanBA Bosnia-HerzegovinaBB BarbadosBD BangladeshBE BelgiumBF Burkina FasoBG BulgariaBH BahrainBI BurundiBJ BeninBM BermudaBN Brunei DarussalamBO BoliviaBR BrazilBS BahamasBT BhutanBV Bouvet IslandBW BotswanaBY BelarusBZ BelizeCA CanadaCC Cocos (Keeling) IslandsCF Central African RepublicCG CongoCH SwitzerlandCI Ivory CoastCK Cook IslandsCL ChileCM CameroonCN ChinaCO ColombiaCR Costa RicaCS Former CzechoslovakiaCU CubaCV Cape VerdeCX Christmas IslandCY CyprusCZ Czech RepublicDE GermanyDJ DjiboutiDK DenmarkDM DominicaDO Dominican RepublicDZ AlgeriaEC EcuadorEE EstoniaEG EgyptEH Western SaharaCode CountryER EritreaES SpainET EthiopiaFI FinlandFJ FijiFK Falkland IslandsFM MicronesiaFO Faroe IslandsFR FranceFX France (European Territory)GA GabonGB Great BritainGD GrenadaGE GeorgiaGF French GuyanaGH GhanaGI GibraltarGL GreenlandGM GambiaGN GuineaGP Guadeloupe (French)GQ Equatorial GuineaGR GreeceGS S. Georgia & S. SandwichIsls.GT GuatemalaGU Guam (USA)GW Guinea BissauGY GuyanaHK Hong KongHM Heard and McDonaldIslandsHN HondurasHR CroatiaHT HaitiHU HungaryID IndonesiaIE IrelandIL IsraelIN IndiaIO British Indian OceanTerritoryIQ IraqIR IranIS IcelandIT ItalyJM JamaicaJO JordanJP JapanKE KenyaKG KyrgyzstanKH Cambodia6KI KiribatiKM ComorosKNSaint Kitts & Nevis AnguillaKP North KoreaKR South KoreaKW KuwaitKY Cayman IslandsKZ KazakhstanLA LaosLB LebanonCode CountryLC Saint LuciaLI LiechtensteinLK Sri LankaLR LiberiaLS LesothoLT LithuaniaLU LuxembourgLV LatviaLY LibyaMA MoroccoMC MonacoMD MoldaviaMG MadagascarMH Marshall IslandsMK MacedoniaML MaliMM MyanmarMN MongoliaMO MacauMP Northern Mariana IslandsMQ Martinique (French)MR MauritaniaMS MontserratMT MaltaMU MauritiusMV MaldivesMW MalawiMX MexicoMY MalaysiaMZ MozambiqueNA NamibiaNC New Caledonia (French)NE NigerNF Norfolk IslandNG NigeriaNI NicaraguaNL NetherlandsNO NorwayNP NepalNR NauruNU NiueNZ New ZealandOM OmanPA PanamaPE PeruPF Polynesia (French)PG Papua New GuineaPH PhilippinesPK PakistanPL PolandPM Saint Pierre and MiquelonPN Pitcairn IslandPR Puerto RicoPT PortugalPW PalauPY ParaguayQA QatarRE Reunion (French)RO RomaniaRU Russian FederationRW RwandaSA Saudi ArabiaSB Solomon IslandsCode CountrySC SeychellesSD SudanSE SwedenSG SingaporeSH Saint HelenaSI SloveniaSJ Svalbard and Jan MayenIslandsSK Slovak RepublicSL Sierra LeoneSM San MarinoSN SenegalSO SomaliaSR SurinameST Saint Tome and PrincipeSU Former USSRSV El SalvadorSY SyriaSZ SwazilandTC Turks and Caicos IslandsTD ChadTF French SouthernTerritoriesTG TogoTH ThailandTJ TadjikistanTK TokelauTM TurkmenistanTN TunisiaTO TongaTP East TimorTR TurkeyTT Trinidad and TobagoTV TuvaluTW TaiwanTZ TanzaniaUA UkraineUG UgandaUK United KingdomUM USA Minor OutlyingIslandsUS United StatesUY UruguayUZ UzbekistanVA Vatican City StateVC Saint Vincent &GrenadinesVE VenezuelaVG Virgin Islands (British)VI Virgin Islands (USA)VN VietnamVU VanuatuWF Wallis and Futuna IslandsWS SamoaYE YemenYT MayotteYU YugoslaviaZA South AfricaZM ZambiaZR ZaireZW ZimbabweEnter the appropriate code number for the initial setting “Country Code”(See page 19).Country Code List
Specification[General][CD/DVD][Video][Tuner]AM FM(MW)[Amplifier][Speakers]Power supply AC 100-240V, 50/60HzPower consumption 80 WMass 4.6 kgExternal dimensions (W x H x D)360 x 72 x 350 mmOperating conditions Temperature: 5°C to 35°C, Operation status: HorizontalOperating humidity 5% to 85%Laser Semiconductor laser, wavelength 650 nmSignal system PAL 625/50, NTSC 525/60Frequency response (audio) 4 Hz to 20 kHzSignal-to-noise ratio (audio) More than 75 dB (1 kHz, NOP, 20 kHz LPF/A-Filter)Dynamic range (audio) More than 70 dBHarmonic distortion (audio)  0.5 % (1 kHz, at 12W position) (20 kHz LPF/A-Filter)Video input 1.0 V (p-p), 75 Ω, negative sync., RCA jackVideo output 1.0 V (p-p), 75 Ω, negative sync., RCA jackS-video output (Y) 1.0 V (p-p), 75 Ω, negative sync., Mini DIN 4-pin x 1(C) 0.3 V (p-p), 75 ΩComponent video output (Y) 1.0 V (p-p), 75 Ω, negative sync., RCA jack x 1(Pb)/(Pr) 0.7 V (p-p), 75 ΩTuning Range 87.5 - 108 MHzIntermediate Frequency 10.7 MHzSignal-to Noise Ratio 60 dBFrequency Response 150 - 10,000 HzTuning Range 522 - 1611 kHz or 530 - 1610 kHzIntermediate Frequency 450 kHzStereo mode 50W + 50W (8 Ωat 1 kHz, THD 10 %)Surround mode Front: 50W + 50W (THD 10 %)Center*: 50W Surround*: 50W + 50W (8Ωat 1 kHz, THD 10 %)Subwoofer*: 80W (4Ωat 30 Hz, THD 10 %)Inputs VIDEO 1, VIDEO 2, OPTICAL AUDIOOutputs VIDEO 1 (AUDIO OUT) : 2 VWOOFER: 2 VPHONES: (32 Ω, 0.9W)Transmission Output : 2.4GHz, Power Supply : DC  7VReception Output : 2.4GHzTypeFrequency ResponseSound Pressure LevelRated Input PowerMax. Input PowerNet Dimensions (W x H x D)Net Weight❋ Designs and specifications are subject to change without notice.(*Depending on the sound modesettings and the source, there may be no sound output.)P/N : 3828R-D029UTransmitter (ACC-W6100) TXRXFront SpeakerFE-6100TE2 Way 3 Speaker110 - 40000 Hz83 dB/W (1m)50W100W270x1150x270 mm4.78 kgCenter SpeakerFE-6100CVE2 Way 3 Speaker110 - 40000 Hz83 dB/W (1m)50W100W329x117x90 mm0.92 kgSubwooferFE-6100WE1 Way 1 Speaker40 - 15000 Hz82 dB/W (1m)100W200W350x326x350 mm7.2 kgWireless SpeakerFA-W6100SR/SL2 Way 3 Speaker110 - 40000 Hz83 dB/W (1m)50W100W270x1150x270 mm5.1 kg

Navigation menu