LG Electronics USA AX830 Cellular/PCS CDMA Phone with Bluetooth User Manual 4 LG AX830
LG Electronics USA Cellular/PCS CDMA Phone with Bluetooth 4 LG AX830
UserManual.wiki
>
LG Electronics USA
>
AX830 User Manual
Users Manual
Navigation menu
Upload a User Manual
Namespaces
Wiki Guide
HTML
PDF
Info
Views
User Manual
Discussion / Help
Navigation
![8For Your SafetyImportant InformationThis user guide contains important information on the use andoperation of this phone. Please read all the informationcarefully for optimal performance and to prevent any damageto or misuse of the phone. Any changes or modifications notexpressly approved in this user guide could void your warrantyfor this equipment.Before You StartSafety InstructionsWARNING! To reduce the possibility of electric shock, do notexpose your phone to high humidity areas, such as thebathroom, swimming pool, etc.Always store your phone away from heat. Never store yourphone in settings that may expose it to temperatures less than32°F or greater than 104°F, such as outside during extremeweather conditions or in your car on a hot day. Exposure toexcessive cold or heat will result in malfunction, damageand/or catastrophic failure.Be careful when using your phone near other electronicdevices. RF emissions from your mobile phone may affectnearby in adequately shielded electronic equipment. Youshould consult with manufacturers of any personal medicaldevices such as pacemakers and hearing aides to determine ifthey are susceptible to interference from your mobile phone.Turn off your phone in a medical facility or at a gas station.Never place your phone in a microwave oven as this willcause the battery to explode.IMPORTANT! Please read the TIA SAFETY INFORMATION onpage 78 before using your phone.Safety InformationRead these simple guidelines. Breaking the rules may bedangerous or illegal. Further detailed information is given in thisuser guide.]Never use an unapproved battery since this could damagethe phone and/or battery and could cause the battery toexplode.]Never place your phone in a microwave oven as it willcause the battery to explode.]Do not dispose of your battery by fire or with hazardous orflammable materials.]Make sure that no sharp-edged items come into contactwith the battery. There is a risk of this causing a fire.]Store the battery in a place out of reach of children.]Be careful that children do not swallow any parts such asrubber plugs (earphone, connection parts of the phone,etc.). This could cause asphyxiation or suffocation.](https://usermanual.wiki/LG-Electronics-USA/AX830/User-Guide-882403-Page-4.png)
![9For Your Safety]Unplug the power cord and charger during lightning stormsto avoid electric shock or fire.]When riding in a car, do not leave your phone or set up thehands-free kit near to the air bag. If wireless equipment isimproperly installed and the air bag is activated, you may beseriously injured.]Do not use a hand-held phone while driving.]Do not use the phone in areas where its use is prohibited.(For example: aircraft).]Do not expose the battery charger or adapter to directsunlight or use it in places with high humidity, such as abathroom.]Never store your phone in temperatures less than- 4°F orgreater than 122°F.]Do not use harsh chemicals (such as alcohol, benzene,thinners, etc.) or detergents to clean your phone. There is arisk of this causing a fire.]Do not drop, strike, or shake your phone severely. Suchactions may harm the internal circuit boards of the phone.]Do not use your phone in high explosive areas as the phonemay generate sparks.]Do not damage the power cord by bending, twisting, pulling,or heating. Do not use the plug if it is loose as it may causea fire or electric shock.]Do not place any heavy items on the power cord. Do notallow the power cord to be crimped as it may cause fire orelectric shock.]Do not handle the phone with wet hands while it is beingcharged. It may cause an electric shock or seriouslydamage your phone.]Do not disassemble the phone.]Do not place or answer calls while charging the phone as itmay short-circuit the phone and/or cause electric shock orfire.]Only use the batteries, antennas, and chargers provided byLG. The warranty will not be applied to products provided byother suppliers.]Only authorized personnel should service the phone and itsaccessories. Faulty installation or service may result inaccidents and consequently invalidate the warranty.]Do not hold or let the antenna come in contact with yourbody during a call.]An emergency call can be made only within a service area.For an emergency call, make sure that you are within aservice area and that the phone is turned on.](https://usermanual.wiki/LG-Electronics-USA/AX830/User-Guide-882403-Page-5.png)
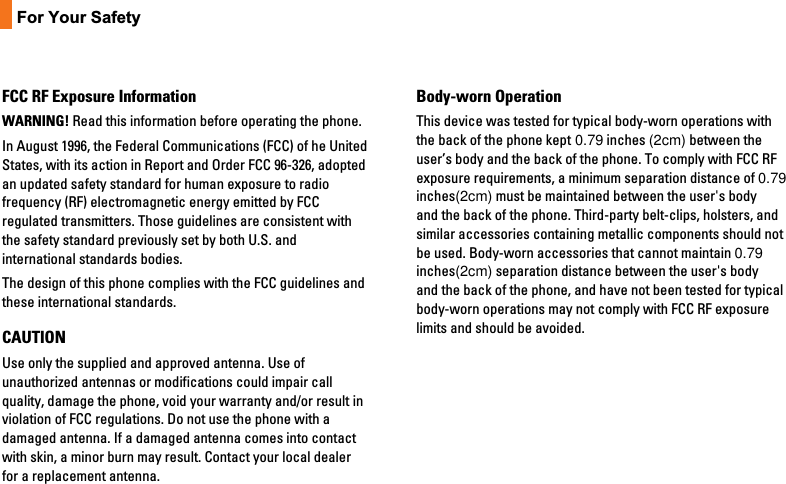
![11For Your SafetyVehicle Mounted External Antenna(optional, if available)A minimum separation distance of 8 inches (20cm) must bemaintained between the user/bystander and the vehiclemounted external antenna to satisfy FCC RF exposurerequirements. For more information about RF exposure, visitthe FCC website at www.fcc.govFCC Part 15 Class B ComplianceThis device and its accessories comply with part 15 of FCCrules. Operation is subject to the following two conditions: (1) This device and its accessories may not cause harmfulinterference, and (2) this device and its accessories mustaccept any interference received, including interference thatmay cause undesired operation.Cautions for Battery]Do not disassemble.]Do not short-circuit.]Do not expose to high temperature: 60°C (140°F).]]Do not incinerate.Battery Disposal]Please dispose of your battery properly or bring to yourlocal wireless carrier for recycling.]Do not dispose in fire or with hazardous or flammablematerials.Adapter (Charger) Cautions]Using the wrong battery charger could damage your phoneand void your warranty.]The adapter or battery charger is intended for indoor useonly.Do not expose the adapter or battery charger to direct sunlightor use it in places with high humidity, such as the bathroom.](https://usermanual.wiki/LG-Electronics-USA/AX830/User-Guide-882403-Page-7.png)
![- 14 - Entering Characters Using the Keypad(T9) To enter a letter, punctuation or number when creating Phone Book or Scheduler entries, press the corresponding key until the desired character appears. By default, the first letter of a word is capitalized and following letters are lowercase. Characters in the following order: 1 . ? , ‘ & - @ ( ) / ~ P Q R S 7 p q r s A B C 2 a b c 2 T U V 8 t u v 8 D E F 3 d e f 3 W X Y Z 9 w x y z 9 G H I 4 g h i 4 Next 0 J K L 5 j k l 5 Shift M N O 6 m n o 6 Space After a character is entered, the cursor automatically advances to the next space after two seconds. You can also advance the cursor by pressing or entering a character not on the same key. If you make a mistake, press to move the cursor left or [CLR] to erase a character. To clear the entire entry, press and hold [CLR] for two seconds. 1 7PQRS 9WXYZ 8TUV 6MNO 5J4G3DEF ABC 1 * 0Space](https://usermanual.wiki/LG-Electronics-USA/AX830/User-Guide-882403-Page-11.png)
![- 17 - Using the AC Adapter To charge the battery, plug the AC Adapter into a standard wall outlet and connect it to the phone via the I/O Connector on the bottom of the phone. Alternatively, you can place the phone in the charging cradle provided with your phone and connect the AC Adapter to the back of the cradle. The battery Charge Status icon flashes during charging. When the battery is fully charged, the battery icon stops flashing. Using Your Phone Placing a Call When the phone is turned on, check the Signal Strength icon to see of you are in a Service Area or authorized PCS CDMA provider’s service area. 1. Open the Flip. 2. Enter the phone number and press [SEND]. ☞Tip! When dialing long distance, it is not necessary to dial a “1” before the area code. 1. When you are finished with your call and press [END]. If the phone is in Active Flip Mode, closing the Flip will also end the call. Roaming With Your Phone Your Phone is you can use it to make and receive calls in many places. Setting Your Phone’s Mode Your Phone allows you to control your ability to roam. (See “Set Mode”)](https://usermanual.wiki/LG-Electronics-USA/AX830/User-Guide-882403-Page-14.png)
![- 18 - Calling Experience When you use your phone on other PCS CDMA networks, your calling experience and call quality will be quite similar to what you experience when making calls within the Network. Although certain calling features may not be available, your phone calls are still private and secure. Correcting Dialing Mistakes To delete one digit at a time, press . To delete all digits, press and hole . Redialing Last Outgoing Number Press and hold [SEND] for 2 seconds. Dialing Options (phone book – Not Functioning) When you enter numbers in the Main Menu, dialing options are displayed. To display a Phone Book entry, enter its entry number. To use the 4- Digit Dial option, enter the last four digits of a phone number in your Phone Book. To select an option, highlight it and press [SEND] .(Menu display only, phone book – Not Functioning) z Call – Dials the phone number. z Roam Confirm – Reminds you that you are making a call on an. (See “Disabling Roam Confirm” ) z Roam Call – Dials the phone number using the current PCS CDMA or analog cellular network. z Save – Saves the phone number in your Phone Book. (See “Saving a Phone Number” on the following page.) z Find – Displays phone numbers in your Phone Book that contain the entered numbers. (See “Finding a Phone Number” ) z Hard Pause – Inserts a Hard Pause. (See “Dialing and Saving Phone Numbers With Pauses” )](https://usermanual.wiki/LG-Electronics-USA/AX830/User-Guide-882403-Page-15.png)
![- 19 - z 2- Second pause – Inserts a two-second pause. (See “ Dialing and Saving Phone Numbers With Pauses” ) z Exit – Returns to the Main Menu. z A Phone Book Entry – Displays the Phone Book entry. To dial the entry’s speed-dealing number, press and hold [SEND]. To dial an alternate number, highlight it and press and hold [SEND]. ☞Tip! To speed dial a Phone Book entry from the Main Menu, press and hold the entry’s number. If the entry number is two digits, enter the first digit, then press and hole the second digit. (This feature will not work when the Roam Confirm option is enabled.) z 4-Digit Dial – Dials the phone number in your Phone Book that ends with the four digits you enter. (See “4-digit Dialing” ) In Call Options During a call, your phone displays menu options in addition to the Main Menu. To select an option, Highlight it and press [OK].( functions ‘Send’ and ‘End’ only) z End Call - Ends the call z Send Tones - Sends the next set of numbers after a Hard Pause. (See “Dialing and Saving Phone Numbers With Pauses “ on the previous page.) z Mute or Unmute – Select Mute to mute your phone’s microphone. Select Unmute to reactivate the microphone. z Dial 3-Way Call – Lets you dial another phone number. z Flash – Answers an incoming Call Waiting call or connects the third party for Three-Way Calling.](https://usermanual.wiki/LG-Electronics-USA/AX830/User-Guide-882403-Page-16.png)
![- 20 - Incoming Call Notification Depending on your settings, your phone notifies you of incoming calls in the following ways: z The phone rings or vibrates z The LED flashes green z The backlight illuminates z The screen displays an incoming call message z The phone number of the caller is displayed of the phone number is available z The caller’s name is displayed if the phone number is in your Phone Book The following options are also displayed. To select an option, highlight it and press [SEND]. z Answer – answers the call. z Silent Ringer – Mutes the ringer. Note: You can also mute the ringer by pressing the up or down Volume Control key or [CLR]. Answering Calls To answer incoming calls, open the Flip (in Active Flip Mode) or press [SEND]. Note: If you open the Flip (in Active Flip Mode) and then press [SEND], you will hang up on the caller. To answer incoming roam calls, highlight Answer and press [SEND].](https://usermanual.wiki/LG-Electronics-USA/AX830/User-Guide-882403-Page-17.png)
![- 22 - Getting the Most From Service <SMS-Pic1> Retrieving Page/Text Messages To retrieve page/text messages: 1. From the Text Messages 2. Highlight Inbox and press [OK]. Highlight the message you want to display and press [OK]. To select an option, highlight it and press [OK]. Text Message options: z Forward z Save Contact z Reply](https://usermanual.wiki/LG-Electronics-USA/AX830/User-Guide-882403-Page-19.png)
![- 23 - z Delete z Lock/Unlock z Move To z Delete Read Msgs z Delete Multiple Erasing All Page/Text Messages 1. From the Messages Menu, Press the Options Menu 2. Highlight Delete All and press [OK]. 3. Highlight Yes and press [OK]. Page/Text Message Storage Your AX830 can store up to 100 page/text messages. When the message memory is 100% full, a warning message prompts you to erase messages to obtain more memory space. Roaming on to Other Service Providers Roaming occurs when you are in an area serviced by another authorized service provider. When this situation occurs, the R icon and Digital Roam of Analog Roam are displayed. If there is no service available, the ☎ icon is displayed. (Call History- not functioning)](https://usermanual.wiki/LG-Electronics-USA/AX830/User-Guide-882403-Page-20.png)
![- 24 - Page/Text Messages For information on page/text messages, see “Retrieving Page/Text Messages” . Sounds Adjusting the Volume 1. From the Main Menu, highlight Sounds and press [OK]. 2. Highlight Volume and press [OK]. 3. Highlight Ringer or Key Beep and press [OK]. ☞Tip! You can use the Volume Control keys to adjust the Ring Volume in the Main Menu or the Voice Volume during a call. 4. Highlight High, Medium, Low, Off or Vibrate (for Ringer only) and press [OK]. Note: When the phone is in Vibrate Mode and attached to and accessory (Desktop Charger, Hands-Free Car Kit, etc.), it uses the Standard Ring Type to alert you of incoming calls, alarms or messages. Selecting Ring Types for Voice Calls To Select a Ring Type for Voice Calls: 1. From the Main Menu, highlight Sounds and press [OK]. 2. Highlight Ring Type and press [OK]. 3. Highlight Voice Calls and press [OK]. 4. Highlight With Caller ID, No Caller ID or Roaming and press [OK]. Note: If you select Roaming, the Ring Type is used for all incoming roaming calls.](https://usermanual.wiki/LG-Electronics-USA/AX830/User-Guide-882403-Page-21.png)
![- 25 - 5. Highlight a Ring Type and press [OK]. You will hear a preview of the Ring Type when you highlight it. ☞Tip! You can also assign different Ring Types to individual Phone Book entries. (See “Selecting an ID Finger” on page 46.) Selecting Ring Types for Messages To select a Ring Type for Messages: 1. From the Main Menu, highlight Sounds and press [OK]. 2. Highlight Ring Type and press [OK]. 3. Highlight Messages and press [OK]. 4. Highlight Voicemail, Page/Text of MiniBrowser and press [OK]. 5. Highlight a Ring Type and press [OK]. You will hear a preview of the Ring Type when you highlight it. Tone Length Longer tone lengths may be better for tone recognition when dialing voicemail or other automated systems. To select a tone length: 1. From the Main Menu, highlight Sounds and press [OK]. 2. Highlight Tone Length and press [OK]. 3. Highlight Short of Long and press [OK].](https://usermanual.wiki/LG-Electronics-USA/AX830/User-Guide-882403-Page-22.png)
![- 26 - Alert Notification To enable of disable alert sounds: 1. From the Main Menu, highlight Sounds and press [OK]. 2. Highlight Alerts and press [OK]. 3. Select an alert by highlighting it and pressing [OK]. z Services – An alert sounds when you exit or enter PCS CDMA or cellular coverage. z Messages – An alert sounds when you receive a voicemail or page/text message. z Minute Minder – Your phone beeps once a minute when you are on a call. (The beep is not audible to the other party.) 4. Highlight ON or Off and press [OK]. Display For information on changing Backlight, Greeting or Contrast settings, see Handy Tips. Display Menu Security Accessing the Security Menu You must enter your lock code to view the Security menu. If you forget your lock code, try using the last four digits of your Social Security number, the last four digits of your Phone Number or 0000. Security Menu](https://usermanual.wiki/LG-Electronics-USA/AX830/User-Guide-882403-Page-23.png)
![- 27 - To access the Security menu: 1. From the Main Menu, select SETTING & TOOLS and press 4 – 2 (System – Security). 2. Enter your lock code. Locking Your Phone When your phone is locked, you can only make calls to 911, Customer Care and Special Numbers or receive incoming calls. To lock your phone: 1. From the Security menu, highlight Lock Phone and press [OK]. 2. Highlight Lock Now or On Power up and press [OK]. If you select On Power Up, the phone will be locked each time it power up. Unlocking Your Phone 1. Highlight Unlock and press [OK]. 2. Enter your lock code. Changing the Lock Code To change your lock code: 1. From the Security menu, highlight Change Lock and press [OK]. 2. Enter your new lock code. 3. Reenter your new lock code.](https://usermanual.wiki/LG-Electronics-USA/AX830/User-Guide-882403-Page-24.png)
![- 28 - Answering Your Phone with the Hands-Free Car Kit You can select different answering options when your phone is connected to the Hands-Free Car Kit. To answer calls automatically or by pressing any key: 1. From the Main Menu, highlight Setup and press [OK]. 2. Highlight Car Use and press [OK]. To select and option, highlight it and press [OK]. z Any Key Answer - You can answer calls by pressing any key (not including the [CLR] key, Mouse Key or Volume Control keys). z Auto Answer - Your phone answers incoming calls automatically after five seconds. 3. Highlight On and press [OK]. To disable an option, follow steps 1 and 2 and select Off.](https://usermanual.wiki/LG-Electronics-USA/AX830/User-Guide-882403-Page-25.png)
![페이지 11: [1] 삭제됨 김미영 2000-12-20 PM 12:03:00 Welcome to Sprint PCS Sprint PCS built the only 100% digital, 100% PCS nationwide network from the ground up for a new level of clarity. We built our network to give you what you really want from a wireless phone: clear sound, private conversations and time-saving features. Sprint Personal Communication Servicessm also has the potential to do something even more far-reaching — simplify your life. Our advanced technology is designed to grow with your communications needs, so that one day you can rely entirely on your phone to stay connected. This guide introduces you to our technology and new phone through easy-to-follow instructions. For additional help, stop by any Sprint PCS Center or call Sprint PCS Customer Care from your phone by dialing (in Southern California dial ).You may also call 1-888-211-4PCS (4727) (in Southern California call 1-800-455-4551). Thank you for choosing Sprint PCS. Our services are provided to you under certain terms and conditions – all of which are listed in the Terms and Conditions of Service pamphlet included with your phone. First Things First Determine If Your Phone Is Pre-Activated If you received your phone in the mail or purchased it from a Sprint PCS Center, your phone is already activated and simply needs to be unlocked. (See “Unlocking Your Phone” on the following page.) * * 6 1 1 O](https://usermanual.wiki/LG-Electronics-USA/AX830/User-Guide-882403-Page-26.png)
![Activating You Phone From a working phone, call Sprint PCS Customer Care toll-free at 1-888-715-4588 (in Southern California call 1-888-PCS-6699). A Sprint PCs Customer Advocate will collect your information and help you select your Sprint PCS Service Plan. Once you’ve made all your selections, he or she will guide you through the activation process. The call typically takes about 30 minutes, but may take longer at peak times. Your Sprint PCS SP-510 will be ready for use about one hour after you complete your call. What you should have handy: Your new Sprint PCS SP-510 The original packaging for your phone Your Social Security number or Tax ID number Your driver’s license number Pen and paper to write down your new Sprint PCS Phone Number 페이지 11: [2] 삭제됨 김미영 2000-12-20 PM 12:04:00 Getting Help If you need assistance at any time, call Sprint PCS Customer Care at 1-888-211-4PCS (4727) (in Southern California call 1-800-455-4551). You can also dial from your activated Sprint PCS SP-510 (in Southern California dial ). A Sprint PCS Customer Advocate is available to assist you 24 hours a day. Getting to Know Your Phone Getting to Know Your Phone Highlights O 2 * * 6 1 1 O](https://usermanual.wiki/LG-Electronics-USA/AX830/User-Guide-882403-Page-27.png)
![Congratulations on the purchase of your Sprint PCS SP-510. This phone is lightweight, easy-to-use, reliable and offers many significant features: Roaming capability provides access to other PCS CDMA where Sprint PCS has implemented roaming agreements (page 10) Data/Fax feature offers wireless modem capabilities for your personal computer in digital mode (page 72) MiniBrowser provides Internet access in digital mode (page 61) Built-in Scheduler and Call Alarms remind you of events and important calls (page 51) Two-hundred Phone Book entrise store 800 phone numbers (up to 4 phone numbers per entry) (page 40) Graphical icons and text prompts inform you of messages, events and the status of your phone (page 7) A Mouse Key provides easy navigation through menu options (page 5) Assign one of twenty ringer tones to any Phone Book entry (page 46) 페이지 19: [3] 삭제됨 김미영 2000-12-20 PM 12:10:00 Saving a Phone Number Enter the phone number. Highlight and press . Select a label by highlighting or and pressing . Note: Phone numbers labeled Fax or Data can only be dialed through a personal computer. Work Pager Fax DataNo Label MobileHomeOSave or O](https://usermanual.wiki/LG-Electronics-USA/AX830/User-Guide-882403-Page-28.png)
![Enter a name for the entry, select an existing entry or highlight and press . (See “Entering Characters Using the Keypad” on page 6.) Press to save the entry in the first available location. (You can also enter an entry number or highlight an empty location and press .) Finding a Phone Number You can search for Phone Book entrise that contain a specific string of numbers. To Find a phone number: Dial one or more digits. The more numbers you enter, the more the search narrows. Highlight and press . 페이지 19: [4] 삭제됨 김미영 2000-12-20 PM 12:31:00 Dialing and Saving Phone Numbers With Pauses You can dial or save phone numbers with pauses for use with automated systems, such as voicemail or credit card billing numbers. If you select a Hard Pause, the next set of numbers are sent when you press . If you select a 2-Second Pause, your phone automatically sends the next set of numbers after two seconds. To dial or save a phone number with pauses: Enter the phone number. Highlight or and press . Hard Pauses are displayed as a “P” and 2- Second Pauses as a “T.” Enter additional numbers. Highlight or and press . Save w/o Name OOOFind OOOCall 2- Second PauseOHard Pause OSave O](https://usermanual.wiki/LG-Electronics-USA/AX830/User-Guide-882403-Page-29.png)
![If you enter a Hard Pause, highlight Send Tones and press [OK] to send the next set of numbers. 4-Digit Dialing Enter four digits to display the 4-Digit Dialing option. If you select 4-Digit Dial, your phone dials the phone number in your Phone Book that ends with the four digits you entered. To use 4-Digit Dialing: Dial the last four digits of an entry’s phone number. Highlight 4-Digit Dial and press [OK]. Note: 4-Digit Dialing dials the first number in your Phone Book matching the four digits. 페이지 21: [5] 삭제됨 김미영 2000-12-20 PM 12:11:00 Changing the Backlight Setting The backlight illuminates when you press a key or receive an phone call. To change the backlight setting: From the Main Menu, highlight Display and press [OK]. Highlight Backlight and press [OK]. Highlight 8 Seconds, 15 Seconds, 30 Seconds, Off or Always On and press [OK]. Note: Long backlight settings affect the battery’s talk and standby times.](https://usermanual.wiki/LG-Electronics-USA/AX830/User-Guide-882403-Page-30.png)
![Editing the Greeting The Greeting is displayed above the time and date on the display screen (except during PCS CDMA of Analog Cellular Roaming). To edit the Greeting: From the Main Menu, highlight Display and press [OK]. Highlight Greeting and press [OK]. Highlight Change and press [OK]. To delete one character at a time, press [CLR]. To delete all characters, press and hold [CLR]. Enter your new Greeting using the keypad. (See “Entering Characters Using the Keypad” on page 6.) Highlight Save and press [OK]. Adjusting the Contrast To adjust the contrast setting: From the Main Menu, highlight Display and press [OK]. Highlight Contrast and press [OK]. Highlight Highest, High, Medium, Low of Lowest and press [OK]. When you highlight an option, a preview of the Contrast setting is displayed. 페이지 21: [6] 삭제됨 spectra 2000-12-21 AM 11:35:00 Creating a Phone Book Entry](https://usermanual.wiki/LG-Electronics-USA/AX830/User-Guide-882403-Page-31.png)
![Your Sprint PCS SP-510 provides multiple ways to add phone numbers to your Phone Book. (For alternative ways, see “Saving a Phone Number” on page 14 or “Saving Phone Numbers From the Call Log” on page 35.) From the Main Menu, highlight Phone Book and press [OK]. Highlight Add New Entry and press [OK]. Enter a name for the entry or highlight Save w/o Name and press [OK]. (See “Entering Characters Using the Keypad” on page 6.) Enter the phone number and press [OK]. ☞Tip! If you save phone numbers with their area codes, you can still dial them from your Phone Book when you travel outside your Sprint PCS Home Service Area. Select a label by highlighting Home, Work, Mobile, Pager, Fax, Data or No Label and pressing [OK]. Note: Phone numbers labeled Fax of Data can only be dialed through a personal computer. Press [OK] to save the entry in the next available memory location. (You can also enter an entry number or highlight an empty location and press [OK]. Calling a Phone Number in Your Phone Book To Dial a phone number in your Phone Book: Display a Phone Book entry. (See “Finding a Name” on page 40 or “Finding an Entry Number” on page 41.) To speed dial the entry’s default number, press and hold [OK]. To dial an alternate number, highlight the number and press and hold [OK]. ☞Tip! To speed dial a Phone Book entry from the Main Menu, press and hold the entry’s number. If the entry number is two digits, enter the first digit, then press and hold the second digit.](https://usermanual.wiki/LG-Electronics-USA/AX830/User-Guide-882403-Page-32.png)
![페이지 22: [7] 삭제됨 spectra 2000-12-21 AM 11:35:00 Accessing Sprint PCS Voicemail To speed dial your voicemail, press and hold [ 1 ]. Note: The phone number for your Sprint PCS Voicemail box is stored in the first Phone Book entry. If you edit the entry, this option may not work. To dial your voicemail from the Main, Menu, highlight Messages and press and hold [OK]. To access your voicemail from a phone other than your Sprint PCS : Deal your Sprint PCS Phone Number. When the voicemail system answers, press [ * ] and enter your pass code. Note: You are charged for air time when accessing your voicemail box. 페이지 22: [8] 삭제됨 김미영 2000-12-20 PM 12:14:00 Setting Up Your Sprint PCS Voicemail Sprint PCS Voicemail allows callers to leave a message when you don’t answer your Sprint PCS SP-510. We suggest you set up your voicemail box soon after your phone is activated. The first time you access the voicemail system (see “Accessing Sprint PCS Voicemail” above) from your Sprint PCS SP-510, it prompts you to: Create your own personal pass code. Make sure that you pick a](https://usermanual.wiki/LG-Electronics-USA/AX830/User-Guide-882403-Page-33.png)
![number that is easy to remember. Record your name announcement. Create the greeting callers hear when they reach your voicemail. Choose whether of not to activate One-Touch Message Access. If you select One-Touch Message Access, you do not have to enter your pass code to access voicemail messages. Note: One-Touch Message Access is available when you call from your Sprint PCS SP-510 in your sprint PCS Home Service Area. 페이지 22: [9] 삭제됨 spectra 2000-12-21 AM 11:37:00 Call – Dials the phone number of the sender (if applicable). Alternate #s – Displays the Phone Book entry (if the sender’s phone number is in your Phone Book and the entry has alternate phone numbers). To dial an alternate number, highlight the phone number and press and hold [OK]. Save Phone # - Saves the sender’s phone number in your Phone Book (if applicable). 페이지 23: [10] 삭제됨 spectra 2000-12-21 AM 11:38:00 Sending a Page or Text Message to Your Phone Callers have the option to send a page message when they reach your voicemail box. A page/text message can also be sent to your phone via e-mail. Your address is Yourphonenumber@messaging.sprintpcs.com. 페이지 23: [11] 삭제됨 spectra 2000-12-21 AM 11:38:00 Caller ID Caller ID displays the phone number of the person calling you (if the number is available). When you](https://usermanual.wiki/LG-Electronics-USA/AX830/User-Guide-882403-Page-34.png)
![receive a call from a phone number stored in your Phone Book, the entry’s name is also displayed. If you call someone from your Sprint PCS SP-510 who has Caller ID, your phone number is displayed on their phone. To block your phone number for a particular outgoing call, press [ * ] [ 6 ] [ 7 ] before dialing the phone number. Call Waiting If you receive an incoming call while you are on another call, you hear a beep and the person’s Caller ID information is displayed. To answer the call, highlight Flash and press [OK]. To toggle between the two callers, highlight Flash again and press [OK]. If you do not want to be interrupted during a call, you can temporarily disable Call Waiting by pressing [ * ] [ 7 ] [ 0 ] before dialing the phone number. When the call is finished, Call Waiting automatically reactivates. To permanently disable Call Waiting for all calls, contact Sprint PCS Customer Care. Three-Way Calling Three-Way Calling lets you talk to two people at the same time. To conference in a third caller when you are on a call: Highlight Dial 3-Way Call and press [OK]. Enter the phone number, highlight 3-Way Call and press [OK]. When the call is answered, highlight Flash and press [OK] to begin your Three-Way Call. Note: You can also initiate a Three-Way Call during a Call by dialing a phone number from your Phone Book, Call Logs or Page/Text messages. 페이지 23: [12] 삭제됨 김미영 2000-12-20 PM 12:15:00](https://usermanual.wiki/LG-Electronics-USA/AX830/User-Guide-882403-Page-35.png)
![Dialing Sprint PCS Customer Care A Sprint PCS Customer Advocate is available to assist you 24 hours a day by dialing [ * ] [ 2 ] [OK] (in Southern California dial [ * ] [ 6 ] [ 1 ] [ 1 ] [OK] ) from your Sprint PCS SP-510. An Advocate can help you with questions regarding your phone, billing, Sprint PCS Services and air time usage. You can also reach Sprint PCS Customer Care By dialing 1-888-211-4PCS (4727) (To dial Sprint PCS Services from your Phone Book, see “Dialing Sprint PCS Services” on page 44.) Dialing Sprint PCS Directory Assistance To obtain residential, business and government listings; to get help completing local – or long – distance calls; or to obtain movie listings, hotel, shopping and local event information, contact Sprint PCS Directory Assistance by dialing [ 4 ] [ 1 ] [ 1 ] [OK]. Sprint PCS will connect your call at no additional charge. (To dial Sprint PCS Services from your Phone Book, see “Dialing Sprint PCs Serviced” on page 44.) Dialing Sprint PCS Operator Services For assistance with placing collect calls or using a calling card, dial [ 0 ] and press [OK]. Roadside Assistance Contact Sprint PCS Customer Care for information on the Roadside Assistance program. Making Emergency Calls You can place calls to 911, Customer Care ( [ * ] [ 2 ] [OK] or [ * ] [ 6 ] [ 1 ] [ 1 ] [OK] in Southern California) or the Special Numbers even when your phone is locked. To call 911, dial [ 9 ] [ 1 ] [ 1 ] and press [OK]. To dial a Special Number, dial the phone number and press [OK]. (See “Using Special Numbers” on page 70.) 페이지 23: [13] 삭제됨 김미영 2000-12-20 PM 12:15:00 Getting the Most From Your Phone](https://usermanual.wiki/LG-Electronics-USA/AX830/User-Guide-882403-Page-36.png)
![Main Menu The Main Menu is displayed when your phone is in a Sprint PCS or authorized PCS CDMA or analog cellular provider’s service area (or below the In Call Options when you are on a call). To return to the Main Menu from another menu, press and hold [CLR]. Main Menu Options Call Logs Scheduler Security Messages MiniBrowser Setup Phone Book Sounds Calculator Roaming Display Games KeyGuard To select a Main Menu option, highlight it and press [OK]. For a complete description of each menu, see the appropriate chapter. 페이지 23: [14] 삭제됨 spectra 2000-12-21 AM 11:39:00 Your Sprint PCS SP-510 stores your last ten incoming, ten outgoing and ten missed calls in the Call Logs menu. Viewing Call Logs To view the last ten incoming, ten outgoing or ten missed calls. From the Main Menu, highlight Call Logs and press [OK]. Highlight either Outgoing Log, Incoming Log or Missed Log and press [OK]. Note: When you receive a call from or dial a phone number in the Missed Log, the entry is removed from the Missed Log. A new entry will be stored in either the Outgoing or Incoming Log. The Outgoing and Incoming Logs also remove duplicate entries. To view a Call Log entry, highlight the entry and press [OK]. The phone number, Phone Book entry name (if the number is in your Phone Book) and following menu options](https://usermanual.wiki/LG-Electronics-USA/AX830/User-Guide-882403-Page-37.png)
![are displayed. To select an option, highlight it and press [OK]. Call – Dials the phone number. Alternate #s – If the phone number is in your Phone Book and the entry has alternate numbers, they are displayed. To dial an alternate number, highlight it and press and hold [OK]. Save Phone # - If the phone number is not in your Phone Book, an entry is created. Time/Date – Displays the time, date and duration of the call. Prepend –Prepends the phone number. (See “Prepend Dialing” on the following page. Erase – Deletes the Call Log entry. Next – Displays the next Call log entry. Previous – Displays the previous Call log entry. ☞Tip! You can also view the next or previous entry by pressing the Mouse Key left (previous ) or right(next). Dialing Phone Numbers From the Call Log. From the Main Menu, highlight Call Long and press [OK]. Highlight Outgoing Log, Incoming Log or Missed Log and press [OK]. Highlight the phone number you want to call and press and hold [OK]. Note: You cannot dial phone numbers identified as No ID, Restricted, Data or Fax](https://usermanual.wiki/LG-Electronics-USA/AX830/User-Guide-882403-Page-38.png)
![calls. Saving Phone Numbers From the Call Log. From the Main Menu, highlight Call Longs and press [OK]. Highlight Outgoing Log, Incoming Log or Missed Log and calls. Highlight the phone number you want to save and press [OK]. Note: You cannot save phone numbers identified as No ID or Restricted Call. Highlight Save Phone # and press [OK]. Select a label by highlighting Home, Work, Mobile, Pager, Fax, Data or No Label and pressing [OK]. Note: Phone numbers labeled Fax or Data can only be dialed through a personal computer. Enter a name or highlight Save w/o Name and press [OK]. Press [OK] to save the entry in the next available memory location. (You can also enter an entry number or highlight an empty location and press [OK].) 페이지 24: [15] 삭제됨 김미영 2000-12-20 PM 12:16:00 Prepend Dialing You can add an area code, pauses or additional number before a phone number by using the Prepend option. To prepend digits to a phone number: Select a phone number from the Call Logs, Phone Book of page/text message. Highlight Prepend and press [OK].](https://usermanual.wiki/LG-Electronics-USA/AX830/User-Guide-882403-Page-39.png)
![Enter the numbers you want dialed before the phone number. To select an option, highlight it and press [OK]. Call – Dials the current phone number. Save Phone # - Creates a Phone Book entry using the current number. Hard Pauses – Inserts a Hard Pause. (See “Dialing and Saving Phone Numbers With Pauses” on page 15.) Exit – Returns to the previous screen. Erasing Multiple Call Logs To erase multiple Call Logs: From the Main Menu, highlight Call Logs and press [OK]. Highlight Erase Logs and press [OK]. Highlight Outgoing Log, Incoming Log, Missed Log or All Logs and press [OK]. Highlight Yes and press [OK]. Viewing and Resetting Air Time Air Time displays MiniBrowser access and Sprint PCS, PCS CDMA and analog cellular air time (rounded to the nearest minute), as well as the number of calls made to or from your phone. To view Air Time: Highlight Call Logs and press [OK].](https://usermanual.wiki/LG-Electronics-USA/AX830/User-Guide-882403-Page-40.png)
![Highlight Air Time and press [OK]. To reset the Air Time, highlight Reset and press [OK]. Note: Air Time is not intended for billing purposes. Messages ======page 38 그림==== Voicemail For information on voicemail messages, see “Accessing Sprint PCS Voicemail” on page 24. 페이지 24: [16] 삭제됨 김미영 2000-12-20 PM 12:45:00 Highlight Call and press [OK]. For information on Sprint PCS Services, see pages 30-31. Adding Call Alarms From the Phone Book Schedule a Call Alarm to remind you to remind you to make an important call. To add a Call Alarm from the Phone Book: Display a Phone Book entry. Highlight Call Alarm and press [OK]. Enter the time and date using your keypad. (Fields must be two digits, for example “05:07a 01/01/99.”) To toggle between AM and PM, highlight AM/PM and press [OK]. To schedule the Call Alarm, highlight Done and press [OK]. To repeat the alarm, highlight Set Repeating and press [OK].](https://usermanual.wiki/LG-Electronics-USA/AX830/User-Guide-882403-Page-41.png)
![Set Repeating – To repeat the Call Alarm, highlight Daily, Weekly, Monthly or Yearly and press [OK]. ☞Tip! You can also add a Call Alarm from the Scheduler menu. (See “Adding Call Alarms From the Scheduler” on page 53.) Call Alarm Notification If your phone is powered on when a Call Alarm is scheduled, the phone displays the Phone Book entry name or phone number, the time and date of the alarm and the following menu options. To select an option, highlight it and press [OK]. OK – Displays the Call or Roam Call option. To dial the number, press [OK] again. To dial an alternate phone number, highlight the number and press and hold [OK]. Snooze – Repeats the alarm in ten minutes. Erase – Deletes the alarm. Edit Time/Date – Lets you reschedule the time, date and frequency of the alarm. Exit – Returns to the Main Menu (or press [CLR]) If your phone is powered off when a Call Alarm is scheduled, the alarm is displayed the next time your phone powers on. 페이지 24: [17] 삭제됨 spectra 2000-12-21 AM 11:41:00 Adding Phone Numbers to a Phone Book Entry To add a phone number to a Phone Book Entry Display a Phone Book entry. Highlight Add Phone # and press [OK].](https://usermanual.wiki/LG-Electronics-USA/AX830/User-Guide-882403-Page-42.png)
![Enter the phone number and press [OK]. Select a label by highlighting Home, Work, Mobile, pager, Fax, Data or No Label and pressing ok. Note: Phone numbers labeled Fax or Data can only be dialed through a personal computer. ☞Tip! You can also add a phone number by entering the number and selecting Save.(See “Saving a Phone Number” on page 14.) 페이지 24: [18] 삭제됨 김미영 2000-12-20 PM 12:46:00 Selecting an ID Ringer You can assign twenty-five ringer tones(plus a vibrating ringer)to a Phone Book entry so you can identify the caller by the sound of the ringer. To select an ID Ringer: Display a Phone Book entry. Highlight Set ID Ringer and press [OK]. 3. Highlight a Ring Type and press [OK] You will hear a preview of the Ring Type when you highlight it. Prepending a Phone Book Entry For information on prepending phone numbers, see “Prepend Dialing” on page 36. Editing a Phone Book Entry To edit a Phone Book entry’s phone number, name or entry number: Display a Phone Book entry. Highlight Edit and press [OK].](https://usermanual.wiki/LG-Electronics-USA/AX830/User-Guide-882403-Page-43.png)
![To select an option, highlight it and press [OK]. Phone # - Highlight the phone number you want to edit and press [OK]. Press the Mouse Key left or [CLR] to delete digits. Use the keypad to enter new digits. Name – Press the Mouse Key left to move the cursor, or press CLR to delete characters. Use the keypad to enter new characters. Press ok to save the change. Entry # - To change the entry number, highlight an empty location and press OK. To make a Phone Book entry secret or change the speed-dialing number, see the following chapters. Secret Phone Book Entries You can hide an entry’s phone number by making it secret . The entry name is still displayed, but the number is replaced by (secret) To make a Phone Book entry secret : Display a Phone Book entry. Highlight Edit and press [OK]. Highlight Make Secret and press [OK]. Highlight Yes and press [OK]. To make a secret Phone Book entry not secret: Display a Phone Book entry. Highlight Edit and press [OK]. Enter your lock code.](https://usermanual.wiki/LG-Electronics-USA/AX830/User-Guide-882403-Page-44.png)
![Highlight Make Secret and press OK. Highlight No and press OK. Changing Speed-Dialing Numbers The first phone number you enter when creating a Phone Book entry is used as the default speed-dialing number. To change the default speed-dialing number for a Phone Book entry: Display a Phone Book entry. Highlight Edit and press [OK]. Highlight Set Speed Dial and press [OK]. Highlight the number you want to make the speed-dialing number and press [OK]. 페이지 24: [19] 삭제됨 spectra 2000-12-21 AM 11:41:00 Roaming =====page49 그림추가======= To operate your phone on either the Sprint PCS Nationwide Network, authorized PCS CDMA or analog cellular network(the phone will search for the Sprint PCS network first): From the Main Menu, highlight Roaming and press [OK]. 2. Highlight Set Mode and press [OK]. To operate your phone on the Sprint PCS Nationwide Network or PCS CDMA network only, or an authorized analog cellular network only(the phone will not use the alternate available network even if your phone is in that network’s coverage area):](https://usermanual.wiki/LG-Electronics-USA/AX830/User-Guide-882403-Page-45.png)
![From the Main Menu, highlight Roaming and press [OK]. Highlight Set Mode and press [OK]. Highlight Sprint PCS or Analog Only and press [OK]. When switching between Sprint PCS and Analog Only, the Battery Charge Status icon may vary due to different transmission power requirements. Note: The Analog Only setting is not saved the next time the phone powers up. To disable the extra step required to make or answer a roaming call: From the Main Menu, highlight Roaming and press [OK]. Highlight Call Guard and press [OK]. Highlight No and press [OK]. 페이지 24: [20] 삭제됨 김미영 2000-12-20 PM 12:25:00 Scheduler Use the Scheduler to remind you of events or important calls you need to make. You can schedule up to 100 events, 15 Call Alarms and 20 To Do Items. Scheduler Menu Adding Meetings, Special Occasions, General Events and Dining Appointments From the Main Menu, highlight Scheduler and press [OK]. Highlight the day you want to add an event to by pressing the Mouse Key left (previous day) or right (next day) and press [OK]. ☞Tip! Press the Mouse Key up or down to scroll through the previous (up) or next (down) week’s events. Press the up or down Volume Control keys to scroll through the week’s events for the previous (up) or next (down) month.](https://usermanual.wiki/LG-Electronics-USA/AX830/User-Guide-882403-Page-46.png)
![Highlight Add Event and press [OK]. Highlight Meeting, Spcl Occasion , Event or Dining Appt. and press [OK]. Enter a description and press [OK]. Enter the time, date and duration using your keypad. (Fides must be two digits, for example “05:07a 01/01/ 99.”) To toggle between AM and PM, highlight AM/PM and press [OK]. To schedule the event, highlight Done and press [OK]. To further edit the event, highlight Edit Alarm, Edit Repeat of Set End Time and press [OK]. Edit Alarm – Enter the number of hours or minutes before the event you want the alarm to sound and press [OK]. If you do not want to be reminded, highlight No Alarm and press [OK]. The icon is displayed next to your event if an alarm is scheduled with the event. Note: Default alarm times are 10 minutes for Meetings, Events and Dining Appointments, 24 hours for Special Occasion and 0 minutes for Call Alarms. Edit Repeat – To repeat the event, highlight Daily, Weekly, Monthly or Yearly and press [OK]. The icon is displayed next to your event if the event if scheduled to repeat. Note : Default alarm times are 10 minutes for Meetings, Events and Dining Appointments, 24 hours for Special Occasions and 0 minutes for Call Alarms. Edit Repeat – To repeat the event, highlight Daily, Weekly, Monthly or Yearly and press icon is displayed next to your event if event is scheduled to repeat. Set End Time – If the duration is longer than 99 hours 99 minutes, you can schedule an end time by entering the time and date and pressing [OK]. Event Notification When an event alarm is scheduled, the event description, time and date and following menu options are displayed. To select an option, highlight it and press [OK].](https://usermanual.wiki/LG-Electronics-USA/AX830/User-Guide-882403-Page-47.png)
![View Details – Displays the event time, date, duration and description. Snooze – Repeats the alarm in ten minutes. Erase – Deletes the event, even if it is a repeating event. Edit – Lets you edit the time and date of the event. Exit – Returns to the Main Menu (or press and hold [CLR]). If your phone is powered off when an event alarm is scheduled, the same menu options are displayed the next time your phone powers on. Adding Call Alarms From the Scheduler Schedule a Call Alarm to remind you to make an important call. To add a Call Alarm from the Scheduler. From the Main Menu, highlight Scheduler and press [OK]. Highlight the day you want to schedule a Call Alarm for by pressing the Mouse Key left (previous day) or right (next day) and press [OK]. ☞Tip! Press the Mouse Key up or down to scroll through the previous (up) or next (down) week’s events. Press the up or down Volume Control keys to scroll through the week’s events for the previous (up) or next (down) month. Highlight Add Event and press [OK]. Highlight Call Alarm and press [OK]. Highlight the Phone Book entry you want to be reminded to call, or highlight Number Only and press [OK]. If you select Number Only, enter the phone number and press [OK]. Enter the time and date using your keypad. (Fields must be two digits, for example “05:07a 01/01/99.”) To toggle between AM and PM, highlight AM/PM and press [OK]. To repeat the alarm, highlight Set](https://usermanual.wiki/LG-Electronics-USA/AX830/User-Guide-882403-Page-48.png)
![Repeating and press [OK]. Set Repeating – To repeat the event, highlight Daily, Weekly, Monthly or Yearly and press [OK]. Highlight Done and press [OK]. ☞Tip! You can also add a Call Alarm from the Phone Book menu. (See “Adding Call Alarms From the Phone Book” on page 45.) Call Alarm Notification See “ Call Alarm Notification” on page 45. Viewing Events and Call Alarms From the Main Menu, highlight Scheduler and press [OK]. A “*” is displayed next to days with events or Call Alarms scheduled. When you highlight a day with an “*”, Event Type icons are displayed at the bottom of the screen. Icons are not displayed in chronological order and only one icon appears per event type. (See “Event Type Icons” on the following page.) ☞Tip! Press the Mouse Key up or down to scroll through the previous (up) or next (down) week’s events. Press the up of down Volume Control keys to scroll through the week’s events for the previous (up ) or next (down) month. To View an individual day, highlight the day by pressing the Mouse Key left (previous day) or right (next day) and press [OK]. Events are displayed in chronological order. To display an event, highlight it and press [OK]. ☞Tip! To view the day’s next or previous event or Call Alarm, press the Mouse Key left (previous) or right (next). To display event options, press [OK]. (See “Event Options” on page 56)](https://usermanual.wiki/LG-Electronics-USA/AX830/User-Guide-882403-Page-49.png)
![To view a future or past day’s scheduled events: From the Main Menu, highlight Scheduler and press [OK]. Press [OK] to display the Scheduler menu. Highlight Go To Date and press [OK]. Enter the date using your keypad. (Fields must be two digits, for example “01/01/99.”) Highlight Go and press [OK]. Press [OK] again to view the day’s events. Event Type Icons When you create events, icons are displayed that indicate that event type. ICON DESCRIPTION Meeting Dining Event Call Alarm Special Occasion Generic Event Repeation Event Alarm Event Options To edit an event, display an event and press [OK]. To select an option, highlight it and press [OK] Erase – Deletes the event.](https://usermanual.wiki/LG-Electronics-USA/AX830/User-Guide-882403-Page-50.png)
![Edit Descript – Edits the event description. Edit Time/Date – Edits the time, date and duration of the event. Next – Displays the next scheduled event for the selected day. Previous – Displays the previous scheduled event for the selected day: ☞Tip! You can also view the next or previous event by pressing the Mouse Key left (previous) or right (next). Exit – Returns to the Scheduler menu. Editing Call Alarms To edit a Call Alarm, highlight the alarm and press [OK]. The time, date and phone number (or Phone Book entry) are displayed with the following options. To select an option, highlight it and press [OK]. Erase – Deletes the Call Alarm. Edit Time/Date – Edits the time and date of the Call Alarm. Next – Displays the next scheduled event or Call Alarm for the selected day. Previous – Displays the previous scheduled event or Call Alarm for the selected day. ☞Tip! You can also view the next or previous event or Call Alarm by pressing the Mouse Key left (previous) or right (next). Exit – Returns to the Scheduler menu. Adding To-Do’s To add an entry to your To-Do List:](https://usermanual.wiki/LG-Electronics-USA/AX830/User-Guide-882403-Page-51.png)
![From the Main Menu, highlight Scheduler and press [OK]. Press [OK] again to display the Scheduler menu. Highlight To Do List and press [OK]. Highlight Add I tem and press [OK]. Enter a description and press [OK]. Highlight Low or High and press [OK]. Low priority To-Do’s are indicated by a “*” , high priority To-Do’s by a “!” . When you complete a To-Do, you can identify it as Done. (See “Editing To-Do’s” on page 59). Viewing To-Do’s To view your To-Do List: From the Main Menu, highlight Scheduler and press [OK]. Press [OK] to display the Scheduler menu. Highlight To Do List and press [OK]. Editing To-Do’s To edit a To-Do, Highlight the To-Do and press [OK]. To select an option, highlight it and press [OK]. Erase Item – Deletes the To-Do. Edit Priority – Edits the To-Do’s priority or identifies it as Done. A check mark identifies To-Do’s as Done. Edit Descript – Edits the To-Do’s description.](https://usermanual.wiki/LG-Electronics-USA/AX830/User-Guide-882403-Page-52.png)
![Add to Schedule – Removes the To-Do from the To-Do List and makes it a scheduled event. To schedule the To-Do to as an event, enter a time and date with your keypad. To select an option, highlight it and press [OK]. Done – Schedules the To-Do as an event. AM/PM – Toggles the event time between AM and PM. Edit Alarm – Edits the number of hours or minutes an alarm sounds before the event. Edit Repeat – Lets you schedule the event to repeat. Set End Time – Edits the event’s end time. Exit – Returns to the Scheduler menu. Next – Displays the next scheduled To-Do. Previous – Displays the previous scheduled To-Do. ☞Tip! You can also view the next or previous To-Do by pressing the Mouse Key left (previous) or right (next) Exit – Returns to the scheduler menu. Erasing Multiple Events, Call Alarms of To-Do’s To erase old events, Call Alarms and To-Do’s: From the Main Menu, highlight Scheduler and press [OK]. Press [OK] to display the Scheduler menu.](https://usermanual.wiki/LG-Electronics-USA/AX830/User-Guide-882403-Page-53.png)
![Highlight Memory and press [OK]. Highlight Erase Old and press [OK]. ☞Tip! To erase all events, Call Alarms and To-Do’s, highlight Erase All and press [OK] Highlight Yes and press [OK]. Viewing Scheduler, Call Alarm and To-Do Memory To view memory space: From the Main Menu, highlight Scheduler and press [OK]. Press [OK] to display the Scheduler menu. Highlight Memory and press [OK]. Highlight View Details and press [OK]. Highlight Schedule, Call Alarm or To-Do List and press [OK]. MiniBrowser MiniBrowser Menu ===page 61 그림추가==== Using the MiniBrowser The phone must be on a Sprint PCS or digital network to use the MiniBrowser, but you can view saved (cached) pages in Analog Mode. When you are viewing cached pages, there is no network activity and you are not billed for air time. Wen you access the Internet and view new Web sites, a data call is initiated. If there is no network activity within a specific time, the data call is automatically dropped.](https://usermanual.wiki/LG-Electronics-USA/AX830/User-Guide-882403-Page-54.png)
![Note: Signal strength affects your phone’s ability to access the Internet. To activate the MiniBrowser: From the Main Menu, highlight MiniBrowser and press [OK]. Note: The first time you log on the MiniBrowser, you may be prompted to enable security encryption by pressing [OK]. What appears on the display when accessing the MiniBrowser is dependent on the service provider content. To view additional text, press the Mouse Key up or down to scroll by line, or press the up or down Volume Control keys to scroll by page To select a menu option at the bottom of the screen, highlight the option by pressing the Mouse Key left or right and press [OK]. Depending on the site you are viewing, the following options may be displayed. Home –Displays the Home page. Exit – Returns to the Main Menu. (You can also press and hold [CLR]) Help – Displays the Help menu. Link – Accesses a linked Web page. Links are identified by brackets “ [Web link].” Back – Backs up to the previously viewed page. (You can also press [CLR]) 페이지 27: [21] 삭제됨 spectra 2000-12-21 AM 11:42:00 Restricting Calls You can restrict which phone numbers you can receive calls from or dial. From the Security menu, highlight Restrict Calls and press [OK]. Highlight Outgoing or Incoming and press [OK].](https://usermanual.wiki/LG-Electronics-USA/AX830/User-Guide-882403-Page-55.png)
![To select an option, highlight it and press [OK] Phone Book Only – You can only make or receive calls from Special Numbers or phone numbers stored in your Phone Book. Special # Only – You can only make or receive calls from Special Numbers. (See “Using Special Numbers” on page 70.) Note: The Restrict Calls setting does not apply to 911 or Sprint PCS Customer Care. 페이지 27: [22] 삭제됨 김미영 2000-12-20 PM 12:26:00 Unrestricting Calls : From the Security menu, highlight Restrict Calls and press [OK]. Highlight Off and press [OK]. To unrestrict incoming or outgoing calls: From the Security menu, highlight Restrict Calls and press [OK]. Highlight Outgoing or Incoming and press [OK]. Highlight Allow All and press [OK]. Using Special Numbers You can save three Special Numbers that can be dialed even when the phone is locked. You can also restrict your phone to dial or receive calls from Special Numbers only. (See “Restricting Calls” on the previous page.) To add or replace a Special Number. From the Security menu, highlight Special #s and press [OK].](https://usermanual.wiki/LG-Electronics-USA/AX830/User-Guide-882403-Page-56.png)
![Highlight and entry location and press [OK]. Enter or replace the phone number. Highlight OK and press [OK]. Note: There are no speed dialing options associated with Special Numbers. Erasing the Phone Book To erase all the names and phone numbers in your Phone Book: From the Security menu, highlight Erase PhoneBook and press [OK]. If you are certain you want to erase the entire contents of the Phone Book, highlight Yes and press [OK]. Resetting Your Phone Resetting the phone restores all the factory defaults, including the Ringer Types and Display settings. The Phone Book, Call Logs, Scheduler, Messages and Call Alarms are not affected. To reset your phone: From the Security menu, highlight Reset Phone and press [OK]. If you are certain you want to reset your phone, highlight Yes and press [OK]. Setup Setup Menu =====page 72 그림추가====== 페이지 28: [23] 삭제됨 spectra 2000-12-21 AM 11:43:00 Data/Fax Mode](https://usermanual.wiki/LG-Electronics-USA/AX830/User-Guide-882403-Page-57.png)
![The Sprint PCS SP-510 can send and receive data or fax transmissions through a personal computer using the optional Data Connectivity Kit. Visit a Sprint PCS Center or dial [ # ] [ A ] [ C ] [ C ] or 1-800-974-2221 to obtain optional accessories. Note: The phone must be on a digital network to send or receive data and faxes. Receiving a Fax To receive a fax with your phone: From the Main Menu, highlight Setup and press [OK]. Note: The Data Cable must be connected to your phone to view Data/Fax menu options. 2. Highlight Data/Fax (In) and press [OK]. 3. Highlight Incoming Fax and press [OK]. Note: When the phone is in Data/Fax (In) Mode, you cannot make or receive voice calls. Receiving Data To receive data with your phone: From the Main Menu, highlight Setup and press [OK]. Note: The Data Cable must be connected to your phone to view Data/Fax menu options Highlight Data/Fax (In) and press (OK). Highlight Incoming Data and press (OK). Note: When the phone is in Data/Fax (In) Mode, you cannot make or receive voice calls.](https://usermanual.wiki/LG-Electronics-USA/AX830/User-Guide-882403-Page-58.png)
![Returning to Voice Mode To return to Voice Mode at the end of a data or fax transmission, highlight Exit Data Mode or Exit Fax Mode and press [OK]. To return to Voice Mode from Data/Fax Mode: From the Main Menu, highlight Setup and press [OK]. Highlight Data/Fax (In) and press [OK]. 3. Highlight Disable and press [OK]. Note: The phone powers up in Voice Mode, even if it was in Data/Fax Mode when it was powered down. The phone also returns to Voice Mode if the Data Cable is disconnected.](https://usermanual.wiki/LG-Electronics-USA/AX830/User-Guide-882403-Page-59.png)