LG Electronics USA BD6070 Dual Band Tri-Mode Cellular Phone User Manual BD6070 UserGuide
LG Electronics USA Dual Band Tri-Mode Cellular Phone BD6070 UserGuide
UserManual.wiki
>
LG Electronics USA
>
BD6070 User Manual
User manual
Navigation menu
Upload a User Manual
Namespaces
Wiki Guide
HTML
PDF
Info
Views
User Manual
Discussion / Help
Navigation
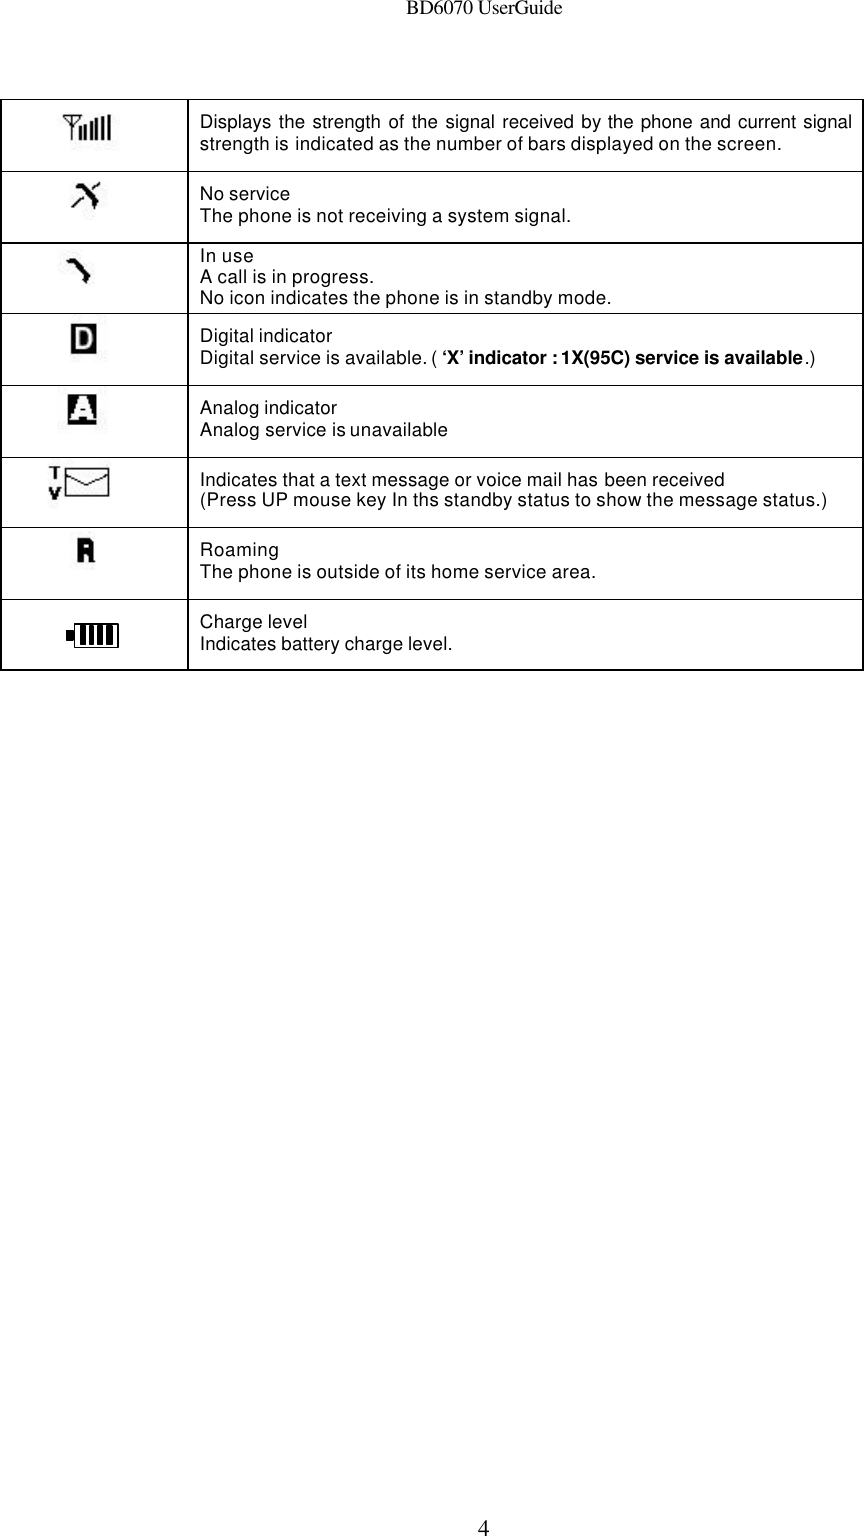
![BD6070 UserGuide 3 Chapter 1. Getting Started Cautions ??Using the phone in proximity to receiving equipment (i.e., TV or radio) may cause interference. ??Keep your phone in a safe place when not in use. ??Only use the batteries, antennas, and chargers provided by LG. Using the wrong accessories could void your warranty. ??Only authorized personnel should service the phone and its accessories. Faulty installation or service may result in accidents and consequently invalidate the warranty. ??Do not hold the antenna while the phone is in use. ??Do not use the phone in designated “no cellular phone use” areas. ??Do not expose the phone to high temperature or humidity. ??Avoid getting your phone wet. If the phone gets wet, turn the power off immediately and remove the battery pack. If the phone is mal-functional, return it to the dealer for service. ??Avoid shock or impact on the phone. Phone Overview Function Key Descriptions LCD screen Displays messages & indicator icons. END/PWR Used to turn power on/off. This key disconnects a call. Using this key, you can also exit out of a menu back to the phone’s standby display without changing the setting. SEND Allows user to place or answer calls. Mouse Key (Navigation Key) This mouse key allows quick access to text and voice mail notification messages. calendar, and sound profiles. Cellcase Close the active cellcase to the terminate a call in progress. Open the active cellcase to answer an incoming call. Soft Keys The current operation of a soft key is defined by the word at the bottom of the display. Side Keys These keys enable you to adjust keybeep volume (in standby mode) and earpiece volume (in a call status). [#],[*] key - In the standby status, set the manner mode by pressing the button[*]. (for 2 seconds) - In the standby status, set the lock function by pressing the button[#]. (for 2 seconds) Alphanumeric Keypad These keys enable you to enter numbers and characters and choose menu items. Clear Key In the standby status, show the My Menu by pressing the buton[Clr]. On screen Icons The phone screen displays several onscreen icons and onscreen icons appears when the phone is power on. Icons Descriptions](https://usermanual.wiki/LG-Electronics-USA/BD6070/User-Guide-329340-Page-3.png)
![BD6070 UserGuide 5 Chapter 2. Basic Functions Turning the Phone On and Off <Turning the Phone On> 1. Install a charged battery pack or connect the phone to an external power source such as the cigarette lighter adapter or car kit. 2. Press [END/PWR] for a few seconds until the red light on the top of the phone flashes. ??Fully extend the antenna for the best performance. <Note> Like any other radio device, avoid any unnecessary contact with the antenna while your phone is on. <Turning the Phone Off> 1. Press and hold until display screen will be turned off, and then release the key. 2. Protect the antenna by pushing it back into the phone, if extended. Making a Call When you make a call, follow these simple steps: 1. Make sure the phone is turned on. ??If not, press [END/PWR]. 2. Enter the phone number with area code, if needed. 3. Press [SEND]. ??If the phone is locked, enter the lock code. ??“Call Failed” indicates that the call did not go through. 4. Press [END/PWR] to disconnect the call. Correcting Dialing Mistakes If you make mistakes in dialing a number, press [CLR] key once to erase the last entered digit or hold down [CLR] for at least two second to delete all digits, or simply press soft key 2 [BACK] to exit dialing state. Receiving Calls 1. When the phone rings, open cellcase or If cellcase is open, press any key (except [END/PWR]) to answer. ??If you press the Side UP key for 2seconds, the present call is rejected. (In case Call Reject ([Menu] +[6]+[3]+[4]) : Activate ) 2. Press [END/PWR] to disconnect the call. In call waiting mode, the present call is on hold as you answer another incoming call. This service is provided by your service provider. When the call waiting function is activated, your phone will beep to let you know if you have an](https://usermanual.wiki/LG-Electronics-USA/BD6070/User-Guide-329340-Page-5.png)
![BD6070 UserGuide 6 incoming call. Your phone may also display the incoming caller’s identification. Dialing a call from Phone Book You can place a call from any memory location either by speed dialing or by pressing [SEND] while looking up the memory location. - For One/Two touch dialing, phone number in personal phone book should be registered on Speed Dial ([Menu] +[1]+[3]) One-Touch Dialing : One-touch dialing is a convenient feature which enables you to dial frequently used numbers in your personal phone book by pressing a key (for Speed Dial memory location 1 through 9). ??For locations 1 to 9, you can use one-touch dialing by pressing and holding down the key corresponding to the memory location. OR ??Press digit, then press [SEND]. Two-Touch Dialing (Speed Dialing) : This dialing feature enables you to dial numbers in your phone book through two keys (for locations 10 to 99). 1) Press the first digit. 2) Press and hold the key of the second digit. OR 1) Press the first and second digits, then press [SEND].](https://usermanual.wiki/LG-Electronics-USA/BD6070/User-Guide-329340-Page-6.png)
![BD6070 UserGuide 7 Chapter 3. Menu Features General Guidelines to MENU Access and Settings 1. Press Soft Key [Menu]. The animation of menu category will appear on the display screen. 2. Press[?] to go through the list of menu features, or use the side keys. 4. Press the corresponding number or [OK] key to the menu item that you want to select. Then the sub-menu list will appear on the screen. 5. Press the appropriate key to select the sub-menu you want to access. 6. Select preferred settings, using the [?] keys. Press CLR key to go one step backward while accessing menu or selecting settings. Menu Structres Names([Menu]+[1]) ??New Entry([Menu] +[1]+[1]) ??Find ([Menu] +[1]+[2]) ??Speed Dials([Menu] +[1]+[3]) ??Capacity([Menu] +[1]+[4]) ??Clear Names([Menu] +[1]+[5]) ??My Phone Num([Menu] +[1]+[6]) ??Info([Menu] +[1]+[7]) Messages ([Menu]+[2]) ??Write Message([Menu] +[2]+[1]) ??Inbox([Menu] +[2]+[2]) ??Outbox([Menu] +[2]+[3]) ??Voice([Menu] +[2]+[4]) ??Archive([Menu] +[2]+[5]) ??Draft([Menu] +[2]+[6]) ??Template([Menu] +[2]+[7]) ??Erase Message([Menu] +[2]+[8]) ??Inbox([Menu] +[2]+[8]+[1]) ??Outbox([Menu] +[2]+[8]+[2]) ??Archive([Menu] +[2]+[8]+[3]) ??Msg Settings([Menu] +[2]+[9]) ??Text Color([Menu] +[2]+[9]+[1]) ??Message Type([Menu] +[2]+[9]+[2])](https://usermanual.wiki/LG-Electronics-USA/BD6070/User-Guide-329340-Page-7.png)
![BD6070 UserGuide 8 ??Message Save([Menu] +[2]+[9]+[3]) ??Delivery Ack([Menu] +[2]+[9]+[4]) ??Auto Delete([Menu] +[2]+[9]+[5]) ??Info([Menu] +[2]+[0]) Records ([Menu]+[3]) ??Outgoing([Menu] +[3]+[1]) ??Incoming([Menu] +[3]+[2]) ??Missed([Menu] +[3]+[3]) ??Added Num([Menu] +[3]+[4]) ??Delete All([Menu] +[3]+[5]) ??Caller Timer([Menu] +[3]+[6]) ??Info([Menu] +[3]+[7]) Schedule ([Menu]+[4]) ??Reminder([Menu] +[4]+[1]) ??Alarm Clock([Menu] +[4]+[2]) ??Scheduler([Menu] +[4]+[3]) ??Find Sche([Menu] +[4]+[4]) ??Delete Old([Menu] +[4]+[5]) ??Info([Menu] +[4]+[6])](https://usermanual.wiki/LG-Electronics-USA/BD6070/User-Guide-329340-Page-8.png)
![BD6070 UserGuide 9 Profiles ([Menu]+[5]) ??Vibrate Only([Menu] +[5]+[1]) ??General([Menu] +[5]+[2]) ??Silent([Menu] +[5]+[3]) ??Meeting([Menu] +[5]+[4]) ??Outdoor([Menu] +[5]+[5]) ??Headset([Menu] +[5]+[6]) ??Car Kit([Menu] +[5]+[7]) 1. Ringer Type([Menu] +[5]+[x]+[1]) 2. Ring Tones([Menu] +[5]+[x]+[2]) 3. Ringer Vol([Menu] +[5]+[x]+[3]) 4. Msg Alert([Menu] +[5]+[x]+[4]) 5. Key tones([Menu] +[5]+[x]+[5]) 6. Key Vol([Menu] +[5]+[x]+[6]) Settings ([Menu]+[6]) ?? Display([Menu] +[6]+[1]) ?? Theme([Menu] +[6]+[1]+[1]) ?? Clock Type([Menu] +[6]+[1]+[2]) ?? Banner([Menu] +[6]+[1]+[3]) ?? Dialing Font([Menu] +[6]+[1]+[4]) ?? Backlight([Menu] +[6]+[1]+[5])](https://usermanual.wiki/LG-Electronics-USA/BD6070/User-Guide-329340-Page-9.png)
![BD6070 UserGuide 10?? Sound([Menu] +[6]+[2]) ?? Ring Tone([Menu] +[6]+[2]+[1]) ?? Connect Snd([Menu] +[6]+[2]+[2]) ?? SVC Alert([Menu] +[6]+[2]+[3]) ?? 1Min Alert([Menu] +[6]+[2]+[4]) ?? Security([Menu] +[6]+[3]) ?? Lock Mode([Menu] +[6]+[3]+[1]) ?? Privacy([Menu] +[6]+[3]+[2]) ?? Call Barring([Menu] +[6]+[3]+[3]) ?? Call Reject([Menu] +[6]+[3]+[4]) ?? New Lockcode([Menu] +[6]+[3]+[5]) ?? Emergency Num([Menu] +[6]+[3]+[6]) ?? Phone([Menu] +[6]+[4]) ?? Language([Menu] +[6]+[4]+[1]) ?? Call Answer([Menu] +[6]+[4]+[2]) ?? Data SVC([Menu] +[6]+[4]+[3]) ?? Data/Fax In([Menu] +[6]+[4]+[4]) ?? Info([Menu] +[6]+[4]+[5])](https://usermanual.wiki/LG-Electronics-USA/BD6070/User-Guide-329340-Page-10.png)
![BD6070 UserGuide 11 Internet ([Menu]+[7]) : (This feature is not available) ?? Start Browser([Menu] +[7]+[1]) ?? Bookmark([Menu] +[7]+[2]) ?? Settings([Menu] +[7]+[3]) ?? Info([Menu] +[7]+[4]) Fun & Util ([Menu]+[8]) ??Game([Menu] +[8]+[1]) ??Calculator([Menu] +[8]+[2]) ??World Time([Menu] +[8]+[3]) ??Info([Menu] +[8]+[4]) My menu([Menu]+[9]) ??Info([Menu] +[9]+[1])](https://usermanual.wiki/LG-Electronics-USA/BD6070/User-Guide-329340-Page-11.png)