LG Electronics USA C320 Cellular/PCS GSM/EDGE Phone with Bluetooth User Manual C300 UK 100715 indd
LG Electronics USA Cellular/PCS GSM/EDGE Phone with Bluetooth C300 UK 100715 indd
Contents
- 1. User Manual
- 2. Users Manual
User Manual

LG-C320 User Guide — English
This guide will help you understand your new mobile phone. It will provide
you with useful explanations of features on your phone.
Some of the content of this manual may differ from your phone depending
on the software of the phone or your service provider.
Disposal of your old appliance
1
When this crossed-out wheeled
bin symbol is attached to a
product it means the product is
covered by the European Directive
2002/96/EC.
2
All electrical and electronic
products should be disposed of
separately from the municipal
waste stream via designated
collection facilities appointed
by the government or the local
authorities.
3
The correct disposal of your old
appliance will help prevent potential
negative consequences for the
environment and human health.
4
For more detailed information
about disposal of your old
appliance, please contact your
city office, waste disposal service
or the shop where you purchased
the product.

Part 15.21 statement
" Change or Modifications that are not expressly approved by the manufacturer could void
the user's authority to operate the equipment. “
Part 15.105 statement
This equipment has been tested and found to comply with the limits for a class B digital
device, pursuant to Part 15 of the FCC Rules.
These limits are designed to provide reasonable protection against harmful interference in
a residential installation. This equipment generates uses and can radiate radio frequency
energy and, if not installed and used in accordance with the instructions, may cause harmful
interference to radio communications. However, there is no guarantee that interference will
not occur in a particular installation. If this equipment does cause harmful interference or
television reception, which can be determined by turning the equipment off and on, the user
is encouraged to try to correct the interference by one or more of the following measures:
- Reorient or relocate the receiving antenna.
- Increase the separation between the equipment and receiver.
- Connect the equipment into an outlet on a circuit different from that to
which the receiver is connected.
- Consult the dealer or an experienced radio/TV technician for help.
This device is not intended for sale in the USA.

Part 15 Class B Compliance
This device and its accessories comply with part15 of FCC rules.
Operation is subject to the following two conditions:
(1) This device & its accessories may not cause harmful interference.
(2) This device & its accessories must accept any interference received,
including interference that may cause undesired operation.
Body-worn Operation
This device has been tested for typical body-worn operations
with the distance of 0.79inches (2.0cm) from the user’s body.
To comply with FCC RF exposure requirements, a minimum separation distance
of 0.79inches(2.0cm) must be maintained from the user's body.
Additionally, Belt clips, holsters & other body-worn accessories may not contain
metallic components.
6
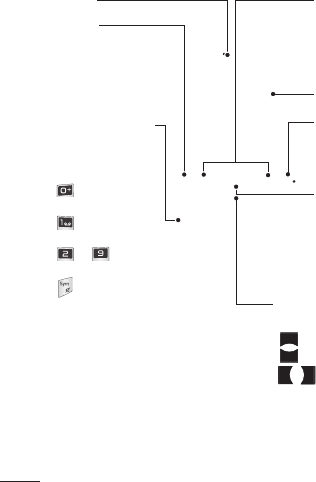
Getting to Know Your Phone
Earpiece
Send key
•
Dials a phone number
and answers a call.
•
In standby mode:
Shows the history
of calls.
Alpha numeric keys
•
In standby mode:
Input numbers to
dial
Hold down
- International
calls
- Connect voice
mail centre
to - Speed
dials
- Hold the key
dow n to go
Silent mode
• In editing mode:
Enter
numbers & characters
Soft keys (Left soft key
/ Right soft key)
•
These keys perform
the function Indicated
in the bottom of the
display.
Main LCD
End key
•
Switch on/off (hold
down)
•
End or reject a call.
Confirm key / OK key
•
Selects menu options
and confirms actions.
Navigation key
In standby mode:
Briefly:
Mp3 player
Briefly:
Camera
Briefly:
Toolbar when it was set.
(Menu>Settings>Displa
y>Homescreen>Display
Items)
• In menu:
Scroll up & down.
7
Side keys
•
In standby mode:
Controls the ring
volume.
•
During a call:
Earpiece volume
adjustment
•
During playing MP3
music:
Audio volume
adjustment
Charger/USB cable connector
TIP:
Please ensure
the phone is powered
on , external memory
card is inserted and
in idle mode before
connecting the
USB cable for Mass
Storage.
Battery pack
Camera lens Battery cover
SIM card holder
Headset
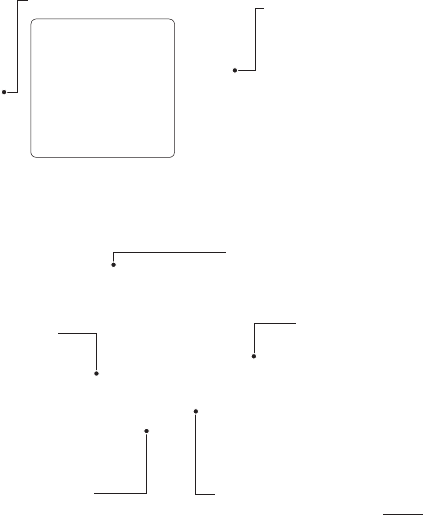
8
1 Remove the battery cover
Press the battery cover release
latch.
2 Remove the battery
Lever the bottom edge of the
battery and remove it carefully
from the battery compartment.
WARNING:
Do not remove
the battery when the phone
is switched on, as this may
damage the phone.
3 Install the SIM card
Slide the SIM card into the SIM
card holder. Make sure that the
gold contact area on the card is
facing downwards. To remove
the SIM card, pull it gently in the
reverse direction.
WARNING:
Do not replace
or remove the SIM card while
your phone is being used or
turned on, or data may be
lost or the SIM card might be
damaged.
4 Install the battery
Insert the top of the battery first
into the top edge of the battery
compartment. Ensure that the
battery contacts align with the
terminals on the phone. Press
down the bottom of the battery
until it clips into place.
Installing the SIM and battery

9
5 Replace the battery cover
6 Charging your phone
Pull open the cover of the
charger socket on the top of
your LG-C320. Insert the charger
and plug into a mains electricity
socket. Your LG-C320 will need
to be charged until a message
reading “Battery full” appears
on screen.
10
Memory card
Installing a memory card
You can expand the memory
available on your phone using a
memory card.
Note:
A memory card is an
optional accessory.
Slide the memory card into the slot
until it clicks into place. Make sure
that the gold contact area is facing
downwards.
Removing a memory card
Carefully remove the memory card
by gently pushing it in to the phone
and quickly releasing it.
Formatting the memory
card
Your memory card may already be
formatted. If your memory card isn’t
formatted, you will need to format it
before you can begin using it.
1
From the home screen press
Menu
then select
Settings
.
2
Choose
Device
and
Memory
info
. and select
External
memory
.
3
Press
Format
and enter the
password, which is set to 0000
as default. Your memory card will
be formatted and ready to use.
4
To view the new formatted
folders on your LG-C320 press
Menu
and select
My stuff
.
Choose
My memory card
.
WARNING:
When you
format your memory card, all
the content will be wiped. If you
do not want to lose the data
on your memory card, back
it up fi rst.
11
Your home screen
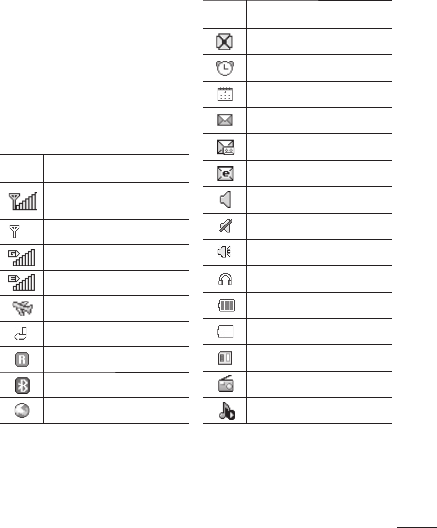
The status bar
The status bar uses various icons to
indicate things like signal strength,
new messages and battery life, as
well as telling you whether your
Bluetooth connection is active.
The table below explains the
meaning of icons you’re likely to
see in the status bar.
Icon Description
Network signal strength
(number of bars will vary)
No network signal
GPRS available
EDGE available
Flight mode is activated
Calls are diverted
Roaming service
Bluetooth® is activated
WAP service is connected
Icon Description
Multitasking available
An alarm is set
Schedule
New message
New voice message
New Email
Normal profile in use
Silent profile in use
Outdoor profile in use
Headset profile in use
Remaining battery life
Battery empty
External memory
FM radio
MP3 music playing
12
Making a call
1
Make sure your phone is on.
2
You can use the keypad. To
delete a digit press or the
back arrow.
3
Press to begin the call.
4
To end the call, press .
TIP!
To enter + when
making an international call,
press and hold 0.
Making a call from your
Contacts
It’s easy to call anyone whose
number you have stored in your
Phonebook
.
1
Press
Menu
to open the main
menu. Select
Phonebook
.
2
Using the keypad, enter the first
letter of the contact you want to
call and scroll to the
Phonebook
.
3
Press to begin the call.
Answering and rejecting
a call
When your phone rings, press
Accept
or press to answer
the call.
While your phone is ringing you can
press
Silent
to mute the ringing.
This is useful if you have forgotten
to change your profile to silent for
a meeting.
Press or select
Reject
in order
to reject an incoming call.
Note:
In call when speaker is
activated, the speaker icon
is displayed with red colour
cross, when the speaker is
deactivated speaker icon is
displayed without red colour
cross.
Speed dialling
You can assign a speed dial number
to a contact you call frequently.
1
Press
Menu
to open the main
menu. Select
Phonebook
, then
select
Option
and
Speed dials
.
2
Your voicemail is preset to speed
dial 1 and you cannot change
this. Select any other number
either by using the navigation
keys and selecting
Set
or by
pressing the hard key number.
3
Your
Phonebook
will open. Select
the contact you’d like to assign to
that number using the navigation
keys then Press
Select
.
Calling
13
To call a speed dial number, press
and hold the assigned number until
the contact appears on screen. The
call will begin automatically and
there is no need to press .
Viewing your Call logs
Press
Menu
and select
Logs
.
All logs
- View a complete list of all
your dialled, received and missed
calls.
Calls Only
- View a list of all
the numbers you have called or
received calls.
Messages Only
- View a list of
all the numbers you have sent or
received messages.
Missed logs
- View a list of any
calls you have missed.
Outgoing logs
- View a list of all the
numbers you have called.
Incoming logs
- View a list of all the
numbers that have called you.
TIP!
From any call log
select
Options
and then
Delete
to delete selected items.
Using call divert
1
Press
Menu
and select
Settings
and
Call
.
2
Select
Call divert
.
3
Choose whether to divert all
calls, when the line is busy, when
there is no answer and when you
are out of reach.
4
Choose
Activate
and select
whether to divert to voice mail, or
to other number.
5
Enter your divert number or
select
Search
to browse for your
divert number.
Note: Charges are incurred for
diverting calls. Please contact
your network provider for details.
TIP! To turn off all call
diverts, choose Call divert from
calling menu then select Options
then select Deactivate all.
Using call barring
1
Press
Menu
and select
Settings
and
Call
.
2
Select
Call barring
.
3
Choose any or all of the options:
All outgoing calls
Outgoing international
Outgoing international calls
except home country
Incoming calls
Incoming when abroad

14
4
Enter the call barring password.
Please check with your network
operator for this service.
TIP!
Select
Fixed dial numbers
from the
calling menu
to turn on
and compile a list of numbers
which can be called from
your phone. You’ll need your
PIN2 code from your operator.
When activated, only numbers
included in the fi xed dial list can
be called from your phone.
Changing the call settings
1
Press
Menu
and select
Settings
and
Call
.
2
From here you can amend the
settings for:
Call divert
- Choose whether to
divert your calls.
Call barring
- Select which calls
you would like to be barred.
Call waiting
- Be alerted when
you have a call waiting.
Fixed dial numbers
- Choose a
list of numbers that can be called
from your phone.
Excuse message
Call reject settings
- Select
Off
or
On
and choose to reject all
calls, those from specific groups,
contacts, unregistered numbers
(those not in your list of contacts)
or those with no caller ID.
Send my number
- Choose
whether your number will
be displayed when you call
someone. (Depends on your
network provider.)
Auto redial
- Allows you to set
the auto redial function when a
call attempt has failed.
Minute minder
- Determines
whether to sound a tone every 1
minute when you are in the call.
Bluetooth answer mode
-
Choose how to answer a call
when using a Bluetooth headset.
Select
Hands-free
or
Handset
.
Save new number
- Selecting
this option will save numbers that
are not already in your contacts
upon ending the call.
Call costs
- View the charges
applied to your last call or all
calls. This service is network
dependent, some operators are
unable to support this.
Calling

15
Taking a quick photo
1
Press
Menu
and select
Camera
and
Camera
.
2
When the camera has focused
on your subject, select the
Capture icon on the bottom-
center of the screen and press
OK
to take a photo.
After taking a photo
Your captured photo will appear
on the screen. The image name
is shown on the bottom top of
the screen with five icons on the
bottom side.
Album
- View the pictures and
videos you have taken in your
Album.
Send
-
Send the photo as
MMS
, as
an
Email
or via
Bluetooth
.
New
- Take another photo straight
away.
Set as
- Use the image as
Wallpaper, as a
Contact
image,
or in your Start up image or Shut
down image.
Delete
- Delete the photo you
have just taken. The viewfinder will
reappear.
Camera

16
Shooting a quick video
1
Press
Menu
and select
Camera
and choose
Video Camera
. The
video camera’s viewfinder will
appear on screen.
2
Focus the camera on what to
record.
3
Select the Rec. icon on the
bottom-center of the screen and
press
OK
to take a video. Rec
will appear at the bottom of the
viewfinder. Press again to
stop recording.
After you’ve shot your
video
A still image representing your
captured video will appear on
screen.
After recording a video clip, you can
check the menu as follow:
Album
- View the pictures and
videos you have taken in your
Album.
Play
- Play the file.
New
- Press to shoot another video
straight away.
Send
- Send the video as
Message
,
as an
Email
or via
Bluetooth
.
Delete
- Delete the video you have
just made. The viewfinder will
reappear.
Video Camera
17
Music
MP3 Player
Your LG-C320 has a built-in music
player so you can play all your
favourite music.
Note:
• Before using music player, you
will need to transfer music fi le
onto your phone.
• Music player supports codec
types as follows: MP3, WMA,
AAC. Music player does
not necessarily support all
features and variations of fi le
formats.
To access the music player, press
Menu
and select
Music
and select
MP3 player
. From here you can
access to:
Recently played
- View all of the
songs you have played recently.
All songs
- Contains all of the
songs you have on your phone.
My Playlists
- Contains all playlists
you have created.
Artists
- Allows you to view all
tracks sorted by artist.
Albums
- Allows you to view all
tracks sorted by album.
Genres
- Allows you to view all
tracks sorted by genre.
Shuffle all songs
- Allows you to
play all of the songs in random
order.
Transferring music onto
your phone
The easiest way to transfer music
onto your phone is via Bluetooth or
sync cable.
To transfer music using Bluetooth:
1
Make sure both devices have
Bluetooth switched on and are
visible to one another.
2
Select the music file on the other
device and choose to send it via
Bluetooth.
3
When the file is sent you should
to accept it on your phone by
selecting
Yes
.
4
The file should appear in
All
songs
.
Playing a song
1
Press
Menu
and select
Music
,
then choose
MP3 player
.
2
Choose
All songs
then select
the song you want to play.
Select .
3
Select to pause the song.
4
Select to skip to the next
song.
18
5
Select
to skip to the previous
song.
6
Select
Back
to stop the music
and return to the
All songs
menu.
TIP!
To change the volume
while listening to music, use the
volume keys on the left hand
side of your phone.
Note:
The copyright of music
fi les can be protected in
international treaties and
national copyright laws.
Therefore, it may be necessary
to obtain a permission or a
license to reproduce or copy
music. In some countires
national law prohibits private
copying of copyrighted
material. Before downlading or
copying hte fi le, please check
the national legistration of the
applicable country concerning
the use of such material.
Using options while playing
music
Select
Options
and choose from:
Minimize
- Hide the music player
screen so that you can continue
using your phone as normal while
music is playing.
Repeat
- You can listen the music
repeated.
Shuffle
- Play your tracks in a
random order.
Equalizer
- You can view
Equalizer
on the screen.
Visualization
- Select a visual
effect.
File info.
- You can view information
about the music file you are
listening to.
Add to playlist
- Adds the current
track to a playlist.
Send
- Send the song as a
Message, Email
or via
Bluetooth
.
Set as
- Use the song as
Ringtone,
Message tone, Start-up
or
Shut
down
.
Music

19
E-Mail
Setting up your email
You can stay on the move using
email on your LG-C320. It’s quick
and simple to set up a e-mail or
Other email accounts.
1
Press
Menu
, choose
Settings
.
2
Select
E-mail
and choose
accounts
.
3
Select
Add
and follow the pop
up instruction and enter the
information required.
Sending an email using
your new account
To send/receive an email, you
should set up an email account
(see above).
1
Press
Menu
, select
E-Mail
and
choose the account you want
to use.
2
Choose
Write e-mail
and a new
email window will open.
3
Write a subject line then press
OK
.
4
Enter your message using the
keypad.
Retrieving your email
1
Press
Menu
and select
E-mail
.
2
Select the account you want
to use.
3
Select
Inbox.
4
Choose
Refresh
and the phone
will connect to your email
account and retrieve your new
messages.
Message folders
Press
Menu
and select
Messaging
.
The folder structure used on your
LG-C320 should be self-explanatory.
Write e-mail
- Create your new
message.
Inbox
- All the e-mails you receive
are placed into your
Inbox
. From
here you can reply, forward and
more.
Drafts
- If you don’t have time to
finish writing a e-mail, you can
save what you have written so far
in here.
Sent
- Copies of all the e-mail you
send are kept into your Sent folder.
Outbox
- This is a temporary
storage folder while e-mail are
being sent or stores the messages
that are failed to sent.
Trash
- All the e-mail you remove
are placed into your
Trash.

20
Changing your email
settings
1
Press
Menu
, choose
Settings
.
2
Select
Settings
then you can
adapt the following settings:
E-mail accounts
- You can set
up an email account.
Allow reply e-mail
- Choose
to allow the sending of ‘read
confirmation’ messages.
Request reply e-mail
- Choose
whether to request read
confirmation messages.
Retrieve interval
- Choose how
often your LG-C320 checks for
new email messages.
Include original message
-
Choose whether or not to include
the original message.
Include attachment
- Choose
whether or not to include the
original attachment.
Auto retrieval in roaming
-
Choose whether or not to
automatically retrieve your
messages when abroad.
New e-mail notification
-
Choose whether or not to be
alerted to new emails.
Signature
- Create an email
signature and switch this feature
on.
Priority
- Choose the priority
level of your email messages.
Maximum size for receiving
- Choose the size of emails to be
retrieved at any one time.
Mail sending size
- Choose the
size of emails to be sent at any
one time.
E-Mail
21
Using the FM radio
Your LG-C320 has an
FM radio
feature so you can tune into your
favorite stations and listen on the
move.
Listening to the radio
1
Press
Menu
, select
Music
and
choose
FM radio
.
2
Select the channel number of the
station you would like to listen to.
Searching for stations
You can tune your phone to radio
stations by searching for them
either manually or automatically.
They will then be saved to specific
channel numbers, so you don‘t
have to keep re-tuning
To auto tune:
1
Press
Menu
and select
Music
.
2
Select
FM radio
choose
Options
.
3
Select
Auto-scan
. A confirmation
message appears. Select
Yes
, then the stations will be
automatically found and allocated
to a channel in your phone.
Note:
If you are in an area with
bad radio reception, you may
have diffi culty listening to the
radio.
You will need to insert your
headphones in order to listen to
the radio. Insert them into the
headphone socket.
Note:
You can also manually
tune into a station by using
and displayed in the centre
of the screen. If you press
and hold and , the stations
will be automatically found.
FM Radio

22
Accessing the web
You can launch the WAP browser
and access the homepage of the
activated profile on web settings.
You can also manually enter a URL
address and access the associated
WAP page.
1
Press
Menu
and select
Web
.
2
To go straight to the browser
home page, select
Web
.
Alternately, select
Enter URL
and type in the URL, followed by
Connect.
NOTE:
You will incur extra cost
by connecting to these services
and downloading content.
Check data charges with your
network provider.
Web
23
Messaging
Messaging
Your LG-C320 includes functions
related to SMS (Short Message
Service), MMS (Multimedia
Message Service) as well as the
network’s service messages. To use
these functions, press
Menu
and
select
Messaging
.
Sending a message
1
Press
Menu
, select
Messaging
and choose
Write message
.
2
A new message editor will open.
Message editor combines
SMS
and
MMS
in one intuitive mode
that is easy to switch between.
The default setting of the
message editor is
SMS
mode.
3
Enter your message using the
keypad. See
Entering text
on
the right for more information on
how to enter text.
4
Select
Options
and choose
Insert
to add an
Image
,
Video
,
Sound
,
Template, Symbols
,
Emoticon
,
Name & Number
,
New slide
,
Subject
or
More
(
Business
card
/
Schedule
/
Memo
/
Task
/
My
business card
).
5
Choose
Send to
.
6
Choose a contact from the list
of contacts or enter the phone
number.
7
Select
Send
.
WARNING: Image, Sound,
Video, New slide, Subject,
Business card, Schedule or
My business card is added
to the message editor, it will
be automatically converted to
MMS mode and you will be
charged accordingly.
Entering text
You can enter alphanumeric
characters using the phone’s
keypad. For example, storing names
in contacts, writing a message and
creating scheduling events in the
calendar all require entering text.
The following text input methods
are available in the phone: Abc
mode, and 123 mode.
Note:
Some fi elds may allow
only one input mode (e.g.
telephone number in contact
fi elds).

24
Text input mode using the
keypad
When you want to enter text, for
example when writing a message,
the keypad will default to Abc mode.
If you are entering a number, for
example when making a call, the
keypad number keys will default to
numbers.
Message folders
Press
Menu
and select
Messaging
.
The folder structure used on your
LG-C320 should be self-explanatory.
Write message
- Create your new
message.
Inbox
- All the messages you
receive are placed into your Inbox.
From here you can reply, forward
and more.
Conversation view
- You can view
the messages by each numbers.
Drafts
- If you don’t have time to
finish writing a message, you can
save what you have written so far
in here.
Outbox
- This is a temporary
storage folder used while messages
are being sent.
Sent
- Copies of all the messages
you send are kept into your Sent
folder.
My folders
- You can move
messages of
Inbox
or
Sent
into
My
folders
. Also you can move those
messages of
My folders
into the
original message box.
Templates
- A list of pre written
useful messages, useful for a quick
reply.
Managing your messages
1
Press
Menu
, select
Messaging
and choose
Inbox
.
2
Select Options and then choose to:
Reply
- Send a reply to the
selected message.
Forward
- Send the selected
message on to another person.
Write message
- Write a new
message or email regardless
who sent you message.
Call
- Call the person who sent
you the message.
Save number
- Save the number
of the message.
Delete
- Delete the selected
message.
Copy&Move
- Choose to copy
or move the selected message
to the SIM card or phone and
specially move selected message
to
My folders.
Messaging
25
Selection mode
- Mark a
message or all.
Search
- you can find messages
by
Keyword
or
Sender
.
Filter
- Displays messages by
desired message types.
Delete all
- Delete all messages.
Message info
- You can check
the message info of its type,
subject, where it is from and
its date.
If you see the message
No space
for SIM message
, you should delete
some messages from your inbox to
create space.
If you see the message
No space
for messages
, you can delete either
messages or saved files to create
more space.
TIP!
When you receive the
message, you can reply quickly
by using
Quick reply
function.
While you see the message,
press
Options
and select
Template reply
. This is useful if
you need to reply the message
during a meeting.
TIP!
While you see the message,
press
Options
and select
Extract
.
You can extract the information
such as a number, email
address or web address from
the selected message.
Changing your text
message settings
Press
Menu
, select
Messaging
, then
choose
Settings
and
Text message
.
You can make changes to:
Text message centre
- Enter the
details for your message centre.
Delivery report
- Choose to receive
confirmation that your message
have been delivered.
Validity period
- Choose how long
your messages are stored at the
message centre.
Message types
- Convert your text
into
Voice
,
Fax
,
X.400
or
Email
.
Character encoding
- Choose how
your characters are encoded. This
affects the size of your message
and therefore data costs.
Send long text as
- Choose
whether to send your message as
Multiple SMS or MMS when you
enter a text longer than 2 pages in
the message field.

26
Changing your multimedia
message settings
Press
Menu
, select
Messaging
,
then choose
Settings
and
Multimedia message
. You can
make changes to:
Retrieval mode
- Choose to
automatically or manually download
multimedia messages depending
on whether you are at home or
roaming.
Delivery report
- Choose to request
or allow a delivery report.
Read reply
- Choose to request or
allow a read reply.
Priority
- Choose the priority level of
your multimedia message.
Validity period
- Choose how long
your message is stored at the
message centre.
Slide duration
- Choose how long
your slides appear on screen.
Creation mode
- Allows you to
select the contents type supported
by MMS.
Delivery time
- Configures the
delivery time of message to the
recipient. The multimedia message
centre will deliver the message after
the delivery time.
Multi msg centre
- Allows you to
configure network information such
as the multimedia service centre
and the internet profile to send a
multimedia message.
Changing your other
settings
Press
Menu
, select
Messaging
, and
choose
Settings
then:
Text message
- You can configure
text message related options.
Multimedia message
-You can
configure multimedia message
related options.
Voicemail
- Add a new voicemail
service. Contact your network
operator for more information on
the service they provide.
Service message
- Choose to
receive or block service messages.
You can also set your message
security by creating trusted and
untrusted lists of senders.
Save sent message
- You can
select to save message you sent.
Message counter
- You can check
amount of messages you sent
during period you want to know.
Info. service
- Choose the reception
status, channels and language of
your info messages.
Messaging

27
Searching for a contact
1
Press
Menu
and select
Phonebook
.
2
Using the keypad enter the first
letter of the name of the contact
you want to call.
3
To scroll through the contacts
and their different numbers use
the navigation keys.
Or, using the slightly quicker
method…
1
Enter the number you wish to
search on the home screen and
select
Options
.
2
Choose
Search contacts
in
option menu.
Adding a new contact
1
Press
Menu
and select
Phonebook
.
2
Press
Option
and select
New
contact
.
3
Choose whether to store your
new contact on your
Handset
or
SIM
card.
4
Enter the information you want
in the fields provided and select
Done
.
Or to use a slightly quicker
method…
1
Enter the number you wish to
store and press
Options
.
2
Choose
Save number
, and
choose either
New contact
or
Update contact
.
3
Enter the relevant information
and select
Done
.
Contact options
There are many things you can
do when viewing a contact. Here’s
how to access and use the options
menu.
1
Press
Menu
and select
Phonebook
.
2
Select
Options
to open the list of
options. From here you can:
Message
- Send a message to
the contact.
Send contack
- Send the
contact’s details to another person
as a business card. Choose to
send as a
Text message
,
MMS
,
E-mail
or via
Bluetooth
.
Call
- Directly make voice call to
a contact you choose.
New contact
- Add a new
contact.
Phonebook
28
Edit
- Change any of the
contact’s details.
Selection Mode
- Choose
whether to mark a contact or
unmark.
Search by
- Search a contact by
Number
or
Group
.
Storage location
- Choose to
move or copy to the phone or
SIM card (depending on where
you originally saved the contact).
Delete
- Delete the contact.
Select
Yes
only if you are sure.
Speed dials
- You can assign
a frequently-called contact to a
speed dial number.
Creating a group
1
Press
Menu
and select
Phonebook
.
2
Select
Groups
and choose
Options
.
3
Select
New group
.
4
Enter a name for your new
group.
5
Press
Done
.
Note:
If you delete a group,
the contacts which were
assigned to that group will not
be lost. They will remain in your
contacts.
TIP!
You can edit an existing
group by highlighting it and
selecting
Options
. Choose to
Add member
to the group from
your contacts, select
Edit group
or
Delete
the group.
Changing your contact
settings
1
Press
Menu
and select
Phonebook
.
2
Select
Option
and choose
Settings
. From here you can
adjust the following settings:
Display name
- You can select
to show the
First name first
or
Last name first
or
Last name,
First name
.
Main store and view
- Choose
whether to store contacts
SIM
or
Handset
. And also choose
whether to view contacts saved
to
both handset & USIM,
Handset only
or
USIM only.
Phonebook

29
Copy all
- Copy your all contacts
from your SIM card to your
handset or from your handset to
your SIM card.
Move all
- This works in the
same way as
Copy all
, but the
contact will only be saved to the
location you’ve moved it to. If
you move a contact from the
SIM card to the handset it will
be deleted from the SIM card
memory.
Export contacts
- You can save
all the phonebook data in the
handset to an external memory
card by the form of vcard.
Import contacts
- You can
restore all the phonebook data
in an external memory card to
the phone memory by the form
of vcard.
Send all contacts via Bluetooth
-
Send all contacts information to
another handset by Bluetooth.

30
More
Setting your alarm
1
Press
Menu
and select
More
,
then choose
Alarm clock
.
2
Press
Options
and select
New
alarm
.
3
Scroll down and enter the time
you would like the alarm to
sound at.
4
Choose the repeat type to
indicate whether you would
like your alarm to sound
Not
repeated
,
Daily
,
Mon - Fri
,
Mon - Sat
,
Select days
.
5
Scroll down and choose whether
you would like the alarm to
Always sound, Always vibrate,
Always sound and vibrate
or
As
in profile
.
6
Scroll down to choose the alarm
tone. Press and choose a
sound from the My stuff.
7
Scroll down and enter a name for
the alarm or keep the suggested
name.
8
Finally you can set the snooze
interval at 5, 10, 20, 30 minutes,
1 hour or off.
9
Select
Done
.
Adding an event to your
calendar
1
Press
Menu
and select
More
and
select
Organiser,
then choose
Calendar
.
2
Select the date you would like to
add an event to. You can choose
a date either by scrolling to it
using the navigation keys or by
selecting
Options
and
Go to date
in order to enter a date.
3
Select Options then select
New
schedule
and scroll down to
enter the time you would like
your event to begin. Scroll down
and enter the end time of your
event.
4
Enter a
Subject
for the event.
Use the keypad to type letters
and numbers.
5
Scroll down again and choose
whether you would like to set an
Alarm
for the event. Scroll left or
right to see the available options.
You can set the alarm to go off at
the starting time of the event or
at a set period of time before the
event starts to remind you the
event is coming up.
31
6
Scroll down once more to select
whether the event is occurring
Not repeat
or repeated at
Daily
,
Weekly
,
Monthly
or
Annually
intervals. If the event is repeated,
you can also scroll down to enter
an
Expiration date
for when the
events will stop completely.
7
Select
Done
and your event will
be saved in the calendar. A
square cursor will mark the days
of any saved events.
Adding an item to your
task list
1
Press
Menu
and select
More
and
choose
Organiser
.
2
Select
Tasks
and select New
task.
3
Set the date for the to do item,
add notes and choose alarm
and select a priority level:
High
,
Normal
or
Low
.
4
Save your to do list item by
selecting
Done
.
TIP!
You can edit an item by
selecting it, pressing
Options
and
Edit
. Confi rm your amends
by selecting
Done
.
Adding a memo
1
Press
Menu
and select More and
select
Organiser
, then
Memo
.
2
Select
New memo
and type your
memo.
3
Select
Save
.
4
Your memo will appear on the
screen.
TIP!
You can lock the memo.
Press
Option
and select
Lock
for the private memo to protect
privacy.
Date finder
Date finder is a handy tool to help
you calculate what the date will be
once a certain number of days have
passed.
Voice recoder
Using the Voice recorder
Use your
Voice recorder
to record
voice memos or other sounds.
Recording your voice memo
1
Press
Menu
and select More,
then choose
Voice recorder
.
2
Press
OK
to begin recording.

32
3
Choose
Stop
to end the
recording.
4
Press
Options
and select
Play
to
listen to the recording.
Note:
You can listen to all of
the voice recordings you have
saved by selecting Options and
Go to Voice recordings.
Sending a voice recording
1
Once you have finished
recording, select
Options
.
2
Select
Send
and choose from
MMS, E-mail
or
Bluetooth
. If
you choose
MMS
or
E-mail
, the
recording will be added to the
message and you can write and
send it as normal. If you choose
Bluetooth
, you will be prompted
to turn Bluetooth on.
Using your calculator
1
Press
Menu
and select
More
,
then choose
Calculator
.
2
Press the numeric keys to input
numbers.
3
For simple calculations, select
the function you require (+, –,
×, ÷) using the navigation keys
followed by =.
4
For more complex calculations,
select
Options
to choose a
command.
5
Select to clear the screen
and start a new calculation.
Using the stopwatch
1
Press
Menu
and select
More,
,
then choose
Stopwatch
.
2
Select
Start
to begin the timer.
3
Choose
Lap
if want to record a
lap time. Up to 99 lap times can
be saved.
4
Select
Stop
to end the timer.
5
Choose
Resume
to restart
the stopwatch at the time you
stopped it at or select
Reset
to
return to zero.
Converting a unit
1
Press
Menu
and select
More
,
then choose
Unit converter
.
2
Choose whether you would
like to convert
Currency
,
Area
,
Length
,
Weight
,
Temperature
,
Volume
or
Velocity
.
3
Scroll left and right to select a
unit, then scroll down and enter
the unit quantity.
More
33
4
Scroll down to the unit
conversion box and choose the
unit measurement you want to
convert into. The conversion will
show automatically in the line
below.
Note:
For
Currency
convert, you need to set
Rate
according to current exchange
rate fi rst.
Adding a city to your World
clock
1
Press
Menu
and select
More
,
then choose
World clock
.
2
To find out the time of specific
city, press
Options
and select
New city
.
3
Move a city by navigator key and
select a city on the Map.
Select
Options
and choose
View
city list
, then also you can select
the list or enter the first letter of
the city.
4
Press
Select
.

34
Settings
Changing your profiles
1
Press
Menu
and select
Settings.
2
Select
Profiles
and then choose
the profile you want to edit.
3
Select
Options
and choose
Personalise
.
4
You can change all of the tones,
its volumes and alert options
from here.
Using flight mode
To turn on flight mode, press
Menu
and then select
Settings
and
Profiles
. Select
Flight mode
to
activate. Flight mode will not allow
you to make calls, connect to the
internet or send message.
Changing your Device
settings
1
Press
Menu
and select
Settings
.
2
Select
Device
settings and
choose from the list below.
Power save
- Choose to switch
the factory set power saving
settings On or Off.
Languages
- Change the
language of for your LG-C320’s
display.
Auto key lock
- Choose a duration
for locking the key automatically.
Primary storage settings
- If you
insert an external memory card in
your phone, you can also select
Primary storage settings then
choose the default location you
prefer items to be saved to.
Device info
- View the technical
information for your LG-C320.
Changing the date & time
1
Press
Menu
and select
Settings
.
2
Select
Device
and choose
Date
and Time
and choose from the
list below:
Date and time settings
- Select
On Auto update, and the phone
will automatically update the date
and time.
Date format
- You can enter the
current date. You can set the
date format (DD/MM/YYYY, MM/
DD/YYYY, YYYY/MM.DD).
Date separator
- You can enter
the current date. You can set the
date separator (DD/MM/YYYY,
DD.MM.YYYY, DD-MM-YYYY).
Time format
- You can set the
date format
12 hours
or
24
hours.

35
Changing your security
settings
Change your security settings
to keep your LG-C320 and the
important information it holds
protected.
1
Press
Menu
and select
Settings
and choose
Device
.
2
Select
Security
and choose from
the list below:
PIN code request
- Choose a PIN
code to be requested when you
turn your phone on.
Device lock -
Choose a security
code to lock your phone
Never,
At device start up, When SIM
card is changed
or
Immediately.
Application lock
- You can lock
the contents you want to hide.
(Phonebook, Messaging, E-mail,
etc.)
Change codes -
Change your
PIN code (This menu item will
appear if PIN code request is set
to On), PIN2 code, Security code.
Note: Security code
The security code protects
the unauthorized use of your
phone. The default security
code is set to ‘0000’ and the
security code is required to
delete all phone entries and
to activate the Reset settings
menu. Also, the security code
is required to enable or disable
the phone lock function to
prevent unauthorized use of
the phone. The security code
default setting can be modifi ed
from the Security > Change codes.
Viewing memory status
Your LG-C320 has three memories
available: the phone, the SIM card
and an external memory card (you
may need to purchase the memory
card separately).
You can use the memory manager
to determine how each memory is
used and see how much space is
available.
Press
Menu
and select
Settings
,
select
Device
and choose
Memory
info
You will then see the current
status of the memories in your
LG-C320.
36
Resetting your phone
Use
Reset Device
in
Device
of
Settings
menu to reset all the
settings to the factory definitions.
You need the security code to
activate this function.
Changing your display
settings
1
Press
Menu
and select
Settings
.
2
Select
Screen
and choose from:
Screen theme
- Choose the
theme of your home screen or
start-up/shut down screen.
Menu style
- Change the menu
view from
List style
or
Grid style
.
Dialling
- Adjust the font style
and size for when you are
dialling a phone number.
Font
- Adjust the font size.
Backlight
- Choose how long the
backlight remains on. Also, use
the navigation keys to adjust the
main screen brightness.
TIP!
The longer the backlight is
on for, the more battery power
is used and you may need to
charge your phone more often.
Handset theme
- Quickly change
the whole look of your screen.
Greeting message
- After
selecting
On
, you can write a
welcome message. The message
will appear on screen whenever
you start-up the phone.
Social network services
(SNS)
Your LG-C320 has SNS that lets
you enjoy and manage your social
network.
NOTE:
An additional costs may
be incurred when connecting
and using online services.
Check your data charges with
your network provider.
Phone Software update
LG Mobile Phone Software update
from internet
For more information on using this
function, please visit the http://
update.lgmobile.com or http://www.
lg.com/common/index.jsp select
country Support.
This Feature allows you to update
the firmware of your phone to the
latest version conveniently from the
internet without the need to visit a
service center.
Settings

37
As the mobile phone firmware
update requires the user’s full
attention for the duration of the
update process, please make
sure to check all instructions and
notes that appear at each step
before proceeding. Please note
that removing the USB data cable
or battery during the upgrade
may seriously damage you mobile
phone.
Connectivity
Changing your connectivity
settings
USB connection mode
Your connectivity settings have
already been set up by your
network operator, so you can enjoy
your new phone straightaway. If you
want to change any settings, use
this menu. Press
Menu
and select
Settings
then choose
Connectivity
.
Your options are:
Bluetooth
- Set up your LG-C320
for Bluetooth use. You can adapt
your visibility to other devices or
search through devices your phone
is paired with.
USB connection mode
- You can
select the USB connection mode on
your phone for several uses.
Changing your Bluetooth
settings
1
Press
Menu
and select
Settings
and choose
Connectivity
.
2
Choose
Bluetooth
then
Settings
.
Make your changes to:
My device visibility
- Set Visible
or
Visible for 1 min
so that other
devices can detect your phone
when they are searching for a
Bluetooth device. If you select
Hidden
, other devices will not
be able to detect your phone
when they are searching for a
Bluetooth device.
My device name
- You can name
or rename your phone as it will
appear on other devices. Your
phone’s name will be shown
on other devices only when
My
device visibility
is set to
Visible
.
Supported services
- You can
view the list of devices such
as headsets and handsfree
supported by Bluetooth enabled
phone.
My address
- Check your
Bluetooth address here.

38
Note:
To improve security,
we recommend that once
you have confi gured or paired
with a device,
Visibility
be
set to
Hidden
. For incoming
connections, regardless of
whether or not the other device
has been paired with your
phone, you can choose to
accept or reject the connection.
Pairing with another
Bluetooth device
By pairing your LG-C320 and
another device, you can set up a
passcode protected connection.
This means your pairing is more
secure.
1
Check your Bluetooth is
Turn
on
and
Visible
. You can change
your visibility in the
Settings
of
Bluetooth
menu, by selecting My
device visibility, then Visible.
2
From
Bluetooth
, choose
Activate
Bluetooth
and select
Search
new device
.
3
Your LG-C320 will search for
devices. When the search is
completed
Add
and
Refresh
will
appear on screen.
4
Choose the device you want to
pair with, select
Add
and enter a
passcode then choose
OK
.
5
Your phone will then connect to
the other device, on which you
should enter the same passcode.
6
Your passcode protected
Bluetooth connection is now
ready.
Using a Bluetooth headset
1
Check your Bluetooth is
Activate
Bluetooth
and
Visible
.
2
Follow the instructions that came
with your headset to place it
in pairing mode and pair your
devices.
3
Your LG-C320 will automatically
connect to your Bluetooth
headset and switch to headset
profile.
Settings
39
Sending and receiving your
files using Bluetooth
Bluetooth is a great way to send
and receive files as no wires are
needed and connection is quick
and easy. You can also connect
to a Bluetooth headset to make
and receive calls. Before you can
start sharing files using Bluetooth,
you will need to pair your phone
with another Bluetooth device. For
information on pairing devices, see
Pairing with another Bluetooth
device.
To switch Bluetooth on:
1
Press
Menu
and select
Settings
.
Choose
Connectivity
then select
Bluetooth
.
2
Select
Activate Bluetooth
.
3
Select
Deactivate Bluetooth
to
switch Bluetooth off.
To send a file:
1
Open the file you want to send,
typically this will be a photo,
video or music file.
2
Select
Options
and choose
Send
,
then
Bluetooth
.
3
Select
Yes
to turn Bluetooth on if
it is not already activated.
4
Your LG-C320 will automatically
search for other Bluetooth
enabled devices within range.
5
Choose the device you want to
send the file to and select
OK
.
To receive a file:
1
To receive files, your Bluetooth
must be both
Activate Bluetooth
and
Visible.
2
A message will prompt you to
accept the file from the sender.
Select
Yes
to receive the file.
TIP!
Keep an eye on the
progress bar to make sure your
fi le is sent.
TIP!
The Bluetooth
®
word
mark and logos are owned
by the Bluetooth SIG, Inc.
and any use of such marks
by LG Electronics is under
licence. Other trademarks and
trade names are those of their
respective owners.

40
Synchronise your phone
with your PC
You can synchronise your phone
with your PC to make sure all your
important details and dates match,
but also to backup your files to put
your mind at ease.
Backing up and restoring
your phone’s information
1
Connect the USB cable to your
phone and your PC.
2
Select the
PC suite
from the
popup menu in your phone.
3
Click on the Backup icon, and
select
Backup
or
Restore.
4
Mark the contents you would
like to back up or restore. Select
the location you would like to
backup information to, or restore
information from. Click OK.
5
Your information will be backed
up.
Viewing your phone files on
your PC
1
Connect the USB cable to your
phone and your PC.
2
Select the
PC suite
from the
popup menu in your phone.
3
After searching the phone it will
be connected automatically.
TIP!
Viewing the contents of
your phone on your PC helps
you to arrange fi les, organise
documents and remove
contents you no longer need.
Settings