LG Electronics USA C395 Cellular/PCS GSM/EDGE/WCDMA Phone with Bluetooth User Manual 1
LG Electronics MobileComm USA, Inc. Cellular/PCS GSM/EDGE/WCDMA Phone with Bluetooth Users Manual 1
UserManual.wiki
>
LG Electronics USA
>
C395 User Manual
>
Users Manual 1
Contents
1.
Users Manual 1
2.
Users Manual 2
Users Manual 1
Navigation menu
Upload a User Manual
Namespaces
Wiki Guide
HTML
PDF
Info
Views
User Manual
Discussion / Help
Navigation


![Making a Call1. Make sure your phone is powered on.2. Touch and enter a phone number using the touch pad or open the slide and enter a phone number using the qwerty keys. To edit a number on the display screen, simply press the key to erase one digit at a time. ► Press and hold the key to erase the entire number.3. Press the [SEND] key to call the number. Or touch Call on the touch pad.Making a Call with the Send Key1. Press the [SEND] key, and the most recent missed, dialed and received phone calls will be displayed.2. Select the desired number.3. Press the [SEND] key or touch Call Back.Making International Calls1. When entering a phone number, press the key and the international access character ‘+’ will appear. When using the touch pad to dial, touch and hold .2. Enter the country code, area code and the phone number.3. Press the [SEND] key to call the number. Or touch Call.Ending a CallWhen you have finished a call, press the [END] key.Making a Call from the ContactsYou can store frequently called names and phone numbers in the SIM card as well as in the phone memory known as the Contacts.You can dial a number by simply selecting a name in the Contacts List and pressing the [SEND] key.General Functions](https://usermanual.wiki/LG-Electronics-USA/C395.Users-Manual-1/User-Guide-1626337-Page-15.png)
![General FunctionsAnswering a CallWhen you receive a call, the phone rings and the phone icon appears on the screen. If the caller can be identified, the caller’s phone number (or name if stored in your Address Book) is displayed.1. Press the [SEND] or unlock the screen and touch Accept. If Any Key has been set as the Answer Mode, any key press will answer a call except for the [END] key or .2. End the call by pressing the [END] key. NoteYou can answer a call while using other functions or features.Adjusting the VolumeDuring a call, if you want to adjust the earpiece volume, use the side volume keys of the phone. In the standby screen, you can adjust the ring volume using the side volume keys.](https://usermanual.wiki/LG-Electronics-USA/C395.Users-Manual-1/User-Guide-1626337-Page-16.png)
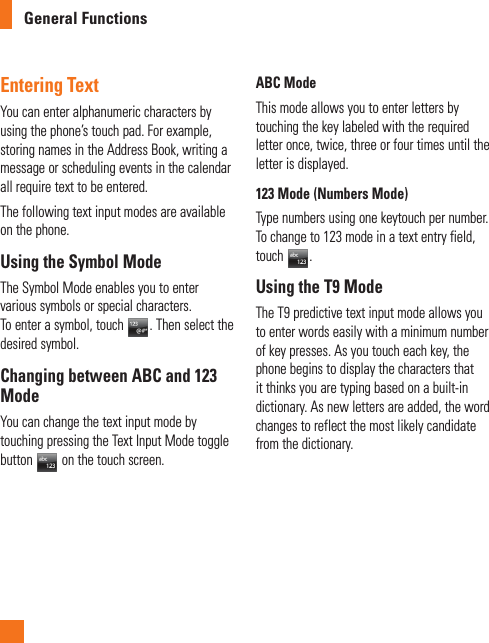
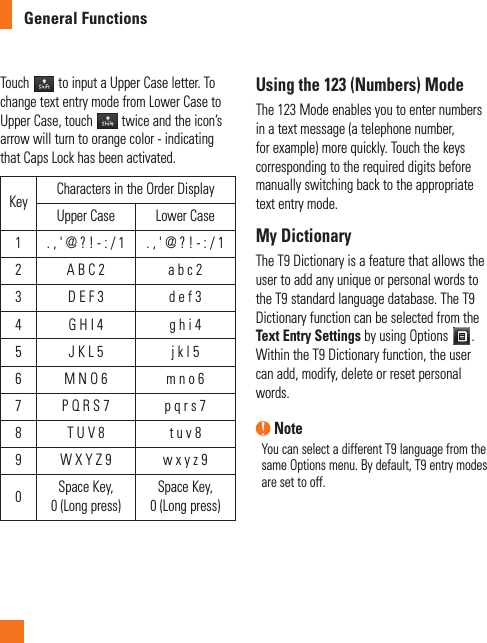
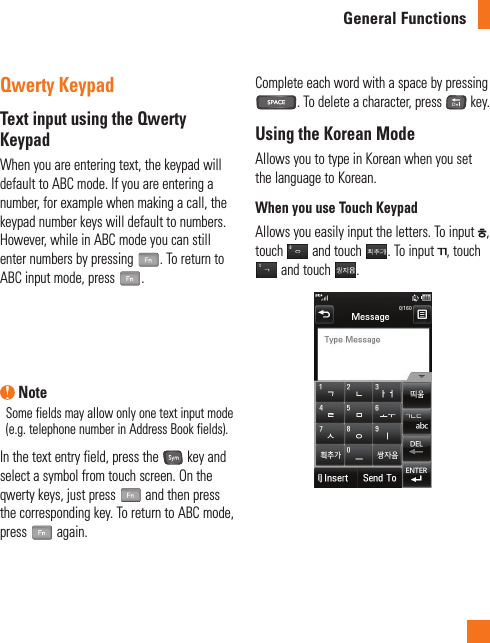
![General Functions1. When you are in the T9 predictive text input mode, begin entering a word by pressing the touch screen keys. Touch one key per letter. ► The word changes as letters are typed - ignore what is displayed on the screen until the word is typed completely. ► If the word is still incorrect after typing completely, press on the pop up menu to see the options. Then select the word you want by touch. ► If the desired word is missing from the word choices list, add it by pressing and selecting to enter the new word. Then press Save to save the word into the built-in dictionary.2. Enter the whole word before editing or deleting any letters.3. Complete each word with a space by touching .To delete letters, touch . Touch and hold down to erase the entire text entry. NotePressing the [END] key will save your unsaved message in the Drafts folder. Using the ABC ModeUse the touch pad keys to enter your text.1. Touch the touch key labeled with the required letter: ► Once for the first letter ► Twice for the second letter ► And so on2. To insert a space, touch . To delete letters, touch . Touch and hold down to erase the entire text entry. NoteRefer to the table below for more information on the characters available using the keys.](https://usermanual.wiki/LG-Electronics-USA/C395.Users-Manual-1/User-Guide-1626337-Page-19.png)

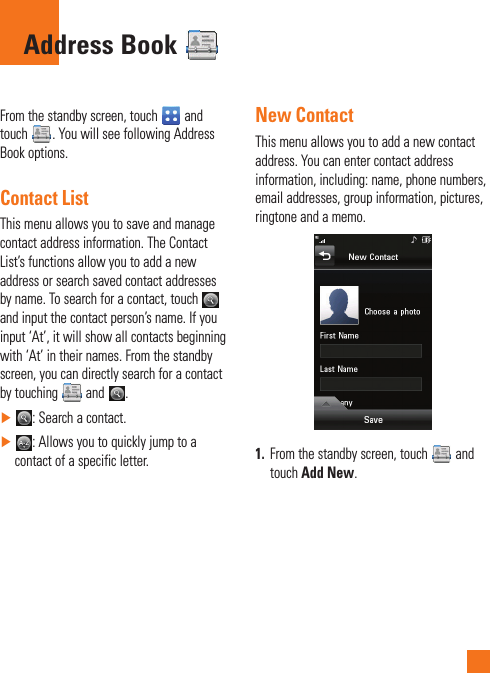

![Address BookFrom this menu, you are also able to delete entries in the SIM card and the Handset. 1. From the standby screen, touch and touch .2. A drop-down menu will appear, touch SIM Management.Service NumbersYou can view the list of Service Dial Numbers (SDN) assigned by your network provider. Such numbers could include the emergency services, directory assistance and voice mail numbers.1. From the standby screen, touch and touch .2. A drop-down menu will appear, touch Service Dial Number.3. The names of the available services will be shown.4. Touch a service number. Press the [SEND] key.My InfoThis displays your own contact information. You can edit and create up to 3 Biz Cards.1. From the standby screen, touch and touch .2. A drop-down menu will appear, touch My Info.3. Touch an empty field, then enter and save your Biz Card information.](https://usermanual.wiki/LG-Electronics-USA/C395.Users-Manual-1/User-Guide-1626337-Page-26.png)
![Your phone provides a number of control functions that you can use during a call. To access these functions during a call, touch .During a CallMaking a Second CallYou can select a number you wish to dial, to make a second call. 1. Press Dialpad, enter the 2nd phone number and press Call. or Press Contacts to select a contact from your Address Book and then press the Call button .Swapping Between Two CallsOnce the second call has been dialed (and answered), you can switch between the two on-going calls.Press [SEND] key or touch .Answering an Incoming CallTo answer an incoming call when the handset is ringing, simply press the [SEND] key or touch Accept. The handset is also able to warn you of an incoming call while you are already on a call. Two tones will sound in the earpiece, and the display will show that a second call is waiting. This feature, known as Call Waiting, is only available if your network supports it.If Call Waiting is turned on, you can put the first call on hold and answer the second call by pressing the [SEND] key.Rejecting an Incoming CallYou can reject an incoming call without answering by simply pressing the [END] key or touching Reject.In-Call Menu](https://usermanual.wiki/LG-Electronics-USA/C395.Users-Manual-1/User-Guide-1626337-Page-27.png)
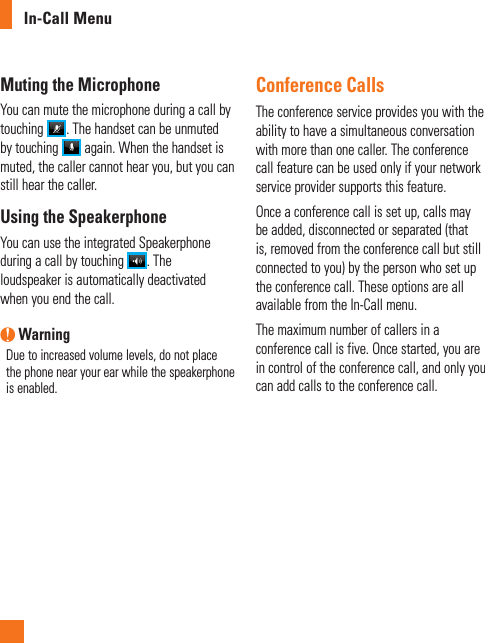
![In-Call MenuMaking a Second CallYou can make a second call while currently on a call simply by pressing Dialpad, entering the second number and pressing the Call. When the second call is connected, the first call is automatically placed on hold. You can swap between calls by pressing the [SEND] key.Setting Up a Conference CallTo set up a conference call, place the first call. Once that is connected, follow the steps above to make a second call. You can then join the two separate calls by touching [Options] and select Merge Calls.Activate the Conference Call on HoldTo activate a conference call on hold, press the key.Adding Calls to the Conference CallTo add a call to an existing conference call, touching [Options] and select Merge Calls.Private Call in a Conference CallTo have a private call with one caller from a conference call, touch . When the numbers of the callers are displayed, select the one you wish to speak in private with. Only the person who initiates the Conference Call can initiate a Private Call.Ending a Conference CallThe currently active conference call can be disconnected by pressing the key.](https://usermanual.wiki/LG-Electronics-USA/C395.Users-Manual-1/User-Guide-1626337-Page-29.png)

![MessagingOutboxThe Outbox is a place where you can find your sent messages. To see the Outbox folder, touch from the standby screen, then touch Inbox and touch Outbox from the drop-down menu.When you press the [SEND] key, you can make a call to the number of the recipient number of the selected message.If a message is not successfully sent, you will receive a Message Sending Failure notification on the screen. Another attempt will be made to send the failed message and after two unsuccessful attempts, the message will no longer be sent automatically. In order to send the message that has failed, you must touch Resend to resend the message.The Outbox will display all failed, sent and pending messages in the order in which they are sent. Touch to use options available from the Outbox. ►Delete: Deletes a message you choose. ►Sort by: Sorts by Date, To and Subject. ►Message Settings: Allows you to set messaging settings. ►Delete All: Delete all messages.The following options are available when you select a message in Outbox and touch . ►View Status: Shows the message status. ►Select Slide: If the multimedia message has more than one slide, you can select and move to the desired slide. ►View Attachment: To view the message attachment. ►Message Details: Allows you to view the message information.](https://usermanual.wiki/LG-Electronics-USA/C395.Users-Manual-1/User-Guide-1626337-Page-42.png)

![This application connects you to the Internet. By default, the account connects you to ’s homepage. Mobile Web is one of the services provided by and it gives you access to all the cool things you can do with your wireless phone. NoteCheck the availability of WAP services, pricing and tariffs with your network operator and/or the service provider whose service you wish to use. Service providers will also give you instructions on how to use their services.Please contact your service provider to open an Internet account.Launch the BrowserTo launch the browser from the standby screen, touch , , and then . You can also access Mobile Web from the Qwerty keyboard by pressing .Once connected, the homepage is displayed. To exit the browser at any time, press the [END] key.Menus for the BrowserYou can surf the Internet using either the phone keys or the Browser menu.Using the Navigation KeysWhen surfing the Internet, the navigation keys function similarly from when the phone is on standby mode.Using the WAP Browser MenuOnline menuOnce you are connected to the Internet, the following menu options are available when you touch [Options]: ►Home: Moves to the initial homepage. ►Windows: You can have several browser windows to navigate different web pages at the same time. ►Enter URL: Connects to the specific URL after editing. ►Bookmarks: You can add or save the current page to Bookmark or view the list saved under Bookmark.Mobile Web](https://usermanual.wiki/LG-Electronics-USA/C395.Users-Manual-1/User-Guide-1626337-Page-55.png)