LG Electronics USA CE110 Cellular/PCS GSM/EDGE Phone with Bluetooth User Manual CE110 Eng 0525
LG Electronics USA Cellular/PCS GSM/EDGE Phone with Bluetooth CE110 Eng 0525
UserManual.wiki
>
LG Electronics USA
>
CE110 User Manual
Users Manual
Navigation menu
Upload a User Manual
Namespaces
Wiki Guide
HTML
PDF
Info
Views
User Manual
Discussion / Help
Navigation
![8For Your SafetyImportant InformationThis user guide contains important information on the use andoperation of this phone. Please read all the informationcarefully for optimal performance and to prevent any damageto or misuse of the phone. Any changes or modifications notexpressly approved in this user guide could void your warrantyfor this equipment.Before You StartSafety InstructionsWARNING! To reduce the possibility of electric shock, do notexpose your phone to high humidity areas, such as thebathroom, swimming pool, etc.Always store your phone away from heat. Never store yourphone in settings that may expose it to temperatures less than32°F or greater than 104°F, such as outside during extremeweather conditions or in your car on a hot day. Exposure toexcessive cold or heat will result in malfunction, damageand/or catastrophic failure.Be careful when using your phone near other electronicdevices. RF emissions from your mobile phone may affectnearby in adequately shielded electronic equipment. Youshould consult with manufacturers of any personal medicaldevices such as pacemakers and hearing aides to determine ifthey are susceptible to interference from your mobile phone.Turn off your phone in a medical facility or at a gas station.Never place your phone in a microwave oven as this willcause the battery to explode.IMPORTANT! Please read the TIA SAFETY INFORMATION onpage 78 before using your phone.Safety InformationRead these simple guidelines. Breaking the rules may bedangerous or illegal. Further detailed information is given in thisuser guide.]Never use an unapproved battery since this could damagethe phone and/or battery and could cause the battery toexplode.]Never place your phone in a microwave oven as it willcause the battery to explode.]Do not dispose of your battery by fire or with hazardous orflammable materials.]Make sure that no sharp-edged items come into contactwith the battery. There is a risk of this causing a fire.]Store the battery in a place out of reach of children.]Be careful that children do not swallow any parts such asrubber plugs (earphone, connection parts of the phone,etc.). This could cause asphyxiation or suffocation.](https://usermanual.wiki/LG-Electronics-USA/CE110/User-Guide-797545-Page-4.png)
![9For Your Safety]Unplug the power cord and charger during lightning stormsto avoid electric shock or fire.]When riding in a car, do not leave your phone or set up thehands-free kit near to the air bag. If wireless equipment isimproperly installed and the air bag is activated, you may beseriously injured.]Do not use a hand-held phone while driving.]Do not use the phone in areas where its use is prohibited.(For example: aircraft).]Do not expose the battery charger or adapter to directsunlight or use it in places with high humidity, such as abathroom.]Never store your phone in temperatures less than- 4°F orgreater than 122°F.]Do not use harsh chemicals (such as alcohol, benzene,thinners, etc.) or detergents to clean your phone. There is arisk of this causing a fire.]Do not drop, strike, or shake your phone severely. Suchactions may harm the internal circuit boards of the phone.]Do not use your phone in high explosive areas as the phonemay generate sparks.]Do not damage the power cord by bending, twisting, pulling,or heating. Do not use the plug if it is loose as it may causea fire or electric shock.]Do not place any heavy items on the power cord. Do notallow the power cord to be crimped as it may cause fire orelectric shock.]Do not handle the phone with wet hands while it is beingcharged. It may cause an electric shock or seriouslydamage your phone.]Do not disassemble the phone.]Do not place or answer calls while charging the phone as itmay short-circuit the phone and/or cause electric shock orfire.]Only use the batteries, antennas, and chargers provided byLG. The warranty will not be applied to products provided byother suppliers.]Only authorized personnel should service the phone and itsaccessories. Faulty installation or service may result inaccidents and consequently invalidate the warranty.]Do not hold or let the antenna come in contact with yourbody during a call.]An emergency call can be made only within a service area.For an emergency call, make sure that you are within aservice area and that the phone is turned on.](https://usermanual.wiki/LG-Electronics-USA/CE110/User-Guide-797545-Page-5.png)
![11For Your SafetyVehicle Mounted External Antenna(optional, if available)A minimum separation distance of 8 inches (20cm) must bemaintained between the user/bystander and the vehiclemounted external antenna to satisfy FCC RF exposurerequirements. For more information about RF exposure, visitthe FCC website at www.fcc.govFCC Part 15 Class B ComplianceThis device and its accessories comply with part 15 of FCCrules. Operation is subject to the following two conditions: (1) This device and its accessories may not cause harmfulinterference, and (2) this device and its accessories mustaccept any interference received, including interference thatmay cause undesired operation.Cautions for Battery]Do not disassemble.]Do not short-circuit.]Do not expose to high temperature: 60°C (140°F).]]Do not incinerate.Battery Disposal]Please dispose of your battery properly or bring to yourlocal wireless carrier for recycling.]Do not dispose in fire or with hazardous or flammablematerials.Adapter (Charger) Cautions]Using the wrong battery charger could damage your phoneand void your warranty.]The adapter or battery charger is intended for indoor useonly.Do not expose the adapter or battery charger to direct sunlightor use it in places with high humidity, such as the bathroom.](https://usermanual.wiki/LG-Electronics-USA/CE110/User-Guide-797545-Page-7.png)
![6Getting StartedIf the battery fails to charge completely:]After turning the phone on and off, please attempt torecharge the battery.]After detaching and reattaching the battery, pleaseattempt to recharge the battery.Turning Your Phone On and Off1. Press the [END] key to swith on the phone.2. If the phone asks for a PIN, enter the PIN and pressthe key.The phone searches for your network and after findingit goes to the idle screen as illustrated below. From theidle screen, you can make or receive a call.nNoteThe display language is preset to Automatic at the factory.To change the language, use the Languages menu option(Menu 9.2.6).3. When you wish to switch the phone off, hold downthe [END] key until the power-off image displays.Access CodesYou can use the access codes described in thissection to avoid unauthorized use of your phone. Theaccess codes can be changed by using the ChangeCodes feature (Menu 9.6.3).Security code (4 digits)The security code protects the unauthorized use ofyour phone. The default security code is set to ‘0000’and the security code is required to delete all phoneentries and to activate the Restore Factory Settingsmenu. The security code default setting can bemodified from the Security Settings menu.](https://usermanual.wiki/LG-Electronics-USA/CE110/User-Guide-797545-Page-8.png)
![7General FunctionsMaking a Call1. Make sure your phone is powered on.2. Enter a phone number including the area code. Toedit a number on the display screen, simply pressthe key to erase one digit at a time.] Press and hold the key to erase the entirenumber.3. Press the [SEND] key to call the number.4. When finished, press the [END] key.Making a Call by Send Key1. Press the [SEND] key, and the most recentincoming, outgoing and missed phone numbers willbe displayed.2. Select the desired number by using the navigationkey.3. Press the [SEND] key.Making International Calls1. Press and hold the key and the internationalaccess character ‘+’ will appear.2. Enter the country code, area code, and the phonenumber.3. Press the [SEND] key.Ending a CallWhen you have finished a call, press the [END]key.Making a Call From the ContactsYou can store names and phone numbers dialedfrequently in the SmartChip as well as in the phonememory known as the Contacts.You can dial a number by simply selecting a name inthe contacts and pressing the [SEND] key.](https://usermanual.wiki/LG-Electronics-USA/CE110/User-Guide-797545-Page-9.png)
![8Adjusting the VolumeDuring a call, if you want to adjust the earpiecevolume, use the side keys of the phone.In idle mode, you can adjust the ring volume using theside keys.Answering a CallWhen you receive a call, the phone rings and theflashing phone icon appears on the screen. If thecaller can be identified, the caller’s phone number (orname if stored in your Address Book) is displayed.1. Open the Flip and press the [SEND] key or theleft soft key to answer an incoming call. If Any Keyhas been set as the answer mode (Menu 9.5.4), anykey press will answer a call except for the [END]key or the right soft key.nNotice] To reject an incoming call, press and hold the side keys onthe left side of the phone.] If Open Flip has been set as the Answer Mode (Menu9.5.4), you do not need to press any key. You can answerthe call simply by opening the flip.2. End the call by closing the phone or pressing the[END] key.nNoticeYou can answer a call while using the Address Book or othermenu features.Using the SpeakerphoneYou can use the integrated Speakerphone during a callby pressing the right soft key [Options] then selectSpeaker On. The speakerphone indicator [ ] willdisplay on the display screen. The loudspeaker isautomatically deactivated when you end the call.WarningDue to higher volume levels, don’t place the phone near yourear while the speakerphone is enabled.Vibrate Mode (Quick)Vibrate Mode can be activated by pressing andholding down the [Star] key.](https://usermanual.wiki/LG-Electronics-USA/CE110/User-Guide-797545-Page-10.png)
![10General Functionswords easily with a minimum number of key presses.As you press each key, the phone begins to display thecharacters that it thinks you are typing based on abuilt-in dictionary. As new letters are added, the wordchanges to reflect the most likely candidate from thedictionary.1. When you are in the T9 predictive text input mode,start entering a word by pressing keys toPress one key per letter.]The word changes as letters are typed - ignorewhat’s on the screen until the word is typedcompletely.]If the word is still incorrect after typing completely,press thethe up/down navigation keys once ormore to cycle through the other word options.]If the desired word is missing from the wordchoices list, add it by using the abc/ABC mode.2. Enter the whole word before editing or deleting anykeystrokes.3. Complete each word with a space by pressing thekey or the right navigation key.To delete letters, press . Press and holddown to erase the letters continuously. Continuehoding to erase entire words.Using the ABC ModeUse the keypad keys to enter your text.1. Press the key labeled with the required letter:]Once for the first letter]Twice for the second letter]And so on2. To insert a space, press the key once. To deleteletters, press the key. Press and hold downthe key to erase the letters continuously.nNoticeRefer to the table below for more information on thecharacters available using the keys.](https://usermanual.wiki/LG-Electronics-USA/CE110/User-Guide-797545-Page-12.png)
![11General FunctionsUsing the 123 (Numbers) ModeThe 123 Mode enables you to enter numbers in a textmessage (a telephone number, for example) morequickly.Press the keys corresponding to the required digitsbefore manually switching back to the appropriate textentry mode.Using the Symbol ModeThe Symbol Mode enables you to enter varioussymbols or special characters.To enter a symbol, press the [Star] key. Use thenavigation keys to select the desired symbol and pressthe [OK] key.Key Characters in the Order DisplayUpper Case Lower Case1 . , - ? ! ' @ : 1 . , - ? ! ' @ : 12 A B C 2 a b c 2 3 D E F 3 d e f 34 G H I 4 g h i 45 J K L 5 j k l 56 M N O 6 m n o 67 P Q R S 7 p q r s 78 T U V 8 t u v 89 W X Y Z 9 w x y z 90Space Key, 0 Space Key, 0(Long press) (Long press)](https://usermanual.wiki/LG-Electronics-USA/CE110/User-Guide-797545-Page-13.png)
![12In-Call MenuYour phone provides a number of control functions thatyou can use during a call. To access these functionsduring a call, press the right soft key [Options].During a CallThe menu displayed on the handset screen during acall is different than the default main menu displayedwhen in idle screen, and the options are describedbelow.Making a Second CallYou can select a number you wish to dial from theAddress Book to make a second call. Press the rightsoft key then select Contacts.Swapping Between Two CallsTo switch between two calls, press the right soft keyor the [SEND] key, and then select Swap. Answering an Incoming CallTo answer an incoming call when the handset isringing, simply press the [SEND] key. The handsetis also able to warn you of an incoming call while youare already on a call. A tone sounds in the earpiece,and the display will show that a second call is waiting.This feature, known as Call Waiting, is only available ifyour network supports it.If Call Waiting is on, you can put the first call on holdand answer the second call, by pressing the[SEND] key.Rejecting an Incoming CallYou can reject an incoming call without answering bysimply pressing the [END] key.During a call, you can reject an incoming call bypressing the [END] key.Muting the MicrophoneYou can mute the microphone during a call by pressingthe [Options] key then selecting Mute or the left softkey [Mute]. The handset can be unmuted by pressingthe Unmute menu or the left soft key [Unmute]. Whenthe handset is muted, the caller cannot hear you, butyou can still hear the caller.](https://usermanual.wiki/LG-Electronics-USA/CE110/User-Guide-797545-Page-14.png)
![13In-Call MenuConference CallsThe conference service provides you with the ability tohave a simultaneous conversation with more than onecaller. The conference call feature can be used only ifyour network service provider supports this feature.The conference call can only be set up when you haveone call active and one call on hold, meaning bothcalls must have been answered. Once a conferencecall is set up, calls may be added, disconnected orseparated (that is, removed from the conference callbut still connected to you) by the person who set upthe conference call. These options are all availablefrom the In-Call menu. The maximum number of callersin a conference call is five. Once started, you are incontrol of the conference call, and only you can addcalls to the conference call. Making a Second CallYou can make a second call while currently on a callsimply by entering the second number and pressingthe [SEND] key. When the second call isconnected, the first call is automatically placed onhold. You can swap between calls, by pressingthe [SEND] key.Setting Up a Conference CallTo set up a conference call, place one call on hold,conference in the second active call by pressing theright soft key and select the Join Calls sub menu optionfrom the Conference Call menu. Activate the Conference Call on HoldTo activate a conference call on hold, press the[SEND] key.Adding Calls to the Conference CallTo add a call to an existing conference call, press theright soft key, and then select the Join Calls sub menufrom the Conference Call option.Private Call in a Conference CallTo have a private call with one caller from aconference call, press the right soft key and select thePrivate Menu from the Conference Call option. Whenthe numbers of the callers are displayed, select theone you wish to speak in private. Ending a Conference CallCurrently active conference call can be disconnectedby pressing the [END] key.](https://usermanual.wiki/LG-Electronics-USA/CE110/User-Guide-797545-Page-15.png)
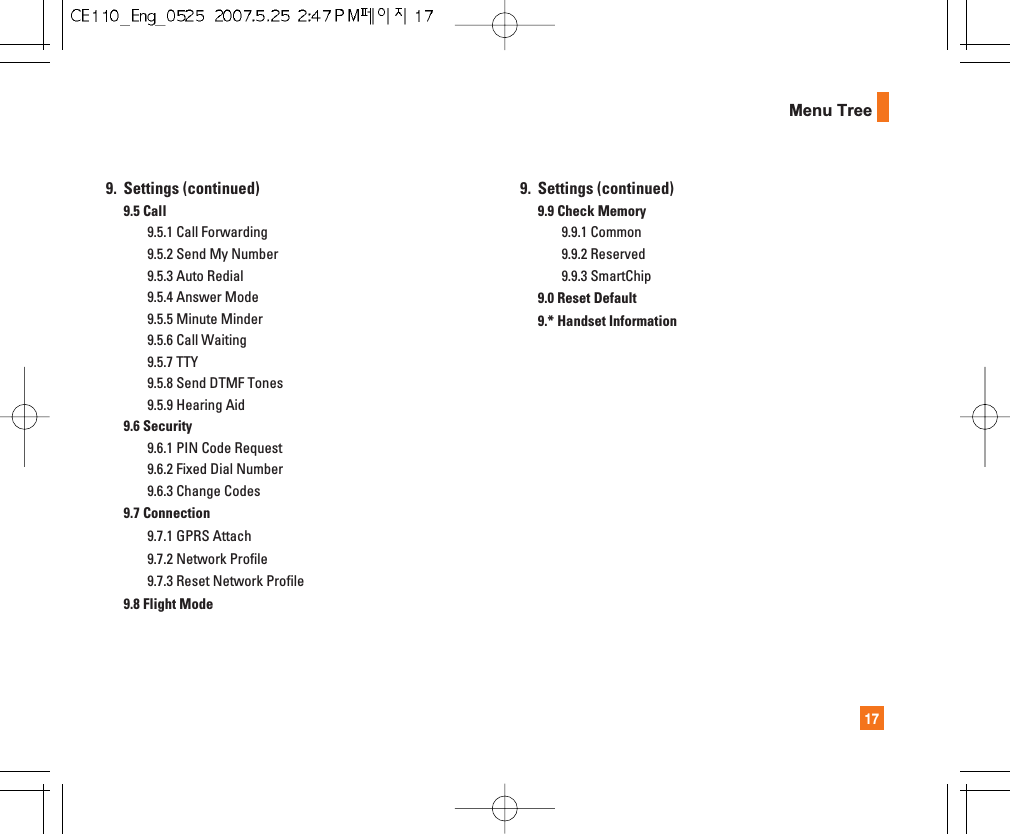
![The following illustration shows the available menu structure and indicates the: ]Number assigned to each menu option.]Page where you can find the feature description.1. IM (see page 32)2. Messaging (see page 36)2.1 New Message2.1.1 Text2.1.2 Multimedia2.2 Inbox2.3 Mobile Email2.4 Drafts2.5 Outbox2.6 Sent2.7 IM2.8 Voice Mail2.9 Templates2.9.1 Text2.9.2 Multimedia2.9.3 Business Card2. Messaging (continued)2.0 Message Settings2.0.1 Text Message2.0.2 Multimedia Message2.0.3 Voicemail Number2.0.4 Download Messages3. Recent Calls (see page 42)3.1 Missed Calls3.2 Dialed Calls3.3 Received Calls3.4 All Calls3.5 Call Duration3.5.1 Last Call3.5.2 Dialed Calls3.5.3 Received Calls3.5.4 All Calls14Menu Tree](https://usermanual.wiki/LG-Electronics-USA/CE110/User-Guide-797545-Page-16.png)

![18IMThe Instant Messaging feature can only be used with thesupport of the network operator or communities such asAIM, MSN Messenger and Y! Messenger. For InstantMessaging users, a valid User ID and Password will berequired in order to login and exchange messages aswell as checking the online status.There are two ways to use the Instant Messaging feature.1. Through the Main Menu.2. Through the IM hotkey (the right navigation key).Short pressing the hotkey will bring up the availableIM clients. The menu items below might not appearsince not all IM communities support the variousoptions. Also the menu strings may appear differentlybased on the selected IM communities. Thekeywords such as User ID, Login and Contact will beused as general terms in IM menus according to thecurrently selected communities such as AIM, MSNMessenger and Y! Messenger.Offline MenuSign InThis allows users to login by filling in the User ID andPassword.nNoteOnce the User ID and Password are saved, you will not berequired to type them in again during Login process. Thisfeature is optional.Saved ConversationsThis is where a user can view saved conversations.Settings]My Status: Allows you to set your status to Available,Busy or Invisible.]Set Sound: Allows you to set on/off an alert for theContact when they have activity on their session.]Default Provider: Allows you to set the default IMcommunity to login.]Auto Sign In: You may set the automatic IM Loginprocess by choosing between the ’When Power On’or ’When IM Start’ options.]Network: You may check your IM Network Profilesor Server Address information.Offline Conversations (Only for AIM)This is where a user can view the conversations thatnot closed in last login time.](https://usermanual.wiki/LG-Electronics-USA/CE110/User-Guide-797545-Page-20.png)
![19IMIM InformationThis indicates the Instant Messaging Client Informationsuch as Client Name and Version Number.Online Menu / 1 to 1 conversationAfter a successful Login, a list of contacts with ScreenNames will appear on screen. Depending on thecursor location in the contacts, the following menuoptions will be available.When cursor is located on a Conversations ListnNoteThe Conversations List contains both the active contactwhere a conversation has taken place as well as anunknown contact.nNoteWhen you select the left/right navigation key or the Confirmkey on the Conversation List, it offers the ability to view orhide conversations.]Send to Others: This offers the ability to send amessage to an unknown contact. When selected, aUser ID must be typed in prior to starting an IMsession or conversation.]Saved Conversations: You may view or delete thestored conversation session.]Search: This allows you to search for the contact byEmail address or name. ]Settings• My Status: Allows you to set your status toAvailable, Busy or Invisible.• Set Sound: Allows you to set an alert for theContact when they have activity on their session.• Auto Sign On: You may Login to an IM clientautomatically with the ‘When Power On’ or ‘WhenIM Start’ options.]Log Out: This begins the Logout process.When cursor is located on a Conversation]End Conversation: This closes the selectedconversation. If an unknown contact was selected,that contact is deleted.]Block/Unblock Contact: This allows you toblock/unblock the selected Conversations Contact.]View Information: This allows you to view the UserID and Status Text information.](https://usermanual.wiki/LG-Electronics-USA/CE110/User-Guide-797545-Page-21.png)
![20IM]Search: This allows you to search for the contact byEmail address or name.]Settings: Please refer to the previous Settings Menu.]Log Out: This begins the Logout process.When cursor is located on a Contact List]Add Contact: This adds a new contact to the selectedcontacts’ list; in the meantime this searches for thecontact on the basis of E-mail Address, First Name, orLast Name.]Refresh List: This refreshes the present informationon the contacts within the contacts.]Send to Others: This offers the ability to send amessage to an unknown contact. When selected,the User ID must be typed in prior to starting an IMsession or conversation.]Saved Conversations: This is where a user can viewsaved conversations.]Search: This allows you to search for the contact byEmail address or name.]Settings: Please refer to the previous Settings Menu.]Log Out: This begins the Logout process.When cursor is located on a Contact]Add Contact: This adds a new contact to theselected contacts list; in the meantime this searchesfor the contact on the basis of E-mail Address, FirstName, or Last Name.]Delete Contact: This deletes the selected Contact.]Block/Unblock Contact: This allows or blocksconversation with the selected Contact.]Refresh Contact: This refreshes the presentinformation on the selected contact.]View Information: This allows you to viewinformation. It provides User ID, Status Text.]Search: This allows you to search for the contact byEmail address or name.]Settings: Please refer to the previous Settings Menu.]Log Out: This begins the Logout process.Menu options available in the Conversationscreen]Back To List: This brings the screen back to thecontacts.]Insert: You can insert Symbol, Template andemoticons in the conversation screen.](https://usermanual.wiki/LG-Electronics-USA/CE110/User-Guide-797545-Page-22.png)
![21IM]Block/Unblock Contact: This allows or blocksconversation with the selected Contact.]Save Conversation: Stores the currently activeconversation.]End Conversation: This ends the active conversationand clears the conversation buffer.]Settings: Please refer to the previous Settings Menu.]Text Entry Mode: Sets the text input mode such asabc, Abc, ABC, T9 abc, T9 Abc, T9 ABC and 123.]Text Entry Mode Settings: This selects the T9predictive mode Language.nNoteIn the conversation window, you can use the up/downnavigation key for scrolling through the conversation.Maximum number of characters supported by a message is400 characters for receiving and 128 characters for sending.The present information might not update in real time so the“Refresh List”/“Refresh Contact” option can be used forthe most up to date status.](https://usermanual.wiki/LG-Electronics-USA/CE110/User-Guide-797545-Page-23.png)
![22MessagingNew Message Menu 2.1Text (Menu 2.1.1)You can write and edit text messages of up to 918characters.1. Type in a message using key presses. For details onhow to enter text, refer to page 22 (Entering Text).2. After completing the message select the requiredoption by pressing the right soft key [Options].The following options are available.]Insert• Symbol: Attach special characters.• Picture: Send and receive text messages thatcontain pictures, known as Enhanced MessagingService. Several preset pictures are available inthe phone and they can be replaced with newones received from other sources.• Animation: Attaching an animation in a messagecan be done through EMS(Enhanced MessagingService).• Audio: Attach sounds that are available for shortmessage.• Text Template: Use the text templates already setin the phone.• Contact: Attach a phone number.• Business Card: Attach your name card.]Save to Drafts: Save the message so that it can besent later.]Set T9: Choose between English or Spanish T9language. For details on how to enter text, refer topage 22 (Using the T9 Mode).]Clear Text: Deletes the written message.]Cancel: Exit the text editor.Press the left soft key [Send To].]Send To: Enter the phone number or select thenumber from the address book.Multimedia (Menu 2.1.2)You can write and edit multimedia messages, checkingmessage size.You can create a new message or choose one of themultimedia message templates already made.](https://usermanual.wiki/LG-Electronics-USA/CE110/User-Guide-797545-Page-24.png)
![23MessagingPress the left soft key [Send To].]Send To: You can send multimedia messages tomultiple recipients, prioritize your message, andmake it sent later as well.The following options are available.]Insert: Symbol, Graphic, Audio, New Slide, TextTemplate, Contact or Business card.]Preview: You can preview multimedia messages youwrote.]Save: You can save multimedia messages To Draftsor As Template.]Delete Slide: You can delete current slide.]Set Timer: You can set timer for slide, text, pictureand sound.]Set T9: Select a T9 input mode.]Cancel: You can back to the Message menu.nNoteIf you select the photo on writing multimedia message,loading duration will take about 5 seconds. At that time, youcan’t activate any key during loading time. After that time, itis available to write multimedia message.Inbox Menu 2.2You will be alerted when you receive a message. Theywill be stored in the Inbox.In the Inbox, you can identify each message by icons.If you are notified that you have received a multimediamessage, you can download the whole multimediamessage by selecting it in the Receive menu. The following [Options] are available in the Inbox list.]Delete: You can delete the current message.]Forward: You can forward the selected message toanother party.]Extract: Extract picture, audio, text webpage andemail address from the message.]Return Call: Call back the sender.Mobile Email Menu 2.3Mobile Email allows you to access your Yahoo! Mail,AOL Mail, AIM Mail and MSN Hotmail accounts onyour phone. So, now you can quickly and easily checkyour email while you’re away from your computer.(When the icon appears, you have received a newJava Push)](https://usermanual.wiki/LG-Electronics-USA/CE110/User-Guide-797545-Page-25.png)
![24MessagingTo Set Up Mobile Email]Open Mobile Email: Slide out the keyboard, highlightMobile Email and press OK.]Select an Email Provider: Use the navigation key tohighlight the email provider you wish to use andpress Options, then Select.]Log In1. Highlight the ID entry field, press down on thenavigation key, and then type in your existingemail ID.2. Scroll down and highlight the Password field,press down on the navigation key, and enter yourpassword.Quick Tip: Your password is case sensitive. Pressthe on the keypad to change to lower case orupper case.3. To save your password scroll down to RememberMe and press down on the navigation key tocheck the box.4. Select Sign In.]Opening an Email: Just scroll down and highlight theemail subject line you want to open and press downon the navigation key. Once the email opens, justselect Options to reply, forward, or delete.]Deleting an Email: Just scroll down to the email youwant to delete, press Options, then Delete.For additional details, visit www.cingular.com/emailDrafts Menu 2.4You can view the messages saved as a draft. The following [Options] are available.]Delete: Deletes the message you choose.]Delete All: Deletes all messages in the folder.Outbox Menu 2.5Outbox is a temporary storage place for messageswaiting to be sent.When you press the [SEND] key, the messagemoves to the Outbox and from there the message is sent.If the message fails to be sent from the Outbox, you willreceive a sound alert along with a Message SendingFail notice on the screen. Another attempt will be madeto send the failed message and after two unsuccessfulattempts, the message will no longer be sentautomatically. In order to send the message that hasfailed, you must press Resend.](https://usermanual.wiki/LG-Electronics-USA/CE110/User-Guide-797545-Page-26.png)
![25MessagingAfter the maximum number of Send attempts has beenreached the Send function has failed.If you were trying to send a text message, open themessage and check that the Sending options are correct.When the message Send has failed, the following[options] are available.]Delete: Deletes the selected message which hasbeen failed to send.]Edit: You can edit a selected message.]Delete All: Deletes all messages which have beenfailed to send.Sent Menu 2.6This is where you can view the lists and contents ofsent messages and also verify if transmission wassuccessful.]Delete: Deletes the selected message from the Sentlist.]Forward: Forwards the current message to otherrecipients.]Delete All: Deletes all messages from the Sent list.IM Menu 2.7Instant Messaging feature can only be used with thesupport of the network operator or communities. ForInstant Messaging users, a valid User ID andPassword will be required in order to login andexchange messages as well as checking the onlinestatus. For further details, see page 32.Voice Mail Menu 2.8This menu provides you with a quick way of accessingyour voice mailbox (if provided by your network).Before using this feature, you must enter the voiceserver number obtained from your service provider.This may already be available; to check the voicemail,press and hold the keyWhen new voicemail is received, the symbol willbe displayed on the screen.](https://usermanual.wiki/LG-Electronics-USA/CE110/User-Guide-797545-Page-27.png)
![26MessagingTemplates Menu 2.9There are 6 predefined messages in the list. You canview and edit the template messages or create newmessages. Text (Menu 2.9.1)• Please call me back • I’m late. I will be there at• Where are you now? • I’m on the way.• Urgent! Please contact. • I love youThe following options are available.]Edit: You can edit the selected template message.]Send via- Text: Sends the selected template message bySMS.- Multimedia: Sends the selected template messageby MMS.]Delete: Allows you to delete the selected templatemessage.Multimedia (Menu 2.9.2)For further details, see page 36.Business Card (Menu 2.9.3)This option allows you to make your own name card.Key in the Name, Mobile number, Office number, Faxnumber and E-mail address.]Send Via- Text: Sends the selected name card by SMS.- Multimedia: Sends the selected name card by MMS.]Delete: Allows you to delete the selected name card.Message Settings Menu 2.0Text Message (Menu 2.0.1)]Message Center Number: If you want to send thetext message, you can receive the address of theSMS center through this menu.]Email Gateway: You can send the text message toan Email Address via this gateway.]Subject: If you set it to on, allows you to enter thesubject.]Bearer Setting: You can select GPRS or GSM.Contact your network operator or service providerfor information related to setting a selected bearer,pricing and connection speed. GSM Preferred/GPRSPreferred.](https://usermanual.wiki/LG-Electronics-USA/CE110/User-Guide-797545-Page-28.png)
![27MessagingMultimedia Message (Menu 2.0.2)Via this menu, you can set up default multimediamessage information.The following options are available:]Subject: Enter the message title.]Slide Duration: Display the duration of each pagewhen writing the message.]Priority: You can set the priority of the message youchoose.]Validity Period: This network service allows you toset how long your multimedia messages will bestored at the message center.]Delivery Reports: If it is set to Yes in this menu, youcan check whether your message is sentsuccessfully.]Read Receipts: This menu allows you to determinewhether to request a read confirmation mail to arecipient.]Auto Download•On: You can always receive multimedia messagesautomatically.• Off: You receive only notification messages in theinbox and then you can check the notifications.]Network Profile: For further details, see page 45.Voicemail Number (Menu 2.0.3)This menu allows you to get the voice mail if thisfeature is supported by the network service provider.Please check with your network service provider fordetails of their service in order to configure thehandset accordingly.Download Messages (Menu 2.0.4)You can set the Service option to determine whetheryou will receive the service messages or not.You can set the Automatic Download option todetermine whether you will automatically connect tothe service or not.]Receive: You can set the option whether you willreceive the message or not.](https://usermanual.wiki/LG-Electronics-USA/CE110/User-Guide-797545-Page-29.png)
![30MEdia NetYou can access various WAP (Wireless Application Protocol)/ Web services such as news, and weather. These servicesare specially designed for mobile phones and they aremaintained by the service providers.nNoteCheck the availability of WAP services, pricing and tariffswith your network operator and/or the service providerwhose service you wish to use. Service providers will alsogive you instructions on how to use their services.Please contact your service provider to open an Internetaccount.To launch the browser in standby mode, press thekey.Once connected, the homepage is displayed. Thecontent depends on the service provider.To exit the browser at any time, press the [END]key. The idle screen is displayed.Menus for the BrowserYou can surf the Internet using either the phone keysor the WAP Browser menu.Using the Navigation KeysWhen surfing the Internet, the keys function differentlythan when in the phone mode. Using the WAP Browser MenuThere are various menus available when surfing theInternet.MEdia Net Home Menu 4.1Connect to Cingular’s homepage. The homepage isdefined in the activated account and cannot be changed. Favorites Menu 4.2This function allows you to store and edit frequentlyaccessed sites. The following [Options] are available.nNoteYour phone may have some pre-installed bookmarks for sitesnot affiliated with LG. LG does not warrant or endorse thesesites. If you choose to access them, you should take the sameprecautions for security or content as you would with any site.Key DescriptionScroll each line of the content areaup/down navigation key](https://usermanual.wiki/LG-Electronics-USA/CE110/User-Guide-797545-Page-32.png)
![31MEdia NetOptions in the Favorites view • View: Display the bookmark title and URL.• Delete: Allow you to erase the selected bookmark.• Edit: Modify the existing bookmark item.• Move to Folder: Move the Favorite to other folder.• New Favorite: Create new Favorite in currentfolder.• New Folder: Create new sub-folder.• Send URL: Allows the bookmark information to besent via SMS to another person.• Delete All: Allows you to erase all bookmarks.Enter URL Menu 4.3Input the URL manually to connect to the Internet site.Recent Pages Menu 4.4You can manage the list of the Internet pages youvisited.Security Menu 4.5A list of the available certificates is shown.]Certificates: You can see the list of certificates andview them in detail.]Clear Session: Removes the secure session.Browser Settings Menu 4.6Accounts (Menu 4.6.1)This includes the network information used to connectthe browser to the Internet. Select the desired account by pressing the soft key,which is labelled as “Activate”. This will activate theaccount that will be used for future connection.MEdia Net is the predefined account that is set asdefault.]Activate: Select the account among the list ofaccounts, so it can be used for future connection. ]View: Allows you to see the specific accountinformation.]Edit: Allows you to change the account information.]Delete: Allows you to delete the account.]New: Allows you to create a maximum of 20 newaccounts.](https://usermanual.wiki/LG-Electronics-USA/CE110/User-Guide-797545-Page-33.png)
![32MEdia NetnNoteYou cannot edit and delete pre-installed accounts.In order to create a new account, please fill in thenetwork information.1. Account Name: Name associated with new account.2. Homepage: Homepage URL3. Connection Mode: Select from UDP(CO), UDP(CL),TCP with Proxy, TCP without Proxy4. Proxy Address: Proxy server address5. Proxy Port Number: Proxy server’s port number6. Security: Select the secure or non-secure mode. 7. Time Out: Values between 10 to 600 seconds8. Network Profiles: You can choose one from thenetwork profiles. Note you can create a newnetwork profile by selecting the list option on thecenter key.nNote1. The account information will be available from youroperator. 2. Creating or editing an account requires care. The browsercannot connect to the Internet if the account informationis not correct.Cache Settings (Menu 4.6.2)The web pages you have accessed are stored in thememory of the phone.]Clear Cache: Remove all cached data in the memory.]Allow Cache: Set a value to determine whether aconnection attempt is made through the cache or not.nNoteA cache is a buffer memory, which is used to store datatemporarily, especially when it is online.Cookie Settings (Menu 4.6.3)The information or services you have accessed arestored in the cookie.]Delete Cookies: Remove all cookies.]Allow Cookies: Set a value to determine whether aconnection attempt is made through the cookie ornot.Show Image (Menu 4.6.4)This allows you to view pictures when browsing.](https://usermanual.wiki/LG-Electronics-USA/CE110/User-Guide-797545-Page-34.png)
![34Games & AppsGames & Apps Menu 6.1Java is a technology developed by Sun Microsystems.Similar to the way you would download the JavaApplet using the standard Netscape or MS InternetExplorer browsers, Java MIDIet can be downloadedusing a WAP enabled phone. Depending on the serviceprovider, Java based programs such as Java gamescan be downloaded and run on a phone. Oncedownloaded, the Java program can be viewed withinthe Games & Apps menu where you can select,execute or delete. The Java program files saved in thephone are in .JAD and .JAR formats.nNoteThe JAR file is a compressed format of the Java programand the JAD file is a description file that includes all detailedinformation. From the network, prior to download, you canview all detailed file descriptions from the JAD file.nWarningOnly J2ME (Java 2 Micro Edition) based programs will run ina phone environment.The J2SE (Java 2 Standard Edition) based programs will onlyrun in a PC environment.Java Account Menu 6.2This includes the network information used to connectthe browser to the Internet. Select the desired account by pressing the soft key,which is labelled as “Activate”. This will activate theaccount that will be used for future connection.MEdia Net is the predefined account that is set asdefault.]Activate: Select the account among the list ofaccounts, so it can be used for future connection. ]View: Allows you to see the specific accountinformation.]Edit: Allows you to change the account information.]Delete: Allows you to delete the account.]New: Allows you to create a maximum of 20 newaccounts.nNoteYou cannot edit and delete pre-installed accounts.In order to create a new account, please fill in thenetwork information.1. Account Name: Name associated with new account.](https://usermanual.wiki/LG-Electronics-USA/CE110/User-Guide-797545-Page-36.png)

![My StuffGames & Apps Menu 7.1For further details, see page 49.Audio & Ringtones Menu 7.2]Shop Tones: This menu option connects to AT&T’sringtone download site.]Record Voice: You can record your own audio bypressing the center key [OK].]Files: You can view the audio files in the list.Graphics Menu 7.3]Shop Graphics: This menu option connects toAT&T’s graphic download site.nNoteAdditional charges may be incurred when downloadinggraphics. Contact your service provider for further information.]Take Photo: You can take your own photo bypressing the center key [OK].]Make Animated GIF: You can make an animation filewith the selected images in the list.]Files: You can view the graphic files in the list.Videos Menu 7.4]Record Video: You can record your own video bypressing the center key [OK].]Files: You can view the video files in the list.nNoteDRM (Digital Rights Management) Contents Copyrightprotected contents.DRM sometimes restricts some functions, such as send, andedit. The indicates content controlled by DRM protection.Tools Menu 7.5Alarm Clock (Menu 7.5.1)The alarm function allows you to set up multipleseparate alarms. You can also set the time, repetitioninterval and alarm sound.Select your desired alarm setting to configure from thealarm list. If there is no alarm setting, press the left softkey [New] to add a new alarm.]Time: Select the desired set time mode using thenavigation key. Input your desired alarm time byspecifying the hour and minute. If the time is in 1236](https://usermanual.wiki/LG-Electronics-USA/CE110/User-Guide-797545-Page-38.png)
![37hour clock format, you have to select either am’ orpm’ using the center soft key.]Repeat: Select the desired repeat mode using thenavigation key.]Alarm Tone: Select the alarm sound to use for thealarm using the key.]Memo: Input alarm name.Calendar (Menu 7.5.2)When you enter this menu a calendar will be displayed.The square cursor is used to locate a particular day.The bottom bar on the calendar indicates schedule(s)for that day. This function helps to remind you of theschedule. The phone will sound an alarm tone if it hasbeen set for a specific schedule item.The following [Options] are available:]Search: Allows you to search the saved schedule(s)by pressing the character keys.]Delete: Allows you to delete the selected schedule.]Send via: Sends the selected schedule by Messageor Bluetooth.]Set Holiday: Allows you to set your personal holidayfor the selected date.]View All: Allows you to view all saved schedules.]Go to Date: Allows you to jump to a specific date.]Delete Schedules: Deletes the defined schedulessuch as Old Schedules, All Schedules.Notepad (Menu 7.5.3)You can create up to a maximum of 30 memos.1. Select a memo pad you want to edit.2. Press the left soft key [New] to create a new memo.3. Input the memo and press the center key [Save] tosave.Key Descriptionup/down navigation key Weeklyleft/right navigation key Dailykey/ key Annuallykey/ key MonthlyMy Stuff](https://usermanual.wiki/LG-Electronics-USA/CE110/User-Guide-797545-Page-39.png)
![38My StuffCalculator (Menu 7.5.4)The calculator function allows you to add, subtract,multiply and divide. You can input numbers using thenumber keys, and input operators using the up, down,left, and right navigation keys.You can input a decimal point by pressing the[Star] key.Whenever you press the key, characters aresequentially deleted in reverse order.Tip Calculator (Menu 7.5.5)This feature allows you to quickly and easily calculatethe tip amount based on the total bill as well as thesplit of the total bill based on the number of people. World Clock (Menu 7.5.6)The World clock function provides time information onmajor cities worldwide.1. You can select a desired city as a base using the leftsoft key [Map].2. You can view the time of desired city using the rightsoft key [Options] - [Change City].Unit Converter (Menu 7.5.7)This function converts any measurement into a unityou want.There are 6 types of units that can be converted: Area,Length, Weight, Temperature, Volume, and Velocity.nNoteYou can input a decimal number by pressing the [Star]key.Camera & Recordings Menu 7.6Take Photo (Menu 7.6.1)Using the camera module built into your phone, youcan take pictures of people or events while on themove. Additionally, you can send photos to otherpeople in a picture message. The right soft key[Options] will bring up the following options.]Change to Video Mode: Go to the video application,enables you to record a video clip.]Resolution: Sets the image size to 640*480(default),320*240 or 160*120. The selected image size appearson the capture screen.](https://usermanual.wiki/LG-Electronics-USA/CE110/User-Guide-797545-Page-40.png)
![39My Stuff]Quality: You can select the desired quality of photoby selecting either Super Fine, Fine or Normal modeby using the navigation keys.]View Full Screen: Allows you to view the subject infull screen.]Multishot: This feature enables the amount ofcontinuous frames that can be taken at one time.The number of frames is determined by the imagesize setting.]Self Timer: Determines the camera timer.]Advanced Settings- White Balance: This adjusts the Light Effect leveland you can select from the following options:Auto / Daylight / Incandescent / Cloudy /Fluorescent / Night Mode- Color Effect: Allows you to apply special effects tothe picture. Press the left or right navigation key tofind the tone you want to use from the followingoptions: Color, Sepia, Mono and Negative.- Shutter Tones: Allows you to select a sound whenyou press the shutter. Tone 1 / Tone 2 / Tone 3 /Off]Default Settings: This restores the default camerasettings (Size, Brightness, Zoom, etc.).nNoteIn Take Photo mode, you can adjust the zoom scale by usingthe up/down navigation keys. The maximum zoom scaledepends on the resolution as follows.In Take Photo mode, you can adjust the brightness by usingthe left/right navigation key. Record Video (Menu 7.6.2)You can record a video clip in this menu by pressingthe Camera key. Before starting to record, press theright soft key [Options] to set the following values.Select the desired value and press the key toconfirm.]Change to Photo Mode: Go to the camera applicationwhich enables you to take a still picture.]Video Record Mode: Sets the recording mode toeither MMS Video Mode or General Mode. ]Quality: Determines the quality of a video clip.Resolution Zoom scale640*480 Level 1320*240 Level 1~Level 10160*120 Level 1~Level 10](https://usermanual.wiki/LG-Electronics-USA/CE110/User-Guide-797545-Page-41.png)
![40My Stuff]White Balance: This adjusts the light effect level andyou can select from the following options: Auto / Daylight / Incandescent / Cloudy /Fluorescent/ Night mode.]Color Effects: Allows you to apply special effects tothe video clip. Press the Left/Right Navigation Keysto find the tone you want to want to use from thefollowing options: Color, Sepia, Mono and Negative.]Default Settings: This restores the default camerasettings (Size, Brightness, Zoom, etc.).nNoteIn Video Record mode, you can adjust the zoom scale byusing the up/down navigation keys. The maximum zoomscale depends on the resolution as follows.In Record Video mode, you can adjust the brightness byusing the left/right navigation keys.Record Voice (Menu 7.6.3)You can record an audio clip in this menu. Therecorded audio file is saved automatically in the Audio& Ringtones menu (Menu 7.2).The right soft key [Options] will bring up the followingoptions.]Record Mode: Sets the recording mode to eitherMMS or General.]Quality: Determines the quality of an audio clip.Other Files Menu 7.7When you receive files of an undefined format (suchas .vcs, .vcf, etc.), the files are saved in this folder.The following [Options] are available.]Delete: You can delete the selected file.]Rename: You can edit the name of the selected file.]New Folder: You can create a new folder.]Sort By: You can sort the folders by name, date andtype.]Delete All: You can delete all files.]Multi Delete: You can delete several files at once.]Information: You can view information about theselected folder.Resolution Zoom scale320*240 Level 1~Level 10176*144 Level 1~Level 10](https://usermanual.wiki/LG-Electronics-USA/CE110/User-Guide-797545-Page-42.png)
![41Contact List Menu 8.1This menu allows you to save and manage contactaddress information. The Contacts’ functions allow youto add a new address or search saved contactaddresses by name.New Contact Menu 8.2This menu allows you to add a new contact address.You can enter input contact address informationincluding name, phone numbers, email addresses,group information items, memos, ring tones, and image(photograph).You have to select the Handset or the SmartChipmemory using the left and right navigation keys.Caller Groups Menu 8.3This menu allows you to manage group information. Bydefault, there are 4 groups: family, friends, colleagueand school. You can also configure a ring tone for agroup so that the group ring tone sounds when a callfrom a specific contact address within that grouparrives and there is no ring tone configured for thespecific contact address.Speed Dial List Menu 8.4This menu allows you to configure the speed dialnumbers. You can select a number from 2 to 9 as aspeed dial. You can configure speed dial numbers forany of the 8 numbers for a specific contact address sothat a contact address may have multiple speed dialnumbers.Copy All Contacts Menu 8.5This menu allows you to copy all of the informationfrom your SmartChip, e.g. name, handset number, etc.,to your handset. If a name is duplicated during thecopying operation, the information is also duplicated.]SmartChip to Handset: You can copy the entry fromthe SmartChip card to the phone memory.]Handset to SmartChip: You can copy the entry fromthe handset memory to the SmartChip card (not allthe data will be copied).Address Book](https://usermanual.wiki/LG-Electronics-USA/CE110/User-Guide-797545-Page-43.png)
![42Delete All Contacts Menu 8.6You can delete all entries in the SmartChip and theHandset.Press the [END] key to return to standby mode.Service Dial Numbers Menu 8.7You can view the list of Service Dialing Numbers (SDN)assigned by your network provider. Such numberscould include the emergency, directory assistance andvoice mail numbers.1. Select the Service dial number option.2. The names of the available services will be shown.3. Use the up/down navigation keys to select a service.Press the [SEND] key.My Numbers Menu 8.8This displays your phone numbers stored in theSmartChip.Address Book](https://usermanual.wiki/LG-Electronics-USA/CE110/User-Guide-797545-Page-44.png)
![43SettingsAudio & Ringtones Menu 9.1There can be 4 sound modes: General, Vibrate All,Silent and Ear Mic. General, Vibrate, and All Silentmodes can be changed from the Volume menu underRing tone. In addition, pressing and holding the[Star] key on idle screen mode can swap Normal andManner mode. Ear Mic is available when respectiveinstruments are attached.Shop Tones (Menu 9.1.1)Connects to AT&T Ring tone Shops.Ringtones (Menu 9.1.2)Shows and plays ring tones. These can be downloadedring tones from Ring tone shops.Volume (Menu 9.1.3)This menu controls Ringtone, Key Tone, Call andMultimedia volume. It is available on Ring tone volumelevel 1~7.Message Alert Tones (Menu 9.1.4)Allows you to select an alert tone which is playedwhen a message is received. You can select any onefrom 10 message alert tones.nNoteFull length music tracks cannot be set as ringtones.Alert Type (Menu 9.1.5)]Ringtones: Supports 3 ring alert types. Ring, Ring andVibration, and Ring after Vibration.]Message Alert Tones: Supports six types ofmessage alerts.- Ring Once, Ring Every 2 Min, Ring Every 15 Min,Ring & Vibrate, Vibrate, Off]Other Alert Tones: This menu option allows you toselect a tone that sounds when pop-up menu alerts.You can set it on / off.Increasing Ringtone (Menu 9.1.6)Allows you to select an increasing ringtone type that isplayed when there is an incoming call. You can set iton / off.Power On/Off Tones (Menu 9.1.7)Allows you to select an power on/off tones. You canset it on / off.](https://usermanual.wiki/LG-Electronics-USA/CE110/User-Guide-797545-Page-45.png)
![45SettingsBluetooth On/Off (Menu 9.3.1)This menu sets the Bluetooth on or off using thenavigation key. Device List (Menu 9.3.2)This function allows you to view the list of all devicesthat are paired with your phone at once.To add a new device, press the left soft key [New]1. Select the [New] key to search the device that canbe connected and which is within range. 2. If you want to stop searching, press the right softkey [Cancel].3. All of the devices found are displayed in the pop-upmenu.Select the desired device by pressing the OK key, andentering the password.Bluetooth Settings (Menu 9.3.3)This menu allows you to configure the profile for aBluetooth.]My Visibility1. Selecting the Show option exposes your phone toother Bluetooth devices.2. Selecting Hide shows your phone only to alreadypaired devices.]My Name: Allows you to change the handset's namethat can be seen by other Bluetooth devices.]My Address: You can check your Bluetooth address.You cannot change the default setting.Date & Time Menu 9.4Set Date (Menu 9.4.1)This allows you to enter the day, month and year. Youcan change the date format via the Date Format menuoption. Date Format (Menu 9.4.2)MM/DD/YYYY(month/day/year)DD/MM/YYYY(day/month/year)YYYY/MM/DD(year/month/day)Set Time (Menu 9.4.3)This allows you to enter the current time. You canchoose the time format via the Time Format menuoption.](https://usermanual.wiki/LG-Electronics-USA/CE110/User-Guide-797545-Page-47.png)
![46Time Format (Menu 9.4.4)12 Hours/24 HoursAuto Update (Menu 9.4.5)Select On to set the phone to automatically update thetime and date according to the current local time zone.Call Menu 9.5Call Forwarding (Menu 9.5.1)When this network service is activated, you can directyour incoming calls to another number, for example, toyour voice mailbox number. For details, contact yourservice provider. Select one of the divert options, forexample, select If busy to divert voice calls when yournumber is busy or when you reject incoming calls. The following options are available: ]All Voice Calls: Diverts voice calls unconditionally. ]If Busy: Diverts voice calls when the phone is in use.]If No Answer: Diverts voice calls which you do notanswer.]If Out of Reach: Diverts voice calls when the phoneis switched off or out of coverage.]All Data Calls: Diverts to a number with a PCconnection unconditionally. ]All Fax Calls: Diverts to a number with a faxconnection unconditionally. Send My Number (Menu 9.5.2)This network service allows you to set your phonenumber to be displayed On or hidden Off from theperson you are calling. You can select Set by Networkif you prefer to have different settings for differentservice providers.Auto Redial (Menu 9.5.3)Select On, your phone redials the number you're tryingto call up to 10 times after you hear a quick, engagedsignal. Press [END] to stop the call attempts.This feature attempts to redial numbers that areengaged due to the wireless network.nNoteThere will be no alert indicating the call has been connected.You must stay on the line to hear when the call is connected.Settings](https://usermanual.wiki/LG-Electronics-USA/CE110/User-Guide-797545-Page-48.png)
![47SettingsAnswer Mode (Menu 9.5.4)This allows you to determine how to answer thephone.]Any Key: You can answer an incoming call bypressing any key, except the [END] key.]Send Key Only: You can only answer an incomingcall by pressing the [SEND] key.]Flip Open: When the phone rings, you can answer acall simply by opening the flip.Minute Minder (Menu 9.5.5)This option allows you to specify whether the phonewill beep every minute during an outgoing call to keepyou informed of the length of the call.Call Waiting (Menu 9.5.6)The network will notify you of a new incoming callwhile you have a call in progress. Select Activate torequest the network to activate call waiting, Deactivateto request the network to deactivate call waiting, orView Status, to check if the function is active or not.](https://usermanual.wiki/LG-Electronics-USA/CE110/User-Guide-797545-Page-49.png)
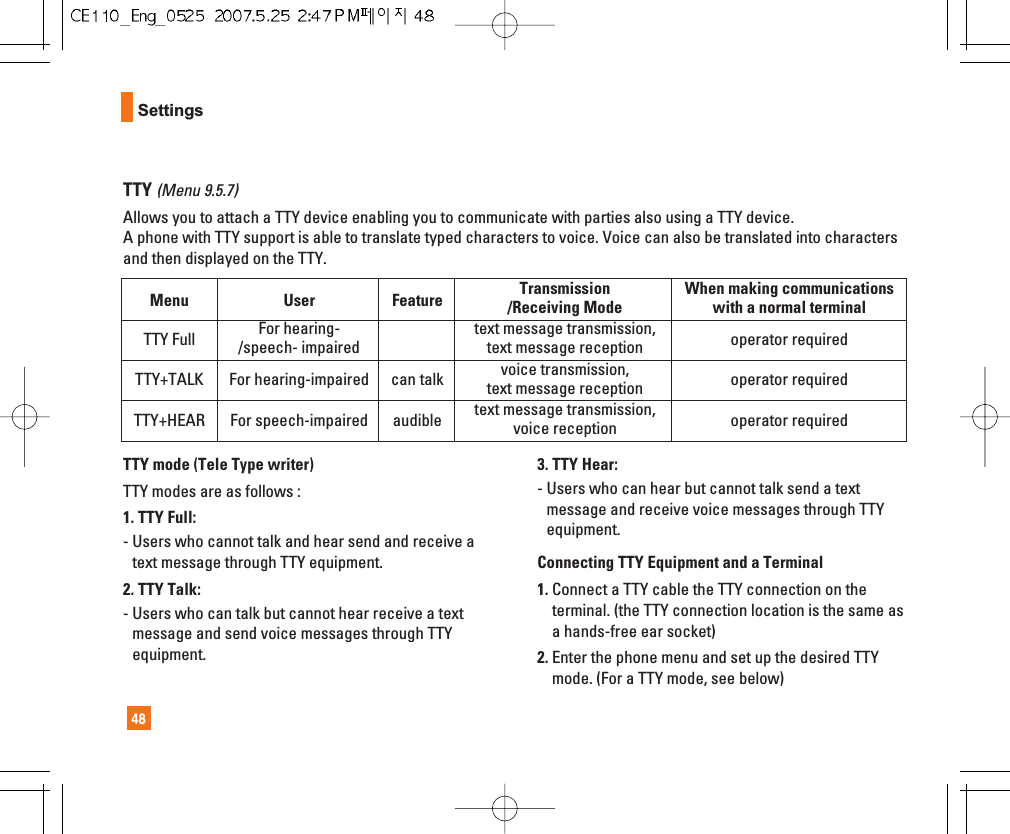
![49Settings3. After setting a TTY mode, check the LCD screen ofthe phone for the TTY icon.4. Connect the TTY equipment to the power source andturn it on.5. Make a phone connection to the desired number.6. When a connection is made, use the TTY equipmentto type in and send a text message or send a voicemessage.7. The voice or text message from the receiver endappears on the TTY equipment display.Send DTMF Tones (Menu 9.5.8)You can send the DTMF (dual tone multi-frequency)tones of the number on the display during a call.This option is helpful for entering a password oraccount number when you call an automated system,like a banking service.Hearing Aid (Menu 9.5.9)If you select On, users having hearing aid with T-Coilwill have better quality of sound. This T-Coil mode willremain On for all calls.Security Menu 9.6Various codes and passwords are used to protect thefeatures and settings of your phone. They aredescribed in the following sections.PIN Code Request (Menu 9.6.1)When the PIN code request feature is set to ‘On’, youmust enter your PIN each time you switch the phoneon. Consequently, any person who does not have yourPIN cannot use your phone without your approval.nNoteBefore setting the PIN code request feature to Off, you mustenter your PINThe following [Options] are available:]On: You must enter the PIN each time the phone isswitched on.]Off: The phone connects directly to the networkwhen you switch it on.Fixed Dial Number (Menu 9.6.2)This allows you to restrict your outgoing calls toselected phone numbers, if this function is supportedby your SmartChip. The PIN2 code is required.](https://usermanual.wiki/LG-Electronics-USA/CE110/User-Guide-797545-Page-51.png)
![50SettingsThe following [Options] are available:]On: You can only call phone numbers stored in theAddress Book. You must enter your PIN2.]Off: You can call any number.nNoteNot all SmartChips have a PIN2. If your SmartChip does not,this menu option is not displayed.Change Codes (Menu 9.6.3)The Change codes feature allows you to change yourcurrent password to a new one. You must enter thecurrent password before you can specify a new one.You can change the access codes for: Security Code,PIN1, PIN2nNotePIN: Personal Identification Number.Connection Menu 9.7GPRS Attach (Menu 9.7.1)If you select Power On and you are in a network thatsupports packet data, the phone registers to the GPRSnetwork and sending short messages will be done viaGPRS. Also, starting an active packet data connection,for example, to send and receive e-mail, is quicker. Ifyou select When Needed, the phone will use a packetdata connection only if you start an application oraction that needs it. The GPRS connection is closedafter it is not used by any application. NoteIf there is no GPRS coverage and you have chosen PowerOn, the phone will periodically try to establish a packet dataconnection. Network Profile (Menu 9.7.2)This menu shows the Network Profile. You canregister, delete and edit by using the Option Menu.However, you cannot delete or edit defaultconfigurations provided by Cingular.Reset Network Profile (Menu 9.7.3)This allows Profile information to be restored tooriginal setting. For example, this option will restorethe Profile that has been deleted by the Delete Allselection from the Network Profile (Menu 4.4)submenu.](https://usermanual.wiki/LG-Electronics-USA/CE110/User-Guide-797545-Page-52.png)
![51Flight Mode Menu 9.8This allows you to use only the phone’s features thatdo not require the use of the wireless network whenyou are in an airplane or in places where the wirelessnetwork is prevented.If you set the flight mode on, the icon will be displayedon the screen instead of the network signal icon.]On: You cannot make (or receive) any calls, includingemergency calls, or use other features that requirenetwork coverage]Off: You can deactivate the flight mode and restartyour handset to access the network.Check Memory Menu 9.9Common (Menu 9.9.1)This function shows the status of the user memory ofthe handset.Reserved (Menu 9.9.2)This function shows the status of the reserved memoryfor the user (Text Message, Contact List, Calendar,Tasks, Memo).SmartChip (Menu 9.9.3)This function shows the status of the SmartChip carduser memory.Reset Default Menu 9.0Restores the settings (e.g.: Audio, Display, Language,Date & Time, Bluetooth Settings) stored in handsetmemory to default values.NoteThe password is preset to 0000. Handset Information Menu 9.*This menu is used to view My Numbers, Manufacturerand Model Name information etc.Settings](https://usermanual.wiki/LG-Electronics-USA/CE110/User-Guide-797545-Page-53.png)
![52Q&APlease check to see if any problems you have encountered with the phone are described in this section before takingthe phone in for a service or calling a service engineer. QHow do I view the list of outgoing calls, incomingcalls and missed calls?APress the key.QHow do I clear all call history?APress the left soft key [Menu] and then thekey.QHow do I view all numbers stored in memory?APress right soft key [Names] and then .QWhy is the connection inconsistent or not audible incertain areas?AWhen frequency environment is unstable in acertain area, connection may be inconsistent andnot audible. Relocate to another area and try again.QWhy is the connection not consistent abruptlydisconnects even when established?AWhen frequency is unstable or weak or if there aretoo many users, connection may be cut off evenafter it was established. Please try again later orattempt after relocating to other areas.QWhy does the LCD not turn on?ARemove the battery and turn on the power afterplacing it back on. If there is no change, fully chargethe battery and try again.QWhy is there an echo when a connection is madewith certain telephones in a certain area?AThis is called the ‘Echo Phenomenon’, where itoccurs if connection volume is too high or causedby special properties (semi electronic telephoneexchange) of the equipment on the other end.](https://usermanual.wiki/LG-Electronics-USA/CE110/User-Guide-797545-Page-54.png)