LG Electronics USA CG300 Dual-Band GSM Phone with Bluetooth User Manual CG300 E 1011
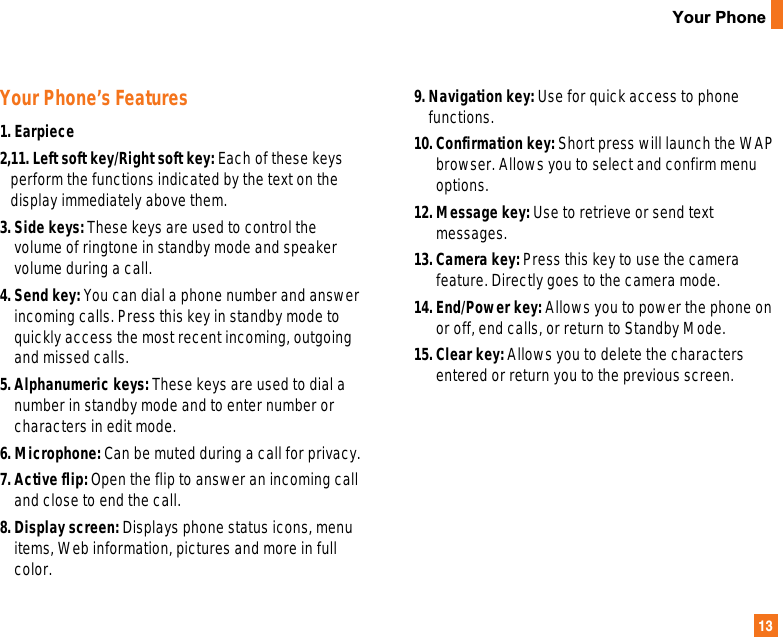
LG Electronics USA Dual-Band GSM Phone with Bluetooth CG300 E 1011
UserManual.wiki
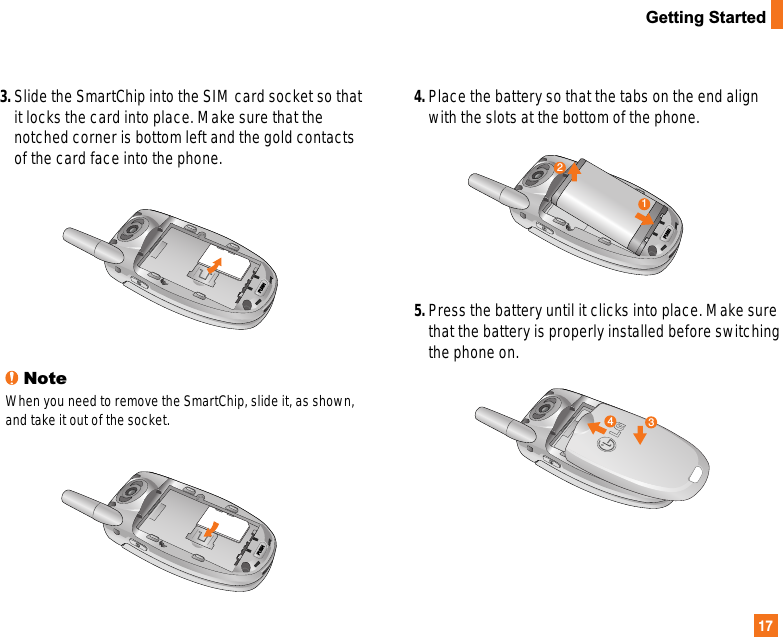
>
LG Electronics USA
>
CG300 User Manual
Users Manual
Navigation menu
Upload a User Manual
Namespaces
Wiki Guide
HTML
PDF
Info
Views
User Manual
Discussion / Help
Navigation
![8For Your SafetyImportant Information This user guide contains important information on theuse and operation of this phone. Please read all theinformation carefully for optimal performance and toprevent any damage to or misuse of the phone. Anychanges or modifications not expressly approved inthis user guide could void your warranty for thisequipment. Before You StartSafety InstructionsWARNING! To reduce the possibility of electric shock,do not expose your phone to high humidity areas, suchas the bathroom, swimming pool, etc. Always store your phone away from heat. Never storeyour phone in settings that may expose it totemperatures less than 32°F or greater than 104°F,such as outside during extreme weather conditions orin your car on a hot day. Exposure to excessive cold orheat will result in malfunction, damage and/orcatastrophic failure. Be careful when using your phone near otherelectronic devices. RF emissions from your mobilephone may affect nearby inadequately shieldedelectronic equipment. You should consult withmanufacturers of any personal medical devices suchas pacemakers and hearing aides to determine if theyare susceptible to interference from your mobilephone. Turn off your phone in a medical facility or at agas station. Never place your phone in a microwaveoven as this will cause the battery to explode. IMPORTANT! Please read the TIA SAFETYINFORMATION on page 82 before using your phone. Safety InformationRead these simple guidelines. Breaking the rules maybe dangerous or illegal. Further detailed information isgiven in this user guide.]Never use an unapproved battery since this coulddamage the phone and/or battery and could causethe battery to explode.]Never place your phone in a microwave oven as itwill cause the battery to explode.]Do not dispose of your battery by fire or withhazardous or flammable materials.](https://usermanual.wiki/LG-Electronics-USA/CG300/User-Guide-601861-Page-8.png)
![9For Your Safety]Make sure that no sharp-edged items such asanimal’s teeth, nails, come into contact with thebattery. There is a risk of this causing a fire.]Store the battery in a place out of reach of children.]Be careful that children do not swallow any partssuch as rubber plugs (earphone, connection parts ofthe phone, etc.). This could cause asphyxiation orsuffocation.]Unplug the power cord and charger during lightningstorms to avoid electric shock or fire.]When riding in a car, do not leave your phone or setup the hands-free kit near to the air bag. If wirelessequipment is improperly installed and the air bag isactivated, you may be seriously injured.]Do not use a hand-held phone while driving.]Do not use the phone in areas where its use isprohibited. (For example: aircraft).]Do not expose the battery charger or adapter todirect sunlight or use it in places with high humidity,such as a bathroom.]Never store your phone in temperatures less than -4°F or greater than 122°F.]Do not use harsh chemicals(such as alcohol,benzene, thinners, etc.) or detergents to clean yourphone. There is a risk of this causing a fire.]Do not drop, strike, or shake your phone severely.Such actions may harm the internal circuit boards ofthe phone.]Do not use your phone in high explosive areas as thephone may generate sparks.]Do not damage the power cord by bending, twisting,pulling, or heating. Do not use the plug if it is looseas it may cause a fire or electric shock.]Do not place any heavy items on the power cord. Donot allow the power cord to be crimped as it maycause fire or electric shock.]Do not handle the phone with wet hands while it isbeing charged. It may cause an electric shock orseriously damage your phone.]Do not disassemble the phone.]Do not place or answer calls while charging thephone as it may short-circuit the phone and/or causeelectric shock or fire.]Only use the batteries, antennas, and chargers](https://usermanual.wiki/LG-Electronics-USA/CG300/User-Guide-601861-Page-9.png)
![10For Your Safetyprovided by LG. The warranty will not be applied toproducts provided by other suppliers.]Only authorized personnel should service the phoneand its accessories. Faulty installation or servicemay result in accidents and consequently invalidatethe warranty.]Do not hold or let the antenna come in contact withyour body during a call.]An emergency call can be made only within aservice area. For an emergency call, make sure thatyou are within a service area and that the phone isturned on.FCC RF Exposure InformationWARNING! Read this information before operating thephone.In August 1996, the Federal Communications (FCC) ofthe United States, with its action in Report and OrderFCC 96-326, adopted an updated safety standard forhuman exposure to radio frequency (RF)electromagnetic energy emitted by FCC regulatedtransmitters. Those guidelines are consistent with thesafety standard previously set by both U.S. andinternational standards bodies. The design of this phone complies with the FCCguidelines and these international standards. CAUTIONUse only the supplied and approved antenna. Use ofunauthorized antennas or modifications could impaircall quality, damage the phone, void your warrantyand/or result in violation of FCC regulations. Do not usethe phone with a damaged antenna. If a damagedantenna comes into contact with skin, a minor burnmay result. Contact your local dealer for a replacementantenna. Body-worn Operation This device was tested for typical body-wornoperations with the back of the phone kept 0.6 inches(1.5cm) between the user’s body and the back of thephone. To comply with FCC RF exposure requirements,a minimum separation distance of 0.6 inches(1.5cm)must be maintained between the user s body and theback of the phone. Third-party belt-clips, holsters, andsimilar accessories containing metallic componentsshould not be used. Body-worn accessories that](https://usermanual.wiki/LG-Electronics-USA/CG300/User-Guide-601861-Page-10.png)
![11For Your Safetycannot maintain 0.6 inches(1.5cm) separation distancebetween the user s body and the back of the phone,and have not been tested for typical body-wornoperations may not comply with FCC RF exposure limitsand should be avoided. Vehicle Mounted External Antenna (optional, ifavailable) A minimum separation distance of 8 inches (20 cm)must be maintained between the user/bystander andthe vehicle mounted external antenna to satisfy FCC RFexposure requirements. For more information about RF exposure, visit the FCCwebsite at www.fcc.gov FCC Part 15 Class B Compliance This device and its accessories comply with part 15 ofFCC rules. Operation is subject to the following twoconditions: (1) This device and its accessories may notcause harmful interference, and (2) this device and itsaccessories must accept any interference received,including interference that may cause undesiredoperation. Cautions for Battery ]Do not disassemble. ]Do not short-circuit. ]Do not expose to high temperature: 60°C (140°F).]Do not incinerate. Battery Disposal]Please dispose of your battery properly or bring toyour local wireless carrier for recycling. ]Do not dispose in fire or with hazardous orflammable materials. Adapter (Charger) Cautions]Using the wrong battery charger could damage yourphone and void your warranty. ]The adapter or battery charger is intended for indooruse only. Do not expose the adapter or battery charger to directsunlight or use it in places with high humidity, such asthe bathroom.](https://usermanual.wiki/LG-Electronics-USA/CG300/User-Guide-601861-Page-11.png)
![18Getting StartedCharging the BatteryUse of unauthorized accessories could damage yourphone and invalidate your warranty. To use the travel adapter provided with your phone:1. With the battery in position on the phone, connectthe lead from the travel adapter to the bottom of thephone. Check that the arrow on the lead connectoris facing towards the front of the phone.2. Connect the adapter to a standard AC wall outlet.Only use the travel adapter that comes included withthe package.WarningYou must unplug the adapter before you remove the batteryfrom the phone during charging; otherwise, the phone couldbe damaged. 3. When charging is finished, disconnect the adapterfrom the power outlet and from the phone bypressing on the gray tabs on both sides of theconnector while pulling the connector out. Notice]If your phone is powered on while charging, you’ll see thebars in the battery indicator icon cycle. When the battery is fully charged, the bars in the batteryindicator icon will flash on and off]If your phone is powered off, the display will show thecharging status. ‘Charging’ or ‘Full’ will be displayed.121](https://usermanual.wiki/LG-Electronics-USA/CG300/User-Guide-601861-Page-18.png)
![19Getting StartedIf the battery fails to charge completely:]After turning the phone on and off, please attempt torecharge the battery.]After detaching and reattaching the battery, please attemptto recharge the battery.Turning Your Phone On and Off1. Open the flip.2. Hold down the key until the phone switches on.3. If the phone asks for a PIN, enter the PIN and pressthe left soft key [OK]. For further details, see page 76.The phone searches for your network and after findingit, the idle screen, illustrated below, appears on bothdisplays. Now, you can make or receive a call. NoteThe display language is preset to English at the factory. Tochange the language, use the Languages menu option(Menu 9.2.4). For further details, see page 73. 4. When you wish to switch the phone off, hold downthe key until the power-off image displays.Access CodesYou can use the access codes described in thissection to avoid unauthorized use of your phone. Theaccess codes can be changed by using the ChangeCodes feature (Menu 9.5.3). Security code (4 to 8 digits) The security code protects the unauthorized use ofyour phone. The default security code is set to ‘0000’and the security code is required to delete all phoneentries and to activate the Restore Factory Settingsmenu. The security code default setting can bemodified from the Security Settings menu.](https://usermanual.wiki/LG-Electronics-USA/CG300/User-Guide-601861-Page-19.png)
![20General FunctionsMaking a Call1. Make sure your phone is powered on.2. Enter a phone number including the area code. To edit a number on the display screen, press theright/left navigation keys to move the cursor todesired position or simply press the key to eraseone digit at a time.]Press and hold the key to erase the entirenumber.3. Press the key to call the number. 4. When finished, press the key.Making a Call by Send Key1. Press the key, and the most recent incoming,outgoing and missed phone numbers will bedisplayed.2. Select the desired number by using the navigationkey.3. Press the key.Making International Calls1. Press and hold the key for the internationalprefix. The ‘+’ character can be replaced with theinternational access code.2. Enter the country code, area code, and the phonenumber.3. Press the key.Ending a CallWhen you have finished a call, press the key.Making a Call From the ContactsYou can store names and phone numbers dialedfrequently in the SmartChip as well as the phonememory known as the Contacts. You can dial a numberby simply looking up a name in the Contacts. For moredetails on the Contacts feature, please refer to page67.](https://usermanual.wiki/LG-Electronics-USA/CG300/User-Guide-601861-Page-20.png)
![21General FunctionsAdjusting the VolumeDuring a call, if you want to adjust the earpiecevolume, use the side keys of the phone. In idle modewith the flip cover open, you can adjust the ringvolume using the side keys. Answering a CallWhen you receive a call, the phone rings and theflashing phone icon appears on the screen. If thecaller can be identified, the caller’s phone number (orname if stored in your Address Book) is displayed.1. Open the flip and press the key or the left softkey to answer an incoming call. If the Any Key menuoption(Menu 9.4.2) has been set to , any key presswill answer a call except for the key or the rightsoft key.Notice]To reject an incoming call, press and hold the side keys onthe left side of the phone without opening the flip. ]If the Flip Open menu option(Menu 9.4.2) is set to , youdo not need to press any key. You can answer the callsimply by opening the flip.2. End the call by closing the phone or pressing thekey.NoticeYou can answer a call while using the Address Book or othermenu features.Using the SpeakerphoneYou can use the integrated Speakerphone during a callby pressing the [OK] key . The loudspeaker isautomatically deactivated when you end the call.WarningDue to higher volume levels, don’t place the phone near yourear while the speakerphone is enabled.Vibrate Mode (Quick)When the flip is closed, Vibrate Mode can be activatedby pressing and holding down side keys. When the flipis opened, Vibrate Mode can be activated by pressingand holding down key.Signal StrengthIf you are inside a building, being near a window may](https://usermanual.wiki/LG-Electronics-USA/CG300/User-Guide-601861-Page-21.png)
![23General Functionschanges to reflect the most likely candidate from thedictionary.1. When you are in the T9 predictive text input mode,start entering a word by pressing keys toPress one key per letter.]The word changes as letters are typed - ignorewhat’s on the screen until the word is typedcompletely.]If the word is still incorrect after typing completely,press the down navigation key once or more to cyclethrough the other word options.Example: Press to type GoodPress [down navigation key]to type Home]If the desired word is missing from the word choiceslist, add it by using the ABC mode.2. Enter the whole word before editing or deleting anykeystrokes.3. Complete each word with a space by pressingthe key.To delete letters, press .Press and hold down to erase entire words.NoticeTo exit the text input mode without saving your input, press . The phone returns to the previous menu level.Using the ABC ModeUse the to keys to enter your text.1. Press the key labeled with the required letter:]Once for the first letter]Twice for the second letter]And so on2. To insert a space, press the key once. To deleteletters, press the key. Press and hold down thekey to clear the display.NoticeRefer to the table below for more information on thecharacters available using the keys.](https://usermanual.wiki/LG-Electronics-USA/CG300/User-Guide-601861-Page-23.png)
![24General FunctionsUsing the 123 (Numbers) ModeThe 123 Mode enables you to enter numbers in a textmessage (a telephone number, for example). Press the keys corresponding to the required digitsbefore manually switching back to the appropriate textentry mode. Using the Symbol ModeThe Symbol Mode enables you to enter varioussymbols or special characters. To enter a symbol, press the key. Use thenavigation keys to select the desired symbol and pressthe [OK] key.Key Characters in the Order DisplayUpper Case Lower Case1 . , - ¿ ? ¡ ! @ 1 . , - ¿ ? ¡ ! @ 12 A B C Á Ã Ç 2 a b c á ã ç 23 D E F É 3 d e f é 34 G H I Í 4 g h i í 45 J K L 5 j k l 56 M N O Ó Ñ 6 m n o ó ñ 67 P Q R S 7 p q r s 78 T U V Ú Ü 8 t u v ú ü 89 W X Y Z 9 w x y z 90Space Key, 0 Space Key, 0(Long press) (Long press)](https://usermanual.wiki/LG-Electronics-USA/CG300/User-Guide-601861-Page-24.png)
![27In-Call MenuYour phone provides a number of control functions thatyou can use during a call. To access these functionsduring a call, press the left soft key [Options].During a CallThe menu displayed on the handset screen during acall is different than the default main menu displayedwhen in idle screen, and the options are describedbelow. Making a Second CallYou can get a number you wish to dial from theAddress Book to make a second call. Press the left softkey then select Contacts. Swapping Between Two CallsTo switch between two calls, press the left soft key orkey, and then select Swap. Answering an Incoming CallTo answer an incoming call when the handset isringing, simply press the key. The handset is alsoable to notify you of an incoming call while you arealready on a call. A tone sounds in the earpiece, andthe display will show that a second call is waiting. Thisfeature, known as Call Waiting, is only available if yournetwork supports it. For details of how to activate anddeactivate it see Call Waiting (Menu 9.4.4). If Call Waiting is on, you can put the first call on holdand answer the second, by pressing . You can endthe current call and answer the waiting call bypressing the left soft key and then selecting Active callmenu of End call.Rejecting an Incoming CallYou can reject an incoming call without answering bysimply pressing the key.During a call, you can reject an incoming call bypressing the left soft key, which is the [Menu] key andselecting the Reject call or by pressing the key.Muting the MicrophoneYou can mute the microphone during a call by pressingthe [Menu] key then selecting Mute or right soft key[Mute]. The handset can be unmuted by pressing theUnmute menu or right soft key [Unmute]. When thehandset is muted, the caller cannot hear you, but youcan still hear them.](https://usermanual.wiki/LG-Electronics-USA/CG300/User-Guide-601861-Page-27.png)
![29Menu TreeThe following illustration shows the available menu structure and indicates the: ]Number assigned to each menu option.]Page where you can find the feature description.1. Mobile Mail (see page 33)2. Messaging (see page 36)2.1 IM(Instant Messaging)2.2 Text Messages2.2.1 New Message 2.2.2 Inbox2.2.3 Sent2.2.4 Drafts2.2.5 Settings2.2.6 Delete All Messages2.3 Multimedia Messages2.3.1 New Message2.3.2 Inbox2.3.3 Outbox2.3.4 Sent2.3.5 Drafts2.3.6 Settings2.4 Voice Mail2.4.1 Listen Voice Mail2.4.2 Voice Mail Number2.5 Download Messages2.4.1 Inbox2.4.2 Receive2.6 Chat2.7 Templates2.6.1 Text2.6.2 Multimedia2.6.3 Business Card](https://usermanual.wiki/LG-Electronics-USA/CG300/User-Guide-601861-Page-29.png)


![36MessagingIM(Instant Messaging) Menu 2.1Instant Messaging feature can only be used with thesupport of the network operator or communities suchas AIM, ICQ. For Instant Messaging users, a vaild UserID and Password will be required in order to login andexchange messages as well as checking the onlinestatus.For further details, see page 53.Text Messages Menu 2.2Your phone receives voice mail notification messagesand Short Message Service (SMS) messages.Voice mail and SMS are network services. Pleasecontact your service provider for more information.When the icon appears, you have received a newvoice mail. When the icon appears, you havereceived a new text message. If the message memoryis full, an error message is displayed, the iconflashes and you cannot receive any new messages.Use the Delete option in the Inbox (Menu 2.2.2) todelete obsolete messages. Once there is space in thememory any undelivered SMS messages will bereceived (provided sufficient space is available).New Message (Menu 2.2.1)You can write and edit text messages of up to 913characters.1. Type in a message using key presses. For details onhow to enter text, refer to page 21 (Entering Text). 2. After completing the message select the requiredoption by pressing the right soft key [Options].The following options are available.]Send to Number: Enter the phone number or selectthe number from the address book. ]Send to Email: Enter the email or select the emailfrom the address book. ]Save to Drafts: Save the message so that it can besent later. ]Set T9: Set on and off for the T9 input mode. ]Set Input Language: Choose between English orSpanish T9 language. For details on how to entertext, refer to page 22 (Using the T9 Mode). ]Clear Text: Delete the written message. ]Cancel: Exit the text editor.3. The following options are available. (Press the leftsoft key [Insert])](https://usermanual.wiki/LG-Electronics-USA/CG300/User-Guide-601861-Page-36.png)
![37Messaging]Symbol: Attach special characters.]Picture: Send and receive text messages thatcontain pictures, known as Enhanced MessagingService. Several preset pictures are available in thephone and they can be replaced with new onesreceived from other sources. ]Animation: Attaching an animation in a message canbe done through EMS(Enhanced MessagingService). ]Sound: Attach sounds that are available for shortmessage. ]Text Template: Use the text templates already set inthe phone. ]Contact: Attach a phone number. ]Business Card: Attach your name card. Inbox (Menu 2.2.2)Received text messages, page messages, and emaillists may be searched and the contents may beviewed. Received messages are displayed fromnewest to oldest. The following options are available. ]Reply: Replies to the received message. ]Delete: Deletes the selected message from theInbox. ]Forward: Forwards a received message to otherrecipients. After recipients are entered, the messagecan be forwarded. ]Call Back: Call back the sender. ]Extract: Extract picture, sound, text webpage andemail address from the message.Sent (Menu 2.2.3)View lists and contents of sent messages in this menuand also verify if transmission was successful. The following options are available. ]Delete: Deletes the selected message from theOutbox. ]Forward: Forwards the current message to otherrecipients. Drafts (Menu 2.2.4)This menu option shows the preset message list. Scrollthrough the list using the up/down navigation keys.](https://usermanual.wiki/LG-Electronics-USA/CG300/User-Guide-601861-Page-37.png)
![38MessagingThe following options are available. ]Edit: You can edit a selected message. ]Delete: Deletes the selected preset message. Settings (Menu 2.2.5)This menu allows you to set up default SMSinformation.]Message Center Number: Allows you to store orchange the number of your email gateway requiredwhen sending text messages. You must obtain thisnumber from your service provider. ]Email Gateway: Allows you to store or change thenumber of your email gateway required whensending text messages. ]Subject: If you set it to on, allows you to enter thesubject. ]Bearer Setting: You can select GPRS or GSM.Contact your network operator or service providerfor information related to setting a selected bearer,pricing and connection speed. GSM Preferred/GPRS Preferred Delete All Messages (Menu 2.2.6) Allows you to delete all messages. Multimedia Messages Menu 2.3A multimedia message can contain text, images,and/or sound clips. This feature can be used only if it issupported by your network operator or serviceprovider. Only devices that offer compatiblemultimedia message or e-mail features can receiveand multimedia messages. Attach to add Symbol,Picture, Sound, Recorded Voice, Text Template. New Message (Menu 2.3.1)The following options are available. • Send: Support multiple number and email addresses.• Preview: To see the multimedia message you wrote. • Save: Allows you to save multimedia messages indraft or as templates.• Delete: Deletes the MMS message. • Slide Duration: Allows you to set timer for slide andtext. • Slide Format: Allows you to make the message](https://usermanual.wiki/LG-Electronics-USA/CG300/User-Guide-601861-Page-38.png)

![41Messaging• Send: Support multiple number and email addresses. • Preview: To see the multimedia message you wrote. • Save: Allows you to save multimedia messages indraft or as templates. • Delete: Allows you to delete the image or sound. • Slide Duration: Allows you to set timer for slide andtext. • Slide Format: Allows you to make the messagecontents aligned right, left, top and bottom. • Add Slide: Allows you to add a slide before or aftercurrent slide. • Remove Image: Deletes the current image. • Remove Sound: Deletes the current sound. • Remove Slide: Allows you to move to previous ornext slide. • Add Image: Allows you to add a image before or aftercurrent image. • Add Sound: Allows you to add a sound before or aftercurrent sound. Settings (Menu 2.3.6)Via this menu, you can set up default multimediamessage information.The following options are available:]Message Subject: Enter the message title. ]Slide Duration: Display the duration of each pagewhen writing the message. ]Alignment: Set the position of a message and textmessage. • Image Bottom • Image Left• Image Top • Image Right]Validity Period: Set the duration for keepingmessages on the network server. ]Auto Download • On: If you select this, messages are downloadedautomatically on receipt. • Off: Defers downloading messages.]Message Center URL: Enter the address of an MMSserver to use the MMS service. ]Network Profile: For further details, see page 51.](https://usermanual.wiki/LG-Electronics-USA/CG300/User-Guide-601861-Page-41.png)
![42MessagingVoice Mail Menu 2.4This menu provides you with a quick way of accessingyour voice mailbox (if provided by your network). Before using this feature, you must enter the voiceserver number obtained from your service provider. When new voicemail is received, the symbol will bedisplayed on the screen. Please check with yournetwork service provider for details of their service inorder to configure the handset accordingly.Listen Voice Mail (Menu 2.4.1)Before using this feature, you must enter the voiceserver number obtained from your service provider(see menu option 2.4.2). You can then select this optionand press the left soft key [OK] to listen to yourmessages. You can quickly connect to the first voice server bypressing and holding the key in Idle Mode.Voice Mail Number (Menu 2.4.2)Allows you to change the voice mail server number, ifnecessary.NoteVoice Mail is a network feature. Please contact your serviceprovider for further details. Download Messages Menu 2.5Inbox (Menu 2.5.1)You can order push messages from WAP serviceproviders. Push messages are notifications of, for example, newsheadlines and they may contain a text message oraddress of a WAP service. For availability andsubscription, contact your WAP service provider. Service providers can update an existing pushmessage every time a new push message is received. Messages can be updated even if you have movedthem to another folder. Push messages expire and theyare deleted automatically. ]Information: Shows the information of receivedpush messages.]Load: Allows you to connect to a specific site usingthe information in the received push message.]Delete: Delete the selected push message.](https://usermanual.wiki/LG-Electronics-USA/CG300/User-Guide-601861-Page-42.png)
![Receive (Menu 2.5.2)You can set the option whether you will receive themessage or not.Chat Menu 2.6This menu option connects to Operator chat site.Templates Menu 2.7There are 6 predefined messages in the list. You canview and edit the template messages or create newmessages. Two options are available: Text andMultimedia.Text (Menu 2.7.1)• Please call me back • I’m late. I will be there at• Where are you now? • I’m on the way.• Urgent! Please contact. • I love youThe following options are available.]Edit: Allows you to write a new message or edit theselected template message. ]Send via • Text Messages: Sends the selected templatemessage by SMS. • Multimedia Messages: Sends the selectedtemplate message by MMS. ]Delete: Allows you to delete the selected templatemessage. Multimedia (Menu 2.7.2)For further details, see page 38.• Send: Support multiple number and email addresses. • Preview: To see the multimedia message you wrote. • Save: Allows you to save multimedia messages indraft or as templates. • Delete: Deletes the MMS message. • Slide Duration: Allows you to set timer for slide andtext. • Slide Format: Allows you to make the messagecontents aligned right, left, top and bottom. • Add Slide: Allows you to add a slide before or aftercurrent slide. • Remove Slide: Deletes the selected slide. • Remove Image: Deletes the current image. • Remove Sound: Deletes the current sound. 43Messaging](https://usermanual.wiki/LG-Electronics-USA/CG300/User-Guide-601861-Page-43.png)
![44Messaging• Add Image: Allows you to add a image before or aftercurrent image. • Add Sound: Allows you to add a sound before or aftercurrent sound. Business Card (Menu 2.7.3)This option allows you to make your own name card.Key in the Name, Mobile number, Office number, Faxnumber and E-mail address. ]Edit: Allows you to write a new message or edit theselected name card. ]Send Via•Text Messages: Sends the selected name card bySMS. • Multimedia Messages: Sends the selected namecard by MMS. ]Delete: Allows you to delete the selected name card. Check Memory Menu 2.8You can check the current memory status of eachmemory for Text and Multimedia.](https://usermanual.wiki/LG-Electronics-USA/CG300/User-Guide-601861-Page-44.png)
![50MEdia NetNetwork Profile Menu 4.4A Profile is the network information used to connect tothe internet. Supports three kinds of profiles: MEdiaNet, Home and Roam. MEdia Net is used to connect to the internet usingGPRS, Home uses CSD (Circuit Switched Data) withgateways, and Roam uses CSD without the network. Because Operator also selects a bearer automaticallyaccording to the current network status, the userdoesn’ t need to select any of them. Each profile has submenus as follows: ]Activate: Set a current profile as a default. ]Edit: Edit the various items of the current profile. ]Rename: Revise the name of profile. ]New Network Profile: Create new profile. ]Delete: Delete the profile. ]Delete All: Allows all Profiles within the AccessPoint to be deleted so please take precaution prior tousing this option. NoteThe changes using these options may affect the otherapplication function. Cache Settings Menu 4.5The information or services you have accessed arestored in the cache memory of the phone. Clear Cache (Menu 4.5.1)Remove all contexts saved in cache.MEdia Net1. Activate2. Edit3. Rename4.New Network Profile5. Delete6. Delete AllHome1. Activate2. Edit3. Rename4. New Network Profile5. Delete6. Delete AllRoam1. Activate2. Edit3. Rename4.New Network Profile5. Delete6. Delete All](https://usermanual.wiki/LG-Electronics-USA/CG300/User-Guide-601861-Page-50.png)
![54Push to Talk (PTT)Icon Descriptions ]My Availability: Your availability icon appears nextto the signal indicator on your idle screen. This iconindicates the availability others will see for you whenyou are listed in their PTT Contacts.AvailableThis will be your availability state once you initializeservice and it will not change unless you change it asnoted below.UnavailableThis becomes your availability state if you power offyour phone, turn PTT Off, or if the system detects youhave moved out of coverage.Do Not DisturbThis becomes your availability state if you change MyAvailability (Menu 6.4.1) to Do Not Disturb. In this stateyou may place PTT calls but will not receive a PTT call.PTT MessageThis icon appears in place of your availability statusnotifying you that a PTT message is waiting. To accessthese messages go to Push to Talk (6) on the MainMenu. The message will either immediately display ormay be found under Pending Invitations (5).]PTT Contact Availability: This section covers theicons which will appear next to individuals andgroups in your PTT Contacts list indicating theiravailability.• INDIVIDUALS:AvailableThis contact is available to talk.UnavailableThis contact has turned PTT Off, powered down theirphone, or moved out of coverage.Do Not DisturbThis contact is not receiving PTT calls.Silent/VibrateThis contact is available to receive PTT calls. Howeverthey will be given the option to accept or reject yourPTT call.Invitation in ProgressYou are waiting for this contact to accept yourinvitation.](https://usermanual.wiki/LG-Electronics-USA/CG300/User-Guide-601861-Page-53.png)
![57Push to Talk (PTT)PTT Floor Release toneWhen you let go of the PTT Key you will hear this toneas will the other participants on the call. All of yourspeech prior to this tone has been heard by otherparticipants. Others on the call are now aware that thefloor is open and they have an opportunity to speak bypressing their PTT Key.Error toneIf you attempt to speak by pressing your PTT Key andsomeone else still has the floor you will hear this tone.The PTT KeyThe gray key on the left hand side of the phone is yourPTT Key.• Pressing and releasing this key while idle displaysyour PTT contacts.• Pressing and holding this key while idle displaysyour PTT history.• Pressing and holding this key while in a PTT callallows you to speak to the other call participants.To make a call press and release your PTT key todisplay your contacts. Select the person or group youwish to connect with and Press and Hold the PTT Key.NoteCustomers should not initiate or participate in a PTT callwhilst driving. The current version of our PTT productrequires you to press the button while talking. For thisreason we advise against using PTT while driving, includingwith a car kit or personal handsfree kit.PTT Contacts Menu 6.1When accessing your PTT Contacts, Options displayson your Right Soft Key. Options may change dependingon whether an individual or a group was highlightedwhen you selected Options.]Call Me Alert: This option allows you to send amessage to an individual in your PTT Contactswhose status is Available, Silent/Vibrate, or Do NotDisturb. First select the individual, select Options,and then select Call Me Alert. A message will displayon their idle screen “Please Call” and your name.They can simply press their PTT Key to call you back.](https://usermanual.wiki/LG-Electronics-USA/CG300/User-Guide-601861-Page-56.png)
![58Push to Talk (PTT)]Quick Group Call: This option allows you to make agroup call without pre-establishing it in your PTTContacts. After selecting this menu item from PTTContacts, Options, a list of available individuals willpresent. Select those you wish to include in your call(up to 6). Then press the PTT Key to begin your QuickGroup call.]Voice Message: This option allows you to leave avoicemail for a person or group of people instantly.• For a message to one person/group, simply highlightthe person/group on your PTT Contacts, selectOptions, and select Voice Message. Pushing thePTT Key begins the recording. Releasing the PTTKey ends the recording and deposits your message.• You may also message several individuals from yourPTT Contacts. Select Voice Message and press OKonce. The list of all individuals will present. Selectthe individuals to receive the message. Pushing thePTT Key begins the recording. Releasing the PTTKey ends the recording and deposits your message.The message is now deposited into the same voicemailused for cellular calls.]Search: This option allows you to search anindividual or group by name or number from the list.]Rename: You can edit the name of the individual orgroup.]Delete: You can delete an individual or a group.Deleting a group which you originated deletes thegroup from PTT Contacts for all participants.]Leave Group: If you have joined a group originatedby another this option allows you to leave the groupbut the group remains intact for all otherparticipants.]Copy to Address Book: This option only displayswhen an individual was highlighted and allows youto copy the name and number to your Address Book.]New Message: You can send a new text message toselected member.]View Members: This option displays when a groupwas highlighted and will present all members of agroup along with their Availability.]Dynamic Call: This option displays when a groupwas highlighted. It is similar to Quick Group Callhowever the participants you select from are onlythose participants in the group.](https://usermanual.wiki/LG-Electronics-USA/CG300/User-Guide-601861-Page-57.png)
![59Push to Talk (PTT)]Add member: This option displays only when youhave highlighted a group which you have originated.After adding any additional members, a notificationis sent to the other group participants of the newgroup members.]Remove Member: This option displays only when youhave highlighted a group which you have originated.After removing a member a notification is sent to theindividual.Add Contact Menu 6.21. Select Add Contact in the PTT menu.2. Enter the contact's name and phone number andthen select [Save]. An invitation to join your PTTContacts will be sent.3. The availability icon will be Invitation in Progressuntil the individual accepts.4. Once accepted they are part of your PTT Contactsand you are part of theirs.Add Group Menu 6.3Setting up a PTT group is a great way to quickly call agroup of people you routinely need to reach. A groupcan be made up of individuals in your PTT Contacts orother Operator PTT subscribers you don't necessarilywant to add to your PTT Contacts.1. After selecting Add Group you will be asked to nameyour group.2. Next step is to choose members. Choosing Select InContacts lets you chose from your PTT Contacts.Choosing New Contact lets you add someone not inyour PTT Contacts.a. If you want to add both types of contacts then youwill need to select one option and save the group.b. Then using Add Member in the PTT ContactsOptions menu you can add the remainingmembers.3. Once you have saved your group invitations will besent to each contact for their acceptance. TheInvitation in Progress icon will display next to thegroup until one member accepts. Availability willthen update each time a person accepts.](https://usermanual.wiki/LG-Electronics-USA/CG300/User-Guide-601861-Page-58.png)
![60Push to Talk (PTT)4. When a participant accepts your invitation the groupis now in their PTT Contacts and they may also placecalls to the group.5. Maximum members in a group is 20, 19 participantsand yourself. You may have up to 30 groups in yourPTT Contacts.PTT Settings Menu 6.4]My Availability: This option allows you to changeyour Availability status between Do Not Disturb andAvailable.]Contact Alerts: This feature allows you to be alertedwhen the availability status of a contact changesfrom Unavailable or Do Not Disturb to Available orSilent/Vibrate.1. Once Contact Alerts is selected a list of individualsfrom PTT Contacts will display. Select thoseindividuals for whom you want to receive alerts foravailability changes.2. Once selected you will receive alerts for availabilitychanges until you de-select them.3. An alert consists of a tone as well as a PTT messagewhen you access the PTT Menu.]Set Your Name: When you initialized service you seta name for yourself. This name is presented inContact Invitations and Call Me Alerts. Changingyour name will not impact invitations already sentbut will be reflected in future invitations.]Auto Accept Invites: If you do not want to pre-screen all additions to your PTT Contacts you canuse this menu item to automatically accept yourinvitations.• Disable All allows you to pre-screen all invitations.• Contact Only automatically accepts individualinvitations.• Group Only automatically accepts group invitations.• Enable All automatically accepts all invitations.]PTT is On/PTT is Off: This menu item allows you toturn your PTT Service off or turn it on.Pending Invitations Menu 6.5This menu item only displays if you have invitationswhich have been waiting for your review. Selectingthis menu item displays a list of invitations pending.Invitations not disposed of within 7 days will expire.](https://usermanual.wiki/LG-Electronics-USA/CG300/User-Guide-601861-Page-59.png)
![61My MEdiaFavorites Menu 7.1Your phone may have some pre-installed bookmarksfor sites not affiliated with LG. LG does not warrant orendorse these sites. If you choose to access them, youshould take the same precautions, for security orcontent, as you would with any site. For further details,see page 50. Games & Apps Menu 7.2For further details, see page 45 (Menu 3.2).Ringtones/Audio Menu 7.3The left soft key [Options] will bring up the followingoptions.]Send via Text Message: iMelody Sound can be sentvia SMS.]Send via Multimedia Message: Downloaded Soundcan be sent via MMS.]Set as Ringtone: This sets the Ring Tone withcurrently selected Sound.]Delete: This deletes currently selected Sound.]Rename: This deletes the Title of currently selectedSound. ]Delete All: This deletes all sounds. NoteSounds supplied as default can only be used under the SetAs Ring Tone mode. Graphics Menu 7.4The right soft key [Options] will bring up the followingoptions.]Send via Text Message: EMS Picture can be sent viaSMS. ]Send via Multimedia Message: Downloaded Picturecan be sent via MMS. ]Set as Wallpaper: Currently selected Picture can beset as a Wallpaper. ]Delete: Currently selected Picture can be deleted. ]Rename: Title of currently selected Picture can beedited. ]Delete All: All Pictures can be deleted.](https://usermanual.wiki/LG-Electronics-USA/CG300/User-Guide-601861-Page-60.png)
![62My MEdiaNotePictures supplied as default can only be used under the SetAs Wallpaper mode. Multimedia Menu 7.5The right soft key [Options] will bring up the followingoptions.]Send via Multimedia Message: DownloadedAnimation can be sent via MMS. ]Set as Wallpaper: Currently selected Animation canbe set as a Wallpaper. ]Delete: Currently selected Animation can be deleted. ]Rename: Title of currently selected Animation can beedited. ]Delete All: All Animations can be deleted. Tools Menu 7.6Camera (Menu 7.6.1)The phone supports 4 modes that can be set to captureimages and they are 128X160, 160X120, 320X240 and640X480. You can access camera feature directly by pressingand holding the about or (camera key) 2seconds. Take Photo Using the camera module built in your phone, you cantake pictures of people or events while on the move.Additionally, you can send photos to other people in apicture message. The right soft key [Options] will bring up the followingoptions. ]Image Size: Sets the image size to one of128X160(Mobile), 160X120(QQVGA), 320X240(QVGA),640X480(VGA). The selected image size displays onthe capture screen. ]Brightness: This adjusts the brightness level of thescreen and there are 9 levels of setting.](https://usermanual.wiki/LG-Electronics-USA/CG300/User-Guide-601861-Page-61.png)
![63My MEdia]White Balance: This adjusts the Light Effect leveland you can select from the following options: Auto /Daylight / Incandescent / Cloudy / Fluorescent. ]Zoom: Determines the zoom rate. ]Color Effect: Allows you to apply special effects tothe picture. Press the left or right navigation key tofind the tone you want to use. Color, Sepia, Mono areavailable. ]Self Timer: Determines the delay time.]Multishot: This feature enables the amount ofcontinuous frames that can be taken at one time.The number of frames is determined by the imagesize setting. 640X480 image size can be set at 1 Shotand 3 Shots per press, 320X240 image size can beset at 1 Shot, 3 Shots and 6 Shots per press, and allother sizes can be set at 1 Shot, 3 Shots, 6 Shots and9 Shots per press. ]Shutter Sound: Allows you to select a sound whenyou press the shutter. Sound 1 / Sound 2 / Sound 3 /Silent ]Default Settings: This restores the original camerasettings (Size, Brightness, Zoom, etc.).Gallery In this menu, you can review the pictures you havetaken. This feature offers the ability to store allcaptured photo images in an album. When no imageshave been captured, the Empty message will bedisplayed. The picture will display the last imageviewed. The title of the image will be displayed on topas well as the index number of the displayed image.The left or right navigation key is used to view previousor next image. ]View: You can view one image at a time.]Send Photo: Allows you to send a multimediamessage using the taken picture. For further detailsabout sending multimedia messages, see page 38. ]Set as Wallpaper: Set selected photo image as awallpaper. ]Set as Photo ID: You can add the selected image to aaddress book contact to use Photo Caller ID feature.]Delete: Delete current image. ]Slideshow: The Slide Show mode will display theimages in slide show format. The images are shownevery 1.5 second intervals.](https://usermanual.wiki/LG-Electronics-USA/CG300/User-Guide-601861-Page-62.png)
![64My MEdia]Rename: Allows you to rename the taken picture. ]Delete All: Delete all images in the album. ]Information: Displays Title, Size, Date and Timeinformation on selected image. Check Memory This indicates the available memory capacity. The totalavailable memory is 300KB and the remaining capacityis displayed. Alarm Clock (Menu 7.6.2)Set the alarm to ring at a specific time. In the AlarmClock menu, the following options are available: On: Set the time(hour and minute) for activating thealarm. 1. Enter the menu. 2. Select [On] by pressing the right/left navigation keys. 3. If you want to set the time for activating the alarm,press the down navigation key. 4. Enter the required time, press the down navigationkey. 5. The following options are available. • Once: The alarm rings only once and is thendeactivated. • Daily: The alarm rings every day at the same time. • Weekly: The alarm rings every week on the sameday and at the same time. • Monthly:The alarm rings every month on the sameday and at the same time. 6. Allows you to select the alarm melody by using theright/left navigation keys. 7. Press the left soft key [Set]. Off: Cancel the alarm. NoticeIf this option is set to On, the alarm will ring at the specifiedtime, even when the phone is switched off. To stop the alarmwhen it rings, open the phone and press the right soft key[Quit].](https://usermanual.wiki/LG-Electronics-USA/CG300/User-Guide-601861-Page-63.png)
![65My MEdiaCalendar (Menu 7.6.3)When you enter this menu a calendar will bedisplayed. Top of the screen indicates sections fordate. Square cursor is used to locate a particular day.The under bar on the calendar indicates a schedule ormemo on that day. This function helps to remind you ofthe schedule and memo. The phone will sound analarm tone if it has been set for a specific note. For changing the day, month, and year. NoteYour phone should be switched on to use this function. ]View: Press the right soft key [Options] to delete oredit the note you selected. ]Edit: Allows you to edit the schedule. ]Delete: Allows you to delete the schedule. ]New Schedule: You can edit maximum of 30characters and create up to 30 notes. ]Calendar: Allows you to consult the calendar. ]Scheduler Tone: The phone can sound an alarmtone when the scheduled date for an event has beenreached with this option. ]All Schedules: Shows the notes that are set for alldays. Use the up/down navigation keys to browsethrough the note lists. ]Go to Date: Allows you to jump to a specific date.]Delete Old: Delete past schedule event that hasalready been notified. ]Delete All: Delete all schedules. You are asked toconfirm your action. NoteYou can see Edit, Delete,View all schedules, Delete past, andDelete all menus dependent on setting of the schedule. Key Descriptionup/down navigation key Weeklyleft/right navigation key Dailykey/ key Yearlykey/ key Monthly](https://usermanual.wiki/LG-Electronics-USA/CG300/User-Guide-601861-Page-64.png)
![66My MEdiaVoice Memo (Menu 7.6.4)Allows you to record a memo. You can record up to 3voice messages with each message up to 30 seconds. You can use the Voice Memo feature to:• Play the recorded voice memos• Delete one or all voice memos1. Once recording is started, the message ‘Recording... ’ and the remaining time is displayed.NoteIf all memo locations are full, you must delete an old memobefore recording a new one. 2. If you want to finish recording, press the left soft key[Save]. ]Play: Allows you to play back all memos recorded,starting with the most recent memo. The screendisplays the date and time when the memo wasrecorded. ]Delete: Allows you to delete a specific memo. Allmemos recorded are played back, starting with themost recent one. ]Record New: Allows you to record a memo. ]Rename: Allows you to rename a specific memo. ]Send via Multimedia Message: Sends the selectedvoice memo by MMS. ]Delete All: Allows you to delete all memos. Calculator (Menu 7.6.5)Using this feature, you can use the phone as acalculator. The calculator provides the basicarithmetic functions: addition, subtraction,multiplication and division. Using the Calculator1. Enter the first number using the numeric keys. 2. Use the navigation keys to select a sign forcalculation. NoteTo include a decimal point, press the key.3. To calculate the result, press the left soft key[Result] or key.](https://usermanual.wiki/LG-Electronics-USA/CG300/User-Guide-601861-Page-65.png)
![67My MEdiaNotepad (Menu 7.6.6)To write, edit and delete a memo on a specific date,proceed as follows. 1. Press the left soft key [New].2. Input the memo and press the right soft key[Options].The following options are available.]Save: Allows you to save the memo. ]T9 Languages: Allows you to select the T9 languageto use in memo. ]Exit Editor: Allows you to exit in memo editor. Or 1. Select a memo. 2. Press the right soft key [Options].The following options are available.]View: Allows you to view the memo. ]Delete: Allows you to delete the memo. You canpress the right soft key [Options →Delete] to edit thememo displayed. ]Edit: If you select a memo that already exists, youcan press the right soft key [Options→Edit] to editthe memo displayed. ]New Note: Add a new memo, up to 20 memos and 40characters per each memo. ]Delete All: Allows you to delete all memos. You areasked to confirm your action. World Clock (Menu 7.6.7)Allows you to check the current Greenwich MeanTime(GMT) and 53 major cities around the world, usingthe left/right navigation keys. The screen shows the city name, current date andtime. To select the time zone in which you are located,proceed as follows: 1. Select the city corresponding to your time zone bypressing the left/right navigation keys one or moretimes. The local date and time are displayed. 2. Press the right soft key [Options].3. If you want to set, press the key.4. If you want to set Daylight Savings, press thekey in Options menu.](https://usermanual.wiki/LG-Electronics-USA/CG300/User-Guide-601861-Page-66.png)
![68My MEdiaNoteThe time zone setting of each city in World time menu maybe affected by network condition. Unit Converter (Menu 7.6.8)This converts any measurement into a unit you want.There are 4 types that can be converted into units:Length, Surface, Weight, and Volume.1. You can select one of four unit types by pressing theleft soft key [Unit].2. Select the standard value by using the left/rightnavigation keys.3. Select the unit you want to convert by pressing theup/down navigation keys. 4. You can check the converted value for the unit youwant. Also, you can input a decimal number bypressing the key.Tip Calculator (Menu 7.6.9)Allows you to quickly and easily calculate the amountsfor a bill with the amount of the bill, the amount of thetip and the number of people as variables.](https://usermanual.wiki/LG-Electronics-USA/CG300/User-Guide-601861-Page-67.png)
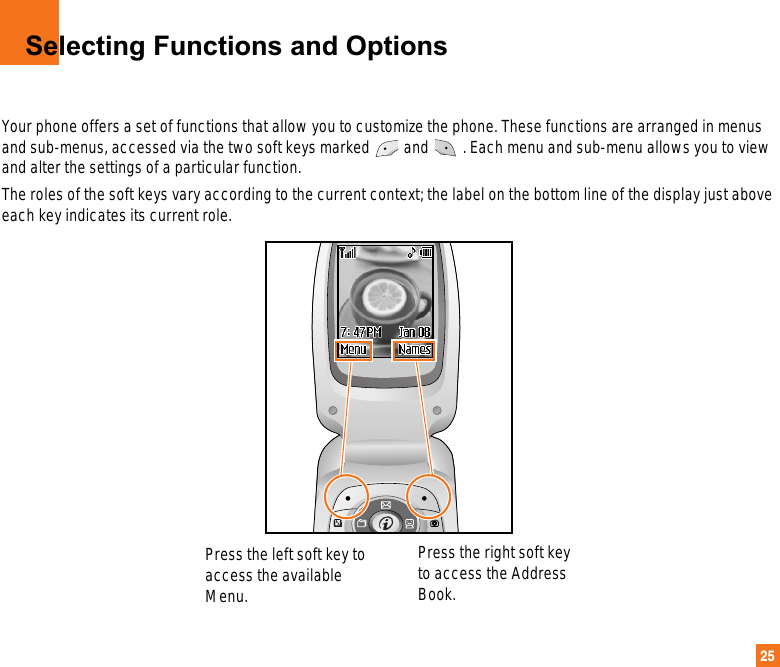
![69You can store phone numbers and their correspondingnames in the memory of your SmartChip. In addition,you can store up to 255 numbers and names in thephone memory. The SmartChip and phone memories,although physically separate, are used as if they werea single entity, called the Address Book. Contacts Menu 8.11. When the idle screen is displayed, press the rightsoft key [Names].2. Press the left soft key [OK].NoteYou can also scroll through the Address Book from thebeginning, in idle mode with the flip cover open, by pressingthe down navigation key directly.3. If you want to edit, delete, copy an entry, or to addthe voice to one, select [Options].4. Once you have found the required entry, press theto dial the number.• View: To view in detail the selected name. • Delete: You can delete an entry. • New Contact: you can add new address bookentires to SmartChip memory or the address bookmemory. • New Message-Text: You can write a text message. For furtherdetails, see page 36. -Multimedia:You can write a multimedia message.For further details, see page 38. • Edit: You can edit the name, mobile number, homenumber, office number, E-mail, group, memo andpicture by press the left soft key [OK]. • Copy to Phone: You can copy an entry fromSmartChip to phone. • Copy to SmartChip: You can copy an entry fromPhone to SmartChip. • Set Voice Dial: You can add voice to the entry orchange the voice tag. • Main Number: You can select the main number outof your mobile, home or office numbers. Choose theone that is most often used. The main number will bedisplayed first, if you set this.Address Book](https://usermanual.wiki/LG-Electronics-USA/CG300/User-Guide-601861-Page-68.png)
![70New Contact Menu 8.2You can add a address book entry by using thisfunction. Phone memory capacity is 255 entries.SmartChip memory capacity depends on the cellularservice provider. You can also save 20 characters ofname in the phone memory, and save characters in theSmartChip. The number of characters is dependent onthe SmartChip. 1. Open the Address Book first by pressing the rightsoft key [Names] in standby mode.2. Scroll to highlight New Contact, and press the leftsoft key [OK].3. You can add new address book entries to SmartChipmemory or the address book memory. To select thememory, go to Set Save Location (Menu 8.8). • Adding new entries into SmartChip memoryYou can enter a name and number, and select therequired group. (Depends on the SIM) • Adding new entries into phone memoryYou can enter a name, numbers, E-mail address andmemo, and select the required group.Speed Dial List Menu 8.3You can assign any of the keys, to with aname list entry. You can call directly by pressing thiskey for 2-3 seconds. 1. Open the Address Book first by pressing the rightsoft key [Names] in a standby mode.2. Scroll to Speed Dial List, then press the left soft key[OK].3. If you want to add a number to speed dial, select<Empty>. Then, you can search the name from theAddress Book.4. Select the name from the speed dial. You canchange and delete the name. In addition, you cancall by this number, write text message, andmultimedia message. Voice Dial List Menu 8.4You can see all the phone numbers which containvoice. You can also call directly by pressing thekey. After selecting the phone number by usingthe up/down navigation keys, press the right soft key[Options] and it will offer the following submenus: ]Listen: You can play back the voice attached to aAddress Book](https://usermanual.wiki/LG-Electronics-USA/CG300/User-Guide-601861-Page-69.png)
![71Address Bookphone number.]Change: You can change the voice attached to aphone number. ]Remove: You can delete the voice attached to aphone number.]Call: You can call by selecting this submenu. ]Add Voice Dial: You can add a new voice to phonenumber.]Remove All: You can delete all the voice attached toa phone number. NoteThe voice can only be attached to the main number whichyou set. For example, if you change the main number, voicewill be automatically attached to the changed number. Thismeans that you cannot attach voice to mobile, office andhome numbers simultaneously. You can add a voice tag to aphone number in the SmartChip. The voice tag can beerased if you remove or change the SIM card. Caller Groups Menu 8.5There are 6 predefined groups as well as oneadditional group labeled Others where you can createyour own lists.1. You can set the phone to ring in a specific way anddisplay a preselected graphic icon when a particularperson calls you. 2. Scroll to Caller Groups then press the left soft key[OK] to enter this menu. 3. Every Group list will be displayed : Family, VIP,Friends, Colleague, Group 1, Group 2, No Group.4. Select the Group name that you want to manage bypressing the right soft key [Options]. 5. You will see the following submenus under thepredefined groups except for the No Groups group. • View Members: Allows you to see the member list inthe group. • Group Ringtone: Allows you to select the ring toneto be used when you receive a voice phone callfrom a person in the group. • Group Icon: Allows you to select the graphic icon tobe displayed when you receive a call from a personin the group.](https://usermanual.wiki/LG-Electronics-USA/CG300/User-Guide-601861-Page-70.png)
![72Address Book• Add Member: Allows you to add the member to thegroup. • Remove Member: Allows you to delete the memberin the group. • Rename: Allows you to assign a name to the group. Copy All Contacts Menu 8.6You can copy or move entries from the SmartChipmemory to the phone memory and vice versa. SmartChip To Phone (Menu 8.6.1)You can copy the entry from the SmartChip to phonememory. Phone To SmartChip (Menu 8.6.2)You can copy the entry from the phone memory to theSmartChip. The following options are available:]Keep Original: When copying, Original Dial Numberis kept. ]Delete Original: When copying, Original Dial Numberwill be erased. Delete All Contacts Menu 8.7You can delete all entries in the SmartChip, Phone andVoice Dial List. This function requires the securitycode except for Voice. Press the key to return to the standby mode. Set Save Location Menu 8.8Scroll to highlight the Set Save Location option, thenpress the left soft key [OK]. ]If you select Ask Always when adding entry, thephone will ask where to store. ]If you select SmartChip or Phone, the phone willstore an entry to the SmartChip or the phone. Information Menu 8.9Service Dial Number (Menu 8.9.1)You can view the list of Service Dialing Numbers (SDN)assigned by your network provider(If supported by theSIM card). Such numbers include the emergency,directory assistance and voice mail numbers. 1. Select the Service dial number option. 2. The names of the available services will be shown.](https://usermanual.wiki/LG-Electronics-USA/CG300/User-Guide-601861-Page-71.png)
![Settings74Sounds Menu 9.1You can use the Sound Settings feature to customizevarious settings, such as the: ]Ring melody, volume and type]Sounds made when you press a key, make an erroror receive a message Shop Ringtones (Menu 9.1.1)This menu option connects to Operator ringtonedownload site. Ringtones (Menu 9.1.2)This option allows you to select the required ringmelody. You can choose between many differentmelodies. If you have downloaded any sounds from theInternet or received any ring tone messages, you canview the list in this menu.Volume (Menu 9.1.3)]Ringtone: To set the volume level for the ringingtones. ]Key Tone: To set the volume level for keypad tones. ]Earpiece: This can adjust the volume level. ]Headset: When using the Headset, volume level canbe adjusted. ]Handsfree: When using the Car Kit, volume level canbe adjusted. Ring Alert Type (Menu 9.1.4)You can select an option from Ring, Ring and Vibrateand Vibrate then Ring.Message Alert Tones (Menu 9.1.5)Select the alert tone for messages. Key Tones (Menu 9.1.6)This menu option allows you to select a tone that thephone sounds when you press a key. You can selectan option from Beep and Voice. Voice Memo (Menu 9.1.7)For further details, see page 86 (Menu 7.6.4).](https://usermanual.wiki/LG-Electronics-USA/CG300/User-Guide-601861-Page-73.png)
![75Display Menu 9.2You can change the background image and the displaystyle for Menu Mode according to your preference. Wallpaper (Menu 9.2.1)This option allows you to change the backgroundimage (wallpaper) to be displayed in idle mode. To change the background image, proceed as follows. 1. Scroll through the list by pressing the left or rightnavigation key. You have various preset images available. You canalso select the blank background and any imagesdownloaded from the Internet. 2. Press the left soft key [Set] when the required imageis displayed. Backlight Timer (Menu 9.2.2)You can select whether or not the phone uses thebacklight. A marginal increase in the standby/talk timecan be achieved by turning the backlight off. It turns off if no key is pressed within one minute. • Off means that the backlight is never on. • 10 Seconds turns the backlight off 10 seconds afterthe last key was pressed. • 30 Seconds turns the backlight off 30 seconds afterthe last key was pressed. • 60 Seconds turns the backlight off 60 seconds afterthe last key was pressed. • Always On turns the backlight always on while flipis opened. Contrast (Menu 9.2.3)This option allows you to adjust the brightness level ofthe display screen.You can adjust by using the right/left and up/downnavigation key.Languages (Menu 9.2.4)You can select the display language. When thelanguage option is set to Automatic, the language isautomatically selected according to the language ofthe SmartChip used. English will be set if the languageon the SIM card is not supported in the phone. Settings](https://usermanual.wiki/LG-Electronics-USA/CG300/User-Guide-601861-Page-74.png)
![76SettingsMenu Style (Menu 9.2.5)This option allows you to select the menu display style.You can choose either Icon style or List style.Date & Time Menu 9.3Set Date (Menu 9.3.1)Allows you to enter the day, month and year. You canchange the date format via the Date Format menuoption. Format: Allows you to change the time and dateformats. Date Format (Menu 9.3.2)YYYY/MM/DD(year/month/day) DD/MM/YYYY(day/month/year) MM/DD/YYYY(month/day/year) Set Time (Menu 9.3.3)Allows you to enter the current time. You can choosethe time format via the Time Format menu option. Time Format (Menu 9.3.4)24 Hours/12 Hours Auto Update (Menu 9.3.5)Select On to set the phone to automatically update thetime and date according to the current time zone. Call Menu 9.4To change the settings for call diverting: Call Forwarding (Menu 9.4.1)When this network service is activated, you can directyour incoming calls to another number, for example, toyour voice mailbox number. For details, contact yourservice provider. Select one of the divert options, forexample, select If busy to divert voice calls when yournumber is busy or when you reject incoming calls. The following options are available: ]All Voice Calls: Diverts voice calls unconditionally. ]If Busy: Diverts voice calls when the phone is in use. ]If No Reply: Diverts voice calls which you do notanswer. ]If Out Of Reach: Diverts voice calls when the phoneis switched off or out of coverage. ]All Data Calls: Diverts to a number with a PC](https://usermanual.wiki/LG-Electronics-USA/CG300/User-Guide-601861-Page-75.png)
![77Settingsconnection unconditionally. ]All Fax Calls: Diverts to a number with a faxconnection unconditionally. • Activate: Activates the corresponding service. - To Other Number: Inputs the number for diverting. - Favorite Number: You can check recent fivediverted numbers. • Cancel: Cancels the corresponding service. • View Status: Checks the status of the service. ]Cancel All: Cancels all call divert service.Answer Mode (Menu 9.4.2)Allows you to determine when to answer the phone. ]Flip Open: This option allows you to answer a callsimply by opening the flip. ]Any Key: You can answer an incoming call bypressing any key, except the key.]Send Key Only: You can answer an incoming call byonly pressing the key.Send My Number (Menu 9.4.3)This network service allows you to set your phonenumber to be displayed On or hidden Off from theperson to whom you are calling. Select Set ByNetwork to reset the phone to the setting that youhave agreed upon with your service provider.Call Waiting (Menu 9.4.4)The network will notify you of a new incoming callwhile you have a call in progress. Select Activate torequest the network to activate call waiting, Cancel torequest the network to deactivate call waiting, or ViewStatus, to check if the function is active or not.Minute Minder (Menu 9.4.5)This option allows you to specify whether the phonemust beep every minute during an outgoing call tokeep you informed of the length of the call. Voice Dial (Menu 9.4.6)You can make a phone call by saying a voice tag thathas been added to a contact card. Any spoken word(s)can be a voice tag. Before using voice dialing, notethat:](https://usermanual.wiki/LG-Electronics-USA/CG300/User-Guide-601861-Page-76.png)
![78Settings• Voice tags are not language dependent. They aredependent on the speaker s voice. • Voice tags are sensitive to background noise.Record them and make calls in a quiet environment. • When recording a voice tag or making a call byusing a voice tag, the loudspeaker is in use. Holdthe phone at a short distance away from yourmouth and face so that the proximity sensor doesnot turn the loudspeaker off. • Very short names are not accepted. Use longnames and avoid similar names for differentnumbers. ]Automatic: You can enter the voice dial modewhenever you open the flip. ]Manual: You can enter the voice dial mode byholding down the key.NoteYou must say the name exactly as you said when yourecorded it. This may be difficult in, for example, a noisyenvironment or during an emergency, so you should not relysolely upon voice dialing in all circumstances. Auto Redial (Menu 9.4.7)Select On, and your phone will make a maximum ofthree attempts to connect the call after anunsuccessful call attempt. Send DTMF Tones (Menu 9.4.8)You can send the DTMF (dual tone multi-frequency)tones of the number on the display during a call. This option is helpful for entering a password oraccount number when you call an automated system,like a banking service. Security Menu 9.5Various codes and passwords are used to protect thefeatures of your phone. They are described in thefollowing sections (see pages 19) Request PIN Code (Menu 9.5.1)When the PIN code request feature is enabled, youmust enter your PIN each time you switch the phoneon. Consequently, any person who does not have yourPIN cannot use your phone without your approval.](https://usermanual.wiki/LG-Electronics-USA/CG300/User-Guide-601861-Page-77.png)
![79SettingsNoteBefore disabling the PIN code request feature, you mustenter your PIN The following options are available: ]Enable: You must enter the PIN each time the phoneis switched on. ]Disable: The phone connects directly to the networkwhen you switch it on.Fixed Dial Number (FDN) (Menu 9.5.2)Allows you to restrict your outgoing calls to selectedphone numbers, if this function is supported by yourSmartChip. The PIN2 code is required. The following options are available: ]Disable: You can call any number. ]Enable: You can only call phone numbers stored inthe Address Book. You must enter your PIN2. ]Number List: You can view the number list saved asfixed dial number. NoteNot all SIM cards have a PIN2. If your SmartChip does not,this menu option is not displayed. Change Codes (Menu 9.5.3)The Change codes feature allows you to change yourcurrent password to a new one. You must enter thecurrent password before you can specify a new one.You can change the access codes: Security Code,PIN1 Code, PIN2 CodeNotePIN: Personal Identification Number. Connection Menu 9.6Change Frequency Band (Menu 9.6.1)When the America(850/1900) option is selected thedevice can be used in the US, and when theEurope(1800) option is chosen the device can be usedin European countries. NoteThe US frequency is set at 850/1900 MHz and the Europeanfrequency is set at 1800 MHz. NoteNote of caution that depending on the SmartChip, the orderof the menu can differ. The World Phone menu option setsthe GSM frequency band between the GSM 850/1900 used in](https://usermanual.wiki/LG-Electronics-USA/CG300/User-Guide-601861-Page-78.png)
![81Please check to see if any problems you have encountered with the phone are described in this section before takingthe phone in for a service or calling a service engineer. QHow do I view the list of outgoing calls, incomingcalls and missed calls?APress the key.QHow do I clear all call history?APress the left soft key [Menu] and then thekey.QHow do I view all numbers stored in memory?APress right soft key [Names] and then .QWhy is the connection inconsistent or not audible incertain areas?AWhen frequency environment is unstable in acertain area, connection may be inconsistent andnot audible. Relocate to another area and try again.QWhy is the connection not consistent abruptlydisconnects even when established?AWhen frequency is unstable or weak or if there aretoo many users, connection may be cut off evenafter it was established. Please try again later orattempt after relocating to other areas.QWhy does the LCD not turn on?ARemove the battery and turn on the power afterplacing it back on. If there is no change, fully chargethe battery and try again.QWhy is there an echo when a connection is madewith certain telephones in a certain area?AThis is called the ‘Echo Phenomenon’, where itoccurs if connection volume is too high or causedby special properties (semi electronic telephoneexchange) of the equipment on the other end.Q&A](https://usermanual.wiki/LG-Electronics-USA/CG300/User-Guide-601861-Page-80.png)

![85Tips on Efficient Operation For your phone to operate most efficiently:]Do not touch the antenna unnecessarily when thephone is in use. Contact with the antenna affects callquality and may cause the phone to operate at ahigher power level than otherwise needed.Driving Check the laws and regulations on the use of wirelessphones in the areas where you drive. Always obeythem. Also, if using your phone while driving, please:]Give full attention to driving-driving safely is yourfirst responsibility;]Use hands-free operation, if available;]Pull off the road and park before making oranswering a call if driving conditions so require.Electronic Devices Most modern electronic equipment is shielded from RFsignals. However, certain electronic equipment maynot be shielded against the RF signals from yourwireless phone.Pacemakers The Health Industry Manufacturers Associationrecommends that a minimum separation of six (6’)inches be maintained between a handheld wirelessphone and a pacemaker to avoid potential interferencewith the pacemaker. These recommendations areconsistent with the independent research by andrecommendations of Wireless Technology Research.Persons with pacemakers: ]Should ALWAYS keep the phone more than sixinches from their pacemaker when the phone isturned ON; ]Should not carry the phone in a breast pocket.]Should use the ear opposite the pacemaker tominimize the potential for interference. ]If you have any reason to suspect that interferenceis taking place, turn your phone OFF immediately.Hearing Aids Some digital wireless phones may interfere with somehearing aids. In the event of such interference, youmay want to consult your service provider.Safety Guidelines](https://usermanual.wiki/LG-Electronics-USA/CG300/User-Guide-601861-Page-84.png)
![87Safety Guidelinesmay include: fueling areas (such as gasoline stations);below deck on boats; fuel or chemical transfer orstorage facilities; vehicles using liquefied petroleumgas (such as propane or butane); areas where the aircontains chemicals or particles (such as grain, dust, ormetal powders); and any other area where you wouldnormally be advised to turn off your vehicle engine.For Vehicles Equipped with an Air Bag An air bag inflates with great force. DO NOT placeobjects, including either installed or portable wirelessequipment, in the area over the air bag or in the air bagdeployment area. If in-vehicle wireless equipment isimproperly installed and the air bag inflates, seriousinjury could result.Safety InformationPlease read and observe the following information forsafe and proper use of your phone and to preventdamage. Also, keep the user guide in an accessibleplace at all the times after reading it.Charger and Adapter Safety]The charger and adapter are intended for indoor useonly.Battery Information and Care]Please dispose of your battery properly or take it toyour local wireless carrier for recycling.]The battery does not need to be fully dischargedbefore recharging.]Use only LG-approved chargers specific to yourphone model since they are designed to maximizebattery life.]Do not disassemble or impact the battery as it maycause electric shock, short-circuit, and fire. Storethe battery in a place out of reach of children.]Keep the battery’s metal contacts clean.]Replace the battery when it no longer providesacceptable performance. The battery can berecharged several hundred times beforereplacement.]Recharge the battery after long periods of non-useto maximize battery life.]Battery life will vary due to usage patterns andenvironmental conditions.]Use of extended backlighting,MEdia Net Browsing,and data connectivity kits affect battery life and](https://usermanual.wiki/LG-Electronics-USA/CG300/User-Guide-601861-Page-86.png)
![88Safety Guidelinestalk/standby times.]The self-protection function of the battery cuts thepower of the phone when its operation is in anabnormal state. In this case, remove the battery fromthe phone, reinstall it, and turn the phone on.Explosion, Shock, and Fire Hazards]Do not put your phone in a place subject toexcessive dust and keep the minimum requireddistance between the power cord and heat sources.]Unplug the power cord prior to cleaning your phone,and clean the power plug pin when it is dirty.]When using the power plug, ensure that it is firmlyconnected. If it is not, it may cause excessive heat orfire.]If you put your phone in a pocket or bag withoutcovering the receptacle of the phone (power plugpin), metallic articles (such as a coin, paperclip orpen) may short-circuit the phone. Always cover thereceptacle when not in use.]Do not short-circuit the battery. Metallic articlessuch as a coin, paperclip or pen in your pocket orbag may short-circuit the + and – terminals of thebattery (metal strips on the battery) upon moving.Short-circuit of the terminal may damage the batteryand cause an explosion.General Notice]Using a damaged battery or placing a battery in yourmouth may cause serious injury.]Do not place items containing magnetic componentssuch as a credit card, phone card, bank book orsubway ticket near your phone. The magnetism ofthe phone may damage the data stored in themagnetic strip.]Talking on your phone for a long period of time mayreduce call quality due to heat generated during use.]When the phone is not used for a long period time,store it in a safe place with the power cordunplugged.]Using the phone in proximity to receiving equipment(i.e., TV or radio) may cause interference to thephone.]Do not use the phone if the antenna is damaged. If adamaged antenna contacts skin, it may cause aslight burn. Please contact an LG Authorized Service](https://usermanual.wiki/LG-Electronics-USA/CG300/User-Guide-601861-Page-87.png)
![89Safety GuidelinesCenter to replace the damaged antenna.]Do not immerse your phone in water. If this happens,turn it off immediately and remove the battery. If thephone does not work, take it to an LG AuthorizedService Center.]The power cord on this product will expose you tolead, a chemical known to the State of California tocause (cancer) birth defects or other reproductiveharm. Wash hands after handling.]Do not paint your phone.]The data saved in your phone might be deleted dueto careless use, repair of the phone, or upgrade ofthe software. Please backup your important phonenumbers. (Ring tones, text messages, voicemessages, pictures, and videos could also bedeleted.) The manufacturer is not liable for damagedue to the loss of data.]When you use the phone in public places, set thering tone to vibration so as not to disturb others.]Do not turn your phone on or off when putting it inyour ear.](https://usermanual.wiki/LG-Electronics-USA/CG300/User-Guide-601861-Page-88.png)
![90Safety GuidelinesFDA Consumer UpdateThe U.S. Food and Drug Administrationís Center forDevices and Radiological Health Consumer Update onMobile Phones.1.Do wireless phones pose a health hazard? The available scientific evidence does not show thatany health problems are associated with usingwireless phones. There is no proof, however, thatwireless phones are absolutely safe. Wirelessphones emit low levels of radiofrequency energy (RF)in the microwave range while being used. They alsoemit very low levels of RF when in the standby mode.Whereas high levels of RF can produce healtheffects (by heating tissue), exposure to low level RFthat does not produce heating effects causes noknown adverse health effects. Many studies of lowlevel RF exposures have not found any biologicaleffects. Some studies have suggested that somebiological effects may occur, but such findings havenot been confirmed by additional research. In somecases, other researchers have had difficulty inreproducing those studies, or in determining thereasons for inconsistent results.2.What is the FDA’s role concerning the safety ofwireless phones? Under the law, the FDA does not review the safety ofradiation-emitting consumer products such aswireless phones before they can be sold, as it doeswith new drugs or medical devices. However, theagency has authority to take action if wirelessphones are shown to emit radiofrequency energy(RF) at a level that is hazardous to the user. In such acase, the FDA could require the manufacturers ofwireless phones to notify users of the health hazardand to repair, replace, or recall the phones so thatthe hazard no longer exists.Although the existing scientific data do not justifyFDA regulatory actions, the FDA has urged thewireless phone industry to take a number of steps,including the following: ]Support needed research into possible biologicaleffects of RF of the type emitted by wireless phones; ]Design wireless phones in a way that minimizes anyRF exposure to the user that is not necessary fordevice function; and]Cooperate in providing users of wireless phoneswith the best possible information on possible](https://usermanual.wiki/LG-Electronics-USA/CG300/User-Guide-601861-Page-89.png)
![91Safety Guidelineseffects of wireless phone use on human health. The FDA belongs to an interagency working group ofthe federal agencies that have responsibility fordifferent aspects of RF safety to ensure coordinatedefforts at the federal level. The following agenciesbelong to this working group:]National Institute for Occupational Safety and Health]Environmental Protection Agency]Occupational Safety and Health Administration]National Telecommunications and InformationAdministration The National Institutes of Health participates in someinteragency working group activities, as well.The FDA shares regulatory responsibilities for wirelessphones with the Federal Communications Commission(FCC). All phones that are sold in the United Statesmust comply with FCC safety guidelines that limit RFexposure. The FCC relies on the FDA and other healthagencies for safety questions about wireless phones.The FCC also regulates the base stations that thewireless phone networks rely upon. While these basestations operate at higher power than do the wirelessphones themselves, the RF exposures that people getfrom these base stations are typically thousands oftimes lower than those they can get from wirelessphones. Base stations are thus not the subject of thesafety questions discussed in this document.3.What kinds of phones are the subject of this update?The term ‘wireless phone’ refers here to handheldwireless phones with built-in antennas, often called‘cell’, ‘mobile’, or ‘PCS’ phones. These types ofwireless phones can expose the user to measurableradiofrequency energy (RF) because of the shortdistance between the phone and the user’s head.These RF exposures are limited by FCC safetyguidelines that were developed with the advice ofthe FDA and other federal health and safetyagencies. When the phone is located at greaterdistances from the user, the exposure to RF isdrastically lower because a person’s RF exposuredecreases rapidly with increasing distance from thesource. The so-called ‘cordless phones,’ which havea base unit connected to the telephone wiring in ahouse, typically operate at far lower power levels,and thus produce RF exposures far below the FCCsafety limits.](https://usermanual.wiki/LG-Electronics-USA/CG300/User-Guide-601861-Page-90.png)