LG Electronics USA D213F Cellular/PCS GSM and Cellular WCDMA Phone with WLAN and Bluetooth User Manual 1
LG Electronics MobileComm USA, Inc. Cellular/PCS GSM and Cellular WCDMA Phone with WLAN and Bluetooth Users Manual 1
Contents
- 1. Users Manual 1
- 2. Users Manual 2
Users Manual 1

1
ENGLISH
MFL00000000 (1.0)
User Guide
LG-D213f
www.lg.com

User Guide
ENGLISH
•
Screendisplaysandillustrationsmaydifferfrom
thoseyouseeonactualphone.
•
Someofthecontentsofthisguidemaynot
applytoyourphone,dependingonthesoftware
andyourserviceprovider.Allinformationinthis
documentissubjecttochangewithoutnotice.
•
Thishandsetisnotsuitableforpeoplewhohave
avisualimpairmentduetothetouchscreen
keyboard.
•
Copyright©2014LGElectronics,Inc.Allrights
reserved.LGandtheLGlogoareregistered
trademarksofLGGroupanditsrelatedentities.
Allothertrademarksarethepropertyoftheir
respectiveowners.
•
Google™,GoogleMaps™,Gmail™,YouTube™,
Hangouts™andGooglePlay™aretrademarks
ofGoogle,Inc.

2
Guidelines for safe and efficient use .... 5
Important notice .................................. 14
Getting to know your phone ................ 19
Phone overview..................................... 19
Installing the SIM card and battery ........ 21
Charging the phone ............................... 23
Using the memory card ......................... 24
Locking and unlocking the screen ......... 25
Knock Code ........................................... 25
KnockOn ............................................... 26
Switching between and exiting
applications........................................... 26
Your Home screen ................................ 27
Touch screen tips .................................. 27
Home screen ......................................... 28
CustomizingtheHomescreen............. 29
Notifications .......................................... 30
QuickSettings..................................... 31
NoticationiconsontheStatusBar...... 31
On-screen keyboard.............................. 33
Enteringspecialcharacters.................. 33
Google account setup .......................... 34
Creating your Google account ............... 34
Signing in to your Google account ......... 34
Connecting to Networks and Devices . 35
Wi-Fi ..................................................... 35
ConnectingtoWi-Finetworks.............. 35
TurningWi-Fionandconnectingtoa
Wi-Finetwork..................................... 35
Bluetooth .............................................. 36
PC connections with a USB cable .......... 38
Calls ..................................................... 39
Making a call ........................................ 39
Calling your contacts ............................. 39
Answering and rejecting a call .............. 39
Whenthescreenislocked/unlocked.... 39
Adjusting the in-call volume .................. 40
Making a second call ............................ 40
Viewing your call logs ........................... 40
Call settings .......................................... 41
Contacts ............................................... 42
Searching for a contact ......................... 42
Adding a new contact ........................... 42
Favorite contacts ................................... 42
Creating a group ................................... 43
Messaging ............................................ 44
Sending a message .............................. 44
View mode ........................................... 45
Changing your message settings .......... 45
Table of contents

3
E-mail ................................................... 46
Managing an email account .................. 46
Working with account folders ................ 46
Composing and sending email .............. 47
Multimedia ........................................... 48
Camera ................................................. 48
Gettingtoknowtheviewnder............. 48
Usingtheadvancedsettings................ 49
Takingaquickphoto.......................... 50
Onceyou'vetakenaphoto.................. 50
Viewingyoursavedphotos.................. 51
Video camera ........................................ 52
Gettingtoknowtheviewnder............. 52
Usingtheadvancedsettings................ 53
Recordingaquickvideo...................... 54
Afterrecordingavideo........................ 54
Watchingyoursavedvideos................ 54
Adjustingthevolumewhenviewinga
video.................................................. 54
Gallery................................................... 55
Viewingpictures.................................. 55
Playingvideos..................................... 55
Editingphotos/videos.......................... 56
Deletingimages.................................. 56
Settingaphotoasthewallpaper.......... 56
Videos ................................................... 56
Playingavideo.................................... 56
Music .................................................... 58
Playingasong.................................... 58
Utilities ................................................. 60
Alarm/Clock .......................................... 60
Using your calculator ............................ 61
Adding an event to your calendar .......... 61
Voice Recorder ...................................... 62
ThinkFree Viewer .................................. 63
Google+ ................................................ 63
Guest Mode ........................................... 64
Voice Search ......................................... 64
Downloads ............................................ 64
QuickMemo........................................... 64
FM radio ................................................ 66
Searching for stations ........................... 66
LG SmartWorld ...................................... 67
The Web ............................................... 68
Internet ................................................. 68
Usingthewebtoolbar.......................... 68
Viewingwebpages.............................. 68
Openingapage.................................. 69
Searchingthewebbyvoice................. 69
Bookmarks......................................... 69
History................................................ 69
Chrome ................................................. 69
Viewingwebpages.............................. 69
Openingapage.................................. 70
Searchingthewebbyvoice................. 70
Syncingwithotherdevices.................. 70
Addingandviewingbookmarks........... 70

4
Settings ................................................ 71
Access the Settings menu ..................... 71
WIRELESS & NETWORKS ...................... 71
DEVICE .................................................. 75
PERSONAL ............................................ 79
SYSTEM ................................................ 81
PC software (LG PC Suite) ................... 84
Phone software update ....................... 87
About this user guide .......................... 89
About this user guide ............................ 89
Trademarks ........................................... 90
Accessories .......................................... 91
Troubleshooting ................................... 92
FAQ ....................................................... 95

5
Pleasereadthesesimpleguidelines.Notfollowingtheseguidelinesmaybedangerousor
illegal.
Shouldafaultoccur,asoftwaretoolisbuiltintoyourdevicethatwillgatherafaultlog.
Thistoolgathersonlydataspecifictothefault,suchassignalstrength,cellIDpositionin
suddencalldropandapplicationsloaded.Thelogisusedonlytohelpdeterminethecause
ofthefault.TheselogsareencryptedandcanonlybeaccessedbyanauthorizedLGRepair
centreshouldyouneedtoreturnyourdeviceforrepair.
Guidelines for safe and efficient use

6
Product care and maintenance
WARNING
Only use batteries, chargers and accessories approved for use with this
particular device model. The use of any other types may invalidate any
approval or warranty applying to the device and may be dangerous.
•
Donotdisassemblethisunit.Takeittoaqualifiedservicetechnicianwhenrepairworkis
required.
•
Repairsunderwarranty,atLG'sdiscretion,mayincludereplacementpartsorboardsthat
areeitherneworreconditioned,providedthattheyhavefunctionalityequaltothatofthe
partsbeingreplaced.
•
KeepawayfromelectricalappliancessuchasTVs,radiosandpersonalcomputers.
•
Theunitshouldbekeptawayfromheatsourcessuchasradiatorsorcookers.
•
Donotdrop.
•
Donotsubjectthisunittomechanicalvibrationorshock.
•
Switchoffthephoneinanyareawhereyouarerequiredtobyspecialregulations.For
example,donotuseyourphoneinhospitalsasitmayaffectsensitivemedicalequipment.
•
Donothandlethephonewithwethandswhileitisbeingcharged.Itmaycausean
electricshockandcanseriouslydamageyourphone.

7
•
Donotchargeahandsetnearflammablematerialasthehandsetcanbecomehotand
createafirehazard.
•
Useadryclothtocleantheexterioroftheunit(donotusesolventssuchasbenzene,
thinneroralcohol).
•
Donotchargethephonewhenitisonsoftfurnishings.
•
Thephoneshouldbechargedinawellventilatedarea.
•
Donotsubjectthisunittoexcessivesmokeordust.
•
Donotkeepthephonenexttocreditcardsortransporttickets;itcanaffectthe
informationonthemagneticstrips.
•
Donottapthescreenwithasharpobjectasitmaydamagethephone.
•
Donotexposethephonetoliquidormoisture.
•
Useaccessorieslikeearphonescautiously.Donottouchtheantennaunnecessarily.
•
Donotuse,touchorattempttoremoveorfixbroken,chippedorcrackedglass.Damage
totheglassdisplayduetoabuseormisuseisnotcoveredunderthewarranty.
•
Yourphoneisanelectronicdevicethatgeneratesheatduringnormaloperation.Extremely
prolonged,directskincontactintheabsenceofadequateventilationmayresultin
discomfortorminorburns.Therefore,usecarewhenhandlingyourphoneduringor
immediatelyafteroperation.
•
Ifyourphonegetswet,immediatelyunplugittodryoffcompletely.Donotattempt
toacceleratethedryingprocesswithanexternalheatingsource,suchasanoven,
microwaveorhairdryer.
•
Theliquidinyourwetphone,changesthecoloroftheproductlabelinsideyourphone.
Damagetoyourdeviceasaresultofexposuretoliquidisnotcoveredunderyour
warranty.

8
Efficient phone operation
Electronics devices
Allmobilephonesmayreceiveinterference,whichcouldaffectperformance.
•
Donotuseyourmobilephonenearmedicalequipmentwithoutrequestingpermission.
Avoidplacingthephoneoverpacemakers,forexample,inyourbreastpocket.
•
Somehearingaidsmightbedisturbedbymobilephones.
•
MinorinterferencemayaffectTVs,radios,PCsetc.
•
Useyourphoneintemperaturesbetween0ºCand40ºC,ifpossible.Exposingyour
phonetoextremelyloworhightemperaturesmayresultindamage,malfunction,oreven
explosion.
Road safety
Checkthelawsandregulationsontheuseofmobilephonesintheareawhenyoudrive.
•
Donotuseahand-heldphonewhiledriving.
•
Givefullattentiontodriving.
•
Pullofftheroadandparkbeforemakingoransweringacallifdrivingconditionsso
require.
•
RFenergymayaffectsomeelectronicsystemsinyourvehiclesuchascarstereosand
safetyequipment.
•
Whenyourvehicleisequippedwithanairbag,donotobstructwithinstalledorportable
wirelessequipment.Itcancausetheairbagtofailorcauseseriousinjurydueto
improperperformance.
•
Ifyouarelisteningtomusicwhilstoutandabout,pleaseensurethatthevolumeis
atareasonablelevelsothatyouareawareofyoursurroundings.Thisisofparticular
importancewhennearroads.

9
Avoid damage to your hearing
Topreventpossiblehearingdamage,donotlistenathighvolumelevelsforlong
periods.
Damagetoyourhearingcanoccurifyouareexposedtoloudsoundforlongperiodsof
time.Wethereforerecommendthatyoudonotturnonoroffthehandsetclosetoyourear.
Wealsorecommendthatmusicandcallvolumesaresettoareasonablelevel.
•
Whenusingheadphones,turnthevolumedownifyoucannothearthepeoplespeaking
nearyou,orifthepersonsittingnexttoyoucanhearwhatyouarelisteningto.
NOTE: Excessive sound pressure from earphones and headphones can
cause hearing loss.
Glass Parts
Somepartsofyourmobiledevicearemadeofglass.Thisglasscouldbreakifyourmobile
deviceisdroppedonahardsurfaceorreceivesasubstantialimpact.Iftheglassbreaks,do
nottouchorattempttoremoveit.Stopusingyourmobiledeviceuntiltheglassisreplaced
byanauthorisedserviceprovider.
Blasting area
Donotusethephonewhereblastingisinprogress.Observerestrictionsandfollowany
regulationsorrules.

10
Potentially explosive atmospheres
•
Donotuseyourphoneatarefuelingpoint.
•
Donotusenearfuelorchemicals.
•
Donottransportorstoreflammablegas,liquidorexplosivesinthesamecompartmentof
yourvehicleasyourmobilephoneoraccessories.
In aircraft
Wirelessdevicescancauseinterferenceinaircraft.
•
Turnyourmobilephoneoffbeforeboardinganyaircraft.
•
Donotuseitonthegroundwithoutpermissionfromthecrew.
Children
Keepthephoneinasafeplaceoutofthereachofsmallchildren.Itincludessmallparts
whichmaycauseachokinghazardifdetached.
Emergency calls
Emergencycallsmaynotbeavailableonallmobilenetworks.Thereforeyoushouldnever
dependsolelyonyourphoneforemergencycalls.Checkwithyourlocalserviceprovider.
Battery information and care
•
Youdonotneedtocompletelydischargethebatterybeforerecharging.Unlikeother
batterysystems,thereisnomemoryeffectthatcouldcompromisethebattery's
performance.
•
UseonlyLGbatteriesandchargers.LGchargersaredesignedtomaximisethebattery
life.

11
•
Donotdisassembleorshort-circuitthebattery.
•
Replacethebatterywhenitnolongerprovidesacceptableperformance.Thebatterypack
mayberechargedhundredsoftimesbeforeitneedsreplacing.
•
Rechargethebatteryifithasnotbeenusedforalongtimetomaximiseusability.
•
Donotexposethebatterychargertodirectsunlightoruseitinhighhumidity,suchasin
thebathroom.
•
Donotleavethebatteryinhotorcoldplaces,asthismaydeterioratebattery
performance.
•
Thereisriskofexplosionifthebatteryisreplacedwithanincorrecttype.
•
Disposeofusedbatteriesaccordingtothemanufacturer'sinstructions.Pleaserecycle
whenpossible.Donotdisposeashouseholdwaste.
•
Ifyouneedtoreplacethebattery,takeittothenearestauthorisedLGElectronicsservice
pointordealerforassistance.
•
Alwaysunplugthechargerfromthewallsocketafterthephoneisfullychargedtosave
unnecessarypowerconsumptionofthecharger.
•
Actualbatterylifewilldependonnetworkconfiguration,productsettings,usagepatterns,
batteryandenvironmentalconditions.
•
Makesurethatnosharp-edgeditemssuchasanimal’steethornails,comeintocontact
withthebattery.Thiscouldcauseafire.

12
DECLARATION OF CONFORMITY
Hereby, LG Electronics declares that this LG-D213f product is in
compliance with the essential requirements and other relevant provisions of
Directive 1999/5/EC. A copy of the Declaration of Conformity can be found
at http://www.lg.com/global/declaration
Notice: Open Source Software
To obtain the corresponding source code under GPL, LGPL, MPL and other
open source licences, please visit http://opensource.lge.com/
All referred licence terms, disclaimers and notices are available for download
with the source code.
Contact office for compliance of this product:
LG Electronics Inc.
EU Representative, Krijgsman 1,
1186 DM Amstelveen, The Netherlands
HOW TO UPDATE YOUR SMARTPHONE
Access to latest firmware releases, new software functions and
improvements.
•
Update your smartphone without a PC. Select Update Center >
Software update.
•
Update your smartphone by connecting it to your PC.
For more information about using this function, please visit
http://www.lg.com/common/index.jsp select country and language.
13
Disposal of your old appliance
1 Allelectricalandelectronicproductsshouldbedisposedofseparatelyfromthe
municipalwastestreamviadesignatedcollectionfacilitiesappointedbythe
governmentorthelocalauthorities.
2 Thecorrectdisposalofyouroldappliancewillhelppreventpotentialnegative
consequencesfortheenvironmentandhumanhealth.
3 Formoredetailedinformationaboutdisposalofyouroldappliance,please
contactyourcityoffice,wastedisposalserviceortheshopwhereyou
purchasedtheproduct.
Disposal of waste batteries/accumulators
1 Thissymbolmaybecombinedwithchemicalsymbolsformercury(Hg),
cadmium(Cd)orlead(Pb)ifthebatterycontainsmorethan0.0005%of
mercury,0.002%ofcadmiumor0.004%oflead.
2 Allbatteries/accumulatorsshouldbedisposedseparatelyfromthemunicipal
wastestreamviadesignatedcollectionfacilitiesappointedbythegovernmentor
thelocalauthorities.
3 Thecorrectdisposalofyouroldbatteries/accumulatorswillhelptoprevent
potentialnegativeconsequencesfortheenvironment,animalandhuman
health.
4 Formoredetailedinformationaboutdisposalofyouroldbatteries/
accumulators,pleasecontactyourcityoffice,wastedisposalserviceorthe
shopwhereyoupurchasedtheproduct.

14
Important notice
Please read this before you start using your phone!
Pleasechecktoseewhetheranyproblemsyouencounteredwithyourphonearedescribed
inthissectionbeforetakingthephoneinforserviceorcallingaservicerepresentative.
1. Phone memory
Whenthereislessthan10%ofspaceavailableinyourphonememory,yourphonecannot
receivenewmessages.Youneedtocheckyourphonememoryanddeletesomedata,such
asapplicationsormessages,tomakemorememoryavailable.
To uninstall applications:
1 FromtheHomescreen,tap >Appstab(ifnecessary)>Settings>Apps.
2 Onceallapplicationsappear,scrolltoandselecttheapplicationyouwanttouninstall.
3 Tap Uninstall,thentapOKtoconfirm.
2. Optimizing battery life
Extendyourbattery'slifebetweenchargesbyturningofffeaturesthatyoudon'tneedto
haverunningconstantlyinthebackground.Youcanmonitorhowapplicationsandsystem
resourcesconsumebatterypower.
Extending your phone's battery life:
•
Turnoffradiocommunicationswhenyou'renotusing.IfyouarenotusingWi-Fi,
BluetoothorGPS,turnthemoff.
•
Reducescreenbrightnessandsetashorterscreentimeout.
•
TurnoffautomaticsyncingforGmail,Calendar,Contactsandotherapplications.
•
Someapplicationsyouhavedownloadedmayreducebatterypower.
15
To check the battery power level:
•
FromtheHomescreen,tap >Appstab(ifnecessary)>Settings>About
phone > Battery.
Thebatterystatus(chargingordischarging)andbatterylevel(percentagecharged)is
displayedatthetopofthescreen.
To monitor and control how battery power is being used:
•
FromtheHomescreen,tap >Appstab(ifnecessary)>Settings>About
phone > Battery>Battery use.
Batteryusagetimeisdisplayedonthescreen.Ittellsyouhowlongithasbeensinceyou
lastconnectedyourphonetoapowersourceor,ifcurrentlyconnected,howlongthephone
waslastrunningonbatterypower.Thescreenshowstheapplicationsorservicesusing
batterypower,listedinorderfromthegreatesttosmallestamountused.
3. Before installing an open source application and
operating system (OS)
WARNING
If you install and use an OS other than the one provided by the manufacturer
it may cause your phone to malfunction. In addition, your phone will no
longer be covered by the warranty.
WARNING
To protect your phone and personal data, only download applications
from trusted sources, such as Play Store. If there are improperly installed
applications on your phone, the phone may not work normally or a serious
error may occur. You must uninstall those applications and all associated
data and settings from the phone.
16
4. Using a screen lock
Setascreenlocktosecureyourphoneandpreventunauthorizeduse.FromtheHome
screen,tap >Appstab(ifnecessary)>Settings>Lock screen>Select
screen lock>None,Swipe,Knock Code, Face Unlock,Pattern,PIN,orPassword.If
youchoosePattern,youwillbepromptedtocreateaBackupPINasasafetymeasurein
caseyouforgetyourscreenlock.
Caution: Create a Google account before setting a screen lock and remember
the Backup PIN you created when creating your screen lock.
WARNING
Precautions to take when using a pattern lock.
It is very important to remember the screen lock you set. You will not be able
to access your phone if you use an incorrect screen lock 5 times. If you have
used all 5 opportunities, you can try again after 30 seconds.
When you can't recall your screen lock:
< If you have forgotten your pattern >
IfyouloggedintoyourGoogleaccountonthephonebutfailedtoenterthecorrectpattern
5times,taptheForgot pattern?buttonatthebottomofthescreen.Youarethenrequired
tologinwithyourGoogleAccountorentertheBackupPINyoucreated.
IfyouhavenotloggedintoaGoogleaccountonthephoneoryouforgotyourBackupPIN,
youhavetoperformahardreset.
< If you have forgotten your PIN or Password >
IfyouforgetyourPINorPassword,youwillneedtoperformahardreset.
Caution: If you perform a hard reset, all user applications and user data will be
deleted.
17
5. Using the Hard Reset (Factory reset)
WARNING
If you perform a Hard Reset, all user applications, user data and DRM
licenses will be deleted. Please remember to backup any important data
before performing a Hard Reset.
1 Turnthephoneoff.
2 PressandholdthePower/Lock Key+Volume Down Key .
3 ReleasethePower/Lock KeywhentheLGlogoisdisplayed.
4 PressthePower/Lock Keyagainwithin3seconds.
5 WhentheFactorydataresetscreenappear,releaseallkeys.
6 PressthePower/Lock Keytwomoretimesdisplayedonthescreeninthisstate,
FactoryResetisperformed.
7 IfwhenyoupresstheVolume Up KeyorVolume Down Key,Factory
ResetisnotperformedandbootsNormally.
6. Opening and switching applications
Multi-taskingiseasywithAndroidbecauseyoucankeepmorethanoneapplicationrunning
atthesametime.Thereisnoneedtoquitanapplicationbeforeopeninganotherone.Use
andswitchbetweenseveralopenapplications.Androidmanageseachapplication,stopping
andstartingthemasneededtoensurethatidleapplicationsdon'tconsumeresources
unnecessarily.
To stop applications:
1 FromtheHomescreen,tap >Appstab(ifnecessary)>Settings>Apps>
RUNNING.
2 TapthedesiredapplicationandtapStoptostopit.

18
7. Transferring music, photos and videos using
Media sync (MTP)
1 ConnectthephonetoyourPCusingtheUSBcableprovidedwithyourphone.
2 AUSBconnectiontypelistwillappearonyourphonescreen.TaptheMedia sync (MTP)
option.
3 SelecttheOpen device to view filesoptiononyourPC.Youcanthenviewmedia
contentsonyourPCandtransferthefiles.
4 CopythefilesfromyourPCtothedrivefolderorviceversa.
5 DragtheStatusBardownandtapUSB connected>Charge phone.
6 DisconnecttheUSBcablefromyourphone.
8. Hold your phone upright
Holdyourcellphonevertically,asyouwouldaregularphone.Yourphonehasaninternal
antenna.Becarefulnottoscratchordamagethebackofthephone,asthismayaffect
performance.
Whenmaking/receivingcallsorsending/receivingdata,avoidholdingthelowerpartofthe
phonewheretheantennaislocated.Doingsomayaffectcallquality.
19
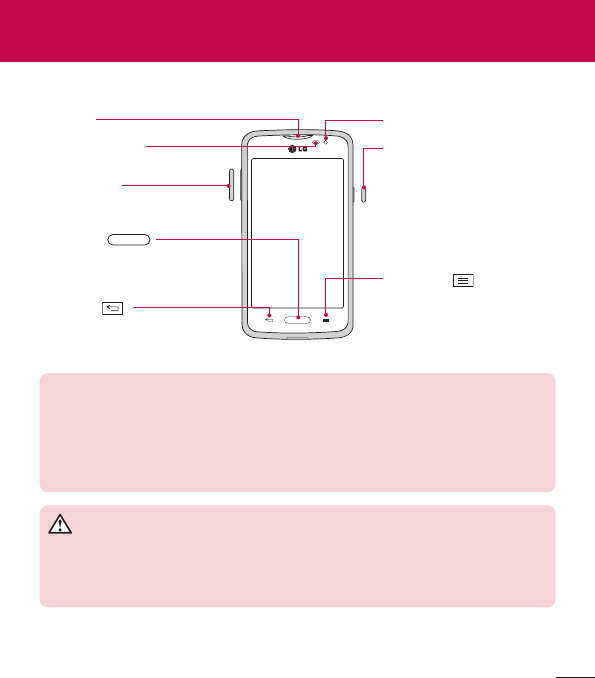
Phone overview
Proximity Sensor
Earpiece
Home Key
ReturntotheHomescreen
fromanyscreen.
Volume Keys
Back Key
Returntothepreviousscreen.
Menu Key
Displaytheavailableoptions.
Power/Lock Key
Turnyourphoneon/off,
restart,lock/unlockthe
screen,turnairplanemode
onoroff,andchangethe
ringertype.
Front-Facing Camera lens
NOTE: Proximity sensor
When receiving and making calls, the proximity sensor automatically turns
the backlight off and locks the touch screen by sensing when the phone is
near your ear. This extends battery life and prevents you from unintentionally
activating the touch screen during calls.
WARNING
Placing a heavy object on the phone or sitting on it can damage the LCD
and touch screen functions. Do not cover the LCD proximity sensor with
protective film. This could cause the sensor to malfunction.
Getting to know your phone
20
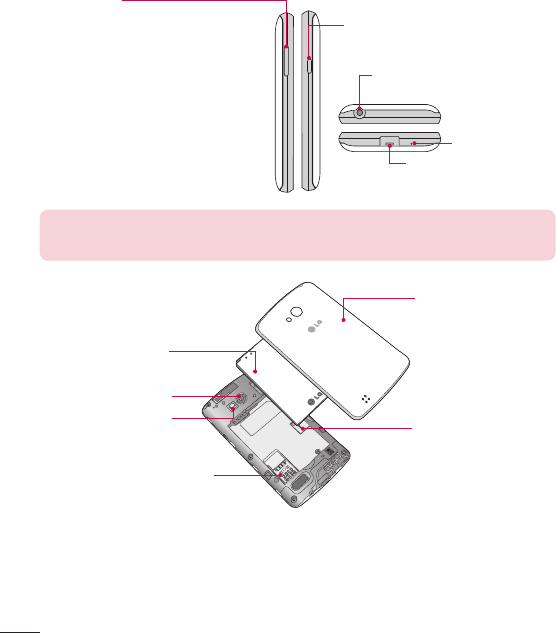
Power/Lock Key
Volume Keys
•
On the Home screen: Control
ringervolume.
•
During a call:Controlyourearpiece
volume.
•
When playing audio/video:Control
volumecontinuously.
Charger/USB Port
Microphone
Earphone Jack
NOTE: Please be careful not to block the microphone by your hand when
you call.
Back cover
microSD Card slot
Camera Lens
Flash
Battery
SIM card slot
21
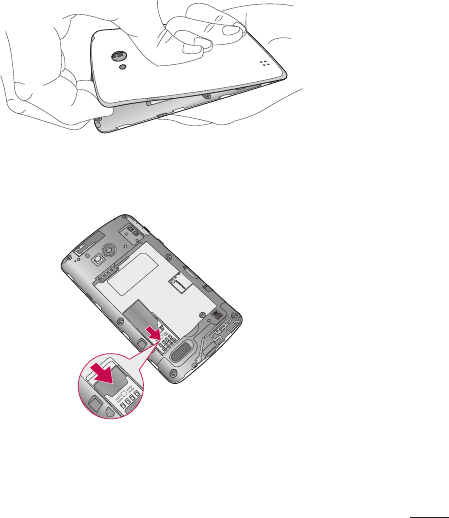
Installing the SIM card and battery
Beforeyoucanstartexploringyournewphone,you'llneedtosetitup.
1 Toremovethebackcover,holdthephonefirmlyinonehand.Withyourotherhand,lift
offthebackcoverwithyourthumbnailasshowninfigurebelow.
2 SlidetheSIMcardintoitsslotasshowninthefigure.Makesurethegoldcontactarea
onthecardisfacingdownwards.
22
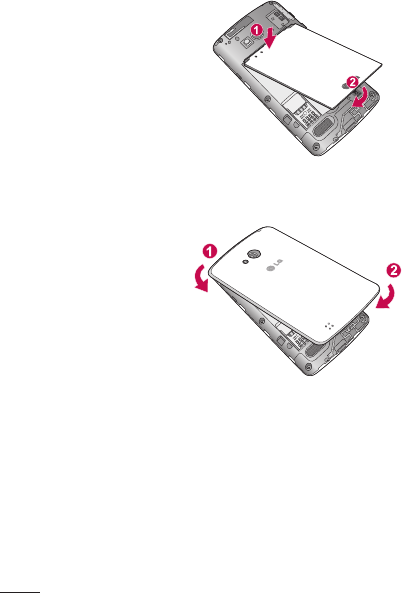
3 Insertthebatteryintoplacebyaligningthegoldcontactsonthephoneandthebattery
(1)andpressingitdownuntilitclicksintoplace(2).
4 Alignthebackcoveroverthebatterycompartment(1)andpressitdownuntilitclicks
intoplace(2).
23
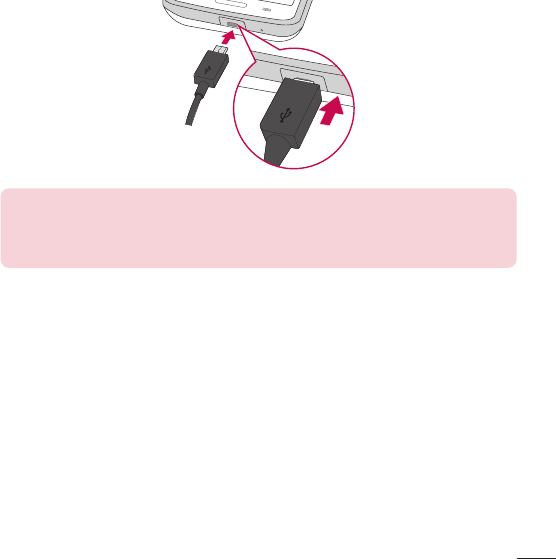
Charging the phone
TheCharger/USBPortisatthebottomofthephone.InsertoneendoftheUSBcableinto
thephoneandplugtheotherendintoanelectricaloutlet.
NOTE:
•
The battery must be fully charged initially to improve battery lifetime.
•
Do not open the back cover while your phone is charging.
24
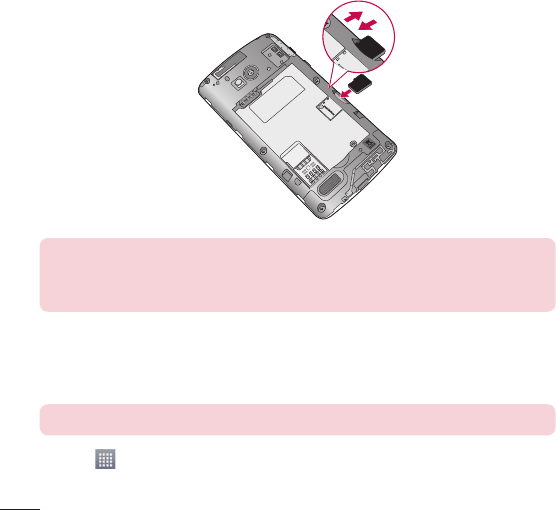
Using the memory card
MakesuretounmounttheSDcardintheStoragemenubeforeremovingit.
1 Removethebackcover.
2 Insertthememorycardintotheslot.Makesurethegoldcontactareaisfacing
downwards.
NOTE: Use only compatible memory cards with your phone. Using
incompatible memory cards may damage the card and data stored on the
card, as well as the phone.
To format the memory card:
Yourmemorycardmayalreadybeformatted.Ifitisn't,youmustformatitbeforeyoucan
useit.
NOTE: All files on your memory card are deleted when it is formatted.
1 Touch toopentheapplicationlist.
2 ScrollandtouchSettings>Storage.
25
3 TouchUnmount SD card.
4 TouchErase SD card>Erase SD card>Erase everything.
5 Ifyouhavesetapatternlock,inputthepatternlockthenselectErase everything.
Locking and unlocking the screen
Ifyoudonotusethephoneforawhile,thescreenwillbeautomaticallyturnedoffand
locked.Thishelpstopreventaccidentaltapsandsavesbatterypower.
Whenyouarenotusingyourphone,pressthePower/Lock Keytolockyourphone.
Ifthereareanyprogramsrunningwhenyoulockyourscreen,theymaybestillrunningin
Lockmode.ItisrecommendedthatyouexitallprogramsbeforeenteringLockmodeto
avoidunnecessarycharges(e.g.phonecalls,webaccessanddatacommunications).
Towakeupyourphone,pressthePower/Lock Key.TheLockscreenwillappear.
TouchandslidetheLockscreeninanydirectiontounlockthescreen.Thelastscreenyou
viewedwillopen.
Knock Code
Youcanunlockthescreenwhenscreenisoffbytapingthecorrectareaandsequence.
To activate Knock Code feature
1 Press > >Appstab>Settings>Lock screen>Select screen lock>
Knock Code.
2 Thisopensascreenthatwillguideyouthroughhowtoselecttheunlocksequence.
YouhavetocreateaBackupPINasasafetymeasureincaseyouforgetyourunlock
sequence.
TIP: Double-tap to turn the screen on when Knock Code is not in use.
26
KnockOn
Youcanturnon/offthescreenbyjustdouble-tap.
To activate KnockON feature
1 Press > >Appstab>Settings>Gestures.
2 PlaceacheckmarkonScreen on/off.
Double-tapthecenterscreenquicklytounlockthescreen.Tolockthescreen,double-tapthe
statusbarinanyscreen(exceptonthecameraviewfinder)oremptyareaontheHomescreen.
NOTE: When turning the screen on, make sure you do not cover the
proximity sensor. Doing so will turn the screen off immediately after turning it
on in order to prevent abnormal turning on in your pocket or bag.
Switching between and exiting applications
Multi-taskingiseasywithAndroidbecauseopenapplicationskeeprunningevenwhenyou
openanotherapplication.Thereisnoneedtoquitanapplicationbeforeopeninganother.
Useandswitchamongseveralopenapplications.Androidmanageseachapplication,
stoppingandstartingthemasneeded,toensurethatidleapplicationsdon’tconsume
resourcesunnecessarily.
Switching between applications
•
TouchandholdtheMenu Key.Alistofrecentlyusedapplicationswillbedisplayed.
Thentaptheapplicationyouwanttoaccess.
•
Toremoveanapplicationfromthelist,swipetheapppreviewtotheleftorright.
To stop/exit an application
1 FromtheHomescreen,taptheMenu KeyandtapSystem settings>Apps.
2 Taponeofthetabsatthetopofthescreen,choosethedesiredapplicationandtap
Force stop(orStop)tostoptheapplication.

27
Touch screen tips
Herearesometipsonhowtonavigateonyourphone.
Touch or tap–Asinglefingertapselectsitems,links,shortcutsandlettersonthe
on-screenkeyboard.
Touch and hold–Touchandholdanitemonthescreenbytouchingitandnotliftingyour
fingeruntilanactionoccurs.Forexample,toopenacontact'savailableoptions,touchand
holdthecontactintheContactslistuntilthecontextmenuopens.
Drag–Touchandholdanitemforamomentandthen,withoutliftingyourfinger,move
yourfingeronthescreenuntilyoureachthetargetposition.Youcandragitemsonthe
Homescreentorepositionthem.
Swipe or slide–Toswipeorslide,quicklymoveyourfingeracrossthesurfaceofthe
screen,withoutpausingwhenyoufirsttouchit(soyoudon'tdraganiteminstead).For
example,youcanslidethescreenupordowntoscrollthroughalistorbrowsethroughthe
differentHomescreensbyswipingfromlefttoright(andviceversa).
Double-tap–Double-taptozoomonawebpageoramap.Forexample,quicklydouble-
tapasectionofawebpagetoadjustthatsectiontofitthewidthofthescreen.Youcanalso
double-taptozoominandoutwhenviewingapictureandwhenusingMaps.
Pinch-to-Zoom–Useyourindexfingerandthumbinapinchingorspreadingmotionto
zoominoroutwhenusingthebrowser,Mapsorwhenviewingpictures.
Rotate the screen–Frommanyapplicationsandmenus,theorientationofthescreen
adjuststothedevice'sphysicalorientation.
Your Home screen
28
NOTE:
•
To select an item, tap the center of the icon.
•
Do not press too hard; the touch screen is sensitive enough to pick up a
light, yet firm tap.
•
Use the tip of your finger to tap the option you want. Be careful not to tap
any other keys.
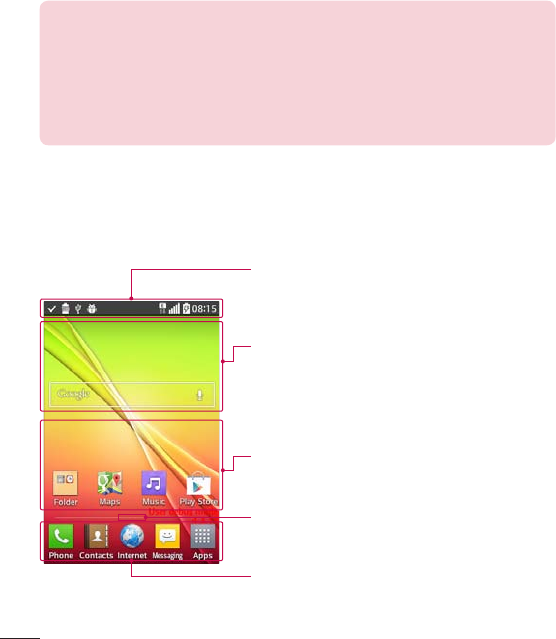
Home screen
SimplyswipeyourfingertotheleftorrighttoviewtheHomescreenpanels.Youcan
customizeeachpanelwithpre-loadedanddownloadedapps,widgets,andwallpapers.
Status bar
Showsphone'sstatusinformationincludingthetime,
signalstrength,batterystatus,andnotificationicons.
Widget
Widgetsareself-containedapplicationsthatcanbe
accessedthroughtheAppsscreenorontheHome
screenoranextendedhomescreen.Unlikeashortcut,
theWidgetappearsasanon-screenapplication.
Application Icons
Tapanicon(application,folder,etc.)toopenanduseit.
Location Indicator
IndicateswhichHomescreencanvasyouareviewing.
Quick Key Area
Providesone-touchaccesstothefunctioninanyhome
screencanvas.
29
TheQuickKeysareavailableatthebottomoftheHomescreen.QuickKeysprovideeasy
andone-tapaccesstothefunctionsyouusethemost.
NOTE: To add an icon, drag it to the Quick Keys bar and release it. To
remove an icon, drag it out of the Quick Keys bar.
Customizing the Home screen
YoucancustomizeyourHomescreenbyaddingapps,downloads,widgetsorwallpapers.
Formoreconvenienceusingyourphone,addyourfavoriteappsandwidgetstotheHome
screen.
To add items on your Home screen:
1 TouchandholdtheemptypartoftheHomescreen.
2 Tapthedesiredtab.ChoosefromAppsorWidget.
3 Dragthedesiredappicontothepreferredlocationandliftyourfinger.
To remove an item from the Home screen:
•
Touchandholdtheiconyouwanttoremove,thendragitto andreleaseit.
TIP! To add an application icon to the Home screen from the Apps screen,
touch and hold the application you want to add and drag it to the desired
location.
TIP! Using folders
You can combine several app icons in a folder to help keep you organized.
Drop one app icon over another one on a Home screen and a folder will be
created with both icons in it.
30
To customize apps icons on the Home screen
1 Touchandholdanapplicationiconuntilitisunlockedfromitscurrentposition.Then
dropitonthescreen.
Theeditingicon willappearintheupperrightcorneroftheapplication.
2 Taptheapplicationiconagainandselectthedesiredicondesignandsize.
3 Tap OKtosavethechange.
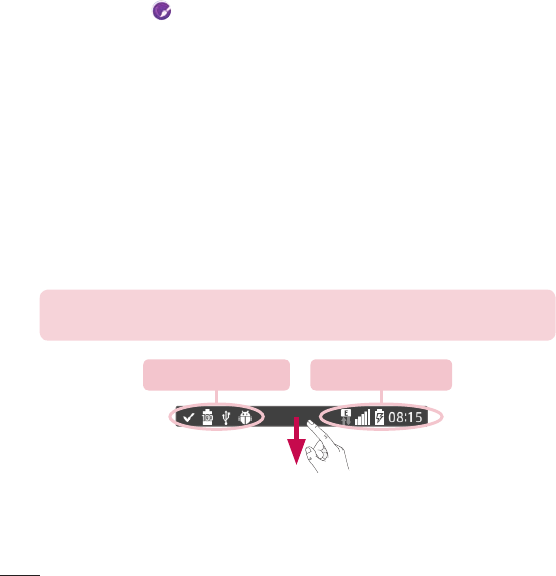
Notifications
Notificationsalertyoutothearrivalofnewmessages,calendarevents,andalarms,aswell
astoongoingevents,suchasvideodownloads.
FromtheNotificationsPanel,youcanviewyourphone'scurrentstatusandpending
notifications.
Whenanotificationarrives,itsiconappearsatthetopofthescreen.Iconsforpending
notificationsappearontheleftandsystemicons,suchasWi-Fiorbatterystrength,onthe
right.
NOTE: The available options may vary depending on the region or service
provider.
Pending notifications System notifications
31
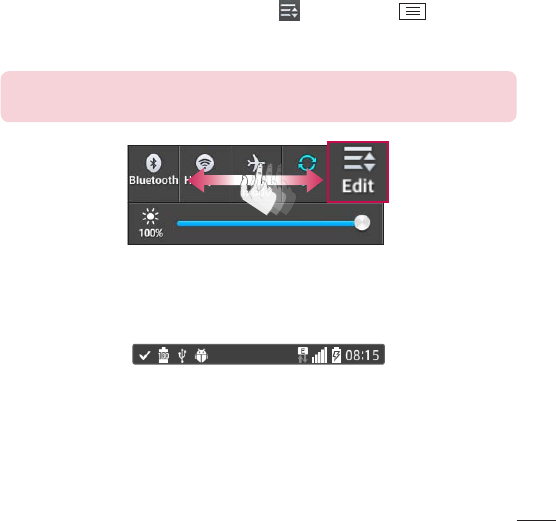
Quick Settings
UsetheQuickSettingstoeasilytogglefunctionsettingslikeWi-Fi,managedisplay
brightnessandmore.ToaccesstheQuickSettings,opentheNotificationsPanel.TheQuick
SettingsbarislocatedatthetopoftheNotificationsPanel.
To rearrange Quick Setting items on the Notification Panel
SwipetheQuickSettingsbartotherightandtap .Touchandhold nexttothe
itemsyouwanttomoveanddragittothedesiredlocation.Tapthecheckboxnexttoeach
itemtoaddthemtotheQuickSettingsbar.
NOTE: Touch and hold an icon on the Quick Settings bar to directly access
its settings menu.
Notification icons on the Status Bar
NotificationiconsappearontheStatusBaratthetopofthescreentoreportmissedcalls,
newmessages,calendarevents,devicestatusandmore.
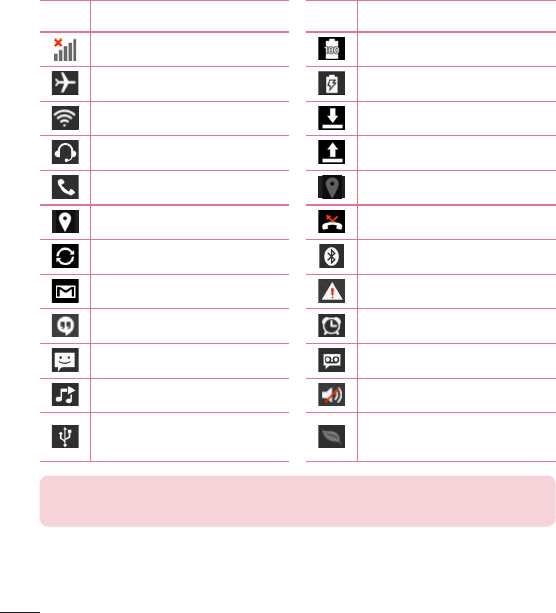
32
Theiconslistedinthetablebelowaresomeofthemostcommonones.
Icon Description Icon Description
Nosignal Batteryfullycharged
Airplanemode Batteryischarging
ConnectedtoaWi-Finetwork Downloadingdata
Wiredheadset Uploadingdata
Callinprogress AcquiringGPS
ReceivinglocationdatafromGPS Missedcall
Dataissyncing Bluetoothison
NewGmailmessage Systemwarning
NewHangoutsmessage Alarmisset
Newtextormultimediamessage Newvoicemail
Songisplaying Ringerissilenced
PhoneisconnectedtoPCvia
USBcable Batterysaverison
NOTE: The icon locations in the Status Bar may differ depending on the
functions, features, and apps being used.

33
On-screen keyboard
Youcanentertextusingtheon-screenkeyboard.Theon-screenkeyboardappears
automaticallyonthescreenwhenyouneedtoentertext.Tomanuallydisplaythekeyboard,
simplytapatextfieldwhereyouwanttoentertext.
Using the keypad & entering text
Taponcetocapitalizethenextletteryoutype.Double-tapforallcaps.
Taptoswitchtothenumbersandsymbolskeyboard.
Taptoenteraspace.
Taptocreateanewlineinthemessagefield.
Taptodeletethepreviouscharacter.
Entering special characters
TheLGKeyboardallowsyoutoenterspecialcharacters(e.g.“á”)whenenteringtext.
Forexample,toenter“á”,touchandholdthe“a”keyuntiltheadditionalcharactersare
displayed.Thenselectthespecialcharacteryouwanttoenter.
NOTE: A symbol at the top right corner of a key indicates that additional
characters are available for that key.
34
ThefirsttimeyouopenaGoogleapplicationonyourphone,youwillberequiredtosign
inwithyourexistingGoogleaccount.IfyoudonothaveaGoogleaccount,youwillbe
promptedtocreateone.
Creating your Google account
1 FromtheHomescreen,tap toopentheapplicationsscreen.
2 Tap Settings>Accounts & sync>Add account>Google>Newtostartthe
Gmailsetupwizard.
3 Tapatextfieldtoopenthekeyboardandenteryournameandusernameforyour
Googleaccount.Whenenteringtext,youcanmovetothenexttextfieldbytappingNext
onthekeyboard.
4 Whenyouhavefinishedenteringyournameandusername,tap .Yourphonethen
communicateswithGoogleserversandchecksforusernameavailability.
5 Enterandre-enteryourpassword.Thenfollowtheinstructionsandentertherequired
andoptionalinformationabouttheaccount.Waitwhiletheservercreatesyouraccount.
Signing in to your Google account
1 OntheGoogleAccountsetupscreen,tapExisting,enteryoure-mailaddressand
password,thentap .
2 Aftersigningin,youcanuseGmailandtakeadvantagesofGoogle
3 OnceyouhavesetupyourGoogleaccountonyourphone,itwillbeautomatically
synchronizedwithyourGoogleaccountontheweb(dependingonyoursynchronization
settings).
Aftersigningin,youcanuseGmail,andPlayStore;backupyoursettingstoGoogle
servers;andtakeadvantageofotherGoogleservicesonyourphone.
Google account setup
35
Wi-Fi
WithWi-Fi,youcanusehigh-speedInternetaccesswithinthecoverageofthewireless
accesspoint(AP).EnjoywirelessInternetusingWi-Fi,withoutextracharges.
Connecting to Wi-Fi networks
TouseWi-Fionyourphone,youneedtoaccessawirelessaccesspointor'hotspot'.Some
accesspointsareopenandyoucansimplyconnecttothem.Othersarehiddenoruse
securityfeatures,youmustconfigureyourphonetobeabletoconnecttothem.
TurnoffWi-Fiwhenyou'renotusingittoextendthelifeofyourbattery.
NOTE: If you are out of the Wi-Fi zone or have set Wi-Fi to off, additional
charges may be applied by your mobile service provider for mobile data use.
Turning Wi-Fi on and connecting to a Wi-Fi network
1 FromtheHomescreen,tap >Appstab(ifnecessary)>Settings>Wi-Fi.
2 Taptheswitch toturnWi-FionandstartscanningforavailableWi-Finetworks.
•
Securednetworksareindicatedbyalockicon.
3 Tapanetworktoconnecttoit.
•
Ifthenetworkissecured,youarepromptedtoenterapasswordorothercredentials.
(Askyournetworkadministratorfordetails)
4 TheStatusBardisplaysiconsthatindicateyourWi-Fistatus.
Connecting to Networks and Devices
36
Bluetooth
BluetoothallowsyoutosharedatawithotherBluetooth-enableddevicesandconnectto
Bluetoothheadsets.
NOTE:
•
LG is not responsible for the loss, interception or misuse of data sent or
received via the Bluetooth wireless feature.
•
Always ensure that you share and receive data with devices that are
trusted and properly secured. If there are obstacles between the devices,
the operating distance may be reduced.
•
Some devices, especially those that are not tested or approved by
Bluetooth SIG, may be incompatible with your device.
Turning on Bluetooth and pairing up your phone with a Bluetooth device
Youmustpairyourphonewithanotherdevicebeforeyouconnecttoit.
1 FromtheHomescreen,tap >Appstab(ifnecessary)>Settings >
Bluetooth.
2 Taptheswitch toturnBluetoothon.
3 Tapthecheckboxnexttoyourphone'snametomakeyourphonevisibletoother
Bluetoothdevices.
4 Alistofavailabledeviceswillbedisplayed.Choosethedeviceyouwanttopairwithfrom
thelist.
5 Dependingonthetypeofdevice,youmayhavetoentermatchingcodes,confirm
matchingcodes,orthedeviceswillautomaticallypair.
37
Oncetheparingissuccessful,yourdevicewillconnecttotheotherdevice.
NOTE: Some devices, especially headsets or hands-free car kits, may have
a fixed Bluetooth PIN, such as 0000. If the other device has a PIN, you will
be asked to enter it.
Send data using the Bluetooth wireless feature
1 Selectafileoritem,suchasacontact,calendareventormediafile,fromanappropriate
applicationorfromtheDownloadsapp.
2 SelecttheoptionforsendingdataviaBluetooth.
NOTE: The method for selecting an option may vary by data type.
3 SearchforandpairwithaBluetooth-enableddevice.
Receive data using the Bluetooth wireless feature
1 FromtheHomescreen,tap >Appstab(ifnecessary)>Settings >
Bluetooth.
2 Taptheswitch toturnBluetoothon.
3 Tapthecheckboxnexttoyourphone'snametomakeyourphonevisibletoother
Bluetoothdevices.
NOTE: To select the length of time that your device will be visible, tap the
Menu Key > Visibility timeout.
4 Tap Accepttoconfirmthatyouarewillingtoreceivedatafromthedevice.

38
PC connections with a USB cable
LearntoconnectyourdevicetoaPCwithaUSBcableusingthedifferentUSBconnection
modes.
Transferring music, photos and videos using Media sync (MTP)
1 ConnectyourphonetoaPCusingtheUSBcableprovidedwithyourphone.
2 AUSBconnectiontypelistwillappearonyourphonescreen.YoucanalsogotoSystem
settings>PC connection > Select USB connection method >Media sync (MTP).
3 YoucannowviewmediacontentsonyourPCandtransferthefiles.
Synchronize with Windows Media Player
EnsurethatWindowsMediaPlayerisinstalledonyourPC.
1 UsetheUSBcabletoconnectthephonetoaPConwhichWindowsMediaPlayerhas
beeninstalled.
2 SelecttheMedia sync (MTP)option.Whenconnected,apop-upwindowwillappearon
thePC.
3 OpenWindowsMediaPlayertosynchronizemusicfiles.
4 Editorenteryourdevice'snameinthepop-upwindow(ifnecessary).
5 Selectanddragthemusicfilesyouwanttothesynclist.
6 Startsynchronization.
•
ThefollowingrequirementsmustbesatisfiedtosynchronizewithWindowsMediaPlayer.
Items Requirement
OS MicrosoftWindowsXPSP2,Vistaorhigher
WindowMediaPlayerversion WindowsMediaPlayer10orhigher
•
IftheWindowsMediaPlayerversionislowerthan10,installversion10orhigher.
39
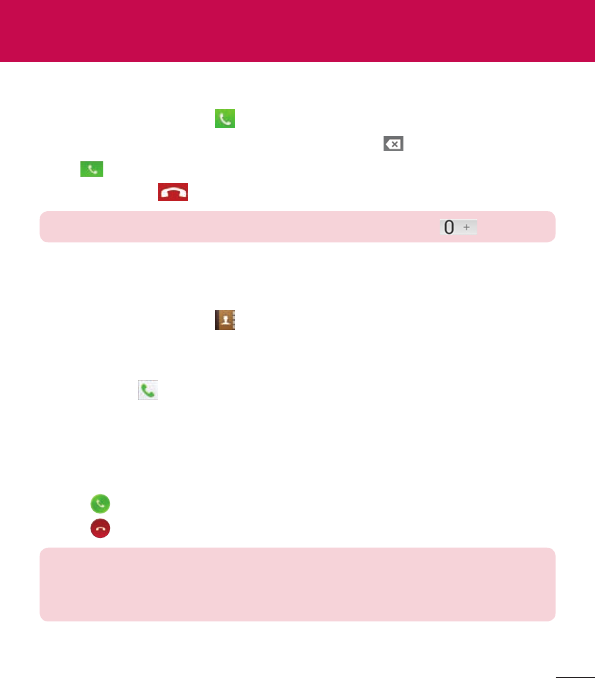
Making a call
1 FromtheHomescreen,tap toopenthedialpad.
2 Enterthenumberusingthedialpad.Todeleteadigit,tap .
3 Tap tomakeacall.
4 Toendacall,tap .
TIP! To enter “+” to make international calls, touch and hold .
Calling your contacts
1 FromtheHomescreen,tap toopenyourcontactlist.
2 ScrollthroughthecontactlistortaptheSearch contacts boxandenterthecontacts
name.Youcanalsoscrollthealphabetbaralongtherightsideofthescreen.
3 Inthelist,tap nexttothedesiredcontacttomakethecall.
Answering and rejecting a call
When the screen is locked/unlocked
•
Swipe inanydirectiontoanswertheincomingcall.
•
Swipe inanydirectiontodeclineanincomingcall.
TIP! Decline with message
You can send a message quickly using this function. This is useful if you
need to reject a call with message during a meeting.
Calls

40
Adjusting the in-call volume
Toadjustthein-callvolumeduringacall,usetheVolumeUpandVolumeDownKeysonthe
left-handsideofthephone.
Making a second call
1 Duringyourfirstcall,tapMenu Key,touchAdd callanddialthenumber.Youcan
alsogototherecentlydialednumberslistbytapping orsearchcontactsbytapping
andselectingthecontactyouwanttocall.
2 Tap tomakethecall.
3 Yourinitialcallisplacedonhold.
4 Tap ifyouwanttostartaconferencecall.
5 Toendactivecalls,tap .
NOTE: You are charged for each call you make.
Viewing your call logs
FromtheHomescreen,tap andchoosetheCall logstab .Acompletelistofall
dialed,receivedandmissedcallsisdisplayed.
TIP!
•
Tap any call log entry to view the date, time and duration of the call.
•
Tap the Menu Key , then tap Delete all to delete all the recorded items
or tap Delete to delete individual items.

41
Call settings
Youcanconfigurephonecallsettingssuchascallforwarding,aswellasotherspecial
featuresofferedbyyourcarrier.
1 FromtheHomescreen,tap .
2 TaptheMenu Key .
3 Tap Call settingsandchoosetheoptionsthatyouwishtoadjust.
42
AddcontactstoyourphoneandsynchronizethemwiththecontactsinyourGoogleaccount
orotheraccountsthatsupportcontactsyncing.
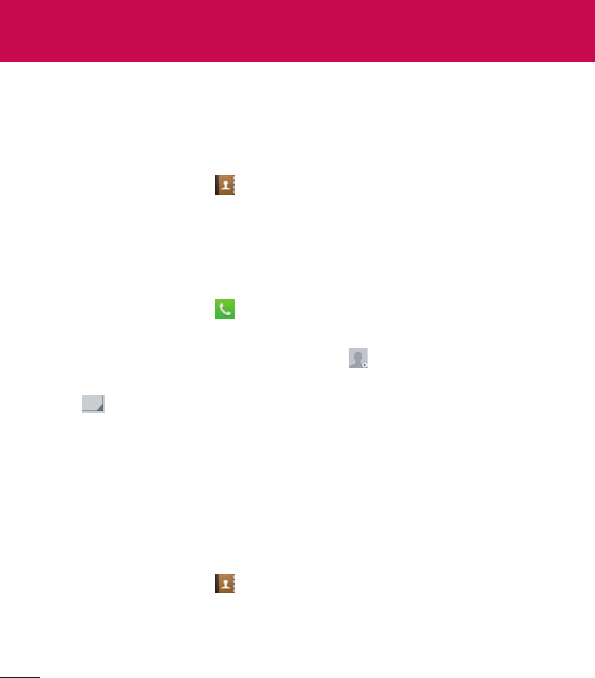
Searching for a contact
1 FromtheHomescreen,tap toopenyourcontactlist.
2 TaptheSearch contacts boxandenterthecontactsname.Youcanalsoscrollthe
alphabetbaralongtherightsideofthescreen.
Adding a new contact
1 FromtheHomescreen,tap andenterthenewcontact'snumber.
2 Tap>New contact.
3 Ifyouwanttoaddapicturetothenewcontact,tap .ChoosefromTake photoor
Select from Gallery.
4 Tap atthetopofthescreenandselecttheaccountyouwanttosavethecontactto.
5 Tapacategoryofcontactinformationandenterthedetailsaboutyourcontact.
6 Tap Save.
Favorite contacts
Youcanclassifyfrequentlycalledcontactsasfavorites.
Adding a contact to your favorites
1 FromtheHomescreen,tap toopenyourcontactlist.
2 Tapacontacttoviewitsdetails.
3 Tapthestartotherightofthecontact'sname.Thestarwillturnyellowcolor.
Contacts
43
Removing a contact from your favorites list
1 FromtheHomescreen,tap toopenyourcontactlist.
2 Tapthe tabandchooseacontacttoviewitsdetails.
3 Taptheyellowcolorstartotherightofthecontact'sname.Thestarturnsgreycolorand
thecontactisremovedfromyourfavorites.
Creating a group
1 FromtheHomescreen,tap toopenyourcontactlist.
2 TaptheGroupstab,thentaptheMenuKey>New group.
3 Enteranameforthenewgroup.Youcanalsosetaringtoneforthenewlycreatedgroup.
4 Tap Savetosavethegroup.
NOTE: If you delete a group, the contacts assigned to that group will not be
lost. They will remain in your contacts.
44
Yourphonecombinestextandmultimediamessagesintooneintuitive,easy-to-usemenu.
NOTE: LG message should be set up to default SMS app. If not, some
message functions will be limited.
Sending a message
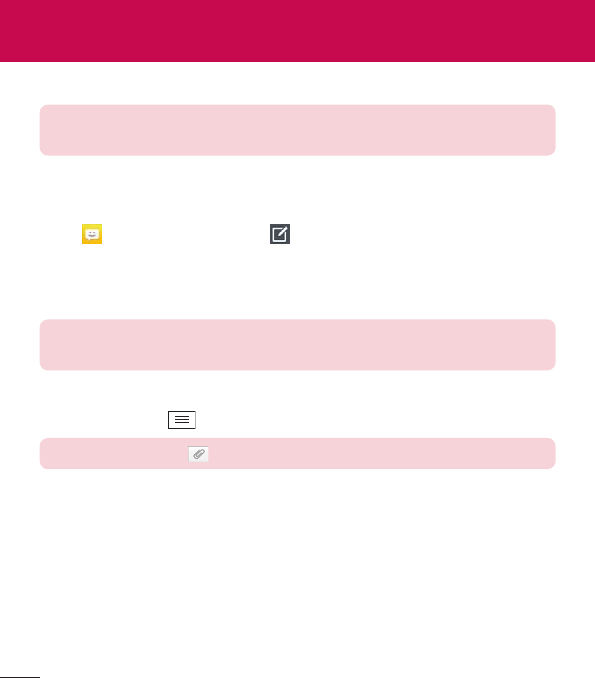
1 Tap ontheHomescreenandtap tocomposeanewmessage.
2 EnteracontactnameorcontactnumberintheTofield.Asyouenterthecontactname,
matchingcontactswillappear.Youcantapasuggestedrecipient.Youcanaddmore
thanonecontact.
NOTE: You will be charged for a text message for every person you send
the message to.
3 Tapthetextfieldandbegincomposingyourmessage.
4 TaptheMenu Keytoaccessthemessagingoptions.
TIP! You can tap the icon to attach a file you want to share.
5 Tap Sendtosendyourmessage.
6 Responseswillappearonthescreen.Asyouviewandsendadditionalmessages,a
messagethreadiscreated.
Messaging
45
WARNING
•
The 160-character limit may vary from country to country, depending on
the language and how the text message is coded.
•
If an image, video or audio file is added to an text message, it is
automatically converted into a multimedia message and you are charged
accordingly.
View mode
Unreadmessagesarelocatedatthetop.Othermessagesexchangedwithanotherparty
aredisplayedinthreadsandinchronologicalordersothatyoucanconvenientlyseean
overviewofyourconversation.
Changing your message settings
Yourphonemessagesettingsarepre-defined,soyoucansendmessagesimmediately.You
canchangethesettingsaccordingtoyourpreferences.
•
OpentheMessagingappandtaptheMenu Key>Settings.

46
E-mail
YoucanusetheEmailapplicationtoreademailsfromserviceslikeGmail.TheEmail
applicationsupportsthefollowingaccounttypes:POP3,IMAPandExchange.
Yourserviceproviderorsystemadministratorcanprovideyouwiththeaccountsettingsyou
need.
Managing an email account
ThefirsttimeyouopentheEmailapplication,aset-upwizardopenstohelpyoutosetup
anemailaccount.
Aftertheinitialset-up,theEmailapplicationdisplaysthecontentsofyourinbox.Ifyouhave
addedmorethanoneaccount,youcanswitchamongaccounts.
To add another email account:
•
OpentheEmailapplicationandtaptheMenu Key>Settings> Add account.
To change an email account's settings:
•
OpentheEmailapplicationandtaptheMenu Key>Settings.ThentapGeneral
settingstoconfiguresettingsforallaccountsortapanindividualaccounttoconfigure
settingsonlyforthatparticularaccount.
To delete an email account:
•
OpentheEmailapplicationandtaptheMenu Key>Settings>Menu Key
>Remove account>tapanaccount>Remove>Yes.
Working with account folders
OpentheEmailapplicationandtaptheMenu Key>Folders.
EachaccounthasanInbox,Outbox,SentandDraftsfolder.Dependingonthefeatures
supportedbyyouraccount'sserviceprovider,youmayhaveadditionalfolders.
47
Composing and sending email
To compose and send a message
1 WhileintheEmailapplication,tap .
2 Enteranaddressforthemessage'sintendedrecipient.Asyouentertext,matching
addresseswillbeproposedfromyourContacts.Separatemultipleaddressesusing
semicolons.
3 TaptheCc/Bccfieldtocopyrecipients.Tap toattachfiles,ifneeded.
4 Tapthemessagefieldandenteryourmessage.
5 Tap tosendtheemail.
Ifyouaren'tconnectedtoanetwork,forexample,ifyou'reworkinginairplanemode,
themessagesthatyousendwillbestoredinyourOutboxfolderuntilyouconnecttoa
networkagain.Ifitcontainsanypendingmessages,theOutboxwillbedisplayedonthe
Accountsscreen.
TIP! When a new email arrives in your Inbox, you will be notified by a sound
or vibration (depending on your sound and vibration settings).

48
Multimedia
Camera
ToopentheCameraapplication,tapCameraontheHomescreen.
Getting to know the viewfinder
Flash–ChoosefromOff,On,Auto.
Swap camera–Switchbetweentherear–facingcameralensandthefront–facing
cameralens.
Shot mode–ChoosefromNormal and Panorama.
Settings–Tapthisicontoopenthesettingsmenu.
Video mode–Tapandslidedownthisicontoswitchtovideomode.
Capture button
Gallery–Taptoviewthelastphotoyoucaptured.Thisenablesyoutoaccessyour
galleryandviewsavedphotoswhileincameramode.
NOTE: The memory capacity may differ depending on the configured
camera settings.
49
Using the advanced settings
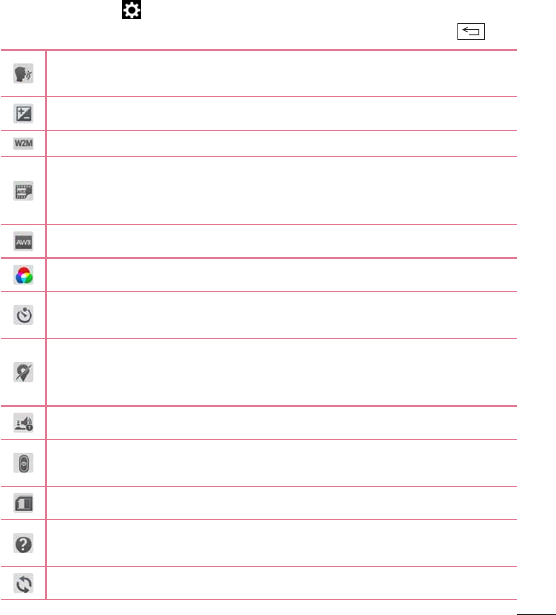
Intheviewfinder,tap toopentheadvancedoptions.Youcanchangethecamera
settingsbyscrollingthroughthelist.Afterselectingtheoption,taptheBackKey .
Thisenablesyoutotakeapicturebysayingavoicecommand.
SayCheese,Smile,Whiskey,Kimchi orLG totakeaphoto.
Thisdefinesandcontrolstheamountofsunlightenteringtheimage.
Youcanchoosetheimagesize.
TheISOratingdeterminesthesensitivityofthecamera'slightsensor.Thehigher
theISO,themoresensitivethecamera.Thisisusefulindarkerconditionswhen
youcannotusetheflash.
Improveswhitebalanceinvariouslightingconditions.
Appliescoloreffectstoyourpictures.
SetsadelayaftertheCapturebuttonispressed.Thisisidealifyouwanttobein
thephoto.
Activatethistouseyourphone'slocation-basedservices.Takepictureswherever
youareandtagthemwiththelocation.Ifyouuploadtaggedpicturestoablog
thatsupportsgeo-tagging,youcanseethepicturesdisplayedonamap.
Selectsashuttersound.
SelectwhatactiontotakewhenpressingtheVolumeKeys.ChoosefromCapture
orZoom.
Selectthelocationwhereyouwanttosaveyourimages.
Tapthiswheneveryouwanttoknowhowafunctionworks.Thisiconwillprovide
youwithaquickhelpguide.
Restoreallcamerasettingsbacktodefault.
50
TIP!
•
When you exit the camera, some settings return to their defaults, such as
white balance, color effect, timer and scene mode. Check these before
you take your next photo.
•
The setting menu is superimposed over the viewfinder, so when you
change photo color or quality elements, you will see a preview of the
changed image behind the Settings menu.
Taking a quick photo
1 OpentheCameraapplication.
2 Holdingthephonehorizontally,pointthelenstowardsthesubjectyouwantto
photograph.
3 Tap tocapturethephoto.
Once you've taken a photo
Taptheimagepreviewatthebottomofthescreentoviewthelastphotoyoucaptured.
ChoosetoviewthephotowiththeGallery.
Taptotakeanotherphotoimmediately.
Taptosendyourphototoothersorshareitviasocialnetworkservices.
Taptodeletethephoto.
TIP! If you have an social networking account set up on your phone, you
can share your photo with your social networking community.