LG Electronics USA D320NR Multi-Band GSM/EDGE Phone with WLAN, Bluetooth and RFID User Manual LG D320nr UG EN FCC 131128 1
LG Electronics MobileComm USA, Inc. Multi-Band GSM/EDGE Phone with WLAN, Bluetooth and RFID LG D320nr UG EN FCC 131128 1
Users Manual

ENGLISH
MFL00000000 (1.0)
User Guide
LG-D320nr
www.lg.com

User Guide
ENGLISH
t Screen displays and illustrations may differ
from those you see on actual phone.
t Some of the contents of this guide may not
apply to your phone, depending on the software
and your service provider. All information in this
document is subject to change without notice.
t This handset is not suitable for people who
have a visual impairment due to the touch
screen keyboard.
t Copyright ©2013 LG Electronics, Inc. All rights
reserved. LG and the LG logo are registered
trademarks of LG Group and its related entities.
All other trademarks are the property of their
respective owners.
t Google™, Google Maps™, Gmail™,
YouTube™, Google Talk™ and Play Store™
are trademarks of Google, Inc.

2
Important notice .......................................5
Getting to know your phone...................11
Phone overview .....................................11
Installing the SIM card and battery.........13
Charging the phone ...............................15
Using the memory card..........................15
Locking and unlocking the screen..........16
Your Home screen...................................17
Touch screen tips ..................................17
Home screen .........................................18
Customizing the Home screen ..............18
Returning to recently-used applications .19
Notifications ..........................................19
Swipe down for notifications & settings .20
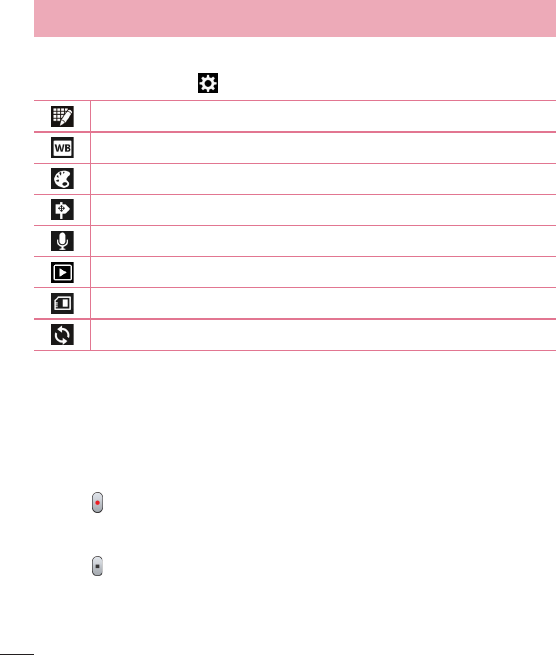
Quick Settings .....................................20
Indicator icons on the Status Bar ..........21
On-screen keyboard ..............................22
Entering accented letters......................23
Google account setup.............................24
Connecting to Networks and Devices....25
Wi-Fi .....................................................25
Connecting to Wi-Fi networks ...............25
Turning Wi-Fi on and connecting to a Wi-Fi
network...............................................25
Bluetooth...............................................26
Sharing your phone's data connection ...27
PC connections with a USB cable...........29
Calls ........................................................31
Making a call.........................................31
Calling your contacts .............................31
Answering and rejecting a call...............31
Adjusting the in-call volume...................32
Making a second call.............................32
Viewing your call logs ............................32
Call settings...........................................33
Contacts..................................................34
Searching for a contact..........................34
Adding a new contact ............................34
Favorite contacts ...................................34
Creating a group....................................35
Messaging...............................................36
Sending a message ...............................36
Threaded box .......................................37
Changing your message settings ...........37
E-mail......................................................38
Managing an email account...................38
Working with account folders.................38
Composing and sending email...............39
Camera....................................................40
Getting to know the viewfinder ..............40
Using the advanced settings ..................41
Taking a quick photo .............................42
Once you've taken a photo.....................43
Viewing your saved photos ....................44
Table of contents

3
Video camera..........................................45
Getting to know the viewfinder ..............45
Using the advanced settings ..................46
Recording a quick video.........................46
After recording a video...........................47
Watching your saved videos ..................47
Adjusting the volume when viewing a
video .....................................................47
LG Unique Function.................................48
QuickMemo function..............................48
Using the QuickMemo options ..............49
Viewing the saved QuickMemo ............49
LG SmartWorld ......................................50
How to Get to LG SmartWorld from
YourPhone..........................................50
How to use LG SmartWorld...................50
Multimedia..............................................52
Gallery...................................................52
Viewing pictures ..................................52
Playing videos .....................................52
Editing photos/videos ...........................53
Deleting images...................................53
Setting as wallpaper ............................53
Videos ...................................................53
Playing a video ....................................53
Music ....................................................54
Playing a song.....................................54
FM radio................................................56
Searching for stations............................56
Tuning in automatically.........................56
Utilities ....................................................57
Setting your alarm .................................57
Using your calculator .............................57
Adding an event to your calendar...........57
Voice Recorder ......................................58
Recording a sound or voice ..................58
Tasks.....................................................58
Polaris Viewer 4.....................................59
Google+ ................................................59
Voice Search..........................................59
Downloads ............................................59
The Web ..................................................60
Internet..................................................60
Using the Web toolbar..........................60
Viewing webpages...............................60
Opening a page ...................................61
Searching the web by voice..................61
Bookmarks..........................................61
History ................................................61
Chrome .................................................62
Viewing webpages...............................62
Opening a page ...................................62
Searching the web by voice..................62
Syncing with other devices ...................62
Settings...................................................63
Access the Settings menu .....................63
WIRELESS & NETWORKS .......................63

4
DEVICE ..................................................65
PERSONAL.............................................67
SYSTEM.................................................68
PC software (LG PC Suite) ......................70
Phone software update ..........................73
About this user guide .............................75
About this user guide.............................75
Trademarks ...........................................75
Accessories.............................................76
Troubleshooting ......................................77
For your safety........................................81
Safety instructions .................................88
Table of contents

5
Please read this before you start using your phone!
Please check to see whether any problems you encountered with your phone are
described in this section before taking the phone in for service or calling a service
representative.
1. Phone memory
When there is less than 10% of space available in your phone memory, your phone
cannot receive new messages. You need to check your phone memory and delete some
data, such as applications or messages, to make more memory available.
To uninstall applications:
1Touch > Apps tab > Settings > Apps from the DEVICE.
2Once all applications appear, scroll to and select the application you want to
uninstall.
3Touch Uninstall.
2. Optimizing battery life
Extend your battery's life between charges by turning off features that you don't need
to have running constantly in the background. You can monitor how applications and
system resources consume battery power.
Extending your phone's battery life:
t Turn off radio communications when you're not using. If you are not using Wi-Fi,
Bluetooth or GPS, turn them off.
t Reduce screen brightness and set a shorter screen timeout.
t Turn off automatic syncing for Gmail, Calendar, Contacts and other applications.
t Some applications you have downloaded may reduce battery power.
Important notice
6
Important notice
To check the battery power level:
t Touch > Apps tab > Settings > About phone from the SYSTEM > Battery.
The battery status (charging or discharging) and battery level (percentage charged) is
displayed at the top of the screen.
To monitor and control how battery power is being used:
t Touch > Apps tab > Settings > About phone from the SYSTEM > Battery >
Battery use.
Battery usage time is displayed on the screen. It tells you how long it has been since
you last connected your phone to a power source or, if currently connected, how long
the phone was last running on battery power. The screen shows the applications or
services using battery power, listed in order from the greatest to smallest amount used.
3. Before installing an open source application and OS
WARNING
If you install and use an OS other than the one provided by the manufacturer
it may cause your phone to malfunction. In addition, your phone will no longer
be covered by the warranty.
WARNING
To protect your phone and personal data, only download applications from
trusted sources, such as Play Store™. If there are improperly installed
applications on your phone, the phone may not work normally or a serious
error may occur. You must uninstall those applications and all associated data
and settings from the phone.
7
4. Using an unlock pattern
Set an unlock pattern to secure your phone. Touch > Apps tab > Settings > Lock
screen from DEVICE > Select screen lock > Pattern. This opens a screen that will
guide you through how to draw a screen unlock pattern. You have to create a Backup
PIN as a safety measure in case you forget your unlock pattern.
Caution: Create a Google account before setting an unlock pattern and
remember the Backup PIN you created when creating your pattern lock.
WARNING
Precautions to take when using pattern lock.
It is very important to remember the unlock pattern you set. You will not be
able to access your phone if you use an incorrect pattern 5 times. You have 5
opportunities to enter your unlock pattern, PIN or password. If you have used
all 5 opportunities, you can try again after 30 seconds.
When you can't recall your unlock Pattern, PIN or Password:
< If you have forgotten your pattern >
If you logged in to your Google account on the phone but failed to enter the correct
pattern 5 times, press the Forgot pattern? button at the bottom of the screen. You are
then required to log in with your Google Account or you have to enter the Backup PIN
which you entered when creating your Pattern Lock.
If you have not created a Google account on the phone or you forgot Backup PIN, you
have to perform a hard reset.
8
Important notice
< If you have forgotten your PIN or Password >
If you forget your PIN or Password, you will need to perform a hard reset.
Caution: If you perform a hard reset, all user applications and user data will be
deleted.
NOTE: If you have not logged into your Google Account and have forgotten
your Unlock Pattern, you will need to enter your Backup PIN.
5. Using the Hard Reset (Factory reset)
If your phone does not restore to its original condition, use a Hard Reset (Factory Reset)
to initialize it.
1Turn the power off.
2Press and hold the Power/Lock key + Volume Down key + QuickMemo function
key.
3When the LG Logo appears on the screen, release all keys.
WARNING
If you perform a Hard Reset, all user applications, user data and DRM
licenses will be deleted. Please remember to backup any important data
before performing a Hard Reset.
9
6. Opening and switching applications
Multi-tasking is easy with Android because you can keep more than one application
running at the same time. There is no need to quit an application before opening
another one. Use and switch between several open applications. Android manages each
application, stopping and starting them as needed to ensure that idle applications don't
consume resources unnecessarily.
To stop applications:
1Touch > Apps tab > Settings > Apps from DEVICE > RUNNING.
2Scroll and touch the desired application and touch Stop to stop it.
NOTE: For multitasking, press Home key to move to another app while
using an app. This does not stop the previous app running in the background
on the device. Make sure to touch the Back key to exit an app after
using it.
7. Transferring music, photos and videos using Media
sync (MTP)
1Touch > Apps tab > Settings > Storage from the DEVICE to check out the
storage media.
2Connect the phone to your PC using the USB cable.
3A USB connection type list will appear on your phone screen, Select the Media sync
(MTP) option.
4Open the memory folder on your PC. You can view the mass storage content on your
PC and transfer the files.
5Copy the files from your PC to the drive folder or vice versa.

10
Important notice
8. Hold your phone upright
Hold your cell phone vertically, as you would a regular phone. Your phone has an
internal antenna. Be careful not to scratch or damage the back of the phone, as this
may affect performance.
When making/receiving calls or sending/receiving data, avoid holding the lower part of
the phone where the antenna is located. Doing so may affect call quality.
9. When the screen freezes
If the screen freezes or the phone does not respond when you try to operate it:
Press and hold the Power/Lock key for 10 seconds to turn your phone off.
If it still does not work, please contact the service center.
11
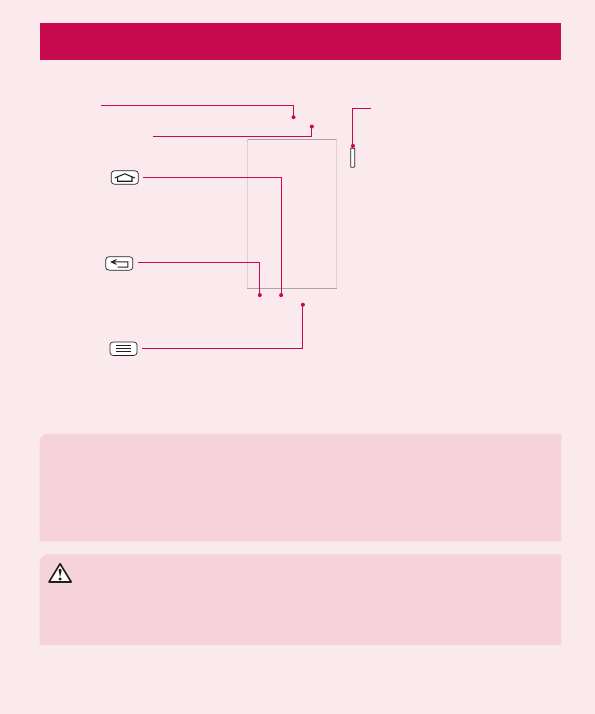
Phone overview
Proximity Sensor
Earpiece
Home Key
Return to the Home screen
from any screen.
Back Key
Return to the previous screen.
Menu Key
Display the available options.
Power/Lock Key
t Switch your phone on/off by
pressing and holding this key.
t Short press to lock/unlock
the screen.
NOTE: Proximity sensor
When receiving and making calls, the proximity sensor automatically turns
the backlight off and locks the touch screen by sensing when the phone is
near your ear. This extends battery life and prevents you from unintentionally
activating the touch screen during calls.
WARNING
Placing a heavy object on the phone or sitting on it can damage the LCD and
touch screen functions. Do not cover the LCD proximity sensor with protective
film. This could cause the sensor to malfunction.
Getting to know your phone

12
Charger/USB Port
Microphone
Earphone Jack
Power/Lock Key
QuickMemo function KeyVolume keys
t In the Home screen: Control ringer
volume.
t During a call: Control your earpiece
volume.
t When playing a song: Control
volume continuously.
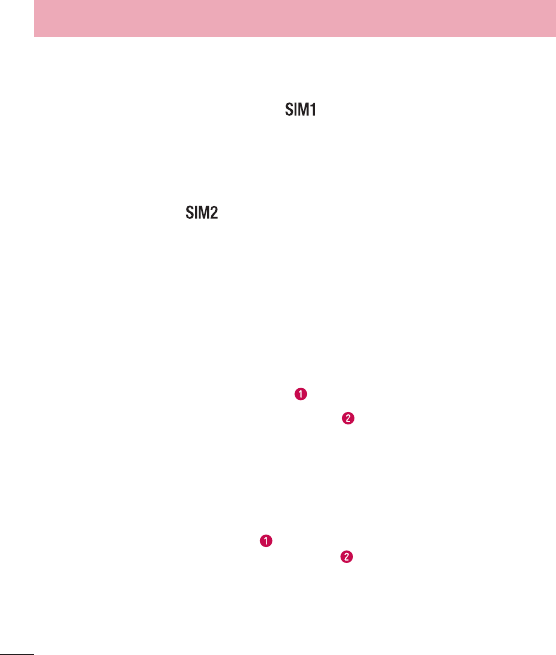
Battery cover
Flash
SIM cards slot
(Upper slot for SIM1 and
Lower slot for SIM2)
microSD Card slot
Speaker
Battery
Camera lens
Getting to know your phone

13
Installing the SIM card and battery
Before you can start exploring your new phone, you'll need to set it up. To insert the
SIM card and battery.
1To remove the battery cover, hold the phone firmly in one hand. With your other
hand, lift off the battery cover with your index finger as shown in figure.
14
Getting to know your phone
2Slide the SIM card into its slots as shown in the figure. Make sure the gold contact
area on the card is facing downwards.
3Insert the battery into place by aligning the gold contacts on the phone and the
battery (1) and pressing it down until it clicks into place (2).
4Align the battery cover over the battery compartment (1) and press it down until it
clicks into place (2).

15
Charging the phone
The charger connector is at the bottom of the phone. Insert one end of the charging
cable into the phone and plug the other end into an electrical outlet.
NOTE:
t The battery must be fully charged initially to improve battery lifetime.
t Do not open the battery cover while your phone is charging.
Using the memory card
Turn the phone off before inserting or removing the memory card. Remove the battery
cover. Insert the memory card into the slot. Make sure the gold contact area is facing
downwards.

16
Getting to know your phone
Locking and unlocking the screen
If you do not use the phone for a while, the screen will be automatically turned off and
locked. This helps to prevent accidental touches and saves battery power.
When you are not using your phone, press the Power/Lock key to lock your phone.
If there are any programs running when you lock your screen, they may be still running
in Lock mode. It is recommended that you exit all programs before entering Lock mode
to avoid unnecessary charges (e.g. phone calls, web access and data communications).
To wake up your phone, press the Power/Lock key . The Lock screen will appear.
Touch and slide the Lock screen in any direction to unlock your Home screen. The last
screen you viewed will open.

17
Your Home screen
Touch screen tips
Here are some tips on how to navigate on your phone.
Tap or touch – A single finger tap selects items, links, shortcuts and letters on the
on-screen keyboard.
Touch and hold – Touch and hold an item on the screen by touching it and not lifting
your finger until an action occurs. For example, to open a contact's available options,
touch and hold the contact in the Contacts list until the context menu opens.
Drag – Touch and hold an item for a moment and then, without lifting your finger, move
your finger on the screen until you reach the target position. You can drag items on the
Home screen to reposition them.
Swipe or slide – To swipe or slide, quickly move your finger across the surface of the
screen, without pausing when you first touch it (so you don't drag an item instead). For
example, you can slide the screen up or down to scroll through a list or browse through
the different Home screens by swiping from left to right (and vice versa).
Double-tap – Double-tap to zoom on a webpage or a map. For example, quickly
double-tap a section of a webpage to adjust that section to fit the width of the screen.
You can also double-tap to zoom in and out when taking a picture (using the Camera),
and when using Maps.
Pinch-to-Zoom – Use your index finger and thumb in a pinching or spreading motion
to zoom in or out when using the browser, Maps or when browsing pictures.
Rotate the screen – From many applications and menus, the orientation of the screen
adjusts to the device's physical orientation.
NOTE:
t To select an item, touch the center of the icon.
t Do not press too hard; the touch screen is sensitive enough to pick up a
light, yet firm touch.
t Use the tip of your finger to touch the option you want. Be careful not to
touch any other keys.
18
Home screen
Simply swipe your finger to the left or right to view the panels. You can customize each
panel with Apps, Downloads, Widgets and Wallpapers.
NOTE: Some screen images may be different depending on your phone
provider.
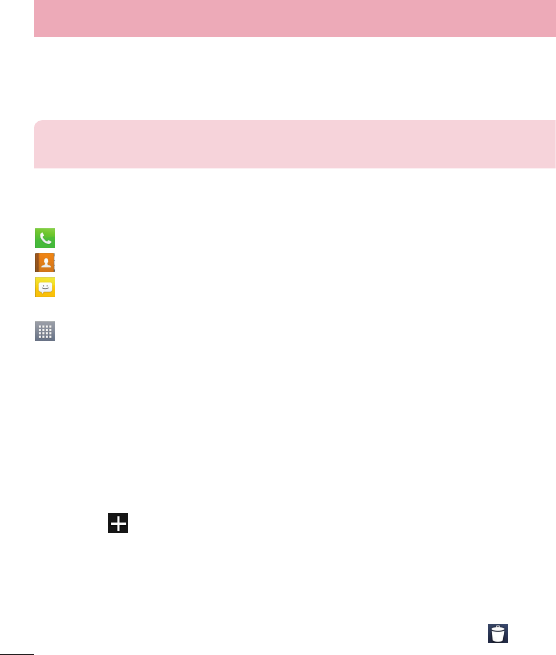
On your Home screen, you can view menu icons at the bottom of the screen. Menu
icons provide easy and one-touch access to the functions you use the most.
Touch the Phone icon to bring up the touch screen dialpad to make a call.
Touch the Contacts icon to open your contacts.
Touch the Messaging icon to access the messaging menu. This is where you can
create a new message.
Touch the Apps icon at the bottom of the screen. This displays all of your installed
applications. To open any application, simply touch the icon in the applications list.
Customizing the Home screen
You can customize your Home screen by adding apps, downloads, widgets or
wallpapers. For more convenience using your phone, add your favorite apps and
widgets to the Home screen.
To add items on your Home screen:
1Touch and hold the empty part of the Home screen.
Or touch at the top of the right side.
2In the Add Mode menu, select the item you wish to add. You will then see this added
item on the Home screen.
3Drag it to the desired location and lift your finger.
To remove an item from the Home screen:
t Home screen > touch and hold the icon you want to remove > drag it to
Your Home screen

19
TIP! To add an application icon to the Home screen from the Apps menu,
touch and hold the application you want to add.
TIP! Using folders
You can combine several app icons in a folder. Drop one app icon over
another one on a Home screen, and the two icons will be combined.
Returning to recently-used applications
1Touch and hold the Home key. The screen displays a pop-up containing the icons of
applications you used recently.
2Touch an icon to open the application. Or touch the Back key to return to your
previous screen.
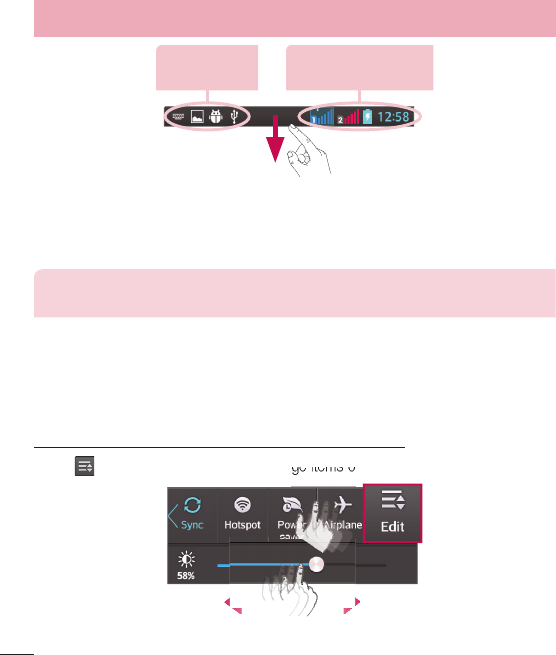
Notifications
Notifications alert you to the arrival of new messages, calendar events, and alarms, as
well as to ongoing events, such as video downloads.
From the notifications panel, you can view your phone's current status and pending
notifications.
When a notification arrives, its icon appears at the top of the screen. Icons for pending
notifications appear on the left, and system icons showing things like Wi-Fi or battery
strength on the right.
NOTE: The available options may vary depending on the region or service
provider.
20
Your Home screen
Pending
notifications
Bluetooth, Wi-Fi &
battery status
Swipe down for notifications & settings
Swipe down from the status bar to open the notifications panel. To close the
notifications panel, swipe up the bar that is at the bottom of the screen.
NOTE: When long pressing icon at the top of the screen, will go to Settings
directly.
Quick Settings
Use Quick Settings to easily toggle function settings like Wi-Fi, manage display
brightness and more. For Quick Settings, swipe down from the status bar to open the
notifications panel and swipe or touch for you desired setting.
To rearrange Quick Setting items on the notification panel
Touch . You can then check and rearrange items on the notification panel.
21
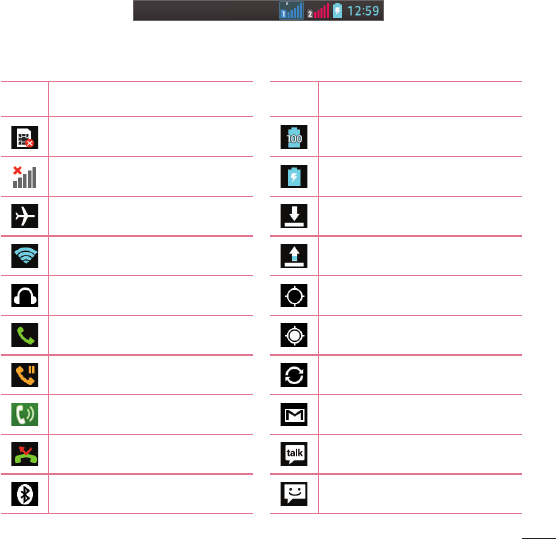
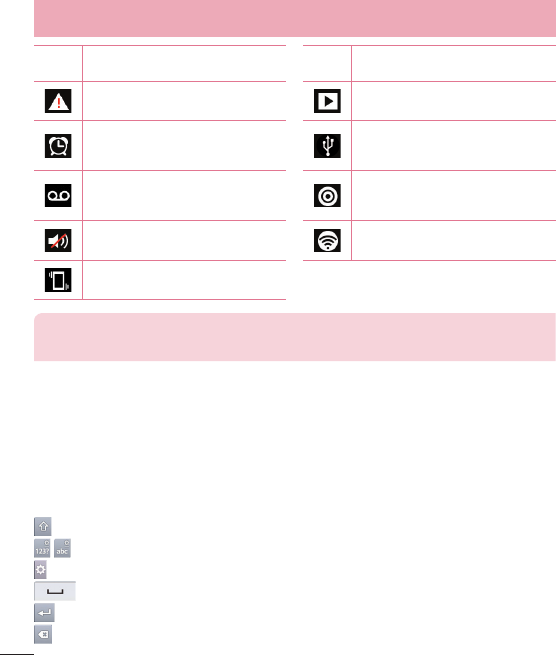
Indicator icons on the Status Bar
Indicator icons appear on the status bar at the top of the screen to report missed calls,
new messages, calendar events, device status and more.
The icons displayed at the top of the screen provide information about the status of the
device. The icons listed in the table below are some of the most common ones.
Icon Description Icon Description
No SIM card Battery fully charged
No signal Battery is charging
Airplane mode Downloading data
Connected to a Wi-Fi network Uploading data
Wired headset GPS is acquiring
Call in progress Receiving location data from GPS
Call hold Data is syncing
Speakerphone New Gmail
Missed call New Google Talk message
Bluetooth is on New message
22
Your Home screen
Icon Description Icon Description
System warning Song is playing
Alarm is set Phone is connected to PC via USB
cable or USB tethering is active
New voicemail Both USB tethering and portable
hotspot are active
Ringer is silenced Portable Wi-Fi hotspot is active
Vibrate mode
NOTE: The icons location in the status bar may differ according to the
function or service.
On-screen keyboard
You can enter text using the on-screen keyboard. The on-screen keyboard appears
automatically on the screen when you need to enter text. To manually display the
keyboard, simply touch a text field where you want to enter text.
Using the keypad & entering text
Tap once to capitalize the next letter you type. Double-tap for all caps.
Tap to switch to the numbers and symbols keyboard.
You can touch and hold this tab to view the Settings menu.
Tap to enter a space.
Tap to create a new line in the message field.
Tap to delete the previous character.

23
Entering accented letters
When you select French or Spanish as the text entry language, you can enter special
French or Spanish characters (e.g. “á”).
For example, to input “á”, touch and hold the “a” key until the zoom-in key grows
bigger and displays characters from different languages.
Then select the special character you want.
24
Google account setup
When you first turn on your phone, you have the opportunity to activate the network, to
sign into your Google Account and select how you want to use certain Google services.
To set up your Google account:
t Sign into a Google Account from the prompted set-up screen.
OR
t Touch > Apps tab > select a Google application, such as Gmail > select New to
create a new account.
If you have a Google account, touch Existing, enter your email address and password,
then touch .
Once you have set up your Google account on your phone, your phone automatically
synchronizes with your Google account on the web.
Your contacts, Gmail messages, Calendar events and other information from these
applications and services on the Web are synchronized with your phone. (This will
depend on your synchronization settings.)
After signing in, you can use Gmail™ and take advantage of Google services on your
phone.

25
Connecting to Networks and Devices
Wi-Fi
With Wi-Fi, you can use high-speed Internet access within the coverage of the wireless
access point (AP). Enjoy wireless Internet using Wi-Fi, without extra charges.
Connecting to Wi-Fi networks
To use Wi-Fi on your phone, you need to access a wireless access point or 'hotspot'.
Some access points are open and you can simply connect to them. Others are hidden
or use security features, you must configure your phone to be able to connect to them.
Turn off Wi-Fi when you're not using it to extend the life of your battery.
NOTE: If you are out of the Wi-Fi zone or have set Wi-Fi to OFF, additional
charges may be applied by your mobile operator for mobile data use.
Turning Wi-Fi on and connecting to a Wi-Fi network
1Touch > Apps tab > Settings > Wi-Fi from the WIRELESS & NETWORKS tab.
2Set Wi-Fi to ON and start scanning for available Wi-Fi networks.
3Tap the Wi-Fi menu again to see a list of active and in-range Wi-Fi networks.
t Secured networks are indicated by a lock icon.
4Touch a network to connect to it.
t If the network is secured, you are prompted to enter a password or other
credentials. (Ask your network administrator for details)
5The status bar displays icons that indicate Wi-Fi status.

26
Bluetooth
You can use Bluetooth to send data by running a corresponding application, but not
from the Bluetooth menu as on most other mobile phones.
NOTE:
t LG is not responsible for the loss, interception or misuse of data sent or
received via the Bluetooth wireless feature.
t Always ensure that you share and receive data with devices that are trusted
and properly secured. If there are obstacles between the devices, the
operating distance may be reduced.
t Some devices, especially those that are not tested or approved by
Bluetooth SIG, may be incompatible with your device.
Turning on Bluetooth and pairing up your phone with a Bluetooth device
You must pair your device with another device before you connect to it.
1Touch > Apps tab > Settings > set Bluetooth to ON from the WIRELESS &
NETWORKS tab.
2Tap the Bluetooth menu again. You will see the option to make your phone visible
and option to search devices. Now tap Search for devices to view the devices in
the Bluetooth Range.
3Choose the device you want to pair with from the list.
Once the paring is successful, your device will connect to the other device.
NOTE: Some devices, especially headsets or hands-free car kits, may have a
fixed Bluetooth PIN, such as 0000. If the other device has a PIN, you will be
asked to enter it.
Connecting to Networks and Devices
27
Send data using the Bluetooth wireless feature
1Select a file or item, such as a contact, calendar event or media file, from an
appropriate application or from Downloads
2Select the option for sending data via Bluetooth.
NOTE: The method for selecting an option may vary by data type.
3Search for and pair with a Bluetooth-enabled device.
Receive data using the Bluetooth wireless feature
1Touch > Apps tab > Settings > set Bluetooth to ON and touch Make phone
visible to be visible on other devices.
NOTE: To select the length of time that your device will be visible, touch
>Visibility timeout.
2Select Pair to confirm that you are willing to receive data from the device.
Sharing your phone's data connection
USB tethering and portable Wi-Fi hotspot are great features when there are no wireless
connections available. You can share your phone's mobile data connection with a
single computer via a USB cable (USB tethering). You can also share your phone's data
connection with more than one device at a time by turning your phone into a portable
Wi-Fi hotspot.
When your phone is sharing its data connection, an icon appears in the status bar and
as an ongoing notification in the notifications drawer.
For the latest information about tethering and portable hotspots, including supported
operating systems and other details, visit http://www.android.com/tether.

28
Connecting to Networks and Devices
To change Portable Wi-Fi hotspot settings:
1Touch > Apps tab > Settings > More... from the WIRELESS & NETWORKS tab
>Portable Wi-Fi hotspot > choose options that you want to adjust.
TIP! If your computer is running Windows 7 or a recent distribution of some
flavours of Linux (such as Ubuntu), you will not usually need to prepare your
computer for tethering. But, if you are running an earlier version of Windows
or another operating system, you may need to prepare your computer to
establish a network connection via USB. For the most current information
about which operating systems support USB tethering and how to configure
them, visit http://www.android.com/tether.
To rename or secure your portable hotspot
You can change the name of your phone's Wi-Fi network name (SSID) and secure its
Wi-Fi network.
1On the Home screen, touch > Apps tab > Settings.
2Touch More... from the WIRELESS & NETWORKS tab and select Portable Wi-Fi
hotspot.
3Ensure that Portable Wi-Fi hotspot is checked.
4Touch Set up Wi-Fi hotspot.
t The Set up Wi-Fi hotspot dialogue box will open.
t You can change the Network SSID (name) that other computers see when
scanning for Wi-Fi networks.
t You can also touch the Security menu to configure the network with Wi-Fi
Protected Access 2 (WPA2) security using a pre-shared key (PSK).
t If you touch the WPA2 PSK security option, a password field is added to the Set
up Wi-Fi hotspot dialogue box. If you enter a password, you will need to enter
that password when you connect to the phone's hotspot with a computer or other
device. You can set Open in the Security menu to remove security from your Wi-Fi
network.

29
5Touch Save.
ATTENTION! If you set the security option as Open, you cannot prevent
unauthorised usage of online services by other people and additional charges
may be incurred. To avoid unauthorized usage, you are advised to keep the
security option active.
PC connections with a USB cable
Learn to connect your device to a PC with a USB cable in USB connection modes.
Transferring music, photos and videos using Media sync (MTP)
1Connect your phone to a PC using a USB cable.
2If you haven't installed the LG Android Platform Driver on your PC, you will need to
manually change the settings. Choose System settings > PC connection > USB
connection type, then select Media sync (MTP).
3You can now view the mass storage content on your PC and transfer the files.
Synchronize with Windows Media Player
Ensure that Windows Media Player is installed on your PC.
1Use the USB cable to connect the phone to a PC on which Windows Media Player
has been installed.
2Select the Media sync (MTP) option. When connected, a pop-up window will appear
on the PC.
3Open Windows Media Player to synchronize music files.
4Edit or enter your device's name in the pop-up window (if necessary).
5Select and drag the music files you want to the sync list.

30
Connecting to Networks and Devices
6Start synchronization.
t The following requirements must be satisfied to synchronize with Windows Media
Player.
Items Requirement
OS Microsoft Windows XP SP2, Vista or higher
Window Media Player version Windows Media Player 10 or higher
t If the Windows Media Player version is lower than 10, install version 10 or higher.
31
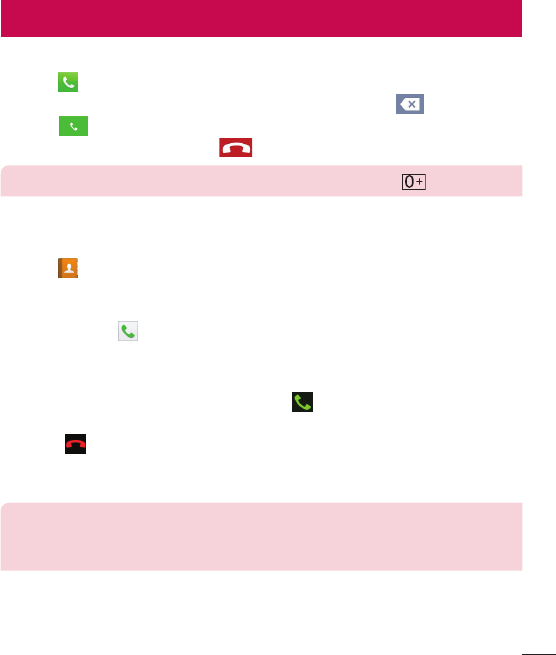
Calls
Making a call
1Touch to open the keypad.
2Enter the number using the keypad. To delete a digit, touch the .
3Touch to make a call.
4To end a call, touch the End icon .
TIP! To enter “+” to make international calls, touch and hold .
Calling your contacts
1Touch to open your contacts.
2Scroll through the contact list or enter the first few letters of the contact you want to
call by touching Search contacts.
3In the list, touch to make the call.
Answering and rejecting a call
When you receive a call in Lock state, swipe the in any direction to Answer the
incoming call.
Swipe the in any direction to Decline an incoming call.
Hold and slide the Decline with message icon from the bottom if you want to send a
message.
TIP! Decline with message
You can send a message quickly using this function. This is useful if you need
to reject a call with message during a meeting.
32
Calls
Adjusting the in-call volume
To adjust the in-call volume during a call, use the Volume up and down keys on the left-
hand side of the phone.
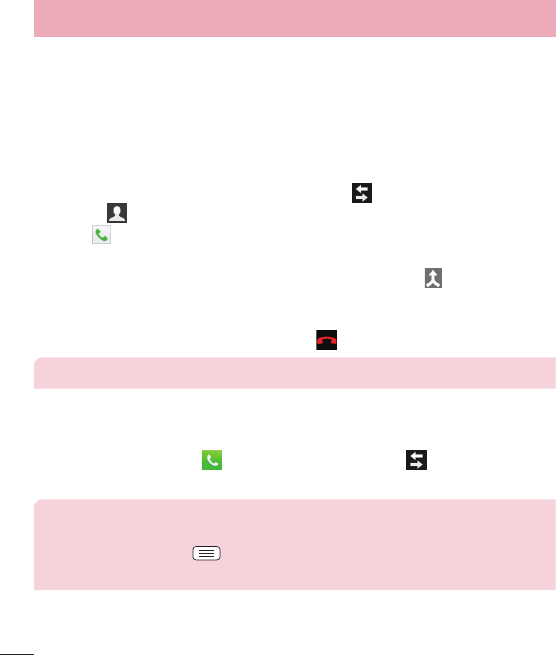
Making a second call
1During your first call, touch Menu key > Add call and dial the number. You can also
go to the recently dialled numbers list by touching or can search contacts by
touching and selecting the contact you want to call.
2Touch to make the call.
3Both calls are displayed on the call screen. Your initial call is locked and put on hold.
4Touch the displayed number to toggle between calls. Or touch Merge calls to
start a conference call.
5To end active calls, touch End or touch the Home key, and slide down the
notification bar and select the End call icon .
NOTE: You are charged for each call you make.
Viewing your call logs
On the Home screen, touch and choose the Call logs tab .
View a complete list of all dialled, received and missed calls.
TIP!
t Touch any call log entry to view the date, time and duration of the call.
t Touch the Menu key , then touch Delete all to delete all the recorded
items.
33
Call settings
You can configure phone call settings such as call forwarding, as well as other special
features offered by your carrier.
1On the Home screen, touch .
2Touch .
3Tap Call settings and choose the options that you wish to adjust.
34
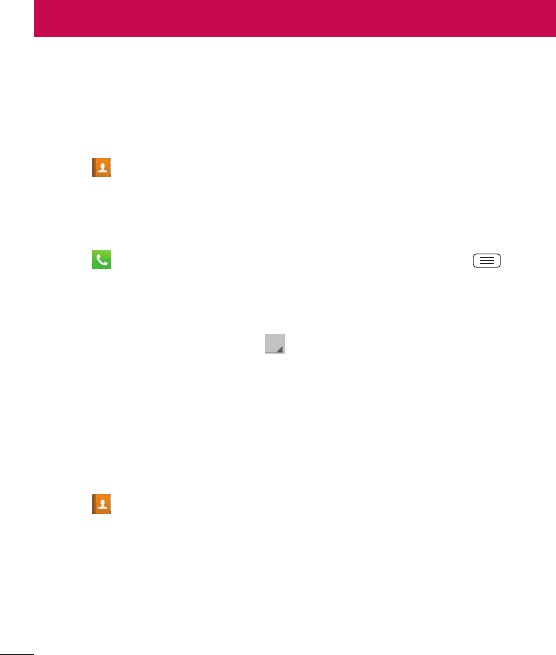
Contacts
Add contacts to your phone and synchronize them with the contacts in your Google
account or other accounts that support contact syncing.
Searching for a contact
On the Home screen
1Touch to open your contacts.
2Touch Search contacts and enter the contact name using the keyboard.
Adding a new contact
1Touch , enter the new contact's number, then touch the Menu key . Touch
Add to Contacts > Create new contact.
2If you want to add a picture to the new contact, touch the image area.
Choose from Take photo or Select from Gallery.
3Select the contact type by touching .
4Touch a category of contact information and enter the details about your contact.
5Touch Save.
Favorite contacts
You can classify frequently called contacts as favorites.
Adding a contact to your favorites
1Touch to open your contacts.
2Touch a contact to view its details.
3Touch the star to the right of the contact's name. The star will turn yellow color.
35
Removing a contact from your favorites list
1Touch to open your contacts.
2Touch the tab, and choose Choose from Quick message a contact to view its
details.
3Touch the yellow color star to the right of the contact's name. The star turns grey
color and the contact is removed from your favorites.
Creating a group
1Touch to open your contacts.
2Touch Groups and touch the Menu key . Select New group.
3Enter a name for the new group. You can also set a ringtone for the newly created
group.
4Touch Save to save the group.
NOTE: If you delete a group, the contacts assigned to that group will not be
lost. They will remain in your contacts.
36
Messaging
Your phone combines SMS and MMS into one intuitive, easy-to-use menu.
Sending a message
1Touch on the Home screen and touch to open a blank message.
2Enter a contact name or contact number in the To field. As you enter the contact
name, matching contacts will appear. You can touch a suggested recipient. You can
add more than one contact.
NOTE: You will be charged for a text message for every person you send the
message to.
3Touch the Message via SIM1/SIM2 field and begin composing your message.
4Touch to open the Options menu. Choose from Quick message,Insert
smiley,Schedule sending and Add subject.
TIP! You can touch the icon to attach the file you want to share to your
message.
5Touch Send to send your message.
6Responses will appear on the screen. As you view and send additional messages, a
message thread is created.
WARNING
t The 160-character limit may vary from country to country, depending on the
language and how the SMS is coded.
t If an image, video or audio file is added to an SMS message, it is
automatically converted into an MMS message and you are charged
accordingly.

37
Threaded box
Unread messages (SMS, MMS) are located on the top.
And the others exchanged with another party can be displayed in chronological order so
that you can conveniently see an overview of your conversation.
Changing your message settings
Your phone message settings are pre-defined, so you can send messages immediately.
You can change the settings according to your preferences.
t Touch the Messaging icon on the Home screen, touch and then tap Settings.
38
E-mail
You can use the E-mail application to read emails from services like Gmail. The E-mail
application supports the following account types: POP3, IMAP and Exchange.
Your service provider or system administrator can provide you with the account settings
you need.
Managing an email account
The first time you open the E-mail application, a set-up wizard opens to help you to set
up an email account.
After the initial set-up, E-mail displays the contents of your inbox. If you have added
more than one account, you can switch among accounts.
To add another email account:
t Touch > Apps tab > E-mail > touch > Accounts > touch > Add
account.
To change an email account's settings:
t Touch > Apps tab > E-mail > touch > Accounts > touch > Entire
settings.
To delete an email account:
t Touch > Apps tab > E-mail > touch > Accounts > touch >
Remove account > touch an account you want to delete > Remove > select Yes.
Working with account folders
Touch > Apps tab > E-mail > touch and select Folders.
Each account has an Inbox, Outbox, Sent and Drafts folder. Depending on the features
supported by your account's service provider, you may have additional folders.

39
Composing and sending email
To compose and send a message
1While in the E-mail application, touch the .
2Enter an address for the message's intended recipient. As you enter text, matching
addresses will be proposed from your Contacts. Separate multiple addresses using
semicolons.
3Touch the Cc/Bcc field to add a Cc/Bcc and Touch to attach files, if required.
4Enter the text of the message.
5Touch .
If you aren't connected to a network, for example, if you're working in airplane mode,
the messages that you send will be stored in your Outbox folder until you connect to
a network again. If it contains any pending messages, the Outbox will be displayed
on the Accounts screen.
TIP! When a new email arrives in your Inbox, you will be notified by a sound
or vibration. Tap the email notification to stop receiving notifications.
40
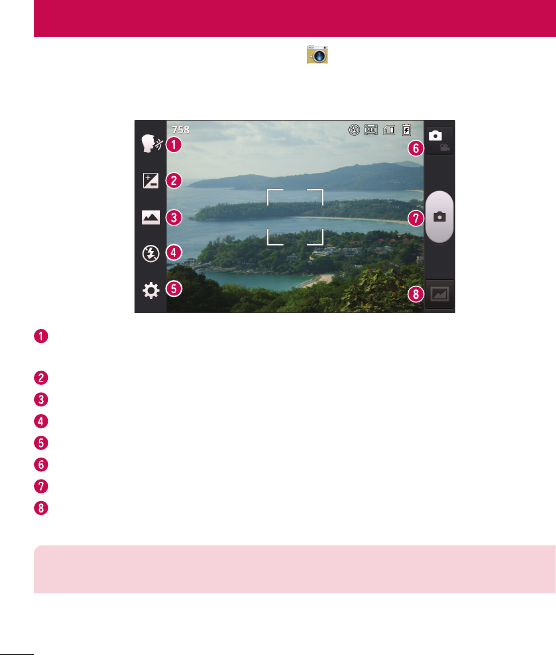
Camera
To open the Camera application, tap Camera on the Home screen.
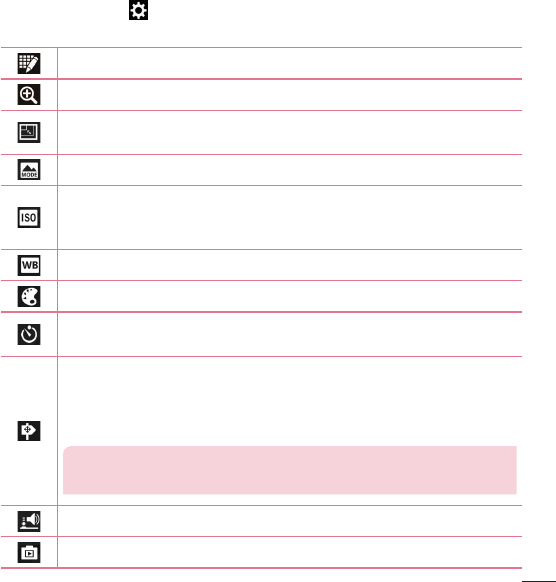
Getting to know the viewfinder
Cheese shutter – This enables you to take a picture as voice command. Say
"Cheese" when you get ready to take a photo.
Brightness – This defines and controls the amount of sunlight entering the image.
Shot mode – Choose from Normal,Panorama or Continuous shot.
Flash – Automatically turns on the flash when taking a photo in a dark place.
Settings – Touch this icon to open the Settings menu.
Video mode – Touch this icon to switch to video mode.
Capture – Takes a photo.
Gallery – Touch to view the last photo you captured. This enables you to access
your gallery and view saved photos within camera mode.
NOTE: The memory capacity may differ depending on the shooting scene or
shooting conditions.
41
Using the advanced settings
In the viewfinder, tap to open the advanced options. You can change the camera
settings by scrolling through the list. After selecting the option, tap the Back key.
Touch if you want to change the viewfinder menu.
Zoom in or out.
Selects photo resolution. If you choose high resolution, file size will increase,
which means you will be able to store fewer photos in the memory.
Finds the appropriate color and light settings for the current environment.
The ISO rating determines the sensitivity of the camera's light sensor. The
higher the ISO, the more sensitive the camera. This is useful in darker
conditions when you cannot use the flash.
Improves color quality in various lighting conditions.
Applies artistic effects to your pictures.
Sets a delay after the capture button is pressed. This is ideal if you want to
be in the photo.
Activate this to use your phone's location-based services. Take pictures
wherever you are and tag them with the location. If you upload tagged
pictures to a blog that supports geotagging, you can see the pictures
displayed on a map.
NOTE: This function is only available when the GPS function is
active.
Selects a shutter sound.
Automatically shows you the picture you just took.
42
Camera
Select storage to save images.
Restore all camera default settings.
Touch this whenever you want to know how a function works. This icon will
provide you with a quick guide.
TIP!
t When you exit the camera, some settings return to their defaults, such as
white balance, color effect, timer and scene mode. Check these before you
take your next photo.
t The setting menu is superimposed over the viewfinder, so when you change
photo color or quality elements, you will see a preview of the changed
image behind the Settings menu.
Taking a quick photo
1Open the Camera application.
2Holding the phone horizontally, point the lens towards the subject you want to
photograph.
3A focus box will appear in the center of the viewfinder screen. You can also tap
anywhere on the screen to focus on that spot.
4When the focus box turns green, the camera has focused on your subject.
5Touch to capture the photo.
43
Once you've taken a photo
Touch to view the last photo you captured.
Touch to take another photo immediately.
Touch to send your photo to others or share it via social network services.
Touch to delete the photo.
TIP! If you have an SNS account and set it up on your phone, you can share
your photo with your SNS community.
NOTE: Additional charges may apply when MMS messages are downloaded
while roaming.
Touch the Menu key to open all advanced options.
Set image as – Touch to use the photo as a Contact photo,Home screen wallpaper
or Lock screen wallpaper.
Move – Touch to move the photo to another place.
Copy – Touch to copy the selected photo and save it to another album.
Rename – Touch to edit the name of the selected photo.
Rotate left/right – To rotate left or right.
Crop – Crop your photo. Move your finger across the screen to select the area to be
cropped.

44
Camera
Edit – View and edit the photo.
Select photo resolution. If you choose high resolution, file size will increase,
which means you will be able to store fewer photos in the memory.
Improves color quality in various lighting conditions.
Applies artistic effects to your photos.
Applies additional options to your photos.
Slideshow – Automatically shows you the images in the current folder one after the
other.
Details – Find out more information about the contents.
Viewing your saved photos
You can access your saved photos when in camera mode. Just tap the Gallery icon
and your Gallery will be displayed.
t To view more photos, scroll left or right.
t To zoom in or out, double-tap the screen or place two fingers and spread them apart
(move your fingers closer together to zoom out).
45
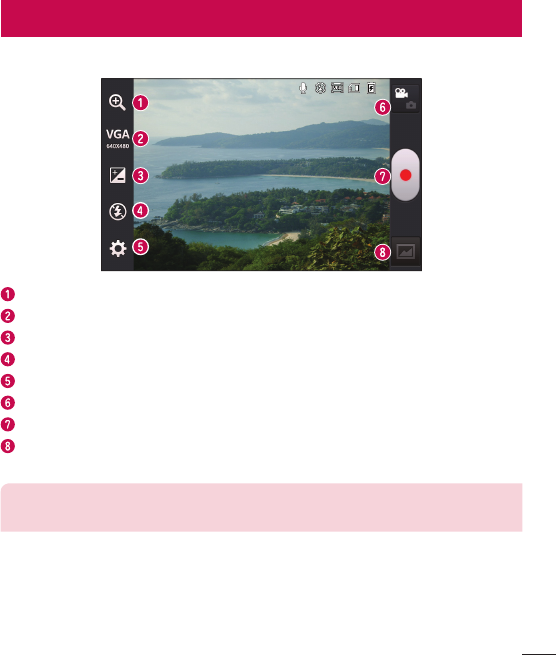
Video camera
Getting to know the viewfinder
Zoom – Zoom in or zoom out.
Video size – Touch to set the size (in pixels) of the video you are recording.
Brightness – This defines and controls the amount of sunlight entering the video.
Flash – Allows you to turn on the flash when recording a video in dark conditions.
Settings – Touch this icon to open the settings menu.
Camera mode – Touch this icon to switch to camera mode.
Record – Starts recording.
Gallery – Touch to view the last video you recorded. This enables you to access your
gallery and view your saved videos from within video mode.
NOTE: While recording a video, place two fingers on the screen and pinch to
use the Zoom function.
46
Using the advanced settings
Using the viewfinder, touch to open all the advanced options.
Touch if you want to change the viewfinder menu.
Improves color quality in various lighting conditions.
Choose a colour tone to use for your new view.
Activate this to use your phone's location-based services.
Choose Off to record a video without sound.
Auto review automatically shows you the video you just recorded.
Select storage to save videos.
Restore all video camera default settings.
Recording a quick video
1Open the Camera application and touch the Video mode button.
2The video camera viewfinder appears on the screen.
3Hold your phone, point the lens towards the subject you wish to capture in your
video.
4Touch once to start recording.
5A red light will appear at the top left corner of the viewfinder with a timer showing
the length of the video.
6Touch on the screen to stop recording.
Video camera
47
After recording a video
Touch to view the last video you took.
Touch to record another video immediately.
Touch to send your video to others or share it via social network services.
Touch to delete the video.
NOTE: Additional charges may apply when MMS messages are downloaded
while roaming.
Watching your saved videos
1In the viewfinder, tap .
2Your Gallery will appear on the screen.
3Tap a video to play it automatically.
Adjusting the volume when viewing a video
To adjust the volume of a video while it is playing, use the volume keys on the left side
of the phone.
48
LG Unique Function
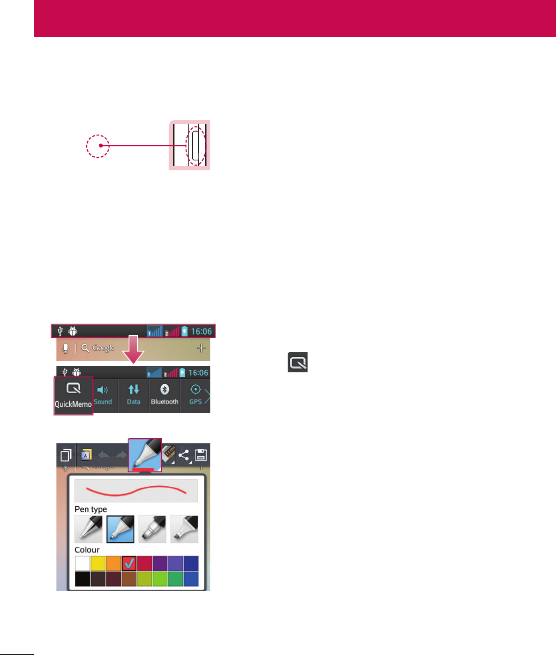
QuickMemo function
Use the QuickMemo function to practically and efficiently create memos during a call,
with a saved picture or on the current phone screen.
1Enter the QuickMemo function screen by pressing
QuickMemo function key.
OR OR
Touch and slide the status bar downward and
touch .
2Select the desired menu option from Pen type,
Colour,Eraser and create a memo.
49
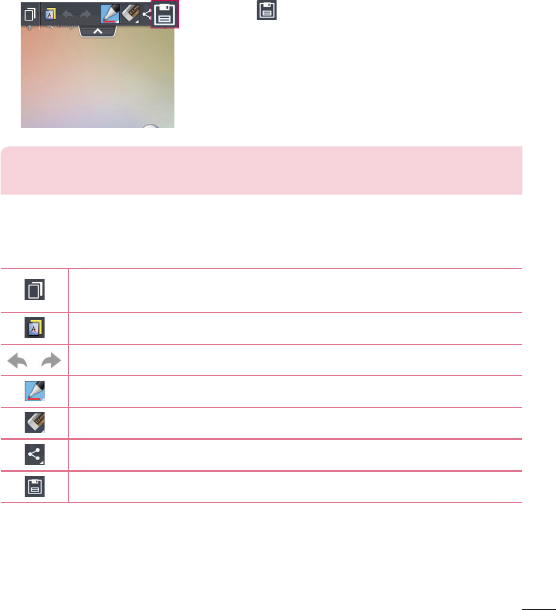
3Touch in the Edit menu to save the memo with
the current screen.
NOTE: Please use a fingertip while using the QuickMemo function. Do not
use your fingernail.
Using the QuickMemo options
You can easily use the QuickMenu options when using the QuickMemo function.
Touch to keep the current memo on the screen and use the phone
simultaneously.
Selects whether to use the background screen or not.
Undo or Redo.
Selects the pen type and the colour.
Erases the memo that you created.
Touch to send your memo to others or share it via social network services.
Saves the memo with the current screen in the Gallery.
Viewing the saved QuickMemo
Touch Gallery and select the QuickMemo album.

50
LG Unique Function
LG SmartWorld
LG SmartWorld offers an assortment of exciting content - games, applications,
wallpaper and ringtones - giving LG phone users the chance to enjoy richer "Mobile
Life" experiences.
How to Get to LG SmartWorld from YourPhone
1Touch > Apps tab > tap the icon to access LG SmartWorld.
2Tap Sign in and enter ID/PW for LG SmartWorld. If you have not signed up yet, tap
Register to receive your LG SmartWorld membership.
3Download the content you want.
NOTE: What if there is no icon?
1Using a mobile Web browser, access LG SmartWorld (www.lgworld.com)
and select your country.
2Download the LG SmartWorld App.
3Run and install the downloaded file.
4Access LG SmartWorld by tapping the icon.
How to use LG SmartWorld
t Participate in monthly LG SmartWorld promotions.
Search content.
Find content by category (e.g. Games, Education, Entertainment etc).
List of downloaded/to-be updated content.

51
t Try the easy "Menu" buttons to find what you’re looking for fast.
Apps for you – Recommended content based on your previous choices.
Settings – Set Profile and Display.
Sign in – Set your ID and Password.
t Try other useful functions as well. (Content Detail screen)
NOTE: LG SmartWorld may not be available from all carriers or in all
countries.

52
Multimedia
Gallery
You can store multimedia files in internal memory for easy access to all your multimedia
files. Use this application to view multimedia files like pictures and videos.
1Touch > Apps tab > Gallery.
Open a list of catalog bars that store your multimedia files.
NOTE:
t Some file formats are not supported, depending on the software installed
on the device.
t Some files may not play properly, depending on how they are encoded.
Viewing pictures
Launching Gallery displays your available folders. When another application, such as
Email, saves a picture, the download folder is automatically created to contain the
picture. Likewise, capturing a screenshot automatically creates the Screenshots folder.
Select a folder to open it.
Pictures are displayed by creation date in a folder. Select a picture to view it full screen.
Scroll left or right to view the next or previous image.
Zooming in and out
Use one of the following methods to zoom in on an image:
t Double-tap anywhere to zoom in.
t Spread two fingers apart on any place to zoom in. Pinch to zoom out, or double-tap
to return.
Playing videos
Video files show the icon in the preview. Select a video to watch it and tap .
The Videos application will launch.
53
Editing photos/videos
When viewing an photo/video, tap the Menu key and use the advanced editing
options.
t Slideshow: start a slideshow with the images in the current folder.
Deleting images
Use one of the following methods:
t In a folder, tap and select photos/videos by ticking, and then tap on Delete.
t When viewing a photo/Video, tap .
Setting as wallpaper
When viewing a photo, touch the Menu key > Set image as to set the image as
wallpaper or to assign it to a contact.
NOTE:
t Some file formats are not supported, depending on the device software.
t If the file size exceeds the available memory, an error can occur when you
open files.
Videos
Your phone has a built-in video player that lets you play all of your favorite videos. To
access the video player, touch > Apps tab > Videos.
Playing a video
1Touch > Apps tab > Videos.
2Select the video you want to play.
54
Multimedia
Touch to pause video playback.
Touch to resume video playback.
Touch to go 10 seconds forward.
Touch to go 10 seconds backward.
Touch to manage the video volume.
Touch to change the ratio of the video screen.
Touch to lock a video screen.
To change the volume while watching a video, press the up and down volume keys on
the left-hand side of the phone.
Touch and hold a video in the list. The Share,Delete and Details options will be
displayed.
Music
Your phone has a built-in music player that lets you play all your favorite tracks. To
access the music player, touch > Apps tab > Music.
Playing a song
1Touch > Apps tab > Music.
2Touch Songs.
3Select the song you want to play.
Touch to find the files with YouTube.
Touch to set shuffle mode.
Touch to set repeat mode.
55
Touch to manage the music volume.
Touch to pause playback.
Touch to resume playback.
Touch to skip to the next track on the album or in the playlist.
Touch to go back to the beginning of the song. Touch twice to return to the
previous song.
Touch to set the favourites.
Touch to see the current playlist.
Touch to see all song list.
To change the volume while listening to music, press the up and down volume keys on
the left-hand side of the phone.
Touch and hold any song in the list. The Play,Add to playlist,Share,Set as ringtone,
Delete,Details and Search options will be displayed.
NOTE:
t Some file formats are not supported, depending on the device software.
t If the file size exceeds the available memory, an error can occur when you
open files.
t Music file copyrights may be protected by international treaties and national
copyright laws.
t Therefore, it may be necessary to obtain permission or a licence to
reproduce or copy music.
In some countries, national laws prohibit private copying of copyrighted
material. Before downloading or copying the file, check the national laws of
the relevant country concerning the use of such material.
56
Multimedia
FM radio
Your LG-D320nr has a built-in FM radio so you can tune in to your favorite stations and
listen on the go.
NOTE: You need to use your headphones to listen to the radio. Insert it into
the headphone jack.
Searching for stations
You can tune in to radio stations by searching for them manually or automatically. They
are then saved to specific channel numbers.
Tuning in automatically
1On the Home screen, touch > Apps tab > FM radio.
2Touch , then select Scan.
3During auto scanning, touch Cancel if you want to stop scanning. Only scanned
channels are saved before you stop scanning.
NOTE: You can also manually tune in to a station using the on-screen wheel.
NOTE: To improve radio reception, extend the headset cord as this also
functions as the radio antenna.
If you connect a headset not specifically made for radio reception, radio
reception may be poor.
57
Utilities
Setting your alarm
1Touch > Apps tab > Alarm/Clock > .
2After you set the alarm, your phone lets you know how much time is left before the
alarm will go off.
3Set Repeat,Snooze duration,Vibration,Alarm sound,Alarm volume,Auto app
starter,Puzzle lock and Memo. Touch Save.
NOTE: To change alarm settings in the alarm list screen, touch the Menu key
and select Settings.
Using your calculator
1Touch > Apps tab > Calculator.
2Touch the number keys to enter numbers.
3For simple calculations, touch the function you want to perform (+, –, x or ÷)
followed by =.
4For more complex calculations, touch , select the Advanced panel, then
choose sin, cos, tan, log etc.
5To check the history, tap the icon .
Adding an event to your calendar
1Touch > Apps tab > Calendar.
2On the screen, you can find the different view types for the Calendar (Day, Week,
Month, Agenda).
3Tap on the date for which you wish to add an event and touch .
4Touch Event name and enter the event name.
5Touch Location and enter the location. Check the date and enter the time you wish
your event to start and finish.
58
6If you wish to add a note to your event, touch Description and enter the details.
7If you wish to repeat the alarm, set REPEAT and set REMINDERS, if necessary.
8Touch Save to save the event in the calendar.
Voice Recorder
Use the voice recorder to record voice memos or other audio files.
Recording a sound or voice
1Touch > the Apps tab and select Voice Recorder.
2Touch to begin recording.
3Touch to end the recording.
4Touch to listen to the recording.
NOTE: Touch to access your album. You can listen to the saved
recording. The available recording time may differ from actual recording time.
Tasks
This task can be synchronized with MS Exchange account. You can create task, revise it
and delete it in MS outlook or MS Office Outlook Web Access.
To Synchronize MS Exchange
1From the Home Screen, Touch > Settings.
2Touch Accounts & sync > ADD ACCOUNT.
3Touch Microsoft Exchange to create Email address and Password.
4Make sure if you checkmark Sync task.
Utilities
59
Polaris Viewer 4
Polaris Viewer let you view various types of electronic documents such as MS-Office,
PDF, Text, etc.
t Touch > Apps tab > Polaris Viewer 4.
Google+
Use this application to stay connected with people via Google’s social network service.
t Touch > Apps tab > Google+.
NOTE: This application may not be available depending on the region or
service provider.
Voice Search
Use this application to search webpages using voice.
1Touch > Apps tab > Voice Search.
2Say a keyword or phrase when Speak now appears on the screen. Select one of the
suggested keywords that appear.
NOTE: This application may not be available depending on the region or
service provider.
Downloads
Use this application to see what files have been downloaded through the applications.
t Touch > Apps tab > Downloads.
NOTE: This application may not be available depending on the region or
service provider.
60
The Web
Internet
Use this application to browse the Internet. Browser gives you a fast, full-color world of
games, music, news, sports, entertainment and much more, right on your mobile phone
wherever you are and whatever you enjoy.
NOTE: Additional charges apply when connecting to these services and
downloading content. Check data charges with your network provider.
1Touch > Apps tab > Internet.
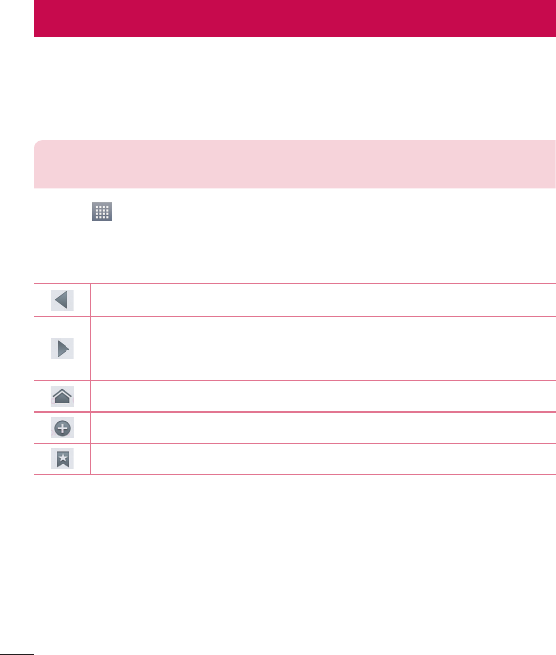
Using the Web toolbar
Touch and hold the Web toolbar and slide it upwards with your finger to open.
Touch to go back one page.
Touch to go forward one page, to the page you connected to after the
current one. This is the opposite of what happens when you touch the Back
key, which takes you to the previous page.
Touch to go to the Home page.
Touch to add a new window.
Touch to access bookmarks.
Viewing webpages
Tap the address field, enter the web address and tap Go.
61
Opening a page
To go to new page, tap > .
To go to another webpage, tap , scroll up or down, and tap the page to select it.
Searching the web by voice
Tap the address field, tap , speak a keyword, and then select one of the suggested
keywords that appear.
NOTE: This feature may not be available depending on the region or service
provider.
Bookmarks
To bookmark the current webpage, touch > Save to bookmarks > OK.
To open a bookmarked webpage, tap and select one.
History
Tap > History to open a webpage from the list of recently-visited webpages. To
clear the history, tap Menu > Clear all history.
62
Chrome
Use Chrome to search for information and browse webpages.
1Touch > Apps tab > Chrome.
NOTE: This application may not be available, depending on your region and
service provider.
Viewing webpages
Tap the Address field, and then enter a web address or search criteria.
Opening a page
To go to a new page, tab > New tab.
To go to another webpage, tap , scroll up or down and tap the page to select it.
Searching the web by voice
Tap the address field, tap , speak a keyword and select one of the suggested
keywords that appear.
Syncing with other devices
Sync open tabs and bookmarks to use with Chrome on another device when you are
logged in with the same Google account.
To view open tabs on other devices, tap Menu > Other devices.
Select a webpage to open.
To view bookmarks, tap .
The Web
63
Settings
Access the Settings menu
1On the Home screen, touch > Apps tab > Settings.
or
On the Home screen, touch > System settings.
2Select a setting category and select an option.
WIRELESS & NETWORKS
< Wi-Fi >
Wi-Fi – Turns on Wi-Fi to connect to available Wi-Fi networks.
TIP! How to obtain the MAC address
To set up a connection in some wireless networks with MAC filters, you may
need to enter the MAC address of your phone in the router.
You can find the MAC address in the following user interface: touch Apps tab
>Settings > Wi-Fi > > Advanced > MAC address.
< Bluetooth >
Turn the Bluetooth wireless feature on or off to use Bluetooth.
< Data usage >
Displays the data usage and set mobile data usage limit.
< Call >
Configure phone call settings such as call forwarding and other special features offered
by your carrier.
Fixed dialing numbers – Turn on and compile a list of numbers that can be called
from your phone. You’ll need your PIN2, which is available from your operator. Only
numbers within the fixed dial list can be called from your phone.
Voicemail – Allows you to select your carrier’s voicemail service.

64
Settings
Call forwarding – Choose whether to divert all calls when the line is busy, when there
is no answer or when you have no signal.
Call barring – Lock incoming, outgoing or international calls.
Call duration – View the duration of calls including Last call, All calls, Dialled calls and
Received calls.
Additional settings – Allows you to change the following settings:
Caller ID: Choose whether to display your number in an outgoing call.
Call waiting: If call waiting is activated, the handset will notify you of an incoming call
while you are on a call (depending on your network provider).
Call reject – Allows you to set the call reject function. Choose from Call reject mode
or Rejection list.
Decline with message – When you want to reject a call, you can send a quick
message using this function. This is useful if you need to reject a call during a meeting.
Connection vibration – Vibrates your phone when the other party answers the call.
Privacy keeper – Hides the caller name and number for an incoming call.
Power button ends call – Allows you to select your end call.
Save unknown numbers – Add unknown numbers to contacts after a call.
< More... >
Airplane mode – After switching to airplane mode, all wireless connections are
disabled.
Portable Wi-Fi hotspot – Allows you to share mobile network via Wi-Fi and you can
configure portable Wi-Fi hotspot settings.
Bluetooth tethering – Allows you to set your phone whether you are sharing the
Internet connection or not.
VPN – Displays the list of Virtual Private Networks (VPNs) that you've previously
configured. Allows you to add different types of VPNs.
Mobile networks – Set options for data roaming, network mode & operators, access
point names (APNs) etc.

65
NOTE: You must set a lock screen PIN or password before you can use
credential storage.
DEVICE
< Sound >
Sound profile – Choose the Sound, either Vibrate only or Silent.
Volumes – Manage the volume of Phone ringtone, Notification sound, Touch feedback
& system, Music, video, games and other media.
Quiet time – Set times to turn off all sounds except alarm and media.
Ringtone with vibration – Vibration feedback for calls and notifications.
SIM1 phone ringtone – Allows you to set your SIM1 incoming call ringtone.
SIM2 phone ringtone – Allows you to set your SIM2 incoming call ringtone.
SIM1 notification sound – Allows you to set your SIM1 notification sound.
SIM2 notification sound – Allows you to set your SIM2 notification sound.
SIM1 incoming call vibration – Allows you to set your SIM1 incoming call vibration.
SIM2 incoming call vibration – Allows you to set your SIM2 incoming call vibration.
Dial pad touch tones – Allows you to set the phone to play tones when using the
dialpad to dial numbers.
Touch sounds – Allows you to set your phone to play a sound when you touch buttons,
icons and other onscreen items that react to your touch.
Screen lock sound – Allows you to set your phone to play a sound when locking and
unlocking the screen.
< Display >
Brightness – Adjust the screen brightness.
Screen timeout – Set the time for screen timeout.
Auto-rotate screen – Set to switch orientation automatically when you rotate the
phone.

66
Settings
Font type – Change the type of display font.
Font size – Change the size of the display font.
< Home screen >
Set the Theme,Screen swipe effect,Wallpaper,Scroll screens circularly,Portrait
view only and Home backup & restore.
< Lock screen >
Select screen lock – Set a screen lock type to secure your phone. Opens a set of
screens that guide you through drawing a screen unlock pattern. Set None,Swipe,
Pattern,PIN or Password.
If you have enabled a Pattern lock type when you turn on your phone or wake up the
screen, you will be asked to draw your unlock pattern to unlock the screen.
Wallpaper – Select the wallpaper for your lock screen from Gallery or Wallpaper
gallery.
Clocks & shortcuts – Customize clocks & shortcuts on the lock screen.
Owner info – Show owner info on the lock screen.
Lock timer – Set the lock time after screen timeout.
Power button instantly locks – Set the screen lock when the power button is
pressed.
< Storage >
PHONE STORAGE – View the internal storage usage.
SD CARD – Check total available SD card space. Touch Unmount SD card for safe
removal. Erase SD card if you want to delete all data from the SD card.
< Battery >
Manage the battery and check the power saving items. You can also check the battery
use.
< Apps >
View and manage your applications.

67
PERSONAL
< Accounts & sync >
Permits applications to synchronize data in the background, whether or not you are
actively working in them. Deselecting this setting can save battery power and lower (but
not eliminate) data usage.
< Location access >
Access to my location – If you select Google's location service, your phone
determines your approximate location using Wi-Fi and mobile networks. When you
select this option, you're asked whether you consent to allowing Google to use your
location when providing these services.
GPS satellites – If you select GPS satellites, your phone determines your location to
street-level accuracy.
Wi-Fi & mobile network location – Let apps use Google's location service to estimate
your location faster. Anonymous location data will be collected and sent to Google.
< Security >
Set up SIM card lock – Set up SIM card lock or change the SIM PIN.
Password typing visible – Show the last character of the hidden password as you
type.
Phone administrators – View or deactivate phone administrators.
Unknown sources – Default setting to install non-market applications.
Trusted credentials – Display trusted CA certificates.
Install from storage – Choose to install encrypted certificates.
Clear credentials – Remove all certificates.

68
Settings
< Language & input >
Use the Language & input settings to select the language for the text on your phone
and to configure the on-screen keyboard, including words you've added to its dictionary.
< Backup & reset >
Change the settings for managing your settings and data.
Backup my data – Set to back up your settings and application data to the Google
server.
Backup account – Set to back up your account.
Automatic restore – Set to restore your settings and application data when the
applications are reinstalled on your device.
Factory data reset – Reset your settings to the factory default values and delete all
your data. If you reset the phone this way, you are prompted to re-enter the same
information as when you first started Android.
SYSTEM
< QuickButton >
Select apps you wish to get quick access to using QuickButton.
< Date & time >
Use Date & time settings to set how dates will be displayed. You can also use these
settings to set your own time and time zone rather than obtaining the current time from
the mobile network.
< Accessibility >
Use the Accessibility settings to configure accessibility plug-ins you have installed on
your phone.
NOTE: Requires additional plug-ins to become selectable.

69
< PC connection >
USB connection type – Set the desired mode: Charge only,Media sync (MTP),
USBtethering, LG software or Camera (PTP).
Ask on connection – Ask in USB connection mode when connecting to a computer.
Help – Help for USB connection.
PC Suite – Checkmark this to use LG PC Suite with your Wi-Fi connection.
Help – Help for LG software.
< Developer options >
Keep in mind that turning on these developer settings may result in irregular device
behavior. The developer options are recommended only for advanced users.
< About phone >
View legal information and check your phone status and software version.

70
"LG PC Suite" PC software is a program that helps you connect your device to a PC via
a USB cable and Wi-Fi. Once connected, you can use the functions of your device from
your PC.
With your "LG PC Suite" PC Software, You Can...
t Manage and play your media contents (music, movie, picture) on your PC.
t Send multimedia contents to your device.
t Synchronizes data (schedules, contacts, bookmarks) in your device and PC.
t Backup the applications in your device.
t Update the softwares in your device.
t Backup and restore the device data.
t Play multimedia contents of your PC from your device.
t Backup and create and edit the memos in your device
NOTE: You can use the Help menu from the application to find out how to
use your "LG PC Suite" PC software.
Installing "LG PC Suite" PC Software
"LG PC Suite" PC software can be downloaded from the webpage of LG.
1Go to www.lg.com and select a country of your choice.
2Go to Support > MOBILE SUPPORT > LG Mobile Phones > Select the Model
or
Go to Support > Mobile > Select the Model.
3Click PC SYNC from MANUALS & DOWNLOAD and click DOWNLOAD to download
"LG PC Suite" PC software.
PC software (LG PC Suite)

71
System Requirements for "LG PC Suite" PC software
t OS: Windows XP (Service pack 3) 32bit, Windows Vista, Windows 7, Windows 8
t CPU: 1 GHz or higher processors
t Memory: 512 MB or higher RAMs
t Graphic card: 1024 x 768 resolution, 32 bit color or higher
t HDD: 500 MB or more free hard disk space (More free hard disk space may be
needed depending on the volume of data stored.)
t Required software: LG integrated drivers, Windows Media Player 10 or later
NOTE: LG Integrated USB Driver
LG integrated USB driver is required to connect an LG device and PC and
installed automatically when you install "LG PC Suite" PC software
application.
Synchronizing your Device to a PC
Data from your device and PC can be synchronized easily with "LG PC Suite"
PC software for your convenience. Contacts, schedules and bookmarks can be
synchronized.
The procedure is as follows:
1Connect your device to PC. (Use a USB cable or Wi-Fi connection.)
2The USB connection type will appear, then select LG software.
3After connection, run the program and select the device section from the category
on the left side of the screen.
4Click Personal information to select.
5Select the checkbox of contents to synchronize and click the Sync button.
NOTE: To synchronize your phone with your PC using the USB cable, you
need to install LG PC Suite onto your PC. Please refer to previous pages to
install LG PC Suite.

72
PC software (LG PC Suite)
Moving contacts from your Old Device to your New Device
1Export your contacts as a CSV file from your old device to your PC using a PC sync
program.
2Install "LG PC Suite" on the PC first. Run the program and connect your Android
mobile phone to the PC using a USB cable.
3On the top menu, select Device > Import to device > Import contacts.
4A popup window to select the file type and a file to import will appear.
5On the popup, click the Select a file and Windows Explorer will appear.
6Select the contacts file to import in Windows Explorer and click the Open.
7Click OK.
8AField mapping popup to link the contacts in your device and new contacts data
will appear.
9If there is a conflict between the data in your PC contacts and device contacts, make
the necessary selections or modifications in LG PC Suite.
10 Click OK.

73
Phone software update
LG Mobile phone software update from the Internet
For more information about using this function, please visit http://update.lgmobile.com
or http://www.lg.com/common/index.jsp select your country and language.
This feature allows you to conveniently update the firmware on your phone to a newer
version from the Internet without needing to visit a service center. This feature will only
be available if and when LG makes a newer firmware version available for your device.
Because the mobile phone firmware update requires the user's full attention for the
duration of the update process, please make sure you check all instructions and notes
that appear at each step before proceeding. Please note that removing the USB data
cable during the upgrade may seriously damage your mobile phone.
NOTE: LG reserves the right to make firmware updates available only for
selected models at its own discretion and does not guarantee the availability
of the newer version of the firmware for all handset models.
LG Mobile Phone software update via Over-the-Air (OTA)
This feature allows you to conveniently update your phone's software to a newer
version via OTA, without connecting using a USB data cable. This feature will only be
available if and when LG makes a newer firmware version available for your device.
You should first check the software version on your mobile phone: Settings >
Aboutphone > Common > Software update > Check now for update.

74
NOTE: Your personal data from internal phone storage—including
information about your Google account and any other accounts, your
system/application data and settings, any downloaded applications and
your DRM licence—might be lost in the process of updating your phone's
software. Therefore, LG recommends that you back up your personal data
before updating your phone's software. LG does not take responsibility for
any loss of personal data.
NOTE: This feature depends on your network service provider, region and
country.
Phone software update

75
About this user guide
About this user guide
t Before using your device, please carefully read this manual. This will ensure that you
use your phone safely and correctly.
t Some of the images and screenshots provided in this guide may appear differently on
your phone.
t Your content may differ from the final product or from software supplied by service
providers or carriers. This content may be subject to change without prior notice. For
the latest version of this manual, please visit the LG website at www.lg.com.
t Your phone's applications and their functions may vary by country, region or hardware
specifications. LG cannot be held liable for any performance issues resulting from the
use of applications developed by providers other than LG.
t LG cannot be held liable for performance or incompatibility issues resulting from
edited registry settings being edited or operating system software being modified. Any
attempt to customize your operating system may cause the device or its applications
to not work as they should.
t Software, audio, wallpaper, images and other media supplied with your device are
licensed for limited use. If you extract and use these materials for commercial or
other purposes is, you may be infringing copyright laws. As a user, you are fully are
entirely responsible for the illegal use of media.
t Additional charges may be applied for data services, such as messaging, uploading
and downloading, auto-syncing or using location services. To avoid additional charges,
select a data plan to is suitable for your needs. Contact your service provider to obtain
additional details.
Trademarks
t LG and the LG logo are registered trademarks of LG Electronics.
t All other trademarks and copyrights are the property of their respective owners.

76
These accessories are available for use with the your phone. (Items described below
may be optional.)
Travel adaptor Battery
Stereo headset Data cable
Quick Start Guide
NOTE:
t Always use genuine LG accessories.
t Failure to do this may void your warranty.
t Accessories may vary in different regions.
Accessories
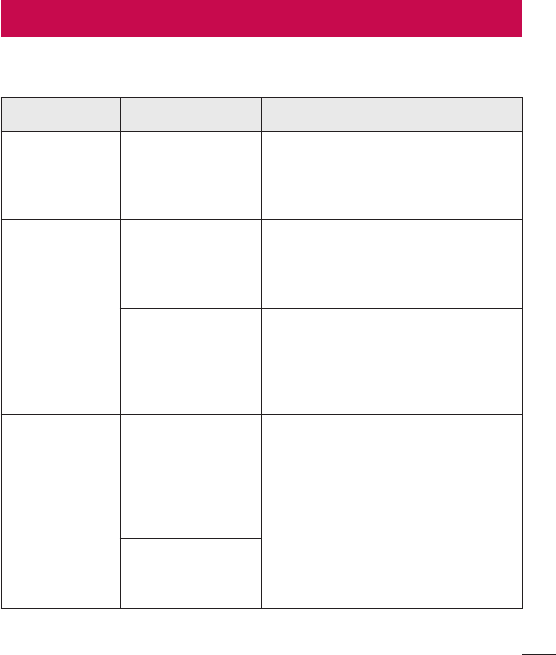
77
Troubleshooting
This chapter lists some problems you might encounter when using your phone. Some
problems require you to call your service provider, but most are easy to fix yourself.
Message Possible causes Possible corrective measures
SIM error
There is no SIM
card in the phone
or it is inserted
incorrectly.
Make sure that the SIM card is
correctly inserted.
No network
connection/
Dropped
network
Signal is weak or
you are outside
the carrier
network.
Move toward a window or into
an open area. Check the network
operator coverage map.
Operator applied
new services.
Check whether the SIM card is more
than 6~12 months old. If so, change
your SIM at your network provider's
nearest branch. Contact your service
provider.
Codes do not
match
To change a
security code,
you will need
to confirm the
new code by
re-entering it.
If you forget the code, contact your
service provider.
The two codes
you have entered
do not match.
78
Message Possible causes Possible corrective measures
No
applications
can be set
Not supported by
service provider
or registration
required.
Contact your service provider.
Calls not
available
Dialling error New network not authorized.
New SIM card
inserted. Check for new restrictions.
Pre-paid charge
limit reached.
Contact service provider or reset
limit with PIN2.
Phone cannot
be switched
on
On/Off key
pressed too
briefly.
Press the On/Off key for at least two
seconds.
Battery is not
charged.
Charge battery. Check the charging
indicator on the display.
Troubleshooting
79
Message Possible causes Possible corrective measures
Charging error
Battery is not
charged. Charge battery.
Outside
temperature is too
hot or cold.
Make sure phone is charging at a
normal temperature.
Contact problem Check the charger and its
connection to the phone.
No voltage Plug the charger into a different
socket.
Charger defective Replace the charger.
Wrong charger Use only original LG accessories.
Number not
allowed
The Fixed dialling
number function
is on.
Check the Settings menu and turn
the function off.
Impossible to
receive / send
SMS & photos
Memory full Delete some messages from your
phone.
Files do not
open
Unsupported file
format Check the supported file formats.
80
Troubleshooting
Message Possible causes Possible corrective measures
The screen
does not turn
on when I
receive a call.
Proximity sensor
problem
If you use a protection tape or case,
make sure it has not covered the
area around the proximity sensor.
Make sure that the area around the
proximity sensor is clean.
No sound Vibration mode
Check the settings status in the
sound menu to make sure you are
not in vibration or silent mode.
Hangs up or
freezes
Intermittent
software problem
Try to perform a software update via
the website.

81
Important Information
This user’s guide contains important information about the use and operation of this
phone. Read all information carefully for optimal performance and to avoid any damage
or misuse of the phone. Any changes or modifications not expressly approved in this
user’s guide could void your warranty for this equipment.
Before you begin
Safety Guidelines
WARNING
To reduce the possibility of electric shock, do not expose your product to high
humidity areas, such as bathroom or swimming pool.
Keep the phone away from heat. Never store your phone in environment that
may expose it to temperatures below 0°C or above 40°C, such as outdoor during
snowstorm, or in your car in hot days. Exposure to cold or heat will result in
malfunction, damage or permanent failure. Be careful when using your phone near
other electronic devices. The RF emissions from mobile phones may affect nearby
electronic equipment that not adequately shielded. You should consult manufacturers
of any personal medical devices, as in the case of pacemakers and hearing aides, to
determine whether they are susceptible to interference from cell phones.
Turn off your phone in medical facilities or at gas stations. Never place your phone in
microwaves, as it will cause the battery to explode.
Important! Before using your phone, please read the SAFETY
INFORMATION OF THE TELECOMMUNICATIONS INDUSTRY ASSOCIATION
(TIA).
For your safety

82
Safety Information
Read these simple guidelines. Breaking the rules may be illegal or dangerous.
More detailed information is provided in this user’s guide.
t Never use an unapproved battery that could cause damages to the phone or the
battery itself, or even explode.
t Never place your phone in a microwave oven, as this will result in an explosion of the
battery.
t Do not dispose of your battery in fire or with hazardous or flammable materials.
t Make sure the battery does not come into contact with sharp-edged items, such as
animal teeth or claws. This could cause a fire.
t Store the battery in a place out of the reach of children.
t Be careful so that children do not swallow any parts of the phone, such as rubber
plugs (earpiece, parts that connect to the phone, etc.). This could cause asphyxiation
or suffocation.
t Disconnect the plug and charger from the outlet when the phone shows that the
battery has been fully charged, because it may cause electric shock or fire hazard.
t When in the car, do not leave your phone, or install a hands-free kit, near the airbag.
If wireless equipment is improperly installed, you can be seriously injured if the airbag
is deployed.
t Do not use mobile phone while driving.
t Do not use the phone in areas where its usage is prohibited. (For example: in
airplanes).
t Do not expose the battery charger or adapter to direct sunlight, or use it in places
with high humidity, such as bathroom.
t Never store your phone in temperatures lower than -20°C or higher than 50°C.

83
t Do not use harsh chemicals (such as alcohol, benzene, solvents, etc.) or detergents to
clean the phone. This could cause fire.
t Do not drop the phone, strike it, or shake it hard. Such actions may harm the phone’s
internal circuit boards.
t Do not use your phone in high explosive areas, as this may generate sparks.
t Do not damage the power cord by bending, twisting, pulling, or heating it. Do not use
the plug if it is loose as it may cause fire or electric shock.
t Do not handle the phone with wet hands while it is charging. This can cause electric
shock or seriously damage your phone.
t Do not disassemble the phone.
t Do not make or answer calls while charging the phone, which can cause a short
circuit, electric shock, or fire.
t Use only batteries and chargers provided by LG. The warranty does not apply to
products provided by other providers.
t Only authorized personnel should service the phone and its accessories. Installation or
service may result in accidents and consequently invalidate the warranty.
t Do not hold or let the antenna come in contact with your body during a call.
t Emergency calls can be made only within a service area. To make an emergency call,
make sure you are within a service area and the phone is on.
t Use your accessories, such as headphones or headsets, with caution, ensuring that
the cables are plugged properly and that they do not touch the antenna unnecessarily.
Information about the RF exposure from FCC
WARNING
Read this information before operating the phone.

84
For your safety
In August 1996, the Federal Communications Commission (FCC) of the United States,
with its action in Report and Order FCC 96-326, adopted an updated safety standard
for human exposure to radio frequency (RF) electromagnetic energy emitted by FCC
regulated transmitters. Those guidelines are consistent with the safety standard
previously set by both international and U.S. standards.
The design of this phone complies with FCC guidelines and these international
standards.
Caution
Use only the supplied antenna. Use of unauthorized antennas, or modifications, could
impair call quality, damage the phone, void your warranty, or result in a violation of FCC
regulations.
Do not use the phone with a damaged antenna.
A damaged antenna in contact with the skin could cause a singe. Contact your local
dealer for an antenna replacement.
Body effects
This device was tested for typical body operation, keeping a distance of 1 cm (0.39
inch) between the user's body and the back of the phone. To comply with RF exposure
requirements of the FCC standards, a minimum distance of 1 cm (0.39 inch) between
the user's body and the back of the phone is required.
Belt-clips, holsters, and similar accessories containing metallic components from others
manufacturers should not be used.
Accessories worn close to the body, without keeping a minimum distance of 1 cm
(0.39 inch) between the user's body and the back of the phone, and that have not been
tested for typical body operation, may not comply with FCC's RF exposure limits and
should be avoided.

85
External antenna mounted on the vehicle (optional, if
available)
It must keep a minimum distance of 20 cm (8 inches) between the user / bystander
and the vehicle mounted external antenna, in order to satisfy FCC's RF exposure
requirements.
For more information about RF exposure, visit the FCC Website at www.fcc.gov
Class B Compliance under article 15 of the FCC
This device and its accessories comply with Article 15 of the FCC rules.
The operation is subject to the following conditions:
(1) This device, and its accessories, will not cause harmful interference and (2) this
device and its accessories must accept any interference received, including interference
that could cause an undesired operation.
Battery Precautions
t Do not disassemble.
t Do not short-circuit.
t Do not expose to high temperatures, over 60 °C (140 °F).
t Do not incinerate.
Battery Disposal
t Please dispose of your battery properly, or bring it to your wireless provider for
recycling.
t Do not dispose of your battery in fire or with hazardous or flammable materials.

86
For your safety
Adapter Precautions (Charger)
t Using the wrong battery charger could damage your phone and void your warranty.
t The adapter or battery charger is only designed for indoor use.
t Do not expose the battery charger or adapter to direct sunlight, or use it in places
with high humidity, such as the bathroom.
Cautions for Battery
t Do not disassemble or open crush, bend or deform, puncture or shred.
t Do not modify or remanufacture, attempt to insert foreign objects into the battery,
immerse or expose to water or other liquids, expose to fire, explosion or other hazard.
t Only use the battery for the system for which it is specified.
t Only use the battery with a charging system that has been qualified with the system
per this standard. Use of an unqualified battery or charger may present a risk of fire,
explosion, leakage, or other hazard.
t Do not short circuit a battery or allow metallic conductive objects to contact battery
terminals.
t Replace the battery only with another battery that has been qualified with the system
per this standard, IEEE-Std-1725-200x. Use of an unqualified battery may present a
risk of fire, explosion, leakage or other hazard.
t Promptly dispose of used batteries in accordance with local regulations.
t Battery usage by children should be supervised.
t Avoid dropping the phone or battery. If the phone or battery is dropped, especially
on a hard surface, and the user suspects damage, take it to a service center for
inspection.
t Improper battery use may result in a fire, explosion or other hazard.

87
t For those host devices that utilize a USB port as a charging source, the host device's
user manual shall include a statement that the phone shall only be connected
to products that bear the USB-IF logo or have completed the USB-IF compliance
program.
Avoid damage to your ear
t Damage to your hear can occur due to constant exposure to excessive high sound.
We, therefore, recommend that you do not turn on or off the phone near your ear. We
also recommend you be reasonable with the music and volume level.
t If you listen to music, please ensure that the volume level is adequate, so that you are
aware of your surroundings. This is particularly important when attempting to cross a
street.

88
Safety instructions
TIA's Safety Information
This includes complete security information on wireless phones from TIA
(Telecommunications Industry Association).
It's required, for CTIA Certification, the inclusion in the user manual of text covering
pacemakers, hearing aids and other medical devices. It's encouraged the use of the
remaining TIA language when relevant.
Exposure to Radio Frequency Signal
Your wireless handheld portable telephone is a lowpower radio transmitter and receiver.
When it is ON, it receives and also sends out radio frequency (RF) signals.
In August, 1996, the Federal Communications Commissions (FCC) adopted RF
exposure guidelines with safety levels for handheld wireless phones. Those guidelines
are consistent with the safety standards previously set by both U.S. and international
standards bodies:
ANSI C95.1 (1992) *
NCRP Report 86 (1986)
ICNIRP (1996)
Those standards were based on comprehensive and periodic evaluations of the relevant
scientific literature. For example, over 120 scientists, engineers, and physicians from
universities, government health agencies, and industry reviewed the available body of
research to develop the ANSI Standard (C95.1).
* American National Standards Institute; National Council on Radiation Protection and
Measurements; International Commission on Non-Ionizing Radiation Protection.
The design of your phone complies with the FCC guidelines (and those standards).

89
Antenna Care
Use only the supplied or an approved replacement antenna. Unauthorized antennas,
modifications, or attachments could damage the phone and may violate FCC
regulations.
Phone Operation
NORMAL POSITION: Hold the phone as you would any other telephone with the
antenna pointed up and over your shoulder.
Suggestions for a more efficient operation
For your phone to operate most efficiently:
t%POPUUPVDIUIFBOUFOOBVOOFDFTTBSJMZXIFOUIFQIPOFJTJOVTF5IFDPOUBDUXJUI
the antenna affects call quality, and may cause the phone to operate at a higher
power level than otherwise would be need.
Driving
Check the laws and regulations related to the use of wireless phones in the areas
where you drive. Always obey these regulations. Also, if using your phone while driving,
make sure to:
t Pay full attention to driving; driving safely is your first responsibility;
t Use hands-free operation, if available;
t Pull off the road and park, before making or answering a call, if driving conditions
demand so.

90
Electronic Devices
Most modern electronic equipment is shielded from RF signals.
However, certain electronic equipment may not be shielded against the RF signals from
your wireless phone.
Pacemaker
The Medical Industry Manufacturers Association recommends a minimum distance of
fifteen (15) centimeters, or six (6) inches, between a handheld wireless phone and a
pacemaker, in order to avoid potential interference between them.
These advices are consistent with independent researches, and with recommendations
based on wireless technology research.
People with pacemakers should:
t ALWAYS keep the phone at least fifteen centimeters (six inches) from their pacemaker,
whenever the phone is turned on;
t Not carry the phone in a shirt pocket;
t Use the ear opposite to the pacemaker, to minimize the potential interference;
t If you have any reason to suspect that interference is taking place, switch off your
phone immediately.
Hearing Aids
Some digital wireless phones may interfere with some hearing aids. In the event of such
interference, we recommend that you contact your service provider.
Safety instructions

91
Other Medical Devices
If you use any other personal medical devices, consult your device manufacturer to
determine if they are adequately shielded from external RF energy. Your doctor can help
you obtain this information.
Health Care Facilities
Turn off your phone in health care facilities, whenever there are signs asking you to
do so. Hospitals or health care facilities may use equipment that could be sensitive to
external RF energy.
Vehicles
RF signals may affect improperly installed or inadequately shielded devices in motor
vehicles.
Check with the manufacturer, or its representative, regarding your vehicle.
You should also consult the manufacturer about any equipment that has been added to
your vehicle.
Facilities with signs
Turn off the phone in any facility where warning signs request you to do so.
Airplanes
FCC regulations prohibit the use of phones while in the air. Turn off your phone before
boarding an airplane.

92
Safety instructions
Blasting Areas
To avoid interfering with blasting operations, turn your phone off when in a 'blasting
area' or in areas with signs that read: 'Turn off two-way radios' . Obey all signs and
instructions.
Potentially Explosive Atmosphere
Turn off the phone when in an area with a potentially explosive atmosphere, and obey
all signs and instructions.
Sparks in such areas could cause an explosion or fire that could result in personal
injury or death.
Areas with a potentially explosive atmosphere are often clearly marked, but not always.
Among the potentially dangerous areas are:
Fueling areas (such as gas stations), areas below deck on boats, facilities where
chemical products are transferred or stored, vehicles using liquefied petroleum gas (as
propane or butane), areas where the air contains chemicals or particles (such as grain,
dust or metal powders), and any other areas where you would normally be advised to
turn off your vehicle engine.
For vehicles equipped with air bags
Air bags inflate with strong force. Do not place objects in the area over the air bag or in
its deployment area, including wireless equipment, either installed or portable.
Serious injuries could occur if wireless equipment is improperly installed into the car
when the air bag inflates.

93
Safety Information
Read and observe the following information for the safe and proper use of your phone,
and to prevent any damage.
Also, keep the user's guide in an accessible place at all times after reading it.
Charger, Adapter and Battery Security
t The charger and adapter are designed only for indoor use.
t Dispose of your battery properly, or bring it to your wireless provider for recycling.
t The battery doesn’t need to be fully discharged before recharging.
t Only use LG approved chargers that are specifically made for your phone model,
since they are designed to maximize the battery life.
t Do not disassemble or short-circuit it.
t Keep the metal contacts on the battery clean.
t Replace the battery when it no longer provides acceptable performance. The battery
can be recharged several hundred times before replacement.
t Charge the battery after long periods without use to maximize its life.
t The battery life will vary depending on usage patterns and environmental conditions.
t Intensive use of backlighting, browser, and packet data connectivity affect battery life
and talk/standby times.
t The role of self-protection interrupts the phone when its operation is in an abnormal
state. In this case, remove the battery from the phone, reinstall it, and turn on the
phone.

94
Safety instructions
Explosion, Shock and Fire Danger
t Do not place the phone in a place exposed to excessive dust, and keep the minimum
required distance between the power cord and heat sources.
t Unplug the power cord before cleaning the phone, and clean the power plug
whenever it is dirty.
t When using the power plug, make sure it is firmly connected. Otherwise, it can
overheat or start a fire.
t Placing the phone in a pocket or bag without covering the receptacle (power plug
pin), metallic articles (such as a coin, clip or pen) may short-circuit the phone. Always
cover the receptacle when not in use.
t Do not short-circuit the battery. Metal items, such as coins, paper clips, or pens, in
your pocket or bag may cause a shortcircuit between the + and - terminals of the
battery (metal strips on the battery). The short-circuit of the terminals may damage
the battery and cause an explosion.
General Notice
t Using a damaged battery, or inserting it into the mouth can cause serious injuries.
t Do not place the phone in proximity to items containing magnetic components, such
as credit cards, calling cards, bank books, or subway tickets. The phone magnetism
may damage the data stored in the magnetic strip.

95
t Talking on the phone for a long period of time may reduce call quality, because of the
heat generated during use.
t When the phone has not been in use for a long time, store it in a safe place, with the
power cord unplugged.
t Using the phone close to a receiving equipment (such as TV or radio) may cause
interference.
t Do not use the phone if the antenna is damaged. If a damaged antenna contacts skin,
it may cause a slight singe. Contact an LG Authorized Service Facility to replace the
damaged antenna.
t Do not immerse your phone in water. If this happens, immediately turn it off and
remove the battery. If your phone does not work, take it to an LG Authorized Service
Facility.
t The power supply contains elements that could be harmful to your health, if
components are handled directly. If this happens, we recommend immediate hand-
washing.
t Do not paint the phone.
t Data stored in your phone might be deleted due to careless use, hardware repair or
software upgrade.
Please backup your important phone numbers (ringtones, text or voice messages,
images, and videos might also get deleted). The manufacturer is not liable for
damages due to loss of data.
t When using the phone in public places, you may set the ringer on vibrate to avoid
disturbing others.
t Do not switch the phone on/off while it is in your ear.

96
Safety instructions
Ambient temperatures
Max: +50°C (discharging), +45°C (charging)
Min: -10°C
Notice: Open Source Software
To obtain the corresponding source code under GPL, LGPL, MPL and other
open source licences, please visit http://opensource.lge.com/
All referred licence terms, disclaimers and notices are available for download
with the source code.
Body-worn Operation
This device was tested for typical body-worn operations with the back of the phone kept 0.39
inches (1cm) from the body. To comply with FCC RF exposure requirements, a minimum
separation distance of 0.39 inches (1cm) must be maintained between the user’s body and the
back of the phone. Third-party belt-clips, holsters and similar accessories containing metallic
components may not be used. Body-worn accessories that cannot maintain 0.39 inch (1cm)
separation distance between the user’s body and the back of the phone, and have not been
tested for typical body-worn operations may not comply with FCC RF exposure limits
and should be avoided.
FCC Part 15.19 statement
This device complies with part 15 of FCC rules. Operation is subject to the
following two conditions: (1) This device may not cause harmful interference,
and (2) this device must accept any interference received,
including interference that may cause undesired operation.
FCC Part 15.21 statement
Changes or Modifications that are not expressly approved by the manufacturer could void the
user's authority to operate the equipment.
FCC Part 15.105 statement
This equipment has been tested and found to comply with the limits for a class B digital device,
pursuant to Part 15 of the FCC Rules . These limits are designed to provide reasonable
protection against harmful interference in a residential installation. This equipment generates
uses and can radiate radio frequency energy and, if not installed and used in accordance with
the instructions, may cause harmful i nterference to radio communications. However, there is
no guarantee that interference will not occur in a p articular installation. If this equipment does
cause harmful interference or television reception, which can be d etermined by turning the
equipment off and on, the user is encouraged to try to correct the interference by one or more of
the following measures:
- Reorient or relocate the receiving antenna.
- Increase the separation between the equipment and receiver.
- Connect the equipment into an outlet on a circuit different from that to which the receiver is
connected.
- Consult the dealer or an experienced radio/TV technician for help.