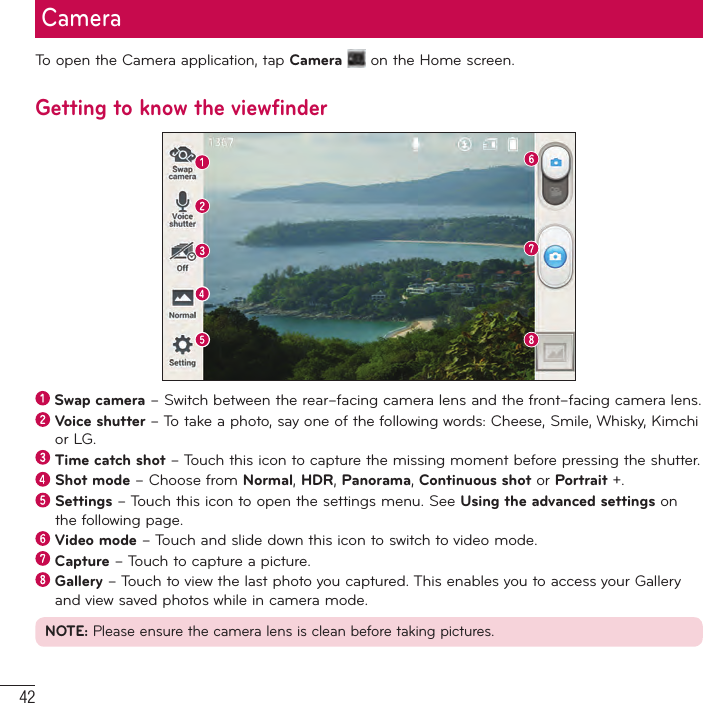
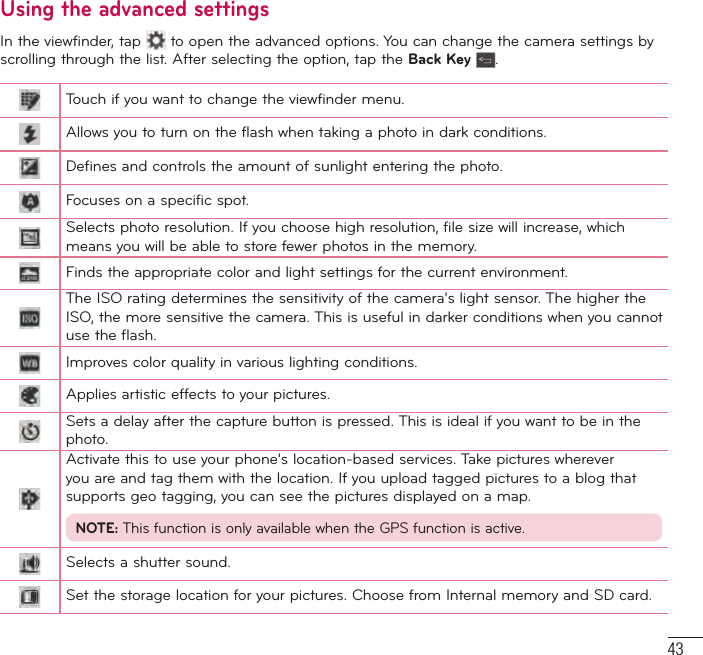
LG Electronics USA D500 LTE Phone Bluetooth, WLAN (2.4GHz & 5GHz) and NFC User Manual LG D500GO TMO Prepaid UG EN JB web 130611 indd

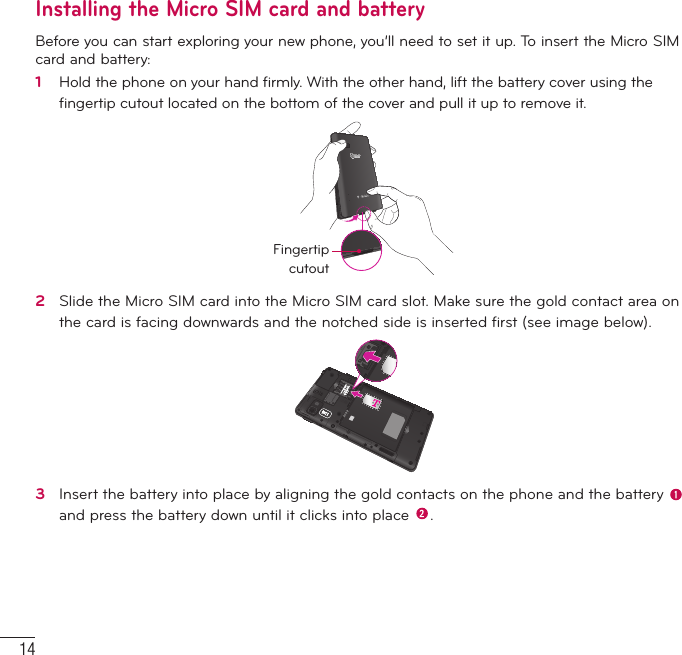
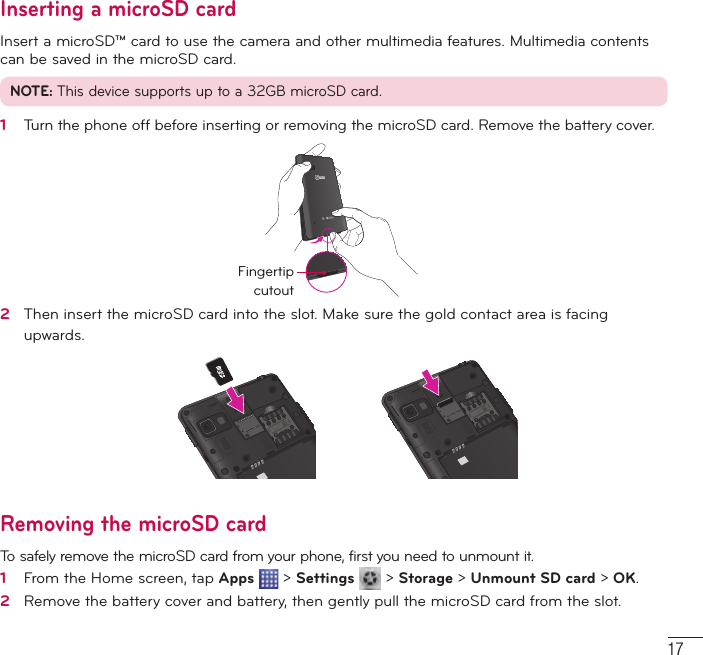
LG Electronics MobileComm USA, Inc. LTE Phone Bluetooth, WLAN (2.4GHz & 5GHz) and NFC LG D500GO TMO Prepaid UG EN JB web 130611 indd
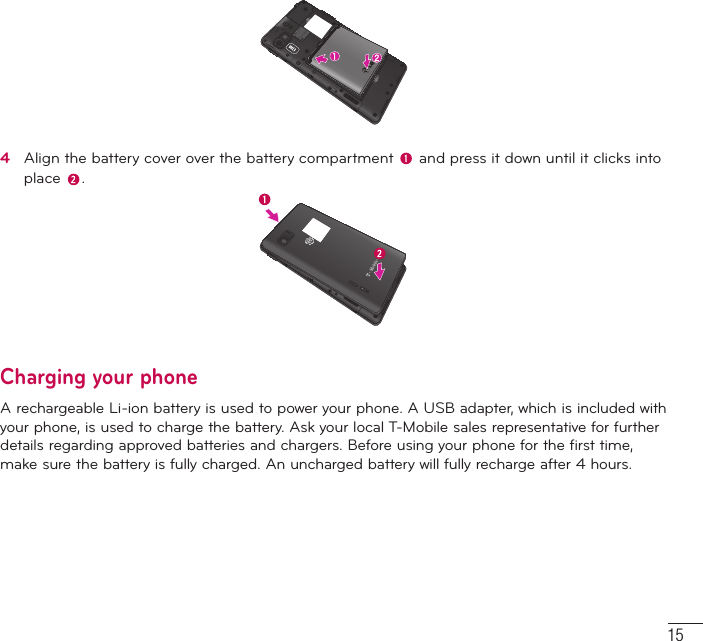
user manual 1 of 2

 User GuideLG-D500MFL00000000 (1.0) ENGLISHwww.lg.com
LG-D500LG-D500 User Guide•  Screen displays and illustrations may differ from those you see on actual phone.•  Some of the contents of this guide may not apply to your phone, depending on the software and your service provider. All information in this document is subject to change without notice.•  This handset is not suitable for people who have a visual impairment due to the touch screen keyboard.•  Copyright ©2013 LG Electronics, Inc. All rights reserved. LG and the LG logo are registered trademarks of LG Group and its related entities. All other trademarks are the property of their respective owners.•  Google™, Google Maps™, Gmail™, YouTube™, Google Talk™ and Google Play™ are trademarks of Google, Inc.English
2SERVICE ACTIVATIONIf you are a new T-Mobile® customer and your service has not been activated, simply call Customer Care at 1-800-937-8997 from your landline phone and a T-Mobile Activations representative will assist you. You will need the following information when activating service:•  Service Agreement and agent code on your Agreement.•  Your name, home address, home phone, and billing address.NOTE: For business and government accounts, please provide the name of your company or government agency, address, and tax ID.•  Your Social Security number, current driver’s license number, and date of birth for credit check purposes.•  Your choice of T-Mobile rate plan and services (see www.t-mobile.com for the latest plan information).•  SIM serial number and IMEI number (located on the box bar code label).By activating service, you acknowledge that you have read, understand, and agree to be bound by each of T-Mobile’s Terms and Conditions and your Service Agreement.About this user guidePlease read this user guide carefully before you use your phone and keep it handy for future reference.Should your phone fails to operate correctly, refer to the FAQ section.•  Some features and service may vary by area, phone, carrier, plan and version of phone software.•  Screen displays and illustrations on this user manual may differ from those you see on the actual phone.•  Designs and specifications of the phone and other accessories are subject to change without any notice.
3Table of contentsSERVICE ACTIVATION .....................................2Important notice ............................................... 6Getting to know your phone .......................... 12Phone overview ........................................................12Installing the Micro SIM card and battery ........14Charging your phone .............................................15Inserting a microSD card ...................................... 17Removing the microSD card................................17Formatting the microSD card ..............................18Locking and unlocking the screen .....................18Your Home screen ........................................... 19Touch Screen tips ...................................................19Home screen ...........................................................20Customizing the Home screen .......................20Returning to recently-used applications ...........21Notifi cations ..............................................................21Swipe down for notifi cations & settings ........21Quick Settings .....................................................22Indicator icons on the Status Bar ...................22On-screen keyboard ..............................................24Entering accented letters..................................24Google account setup .................................... 25Connecting to Networks and Devices ...........26Wi-Fi ..........................................................................26Connecting to Wi-Fi networks.........................26Turning Wi-Fi on and connecting to a Wi-Fi network ..................................................................26Bluetooth ..................................................................26USB Tethering .........................................................28Smartphone Mobile Hotspots ............................29Enabling Wi-Fi Direct to share through SmartShare ..............................................................29SmartShare ............................................................. 30Calls ................................................................. 33Making a call ...........................................................33Calling your contacts .............................................33Answering and rejecting a call ...........................33Adjusting the in-call volume ...............................34Making a second call ............................................34Ending a Call ...........................................................34Ending a Call from the Status Bar.....................35Viewing your call logs ............................................35Call settings .............................................................35Contacts .......................................................... 36Searching for a contact ........................................36Adding a new contact ...........................................36Favorite Contacts....................................................36Creating a group .................................................... 37Messaging ....................................................... 38Conversation view ..................................................38Sending a message ..............................................38Using smilies ...........................................................38Changing your message settings ......................39Email ................................................................ 40Managing an email account............................... 40Working with account folders............................. 40Composing and sending email ...........................41Camera ............................................................ 42Getting to know the viewfi nder ...........................42Using the advanced settings ..............................43
4Table of contentsTaking a quick photo  ............................................44Once you've taken a photo ..................................44Viewing your saved photos ..................................45Video camera .................................................. 46Getting to know the viewfi nder ...........................46Using the advanced settings .............................. 47Recording a quick video ....................................... 47After recording a video .........................................48Watching your saved videos ................................48Adjusting the volume when viewing a video ...48LG Unique Functions ......................................49QuickMemo .............................................................49Using the QuickMemo options ...................... 50Viewing the saved QuickMemo ..................... 50Live Zooming ...........................................................51QSlide .......................................................................52QuickTranslator .......................................................52VuTalk ........................................................................54Registering VuTalk ..............................................54Using VuTalk ........................................................55Multimedia .......................................................57Gallery .......................................................................57Viewing pictures .................................................. 57Zooming in and out ........................................... 57Playing videos ...................................................... 57Viewing photo and video options ................... 57Deleting images and videos ............................58Setting as wallpaper ...........................................58Videos .......................................................................58Playing a video ....................................................58Video Wiz .................................................................59Music .......................................................................... 61Add music fi les to your phone ......................... 61Transfer music using Media sync (MTP) ....... 61Playing a song ...................................................... 61Utilities ............................................................ 64411 & More ...............................................................64Setting your alarm .................................................64Using your calculator.............................................64Adding an event to your calendar .....................65Lookout Security ....................................................65T-Mobile TV .............................................................66T-Mobile Name ID ................................................. 67File manager ........................................................... 67Application Manager ............................................. 67Scout .........................................................................68Visual Voicemail ......................................................68Voice Recorder ........................................................69Recording a sound or voice .............................69Sending the voice recording............................69Task Manager ..........................................................70Polaris Viewer 4 ......................................................70FileShare ...................................................................70Backup ....................................................................... 71About backing up and restoring smartphone data ......................................................................... 71Backup your smart phone data ...................... 72Scheduling automatic backups ...................... 72Restoring smartphone data ............................. 72Google+ .................................................................... 73Voice Search ............................................................ 73Downloads ................................................................ 73The Web ...........................................................74
5Browser ..................................................................... 74Using the Web toolbar ...................................... 74Viewing webpages .............................................. 74Opening a page .................................................. 74Searching the web by voice ............................. 75Bookmarks ............................................................ 75History .................................................................... 75Using QSlide ........................................................ 75Chrome .....................................................................75Viewing webpages .............................................. 75Opening a page .................................................. 76Searching the web by voice ............................. 76Syncing with other devices ............................... 76Settings ............................................................ 77Access the Settings menu .................................. 77WIRELESS & NETWORKS .................................. 77DEVICE .................................................................... 80PERSONAL .............................................................82SYSTEM ....................................................................83Phone software update ..................................87Phone software update ........................................ 87LG Mobile Phone Software update via Over-the-Air (OTA) ........................................................... 87About this user guide .................................... 88DivX Mobile  ............................................................88Accessories ......................................................89Technical data ................................................. 90Troubleshooting ............................................... 91For Your Safety ................................................94
6Important noticeBefore you start using the phone, please read this!Please check to see if any problems you have encountered with your phone are described in this section before taking the phone in for service or calling a service representative.1. Phone MemoryIn order to make more memory available, you will have to manage your applications and delete some data, such as applications or messages.Managing Applications 1   From the Home screen, tap Apps  > Settings   > Apps.2   When the list of applications appears, scroll and tap the application you want to disable.3   Tap Uninstall and then tap OK to confi rm that you want to uninstall the desired application.To stop applications:1   From the Home screen, tap Apps  > Settings   > Apps and select the RUNNING tab.2   Scroll to the desired application and tap Stop to stop it.2.  Optimizing Battery LifeYou can extend your battery’s life between charges by turning off features that you don’t need to run constantly in the background. You can also monitor how applications and system resources consume battery power. To extend the life of your battery•  Turn off radio communications that you aren’t using, such as Wi-Fi, Bluetooth, or GPS. •  Lower screen brightness and set a shorter screen timeout.•  Turn off automatic syncing for Gmail™, Calendar, Contacts, and other applications.•  Some applications you have downloaded may cause your battery power to be reduced.•  While using downloaded applications, check the battery charged level.To view the battery charge level1   From the Home screen, tap Apps  > Settings   > About phone > Battery.
72   The battery status (charging or discharging) and level are displayed on the top menu of the screen.To monitor and control what uses the battery1   From the Home screen, tap Apps  > Settings   > About phone > Battery > Battery use.2   The bottom of the screen displays battery usage time and also lists applications or services using battery power from greatest amount to least.3. Installing an Open Source Operating System Installing an open source operating system on your phone and not using the operating system provided by the manufacturer can cause your phone to malfunction.Warning! •  If you install and use an OS other than the one provided by the manufacturer, your phone is no longer covered by the warranty. •  To protect your phone and personal data, download applications only from trusted sources, such as Play Store. If some applications are not properly installed on your phone, your phone may not work properly- or serious errors may occur. You will need to uninstall those applications and all of its data and settings from the phone.4.  Using an unlock patternSet a screen lock to secure your phone from unauthorized use. To set the screen lock, follow the process below.From the Home screen, tap Apps  > Lock screen > Select screen lock and select from Swipe, Face Unlock, Pattern, PIN or Password.NOTE: In case that you have trouble with Face Unlock, you can unlock the screen with a pattern and/or PIN as a backup.
8Important noticeWarning! Take precautions when using an Unlock Pattern, PIN, or Password. It is very important that you remember the screen unlock information you set. You are allowed 5 attempts to enter your screen unlock information. If you used up all 5 opportunities, you will have to wait 30 seconds to attempt unlocking the phone again.When you can’t recall your Unlock Pattern, PIN, or Password: If you logged into a Google account on the phone and failed to use the correct pattern 5 times, tap Forgot pattern? You will be required to sign in with your Google account and prompted to create a new unlock pattern.If you have set a backup PIN, you can unlock the screen by entering the backup PIN.If you haven’t created a Google account on the phone or you forgot your PIN or Password, you need to perform a hard reset. 5.  Using Hard Reset (Factory Reset)  If your phone needs to be restored to its original condition, use a Hard Reset to initialize your phone.Warning! If you perform a Hard Reset, all user applications and user data will be deleted. Please remember to back up any important data before performing a Hard Reset.1   Turn the phone off. 2   Press and hold the following keys at the same time for 8 seconds: Volume Down Key   + Home Key   + Power/Lock Key   .3   Your device will perform a factory reset and reboot.6. Using Safe Mode To recover your phone when malfunctioning.1   Turn off your phone and reboot. When you see the T-Mobile animation press and hold the Volume Down Key  . Your main screen will then be displayed with the words “Safe mode” in
9the lower left corner.2   From the Home screen, tap the Menu Key   and tap System settings > Apps.3   Tap one of the available tabs at the top of the screen and select the application you wish to uninstall.4   Tap Uninstall and OK to confi rm.5   After uninstalling the application, turn off and reboot your phone.7.  Using a microSD CardPictures, Music and Video files, can be saved to external memory. Before saving these files to external memory, you need to insert a microSD card. If you have not inserted a microSD card, your items will be saved to internal memory. Warning! Do not remove the microSD card without unmounting it first. Otherwise, it may damage the microSD card as well as your phone, and the data stored on the microSD card may be corrupted. To unmount the microSD card, from the Home screen, tap the Menu Key   and tap System settings > Storage > Unmount SD card > OK.8.  Connecting Your Phone to a Computer via USB1   Use the USB cable that was provided with your phone to connect the phone to a USB port on your computer. You’ll receive a notifi cation that the USB is connected and can see USB connection type pop-up.2   Tap Media sync (MTP) to confi rm that you want to transfer fi les between your phone’s microSD card and the computer.When the phone is connected as USB storage, you receive a notification. Your phone’s microSD card is installed as a drive on your computer. You can now copy files to and from the microSD card.
10Important notice9.  Opening and Switching ApplicationsMulti-tasking is easy with Android because you can keep more than one application running at the same time. There’s no need to quit an application before opening another. Use and switch between several open applications. Android manages each application, stopping and starting them as needed to ensure that idle applications don’t consume resources unnecessarily.TIP! To return to a recent application, press and hold the Home Key . The screen then displays a list of applications you have recently used.10.  Unlock Screen When Using Data ConnectionYour screen will go dark if untouched for a period of time when using a data connection. To turn on your LCD screen, press the Power/Lock Key  .11.  Hold the Phone Straight UpPlease hold the mobile phone straight up as a regular phone.While making/receiving calls or sending/receiving data, try to avoid holding the lower part of the phone where the antenna is located. It may affect call quality.12.  When the Screen FreezesIf the phone does not respond to user input or the screen freezes:Remove the battery, reinsert it, then turn the phone on.ORPress and hold the Power/Lock Key  for 10 seconds to turn it off. If it still does not work, please contact the service center.
1113.  Do Not Connect Your Phone When You Power On/Off Your PC Make sure to disconnect your phone from the PC when powering your PC on or off as it might result in PC errors.
12Phone overviewEarpieceProximity SensorFront-Facing Camera LensUse to take a picture of yourself or to video chat on supported applications.Home Key •  Returns to the Home screen from any screen.•  Press and hold to view a list of the most recently used apps.Back Key •  Returns to the previous screen.•  Closes pop-up menus and dialog boxes.Power/Lock Key•  Press and hold to power on and off, restart, or enable Airplane mode, or change the ringer type.•  Turns your screen on and off and locks it.Menu Key •  Displays available options for the current screen or app.Touch screenNOTE: Proximity sensor When receiving and making calls, the proximity sensor automatically turns the backlight off and locks the touch screen by sensing when the phone is near your ear. This extends battery life and prevents you from unintentionally activating the touch screen during calls.Warning! Placing a heavy object on the phone or sitting on it can damage the LCD and touch screen functions. Do not cover the LCD proximity sensor with protective film. This could cause the sensor to malfunction.Getting to know your phone
13TIP!•  Tap the Menu Key  whenever you open an application to check what options are available.•  If your phone has errors when you use it or you cannot turn it on, remove the battery, install it again and turn it on after 5 seconds. Volume Keys•  On the Home screen: Controls ringer volume•  During a call: Controls your earpiece volume•  When playing a track: Controls volume continuouslyTIP! QuickMemoPress and hold the Volume Up and Volume Down Keys for one second to use QuickMemo.Power/Lock KeyEarphone JackFlashCharger/Accessory PortMicrophoneBack Camera LensSpeakerMicrophone
14Installing the Micro SIM card and batteryBefore you can start exploring your new phone, you’ll need to set it up. To insert the Micro SIM card and battery:1   Hold the phone on your hand fi rmly. With the other hand, lift the battery cover using the fi ngertip cutout located on the bottom of the cover and pull it up to remove it.Fingertip cutout2   Slide the Micro SIM card into the Micro SIM card slot. Make sure the gold contact area on the card is facing downwards and the notched side is inserted fi rst (see image below). 3   Insert the battery into place by aligning the gold contacts on the phone and the battery   and press the battery down until it clicks into place  .Getting to know your phone
154   Align the battery cover over the battery compartment   and press it down until it clicks into place  .Charging your phoneA rechargeable Li-ion battery is used to power your phone. A USB adapter, which is included with your phone, is used to charge the battery. Ask your local T-Mobile sales representative for further details regarding approved batteries and chargers. Before using your phone for the first time, make sure the battery is fully charged. An uncharged battery will fully recharge after 4 hours.
16USB AdapterUSB CableNOTE: Make sure the battery is installed before connecting the USB adapter. If the battery is not installed and the USB adapter is connected, the phone will not operate properly due to prolonged power cycling. Also, removing the battery with the USB adapter connected may damage the device. Please unplug USB adapter before removing battery.Warning! If the touch screen does not function while the phone’s in the process of charging, this may be due to an unstable power supply. As a result, disconnect the USB cable from the device or unplug the USB adapter from the power outlet.1   Connect the USB adapter and USB cable.2   Plug the USB cable (as shown below) into the phone’s Charger/Accessory Port.NOTE: The battery must be fully charged initially to improve battery lifetime.Getting to know your phone
17Inserting a microSD cardInsert a microSD™ card to use the camera and other multimedia features. Multimedia contents can be saved in the microSD card. NOTE: This device supports up to a 32GB microSD card.1   Turn the phone off before inserting or removing the microSD card. Remove the battery cover.Fingertip cutout2   Then insert the microSD card into the slot. Make sure the gold contact area is facing upwards.Removing the microSD cardTo safely remove the microSD card from your phone, first you need to unmount it.1   From the Home screen, tap Apps  > Settings   > Storage > Unmount SD card > OK.2   Remove the battery cover and battery, then gently pull the microSD card from the slot.
18Warning! Do not remove the microSD card without unmounting it first. Otherwise, it may damage the microSD card as well as your phone, and the data stored on the microSD card may be corrupted.Formatting the microSD cardWarning! All files stored on your microSD card are deleted when you format the card.1   From the Home screen, tap Apps   > Settings   > Storage.2   Tap Erase SD card (twice).3   If you set an unlock pattern, enter it and tap Erase everything. The card will then be formatted and ready to use.NOTE: If there is content on your microSD card, the folder structure may be different after formatting since all the files will have been deleted.Locking and unlocking the screenIf you do not use the phone for a while, the screen will be automatically turned off and locked. This helps to prevent accidental touches and saves battery power.When you are not using the your phone, press the Power/Lock Key  to lock your phone. If there are any programs running when you lock your screen, they may be still running in Lock mode. It is recommended that you exit all programs before entering Lock mode to avoid unnecessary charges (e.g. phone calls, web access and data communications).To wake up your phone, press the Power/Lock Key . The Lock screen will appear. Touch and slide the Lock screen in any direction to unlock your Home screen. The last screen you viewed will open.Getting to know your phone
19Touch Screen tipsHere are some tips on how to navigate on your phone.Tap or touch – A single finger tap selects items, links, shortcuts and letters on the on-screen keyboard.Touch and hold – Touch and hold an item on the screen by touching it and not lifting your finger until an action occurs. For example, to open a contact's available options, touch and hold the contact in the Contacts list until the context menu opens.Drag – Touch and hold an item for a moment and then, without lifting your finger, move your finger on the screen until you reach the target position. You can drag items on the Home screen to reposition them.Swipe or slide – To swipe or slide, quickly move your finger across the surface of the screen, without pausing when you first touch it (so you don’t drag an item instead). For example, you can slide the screen up or down to scroll through a list, or browse through the different Home screens by swiping from left to right (and vice versa).Double-tap – Double-tap to zoom on a webpage or a map. For example, quickly double-tap a section of a webpage to adjust that section to fit the width of the screen. You can also double-tap to zoom in and out after taking a picture (using the Camera), and when using Maps.Pinch-to-Zoom – Use your index finger and thumb in a pinching or spreading motion to zoom in or out when using the browser or Maps, or when browsing pictures.Rotate the screen – From many applications and menus, the orientation of the screen adjusts to the device's physical orientation.NOTE:•  To select an item, touch the center of the icon.•  Do not press too hard; the touch screen is sensitive enough to pick up a light, yet firm touch.•  Use the tip of your finger to touch the option you want. Be careful not to touch any other keys.Your Home screen
20Home screenSimply swipe your finger to the left or right to view the panels. You can customize each panel with apps, downloads, widgets and wallpapers.NOTE: Some screen images may be different depending on your phone provider.On your Home screen, you can view menu icons at the bottom of the screen. Menu icons provide easy, one-touch access to the functions you use the most.  Touch the Phone icon to bring up the touch screen dialpad to make a call.  Touch the Contacts icon to open your contacts.   Touch the Messaging icon to access the messaging menu and create a new message.  Touch the Apps icon to display all of your installed applications. To open any application, simply touch the icon in the applications list.Customizing the Home screenYou can customize your Home screen by adding apps, downloads, widgets or wallpapers. For more convenience using your phone, add your favorite apps and widgets to the Home screen.To add items on your Home screen:1   Touch and hold the empty part of the Home screen.2   Tap the Apps, Downloads, Widgets or Wallpapers tab.3   Drag the desired item to the desired location and lift your fi nger.To remove an item from the Home screen:Touch and hold the icon you want to remove, drag it to  , and lift your finger.TIP! To add an application icon to the Home screen from the Apps screen, touch and hold the application you want to add and drag it to the desired location.TIP! Using foldersYou can add several app icons in a folder. Drop one app icon over another one on a Home screen, and a folder will be created.Your Home screen
21Returning to recently-used applications1   Touch and hold the Home Key . The screen displays a pop-up containing the icons of applications you used recently.2   Touch an icon to open the application. Or touch the Back Key  to return to your previous screen.NotificationsNotifications alert you to the arrival of new messages, calendar events, and alarms, as well as to ongoing events, such as video downloads.From the Notifications Panel, you can view your phone’s current status and pending notifications.When a notification arrives, its icon appears at the top of the screen. Icons for pending notifications appear on the left, and system icons showing things like Wi-Fi or bat tery strength on the right.NOTE: The available options may vary depending on the region or service provider.Pending notificationsBluetooth, Wi-Fi, & battery statusSwipe down for notifications & settingsSwipe the Status Bar down to open the Notifications Panel. To close the Notifications Panel, swipe the bar that is at the bottom of the screen upwards.NOTE: Touch and hold an icon from the Quick Settings to view the function's settings menu.
22Quick SettingsUse Quick Settings to easily toggle function settings like Wi-Fi, manage display brightness and more. The Quick Settings are located at the top of the Notifications Panel.To rearrange Quick Setting items on the Notification Panel Open the Notifications Panel and touch  . You can then view and rearrange the desired items on the Quick Settings menu. To set more items to be displayed on the Notifications panel, touch  .Indicator icons on the Status BarIndicator icons appear on the Status Bar at the top of the screen to report missed calls, new messages, calendar events, device status and more. The icons displayed at the top of the screen provide information about the status of the device. The icons listed in the table below are some of the most common ones.Icon Description Icon DescriptionNo Micro SIM card Vibrate modeNo signal Battery fully chargedYour Home screen
23Airplane mode Battery is chargingConnected to a Wi-Fi network Downloading dataWired headset Uploading dataCall in progress GPS is acquiringCall hold Receiving location data from GPSMissed call Data is syncingBluetooth is on New GmailSystem warning New Google Talk messageAlarm is set New messageNew voicemail Song is playingRinger is silenced Phone is connected to PC via USB cable or USB tethering is activePortable Wi-Fi hotspot is active Wi-Fi Direct activatedSmartShare music playing SmartShare onNOTE: The icons location in the Status Bar may differ according to the function or service.
24On-screen keyboardYou can enter text using the on-screen keyboard. The on-screen keyboard appears automatically on the screen when you need to enter text. To manually display the keyboard, simply touch a text field where you want to enter text.Using the keypad & entering text Tap once to capitalize the next letter you type. Double-tap for all caps. Tap to switch to the numbers and symbols keyboard. Tap to use the voice input function. You can also touch and hold this icon to select the handwriting and settings menu. Tap to enter a space. Tap to create a new line in the message field. Tap to delete the previous character.Entering accented lettersThe on-screen keyboard allows you to enter special characters (e.g. "á").For example, touch and hold the desired key (for example, the "a" key). After the desired character appears, slide your your finger over it and lift it off to enter it.Your Home screen
25When you first turn on your phone, you have the opportunity to activate the network, to sign into your Google Account and select how you want to use certain Google services. To set up your Google account: •  Sign into a Google Account from the prompted set-up screen. OR •  From the Home screen, tap Apps  > Apps tab > Settings  > Accounts & sync > ADD ACCOUNT > Google.If you have a Google account, touch Existing, enter your email address and password, then touch . Otherwise, touch New and enter the necessary information to create a new Google Account.Once you have set up your Google account on your phone, your phone automatically synchronizes with your Google account on the Web.Your contacts, Gmail messages, Calendar events and other information from these applications and services on the Web are synchronized with your phone. (This will depend on your synchronization settings.)After signing in, you can use Gmail™ and take advantage of Google services on your phone.Google account setup
26Connecting to Networks and DevicesWi-FiWith Wi-Fi, you can use high-speed Internet access within the coverage of the wireless access point (AP). Enjoy wireless Internet using Wi-Fi, without extra charges. Connecting to Wi-Fi networksTo use Wi-Fi on your phone, you need to access a wireless access point or ‘hotspot’. Some access points are open and you can simply connect to them. Others are hidden or use security features; you must configure your phone to be able to connect to them. Turn off Wi-Fi when you're not using it to extend the life of your battery. NOTE: If you are out of the Wi-Fi zone or have set Wi-Fi to OFF, additional charges may be applied by your mobile operator for mobile data use. Turning Wi-Fi on and connecting to a Wi-Fi network1   From the Home screen, tap Apps   > Apps tab > Settings  > Wi-Fi from the WIRELESS & NETWORKS.2   Tap   to turn it on and start scanning for available Wi-Fi networks.3   Tap SEARCH to see a list of active and in-range Wi-Fi networks.•  Secured networks are indicated by a lock icon.4   Touch a network to connect to it.•  If the network is secured, you are prompted to enter a password or other credentials. (Ask your network administrator for details)5   The Status Bar displays icons that indicate Wi-Fi status.BluetoothYou can use Bluetooth to send data by running a corresponding application, but not from the Bluetooth menu as on most other mobile phones.
27NOTE: •  LG is not responsible for the loss, interception or misuse of data sent or received via the Bluetooth wireless feature.•  Always ensure that you share and receive data with devices that are trusted and properly secured. If there are obstacles between the devices, the operating distance may be reduced.•  Some devices, especially those that are not tested or approved by Bluetooth SIG, may be incompatible with your device.Turning on Bluetooth and pairing up your phone with a Bluetooth deviceYou must pair your device with another device before you connect to it.1   From the Home screen, tap Apps  > Apps tab > Settings  > Bluetooth from the WIRELESS & NETWORKS.2   Tap   to turn Bluetooth on. You will see the option to make your phone visible and option to search devices. Then tap Search for devices to view the devices in range.3   Choose the device you want to pair with from the list.Once the paring is successful, your device will connect to the device.NOTE: Some devices, especially headsets or hands-free car kits, may have a fixed Bluetooth PIN, such as 0000. If the other device has a PIN, you will be asked to enter it.Send data using the Bluetooth wireless feature1   Open the item and tap  .ORTouch and hold the item and select Share.OROpen the item and tap the Menu Key   > Share.2   Tap Bluetooth to share via Bluetooth.NOTE: The method for selecting an option may vary by data type.
28Connecting to Networks and Devices3   Search for and pair with a Bluetooth-enabled device.Receive data using the Bluetooth wireless feature1   From the Home screen, tap Apps  > Apps tab > Settings  > Bluetooth.2   Tap   to turn Bluetooth on and mark the checkbox at the top of the screen to visible on other devices.NOTE: To select the length of time that your device will be visible, tap the Menu Key   > Visibility timeout.3   Pair the devices and tap Pair when you receive a Bluetooth Authorization Request to accept the fi le(s).USB TetheringYou can use your phone to provide a data connection to a computer by activating data tethering and connecting the phone and computer with a USB cable.To tether your phone with your computer using the USB1   Connect your phone to your computer with a USB cable. 2   Tap Apps  > Settings   > Tethering & Networks > USB tethering. Tap   to turn it on.NOTE:•  To use your phone’s tethering capability, you must have the Smartphone Mobile Hotspot service added to your rate plan. Performance may vary depending on the number of devices connected and other factors.•  You cannot access your phone’s microSD card on your computer when using USB tethering.
29Smartphone Mobile HotspotsYou can also use your phone to provide a mobile broadband connection for up to 8 other devices. Create a hotspot and share your connection.To create a portable hotspot, tap Apps  > Settings   > Tethering & Networks > Mobile HotSpot. A checkmark indicates that the function is active. Then tap Configure Mobile HotSpot and set a password upon first use.NOTE: To use your phone’s Hotspot capability, you must have the Smartphone Mobile Hotspot service added to your rate plan. In addition, your Smartphone Mobile Hotspot service cannot be used at the same time as Wi-Fi. Please close your WiFi connection prior to launching this service. Performance may vary depending on the number of devices connected and other factors. If you do not use a password, other unauthorized devices be able to use your Mobile Hotspot connection.Enabling Wi-Fi Direct to share through SmartShareWi-Fi Direct automatically scans nearby Wi-Fi Direct devices and the searched devices are listed as they are found. This allows you to select a specific device to share multimedia data with through SmartShare.NOTE: Wi-Fi Direct cannot be enabled while using other Wi-Fi functions.1   From the Home screen, tap Apps  > Apps tab > Settings   > Wi-Fi from the WIRELESS & NETWORKS.2   Tap   to turn it on and touch the Menu Key   > Wi-Fi Direct.3   Select a device to connect with from the scanned device list.CREATE GROUP – Touch to activate group owner mode, which enables the legacy Wi-Fi devices to connect by scanning your phone.
30NOTE: When your phone becomes a group owner it will consume more battery power than when it is a client. The Wi-Fi Direct connection does not provide Internet service. As a result, additional costs may be incurred when connecting and using online services. Check data charges with your network provider.SmartShareSmartShare uses DLNA (Digital Living Network Alliance) technology to share digital content over a wireless network. Both devices must be DLNA certified to support this feature.To turn SmartShare on and allow content sharing1   From the Home screen, tap Apps   > Apps tab > SmartShare  .2   Touch the Menu Key  > Settings.3   Touch Contents share to allow your device to be detected by other devices.•  Touch Receive files if you would like to allow other devices to upload media files to your phone.•  Touch Sharing requests and select the sharing requests option.NOTE: Make sure that the microSD card is correctly mounted and the Receive files option in the Settings menu is checked.4   Touch Shared contents and checkmark the types of content you would like to share. Choose from Photos, Videos, and Music.5   SmartShare is now activated and ready to share content.To control your renderer devicesLet your renderer device (e.g., TV) play multimedia content from your remote content library (e.g., PC).NOTE: Make sure that the DLNA function of your devices is properly configured (e.g., for TV and PC).1   From the Home screen, tap Apps   > Apps tab > SmartShare  .2   Touch the Player button   and select the device from the renderer device list.3   Touch the Library button   and select the device for the remote content library.Connecting to Networks and Devices
314   You can browse the content library.5   Touch and hold a content thumbnail and fl ick it to the top area with your fi nger or touch the Menu Key  > Play.To share content from your phone to your renderer device (e.g. TV) NOTE: Make sure that your renderer device is properly configured.1   While watching your pictures or videos using the Gallery application, touch   /   /   at the top of the screen. : Need to be connected to a network  : Select the device in the network :  Currently, the content is being shared through SmartShare.NOTE: Follow the same steps to use the Music, Videos and Polaris Office 4 apps to share content.2   Select the device from renderer device list to play the fi les.NOTICE: Make sure that your device is connected to your home network using Wi-Fi connection to use this application.Some DLNA enabled devices (e.g. TV) support only the DMP feature of DLNA and will not appear in the renderer device list.Your device may not be able to play some content.To download contents from the remote content library1   From the Home screen, tap Apps  > Apps tab > SmartShare  .2   Touch the Library button   and select the device for the remote content library.3   You can now browse the content library.4   Touch and hold a content thumbnail and then touch Download.NOTICE: A few types of content are not supported.To upload content from the remote content library1   From the Home screen, tap Apps  > Apps tab > SmartShare  .
322   Touch the Library button   and select My phone.3   You can browse the local content library.4   Touch and hold a content thumbnail and then touch Upload.5   Select the device for the remote content library to be uploaded.NOTICE: Some DLNA enabled devices do not support the DMS upload functionality and will not upload files. A few types of content are not supported.Connecting to Networks and Devices
33CallsMaking a call1   From the Home screen, tap Phone   to open the keypad.2   Enter the number on the keypad. To delete a digit, tap Clear .3   Tap Call  to make a call.4   To end a call, tap End .TIP! To enter “+” to make international calls, touch and hold  .Calling your contacts1   From the Home screen, tap Contacts  to open your contacts.2   Scroll through the contact list or tap the Search contacts box and enter the fi rst letter(s) of the contact you want to call. You can also tap a letter along the right side of the screen to access names starting with the chosen letter.3   In the list that is displayed, tap the contact you want to call.4   In the Contact Info screen, tap the phone number you wish to call.Answering and rejecting a callLocked screenTo answer an incoming call when the screen is locked, swipe Answer  in any direction. Swipe Decline  in any direction to decline an incoming call.Unlocked screenTo answer an incoming call when the screen is unlocked, tap Answer . To decline the call, tap Decline  .
34TIP! Decline with messageYou can send a message quickly using this function. This is useful if you need to reject a call with message during a meeting.Adjusting the in-call volumeTo adjust the in-call volume during a call, use the Volume Keys on the left side of the phone.Making a second call1   During your initial call, tap the Menu Key  and select Add call.2   Dial the number or search your contacts.3   Tap Call  to connect the call.4   Both calls will be displayed on the call screen. Your initial call will be put on hold.5   Tap the call entry on the screen to toggle between active calls or tap Merge calls  to merge the calls.6   To end active calls, tap End . If there is no active call, it will end the call on Hold.Ending a CallTap End  to end a call.NOTE: To redial recent numbers, touch Redial  at the end of the call or find the number within the Call logs and tap Call   to the right of the entry.Calls
35If you exit the current call screen and return to the Home screen, you will be notified that you are still on an active call by the green phone icon within the Status Bar.Active Call NotificationEnding a Call from the Status Bar1   Touch and drag the Status Bar down to open the Notifi cations Panel.2   Tap End call  to end the currently active call.Viewing your call logsFrom the Home screen, tap Phone , then tap the Call logs  tab.View a complete list of all dialed, received, and missed voice calls.TIP! Tap any single call log entry to view the date, time, and duration of the call.TIP! Tap the Menu Key , then tap Clear to delete entries individually or Clear all to delete all.Call settingsYou can configure phone call settings, such as call forwarding, and other special features offered by T-Mobile.1   From the Home screen, tap Apps  > Settings  .2   Tap Call and set any desired options.
36You can add contacts on your phone and synchronize them with the contacts in your Google Account or other accounts that support syncing contacts.Searching for a contact1   From the Home screen, tap Contacts  to open your contacts.2   Tap the Search contacts box and enter the contact name using the keypad. You can also tap a letter along the right side of the screen to access names starting with the chosen letter.Adding a new contact1   From the Home screen, tap Phone  and enter the new contact’s number.2   Tap the Menu Key  > Add to Contacts > Create new contact. Select the desired account (if applicable).3   If you want to add a picture to the new contact, tap  . Choose from Take photo to take a picture using the camera or Select from Gallery. Then browse for an image and select it.4   Tap   to enter more specifi c name information.5   Enter the details about your contact.6   Tap Save to save the contact entry.Favorite ContactsYou can classify frequently called contacts as favorites.To add a contact to your favorites1   From the Home screen, tap Contacts  to open your contacts.2   Tap a contact to view its details.3   Tap the star to the right of the contact’s name. The star turns gold and the contact is added to your favorites.Contacts
37To remove a contact from your favorites list1   From the Home screen, tap Contacts  to open your contacts.2   Tap the Favorites tab to view your favorite contacts.3   Tap a contact to view its details.4   Tap the gold star to the right of the contact’s name. The star turns grey and the contact is removed from your favorites.Creating a group1   From the Home screen, tap Contacts  to open your contacts.2   Touch the Groups tab, then touch the Menu Key  and select New group.3   Enter a name for the new group. You can also set a ringtone for the group.4   Touch Save to save the group.NOTE: If you delete a group, the contacts assigned to that group will not be lost. They will remain in your contacts.
38Your phone combines text and multimedia messages into one intuitive, easy-to-use menu.Conversation viewMessages exchanged with another party are displayed in chronological order so that you can conveniently see an overview of your conversations.Sending a message1   From the Home screen, tap Messaging , then tap Compose  to create a new message.2   Enter a contact name or phone number in the To  fi eld. As you enter the contact name, matching contacts appear. You can tap a suggested recipient. You can also add multiple contacts.3   Tap the text fi eld to start entering your message.4   Tap the Menu Key  to open the options menu. Choose from any of the available options.5   Tap Send to send your message.Warning! The 160-character limit may vary from country to country depending on how the text message is coded and the language used in the message.Warning! If an image, video, or audio file is added to a text message, it will be automatically converted into a multimedia message and your service plan will be decremented accordingly.NOTE: When you get a text message during a call, there will be an audible notification.Using smiliesLiven up your messages using smilies.When writing a new message, tap the Menu Key , then tap Insert smiley.Messaging
39Changing your message settingsYour phone’s message settings are predefined, so you can send messages immediately. You can change the settings based on your preferences.•  From the Home screen, tap Messaging   > Menu Key  > Settings.
40EmailYou can use the Email application to read emails from services like Gmail. The Email application supports the following account types: POP3, IMAP and Exchange.Your service provider or system administrator can provide you with the account settings you need.Managing an email accountThe first time you open the Email application, a set-up wizard opens to help you to set up an email account.After the initial setup, Email displays the contents of your inbox. If you have added more than one account, you can switch among accounts.To add another email account:•  Open the Email application and tap the Menu Key  > Settings >  .To change an email account’s settings:•  Open the Email application and tap the Menu Key  > Settings > General settings.To delete an email account:•  Open the Email application and tap the Menu Key  > Settings > touch   > touch an account you want to delete > Remove > select Yes .Working with account foldersOpen the Email application and tap the Menu Key  and select Folders. Each account has an Inbox, Outbox, Sent and Drafts folder. Depending on the features supported by your account’s service provider, you may have additional folders.
41Composing and sending emailTo compose and send a message1   While in the Email application, tap Write  .2   Enter an address for the message’s intended recipient. As you enter text, matching addresses will be proposed from your Contacts. Separate multiple addresses using semicolons.3   Tap Menu Key  to add a Cc/Bcc and tap Attach   to attach fi les, if required.4   Enter the subject and your message5   Tap the Send  to send the message.If you aren’t connected to a network, for example, if you’re working in airplane mode, the messages that you send will be stored in your Outbox folder until you connect to a network again. If it contains any pending messages, the Outbox will be displayed on the Accounts screen.TIP! When a new email arrives in your Inbox, you will be notified by a sound or vibration. Tap the email notification to stop receiving notifications.
42To open the Camera application, tap Camera  on the Home screen.Getting to know the viewfinder  Swap camera – Switch between the rear–facing camera lens and the front–facing camera lens.  Voice shutter – To take a photo, say one of the following words: Cheese, Smile, Whisky, Kimchi or LG.  Time catch shot – Touch this icon to capture the missing moment before pressing the shutter.  Shot mode – Choose from Normal, HDR, Panorama, Continuous shot or Portrait +.  Settings – Touch this icon to open the settings menu. See Using the advanced settings on the following page.  Video mode – Touch and slide down this icon to switch to video mode.  Capture – Touch to capture a picture.  Gallery – Touch to view the last photo you captured. This enables you to access your Gallery and view saved photos while in camera mode.NOTE: Please ensure the camera lens is clean before taking pictures.Camera
43Using the advanced settingsIn the viewfinder, tap   to open the advanced options. You can change the camera settings by scrolling through the list. After selecting the option, tap the Back Key  .Touch if you want to change the viewfinder menu.Allows you to turn on the flash when taking a photo in dark conditions.Defines and controls the amount of sunlight entering the photo.Focuses on a specific spot.Selects photo resolution. If you choose high resolution, file size will increase, which means you will be able to store fewer photos in the memory.Finds the appropriate color and light settings for the current environment.The ISO rating determines the sensitivity of the camera's light sensor. The higher the ISO, the more sensitive the camera. This is useful in darker conditions when you cannot use the flash.Improves color quality in various lighting conditions.Applies artistic effects to your pictures.Sets a delay after the capture button is pressed. This is ideal if you want to be in the photo.Activate this to use your phone's location-based services. Take pictures wherever you are and tag them with the location. If you upload tagged pictures to a blog that supports geo tagging, you can see the pictures displayed on a map.NOTE: This function is only available when the GPS function is active.Selects a shutter sound.Set the storage location for your pictures. Choose from Internal memory and SD card.
44CameraTIP!•  When you exit the camera, some settings return to their defaults, such as white balance, color effect, timer and scene mode. Check these before you take your next photo.•  The setting menu is superimposed over the viewfinder, so when you change  photo color or quality elements, you will see a preview of the changed image behind the Settings menu.Taking a quick photo 1   Open the Camera application.2   Holding the phone horizontally, point the lens towards the subject you want to photograph.3   A focus box will appear in the center of the viewfi nder screen. You can also tap anywhere on the screen to focus on that spot.4   When the focus box turns green, the camera has focused on your subject.5   Touch   to capture the photo.Once you've taken a photoTouch   to view the last photo you took.Touch to share your photo using the SmartShare function.Touch to take another photo immediately.Touch to send your photo to others or share it via social network services.Touch to delete the photo.
45TIP! If you have a social networking account and set it up on your phone, you can share your photo with your social networking community.Touch the Menu Key   to open all advanced options.Set image as – Touch to use the photo as a Contact photo, Home screen wallpaper or Lock screen wallpaper.Move – Touch to move the photo to another place.Copy – Touch to copy the selected photo and save it to another album.Rename – Touch to edit the name of the selected photo.Rotate left/right – To rotate left or right.Crop – Crop your photo. Move your finger across the screen to select the area to be cropped.Edit – View and edit the photo.Applies a brightness effect to your photo.Applies artistic effects to your photos.Applies color effects to your photos.Applies additional options to your photos.Slideshow – Automatically shows you the images in the current folder one after the other.Details – Find out more information about the contents.Viewing your saved photosYou can access your saved photos when in camera mode. Just tap the image preview in the bottom of the screen and your Gallery will be displayed.•  To view more photos, scroll left or right.•  To zoom in or out, double-tap the screen or place two fingers and spread them apart (move your fingers closer together to zoom out).
46Getting to know the viewfinder  Swap camera – Switch between the rear–facing camera lens and the front-facing camera lens.  Video size – Touch to set the size (in pixels) of the video you are recording. Live effect – Live effect provides various visual effects when recording a video.   Flash – Allows you to turn on the flash when taking a video in dark conditions.  Settings – Touch this icon to open the settings menu. See Using the advanced settings on the following page.  Camera mode – Touch and slide up this icon to switch to camera mode.  Record – Touch to start recording a video.  Gallery – Touch to view the last video you recorded. This enables you to access your Gallery and view your saved videos while in video mode.TIP! When recording a video, place two fingers on the screen and pinch to use the Zoom function.Video camera
47Using the advanced settingsUsing the viewfinder, touch   to open all the advanced options. Touch if you want to change the viewfinder menu.Defines and controls the amount of sunlight entering the video.Improves color quality in various lighting conditions.Choose a color tone to use for your new view.Activate this to use your phone's location-based services.Set the storage location for your pictures. Choose from Internal memory and SD card.Recording a quick video1   Open the Camera application and touch the Video mode button. 2   The video camera viewfi nder appears on the screen.3   Holding the phone, point the lens towards the subject you wish to capture in your video.4   Touch   once to start recording.5   A timer showing the length of the video will appear.6   Touch   on the screen to stop recording.NOTE: Touch   on the screen to take a picture while you're recording.
48After recording a videoTouch   to view the last video you took.Touch to share your video using the SmartShare function.Touch to record another video immediately.Touch to send your video to others or share it via social network services.Touch to delete the video.Watching your saved videos1   In the viewfi nder, touch the image preview in the bottom of the screen.2   Your Gallery will appear on the screen.3   Tap a video to play it automatically.Adjusting the volume when viewing a videoTo adjust the volume of a video while it is playing, use the Volume Keys on the left side of the phone.Video camera
49QuickMemoThe QuickMemo feature allows you to create memos and capture screen shots.Capture screens, draw on them, and share them with family and friends with QuickMemo.OR1   Enter the QuickMemo screen by pressing both the Volume Keys for one second on the screen you want to capture. Or open the Notifi cations Panel and tap  .2   Select the desired menu option from Pen type, Color, and Eraser. Then create a memo.LG Unique Functions
503   Tap   in the Edit menu and select   to save the memo. To exit QuickMemo at any time, tap the Back Key .NOTE: Please use a fingertip while using the QuickMemo. Do not use your fingernail.Using the QuickMemo optionsYou can easily use the QuickMenu options when using the QuickMemo.Touch to keep the current memo on the screen and use the phone simultaneously.Selects whether to use the background screen or not.Allows you to undo and redo previous actions.Selects the pen type and the color.Erases the memo that you created.Touch to send your memo to others or share it via social network services.Saves the memo in the Gallery.Viewing the saved QuickMemoFrom the Home screen, tap Apps  > Gallery  and select the QuickMemo album.LG Unique Functions
51Live ZoomingLive Zooming allows you to zoom in or zoom out on a portion of a video that is being played to make the desired scan appear larger or smaller.When viewing the video, use your index finger and thumb in a pinching or spreading motion to zoom in or out.NOTE: •  When in video playback mode, slide the screen up or down to adjust the screen brightness.•  When in video playback mode, slide the screen left or right to rewind or fast-forward.NOTE: Do not to press too hard; the touch screen is sensitive enough to pick up a light, but firm touch.
52QSlideThe QSlide function enables an overlay on your phone’s display for easy multi-tasking.ORTap to exit the QSlide function and return to full window.Slide to adjust transparency.Tap to exit the QSlide function.NOTE: The QSlide function can support up to two windows at the same time.1   Open the Notifi cations Panel and tap the desired app from the QSlide apps section.ORWhile using an application that supports QSlide, tap  . The function will be displayed continuously as a small window on your screen.2   Slide   to adjust the transparency level.QuickTranslatorSimply aim the camera of your smart phone at the foreign sentence you want to understand. You can get the real-time translation anywhere and anytime.You can buy additional dictionaries for offline translation from the Google Play Store.LG Unique Functions
53  Home language. Destination language. Translation of word. Translation of sentence. Translation of block. Flash.1   Touch   > Apps tab > QuickTranslator.2   Touch Word, Line or Block.3   Touch and select the desired language.4   Hold the phone toward the subject you want to translate for a few seconds.NOTE: Only one dictionary is provided free of charge. Additional dictionaries must be purchased. Please select from the list below the dictionary you would like to install as your complimentary dictionary.NOTE: There may be a difference in the rate of recognization depending on the size, font, color, brightness and angle of the letters that need to be translated.
54VuTalkUes the VuTalk to create notebook cotents using real-time interactive handwriting and shared emotional conversations.NOTE: •  Additional charges may be applied for data services when using VuTalk.•  Connect a device preloaded available VuTalk feature to use VuTalk.•  You can use only VuTalk when connecting data network, futhermore during a call.•  Please be careful that the screen may be looked, if you input nothing for a period of time.Registering VuTalk1   From the Home screen, tap  .2   Tap   to agree terms and conditions.•  Once you register the VuTalk service, you can set up tapping  .•  You can also register the VuTalk service tapping   during a call screen.Contacts screen Call screenRegisteringthe VuTalkservice•   Befor registering the VuTalk service:Register the VuTalk service.•   After registering the VuTalk service:Run the VuTalk feature. LG Unique Functions
55Using VuTalk1   Select VuTalk user from the contacts.•  If you tap,   you can display only VuTalk user.2   Tap   from the detail contacts screen.Contacts screen Detail contacts screenArrangeVuTalk userVuTalk userRun the VuTalkreVuTalk agreement screen VuTalk request screen •  Tap   to attach image, photographic, place, sticker.
56A example of use 1 A example of use 2 3   Tap   or   to end VuTalk feature.•  VuTalk saved Notebook contents when ending VuTalk feature. •  Tap   to end VuTalk feature because Vutalk is still running when the screen is changed the Home screen tapping Home key.LG Unique Functions
57GalleryYou can store multimedia files in internal memory for easy access to all your multimedia files. Use this application to view multimedia files like pictures and videos.1   From the Home screen, tap Apps  > Apps tab > Gallery  .You can manage and share all your image and video fi les with Gallery.NOTE:•  Some file formats are not supported, depending on the software installed on the device.•  Some files may not play properly, depending on how they are encoded.Viewing picturesLaunching Gallery displays your available folders. When another application, such as Email, saves a picture, the download folder is automatically created to contain the picture. Likewise, capturing a screenshot automatically creates the Screenshots folder. Tap a folder to open it.Pictures are displayed by creation date in a folder. Select a picture to view it full screen. Scroll left or right to view the next or previous image.Zooming in and outUse one of the following methods to zoom in on an image:•  Double-tap anywhere to zoom in. Double-tap again to return to fullscreen view.•  Spread two fingers apart on any place to zoom in. Pinch in to zoom out.Playing videosVideo files show the   icon in the preview. Select a video and tap   to play it.Viewing photo and video optionsWhen viewing a photo or video, tap the Menu Key  and use the advanced editing options.Multimedia
58Deleting images and videosUse one of the following methods:•  In a folder, tap   and select the photos and videos you want to delete, then tap Delete.•  When viewing a photo or video, tap  .Setting as wallpaperWhen viewing a photo, touch the Menu Key  > Set image as and select Contact photo, Home screen wallpaper or Lock screen wallpaper.NOTE:•  Some file formats are not supported, depending on the device software.•  If the file size exceeds the available memory, an error can occur when you open files.VideosYour phone has a video player that lets you play all of your favorite videos. To access the video player, from the Home screen tap Apps  > Apps tab > Videos  .Playing a video1   From the Home screen, tap Apps   > Apps tab > Videos  . 2   Select the video you want to play.Multimedia
59Touch to pause video playback.Touch to resume video playback.Touch to go 10 seconds forward.Touch to go 10 seconds backward.Touch to manage the video volume.Touch to change the ratio of the video screen.Touch access QSlide and display the video in small window.Touch to share your video via the SmartShare function.Touch to lock the window.To change the volume while watching a video, press the Volume Keys on the left side of the phone.Touch and hold a video in the list to access the following options: Share, Trim, Delete and Details.Video WizYou can make your own movie using your images/video and music.1   From the Home screen, tap Apps  > Apps tab > Video Wiz  .2   After seeing the brief introduction on the steps to follow, tap OK.
60Multimedia3   Tap  to add images or video.4   Tap the desired images or videos, then tap  .•  To remove images or videos, tap  and touch cross mark on image >  .•  To rearrange them, touch and hold an image/video, and drag and drop it to the desired position.5   Tap Select style to select the desired movie style.•  Scroll through and select the style you want. A preview will be displayed.6   Tap Select music to set the background music.7   Tap   to play your movie.8   Tap   to edit the video clip using Text, Sticker or Magic Spot.•  After editing the video, tap  .9   Tap  to save the video.10  Tap  to view the help information on using this feature.11   Tap  to reset changes.

Navigation menu