LG Electronics USA D805 Mobile Phone User Manual

LG Electronics MobileComm USA, Inc. Mobile Phone
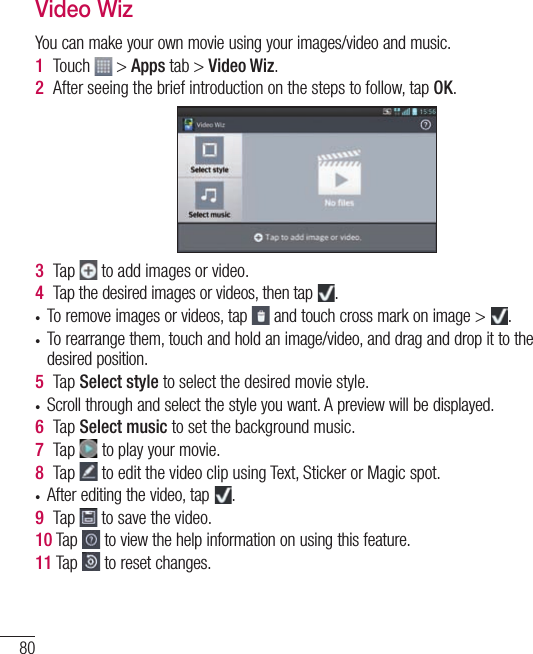
user manual

User GuideLG-D805 (1.0)  www.lg.comENGLISH
2CTVUVCVGOGPV&KDQJHRU0RGLILFDWLRQVWKDWDUHQRWH[SUHVVO\DSSURYHGE\WKHPDQXIDFWXUHUFRXOGYRLGWKHXVHUVDXWKRULW\WRRSHUDWHWKHHTXLSPHQW2CTVUVCVGOGPV7KLVHTXLSPHQWKDVEHHQWHVWHGDQGIRXQGWRFRPSO\ZLWKWKHOLPLWVIRUDFODVV%GLJLWDOGHYLFHSXUVXDQWWR3DUWRIWKH)&&5XOHV7KHVHOLPLWVDUHGHVLJQHGWRSURYLGHUHDVRQDEOHSURWHFWLRQDJDLQVWKDUPIXOLQWHUIHUHQFHLQDUHVLGHQWLDOLQVWDOODWLRQ7KLVHTXLSPHQWJHQHUDWHVXVHVDQGFDQUDGLDWHUDGLRIUHTXHQF\HQHUJ\DQGLIQRWLQVWDOOHGDQGXVHGLQDFFRUGDQFHZLWKWKHLQVWUXFWLRQVPD\FDXVHKDUPIXOLQWHUIHUHQFHWRUDGLRFRPPXQLFDWLRQV+RZHYHUWKHUHLVQRJXDUDQWHHWKDWLQWHUIHUHQFHZLOOQRWRFFXULQDSDUWLFXODULQVWDOODWLRQ,IWKLVHTXLSPHQWGRHVFDXVHKDUPIXOLQWHUIHUHQFHRUWHOHYLVLRQUHFHSWLRQZKLFKFDQEHGHWHUPLQHGE\WXUQLQJWKHHTXLSPHQWRIIDQGRQWKHXVHULVHQFRXUDJHGWRWU\WRFRUUHFWWKHLQWHUIHUHQFHE\RQHRUPRUHRIWKHIROORZLQJPHDVXUHV5HRULHQWRUUHORFDWHWKHUHFHLYLQJDQWHQQD,QFUHDVHWKHVHSDUDWLRQEHWZHHQWKH HTXLSPHQWDQGUHFHLYHU&RQQHFWWKHHTXLSPHQWLQWRDQRXWOHWRQDFLUFXLWGLIIHUHQWIURPWKDWWRZKLFKWKHUHFHLYHULVFRQQHFWHG&RQVXOWWKHGHDOHURUDQH[SHULHQFHGUDGLR79WHFKQLFLDQIRUKHOSPart .19 statement7KLVGHYLFHFRPSOiesZLWKSDUWRI)&&UXOHV.2SHUDWLRQLVVXEMHFWWRWKHIROORZLQJWZRFRQGLWLRQV7KLVGHYLFHPD\QRWFDXVHKDUPIXOLQWHUIHUHQFHDQGWKLVGHYLFHPXVWDFFHSWDQ\LQWHUIHUHQFHUHFHLYHGLQFOXGLQJLQWHUIHUHQFHWKDWPD\FDXVHXQGHVLUHGRSHUDWLRQ$QF[YQTP1RGTCVKQP7KLVGHYLFHwasWHVWHGIRUtypical ERG\ZRUQRSHUDWLRQVZLWKWKH back of the phone keptFP LQFKHVEHWZHHQWKHXVHUĜVERG\DQGWKHback of the SKRQH7RFRPSO\ZLWK)&&5)H[SRVXUH UHTXLUHPHQWVDPLQLPXPVHSDUDWLRQGLVWDQFHRIFPLQFKHVPXVWEHPDLQWDLQHG betweenWKHXVHUVERG\ and the back of the phone7KLUGSDUW\EHOWFOLSVKROVWHUVDQGVLPLODUDFFHVVRULHVFRQWDLQLQJ PHWDOOLFFRPSRQHQWVPD\QRWEHXVHG%RG\ZRUQDFFHVVRULHVWKDWFDQQRWPDLQWDLQFPLQFKHVVHSDUDWLRQGLVWDQFHEHWZHHQWKHXVHUVERG\DQGWKHback of SKRQHDQGKDYHQRW EHHQWHVWHGIRUW\SLFDOERG\ZRUQRSHUDWLRQVPD\QRWFRPSO\ZLWK)&&5)H[SRVXUHOLPLWV DQGVKRXOGEHDYRLGHG9+(+%CWVKQP7KLVGHYLFHLVFDSDEOHRIRSHUDWLQJLQDQPRGH)RUDQGHYLFHVRSHUDWLQJLQWKHIUHTXHQF\UDQJHRI *+]WKH\DUHUHVWULFWHGIRULQGRRURSHUDWLRQVWRUHGXFHDQ\SRWHQWLDOKDUPIXOLQWHUIHUHQFHIRU0RELOH6DWHOOLWH6HUYLFHV066LQWKH86:,),$FFHVV3RLQWVWKDWDUHFDSDEOHRIDOORZLQJ\RXUGHYLFHWRRSHUDWHLQDQPRGH *+]EDQGDUHRSWLPL]HGIRULQGRRUXVHRQO\,I\RXU:,),QHWZRUNLVFDSDEOHRIRSHUDWLQJLQWKLVPRGHSOHDVHUHVWULFW\RXU:,),XVHLQGRRUVWRQRWYLRODWHIHGHUDOUHJXODWLRQVWRSURWHFW0RELOH6DWHOOLWH6HUYLFHV7KLV GHYLFHLVQRWLQWHQGHGIRUVDOHLQWKH86$
User Guidet Screen displays and illustrations may differ from those you see on actual phone.t Some of the contents of this guide may not apply to your phone, depending on the software and your service provider. All information in this document is subject to change without notice.t This handset is not suitable for people who have a visual impairment due to the touch screen keyboard.t Copyright ©2013 LG Electronics, Inc. All rights reserved. LG and the LG logo are registered trademarks of LG Group and its related entities. All other trademarks are the property of their respective owners.t Google™, Google Maps™, Gmail™, YouTube™, Google Talk™ and Play Store™ are trademarks of Google, Inc.ENGLISH
2Table of contentsFor your safety ..........................................5Safety instructions .................................12Important notice .....................................20Getting to know your phone ...................26Phone overview .....................................26Installing the Micro-USIM card ...............28Charging your phone .............................29Locking and unlocking the screen ..........30Your Home screen ...................................31Touch Screen tips ..................................31Home screen .........................................32Customizing the Home screen ..............32Returning to recently-used applications .33Notifications ..........................................33Swipe down for notifications & settings .34Quick Settings .....................................34Indicator icons on the Status Bar ..........35On-screen keyboard ..............................36Entering accented letters ......................37Google account setup .............................38Connecting to Networks and Devices ....39Wi-Fi .....................................................39Connecting to Wi-Fi networks ...............39Turning Wi-Fi on and connecting to a Wi-Fi network ............................................... 39Bluetooth ...............................................40Sharing your phone's data connection ...41Wi-Fi Direct ...........................................43Using SmartShare ..................................43PC connections with a USB cable ...........45Calls ........................................................47Making a call .........................................47Calling your contacts .............................47Answering and rejecting a call ...............47Adjusting the in-call volume ...................48Making a second call .............................48Viewing your call logs ............................48Call settings ...........................................49Contacts ..................................................50Searching for a contact ..........................50Adding a new contact ............................50Favourites contacts ................................50Creating a group ....................................51Messaging ............................................... 52Sending a message ...............................52Threaded box  .......................................53Changing your message settings ...........53E-mail ......................................................54Managing an email account ...................54Working with account folders .................54Composing and sending email ...............55Camera .................................................... 56Getting to know the viewfinder ..............56Using the advanced settings ..................57Taking a quick photo  .............................58
3Once you've taken a photo.....................59Viewing your saved photos ....................60Video camera ..........................................61Getting to know the viewfinder ..............61Using the advanced settings ..................62Recording a quick video .........................62After recording a video...........................63Watching your saved videos ..................63Adjusting the volume when viewing a video .....................................................63Function ..................................................64QuickMemo ...........................................64Using the QuickMemo options ..............65Viewing the saved QuickMemo  ............65QuickTranslator .....................................66QSlide ....................................................67Dual recording .......................................68QuickRemote .........................................69Audio zoom ...........................................70Tracking focus .......................................71Live Zooming .........................................71LG SmartWorld ......................................72How to Get to LG SmartWorld from Your Phone .................................................72How to use LG SmartWorld ...................73On-Screen Phone ..................................73On-Screen Phone icons ........................73On-Screen Phone features ...................74How to install On-Screen Phone on your PC ......................................................74Multimedia ..............................................75Gallery ................................................... 75Viewing pictures ..................................75Playing videos .....................................76Editing photos......................................76Deleting photos/videos .........................76Setting as wallpaper ............................76Videos ...................................................76Playing a video ....................................77Video Editor ...........................................78Video Wiz ...............................................80Music ....................................................81Add music files to your phone ...............81Transfer music using Media sync (MTP) 81Playing a song .....................................81Utilities ....................................................84Setting your alarm .................................84Using your calculator .............................84Adding an event to your calendar ...........84Voice Recorder ......................................85Recording a sound or voice ..................85Sending the voice recording .................85Task Manager ........................................86Tasks ..................................................... 86Polaris Office 4 ......................................86Backup ..................................................87About backing up and restoring smart phone data ..........................................87Backup your smart phone data .............88Scheduling automatic backups .............88Restoring smart phone data..................88
4Google+ ................................................89Voice Search..........................................90Downloads ............................................90The Web ..................................................91Internet .................................................. 91Using the Web toolbar ..........................91Viewing webpages ...............................91Opening a page ...................................92Searching the web by voice ..................92Bookmarks ..........................................92History ................................................92Using Popup Browser ...........................92Chrome .................................................93Viewing webpages ...............................93Opening a page ...................................93Syncing with other devices ...................93Settings ...................................................94Access the Settings menu .....................94WIRELESS & NETWORKS .......................94DEVICE ..................................................97PERSONAL ........................................... 100SYSTEM ...............................................101PC software (LG PC Suite) ....................103Phone software update ........................106Phone software update ........................106About this user guide ...........................108About this user guide ...........................108Trademarks .........................................108DivX HD  ..............................................109Dolby Digital Plus  ................................109Accessories ........................................... 110Troubleshooting ....................................111FAQ ........................................................115Table of contents
5Important InformationThis user’s guide contains important information about the use and operation of this phone. Read all information carefully for optimal performance and to avoid any damage or misuse of the phone. Any changes or modifications not expressly approved in this user’s guide could void your warranty for this equipment.Before you beginSafety Guidelines WARNINGTo reduce the possibility of electric shock, do not expose your product to high humidity areas, such as bathroom or swimming pool. Keep the phone away from heat. Never store your phone in environment that may expose it to temperatures below 0°C or above 40°C, such as outdoor during snowstorm, or in your car in hot days. Exposure to cold or heat will result in malfunction, damage or permanent failure. Be careful when using your phone near other electronic devices. The RF emissions from mobile phones may affect nearby electronic equipment that not adequately shielded. You should consult manufacturers of any personal medical devices, as in the case of pacemakers and hearing aides, to determine whether they are susceptible to interference from cell phones.Turn off your phone in medical facilities or at gas stations. Never place your phone in microwaves, as it will cause the battery to explode. Important!Before using your phone, please read the SAFETY INFORMATION OF THE TELECOMMUNICATIONS INDUSTRY ASSOCIATION (TIA).For your safety
6Safety InformationRead these simple guidelines. Breaking the rules may be illegal or dangerous.More detailed information is provided in this user’s guide.t Never use an unapproved battery that could cause damages to the phone or the battery itself, or even explode.t Never place your phone in a microwave oven, as this will result in an explosion of the battery.t Do not dispose of your battery in fire or with hazardous or flammable materials.t Make sure the battery does not come into contact with sharp-edged items, such as animal teeth or claws. This could cause a fire.t Store the battery in a place out of the reach of children.t  Be careful so that children do not swallow any parts of the phone, such as rubber plugs (earpiece, parts that connect to the phone, etc.). This could cause asphyxiation or suffocation.t Disconnect the plug and charger from the outlet when the phone shows that the battery has been fully charged, because it may cause electric shock or fire hazard.t When in the car, do not leave your phone, or install a hands-free kit, near the airbag. If wireless equipment is improperly installed, you can be seriously injured if the airbag is deployed.t  Do not use mobile phone while driving.t  Do not use the phone in areas where its usage is prohibited. (For example: in airplanes).t Do not expose the battery charger or adapter to direct sunlight, or use it in places with high humidity, such as bathroom.t Never store your phone in temperatures lower than -20°C or higher than 50°C.t Do not use harsh chemicals (such as alcohol, benzene, solvents, etc.) or detergents to clean the phone. This could cause fire.t Do not drop the phone, strike it, or shake it hard. For your safety
7Such actions may harm the phone’s internal circuit boards.t Do not use your phone in high explosive areas, as this may generate sparks.t Do not damage the power cord by bending, twisting, pulling, or heating it. Do not use the plug if it is loose as it may cause fire or electric shock.t  Do not handle the phone with wet hands while it is charging. This can cause electric shock or seriously damage your phone.t Do not disassemble the phone.t Do not make or answer calls while charging the phone, which can cause a short circuit, electric shock, or fire.t Use only batteries and chargers provided by LG. The warranty does not apply to products provided by other providers.t  Only authorized personnel should service the phone and its accessories. Installation or service may result in accidents and consequently invalidate the warranty.t  Do not hold or let the antenna come in contact with your body during a call.t Emergency calls can be made only within a service area. To make an emergency call, make sure you are within a service area and the phone is on.t  Use your accessories, such as headphones or headsets, with caution, ensuring that the cables are plugged properly and that they do not touch the antenna unnecessarily.
10Battery Disposalt  Please dispose of your battery properly, or bring it to your wireless provider for recycling.t Do not dispose of your battery in fire or with hazardous or flammable materials.Adapter Precautions (Charger)t  Using the wrong battery charger could damage your phone and void your warranty.t The adapter or battery charger is only designed for indoor use.t Do not expose the battery charger or adapter to direct sunlight, or use it in places with high humidity, such as the bathroom.Cautions for Batteryt Do not disassemble or open crush, bend or deform, puncture or shred.t Do not modify or remanufacture, attempt to insert foreign objects into the battery, immerse or expose to water or other liquids, expose to fire, explosion or other hazard.t Only use the battery for the system for which it is specified.t Only use the battery with a charging system that has been qualified with the system per this standard. Use of an unqualified battery or charger may present a risk of fire, explosion, leakage, or other hazard.t  Do not short circuit a battery or allow metallic conductive objects to contact battery terminals.t  Replace the battery only with another battery that has been qualified with the system per this standard, IEEE-Std-1725-200x. Use of an unqualified battery may present a risk of fire, explosion, leakage or other hazard.t   Promptly dispose of used batteries in accordance with local regulations.t  Battery usage by children should be supervised.For your safety
14Safety instructionsElectronic DevicesMost modern electronic equipment is shielded from RF signals.However, certain electronic equipment may not be shielded against the RF signals from your wireless phone.PacemakerThe Medical Industry Manufacturers Association recommends a minimum distance of fifteen (15) centimeters, or six (6) inches, between a handheld wireless phone and a pacemaker, in order to avoid potential interference between them.These advices are consistent with independent researches, and with recommendations based on wireless technology research.People with pacemakers should:t ALWAYS keep the phone at least fifteen centimeters (six inches) from their pacemaker, whenever the phone is turned on;t Not carry the phone in a shirt pocket;t Use the ear opposite to the pacemaker, to minimize the potential interference;t If you have any reason to suspect that interference is taking place, switch off your phone immediately.Hearing AidsSome digital wireless phones may interfere with some hearing aids. In the event of such interference, we recommend that you contact your service provider.
15Other Medical DevicesIf you use any other personal medical devices, consult your device manufacturer to determine if they are adequately shielded from external RF energy. Your doctor can help you obtain this information.Health Care FacilitiesTurn off your phone in health care facilities, whenever there are signs asking you to do so. Hospitals or health care facilities may use equipment that could be sensitive to external RF energy.VehiclesRF signals may affect improperly installed or inadequately shielded devices in motor vehicles.Check with the manufacturer, or its representative, regarding your vehicle.You should also consult the manufacturer about any equipment that has been added to your vehicle.Facilities with signsTurn off the phone in any facility where warning signs request you to do so.AirplanesFCC regulations prohibit the use of phones while in the air. Turn off your phone before boarding an airplane.
16Safety instructionsBlasting AreasTo avoid interfering with blasting operations, turn your phone off when in a 'blasting area' or in areas with signs that read: 'Turn off two-way radios' . Obey all signs and instructions.Potentially Explosive AtmosphereTurn off the phone when in an area with a potentially explosive atmosphere, and obey all signs and instructions.Sparks in such areas could cause an explosion or fire that could result in personal injury or death.Areas with a potentially explosive atmosphere are often clearly marked, but not always. Among the potentially dangerous areas are:Fueling areas (such as gas stations), areas below deck on boats, facilities where chemical products are transferred or stored, vehicles using liquefied petroleum gas (as propane or butane), areas where the air contains chemicals or particles (such as grain, dust or metal powders), and any other areas where you would normally be advised to turn off your vehicle engine.For vehicles equipped with air bags Air bags inflate with strong force. Do not place objects in the area over the air bag or in its deployment area, including wireless equipment, either installed or portable.Serious injuries could occur if wireless equipment is improperly installed into the car when the air bag inflates.
17Safety InformationRead and observe the following information for the safe and proper use of your phone, and to prevent any damage.Also, keep the user's guide in an accessible place at all times after reading it.Charger, Adapter and Battery Securityt The charger and adapter are designed only for indoor use.t  Dispose of your battery properly, or bring it to your wireless provider for recycling.t  The battery doesn’t need to be fully discharged before recharging.t Only use LG approved chargers that are specifically made for your phone model, since they are designed to maximize the battery life.t Do not disassemble or short-circuit it.t  Keep the metal contacts on the battery clean.t Replace the battery when it no longer provides acceptable performance. The battery can be recharged several hundred times before replacement.t Charge the battery after long periods without use to maximize its life.t  The battery life will vary depending on usage patterns and environmental conditions.t Intensive use of backlighting, browser, and packet data connectivity affect battery life and talk/standby times.t The role of self-protection interrupts the phone when its operation is in an abnormal state. In this case, remove the battery from the phone, reinstall it, and turn on the phone.
18Safety instructionsExplosion, Shock and Fire Dangert Do not place the phone in a place exposed to excessive dust, and keep the minimum required distance between the power cord and heat sources.t Unplug the power cord before cleaning the phone, and clean the power plug whenever it is dirty.t When using the power plug, make sure it is firmly connected. Otherwise, it can overheat or start a fire.t Placing the phone in a pocket or bag without covering the receptacle (power plug pin), metallic articles (such as a coin, clip or pen) may short-circuit the phone. Always cover the receptacle when not in use.t Do not short-circuit the battery. Metal items, such as coins, paper clips, or pens, in your pocket or bag may cause a shortcircuit between the + and - terminals of the battery (metal strips on the battery). The short-circuit of the terminals may damage the battery and cause an explosion.General Noticet Using a damaged battery, or inserting it into the mouth can cause serious injuries.t  Do not place the phone in proximity to items containing magnetic components, such as credit cards, calling cards, bank books, or subway tickets. The phone magnetism may damage the data stored in the magnetic strip.t Talking on the phone for a long period of time may reduce call quality, because of the heat generated during use.t  When the phone has not been in use for a long time, store it in a safe place, with the power cord unplugged.t  Using the phone close to a receiving equipment (such as TV or radio) may cause interference.
19t Do not use the phone if the antenna is damaged. If a damaged antenna contacts skin, it may cause a slight singe. Contact an LG Authorized Service Facility to replace the damaged antenna.t Do not immerse your phone in water. If this happens, immediately turn it off and remove the battery. If your phone does not work, take it to an LG Authorized Service Facility.t  The power supply contains elements that could be harmful to your health, if components are handled directly. If this happens, we recommend immediate hand-washing.t Do not paint the phone.t  Data stored in your phone might be deleted due to careless use, hardware repair or software upgrade. Please backup your important phone numbers (ringtones, text or voice messages, images, and videos might also get deleted). The manufacturer is not liable for damages due to loss of data.t When using the phone in public places, you may set the ringer on vibrate to avoid disturbing others.t Do not switch the phone on/off while it is in your ear.Ambient temperaturesMax:  +50°C (discharging), +45°C (charging) Min: -10°CNotice: Open Source SoftwareTo obtain the corresponding source code under GPL, LGPL, MPL and other open source licences, please visit http://opensource.lge.com/ All referred licence terms, disclaimers and notices are available for download with the source code.
20Important noticePlease check to see whether any problems you encountered with your phone are described in this section before taking the phone in for service or calling a service representative.1. Phone memory When there is less than 10% of space available in your phone memory, your phone cannot receive new messages. You need to check your phone memory and delete some data, such as applications or messages, to make more memory available.To uninstall applications:1  Touch   > Apps tab > Settings > Apps from the DEVICE.2  Once all applications appear, scroll to and select the application you want to uninstall.3  Touch Uninstall.2. Optimizing battery lifeExtend your battery's power by turning off features that you don't have to run constantly in the background. You can monitor how applications and system resources consume battery power.Extending your phone's battery life:t Turn off radio communications when you are not using. If you are not using Wi-Fi, Bluetooth or GPS, turn them off.t Reduce screen brightness and set a shorter screen timeout.t Turn off automatic syncing for Gmail, Calendar, Contacts and other applications.t Some applications you have downloaded may reduce battery power.Please read this before you start using your phone!
21To check the battery power level:t Touch   > Apps tab > Settings > About phone from the SYSTEM > Battery.The battery status (charging or discharging) and battery level (percentage charged) is displayed at the top of the screen.To monitor and control how battery power is being used:t Touch   > Apps tab > Settings > About phone from the SYSTEM > Battery > Battery use.Battery usage time is displayed on the screen. It tells you how long it has been since you last connected your phone to a power source or, if currently connected, how long the phone was last running on battery power. The screen shows the applications or services using battery power, listed in order from the greatest to smallest amount used.3.  Before installing an open source application and OS WARNINGIf you install and use an OS other than the one provided by the manufacturer it may cause your phone to malfunction. In addition, your phone will no longer be covered by the warranty. WARNINGTo protect your phone and personal data, only download applications from trusted sources, such as Play Store™. If there are improperly installed applications on your phone, the phone may not work normally or a serious error may occur. You must uninstall those applications and all associated data and settings from the phone.
224. Using an unlock patternSet an unlock pattern to secure your phone. Touch   > Apps tab > Settings > Lock screen from DEVICE > Select screen lock > Pattern. This opens a screen that will guide you through how to draw a screen unlock pattern. You have to create a Backup PIN as a safety measure in case you forget your unlock pattern.Caution: Create a Google account before setting an unlock pattern and remember the Backup PIN you created when creating your pattern lock. WARNINGPrecautions to take when using pattern lock.It is very important to remember the unlock pattern you set. You will not be able to access your phone if you use an incorrect pattern 5 times. You have 5 opportunities to enter your unlock pattern, PIN or password. If you have used all 5 opportunities, you can try again after 30 seconds.When you can’t recall your unlock Pattern, PIN or Password:< If you have forgotten your pattern >If you logged in to your Google account on the phone but failed to enter the correct pattern 5 times, touch the Forgot pattern? button at the bottom of the screen. You are then required to log in with your Google Account or you have to enter the Backup PIN which you entered when creating your Pattern Lock.If you have not created a Google account on the phone or you forgot Backup PIN, you have to perform a hard reset.< If you have forgotten your PIN or Password > If you forget your PIN or Password, you will need to perform a hard reset.Caution: If you perform a hard reset, all user applications and user data will be deleted.Important notice
23NOTE: If you have not logged into your Google Account and have forgotten your Unlock Pattern, you will need to enter your Backup PIN.5.  Using the Hard Reset (Factory Reset)If your phone does not restore to its original condition, use a Hard Reset (Factory Reset) to initialize it.1  Turn the power off.2  Press and hold the Power/Lock key + Volume Down key.3   LG Logo appears on the screen and After a few seconds,  FACTORY HARD RESET screen will appear, Now release all keys.4  The phone will allow you to select the factory reset function in the Android system recovery utility by pressing Power/Lock key .5  Press the Power/Lock key again to confirm factory reset and your phone will be restored to its factory settings. To cancel, press any other key. WARNINGIf you perform a Hard Reset, all user applications, user data and DRM licenses will be deleted. Please remember to backup any important data before performing a Hard Reset.6.  Opening and switching applicationsMulti-tasking is easy with Android, you can keep more than one application running at the same time. There is no need to quit an application before opening another one. Use and switch between several open applications. Android manages each application, stopping and starting them as needed to ensure that idle applications don't consume resources unnecessarily.
24To stop applications: 1  Touch   > Apps tab > Settings > Apps from DEVICE > RUNNING.2  Scroll and touch the desired application and touch Stop to stop it.NOTE: For multitasking, press and hold Home key  to move to another app while using an app. This does not stop the previous app running in the background on the device. Make sure to touch the Back key  to exit an app after using it.7.  Transferring music, photos and videos using Media sync (MTP)1  Touch   > Apps tab > Settings > Storage from the DEVICE to check out the storage media. 2  Connect the phone to your PC using the USB cable.3  A USB connection type list will appear on your phone screen, Select the Media sync (MTP) option.4  Open the memory folder on your PC. You can view the mass storage content on your PC and transfer the files from PC to Device memory folder or vice versa.5  After transfering files ,slide down the status bar and touch USB connected and select Charge only from USB connection type list.8.  Hold your phone uprightHold your cell phone vertically, as you would a regular phone. Your phone has an internal antenna. Be careful not to scratch or damage the back of the phone, as this may affect performance.When making/receiving calls or sending/receiving data, avoid holding the lower part of the phone where the antenna is located. Doing so may affect call quality.Important notice
259.  When the screen freezesIf the screen freezes or the phone does not respond when you try to operate it:Press and hold the Power/Lock key for 10 seconds to turn your phone off. If it still does not work, please contact the service center.
26Phone overviewBack Key t Return to the previous screen. Exit an app after using it.Front Camera LensHome Key t Return to the Home screen from any screen.Proximity SensorEarpieceTouch ScreenMenu Keyt Check what options are available.NOTE: Proximity sensor When receiving and making calls, the proximity sensor automatically turns the backlight off and locks the touch screen by sensing when the phone is near your ear. This extends battery life and prevents you from unintentionally activating the touch screen during calls.WARNINGPlacing a heavy object on the phone or sitting on it can damage the LCD and touch screen functions. Do not cover the LCD proximity sensor with protective film. This could cause the sensor to malfunction.Getting to know your phone
27 WARNINGt  This part encloses the battery compartment. Please do not open the back cover.t  Be careful not to damage the NFC touch point on the phone, which is part of the NFC antenna.Volume Keyst On the home screen: Controls ringer volume.t During a call: Control your earpiece volume.t When playing a track: Controls volume continuously.Headset JackEject Button ApertureSIM Card TraySpeakerCharger/USB portPower/Lock Key t Switch your phone on/off by pressing and holding this keyt Short press to lock/unlock the screenNFC Touch PointCamera LensFlashMicrophone
28Installing the Micro-USIM cardBefore you start exploring your new phone, you may choose to insert the Micro-USIM card.The eject button is a small round aperture just above the tray door. To install a new Micro-USIM card:1  Insert the Micro-USIM ejection tool that comes with the phone (or a thin pin) into the eject button aperture, and push gently but firmly until the tray pops out.2  Remove the tray and place the Micro-USIM card inside it, with the contacts out and the angled corner to the right. There is only one possible way to fit the card snugly into the tray.3  Carefully reposition the tray in the slot and push it gently back into the phone.NOTE: Make sure the gold contact area on the card is facing downwards.Eject button apertureGetting to know your phone
29Charging your phoneCharge the battery before using it for the first time. Use the charger to charge the battery. A computer can be also used to charge the device by connecting them via the USB cable. WARNINGUse only LG-approved chargers, batteries and cables. If you use unapproved chargers, batteries or cables, it may cause battery charging delay or pop up the message regarding slow charging, Or this can cause the battery to explode or damage the device, which are not covered by the warranty.The charger connector is at the bottom of the phone. Insert the charger and plug it into an electrical outlet.NOTE:  t The battery must be fully charged initially to improve battery lifetime.t Do not open the back cover while your phone is charging.
30Locking and unlocking the screenIf you do not use the phone for a while, the screen will be automatically turned off and locked. This helps to prevent accidental touches and saves battery power.When you are not using the phone, press the Power/Lock key  to lock your phone. If there are any programs running when you lock your screen, they may be still running in Lock mode. It is recommended that you exit all programs before entering Lock mode to avoid unnecessary charges (e.g. phone calls, web access and data communications).To wake up your phone, press the Power/Lock key . The Lock screen will appear. Touch and slide the Lock screen in any direction to unlock your Home screen. The last screen you viewed will open.Getting to know your phone
31Your Home screenTouch Screen tipsHere are some tips on how to navigate on your phone.Tap or touch – A single finger tap selects items, links, shortcuts and letters on the on-screen keyboard.Touch and hold – Touch and hold an item on the screen by touching it and not lifting your finger until an action occurs. For example, to open a contact's available options, touch and hold the contact in the Contacts list until the context menu opens.Drag – Touch and hold an item for a moment and then, without lifting your finger, move your finger on the screen until you reach the target position. You can drag items on the Home screen to reposition them.Swipe or slide – To swipe or slide, quickly move your finger across the surface of the screen, without pausing when you first touch it (so you don’t drag an item instead). For example, you can slide the screen up or down to scroll through a list, or browse through the different Home screens by swiping from left to right (and vice versa).Double-tap – Double-tap to zoom on a webpage or a map. For example, quickly double-tap a section of a webpage to adjust that section to fit the width of the screen. You can also double-tap to zoom in and out while viewing the picture.Pinch-to-Zoom – Use your index finger and thumb in a pinching or spreading motion to zoom in or out when using the browser or Maps, or when browsing pictures.Rotate the screen – From many applications and menus, the orientation of the screen adjusts to the device's physical orientation.NOTE:t To select an item, touch the center of the icon.t Do not press too hard; the touch screen is sensitive enough to pick up a light, yet firm touch.t Use the tip of your finger to touch the option you want. Be careful not to touch any other keys.
32Home screenSimply swipe your finger to the left or right to view the panels. You can customize each panel with apps, downloads, widgets and wallpapers.NOTE: Some screen images may be different depending on your phone provider.On your Home screen, you can view menu icons at the bottom of the screen. Menu icons provide easy, one-touch access to the functions you use the most.  Touch the Phone icon to bring up the touch screen dialpad to make a call.  Touch the Contacts icon to open your contacts.  Touch the Internet icon to access the web browser.    Touch  the  Messaging icon to access the messaging menu. This is where you can create a new message.  Touch the Apps icon at the bottom of the screen. This displays all of your installed applications. To open any application, simply touch the icon in the applications list.Customizing the Home screenYou can customize your Home screen by adding apps, downloads, widgets or changing wallpapers. For more convenience using your phone, add your favorite apps and widgets to the Home screen.To add items on your Home screen:1  Touch and hold the empty part of the Home screen. 2  In the Add Mode menu, select the item you wish to add. You will then see this added item on the Home screen.3  Drag it to the desired location and lift your finger.To remove an item from the Home screen:t Home screen > touch and hold the icon you want to remove > drag it to  .Your Home screen
33TIP! To add an application icon to the Home screen from the Apps menu, touch and hold the application you want to add.TIP! Using foldersYou can combine several app icons in a folder. Drop one app icon over another one on a Home screen, and the two icons will be combined.Returning to recently-used applications1  Press  and hold the Home key. The screen displays a pop-up containing the icons of applications you used recently.2  Touch an icon to open the application. Or touch the Back key to return to your previous screen.NotificationsNotifications alert  you the arrival of new messages, calendar events, and alarms, as well as to ongoing events, such as video downloads.From the notifications panel, you can view your phone’s current status and pending notifications.When a notification arrives, its icon appears at the top of the screen. Icons for pending notifications appear on the left, and system icons such as  Wi-Fi or battery strength shown on the right.NOTE: The available options may vary depending on the region or service provider.
34Pending notificationsBluetooth, Wi-Fi & battery statusSwipe down for notifications & settingsSwipe down from the status bar to open the notifications panel. To close the notifications panel, swipe up the bar that is at the bottom of the screen.NOTE:  If long touch a icon at the top of the screen, will go to Settings directly.Quick SettingsUse Quick Settings to easily toggle function settings like Wi-Fi, manage display brightness and more. For Quick Set tings, swipe down from the status bar to open the notifications panel and swipe or touch for you desired setting.To rearrange Quick Setting items on the notification panel Touch  . You can then check and rearrange items on the notification panel.Your Home screen
35Indicator icons on the Status BarIndicator icons appear on the status bar at the top of the screen to report missed calls, new messages, calendar events, device status and more. The icons displayed at the top of the screen provide information about the status of the device. The icons listed in the table below are some of the most common ones.Icon Description Icon DescriptionNo Micro-USIM card Vibrate modeNo signal Battery fully chargedAirplane mode Battery is chargingConnected to a Wi-Fi network Downloading dataWired headset Uploading dataCall in progress GPS is acquiringCall hold Receiving location data from GPSSpeakerphone Data is syncingMissed call New GmailBluetooth is on New Google Talk messageSystem warning New message
36Alarm is set Song is playingNew voicemailPhone is connected to PC via USB cable or USB tethering is activeRinger is silenced Portable Wi-Fi hotspot is activeNFC is on P2P is onNOTE: The icons location in the status bar may differ according to the function or service.On-screen keyboardYou can enter text using the on-screen keyboard. The on-screen keyboard appears automatically on the screen when you need to enter text. To manually display the keyboard, simply touch a text field where you want to enter text.Using the keypad & entering text Tap once to capitalize the next letter you type. Double-tap for all caps.  Tap to switch to the numbers and symbols keyboard. Tap to switch to handwriting mode. Tap to enter a space. Tap to create a new line. Tap to delete the previous character.Your Home screen
37Entering accented lettersWhen you select French or Spanish as the text entry language, you can enter special French or Spanish characters (e.g. "á").For example, to input "á", touch and hold the "a" key until the zoom-in key grows bigger and displays characters from different languages.  Then select the special character you want.
38Google account setupWhen you first turn on your phone, you have the opportunity to activate the network, to sign into your Google Account and select how you want to use certain Google services. To set up your Google account: t Sign into a Google Account from the prompted set-up screen. OR t Touch   > Apps tab > select a Google application, such as Gmail > select New to create a new account. If you have a Google account, touch Existing, enter your email address and password, then touch  .Once you have set up your Google account on your phone, your phone automatically synchronizes with your Google account on the Web.Your contacts, Gmail messages, Calendar events and other information from these applications and services on the Web are synchronized with your phone. (This will depend on your synchronization settings.)After signing in, you can use Gmail™ and take advantage of Google services on your phone.
39Connecting to Networks and DevicesWi-FiWith Wi-Fi, you can use high-speed Internet access within the coverage of the wireless access point (AP). Enjoy wireless Internet using Wi-Fi, without extra charges. Connecting to Wi-Fi networksTo use Wi-Fi on your phone, you need to access a wireless access point or ‘hotspot’. Some access points are open and you can simply connect to them. Others are hidden or use security features; you must configure your phone to be able to connect to them.Turn off Wi-Fi when you're not using it to extend the life of your battery. NOTE: If you are out of the Wi-Fi zone or have set Wi-Fi to OFF, additional charges may be applied by your mobile operator for mobile data use. Turning Wi-Fi on and connecting to a Wi-Fi network1  Touch   > Apps tab > Settings > Wi-Fi from the WIRELESS & NETWORKS.2  Set Wi-Fi to ON to turn it on and start scanning for available Wi-Fi networks.3  Tap the Wi-Fi menu again to see a list of active and in-range Wi-Fi networks.t Secured networks are indicated by a lock icon.4  Touch a network to connect to it.t If the network is secured, you are prompted to enter a password or other credentials. (Ask your network administrator for details)5  The status bar displays icons that indicate Wi-Fi status.
40BluetoothYou can use Bluetooth to send data by running a corresponding application, but not from the Bluetooth menu as on most other mobile phones.NOTE: t LG is not responsible for the loss, interception or misuse of data sent or received via the Bluetooth wireless feature.t Always ensure that you share and receive data with devices that are trusted and properly secured. If there are obstacles between the devices, the operating distance may be reduced.t Some devices, especially those that are not tested or approved by Bluetooth SIG, may be incompatible with your device.  Turning on Bluetooth and pairing up your phone with a Bluetooth deviceYou must pair your device with another device before you connect to it.1  Touch   > Apps tab > Settings > set Bluetooth to ON from the WIRELESS & NETWORKS.2  Tap the Bluetooth menu again. You will see the option to make your phone visible and option to search devices. Now tap Search for devices to view the devices in the Bluetooth Range.3  Choose the device you want to pair with from the list.Once the paring is successful, your device will connect to the other device. NOTE: Some devices, especially headsets or hands-free car kits, may have a fixed Bluetooth PIN, such as 0000. If the other device has a PIN, you will be asked to enter it.Connecting to Networks and Devices
41Send data using the Bluetooth wireless feature1  Select a file or item, such as a contact, calendar event or media file, from an appropriate application or from Downloads.2  Select the option for sending data via Bluetooth.NOTE: The method for selecting an option may vary by data type. 3  Search for and pair with a Bluetooth-enabled device.Receive data using the Bluetooth wireless feature1  Touch   > Apps tab > Settings > set Bluetooth to ON from the WIRELESS & NETWORKS. 2  Tap the Bluetooth menu again and mark the checkbox at the top of the screen to visible on other devices.NOTE: To select the length of time that your device will be visible, touch   > Visibility timeout.3  Select Accept to confirm that you are willing to receive data from the device.Sharing your phone's data connectionUSB tethering and portable Wi-Fi hotspot are great features when there are no wireless connections available. You can share your phone's mobile data connection with a single computer via a USB cable (USB tethering). You can also share your phone's data connection with more than one device at a time by turning your phone into a portable Wi-Fi hotspot.When your phone is sharing its data connection, an icon appears in the status bar and as an ongoing notification in the notifications drawer.For the latest information about tethering and portable hotspots, including supported operating systems and other details, visit http://www.android.com/tether.
42To change Portable Wi-Fi hotspot settings1  Touch   > Apps tab > Settings > Tethering & Networks from the WIRELESS & NETWORKS > Portable Wi-Fi hotspot > choose options that you want to adjust.TIP! If your computer is running Windows 7 or a recent distribution of some flavours of Linux (such as Ubuntu), you will not usually need to prepare your computer for tethering. But, if you are running an earlier version of Windows or another operating system, you may need to prepare your computer to establish a network connection via USB. For the most current information about which operating systems support USB tethering and how to configure them, visit http://www.android.com/tether.To rename or secure your portable hotspotYou can change the name of your phone's Wi-Fi network name (SSID) and secure its Wi-Fi network.1  On the Home screen, touch   > Apps tab > Settings.2  Touch Tethering & Networks from the WIRELESS & NETWORKS and select Portable Wi-Fi hotspot.3  Ensure that Portable Wi-Fi hotspot is checked.4  Touch Set up Wi-Fi hotspot.t The Set up Wi-Fi hotspot dialogue box will open.t You can change the Network SSID (name) that other devices see when scanning for Wi-Fi networks.t You can also touch the Security menu to configure the network with Wi-Fi Protected Access 2 (WPA2) security using a pre-shared key (PSK).t If you touch the WPA2 PSK security option, a password field is added to the Set up Wi-Fi hotspot dialogue box. If you enter a password, you will need to enter that password when you connect to the phone's hotspot with a computer or other device. You can set Open in the Security menu to remove security from your Wi-Fi network.5  Touch Save.Connecting to Networks and Devices
43ATTENTION! If you set the security option as Open, you cannot prevent unauthorised usage of online services by other people and additional charges may be incurred. To avoid unauthorized usage, you are advised to keep the security option active.Wi-Fi DirectWi-Fi Direct supports a direct connection between Wi-Fi enabled devices without an access point. Due to the high battery usage of Wi-Fi direct, it is recommended that you plug your phone into a power outlet while using the Wi-Fi Direct feature. Check your Wi-Fi & Wi-Fi Directed network in advance and make sure the users are connected to the same network.To turn on Wi-Fi Direct:1  Tap the Menu Key  > System settings > Wi-Fi.2  Tap the Menu Key  > Wi-Fi Direct.3  Select a device to connect with from the scanned device list.Using SmartShareSmartShare uses DLNA (Digital Living Network Alliance) technology to share digital content through a wireless network. Both devices must be DLNA certified to support this feature.1  From the Home screen, touch   > SmartShare  .2  Touch the Menu Key  > Settings.3  Touch Contents share to allow your device to be detected by other devices.t Touch Sharing requests and select the sharing requests option.t Touch Receive files if you would like to allow other devices to upload media files to your phone.
44NOTE: Make sure that the microSD card is correctly mounted and the Receive files option in the Settings menu is checked.4  Touch Shared contents and checkmark the types of content you would like to share. Choose from Photos, Videos and Music. 5  SmartShare is now activated and ready to share contents.To control your renderer devicesLet your renderer device (e.g., TV) play multimedia content from your remote content library (e.g., PC).NOTE: Make sure that the DLNA function of your devices is properly configured (e.g., TV and PC).1  Touch   > SmartShare  .2  Touch the Player icon   and select the device from the renderer device list.3  Touch the Library icon   and select the device of the remote content library.4  You can browse the content library.5  Touch and hold a content thumbnail and touch Play or touch the Menu Key  > Play. To share content from your phone to your renderer device (e.g. TV) NOTE: Make sure that your renderer device is properly configured.1  While playing your music using the Music application, touch   on the Title area. 2  Select the device from renderer lists to play the files.NOTE: Follow the similar steps to use the Gallery, Videos or Polaris Office to share contents.Connecting to Networks and Devices
45NOTICE: Check that your device is connected with your home network using Wi-Fi connection to use this application.Some DLNA enabled devices (e.g. TV) support only the DMP feature of DLNA and will not appear in the renderer device list.Your device might not be able to play some contents.To download contents from the remote content library1  Touch  > SmartShare  .2  Touch the Library button   and select the device of the remote content library.3  You can browse the content library.4  Touch and hold a content thumbnail and then touch Download.NOTICE: Some contents are not supported.To upload contents to the remote content library1  Touch  > SmartShare  .2  Touch the Library icon   and select My phone.3  You can browse the local content library to find the content(s) you want.4  Touch and hold a content thumbnail and then touch Upload.5  Select the device of the remote content library to be uploaded.NOTICE: Some DLNA enabled devices do not support the DMS upload functionality and will not upload files. Some contents are not supported.PC connections with a USB cableLearn to connect your device to a PC with a USB cable in USB connection modes. Transferring music, photos and videos using the USB mass storage mode1  Connect your phone to a PC using a USB cable.2  If you haven't installed the LG Android Platform Driver on your PC, you will need to
46manually change the settings. Choose System settings > PC connection > USB connection type, then select Media sync (MTP).3  You can now view the mass storage content on your PC and transfer the files.Synchronize with Windows Media PlayerEnsure that Windows Media Player is installed on your PC.1  Use the USB cable to connect the phone to a PC on which Windows Media Player has been installed.2  Select the Media sync (MTP) option. When connected, a pop-up window will appear on the PC.3  Open Windows Media Player to synchronize music files.4  Edit or enter your device’s name in the pop-up window (if necessary).5  Select and drag the music files you want to the sync list.6  Start synchronization.t The following requirements must be satisfied to synchronize with Windows Media Player. Items RequirementOS Microsoft Windows XP SP2, Vista or higherWindow Media Player version Windows Media Player 10 or highert If the Windows Media Player version is lower than 10, install version 10 or higher.Connecting to Networks and Devices
47CallsMaking a call1  Touch   to open the keypad.2  Enter the number using the keypad. To delete a digit, touch the  .3  Touch   to make a call.4  To end a call, touch the End icon  .TIP! To enter "+" to make international calls, touch and hold  .Calling your contacts1  Touch   to open your contacts.2  Scroll through the contact list or enter the first few letters of the contact you want to call by touching Search contacts.3  In the list, touch   you want to call.Answering and rejecting a callWhen you receive a call in Lock state, swipe the   in any direction to Answer the incoming call.Swipe the   in any direction to Decline an incoming call. Swipe the Decline with message icon from the bottom if you want to send a message. TIP! Decline with messageYou can send a message quickly using this function. This is useful if you need to reject a call with message during a meeting.
48Adjusting the in-call volumeTo adjust the in-call volume during a call, use the Volume up and down keys on the left-hand side of the phone.Making a second call1  During your first call, touch Menu key  > Add call and dial the number. You can also go to the recently dialled numbers list by touching   or can search contacts by touching   and selecting the contact you want to call.2  Touch   to make the call.3  Both calls are displayed on the call screen. Your initial call is locked and put on hold.4  Touch the displayed number to toggle between calls. Or touch   Merge calls to start a conference call.5  To end active calls, touch End or touch the Home key and slide the notification bar down and select the End call icon  .NOTE: You are charged for each call you make.Viewing your call logsOn the Home screen, touch   and choose the Call logs tab  .View a complete list of all dialled, received and missed calls.TIP! t Touch any call log entry to view the date, time and duration of the call.t Touch the Menu key , then touch Delete all to delete all the recorded items.Calls
49Call settingsYou can configure phone call settings such as call forwarding, as well as other special features offered by your carrier. 1  On the Home screen, touch  .2  Touch .3  Tap Call settings and choose the options that you wish to adjust.
50ContactsAdd contacts to your phone and synchronize them with the contacts in your Google account or other accounts that support contact syncing.Searching for a contactOn the Home screen1  Touch   to open your contacts. 2  Touch Search contacts and enter the contact name using the keyboard.Adding a new contact1  Touch  , enter the new contact's number, then touch the Menu key . Touch Add to Contacts > Create new contact. 2  If you want to add a picture to the new contact, touch the image area.  Choose from Take photo or Select from Gallery.3  Select the contact type by touching  .4  Touch a category of contact information and enter the details about your contact.5  Touch Save.Favourites contactsYou can classify frequently called contacts as favourites.Adding a contact to your favourites1  Touch   to open your contacts.2  Touch a contact to view its details.3  Touch the star to the right corner of the contact's name. The star will turn yellow color.
51Removing a contact from your favourites list1  Touch   to open your contacts.2  Touch the   tab, and choose a contact to view its details.3  Touch the yellow color star to the right corner of the contact's name. The star turns grey color and the contact is removed from your favourites.Creating a group1  Touch   to open your contacts.2  Touch Groups and touch the Menu key . Select New group.3  Enter a name for the new group. You can also set a ringtone for the newly created group.4  Touch Save to save the group.NOTE: If you delete a group, the contacts assigned to that group will not be lost. They will remain in your contacts.
52MessagingYour phone combines SMS and MMS into one intuitive, easy-to-use menu.Sending a message1  Touch   on the Home screen and touch   to open a blank message.2  Enter a contact name or contact number in the To field. As you enter the contact name, matching contacts will appear. You can touch a suggested recipient. You can add more than one contact.NOTE: You will be charged for a text message for every person to whom you send the message.3  Touch the Enter message field and begin composing your message.4  Touch  to open the Options menu. Choose from Quick message, Insert smiley, Schedule sending, Add subject and Discard. TIP! You can touch the   icon to attach the file, that you want to share with message.5  Touch Send to send your message.6  Responses will appear on the screen. As you view and send additional messages, a message thread is created. WARNING: t The 160-character limit may vary from country to country, depending on the language and how the SMS is coded.t If an image, video or audio file is added to an SMS message, it is automatically converted into an MMS message and you are charged accordingly.
53Threaded box Messages (SMS, MMS) exchanged with another party can be displayed in chronological order so that you can conveniently see an overview of your conversation.Changing your message settingsYour phone message settings are pre-defined, so you can send messages immediately. You can change the settings according to your preferences.t Touch the Messaging icon on the Home screen, touch  and then tap Settings.
54E-mailYou can use the E-mail application to read emails from services like Gmail. The E-mail application supports the following account types: POP3, IMAP and Exchange.Your service provider or system administrator can provide you with the account settings you need.Managing an email accountThe first time you open the E-mail application, a set-up wizard opens to help you to set up an email account.After the initial set-up, E-mail displays the contents of your inbox. To add another email account:t Touch   > Apps tab > E-mail >touch  > Settings >  .To change an email account's settings:t Touch   > Apps tab > E-mail > touch  > Settings > General settings.To delete an email account:t Touch   > Apps tab > E-mail > touch  > Settings > touch   > touch an account you want to delete > Remove > select Yes.Working with account foldersTouch   > Apps tab > E-mail > touch  and select Folders.Each account has an Inbox, Outbox, Sent and Drafts folder. Depending on the features supported by your account's service provider, you may have additional folders.
55Composing and sending emailTo compose and send a message1  While in the E-mail application, touch the  .2  Enter an address for the message's intended recipient. As you enter text, matching addresses will be proposed from your Contacts. Separate multiple addresses using semicolons.3  Touch the  to add a Cc/Bcc and Touch   to attach files, if required.4  Enter the text of the message. 5  Touch  .TIP! When a new email arrives in your Inbox, you will be notified by a sound or vibration.
56CameraTo open the Camera application, tap Camera  on the Home screen.Getting to know the viewfinder  Swap camera – Switch between the rear–facing camera lens and the front–facing camera lens.  Intelligent  auto – Automatically identifies the scene's characteristics and adjusts aperture, shutter speed, options to take a photo.   Shot  mode – Choose from Normal, HDR, Panorama, VR panorama, Burst shot, Beauty shot or Dual camera.  Time catch shot – Touch this icon to capture the missing moment before pressing the shutter.  Settings – Touch this icon to open the settings menu.  Video mode –  Touch and slide down this icon to switch to video mode.  Take a photo  Gallery – Touch to view the last photo you captured. This enables you to access your gallery and view saved photos while in camera mode.NOTE: Please ensure the camera lens is clean before taking pictures.
57Using the advanced settingsIn the viewfinder, tap   to open the advanced options. You can change the camera settings by scrolling through the list. After selecting the option, tap the Back key.Touch if you want to change the viewfinder menu.To take a photo, say one of the following words: Cheese, Smile, Whisky, Kimchi or LG.Allows you to turn on the flash when taking a photo in dark conditions.Defines and controls the amount of sunlight entering the photo.Tap to select the focus mode.Selects photo resolution. If you choose high resolution, file size will increase, which means you will be able to store fewer photos in the memory.Finds the appropriate color and light settings for the current environment.The ISO rating determines the sensitivity of the camera's light sensor. The higher the ISO, the more sensitive the camera. This is useful in darker conditions when you cannot use the flash.Improves color quality in various lighting conditions.Applies artistic effects to your pictures.Sets a delay after the capture button is pressed. This is ideal if you want to be in the photo.
58Activate this to use your phone's location-based services. Take pictures wherever you are and tag them with the location. If you upload tagged pictures to a blog that supports Geotagging, you can see the pictures displayed on a map.NOTE: This function is only available when the GPS function is active.Selects a shutter sound.Select storage to save photos.TIP!t When you exit the camera, some settings return to their defaults, such as white balance, color effect, timer and scene mode. Check these before you take your next photo.t The setting menu is superimposed over the viewfinder, so when you change  photo color or quality elements, you will see a preview of the changed image behind the Settings menu.Taking a quick photo 1  Open the Camera application.2  Holding the phone horizontally, point the lens towards the subject you want to photograph.3  A focus box will appear in the center of the viewfinder screen. You can also tap anywhere on the screen to focus on that spot.4  When the focus box turns green, the camera has focused on your subject.5  Touch   to capture the photo.Camera
59Once you've taken a photoTouch   to view the last photo you took. Touch to share your photo using the SmartShare function.Touch to take another photo immediately.Touch to send your photo to others or share it via social network services.Touch to delete the photo.TIP! If you have an SNS account and set it up on your phone, you can share your photo with your SNS community.NOTE: Additional charges may apply when MMS messages are downloaded while roaming.Touch the Menu key  to open all advanced options.Set image as – Touch to use the photo as a Contact photo, Home screen wallpaper or Lock screen wallpaper.Move – Touch to move the photo to another place.Copy – Touch to copy the selected photo and save it to another album.Rename – Touch to edit the name of the selected photo.Rotate left/right – To rotate left or right.Crop – Crop your photo. Move your finger across the screen to select the area to be cropped.Edit – View and edit the photo.Slideshow – Automatically shows you the images in the current folder one after the other.Details – Find out more information about the file.
60Viewing your saved photosYou can access your saved photos when in camera mode. Just tap the Gallery icon   and your Gallery will be displayed.t To view more photos, scroll left or right.t To zoom in or out, double-tap the screen or place two fingers and spread them apart (move your fingers closer together to zoom out).Camera
61Video cameraGetting to know the viewfinder  Swap camera – Switch between the rear–facing camera lens and the front-facing camera lens.  Audio zoom – Tap to turn the Audio zoom On or Off.TIP! Zoom in a certain area to increase sound sensitivity and decrease noise.  Recording mode – Choose from Normal, WDR recording, Live effect or Dual recording.  Flash –  Tap to turn the flash On or Off.   Settings – Touch this icon to open the settings menu.  Camera mode – Touch and slide up this icon to switch to camera mode.  Start recording  Gallery – Touch to view the last video you recorded. This enables you to access your gallery and view your saved videos while in video mode.TIP!When recording a video, place two fingers on the screen and pinch to use the Zoom function.
62Using the advanced settingsUsing the viewfinder, touch   to open all the advanced options. Touch if you want to change the viewfinder menu.Touch to set the size (in pixels) of the video you are recording.Allows you to reduces image blur due to the movement of the subject of the video or hand movement. Defines and controls of the amount of sunlight entering the lens. Slide the brightness indicator along the bar towards “-” for a lower brightness video or towards “+” for a higher brightness video.Improves color quality in various lighting conditions.Choose a colour tone to use for your new view.Activate this to use your phone's location-based services.Select storage to save videos.Recording a quick video1  Open the Camera application and slide the Video mode button. 2  The video camera viewfinder appears on the screen.3  Holding the phone, point the lens towards the subject you wish to capture in your video.4  Touch   once to start recording.5  A red light will appear at the top left corner of the viewfinder with a timer showing the length of the video. 6  Touch  on the screen to stop recording.Video camera
63TIP! – Touch to capture image during recording a video. – Touch to pause during recording a video.After recording a videoTouch   to veiw the last video you took.Touch to share your video using the SmartShare function.Touch to record another video immediately.Touch to send your video to others or share it via social network services.Touch to delete the video.NOTE: Additional charges may apply when MMS messages are downloaded while roaming.Watching your saved videosFrom the Viewfinder tap  , you can see  the camera gallery. Tap on video play icon  to play the video.Adjusting the volume when viewing a videoTo adjust the volume of a video while it is playing, use the volume keys on the left side of the phone.
64FunctionQuickMemoUse the QuickMemo to practically and efficiently create memos during a call, with a saved picture or on the current phone screen.OR1  Enter the QuickMemo screen by pressing QuickButton Key for one second on the screen you want to capture.OR Touch and slide the status bar downward and touch  .2  Select the desired menu option from Pen type, Colour, Eraser and create a memo.
653  Touch   in the Edit menu to save the memo with the current screen in the Gallery or Notebook.NOTE: Please use a fingertip while using the QuickMemo. Do not use your fingernail.Using the QuickMemo optionsYou can easily use the QuickMenu options when using the QuickMemo.Touch to keep the current memo on the screen and use the phone simultaneously.Selects whether to use the background screen or not.Undo or Redo.Selects the pen type and the colour.Erases the memo that you created.Touch to send your memo to others or share it via social network services.Saves the memo with the current screen in the Gallery or Notebook.Viewing the saved QuickMemo Touch Notebook/Gallery and select the QuickMemo album.
66QuickTranslatorSimply aim the camera of your smart phone at the foreign sentence you want to understand. You can get the real-time translation anywhere and anytime.You can buy additional dictionaries for offline translation from the Google Play Store. Home language. Destination language. Translation of word. Translation of sentence. Translation of block. Flash.1  Touch   > Apps tab > QuickTranslator.2  Touch Word, Line or Block.3  Touch and select the desired language.4  Hold the phone toward the subject you want to translate for a few seconds.NOTE: Only one dictionary is provided free of charge. Additional dictionaries must be purchased. Please select from the list below the dictionary you would like to install as your complimentary dictionary.NOTE: There may be a difference in the rate of recognization depending on the size, font, color, brightness and angle of the letters that need to be translated.Function
67QSlideThe QSlide enables an overlay on your phone’s display for easy multi-window viewing.ORTouch to exit the QSlide and return to full window.Tap to adjust transparency.Tap to end the QSlide.Tap to adjust the size.1  Touch and slide the status bar downward > touch QSlide apps or when using applications that support by the QSlide > touch  . The function will be continuously displayed as a small window on your screen.2  You can make a call, browse the Web, or choose other phone options. You can also use and tap the screen of the small windows when the transparency bar is not full .NOTE: The QSlide can support up to two windows at the same time.
68Dual recordingThe Dual recording allows you to record videos with the front and rear cameras at the same time.1  Touch   > Apps tab > Camera. 2  Change to video mode > touch   > touch Dual recording.3  Touch   to start dual recording.NOTE: t Drag the small screen to move it to your desired location.t Touch and hold the small screen to resize it. t Tap on the small screen to switch screens.4  Touch  to stop dual recording.Function
69QuickRemoteQuickRemote turns your phone into a Universal Remote for your home TV, Set top box, audio system, DVD/Blu-ray players, air conditioner and projector.OR1  Touch   > Apps tab > QuickRemote > touch  .OR Touch and slide the status bar downwards and touch   > ADD DEVICES.2  Select the type and brand of device, then follow the on-screen instructions to configure the device(s).3  Touch and slide the status bar downwards and use QuickRemote features.Touch the Menu key  to select Delete device, Edit room, Settings and Help.NOTE: The QuickRemote operates the same way as an ordinary remote control infrared (IR) signals. Be careful not to cover the infrared sensor at the top of the phone when you use the QuickRemote function. This function may not be supported depending on the model, the manufacturer or service company.
70Audio zoomIncrease sound sensitivity in zooming area and decrease noise when recording.1  Touch   > Apps tab > Camera.2  Change to video mode > touch Audio zoom   and select On.3  Touch   to start recording.4  Zoom in a certain area to increase sound sensitivity and decrease noise.NOTE: t Available only in landscape view.t Do not cover the side microphones while using this feature.5  Touch  to stop recording.Function
71Tracking focus1  Touch   > Apps tab > Camera.2  Change to video mode > touch   to start recording.3  Touch on the subject in the preview screen to track it.4  Touch   to refine the focus.Live ZoomingLive Zooming allows you to zoom in or zoom out on a portion of a video that is being played to make the desired scan appear larger or smaller. 1  When viewing the video, use your index finger and thumb in a pinching or spreading motion to zoom in or out.
72NOTE: t While a video is playing, slide the screen up or down to adjust the screen brightness.t While playing a video, slide the screen left or right to rewind or fast-forward.t Do not press too hard; the touch screen is sensitive enough to pick up a light, but firm touch.LG SmartWorldLG SmartWorld offers an assortment of exciting content - games, applications, wallpaper and ringtones - giving LG phone users the chance to enjoy richer "Mobile Life" experiences.How to Get to LG SmartWorld from Your Phone1  Touch   > Apps tab > tap the   icon to access LG SmartWorld.2  Tap Sign in and enter ID/PW for LG SmartWorld. If you have not signed up yet, tap Register to receive your LG SmartWorld membership.3  Download the content you want.NOTE: What if there is no   icon? 1  Using a mobile Web browser, access LG SmartWorld (www.lgworld.com) and select your country. 2  Download the LG SmartWorld App. 3  Run and install the downloaded file.4  Access LG SmartWorld by tapping the   icon.Function
73How to use LG SmartWorldt Participate in monthly LG SmartWorld promotions.Search content.Find content by category (e.g. Games, Education, Entertainment etc).List of downloaded/to-be updated content.t Try the easy "Menu" buttons to find what you’re looking for fast.   Apps for you – Recommended content based on your previous choices.  Settings – Set Profile and Display.  Sign  in – Set your ID and Password.t Try other useful functions as well. (Content Detail screen)NOTE: LG SmartWorld may not be available from all carriers or in all countries.On-Screen PhoneOn-Screen Phone allows you to view your mobile phone screen from a PC via a USB or Wi-Fi connection. You can also control your mobile phone from your PC, using the mouse or keyboard.On-Screen Phone iconsConnects your mobile phone to your PC, or disconnects it.Changes the On-Screen Phone preferences.Exits the On-Screen Phone programme.
74Maximises the On-Screen Phone window.Minimize the On-Screen Phone window.On-Screen Phone featurest Real-time transfer and control: displays and controls your mobile phone screen when connected to your PC.t Mouse control: allows you to control your mobile phone by using the mouse to click and drag on your PC screen.t Text input with keyboard: allows you to compose a text message or note using your computer keyboard.t File transfer (mobile phone to PC): sends files from your mobile phone (e.g. photos, videos, music and Polaris Office files) to your PC. Simply right-click on the file which you want to send to PC and click on "Save to PC". t File transfer (PC to mobile phone): sends files from your PC to your mobile phone. Just select the files you wish to transfer and drag and drop them into the On-Screen Phone window. The files sent are stored in internal SD card.t Real-time event notifications: prompts a pop-up to inform you of any incoming calls or text/multimedia messages.How to install On-Screen Phone on your PC1  Visit LG Home (www.lg.com) and select a country of your choice.2  Go to Support > Mobile Phone Support > Select the Model (LG-D805) > Click OSP ( On-Screen Phone ) to download. You can install the On-Screen Phone on your PC.Function
75GalleryYou can store multimedia files in storage for easy access to all your multimedia files. Use this application to view multimedia files like pictures and videos.1  Touch   > Apps tab > Gallery. You can manage and share all your image and video files with Gallery.NOTE:t Some file formats are not supported, depending on the software installed on the device.t Some files may not play properly, depending on how they are encoded.Viewing picturesLaunching Gallery displays your available folders. When another application, such as Email, saves a picture, the download folder is automatically created to contain the picture. Likewise, capturing a screenshot automatically creates the Screenshots folder. Select a folder to open it.Pictures are displayed by creation date in a folder. Select a picture to view it full screen. Scroll left or right to view the next or previous image.Zooming in and outUse one of the following methods to zoom in on an image:t Double-tap anywhere to zoom in.t Spread two fingers apart on any place to zoom in. Pinch to zoom out, or double-tap to return.Multimedia
76Playing videosVideo files show the   icon in the preview. Select a video to watch it and tap  . The Videos application will launch.Editing photosWhen viewing an photo, tap the Menu key  > Edit.Deleting photos/videosUse one of the following methods:t In a folder, tap   and select photos/videos by ticking, and then tap on Delete.t When viewing a photo/Video, tap  .Setting as wallpaperWhen viewing a photo, touch the Menu key  > Set image as to set the image as wallpaper or assign to a contact.NOTE:t Some file formats are not supported, depending on the device software.t If the file size exceeds the available memory, an error can occur when you open files.VideosYour phone has a built-in video player that lets you play all of your favorite videos. To access the video player, touch   > Apps tab > Videos.Multimedia
77Playing a video1  Touch   > Apps tab > Videos. 2  Select the video you want to play.Touch the desired direction for audio zoom.Touch to enter into Qslide mode.Touch to share your video via the SmartShare function.Touch to lock a video screen.   Touch to view the video list.Touch to pause video playback.Touch to resume video playback.Touch to go 10 seconds forward.Touch to go 10 seconds backward.Touch to manage the video volume.Touch to change the ratio of the video screen.   To change the volume while watching a video, press the up and down volume keys on the left-hand side of the phone.Touch and hold a video in the list. The Share, Trim, Delete and Details options will be displayed.
78Video EditorYou can edit the photos or videos stored on the phone.NOTE: Video Editing function is supported only for photos or videos which recorded with this phone.< Project list screen >Buttons areaProject list areaHelp Create projectProjects should be exported to play in applications such as videosPlay projectDelete projectShare project with application such as YouTubeMultimedia
79< Project edit screen >Timeline areaViewer areaMove to project list screen. Currently edited project is save automaticallySplit video clip into two portions over the playheadAdd sound effectAdd video, image or audio clipUndo an actionRedo an actionAdd text to video or image clip
80Video WizYou can make your own movie using your images/video and music.1  Touch   > Apps tab > Video Wiz.2  After seeing the brief introduction on the steps to follow, tap OK.3  Tap   to add images or video.4  Tap the desired images or videos, then tap  .t To remove images or videos, tap   and touch cross mark on image >  .t To rearrange them, touch and hold an image/video, and drag and drop it to the desired position.5  Tap Select style to select the desired movie style.t Scroll through and select the style you want. A preview will be displayed.6  Tap Select music to set the background music.7  Tap   to play your movie.8  Tap   to edit the video clip using Text, Sticker or Magic spot.t After editing the video, tap  .9  Tap   to save the video.10 Tap   to view the help information on using this feature.11 Tap   to reset changes.Multimedia
81MusicYour phone has a built-in music player that lets you play all your favorite tracks. To access the music player, touch   > Apps tab > Music.Add music files to your phoneStart by transferring music files to your phone:t Transfer music using Media sync (MTP).t Download from the wireless Web.t Synchronize your phone to a computer.t Receive files via Bluetooth.Transfer music using Media sync (MTP)1  Connect the phone to your PC using the USB cable.2  Select the Media sync (MTP) option. Your phone will appear as another hard drive on your computer. Click on the drive to view it. Copy the files from your PC to the drive folder.3  When you’re finished transferring files, swipe down on the Status Bar and touch USB connected > Charge only. You may now safely unplug your device.Playing a song1  Touch   > Apps tab > Music. 2  Touch Songs.3  Select the song you want to play.Touch to find the files with YouTubeTouch to share your music via SmartShare function.Touch to set shuffle mode
82Touch to set repeat modeTouch to manage the music volumeTouch to pause playbackTouch to resume playbackTouch to skip to the next track on the album or in the playlistTouch to go back to the beginning of the song. Touch twice to return to the previous songTouch to set the favouritesTouch to see the current playlistTouch to set Dolby audio effect when connected with a headset jackTo change the volume while listening to music, press the up and down volume keys on the left-hand side of the phone.Touch and hold any song in the list. The Play, Add to playlist, Share, Set as ringtone, Delete, Details and Search options will be displayed.NOTE:t Some file formats are not supported, depending on the device software.t If the file size exceeds the available memory, an error can occur when you open files.Multimedia
83NOTE: Music file copyrights may be protected by international treaties and national copyright laws. Therefore, it may be necessary to obtain permission or a licence to reproduce or copy music.  In some countries, national laws prohibit private copying of copyrighted material. Before downloading or copying the file, check the national laws of the relevant country concerning the use of such material.
84Setting your alarm1  Touch   > Apps tab > Alarm/Clock >  .2  After you set the alarm, your phone lets you know how much time is left before the alarm will go off.3  Set Repeat, Snooze duration, Vibration, Alarm sound, Alarm volume, Auto app starter, Puzzle lock and Memo. Touch Save.NOTE: To change alarm settings in the alarm list screen, touch the Menu key  and select Settings.Using your calculator1  Touch   > Apps tab > Calculator.2  Touch the number keys to enter numbers.3  For simple calculations, touch the function you want to perform (+, –, x or ÷) followed by =.4  For more complex calculations, slide the left then choose sin, cos, tan, log etc.5  To check the history, tap the icon  .Adding an event to your calendar1  Touch   > Apps tab > Calendar.2  On the screen, you can find the different view types for the Calendar (Day, Week, Month, Agenda).3  Tap on the date for which you wish to add an event and touch  .4  Touch Event name and enter the event name.5  Touch Location and enter the location. Check the date and enter the time you wish your event to start and finish.Utilities
856  If you wish to add a note to your event, touch Add note select the saved notebook image.7  If you wish to repeat the alarm, set REPEAT and set REMINDERS, if necessary.8  Touch Save to save the event in the calendar.Voice RecorderUse the voice recorder to record voice memos or other audio files.Recording a sound or voice1  Touch   > the Apps tab and select Voice Recorder.2  Touch   to begin recording.3  Touch   to end the recording.4  Touch   to listen to the recording.NOTE: Touch  to access your album. You can listen to the saved recording. The available recording time may differ from actual recording time.Sending the voice recording1  Once you have finished recording, you can send the audio clip by touching  .2  Choose from Bluetooth, E-mail, Gmail, Memo, Messaging or SmartShare Beam. When you select Bluetooth, E-mail, Gmail, Memo, Messaging or SmartShare Beam the voice recording is added to the message. You may then write and send the message as you usually would.
86Task ManagerYou can manage your applications using Task Manager. You can easily check the number of applications that are currently running and shut down certain applications. TasksThis task can be synchronized with MS Exchange account. You can create task, revise it and delete it in MS outlook or MS Office Outlook Web Access.To Synchronize MS Exchange1  From the Home Screen, Touch   > Settings.2  Touch Accounts & sync > ADD ACCOUNT.3  Touch Microsoft Exchange to create Email address and Password.4  Make sure if you checkmark Sync task.NOTE: MS Exchange may not be supported depending on email server.Polaris Office 4Polaris Office is a professional mobile office solution that lets users conveniently view various types of office documents, including Word, Excel and PowerPoint files, anywhere  or anytime, using their mobile devices.Touch   > Apps tab > Polaris Office 4.Viewing filesMobile users can now easily view a wide variety of file types, including Microsoft Office documents and Adobe PDF, right on their mobile devices. When viewing documents using Polaris Office 4, the objects and layout remain the same as in the original documents.Utilities
87BackupAbout backing up and restoring smart phone dataIt is recommended that you regularly create and save a backup file on the internal storage, especially before updating any software. Maintaining a current backup file in storage memory may allow you to recover smart phone data if your smart phone is lost, stolen, or corrupted by an unforeseen issue.This Backup application is supported between LG smart phones, other S/W versions or OSs. As a result so, when you buy the new LG smart phone, you can backup the current Your phone data to your new phone.If you have preloaded Backup application on your smart phone, you can backup and restore most of your smart phone data, LG Home screen, Personal data, LG Apps, Settings and Downloaded apps.Using this application you may:t Perform a manual backup of your smart phone data.t Schedule automatic backups of your smart phone data.t Restore your smart phone data.NOTE: Please note that the Backup function does not support the backup of User data & Media data (Picture/Video/Music). Please backup those files using the Media sync (MTP). Connect your phone to your computer using a USB cable and touch Media sync (MTP). WARNING To protect against unexpected shutoff during backup or restore operations, due to insufficient battery power, you should always keep your battery fully charged.
88Backup your smart phone data1  Touch   > Apps tab > Backup > Manual backup > Internal storage or SD card.2  Touch New backup to enter a name for your backup file and select Next.3  Select the check box next to the item you want to backup and select Backup to backup.4  When all selected files have been backed up, you will see the message Backup complete. Scheduling automatic backupsYou can also program automatic backups for the data on your smart phone according to your schedule setting. To do this, complete the following steps:1  Touch   > Apps tab > Backup > Auto-backup.2  On the Backup Location screen, touch Internal storage or SD card. 3  Enter a name for your backup file and select Next.4  Select the check box next to the data you want to backup, and select Next.5  From the list, select how often you want to backup your device data and settings, and select Done to finish the schedule set.Restoring smart phone dataNOTE: All files that are stored on your smart phone are deleted before the backup file is restored.Utilities
891  Touch   > Apps tab > Backup > Restore.2  On the Restore screen, select a backup file that contains the data you wish to restore. 3  Select the check box next to the item you wish to restore and select Restore to restore it to your phone.NOTE: Please note that your phone data will be overwritten with the content of your backup.4  If the backup file is encrypted, type the password that you created to encrypt it. 5  When all selected files have been restored, the phone will automatically be restart.NOTE: You can set Enable encryption to encrypt your backup files for extra protection.Touch   from the Backup screen, and enter a password and hint in case you forgot your password. Once you have set up a password, you need to enter it every time you want to do backup/restore.Google+Use this application to stay connected with people via Google’s social network service.t Touch   > Apps tab > Google+.NOTE: This application may not be available depending on the region or service provider.
90Voice SearchUse this application to search webpages using voice.1  Touch   > Apps tab > Voice Search.2  Say a keyword or phrase when Speak now appears on the screen. Select one of the suggested keywords that appear.NOTE: This application may not be available depending on the region or service provider.DownloadsUse this application to see what files have been downloaded through the applications.t Touch   > Apps tab > Downloads.NOTE: This application may not be available depending on the region or service provider.Utilities
91The WebInternetUse this application to browse the Internet. Browser gives you a fast, full-color world of games, music, news, sports, entertainment and much more, right on your mobile phone wherever you are and whatever you enjoy.NOTE: Additional charges apply when connecting to these services and downloading content. Check data charges with your network provider.1  Touch   > Apps tab > Internet.Using the Web toolbarTouch slide it upwards with your finger to open.Touch to go back one page.Touch to go forward one page, to the page you connected to after the current one. This is the opposite of what happens when you touch the Back key, which takes you to the previous page.Touch to go to the Home page. Touch to add a new window.  Touch to access bookmarks.Viewing webpagesTap the address field, enter the web address and tap Go.
92Opening a pageTo go to new page, tap     .To go to another webpage, tap  , scroll up or down, and tap the page to select it.Searching the web by voiceTap the address field, tap   , speak a keyword, and then select one of the suggested keywords that appear.NOTE: This feature may not be available depending on the region or service provider.BookmarksTo bookmark the current webpage, touch   > Save to bookmarks > OK.To open a bookmarked webpage, tap   and select one.HistoryTap   > History to open a webpage from the list of recently-visited webpages. To clear the history, tap Menu key   Clear all history.Using Popup BrowserUse this feature to access the Internet without closing the current application.While viewing content, such as contacts or notes that include web addresses, select a web address and then tap Popup Browser to open the pop-up browser. Tap and drag the browser to move it to another location.To view the browser in full screen, tap  .To close the browser, tap  .The Web
93ChromeUse Chrome to search for information and browse webpages.1  Touch   > Apps tab > Chrome.NOTE: This application may not be available, depending on your region and service provider.Viewing webpagesTap the Address field, and then enter a web address or search criteria.Opening a pageTo go to a new page, tab      New tab.To go to another webpage, tap  , scroll up or down and tap the page to select it.Syncing with other devicesSync open tabs and bookmarks to use with Chrome on another device when you are logged in with the same Google account.To view open tabs on other devices, tap Menu key   Other devices. Select a webpage to open.To add bookmarks, tap  .
94SettingsAccess the Settings menuOn the Home screen, touch   > Apps tab > Settings. or On the Home screen, touch  > System settings.1  Select a setting category and select an option.WIRELESS & NETWORKS< Wi-Fi >Wi-Fi – Turns on Wi-Fi to connect to available Wi-Fi networks.TIP! How to obtain the MAC addressTo set up a connection in some wireless networks with MAC filters, you may need to enter the MAC address of your phone in the router.You can find the MAC address in the following user interface: touch   > Apps tab > Settings > Wi-Fi >   > Advanced > MAC address.< Bluetooth >Turn the Bluetooth wireless feature on or off to use Bluetooth.< Mobile data >Displays the data usage and set mobile data usage limit.< Call >Configure phone call settings such as call forwarding and other special features offered by your carrier.Fixed dialing numbers – Turn on and compile a list of numbers that can be called from your phone. You’ll need your PIN2, which is available from your operator. Only numbers within the fixed dial list can be called from your phone.Save unknown numbers – Add unknown numbers to contacts after a call.Voicemail – Allows you to select your carrier’s voicemail service.
95Incoming call popup – Display incoming call popup when using camera and videosCall reject – Allows you to set the call reject function. Choose from Call reject mode or Rejection list.Decline with message – When you want to reject a call, you can send a quick message using this function. This is useful if you need to reject a call during a meeting.Connection vibration – Vibrates your phone when the other party answers the call.Privacy keeper – Hides the caller name and number for an incoming call.Power button ends call – Allows you to select your end call.Call forwarding – Choose whether to divert all calls when the line is busy, when there is no answer or when you have no signal.Call barring – Lock incoming, outgoing or international calls.Call duration – View the duration of calls including Last call, All calls, Dialled calls and Received calls.Noise suppression – Suppress background noise in call.Additional settings – Allows you to change the following settings:   Caller ID: Choose whether to display your number in an outgoing call.  Call waiting: If call waiting is activated, the handset will notify you of an incoming call while you are on a call (depending on your network provider).< Share & Connect >NFC – Your phone is an NFC-enabled mobile phone. NFC (Near Field Communication) is a wireless connectivity technology that enables two-way communication between electronic devices. It operates over a distance of a few centimeters. You can share your content with an NFC tag or another NFC support device by simply touching it with your device. If you touch an NFC tag with your device, it will display the tag content on your device.   To switch NFC on or off: From the Home screen, touch and slide the notification panel down with your finger, then select the NFC icon to turn it on.
96NOTE: When airplane mode is activated, the NFC application can be used.  Using NFC: To use NFC, make sure your device is switched on, and activate NFC if disabled.Direct/Android Beam – When this feature is turned on, you can beam app content to another NFC-capable device by holding the devices close together. Just bring the device together(typically back to back) and then touch your screen. The app determines what gets beamed.Miracast – Mirror phone screen and sound onto Miracast dongle or TV Wirelessly.SmartShare Beam – Enable to receive files from LG phones.File networking – Allows you to share folders with other devices via wireless connection.< Tethering & Networks >Airplane mode – After switching to Airplane mode, all wireless connections are disabled.Portable Wi-Fi hotspot – Allows you to share mobile network via Wi-Fi and you can configure portable Wi-Fi hotspot settings.Bluetooth tethering – Allows you to set your phone whether you are sharing the Internet connection or not.VPN – Displays the list of Virtual Private Networks (VPNs) that you've previously configured. Allows you to add different types of VPNs.NOTE: You must set a lock screen PIN or password before you can use credential storage.Mobile networks – Set options for data roaming, network mode & operators, access point names (APNs) etc.Settings
97DEVICE< Sound >Sound profile – Choose the Sound, either Vibrate only or Silent.Volumes – Adjust the phone's volume settings to suit your needs and your environment.Quiet time – Disable notification including call and message to focus on private time effectively.Ringtone with vibration – Vibration feedback for calls and notifications.Smart ringtone – Increase phone ringtone volume automatically in noisy environments.Phone ringtone – Allows you to set your default incoming call ringtone.Notification sound – Allows you to set your default notification ringtone.Gentle vibration – Gradually increasing vibration up to current strength set.Vibrate strength – Set vibrate strength for calls, notifications and touch feedbacks.Incoming call vibration – Allows you to choose the type of vibration for incoming calls.Dial pad touch tones – Allows you to set the phone to play tones when using the dialpad to dial numbers.Touch sounds – Allows you to set your phone to play a sound when you touch buttons, icons and other onscreen items that react to your touch.Screen lock sound – Allows you to set your phone to play a sound when locking and unlocking the screen.Vibrate on touch – Allows you to set the vibration feedback when the phone screen is touched.< Display >Brightness – Adjust the screen brightness.Screen timeout – Set the time for screen timeout.Auto-rotate screen – Set to switch orientation automatically when you rotate the phone.
98Font type – Change the type of display font.Font size – Change the size of the display font.Smart screen – Keep screen on when device detects your eyes looking at the screen.Smart video – Pause video while playing automatically when phone detects you are not looking at the screen.Front touch key light – Set the front key light duration.Home button LED – LED light around the Home button is controlled by your selections.Quick Cover – Activate the Quick Cover(only for CCF-210 model). The screen will be automatically turned on or off.Aspect ratio correction – This will change the aspect ration of downloaded apps.Motion sensor calibration – Allows you to improve the accuracy of the tilt and speed of the sensor.< Home screen >Set the Theme, Screen swipe effect, Wallpaper or Portrait view only. Select the option to set Scroll screens circularly and Home backup & restore.< Lock screen >Select screen lock – Set a screen lock type to secure your phone. Opens a set of screens that guide you through drawing a screen unlock pattern. Set None, Swipe, Face Unlock, Pattern, PIN or Password.If you have enabled a Pattern lock type when you turn on your phone or wake up the screen, you will be asked to draw your unlock pattern to unlock the screen.Wallpaper – Select the wallpaper for your lock screen from Gallery or Wallpaper gallery.Clocks & shortcuts – Customize clocks & shortcuts on the lock screen.Screen effect – Select the screen effect.Owner info – Show owner info on the lock screen.Lock timer – Set the lock time after screen timeout.Settings
99Power button instantly locks – Set the screen lock when the power button is pressed.Vibrate on touch – Allows you to set the vibration feedback for phone screen touch.< Gestures >Move Home screen items – Touch and hold an item and tilt the device to move the item in Home screens or applications.Tilt sensitivity – Test and adjust the sensitivity of the tilt sensor for the Home screen and applications.Silence incoming calls – Flip the device to mute incoming calls.Snooze or stop alarm – Flip the device to snooze or stop alarm.Pause video – Flip the device to pause playing video.Help – Help for gesture functions.<One-handed operation>Press the arrow to adjust the position of dial keypad, LG keyboard, Message or lock screen left or right side of the screen to easily use it with one hand.< Storage >INTERNAL STORAGE – View the internal storage usage.SD CARD – Check total available SD card space. Touch Unmount SD card for safe removal. Erase SD card if you want to delete all data from the SD card.< Battery >Power saver – Manage the battery for the power saving items.< Apps >View and manage your applications.
100PERSONAL< Accounts & sync >Permits applications to synchronize data in the background, whether or not you are actively working in them. Deselecting this setting can save battery power and lower (but  not eliminate) data usage.< Location access >Access to my location – If you select Google's location service, your phone determines your approximate location using Wi-Fi and mobile networks. When you select this option, you're asked whether you consent to allowing Google to use your location when providing these services.GPS satellites – If you select GPS satellites, your phone determines your location to street-level accuracy.Wi-Fi & mobile network location – Lets apps use data from sources such as Wi-Fi and mobile networks to determine your approximate location.< Security >Set up SIM card lock – Set up Micro-USIM card lock or change the Micro-USIM card PIN.Password typing visible – Show the last character of the hidden password as you type.Phone administrators – View or deactivate phone administrators.Unknown sources – Default setting to install non-Play store applications.Trusted credentials – Display trusted CA certificates.Install from storage – Choose to install encrypted certificates.Clear credentials – Remove all certificates.< Language & input >Use the Language & input settings to select the language for the text on your phone and to configure the on-screen keyboard, including words you've added to its dictionary.Settings
101< Backup & reset >Change the settings for managing your settings and data.Backup my data – Set to backup your settings and application data to the Google server.Backup account – Set to backup your account.Automatic restore – Set to restore your settings and application data when the applications are reinstalled on your device.Factory data reset – Reset your settings to the factory default values and delete all your data. If you reset the phone this way, you are prompted to re-enter the same information as when you first started Android.SYSTEM<QuickButton>Select apps you wish to get quick access to using QuickButton.< Date & time >Use Date & time settings to set how dates will be displayed. You can also use these settings to set your own time and time zone rather than obtaining the current time from the mobile network.< Accessibility >Use the Accessibility settings to configure accessibility plug-ins you have installed on your phone.NOTE: Requires additional plug-ins to become selectable.< PC connection >USB connection type – Set the desired mode: Charge only, Media sync (MTP), USB tethering, LG software or Camera (PTP).Ask on connection – Ask in USB connection mode when connecting to a computer.
102Help – Help for USB connection.PC Suite – Check this to use LG PC Suite with your Wi-Fi connection.Please note that Wi-Fi network should be connected to LG PC Suite via a Wi-Fi connection through WIRELESS & NETWORKS.On-Screen Phone – Check this  to receive Wi-Fi connection request from On-Screen Phone.Help – Help for LG software.< Developer options > Keep in mind that turning on these developer settings may result in irregular device behavior. The developer options are recommended only for advanced users.< About phone >View legal information and check your phone status and software version.Settings
103"LG PC Suite" PC software is a program that helps you connect your device to a PC via a USB cable and Wi-Fi. Once connected, you can use the functions of your device from your PC.With your "LG PC Suite" PC Software, You Can...t Manage and play your media contents (music, movie, picture) on your PC.t Send multimedia contents to your device.t Synchronizes data (schedules, contacts, bookmarks) in your device and PC.t Backup the applications in your device.t Update the softwares in your device.t Backup and restore the device data.t Play multimedia contents of your PC from your device.t Backup and create and edit the memos in your deviceNOTE: You can use the Help menu from the application to find out how to use your "LG PC Suite" PC software.Installing "LG PC Suite" PC Software"LG PC Suite" PC software can be downloaded from the webpage of LG.1  Go to www.lg.com and select a country of your choice.2  Go to Support > MOBILE SUPPORT > LG Mobile Phones > Select the Model  or Go to Support > Mobile > Select the Model.3  Click PC SYNC from MANUALS & DOWNLOAD and click DOWNLOAD to download "LG PC Suite" PC software.PC software (LG PC Suite)
104System Requirements for "LG PC Suite" PC softwaret OS: Windows XP (Service pack 3) 32bit, Windows Vista, Windows 7, Windows 8t CPU: 1 GHz or higher processorst Memory: 512 MB or higher RAMst Graphic card: 1024 x 768 resolution, 32 bit color or highert HDD: 500 MB or more free hard disk space (More free hard disk space may be needed depending on the volume of data stored.)t Required software: LG integrated drivers, Windows Media Player 10 or laterNOTE: LG Integrated USB DriverLG integrated USB driver is required to connect an LG device and PC and installed automatically when you install "LG PC Suite" PC software application.Synchronizing your Device to a PCData from your device and PC can be synchronized easily with "LG PC Suite" PC software for your convenience. Contacts, schedules and bookmarks can be synchronized.The procedure is as follows:1  Connect your device to PC. (Use a USB cable or Wi-Fi connection.)2  The USB connection type will appear, then select LG software.3  After connection, run the program and select the device section from the category on the left side of the screen.4  Click Personal information to select.5  Select the checkbox of contents to synchronize and click the Sync button.NOTE: To synchronize your phone with your PC, you need to install LG PC Suite onto your PC. Please refer to previous pages to install LG PC Suite.PC software (LG PC Suite)
105Moving contacts from your Old Device to your New Device1  Export your contacts as a CSV file from your old device to your PC using a PC sync program.2  Install "LG PC Suite" on the PC first. Run the program and connect your Android mobile phone to the PC using a USB cable.3  On the top menu, select Device > Import to device > Import contacts.4  A popup window to select the file type and a file to import will appear.5  On the popup, click the Select a file and Windows Explorer will appear.6  Select the contacts file to import in Windows Explorer and click the Open.7  Click OK.8  A Field mapping popup to link the contacts in your device and new contacts data will appear.9  If there is a conflict between the data in your PC contacts and device contacts, make the necessary selections or modifications in LG PC Suite.10 Click OK.
106Phone software updateLG Mobile phone software update from the InternetFor more information about using this function, please visit http://update.lgmobile.com or http://www.lg.com/common/index.jsp   select your country and language. This feature allows you to conveniently update the firmware on your phone to a newer version from the Internet without needing to visit a service center. This feature will only be available if and when LG makes a newer firmware version available for your device.Because the mobile phone firmware update requires the user's full attention for the duration of the update process, please make sure you check all instructions and notes that appear at each step before proceeding. Please note that removing the USB data cable during the upgrade may seriously damage your mobile phone.NOTE: LG reserves the right to make firmware updates available only for selected models at its own discretion and does not guarantee the availability of the newer version of the firmware for all handset models.LG Mobile Phone software update via Over-the-Air (OTA)This feature allows you to conveniently update your phone's software to a newer version via OTA, without connecting using a USB data cable. This feature will only be available if and when LG makes a newer firmware version available for your device.You should first check the software version on your mobile phone: Settings > About phone > Software Update > Check now for update.Phone software update
107NOTE: Your personal data from internal phone storage—including information about your Google account and any other accounts, your system/application data and settings, any downloaded applications and your DRM licence—might be lost in the process of updating your phone's software. Therefore, LG recommends that you backup your personal data before updating your phone's software. LG does not take responsibility for any loss of personal data.NOTE: This feature depends on your network service provider, region and country.
108About this user guidet Before using your device, please carefully read this manual. This will ensure that you use your phone safely and correctly.t Some of the images and screenshots provided in this guide may appear differently on your phone.t Your content may differ from the final product, or from software supplied by service providers or carriers, This content may be subject to change without prior notice. For the latest version of this manual, please visit the LG website at www.lg.com.t Your phone's applications and their functions may vary by country, region, or hardware specifications. LG cannot be held liable for any performance issues resulting from the use of applications developed by providers other than LG.t LG cannot be held liable for performance or incompatibility issues resulting from edited registry settings being edited or operating system software being modified. Any attempt to customize your operating system may cause the device or its applications to not work as they should.t Software, audio, wallpaper, images, and other media supplied with your device are licensed for limited use. If you extract and use these materials for commercial or other purposes is, you may be infringing copyright laws. As a user, you are fully are entirely responsible for the illegal use of media.t Additional charges may be applied for data services, such as messaging, uploading and downloading, auto-syncing, or using location services. To avoid additional charges, select a data plan to is suitable for your needs. Contact your service provider to obtain additional details.Trademarkst LG and the LG logo are registered trademarks of LG Electronics.t All other trademarks and copyrights are the property of their respective owners.About this user guide
109DivX HD ABOUT DIVX VIDEO: DivX® is a digital video format created by DivX, LLC, a subsidiary of Rovi Corporation. This is an official DivX Certified® device that has passed rigorous testing to verify that it plays DivX video. Visit divx.com for more information and software tools to convert your files into DivX videos. ABOUT DIVX VIDEO-ON-DEMAND: This DivX Certified® device must be registered in order to play purchased DivX Video-on-Demand (VOD) movies. To obtain your registration code, locate the DivX VOD section in your device setup menu. Go to vod.divx.com for more information on how to complete your registration.DivX Certified® to play DivX® video up to HD 720p, including premium content.DivX®, DivX Certified® and associated logos are trademarks of Rovi Corporation or its subsidiaries and are used under license.Dolby Digital Plus Manufactured under license from Dolby Laboratories. Dolby, Dolby Digital Plus, and the double-D symbol are trademarks of Dolby Laboratories.Notice: Open Source SoftwareTo obtain the corresponding source code under GPL, LGPL, MPL and other open source licences, please visit http://opensource.lge.com/ All referred licence terms, disclaimers and notices are available for download with the source code.
110These accessories are available for use with the your phone. (Items described below may be optional.)Travel adaptor Stereo headsetQuick Start Guide Data cableMicro-USIM ejection toolAccessoriesNOTE: t  Always use genuine LG accessories. t  Failure to do this may void your warranty.t  Accessories may vary in different regions.
111TroubleshootingThis chapter lists some problems you might encounter when using your phone. Some problems require you to call your service provider, but most are easy to fix yourself.Message Possible causes Possible corrective measuresMicro-USIM card errorThere is no Micro-USIM card in the phone or it is inserted incorrectly.Make sure that the Micro-USIM card is correctly inserted.No network connection/ Dropped networkSignal is weak or you are outside the carrier network.Move toward a window or into an open area. Check the network operator coverage map.Operator applied new services.Check whether the Micro-USIM card is more than 6~12 months old. If so, change your Micro-USIM card at your network provider's nearest branch. Contact your service provider.Codes do not matchTo change a security code, you will need to confirm the new code by re-entering it.If you forget the code, contact your service provider.The two codes you have entered do not match.
112Message Possible causes Possible corrective measuresNo applications can be setNot supported by service provider or registration required.Contact your service provider.Calls not availableDialling error  New network not authorized.New Micro-USIM card inserted. Check for new restrictions.Pre-paid charge limit reached.Contact service provider or reset limit with PIN2.Phone cannot be switched onOn/Off key pressed too briefly.Press the On/Off key for at least two seconds.Battery is not charged.Charge battery. Check the charging indicator on the display.Troubleshooting
113Message Possible causes Possible corrective measuresCharging errorBattery is not charged. Charge battery.Outside temperature is too hot or cold.Make sure phone is charging at a normal temperature.Contact problem Check the charger and its connection to the phone.No voltage Plug the charger into a different socket.Charger defective Replace the charger.Wrong charger Use only original LG accessories.Number not allowedThe Fixed dialling number function is on.Check the Settings menu and turn the function off.Impossible to receive / send SMS & photosMemory full Delete some messages from your phone.Files do not openUnsupported file format Check the supported file formats.
114Message Possible causes Possible corrective measuresThe screen does not turn on when I receive a call.Proximity sensor problemIf you use a protection tape or case, make sure it has not covered the area around the proximity sensor. Make sure that the area around the proximity sensor is clean.No sound Vibration modeCheck the settings status in the sound menu to make sure you are not in vibration or silent mode.Hangs up or freezesIntermittent software problemTry to perform a software update via the website.Troubleshooting
115CategorySub-CategoryQuestion AnswerBTBluetoothDevicesWhat are the functions available via BluetoothYou can connect a Bluetooth audio device such as a Stereo/Mono headset or Car Kit. Also, when the FTP server is connected to a compatible device, you can share content stored on the storage media.BTBluetoothHeadsetIf my Bluetooth headset is connected, can I listen to my music through my 3.5 mm wired headphones?When a Bluetooth headset is connected, all system sounds are played over the headset. As a result, you will not be able to listen to music through your wired headphones.DataContactsBackupHow can I backup Contacts?The Contacts data can be synchronized between your phone and Gmail™.DataSynchronizationIs it possible to set up one-way sync with Gmail?Only two-way synchronization is available.DataSynchronizationIs it possible to synchronize all email folders?The Inbox is automatically synchronized. You can view other folders by Touching the Menu Key  and select Folders to choose a folder.FAQ
116CategorySub-CategoryQuestion AnswerGoogle™ ServiceGmail Log-InDo I have to log into Gmail whenever I want to access Gmail?Once you have logged into Gmail, no need to log into Gmail again.Google™ ServiceGoogle AccountIs it possible to filter emails?No, email filtering is not supported via the phone.Phone FunctionEmailWhat happens when I execute another application while writing an email?Your email will automatically be saved as a draft.Phone FunctionRingtoneIs there a file size limitation for when I want to use  MP3 file as  ring tone?There is no file size limitation.Phone FunctionMessage TimeMy phone does not display the time of receipt for messages older than 24 hrs. How can I change this?You will only be able to see the times for messages received the same day.Phone FunctionNavigationIs it possible to install another navigation application on my phone?Any application that is available at Play Store™ and is compatible with the hardware can be installed and used.FAQ
117CategorySub-CategoryQuestion AnswerPhone FunctionSynchronisationIs it possible to synchronize my contacts from all my email accounts?Only Gmail and MS Exchange server (company email server) contacts can be synchronized.Phone FunctionWait and PauseIs it possible to save a contact with Wait and Pause in the numbers?If you transferred a contact with the W & P functions saved into the number, you will not be able to use those features. You will need to re-save each number.How to save with Wait and Pause:1.  From the Home screen, touch the Phone icon  .2.  Dial the number, then touch the Menu Key .3.  Touch Add 2-sec pause or Add wait.Phone FunctionSecurityWhat are the phone’s security functions?You are able to set the phone to require that an Unlock Pattern be entered before the phone can be accessed or used.
118CategorySub-CategoryQuestion AnswerPhone FunctionUnlockPatternHow do I create the Unlock Pattern?1.  From the Home screen, touch the Menu Key .2.  Touch System settings > Lock screen.3.  Touch Select screen lock > Pattern. The first time you do this, a short tutorial about creating an Unlock Pattern will appear.4.  Set up by drawing your pattern once, and once again for confirmation.Precautions to take when using the pattern lock.It is very important to remember the unlock pattern you set. You will not be able to access your phone if you use an incorrect pattern five times. You have five chances to enter your unlock pattern, PIN or password. If you have used all 5 opportunities, you can try again after 30 seconds. (Or, if you preset the backup PIN, you can use the backup PIN code to unlock the pattern.)FAQ
119CategorySub-CategoryQuestion AnswerPhone FunctionUnlockPatternWhat should I do if I forget the unlock pattern and I didn’t create my Google account on the phone?If you have forgotten your pattern:If you logged into your Google account on the phone but failed to enter the correct pattern 5 times, touch the forgot pattern button. You are then required to log in with your Google account to unlock your phone. If you have not created a Google account on the phone or you have forgotten it, you will have to perform a hard reset.Caution: If you perform a factory reset, all user applications and user data will be deleted. Please remember to backup any important data before performing a factory reset.Phone FunctionMemoryWill I know when my memory is full? Yes, you will receive a notification.Phone FunctionLanguage SupportIs it possible to change my phone's language?The phone has multilingual capabilities.To change the language:1.  From the Home screen, touch the Menu Key  and touch System settings.2.  Touch Language & input > Language.3.  Touch the desired language.
120CategorySub-CategoryQuestion AnswerPhone FunctionVPNHow do I set up a VPN?VPN access configuration is different for each company. To configure VPN access from your phone, you must obtain the details from your company’s network administrator.Phone FunctionScreen time outMy screen turns off after only 15 seconds. How can I change the amount of time for the backlight to turn off?1.  From the Home screen, touch the Menu Key .2.  Touch System settings > Display.3.  Touch Screen timeout from SCREEN.4.  Touch the preferred screen backlight timeout time.Phone FunctionWi-Fi & mobile networkWhen Wi-Fi and mobile network are both available, which service will my phone use?When using data, your phone may default to the Wi-Fi connection (if Wi-Fi connectivity on your phone is set to On). However, there will be no notification when your phone switches from one to the other.To know which data connection is being used, view the mobile network or Wi-Fi icon at the top of your screen.Phone FunctionHome screenIs it possible to remove an application from the Home screen?Yes. Just touch and hold the icon until the dustbin icon appears at the top and center of the screen. Then, without lifting your finger, drag the icon to the trash can.FAQ
121CategorySub-CategoryQuestion AnswerPhone FunctionApplicationI downloaded an application and it causes a lot of errors. How do I remove it?1.  From the Home screen, touch the Menu Key .2.  Touch System settings > Apps from DEVICE > DOWNLOADED.3.  Touch the application, then touch Uninstall.Phone FunctionChargerIs it possible to charge my phone using a USB data cable without installing the necessary USB driver?Yes, the phone will be charged by the USB cable regardless of whether the necessary drivers are installed or not.Phone FunctionAlarmCan I use music files for my alarm?Yes. After saving a music file as a ringtone, you can use it as your alarm.1.  Touch and hold a song in a library list. In the menu that opens, touch Set as ringtone.2.  In the alarm clock setting screen, select the song as a ringtone.Phone FunctionAlarmWill my alarm be audible or will it go off if the phone is turned off?No, this is not supported.Phone FunctionAlarmIf my ringer volume is set to Off or Vibrate, will I hear my alarm?Your alarm is programmed to be audible even in these scenarios.
122CategorySub-CategoryQuestion AnswerRecovery SolutionHard Reset (Factory Reset)How can I perform a factory reset if I can’t access the phone’s setting menu?If your phone does not restore to its original condition, use a hard reset (factory reset) to initialize it.FAQ

Navigation menu