LG Electronics USA DT-LG24V55 Personal Computer User Manual
LG Electronics USA Personal Computer
UserManual.wiki
>
LG Electronics USA
>
DT LG24V55 User Manual
User Manual
Navigation menu
Upload a User Manual
Namespaces
Wiki Guide
HTML
PDF
Info
Views
User Manual
Discussion / Help
Navigation
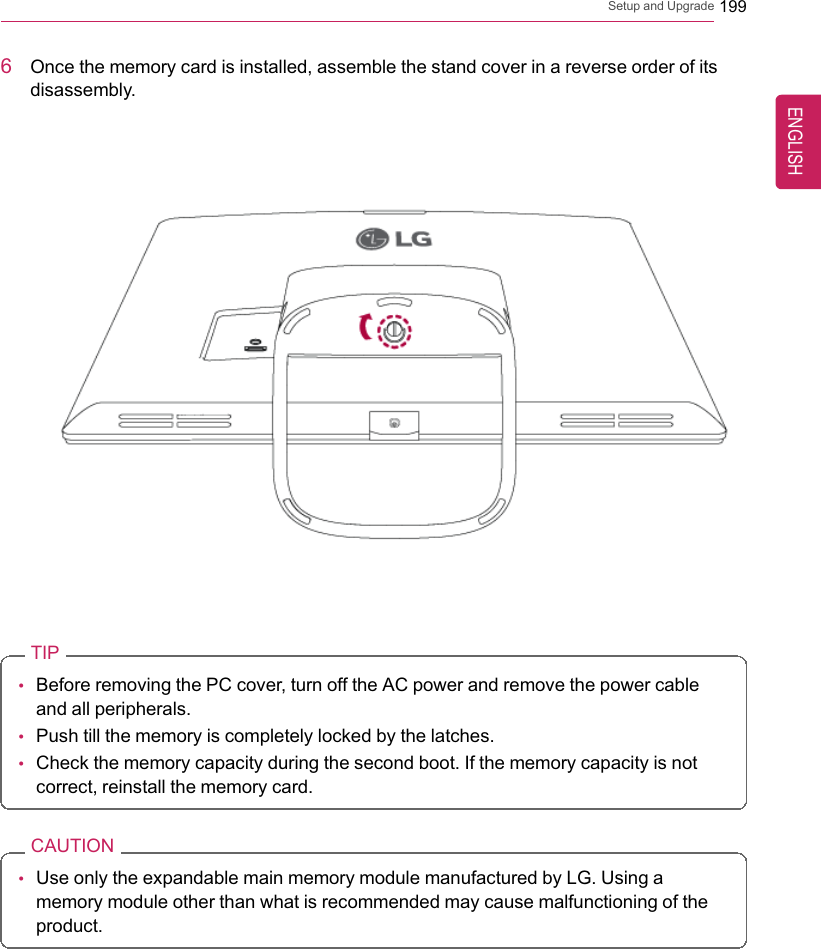
![2Instruction / Safety InformationInstruction / Safety InformationUsing LG Easy Guide, LG TroubleshootingLG Easy Guide (User's Guide) and LG Troubleshooting (Troubleshooting Guide) areprovided to users for easy and convenient use of the product.LG Easy Guide and LG Troubleshootingcan be used on the Start screen and theDesktop.Running in the Start ScreenOn the Start screen, press [LG Easy Guide] or [LG Troubleshooting] tile to run it.•LG Easy Guide and LG Troubleshooting on the Start screen can be used only in theonline environment.•If the product is not connected to the Internet, use [LG Easy Guide] and [LGTroubleshooting] installed on the Desktop.ENGLISH](https://usermanual.wiki/LG-Electronics-USA/DT-LG24V55/User-Guide-2688629-Page-2.png)
![Instruction / Safety Information 3Running on the Desktop PC1On the Start screen or Desktop, click [ ] icon to run [LG Easy Starter].TIPLG Easy Starter may be installed through LG Update Center.2From [LG Software] menu, run [LG Easy Guide] or [LG Troubleshooting].•If LG Easy Starter is not installed, refer to [Running, Standing by and Exiting App]and then run [LG Easy Guide] or [LG Troubleshooting].ENGLISH](https://usermanual.wiki/LG-Electronics-USA/DT-LG24V55/User-Guide-2688629-Page-3.png)
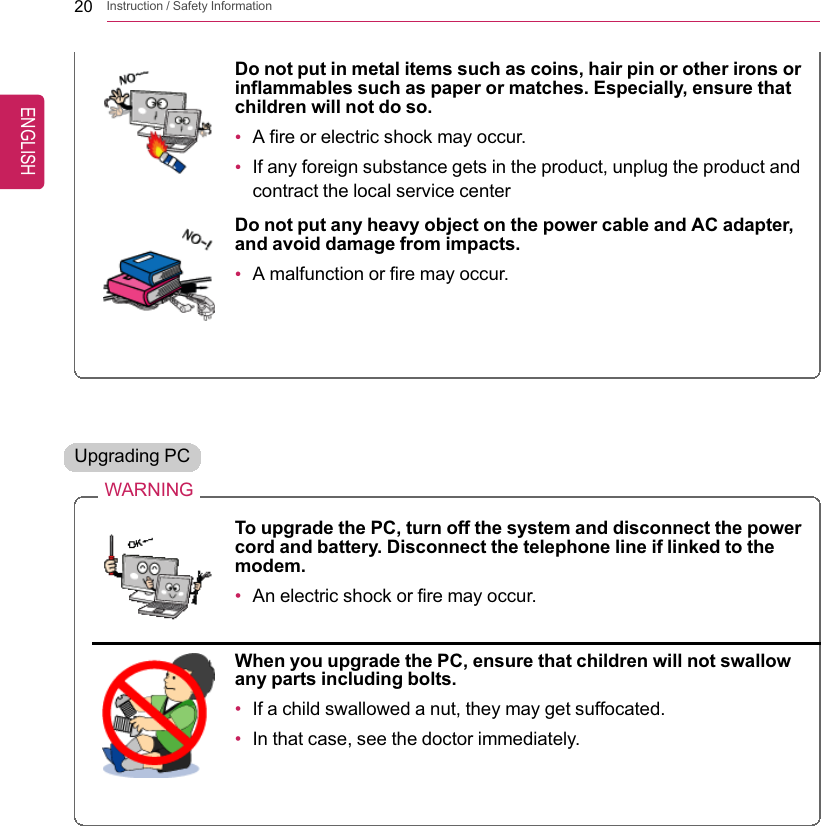
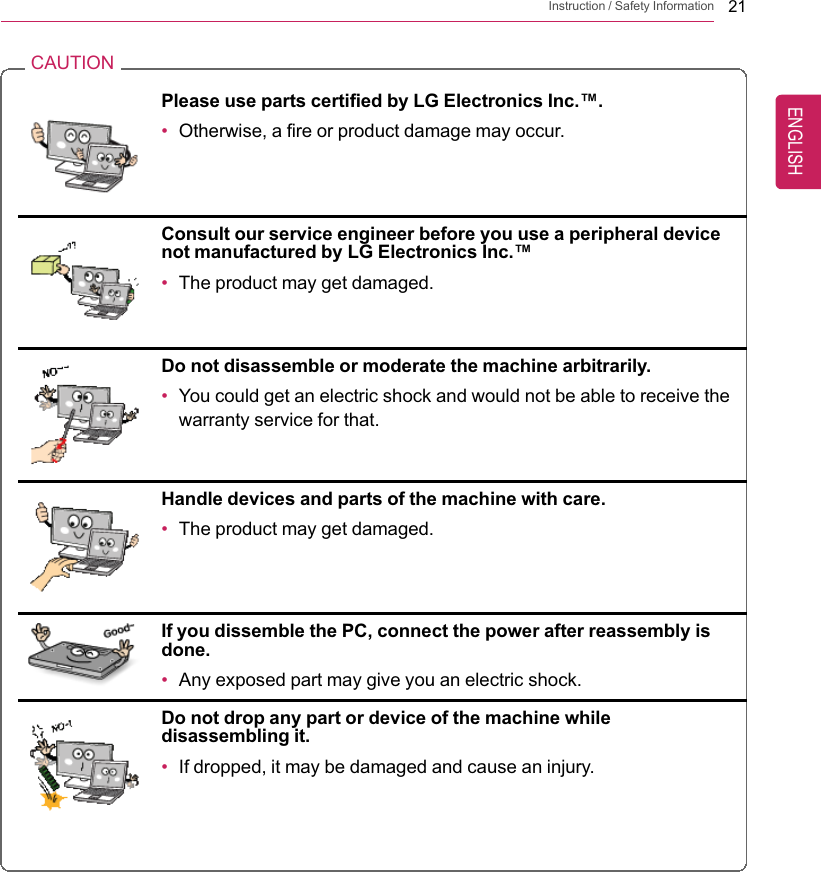
![Instruction / Safety Information 19Prevent children from thrusting their finger into the optical diskdrive (CD/DVD/Blu-ray) tray.•The finger may be stuck in the tray and injured.To remove an optical disc (CD/DVD/Blue-ray) from the tray, turnoff the program accessing the disc and wait until the disc drivelight is turned off before pressing the [Eject] button.•The optical disk spins fast inside the tray and may be ejected fromthe tray to cause bodily injury.Do not block the ventilation hole with any object.•Otherwise, an electric shock may occur.Do not leave the machine in a car.•The battery may cause an explosion or fire.Avoid using a wireless LAN connection within the 5 m radius of amicrowave or plasma lamp. If you have to use wireless LAN and aplasma bulb within the range, do it between channels 11 and 13.•The transmission rate may drop even if the connection is made.Turn off the PC if you are not going to use it for an extended timeperiod.•It may overheat the battery.As the AC adapter can be hot, do not touch it with bare skin whileusing it.•Extended period of exposure may cause burn.Make sure that the memory cover is securely closed beforeturning on the PC.•Do not use the machine when the memory cover is open. It maydamage the machine.ENGLISH](https://usermanual.wiki/LG-Electronics-USA/DT-LG24V55/User-Guide-2688629-Page-19.png)
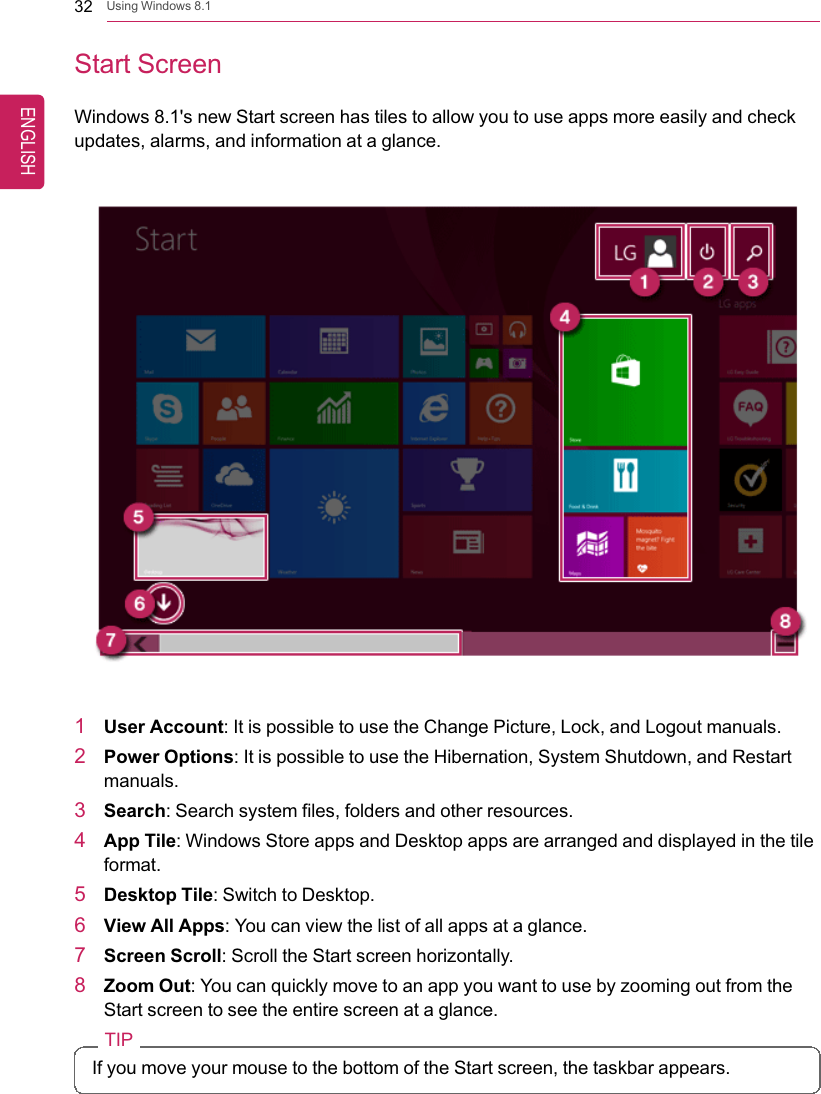
![28 Using Windows 8.1Using Windows 8.1Before UseThis LG Easy Guide has been created for the latest Windows update.New Start ScreenFor the new Windows, a new Start screen was added to the existing desktop screen fromwhich programs may be run and a variety of functions may be used.Windows 8.1 Start ButtonWindows 8.1 Start button is designed to allow you to easily switch from Desktop to StartScreen and also provides the pop-up menu including the shortcut keys for Control Panel,Explorer, Search, System Shutdown, and the Desktop.•Press [] + [X] keys, and then the pop-up menu of the Start button appears.Start Screen and DesktopWindows 8.1 supports Desktop screen for compatibility with the Desktop app.Users can switch between the Start screen and the Desktop screen at any time, ifnecessary, while using the PC.ENGLISH](https://usermanual.wiki/LG-Electronics-USA/DT-LG24V55/User-Guide-2688629-Page-28.png)
![30 Using Windows 8.1Taskbar and Title BarWith the new Windows 8.1 taskbar and title bar, it is easier to use features like appswitching, power options, and screen split.LG Easy Starter for Desktop StartTo use the Desktop like in previous versions of Windows, LG Electronics provides LG EasyStarter.LG Easy Starter may be installed through LG Update Center.For more information, refer to [Using Software] >[LG Easy Starter].Windows Live AccountWindows 8.1 is built to connect you with your social media accounts through the WindowsLive account service, and allows you to download and use various apps found throughoutthe entire store.You must create a Windows Live account to access various features online and the AppStore provided by Microsoft.ENGLISH](https://usermanual.wiki/LG-Electronics-USA/DT-LG24V55/User-Guide-2688629-Page-30.png)

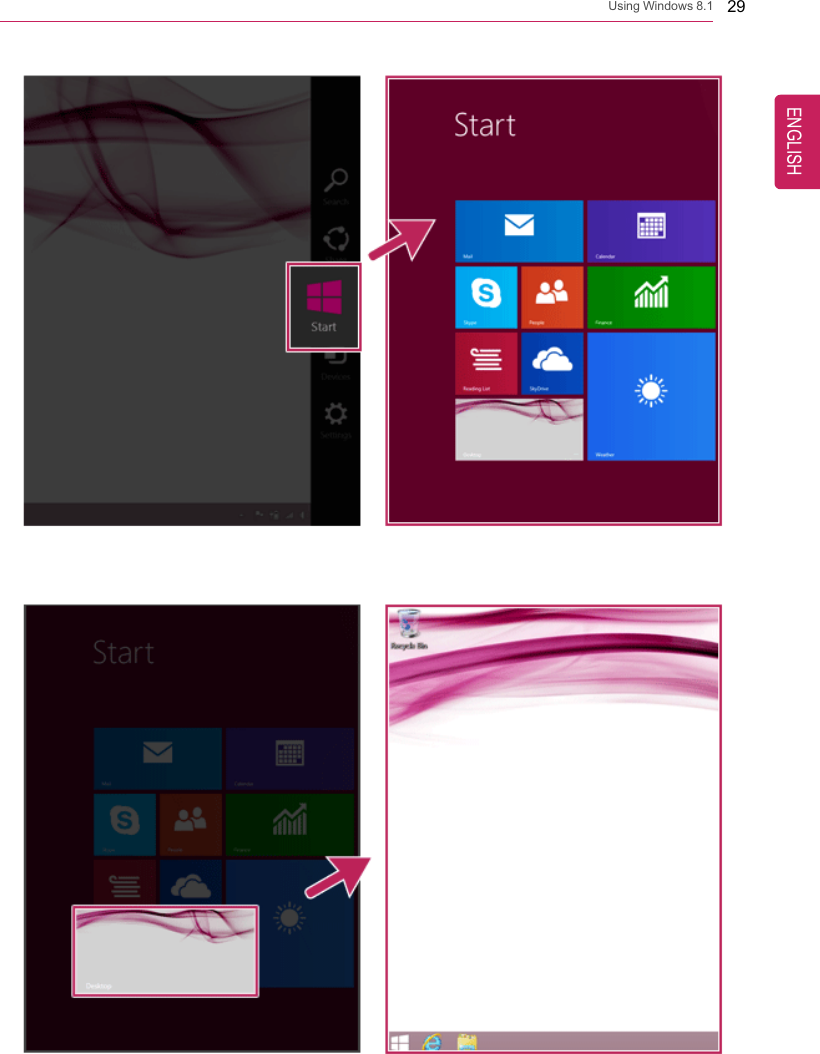
![Using Windows 8.1 33Start screen / Desktop screen switchingSwitching from Desktop to Start ScreenOn the Desktop screen, press [] key on the keyboard.Press [Charms] > [ ] button or [ ] button at the left bottom to switch to the Startscreen.ENGLISH](https://usermanual.wiki/LG-Electronics-USA/DT-LG24V55/User-Guide-2688629-Page-33.png)
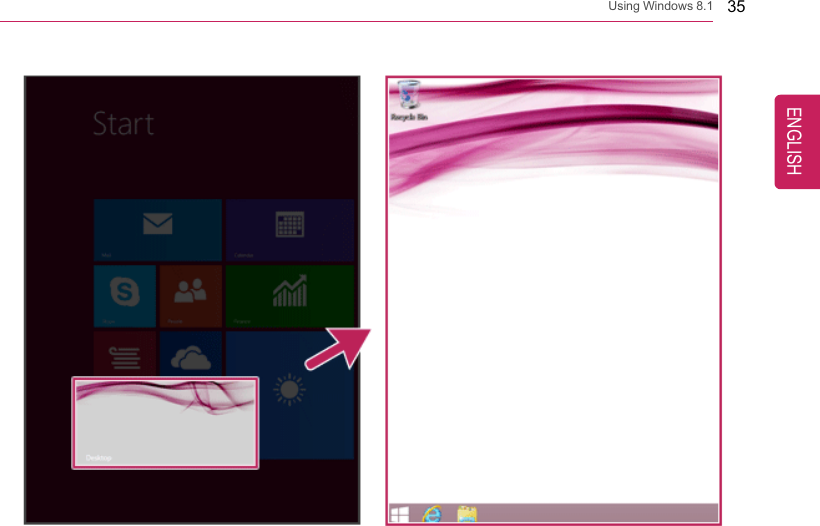
![34 Using Windows 8.1Switching from Start Screen to DesktopPress the [Desktop] tile on the Start screen to switch to Desktop.ENGLISH](https://usermanual.wiki/LG-Electronics-USA/DT-LG24V55/User-Guide-2688629-Page-34.png)
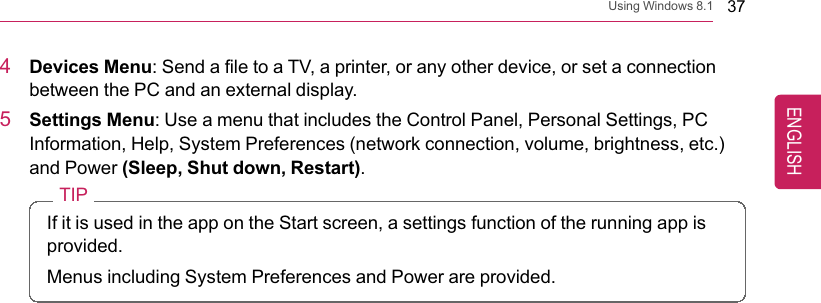
![36 Using Windows 8.1Using CharmsCharms of the new Windows is a menu designed to allow you to easily access functionssuch as Search, Share, Start, Devices and Settings.When you move the mouse pointer from the Start screen or the Desktop screen to the topor bottom-right corner, Charms appears.TIPWhen you press [] + [C], Charms appears immediately.1Search Menu: Search system files, folders and other resources.TIPIf it is used in the app on the Start screen, it is used as a search function for therunning app.(Some apps which do not support the search function may not work properly.)2Share Menu: Setting the app sharing feature.3Start Menu: Switch to the Start screen or the screen of the previously running app.ENGLISH](https://usermanual.wiki/LG-Electronics-USA/DT-LG24V55/User-Guide-2688629-Page-36.png)
![38 Using Windows 8.1Running, Standing by and Exiting AppRunningAn app which is not added on the Start screen or Desktop may be run using the followingmethod:1Click the [] icon on the left bottom on the Start screen.ENGLISH](https://usermanual.wiki/LG-Electronics-USA/DT-LG24V55/User-Guide-2688629-Page-38.png)
![Using Windows 8.1 392When the list of all apps appears, select an app to run on the screen.TIPUsing Search in the Start screen or Charms, you can run the app.•When you press [ ] + [Q] keys, the Search menu is run immediately.Switching to Standby ModeWindows Store apps can switch the app to the standby mode to switch and use the apprapidly.ENGLISH](https://usermanual.wiki/LG-Electronics-USA/DT-LG24V55/User-Guide-2688629-Page-39.png)
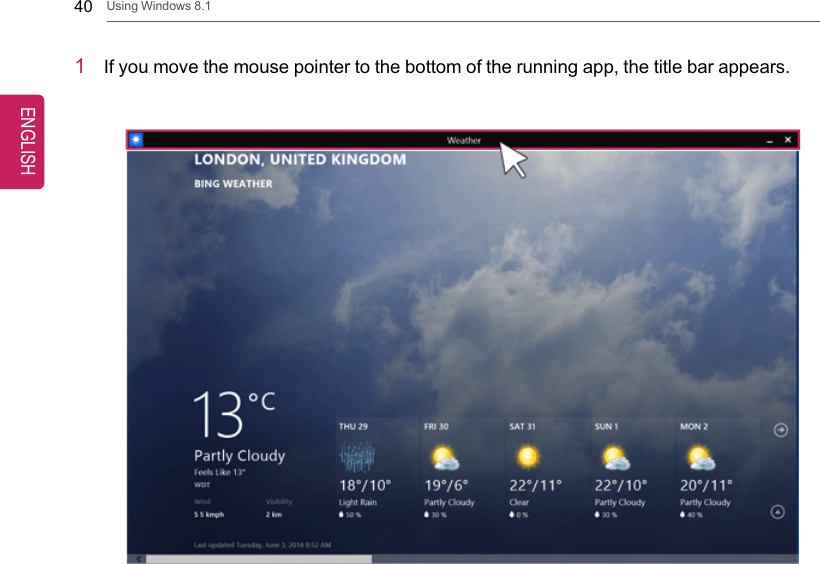
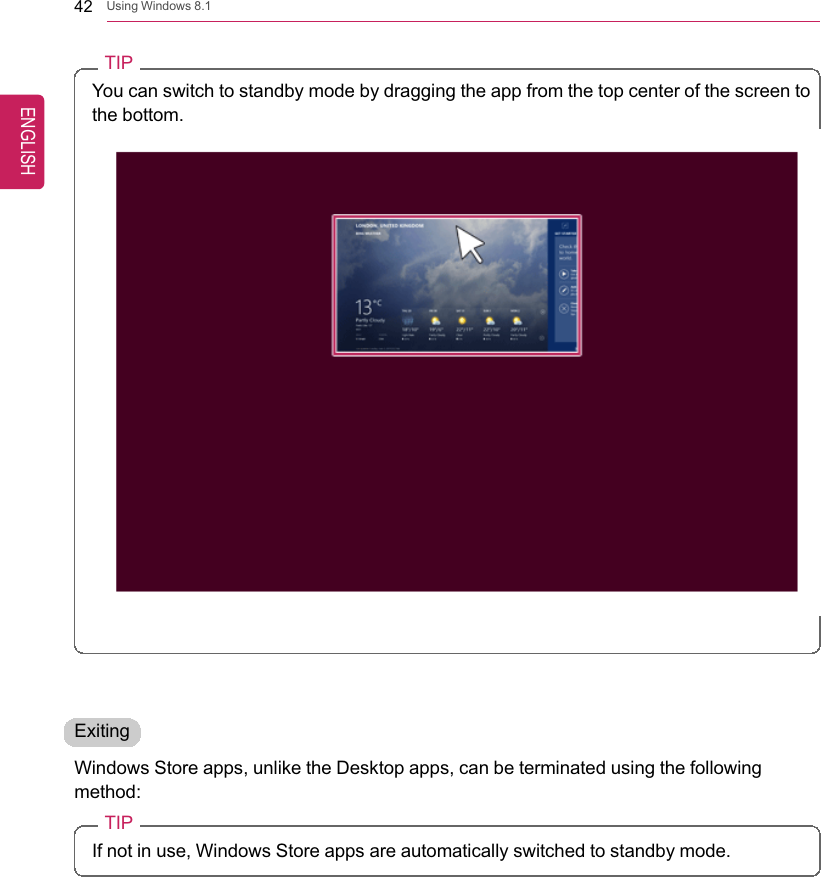
![Using Windows 8.1 412When the title bar appears, click the [] icon at the top-right to switch to standbymode.ENGLISH](https://usermanual.wiki/LG-Electronics-USA/DT-LG24V55/User-Guide-2688629-Page-41.png)
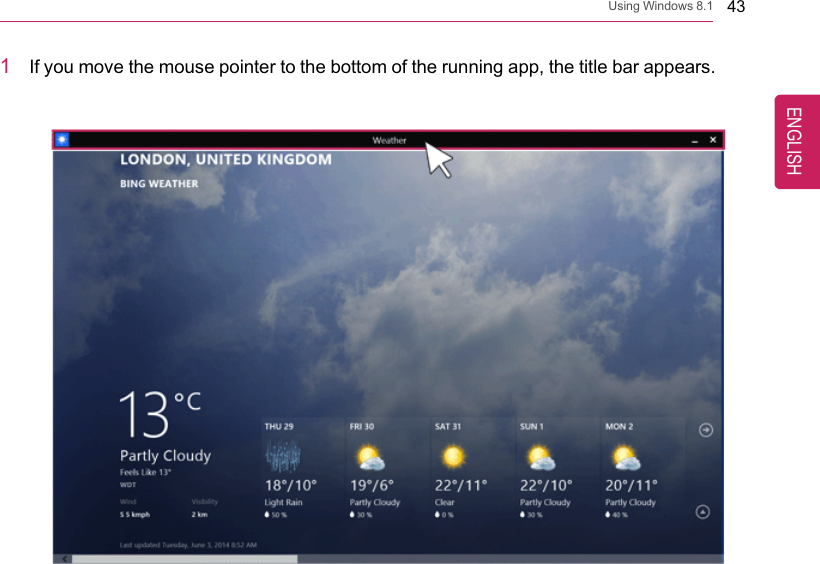
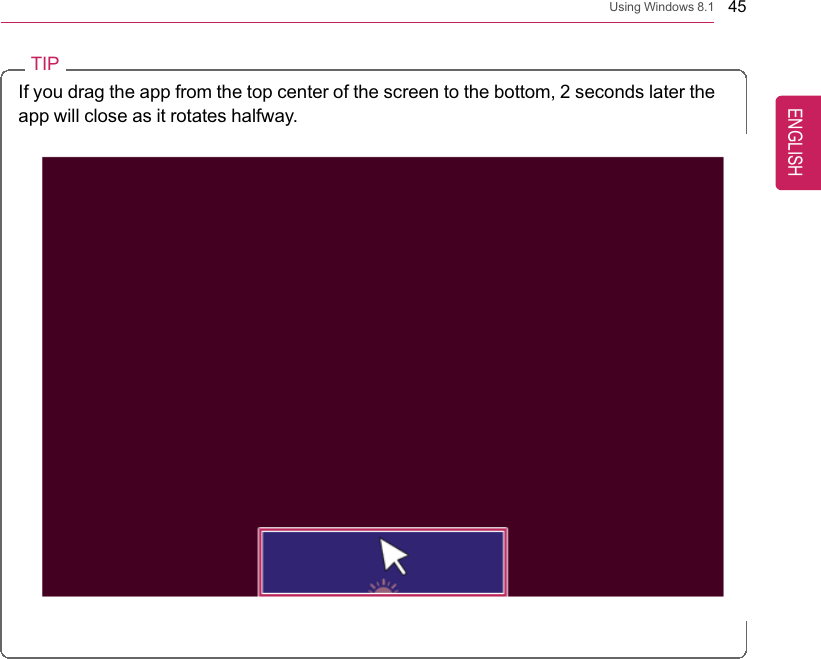
![44 Using Windows 8.12When the title bar appears, click the [] icon at the top-right to close the app.ENGLISH](https://usermanual.wiki/LG-Electronics-USA/DT-LG24V55/User-Guide-2688629-Page-44.png)
![46 Using Windows 8.1Windows Help and SupportWindows Help provides detailed information on how to use Windows easily.TIPOn Desktop, you can press the [F1] key to run [Windows Help and Support].On the Start screen, from [Charms], select [Settings] >[Help] to display the help of thecurrently running app.Some apps may not support help.1Run [Charms] on the desktop screen.ENGLISH](https://usermanual.wiki/LG-Electronics-USA/DT-LG24V55/User-Guide-2688629-Page-46.png)
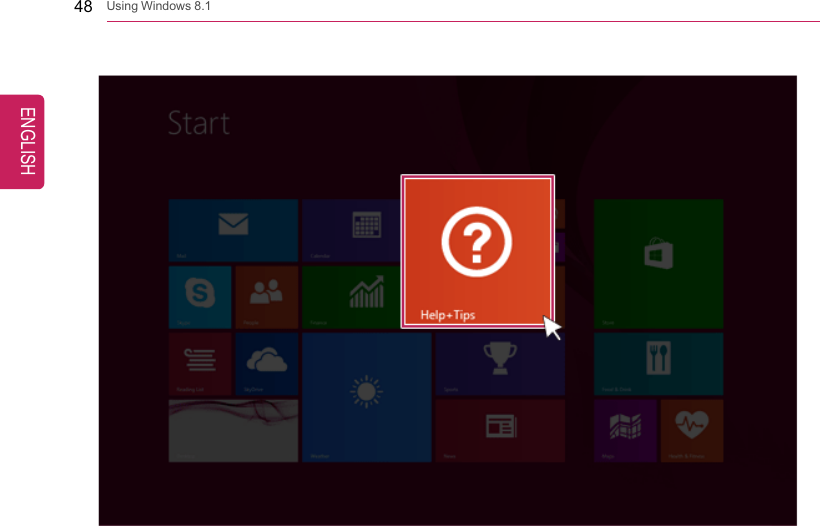
![Using Windows 8.1 472Press the [Settings] >[Help] from the Charms to run the [Windows Help andSupport].Help and Tips TourPress and run the [Help + Tips] tile on the Start screen to get information on the newfunctions of Windows.ENGLISH](https://usermanual.wiki/LG-Electronics-USA/DT-LG24V55/User-Guide-2688629-Page-47.png)
![Using Windows 8.1 49Using the Store (Installing and Deleting Windows Store Apps)When you use the Windows store, you may install and use a variety of applications easily.TIPTo use the store, you must have a Microsoft account.While using a local account, you can create a Windows Live account through [Charms] >[Settings] >[Change PC Settings] >[Account] >[Account].Installing Apps1On the Start screen, select [Store] tile.ENGLISH](https://usermanual.wiki/LG-Electronics-USA/DT-LG24V55/User-Guide-2688629-Page-49.png)
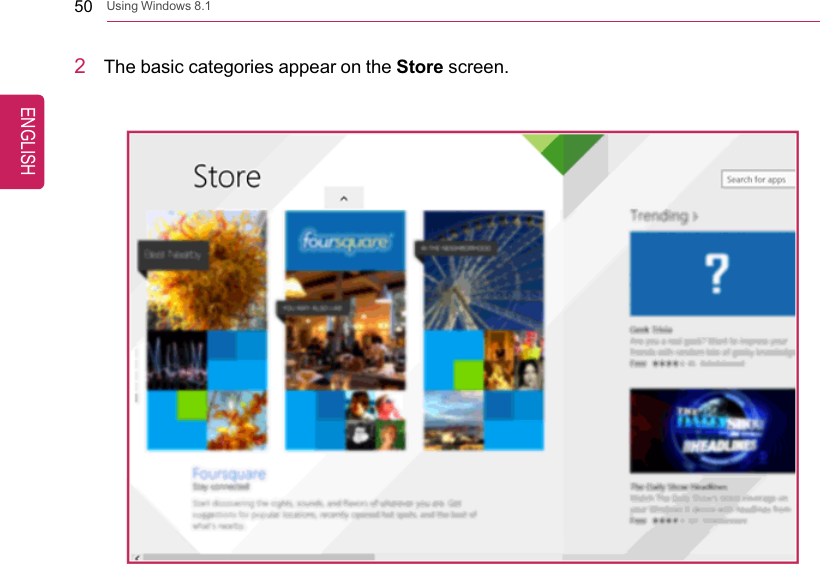
![Using Windows 8.1 513Right-click the mouse to open the category details.4Select an app in a category you want.5When the detailed app screen appears, click the [Install] button.If a local account is being used, a login screen appears.Login with a Microsoft account, or press the [Register New Account] button to createan account in accordance with the instructions.6After a while, an Installation Guide message appears on the top-right of the screen.7When the installation is complete, click the [ ] icon on the Start screen to check theapps installed in the list of apps.TIPYou can add a newly installed app tile on the Start screen as follows:1On the Start screen, press [ ] icon.2Right-click on the installed app in the App list, then press the [Lock in Start Screen]button.(Enter the name of the app in the search field and then you can find the app installedfaster.)3The app tile selected is added to the Start screen.ENGLISH](https://usermanual.wiki/LG-Electronics-USA/DT-LG24V55/User-Guide-2688629-Page-51.png)
![52 Using Windows 8.1Deleting Apps1Select the app you want to delete from the Start Screen by right-clicking on it, thenpress the [Uninstall] button.2When prompted to confirm the deletion, press the [Uninstall] button to delete the app.ENGLISH](https://usermanual.wiki/LG-Electronics-USA/DT-LG24V55/User-Guide-2688629-Page-52.png)
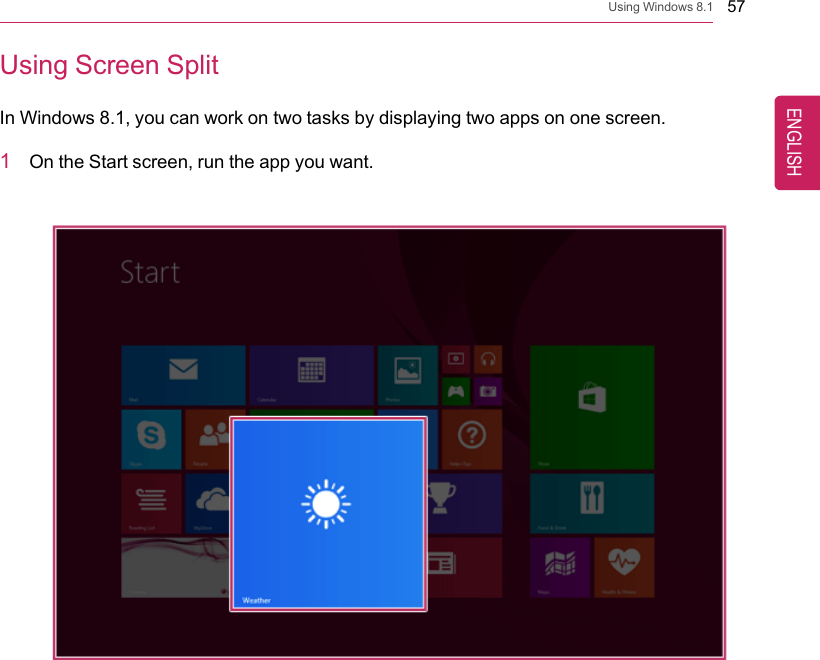
![54 Using Windows 8.1App switching on the Startscreen+ Tab1When you press the [ ] + [Tab] keys, a previewscreen of the running app on the Start screen appearson the right side of the screen.2Whenever you press the [ ] key together with the[Tab] key, an app is selected. When you deselect thekeys, the selected app becomes active.[Desktop app does not appear.]+ Ctrl + Tab1When you press the [ ] + [Ctrl] + [Tab] keys, thepreview screen of the running app on the Start screenappears in a fixed form.2When you select an app that you intend to switch to,the selected app becomes active.App switching between theStart screen and theDesktop1When you press the [Alt] + [Tab] keys, the previewscreen of the running apps on the Start screen and inDesktop mode appear in the center of the screen.ENGLISH](https://usermanual.wiki/LG-Electronics-USA/DT-LG24V55/User-Guide-2688629-Page-54.png)
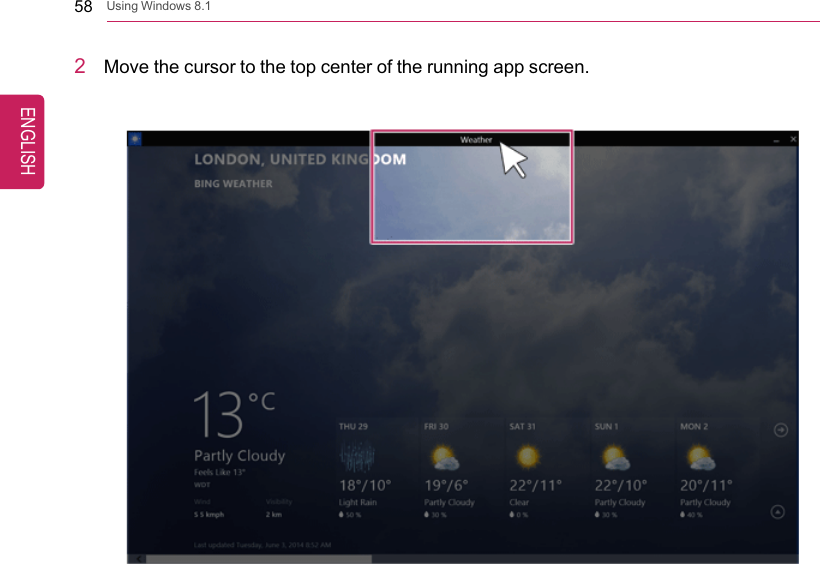
![Using Windows 8.1 552Whenever you press the [Alt] key together with the[Tab] key, an app is selected. When you deselect thekeys, the selected app becomes active.ENGLISH](https://usermanual.wiki/LG-Electronics-USA/DT-LG24V55/User-Guide-2688629-Page-55.png)
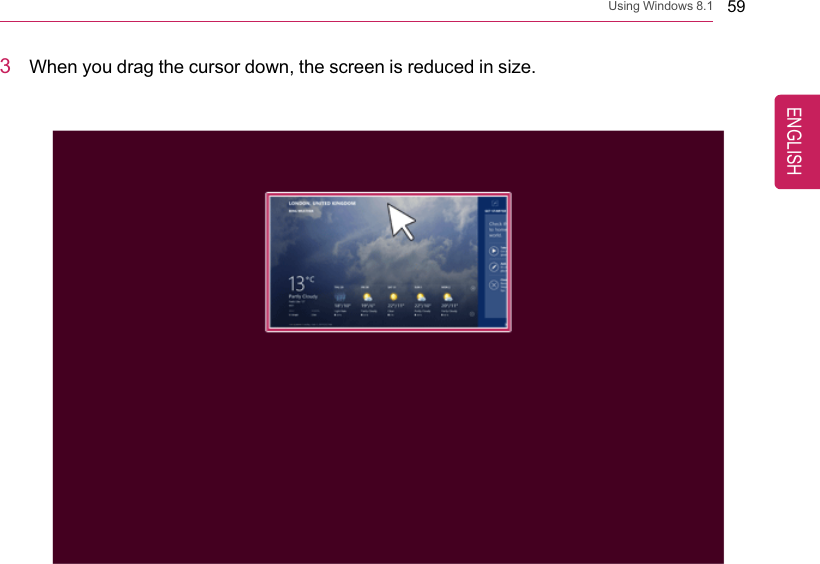
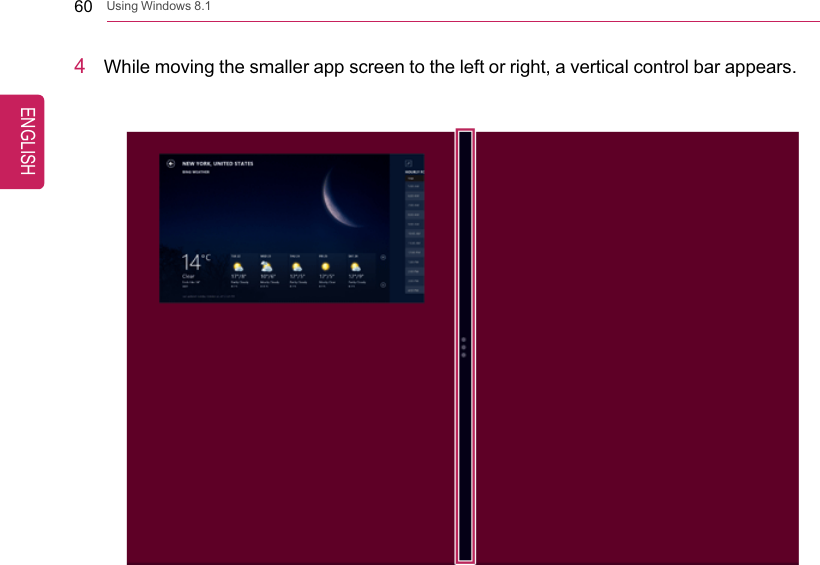
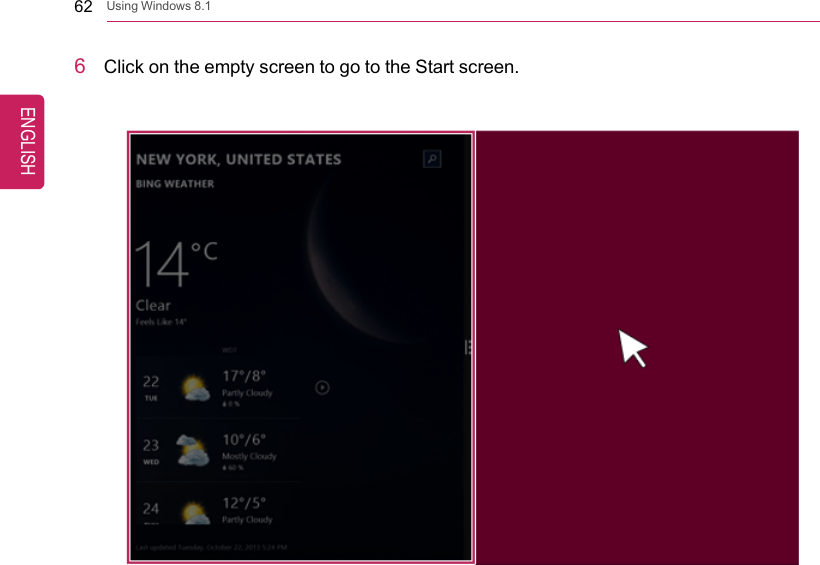
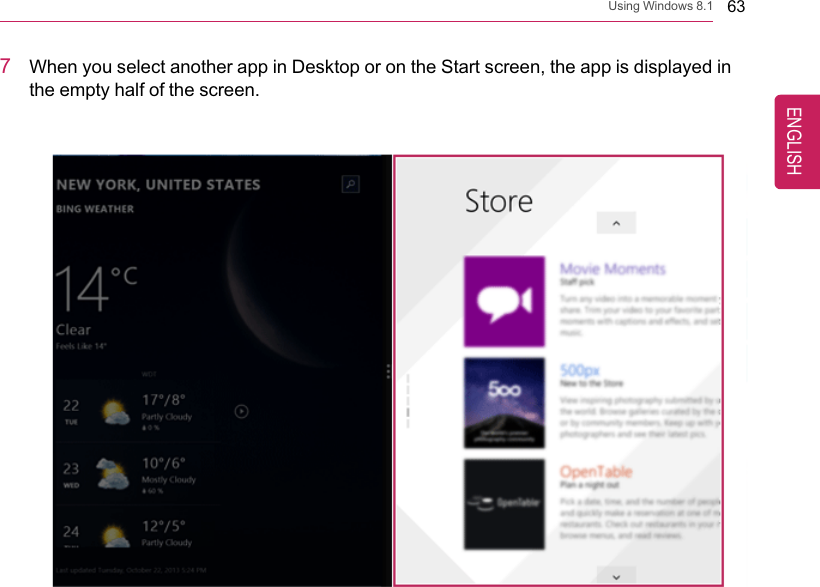
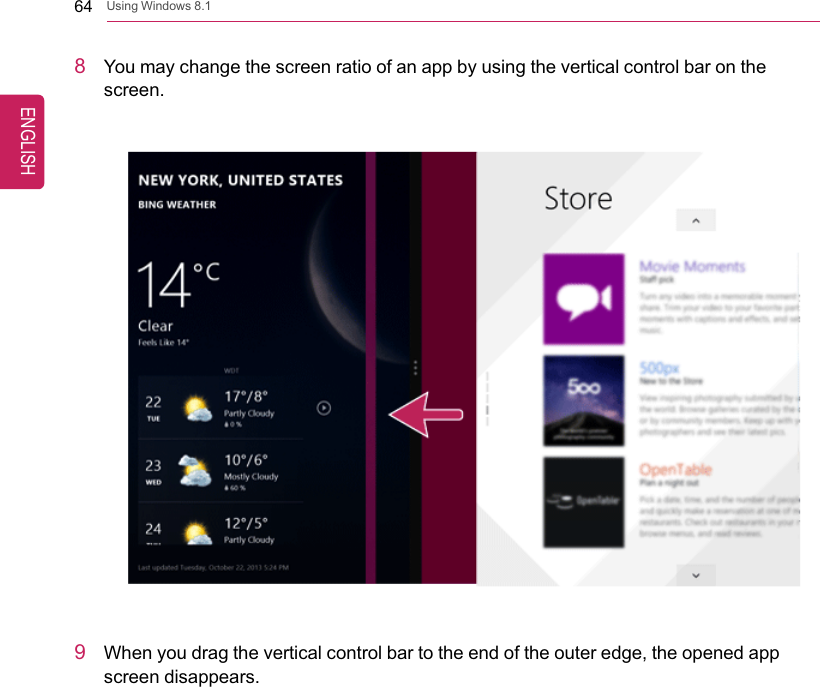
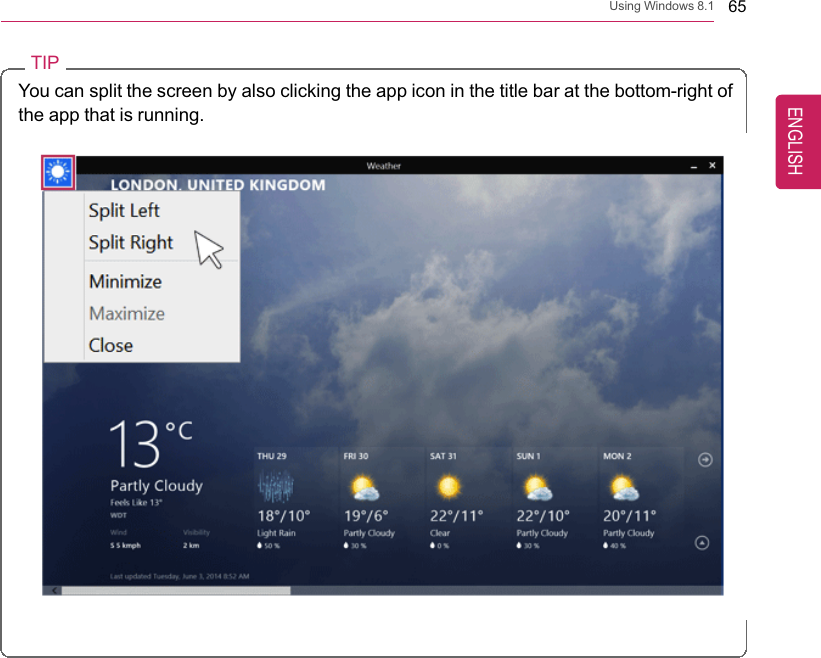
![56 Using Windows 8.1Exiting an app on the taskswitching screen 1Place the cursor at the left top or bottom edge of thescreen on the Start screen or in Desktop.2Move up or down the cursor and the running app'spreview appears.TIPWhen you press the [ ] + [Ctrl] + [Tab] keys, thepreview screen of the running app appears.3After placing the cursor on the app you want to exit,press the right mouse button and [Close] button to exitthe app.ENGLISH](https://usermanual.wiki/LG-Electronics-USA/DT-LG24V55/User-Guide-2688629-Page-56.png)
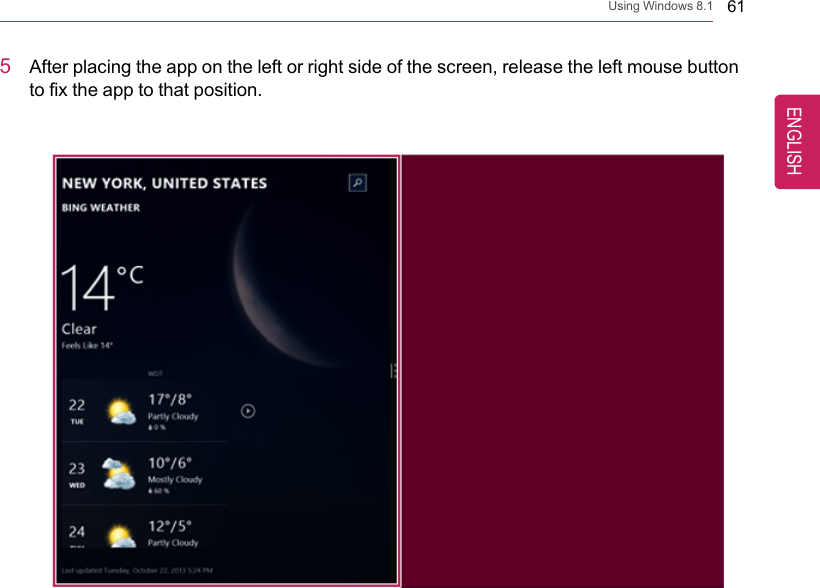
![66 Using Windows 8.1Setting the PCWindows 8.1 provides an easy-to-use PC settings menu to allow you to setup the PC moreintuitively.1Run [Charms] on the Desktop or the Start screen.ENGLISH](https://usermanual.wiki/LG-Electronics-USA/DT-LG24V55/User-Guide-2688629-Page-66.png)
![Using Windows 8.1 672In the Charms, click [Settings] >[Change PC Settings].3Configure the PC using the Personal and User Settings.ENGLISH](https://usermanual.wiki/LG-Electronics-USA/DT-LG24V55/User-Guide-2688629-Page-67.png)
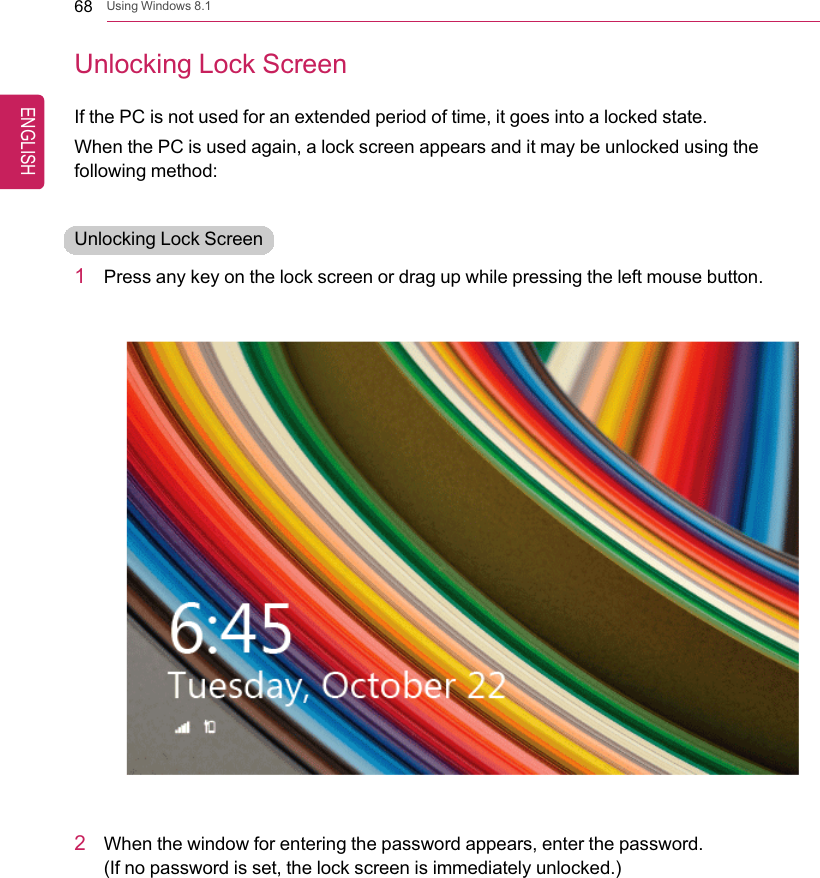
![Using Windows 8.1 69Shut Down OptionsIn Windows 8.1, you can use the shutdown options (Sleep, Shut down, Restart) throughCharms.Using Start Screen1Click the [] icon on the bottom-right of the Start screen.2As shown in the following, the power options appear.Using Charms1Select [Settings] in [Charms] in the Desktop or on the Start screen.ENGLISH](https://usermanual.wiki/LG-Electronics-USA/DT-LG24V55/User-Guide-2688629-Page-69.png)
![70 Using Windows 8.12When you press the [Power] icon on the [Settings] menu, the power options appear asshown below.TIPWhen you press [] + [I], the [Settings] menu appears immediately.Using the Start button1Press the Start button ( ) on the bottom left corner of the Desktop by using the rightmouse button and then the pop-up window appears.ENGLISH](https://usermanual.wiki/LG-Electronics-USA/DT-LG24V55/User-Guide-2688629-Page-70.png)
![Using Windows 8.1 712Select [Shut down or sign out] and then [Shut down] as shown in the following figure.ENGLISH](https://usermanual.wiki/LG-Electronics-USA/DT-LG24V55/User-Guide-2688629-Page-71.png)
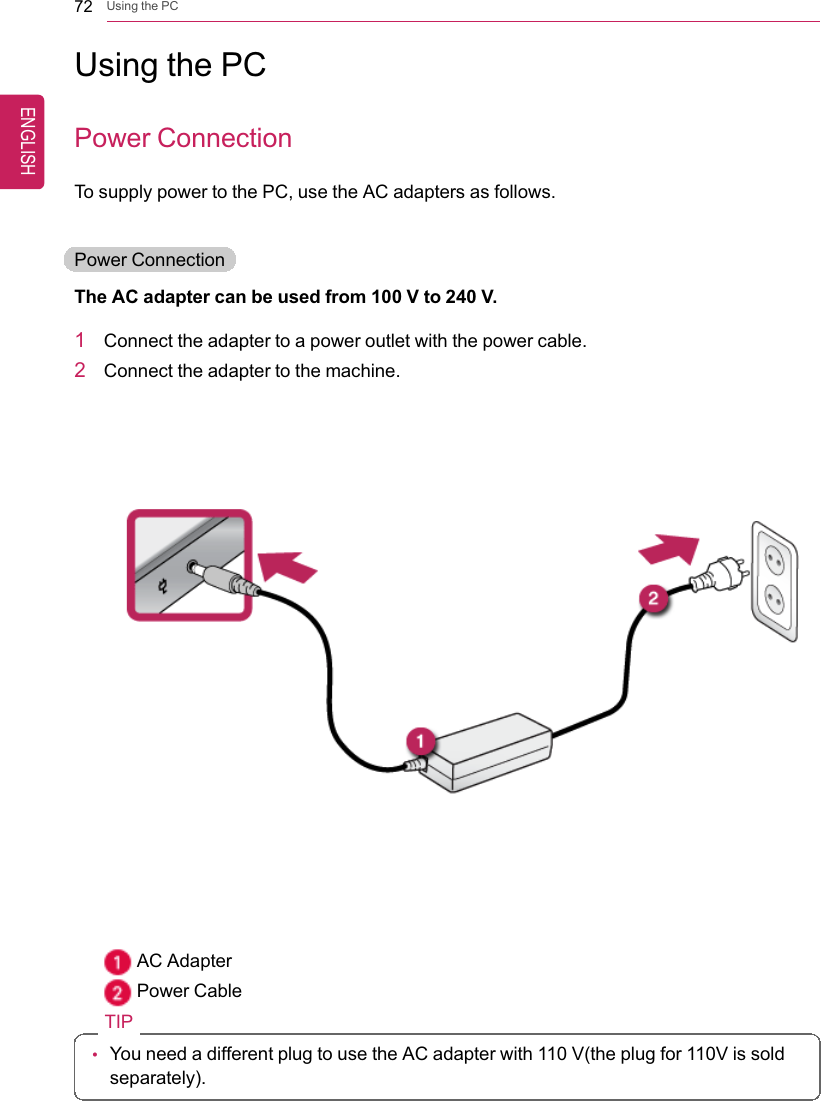
![74 Using the PCOperation Status Lamps1Webcam Operation Status Lamp•On: When the webcam is operating•Off: When the webcam is not operating2Monitor / TV Power Lamp•On: The monitor or TV is turned off.•Off: The monitor or TV is turned on.3PC Power Lamp•On: The system is turned on.•Off: The system is turned off or in Hibernates.•Blinking: The system is in the sleep mode.TIPYou can select whether to use the Monitor / TV power lamp by configuring [Settings] >[General] >[Display Lamp].ENGLISH](https://usermanual.wiki/LG-Electronics-USA/DT-LG24V55/User-Guide-2688629-Page-74.png)
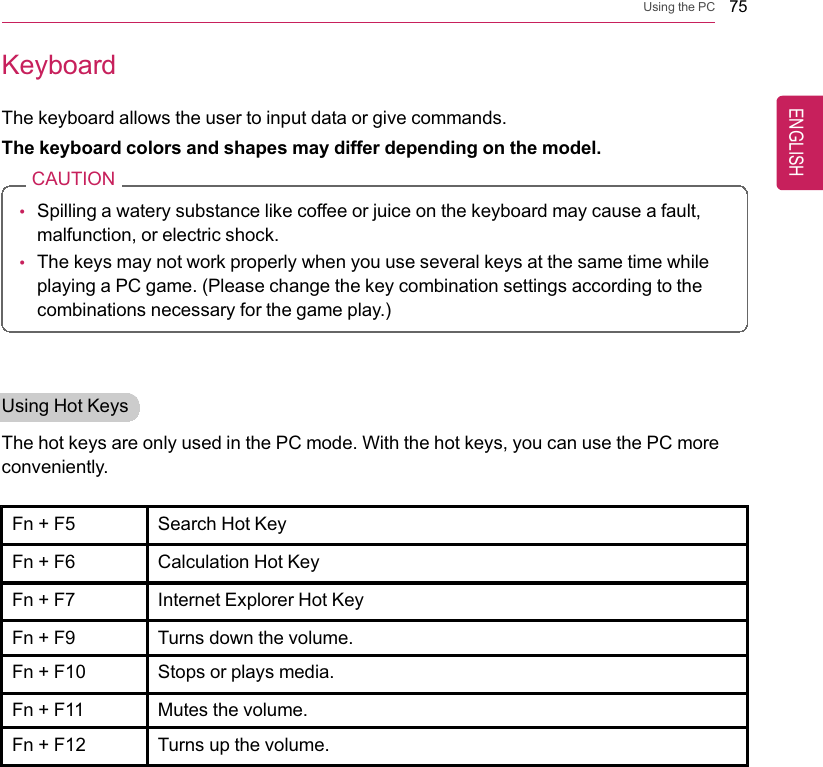
![76 Using the PCShortcut KeysTIP•To change the input mode temporarily, you can press the [Shift] key together with theletter you want to enter. By doing so, you can enter an uppercase letter when theCaps Lock key is not pressed and a lowercase letter when it is pressed.For more convenient use of Windows, remember the following Windows keycombinations:•+ F1Displays Windows Help.•+ F3Displays "Search" window.•+ RDisplays an input window for program execution.•+ TabShows all the currently running apps.•+ MMinimizes the current window.ENGLISH](https://usermanual.wiki/LG-Electronics-USA/DT-LG24V55/User-Guide-2688629-Page-76.png)
![78 Using the PCTIP•If you do not complete the initial automatic channel configuration step, theconfiguration window will appear every time you use the TV.•The configuration window disappears automatically, after a certain amount of time, ifyou do not proceed with the initial configuration.•The automatic channel configuration memorizes only the active channels. If youpress the [Exit] button while searching for channels, or terminate the configuration,only those channels searched up until the point of termination will be memorized.1Connect the TV power cord and the TV antenna cable, then press the [Power] button onthe remote control.If you are using the TV function only, you don't have to turn on the product.2After a moment, the Monitor/TV power lamp turns off and the TV turns on.3When the following screen opens, select a language as you wish and press the [OK]button on the remote control.ENGLISH](https://usermanual.wiki/LG-Electronics-USA/DT-LG24V55/User-Guide-2688629-Page-78.png)
![Using the PC 794When the [Mode Setting] screen appears, select [Home Use] and press the [OK]button on the remote control.[Store Demo] is used for exhibition in the shop.ENGLISH](https://usermanual.wiki/LG-Electronics-USA/DT-LG24V55/User-Guide-2688629-Page-79.png)
![80 Using the PC5When the [Power Indicator] screen appears, select whether to use the Standby Lightand press the [OK] button on the remote control.ENGLISH](https://usermanual.wiki/LG-Electronics-USA/DT-LG24V55/User-Guide-2688629-Page-80.png)
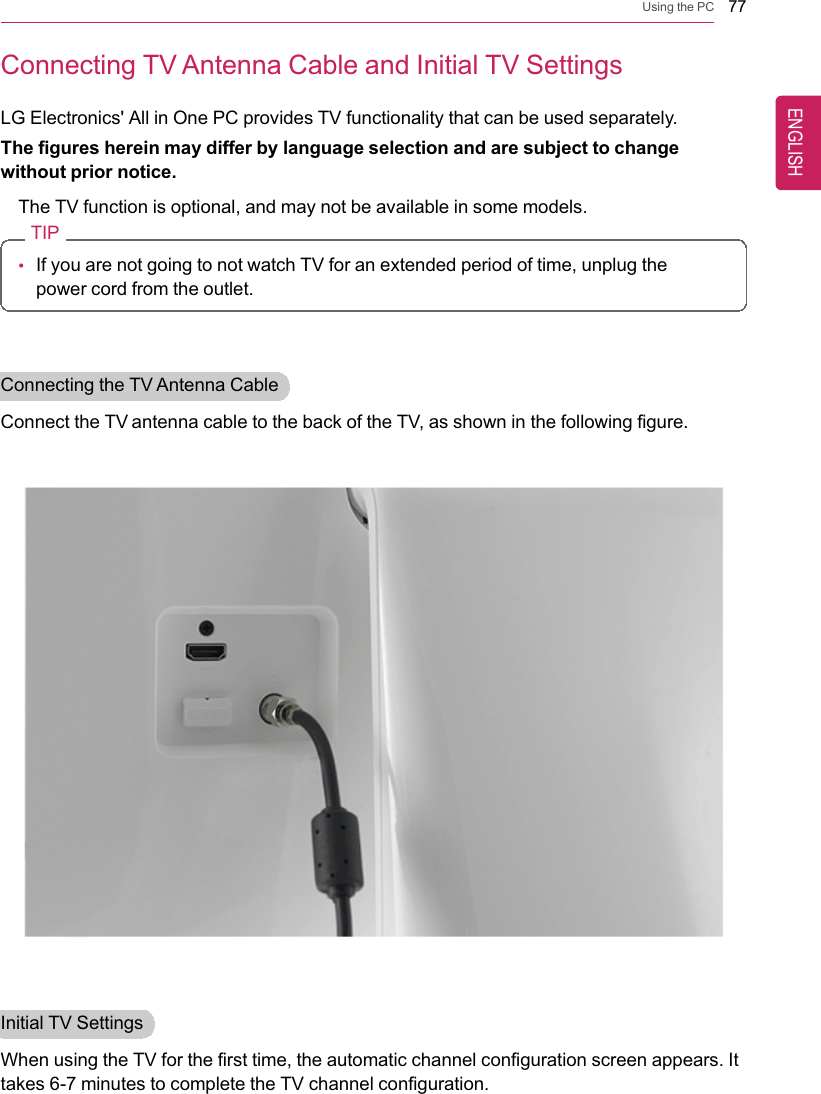
![Using the PC 816When the following screen opens, connect the TV antenna cable to the product andpress the [OK] button.ENGLISH](https://usermanual.wiki/LG-Electronics-USA/DT-LG24V55/User-Guide-2688629-Page-81.png)
![82 Using the PC7When a message appears to confirm that the TV antenna cable is connected, click the[Start] button on the remote control.ENGLISH](https://usermanual.wiki/LG-Electronics-USA/DT-LG24V55/User-Guide-2688629-Page-82.png)
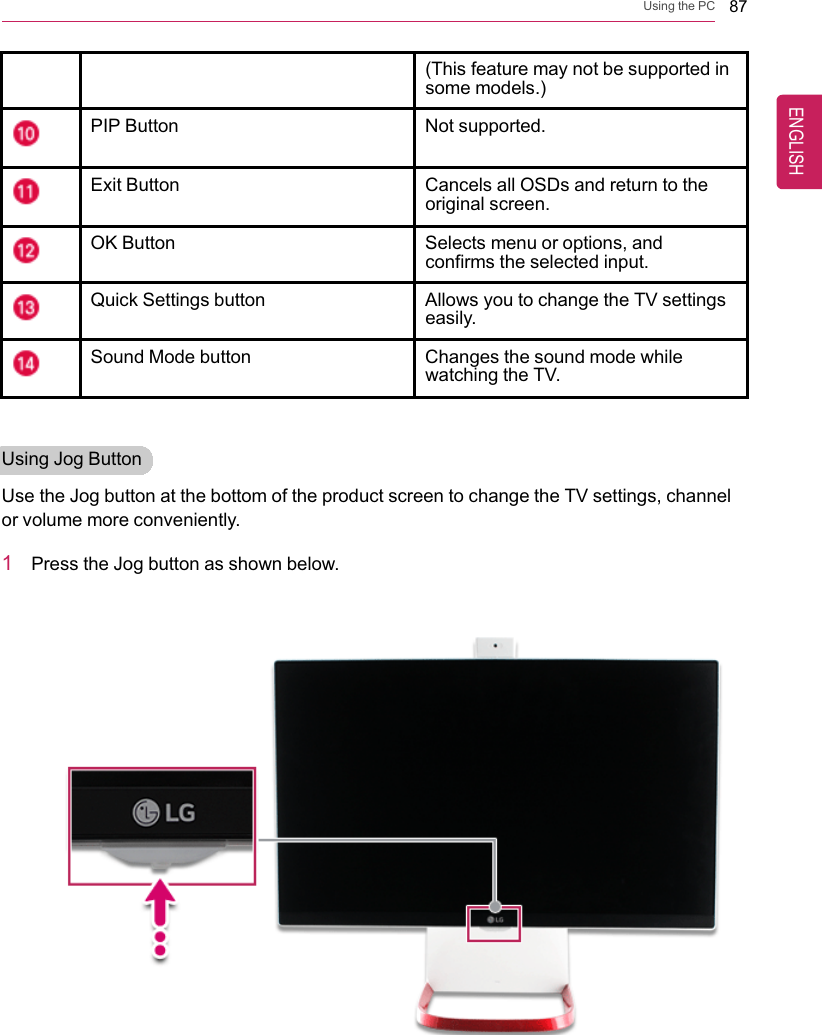
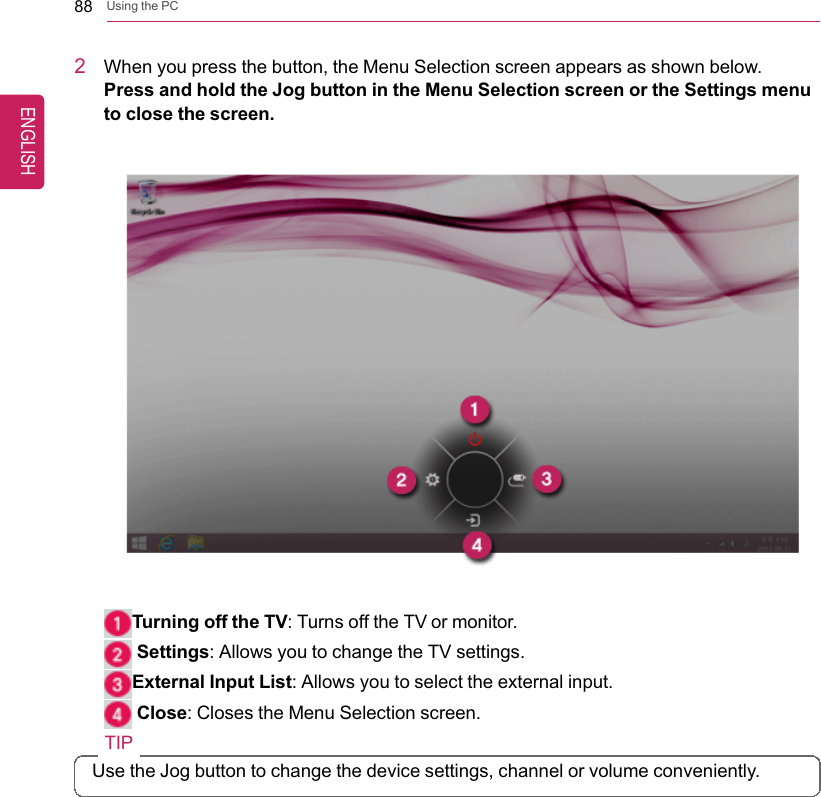
![Using the PC 838As shown in the following figure, channels are then searched for automatically.9When the automatic channel configuration is completed, click the [Exit] button on theremote control.ENGLISH](https://usermanual.wiki/LG-Electronics-USA/DT-LG24V55/User-Guide-2688629-Page-83.png)
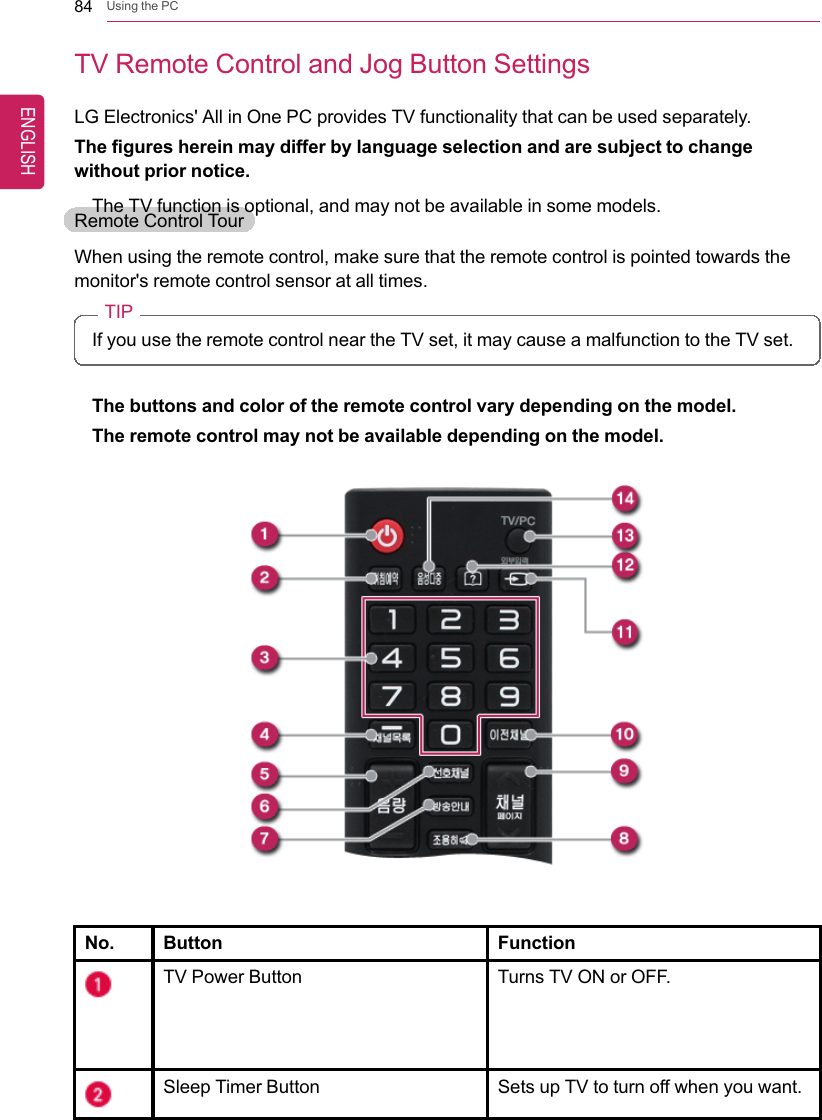
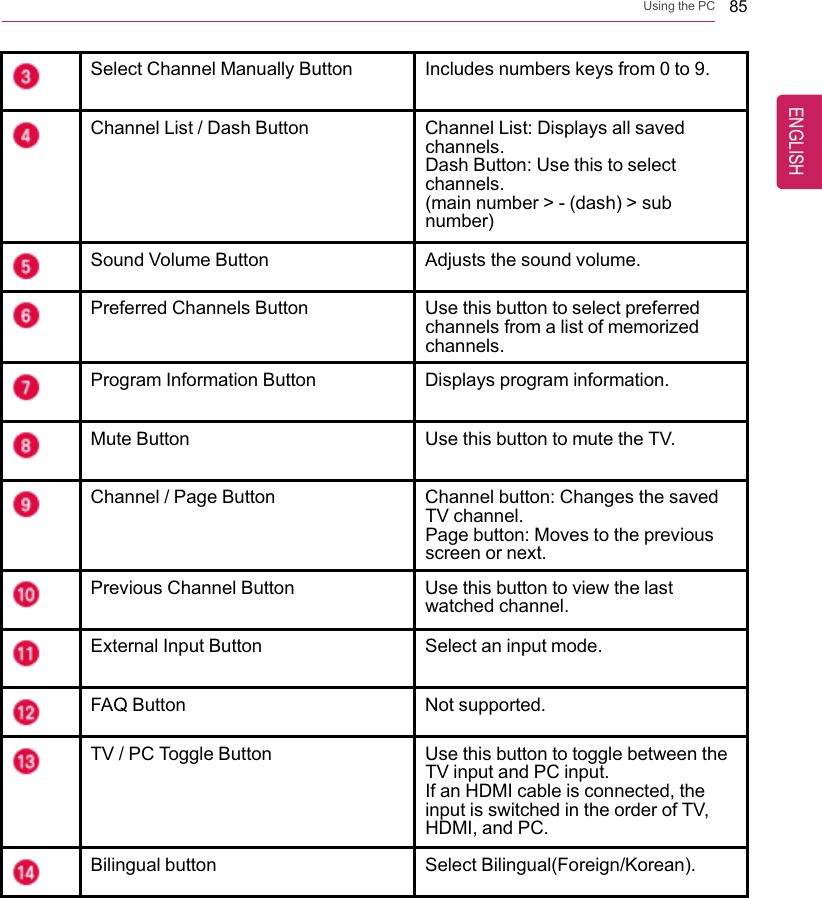
![Using the PC 89User SettingsTV / Monitor User SettingsPress the [Settings] button on the remote control to change the TV / monitor settings.1PICTURE: Adjusts the screen size, image quality and effects, including image mode,backlight, contrast, brightness, definition, or color.2AUDIO: Adjusts the volume, sound quality and effects, including sound mode, soundeffects, or automatic volume.3CHANNEL: Setup and edit channels.4TIME: Adjusts the time, date, and timer function.5LOCK: Locks or unlocks a channel or program.6OPTION: Customizes general settings (language settings, closed captioning, display, orinitial settings).7Customer Support: Displays software updates, image tests, sound tests, and product/service information.In PC mode, the customer support function is not supported.8EXIT: Exits the settings menu.ENGLISH](https://usermanual.wiki/LG-Electronics-USA/DT-LG24V55/User-Guide-2688629-Page-89.png)
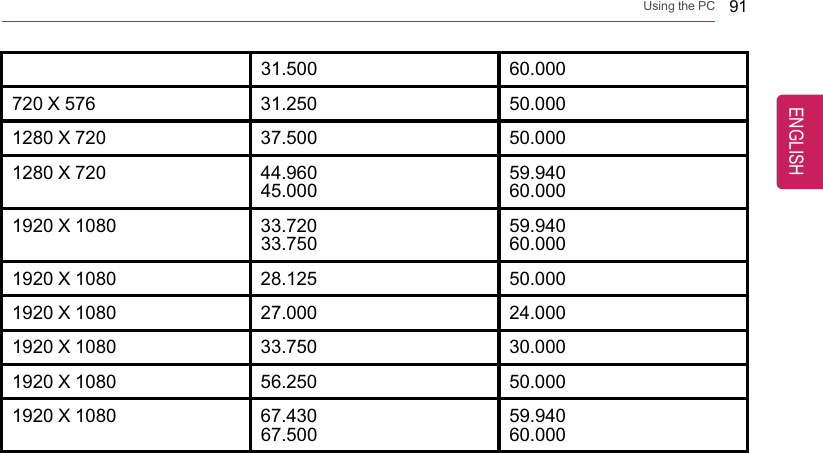
![90 Using the PCUsing Monitor FunctionsThe 27V750 / 24V550 Series monitors have functionality to receive digital images andsound directly from external devices.TIPHDMI port transfers both video and audio simultaneously. So you don't need a separateaudio connection.Use a high-speed HDMI cable.High-speed HDMI cables can transmit up to 1080p signals.1Connect the external device to the HDMI input port on the back of the monitor, as shownin the following figure.2Select HDMI by pressing the [External Input] button on the remote control.HDMI (DTV) Support ModeResolution Horizontal Frequency(kHz)Vertical Frequency (Hz)720 X 480 31.469 59.940ENGLISH](https://usermanual.wiki/LG-Electronics-USA/DT-LG24V55/User-Guide-2688629-Page-90.png)
![92 Using the PCConnecting a Monitor / TVTIP•Ensure the monitor power is off before connecting the external monitor to the PC.Connecting to the HDMI PortHDMI is a high-speed multimedia interface that can transfer uncompressed full digital audioand video signals.1Connect the HDMI cable to the PC and the external device (TV, monitor) that supportsHDMI.2HDMI port transfers both video and audio simultaneously. So you don't need a separateaudio connection.3On the PC, press [ ] + [P] keys to output the screen to the external device.ENGLISH](https://usermanual.wiki/LG-Electronics-USA/DT-LG24V55/User-Guide-2688629-Page-92.png)
![Using the PC 93TIPToggle screen by pressing [] + [P] keys•Press [ ] + [P] keys to display the Switch Screen menu. Select the screen to useand press the [Enter] key.CAUTION•If you do not set Speaker as the default value after disconnecting the HDMI cable,the system may not produce any sound.•If a program was running already, you need to exit and restart the program for it toproduce sound.ENGLISH](https://usermanual.wiki/LG-Electronics-USA/DT-LG24V55/User-Guide-2688629-Page-93.png)
![94 Using the PCConnecting an External Digital DeviceConnecting a digital camera, camcorder, cell phone, Smartphone or other digital devices tothe USB port, allows you to transfer data or use other additional features.For details on how to use external digital devices, refer to the manual provided by themanufacturer for instructions.The drive of the external digital device connected to the USB port can be differentlyspecified according to the model.TIPDevices that are not authorized with USB 3.0 may not operate normally when connectedto the USB 3.0 port.It is recommended to use the USB 2.0 port in case the device does not function normally.Connecting the Device and Basic UseLG Electronics™does not provide the USB cable for the digital device. It is providedby the device's manufacturer or has to be bought separately.1Please turn on the power of the digital device after booting the PC.2Use the USB cable to connect the external digital device to the PC.After connecting smartphones or other external digital devices to the USB cable,select either [External Disk], [Disk Drive], [SD Card Mount] on the external digitaldevice to use it.ENGLISH](https://usermanual.wiki/LG-Electronics-USA/DT-LG24V55/User-Guide-2688629-Page-94.png)
![Using the PC 953When the [Autorun] window appears, select [Open device to view files].4Execute the operation you need when the files and data of the external digital deviceappear.ENGLISH](https://usermanual.wiki/LG-Electronics-USA/DT-LG24V55/User-Guide-2688629-Page-95.png)
![Using the PC 972In the Charms, click [Settings] >[Change PC Settings].ENGLISH](https://usermanual.wiki/LG-Electronics-USA/DT-LG24V55/User-Guide-2688629-Page-97.png)
![98 Using the PC3On the [PC Settings] screen, as shown below, click [PC and devices] >[Bluetooth].4When [Bluetooth] appears, search other connectible devices.ENGLISH](https://usermanual.wiki/LG-Electronics-USA/DT-LG24V55/User-Guide-2688629-Page-98.png)
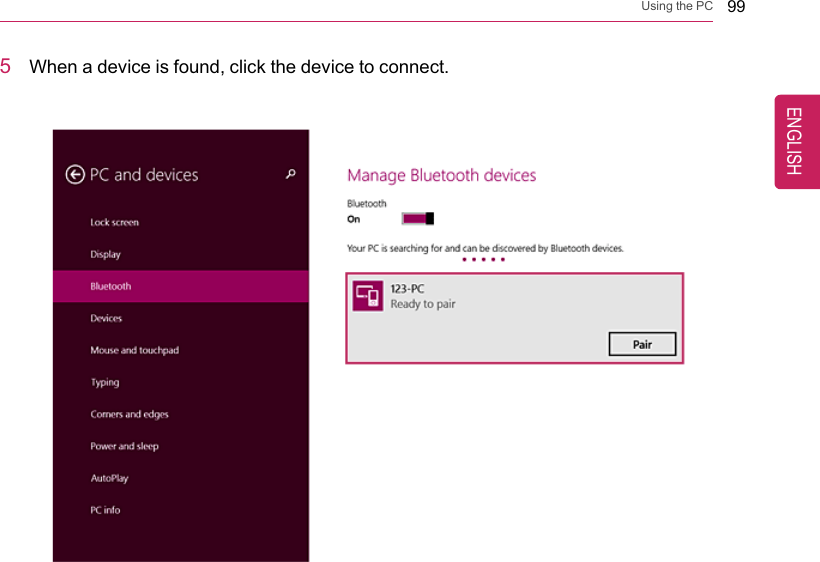
![100 Using the PC6When the passwords are matched, click [Yes] to complete the connection.ENGLISH](https://usermanual.wiki/LG-Electronics-USA/DT-LG24V55/User-Guide-2688629-Page-100.png)
![Using the PC 101LANLAN is the network environment that users can connect to by using a cable to connect totheir internet providers or the company's network.Using Wired LANLAN is installed with an automatic IP (DHCP) as default value.Please refer to the following instructions to find out more about setting up an automatic IP(DHCP) or manual IP.1Connect LAN cable to the LAN port.2Switch to the Desktop mode after clicking the [Desktop tile] in the Start screen. Andthen, run the [Charms].ENGLISH](https://usermanual.wiki/LG-Electronics-USA/DT-LG24V55/User-Guide-2688629-Page-101.png)
![102 Using the PC3In the Charms, click [Settings] >[Control Panel] >[View By] >[Small Icon] >[Network and Sharing Center].ENGLISH](https://usermanual.wiki/LG-Electronics-USA/DT-LG24V55/User-Guide-2688629-Page-102.png)
![Using the PC 1034Click [Change adapter settings].ENGLISH](https://usermanual.wiki/LG-Electronics-USA/DT-LG24V55/User-Guide-2688629-Page-103.png)
![104 Using the PC5Right-click [Ethernet] and select [Properties].ENGLISH](https://usermanual.wiki/LG-Electronics-USA/DT-LG24V55/User-Guide-2688629-Page-104.png)
![Using the PC 1056Select [Internet Protocol Version 4 (TCP/IPv4)] and click [Properties].ENGLISH](https://usermanual.wiki/LG-Electronics-USA/DT-LG24V55/User-Guide-2688629-Page-105.png)
![106 Using the PC7If you want to use an automatic IP(DHCP), select [Obtain an IP addressautomatically]. If you want to use a manual IP, select [Use the following IP address]to enter the address.Please ask the network administrator about obtaining a manual IP.8Press [OK] to complete the network setup.9Click the [Internet Explorer] icon in the taskbar to check whether the internet is operatingnormally.ENGLISH](https://usermanual.wiki/LG-Electronics-USA/DT-LG24V55/User-Guide-2688629-Page-106.png)
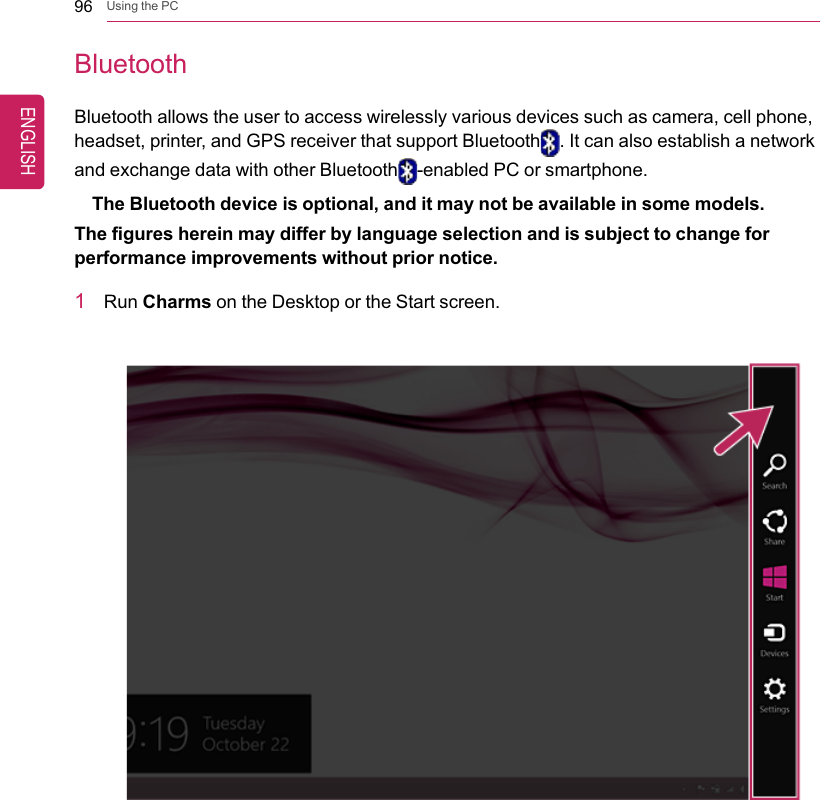
![Using the PC 107Wireless NetworkThe wireless network (Wireless LAN) is the network environment that connects a PC withthe internet provider or company network through an Access Point (wireless or regularrouter).Wireless network is optional, and so it may not be installed in some models.Using the Wireless NetworkIf an Access Point (wired or wireless router) is in the vicinity of the PC, the wireless networkcan easily be accessed.During the search for a wireless network (Wireless LAN), various Access Point maybe found according to the location where the PC is used.In case no accessible wireless network (Wireless LAN) is near the PC, no AccessPoint might be found.A password protected Access Point cannot be accessed without knowing the rightpassword.1Run [Charms] on the Start screen or in Desktop mode.2In the Charms, click [Settings] >[Wireless Network Icon].ENGLISH](https://usermanual.wiki/LG-Electronics-USA/DT-LG24V55/User-Guide-2688629-Page-107.png)

![Using the PC 1094Select the Access Point (wireless network) you want to use and click [Connect] toconnect to the Access Point.If a password is set for the wireless network, the Enter Password windowappears.5When the connection is established, [Connected] is displayed in the connected AccessPoint (wireless network).6Click the [Internet Explorer] icon in the taskbar to check whether the internet is operatingnormally.ENGLISH](https://usermanual.wiki/LG-Electronics-USA/DT-LG24V55/User-Guide-2688629-Page-109.png)
![Using the PC 113TIPTo safely removing a memory card:The figures herein may differ by language selection and is subject to change forperformance improvements without prior notice.1Click the [Safely Remove Hardware and other Media] icon on the right side of thetaskbar.2Select [Remove Multi-Card USB Device] to safely remove the hardware.ENGLISH](https://usermanual.wiki/LG-Electronics-USA/DT-LG24V55/User-Guide-2688629-Page-113.png)
![114 Using SoftwareUsing SoftwareLG Easy StarterLG Easy Starter provides classic functions, like the Start menu of previous Windows, inDesktop Mode to allow you to easily use the desktop.TIPWindows Style apps do not appear in LG Easy Starter.The figures herein are subject to change for performance improvements without priornotice.Installing LG Easy Starter1Click the [] tile on the Start screen, or the [ ] icon in desktop to run [LGUpdate Center].ENGLISH](https://usermanual.wiki/LG-Electronics-USA/DT-LG24V55/User-Guide-2688629-Page-114.png)
![Using Software 1152Click the [All List] menu to access the update and install lists.ENGLISH](https://usermanual.wiki/LG-Electronics-USA/DT-LG24V55/User-Guide-2688629-Page-115.png)
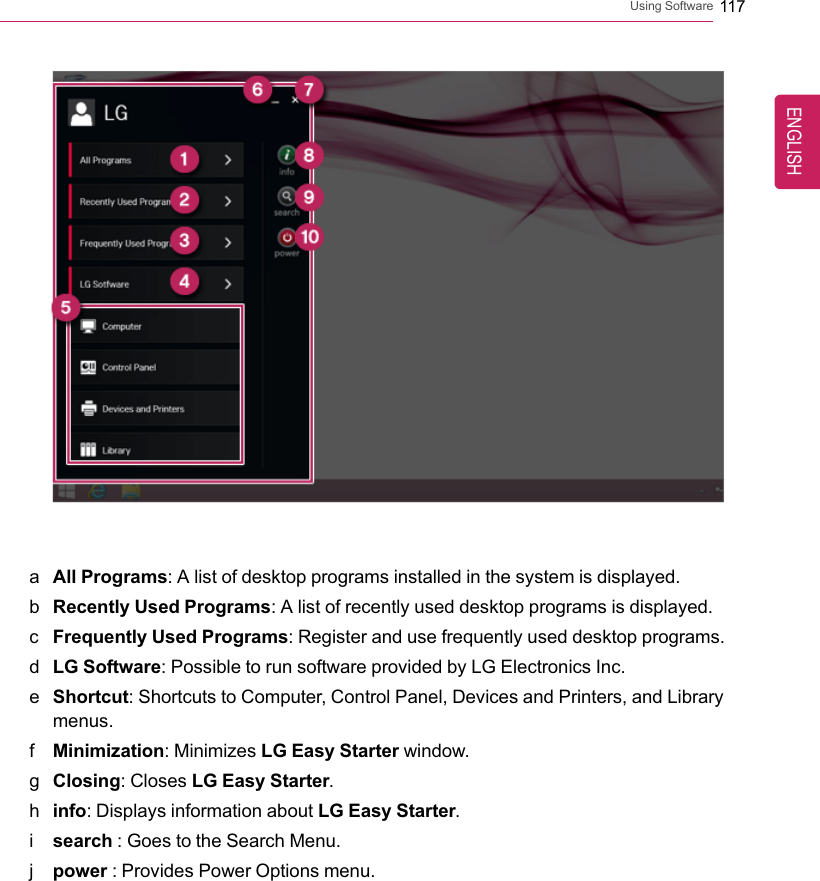
![116 Using Software3Select LG Easy Starter and click [Installation] to install.4When the installation is completed, LG Easy Starter [ ] tile and icon are created onthe Start screen and Desktop.Running LG Easy Starter1Click the [ ] tile on the Start screen, or the [ ] icon in Desktop Mode to run [LGEasy Starter].2[LG Easy Starter] runs as follows:ENGLISH](https://usermanual.wiki/LG-Electronics-USA/DT-LG24V55/User-Guide-2688629-Page-116.png)
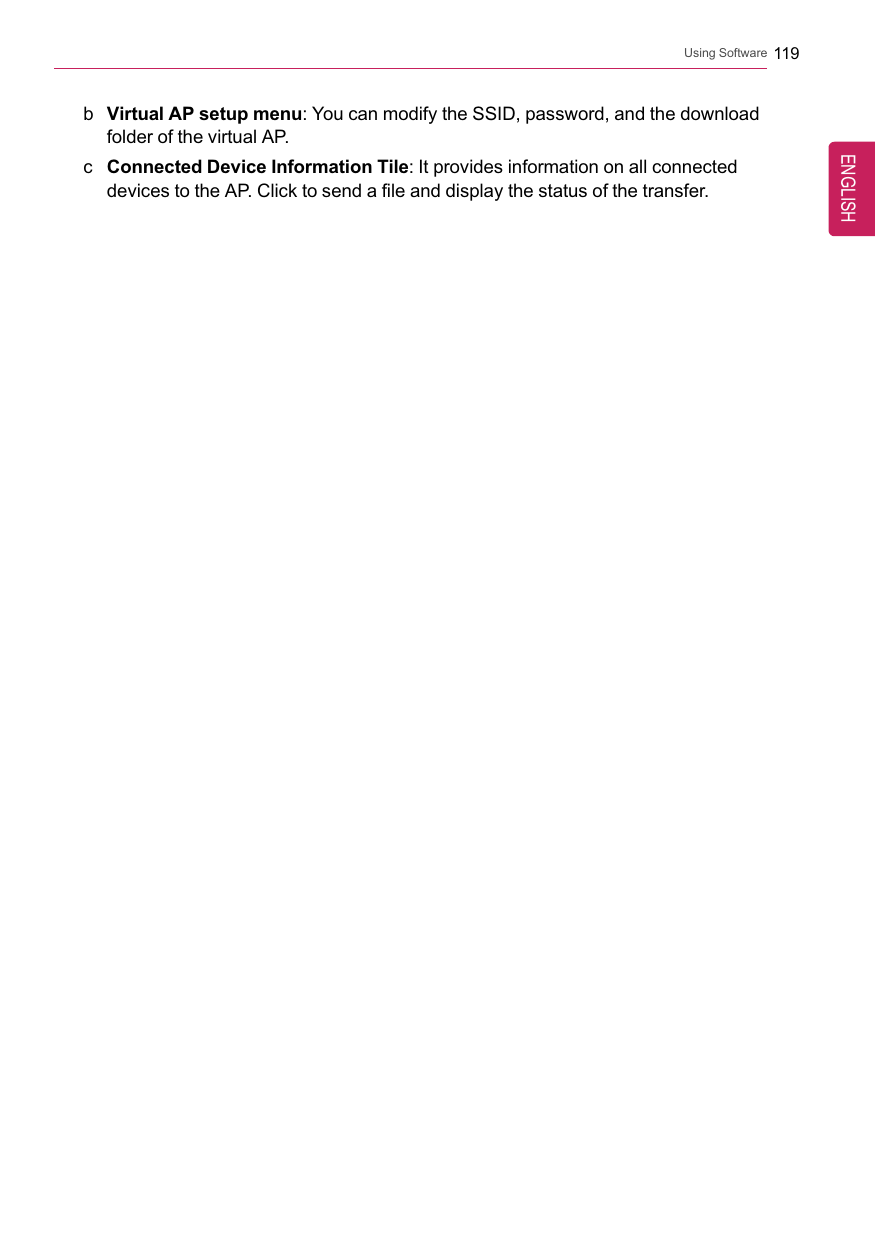
![118 Using SoftwareLG Network ShareLG Network Share is software that allows you to configure and use Virtual AP and FileSharing.TIPLG Network Share For more details about how to use, refer to the correspondinghelp.The figures herein are subject to change without prior notice.It may not work properly depending on user preferences (security tools, etc.) and thenetwork status.If it is not a built-in communication device, you cannot use Network Share to use thevirtual AP function.LG Network Share Using the Program1Click the [] tile from the Start screen to run [LG Network Share].aVirtual AP function ON/OFF: Turn on or off the virtual AP function.ENGLISH](https://usermanual.wiki/LG-Electronics-USA/DT-LG24V55/User-Guide-2688629-Page-118.png)
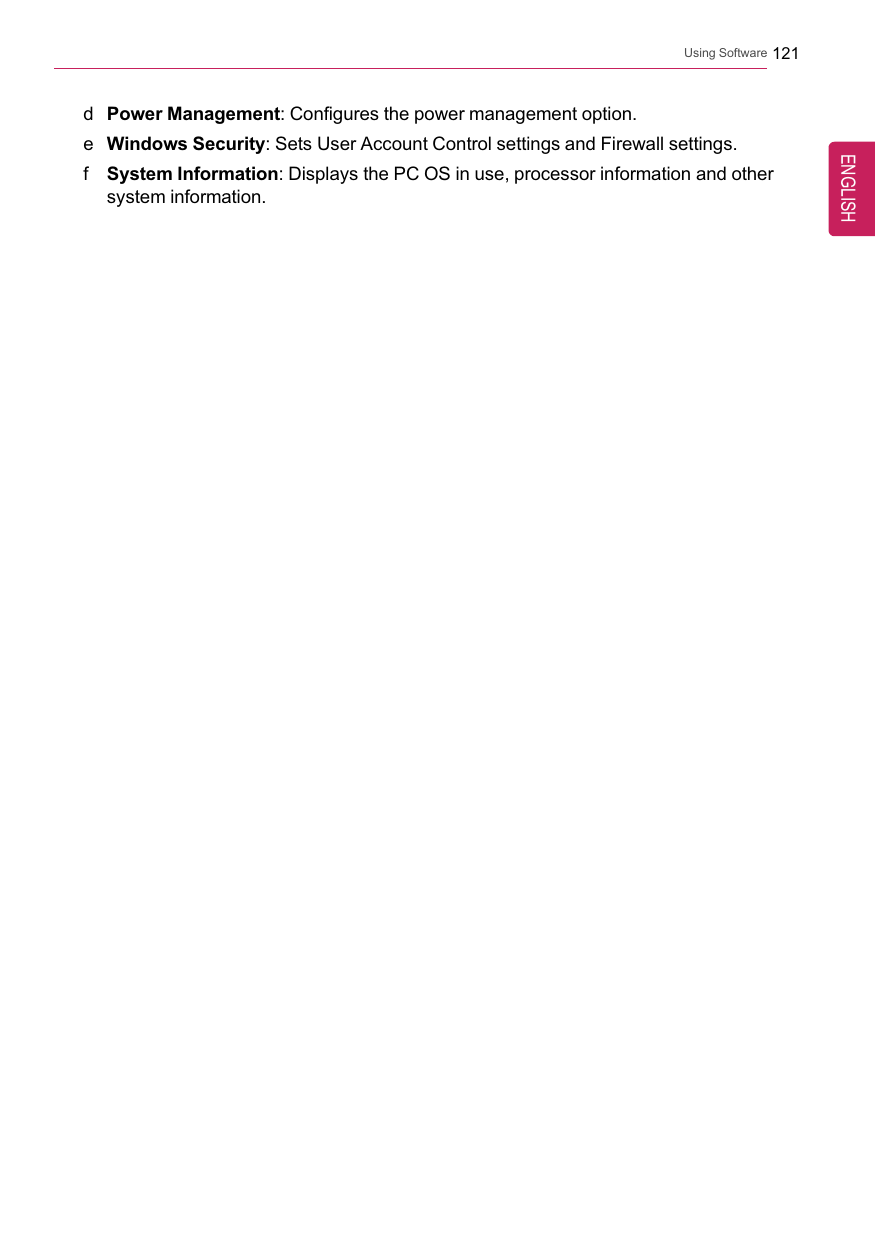
![120 Using SoftwareLG Control CenterLG Control Center is software that helps you change PC Settings, Power Settings,Windows Security Settings, etc. as well as viewing system information.TIPLG Control Center For more details about how to use , refer to the correspondinghelp.The figures herein is subject to change for performance improvements without priornotice and the functions supported by LG Control Center may vary from models.Using LG Control Center1Click the [] tile on the Start screen, or the [ ] icon in Desktop to run [LGControl Center].aMinimize/Exit Button: Minimizes the size of the window, or exits the software.bhelp/info Button: Runs Help or displays information about the software.cSystem Settings: Sets up the screen brightness / resolution, external display, soundand other various devices.ENGLISH](https://usermanual.wiki/LG-Electronics-USA/DT-LG24V55/User-Guide-2688629-Page-120.png)
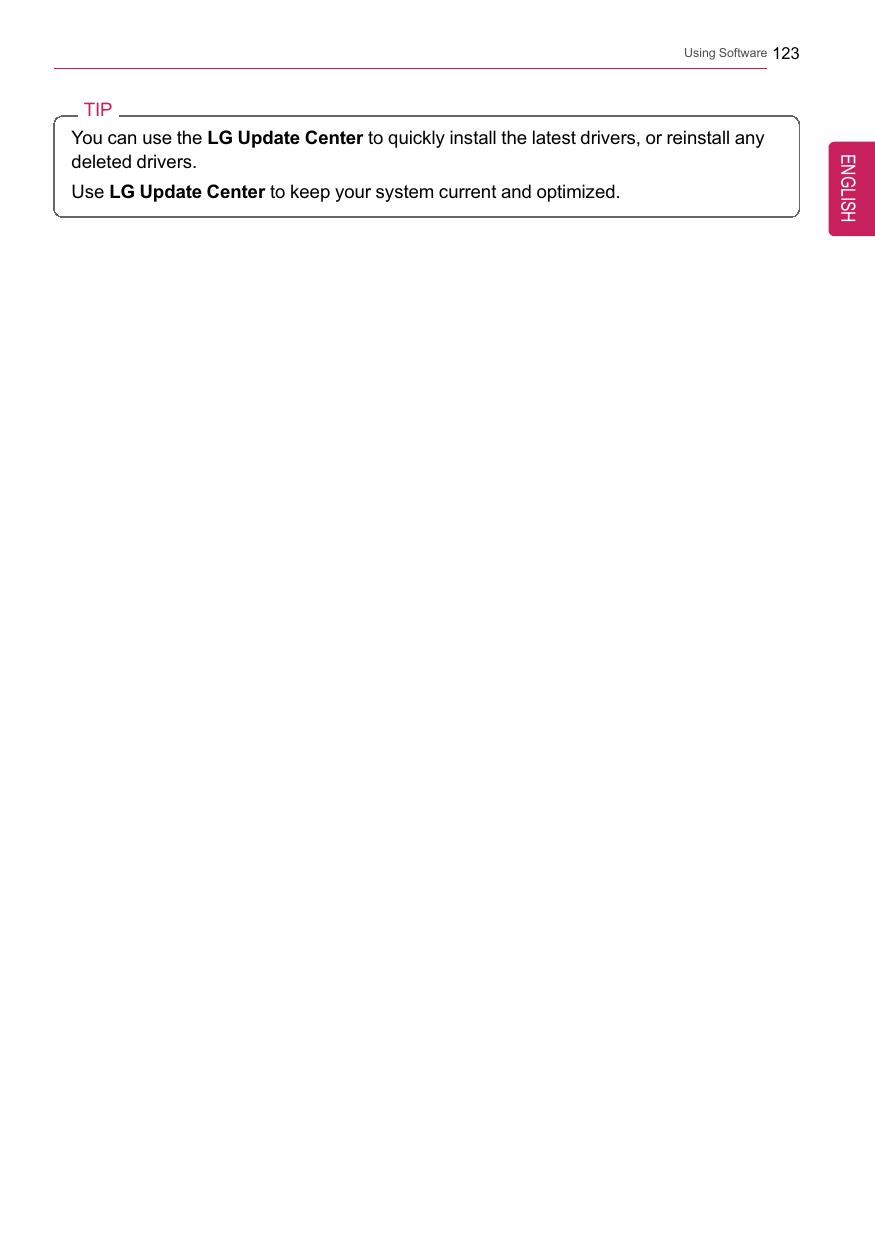
![122 Using SoftwareLG Update CenterLG Update Center allows you to install various PC drivers, applications and Windowspatches easily.TIPThe figures herein are subject to change without prior notice.It may not work properly depending on user preferences (security tools, etc.) and thenetwork status.For more information on LG Update Center, refer to Help.Using LG Update Center1Click the [] tile on the Start screen, or the [ ] icon in Desktop mode to run LGUpdate Center.aRequired Update: Installs critical items that must be applied to the system.bAll List: Displays and installs all required items for the system.cNotification Setting: Sets up notifications for online updates for installed items.ENGLISH](https://usermanual.wiki/LG-Electronics-USA/DT-LG24V55/User-Guide-2688629-Page-122.png)
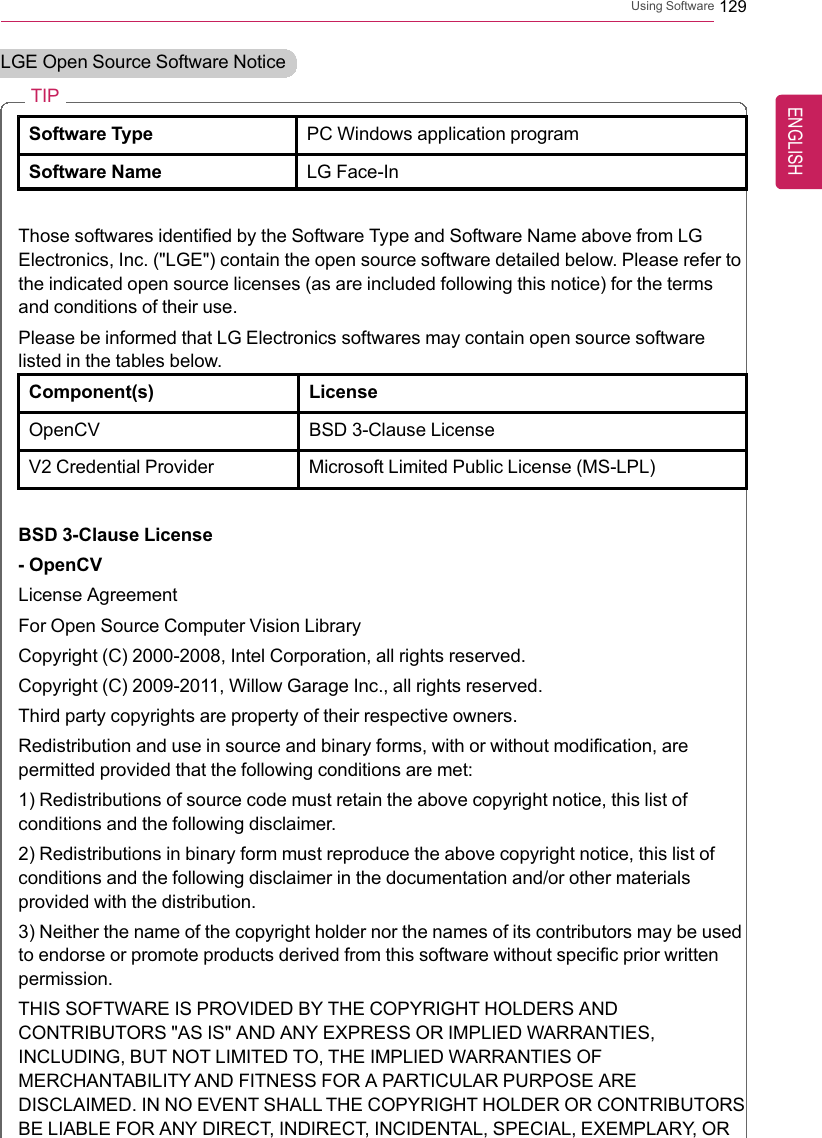
![124 Using SoftwareLG Face-InLG Face-In provides quick and easy Windows login with user's face instead of password.TIPTo use LG Face-In, password for Windows account must be set. Set up the passwordbefore using this feature if no password is set.The figures herein are subject to change without prior notice.CAUTIONLG Face-In is less secure than password lock and can be bypassed by someone whoresembles the user.The data used for face recognition remains privately stored in the product. This datacannot be accessed by any outside devices.Setting LG Face-In1On the Desktop, click the [] icon to run [LG Face-In].ENGLISH](https://usermanual.wiki/LG-Electronics-USA/DT-LG24V55/User-Guide-2688629-Page-124.png)
![Using Software 1252Press the [Next] button and the photo screen appears.ENGLISH](https://usermanual.wiki/LG-Electronics-USA/DT-LG24V55/User-Guide-2688629-Page-125.png)
![126 Using Software3Align face and shoulders along the dots. Press the [Capture] button when the dots turngreen.ENGLISH](https://usermanual.wiki/LG-Electronics-USA/DT-LG24V55/User-Guide-2688629-Page-126.png)
![Using Software 1274Enter the password for Windows account and press the [Registration complete] buttonto complete Face-In registration.Deleting LG Face-In Account1On the Desktop, click the [ ] icon to run [LG Face-In].ENGLISH](https://usermanual.wiki/LG-Electronics-USA/DT-LG24V55/User-Guide-2688629-Page-127.png)
![128 Using Software2Press the [Delete Account] button as shown below.3Press the [Delete] button when prompted to confirm the deletion.ENGLISH](https://usermanual.wiki/LG-Electronics-USA/DT-LG24V55/User-Guide-2688629-Page-128.png)
![132 Using SoftwareLG Reader ModeLG Reader Mode prevents the users from eyestrain and helps them to read the PC screencomfortably by displaying the screen just like a printed paper.Using LG Reader Mode1Click the [] icon on the task bar.ENGLISH](https://usermanual.wiki/LG-Electronics-USA/DT-LG24V55/User-Guide-2688629-Page-132.png)
![Using Software 1332Select the [Reader Mode On] menu to switch to Reader Mode as shown in the figure.ENGLISH](https://usermanual.wiki/LG-Electronics-USA/DT-LG24V55/User-Guide-2688629-Page-133.png)
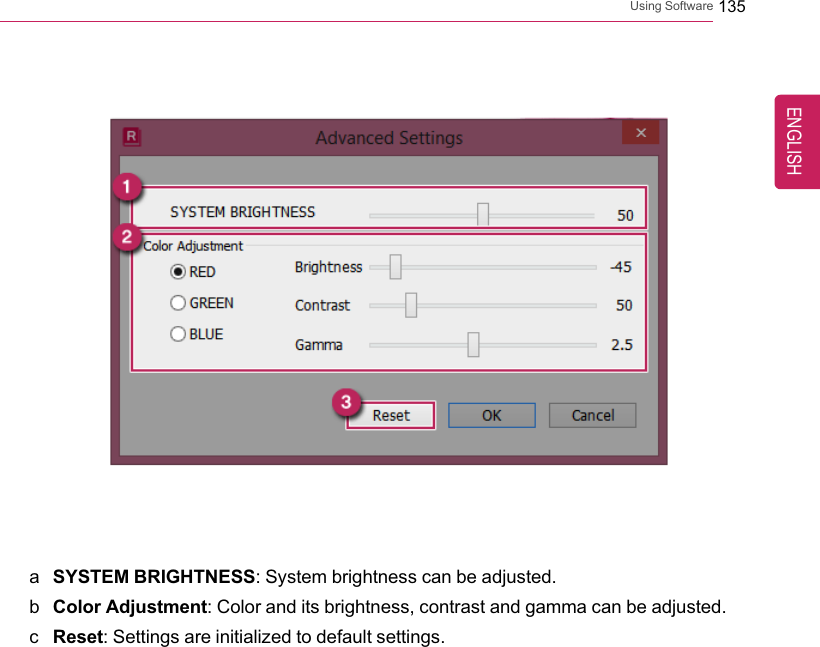
![134 Using SoftwareUsing Advanced Settings1Select the [Advanced Settings] menu as shown in the figure.TIP[Advanced Settings] menu is activated when the Reader Mode is On.2[Advanced Settings] window appears as shown below.ENGLISH](https://usermanual.wiki/LG-Electronics-USA/DT-LG24V55/User-Guide-2688629-Page-134.png)
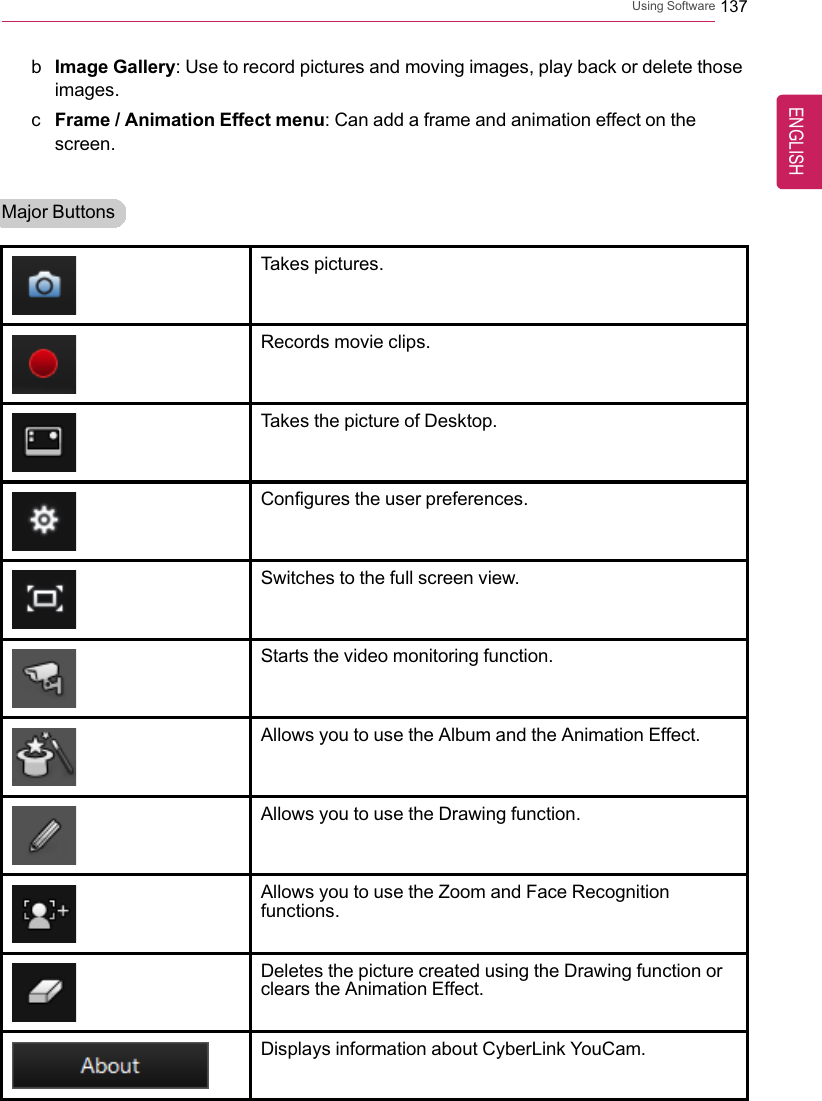
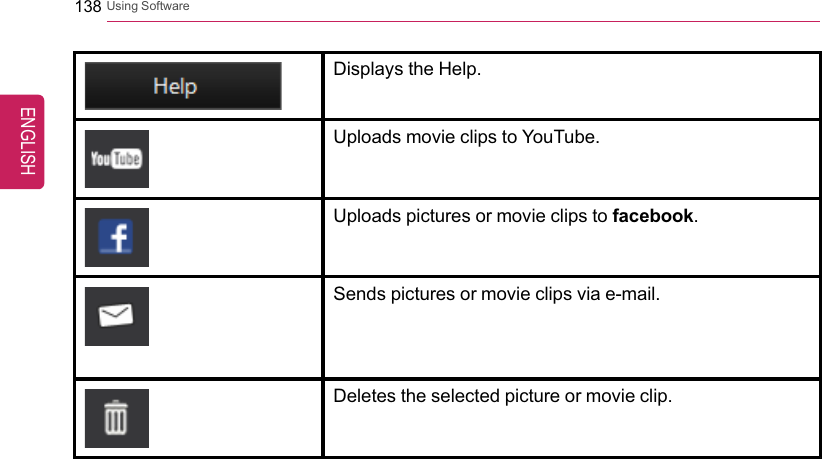
![136 Using SoftwareCyberLink YouCamCyberLink YouCam is the program that can take picture or moving images through theweb camera.The figures herein are subject to change without prior notice.The web camera is optional, and so it may not be installed in some models.For more information on how to use the program, refer to CyberLink YouCam help.TIPYou can change the web camera resolution on Setup menu.Using CyberLink YouCam1Switch to the Desktop mode after clicking the [Desktop tile] in the Start screen. Andthen, click the [] icon to run the [CyberLink YouCam].2CyberLink YouCam Home Page appears as follows.aViewer : Displays the Webcam screen.ENGLISH](https://usermanual.wiki/LG-Electronics-USA/DT-LG24V55/User-Guide-2688629-Page-136.png)
![Restoring the System 139Restoring the SystemLG Recovery CenterIf the system has an error, you can use LG Recovery Center to use Windows 8.1 recoveryfunction to recover or restore the system to its initial pre-purchase state.TIPLG Recovery Center uses the Windows 8.1 recovery function.For more information about Windows 8.1 recovery, refer to [Windows Help and Support].CAUTIONIf you have deleted the restoration data in the protected area of the disk, or havearbitrarily installed another operating system, the restore function may not work.Click the [] icon in Desktop to run [LG Recovery Center].ENGLISH](https://usermanual.wiki/LG-Electronics-USA/DT-LG24V55/User-Guide-2688629-Page-139.png)
![140 Restoring the System1PC Refresh: Recovers the PC without losing any personal files.CAUTIONPC settings are reset to default and any user-installed software will be deleted.2PC Reset: Removes all items from the system and restores the system to its initial pre-purchase state.CAUTIONAll data is lost during the initialization, so you must backup all critical data in advance.It may take about 5 hours or longer depending on the system conditions.3Create Recovery Drive: You can create a recovery drive in Windows as a precautionagainst a system failure that prevents you from entering the operating system, or anyother severe system issues.a When the following screen appears, select [Copy the recovery partition from the PCto the recovery drive.] and click [Next].b When the following screen appears, select the USB flash drive and click [Next].CAUTIONThis process deletes all the data on the storage device designated as a recoverydrive. Make sure to back up its data in advance.ENGLISH](https://usermanual.wiki/LG-Electronics-USA/DT-LG24V55/User-Guide-2688629-Page-140.png)
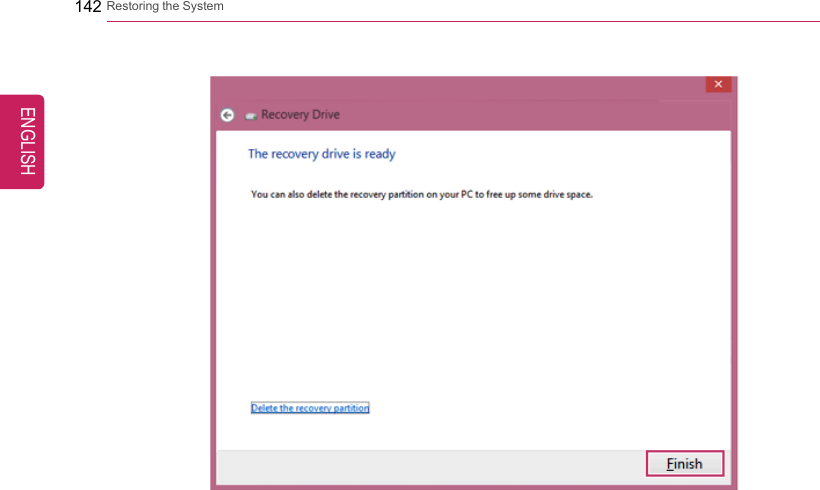
![Restoring the System 141c Once the storage device is ready, click [Finish] to create a recovery drive.CAUTIONSelect [Delete the recovery partition] while creating a recovery drive to remove therecovery partition in the PC.Once the recovery partition is removed, you cannot use the recovery function ofthe PC. You can only recover the system using the recovery media.ENGLISH](https://usermanual.wiki/LG-Electronics-USA/DT-LG24V55/User-Guide-2688629-Page-141.png)
![Restoring the System 143Recovering from a Boot FailureIf booting is impossible due to a serious error with the system, you can recover the systemusing LG Recovery Center RE.CAUTIONIf you have deleted the restoration data in the protected area of the disk, the restorefunction may not work.Using LG Recovery Center RECAUTIONAll data is lost during the initialization, so you must backup all critical data inadvance.1Turn on the PC and press [F11].2When the following screen appears, select a language you want to use and then click[Next].ENGLISH](https://usermanual.wiki/LG-Electronics-USA/DT-LG24V55/User-Guide-2688629-Page-143.png)
![144 Restoring the System3When the following screen appears, select the [I Agree] button and then click the [Next]button.ENGLISH](https://usermanual.wiki/LG-Electronics-USA/DT-LG24V55/User-Guide-2688629-Page-144.png)
![Restoring the System 1454When the factory reset has been completed as shown in the following figure, click the[Complete] button and then restart the system.Recover by Using a Recovery DriveIf it is impossible to recover by using [F11], you can recover the system through a recoverydrive.TIPTo recover by using a recovery drive, you must have the recovery drive made through LGRecovery Center's [Create Recovery Drive].1Connect the recovery drive to the USB port of the PC.2Turn on the PC and press [F10].3When the screen for selecting the boot device appears, select the connected recoverydrive and click [Enter].4Select the [Troubleshooting] menu.5Select the item you want and recover the system following the instructions.ENGLISH](https://usermanual.wiki/LG-Electronics-USA/DT-LG24V55/User-Guide-2688629-Page-145.png)
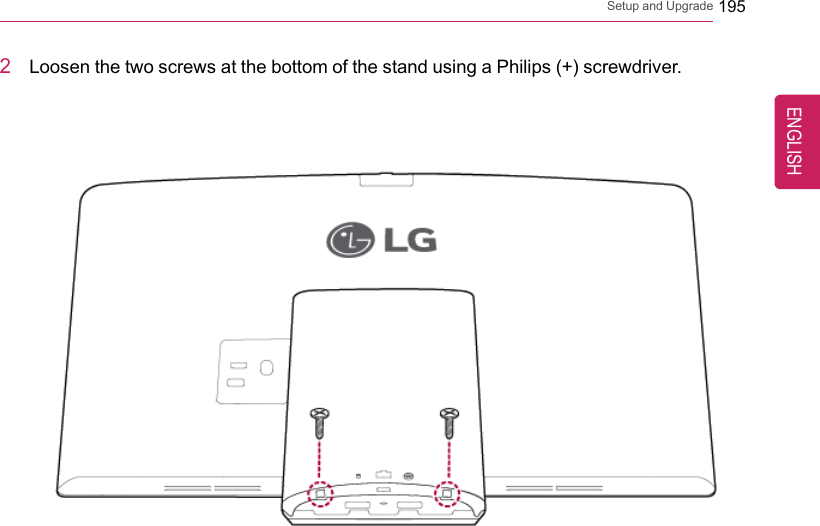
![146 Setup and UpgradeSetup and UpgradeInstalling the DriverThe figures herein may differ by language selection and are subject to changewithout prior notice.Using LG Update Center to install the Driver1Click the [] tile on the Start screen, or the [ ] icon in Desktop mode to run LGUpdate Center.2Select [Required Update] or [All List] to install the driver.For more information on LG Update Center, refer to [Help].TIPYou can use the LG Update Center to quickly install the latest drivers, or reinstall anydeleted drivers.Use LG Update Center to keep your system current and optimized.ENGLISH](https://usermanual.wiki/LG-Electronics-USA/DT-LG24V55/User-Guide-2688629-Page-146.png)

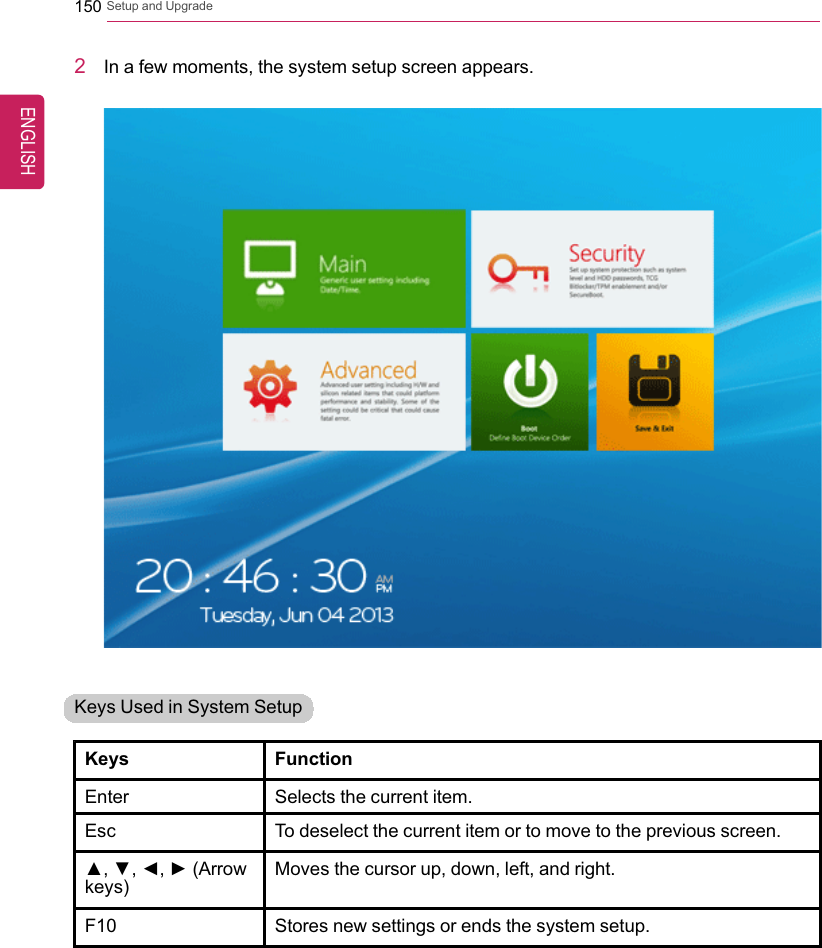
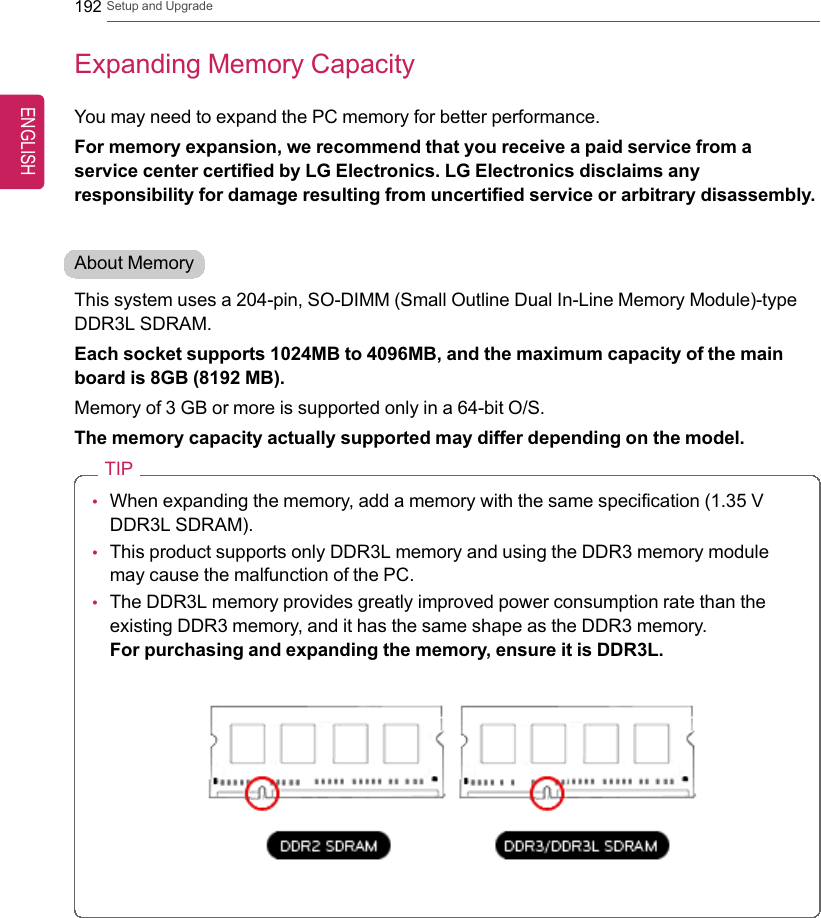
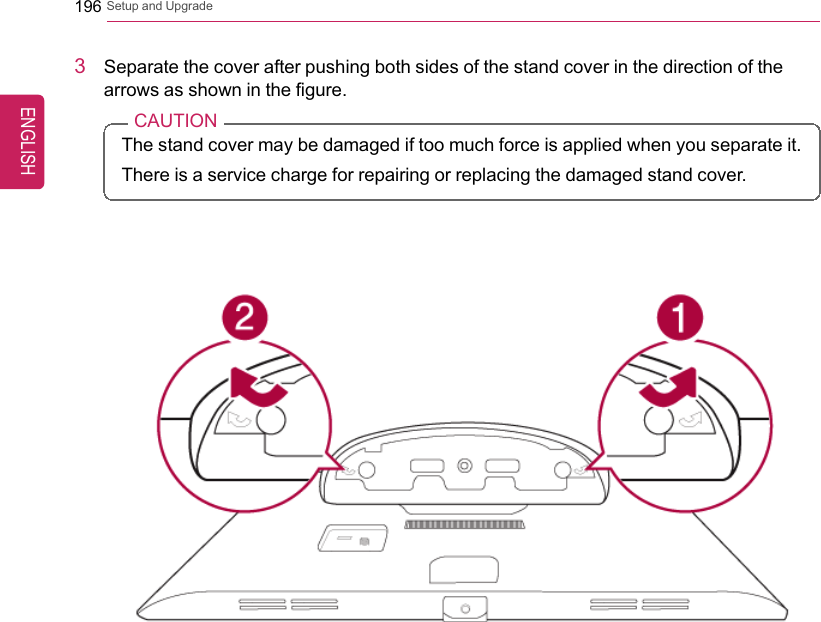
![148 Setup and UpgradeStarting System SetupSystem setup means storing the hardware configuration information of the PC in the flashmemory. Through system setup, the PC retrieves various information including current dateand time, memory capacity, and storage device (HDD, SSD, eMMC) capacity and type.You setup the system when you set passwords, change the boot order, and add newperipheral devices to the machine.Items displayed on the Setup screen may differ by model type and spec.•••TIPTo use the system setup (F2), booting device selection (F10), or recovery (F11), you needto restart the system (click [Restart] in the system power menu) and then immediatelypress the corresponding function key due to the fast booting speed.CAUTION•Do not change the system setup unless necessary. Incorrect system setup maycause errors during system operation. Use caution when changing the systemsetup.•For performance improvement, the system setup menu configuration and the initialsetup status may be changed and may become different from images included in theuser manual.ENGLISH](https://usermanual.wiki/LG-Electronics-USA/DT-LG24V55/User-Guide-2688629-Page-148.png)
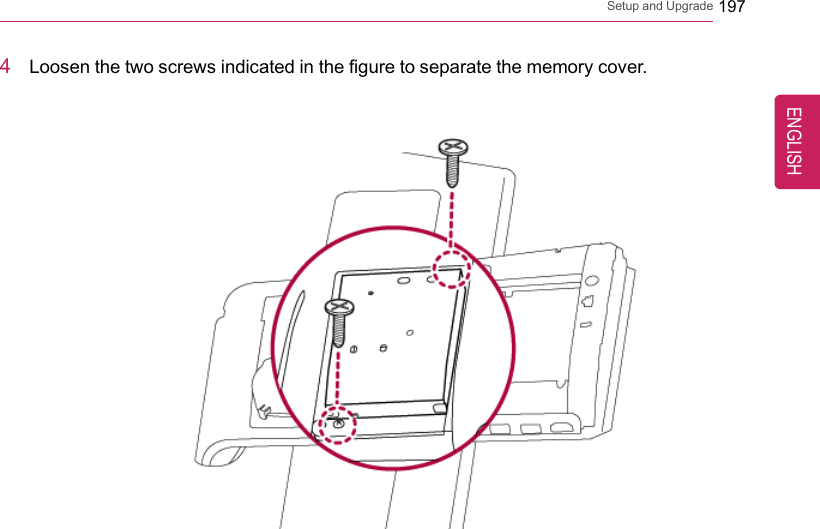
![Setup and Upgrade 1491Reboot the system and press [F2].ENGLISH](https://usermanual.wiki/LG-Electronics-USA/DT-LG24V55/User-Guide-2688629-Page-149.png)
![Setup and Upgrade 151Setting the PasswordThis process is to set a password so that other people cannot use the PC or change thesettings.The user can set a password while booting the system or setting up the system.CAUTION•Without the registered password, access to the system will be denied. Write downand keep the password in a safe place.Set Supervisor PasswordThe password prevents unauthorized people from accessing the PC. By default, nopassword is set for the machine. If an unauthorized person changes the password in theSystem Setup, you will be unable to access the system.1After opening the system setup screen, click the [Security] button.ENGLISH](https://usermanual.wiki/LG-Electronics-USA/DT-LG24V55/User-Guide-2688629-Page-151.png)
![152 Setup and Upgrade2When the following screen appears, click [Enter] in the [Set Supervisor Password]menu.ENGLISH](https://usermanual.wiki/LG-Electronics-USA/DT-LG24V55/User-Guide-2688629-Page-152.png)
![Setup and Upgrade 1533When the following message appears, enter the password and click [OK]. Thepassword must not exceed 8 total characters consisting of letters (A - Z), numbers (0 -9), or a combination of both.ENGLISH](https://usermanual.wiki/LG-Electronics-USA/DT-LG24V55/User-Guide-2688629-Page-153.png)
![154 Setup and Upgrade4When the following message appears, click [OK].5To save the changes in system setup, press [F10].ENGLISH](https://usermanual.wiki/LG-Electronics-USA/DT-LG24V55/User-Guide-2688629-Page-154.png)
![Setup and Upgrade 1556When the following message appears, click [YES]. The PC will restart.TIP•With Supervisor Password, you are authorized to set all items in the System Setupand to set Password on boot. In case other people also use the PC, it isrecommended to set the Set User Password.Set User PasswordThe password set by the [Set User Password] process is lower than that set by the [SetSupervisor Password] process, and so the user can use the[Set User Password] onlyafter setting a password in the [Set Supervisor Password] menu.ENGLISH](https://usermanual.wiki/LG-Electronics-USA/DT-LG24V55/User-Guide-2688629-Page-155.png)
![156 Setup and Upgrade1After opening the system setup screen, click the [Security] button.ENGLISH](https://usermanual.wiki/LG-Electronics-USA/DT-LG24V55/User-Guide-2688629-Page-156.png)
![Setup and Upgrade 1572When the following screen appears, click [Enter] in the [Set User Password] menu.ENGLISH](https://usermanual.wiki/LG-Electronics-USA/DT-LG24V55/User-Guide-2688629-Page-157.png)
![158 Setup and Upgrade3When the following message appears, enter the password and click [OK]. Thepassword must not exceed 8 total characters consisting of letters (A - Z), numbers (0 -9), or a combination of both.ENGLISH](https://usermanual.wiki/LG-Electronics-USA/DT-LG24V55/User-Guide-2688629-Page-158.png)
![Setup and Upgrade 1594When the following message appears, click [OK].5To save the changes in the system setup, press [F10].ENGLISH](https://usermanual.wiki/LG-Electronics-USA/DT-LG24V55/User-Guide-2688629-Page-159.png)
![160 Setup and Upgrade6When the following message appears, click [YES]. The PC will restart.TIP•[User Password] allows limited access to the items in the System Setup comparedto the [Supervisor Password] item.Password on boot[Password on boot] menu protects the system by requesting [Set Supervisor Password]or [Set User Password] during boot up.ENGLISH](https://usermanual.wiki/LG-Electronics-USA/DT-LG24V55/User-Guide-2688629-Page-160.png)
![Setup and Upgrade 1611After opening the system setup screen, click the [Security] button.ENGLISH](https://usermanual.wiki/LG-Electronics-USA/DT-LG24V55/User-Guide-2688629-Page-161.png)
![162 Setup and Upgrade2When the following screen appears, set [Set Supervisor Password] only or both [SetSupervisor Password] and [Set User Password].ENGLISH](https://usermanual.wiki/LG-Electronics-USA/DT-LG24V55/User-Guide-2688629-Page-162.png)
![Setup and Upgrade 1633Click the [Off] button in the [Password on boot] menu as shown in the following figure.The button changes to [On] and the [Password on boot] setting is completed.Set HDD Password / Set SSD PasswordHDD / SSD Password is to set a password in the HDD and SSD separately from theSupervisor Password.If you set both HDD password and SSD password, the password input windowappears twice during booting.If you set both HDD password and SSD password, the password input windowappears in order of [Boot Priority Order] at the top of the [Boot] menu.SSD is an option, and the Set SSD Password function may not be supported in somemodel.ENGLISH](https://usermanual.wiki/LG-Electronics-USA/DT-LG24V55/User-Guide-2688629-Page-163.png)
![164 Setup and Upgrade1After opening the system setup screen, click the [Security] button.2When the [Security] menu appears, click the [HDD Security Status] button.ENGLISH](https://usermanual.wiki/LG-Electronics-USA/DT-LG24V55/User-Guide-2688629-Page-164.png)
![Setup and Upgrade 1653When the following screen appears, click [Enter] in the [Set HDD Password] or [SetSSD Password] menu.ENGLISH](https://usermanual.wiki/LG-Electronics-USA/DT-LG24V55/User-Guide-2688629-Page-165.png)
![166 Setup and Upgrade4When the following message appears, enter the password and click [OK]. Thepassword must not exceed 8 total characters consisting of letters (A - Z), numbers (0 -9), or a combination of both.ENGLISH](https://usermanual.wiki/LG-Electronics-USA/DT-LG24V55/User-Guide-2688629-Page-166.png)
![Setup and Upgrade 1675When the following message appears, click [OK].6To save the changes in the system setup, press [F10].ENGLISH](https://usermanual.wiki/LG-Electronics-USA/DT-LG24V55/User-Guide-2688629-Page-167.png)
![168 Setup and Upgrade7When the following message appears, click [YES]. The PC will restart.CAUTIONHDD Password Without the password, it is impossible to recover the HDD.•The replacement of HDD due to a forgotten HDD Password is not covered bywarranty.ENGLISH](https://usermanual.wiki/LG-Electronics-USA/DT-LG24V55/User-Guide-2688629-Page-168.png)
![Setup and Upgrade 169Changing or Deleting the PasswordYou can delete or change the password only after inputting the current password.Changing the Password1Execute System Setup, enter the password, and press [Enter] key.2Change the password the same way as setting one.ENGLISH](https://usermanual.wiki/LG-Electronics-USA/DT-LG24V55/User-Guide-2688629-Page-169.png)
![170 Setup and UpgradeDeleting the Password1Execute System Setup, enter the password, and press the [Security] button.ENGLISH](https://usermanual.wiki/LG-Electronics-USA/DT-LG24V55/User-Guide-2688629-Page-170.png)
![Setup and Upgrade 1712When the following screen appears, click [Enter] in the [Set Supervisor Password]menu.ENGLISH](https://usermanual.wiki/LG-Electronics-USA/DT-LG24V55/User-Guide-2688629-Page-171.png)
![172 Setup and Upgrade3When the following message appears, enter the current password in the [Enter CurrentPassword] field.ENGLISH](https://usermanual.wiki/LG-Electronics-USA/DT-LG24V55/User-Guide-2688629-Page-172.png)
![Setup and Upgrade 1734Press [Enter] in [Enter New Password] and [Confirm New Password].ENGLISH](https://usermanual.wiki/LG-Electronics-USA/DT-LG24V55/User-Guide-2688629-Page-173.png)
![174 Setup and Upgrade5When the following message appears, click [OK].6To save the changes in the system setup, press [F10].ENGLISH](https://usermanual.wiki/LG-Electronics-USA/DT-LG24V55/User-Guide-2688629-Page-174.png)
![Setup and Upgrade 1757When the following message appears, click [YES]. The PC will restart.ENGLISH](https://usermanual.wiki/LG-Electronics-USA/DT-LG24V55/User-Guide-2688629-Page-175.png)
![176 Setup and UpgradeDeleting the Password (Set HDD Password / Set SSD Password)1Execute System Setup, enter the password, and press the [Security] button.2When the [Security] menu appears, click the [HDD Security Status] button.ENGLISH](https://usermanual.wiki/LG-Electronics-USA/DT-LG24V55/User-Guide-2688629-Page-176.png)
![Setup and Upgrade 1773When the following screen appears, click [Enter] in the [Set HDD Password] or [SetSSD Password] menu.ENGLISH](https://usermanual.wiki/LG-Electronics-USA/DT-LG24V55/User-Guide-2688629-Page-177.png)
![178 Setup and Upgrade4When the following message appears, enter the current password in the [Enter CurrentPassword] field.ENGLISH](https://usermanual.wiki/LG-Electronics-USA/DT-LG24V55/User-Guide-2688629-Page-178.png)
![Setup and Upgrade 1795Press [Enter] in [Enter New Password] and [Confirm New Password].ENGLISH](https://usermanual.wiki/LG-Electronics-USA/DT-LG24V55/User-Guide-2688629-Page-179.png)
![180 Setup and Upgrade6When the following message appears, click [OK].7To save the changes in the system setup, press [F10].ENGLISH](https://usermanual.wiki/LG-Electronics-USA/DT-LG24V55/User-Guide-2688629-Page-180.png)
![Setup and Upgrade 1818When the following message appears, click [YES]. The PC will restart.ENGLISH](https://usermanual.wiki/LG-Electronics-USA/DT-LG24V55/User-Guide-2688629-Page-181.png)
![182 Setup and UpgradeRestoring the Factory Default SettingsIf you have changed the system setup by mistake, you can restore the system defaultsettings.1After opening the system setup screen, click the [Save & Exit] button.ENGLISH](https://usermanual.wiki/LG-Electronics-USA/DT-LG24V55/User-Guide-2688629-Page-182.png)
![Setup and Upgrade 1832When the [Exit] menu appears, click [Load Setup defaults].ENGLISH](https://usermanual.wiki/LG-Electronics-USA/DT-LG24V55/User-Guide-2688629-Page-183.png)
![184 Setup and Upgrade3When the following message appears, click [Yes]. The settings will be reset to thefactory default.4To save the changes in the system setup, press [F10].ENGLISH](https://usermanual.wiki/LG-Electronics-USA/DT-LG24V55/User-Guide-2688629-Page-184.png)
![Setup and Upgrade 1855When the following message appears, click [YES]. The PC will restart.TIP•You may press [F9] to use the [Load Setup defaults] menu.ENGLISH](https://usermanual.wiki/LG-Electronics-USA/DT-LG24V55/User-Guide-2688629-Page-185.png)
![186 Setup and UpgradeChanging Boot OrderThe user can change the boot order according to his or her needs, or select a boot deviceThe model in the example can differ from actual models and is subject to change forperformance improvements, without prior notice.TIPTo use the system setup (F2), booting device selection (F10), or recovery (F11), you needto restart the system (click [Restart] in the system power menu) and then immediatelypress the corresponding function key due to the fast booting speed.Changing Boot Order1Reboot the system and press [F2].ENGLISH](https://usermanual.wiki/LG-Electronics-USA/DT-LG24V55/User-Guide-2688629-Page-186.png)
![Setup and Upgrade 1872When the system setup screen appears, click the [Boot] button.ENGLISH](https://usermanual.wiki/LG-Electronics-USA/DT-LG24V55/User-Guide-2688629-Page-187.png)
![188 Setup and Upgrade3Drag the icon of the device to change the booting order in the [Edit Boot Order] menuto change the booting order.4To save the changes in the system setup, press [F10].ENGLISH](https://usermanual.wiki/LG-Electronics-USA/DT-LG24V55/User-Guide-2688629-Page-188.png)
![Setup and Upgrade 1895When the following message appears, click [YES].6The changes are saved and the system reboots.ENGLISH](https://usermanual.wiki/LG-Electronics-USA/DT-LG24V55/User-Guide-2688629-Page-189.png)
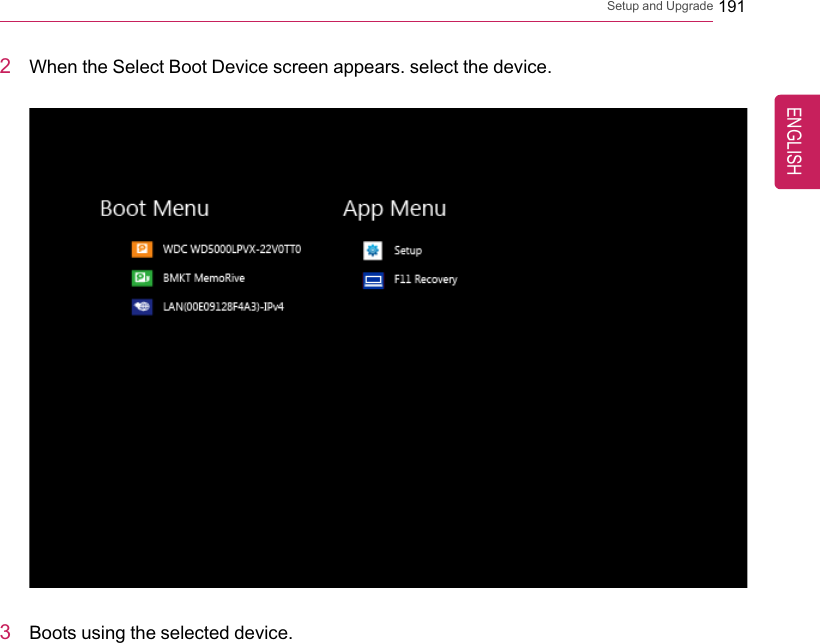
![190 Setup and UpgradeSelecting a Boot Device to Use1Reboot the system and press [F10].ENGLISH](https://usermanual.wiki/LG-Electronics-USA/DT-LG24V55/User-Guide-2688629-Page-190.png)
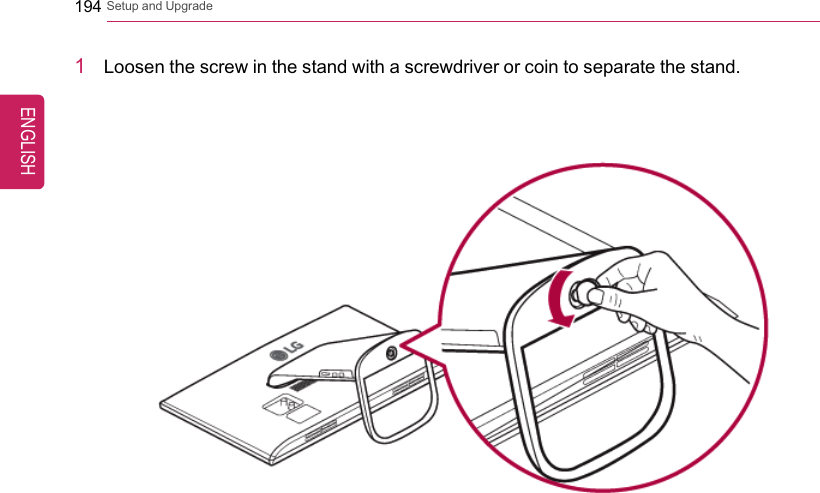
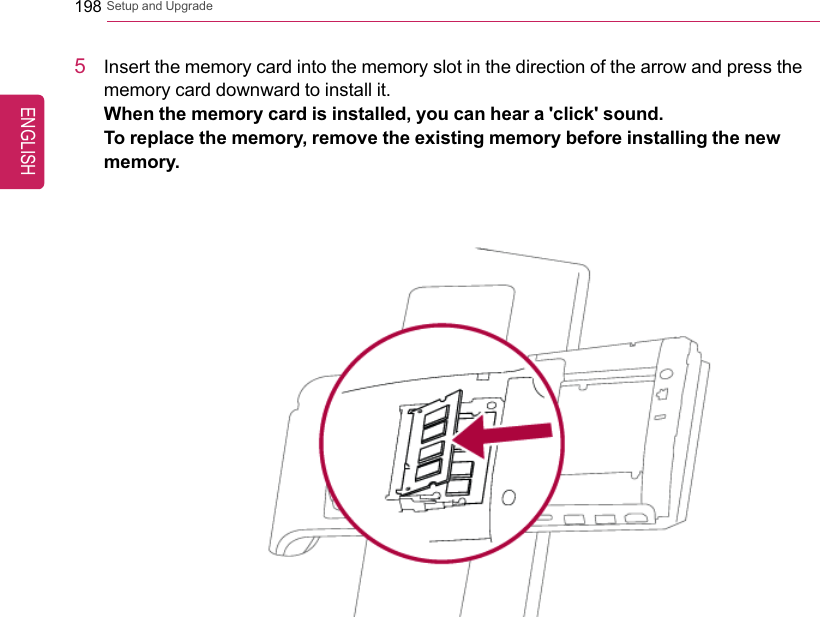
![200 Setup and UpgradeWindows 8.1 Auto ScalingWindows 8.1 Auto Scaling feature may blur the screen or display some icons and textslarger.Change the DPI scaling to fit for you as follows:1On the Start screen, click the [Desktop] tile to convert the screen to the Desktopscreen.2Right-click on the desktop and select [Personal Settings] >[Display], and then check[Let me choose one scaling level for all my displays].ENGLISH](https://usermanual.wiki/LG-Electronics-USA/DT-LG24V55/User-Guide-2688629-Page-200.png)

![202 FAQFAQFAQ ContentRecovering from a Boot FailureIf booting is impossible due to a serious error with the system, you can recover the systemusing LG Recovery Center RE.CAUTIONIf you have deleted the restoration data in the protected area of the disk, the restorefunction may not work.Using LG Recovery Center RECAUTIONAll data is lost during the initialization, so you must backup all critical data inadvance.1Turn on the PC and press [F11].ENGLISH](https://usermanual.wiki/LG-Electronics-USA/DT-LG24V55/User-Guide-2688629-Page-202.png)
![FAQ 2032When the following screen appears, select a language you want to use and then click[Next].ENGLISH](https://usermanual.wiki/LG-Electronics-USA/DT-LG24V55/User-Guide-2688629-Page-203.png)
![204 FAQ3When the following screen appears, select the [I Agree] button and then click the [Next]button.ENGLISH](https://usermanual.wiki/LG-Electronics-USA/DT-LG24V55/User-Guide-2688629-Page-204.png)
![FAQ 2054When the factory reset has been completed as shown in the following figure, click the[Complete] button and then restart the system.Recover by Using a Recovery DriveIf it is impossible to recover by using [F11], you can recover the system through a recoverydrive.TIPTo recover by using a recovery drive, you must have the recovery drive made through LGRecovery Center's [Create Recovery Drive].1Connect the recovery drive to the USB port of the PC.2Turn on the PC and press [F10].3When the screen for selecting the boot device appears, select the connected recoverydrive and click [Enter].4Select the [Troubleshooting] menu.5Select the item you want and recover the system following the instructions.ENGLISH](https://usermanual.wiki/LG-Electronics-USA/DT-LG24V55/User-Guide-2688629-Page-205.png)
![206 FAQWindows 8.1 Auto ScalingWindows 8.1 Auto Scaling feature may blur the screen or display some icons and textslarger.Change the DPI scaling to fit for you as follows:1On the Start screen, click the [Desktop] tile to convert the screen to the Desktopscreen.2Right-click on the desktop and select [Personal Settings] >[Display], and then check[Let me choose one scaling level for all my displays].ENGLISH](https://usermanual.wiki/LG-Electronics-USA/DT-LG24V55/User-Guide-2688629-Page-206.png)

![208 FAQLG Recovery CenterIf the system has an error, you can use LG Recovery Center to use Windows 8.1 recoveryfunction to recover or restore the system to its initial pre-purchase state.TIPLG Recovery Center uses the Windows 8.1 recovery function.For more information about Windows 8.1 recovery, refer to [Windows Help and Support].CAUTIONIf you have deleted the restoration data in the protected area of the disk, or havearbitrarily installed another operating system, the restore function may not work.Click the [] icon in Desktop to run [LG Recovery Center].1PC Refresh: Recovers the PC without losing any personal files.CAUTIONPC settings are reset to default and any user-installed software will be deleted.ENGLISH](https://usermanual.wiki/LG-Electronics-USA/DT-LG24V55/User-Guide-2688629-Page-208.png)
![FAQ 2092PC Reset: Removes all items from the system and restores the system to its initial pre-purchase state.CAUTIONAll data is lost during the initialization, so you must backup all critical data in advance.It may take about 5 hours or longer depending on the system conditions.3Create Recovery Drive: You can create a recovery drive in Windows as a precautionagainst a system failure that prevents you from entering the operating system, or anyother severe system issues.a When the following screen appears, select [Copy the recovery partition from the PCto the recovery drive.] and click [Next].b When the following screen appears, select the USB flash drive and click [Next].CAUTIONThis process deletes all the data on the storage device designated as a recoverydrive. Make sure to back up its data in advance.ENGLISH](https://usermanual.wiki/LG-Electronics-USA/DT-LG24V55/User-Guide-2688629-Page-209.png)
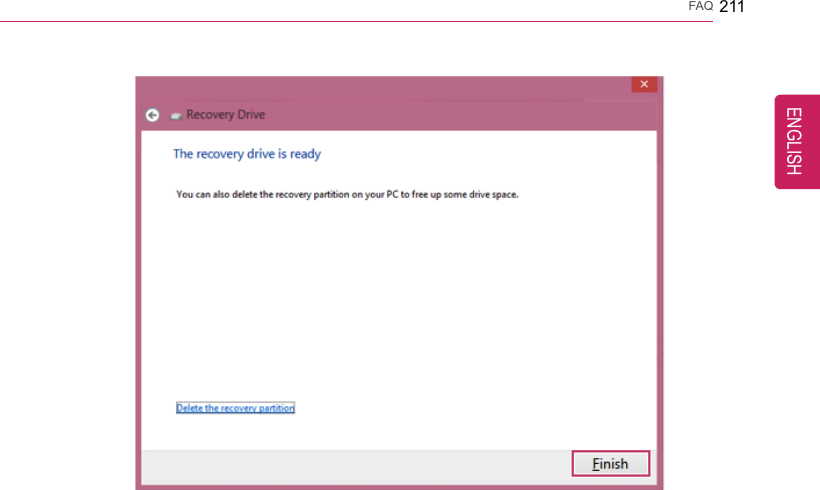
![210 FAQc Once the storage device is ready, click [Finish] to create a recovery drive.CAUTIONSelect [Delete the recovery partition] while creating a recovery drive to remove therecovery partition in the PC.Once the recovery partition is removed, you cannot use the recovery function ofthe PC. You can only recover the system using the recovery media.ENGLISH](https://usermanual.wiki/LG-Electronics-USA/DT-LG24V55/User-Guide-2688629-Page-210.png)
![212 FAQConnecting a Monitor / TVTIP•Ensure the monitor power is off before connecting the external monitor to the PC.Connecting to the HDMI PortHDMI is a high-speed multimedia interface that can transfer uncompressed full digital audioand video signals.1Connect the HDMI cable to the PC and the external device (TV, monitor) that supportsHDMI.2HDMI port transfers both video and audio simultaneously. So you don't need a separateaudio connection.3On the PC, press [ ] + [P] keys to output the screen to the external device.ENGLISH](https://usermanual.wiki/LG-Electronics-USA/DT-LG24V55/User-Guide-2688629-Page-212.png)
![FAQ 213TIPToggle screen by pressing [] + [P] keys•Press [ ] + [P] keys to display the Switch Screen menu. Select the screen to useand press the [Enter] key.CAUTION•If you do not set Speaker as the default value after disconnecting the HDMI cable,the system may not produce any sound.•If a program was running already, you need to exit and restart the program for it toproduce sound.ENGLISH](https://usermanual.wiki/LG-Electronics-USA/DT-LG24V55/User-Guide-2688629-Page-213.png)
![FAQ 215Wireless NetworkThe wireless network (Wireless LAN) is the network environment that connects a PC withthe internet provider or company network through an Access Point (wireless or regularrouter).Wireless network is optional, and so it may not be installed in some models.Using the Wireless NetworkIf an Access Point (wired or wireless router) is in the vicinity of the PC, the wireless networkcan easily be accessed.During the search for a wireless network (Wireless LAN), various Access Point maybe found according to the location where the PC is used.In case no accessible wireless network (Wireless LAN) is near the PC, no AccessPoint might be found.A password protected Access Point cannot be accessed without knowing the rightpassword.1Run [Charms] on the Start screen or in Desktop mode.2In the Charms, click [Settings] >[Wireless Network Icon].ENGLISH](https://usermanual.wiki/LG-Electronics-USA/DT-LG24V55/User-Guide-2688629-Page-215.png)
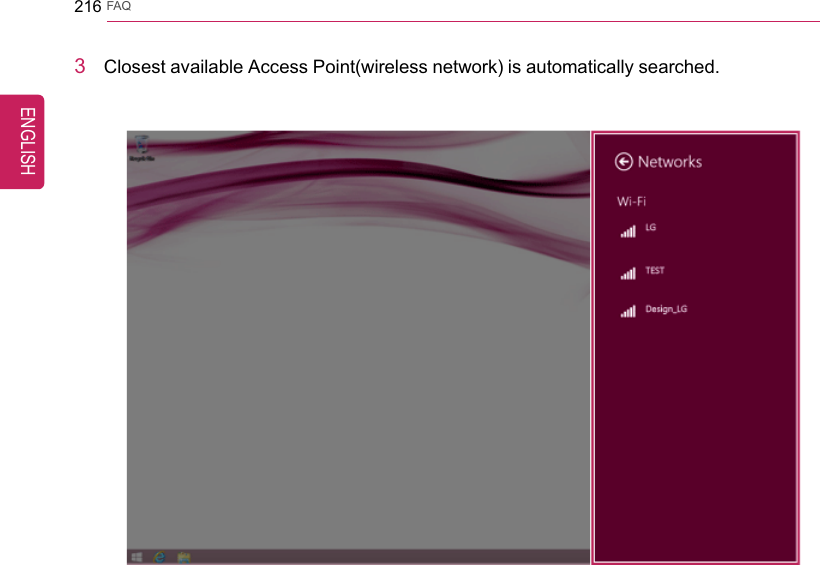
![FAQ 2174Select the Access Point (wireless network) you want to use and click [Connect] toconnect to the Access Point.If a password is set for the wireless network, the Enter Password windowappears.5When the connection is established, [Connected] is displayed in the connected AccessPoint(wireless network).6Click the [Internet Explorer] icon in the taskbar to check whether the internet is operatingnormally.ENGLISH](https://usermanual.wiki/LG-Electronics-USA/DT-LG24V55/User-Guide-2688629-Page-217.png)
![218 FAQLANLAN is the network environment that users can connect to by using a cable to connect totheir internet providers or the company's network.Using Wired LANLAN is installed with an automatic IP (DHCP) as default value.Please refer to the following instructions to find out more about setting up an automatic IP(DHCP) or manual IP.1Connect LAN cable to the LAN port.2Switch to the Desktop mode after clicking the [Desktop tile] in the Start screen. Andthen, run the [Charms].ENGLISH](https://usermanual.wiki/LG-Electronics-USA/DT-LG24V55/User-Guide-2688629-Page-218.png)
![FAQ 2193In the Charms, click [Settings] >[Control Panel] >[View By] >[Small Icon] >[Network and Sharing Center].ENGLISH](https://usermanual.wiki/LG-Electronics-USA/DT-LG24V55/User-Guide-2688629-Page-219.png)
![220 FAQ4Click [Change adapter settings].ENGLISH](https://usermanual.wiki/LG-Electronics-USA/DT-LG24V55/User-Guide-2688629-Page-220.png)
![FAQ 2215Right-click [Ethernet] and select [Properties].ENGLISH](https://usermanual.wiki/LG-Electronics-USA/DT-LG24V55/User-Guide-2688629-Page-221.png)
![222 FAQ6Select [Internet Protocol Version 4 (TCP/IPv4)] and click [Properties].ENGLISH](https://usermanual.wiki/LG-Electronics-USA/DT-LG24V55/User-Guide-2688629-Page-222.png)
![FAQ 2237If you want to use an automatic IP(DHCP), select [Obtain an IP addressautomatically]. If you want to use a manual IP, select [Use the following IP address]to enter the address.Please ask the network administrator about obtaining a manual IP.8Press [OK] to complete the network setup.9Click the [Internet Explorer] icon in the taskbar to check whether the internet is operatingnormally.ENGLISH](https://usermanual.wiki/LG-Electronics-USA/DT-LG24V55/User-Guide-2688629-Page-223.png)