LG Electronics USA E400G Cellular/PCS GSM/WCDMA Phone with WLAN and Bluetooth User Manual LG E400 ENG 111107 indd
LG Electronics MobileComm USA, Inc. Cellular/PCS GSM/WCDMA Phone with WLAN and Bluetooth LG E400 ENG 111107 indd
UserManual.wiki
>
LG Electronics USA
>
E400G User Manual
Users Manual
Navigation menu
Upload a User Manual
Namespaces
Wiki Guide
HTML
PDF
Info
Views
User Manual
Discussion / Help
Navigation
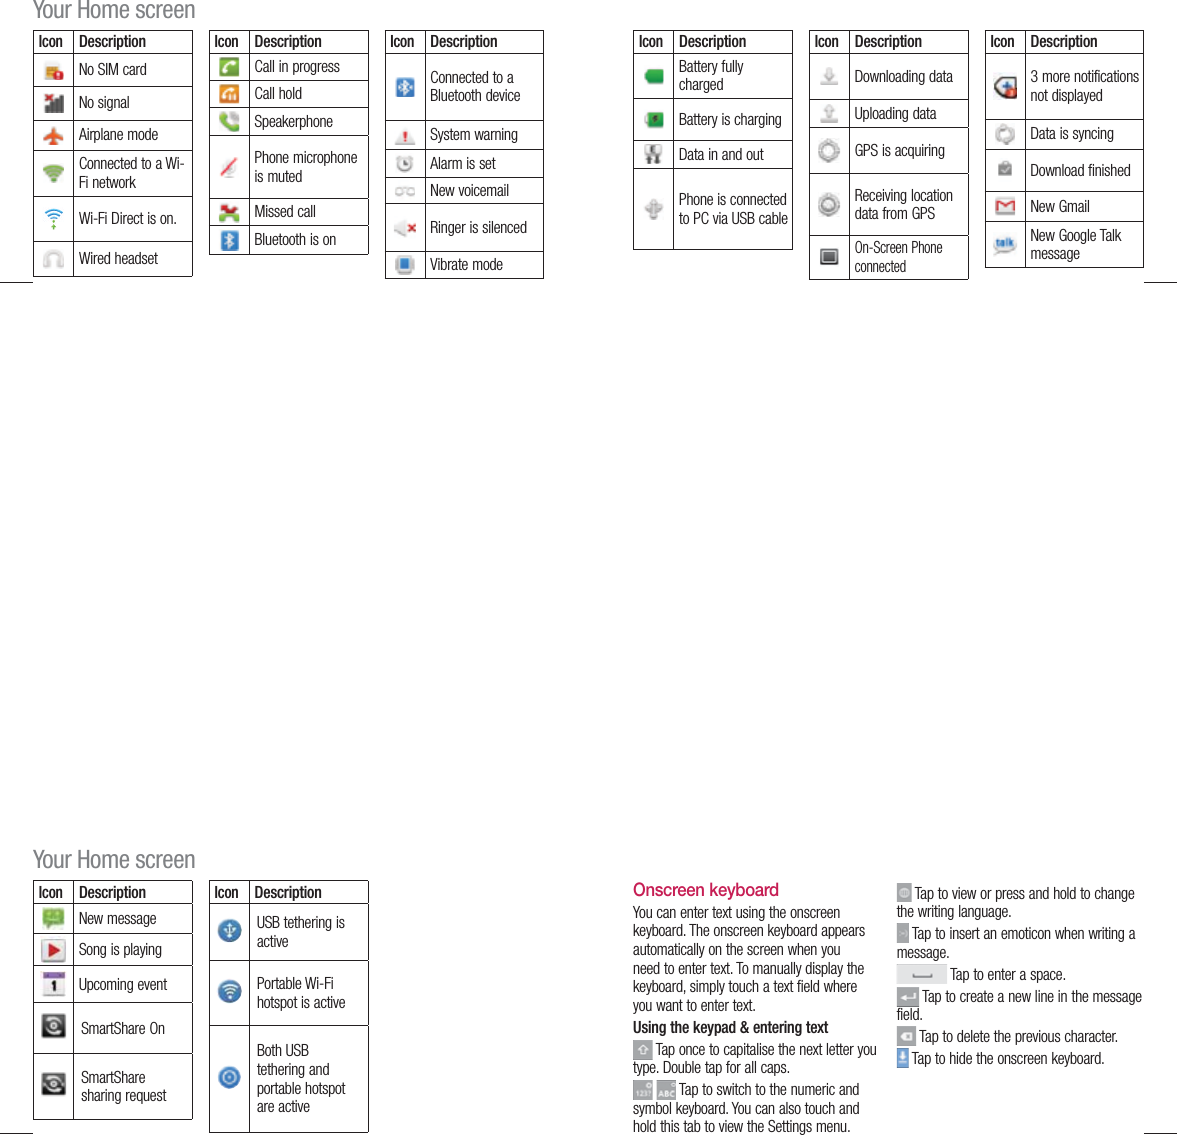
![44In your Home screen, you can view quick keys at the bottom of the screen. Quick keys provide easy, one-touch access to the functions you use the most. Touch the Phone icon to bring up the touch screen dialpad to make a call. Touch the Contacts icon to open your contacts. Touch the Message icon to access the messaging menu. This is where you can create a new message. Touch the Applications tab at the bottom of the screen. You can then view all your installed applications.To open the desired application, simply touch the icon in the applications list.NOTE: Preloaded applications may differ according to your phone’s software or your service provider.Adding widgets to your Home screenYou can customise your Home screen by adding shortcuts, widgets or folders to it. For more convenience using your phone, add your favourite widgets to the Home screen.Your Home screen45In the Home screen, press the Menu key and select Add. Or touch and hold the empty part of the home screen.In the Edit Mode menu, touch the type of item you want to add.For example, select Folders from the list and tap it. You then see a new folder icon on the Home screen. Drag it to the desired location on the desired panel, then take your finger off the screen.1 2 3 4 TIP! To add an application icon to the Home screen from the Applications menu, touch and hold the application you want to add.TIP! To remove an application icon from the Home screen, touch and hold the icon you want to remove, then drag it to .NOTE: You cannot delete preloaded applications. (Only their icons can be deleted from the screen)46Returning to recently-used applicationsTouch and hold the Home key. The screen displays a pop-up with icons of applications you used recently.Touch an icon to open the application. Or touch the Back key to return to the current application.Notification drawerThe notification drawer runs across the top of your screen. 1 2 DataenabledGPSBluetoothWi-FiRingYour Home screen47Touch and slide the notification drawer down with your finger. Or, in the Home screen, press the Menu key and select Notifications. Here you can check and manage sound, Wi-Fi, Bluetooth and GPS as well as other notifications.Viewing the status barThe status bar uses different icons to display phone information such as signal strength, new messages, battery life and active Bluetooth and data connections.Below is a table explaining the meaning of icons you’re likely to see in the status bar.[Status bar]](https://usermanual.wiki/LG-Electronics-USA/E400G/User-Guide-1653437-Page-4.png)