LG Electronics USA E975K GSM/ WCDMA Phone with WLAN, Bluetooth and RFID User Manual 1 LG E975K EN UG 121011 indd
LG Electronics MobileComm USA, Inc. GSM/ WCDMA Phone with WLAN, Bluetooth and RFID 1 LG E975K EN UG 121011 indd
UserManual.wiki
>
LG Electronics USA
>
E975K User Manual
Users Manual
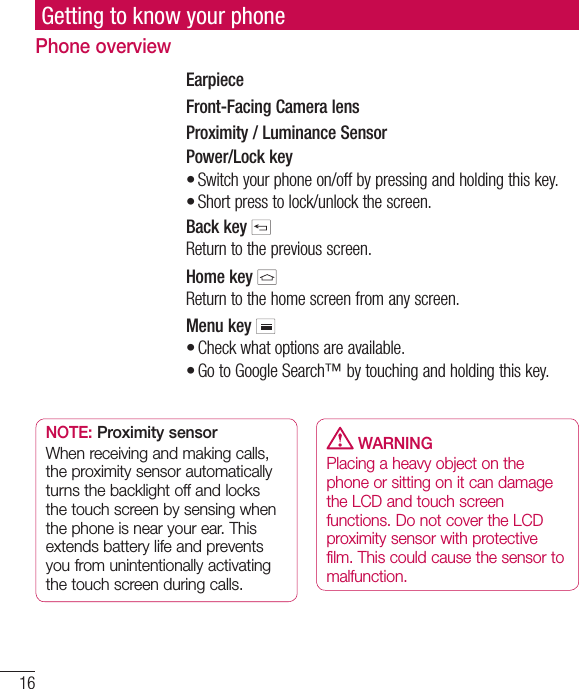
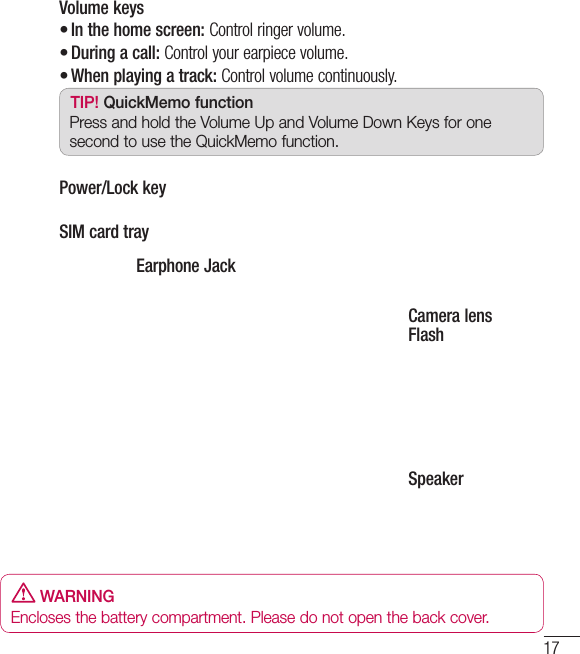
Navigation menu
Upload a User Manual
Namespaces
Wiki Guide
HTML
PDF
Info
Views
User Manual
Discussion / Help
Navigation
![2CTVUVCVGOGPV&KDQJHRU0RGLILFDWLRQVWKDWDUHQRWH[SUHVVO\DSSURYHGE\WKHPDQXIDFWXUHUFRXOGYRLGWKHXVHUVDXWKRULW\WRRSHUDWHWKHHTXLSPHQW2CTVUVCVGOGPV7KLVHTXLSPHQWKDVEHHQWHVWHGDQGIRXQGWRFRPSO\ZLWKWKHOLPLWVIRUDFODVV%GLJLWDOGHYLFHSXUVXDQWWR3DUWRIWKH)&&5XOHV7KHVHOLPLWVDUHGHVLJQHGWRSURYLGHUHDVRQDEOHSURWHFWLRQDJDLQVWKDUPIXOLQWHUIHUHQFHLQDUHVLGHQWLDOLQVWDOODWLRQ7KLVHTXLSPHQWJHQHUDWHVXVHVDQGFDQUDGLDWHUDGLRIUHTXHQF\HQHUJ\DQGLIQRWLQVWDOOHGDQGXVHGLQDFFRUGDQFHZLWKWKHLQVWUXFWLRQVPD\FDXVHKDUPIXOLQWHUIHUHQFHWRUDGLRFRPPXQLFDWLRQV+RZHYHUWKHUHLVQRJXDUDQWHHWKDWLQWHUIHUHQFHZLOOQRWRFFXULQDSDUWLFXODULQVWDOODWLRQ,IWKLVHTXLSPHQWGRHVFDXVHKDUPIXOLQWHUIHUHQFHRUWHOHYLVLRQUHFHSWLRQZKLFKFDQEHGHWHUPLQHGE\WXUQLQJWKHHTXLSPHQWRIIDQGRQWKHXVHULVHQFRXUDJHGWRWU\WRFRUUHFWWKHLQWHUIHUHQFHE\RQHRUPRUHRIWKHIROORZLQJPHDVXUHV5HRULHQWRUUHORFDWHWKHUHFHLYLQJDQWHQQD,QFUHDVHWKHVHSDUDWLRQEHWZHHQWKH HTXLSPHQWDQGUHFHLYHU&RQQHFWWKHHTXLSPHQWLQWRDQRXWOHWRQDFLUFXLWGLIIHUHQWIURPWKDWWRZKLFKWKHUHFHLYHULVFRQQHFWHG&RQVXOWWKHGHDOHURUDQH[SHULHQFHGUDGLR79WHFKQLFLDQIRUKHOSFCC Part 15.19 StatementThis device complies with part15 of FCC rules.Operation is subject to the following two conditions: (1) This device may not cause harmful interference. (2) This device must accept any interference received, including interference that may cause undesired operation. $QF[YQTP1RGTCVKQP7KLVGHYLFHKDVEHHQWHVWHGIRUERG\ZRUQRSHUDWLRQVZLWKWKHGLVWDQFHRIFPLQFKHVEHWZHHQWKHXVHUĜVERG\DQGWKHSKRQH7RFRPSO\ZLWK)&&5)H[SRVXUHUHTXLUHPHQWVDPLQLPXPVHSDUDWLRQGLVWDQFHRIFPLQFKHVPXVWEHPDLQWDLQHGIURPWKHXVHUVERG\7KLUGSDUW\EHOWFOLSVKROVWHUVDQGVLPLODUDFFHVVRULHVFRQWDLQLQJPHWDOOLFFRPSRQHQWVPD\QRWEHXVHG%RG\ZRUQDFFHVVRULHVWKDWFDQQRWPDLQWDLQFPLQFKHVVHSDUDWLRQGLVWDQFHEHWZHHQWKHXVHUVERG\DQGWKHSKRQHDQGKDYHQRWEHHQWHVWHGIRUW\SLFDOERG\ZRUQRSHUDWLRQVPD\QRWFRPSO\ZLWK)&&5)H[SRVXUHOLPLWVDQGVKRXOGEHDYRLGHG9+(+%CWVKQP7KLVGHYLFHLVFDSDEOHRIRSHUDWLQJLQDQPRGH)RUDQGHYLFHVRSHUDWLQJLQWKHIUHTXHQF\UDQJHRI *+]WKH\DUHUHVWULFWHGIRULQGRRURSHUDWLRQVWRUHGXFHDQ\SRWHQWLDOKDUPIXOLQWHUIHUHQFHIRU0RELOH6DWHOOLWH6HUYLFHV066LQWKH86:,),$FFHVV3RLQWVWKDWDUHFDSDEOHRIDOORZLQJ\RXUGHYLFHWRRSHUDWHLQDQPRGH *+]EDQGDUHRSWLPL]HGIRULQGRRUXVHRQO\,I\RXU:,),QHWZRUNLVFDSDEOHRIRSHUDWLQJLQWKLVPRGHSOHDVHUHVWULFW\RXU:,),XVHLQGRRUVWRQRWYLRODWHIHGHUDOUHJXODWLRQVWRSURWHFW0RELOH6DWHOOLWH6HUYLFHV7KLV GHYLFHLVQRWLQWHQGHGIRUVDOHLQWKH86$](https://usermanual.wiki/LG-Electronics-USA/E975K/User-Guide-1860283-Page-2.png)

![1432 bit color or higherHDD: 100 MB or more free hard disk space (More free hard disk space may be needed depending on the volume of data stored.)Required software: LG integrated drivers, Windows Media Player 10 or laterNOTE: LG Integrated USB DriverLG integrated USB driver is required to connect an LG device and PC and installed automatically when you install "LG PC Suite" PC software.8. Synchronising your phone to a ComputerData from your device and PC can be synchronized easily with "LG PC Suite" PC application for your convenience. Contacts, schedules, and bookmarks can be synchronized. The procedure is as follows:Connect your device to PC. (Use a USB cable or Wi-Fi connection.)After connection, run the program and select the device section from the category on the left side of the screen.Click [Personal information] to select.••1 2 3 Select the checkbox of contents to synchronize and click the Sync button.9. Synchronising your phone to a computer via USBNOTE: To synchronize your phone with your PC using the USB cable, you need to install LG PC Suite onto your PC. Please refer to previous pages to install LG PC Suite.Touch > Apps tab > Settings > Storage from the DEVICE to check out the storage media. Connect the phone to your PC using the USB cable.USB connection type list will appear in your phone screen, and select Media sync (MTP) option.Open the memory folder on your PC. You can view the mass storage con-tent on your PC and transfer the fi les.Copy the fi les from your PC to the drive folder.Select Charge only option to discon-nect the phone. 4 1 2 3 4 5 6 Important notice](https://usermanual.wiki/LG-Electronics-USA/E975K/User-Guide-1860283-Page-15.png)