LG Electronics USA E980 Portable Handset with Multi-Band GSM/EDGE/UMTS/LTE Phone with WLAN, Bluetooth and RFID User Manual LG E980 ATT UG EN 121227 indd
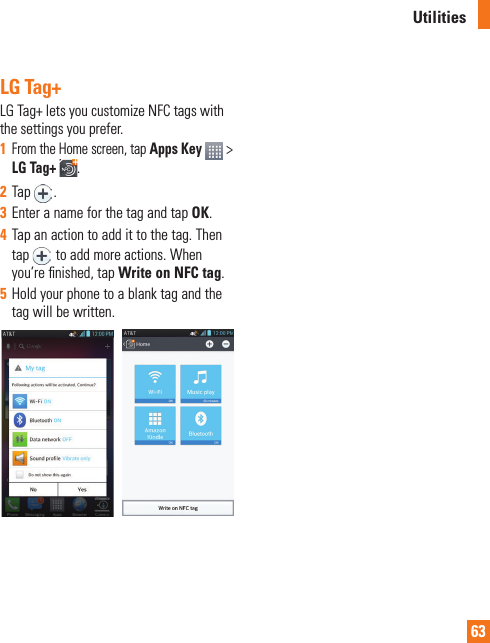
LG Electronics MobileComm USA, Inc. Portable Handset with Multi-Band GSM/EDGE/UMTS/LTE Phone with WLAN, Bluetooth and RFID LG E980 ATT UG EN 121227 indd
Users Manual
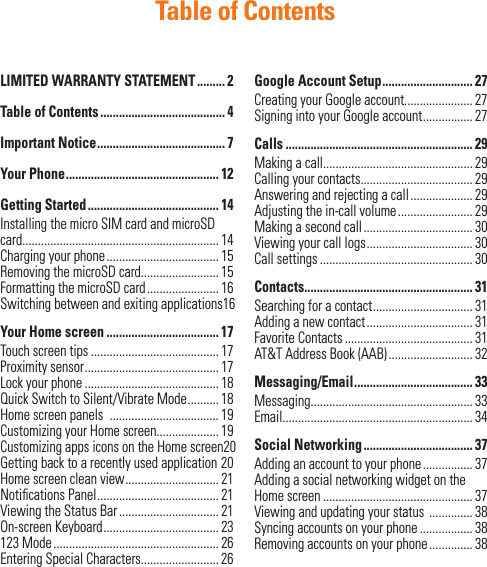
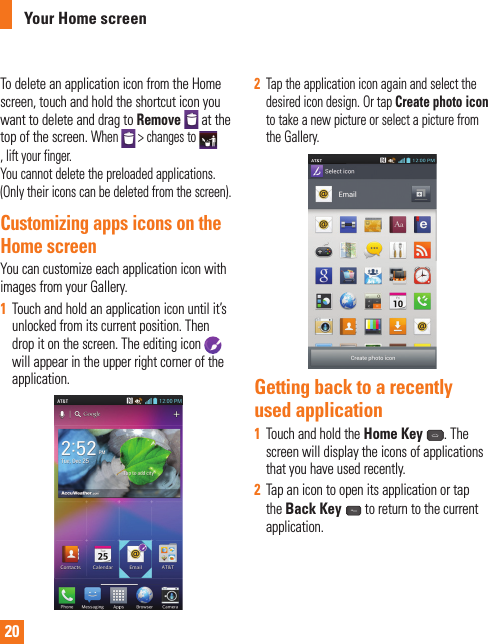
![21Home screen clean viewYou can see the wallpaper without items on the Home screen by pinching out. Pinch in or tap the Back Key to see applications and widgets again.Notifications PanelNotification icons on the Status Bar report the arrival of new messages, calendar events, alarms, as well as ongoing events, such as when you are in a call. You can view a list of all recent notifications.The Notifications Panel runs across the top of your screen. Touch and hold the Status Bar and slide it down with your finger to open the Notifications Panel. From here, you can check and quickly turn on and off Sound, Wi-Fi, Bluetooth, GPS, and any other options you add.Viewing the Status BarThe Status Bar uses different icons to display phone information, such as signal strength, new messages, battery life, and activate Bluetooth and data connections.Below is a table explaining the meaning of icons you are likely to see in the Status Bar.[Status Bar]Icon DescriptionNo SIM card insertedNo network signal availableAirplane mode is onYour Home screen](https://usermanual.wiki/LG-Electronics-USA/E980/User-Guide-1904169-Page-21.png)
![34] From the Home screen, tap Messaging > Menu Key > All Settings. EmailYou can use the Email application to read email from providers other than Gmail. The Email application supports the following account types: POP3, IMAP and Microsoft Exchange (for Enterprise users).To open the Email application] From the Home screen, tap the Apps Key > Email .The first time you open the Email application, a setup wizard opens to help you add an email account. Microsoft Exchange Email Account Email address – Enter the account email address.Username – Enter the account username.Password – Enter the account password.Server address – Enter the server address.Domain – Enter the account domain (optional).Use SSL – Choose whether or not to use SSL for Microsoft Exchange. Other (POP3, IMAP) Email Account Email address – Enter the account email address.Password – Enter the account password. Incoming Server SettingsPOP3 / IMAP4 – Select protocol type, either POP3 or IMAP4.Secure type – Choose from Off, SSL, or TLS.Port number – Normally each account’s default number will be displayed.Advanced Server Settings (Outgoing)SMTP server – Enter the outgoing email server address.Secure type – Choose from Off, SSL, or TLS.Port number – Normally each account’s default number will be displayed.The Accounts ScreenThe Accounts screen lists your Combined inbox and each of your email accounts.] Open Email and tap Menu Key > Accounts. The Account list appears.Messaging/Email](https://usermanual.wiki/LG-Electronics-USA/E980/User-Guide-1904169-Page-34.png)
![35n TIPTo make a shortcut to the Inbox of an account:In the accounts list, touch and hold an email account. Then tap Add to home screen.You can tap an account to view its Inbox. The default account from which you send email is indicated with a checkmark.To open your Combined inboxIf you have configured email to send and receive email from more than one account, you can view all messages sent to all accounts in your Combined inbox.] Open the Accounts screen and touch Combined inbox. Messages in the Combined inbox are color coded on the left, by account, using the same colors used for your accounts in the Accounts screen.When a new email arrives in the inbox, there will be sound and/or vibration notification (depending on your current sound and vibrate settings).Composing and Sending Email 1 In the Email application, tap Compose .2 Enter an address for the message’s intended recipient. As you enter text, matching addresses will be offered from your contacts. Separate multiple addresses with commas.3 Tap the Cc/Bcc field to copy or blind copy to other contacts/email addresses.4 Tap the text field and enter your message.5 Tap Attach to attach the file you want to send with your message.6 Tap Send to send the message.If you are not ready to send the message, tap Save to save it in a Drafts folder. Touch a message in the Drafts folder to resume working on it. Your message will also be saved as a draft if you touch the Back Key before sending it.Tap Cancel to abandon and delete a message, including any saved drafts. If you are not connected to a network, for example if you’re working in airplane mode, the messages you send are stored in your Outbox folder until you’re connected to a network. If it contains any pending messages, the Outbox will be displayed on the Accounts screen.Messaging/Email](https://usermanual.wiki/LG-Electronics-USA/E980/User-Guide-1904169-Page-35.png)
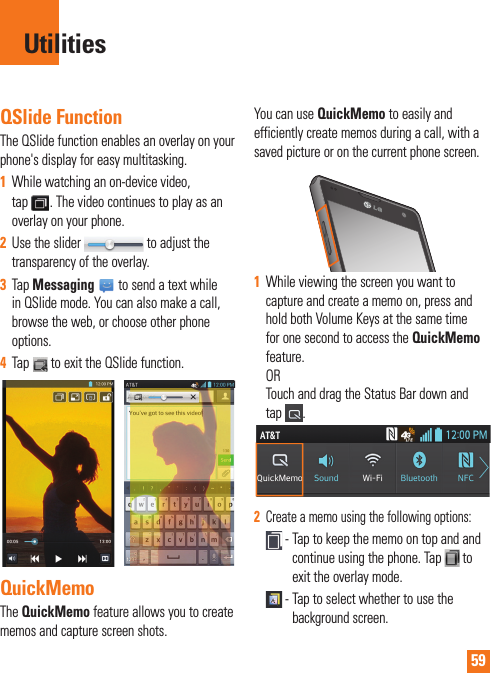
![46MultimediaYou can store multimedia files to a microSD card or internal memory to have easy access to all your image and video files.GalleryFrom the Home screen, tap the Apps Key > Gallery . Video WizYou can make your own movie using your images/video and music.1 From the Home Screen, tap the Apps Key > Video Wiz .2 After seeing the brief introduction on the Steps, tap OK.3 Tap to add images and/or video to your movie.4 Tap images and/or videos to make a video with, then tap .] To remove images or videos, tap and tap . Then, tap .] To rearrange them, touch and hold an image/video, drag and drop it to the desired position.5 Tap Select style to select the desired movie style. ] Scroll through and select the style you want. As you tap the desired style, preview is displayed.] Tap OK.6 Tap Select music to set the background music.] Select Default for this style or Music track.7 Tap to play your movie.8 Tap to edit the video clip using Text, Sticker or Magic spot. ] After editing the video, tap .9 Tap to save the video.10 Tap to clear it up.n NOTETap if you want to see Help information about Video Wiz.](https://usermanual.wiki/LG-Electronics-USA/E980/User-Guide-1904169-Page-46.png)
![511 From the Home screen, tap the Apps Key > Share > SmartShare .2 Tap the From button and select My phone.3 You can browse the content library.4 Tap and hold a content thumbnail and then touch Upload.5 Select a device of remote content library to be uploaded.n NOTICESome DLNA enabled devices do not support the DMS upload functionality and will not upload files. A few types of contents are not supported.Media HomeYou can play videos or music files, or view photos stored in the phone on HDMI-enabled products such as a smart TV or monitor.n TipOnce you connect your device to a TV or monitor via a MHL cable, Media Home will be launched automatically. Any apps that are running will be interrupted, including playback of DivX VOD movies.1 Connect the phone and HDMI-enabled TV or monitor with an MHL cable (sold separately). Media Home will automatically run.] When Auto-launch and auto-off is set to off, slide the Status Bar down and tap Media Home. 2 Select a video, music, or picture to view it on the TV or monitor.Multimedia](https://usermanual.wiki/LG-Electronics-USA/E980/User-Guide-1904169-Page-51.png)
![523 Tap to configure the following settings:] Auto-launch and auto-off: Place a checkmark on this to launch Media Home automatically when a device is connected to an MHL cable or desk cradle.] Video settings: Allows you to view group videos by folders or how to sort the list.] Photo settings: Allows you to sort the list or set slideshow settings.] Screen saver settings: Allows you configure the type and album to use for the slideshow.Multimedia](https://usermanual.wiki/LG-Electronics-USA/E980/User-Guide-1904169-Page-52.png)
![53About Google applicationsGoogle applications, including mobile versions of Gmail, Google Talk, Google Calendar, and Google Maps, are loaded on your phone.1 To set up a Google account, tap any Google application, enter your user name and password and sign in.2 After signing in, your contacts, email, and calendar in your Google account will automatically synchronize with your phone.Google Maps™To open Google Maps and view your location1 From the Home screen, tap the Apps Key and tap Maps . 2 Tap the My location icon on the screen.The map centers on a blue arrow that indicates your location. A blue circle around the arrow indicates that your actual location is within the circle.n TipWhile viewing a map, tap the Menu Key for the following options: Clear map, Make available offl ine, Settings and Help.To get an address and additional information for a location1 Touch and hold a location on the map. A balloon with the address and a thumbnail from Street View (if available) opens over the location.2 Tap the balloon to access additional options.To view map, satellite, or traffic layers] Tap the Layers icon on the map and select a layer option. You can choose from Traffic, Satellite, Terrain, Latitude, and others.Searching For Locations and PlacesYou can search for a location and view it on a map. You can also search for places on the map that you're viewing.Google Applications](https://usermanual.wiki/LG-Electronics-USA/E980/User-Guide-1904169-Page-53.png)
![54To search for a location1 While viewing a map, tap at the bottom of the screen. You can also touch and hold the Menu Key .2 In the search box, enter the place you're looking for. You can enter an address, a city, or a type of business or establishment. For example, “theater in New York”.3 Tap the Search icon on the keyboard. Markers with letter labels indicate search matches on the map. n NOTELocation information might be inaccurate if GPS and Wi-Fi is turned off. Please make sure that GPS and Wi-Fi is turned on.Getting DirectionsTo get directions1 While viewing a map, tap . 2 Enter a starting point in the top text box and your destination in the bottom text box. To reverse directions, tap the Menu Key and tap Reverse Start & End.3 Tap the icon for car, public transit, or walking directions.4 Tap GET DIRECTIONS. The directions to your destination appear as a route.To view turn-by-turn navigation directionsYou can view each turn in your route as a list of written directions.When searching for directions, tap NAVIGATION instead of GET DIRECTIONS to view turn-by-turn directions in Navigation View.To search for locations along your routeYou can search for businesses, points of interest, and other features along your route. When you search while navigating, your results include locations along your route, rather than locations that are near your current location.] Touch and hold the Menu Key and search for locations of interest. The results are displayed as markers along your route; the fi rst result is labeled. You can tap a label for more information about the marker.] When you're fi nished, tap the Navigation icon to return to Navigation View.Google Applications](https://usermanual.wiki/LG-Electronics-USA/E980/User-Guide-1904169-Page-54.png)
![55Clear MapClear any information, such as routes and search results, from the map.To clear a mapWhile viewing a map, tap the Menu Key and tap Clear Map.LatitudeFinding Your Friends with Google LatitudeTMGoogle Latitude lets you and your friends view each others' locations on maps and get directions to your friends' locations using Google Latitude. Your location is not shared automatically. It is by invitation only.You must join Latitude and then invite your friends to view your location or accept invitations from your friends.To join Latitude] While viewing a map, tap and then Latitude. The first time you join Latitude, you're prompted to accept or reject the Google privacy policy. After you've joined Latitude, the Join Latitude option changes to Latitude.To open LatitudeAfter you join Latitude, you can open it to find your friends and view their updates.] While viewing a map, tap and then Latitude.To invite friends to share their locationsAfter you join Latitude, you can start sharing your location with your friends. Only friends whom you have explicitly invited or accepted can see your location.1 Open Latitude and tap .2 Tap Select from Contacts or Add via email address in the menu that opens. 3 Tap Add friends at the bottom of the screen. If your friends already use Latitude, they receive an email request and a notification on Latitude. If they have not yet joined Latitude, they receive an email inviting them to sign in to Latitude with their Google Account.PlacesTo fi nd placesTap the Places icon while in Google Maps to find different venues, such as gas stations, coffee, bars, restaurants, etc.Once you select a category, you will see a list Google Applications](https://usermanual.wiki/LG-Electronics-USA/E980/User-Guide-1904169-Page-55.png)
![60 - Tap to undo the most recent action. - Tap to redo the most recently deleted action. - Tap to select the pen type and color. - Tap to use the eraser to erase the memo that you created. - Tap to share the memo with others via any of the available applications. - Tap to save the memo you’ve created.n NOTE Please use a fingertip while using the QuickMemo feature. Do not use your fingernail.3 Tap . You can also crop the image using the triangles in each corner. Touch and drag to the desired part of the screen.4 Tap to show the Edit menu and tap to save the current memo.Discard QuickMemos:] Tap the Back Key .View the Saved QuickMemoFrom the Home screen tap the Apps Key tap > Gallery and select the QuickMemo album.Setting the alarm1 From the Home screen, tap the Apps Key and tap Clock .2 To add a new alarm, tap the tab (if necessary). 3 Tap and set the alarm time.4 Set any desired options and tap Save. 5 Tap the Menu Key to delete all alarms or adjust the alarm settings.Using the calculator1 From the Home screen, tap the Apps Key and tap Calculator .2 Tap the number keys to enter numbers.3 For simple calculations, tap the function you want , followed by .4 For more complex calculations, tap the Menu Key , tap the Advanced panel, then choose an option.Adding an event to your calendarn NOTEYou must create a Google account to use Calendar.1 From the Home screen, tap the Apps Key and tap Calendar .Utilities](https://usermanual.wiki/LG-Electronics-USA/E980/User-Guide-1904169-Page-60.png)
![62View and edit a document on your device1 From the Home screen, tap the Apps Key > Polaris Office 4 .2 Tap List view, Grid view, or Favorites to search for documents on your microSD card. 3 Tap the document that you want to view or edit.n NOTEYou can also open an attachment in an email by tapping the attachment in the message.4 The document opens for you to view. If you want to edit it, tap anywhere on the document.] To move between pages or pan through the document, scroll in the corresponding direction.] To change the zoom level, simply pinch-to zoom to achieve the zoom level you want.] Use the toolbar at the top of the screen to edit the document (Word, Excel, or PowerPoint file).] Tap for the following additional menu options : Save, Save as, PDF Export, Find & Replace, Page layout, Full width view, Reflow text, Text-to-speech and Share.5 When you're finished editing, tap > Save. Then tap the Back Key to exit.Polaris Office toolbarThe Polaris Office application has a toolbar that appears automatically when you create a document. 1 To display the toolbar in an existing document, tap .2 Tap the Font, Paragraph, or Style tab and choose the desired options. 3 To hide the tool options pop-up balloon, tap .Voice CommandYou can search for and dial a contact by speaking, rather than by manually dialing a contact.To place a call by speaking1 From the Home screen, tap the Apps Key > Voice Command .2 Say "Call" followed by the name of the contact to call.If Voice Command finds a match, it dials the contact's default number. Utilities](https://usermanual.wiki/LG-Electronics-USA/E980/User-Guide-1904169-Page-62.png)

![87For Your SafetyImportant InformationThis user guide contains important information on the use and operation of this phone. Please read all the information carefully for optimal performance and to prevent any damage to or misuse of the phone. Any changes or modifications not expressly approved in this user guide could void your warranty for this equipment. Any changes or modifications not expressly approved by the manufacturer could void the user’s authority to operate the equipment.Before You StartWARNING! This product contains chemicals known to the State of California to cause cancer and birth defects or reproductive harm. Wash hands after handling.Safety InstructionsWARNING! To reduce the possibility of electric shock, do not expose your phone to high humidity areas, such as the bathroom, swimming pool, etc.Always store your phone away from heat. Never store your phone in settings that may expose it to temperatures less than 32°F or greater than 104°F, such as outside during extreme weather conditions or in your car on a hot day. Exposure to excessive cold or heat will result in malfunction, damage and/or catastrophic failure.Be careful when using your phone near other electronic devices. RF emissions from your mobile phone may affect nearby in adequately shielded electronic equipment. You should consult with manufacturers of any personal medical devices such as pacemakers and hearing aides to determine if they are susceptible to interference from your mobile phone. Turn off your phone in a medical facility or at a gas station. Never place your phone in a microwave oven as this will cause the battery to explode.IMPORTANT! Please read the TIA SAFETY INFORMATION before using your phone.Safety InformationRead these simple guidelines. Breaking the rules may be dangerous or illegal. Further detailed information is given in this user guide.] Do not disassemble this unit. Take it to a qualified service technician when repair work is required.](https://usermanual.wiki/LG-Electronics-USA/E980/User-Guide-1904169-Page-87.png)
![88For Your Safety] Keep away from electrical appliances such as TVs, radios, and personal computers.] The unit should be kept away from heat sources such as radiators or cookers.] Do not drop.] Do not subject this unit to mechanical vibration or shock.] The coating of the phone may be damaged if covered with wrap or vinyl wrapper.] Use dry cloth to clean the exterior of the unit. (Do not use solvent such as benzene, thinner or alcohol.)] Do not subject this unit to excessive smoke or dust.] Do not keep the phone next to credit cards or transport tickets; it can affect the information on the magnetic strips.] Do not tap the screen with a sharp object; otherwise, it may damage the phone.] Do not expose the phone to liquid or moisture.] Use the accessories like an earphone cautiously. Do not tap the antenna unnecessarily.microSD card information and care] The microSD card cannot be used for recording copyright- protected data.] Keep the microSD card out of the small children's reach.] Do not leave the microSD card in extremely hot location.] Do not disassemble or modify the microSD card.FCC RF Exposure InformationWARNING! Read this information before operating the phone.In August 1996, the Federal Communications Commission (FCC) of the United States, with its action in Report and Order FCC 96-326, adopted an updated safety standard for human exposure to radio frequency (RF) electromagnetic energy emitted by FCC regulated transmitters. Those guidelines are consistent with the safety standard previously set by both U.S. and international standards bodies.The design of this phone complies with the FCC guidelines and these international standards.](https://usermanual.wiki/LG-Electronics-USA/E980/User-Guide-1904169-Page-88.png)
![90For Your SafetyIf you experience interference with reception (e.g.,television), determine if this equipment is causing the harmful interference by turning the equipment off and then back on to see if the interference is affected. If necessary, try correcting the interference by one or more of the following measures:] Reorient or relocate the receiving antenna.] Increase the separation between the equipment and receiver.] Connect the equipment into an outlet on a circuit different from that to which the receiver is connected.] Consult the dealer or an experienced radio/TV technician for help.Cautions for Battery] Do not disassemble or open crush, bend or deform, puncture or shred] Do not modify or remanufacture, attempt to insert foreign objects into the battery, immerse or expose to water or other liquids, expose to fire, explosion or other hazard.] Only use the battery for the system for which it is specified] Only use the battery with a charging system that has been qualified with the system per CTIA Certification Requirements for Battery System Compliance to IEEE 1725. Use of an unqualified battery or charger may present a risk of fire, explosion, leakage, or other hazard.] Do not short circuit a battery or allow metallic conductive objects to contact battery terminals.] Replace the battery only with another battery that has been qualified with the system per this standard, IEEE-Std-1725. Use of an unqualified battery may present a risk of fire, explosion, leakage or other hazard.] Only authorized service providers shall replace battery. (If the battery is non-user replaceable).] Promptly dispose of used batteries in accordance with local regulations] Battery usage by children should be supervised.] Avoid dropping the phone or battery. If the phone or battery is dropped, especially on a hard surface, and the user suspects](https://usermanual.wiki/LG-Electronics-USA/E980/User-Guide-1904169-Page-90.png)
![91For Your Safetydamage, take it to a service center for inspection.] Improper battery use may result in a fire, explosion or other hazard.For those host devices that utilize a USB port as a charging source, the host device's user manual shall include a statement that the phone shall only be connected to CTIA certified adapters, products that bear the USB-IF logo or products that have completed the USB-IF compliance program.Adapter (Charger) Cautions] Using the wrong battery charger could damage your phone and void your warranty.] The adapter or battery charger is intended for indoor use only.Do not expose the adapter or battery charger to direct sunlight or use it in places with high humidity, such as the bathroom.Avoid damage to your hearing] Damage to your hearing can occur if you are exposed to loud sound for long periods of time. We therefore recommend that you do not turn on or off the handset close to your ear. We also recommend that music and call volumes are set to a reasonable level.] If you are listening to music while out and about, please ensure that the volume is at a reasonable level so that you are aware of your surroundings. This is particularly imperative when attempting to cross the street.Wi-Fi CautionThis device is capable of operating in 802.11a/n mode. For 802.11a/n devices operating in the frequency range of 5.15 – 5.25 GHz, they are restricted for indoor operations to reduce any potential harmful interference for Mobile Satellite Services (MSS) in the US. WIFI Access Points that are capable of allowing your device to operate in 802.11a/n mode(5.15 – 5.25 GHz band) are optimized for indoor use only.If your WIFI network is capable of operating in this mode, please restrict your WIFI use indoors to not violate federal regulations to protect Mobile Satellite Services.](https://usermanual.wiki/LG-Electronics-USA/E980/User-Guide-1904169-Page-91.png)
![93Safety GuidelinesDrivingCheck the laws and regulations on the use of wireless phones in the areas where you drive and always obey them. Also, if using your phone while driving, please observe the following:] Give full attention to driving - driving safely is your first responsibility;] Use hands-free operation, if available;] Pull off the road and park before making or answering a call if driving conditions or the law require it.Electronic DevicesMost modern electronic equipment is shielded from RF signals. However, certain electronic equipment may not be shielded against the RF signals from your wireless phone.PacemakersThe Health Industry Manufacturers Association recommends that a minimum separation of six (6’) inches be maintained between a handheld wireless phone and a pacemaker to avoid potential interference with the pacemaker. These recommendations are consistent with the independent research by and recommendations of Wireless Technology Research.Persons with pacemakers:] Should ALWAYS keep the phone more than six (6) inches from their pacemaker when the phone is turned ON;] Should not carry the phone in a breast pocket;] Should use the ear opposite the pacemaker to minimize the potential for interference;] Should turn the phone OFF immediately if there is any reason to suspect that interference is taking place.Hearing AidsSome digital wireless phones may interfere with some hearing aids. In the event of such interference, you may want to consult AT&T.](https://usermanual.wiki/LG-Electronics-USA/E980/User-Guide-1904169-Page-93.png)
![95Safety GuidelinesBlasting AreasTo avoid interfering with blasting operations, turn your phone OFF when in a ‘blasting areas or in areas posted: ‘Turn off two-way radio’. Obey all signs and instructions.Potentially Explosive AtmosphereTurn your phone OFF when in any area with a potentially explosive atmosphere and obey all signs and instructions. Sparks in such areas could cause an explosion or fire resulting in bodily injury or even death.Areas with a potentially explosive atmosphere are often, but not always, marked clearly. Potential areas may include: fueling areas (such as gasoline stations); below deck on boats; fuel or chemical transfer or storage facilities; vehicles using liquefied petroleum gas (such as propane or butane); areas where the air contains chemicals or particles (such as grain, dust, or metal powders); and any other area where you would normally be advised to turn off your vehicle engine.For Vehicles Equipped with an Air BagAn air bag inflates with great force. DO NOT place objects, including either installed or portable wireless equipment, in the area over the air bag or in the air bag deployment area. If in-vehicle wireless equipment is improperly installed and the air bag inflates, serious injury could result.Charger and Adapter Safety] The charger and adapter are intended for indoor use only.Battery Information and Care] Always unplug the charger from the wall socket after the phone is fully charged to save unnecessary power consumption of the charger.] Please read the manual of specified charger about charging method.] Do not damage the power cord by bending, twisting, or heating. Do not use the plug if it is loose as it may cause electric shock or fire.] Do not place any heavy items on the power cord. Do not allow the power cord to be](https://usermanual.wiki/LG-Electronics-USA/E980/User-Guide-1904169-Page-95.png)
![96Safety Guidelinescrimped as it may cause electric shock or fire.] Unplug the power cord prior to cleaning your phone, and clean the power plug pin when it’s dirty. When using the power plug, ensure that it’s firmly connected. If not, it may cause excessive heat or fire. If you put your phone in a pocket or bag without covering the receptacle of the phone (power plug pin), metallic articles (such as a coin, paperclip or pen) may short-circuit the phone. Always cover the receptacle when not in use.] Recharge the battery after long periods of non-use to maximize battery life. Battery life will vary due to usage pattern and environmental conditions.] Never store your phone in temperature less than -4°F or greater than 122°F. Charge the battery in range of 0°C ~ 45°C.] Charging temperature range is regulated between 0°C and 45°C. Do not charge the battery out of recommended temperature range. Charging out of recommended range might cause the generating heat or serious damage of battery. And also, it might cause the deterioration of battery's characteristics and cycle life.] Do not use or leave the battery under the blazing sun or in heated car by sunshine.The battery may generate heat, smoke or flame. And also, it might cause the deterioration of battery’s characteristics or cycle life.] The battery pack has protection circuit to avoid the danger. Do not use nearby the place where generates static electricity more than 100V which gives damage to the protection circuit. If the protection circuit were broken, the battery would generate smoke, rupture or flame.] If the skin or cloth is smeared with liquid from the battery, wash with fresh water. It may cause the skin inflammation.] Please take your phone to an authorized service center immediately if this occurs.] Do not handle the phone with wet hands while it is being charged. It may cause an electric shock or seriously damage your phone.] Do not place or answer calls while charging the phone as it may short-circuit the phone and/or cause electric shock or fire.](https://usermanual.wiki/LG-Electronics-USA/E980/User-Guide-1904169-Page-96.png)
![97Safety Guidelines] The charger and adapter are intended for indoor use only.] Talking on your phone for a long period of time may reduce call quality due to heat generated during use.Explosion, Shock, and Fire Hazards] Do not put your phone in a place subject to excessive dust and keep the minimum required distance between the power cord and heat sources.] Unplug the power cord prior to cleaning your phone, and clean the power plug pin when it is dirty.] When using the power plug, ensure that it is firmly connected. If it is not, it may cause excessive heat or fire.] If you put your phone in a pocket or bag without covering the receptacle of the phone (power plug pin), metallic articles (such as a coin, paperclip or pen) may short-circuit the phone. Always cover the receptacle when not in use.] Do not short-circuit the battery. Metallic articles such as a coin, paperclip or pen in your pocket or bag may short-circuit the + and – terminals of the battery (metal strips on the battery) upon moving. Short-circuit of the terminal may damage the battery and cause an explosion.General Notice] Using a damaged battery or placing a battery in your mouth may cause serious injury.] Do not place items containing magnetic components such as a credit card, phone card, bank book or subway ticket near your phone. The magnetism of the phone may damage the data stored in the magnetic strip.] Talking on your phone for a long period of time may reduce call quality due to heat generated during use.] When the phone is not used for a long period time, store it in a safe place with the power cord unplugged.] Using the phone in proximity to receiving equipment (i.e., TV or radio) may cause interference to the phone.] Do not use the phone if the antenna is damaged. If a damaged antenna contacts skin, it may cause a slight burn. Please](https://usermanual.wiki/LG-Electronics-USA/E980/User-Guide-1904169-Page-97.png)
![98Safety Guidelinescontact an LG Authorized Service Center to replace the damaged antenna.] Do not immerse your phone in water. If this happens, turn it off immediately and remove the battery. If the phone does not work, take it to an LG Authorized Service Center.] Do not paint your phone.] The data saved in your phone might be deleted due to careless use, repair of the phone, or upgrade of the software. Please backup your important phone numbers. (Ring tones, text messages, voice messages, pictures, and videos could also be deleted.) The manufacturer is not liable for damage due to the loss of data.] When you use the phone in public places, set the ring tone to vibration so as not to disturb others.] Do not turn your phone on or off when putting it in your ear.] Your phone is an electronic device that generates heat during normal operation. Extremely prolonged, direct skin contact in the absence of adequate ventilation may result in discomfort or minor burns. Therefore, use care when handling your phone during or immediately after operation.Caution: Avoid potential hearing loss.Prolonged exposure to loud sounds (including music) is the most common cause of preventable hearing loss. Some scientific research suggests that using portable audio devices, such as portable music players and cellular telephones, at high volume settings for long durations may lead to permanent noise induced hearing loss. This includes the use of headphones (including headsets, earbuds and Bluetooth® or other wireless devices).Exposure to very loud sound has also been associated in some studies with tinnitus (a ringing in the ear), hypersensitivity to sound and distorted hearing. Individual susceptibility to noise-induced hearing loss and other potential hearing problems varies.The amount of sound produced by a portable audio device varies depending on the nature of the sound, the device, the device settings and the headphones. You should follow some commonsense recommendations when using any portable audio device: 204 Safety] Set the volume in a quiet environment and](https://usermanual.wiki/LG-Electronics-USA/E980/User-Guide-1904169-Page-98.png)
![99Safety Guidelinesselect the lowest volume at which you can hear adequately.] When using headphones, turn the volume down if you cannot hear the people speaking near you or if the person sitting next to you can hear what you are listening to.] Do not turn the volume up to block out noisy surroundings. If you choose to listen to your portable device in a noisy environment, use noisecancelling headphones to block out background environmental noise.] Limit the amount of time you listen. As the volume increases, less time is required before your hearing could be affected.] Avoid using headphones after exposure to extremely loud noises, such as rock concerts, that might cause temporary hearing loss. Temporary hearing loss might cause unsafe volumes to sound normal.] Do not listen at any volume that causes you discomfort. If you experience ringing in your ears, hear muffled speech or experience any temporary hearing difficulty after listening to your portable audio device, discontinue use and consult your doctor.You can obtain additional information on this subject from the following sources: Safety 205American Academy of Audiology 11730 Plaza American Drive, Suite 300Reston, VA 20190Voice: (800) 222-2336Email: info@audiology.orgInternet: www.audiology.orgNational Institute on Deafness and Other CommunicationDisordersNational Institutes of Health31 Center Drive, MSC 2320Bethesda, MD USA 20892-2320Voice: (301) 496-7243Email: nidcdinfo@nih.govInternet: http://www.nidcd.nih.gov/health/hearingNational Institute for Occupational Safety and Health Hubert H. Humphrey Bldg.200 Independence Ave., SW Washington, DC 20201 Voice: 1-800-35-NIOSH (1-800-356-4674)](https://usermanual.wiki/LG-Electronics-USA/E980/User-Guide-1904169-Page-99.png)
![100Safety GuidelinesInternet: http://www.cdc.gov/niosh/topics/noise/default.htmlFDA Consumer UpdateThe U.S. Food and Drug Administration Center for Devices and Radiological Health Consumer Update on Mobile Phones.1. Do wireless phones pose a health hazard? The available scientific evidence does not show that any health problems are associated with using wireless phones. There is no proof, however, that wireless phones are absolutely safe. Wireless phones emit low levels of radiofrequency energy (RF) in the microwave range while being used. They also emit very low levels of RF when in the Home screen. Whereas high levels of RF can produce health effects (by heating tissue), exposure to low level RF that does not produce heating effects causes no known adverse health effects. Many studies of low level RF exposures have not found any biological effects. Some studies have suggested that some biological effects may occur, but such findings have not been confirmed by additional research. In some cases, other researchers have had difficulty in reproducing those studies, or in determining the reasons for inconsistent results.2. What is the FDA’s role concerning the safety of wireless phones? Under the law, the FDA does not review the safety of radiation-emitting consumer products such as wireless phones before they can be sold, as it does with new drugs or medical devices. However, the agency has authority to take action if wireless phones are shown to emit radiofrequency energy (RF) at a level that is hazardous to the user. In such a case, the FDA could require the manufacturers of wireless phones to notify users of the health hazard and to repair, replace, or recall the phones so that the hazard no longer exists. Although the existing scientific data do not justify FDA regulatory actions, the FDA has urged the wireless phone industry to take a number of steps, including the following:] Support needed research into possible biological effects of RF of the type emitted by wireless phones;](https://usermanual.wiki/LG-Electronics-USA/E980/User-Guide-1904169-Page-100.png)
![101Safety Guidelines] Design wireless phones in a way that minimizes any RF exposure to the user that is not necessary for device function; and] Cooperate in providing users of wireless phones with the best possible information on possible effects of wireless phone use on human health. The FDA belongs to an interagency working group of the federal agencies that have responsibility for different aspects of RF safety to ensure coordinated efforts at the federal level. The following agencies belong to this working group:] National Institute for Occupational Safety and Health] Environmental Protection Agency] Occupational Safety and Health Administration] National Telecommunications and Information Administration The National Institutes of Health participates in some interagency working group activities, as well. The FDA shares regulatory responsibilities for wireless phones with the Federal Communications Commission (FCC). All phones that are sold in the United States must comply with FCC safety guidelines that limit RF exposure. The FCC relies on the FDA and other health agencies for safety questions about wireless phones. The FCC also regulates the base stations that the wireless phone networks rely upon. While these base stations operate at higher power than do the wireless phones themselves, the RF exposures that people get from these base stations are typically thousands of times lower than those they can get from wireless phones. Base stations are thus not the subject of the safety questions discussed in this document.3. What kinds of phones are the subject of this update? The term ‘wireless phone’ refers here to handheld wireless phones with built-in antennas, often called ‘cell’, ‘mobile’, or ‘PCS’ phones. These types of wireless phones can expose the user to measurable radiofrequency energy (RF) because of the short distance between the phone and the user’s head. These RF exposures are limited by FCC safety guidelines that were developed with the advice of the FDA and other federal health and safety agencies.](https://usermanual.wiki/LG-Electronics-USA/E980/User-Guide-1904169-Page-101.png)