LG Electronics USA E989 Cellular/PCS GSM/EDGE/WCDMA Phone with WLAN, RFID and BT User Manual LG E980 ATT UG EN 121227 indd
LG Electronics MobileComm USA, Inc. Cellular/PCS GSM/EDGE/WCDMA Phone with WLAN, RFID and BT LG E980 ATT UG EN 121227 indd
Contents
- 1. Users Manual 1
- 2. Users Manual 2
- 3. Users Manual 3
Users Manual 2
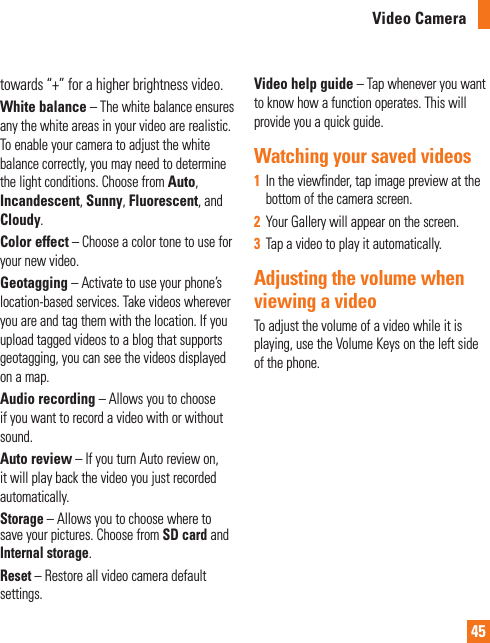
![34] From the Home screen, tap Messaging > Menu Key > All Settings. EmailYou can use the Email application to read email from providers other than Gmail. The Email application supports the following account types: POP3, IMAP and Microsoft Exchange (for Enterprise users).To open the Email application] From the Home screen, tap the Apps Key > Email .The first time you open the Email application, a setup wizard opens to help you add an email account. Microsoft Exchange Email Account Email address – Enter the account email address.Username – Enter the account username.Password – Enter the account password.Server address – Enter the server address.Domain – Enter the account domain (optional).Use SSL – Choose whether or not to use SSL for Microsoft Exchange. Other (POP3, IMAP) Email Account Email address – Enter the account email address.Password – Enter the account password. Incoming Server SettingsPOP3 / IMAP4 – Select protocol type, either POP3 or IMAP4.Secure type – Choose from Off, SSL, or TLS.Port number – Normally each account’s default number will be displayed.Advanced Server Settings (Outgoing)SMTP server – Enter the outgoing email server address.Secure type – Choose from Off, SSL, or TLS.Port number – Normally each account’s default number will be displayed.The Accounts ScreenThe Accounts screen lists your Combined inbox and each of your email accounts.] Open Email and tap Menu Key > Accounts. The Account list appears.Messaging/Email](https://usermanual.wiki/LG-Electronics-USA/E989.Users-Manual-2/User-Guide-2011708-Page-10.png)
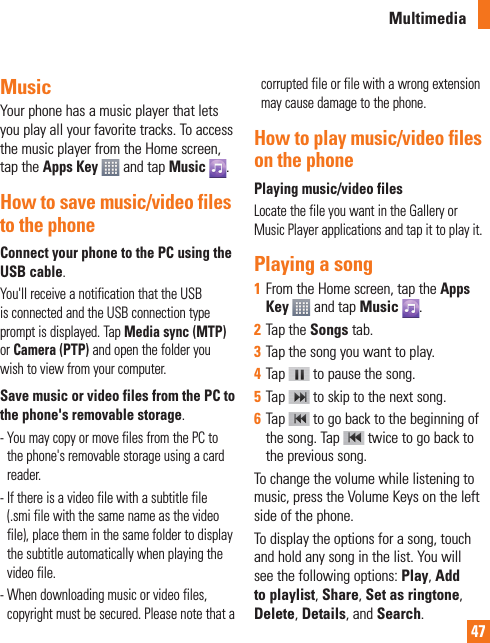
![35n TIPTo make a shortcut to the Inbox of an account:In the accounts list, touch and hold an email account. Then tap Add to home screen.You can tap an account to view its Inbox. The default account from which you send email is indicated with a checkmark.To open your Combined inboxIf you have configured email to send and receive email from more than one account, you can view all messages sent to all accounts in your Combined inbox.] Open the Accounts screen and touch Combined inbox. Messages in the Combined inbox are color coded on the left, by account, using the same colors used for your accounts in the Accounts screen.When a new email arrives in the inbox, there will be sound and/or vibration notification (depending on your current sound and vibrate settings).Composing and Sending Email 1 In the Email application, tap Compose .2 Enter an address for the message’s intended recipient. As you enter text, matching addresses will be offered from your contacts. Separate multiple addresses with commas.3 Tap the Cc/Bcc field to copy or blind copy to other contacts/email addresses.4 Tap the text field and enter your message.5 Tap Attach to attach the file you want to send with your message.6 Tap Send to send the message.If you are not ready to send the message, tap Save to save it in a Drafts folder. Touch a message in the Drafts folder to resume working on it. Your message will also be saved as a draft if you touch the Back Key before sending it.Tap Cancel to abandon and delete a message, including any saved drafts. If you are not connected to a network, for example if you’re working in airplane mode, the messages you send are stored in your Outbox folder until you’re connected to a network. If it contains any pending messages, the Outbox will be displayed on the Accounts screen.Messaging/Email](https://usermanual.wiki/LG-Electronics-USA/E989.Users-Manual-2/User-Guide-2011708-Page-11.png)
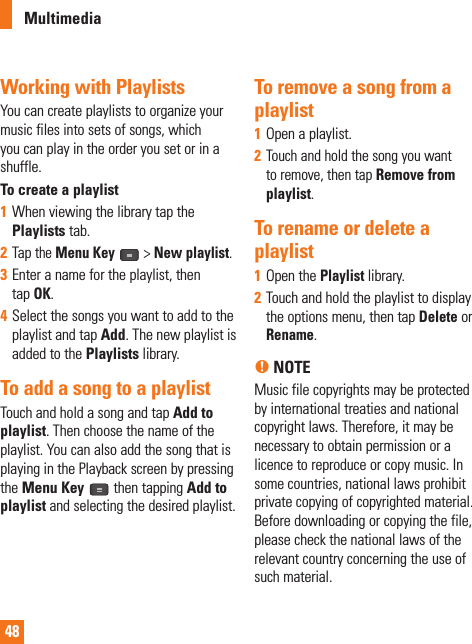
![46MultimediaYou can store multimedia files to a microSD card or internal memory to have easy access to all your image and video files.GalleryFrom the Home screen, tap the Apps Key > Gallery . Video WizYou can make your own movie using your images/video and music.1 From the Home Screen, tap the Apps Key > Video Wiz .2 After seeing the brief introduction on the Steps, tap OK.3 Tap to add images and/or video to your movie.4 Tap images and/or videos to make a video with, then tap .] To remove images or videos, tap and tap . Then, tap .] To rearrange them, touch and hold an image/video, drag and drop it to the desired position.5 Tap Select style to select the desired movie style. ] Scroll through and select the style you want. As you tap the desired style, preview is displayed.] Tap OK.6 Tap Select music to set the background music.] Select Default for this style or Music track.7 Tap to play your movie.8 Tap to edit the video clip using Text, Sticker or Magic spot. ] After editing the video, tap .9 Tap to save the video.10 Tap to clear it up.n NOTETap if you want to see Help information about Video Wiz.tt](https://usermanual.wiki/LG-Electronics-USA/E989.Users-Manual-2/User-Guide-2011708-Page-22.png)
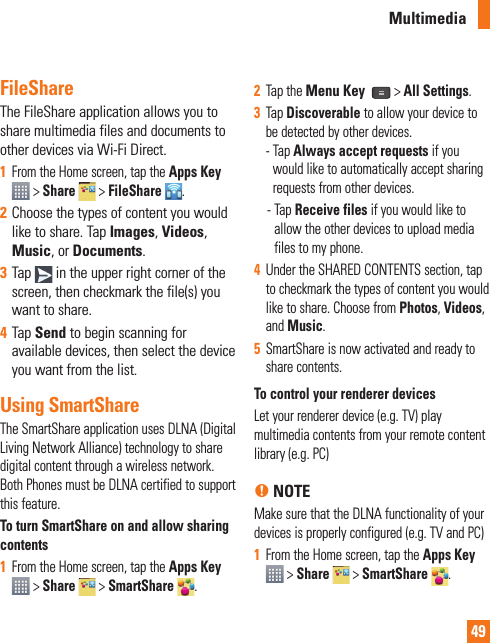

![511 From the Home screen, tap the Apps Key > Share > SmartShare .2 Tap the From button and select My phone.3 You can browse the content library.4 Tap and hold a content thumbnail and then touch Upload.5 Select a device of remote content library to be uploaded.n NOTICESome DLNA enabled devices do not support the DMS upload functionality and will not upload files. A few types of contents are not supported.Media HomeYou can play videos or music files, or view photos stored in the phone on HDMI-enabled products such as a smart TV or monitor.n TipOnce you connect your device to a TV or monitor via a MHL cable, Media Home will be launched automatically. Any apps that are running will be interrupted, including playback of DivX VOD movies.1 Connect the phone and HDMI-enabled TV or monitor with an MHL cable (sold separately). Media Home will automatically run.] When Auto-launch and auto-off is set to off, slide the Status Bar down and tap Media Home. 2 Select a video, music, or picture to view it on the TV or monitor.Multimedia](https://usermanual.wiki/LG-Electronics-USA/E989.Users-Manual-2/User-Guide-2011708-Page-27.png)
![523 Tap to configure the following settings:] Auto-launch and auto-off: Place a checkmark on this to launch Media Home automatically when a device is connected to an MHL cable or desk cradle.] Video settings: Allows you to view group videos by folders or how to sort the list.] Photo settings: Allows you to sort the list or set slideshow settings.] Screen saver settings: Allows you configure the type and album to use for the slideshow.Multimedia](https://usermanual.wiki/LG-Electronics-USA/E989.Users-Manual-2/User-Guide-2011708-Page-28.png)
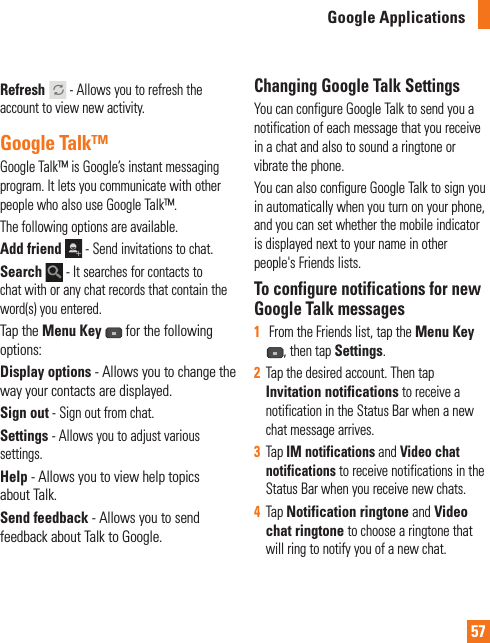
![53About Google applicationsGoogle applications, including mobile versions of Gmail, Google Talk, Google Calendar, and Google Maps, are loaded on your phone.1 To set up a Google account, tap any Google application, enter your user name and password and sign in.2 After signing in, your contacts, email, and calendar in your Google account will automatically synchronize with your phone.Google Maps™To open Google Maps and view your location1 From the Home screen, tap the Apps Key and tap Maps . 2 Tap the My location icon on the screen.The map centers on a blue arrow that indicates your location. A blue circle around the arrow indicates that your actual location is within the circle.n TipWhile viewing a map, tap the Menu Key for the following options: Clear map, Make available offl ine, Settings and Help.To get an address and additional information for a location1 Touch and hold a location on the map. A balloon with the address and a thumbnail from Street View (if available) opens over the location.2 Tap the balloon to access additional options.To view map, satellite, or traffic layers] Tap the Layers icon on the map and select a layer option. You can choose from Traffic, Satellite, Terrain, Latitude, and others.Searching For Locations and PlacesYou can search for a location and view it on a map. You can also search for places on the map that you're viewing.Google Applications](https://usermanual.wiki/LG-Electronics-USA/E989.Users-Manual-2/User-Guide-2011708-Page-29.png)
![54To search for a location1 While viewing a map, tap at the bottom of the screen. You can also touch and hold the Menu Key .2 In the search box, enter the place you're looking for. You can enter an address, a city, or a type of business or establishment. For example, “theater in New York”.3 Tap the Search icon on the keyboard. Markers with letter labels indicate search matches on the map. n NOTELocation information might be inaccurate if GPS and Wi-Fi is turned off. Please make sure that GPS and Wi-Fi is turned on.Getting DirectionsTo get directions1 While viewing a map, tap . 2 Enter a starting point in the top text box and your destination in the bottom text box. To reverse directions, tap the Menu Key and tap Reverse Start & End.3 Tap the icon for car, public transit, or walking directions.4 Tap GET DIRECTIONS. The directions to your destination appear as a route.To view turn-by-turn navigation directionsYou can view each turn in your route as a list of written directions.When searching for directions, tap NAVIGATION instead of GET DIRECTIONS to view turn-by-turn directions in Navigation View.To search for locations along your routeYou can search for businesses, points of interest, and other features along your route. When you search while navigating, your results include locations along your route, rather than locations that are near your current location.] Touch and hold the Menu Key and search for locations of interest. The results are displayed as markers along your route; the fi rst result is labeled. You can tap a label for more information about the marker.] When you're fi nished, tap the Navigation icon to return to Navigation View.Google Applications](https://usermanual.wiki/LG-Electronics-USA/E989.Users-Manual-2/User-Guide-2011708-Page-30.png)
![55Clear MapClear any information, such as routes and search results, from the map.To clear a mapWhile viewing a map, tap the Menu Key and tap Clear Map.LatitudeFinding Your Friends with Google LatitudeTMGoogle Latitude lets you and your friends view each others' locations on maps and get directions to your friends' locations using Google Latitude. Your location is not shared automatically. It is by invitation only.You must join Latitude and then invite your friends to view your location or accept invitations from your friends.To join Latitude] While viewing a map, tap and then Latitude. The first time you join Latitude, you're prompted to accept or reject the Google privacy policy. After you've joined Latitude, the Join Latitude option changes to Latitude.To open LatitudeAfter you join Latitude, you can open it to find your friends and view their updates.] While viewing a map, tap and then Latitude.To invite friends to share their locationsAfter you join Latitude, you can start sharing your location with your friends. Only friends whom you have explicitly invited or accepted can see your location.1 Open Latitude and tap .2 Tap Select from Contacts or Add via email address in the menu that opens. 3 Tap Add friends at the bottom of the screen. If your friends already use Latitude, they receive an email request and a notification on Latitude. If they have not yet joined Latitude, they receive an email inviting them to sign in to Latitude with their Google Account.PlacesTo fi nd placesTap the Places icon while in Google Maps to find different venues, such as gas stations, coffee, bars, restaurants, etc.Once you select a category, you will see a list Google Applications](https://usermanual.wiki/LG-Electronics-USA/E989.Users-Manual-2/User-Guide-2011708-Page-31.png)

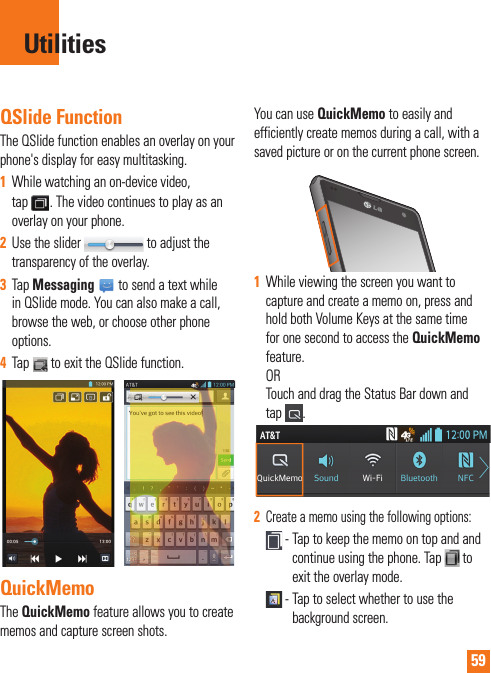
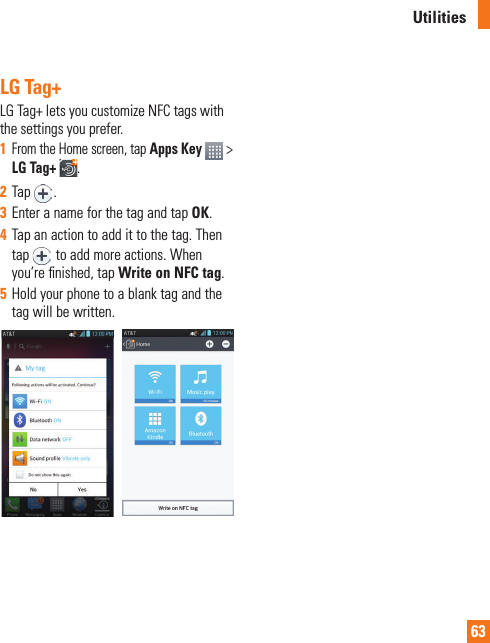
![60 - Tap to undo the most recent action. - Tap to redo the most recently deleted action. - Tap to select the pen type and color. - Tap to use the eraser to erase the memo that you created. - Tap to share the memo with others via any of the available applications. - Tap to save the memo you’ve created.n NOTE Please use a fingertip while using the QuickMemo feature. Do not use your fingernail.3 Tap . You can also crop the image using the triangles in each corner. Touch and drag to the desired part of the screen.4 Tap to show the Edit menu and tap to save the current memo.Discard QuickMemos:] Tap the Back Key .View the Saved QuickMemoFrom the Home screen tap the Apps Key tap > Gallery and select the QuickMemo album.Setting the alarm1 From the Home screen, tap the Apps Key and tap Clock .2 To add a new alarm, tap the tab (if necessary). 3 Tap and set the alarm time.4 Set any desired options and tap Save. 5 Tap the Menu Key to delete all alarms or adjust the alarm settings.Using the calculator1 From the Home screen, tap the Apps Key and tap Calculator .2 Tap the number keys to enter numbers.3 For simple calculations, tap the function you want , followed by .4 For more complex calculations, tap the Menu Key , tap the Advanced panel, then choose an option.Adding an event to your calendarn NOTEYou must create a Google account to use Calendar.1 From the Home screen, tap the Apps Key and tap Calendar .Utilities](https://usermanual.wiki/LG-Electronics-USA/E989.Users-Manual-2/User-Guide-2011708-Page-36.png)
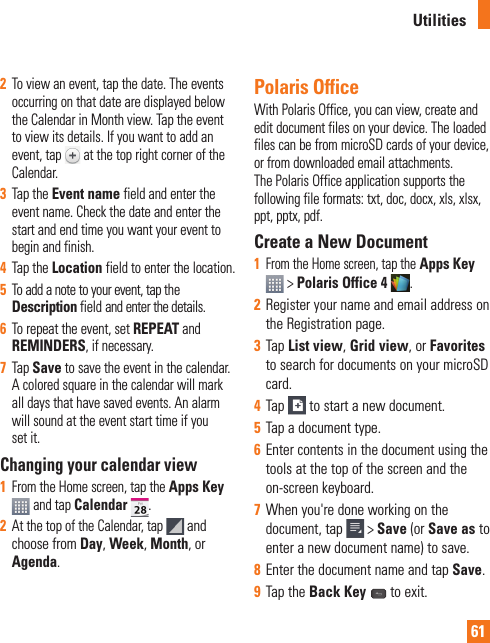
![62View and edit a document on your device1 From the Home screen, tap the Apps Key > Polaris Office 4 .2 Tap List view, Grid view, or Favorites to search for documents on your microSD card. 3 Tap the document that you want to view or edit.n NOTEYou can also open an attachment in an email by tapping the attachment in the message.4 The document opens for you to view. If you want to edit it, tap anywhere on the document.] To move between pages or pan through the document, scroll in the corresponding direction.] To change the zoom level, simply pinch-to zoom to achieve the zoom level you want.] Use the toolbar at the top of the screen to edit the document (Word, Excel, or PowerPoint file).] Tap for the following additional menu options : Save, Save as, PDF Export, Find & Replace, Page layout, Full width view, Reflow text, Text-to-speech and Share.5 When you're finished editing, tap > Save. Then tap the Back Key to exit.Polaris Office toolbarThe Polaris Office application has a toolbar that appears automatically when you create a document. 1 To display the toolbar in an existing document, tap .2 Tap the Font, Paragraph, or Style tab and choose the desired options. 3 To hide the tool options pop-up balloon, tap .Voice CommandYou can search for and dial a contact by speaking, rather than by manually dialing a contact.To place a call by speaking1 From the Home screen, tap the Apps Key > Voice Command .2 Say "Call" followed by the name of the contact to call.If Voice Command finds a match, it dials the contact's default number. Utilities](https://usermanual.wiki/LG-Electronics-USA/E989.Users-Manual-2/User-Guide-2011708-Page-38.png)