LG Electronics USA EG784G Computer Monitor User Manual users manual
LG Electronics USA Computer Monitor users manual
users manual

APPENDIX G :
FCC ID : BEJEG784G
USER’S MANUAL

VX730 monitor user's guide
P/NO.3828TUO197G(REV00-0204)
Printed in Korea
1
Contents
Using Your VX 730 Monitor . . . . . . . . . . . . . . . . . . . . . . . . . . . . . . . . . . . . . . . . . 1
Setting up the monitor . . . . . . . . . . . . . . . . . . . . . . . . . . . . . . . . . . . . . . . . . . . . . . . . 2
Removing the base . . . . . . . . . . . . . . . . . . . . . . . . . . . . . . . . . . . . . . . . . . . . . . . 5
Starting the monitor . . . . . . . . . . . . . . . . . . . . . . . . . . . . . . . . . . . . . . . . . . . . . . . . . . 6
Adjusting monitor settings . . . . . . . . . . . . . . . . . . . . . . . . . . . . . . . . . . . . . . . . . . . . . 8
OSD options . . . . . . . . . . . . . . . . . . . . . . . . . . . . . . . . . . . . . . . . . . . . . . . . . . . . 9
Software controls . . . . . . . . . . . . . . . . . . . . . . . . . . . . . . . . . . . . . . . . . . . . . . . 11
Power management . . . . . . . . . . . . . . . . . . . . . . . . . . . . . . . . . . . . . . . . . . . . . . . . 15
ENERGY STAR . . . . . . . . . . . . . . . . . . . . . . . . . . . . . . . . . . . . . . . . . . . . . . . . 15
Energy declaration . . . . . . . . . . . . . . . . . . . . . . . . . . . . . . . . . . . . . . . . . . . . . . 15
Maintenance . . . . . . . . . . . . . . . . . . . . . . . . . . . . . . . . . . . . . . . . . . . . . . . . . . . . . . 16
Troubleshooting . . . . . . . . . . . . . . . . . . . . . . . . . . . . . . . . . . . . . . . . . . . . . . . . . . . . 17
No picture . . . . . . . . . . . . . . . . . . . . . . . . . . . . . . . . . . . . . . . . . . . . . . . . . . . . . 17
Picture is scrambled . . . . . . . . . . . . . . . . . . . . . . . . . . . . . . . . . . . . . . . . . . . . . 18
Display colors are wrong . . . . . . . . . . . . . . . . . . . . . . . . . . . . . . . . . . . . . . . . . 19
Picture is fuzzy . . . . . . . . . . . . . . . . . . . . . . . . . . . . . . . . . . . . . . . . . . . . . . . . . 19
Picture bounces, jitters, or has waves . . . . . . . . . . . . . . . . . . . . . . . . . . . . . . . 19
Picture has shadows or “ghosts” . . . . . . . . . . . . . . . . . . . . . . . . . . . . . . . . . . . 19
Color is not uniform . . . . . . . . . . . . . . . . . . . . . . . . . . . . . . . . . . . . . . . . . . . . . 20
Image is not sized or centered correctly . . . . . . . . . . . . . . . . . . . . . . . . . . . . . 20
Image cannot be adjusted full screen . . . . . . . . . . . . . . . . . . . . . . . . . . . . . . . 20
Specifications . . . . . . . . . . . . . . . . . . . . . . . . . . . . . . . . . . . . . . . . . . . . . . . . . . . . . . 21
Safety, Regulatory, and Legal Information . . . . . . . . . . . . . . . . . . . . . . . . . 23
08595.book Page 1 Friday, April 12, 2002 4:16 PM
2
08595.book Page 2 Friday, April 12, 2002 4:16 PM

1
www.gateway.com
Using Your
VX 730 Monitor
The VX 730 monitor is a high-resolution color monitor with:
■1280 × 1024 maximum resolution
■Unlimited colors
■Excellent contrast and legibility
■Reduced power usage
The microprocessor-based on-screen display (OSD) controls let you adjust a
variety of image settings.
08595.book Page 1 Friday, April 12, 2002 4:16 PM
2
Using Your VX 730 Monitor
www.gateway.com
Setting up the monitor
Setting up the monitor consists of two procedures: attaching the base and
connecting the monitor cables. If you are setting up your system for the first
time, refer to the setup poster for more information about connecting
additional peripheral devices.
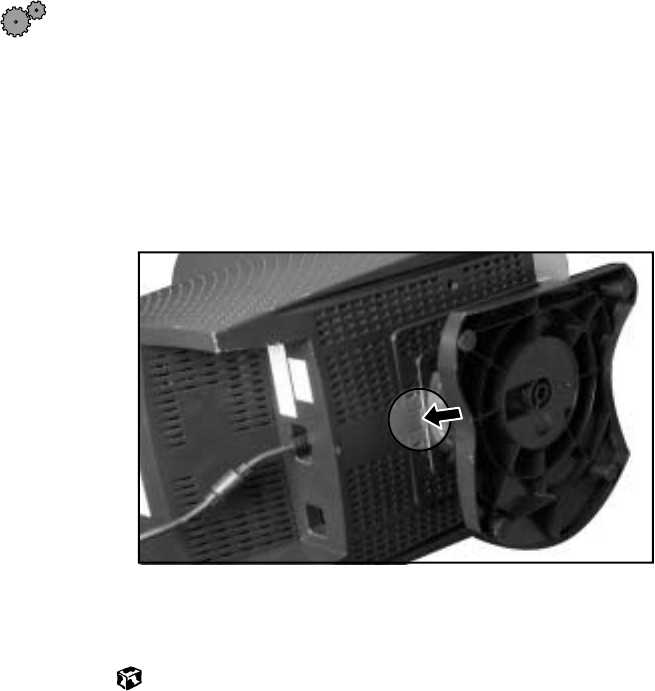
To attach the base:
1Carefully set the monitor on its side with the bottom of the monitor
facing you.
2Hold the base so that the rounded end is pointing toward the back of
the monitor, then align the hooks on the bottom of the base with the
corresponding slots on the bottom of the monitor.
3Slide the base toward the front of the monitor so that all hooks are
securely in place. The retaining latch clicks into place when the base is
correctly attached.
4Carefully set the monitor upright and place it on a sturdy, level surface.
Retaining latch
08595.book Page 2 Friday, April 12, 2002 4:16 PM
3
Setting up the monitor
www.gateway.com
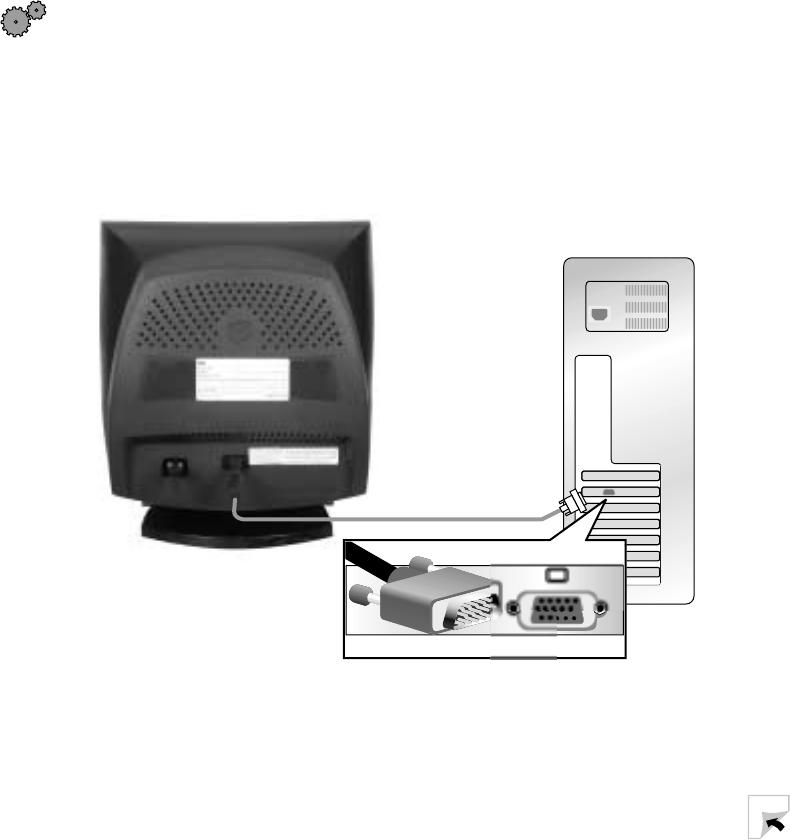
To connect the power and video cables:
1Position the monitor and the computer so that you can easily get at the
back panel of each. Make sure that all power cables can reach a properly
grounded electrical outlet.
2Connect the video cable to the matching (blue) video port on the back
of your computer.
3Tighten the screws on the video cable connectors to keep them from
coming loose. Tightening the screws also prevents radio and TV
interference.
08595.book Page 3 Friday, April 12, 2002 4:16 PM
4
Using Your VX 730 Monitor
www.gateway.com
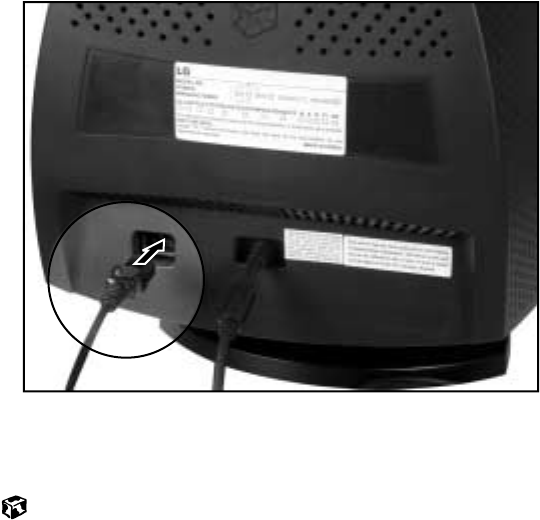
4Connect the power cord that came with the monitor to the AC power
connector at the back of the monitor. To maintain FCC standards, only
use the cord that came with the monitor.
5Plug the other end of the power cord into a properly grounded electrical
outlet.
08595.book Page 4 Friday, April 12, 2002 4:16 PM
5
Setting up the monitor
www.gateway.com
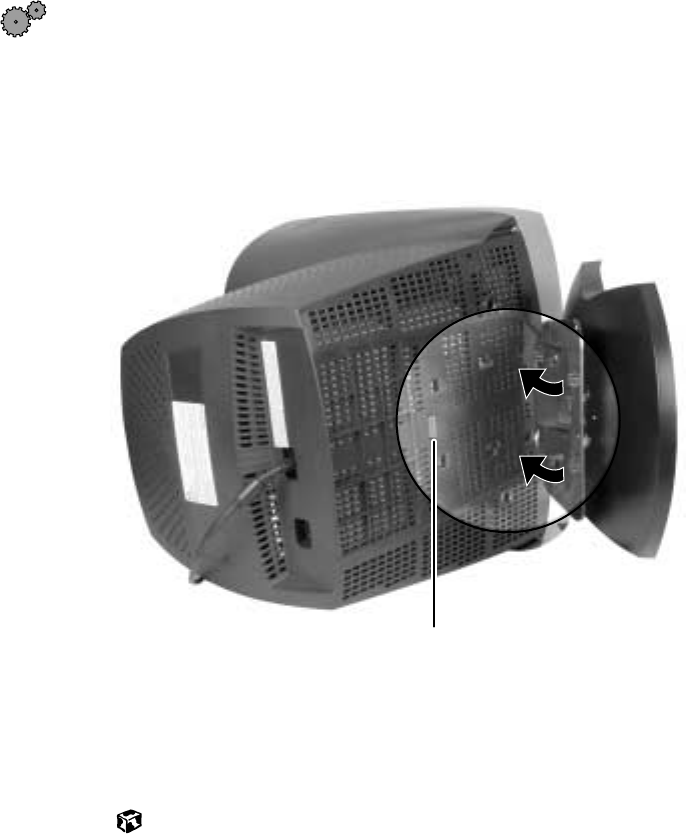
Removing the base
To remove the base:
1Turn off the system, then disconnect the monitor’s video and power
cables.
2Carefully set the monitor on its side with the bottom of the monitor
facing you.
3Rotate the base so that you can easily get to the retaining latch on the
bottom of the monitor, then press in the retaining latch.
4While pressing in the latch, slide the base toward the back of the monitor,
then remove the base.
08595.book Page 5 Friday, April 12, 2002 4:16 PM
6
Using Your VX 730 Monitor
www.gateway.com
Starting the monitor
To start the monitor:
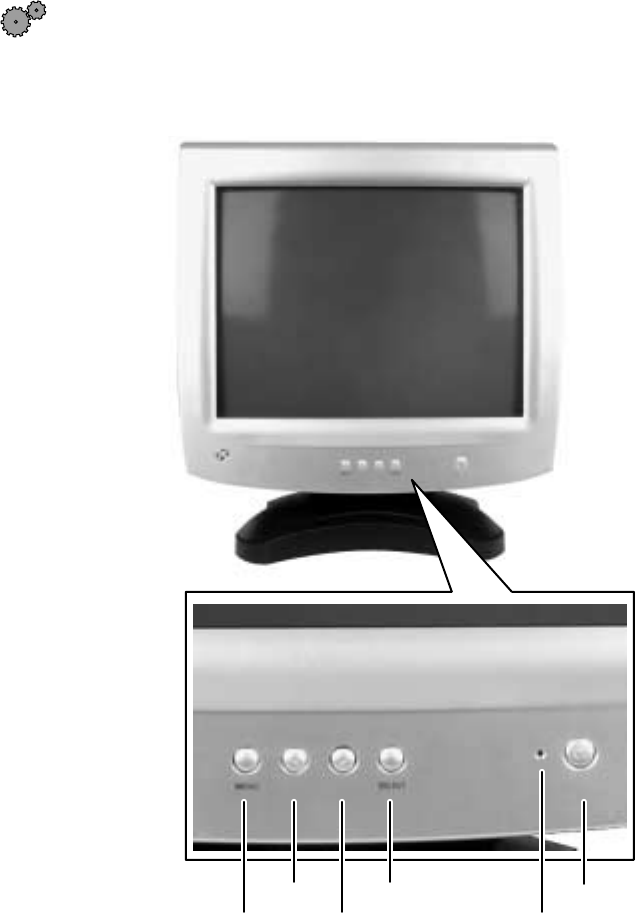
1Press and hold the power button for approximately one second. The
power LED turns on, and the monitor demagnetizes itself for about
five seconds.
Left
arrow Right
arrow
Power
button
Power
LED
Select
button
Menu
button
08595.book Page 6 Friday, April 12, 2002 4:16 PM

7
Starting the monitor
www.gateway.com
2Turn on the computer.
3After the system is running, the power LED on the monitor should be
green. If not, check the connections. For more troubleshooting
information, see “Troubleshooting” on page 17.
4Adjust the controls to get the ideal image size and position for you. For
more information, see “Adjusting monitor settings” on page 8.
Caution Do not store tapes or diskettes next to the monitor because
the monitor generates a strong magnetic field during
startup. This field can erase or damage data stored on
magnetic tapes or diskettes.
08595.book Page 7 Friday, April 12, 2002 4:16 PM
8
Using Your VX 730 Monitor
www.gateway.com
Adjusting monitor settings
This monitor features an on-screen display (OSD) that lets you adjust and save
contrast, brightness, and other settings for the display image.
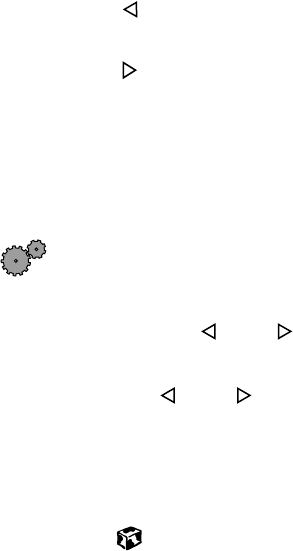
■Menu. Press to view the OSD. Press again to exit.
■(left). Press to move between the OSD options. After selecting an
option, use to adjust the setting.
■(right). Press to move between the OSD options. After selecting an
option, use to adjust the setting.
■Select. Press to select an OSD option.
The system saves any changes you make to the settings, even if you turn off
the monitor.
To adjust the monitor settings:
1Press the Menu button. The OSD menu opens.
2Use the and buttons to highlight a menu option.
3Press the Select button to select the highlighted menu option, then use
the and buttons to adjust it.
4Press the Select button to return to the Main menu.
5When you have finished making all adjustments, press the Menu button
to exit the OSD.
08595.book Page 8 Friday, April 12, 2002 4:16 PM
9
Adjusting monitor settings
www.gateway.com
OSD options
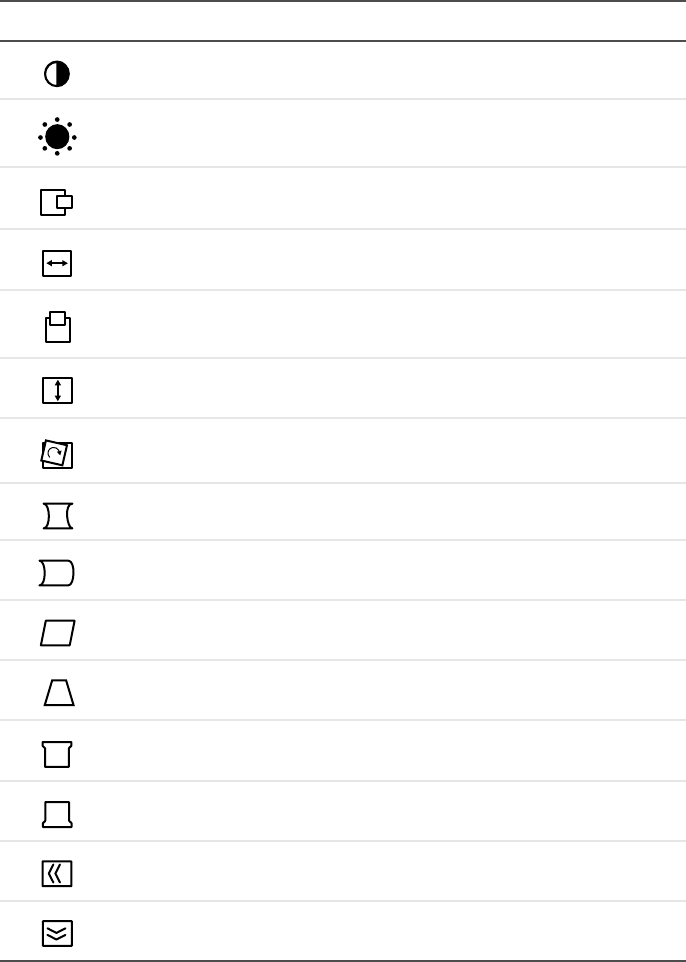
Main menu Option
Contrast. Increases or decreases display image contrast.
Brightness. Increases or decreases display image brightness.
Horizontal Position (H Position). Moves the display image to the
left or right side of the screen.
Horizontal Size (H Size). Increases or decreases the width of the
display image.
Vertical Position (V Position). Moves the display image to the top
or bottom of the screen.
Vertical Size (V Size). Increases or decreases the height of the
display image.
Tilt. Rotates the display image.
Pincushion. Curves the sides of the display image inward or outward.
Pin Balance. Curves the display to the left or right.
Parallelogram. Slants the display to the left or right.
Trapezoid. Increases or decreases the trapezoid distortion of the
display image.
Top corner. Curves the sides of the top of the display image inward
or outward.
Bottom corner. Curves the sides of the bottom of the display image
inward or outward.
Horizontal Moire (H Moire). Removes the horizontal line pattern
which results from interference.
Vertical Moire (V Moire). Removes the vertical line pattern which
results from interference.
08595.book Page 9 Friday, April 12, 2002 4:16 PM
10
Using Your VX 730 Monitor
www.gateway.com
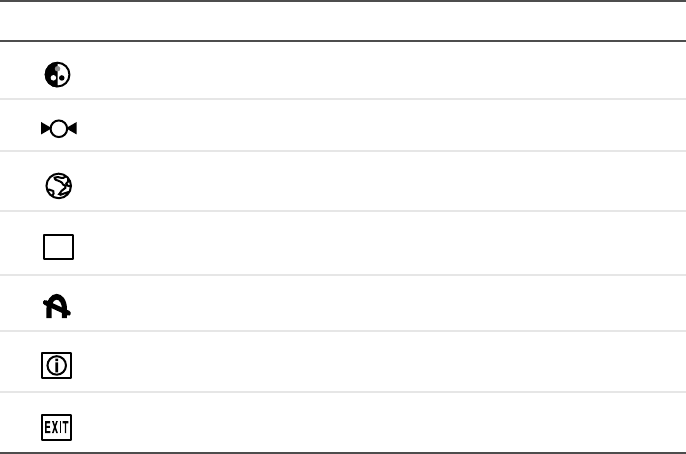
Color. Adjusts color balance.
Recall. Resets the monitor settings to the defaults.
Language. Changes the display language for the OSD control
system.
OSD Time. Adjusts the on-screen display time-out.
Degauss. Demagnetizes the screen.
Information. Displays the frequency and resolution in which the
monitor is currently operating.
Exit. Closes the OSD menu.
Main menu Option
OSD
08595.book Page 10 Friday, April 12, 2002 4:16 PM

11
Adjusting monitor settings
www.gateway.com
Software controls
Adjusting the color depth and screen resolution are two of the most basic
display settings you may need to change.
Adjusting the color depth
Color depth is the number of colors your video card uses. Different image types
require various color depths for optimum appearance on your monitor. For
example, simple color drawings may appear adequately in 256 colors while
color photographs need millions of colors to be displayed with optimum
quality.
Windows lets you choose from several color depth settings for your monitor.
We recommend that the 32-bit True Color setting or the highest setting
available, be used at all times.
If the color in your images seems “false” or “jumpy,” especially after you have
played a game or run a video-intensive program, check the color depth setting
and return it to 32-bit True Color, if necessary.
To change the color depth:
1In Windows XP, click Start, then click Control Panel. The Control Panel
window opens. If your Control Panel is in Category View, click
Appearance and Themes.
- OR -
In Windows 2000, click Start, Settings, then click Control Panel. The
Control Panel window opens.
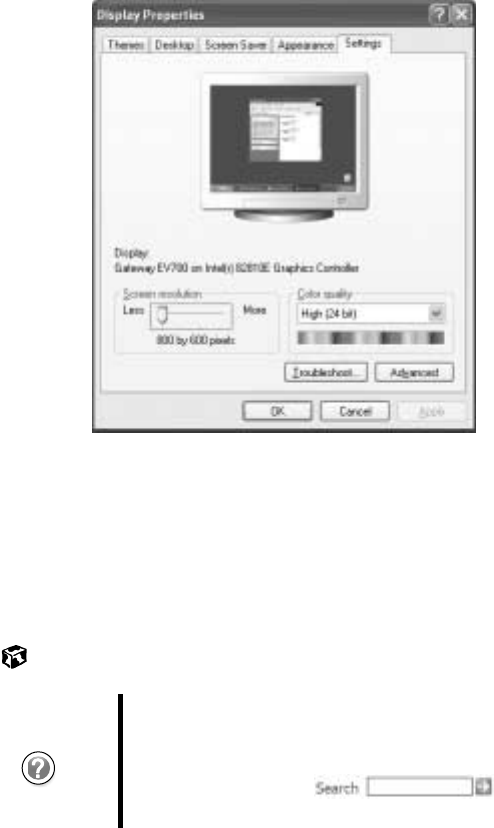
2Click/Double-click the Display icon. The Display Properties dialog box
opens.
08595.book Page 11 Friday, April 12, 2002 4:16 PM
12
Using Your VX 730 Monitor
www.gateway.com
3Click the Settings tab.
4Click the arrow button to open the Color quality or Colors list, then click
the color depth you want.
5To save your changes in WindowsXP, click OK, then click Yes.
- OR -
To save your changes in Windows 2000, click OK, then click OK again
Help and
Support For more information about adjusting display settings in
Windows XP, click Start, then click Help and Support.
Type the keyword changing display settings in the
HelpSpot Search box , then click
the arrow.
08595.book Page 12 Friday, April 12, 2002 4:16 PM

13
Adjusting monitor settings
www.gateway.com
Adjusting the screen resolution
You can change the screen resolution to a size you prefer. For example, you
can increase the resolution to fit more icons on your desktop, or you can
decrease the resolution to make reading and identifying objects on the
monitor easier. The higher the resolution, the smaller individual components
of the screen (such as icons and menu bars) appear.
To change the screen resolution:
1In Windows XP, click Start, then click Control Panel. The Control Panel
window opens. If your Control Panel is in Category View, click
Appearance and Themes.
- OR -
In Windows 2000, click Start, Settings, then click Control Panel. The
Control Panel window opens.
2Click/Double-click the Display icon. The Display Properties dialog box
opens.
08595.book Page 13 Friday, April 12, 2002 4:16 PM

14
Using Your VX 730 Monitor
www.gateway.com
3Click the Settings tab.
4Drag the Screen resolution or Screen area slider to the size you prefer.
5To save your changes in WindowsXP, click OK, then click Yes.
- OR -
To save your changes in Windows 2000, click OK, then click OK again.
Help and
Support For more information about adjusting screen resolution in
Windows XP, click Start, then click Help and Support.
Type the keyword changing screen resolution in the
HelpSpot Search box , then click
the arrow.
08595.book Page 14 Friday, April 12, 2002 4:16 PM

15
Power management
www.gateway.com
Power management
ENERGY STAR
As an ENERGY STAR® Partner, Gateway has determined that this product
meets the ENERGY STAR guidelines for energy efficiency.
This monitor complies with the EPA's International ENERGY STAR Program,
which is a program designed to encourage manufacturers of computer
equipment to build circuitry into their products to reduce energy
consumption during time of non-use.
Energy declaration
When connected to a computer that supports the Display Power Management
Signaling (DPMS) Protocol, this monitor can conserve significant energy by
reducing power consumption during periods of non-use. When the computer
goes into the energy saving mode, the monitor will then enter the Active Off
mode (different from total shut down). In the Active Off mode the power LED
will still show amber.
By following these conventions, the power can be reduced to the following
levels:
To “wake” the monitor when it is in Active Off mode, move your mouse or
press any keyboard key.
You can change the period of time after which the monitor enters these low
power states by accessing the power management options in the Control
Panel.
State LED color Power consumption
On Green 80 W
Off Amber Less than or equal to 8 W
08595.book Page 15 Friday, April 12, 2002 4:16 PM

16
Using Your VX 730 Monitor
www.gateway.com
Maintenance
To keep your monitor in the best working order:
■Do not block the ventilation holes.
■Do not expose the monitor to rain or use near water.
■Keep the monitor away from radiators or heat vents.
■Keep the monitor out of direct sunlight.
■Keep the monitor away from any equipment that generates a magnetic
field.
■Use a screen saver to avoid permanent phosphor discoloration. For more
information about screen savers, see the documentation that came with
your computer.
■Clean the monitor using a soft cloth lightly moistened with water. Wipe
the cabinet, glass panel, and controls.
Caution Do not use any type of abrasive pad or glass cleaner. You
can permanently scratch the glass panel.
08595.book Page 16 Friday, April 12, 2002 4:16 PM

17
Troubleshooting
www.gateway.com
Troubleshooting
If you have problems with your monitor, the information in this
troubleshooting section may help you solve them.
No picture
■Make sure that the power cord is properly connected to both the back
of the monitor and the wall outlet.
■Make sure that the video cable is securely connected to the back of the
computer.
■Make sure that the monitor is turned on.
■If the power LED is amber or blinking amber:
■Make sure that the computer is turned on.
■Move the mouse or press any key on the keyboard to bring the
monitor out of Active Off mode.
■Restart the computer with the monitor turned on.
■Check the video port and the end of the video cable for any pins
that might be bent or pushed in.
■Make sure that the video cable is not damaged.
■Perform a monitor self-test by turning off your monitor and unplugging
the video cable from the back of the computer. Turn the monitor back
on and wait for ten seconds. If the monitor is functioning correctly, a
self-diagnostic screen appears.
Important Make sure that the monitor has warmed up for about
30 minutes before making any judgments about the picture
quality.
08595.book Page 17 Friday, April 12, 2002 4:16 PM

18
Using Your VX 730 Monitor
www.gateway.com
Picture is scrambled
If your picture is scrambled or does not look right, you can reset your monitor
to its default video mode and resolution settings.
To reset your monitor settings:
1Restart the system, then press and hold F8 while the system is starting up.
2Select Safe Mode or Enable VGA Mode, then press Enter. The system restarts.
3In Windows XP, click Start, then click Control Panel. If your Control Panel
is in Category View, click Appearance and Themes.
- OR -
In Windows 2000, click Start, Settings, then Control Panel.
4Click/Double-click the Display icon. The Display Properties dialog box
opens.
5Click the Settings tab.
6Drag the Screen Resolution or Screen area slider to the size you prefer. If
you are not sure what resolution to use, select 800 × 600.
7To save your changes in WindowsXP, click OK, then click Yes.
- OR -
To save your changes in Windows 2000, click OK, then click OK again.
8If prompted, restart the system.
The mode you have chosen should allow you to use the system or select
a different resolution or number of colors (select the maximum number
possible). If the settings you selected are beyond the monitor’s display
capabilities, the operating system restores the image back to the last
settings in 15-20 seconds.
08595.book Page 18 Friday, April 12, 2002 4:16 PM
19
Troubleshooting
www.gateway.com
Display colors are wrong
■Make sure that the video cable is securely connected to the back of the
computer.
■Restart the computer with the monitor turned on.
■Check the video port and the end of the video cable for any pins that
might be bent or pushed in.
■Make sure that the video cable is not damaged.
Picture is fuzzy
Adjust the contrast and brightness controls to improve the display image. For
more information, see “Adjusting monitor settings” on page 8.
Picture bounces, jitters, or has waves
Make sure that:
■Non-shielded speakers are not placed too close to the monitor.
■The monitor is not positioned too close to another monitor, power
transformer or adapter, electric fan, fluorescent light, metal shelf, or laser
printer.
If none of these suggestions solves the problem, try plugging the monitor into
another outlet, preferably one on a different circuit.
Picture has shadows or “ghosts”
■Remove any extension cables or switchboxes.
■Make sure that the video cable is securely connected to the back of the
computer.
■Check the video port and the end of the video cable for any pins that
might be bent or pushed in.
■Make sure that the video cable is not damaged.
08595.book Page 19 Friday, April 12, 2002 4:16 PM
20
Using Your VX 730 Monitor
www.gateway.com
Color is not uniform
Make sure that the monitor warms up for at least 30 minutes before making
a final judgment about color uniformity.
Make sure that:
■Non-shielded speakers are not placed too close to the monitor.
■The monitor is not positioned too close to another monitor, power
transformer or adapter, electric fan, fluorescent light, metal shelf, or laser
printer.
■You demagnetize the screen using the Degauss feature in the OSD. For
instructions on how to degauss your monitor, see “Adjusting monitor
settings” on page 8.
Image is not sized or centered correctly
Use the size and position controls to adjust the image. For instructions on
how to change your monitor settings, see “Adjusting monitor settings” on
page 8.
Image cannot be adjusted full screen
Some video modes used by your monitor produce images that cannot be
adjusted all the way out to the bezel edge (the edge where the screen glass
and monitor casing meet).
This condition does not indicate that the monitor is defective.
08595.book Page 20 Friday, April 12, 2002 4:16 PM
21
Specifications
www.gateway.com
Specifications
Specifications are subject to change without notice or obligation.
Many products for Gateway and its subsidiaries are custom engineered by our
suppliers to Gateway specifications and may vary with similarly marketed
products.
CRT 17 inches diagonal (16.0 inches viewable),
anti-reflective/anti-glare, 90°deflection, 0.25 mm
dot pitch
Maximum resolution 1280 ×1024 non-interlaced
Display colors Unlimited
Synchronization Horizontal, 30-85 kHz
Vertical, 50-160 Hz
Power input
100-240 VAC, 50/60 Hz
Certifications UL, CSA, cUL, NOM, EPA, DHHS, and
FCC Class B
Power management Meets International ENERGY STAR requirements:
Active Off mode = less than or equal to 8 W
Environment Operating temperature: 41° to 104°F (5° to 40°C)
Operating humidity: 5% to 90%
08595.book Page 21 Friday, April 12, 2002 4:16 PM
22
Using Your VX 730 Monitor
www.gateway.com
08595.book Page 22 Friday, April 12, 2002 4:16 PM

23
www.gateway.com
Safety,
Regulatory, and
Legal Information
Important safety information
Your Gateway system is designed and tested to meet the latest standards for safety of information
technology equipment. However, to ensure safe use of this product, it is important that the
safety instructions marked on the product and in the documentation are followed.
Setting up your system
■Read and follow all instructions marked on the product and in the documentation before you
operate your system. Retain all safety and operating instructions for future use.
■Do not use this product near water or a heat source such as a radiator.
■Set up the system on a stable work surface.
■The product should only be operated from the type of power source indicated on the rating
label.
■If your product has a voltage selector switch, make sure that the switch is in the proper
position for your area. The voltage selector switch is set at the factory to the correct voltage.
■Openings in the monitor case are provided for ventilation. Do not block or cover these
openings. Make sure you provide adequate space, at least 6 inches (15 cm), around the system
for ventilation when you set up your work area. Never insert objects of any kind into the
monitor ventilation openings.
Warning Always follow these instructions to help guard against
personal injury and damage to your Gateway system.
08595.book Page 23 Friday, April 12, 2002 4:16 PM

24
Appendix : Safety, Regulatory, and Legal Information
www.gateway.com
■Some products are equipped with a three-wire power cord to make sure that the product is
properly grounded when in use. The plug on this cord will only fit into a grounding-type
outlet. This is a safety feature. If you are unable to insert the plug into an outlet, contact an
electrician to install the appropriate outlet.
■If you use an extension cord with this system, make sure that the total ampere rating on the
products plugged into the extension cord does not exceed the extension cord ampere rating.
■If your system is fitted with a TV Tuner, cable, or satellite receiver card, make sure that the
antenna or cable system is electrically grounded to provide some protection against voltage
surges and buildup of static charges.
Care during use
■Do not walk on the power cord or allow anything to rest on it.
■Do not spill anything on the system. The best way to avoid spills is to avoid eating and
drinking near your system.
■Do not expose the monitor to rain or use near water. If the monitor does get exposed to
moisture, unplug it and allow it to dry for 24 hours. Call Gateway Technical Support for advice
on whether the monitor is safe to turn back on.
■When the monitor is turned off, a small amount of electrical current still flows through the
monitor. To avoid electrical shock, always unplug all power cables and modem cables from the
wall outlets before cleaning the system.
■Unplug the system from the wall outlet and refer servicing to qualified personnel if:
■The power cord or plug is damaged.
■Liquid has been spilled into the system.
■The system does not operate properly when the operating instructions are followed.
■The system was dropped or the cabinet is damaged.
■The system performance changes.
Replacement parts and accessories
Use only replacement parts and accessories recommended by Gateway.
Warning To prevent electric shock, never remove the cover. No
user serviceable parts inside. Refer servicing to qualified
service personnel.
Important Do not use Gateway products in areas classified as
hazardous locations. Such areas include patient care
areas of medical and dental facilities, oxygen-laden
environments, or industrial facilities.
08595.book Page 24 Friday, April 12, 2002 4:16 PM

25
Regulatory compliance statements
www.gateway.com
Regulatory compliance statements
United States of America
Federal Communications Commission (FCC)
Unintentional emitter per FCC Part 15
This device has been tested and found to comply with the limits for a Class B digital device,
pursuant to Part 15 of the FCC rules. These limits are designed to provide reasonable protection
against harmful interference in a residential installation. This equipment generates, uses, and
can radiate radio frequency energy and, if not installed and used in accordance with the
instructions, may cause harmful interference to radio or television reception. However, there is
no guarantee that interference will not occur in a particular installation. If this equipment does
cause interference to radio and television reception, which can be determined by turning the
equipment off and on, the user is encouraged to try to correct the interference by one or more of
the following measures:
■Reorient or relocate the receiving antenna
■Increase the separation between the equipment and receiver
■Connect the equipment to an outlet on a different circuit from that to which the receiver is
connected
■Consult the dealer or an experienced radio/TV technician for help.
Compliance Accessories: The accessories associated with this equipment are: shielded video
cable. These accessories are required to be used in order to ensure compliance with FCC rules.
FCC declaration of conformity
Responsible party:
Gateway Companies, Inc.
610 Gateway Drive, North Sioux City, SD 57049
(605) 232-2000 Fax: (605) 232-2023
This device complies with Part 15 of the FCC Rules. Operation of this device is subject to the
following two conditions: (1) this device may not cause harmful interference, and (2) this device
must accept any interference received, including interference that may cause undesired
operation.
Caution Changes or modifications not expressly approved by
Gateway could void the FCC compliance and negate your
authority to operate the product.
08595.book Page 25 Friday, April 12, 2002 4:16 PM

26
Appendix : Safety, Regulatory, and Legal Information
www.gateway.com
Canada
Industry Canada (IC)
Unintentional emitter per ICES-003
This digital apparatus does not exceed the Class B limits for radio noise emissions from digital
apparatus as set out in the radio interference regulations of Industry Canada.
Le présent appareil numérique n’émet pas de bruits radioélectriques dépassant les limites
applicables aux appareils numériques de Classe B prescrites dans le règlement sur le brouillage
radioélectrique édicté par Industrie Canada.
EPA ENERGY STAR
As an ENERGY STAR® Partner, Gateway has determined that this product
meets the ENERGY STAR guidelines for energy efficiency when used with
a computer equipped with a Display Power Management System.
08595.book Page 26 Friday, April 12, 2002 4:16 PM

27
Notices
www.gateway.com
Notices
Copyright © 2002 Gateway, Inc.
All Rights Reserved
14303 Gateway Place
Poway, CA 92064 USA
All Rights Reserved
This publication is protected by copyright and all rights are reserved. No part of it may be reproduced or
transmitted by any means or in any form, without prior consent in writing from Gateway.
The information in this manual has been carefully checked and is believed to be accurate. However, changes are
made periodically. These changes are incorporated in newer publication editions. Gateway may improve and/or
change products described in this publication at any time. Due to continuing system improvements, Gateway is
not responsible for inaccurate information which may appear in this manual. For the latest product updates,
consult the Gateway Web site at www.gateway.com. In no event will Gateway be liable for direct, indirect,
special, exemplary, incidental, or consequential damages resulting from any defect or omission in this manual,
even if advised of the possibility of such damages.
In the interest of continued product development, Gateway reserves the right to make improvements in this
manual and the products it describes at any time, without notices or obligation.
Trademark Acknowledgments
1-800-GATEWAY, ActiveCPR, ALR, AnyKey, black-and-white spot design, CrystalScan, Destination, DestiVu,
EZ Pad, EZ Point, Field Mouse, Gateway 2000, Gateway Country, gateway.net, Gateway stylized logo, Perfect
Scholar, Solo, TelePath, Vivitron, stylized “G” design, and “Yo u ’ve got a friend in the business” slogan are
registered trademarks and black-and-white spotted box logo, GATEWAY, Gateway Astro, Gateway@Work,
Gateway Connected touch pad, Gateway Connected music player, Gateway Cyber:)Ware, Gateway
Education:)Ware, Gateway Flex Case, Gateway Gaming:)Ware, Gateway GoBack, Gateway Gold, Gateway
Learning:)Ware, Gateway Magazine, Gateway Micro Server, Gateway Money:)Ware, Gateway Music:)Ware,
Gateway Networking Solutions, Gateway Online Network (O.N.) solution, Gateway Photo:)Ware, Gateway
Professional PCs, Gateway Profile, Gateway Solo, green stylized GATEWAY, green stylized Gateway logo,
Gateway Teacher:)Ware, Gateway Video:)Ware, HelpSpot, InforManager, Just click it!, Learn@Gateway, Kids
BackPack, SERVE-TO-ORDER, Server Watchdog, SpotShop, Spotshop.com, and Your:)Ware are trademarks
of Gateway, Inc. Intel, Intel Inside logo, and Pentium are registered trademarks and MMX is a trademark of Intel
Corporation. Microsoft, MS, MS-DOS, and Windows are trademarks or registered trademarks of Microsoft
Corporation. All other product names mentioned herein are used for identification purposes only, and may be the
trademarks or registered trademarks of their respective companies.
08595.book Page 27 Friday, April 12, 2002 4:16 PM
28
Appendix : Safety, Regulatory, and Legal Information
www.gateway.com
08595.book Page 28 Friday, April 12, 2002 4:16 PM