LG Electronics USA F1200 Single-Band PCS GSM Phone User Manual F1200 1126 2
LG Electronics USA Single-Band PCS GSM Phone F1200 1126 2
UserManual.wiki
>
LG Electronics USA
>
F1200 User Manual
Users Manual
Navigation menu
Upload a User Manual
Namespaces
Wiki Guide
HTML
PDF
Info
Views
User Manual
Discussion / Help
Navigation

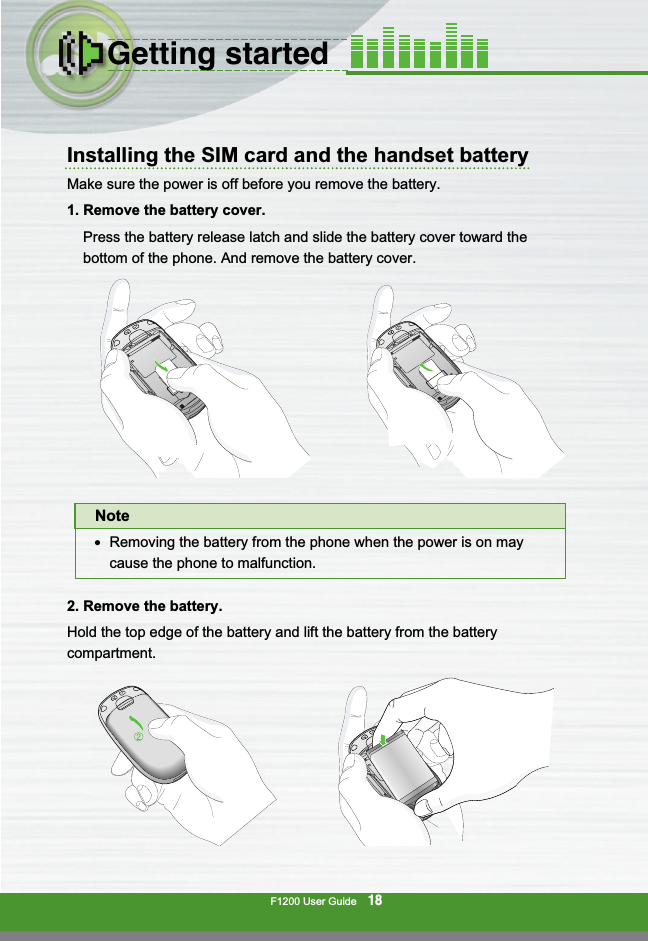
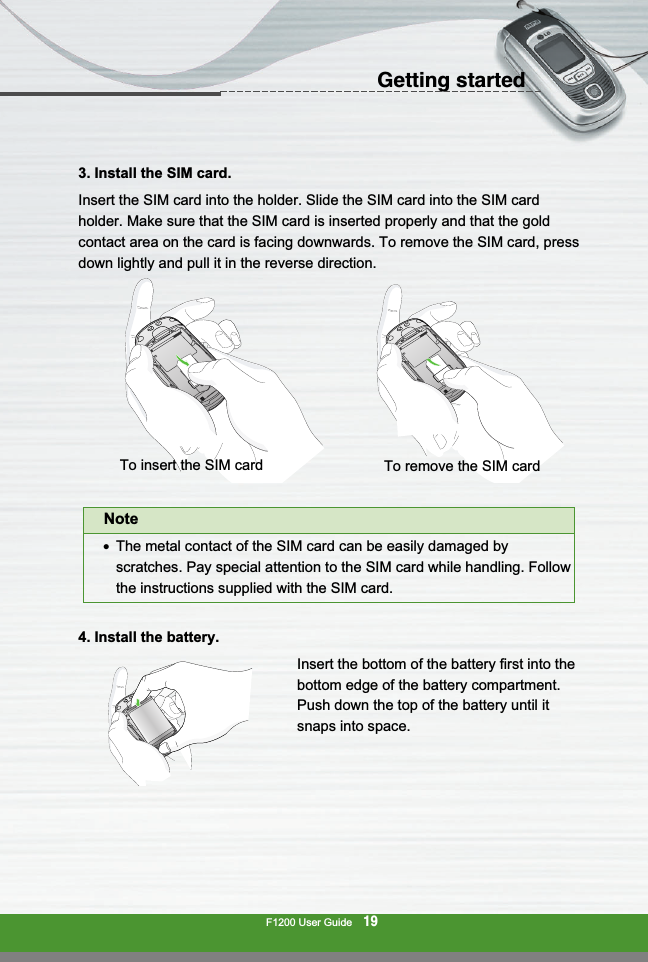
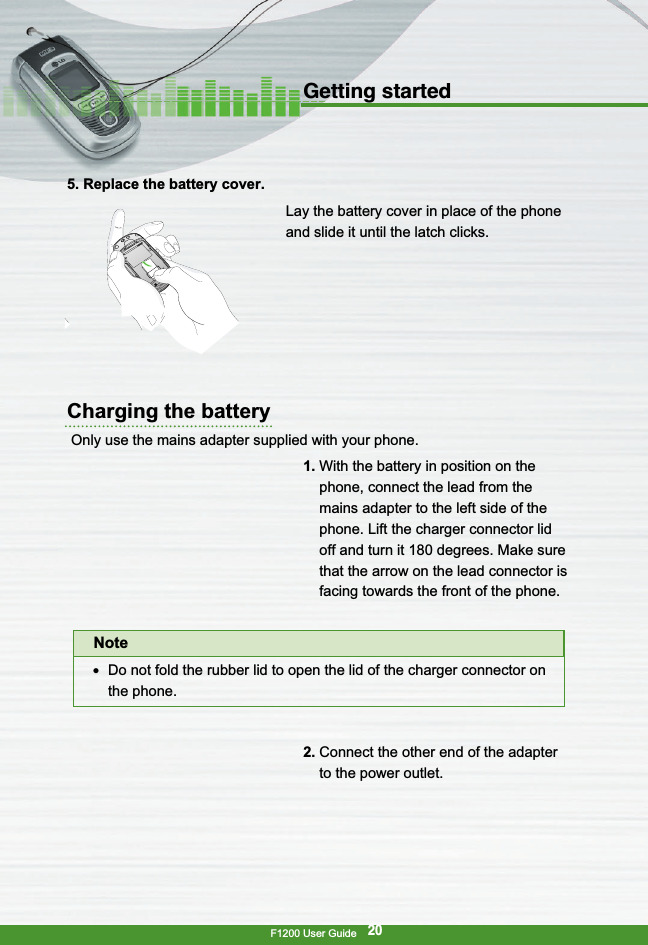
![T a b l e o f C o n t e n t sF1200 User GuideF1200 features ................................................................................... 12● Parts of the phone ........................................................................... 12● Display information .......................................................................... 17Getting started ................................................................................... 18● Installing the SIM card and the handset battery .............................. 18● Charging the battery ........................................................................ 20● Disconnecting the adapter ............................................................... 21● Turning your phone on and off ......................................................... 22● Access codes ................................................................................... 22● Barring password ............................................................................. 23General functions ................................................................................ 24● Making and answering calls ............................................................. 24● Entering text ..................................................................................... 36● Phonebook ....................................................................................... 29● In-call menu ..................................................................................... 30● Multiparty or conference calls .......................................................... 31Menu tree ........................................................................................... 33Selecting functions and options ...................................................... 35Profiles [Menu 1] ................................................................................ 36● Vibrate only [Menu 1-1] .................................................................... 41● Silent [Menu 1-2] .............................................................................. 41● General [Menu 1-3] .......................................................................... 41● Loud [Menu 1-4] ............................................................................... 41● Headset [Menu 1-5] ......................................................................... 418](https://usermanual.wiki/LG-Electronics-USA/F1200/User-Guide-578274-Page-8.png)
![F1200 User Guide● Car [Menu 1-6] ................................................................................. 41Call Manager [Menu 1] ...................................................................... 38● Call register [Menu 1-1] ................................................................... 38● Call charges [Menu 1-2] ................................................................... 40● GPRS information [Menu 1-3] .......................................................... 41● Call divert [Menu 1-4] ....................................................................... 42● Call barring service [Menu 1-5] ........................................................ 43● Call waiting [Menu 1-6] .................................................................... 44● Fixed dial number [Menu 1-7] .......................................................... 44● Settings [Menu 1-8] .......................................................................... 44Organiser [Menu 4] ............................................................................ 47● Phonebook [Menu 2-1] .................................................................... 47● Scheduler [Menu 2-2] ...................................................................... 50● Alarm clock [Menu 2-3] .................................................................... 52● To do..................................................................................................52● Memo [Menu 2-5] ............................................................................. 53Tools [Menu 3] ................................................................................... 54● Favorite [Menu 3-1] .......................................................................... 54● Calculator [Menu 3-2] ...................................................................... 54● Unit converter [Menu 3-3] ................................................................ 55● Stop watch .........................................................................................56● World time [Menu 3-5] ..................................................................... 56● Voice recorder [Menu 3-6] ............................................................... 56● Activate IrDA [Menu 3-7] .................................................................. 579](https://usermanual.wiki/LG-Electronics-USA/F1200/User-Guide-578274-Page-9.png)
![T a b l e o f C o n t e n t sF1200 User GuideMultimedia [Menu 4] .......................................................................... 59● Music [Menu 4-1] ............................................................................. 59● Game [Menu 4-2] ............................................................................. 61● Java [Menu 4-3] ............................................................................... 61Messages [Menu 5] ............................................................................ 63● Text messages [Menu 5-1] .............................................................. 63● Multimedia messages (MMS) [Menu 5-2] ........................................ 67● Voice messages [Menu 5-3] ............................................................ 71● Info service [Menu 5-4] ..................................................................... 72● Templates [Menu 5-5] ...................................................................... 73● Name card [Menu 5-6] ..................................................................... 74● Memory status [Menu 5-7] ............................................................... 75Camera [Menu 6] ................................................................................ 76● Take pictures [Menu 6-1] ................................................................. 76● Gallery [Menu 6-2] ........................................................................... 77● Memory status [Menu 6-3] ............................................................... 78Service [Menu 8] ................................................................................ 81● Internet [Menu 8-1] .......................................................................... 81● SIM service [Menu 8-2] .................................................................... 85Settings [Menu 9] ............................................................................... 86● Sound [Menu 9-1] ............................................................................ 86● Display [Menu 9-2] ........................................................................... 87● Date&Time [Menu 9-3] ..................................................................... 8810](https://usermanual.wiki/LG-Electronics-USA/F1200/User-Guide-578274-Page-10.png)
![● Languages [Menu 9-4] ..................................................................... 89● Security [Menu 9-5] .......................................................................... 89● Network [Menu 9-6] ......................................................................... 90● Reset Settings [Menu 9-7] ............................................................... 91Q&A ..................................................................................................... 92Accessories ....................................................................................... 95Technical data .................................................................................... 96F1200 User Guide11](https://usermanual.wiki/LG-Electronics-USA/F1200/User-Guide-578274-Page-11.png)
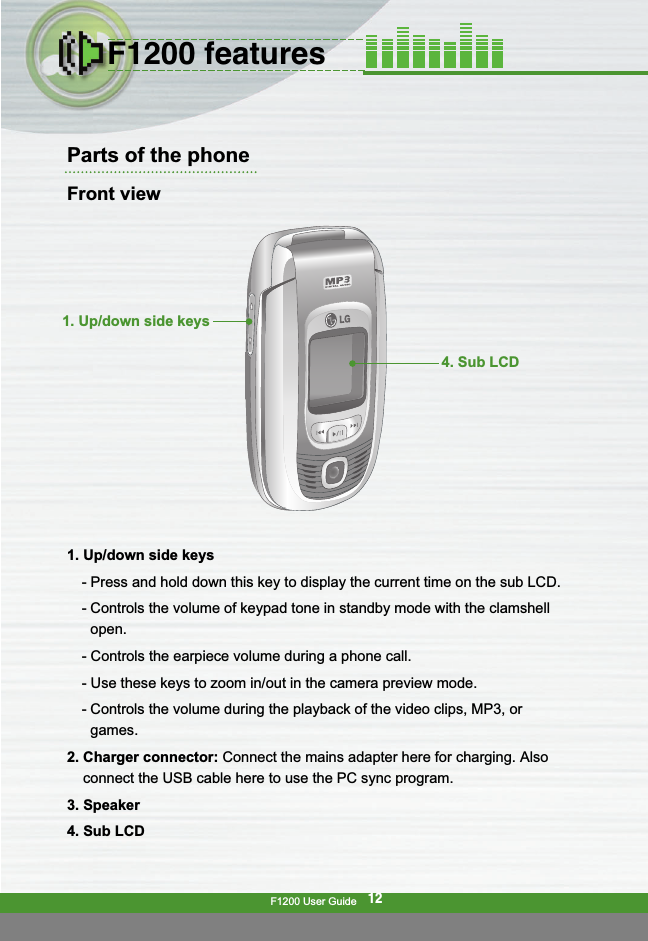
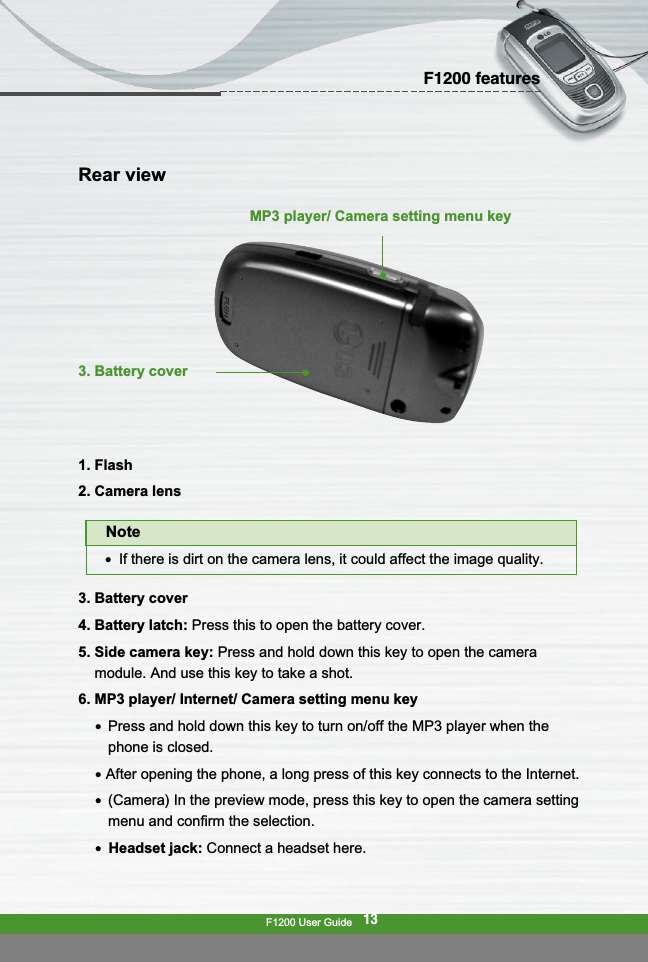
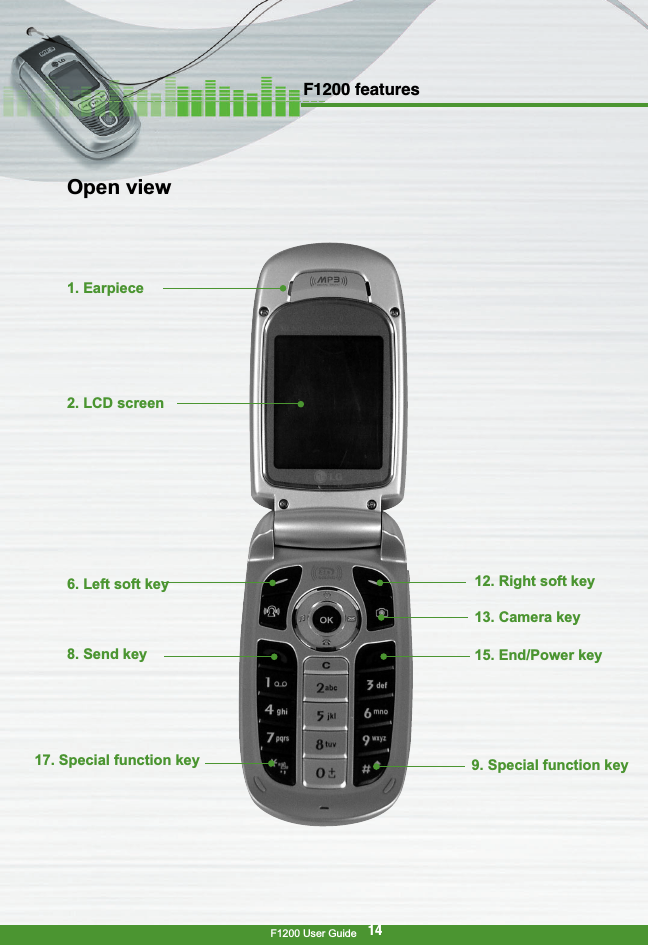
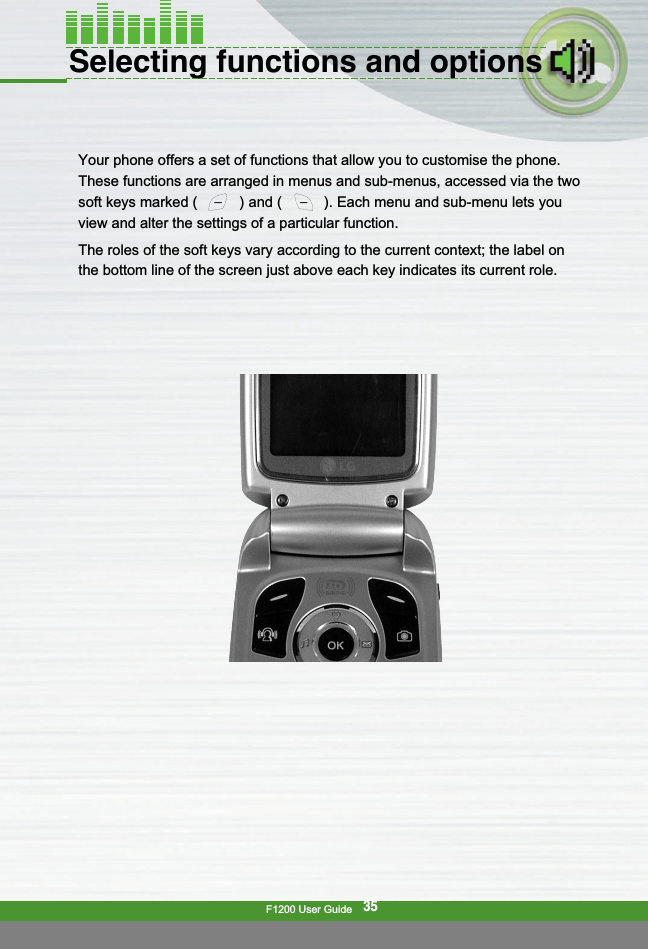
![F1200 User Guide15F1200 features1. Earpiece2. LCD screen: Displays phone status icons, menu items, Web information,pictures and more in full colour.3. Camera lens4. Confirm/Internet key: Selects menu options and confirms actions.* In standby mode, holding this key down connects to the Internet.5. Microphone: Can be muted during a call for privacy.(See page 35.)6. 12. Left soft key / Right soft key: Each of these keys performs thefunction indicated by the text on the screen immediately above it.7. Scheduler key: A shortcut key to the Scheduler menu.8. Send key: Dials a phone number and answers incoming calls. You canalso quickly access the latest incoming, outgoing and missed calls bypressing the key in standby mode.9. Special function key ( )●In standby mode, press and hold down this key to make a call by voicedialling.●Self-timer: In camera shot mode, press this key to activate/deactivate theself-timer. You can set the desired delay time using Timer mode menu [Menu 6-6-4]. (See page 85.)10. Flash: In preview mode, you can turn the flash on/off by pressing ( ). And you can set the desired flash mode using the Flash modemenu [Menu 6-6-5]. (See page 85.)11. Navigation keys: Use to scroll through menus and move the cursor. Youcan also use these keys for quick access to the following functions.●Up navigation key: By pressing this key in standby mode, you can searchthe phonebook by name.● Down navigation key: A shortcut key to the Favorite menu.● Left navigation key: A shortcut key to the Profiles menu.#*.,](https://usermanual.wiki/LG-Electronics-USA/F1200/User-Guide-578274-Page-15.png)
![F1200 User Guide22Getting startedTurning your phone on and offTurning your phone ON1. Install a battery to the handset and connect the phone to an external powersource such as the mains adapter, cigarette lighter adapter or hands-freecar kit. Or install a charged battery pack to the handset.2. Press for a few seconds until the LCD screen is turned on.3. Depending on the status of the PIN code request setting you may need toenter your PIN code.Turning your phone OFF1. Press for a few seconds until the LCD screen is turned off.Access codesYou can use the access codes described in this section to avoid unauthoriseduse of your phone. The access codes (except PUK and PUK2 codes) can bechanged by using the Change codes feature [Menu 9-4-5]. See page 108.PIN code (4 to 8 digits)The PIN (Personal Identification Number) code protects your SIM cardagainst unauthorised use. The PIN code is usually supplied with the SIM card.When the PIN code request is set to Enable, your phone will request the PINcode every time the phone is switched on. When the PIN code request is setto Disable, your phone connects to the network directly without the PIN code.PIN2 code (4 to 8 digits)The PIN2 code, supplied with some SIM cards, is required to access functionssuch as Advice of Call Charge and Fixed dial number. These functions are only available if supported by your SIM card. Check withyour network for further information.](https://usermanual.wiki/LG-Electronics-USA/F1200/User-Guide-578274-Page-22.png)
![F1200 User Guide24General functionsMaking and answering callsMaking a call1. Make sure your phone is switched on.2. Enter a phone number, including the area code. To edit a number on theLCD screen, press the right/left navigation keys to move the cursor to thedesired position or simply press the clear key ( ) to erase one digit ata time. ▶Press and hold the clear key ( )to erase the entire number.3. Press the send key ( ) to call the number.4. To end the call, press the end key ) or the right soft key. You canalso end the call by closing the folder.Making a call using the send key1. In standby mode, press the send key ( ), and the latest incoming,outgoing and missed phone numbers will be displayed.2. Select the desired number by using the up/down navigation key.3. Press .Making an international call1. Press and hold the key for the international prefix. The ‘+’characterautomatically selects the international access code.2. Enter the country code, area code, and the phone number.3. Press .Ending a callWhen you have finished your call, press the end key.0+]C C](https://usermanual.wiki/LG-Electronics-USA/F1200/User-Guide-578274-Page-24.png)
![F1200 User Guide25General functionsMaking a call from the phonebook You can save the names and phone numbers dialled regularly in the SIM cardand/or phone memory, which is Phonebook. You can dial a number by simplylooking up the desired name in the Phonebook. For further details on thePhonebook feature, please refer to page 56-60.Adjusting the volumeIf you want to adjust the earpiece volume during a call, use the side keys ( ).Press the up side key to increase and down side key to decrease the volume.Answering a callWhen you receive a call, the phone rings. If the caller can be identified, thecaller’s phone number (or name and image if saved in the phonebook) isdisplayed. This phone supports the Photo Caller ID feature.1. To answer an incoming call, open the phone. (When Flip open has beenset as the answer mode. See page 102 [Menu 9-2-2].)▶To reject an incoming call, press and hold one of the side keys on theleft side of the phone without opening the phone.▶You can answer a call while using the Phonebook or other menufeatures.2. To end the call, close the folder or press the key.Note● In standby mode, pressing the side keys adjusts the key tone volume.Note● If Any key has been set as the answer mode (see page 100), any keypress will answer a call except for the or the right soft key.](https://usermanual.wiki/LG-Electronics-USA/F1200/User-Guide-578274-Page-25.png)

![F1200 User Guide27General functionsChanging the text input mode1. When you are in a field that allowscharacters to be entered, you willnotice the text input mode indicator inthe lower right corner of the LCDscreen. 2. Change the text input mode bypressing . You can check thecurrent text input mode in the lowerright corner of the LCD screen.▶Using the T9 modeThe T9 predictive text input mode lets you enter words easily with a minimumnumber of key presses. As you press each key, the phone begins to displaythe characters that it thinks you are typing based on the built-in dictionary.You can also add new words in the dictionary. As new words are added, theword changes to reflect the most likely candidate from the dictionary. 1. When you are in the T9 predictive text input mode, start entering a word bypressing keys to Press one key per letter. - The word changes as letters are typed. Ignore what°Øs on the screen untilthe word is typed completely.- If the word is still incorrect after typing completely, press the downnavigation key once or more to cycle through the other word options.- If the desired word is missing from the word choice list, add it using theABC mode.wxyz92abc#Example● Press to type Good. ● Press [Down navigation key] to type Home.3defmno6mno6ghi43defmno6mno6ghi4fT9En1918Options AttachWritetext input mode](https://usermanual.wiki/LG-Electronics-USA/F1200/User-Guide-578274-Page-27.png)
![F1200 User Guide28General functions- You can select the language of the T9 mode. Press the left soft key[Options], then select T9 languages. Select the desired language of T9mode. You can also turn off the T9 mode by selecting T9 off. The defaultsetting on the phone is T9 enabled mode.2. Enter the whole word before editing or deleting any keystrokes.3. Complete each word with a space by pressing the key. ▶To delete letters, press . Press and hold down to eraseentire words.▶Using the ABC modeUse the to keys to enter your text.1. Press the key labeled with the required letter:- Once for the first letter- Twice for the second letter- And so on2. To insert a space, press the key once. To delete letters, press thekey. Press and hold down the key to clear the whole display.C C wxyz92abcC C 0+]Note● To exit from the text input mode without saving your input, press. The phone goes back to standby mode.Note● Refer to the table below for more information on the charactersavailable using the alphanumeric keys.0+]](https://usermanual.wiki/LG-Electronics-USA/F1200/User-Guide-578274-Page-28.png)
![F1200 User Guide29General functions▶Using the 123 (Number) modeThe 123 mode enables you to enter numbers in a text message (a telephonenumber, for example).Press the keys corresponding to the required digits before manually switchingback to the appropriate text entry mode.PhonebookYou can store phone numbers and their corresponding names in the memoryof your SIM card. In addition, you can store up to 255 numbers and names inthe phone memory.The SIM card and phone are both used in the same way in the Phonebookmenu. (Refer to page 54-58 for details.)KeyCharacters in the order displayUpper case Lower case. , - ? ! ' @ : 1 . , - ? ! ' @ : 1A B C 2 a b c 2D E F 3 d e f 3G H I 4 g h i 4J K L j k l 5M N O m n o 6P Q R S p q r s 7T U V t u v 8W X Y Z w x y z 9Space key, 0 (Long press) Space key, 0 (Long press)0+]wxyz9tuv8pqrs7mno6jkl5ghi43def2abc1](https://usermanual.wiki/LG-Electronics-USA/F1200/User-Guide-578274-Page-29.png)
![F1200 User Guide30General functionsIn-call menuYour phone provides a number of control functions that you can use during acall. To access these functions during a call, press the left soft key [Options].During a callThe menu displayed on the handset screen during a call is different to thedefault main menu displayed when in standby mode, and the options aredescribed below.Making a second callYou can get a number you wish to dial from the phonebook to make a secondcall. Press the right soft key then select Search. To save the dialled numberinto the phonebook during a call, press the right soft key then select Addnew.Switching between two callsTo switch between two calls, press the left soft key then select Swap.Answering an incoming callTo answer an incoming call when the handset is ringing, simply press thekey. The handset is also able to warn you of an incoming call while youare already on a call. A tone sounds in the earpiece, and the display will showthat a second call is waiting. This feature, known as Call waiting, is onlyavailable if your network supports it. For details of how to activate anddeactivate it see Call waiting [Menu 9-2-4] on page 102.If Call waiting is activated, you can put the first call on hold and answer thesecond, by pressing or by selecting left soft key, then Hold & Answer.You can end the current call and answer the waiting call by selecting left softkey and then End & Answer.](https://usermanual.wiki/LG-Electronics-USA/F1200/User-Guide-578274-Page-30.png)
![F1200 User Guide31General functionsRejecting an incoming callYou can reject an incoming call without answering by simply pressing thekey. During a call, you can reject an incoming call by pressing the leftsoft key [Menu] key and selecting the Conference / Reject or by pressing the.Muting the microphoneYou can mute the microphone during a call by pressing the [Menu] key thenselecting Mute on. The handset can be unmuted by selecting Mute off. Whenthe handset is muted, the caller cannot hear you, but you can still hear them.Switching DTMF tones on during a callTo turn DTMF tones on during a call, press the left soft key, and then selectDTMF on. DTMF tones can be turned off the same way. DTMF tones allowyour phone to make use of an automated switchboard.Multiparty or conference callsThe multiparty or conference service provides you with the ability to have asimultaneous conversation with more than one caller, if your network operatorsupports this feature. A multiparty call can only be set up when you have oneactive call and one call on hold, both calls having been answered. Once amultiparty call is set up, calls can be added, disconnected or separated (thatis, removed from the multiparty call but still connected to you) by the personwho set up the multiparty call. These options are all available from the In-Callmenu. The maximum callers in a multiparty call are five. Once started, youare in control of the multiparty call, and only you can add callers to themultiparty call.](https://usermanual.wiki/LG-Electronics-USA/F1200/User-Guide-578274-Page-31.png)
![F1200 User Guide38Call manager [Menu 1]Call register [Menu 1-1]You can check the record of missed, received, and dialled calls only if thenetwork supports Calling Line Identification (CLI) within the service area.The number and name (if available) are displayed together with the date andtime at which the call was made. You can also view call times and costs.Press the Menu key and select Call manager using navigation keys.You can set diverse functions related to call feature.Missed calls[Menu 1-1-1]This option lets you view the last 10 unanswered calls. After selecting aphone number, you can make a call to the number by pressing the send key( ). And using the left soft key [Options], the following options areavailable.● Write text message: You can send a text message to this number.● Write multimedia message: You can send a multimedia message to thisnumber.● Edit: Edits the phonebook entry.● Save (Shown if the name is not saved in the phonebook): Saves thenumber creating a new contact in the phonebook.● Add to name (Shown if the name is not saved in the phonebook): Youcan add the number to an existing phonebook entry.● Delete: Deletes the call log from the list.● View details: Displays the call information.● Delete all: Select this to clear up the missed call logs.Received calls [Menu 1-1-2]This option lets you view the last 10 incoming calls. After selecting a phonenumber, you can make a call to the number by pressing the send key .And using the left soft key [Options], the following options are available.(Dependent on the network service)](https://usermanual.wiki/LG-Electronics-USA/F1200/User-Guide-578274-Page-36.png)
![F1200 User Guide39Call manager [Menu 1]● Write text message: You can send a text message to this number.● Write multimedia message: You can send a multimedia message to thisnumber.● Edit: Edits the phonebook entry.● Save (Shown if the name is not saved in the phonebook): Saves thenumber creating a new contact in the phonebook.● to name (Shown if the name is not saved in the phonebook): You canadd the number to an existing phonebook entry.● Delete: Deletes the call log from the list.● View details: Displays the call information.● Delete all: Select this to clear up the received call logs.Dialled calls [Menu 1-1-3]This option lets you view the last 10 outgoing calls (called or attempted). Afterselecting a phone number, you can make a call to the number by pressing thesend key ( ). And using the left soft key [Options], the following optionsare available.● Write text message: You can send a text message to this number.● Write multimedia message: You can send a multimedia message to thisnumber.● Edit: Edits the phonebook entry.● Save (Shown if the name is not saved in the phonebook): Saves thenumber creating a new contact in the phonebook.● Add to name (Shown if the name is not saved in the phonebook): Youcan add the number to an existing phonebook entry.● Delete: Deletes the call log from the list.● View details: Displays the call information.Save (Shown if the name is notsaved in the phonebook):Saves the number creating a new contact in thephonebook.(Dependent on the network service)](https://usermanual.wiki/LG-Electronics-USA/F1200/User-Guide-578274-Page-37.png)
![F1200 User Guide40Call manager [Menu 1]● Delete all: Select this to clear up the dialled call logs.● Add to name (Shown if the name is not saved in the phonebook): Youcan add the number to an existing phonebook entry.● Delete: Deletes the call from the list.● View details: Displays the call information.● Delete all: Select this to clear up the dialled call logsCall charges [Menu 1-2]Call durations [Menu 1-2-1]Use this to view the duration of your incoming and outgoing calls. You cancheck each call duration at the bottom of screen while scrolling using theup/down navigation keys. Pressing the OK key or the left soft key [Reset]resets the call timer of selected call. To prevent accidental reset, you arerequested to enter the security code.● Last call: Length of the last call● Received calls: Length of the incoming calls● Dialled Calls: Length of the outgoing calls● All calls: Total length of all calls made orreceived calls since the timer was last reset.Call costs [Menu 1-2-2]This network service allows you to check the last call cost and the total callcost. The call cost is displayed on the bottom of the LCD screen. To reset thecall cost, press the left soft key [Reset] or the OK key. You are requested toenter the PIN2 codeNotice● The actual time invoiced for calls by your service provider may vary,depending on network features, rounding-off for billing, etc.1234Reset BackCall durationsLast call00: 00: 00Received callsDialled callsAll calls](https://usermanual.wiki/LG-Electronics-USA/F1200/User-Guide-578274-Page-38.png)
![F1200 User Guide41Call manager [Menu 1]Cost settings [Menu 1-2-3]● Call cost’s limit: This network service allows you to limit the cost of yourcalls to the number of charging units or units of currency. You can make orreceive a call up to the specified cost limit. You can change the call cost’slimit after entering the PIN2 code.● Set tariff: You can set the currency type and the unit price. Contact yourservice providers to obtain charging unit prices. To select the Currency or1 Unit in this menu, you need the PIN2 code.● Auto display: This network service allows you to see automatically thecost of your last call. If you select On in Auto display menu, you can seethe cost of the last call when the call is released.GPRS information [Menu 1-3]You can check the amount of data transferred over the network through theGPRS information option. In addition, you can also view how much time youare online. (GPRS stands for General Packet Radio Service.)WAP information [Menu 1-3-1]You can check the data volume and the time spent using WAP. On the selected menu, pressing the left soft key [Reset] or the OK key clearsthe counter.Note● The actual cost invoiced for calls by your service provider may vary,depending on network features, rounding-off for billing, taxes, etc.Note● When all units have been used, no calls can be made exceptemergency calls. Depending on the SIM card, you need the PIN2code to set a call cost limit.](https://usermanual.wiki/LG-Electronics-USA/F1200/User-Guide-578274-Page-39.png)
![F1200 User Guide42Call manager [Menu 1]External device [Menu 1-3-2]You can check the data volume and the time spent using GPRS with anexternal device such as a serial port.Total data [Menu 1-3-3]You can check the total amount of data through WAP and the external device. Call divert [Menu 1-4]When this network service is activated, you can direct your incoming calls toanother number, for example, to your voice mailbox number. For details,contact your network operator.Select one of the divert options, for example, select If busy to divert voicecalls when your number is busy or when you reject incoming calls.The following options are available.All voice calls: Diverts all voice calls unconditionally.If busy: Diverts voice calls when the phone is in use.If no reply: Diverts voice calls which you do not answer.If out of reach: Diverts voice calls when the phone is switched off or out ofcoverage.All data calls: Diverts to a number with a PC connection unconditionally.All fax calls: Diverts to a number with a fax connection unconditionally.Each option has the following menu:● Activate: Activates the corresponding service.- To voice mail: Forwards to message centre. This function does notapply to All data calls and All fax calls menus.- To other number: Input the number for call diverting.-Favorite number: After entering up to 5 frequently used phonenumbers, you can divert calls to them.](https://usermanual.wiki/LG-Electronics-USA/F1200/User-Guide-578274-Page-40.png)
![F1200 User Guide43Call manager [Menu 1]● Cancel: Cancels the selected call divert.● View status: You can check the status of the service.Cancel all: Cancels all call divert settings.Call barring service [Menu 1-5] (Network dependent)Call barring lets you restrict the making and receiving of calls with your phone.For this function, you need the barring password, which you can obtain fromyour service provider.The following options are available:● All outgoing: No call can be made.● Outgoing international: International calls cannot be made.● Outgoing international except home country: When abroad, calls can bemade only to numbers within the current country and to your home country,the country where your home network provider is located.● All incoming: No call can be received.● Incoming when abroad: Calls cannot be received when you are using yourphone outside your home service area.● Cancel all barrings: All call barring settings are deactivated; calls can bemade and received normally.● Change password: Use this to set and change the call barring passwordobtained from your service provider using this option. You must enter the current password before you can specify a new one.Once you have entered a new password, you are asked to confirm it byentering it again.](https://usermanual.wiki/LG-Electronics-USA/F1200/User-Guide-578274-Page-41.png)
![F1200 User Guide44Call manager [Menu 1]Call waiting [Menu 1-6] (Network Service)The network will notify you of a new incoming call while you have a call inprogress. Select Activate to request the network to activate call waiting,Cancel to request the network to deactivate call waiting, or View status, tocheck if the function is active or not.Fixed dial number (FDN) [Menu 1-7] (SIM dependent)Use this to restrict your outgoing calls to selected phone numbers, if thisfunction is supported by your SIM card. The PIN2 code is required.When FDN is activated, if you try to dial a number not included in the FDN list,the message “Check FDN” will appear.The following options are available:● Enable: Use this to only call phone numbers saved in the phonebook. Youmust enter your PIN2 code.● Disable: Allows you to call any number.● Number list: Use this to view the numbers saved as fixed dial numbers.Settings[menu1-8]Answer mode [Menu1-8-1]Select the desired mode to answer a call.● Flip open: When the phone rings, you can answer a call simply by openingthe folder.Note● Not all SIM cards have a PIN2. If your SIM card does not, this menuoption is not displayed.](https://usermanual.wiki/LG-Electronics-USA/F1200/User-Guide-578274-Page-42.png)
![Call manager [Menu 1]F1200 User Guide45● Any key: When the phone rings, you can answer a call by pressing any keyexcept the key and the right soft key ( ).● Only send key: You can answer a call only by pressing the send key. Send my number [Menu 1-8-2]This network service lets you decide whether your phone number is displayed(On) or hidden (Off) from the person you are calling.Select Set by network to reset the phone to the setting that you have agreedupon with your service provider.Minute minder [Menu 1-8-3]When set to On, the phone will beep every minute during an outgoing call tokeep you informed of the length of the call.Auto redial [Menu 1-8-4]Select On, and your phone will make a maximum of five attempts to connectthe call after an unsuccessful call attempt.Select line [Menu 1-8-5]This setting is shown only if the SIM card supports two subscriber numbers,that is, two phone lines. Select which phone line (Line 1 or Line 2) you want touse for making calls and sending short messages. Calls on both lines can beanswered irrespective of the selected line.Note● You will not be able to make calls if you select Line 2 and have notsubscribed to this network service.](https://usermanual.wiki/LG-Electronics-USA/F1200/User-Guide-578274-Page-43.png)
![F1200 User Guide46Call manager [Menu 1]Closed user group [Menu 1-8-6]This is a network service that specifies the group of people who you can calland who can call you. For more information, contact your network operator orservice provider. If a group index is specified, it is used for all outgoing calls. Ifno group index is specified, the network will use the preferential index.(A specific index is stored in the network.)● Preset: Select this to activate the previous CUG index.● On: You can edit the CUG indexes and activate it.● Off: Deactivates this function.Auto answer [Menu 1-8-7]You can activate the automatic answer feature when the phone is connectedto a compatible headset. Select the time before answering automatically. Ifyou select "Off", you have to press and hold the key on the headset to answera call.](https://usermanual.wiki/LG-Electronics-USA/F1200/User-Guide-578274-Page-44.png)
![F1200 User Guide47Organiser [Menu 2]Press the Menu key ( ). Select Organiser using navigation keys.Phonebook [Menu2-1]You can save phone numbers and their corresponding names in the memoryof your SIM card. In addition, you can save up to 255 numbers and names inthe phone memory.Press the left soft key [Menu] in standby mode, then select Organiser →→Phonebook. Or, press the right soft key [Names] in standbymode.Search [Menu 2-1-1]1. In standby mode, press right soft key [Names]. Select Search.2. Enter the start of the name that you wish to find.3. After finding the desired name, you can make a call to the number bypressing the send key ( ). Or press the left key [Options] to use thefollowing options.● Write text message: Use this to write a text message to the name.● Write multimedia message: Use this to write a multimedia message tothe name.● Photo view: Shows all the images stored in the phonebook. You cansearch the phonebook by the photo.● Voice: Record the name of the selected phonebook entry forvoice-activated dialling.● Edit: Edits the name, number the listing group and photo.● Copy: Use this to copy the phonebook entry from SIM to the phonememory or vice versa. Select whether to keep the original phone numberor not.● Delete: Deletes the phonebook entry.● View details: To view details of the selected name.](https://usermanual.wiki/LG-Electronics-USA/F1200/User-Guide-578274-Page-45.png)
![F1200 User Guide48Organiser [Menu 2]Add new [Menu 2-1-2]You can add a phonebook entry using this function.There are 2 memories: Phone memory and SIM memory. To select thememory, go to Set memory [Menu 2-1-2]. The phone memory capacity is 255entries. You can enter up to 30 characters in each name in the phonememory. The SIM card memory capacity depends on the SIM card.1. Open the Phonebook first by pressing the right soft key [Names] instandby mode.2. Scroll to highlight Add new, and press [OK]3. You can add new phonebook entries to SIM memory or the phone memory.To select the memory, go to Set memory [Menu2-1-2]. (Refer to page 58.)● Adding new entries into SIM memory You can enter a name and anumber, select the caller group, and attach a photo image. (Depends onthe SIM)● Adding new entries into the phone memory You can enter a name,numbers, E-mail address and memo, select the caller group, and attach aphoto image.Speed dials [Menu 2-1-3]You can assign any of the keys to with a name list entry. Youcan call directly by pressing this key for 2-3 seconds.wxyz92abcTip● Pause feature: When you call automated systems (such as voice mailor credit billing numbers), you often have to enter a series of numbers.Instead of entering these numbers by hand, you can store the numbersin the phonebook using the Pause feature. Between numbers to insert apause, press and hold down .#Note● This phone supports the Photo caller ID feature.](https://usermanual.wiki/LG-Electronics-USA/F1200/User-Guide-578274-Page-46.png)
![F1200 User Guide49Organiser [Menu 2]1. Open the Phonebook first by pressing the right soft key [Names] instandby mode.2. Scroll to Speed dials, then press [OK].3. To add a number to Speed dials, press the left soft key [Add]. Search thename through the phonebook.4. You can change or delete a speed dial number, make a call or send amessage by pressing the left soft key [Options].Caller groups [Menu 2-1-4]You can classify the phonebook entries with 6 groups. Use this feature toassign a ring tone and/or a graphic icon to each group. This enables you toidentify callers from which group.▶When you enter a contact in the phonebook or edit contacts, select thedesired group.In this menu, you can customise and manage each group. Press the left softkey [Options]. The following submenus will be displayed.● Member list: Displays the member list in the group.● Group ring tone: Select the ring tone to be used when you receive a callfrom a person in the group.● Group icon: Select the graphic icon to be displayed when you receive a callfrom a person in the group.● Add member: Select this to add a member to the group.● Delete member: Select this to delete a member in the group. ● Rename: To assign a new name to the group.Copy all [Menu 2-1-5]You can copy/move entries from the SIM card memory to the phone memoryand vice versa.● SIM to Phone: Use this to copy the entry from the SIM Card to Phonememory.](https://usermanual.wiki/LG-Electronics-USA/F1200/User-Guide-578274-Page-47.png)
![F1200 User Guide50Organiser [Menu 2]● Phone to SIM: Use this to copy the entry from the Phone memory to theSIM Card.The following options are available.- Keep original: When copying, the original dial numbers are kept.- Delete original: When copying, the original dial numbers will be erased.Delete all [Menu 2-1-6]You can delete all entries in the SIM or Phone. Except for Voice list, thisfunction requires the security code. Press to return to standby mode.Set memory [Menu 2-1-7]You can select the memory for the Phonebook feature between the SIM andthe phone. If you select Variable, when adding entry, the phone will askwhere to save the number.● Check memory: You can check the current memory status of the SIM cardand phone memory.Scheduler [Menu 2-2]When you enter this menu, a calendar appears. A square cursor is located onthe current date. You can move the cursor to another date using navigationkeys. On the calendar, you can use the following keys.To enter a schedule note on the selected day,1. Press the right soft key [Add].Each press of skips back a year.skips forward a year.skips back a month.skips forward a month.To go back to the today’s date, press ( )jkl5wxyz9pqrs73def1](https://usermanual.wiki/LG-Electronics-USA/F1200/User-Guide-578274-Page-48.png)
![F1200 User Guide51Organiser [Menu 2]2. Enter a note. And set the alarm time.3. Select the desired one from the repetition options.4. Select when to alarm.5. Press the left soft key [Save] or the OK key.After a schedule is entered on a date, the date is shown in a different colourand ( ) appears on the right bottom of the screen.This function reminds you of your schedule. The phone will sound an alarmtone if you set the phone to do so.The following options are available.● View: Shows the shedule.● Edit: Use this to edit the schedule.● Delete: Use this to delete the schedule● Add new: You can edit a maximum of 40 characters and take up to 30notes.● Calendar: Goes back to the calendar.● Go to date: Use this to jump to a specific date. Enter the date using thenumeric keys and the left/right navigation keys● Scheduler tone: The phone can sound an alarm tone when the scheduleddate and time for an event has been reached. Select the desired alarmtone.● View all schedules: Shows the notes that are set for all days. Use theup/down navigation keys to browse through the note lists.● Delete past: You can delete expired schedule notes that have alreadybeen notified.● Delete all: Use this to delete all schedules. You are asked to confirm thisaction.Note● The Scheduler alarm will work even if the phone is switched off.](https://usermanual.wiki/LG-Electronics-USA/F1200/User-Guide-578274-Page-49.png)
![F1200 User Guide52Organiser [Menu 2]Alarm clock [Menu 2-3]You can set the alarm to go off at a specified time.1. Alarm on/off: Select On using the left/right navigation key. Todeactivate the alarm function, select Off.2. Alarm time: Enter the alarm time using the numeric keys.3. Repetition: Select the desired one from Once,Daily,Weekly andMonthly using the left/right navigation key.4. Alarm melody: Select the desired alarm melody using the left/rightnavigation key.5. Press the left soft key [Set] or the OK key. When the alarm function isactivated, ( ) is shown in standby mode. When the alarm time isreached, it sounds the alarm melody.▶To turn off the alarm, press the right soft key [Quit].To-do [Menu 2-4]Use this feature to track tasks or errands that need to doing.1.Select the left soft key [Add] to add a new to-do item.2.After keying in the subject, press the down navigation key.3.Enter the date with the numeric keys and press the left soft key [Save].With the to-do list, the following options are available by pressing the left softkey [Options].● View: Displays the detail of the note.● Done: Select this when the task has been done.● Edit: To edit the note.● Delete: To delete the note.● Add new: To add a new to-do item.● View calendar: To view the canlendar.● Delete-done: Deletes only to-do items which have been done.](https://usermanual.wiki/LG-Electronics-USA/F1200/User-Guide-578274-Page-50.png)
![F1200 User Guide53Organiser [Menu 2]● Delete all: Clears up the to-do list.Memo [Menu 2-5]You can write, edit, and delete a memo.1. Scroll to highlight Memo.2. Press the left soft key [Add].3. Keying in the memo, then press the left soft key [Options].The following options are available.● Save: Saves the memo.● T9 languages: Select the T9 language to use in the memo.● Exit editor: Allows you to exit from the memo editor.After a memo is already input in your phone, the following options areavailable.● View: Shows the memo.● Edit: To edit the memo.● Delete: Select this to delete the selected memo.● Add new: Use this to add a new memo. The phone can store up to 20memos and 40 characters.● Delete all: Deletes all memos.](https://usermanual.wiki/LG-Electronics-USA/F1200/User-Guide-578274-Page-51.png)
![F1200 User Guide54Tools [Menu 3]Press the Menu key ( ) and select Tools using navigation keys.Favorite [Menu 3-1]In this menu, you can construct your own menu with the frequently usedmenus for easy access.In standby mode, you can access the Favorite menu by pressing the downnavigation key ( ).1. After selecting the desired location from the menu number 1 to 9, press theleft soft key [Add].2. Select the menu you wish to add by pressing the left soft key [Select]. Themenu is added in the Favorite menu, with the pop-up message, “Activated”.After making up the Favorite menu, in each favorite menu, the followingoptions are available by pressing the left soft key [Options].● Select: Selects the menu.● Change: You can change the favorite menu with the another menu.● Delete: Deletes the selected favorite menu.● View details: Displays the route to the favorite menu.● Delete all: Deletes all the favorite menus.Calculator [Menu 3-2]Using this feature, you can use the phone as a calculator. The calculator provides the basic arithmetic functions: addition, subtraction,multiplication and division.Note● You can add up to 9 menus.](https://usermanual.wiki/LG-Electronics-USA/F1200/User-Guide-578274-Page-52.png)
![F1200 User Guide55Tools [Menu 3]Using the calculator1. Enter the first number using the numeric keys.2. Press the corresponding navigation key to select a mathematical function.3. To calculate the result, press the left soft key [Result] or OK key.4. After calculation, press the left soft key [Clear] to return to the initial state.Unit converter [Menu 3-3]This converts any measurement from one unit to another.There are 4 types that can be converted into units: Length, Surface, Weightand Volume.1. Select one of four unit types by pressing the left soft key [Unit].2. Move to the Current unit section by pressing the down navigation key.3. Select the unit you want to convert using the left/right navigation keys.4. Move to the Convert unit section by pressing the down navigation key.5. Select the unit you want to convert to, using the left/right navigation keys.6. Input numbers using the numeric keys. Conversion is calculatedautomatically.Note● To erase any mistake or clear the display, use the key.● To include a decimal point, press the key.● To include a minus sign, press the key.#*.,C Note● You can input a decimal number by pressing the key.*.,](https://usermanual.wiki/LG-Electronics-USA/F1200/User-Guide-578274-Page-53.png)
![F1200 User Guide56Tools [Menu 3]Stop watch [Menu 3-4]This menu allows you to record the elapsed time of an event. The duration ofan individual lap time (up to 4 times) and the total time can be displayed.1. To start timing, press the left soft key [Start]. The running time is displayedas HH.MM.SS.hh (hours, minutes, sends, hundredths of a second).2. During the timing, you can record an individual lap time by pressing theright soft key [Lap]. Up to 4 lap times can be recorded.3. You can stop or restart timing using the left soft key.4. To reset the stop watch, press the right soft key [Reset].World time [Menu 3-5]You can check the current time of Greenwich Mean Time (GMT) and 54 majorcities around the world, using the left/right navigation keys.The screen shows the city name, current date and time.To select the time zone in which you are located, proceed as follows:1. Select the city corresponding to your time zone by pressing the left/rightnavigation keys one or more times. The local date and time are displayed.2. If you want to change the time display in standby mode to the selectedtime, press the left soft key [Set].Voice recorder [Menu 3-6]You can record a memo. You can record up to 3 voice memos up to amaximum of 30 seconds each.You can play or delete the recorded memo or record new voice memo usingthe left soft key [Options] key.Note● The time zone setting of each city in World time menu may beaffected by network condition.](https://usermanual.wiki/LG-Electronics-USA/F1200/User-Guide-578274-Page-54.png)
![F1200 User Guide57Tools [Menu 3]1. To record a voice memo, press the left soft key [Record].2 Once recording is started, the message °ÆRecording...°Ø and therecording time is displayed.3. When you finish recording, press the left soft key [Save].Activate IrDA [Menu 3-7]This feature allows you to send or receive data/fax through the infrared port.To use an infrared connection:● Install the modem driver for receiving or sending the data/fax.● Install the network dial-up software supplied by your network provider or faxapplication program for a fax call on your PC.● Configure and activate an IrDA-compliant infrared port on your PC.● Activate the infrared feature on the phone; the symbol appears on the rightside at the bottom of the display.● Call the network service number given to you by the service provider.If there is no communication between your phone and the IrDAcompliantdevice within 30 seconds of activation of the feature, it is automaticallydeactivated. For further details, contact your network provider.Note● If all memo locations are full, you must delete an old memo beforerecording a new one.](https://usermanual.wiki/LG-Electronics-USA/F1200/User-Guide-578274-Page-55.png)
![F1200 User Guide58Tools [Menu 3]Note● PC Sync is a program for data exchange between PC and the phoneby a data cable. Therefore, if you want to use this function, you needthe accessory kit. For more information, you can use the PC SyncHelp file on the CD.● With this IrDA feature, you can transfer anything you want such asphonebook entries, messages, pictures, video clips, etc.](https://usermanual.wiki/LG-Electronics-USA/F1200/User-Guide-578274-Page-56.png)
![F1200 User Guide59Music [Menu 4-1]The F1200 has a digital music player built-in. You can enjoy listening to MP3or AAC music files on a memory in your phone using a compatible headset orvia the internal loudspeaker.The music player supports:● MPEG-1 Layer III: Sampling frequency up to 48KHz, Bit rate up to240Kbps, stereo.● MPEG-1 Layer III: Sampling frequency up to 24KHz, Bit rate up to160Kbps, stereo.You can transfer MP3 files from a compatible PC to the memory in yourphone using the Mobile Agent program (or PC sync program) on the CD-ROMin the sales package. When you connect the phone to a PC using the USBcable (supplied in the same package), you need to install a driver. SelectF1200.inf. For further details, refer to the CD-ROM manual.Note● Because of the small dimension of the speaker, in some cases theaudio could be distorted, especially at maximum volume and whenthere are lots of bass sounds. Therefore, we recommend you to usethe stereo headset in order to appreciate the high quality of yourmusic.Note● The PC should run Windows 98 SE, Windows 2000, Windows ME, orWindows XP operating system.● Besides downloading the MP3 files to the phone, you can upload thepictures and movies taken on the phone to the PC using the USBcable. To download the ring tones, wallpaper, or Java games, theserial cable is required. And you can also manage the phonebook,scheduler, and message box on the PC with the serial cable. Consultwith the authorised dealer for availability of accessories.Multimedia [Menu 4]](https://usermanual.wiki/LG-Electronics-USA/F1200/User-Guide-578274-Page-57.png)
![F1200 User Guide60Audio player [Menu-4-1-1]Plays the music.The following options are available with the left soft key [Options].● View playlist: Select this to view the playlist during the playback.● Equalizer: Select the desired sound style.● Playmode: Select the desired play mode.- Play all: Plays all the tracks.- Repeat all: Repeats all the tracks in the phone in order.- Shuffle: Plays all the tracks in random order.- Play one: Plays the current track and stops playing.- Repeat one: Keeps playing the current track.Playlist [Menu-4-1-2]Displays the playlist. The following options are available.● Mark all: Marks all the tracks in the playlist.● Unmark all: Unmarks all the tracks in the playlist.● Go to audio player: Accesses the audio player.● Set as ring tone: After selecting a desired track, press the left soft key[Options] and select this. Sets the selected track as a ring tone.● Delete: Deletes the track from the list.● Rename: To change the name of the track.Multimedia [Menu 4]Note● You can mark/unmark each track in the playlist with the right soft key[Mark/Unmark].](https://usermanual.wiki/LG-Electronics-USA/F1200/User-Guide-578274-Page-58.png)
![Multimedia [Menu 4]● View details:● Delete all: Clears out the playlist.Settings [Menu-4-1-3]Player skin: You can select the desired player skin on the main display andthe front display.Flip setting: Select whether the playback will continue or stop when youopen/close the phone. (?)Memory status [Menu-4-1-4]You can check the current memory status of the phone.Game [Menu 4-2]You can enjoy a game on the phone. For further details, use the onscreeninstruction or help menu.Java [Menu 4-3]Java is a technology developed by Sun Microsystems. Similar to the way youwould download the Java Applet using the standard Netscape or MS InternetExplorer browsers, Java MIDlet can be downloaded using the WAP enabledphone.Depending on the service provider, all Java based programs such as Javagames can be downloaded and run on a phone. Once downloaded, the Javaprogram can be viewed within the Applications menu where you can select,execute,or delete. The Java program files saved in the phone are in .JAD and.JAR formats.F1200 User Guide61](https://usermanual.wiki/LG-Electronics-USA/F1200/User-Guide-578274-Page-59.png)
![F1200 User Guide62Multimedia [Menu 4]Note● The JAR file is a compressed format of the Java program and the JADfile is a description file that includes all detailed information. From thenetwork, prior to download, you can view all detailed file descriptionsfrom the JAD file.Warning● Only J2ME (Java 2 Micro Edition) based programs will run in a phoneenvironment. The J2SE (Java 2 Standard Edition) based programswill only run in a PC environment.](https://usermanual.wiki/LG-Electronics-USA/F1200/User-Guide-578274-Page-60.png)
![F1200 User Guide63Press the Menu key and select Messages using navigation keys.Text messages [Menu 5-1]Your phone receives voice mail notification messages and Short MessageService (SMS) messages.Voice mail and SMS are network services. Please contact your networkoperator for more information.When the icon appears, you have received voice mail.When the icon appears, you have received a new text message.If the message memory is full, a message is displayed, the iconflashes and you cannot receive any new messages.Use the Delete option in the Inbox menu to delete obsolete messages.Once there is space in the message memory, any undelivered SMSmessages will be received (provided sufficient space is available).Write [Menu 5-1-1]You can write and edit text messages up to 6 pages. (approximately918 characters)1. Key in your message. For details on how to enter text, refer to page 30through 34 (Entering Text).2. After you complete the message, press the left soft key [Options] to selectrequired option. The following options are available.● Send : Enter the number or select the number from the phonebook or therecent numbers using the left soft key [Options]. You can send amessage up to 5 phone numbers at a time.● Save to draft: Allows you to save the message so that it can be sentlater.● T9 languages: Select the language for T9 input mode. You can alsodeactivate T9 input mode by selecting ‘ 9 off ‘. For further details on theT9 mode, refer to page 30 through 32.Messages [Menu 5]](https://usermanual.wiki/LG-Electronics-USA/F1200/User-Guide-578274-Page-61.png)
![F1200 User Guide64Messages [Menu 5]● Clear text: Erases the whole text.● Exit editor: Allows you to exit from the Write menu.3. You can also send attachments with the message by pressing the right softkey [Attach], while you're entering a message.● Symbol: You can attach special characters.● Emoticon: You can put various emoticons preset in the phone.● Picture: You can send and receive text messages that contain pictures,known as ‘Picture messages’. Several preset pictures are available in thephone and they can be replaced with new ones received from othersources.● Animation: Attaching an animation in a message can be done throughEMS (Enhanced Messaging Service). You can select any of 15animations in the phone.● Sound: If available, you can attach a sound available for a shortmessage.● Text template: You can use text templates already set in the phone.● Phone number: You can add phone numbers in the message.● Name card: You can attach your name card.Inbox [Menu 5-1-2]Received text messages and page messages can be searched and thecontents can be viewed.Received messages are displayed in date order. Press the menu key and select Messages →→Text message →→Inbox.Note● You can also insert special characters by pressing ( ) whilekeying in a message.*.,](https://usermanual.wiki/LG-Electronics-USA/F1200/User-Guide-578274-Page-62.png)
![F1200 User Guide65Messages [Menu 5]Or, you can take a shortcut by pressing the right navigation key ( instandby mode.Each received message has the following options available. Press the left softkey [Options].● Reply: Replies to the received message.● Forward: Forwards a received message to other recipients.● Return call: Calls the sender°Øs phone.● Extract: Extracts a picture, sound, text web page or email address from themessage. These will be saved in My folder, Phonebook, or bookmarks.● Delete: Deletes the selected message from the Inbox.Outbox [Menu 5-1-3]You can view the list and contents of sent messages in this menu and canalso verify if the transmission was successful.Icon DescriptionRead SIM messageUnread SIM messageRead messageUnread messageRead delivery reportUnread delivery reportNote● SIM message refers to the message saved in the SIM memory. Andthe network distinguishes an incoming message into the SIMmessage or just message.](https://usermanual.wiki/LG-Electronics-USA/F1200/User-Guide-578274-Page-63.png)
![F1200 User Guide66Messages [Menu 5]The following options are available.● Forward: Forwards the current message to other recipients.● Delete: Deletes the selected message from the Outbox.Draft [Menu 5-1-4]In this menu, you can see the message list saved as draft. Scroll through thelist using the up/down navigation keys. You can send draft messages bypressing the left soft key [Options].Settings [Menu 5-1-5]This menu lets you set up the default SMS information.● Message types: Sets the default message type (Text, Voice, Fax, Paging,X.400, E-mail, and ERMES). The network can convert the messages intothe selected format.● Validity period: Sets the length of time for which your text messages willbe saved at the SMS center while attempts are made to deliver them to therecipient. Possible values are 30minutes, 1 hour, 6 hours, 1 day, 1 weekand the maximum authorised by your network operator.● Paper: You can insert one of 4 wallpaper images to a text message.● Delivery report: Activates or deactivates the report function. When thisfunction is activated, the network informs you whether or not your messagehas been delivered.● Pay for reply: Allows the recipient of your SMS message to send you areply via your message centre, if the service is provided by the network.Icon DescriptionSent SIM messageSent message](https://usermanual.wiki/LG-Electronics-USA/F1200/User-Guide-578274-Page-64.png)
![F1200 User Guide67Messages [Menu 5]● Message centre number: Saves or changes the number of your SMScentre when sending text messages. You must obtain this number fromyour service provider.● Bearer setting: Selects GPRS or GSM. Contact your network operator orservice provider for information related to setting a selected bearer, pricingand connection speed.Multimedia messages (MMS) [Menu 5-2]A multimedia message can contain text, images, and/or sound clips. Thisfeature can be used only if it is supported by your network operator or serviceprovider. Only the devices that offer compatible multimedia message or e-mailfeatures can receive and send multimedia messages.Write [Menu 5-2-1]1. Key in the text message. Using the right soft key, you can input symbols,numbers and emoticons, or select the text input mode. After the textmessage input, press the left soft key [Done].2. Add an image and/or sound. You can move to the next section using theup/down navigation.3. You can add a slide by moving the cursor on then pressing the OKkey or the left soft key [Select]. You can also add a slide using the right softkey [Menu].4. Press the right soft key [Menu]. The following options are available.● Send: Select this to send the multimedia message. This phone supportsmultiple numbers and e-mail addresses.● Preview: Displays the multimedia message you wish to send.● Save: You can save the multimedia message in draft or as a template.Note● Up to 9 slides are affordable.](https://usermanual.wiki/LG-Electronics-USA/F1200/User-Guide-578274-Page-65.png)
![F1200 User Guide68Messages [Menu 5]● Delete: Deletes the message you°Øre been creating.● Slide duration: Set the slide duration. Enter the desired duration usingthe numeric keypad.● Slide format: Select where to align the image.● Add slide: Adds a slide before of after the current slide.● Remove slide: Deletes the selected slide.Inbox [Menu 5-2-2]You will be alerted when you have received messages. They will be saved inthe Inbox. You can identify each message by icons. For details, see the icondescription below.If the phone has ‘No space for messages’, you can make space by deletingmessages, media and applications.● Timer stop: The Timer stop menu is displayed when you receive amessage including various pictures. Usually, the pictures are sequentiallydisplayed automatically. However, if you select this menu, you can see thenext picture by pressing the left soft key [Next] manually.● Timer start: Select this to activate the slide show automatically again.Icon DescriptionRead normal messageUnread normal messageRead notification messageUnread notification messageRead high priority messageUnread high priority messageRead low priority messageUnread low priority message](https://usermanual.wiki/LG-Electronics-USA/F1200/User-Guide-578274-Page-66.png)
![F1200 User Guide69Messages [Menu 5]● Previous slide: Displays the previous page.● Restart: Restarts the slide show from the first slide.● Save message: Saves a multimedia message in draft form or as atemplate.● Save items: Extracts pictures or sounds. They will be saved in My folder orPhonebook.● Details: Displays information about received messages: Sender°Øsaddress, Subject (only for Multimedia message), Message date & time,Message type, Message size.● Reply: Replies to the sender.● Reply all: Replies to all senders.● Delete message: Deletes the current message.● Forward: Forwards the selected message to other recipients.Outbox [Menu 5-2-3]Use this to see sent messages. For each sent message, you can see thedelivery status.● Timer stop: The Timer stop menu is displayed when you receive amessage including various pictures. Usually, the pictures are sequentiallydisplayed automatically. However, if you select this menu, you can see thenext picture by pressing the left soft key [Next] manually.● Timer start: Select this to activate the slide show automatically again.● Previous slide: Displays the previous page.● Restart: Restarts the slide show from the first slide.● Save message: Saves a multimedia message in draft form or as atemplate.Icon DescriptionSent](https://usermanual.wiki/LG-Electronics-USA/F1200/User-Guide-578274-Page-67.png)
![F1200 User Guide70Messages [Menu 5]● Save items: Extracts pictures or sounds. They will be saved in My folder orPhonebook.● Details: Displays information about received messages: Sender’s address,Subject (only for Multimedia message), Message date & time, Messagetype, Message size.● Delete message: Deletes the current message.● Forward: Forwards the selected message to other recipients.Draft [Menu 5-2-4]Using this menu, you can preset up to five multimedia messages that you usemost frequently. This menu shows the preset multimedia message list.The following options are available.● Send: Select this to send the multimedia message. This phone supportsmultiple numbers and e-mail addresses.● Preview: Displays the multimedia message you wish to send.● Save: You can save the multimedia message in draft or as a template.● Delete: Deletes the message you°Øre been creating.● Slide duration: Set the slide duration. Enter the desired duration using thenumeric keypad.● Slide format: Select where to align the image.● Add slide: Adds a slide before of after the current slide.● Remove slide: Deletes the selected slide.Settings [Menu 5-2-5]Via this menu, you can set up the default multimedia message information.The following options are available.● Message title: Enter the message title.● Slide duration: Set the duration of each slide.● Alignment: Select where to align the image.](https://usermanual.wiki/LG-Electronics-USA/F1200/User-Guide-578274-Page-68.png)
![F1200 User Guide71Messages [Menu 5]● Valid period: Set the duration for keeping messages on the networkserver.● Auto download- On: If you select this, messages are downloaded automatically on receipt.- Confirm: Requires you to confirm you want to download the message.- Off: Defers downloading messages.● Profiles: See page 96 for further information.Voice messages [Menu 5-3]This menu provides you with a quick way of accessing your voice mailbox (ifprovided by your network).Before using this feature, you must enter the voice server number obtainedfrom your network operator.When a new voice message is received, the symbol will be displayedon the screen. Please check with your network provider for details of theirservice in order to configure the handset correctly.Listen to voice messages [Menu 5-3-1]Once this option has been selected, simply press the left soft key [OK] tolisten to voice messages. You can also hold down the key in standbymode to listen to voice messages.Voice mail centre [Menu 5-3-2]You can input and set the voice mailbox centre.1](https://usermanual.wiki/LG-Electronics-USA/F1200/User-Guide-578274-Page-69.png)
![F1200 User Guide72Messages [Menu 5]Info service [Menu 5-4]Info service messages are text messages sent by the network to mobilephone users. They provide general information such as weather reports,traffic news, taxis, pharmacies, and stock prices. Each type of information isassociated with a number, which can be obtained from the network operator.When you receive an info service message, a popup message will indicate anew message receipt or the info service message will be displayed directly. Instandby mode, the following options are available when viewing info servicemessages.Receive [Menu 5-4-1]Use this to enable or disable the reception of broadcast messages.Inbox [Menu 5-4-2]The list of received broadcast messages can be searched and the contentsviewed.Topics [Menu 5-4-3](Dependent to network and subscription)To create new topics, press the left soft key [Options] then select Add new. Ifyou already have topics, you can deactivate, edit, or delete them by using theleft soft key [Options].Alert [Menu 5-4-4]Set alert on or Off for a new broadcast message.Auto display [Menu 5-4-5]If you select this option On, all received broadcast messages will beautomatically displayed.](https://usermanual.wiki/LG-Electronics-USA/F1200/User-Guide-578274-Page-70.png)
![F1200 User Guide73Messages [Menu 5]Languages [Menu 5-4-6](Dependent to network and subscription)This option lets you select the preferred languages. Cell broadcast messageswill be displayed in the selected language. If you use all the languagessupported by the phone, select Automatic at the end of the list.Templates [Menu 5-5]There are pre-defined messages in the list. You can view and edit thetemplate messages or create new messages. Two types of templates areavailable: Text and Multimedia.Text messages [Menu 5-5-1]● Please call me back.● I’m late. I will be there at...● Where are you now?● I’m on the way.● Top urgent. Please contact.● I love you.](https://usermanual.wiki/LG-Electronics-USA/F1200/User-Guide-578274-Page-71.png)
![F1200 User Guide74Messages [Menu 5]The following options are available.● Edit: Use this to write a new message or edit the selected templatemessage from the text template list.● Delete: Deletes the selected template message from the text template list.● Send via text message: Use this to send the selected template messageby SMS.● Send via multimedia message: Use this to send the selected templatemessage by MMS.● Add new: Use this to create a new template. Multimedia messages [Menu 5-5-2]● Send: Sends the multimedia template. Supports multiple numbers andemail addresses.● Preview: Displays the draft multimedia message.● Save: Saves multimedia messages in draft form or as templates.● Delete: Deletes the multimedia template.● Slide duration: Set the slide duration. Enter the desired duration using thenumeric keypad.● Slide format: Select where to align the image.● Add Slide: Adds a slide before or after the current slide.● Remove Slide: Deletes the highlighted slide.Name card [Menu 5-6]This option helps you to make your own name card.1. Press the left soft key [Add].2. Key in the name, mobile phone number, office number, Fax number, andE-mail address.3. Press the left soft key [Save]. With the name card, the following options areavailable.](https://usermanual.wiki/LG-Electronics-USA/F1200/User-Guide-578274-Page-72.png)
![F1200 User Guide75Messages [Menu 5]● Edit: Use this to edit the name card.● Delete: Use this to delete the name card.● Send via text message: Use this to send the name card by SMS.● Send via multimedia message: Sends the name card by MMS.Memory status [Menu 5-7]You can check the current memory status for Text messages and Multimediamessages.Note● You can also attach the name card when you write a text messageusing the Attach function. See page 65.](https://usermanual.wiki/LG-Electronics-USA/F1200/User-Guide-578274-Page-73.png)
![F1200 User Guide76Camera [Menu 6]F1200 has a 1.3 Mega pixel digital camera which allows you to take picturesat a maximum resolution 640x480 pixels (also known as VGA). The CMOSsensor guarantees high definition and quality of the images. Taking pictureswill be more fun thanks to the additional functions such as the 4x Zoom(depending on the resolution), Brightness control, White balancing and Coloureffects.And the integrated flash allows you to take pictures even when lightconditions are poor.Press the Menu key ( ) and select Camera using navigation keys.Or, you can go to this menu by pressing or on the right sidestandby mode.Take picture [Menu 6-1]Press the Menu key and select Camera →→Take pictures. Or, press thecamera hot key ( or ) longer than 2 seconds in standby mode.You can see the viewfinder.Before shooting, you can set the following values.①Mode ( ): Select one of the camera modes using the left/rightnavigation keys.(Single shot ): Select this to take a single shot.(Multi shot ):Select this to take multiple shots.(Frame shot ): Select this to take a still image with various frames.②Resolution ( ): 640x480(VGA), 320x240(QVGA), 128*160(Screen),96X96(Phonebook)③Image quality ( ): Fine/Normal/Basic④Digital zoom ( ): x1, x2, x4Note● If the battery is too low, you may not use the Camerafeature.](https://usermanual.wiki/LG-Electronics-USA/F1200/User-Guide-578274-Page-74.png)
![F1200 User Guide77Camera [Menu 6]⑤Tone ( ): Colour ( )/Sepia ( )/Black and white ( )⑥Brightness ( ): +2, +1, 0, -1, -2⑦Timer ( ): Off, 3 sec., 5 sec.⑧White balance: Auto, Daylight, Incandescent, Cloudy, Flourescent1. Center the desired option menu using the left/right navigation keys.2. Select the desired value with the up/down navigation keys.3. After finishing all the settings, focus on the subject to capture and press theCamera key or OK key. With a click, the image is captured and stored inthe phone. Gallery [Menu 6-2]Press the Menu key and select Camera →→Gallery.All the still images taken in the Take picture menu are stored inthis menu. You can view, or ganiseor send the pictures through MMS.1. Select the picture you want a full screen of and press the OK key. Or pressthe left soft key [Options] to access the following submenus.● Normal view: You can view one image at a time.Note● The maximum zoom scale depends on the resolution as follows.Resolution Zoom scale640x480 x1, x2320x240 x1, x2128*160 x1, x296X96 x1, x2](https://usermanual.wiki/LG-Electronics-USA/F1200/User-Guide-578274-Page-75.png)
![F1200 User Guide78Camera [Menu 6]● Multi view: (Shown in the normal view) Go back to the multi view/list viewmode.● Write multimedia message: You can send the selected image via amultimedia message.● Set as wallpaper: You can set the selected image as the internal LCDwallpaper or external LCD wallpaper.● Add to phonebook (Only available for the phonebook sizedpictures): You can add the selected image to a phonebook contact touse the Photo Caller ID feature.● Slide show: Plays back every image in succession. To pause / resumethe slide show, press the left soft key. To stop the slide show and goback to My photo gallery, press the right soft key.● Rename: You can change the name of the selected image.● Delete: Deletes the selected image.● View details: You can check the title, resolution, size, and date and timeof the selected image.● Delete all: Deletes all the images in your phone.Memory status [Menu 6-3]Press the Menu key and select Camera . Memory status.You can check the current memory status on the phone. Images,Movie and MP3 Player share the memory.Note● For details, refer to Multimedia messages - Write on page 68-69.● Because of the big size, the pictures of which resolution is SXGAcannot be sent via MMS. The phone will ask if you want to resize thepicture in order to send it via MMS.](https://usermanual.wiki/LG-Electronics-USA/F1200/User-Guide-578274-Page-76.png)
![F1200 User Guide79My stuff [Menu 7]My stuff is organised into 4 folders: Picture, Video, Animation, and Sound.The downloaded contents through WAP, MMS or EMS are stored in eachfolder. You can view, delete or control the downloaded contents.Images [Menu 7-1]Using the left soft key [Options], you can send a picture via SMS or MMS, setit as a wallpaper, rename or delete it.Sounds [Menu 7-2]Using the left soft key [Options], you can send a sound via SMS or MMS, setit as a ringtone, rename or delete it.Applications [Menu 7-3]When a new Java program is downloaded using the WAP, the address fromwhich a download takes place is known as a bookmark. The Java menuincludes a bookmark list for downloading Java programs and this bookmarklist can be viewed from the Download menu. You can connect, view, edit,delete, and add new bookmarks.● Connect: Selected address in the bookmark is used for data connection.After successful connection, desired Java program can be downloadedfrom the list.● View: Detailed information on a bookmark can be viewed such as theaddress of bookmark and title of bookmark required for connecting tocertain sites.● Edit: Selected bookmark can be edited. Editing a bookmark is done in theorder of Address . Title. When creating a new bookmark, same order isfollowed.● Delete: Selected bookmark is deleted. All bookmarks can be deletedcompletely from the bookmark list screen. Deleted bookmark cannot berestored so caution is required when deleting bookmarks.](https://usermanual.wiki/LG-Electronics-USA/F1200/User-Guide-578274-Page-77.png)
![F1200 User Guide80My stuff [Menu 7]● Add new: New bookmark is added. The same order used during Editbookmark applies to Add new bookmark. Select the Add new option fromthe bookmark menu or when no bookmark exists, then the Add new can beselected from the bookmark list screen.](https://usermanual.wiki/LG-Electronics-USA/F1200/User-Guide-578274-Page-78.png)
![F1200 User Guide81Service [Menu 8]Press the Menu key ( ) and select Service using navigation keys.Internet [Menu 8-1]You can access various WAP (Wireless Application Protocol) services suchas banking, news, weather reports and flight information. These services arespecially designed for mobile phones and they are maintained by WAPservice providers.Check the availability of WAP services, pricing and tariffs with your networkoperator and/or the service provider whose service you wish to use. Serviceproviders will also give you instructions on how to use their services.Please contact your network operator to open your Internet account To usethe Web Browser, you must indicate your phone number via the Ownnumber menu option (See page 60 for further details.).To launch the browser in standby mode, press and hold down the keyor Camera setting menu key ( ) on the right side of thephone.Once connected, the homepage is displayed. The content depends on theservice provider.You can access any website page by entering its URL address. To exit thebrowser at any time, press the key. The phone will return to thestandby mode.Navigating with the WAP browserYou can surf the Internet using either the phone keys or the WAP browsermenu.Using the phone keysWhen surfing the Internet, the phone keys function differently to phone mode.OKOK](https://usermanual.wiki/LG-Electronics-USA/F1200/User-Guide-578274-Page-79.png)
![F1200 User Guide82Service [Menu 8]Using the WAP browser menuThere are various menu options available when surfing the Wireless Web.Home [Menu 8-1-1]Connect to a homepage. The homepage will be the site which is defined inthe activated profile. It will be defined by the service provider if you have notdefined it in the activated profile.Bookmarks [Menu 8-1-2]This menu allows you to store the URL of favourite web pages for easyaccess at a later time. You can also create folders and organise thebookmarks in each folder.To create a bookmark1. Press the left soft key [Options].2. Select New bookmark and press the OK key.3. Enter the desired URL and title and press the OK key.After creating bookmarks, the following options are available.● Connect: Connects to the selected bookmark.● Edit: You can edit the URL and/or the title of the selected bookmark.Note● The WAP browser menus may vary, depending on your browserversion.Key DescriptionScrolls each line of the content areaReturns to the previous pageSelects options and confirms actionsOKOKC](https://usermanual.wiki/LG-Electronics-USA/F1200/User-Guide-578274-Page-80.png)
![F1200 User Guide83Service [Menu 8]● New bookmark: Select this to create a new bookmark.● New folder: Select this to create a new folder.● Delete: Deletes the selected bookmark.● Delete all: Deletes all the bookmarks and folders.Your phone may have some pre-installed bookmarks for sites not affiliatedwith LG. LG does not warrant or endorse these sites. If you choose to accessthem, you should use the same security or content precautions as you wouldwith any site.Push messages [Menu 8-1-3]●inboxYou can order Push messages from WAP service providers. Pushmessages are notifications of, for example, news headlines and they cancontain a text message or the address of a WAP service. For availabilityand subscription, contact your WAP service provider. Service providers canupdate an existing Push message every time a new Push message isreceived. Messages can be updated even if you have moved them toanother folder. When Push messages expire, they are deletedautomatically.● Information: Shows the information of received push messages.● Load: Connects to a specific site using the information in the receivedpush message.● Delete: Deletes the selected push message.● ReceiveYou can choose whether or not you wish to receive push messages.Profiles [Menu 8-1-4]For more information, consult your network operator. Each profile hassubmenus as follows:](https://usermanual.wiki/LG-Electronics-USA/F1200/User-Guide-578274-Page-81.png)
![F1200 User Guide84Service [Menu 8]● Activate: Activates the selected profile.● Settings: Use this to edit and change WAP settings for the selected profile.● Rename: You can change the selected profile’s name.● Delete: Deletes the selected profile from the list.● Add new: You can add a new profileGo to URL [Menu 8-1-5]You can connect directly to the site you want. To do this, you need to enter aspecific URL.Cache settings [Menu 8-1-6]The information or services you have accessed are saved in the cachememory of the phone.● Clear cacheRemoves all context saved in cache.●Cache checkSet a value whether a connection attempt is made through cache or not.Security certificates [Menu 8-1-7]A list of the available certificates is shown.Reset profiles [Menu 8-1-8]You can reset profiles to return to original settings.Note● The changes using these options may affect the MMS function.](https://usermanual.wiki/LG-Electronics-USA/F1200/User-Guide-578274-Page-82.png)
![F1200 User Guide85Service [Menu 8]WAP information [Menu 8-1-9]The WAP browser version is displayed.SIM service [Menu 8-2]Your service provider can offer special application through SIM card, such ashome banking, stock market, etc. If you are registered for one of theseservices, the service name will appear at the end of the main menu. With theSIM service menu, your phone is future-proof and will support additions toyour service provider°Øs service. For further information, contact your serviceprovider.](https://usermanual.wiki/LG-Electronics-USA/F1200/User-Guide-578274-Page-83.png)
![F1200 User Guide86Settings [Menu 9]Press the Menu key ( ) and select Settings using navigation keys.Sound [Menu 9-1] Alert type [Menu 9-1-1]Select the incoming call notification type from Ring, Vibrate, Silent, Ring &vibrate, Max. ring & vibrate.Ring tone [Menu 9-1-2]Select the desired ring tone from the list and select the volume level. Scrollthrough the list using up/down navigation keys. You can hear the desired toneprior to making a selection.Message tone [Menu 9-1-3]Select the alert tone for message receipt and the volume level.Effect tone [Menu 9-1-4]Select the desired effect tone. It’s the tone When you press keys or open/close the phone, the phone emits the effecttone you set in this menu.System alert [Menu 9-1-5]Set the desired ringing tone when switching the phone on/off.DVX on/off [Menu 9-1-6]Note● The effect tone sounds, regardless of the alert type.](https://usermanual.wiki/LG-Electronics-USA/F1200/User-Guide-578274-Page-84.png)
![F1200 User Guide87Settings [Menu 9]Display [Menu 9-2] Main display [Menu 9-2-1]● Wallpaper: Select the wallpaper which will be displayed on the main LCDscreen in standby mode.● Clock/ Calendar: Set the time display type and calendar.● Incoming call: Select the animation which will be displayed for incomingcalls.● Greeting note: To enter a greeting note, select On. And input a greetingnote using the keypad. The greeting note is displayed in standby mode.Front display [Menu 9-2-2]● Wallpaper: Select the wallpaper which will be displayed on the front screen(sub screen).● Greeting note: To enter a greeting note, select On. And input a greetingnote using the keypad. The greeting note is displayed in standby mode.Backlight [Menu 9-2-3]Use this to select whether or not the phone uses the backlight. A smallincrease in standby/talk time can be achieved by turning the backlight off.Font setting [Menu 9-2-4]Select the desired font.Menu colour [Menu 9-2-5]Your phone provides you with 4 menu colour themes. Set the menu colour byscrolling and pressing the left soft key [Select].Network name [Menu 9-2-6]Select whether the network name to be displayed when the phone is turnedon/off.](https://usermanual.wiki/LG-Electronics-USA/F1200/User-Guide-578274-Page-85.png)
![F1200 User Guide88Settings [Menu 9]Date & Time [Menu 9-3]This option lets you change the current time and date displayed. The followingoptions are available.Set date [Menu 9-3-1]Use this to enter the day, month and year. You can change the date formatvia the Date format menu option.Date format [Menu 9-3-2]YYYY/MM/DD (year/month/day)DD/MM/YYYY (day/month/year)MM/DD/YYYY (month/day/year)Set time [Menu 9-3-3]Use this to enter the current time. You can choose the time format via theTime format menu option.Time format [Menu 9-3-4]24 hours12 hoursDual time [Menu 9-3-5]You can activate the phone to run dual time clocks. After selecting On, selectthe desired dual time zone.Beep every hour [Menu 9-3-6]You can set the phone to beep every hour by selecting On.](https://usermanual.wiki/LG-Electronics-USA/F1200/User-Guide-578274-Page-86.png)
![F1200 User Guide89Settings [Menu 9]Languages [Menu 9-4]You can select the display language. When the language option is set toAutomatic, the language is automatically selected according to the languageof the SIM card used. English will be set if the language on the SIM card isnot supported by the phone.Security [Menu 9-5]Various passwords are used to protect certain features of your phone. Referto page 26-27 for the various passwords.PIN code request [Menu 9-5-1]When the PIN code request feature is enabled, you must enter your PINeach time you switch the phone on. Consequently, any person who does nothave your PIN cannot use your phone without your approval.The following options are available:● Enable: You must enter the PIN each time the phone is switched on.● Disable: The phone connects directly to the network when you switch it on.Phone lock [Menu 9-5-2]You can lock your phone. Select the desired phone lock option. To changethe phone lock option, you are asked to enter the security code.▶To unlock the phone, press the right soft key and enter the security code.Change codes [Menu 9-5-3]The Change codes feature lets you change your current password to a newone. You must enter the current password before you can specify a new one.Note● Before disabling the PIN code request feature, you must enter yourPIN.](https://usermanual.wiki/LG-Electronics-USA/F1200/User-Guide-578274-Page-87.png)
![F1200 User Guide90Settings [Menu 9]Use this to change the access codes: Security code,PIN1 code, PIN2 codeNetwork [Menu 9-6]The Network feature enables you to indicate whether the network used whenroaming (outside your home area) is selected:Automatic, Manual, Preferred.Band selection [Menu 9-6-4]Tri-band phone can be used over much of the world. The GSM 1800 bandprovides for a GSM uplink in the range 1850-1910 MHz, and a GSM downlinkin the range 1930-1990 MHz. The 1900 MHz frequency is mainly used in theUSA. UK networks usually use 900 MHz or 1800 MHz frequencies.This phone is factory-reset to the GSM 900/1800 band. To use the phone inthe USA or South America, select GSM 1900. Next you must turn the phoneoff, then on, in order to enable the selected band.GPRS [Menu 9-7]GPRS (General Packet Radio Service) is a technology that allows mobilephones to be used for sending and receiving data over the mobile network.GPRS is a data bearer that enables wireless access to data network such asthe Internet.Before you can use GPRS technology:Note● You can select a network other than your home network only if it hasa valid roaming agreement with your home network.Note● If there is no GPRS coverage and you have chosen Automatic, thephone will periodically try to establish a connection.](https://usermanual.wiki/LG-Electronics-USA/F1200/User-Guide-578274-Page-88.png)
![F1200 User Guide91Settings [Menu 9]● You need to subscribe to the GPRS service. For availability andsubscription to GPRS service, contact your network operator or serviceprovider.● You need to save the GPRS settings for the applications used over GPRS.Attach [Menu 9-7-1]If you select Power on and you are in a network that supports GPRS, thephone registers to the GPRS network and sending short messages will bedone via GPRS. Also, starting an active packet data connection, for example,to send and receive e-mail, is quicker. If you select When needed, the phonewill use a GPRS connection only if you start an application or action thatneeds it. The GPRS connection is closed after it is no longer required by anyapplication.External device [Menu 9-7-2]When you use Internet via GPRS by using external device, you can set thefollowing six profiles: Rename,APN,IP address,DNS, User ID, andPassword.Reset settings [Menu 9-8]You can reset your phone to its default configuration. To do so, proceed, asfollows.1. Select the Reset settings menu option.2. Enter the 4-digit security code.Note● The security code is preset to 0000.To change this, refer to page 107.](https://usermanual.wiki/LG-Electronics-USA/F1200/User-Guide-578274-Page-89.png)