LG Electronics USA F156XJ Microwave Oven User Manual
LG Electronics USA Microwave Oven Users Manual
UserManual.wiki
>
LG Electronics USA
>
F156XJ User Manual
Users Manual
Navigation menu
Upload a User Manual
Namespaces
Wiki Guide
HTML
PDF
Info
Views
User Manual
Discussion / Help
Navigation


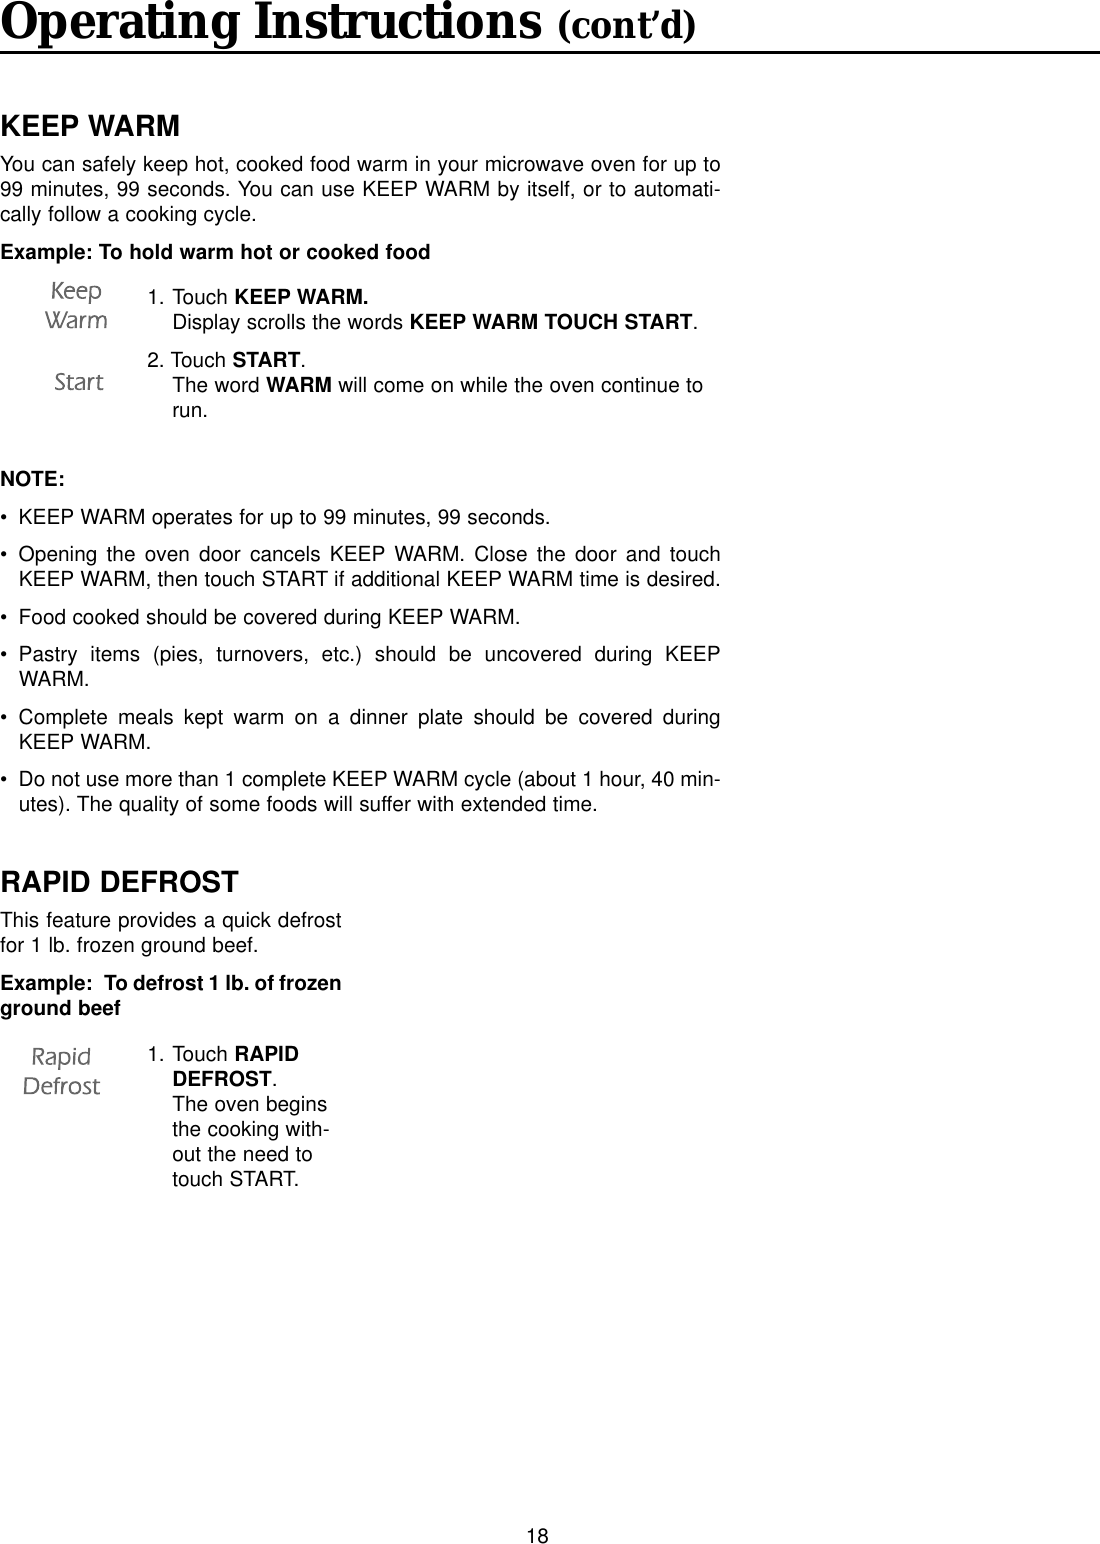
![13Operating Instructions12-Hour Clock and TimerOven is equipped with a 12-hourclock and a timer that can be set upto 99 minutes and 99 seconds. Clockdoes not display AM, PM or militarytime.Add 30 Sec.A time-saving pad, this simplifiedcontrol lets you quickly set and startmicrowave cooking without the needto touch START.NOTE: If you touch Add 30 Sec., itwill add 30 seconds up to 9 minutes59 seconds:TIME COOKThis function allows you to cook foodfor a desired amount of time.Because many foods need slowercooking (at less than HI-POWER),there are 10 power level settings inaddition to HI-POWER.When cooking is complete, beepswill sound. The word COOKENDshows in the display window. Thenthe oven shuts itself off.NOTE: If you do not select the powerlevel, the oven will operate at powerHIGH. To set HI-POWER cooking,skip steps 4 and 5 below.Example: To cook food on 80%Power (power 8) for 5 minutes 30seconds To set clock:To set timer:1. TouchSTOP/CLEARpad.2. Touch CLOCKpad.• ENTER TIME OFDAY scrollsthrough display.3. Enter desired timeby using digittouch pads.• TOUCH STARTscrolls throughdisplay.4. Touch START.1. TouchSTOP/CLEARpad.2. Touch TIMER pad.• ENTER TIME INMIN AND SECscrolls throughdisplay.3. Enter desired timeby using digittouch pads.• TOUCH STARTscrolls throughdisplay.4. Touch START .• To cancel timerat any time,pressSTOP/CLEARpad.Example: To set for 2 minutesTouch Add 30 Sec.4 times. The ovenbegins cooking anddisplay shows timecounting down.1. Touch COOKTIMEpad.2. Touch number keys• ENTER COOKINGTIME scrollsthrough display.3. Enter 5 minutes 30seconds by touching[5], [3], and [0].Display scrolls thewords 5:30 TOUCHSTART OR POWER.4. Touch POWERLEVEL. Displayscrolls the wordsENTER POWERLEVEL 1 TO 10.5. Touch 8.To select power level80%. Display scrollsthe words P80TOUCH START.6. Touch START.](https://usermanual.wiki/LG-Electronics-USA/F156XJ/User-Guide-290591-Page-13.png)