LG Electronics USA F23GDA07 Refrigerator User Manual EMISSION TEST REPORT
LG Electronics USA Refrigerator EMISSION TEST REPORT
Contents
- 1. User Manual 1
- 2. User Manual 2
- 3. User Manual 3
User Manual 1

Order Number
: GETEC-C1-16-339
FCC Part 18
Test Report Number
: GETEC-E3-16-045
Page 1 / 1
EUT Type: Refrigerator
FCC ID.: BEJF23GDA07
APPENDIX H
: USER’S MANUAL
OWNER’S MANUAL
REFRIGERATOR
Please read this owner's manual thoroughly before operating
and keep it handy for reference at all times.
LUPXS3186N
LUPXC2386N
www.lg.com

2TABLE OF CONTENTS
ENGLISH
TABLE OF CONTENTS
3 PRODUCT FEATURES
4 IMPORTANT SAFETY
INSTRUCTIONS
7 COMPONENTS
7 Refrigerator Exterior
8 Refrigerator Interior
9 INSTALLATION
9 Installation Overview
10 Specifications
11 Unpacking the Refrigerator
11 Choosing the Proper Location
11 - Flooring
12 - Ambient Temperature
12 - Measuring the Clearances
12 Removing/Assembling the Doors
17 Connecting the Water Line
17 - Before You Begin
18 - Water Pressure
18 - What You Will Need
19 - Water Line Installation Instructions
20 Turning On the Power
21 Leveling
21 Door Alignment
21 - Adjusting Door Height
22 HOW TO USE
22 Before Use
23 Eclipse Display
23 - Eclipse Display Features
25 -Using the Interior Display
26 Smart Features
31 In-Door Ice Bin
31 - Detaching the In-Door Ice Bin
31 - Assembling the In-Door Ice Bin
32 Automatic Icemaker
34 Ice and Water Dispenser
35 Storing Food
35 - Food Preservation Location
36 - Food Storage Tips
36 - Storing Frozen Food
37 Adjusting the Refrigerator Shelves
37 - Detaching the Shelf
37 - Assembling the Shelf
38 - When Closing the Door
38 CustomChill™ Pantry
38 - Setting the CustomChill™ Pantry
39 Crisper Drawers
39 - Removing the Crisper Drawers
39 - Assembling the Crisper Drawers
40 - Removing the Crisper Support Box
40 - Assembling the Crisper Support Box
41 Removing the CustomChill™ Pantry Insert
41 FRESHSteel Container
41 InstaView™Door-in-Door®
42 EasyLift Bin
42 Freezer Drawer
42 - Removing the Freezer Drawer
43 - Assembling the Freezer Drawer
43 - Removing the Drawer Support
44 - Assembling the Drawer Support
44 Refrigerator/Freezer Door Bins
46 MAINTENANCE
46 Cleaning
47 Replacing the Fresh Air Filter
48 Replacing the Water Filter
52 SMART DIAGNOSIS
52 Using Smart Diagnosis™
53 TROUBLESHOOTING
64 WARRANTY
3
PRODUCT FEATURES
ENGLISH
PRODUCT FEATURES
Depending on the model, some of the following functions may not be available.
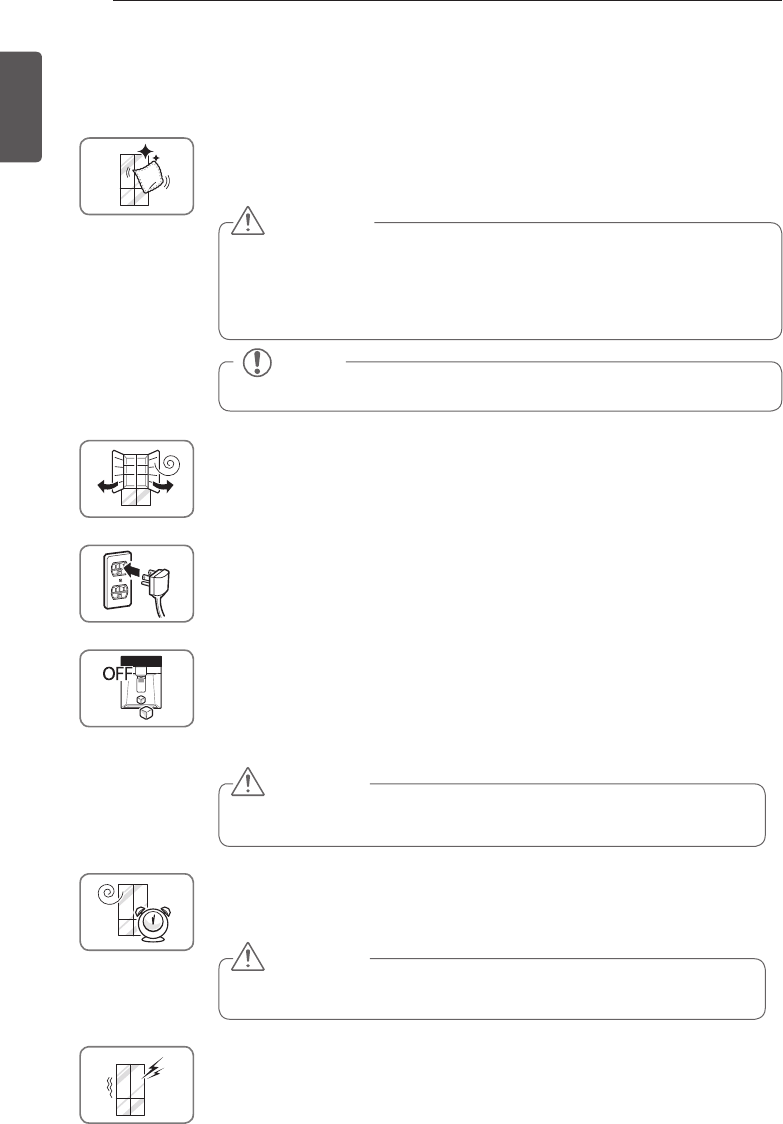
DOOR ALARM
The Door Alarm function is designed to prevent refrigerator malfunctioning
that could occur if a refrigerator door or freezer door remains open. If a
refrigerator door or freezer door is left open for more than 60 seconds, a
warning alarm sounds at 30 second intervals until it is closed.
ICE PLUS
Ice production can be increased by approximately 20 percent when the
freezer section is maintained at the coldest temperature for a 24-hour
period.
AUTO CLOSING HINGE
The refrigerator doors close automatically with a slight push. (The door only
closes automatically when it is open at an angle less than 30°.)
MEASURED FILL DISPENSER
Select from the Measured Fill menu on the dispenser to quickly dispense
pre-measured amounts automatically.
InstaView™Door-in-Door®
See at a glance if you have enough mustard or cold soft drinks without
opening the door and allowing the cold air to escape.
AUTO OPEN DOOR
When your hands are full of groceries, open the refrigerator door
automatically by placing your foot near the Auto Door sensor.
FOLD-DOWN BIN RAILS
Use the metal bars on the DID bins as either bin dividers or as rails to keep
tall items secure.
4IMPORTANT SAFETY INSTRUCTIONS
ENGLISH
IMPORTANT SAFETY INSTRUCTIONS
READ ALL INSTRUCTIONS BEFORE USING THE APPLIANCE.
This guide contains many important safety messages. Always read and obey all safety messages.
WARNING You can be killed or seriously injured if you do not follow instructions.
CAUTION
Indicates an imminently hazardous situation which, if not avoided, may result
in minor or moderate injury, or product damage.
WARNING
To reduce the risk of fire, electric shock, or personal injury when using your product, basic safety
precautions should be followed, including the following:
Power
NEVER unplug your refrigerator by pulling on the power cord. Always grip the plug firmly and pull it
y
straight out from the outlet.
If the supply cord is damaged, it must be replaced by the manufacturer or its service agent or a
y
similarly qualified person in order to avoid a hazard. Do not use a cord that shows cracks or abrasion
damage along its length or at either the plug or connector end.
Do not use an uncertified power outlet.
y
Unplug the power plug immediately in the event of a blackout or thunderstorm.
y
Plug in the power plug with the power cord facing downward.
y
Installation
Contact an authorized service center before you install or relocate the refrigerator.
y
When moving your refrigerator away from the wall, be careful not to roll over or damage the power
y
cord.
Prior to use, ensure that you are connecting this product to a dedicated, grounded electrical outlet
y
rated for use with this product (115V, 60Hz, AC only). It is the user’s responsibility to replace a
standard 2-prong wall outlet with a standard 3-prong wall outlet.
Do not install the refrigerator where there may be a danger of the unit falling.
y
Use
DO NOT allow children to climb, stand, or hang on the refrigerator doors or on the shelves in the
y
refrigerator. They could damage the refrigerator and seriously injure themselves.
Do not hang on to or place heavy objects on the refrigerator’s dispenser.
y
Do not place heavy or dangerous objects (bottles with liquid) on the refrigerator.
y
Do not put live animals inside the refrigerator.
y
Do not allow children to climb into the product when it is in use.
y
In the event of a gas leak (propane/LPG), ensure adequate ventilation and contact an authorized service
y
center before resuming use. Do not touch or disassemble the electric outlet of the refrigerator.
In the event of a refrigerant leak, move flammable objects away from the refrigerator. Ensure adequate
y
ventilation and contact an authorized service center.
Do not use or place flammable substances (chemicals, medicine, cosmetics, etc) near the refrigerator
y
or store them inside the refrigerator. Do not place the refrigerator in the vicinity of flammable gas.
Do not overfill or pack items too tightly into door bins. Doing so may cause damage to the bin or
y
personal injury if items are removed with excessive force.
This is the safety alert symbol. It alerts you to safety messages that inform you of
hazards that can kill or hurt you or others, or cause damage to the product.
All safety messages will be preceded by the safety alert symbol and the hazard
signal word WARNING or CAUTION. These words mean:

5
IMPORTANT SAFETY INSTRUCTIONS
ENGLISH
Do not hit the glass door panel with excessive force. Do not allow hard objects like cookware or
y
glass bottles to hit the glass door panel. The glass could break, resulting in a risk of personal injury or
product damage.
This product is not to be used for special purposes such as the storage of medicine or test materials
y
or for use on ships, etc.
Unplug the power plug before cleaning or repairing the refrigerator.
y
When you replace the light bulb in the refrigerator, unplug the refrigerator or turn off the power.
y
Do not modify or extend the power cord.
y
Do not use a dryer to dry the interior. Do not light a candle to remove interior odors.
y
For your safety, this appliance must be properly grounded. Have the wall outlet and the circuit
y
checked by a qualified electrician to make sure the outlet is properly grounded.
Do not use an outlet that can be turned off with a switch. Do not use an extension cord. It is the
y
user’s responsibility to replace a standard 2-prong wall outlet with a standard 3-prong wall outlet.
Do not, under any circumstances, cut or remove the third (ground) prong from the power cord.
y
Do not use an adapter plug and plug the power plug into a multi-outlet extension cord.
y
Disconnect the power cord immediately if you hear a noise, smell a strange odor or detect smoke
y
coming from the appliance.
Turn the power off if water or dust penetrates into the refrigerator. Call a service agent.
y
Do not disassemble or modify the refrigerator.
y
Do not put hands, feet, or metal objects below or behind the refrigerator.
y
Do not operate the refrigerator or touch the power cord with wet hands.
y
In refrigerators with automatic icemakers, avoid contact with the moving parts of the ejector
y
mechanism or with the heating element that releases the cubes. Do not place fingers or hands on the
automatic ice-making mechanism while the refrigerator is plugged in.
When dispensing ice from the dispenser, do not use crystal ceramics.
y
Do not touch the cold surfaces in the freezer compartment with wet or damp hands, when your
y
refrigerator is in operation.
Do not put glass containers, glass bottles or soda in the freezer.
y
This appliance is not intended for use by persons (including children) with reduced physical, sensory
y
or mental capabilities, or lack of experience and knowledge, unless they have been given supervision
or instruction concerning the use of the appliance by a person responsible for their safety.
Do not refreeze frozen food that has thawed completely. Doing so may result in a serious health
y
issue.
If you are throwing away your old refrigerator, make sure the CFC coolant is removed for proper
y
disposal by a qualified servicer. If you release CFC coolant, you may be fined or imprisoned in
accordance with the relevant environmental law.
Junked or abandoned refrigerators are dangerous, even if they are sitting for only a few days. When
y
disposing of the refrigerator, remove the packing materials from the door or take off the doors but
leave the shelves in place so that children may not easily climb inside.
If connected to a circuit protected by fuses, use time delay fuse.
y
READ ALL INSTRUCTIONS BEFORE USING THE APPLIANCE.
WARNING
This product contains chemicals known to the State of California to cause cancer and birth defects
or other reproductive harm.
Wash hands after handling.
To reduce the risk of fire, electric shock, or personal injury when using your product, basic safety
precautions should be followed, including the following:

6IMPORTANT SAFETY INSTRUCTIONS
ENGLISH
CAUTION
Installation
The refrigerator must be properly installed in accordance with the Installer Instructions that were
y
taped to the front of the refrigerator.
Be careful when you unpack and install the refrigerator. Immediately dispose of plastic and other
y
packing materials out of reach of children.
The appliance must be positioned for easy access to a power source.
y
Use
Close the door carefully when children are around.
y
Keep fingers out of pinch point areas; clearances between the doors and cabinets are
y
necessarily small. Be careful closing doors when children are nearby.
If you store food improperly, be aware that it may fall and cause injury.
y
Do not use aerosols near the refrigerator.
y
Do not store articles on the top of the appliance.
y
Maintenance
Do not use strong detergents like wax or thinners for cleaning. Clean with a soft cloth.
y
Wipe foreign objects (such as dust and water) off the prongs of the power plug and contact
y
areas regularly.
Do not store, disassemble or repair the refrigerator by yourself.
y
Remove any dust or foreign matter from the power plug pins.
y
Do not use a wet or damp cloth when cleaning the plug.
y
If the refrigerator is disconnected from the power supply, you should wait for at least five
y
minutes before plugging it back in.
If you notice a chemical or burning plastic smell or see smoke, unplug the refrigerator
y
immediately and contact your LG Electronics Service Center.
READ ALL INSTRUCTIONS BEFORE USING THE APPLIANCE.
To reduce the risk of fire, electric shock, or personal injury when using your product, basic safety
precautions should be followed, including the following:
SAVE THESE INSTRUCTIONS
7
COMPONENTS
ENGLISH
COMPONENTS
Use this page to become more familiar with the parts and features of your refrigerator.
*The appearance and specifications of the actual product may differ depending on the model.
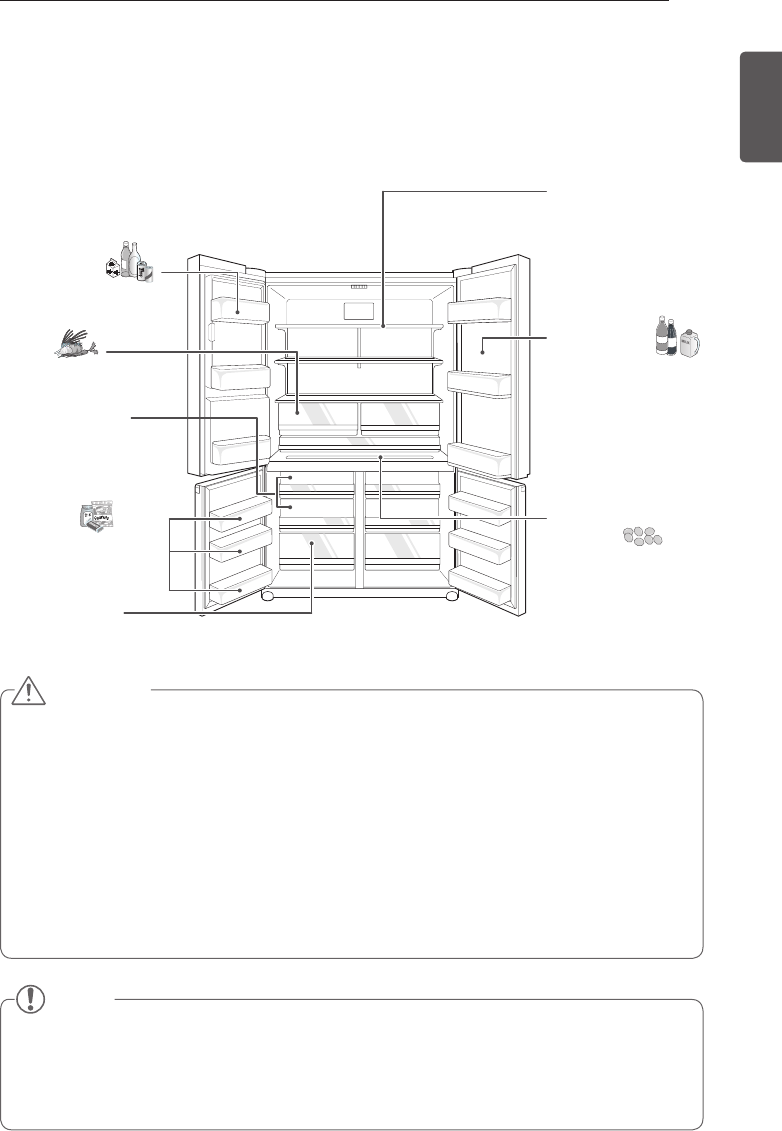
Refrigerator Exterior
Refrigerator
Preserves food.
Freezer
Preserves frozen food.
Dispenser Control Panel
Displays the icemaker and
dispenser modes and the water
filter status.
Filtered Water and
Ice Dispenser
Dispenses purified water and ice.
InstaView™
Door-in-Door®
Eclipse Display
Displays the refrigerator and
freezer target temperatures,
the air filter condition and the
network connection status.
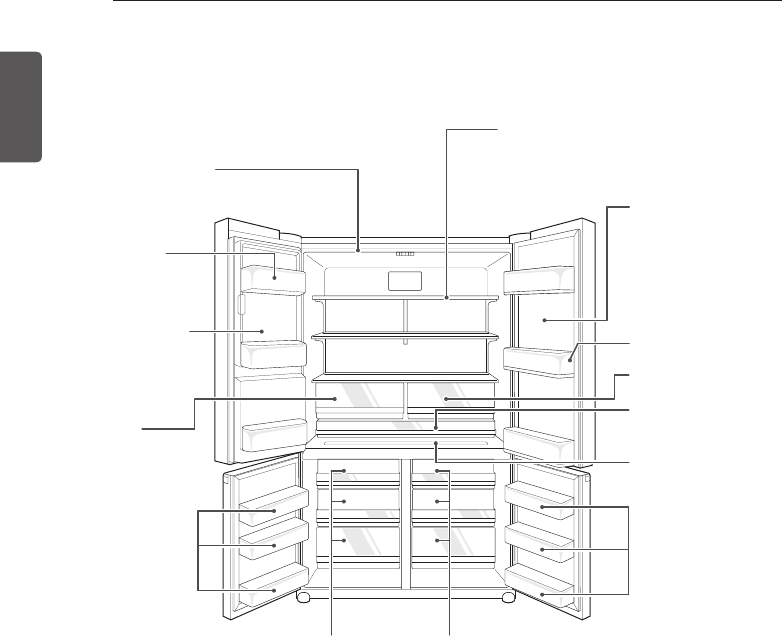
8COMPONENTS
ENGLISH
Refrigerator Interior
LED Interior Lamp
The interior lamps light up
the inside of the refrigerator.
Adjustable Refrigerator Shelf
The shelves in your refrigerator are adjustable
to meet your individual storage needs.
Refrigerator
Bin
Crisper
Freezer Bin
FreshSteel Container
CustomChill™
Pantry
Freezer
Drawer
Freezer
Drawer
Indoor Ice Bin
Ice cubes are
automatically
produced.
InstaView™
Door-in-Door®
See what's inside the
Door-in-Door compartment
without opening the door.
Keeps the cold air inside
and saves energy.
Condiment Bin
Crisper
Freezer Bin
9
INSTALLATION
ENGLISH
INSTALLATION
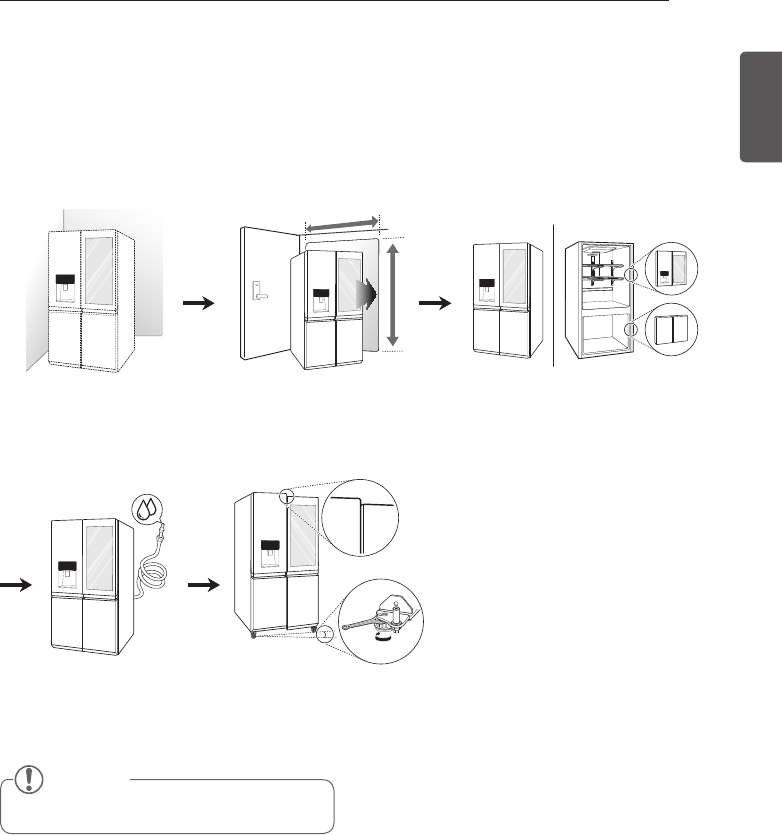
Installation Overview
Please read the following installation instructions first after purchasing this product or transporting
it to another location.
NOTE
Connect to potable water supply only.
1 Unpacking your
refrigerator
4 Connecting the
water supply and
water line
2 Choosing the proper
location
5 Leveling and Door
Alignment
3 Disassembling/Assembling
10 INSTALLATION
ENGLISH
Specifications
The appearance and specifications listed in this manual may vary due to constant product
improvements.
Bottom-freezer refrigerator model LUPXS3186N
Description French door refrigerator
Electrical requirements 115 VAC @ 60 Hz
Min./Max. Water pressure
20 - 120psi (138 - 827kPa)
Dimensions
35 7/8”(W) x 36 1/2”(D) x 70 1/4”(H) x 51 1/8”(D w/ door open)
912(W) X 929(D) X 1784(H) X 1298 mm (D w/ door open)
Net weight 483 lb. (219 kg)
Bottom-freezer refrigerator model LUPXC2386N
Description French door refrigerator
Electrical requirements 115 VAC @ 60 Hz
Min./Max. Water pressure
20 - 120psi (138 - 827kPa)
Dimensions
35 7/8”(W) x 29 5/8”(D) x 70 1/4”(H) x 44 3/16”(D w/ door open)
912(W) X 754(D) X 1784(H) X 1123 mm (D w/ door open)
Net weight 430 lb. (195 kg)

11
INSTALLATION
ENGLISH
Choosing the Proper Location
Select a place where a water supply can
y
be easily connected for the automatic
icemaker.
Unpacking the Refrigerator
WARNING
Use two or more people to move and
y
install the refrigerator. Failure to do so
can result in back or other injury.
Your refrigerator is heavy. When moving
y
the refrigerator for cleaning or service,
be sure to protect the floor. Always pull
the refrigerator straight out when moving
it. Do not wiggle or walk the refrigerator
when trying to move it, as floor damage
could occur.
Keep flammable materials and vapors,
y
such as gasoline, away from the
refrigerator. Failure to do so can result in
fire, explosion, or death.
Remove tape and any temporary labels from your
refrigerator before using. Do not remove any
warning-type labels, the model and serial number
label, or the Tech Sheet that is located under the
front of the refrigerator.
To remove any remaining tape or glue, rub the
area briskly with your thumb. Tape or glue residue
can also be easily removed by rubbing a small
amount of liquid dish soap over the adhesive with
your fingers. Wipe with warm water and dry.
Do not use sharp instruments, rubbing alcohol,
flammable fluids, or abrasive cleaners to remove
tape or glue. These products can damage the
surface of your refrigerator.
Refrigerator shelves are installed in the shipping
position. Please reinstall shelves according to
your individual storage needs.
The refrigerator should always be plugged
y
into its own individual properly grounded
electrical outlet rated for 115 Volts, 60 Hz,
AC only, and fused at 15 or 20 amperes.
This provides the best performance
and also prevents overloading house
wiring circuits which could cause a fire
hazard from overheated wires. It is
recommended that a separate circuit
serving only this appliance be provided.
WARNING
To reduce the risk of electric shock, do not
install the refrigerator in a wet or damp
area.
NOTE
The water pressure must be 20~120
psi or 138~827 kPa or 1.4~8.4 kgf/cm²
on models without a water filter and
40~120 psi or 276~827 kPa or 2.8~8.4
kgf/cm² on models with a water filter.
Flooring
To avoid noise and vibration, the unit must be
leveled and installed on a solidly constructed
floor. If required, adjust the leveling legs to
compensate for unevenness of the floor. The
front should be slightly higher than the rear to
aid in door closing. Leveling legs can be turned
easily by tipping the cabinet slightly. Turn the
leveling legs to the left to raise the unit or to
the right to lower it. (See Leveling and Door
AlIgnment.)
NOTE
Installing on carpeting, soft tile surfaces,
a platform or weakly supported structure
is not recommended.
12 INSTALLATION
ENGLISH
Ambient Temperature
Install this appliance in an area where the
temperature is between 55°F (13°C) and 110°F
(43°C). If the temperature around the appliance
is too low or high, cooling ability may be
adversely affected.
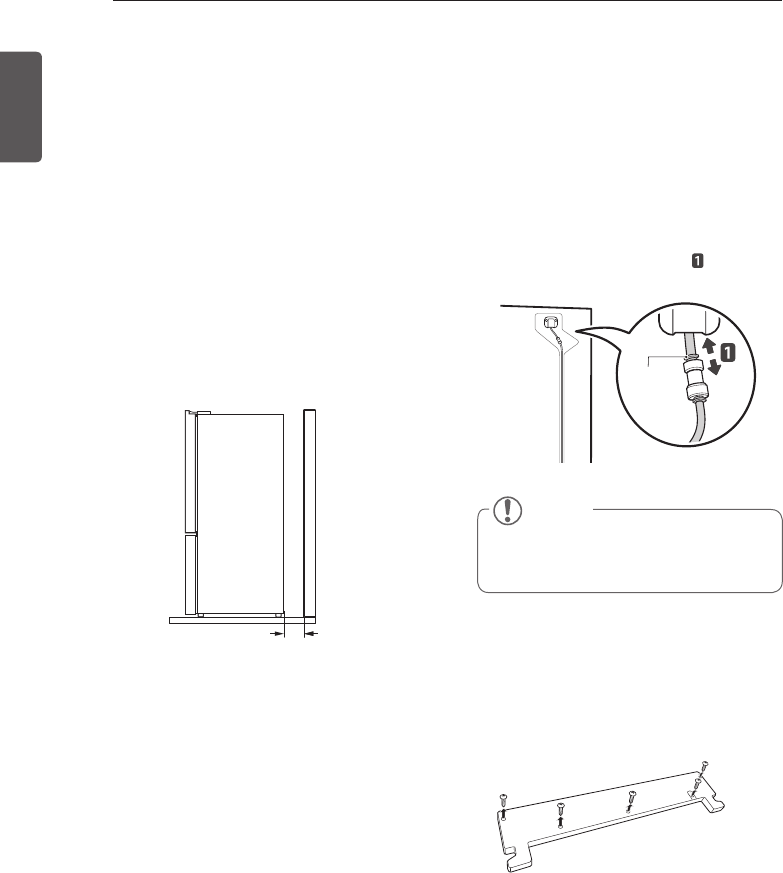
Measuring the Clearances
Too small of a distance from adjacent items
may result in lowered freezing capability and
increased electricity consumption charges.
Allow at least 24 inches (61 cm) in front of the
refrigerator to open the doors, and at least
2 inches (5.08 cm) between the back of the
refrigerator and the wall.
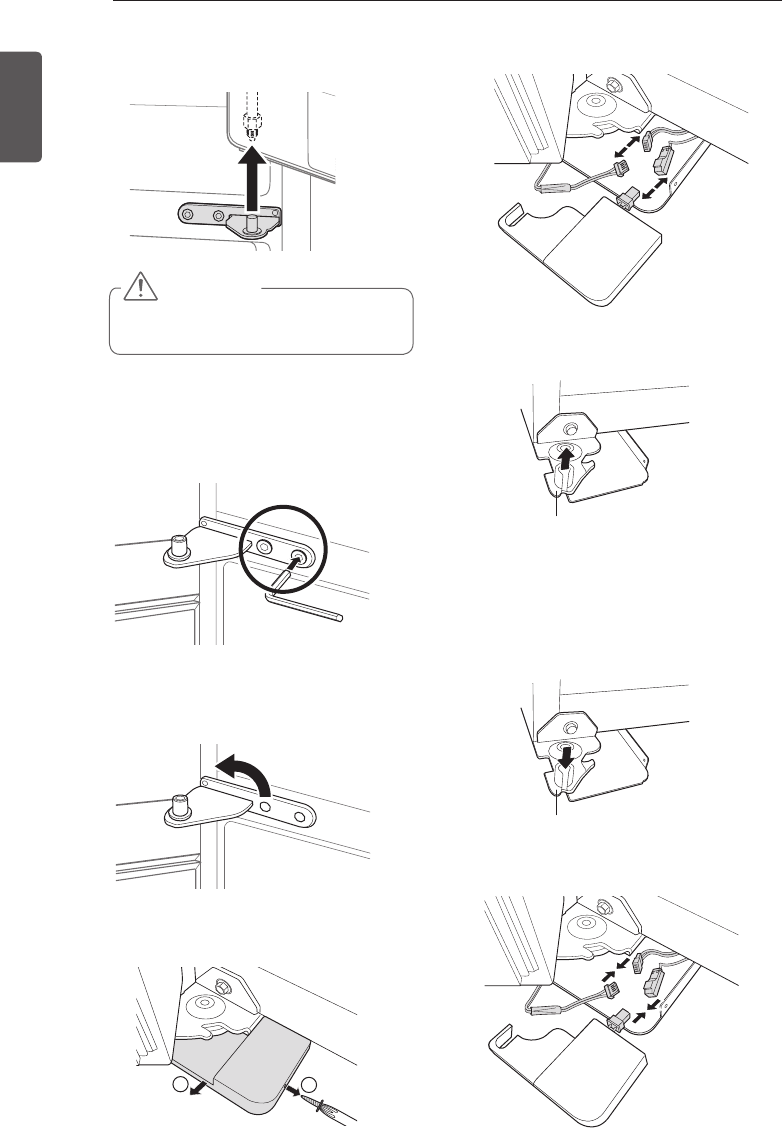
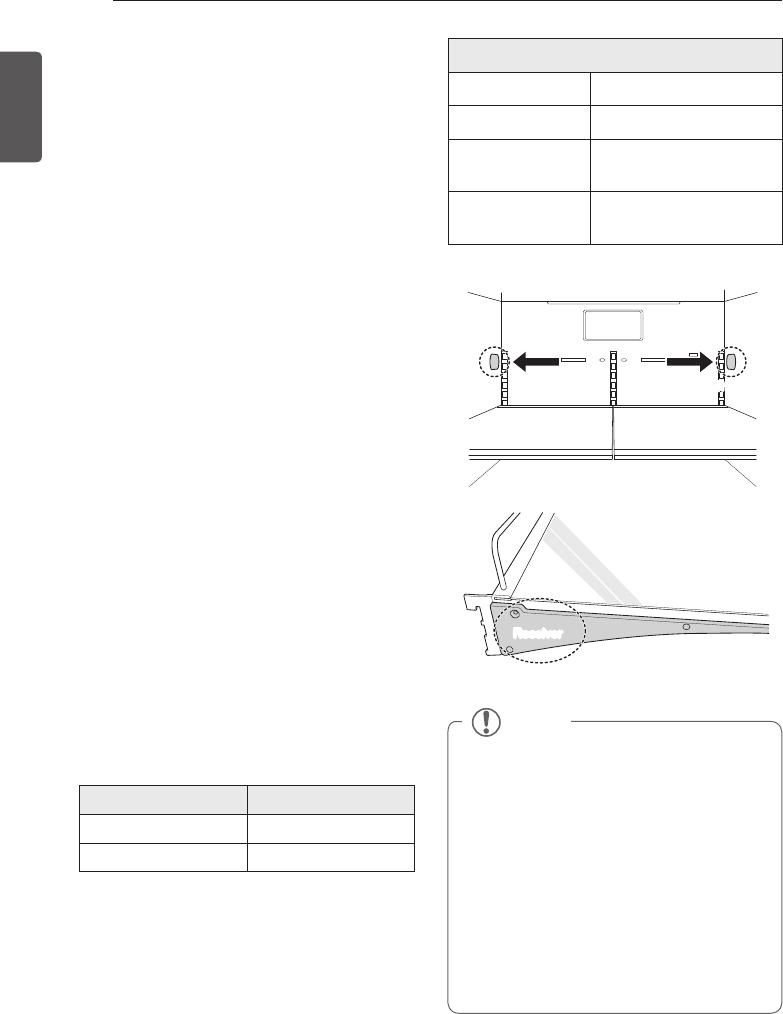
Removing/Assembling the Doors
2” (5.08 cm)
24” (61 cm)
Removing the Left Refrigerator Door
1 The water supply is connected to the
upper right part of the rear surface of the
refrigerator. Remove the ring in the joint
area. Hold the water supply connection
and gently push the collet to detach the
water supply line as shown in .
NOTE
Detachment of the water supply line is
applicable only when detaching the left
refrigerator door.
Collet
2 Remove the screws from the hinge cover
at the top of the refrigerator. Lift the
hook(not visible), located on the side of the
cover at the bottom edge, with a flat-head
screwdriver.

13
INSTALLATION
ENGLISH
3 Remove the cover and pull out the tube .
Disconnect all wire harnesses .
4 Rotate the hinge lever counterclockwise
. Lift the top hinge free of the hinge
lever latch.
CAUTION
When lifting the hinge free of the latch, be
careful that the door does not fall forward.
1
2
1
2
Hinge Lever Latch
5 Lift the door from the middle hinge pin and
remove the door.
CAUTION
Place the door, inside facing up, on a
non-scratching surface.
Removing the Right Refrigerator
Door
1 Remove the screws from the hinge cover
at the top of the refrigerator. Lift the
hook(not visible), located on the side of the
cover at the bottom edge, with a flat-head
screwdriver.
2 Detach the wire harness .
1
1
CAUTION
When lifting the hinge free of the hinge
lever latch, be careful that the door
does not fall forward.
3 Rotate the hinge lever clockwise.
Lift the top hinge free of the hinge
lever latch.
1
2
Hinge Lever Latch
14 INSTALLATION
ENGLISH
4 Lift the door from the middle hinge pin and
remove the door.
CAUTION
Place the door, inside facing up, on a
non-scratching surface.
3 Unscrew the screw that attaches the
lower hinge cover and remove the cover.
Removing the Freezer Doors
1 Remove the two hinge bolts.
2 Twist the hinge to raise the pivoting end
so that the door can be lifted off. Lift the
door off the lower hinge pin and remove it.
4 Disconnect all wire harnesses.
5 Remove the door by lifting it off the lower
hinge pin.
Assembling the Freezer Doors
1 Lower the door onto the lower hinge pin.
2 Connect the wire harnesses.
1
2
Lower hinge
15
INSTALLATION
ENGLISH
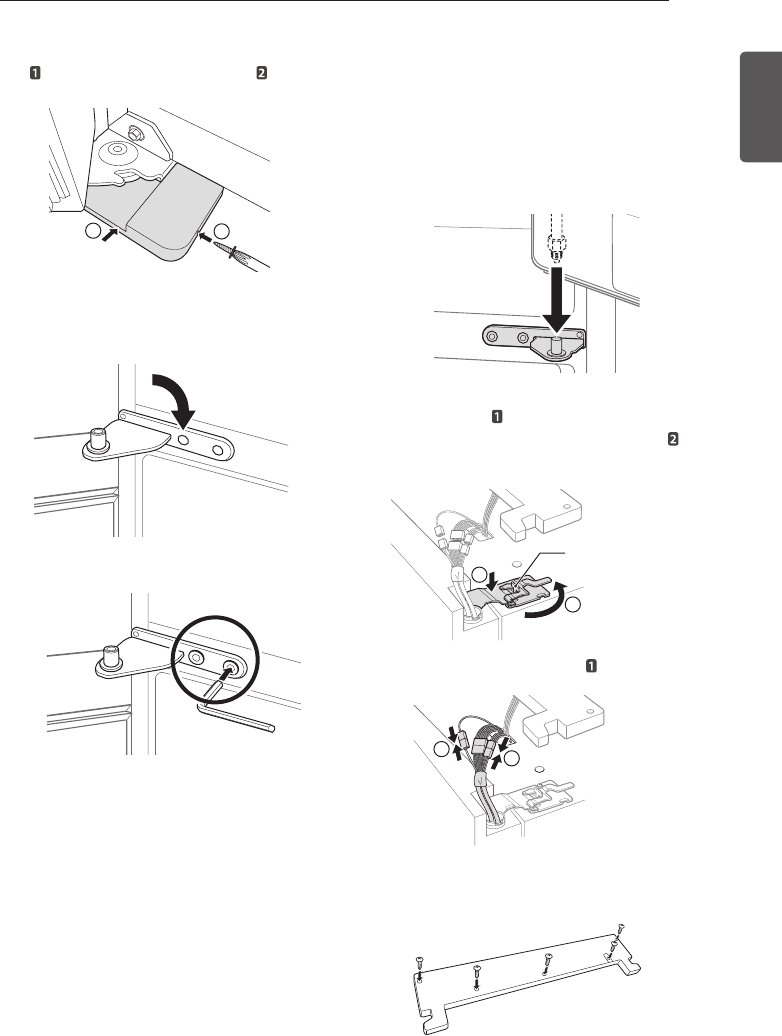
Install the right refrigerator door first.
1 Make sure that the plastic sleeve is
inserted in the bottom of the door. Lower
the door onto the middle hinge pin as
shown in the figure.
2 Fit the hinge over the hinge lever latch
and slot it into place. Rotate the lever
counterclockwise to secure the hinge.
3 Connect the wire harness .
4 Position the cover in its place. Insert and
tighten the cover screws.
3 Position the bottom hinge cover in its place
and tighten the cover screw .
4 Position the middle hinge pin in place to
hold the door and insert the two hinge
bolts.
5 Tighten the two hinge bolts.
Assembling the Right Refrigerator Door
2
1
Hinge Lever Latch
2
1
1
1
16 INSTALLATION
ENGLISH
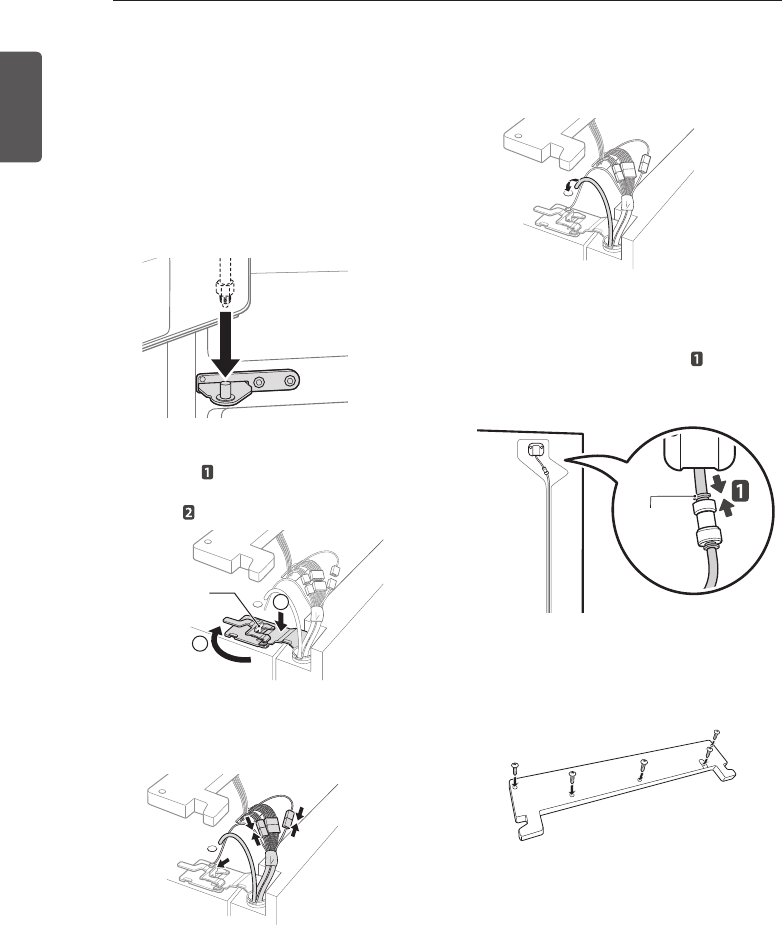
Install the left refrigerator door after the right
door is installed.
1 Make sure that the plastic sleeve is
inserted in the bottom of the door. Install
the refrigerator door onto the middle hinge
pin.
2 Fit the hinge over the hinge lever latch
and slot it into place. Rotate the lever
clockwise and fasten the hinge.
Assembling the Left Refrigerator
Door
3 Connect all the wire harnesses.
2
1
Hinge Lever Latch
4 Push the water supply tube into the hole
on the top case and pull it through the
backplate.
5 Hold the water supply connection and
gently push in the collet to connect the
water supply line as shown in . Insert
the tube at least 5/8 inch (15 mm) into the
connector.
6 Position the cover in its place. Insert and
tighten the cover screws.
Collet
17
INSTALLATION
ENGLISH
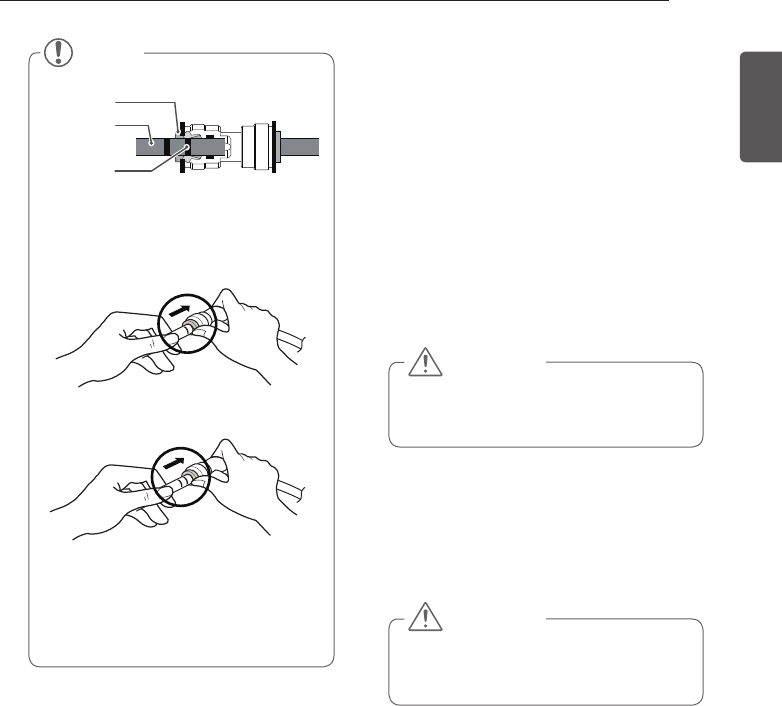
NOTE
1) Gently insert the tube until only one
line shows on the tube.
(Correct)
(Incorrect)
2) Pull the tube to make sure that the
tube is tightly fastened.
Collet
Tube
Insert Line
Connecting the Water Line
Before You Begin
This water line installation is not covered by the
refrigerator warranty. Follow these instructions
carefully to minimize the risk of expensive water
damage.
Water hammer (water banging in the pipes) in
house plumbing can cause damage to refrigerator
parts and can lead to water leakage or flooding.
Call a qualified plumber to correct water hammer
before installing the water supply line to the
refrigerator.
If you use your refrigerator before connecting
the water line, make sure the icemaker power
switch on the control panel is in the OFF
position.
CAUTION
Do not install the icemaker tubing in
areas where temperatures fall below
freezing.
CAUTION
To prevent burns and product damage,
only connect the refrigerator water line to
a cold water supply.
18 INSTALLATION
ENGLISH
CAUTION
Wear eye protection during installation
to prevent injury.
Water Pressure
The water pressure must be 20~120 psi or
138~827 kPa or 1.4~8.4 kgf/cm² on models
without a water filter and 40~120 psi or 276~827
kPa or 2.8~8.4 kgf/cm² on models with a water
filter.
If a reverse osmosis water filtration system is
connected to the cold water supply, this water
line installation is not covered by the refrigerator
warranty. Follow the instructions carefully to
minimize the risk of expensive water damage.
If a reverse osmosis water filtration system is
connected to the cold water supply, the water
pressure to the reverse osmosis system needs
to be a minimum of 40 to 60 psi (276~414 kPa or
2.8~4.2 kgf/cm², less than 2.0~3.0 sec. to fill a
cup of 7 oz or 198 cc capacity).
If the water pressure from the reverse osmosis
system is less than 20 psi or 138 kPa or 1.4 kgf/
cm² (takes more than 4.0 sec to fill a cup of 7 oz
or 198 cc capacity):
Check to see if the sediment filter in
y
the reverse osmosis system is blocked.
Replace the filter if necessary.
Allow the storage tank on the reverse
y
osmosis system to refill after heavy
usage.
If the issue concerning water pressure
y
from reverse osmosis remains, call a
licensed, qualified plumber.
All installations must be in accordance
y
with local plumbing code requirements.
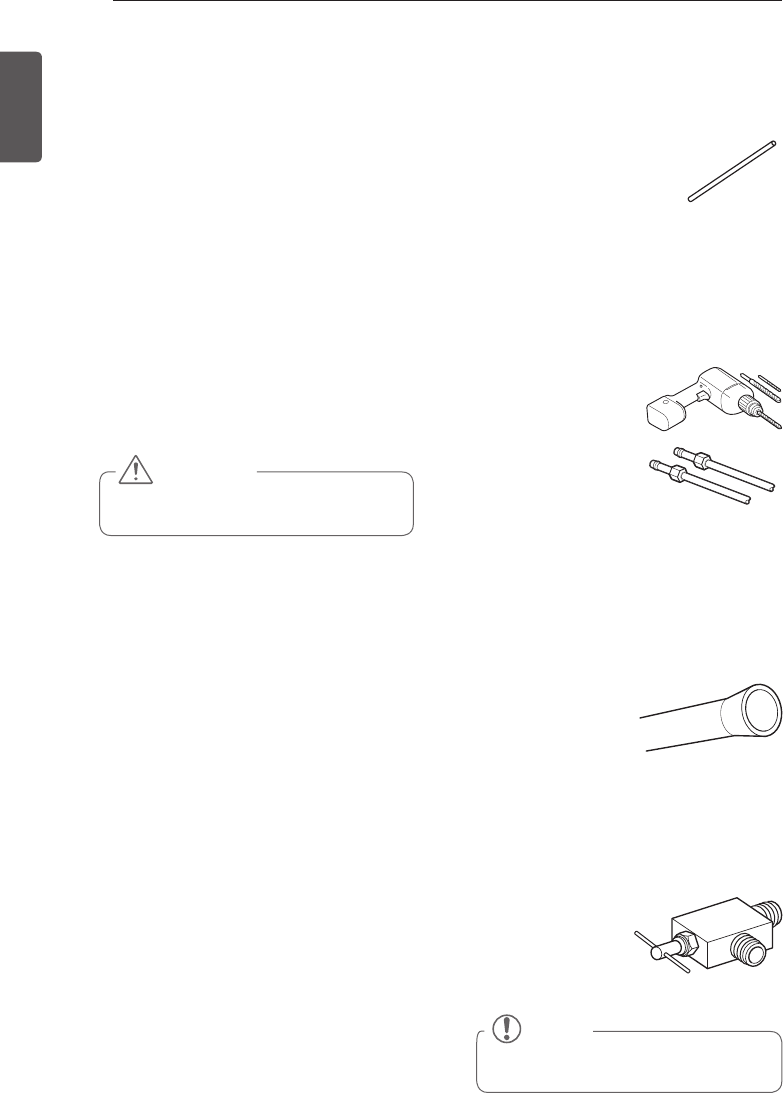
What You Will Need
Copper Tubing,
y ¼ in. outer diameter, to
connect the refrigerator to the water
supply. Be sure both ends of the tubing
are cut square.
To determine how
y
much tubing you need:
measure the distance
from the water valve on the back of
the refrigerator to the water supply
pipe. Then, add 8 feet (2.4 m). Be sure
there is sufficient extra tubing (about 8
feet [2.4 m] coiled into 3 turns of about
10 in. [25 cm] diameter) to allow the
refrigerator to move out from the wall
after installation.
Power drill.
y
½ in. or adjustable
y
wrench.
Flat blade and Phillips
y
head screwdrivers.
Two ¼ in. outer
y
diameter compression
nuts and 2 ferrules (sleeves) to connect the
copper tubing to the shutoff valve and
the refrigerator water valve.
NOTE
A self piercing saddle type water valve
should not be used.
If your existing copper water line has a
y
flared fitting at the end, you will need
an adapter (available at plumbing supply
stores) to connect the water line to the
refrigerator OR you
can cut off the flared
fitting with a tube
cutter and then use a
compression fitting.
Shutoff valve
y to connect to the cold
water line. The shutoff valve should
have a water inlet with a minimum
inside diameter of 5/32 in. at the point of
connection to the COLD WATER LINE.
Saddle-type shutoff valves are included
in many water
supply kits. Before
purchasing, make
sure a saddle-type
valve complies with
your local plumbing codes.
19
INSTALLATION
ENGLISH
NOTE
The hookup line cannot be white, plastic
tubing. Licensed plumbers must use
only copper tubing (NDA tubing #49595
or #49599) or Cross Link Polyethylene
(PEX) tubing.
Water Line Installation Instructions
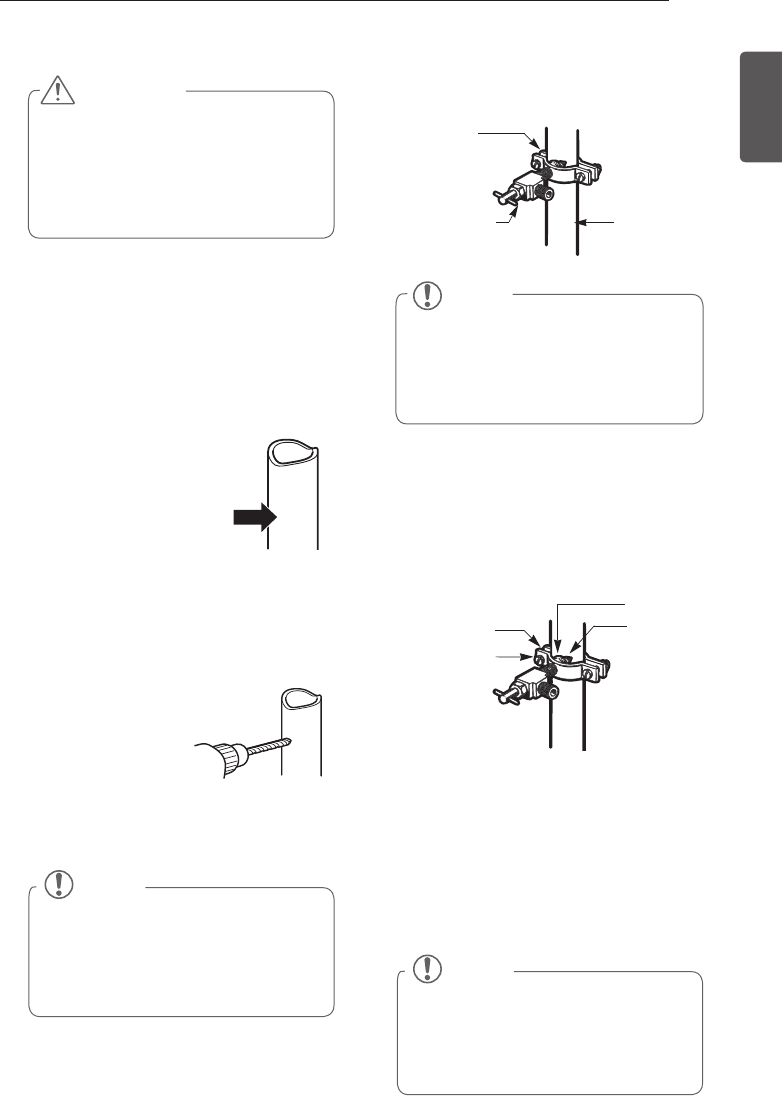
Install the shutoff valve on the nearest
frequently used drinking water line.
1 SHUT OFF THE MAIN WATER SUPPLY
Turn on the nearest faucet to relieve the
pressure on the line.
2 CHOOSE THE VALVE LOCATION
Choose a location for
the valve that is easily
accessible. It is best to
connect into the side of a
vertical water pipe. When
it is necessary to connect
into a horizontal water
pipe, make the connection to the top or
side, rather than at the bottom, to avoid
drawing off any sediment from the water
pipe.
3 DRILL THE HOLE FOR THE VALVE
Drill a ¼ in. hole in
the water pipe using
a sharp bit. Remove
any burrs resulting
from drilling the hole
in the pipe. Be careful
not to allow water
to drain into the drill. Failure to drill a ¼ in.
hole may result in reduced ice production
or smaller cubes.
WARNING
When using any electrical device
(such as a power drill) during
installation, be sure the device is
battery powered, double insulated
or grounded in a manner that will
prevent the hazard of electric shock.
4 FASTEN THE SHUTOFF VALVE
Fasten the shutoff valve to the cold water
pipe with the pipe clamp.
Pipe Clamp
Saddle-Type
Shutoff Valve Vertical Cold
Water Pipe
NOTE
Commonwealth of Massachusetts
Plumbing Codes 248CMR shall be adhered
to. Saddle valves are illegal and their use is
not permitted in Massachusetts. Consult
with your licensed plumber.
5 TIGHTEN THE PIPE CLAMP
Tighten the clamp screws until the sealing
washer begins to swell.
NOTE: Do not overtighten the clamp or
you may crush the tubing.
6 ROUTE THE TUBING
Route the tubing between the cold water
line and the refrigerator.
Route the tubing through a hole drilled in
the wall or floor (behind the refrigerator or
adjacent base cabinet) as close to the wall
as possible.
Pipe Clamp
Clamp Screw
Washer
Inlet End
NOTE
Be sure there is sufficient extra tubing
(about 8 feet coiled into 3 turns of
about 10 in. diameter) to allow the
refrigerator to move out from the wall
after installation.
20 INSTALLATION
ENGLISH
7 CONNECT THE TUBING TO THE VALVE
Place the compression nut and ferrule
(sleeve) for the copper tubing onto the
end of the tubing and connect it to the
shutoff valve. Make sure the tubing is
fully inserted into the valve. Tighten the
compression nut securely.
8 FLUSH OUT THE TUBING
Turn the main water
supply on and flush out
the tubing until the water
is clear.
Shut the water off at the
water valve after about
one quart of water has
been flushed through the tubing.
9 CONNECT THE TUBING TO THE
REFRIGERATOR
NOTE: Before making the connection
to the refrigerator, be sure that the
refrigerator power cord is not plugged into
the wall outlet.
a. Remove the plastic flexible cap from the
water valve.
b. Place the compression nut and ferrule
(sleeve) onto the end of the tubing as
shown.
c. Insert the end of the copper tubing into
the connection as far as possible. While
holding the tubing, tighten the fitting.
Tubing Clamp ¼ in. Tubing
¼ in.
Compression
Nut
Refrigerator
Connection
Ferrule
(sleeve)
Saddle-Type
Shutoff Valve
Packing Nut
Outlet Valve
Compression
Nut
Ferrule (sleeve)
10 TURN THE WATER ON AT THE SHUTOFF
VALVE
Tighten any connections that leak.
11 PLUG IN THE REFRIGERATOR
Arrange the coil of tubing so that it
does not vibrate against the back of the
refrigerator or against the wall. Push the
refrigerator back to the wall.
12 START THE ICEMAKER
Turn the icemaker ON at the control panel.
The icemaker will not begin to operate
until it reaches its operating temperature
of 15°F (–9°C) or below. It will then begin
operation automatically if the icemaker has
been turned ON.
Turning On The Power
Plug in the refrigerator.
CAUTION
Check to see if leaks occur at the water
line connections.
CAUTION
Connect to a rated power outlet.
y
Have a certified electrician check
y
the wall outlet and wiring for proper
grounding.
Do not damage or cut off the ground
y
terminal of the power plug.
21
INSTALLATION
ENGLISH
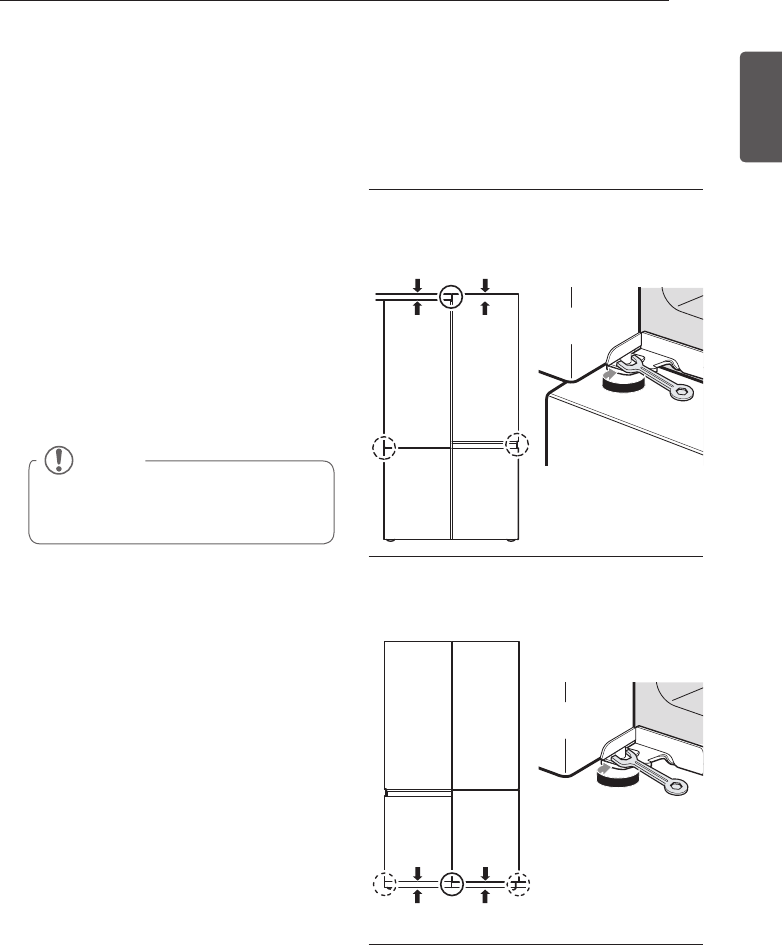
Door Alignment
If the floor is not flat, the door heights may
differ. In this case, use the following method
to adjust the difference.
Adjusting Door Height
Adjusting Fridge Door
Height
Height difference
Open the fridge door
and use a wrench to
rotate the door hinge
bolt as shown.
Fridge door
Freezer door
Adjusting Freezer
Door Height
Height difference
Open the freezer door
and use a wrench to
rotate the door hinge
bolt as shown.
Freezer door
Leveling
After installing, plug the refrigerator’s power
cord into a 3-prong grounded outlet and push
the refrigerator into the final position.
The refrigerator has two front leveling legs—
one on the right and one on the left. Adjust the
legs to alter the tilt from front-to-back or side-
to-side. If the refrigerator seems unsteady, or
you want the doors to close more easily, adjust
the refrigerator’s tilt using the instructions
below:
1 Turn the leveling leg to the left to raise
that side of the refrigerator or to the right
to lower it. It may take several turns of the
leveling leg to adjust the tilt of the
refrigerator.
2 Open both doors again and check to make
sure that they close easily. If the doors do
not close easily, tilt the refrigerator slightly
more to the rear by turning both leveling
legs to the left. It may take several more
turns, and you should turn both leveling
legs the same amount.
NOTE
A flare nut wrench works best, but an
open-end wrench will suffice.
Do not over-tighten.
22 HOW TO USE
ENGLISH
HOW TO USE
Before use
Clean the refrigerator.
Clean the refrigerator thoroughly and wipe off all dust that accumulated during
shipping.
NOTE
Remove adhesive residue by wiping it off with your thumb or dish detergent.
CAUTION
Do not scratch the refrigerator with a sharp object or use a detergent that
y
contains alcohol, a flammable liquid or an abrasive when removing any tape
or adhesive from the refrigerator,.
Do not peel off the model or serial number label or the technical information
y
on the rear surface of the refrigerator.
Connect the power supply.
Check if the power supply is connected before use.
Read the “Turning On The Power” section.
CAUTION
Running the automatic icemaker before connecting it to the water
supply may cause the refrigerator to malfunction.
Turn off the icemaker if the refrigerator is not yet connected to the
water supply.
Turn off the automatic icemaker and then plug the power plug of the refrigerator
into the grounded electrical outlet.
* This is applicable only to certain models.
CAUTION
Putting food in the refrigerator before it has cooled could cause the
food to spoil, or a bad odor could linger inside the refrigerator.
Wait for the refrigerator to cool.
Allow your refrigerator to run for at least two to three hours before putting food in
it. Check the flow of cold air in the freezer compartment to ensure proper cooling.
The refrigerator makes a loud noise after initial operation.
This is normal. The volume will decrease as the temperature lowers.
Open refrigerator and freezer doors to ventilate the interior.
The inside of the refrigerator may smell like plastic at first. Remove any adhesive
tape from inside the refrigerator and open the refrigerator and the freezer doors for
ventilation.
23
HOW TO USE
ENGLISH
Eclipse Display
Depending on the model, some of the following functions may not be available.
Eclipse Display Features
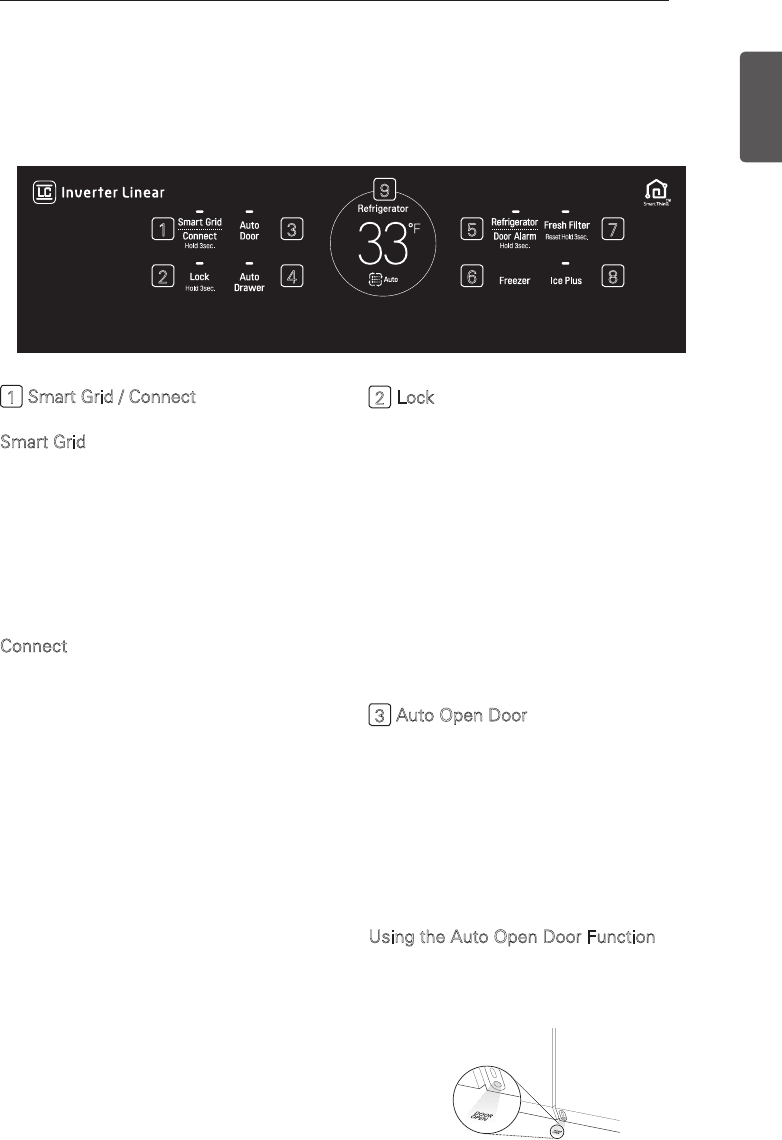
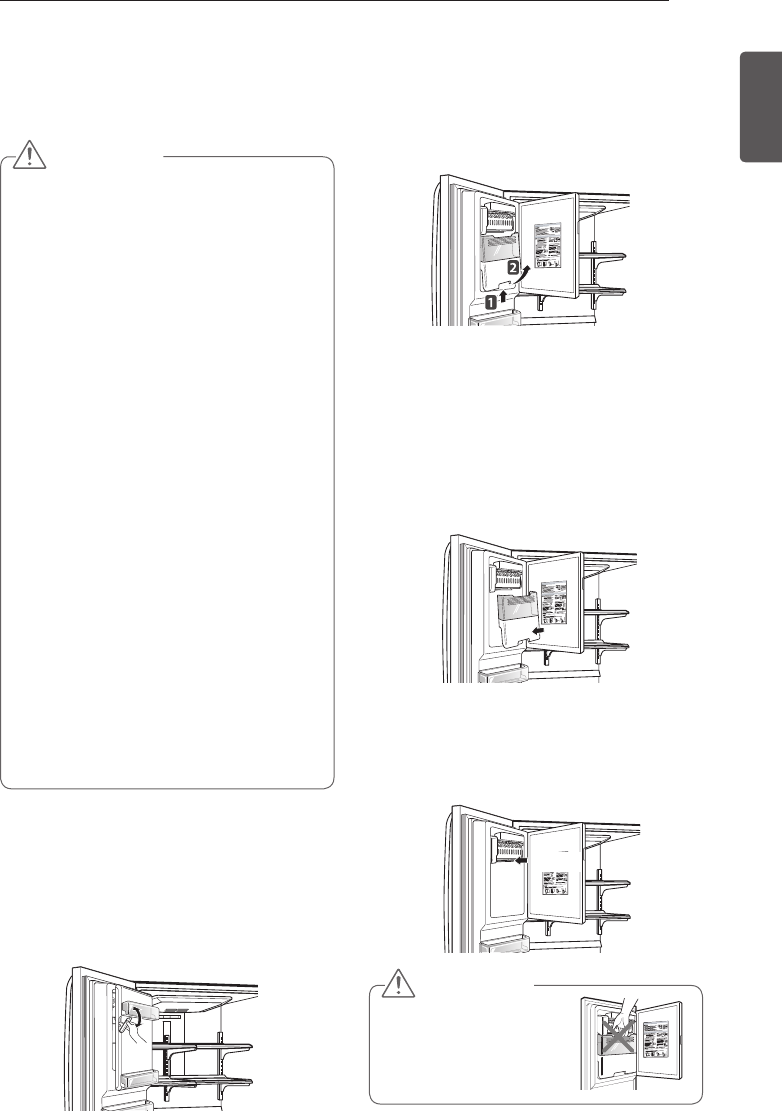
2 Lock
The Lock function disables every other button on
the display.
When power is initially connected to the
y
refrigerator, the Lock function is off.
To activate the Lock function, press and
y
hold the Lock button until the lock indicator
appears in the display. The other buttons are
now disabled.
To disable the Lock function, press and hold
y
the Lock button for approximately three
seconds.
3 Auto Open Door
The right refrigerator door opens automatically
if you place a foot near the motion sensor at the
bottom of the door. This is convenient when
you have both hands full of groceries and need
to open the refrigerator door. To set the Auto
Open Door function, press the button repeatedly
to toggle between the ON, Sound Off, and OFF
settings.
Using the Auto Open Door Function
When the Auto Open Door Function is 1.
enabled, text is displayed on the floor near
the motion sensor.
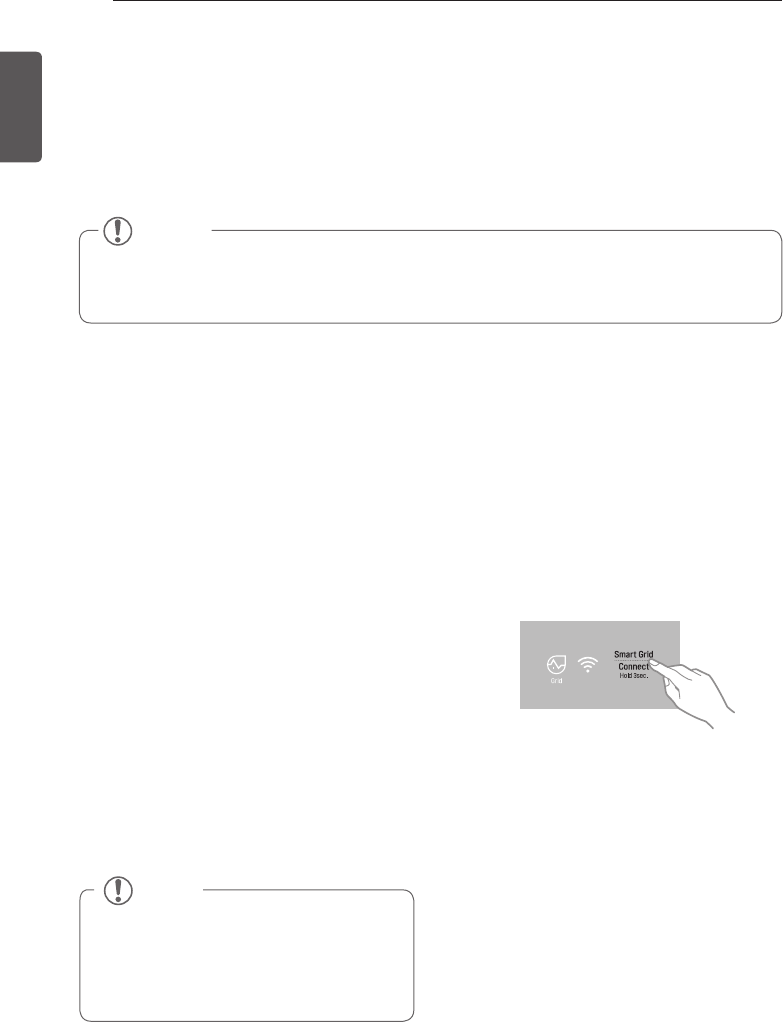
1 Smart Grid / Connect
Smart Grid
Press the Smart Grid button to turn the Smart
Grid function On/Off. When the function is on,
the icon illuminates. The Smart Grid function
automatically turns on when the refrigerator
is connected to the Wi-Fi network. When the
refrigerator is responding to a Demand Response
(DR) message from the electric company, the
Grid text illuminates.
Connect
The Connect button, when used with the LG
Electronics Smart Refrigerator smart phone app,
allows the refrigerator to connect to your home’s
Wi-Fi network. Refer to the
Smart Features
section for information on the initial setup of the
application. The Connect icon indicates the status
of the refrigerator’s network connection. When
the refrigerator is connected to the network, the
Connect icon is illuminated. Press and hold the
Connect button for 3 seconds to connect to the
network. The icon will blink while the connection
is being made, then turn on once the connection
is successfully made. To disconnect, press and
hold the button again.
7
8
5
6
9
3
42
1

24 HOW TO USE
ENGLISH
Using Auto Open Drawer
Open the freezer door at least 85 degrees to
automatically open the drawers. Slowly close the
door to automatically close the drawers.
4 Auto Open Drawer
When Auto Open Drawer is enabled, the freezer
drawers automatically open when the freezer
door is opened. The drawers automatically close
when the freezer door is closed.
Setting Auto Open Drawer
Press Auto Drawer to activate or deactivate the
function. When the function is activated, an icon
appears on the display.
5 Refrigerator/Door Alarm
Refrigerator
Indicates the set temperature of the
y
refrigerator compartment in Celsius (°C) or
Fahrenheit (°F). The refrigerator temperature
control ranges from 33°F to 46°F (1°C to 8°C).
The recommended temperature setting for the
refrigerator compartment is 37°F (3°C).
Door Alarm
The door alarm sounds when a refrigerator
y
or freezer door is left open for more than 60
seconds.
To stop the alarm, close the doors.
y
The door alarm is enabled by default. To disable
y
the door alarm, press and hold Door Alarm for
three seconds.
2. Pass one foot in front of the motion sensor
and step on the displayed text. The right
door opens. If the door opens less than 20
degrees and is not opened further, it will
close automatically after 3 seconds.
CAUTION
Do not use excessive force to push or
y
pull the freezer drawers.
Do not slam the freezer door shut
y
while the drawers are open.
Failure to follow these warnings may
result in personal injury or damage to
the product.
NOTE
The displayed text may not
y
be readable on some flooring
materials, but this will not affect the
performance of the Auto Open Door
function.
If flooring material is highly reflective
y
(metal, glass tile), the motion sensor
may malfunction and the Auto Open
Door function may not work properly.
Reflective objects placed in front of
y
the motion sensor may cause the text
to display, but the text disappears if
no movement is detected.
NOTE
Place your foot close enough to the
sensor that the text appears on top of
the foot, not just on the toes.
More than 85°
CAUTION
Disable the Auto Open Door function
if you have young children or people
lacking in cognitive ability in the home.
They could be injured if the door opens
unexpectedly while they are nearby.
25
HOW TO USE
ENGLISH
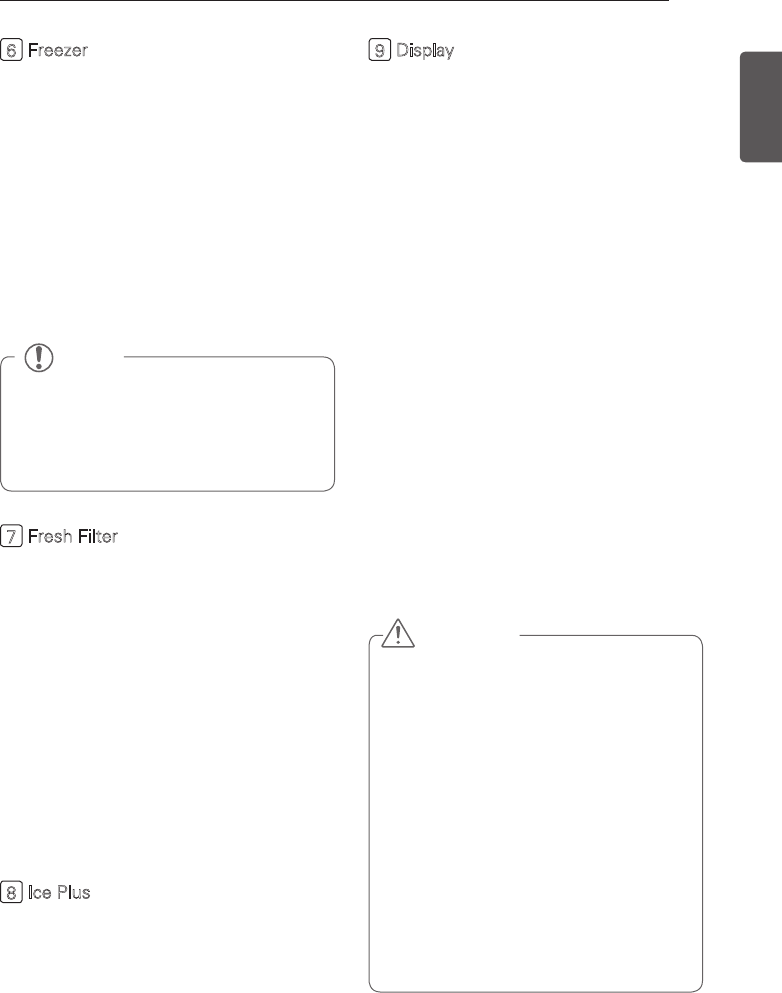
6 Freezer
Indicates the set temperature of the freezer
compartment in Celsius (°C) or Fahrenheit (°F).
The freezer temperature control ranges from
-6°F to 8°F (-21°C to -13°C). The recommended
temperature setting for the freezer compartment
is 0°F (-18°C).
To change the temperature mode from °F to °C
(or vice versa) press and hold the Refrigerator
and Freezer temperature buttons simultaneously
for approximately five seconds. The temperature
indication on the display window switches
between Celsius and Fahrenheit.
7 Fresh Filter
The Fresh Air Filter helps remove odors from the
refrigerator. The Fresh Air Filter has two settings,
Auto and Power(PWR). In Auto mode, the Fresh
Air Filter will cycle on and off in increments of
ten minutes on and 110 minutes off. If set to the
Power(PWR) mode, the Fresh Air Filter will stay
on continuously for four hours, cycling on and off
in increments of ten minutes on and five minutes
off. After four hours, the Fresh Air Filter will
switch back to Auto mode.
Press the Fresh Air Filter button once for
y
Power(PWR) mode.
Press the Fresh Air Filter button again to
y
switch back to Auto mode.
8 Ice Plus
This function increases both ice making and
freezing capabilities.
Press Ice Plus to illuminate the icon in the
y
display and activate the function for 24 hours.
After 24 hours, the icon and the function
automatically turn off.
To deactivate the function manually, press Ice
y
Plus again.
9 Display
The display indicates the current status of the
refrigerator. Press any button to display the
current setting for that function.
To turn the interior display on, open a
y
refrigerator or freezer door or knock twice
on the InstaView™Door-in-Door® to activate
the interior LED
The interior display turns off automatically
y
five seconds after all the doors are closed or
five seconds after you have knocked twice
on the InstaView™Door-in-Door®.
The interior display buttons operate using
y
static electricity. Wear gloves while cleaning
to avoid activating button functions.
Keep the display clean and free from foreign
y
substances. Skin must contact the buttons
directly for them to properly function.
Wipe any moisture off the display before
y
using it. Moisture on the display may
interfere with the functioning of the buttons.
Using the Interior Display
CAUTION
Display Mode (For Store Use Only)
The Display Mode disables all cooling in the
refrigerator and freezer sections to conserve
energy while on display in a retail store. When
you turn on the interior display, “Demo Mode”
appears in the display.
To deactivate / activate:
With InstaView™Door-in-Door® opened, press
and hold the Refrigerator and Ice Plus buttons
at the same time for five seconds. When demo
mode is activated, the control panel will beep
and the temperature settings will display as
“Demo Mode” for five seconds and then return
to normal temperature display. Use the same
procedure to deactivate the Display Mode.
NOTE
The displayed temperature is the target
temperature, and not the actual temperature
of the refrigerator. The actual refrigerator
temperature depends on the food inside the
refrigerator.
26 HOW TO USE
ENGLISH
Smart Features
To use the Smart Features on your refrigerator, you will need the following devices and apps:
1. a wireless router and home Wi-Fi network
2. the LG Smart Grid refrigerator
3. an Android-based smart phone
4. the LG Smart Refrigerator app from the Google Play Store.
Setting Up the Smart App and Connecting the Refrigerator
1 Create an account at Smart ThinQ.
https://us.smartthinq.com/
You will use the ID and password from this
account in the smart phone application.
2 Download the smart phone app from the
Google Play Store. (LG Smart Refrigerator
app)
3 In the app, select the Smart Model.
4 Log in to the app using the Smart ThinQ ID
and password created in step 1.
5 When prompted, select the Non Touch
Screen Model.
6 Choose your home wireless router
from the list of routers in the app. Your
refrigerator and smart phone must both be
connected to the same Wi-Fi network.
7 If necessary, enter the password for your
router and click the connect button in the
app.
8 Make sure the refrigerator display is active
by pressing any button. Press and hold the
Smart Grid button on the refrigerator for
three seconds. The Connect LED should
blink while the connection is being made.
9 The app will automatically go through the
process of registering your product on
the network, using the information you’ve
provided. This may take some time, and
the Connect LED will continue to blink
during this process. After the registration
process is completed, a message is
displayed and the app will proceed to the
Home screen.
10 Check that the Connect LED is illuminated
to confirm that the Wi-Fi network is
connected. You can now use the app
to control the Smart Features on your
refrigerator.
NOTE
To use the Smart Grid feature, you must also register for the Smart Grid (Demand Response)
service with your local electric utility company. The company must provide Demand Response
service.
NOTE
You must connect the refrigerator to the
internet using a wireless router on your
home network. Tethering to a mobile phone,
hotspot, or an unsecured network, for
example, will cause unstable functionality.

27
HOW TO USE
ENGLISH
LG Smart Refrigerator App - What’s
Included
Food Manager
Allows you to keep track of items in your
refrigerator and freezer, so you can be alerted
when they are near their use-by dates, generate
grocery lists, and link to related recipes.
Recipes
Features recipes from the Food Channel,
searchable by ingredient, course, cuisine, total
time required, and the food in your refrigerator
(if entered in the Food Manager). Automatically
makes grocery lists from chosen recipes.
Grocery
Makes and manages grocery lists from items in
your refrigerator or recipes.
Refrigerator Manager
Allows you to control the refrigerator and freezer
temperature settings, air filter, water filter, Ice
Plus, Smart Saving, and Energy Monitoring from
your smart phone.
Smart Diagnosis
Allows you to diagnose and troubleshoot
problems with your refrigerator.
Settings
Allows you to set various options on the
refrigerator and in the app.
Smart Grid Function
When the refrigerator operates in Smart Grid
mode, the Smart Refrigerator function can control
energy usage or delay the operation of some
functions to save energy during peak usage
periods.
You can override the Smart Grid function
y
at any time (using the Smart Grid button or
application).
To use the Smart Grid function, you need to
y
register your appliance with your electric utility
company.
Using the Smart Grid Function
This feature responds to notification events
from your utility company to run high energy-
consuming tasks during off-peak periods when
demand is lower. These notification events are
known as Demand Response signals.
If the refrigerator receives a Demand Response
signal from the utility company, the refrigerator
will turn on the Grid LED on the refrigerator
display and control its power consumption
according to the signal.
The refrigerator will respond to the signals
received from the utility company as long as
product performance is maintained.
If the refrigerator receives a Demand Response
signal, the refrigerator will operate in Delay
Appliance Load (DAL) or Temporary Appliance
Load Reduction (TALR) mode.
Delay Appliance Load (DAL): The refrigerator
responds to a DAL signal by providing a moderate
load reduction for the duration of the delay period.
This mode controls functions that consume a lot
of energy such as adjusting the cooling system,
running the defrost cycle, and making ice.
- When the refrigerator operates in DAL mode,
the Grid LED is illuminated on the refrigerator
display.
- DAL mode is automatically deactivated after it
lasts for the amount of time stipulated by the
DAL signal (max. 4 hours) or when you override
the Smart Grid function.
Temporary Appliance Load Reduction (TALR) :
The refrigerator responds to a TALR signal by
aggressively reducing the load for a short time
period, typically 10 minutes. This mode reduces
energy consumption by stopping the compressor
and controlling the functions that consume a lot
of energy such as the defrost cycle and fan.
- When the refrigerator operates in TALR mode,
the Grid LED is illuminated on the refrigerator
display.
- TALR mode is automatically deactivated after it
lasts for the received duration (max. 10 minutes),
or when you override the Smart Grid function.
The mode is immediately deactivated and the
refrigerator returns to its normal state when the
door is opened or closed, or the dispenser is
used.

28 HOW TO USE
ENGLISH
Smart Features (continued)
Override Smart Grid Mode
If you want the refrigerator to ignore the Demand
Response signal from the utility company, you
can override the Smart Grid function by pushing
the Smart Grid button while the refrigerator is in
Smart Grid mode.
When you override the Smart Grid function, the
refrigerator ignores the Demand Response signal
and is no longer controlled by the utility company
until the next Demand Response signal is sent.
You can also override the Smart Grid function
using the smart phone app.
Open API
LG Open API
You can manage Smart Grid features for the LG
Smart Refrigerator.
Please check the detailed specifications on the
notice page on us.smartthinq.com.
API list :
Demand response
- Send demand response signal
Power saving
- Set saving mode
- Get schedule of DR/Delay Defrost
Energy monitoring
- Get setting temperature
- Get door open event
- Get energy consumption
Delay defrost capability
- Insert a delay defrost schedule event
- Update a delay defrost schedule event
- Delete a delay defrost schedule event
- Get the delay defrost schedule
Smart Grid Application Features
1 Smart Saving_Demand Response
You can lower energy usage based on
Demand Response (DR) signals from the
utility company.
If the refrigerator is operating in Smart
Saving mode according to the DR signal,
you can see a pop up.
Smart Saving_Delay Defrost
Lower energy usage based on time period.
2 Energy monitoring
The refrigerator can check number of door
openings and power consumption.
3 Remote Control
You can control the Refrigerator
Temperature, Fresh Air Filter and Ice Plus
from the smart phone app.
4 Push messages.
- When the door is open over ten minutes,
you will receive a push message.
- When Ice Plus is finished, you will receive
a push message.
Open Source Software Notice
Information
To obtain the source code that is contained in
this product that was developed under GPL,
LGPL, MPL, and other open source licenses,
visit http://opensource.lge.com. In addition to the
source code, all referred license terms, warranty
disclaimers and copyright notices are available for
download.
LG Electronics will also provide open source code
on CD-ROM for a charge covering the cost of
performing such distribution (such as the cost
of media, shipping, and handling) upon email
request to opensource@lge.com. This offer is
valid for three (3) years from the date on which
you purchased the product.
Wireless LAN module Specifications
Model LCW-003
Frequency Range 2412 to 2462MHz
Output Power
(Max.)
IEEE 802.11b: 17.56 dBm
IEEE 802.11g: 25.53 dBm
IEEE 802.11n: 25.29 dBm

29
HOW TO USE
ENGLISH
FCC Notice (For transmitter module
contained in this product)
This equipment has been tested and found to
comply with the limits for a Class B digital device,
pursuant to Part 15 of the FCC Rules. These limits
are designed to provide reasonable protection
against harmful interference in a residential
installation. This equipment generates, uses,
and can radiate radio frequency energy and, if
not installed and used in accordance with the
instructions, may cause harmful interference
to radio communications. However, there is no
guarantee that interference will not occur in a
particular installation. If this equipment does
cause harmful interference to radio or television
reception, which can be determined by turning
the equipment off and on, the user is encouraged
to try to correct the interference by one or more
of the following measures:
- Reorient or relocate the receiving antenna.
- Increase the separation between the equipment
and the receiver.
- Connect the equipment to an outlet on a circuit
different from that to which the receiver is
connected.
- Consult the dealer or an experienced radio/TV
technician for help.
This device complies with part 15 of the FCC
Rules. Operation is subject to the following two
conditions:
1) this device may not cause harmful interference
and
2) this device must accept any interference
received, including interference that may cause
undesired operation of the device.
Any changes or modifications in construction of
this device which are not expressly approved by
the party responsible for compliance could void
the user’s authority to operate the equipment.
FCC RF Radiation Exposure Statement
This equipment complies with FCC radiation
exposure limits set forth for an uncontrolled
environment. This transmitter must not be co-
located or operating in conjunction with any other
antenna or transmitter.
This equipment should be installed and operated
with minimum distance 20 cm (7.8 inches)
between the antenna and your body. Users must
follow the specific operating instructions for
satisfying RF exposure compliance.
Industry Canada Statement (For
transmitter module contained in this
product)
This device complies with Industry Canada’s
licence-exempt RSSs. Operation is subject to the
following two conditions:
1) this device may not cause interference; and
2) this device must accept any interference,
including interference that may cause undesired
operation of the device.
This Class B digital apparatus complies with
Canadian ICES-003.
IC Radiation Exposure Statement
This equipment complies with IC radiation
exposure limits set forth for an uncontrolled
environment. This equipment should be installed
and operated with minimum distance 20 cm
(7.8 inches) between the antenna & your body.
NOTE
The manufacturer is not responsible
for any radio or TV interference caused
by unauthorized modifications to this
equipment. Such modifications could
void the user’s authority to operate the
equipment.
30 HOW TO USE
ENGLISH
FCC Regulation Notice
This device complies with Part 18 of the FCC
Rules. Operation is subject to the following two
conditions:
(1) this device may not cause harmful interference
and
(2) this device must accept any interference
received, including interference that may
cause undesired operation of the device.
Any changes or modifications in construction of
this device which are not expressly approved by
the party responsible for compliance could void
the user’s authority to operate the equipment.
This device has no serviceable parts.
This equipment generates, uses, and can radiate
radio frequency energy and, if not installed
and used in accordance with the instructions,
may cause harmful interference to radio
communications. However, there is no guarantee
that interference will not occur in a particular
installation. If this equipment does cause harmful
interference to radio or television reception, which
can be determined by turning the equipment off
and on, the user is encouraged to try to correct
the interference by one or more of the following
measures:
- Reorient or relocate the receiving antenna.
- Increase the separation between the
equipment and the receiver.
- Connect the equipment to an outlet on a circuit
different from that to which the receiver is
connected.
- Consult the dealer or an experienced radio/TV
technician for help.
Model FCC ID
LUPXS3186N BEJF31GDA
LUPXC2386N BEJF23GDA07
Industry Canada Statement
This device complies with Industry
Canada’slicense-exempt RSSs. Operation is
subject to the following two conditions:
(1) This device may not cause interference; and
(2) This device must accept any interference,
including interference that may cause
undesired operation of the device.
CAN RSS-216 / CNR-216
Wireless Power Transfer Specifications
Frequency 350 kHz ± 20kHz
Rated voltage DC 12V
Delivered power Less than or equal to 1.2W
per shelf
Transmission
mode
Electromagnetic induction
NOTE
Installing the shelf on the right side will
y
disable the shelf light.
The shelf light turns on only when the
y
shelf is installed in the highest or lowest
positions.
Foreign objects and dirt between the shelf
y
and the inner cabinet wall could prevent
the shelf light from turning on.
The shelf light turns on when the door is
y
opened.
The shelf light turns off after seven
y
minutes or when the door is closed.
Transmitter
Receiver
31
HOW TO USE
ENGLISH
CAUTION
When handling the ice bin,
keep hands away from
the icemaker tray area to
avoid personal injury.
In-Door Ice Bin
Depending on the model, some of the
following functions may not be available.
Detaching the In-Door Ice Bin
1 Gently pull the handle to open the ice
compartment.
2 To remove the in-door ice bin, grip the
front handle, slightly lift the lower part,
and slowly pull out the bin as shown.
Assembling the In-Door Ice Bin
1 Carefully insert the in-door ice bin while
slightly slanting it to avoid contact with the
icemaker.
2 Avoid touching the auto shutoff (feeler
arm) when replacing the ice bin. See the
label on the ice compartment door for
details.
CAUTION
Keep hands and tools out of the ice
y
compartment door and dispenser chute.
Failure to do so may result in damage or
personal injury.
The icemaker stops producing ice when the
y
in-door ice bin is full. If you need more ice,
empty the ice bin into the extra ice bin in
the freezer compartment. During use, ice
may build up higher around the sensor than
in the rest of the bin, causing the icemaker
to stop producing ice before the bin is full.
Shaking the ice bin to level the ice within it
can reduce this problem.
To avoid damaging the icemaker, do not
y
store cans or other items in the ice bin.
Keep the ice compartment door closed
y
tightly. If the ice compartment door is not
closed tightly, the cold air in the ice bin will
freeze food in the refrigerator compartment.
This could also cause the icemaker to stop
producing ice.
If the icemaker is turned OFF for
y
an extended period of time, the ice
compartment will gradually warm up
to the temperature of the refrigerator
compartment. To prevent ice cubes from
melting and leaking from the dispenser,
ALWAYS empty the ice bin when the
icemaker is set to OFF for more than a few
hours.
Auto shutoff
(feeler arm)
32 HOW TO USE
ENGLISH
Automatic Icemaker
Depending on the model, some of the
following functions may not be available.
Ice is made in the automatic icemaker and sent
to the dispenser. The icemaker will produce
70-182 cubes in a 24-hour period, depending
on freezer compartment temperature, room
temperature, number of door openings and
other operating conditions.
It takes about 12 to 24 hours for a newly
y
installed refrigerator to begin making ice. Wait
72 hours for full ice production to occur.
Ice making stops when the in-door ice bin
y
is full. When full, the in-door ice bin holds
approximately 6 to 8 (12-16 oz) glasses of ice.
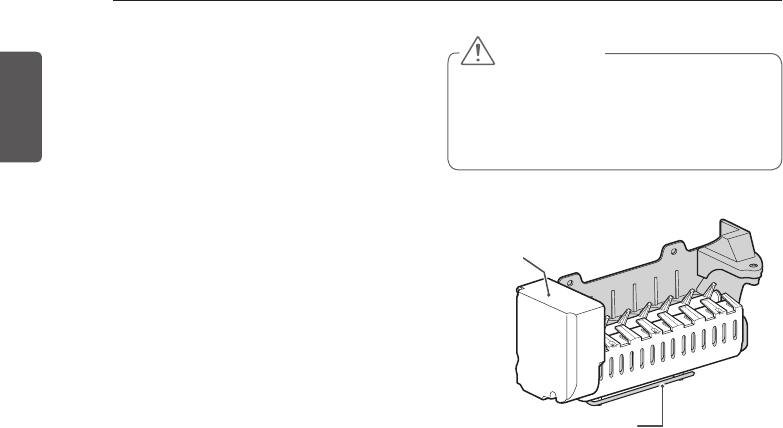
Foreign substances or frost on the auto shutoff
y
(feeler arm) can interrupt ice production. Make
sure the feeler arm is clean at all times for
proper operation.
To increase ice production, use the Ice Plus
y
function. The function increases both ice
making and freezing capabilities.
Auto shutoff (feeler arm)
Icemaker
Turning the Automatic Icemaker
On or Off
To turn the automatic icemaker On/Off, press
and hold the Ice On/Off button on the control
panel for 3 seconds.
WARNING
Personal Injury Hazard
DO NOT place fingers or hands on the
automatic ice making mechanism while the
refrigerator is plugged in.
33
HOW TO USE
ENGLISH
Automatic Icemaker
(continued)
The first ice and water dispensed may
y
include particles or odor from the water
supply line or the water tank.
Throw away the first few batches of ice.
y
This is also necessary if the refrigerator has
not been used for a long time.
Never store beverage cans or other items in
y
the ice bin for the purpose of rapid cooling.
Doing so may damage the icemaker or the
containers may burst.
If discolored ice is dispensed, check the
y
water filter and water supply. If the problem
continues, contact a qualified service
center. Do not use the ice or water until the
problem is corrected.
Keep children away from the dispenser.
y
Children may play with or damage the
controls.
The ice passage may become blocked with
y
frost if only crushed ice is used. Remove the
frost that accumulates by removing the ice
bin and clearing the passage with a rubber
spatula. Dispensing cubed ice can also help
prevent frost buildup.
Never use thin crystal glass or crockery to
y
collect ice. Such containers may chip or
break resulting in glass fragments in the ice.
Dispense ice into a glass before filling it
y
with water or other beverages. Splashing
may occur if ice is dispensed into a glass
that already contains liquid.
Never use a glass that is exceptionally
y
narrow or deep. Ice may jam in the ice
passage and refrigerator performance may
be affected.
Keep the glass at a proper distance from
y
the ice outlet. A glass held too close to the
outlet may prevent ice from dispensing.
To avoid personal injury, keep hands out of
y
the ice door and passage.
Never remove the dispenser cover.
y
If ice or water dispenses unexpectedly, turn
y
off the water supply and contact a qualified
service center.
CAUTION
When You Should Turn the
Icemaker Off
When the water supply will be shut off
y
for several hours.
When the ice bin is removed for more
y
than one or two minutes.
When the refrigerator will not be used
y
for several days.
Normal Sounds You May Hear
The icemaker water valve will buzz as
y
the icemaker fills with water. If the Ice
on/off button is set to On, the icemaker
will buzz even if it has not yet been
hooked up to water. To stop the buzzing,
press the Ice on/off button to set it to
the Off position.
You will hear the sound of cubes
y
dropping into the bin and water running
in the pipes as the icemaker refills.
Preparing For Vacation
Set the Ice On/Off button to Off and shut off
the water supply to the refrigerator.
If the ambient temperature is expected to drop
below freezing, have a qualified technician
drain the water supply system to prevent
serious property damage due to flooding
caused by ruptured water lines or connections.
NOTE
The ice bin should be emptied when
the Ice On/Off button is set to the Off
mode.
NOTE
Keeping the icemaker on before the
water line is connected can damage the
icemaker.
NOTE
The ice bin should be emptied any time
the Ice On/Off button is turned Off.
34 HOW TO USE
ENGLISH
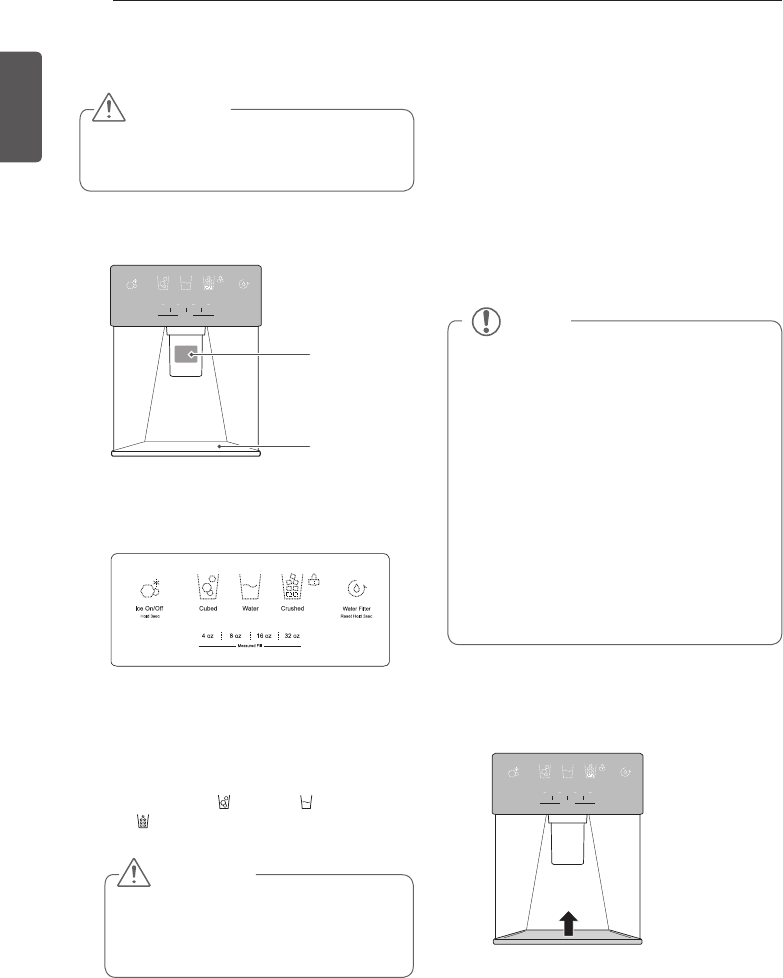
Ice and Water Dispenser
CAUTION
Keep children away from the dispenser
to prevent them from playing with or
damaging the controls.
Dispenser
Cubed
4 oz 8 oz 16 oz
Measured Fill
32 oz
Ice On/Off
Hold 3sec Reset Hold 3sec
Water Crushed Water Filter
Using the Dispenser
1 Turn the icemaker on or off by pressing
and holding Ice On/Off for three seconds.
2 To dispense cold water or ice, press the
text on the dispenser control panel to se-
lect Cubed ice( ), Water( ), or Crushed
ice( ).
NOTE
If discolored ice is dispensed, check
y
the water filter and water supply. If the
problem continues, contact a qualified
service center. Do not use the ice or
water until the problem is corrected.
The dispenser will not operate when
y
either of the refrigerator doors are open.
If dispensing water or ice into a container
y
with a small opening, place it as close to
the dispenser as possible.
Some dripping may occur after
y
dispensing. Hold the cup beneath the
dispenser for a few seconds after
dispensing to catch all of the drops.
CAUTION
Throw away the first few batches of ice
(about 24 cubes). This is also necessary
if the refrigerator has not been used for
a long time.
Cleaning the Dispenser Stand
1 Raise up, holding both ends.
2 Wipe out dirty areas with a clean cloth.
Using the Measured Fill
The measured fill function dispenses pre-
measured amounts of water automatically.
1 Select the desired amount from the
Measured Fill buttons on the dispenser
control panel.
2 Depress the dispenser switch with a
container.
3 To stop the measured fill, release the
dispenser switch.
Cubed
4 oz 8 oz 16 oz
Measured Fill
32 oz
Ice On/Off
Hold 3sec Reset Hold 3sec
Water Crushed Water Filter
Locking the Dispenser
Press and hold the Lock button on the interior
display for three seconds to lock the dispenser
and all of the display panel functions. Follow
the same instructions to unlock.
Stand
Ice and Water
switch
35
HOW TO USE
ENGLISH
NOTE
If you are leaving home for a short period of time, like a short vacation, the refrigerator should be left
y
on. Refrigerated foods that are able to be frozen will stay preserved longer if stored in the freezer.
If you are leaving the refrigerator turned off for an extended period of time, remove all food and unplug
y
the power cord. Clean the interior, and leave the door open to prevent fungi from growing in the
refrigerator.
CAUTION
Do not store food with high moisture content toward the top of the refrigerator. The moisture could
y
come in direct contact with the cold air and freeze.
Wash food before storing it in the refrigerator. Vegetables and fruit should be washed, and food
y
packaging should be wiped down to prevent adjacent foods from being contaminated.
If the refrigerator is kept in a hot and humid place, frequent opening of the door or storing a lot of
y
vegetables in the refrigerator may cause condensation to form. Wipe off the condensation with a
clean cloth or a paper towel.
If the refrigerator door or freezer drawer is opened too often, warm air may penetrate the refrigerator
y
and raise its temperature. It can also increase the cost to run the appliance.
Do not overfill or pack items too tightly into door bins. Doing so may cause damage to the bin or
y
personal injury if items are removed with excessive force.
The temperature inside the FRESHSteel Container is slightly lower than in the shelf or door bin area.
y
Storing Food
Food Preservation Location
Each compartment inside the refrigerator is designed to store different types of food.
Store your food in the optimal space to enjoy the freshest taste.
Adjustable refrigerator
shelf
Adjustable shelves to
meet individual storage
needs.
FRESHSteel
Container
Store small items or
defrost frozen items.
Refrigerator Bin
Store beverages, water, etc.
Freezer Drawer (1)
Preserve small packaged
frozen food or frequently-used
foods.
Freezer Drawer(2)
Preserve frozen food for longer storage.
Crisper
Preserve vegetables and
fruits.
Freezer Bin
Preserve small packaged
frozen food or frequently-
used foods.
InstaView™
Door-in-Door®
Store frequently
used items such as
condiments, beverages,
butter, or cheese.
36 HOW TO USE
ENGLISH
Food Storage Tips
The following tips may not be applicable
depending on the model.
Wrap or store food in the refrigerator in airtight
and moisture-proof material unless otherwise
noted. This prevents food odor and taste transfer
throughout the refrigerator. For dated products,
check date code to ensure freshness.
Food How to
Butter or
Margarine
Keep opened butter in a covered
dish or closed compartment.
When storing an extra supply,
wrap in freezer packaging and
freeze.
Cheese
Store in the original wrapping
until you are ready to use it.
Once opened, rewrap tightly in
plastic wrap or aluminum foil.
Milk Wipe milk cartons. For coldest
milk, place containers on
interior shelf.
Eggs Store in original carton on
interior shelf, not on door shelf.
Fruit Do not wash or hull the fruit
until it is ready to be used. Sort
and keep fruit in its original
container, in a crisper, or store
in a completely closed paper
bag on a refrigerator shelf.
Leafy
Vegetables
Remove store wrapping and
trim or tear off bruised and
discolored areas. Wash in cold
water and drain. Place in plastic
bag or plastic container and
store in crisper.
Vegetables
with skins
(carrots,
peppers)
Place in plastic bags or plastic
container and store in crisper.
Fish Store fresh fish and shellfish
in the freezer section if they
are not being consumed the
same day of purchase. It is
recommended to consume
fresh fish and shellfish the
same day purchased.
Leftovers
Cover leftovers with plastic wrap
or aluminum foil, or store in
plastic containers with tight lids.
Storing Frozen Food
Freezing
Your freezer will not quick-freeze a large
quantity of food. Do not put more unfrozen
food into the freezer than will freeze within
24 hours (no more than 2 to 3 lbs. of food per
cubic foot of freezer space). Leave enough
space in the freezer for air to circulate around
packages. Be careful to leave enough room at
the front so the door can close tightly.
Storage times will vary according to the quality
and type of food, the type of packaging or wrap
used (how airtight and moisture-proof) and
the storage temperature. Ice crystals inside a
sealed package are normal. This simply means
that moisture in the food and air inside the
package have condensed, creating ice crystals.
NOTE
Check a freezer guide or a reliable cookbook
for further information about preparing food
for freezing or food storage times.
NOTE
Allow hot foods to cool at room temperature
for 30 minutes, then package and freeze.
Cooling hot foods before freezing saves
energy.
37
HOW TO USE
ENGLISH
Storing Frozen Food (continued)
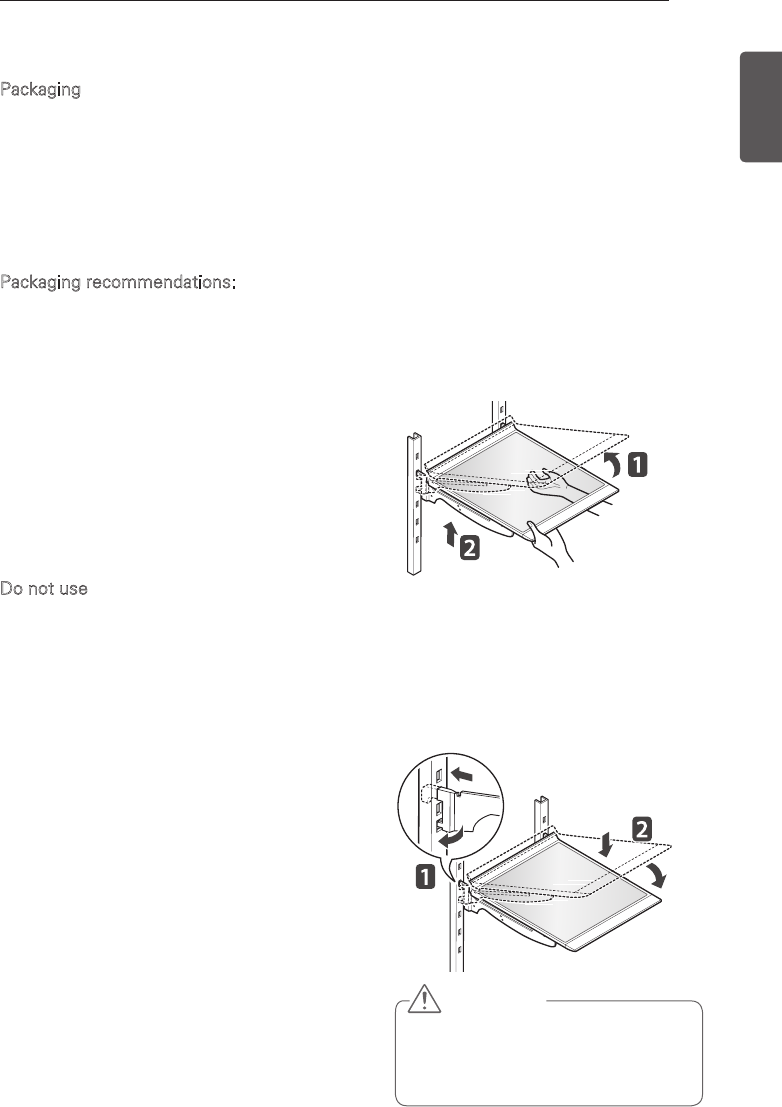
Packaging
Successful freezing depends on correct
packaging. When you close and seal the
package, it must not allow air or moisture in or
out. If it does, you could have food odor and
taste transfer throughout the refrigerator and
could also dry out frozen food.
Packaging recommendations:
Rigid plastic containers with tight-fitting
y
lids
Straight-sided canning/freezing jars
y
Heavy-duty aluminum foil
y
Plastic-coated paper
y
Non-permeable plastic wraps
y
Specified freezer-grade self-sealing plastic
y
bags
Follow package or container instructions for
proper freezing methods.
Do not use
Bread wrappers
y
Non-polyethylene plastic containers
y
Containers without tight lids
y
Wax paper or wax-coated freezer wrap
y
Thin, semi-permeable wrap
y
Adjusting the Refrigerator
Shelves
The shelves in the refrigerator are adjustable
to meet individual storage needs. Your model
may have either glass or wire shelves.
Adjusting the shelves to fit items of different
heights will make finding the exact item you
want easier. Doing so will also reduce the
amount of time the refrigerator door is open
which will save energy.
Detaching the Shelf
Tilt up the front of the shelf and lift it straight
up. Pull the shelf out.
Assembling the Shelf
Tilt the front of the shelf up and guide the rear
shelf hooks into the slots at the desired height.
Then, lower the front of the shelf so that the
hooks drop into the slots.
CAUTION
Make sure that shelves are level from
one side to the other. Failure to do so
may result in the shelf falling or food
spilling.
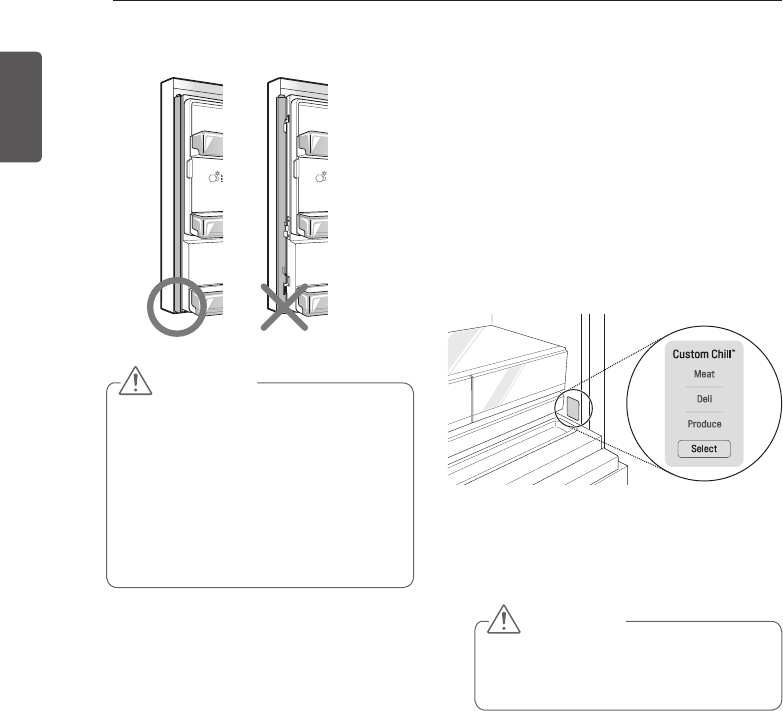
38 HOW TO USE
ENGLISH
CustomChill™ Pantry
This space is used to store meat, fish, dairy
products, beverages, and other items that
need to be kept chilled.
Setting the CustomChill™ Pantry
Choose a temperature setting for the
CustomChill™ pantry by pressing the Select
button repeatedly to toggle between Meat,
Deli, or Produce.
The temperature setting becomes
progressively colder from Produce → Deli →
Meat.
CAUTION
Vegetables or fruit may freeze if placed
in the CustomChill™ pantry when it is
set to Meat or Deli.
When Closing the Door
CAUTION
To reduce the risk of door scratches
y
and breaking the center door mullion,
make sure that the refrigerator door
mullion is always folded in.
The door alarm sounds every 30
y
seconds if the door remains open
longer than one minute. Ensure that
the folding mullion is folded in before
closing the left-hand door.
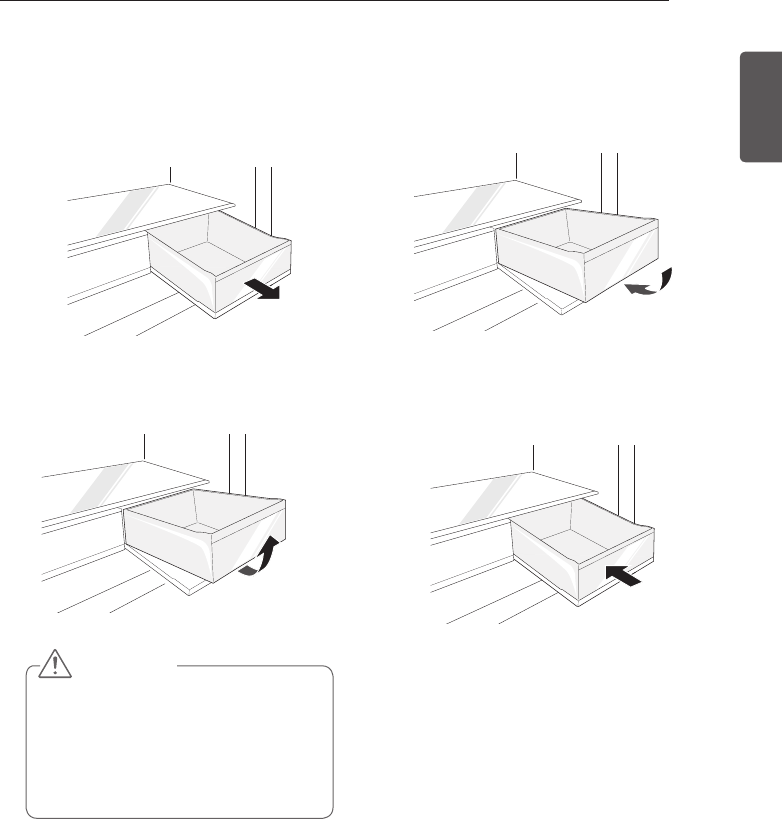
39
HOW TO USE
ENGLISH
CAUTION
Always empty the crispers before
y
removing them, and use both hands
when removing and assembling them.
Make sure that the refrigerator doors
y
are fully open before removing and
assembling the crispers.
Crisper Drawers
Removing the Crisper Drawers
1 Pull the crisper drawer out until it stops.
2 Slightly lift the crisper drawer to remove it
from the support.
Assembling the Crisper Drawers
1 Pull out the crisper drawer support until it
stops. Angle the crisper drawer into the
opening to place it on the support.
2 Slide the crisper drawer back on the
support until it drops into place and then
close the crisper drawer.
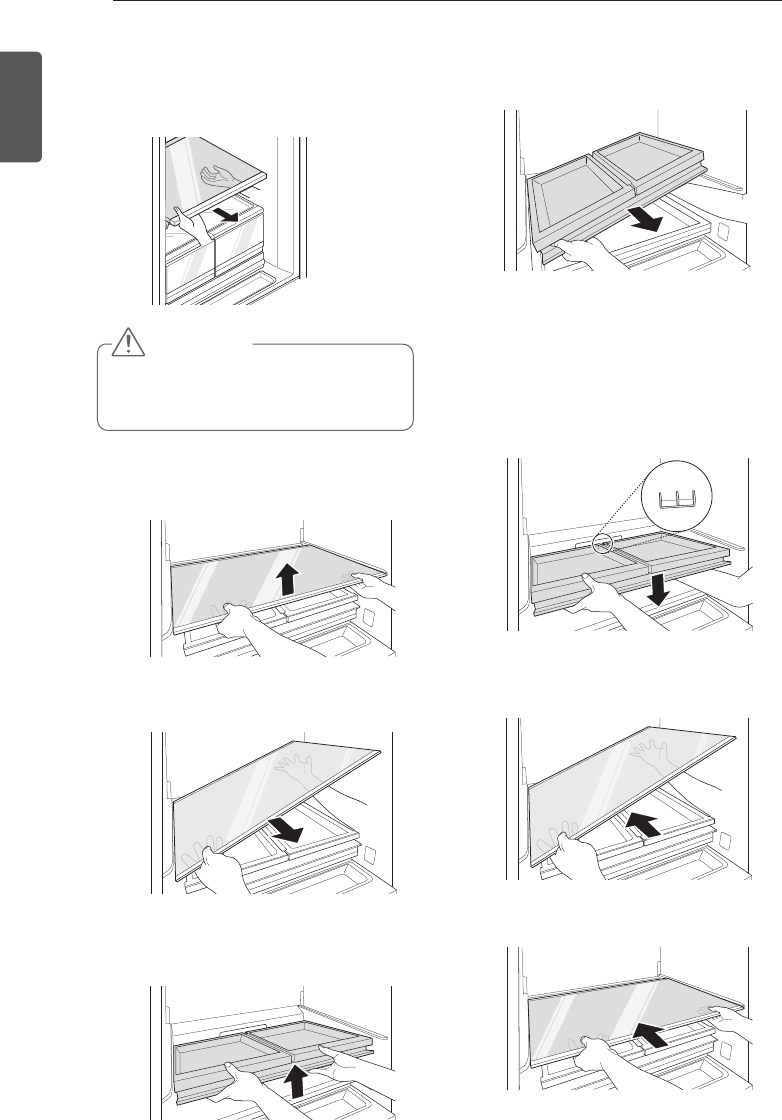
40 HOW TO USE
ENGLISH
Removing the Crisper Support Box
1 Fully open the fridge door and pull out all
the shelves.
2 Lift the front of the crisper cover until you
hear a loud click.
3 Tilt the cover slightly and support it with
one hand while pulling it out.
4 Open the convertible pantry and lift the
front side of the crisper support box with
both hands.
Assembling the Crisper Support Box
1 Use one hand to support the bottom of the
crisper support box while aligning the inner
edge of the box with the groove inside the
refrigerator. Lower the box into place.
2 Angle the crisper cover into the refrigerator
and then lower it into place.
3 Slide the crisper cover back until it stops.
5 Slide one hand under the crisper support
box and tilt the box up slightly to remove
it.
CAUTION
To avoid injury, always empty the shelves
y
and crisper drawers before removing
them.
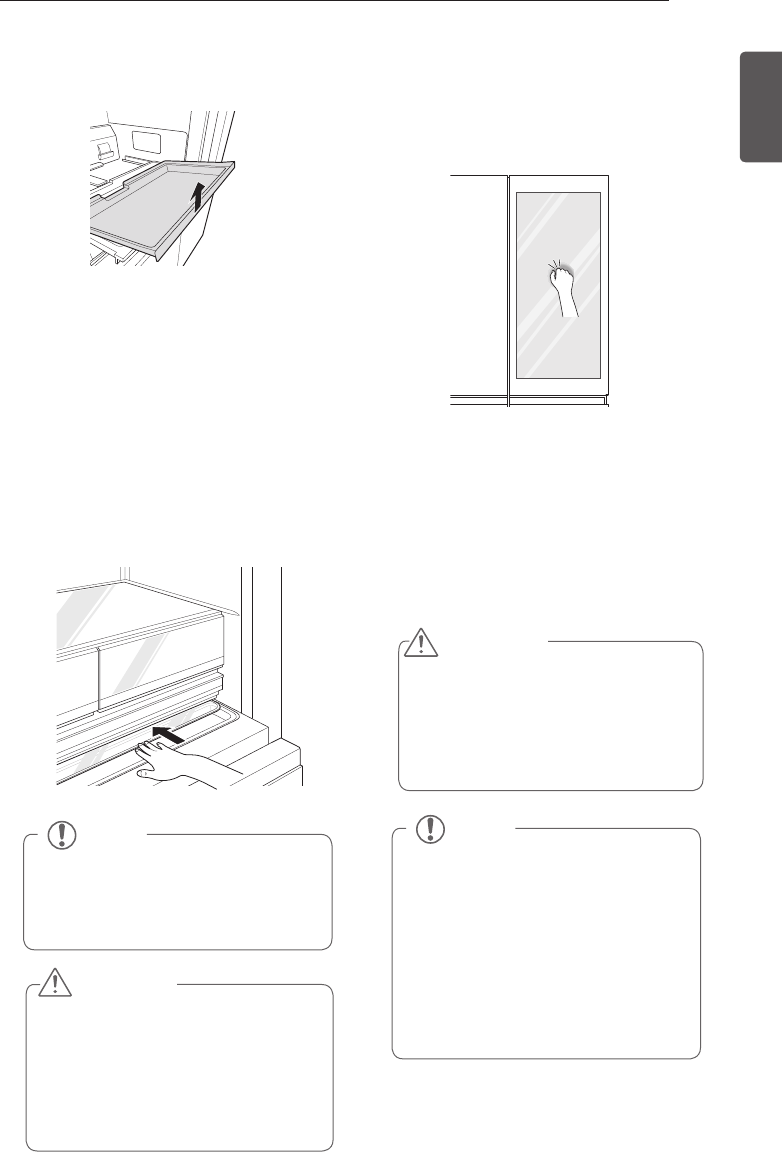
41
HOW TO USE
ENGLISH
InstaView™Door-in-Door®
Knock twice on the center of the glass panel
to reveal the contents of the door bins without
opening the door and allowing the cold air to
escape.
Knocking twice on the glass panel turns the
y
interior LED on or off.
The LED turns off automatically after
y
5 seconds.
The Knock-On function is disabled when
y
the right refrigerator door is open, for two
seconds after closing the door, and when
the ice dispenser is in use.
CAUTION
Be careful when handling and storing
y
larger eggs. They can be broken if the
cover is not completely closed and the
drawer above is pushed in.
Store foods like tofu, celery or lettuce
y
which have high water content or freeze
easily on the interior shelves at the front.
FRESHSteel Container
The FRESHSteel Container compartment
is slightly cooler than the shelf or door bin
areas, so it is a convenient place to store dairy
snacks or other small items you want to keep
especially cold. It is also a handy place to
defrost meat.
NOTE
Tapping the edges of the glass
y
panel may not activate the Knock-On
function.
The taps on the glass panel must be
y
hard enough to be audible.
Loud noises near the refrigerator
y
may activate the Knock-On function.
The InstaView™Door-in-Door® will
y
not open if the right refrigerator door
is open.
WARNING
Do not hit the glass door panel with
excessive force. Do not allow hard
objects like cookware or glass bottles
to hit the glass door panel. The glass
could break, resulting in a risk of
personal injury or product damage.
NOTE
To open cover, push handle toward
rear of bin to release catch.
To close cover, slide cover over bin
until catch clicks into place.
Removing the CustomChill™
Pantry Insert
Remove the contents from the CustomChill™
pantry before removing the insert. To remove,
open the drawer to full extension, lift the front
of the insert, and pull it out.
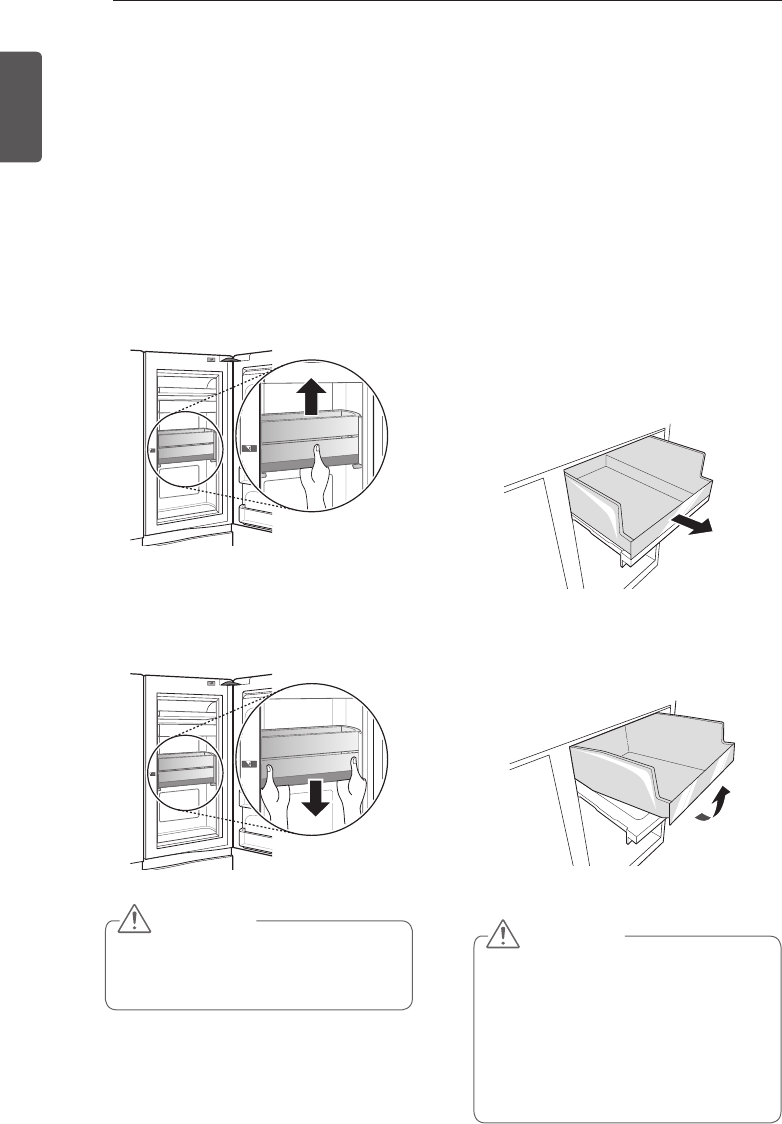
42 HOW TO USE
ENGLISH
EasyLift Bin
Move the EasyLift bin up and down easily and
conveniently as necessary.
Remove all items from the EasyLift bin before
y
moving it up or down.
Adjusting the EasyLift Bin allows taller food
y
items to be stored more conveniently.
CAUTION
To avoid personal injury or damage to the
y
bin or its contents, empty the EasyLift bin
before moving it up or down.
CAUTION
The drawers are heavy. Always use two
y
hands when removing or assembling
the drawers to avoid product damage or
personal injury. Always empty drawers
before removing them.
Always open the freezer doors completely
y
before removing or assembling the
drawers.
Freezer Drawer
Use the upper compartments to store
packaged frozen foods and frequently-used
foods.
Use the lower compartments for larger frozen
foods and items stored for longer periods.
The sliding freezer drawers allow easy
y
access and convenience of use.
Removing the Freezer Drawer
1 Pull the freezer drawer out until it stops.
Empty all contents out of the drawer
before removing it.
2 Lift the empty freezer drawer slightly to
remove it from the support.
1 To raise the EasyLift bin, hold the bottom
of the bin in the center and push the bin
up until it clicks into place.
2 To lower the EasyLift bin, press up to
release the levers at the bottom of the bin
and lower the bin until it clicks into place.
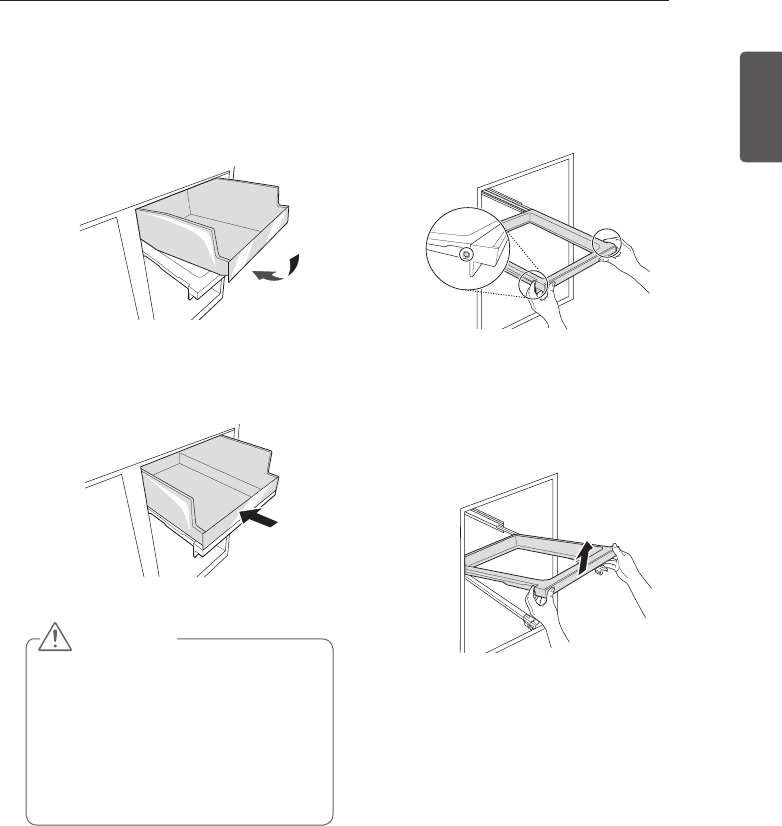
43
HOW TO USE
ENGLISH
CAUTION
The drawers are heavy. Always use two
y
hands when removing or assembling
the drawers to avoid product damage or
personal injury. Always empty drawers
before removing or assembling them.
Always open the freezer doors completely
y
before removing or assembling the
drawers.
Assembling the Freezer Drawer
1 Pull out the drawer support until it stops.
Angle the drawer into the space and set it
on the support.
2 Slide the drawer back until it lowers into
place on the support. Close the drawer.
Removing the Drawer Support
1 Press the levers on either side of the
drawer support.
2 Keeping both levers pressed, lift the
drawer support slightly and remove it from
the rail system.
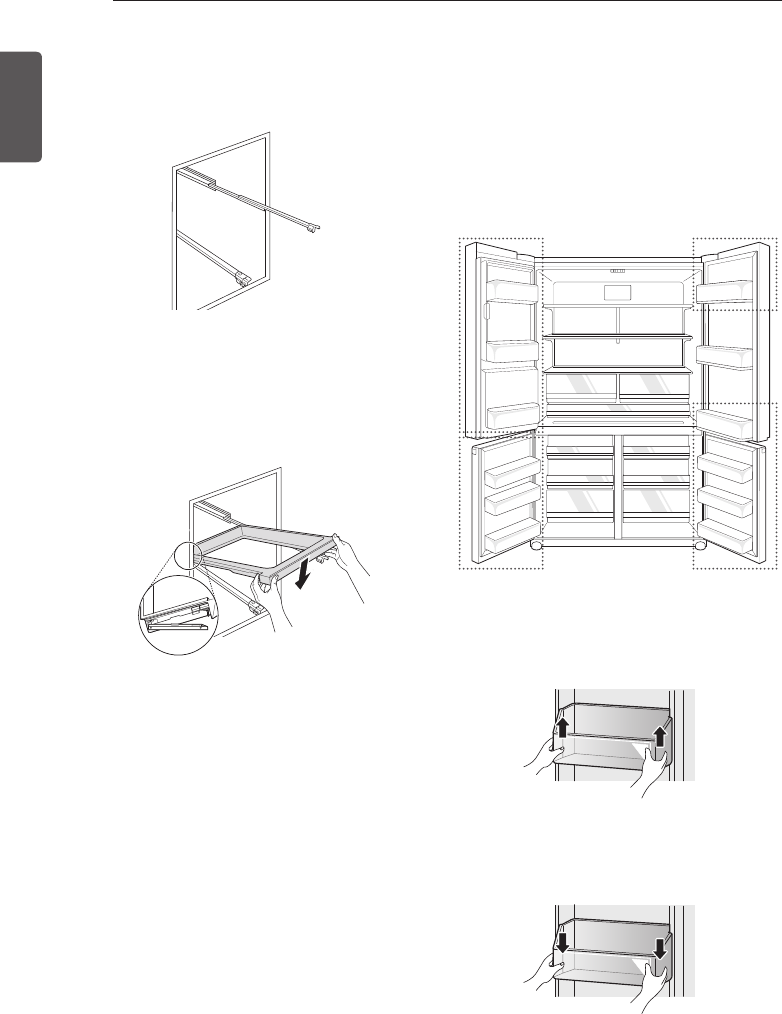
44 HOW TO USE
ENGLISH
Assembling the Drawer Support
1 Pull both drawer rails out until they stop.
2 Line up the bottom edges on the sides
of the drawer support with the groove in
each rail and then lower the support until it
clicks into place.
Refrigerator/Freezer Door Bins
You can store small packaged frozen food
in the freezer door bins, or small packaged
refrigerated food or beverages in the
refrigerator door bins, such as milk, water,
juice, beer, etc.
Do not store ice cream or foods intended for
long-term storage in the freezer door bins.
1. Left Refrigerator Door Bins
To remove the door bins, hold the bin with
both hands and lift up to remove it.
To replace the freezer door bin, align both
sides of the bin with the guides and push the
bin down until it snaps into place.
1 3
2
2

45
HOW TO USE
ENGLISH
Using the Door-in-Door Bin Bars
The metal bars attached to the Door-in-Door
bins can be used as either rails or dividers.
1 To keep tall items secure in the door bin,
unfold the bar and extend it upward from
the top of the bin as a rail.
2 To keep bin contents organized, unfold
the bar and extend it back into the bin as a
divider.
3 Fold the bar down into the front of the bin
when not in use.
2. Freezer Bins and Lower
InstaView™Door-in-Door® bin
To remove the door bins, slightly lift both ends
of the basket and pull forward to separate.
Match the both ends of the basket to the hole,
and push with force until there is a click sound.
3. Upper InstaView™Door-in-Door®
bin
Separating upper section InstaView™Door-in-
Door® bin
1 To remove the door bins, after unscrewing
the hooks below both ends of the basket in
order, slightly push the basket backward.
2 Hold and lift both ends of the basket to
separate.
Re-assembly of the upper section
InstaView™Door-in-Door® bin
1 Match to the hole at both ends of the
basket and slightly pull forward to fix it.
2 Lock the hooks below both ends of the
basket in order.
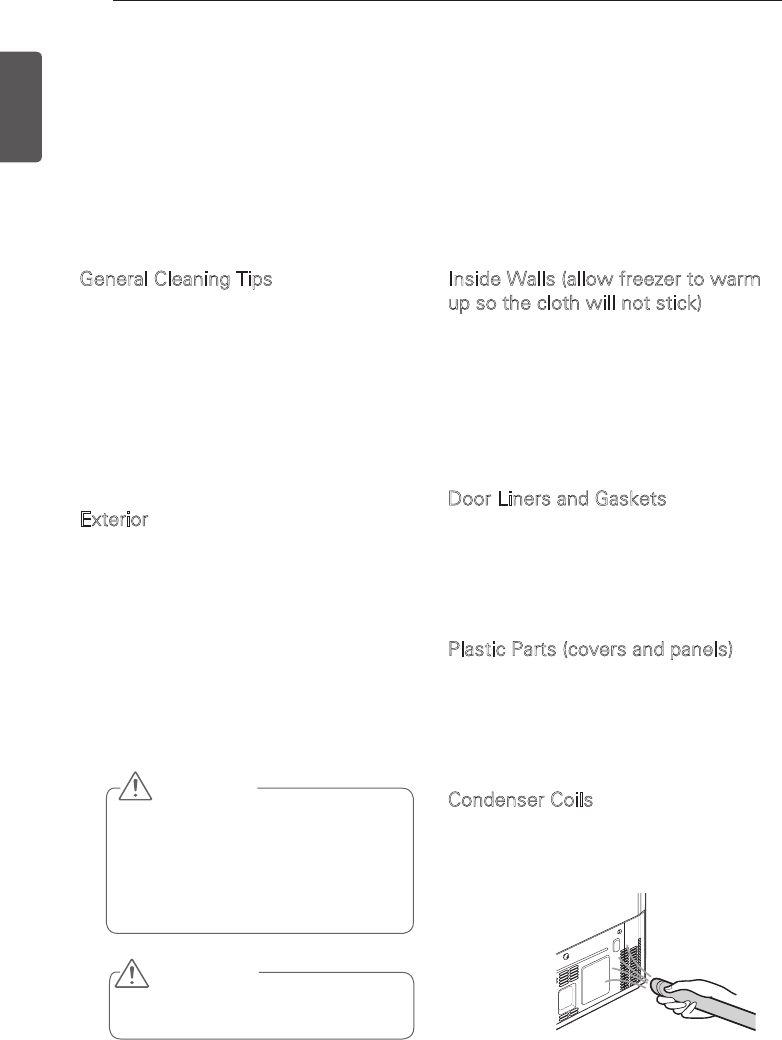
46 MAINTENANCE
ENGLISH
MAINTENANCE
Cleaning
Both the refrigerator and freezer sections defrost automatically; however, clean both
y
sections about once a month to prevent odors.
Wipe up spills immediately.
y
Always unplug the refrigerator before cleaning.
y
General Cleaning Tips
Unplug refrigerator or disconnect power.
y
Remove all removable parts, such as
y
shelves, crispers, etc.
Use a clean sponge or soft cloth and a
y
mild detergent in warm water. Do not
use abrasive or harsh cleaners.
Hand wash, rinse and dry all surfaces
y
thoroughly.
Exterior
Waxing external painted metal surfaces helps
provide rust protection. Do not wax plastic
parts. Wax painted metal surfaces at least
twice a year using appliance wax (or auto paste
wax). Apply wax with a clean, soft cloth.
For products with a stainless steel exterior,
use a clean sponge or soft cloth and a mild
detergent in warm water. Do not use abrasive
or harsh cleaners. Dry thoroughly with a soft
cloth.
Inside Walls (allow freezer to warm
up so the cloth will not stick)
To help remove odors, you can wash the inside
of the refrigerator with a mixture of baking
soda and warm water. Mix 2 tablespoons of
baking soda to 1 quart of water (26 g soda
to 1 liter water) Be sure the baking soda is
completely dissolved so it does not scratch the
surfaces of the refrigerator.
Door Liners and Gaskets
Use a clean sponge or soft cloth and a mild
detergent in warm water. Do not use cleaning
waxes, concentrated detergents, bleaches,
or cleaners containing petroleum on plastic
refrigerator parts.
Plastic Parts (covers and panels)
Use a clean sponge or soft cloth and a mild
detergent in warm water. Do not use glass
cleaners, abrasive cleansers, or flammable
fluids. These can scratch or damage the
material.
Condenser Coils
Use a vacuum cleaner with an attachment to
clean the condenser cover and vents. Do not
remove the panel covering the condenser coil
area.
CAUTION
Do not use a rough cloth or sponge
y
when cleaning the interior and exterior
of the refrigerator.
Do not place your hand on the bottom
y
surface of the refrigerator when
opening and closing.
WARNING
Use non-flammable cleaner. Failure to do
so can result in fire, explosion, or death.
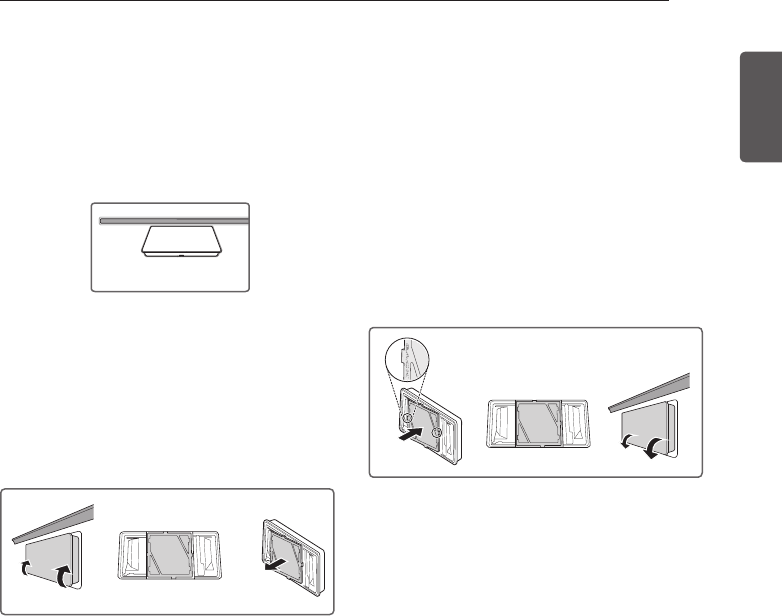
47
MAINTENANCE
ENGLISH
2 Install a new air filter.
Insert the side tab of the new filter into
the slot on the side of the central cover
compartment. Snap the other side of
the filter down into place. It may help to
press the side of the central compartment
outward while pressing down on the filter.
Make sure the side of the filter labeled
"Back" is facing out. Snap the cover of the
filter back onto the filter compartment in
the refrigerator.
After changing the filter, push and hold the
Fresh Filter button for three seconds to
reset the filter sensor.
KCAB
KCA
B
Replacing the Fresh Air Filter
Replace the air filter:
Approximately every six months.
y
When the Fresh Filter LED blinks or the
y
Replace Filter icon is displayed.
1 Remove the old filter.
Remove the cover to the air filter
compartment. The air filter is on the inside
of the cover. Press outward on the sides
of the central cover compartment to
release the tabs of the air filter. Remove
the air filter.
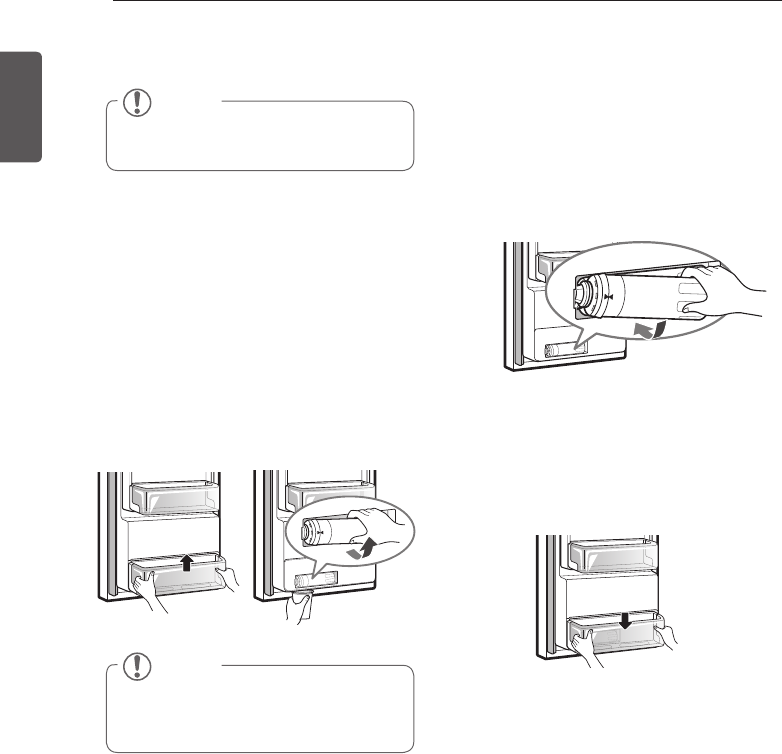
48 MAINTENANCE
ENGLISH
Replacing the Water Filter
Replace the water filter:
Approximately every six months.
y
When the water filter indicator blinks.
y
When the water dispenser output decreases.
y
When the ice cubes are smaller than normal.
y
3
Assemble the door bin.
After changing the filter, push and hold the
Water Filter button for three seconds to reset
the filter.
1 Remove the old water filter.
Lift up and remove the lower door bin. Swing
the right end of the water filter out of the
compartment and then grasp and rotate the
filter counterclockwise to remove it from the
filter head.
NOTE
Replacing the water filter could cause a
small amount of water to drain. Place a cup
under the filter head to catch any water.
NOTE
This refrigerator does not require a filter
bypass plug when the filter is not in place.
2
Replace with a new water filter.
Insert the new filter into the filter head and
rotate it clockwise until the arrow on the
new filter lines up with the arrow on the
filter head. Swing the filter back into the
compartment.
49
MAINTENANCE
ENGLISH
Performance Data Sheet
Use Replacement Cartridge: ADQ73613401
The concentration of the indicated substances in water entering the system was reduced to a
concentration less than or equal to the permissible limit for water leaving the system as specified in
NSF/ANSI Standard 42 and Standard 53.
Capacity 200 Gallons (757 Liters) Contaminant Reduction Determined by NSF testing.
System tested and certified by NSF International against NSF/ANSI Standard 42
and Standard 53 for the reduction of substances listed below.
Contaminant
Reduction Average
Influent
NSF specified
Challenge
Concentration
Avg %
Reduction
Average
Product Water
Concentration
Max
Permissible
Product Water
Concentration
NSF Reduction
equirements
Chlorine Taste and
Odor 2.0 mg/L 2.0 mg/L ± 10% 97.5% 0.05 mg/L N/A ≥ 50%
Nominal Particulate
Class I, , ≥ 0.5 to <
1.0 µm
5,600,000 pts/
mL
At least 10,000 particles/
mL 99.3% 73,000 pts/ml N/A ≥ 85%
Asbestos 170 MFL
107 to 108 MFL; fibers
greater than 10 µm in
length
>99% < 1MLF N/A ≥ 99%
Atrazine 0.0087 mg/L 0.009 mg/L ± 10% 94.2% 0.0005 mg/L 0.003 mg/L N/A
Benzene 0.017 mg/L 0.015 mg/L ± 10% 97.0% < 0.0005 mg/L 0.005 mg/L N/A
Carbofuran 0.073 mg/L 0.08 mg/L ± 10% 98.8% 0.001 mg/L 0.04 mg/L N/A
Lindane 0.002 mg/L 0.002 mg/L ± 10% 98.8% 0.00002 mg/L 0.0002 mg/L N/A
P-Dichlorobenzene 0.263 mg/L 0.225 mg/L ± 10% 99.6% 0.001 mg/L 0.075 mg/L N/A
Toxaphene 0.015 mg/L 0.015 mg/L ± 10% 93.5% 0.001 mg/L 0.003 mg/L N/A
2,4-D 0.25 mg/L 0.210 mg/L ± 10% 99.5% 0.0012 mg/L 0.07 mg/L N/A
Lead pH @6.5 0.150 mg/L 0.15 mg/L ± 10% >99.3% 0.001 mg/L 0.010 mg/L N/A
Lead pH @8.5 0.150 mg/L 0.15 mg/L ± 10% >99.3% 0.001 mg/L 0.010 mg/L N/A
Mercury @ pH 6.5 0.006 mg/L 0.006 mg/L ± 10% 96.5 0.0002 mg/L 0.002 mg/L N/A
Mercury @ pH 8.5 0.0062 mg/L 0.006 mg/L ± 10% 86.9 0.0081 mg/L 0.002 mg/L N/A
Cyst* 200,000
cysts/L Minimum 50,000 cysts/L >99.99% <1 cyst/L N/A ≥ 99.95%
* Based on the use of Cryptosporidium parvum oocysts.

50 MAINTENANCE
ENGLISH
It is essential that the manufacturer’s
recommended installation, maintenance and filter
replacement requirements be carried out for the
product to perform as advertised.
Replacement Cartridge: ADQ73613401
For estimated costs of replacement elements
please call 1-877-714-7486 or visit our website at
www.lge.com
Refer to the “warranty” section of the
Refrigerator Owner’s Manual for Limited Warranty
information.
Note that while the testing was performed under
standard laboratory conditions, actual performance
may vary.
Read, understand, and follow all safety Information contained in these instructions prior to installation and
use of this product. Retain these instructions for future reference.
NSF System Trade Name Code : ADQ73613401-S
NSF Replacement Code : ADQ73613401
Service Flow 0.5 gpm (1.9 lpm)
Water Supply Community or private well
— Potable Water
Water Pressure 20 -120 psi (138 - 827 kPa)
Water Temperature 33-100°F (0.6 -37.8°C)
Capacity 200 gallons (757 liters)
WARNING
To reduce the risk associated with the ingestion of contaminants:
Do not
y use with water that is microbiologically unsafe or of unknown quality without adequate
disinfection before or after the system. Systems certified for cyst reduction may be used on
disinfected water that may contain filterable cysts.
CAUTION
Please note that water could leak while replacing the filter which could result in property damage.
To reduce the risk associated with property damage due to water leakage:
Read and follow
y Use Instructions before installation and use of this system.
Installation
ymust comply with existing state or local plumbing codes.
Protect filter from freezing
y Drain filter when room temperature drops below 33°F (0.6°C).
Do not
y install if water pressure exceeds 120 psi (827 kPa). If your water pressure exceeds 80 psi,
you must install a pressure limiting valve. Contact a plumbing professional if you are uncertain how
to check your water pressure.
Do not
y install where water hammer conditions may occur. If water hammer conditions exist you
must install a water hammer arrester. Contact a plumbing professional if you are uncertain how to
check for this condition.
Do not
y install on hot water supply lines. Install on cold water lines only. The maximum operating
water temperature of this filter system is 100°F (37.8°C).
Where a backflow prevention device is installed on a water system, a device for controlling pressure
y
due to thermal expansion must be installed.
The disposable filter cartridge
ymust be replaced every six months, at the rated capacity or if a
noticeable reduction in flow rate occurs.
NSF is a trademark of NSF International. LG is a trademark of LG Corp. MCM Co..Ltd.
Application Guidelines / Water Supply Parameters
SAFETY INFORMATION
51
mAINTENANCE
ENGLISH
California Department of Public Health Certification 14-3015
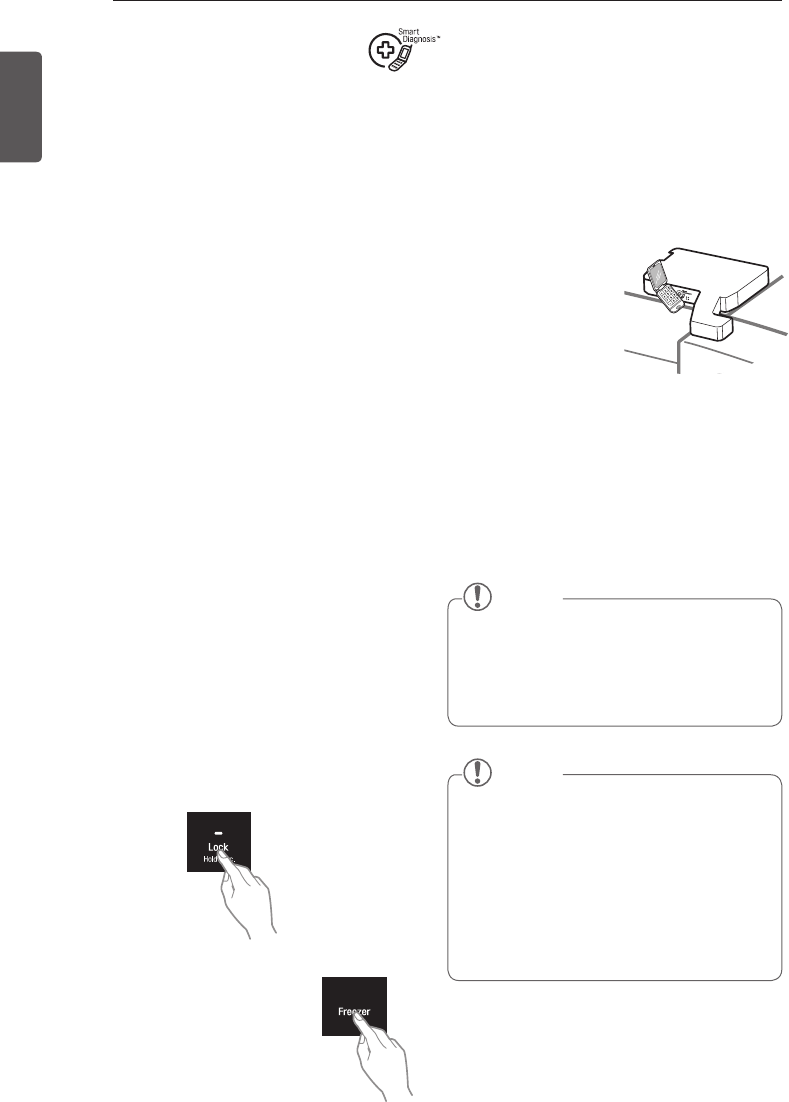
52 SmART DIAgNOSIS
ENGLISH
3 After the display indicates “Smart Diagnosis”
and number “3”, release the Freezer button.
4 When instructed to do so by the call
center, close the Door-in-Door and open
the right refrigerator door.
5 Immediately hold the
mouthpiece of your
phone in front of the
speaker that is located
on the right hinge of
the refrigerator door.
6 Keep the phone in place until the tone
transmission has finished. This takes about
6 seconds, and the display will count down
the time. Once the countdown is over
and the tones have stopped, resume your
conversation with the specialist, who will then
be able to assist you in using the information
transmitted for analysis.
Should you experience any problems with your
refrigerator, it has the capability of transmitting
data via your telephone to the LG service
center. This allows you to speak directly to our
trained specialists. The specialist records the
data transmitted from your machine and uses
it to analyze the issue, providing a fast and
effective diagnosis.
If you experience problems with your
refrigerator, call 1-800-243-0000. Only use the
Smart Diagnosis™ feature when instructed
to do so by the LG call center agent. The
transmission sounds that you will hear are
normal and sound similar to a fax machine.
Smart Diagnosis™ cannot be activated unless
your refrigerator is connected to power. If
your refrigerator is unable to turn on, then
troubleshooting must be done without using
Smart Diagnosis™.
Using Smart Diagnosis™
First, call 1-800-243-0000. Only use the Smart
Diagnosis™ feature when instructed to do so
by the LG call center agent.
1 Lock the display. To lock the display,
open the InstaView™Door-in-Door® and
press and hold the Lock button for three
seconds. (If the display has been locked
for over five minutes, you must deactivate
the lock and then reactivate it.)
2 Press and hold the Freezer
button for three seconds.
SMART DIAGNOSIS
NOTE
For best results, do not move the phone
y
while the tones are being transmitted.
If the call center agent is not able to get
y
an accurate recording of the data, you
may be asked to try again.
NOTE
Call quality differences by region may
y
affect the function.
Use a land line rather than a cell phone
y
for better communication performance,
resulting in better service.
Bad call quality may result in poor data
y
transmission from your phone to the
machine, which could cause Smart
Diagnosis™ to malfunction.
53
TROUBLESHOOTINg
ENGLISH
TROUBLESHOOTING
Review the Troubleshooting section before calling for service; doing so will save you both time
and money.
Problem Possible Causes Solutions
Refrigerator and
Freezer section
are not cooling.
The refrigerator control is set to
OFF (some models).
Turn the control ON. Refer to the Setting the
Controls section for proper temperature settings.
Refrigerator is in the defrost
cycle.
During the defrost cycle, the temperature of
each compartment may rise slightly. Wait 30
minutes and confirm the proper temperature
has been restored once the defrost cycle has
completed.
Refrigerator was recently
installed.
It may take up to 24 hours for each compartment
to reach the desired temperature.
Refrigerator was recently
relocated.
If the refrigerator was stored for a long period of
time or moved on its side, it is necessary for the
refrigerator to stand upright for 24 hours before
connecting it to power.
May be in Display mode. Refer to page 25 for Display mode instructions.
Cooling system
runs too much.
Refrigerator is replacing an
older model.
Modern refrigerators require more operating
time but use less energy due to more efficient
technology.
Refrigerator was recently
plugged in or power restored.
The refrigerator will take up to 24 hours to cool
completely.
Door opened often or a large
amount of food / hot food was
added.
Adding food and opening the door warms the
refrigerator, requiring the compressor to run
longer in order to cool the refrigerator back
down. In order to conserve energy, try to get
everything you need out of the refrigerator
at once, keep food organized so it is easy to
find, and close the door as soon as the food is
removed. (Refer to the Food Storage Guide.)
Doors are not closed
completely.
Firmly push the doors shut. If they will not shut all
the way, see the Doors will not close completely
or pop open section in Troubleshooting.
Refrigerator is installed in a hot
location.
The compressor will run longer under warm
conditions. At normal room temperatures (70°F)
expect your compressor to run about 40% to
80% of the time. Under warmer conditions,
expect it to run even more often. The refrigerator
should not be operated above 110°F.
Condenser / back cover is
clogged.
Use a vacuum cleaner with an attachment to
clean the condenser cover and vents. Do not
remove the panel covering the condenser coil
area. Unplug the cord or switch off the breaker
before cleaning.
54 TROUBLESHOOTINg
ENGLISH
Problem Possible Causes Solutions
Refrigerator or
Freezer section is
too warm.
Refrigerator was recently
installed. It may take up to 24 hours for each compartment
to reach the desired temperature.
Air vents are blocked. Rearrange items to allow air to flow throughout
the compartment. Refer to the Airflow diagram in
the Using Your Refrigerator section.
Doors are opened often or for
long periods of time. When the doors are opened often or for long
periods of time, warm, humid air enters the
compartment. This raises the temperature and
moisture level within the compartment. To lessen
the effect, reduce the frequency and duration of
door openings.
Unit is installed in a hot location. The refrigerator should not be operated in
temperatures above 110°F.
A large amount of food or
hot food was added to either
compartment.
Adding food warms the compartment requiring
the cooling system to run. Allowing hot food to
cool to room temperature before putting it in the
refrigerator will reduce this effect.
Doors not closed correctly. See the Doors will not close correctly or pop
open section in Troubleshooting.
Temperature control is not set
correctly. If the temperature is too warm, adjust the
control one increment at a time and wait for the
temperature to stabilize. Refer to the Setting the
Controls section for more information.
Defrost cycle has recently
completed. During the defrost cycle, the temperature of each
compartment may rise slightly and condensation
may form on the back wall. Wait 30 minutes
and confirm the proper temperature has been
restored once the defrost cycle has completed.
55
TROUBLESHOOTINg
ENGLISH
Problem Possible Causes Solutions
Interior moisture
buildup. Doors are opened often or for
long periods of time. When the doors are opened often or for long
periods of time, warm, humid air enters the
compartment. This raises the temperature and
moisture level within the compartment. To
lessen the effect, reduce the frequency and
duration of door openings.
Doors not closed correctly. See the Doors will not close correctly section in
the Troubleshooting section.
Weather is humid. Humid weather allows additional moisture
to enter the compartments when the doors
are opened leading to condensation or frost.
Maintaining a reasonable level of humidity in the
home will help to control the amount of moisture
that can enter the compartments.
Defrost cycle recently
completed. During the defrost cycle, the temperature of each
compartment may rise slightly and condensation
may form on the back wall. Wait 30 minutes and
confirm that the proper temperature has been
restored once the defrost cycle has completed.
Food is not packaged correctly. Food stored uncovered or unwrapped, and damp
containers can lead to moisture accumulation
within each compartment. Wipe all containers
dry and store food in sealed packaging to prevent
condensation and frost.
Food is freezing
in the refrigerator
compartment.
Food with high water content
was placed near an air vent.
Rearrange items with high water content away
from air vents.
Refrigerator temperature control
is set incorrectly.
If the temperature is too cold, adjust the control
one increment at a time and wait for the
temperature to stabilize. Refer to the Setting the
Controls section for more information.
Refrigerator is installed in a cold
location.
When the refrigerator is operated in temperatures
below 41°F (5°C), food can freeze in the
refrigerator compartment. The refrigerator should
not be operated in temperatures below 55°F (13°C).
Frost or ice
crystals form
on frozen food
(outside of
package).
Door is opened frequently or for
long periods of time.
When the doors are opened often or for long
periods of time, warm, humid air enters the
compartment. This raises the temperature and
moisture level within the compartment. Increased
moisture will lead to frost and condensation.
To lessen the effect, reduce the frequency and
duration of door openings.
Door is not closing properly. Refer to the Doors will not close correctly or pop
open section in the Troubleshooting section.
Refrigerator or
Freezer section is
too cold.
Incorrect temperature control
settings.
If the temperature is too cold, adjust the control
one increment at a time and wait for the
temperature to stabilize. Refer to the Setting the
Controls section for more information.
56 TROUBLESHOOTINg
ENGLISH
Problem Possible Causes Solutions
Frost or ice
crystals on frozen
food (inside of
sealed package).
Condensation from food with a
high water content has frozen
inside of the food package.
This is normal for food items with a high water
content.
Food has been left in the freezer
for a long period of time.
Do not store food items with high water content
in the freezer for a long period of time.
Icemaker is not
making enough
ice.
Demand exceeds ice storage
capacity.
The icemaker will produce approximately 70~182
cubes in a 24 hour period.
House water supply is not
connected, valve is not turned
on fully, or valve is clogged.
Connect the refrigerator to a cold water supply
with adequate pressure and turn the water
shutoff valve fully open.
If the problem persists, it may be necessary to
contact a plumber.
Water filter has been
exhausted.
It is recommended that you replace the water
filter:
Approximately every six months.•
When the water filter indicator blinks.•
When the water dispenser output decreases. •
When the ice cubes are smaller than normal.•
Low house water supply
pressure.
The water pressure must be 20~120 psi or
138~827 kPa or 1.4~8.4 kgf/cm² on models
without a water filter and 40~120 psi or 276~827
kPa or 2.8~8.4 kgf/cm² on models with a water
filter.
If the problem persists, it may be necessary to
contact a plumber.
Reverse Osmosis filtration
system is used.
Reverse osmosis filtration systems can reduce
the water pressure below the minimum amount
and result in icemaker issues.
(Refer to Water Pressure section.)
Tubing connecting refrigerator
to house supply valve is kinked.
The tubing can kink when the refrigerator is
moved during installation or cleaning resulting
in reduced water flow. Straighten or repair the
water supply line and arrange it to prevent future
kinks.
57
TROUBLESHOOTINg
ENGLISH
Problem Possible Causes Solutions
Icemaker is not
making enough
ice (continued).
Doors are opened often or for
long periods of time.
If the doors of the unit are opened often, ambient
air will warm the refrigerator which will prevent
the unit from maintaining the set temperature.
Lowering the refrigerator temperature can help,
as well as not opening the doors as frequently.
Doors are not closed
completely.
If the doors are not properly closed, ice
production will be affected. See the Doors will
not close completely or pop open section in
Troubleshooting for more information.
The temperature setting for the
freezer is too warm.
The recommended temperature for the freezer
compartment for normal ice production is 0°F. If
the freezer temperature is warmer, ice production
will be affected.
Dispensing water
slowly.
Water filter has been exhausted. It is recommended that you replace the water
filter:
Approximately every six months.•
When the water filter indicator blinks.•
When the water dispenser output decreases. •
When the ice cubes are smaller than normal.•
Reverse osmosis filtration
system is used.
Reverse osmosis filtration systems can reduce
the water pressure below the minimum amount
and result in icemaker issues.
If the problem persists, it may be necessary to
contact a plumber.
Low house water supply
pressure.
The water pressure must be 20~120 psi or
138~827 kPa or 1.4~8.4 kgf/cm² on models
without a water filter and 40~120 psi or 276~827
kPa or 2.8~8.4 kgf/cm² on models with a water
filter.
If the problem persists, it may be necessary to
contact a plumber.

58 TROUBLESHOOTINg
ENGLISH
Problem Possible Causes Solutions
Not dispensing
ice.
Doors are not closed
completely.
Ice will not dispense if any of the refrigerator
doors are left open.
Infrequent use of the dispenser. Infrequent use of the ice dispenser will cause
the cubes to stick together over time, which
will prevent them from properly dispensing.
Check the ice bin for ice cubes clumping/sticking
together. If they are, break up the ice cubes to
allow for proper operation.
The delivery chute is clogged
with frost or ice fragments.
Eliminate the frost or ice fragments by removing
the ice bin and clearing the chute with a plastic
utensil. Dispensing cubed ice can also help
prevent frost or ice fragment buildup.
The dispenser display is locked. Press and hold the Lock button for three seconds
to unlock the control panel and dispenser.
Ice bin is empty. It may take up to 24 hours for each compartment
to reach the desired temperature and for the
icemaker to begin making ice. Make sure that the
shutoff (arm/sensor) is not obstructed.
Once the ice supply in the bin has been
completely exhausted, it my take up to 90
minutes before additional ice is available, and
approximately 24 hours to completely refill the
bin.
Icemaker is not
making ice.
Refrigerator was recently
installed or icemaker recently
connected.
It may take up to 24 hours for each compartment
to reach the desired temperature and for the
icemaker to begin making ice.
Icemaker not turned on. Locate the Ice On/Off button on the display and
confirm that it is turned On.
The ice detecting sensor is
obstructed.
Foreign substances or frost on the ice-detecting
sensor can interrupt ice production. Make sure
that the sensor area is clean at all times for proper
operation.
The refrigerator is not connected
to a water supply or the supply
shutoff valve is not turned on.
Connect refrigerator to the water supply and turn
the water shutoff valve fully open.
Icemaker shutoff (arm or
sensor) obstructed.
If your icemaker is equipped with an ice shutoff
arm, make sure that the arm moves freely. If
your icemaker is equipped with the electronic ice
shutoff sensor, make sure that there is a clear
path between the two sensors.
Reverse osmosis water filtration
system is connected to your
cold water supply.
Reverse osmosis filtration systems can reduce
the water pressure below the minimum amount
and result in icemaker issues.
(Refer to the Water Pressure section.)
59
TROUBLESHOOTINg
ENGLISH
Problem Possible Causes Solutions
Not dispensing
water.
New installation or water line
recently connected.
Dispense 2.5 gallons of water (flush for
approximately 5 minutes) to remove trapped air
and contaminants from the system.
Do not dispense the entire 2.5 gallon amount
continuously. Depress and release the dispenser
pad for cycles of 30 seconds ON and 60 seconds
OFF.
The dispenser panel is locked. Press and hold the Lock button for three seconds
to unlock the control panel and dispenser.
The dispenser is not set for
water dispensing.
The dispenser can be set for ice or water. Make
certain that the control panel is set for the proper
operation. Press the Water button on the control
panel to dispense water.
Refrigerator or freezer doors are
not closed properly.
Water will not dispense if any of the refrigerator
doors are left open.
Water filter has been recently
removed or replaced.
After the water filter is replaced, dispense 2.5
gallons of water (flush for approximately 5
minutes) to remove trapped air and contaminants
from the system. Do not dispense the entire 2.5
gallon amount continuously. Depress and release
the dispenser pad for cycles of 30 seconds ON
and 60 seconds OFF.
Tubing connecting refrigerator
to house supply valve is kinked.
The tubing can kink when the refrigerator is
moved during installation or cleaning resulting in
reduced water flow. Straighten or repair the water
supply line and arrange it to prevent future kinks.
The house water supply is not
connected, the valve is not
turned on fully, or the valve is
clogged.
Connect refrigerator to the water supply and turn
the water shutoff valve fully open.
If the problem persists, it may be necessary to
contact a plumber.
60 TROUBLESHOOTINg
ENGLISH
Problem Possible Causes Solutions
Ice has bad taste
or odor.
Water supply contains minerals
such as sulfur.
A water filter may need to be installed to
eliminate taste and odor problems.
NOTE: In some cases, a filter may not help. It
may not be possible to remove all minerals / odor
/ taste in all water supplies.
Icemaker was recently installed. Discard the first few batches of ice to avoid
discolored or bad tasting ice.
Ice has been stored for too
long.
Ice that has been stored for too long will shrink,
become cloudy, and may develop a stale taste.
Throw away old ice and make a new supply.
The food has not been stored
properly in either compartment.
Rewrap the food. Odors may migrate to the ice if
food is not wrapped properly.
The interior of the refrigerator
needs to be cleaned.
See the Care and Cleaning section for more
information.
The ice storage bin needs to be
cleaned.
Empty and wash the bin (discard old cubes).
Make sure that the bin is completely dry before
reinstalling it.
Dispensing warm
water.
Refrigerator was recently
installed.
Allow 24 hours after installation for the water
storage tank to cool completely.
The water dispenser has been
used recently and the storage
tank was exhausted.
Depending on your specific model, the water
storage capacity will range from approximately 20
to 30 oz.
Dispenser has not been used
for several hours.
If the dispenser has not been used for several
hours, the first glass dispensed may be warm.
Discard the first 10 oz.
Refrigerator is connected to the
hot water supply.
Make sure that the refrigerator is connected to a
cold water pipe.
WARNING: Connecting the refrigerator to a
hot water line may damage the icemaker.
Water has bad
taste or odor.
Water supply contains minerals
such as sulfur.
A water filter may need to be installed to
eliminate taste and odor problems.
Water filter has been exhausted. It is recommended that you replace the water
filter:
Approximately every 6 months.•
When the water filter indicator blinks.•
When the water dispenser output decreases. •
When the ice cubes are smaller than normal.•
Refrigerator was recently
installed.
Dispense 2.5 gallons of water (flush for
approximately 5 minutes) to remove trapped
air and contaminants from the system. Do
not dispense the entire 2.5 gallon amount
continuously. Depress and release the dispenser
pad for cycles of 30 seconds ON and 60 seconds
OFF.
61
TROUBLESHOOTINg
ENGLISH
Problem Possible Causes Solutions
Icemaker is
making too much
ice.
Icemaker shutoff (arm/sensor)
is obstructed.
Empty the ice bin. If your icemaker is equipped
with an ice shutoff arm, make sure that the arm
moves freely. If your icemaker is equipped with
the electronic ice shutoff sensor, make sure that
there is a clear path between the two sensors.
Reinstall the ice bin and wait 24 hours to confirm
proper operation.
Clicking The defrost control will click
when the automatic defrost
cycle begins and ends.
The thermostat control (or
refrigerator control on some
models) will also click when
cycling on and off.
Normal Operation
Rattling Rattling noises may come from
the flow of refrigerant, the
water line on the back of the
unit, or items stored on top of
or around the refrigerator.
Normal Operation
Refrigerator is not resting solidly
on the floor.
Floor is weak or uneven or leveling legs need to
be adjusted. See the Door Alignment section.
Refrigerator with linear
compressor was jarred while
running.
Normal Operation
Whooshing Evaporator fan motor is
circulating air through the
refrigerator and freezer
compartments.
Normal Operation
Air is being forced over the
condenser by the condenser
fan.
Normal Operation
Gurgling Refrigerant flowing through the
cooling system.
Normal Operation
Popping Contraction and expansion of
the inside walls due to changes
in temperature.
Normal Operation
Sizzling Water dripping on the defrost
heater during a defrost cycle.
Normal Operation
Vibrating If the side or back of the
refrigerator is touching a cabinet
or wall, some of the normal
vibrations may make an audible
sound.
To eliminate the noise, make sure that the sides
and back cannot vibrate against any wall or
cabinet.
Dripping Water running into the drain pan
during the defrost cycle.
Normal Operation
62 TROUBLESHOOTINg
ENGLISH
Problem Possible Causes Solutions
Pulsating or
High-Pitched
Sound
Your refrigerator is designed
to run more efficiently to keep
your food items at the desired
temperature. The high efficiency
compressor may cause your
new refrigerator to run longer
than your old one, but it is still
more energy efficient than
previous models. While the
refrigerator is running, it is
normal to hear a pulsating or
high-pitched sound.
Normal Operation
Doors will not
close correctly or
pop open.
Food packages are blocking the
door open.
Rearrange food containers to clear the door and
door shelves.
Ice bin, crisper cover, pans,
shelves, door bins, or baskets
are out of position.
Push bins all the way in and put crisper cover,
pans, shelves and baskets into their correct
positions. See the Using Your Refrigerator section
for more information.
The doors were removed during
product installation and not
properly replaced.
Remove and replace the doors according to the
Removing and Replacing Refrigerator Handles
and Doors section.
Refrigerator is not leveled
properly.
See Door Alignment in the Refrigerator Installation
section to level refrigerator.
Doors are difficult
to open.
The gaskets are dirty or sticky. Clean the gaskets and the surfaces that they
touch. Rub a thin coat of appliance polish or
kitchen wax on the gaskets after cleaning.
Door was recently closed. When you open the door, warmer air enters the
refrigerator. As the warm air cools, it can create
a vacuum. If the door is hard to open, wait one
minute to allow the air pressure to equalize, then
see if it opens more easily.
InstaView™Door-
in-Door® panel
doesn't work
properly.
Knocking too softly or on edges
of panel. Loud noise near
refrigerator.
Knock twice near the center of the glass panel.
Tap hard enough so the taps are audible. Loud
noises may activate InstaView™ function. The
LED turns off automatically after 5 seconds.
Auto Open Door
does not work
properly.
Motion sensor not activated or
flooring material too reflective.
Make sure your foot passes in front of the motion
sensor before you step on the displayed text. If
the flooring material is highly reflective, the Auto
Door sensor may malfunction.
Auto Open
Drawer does not
work properly.
Door not open wide enough.
Closing door too quickly.
Open the door at least 85 degrees. Close the door
to less than 85 degrees, then allow the sensor to
react and the drawers to close before fully closing
the door.

63
TROUBLESHOOTINg
ENGLISH
Problem Possible Causes Solutions
Refrigerator
wobbles or
seems unstable.
Leveling legs are not adjusted
properly.
Refer to the Leveling and Door Alignment section.
Floor is not level. It may be necessary to add shims under the
leveling legs or rollers to complete installation.
Lights do not
work.
LED interior lighting failure. The refrigerator compartment lamp is LED interior
lighting, and service should be performed by a
qualified technician.
Refrigerator has
an unusual odor.
The Air Filter may need to
be set to the MAX setting or
replaced.
Set the Air Filter to the MAX setting. If the odor
does not go away within 24 hours, the filter may
need to be replaced. See the Replacing the Air
Filter section for replacement instructions.
The interior of
the refrigerator
is covered with
dust or soot.
The refrigerator is located near a
fire source, such as a fireplace,
chimney or candle.
Make sure that the refrigerator is not located
near a fire source, such as a fireplace, chimney or
candle.
64 WARRANTY
ENGLISH
Should your LG Refrigerator (“Product”) fail due to a defect in materials or workmanship under
normal home use, during the warranty period set forth below, LG will at its option repair or replace
the product. This limited warranty is valid only to the original retail purchaser of the product and
applies only when purchased and used within the United States including U.S. Territories. Proof of
original retail purchase is required to obtain warranty service under this limited warranty.
Noises associated with normal operation and failure to follow instructions found in the use and
care and installation guides or operating the unit in an unsuitable environment will not be covered
under this warranty.
Replacement products and parts are warranted for the remaining portion of the original warranty
period or ninety (90) days, whichever is greater.
Replacement products and parts may be new or remanufactured.
THIS WARRANTY IS IN LIEU OF ANY OTHER WARRANTY, EXPRESS OR IMPLIED,
INCLUDING WITHOUT LIMITATION, ANY WARRANTY OF MERCHANTABILITY OR FITNESS
FOR A PARTICULAR PURPOSE. TO THE EXTENT ANY IMPLIED WARRANTY IS REQUIRED
BY LAW, IT IS LIMITED IN DURATION TO THE EXPRESS WARRANTY PERIOD ABOVE.
NEITHER THE MANUFACTURER NOR ITS U.S. DISTRIBUTOR SHALL BE LIABLE FOR ANY
INCIDENTAL, CONSEQUENTIAL, INDIRECT, SPECIAL, OR PUNITIVE DAMAGES OF ANY
NATURE, INCLUDING WITHOUT LIMITATION, LOST REVENUES OR PROFITS, OR ANY
OTHER DAMAGE WHETHER BASED IN CONTRACT, TORT, OR OTHERWISE. Some states do
not allow the exclusion or limitation of incidental or consequential damages or limitations on how
long an implied warranty lasts, so the above exclusion or limitation may not apply to you. This
warranty gives you specific legal rights and you may also have other rights that vary from state
to state.
WARRANTY (USA)
WARRANTY PERIOD
Refrigerator
Sealed System
(Condenser, Dryer, Connecting Tube,
Refrigerant and Evaporator)
Linear Compressor
One (1) year from
the date of original
retail purchase
One (1) year from the
date of original retail
purchase
Seven (7) years from
the date of original
retail purchase
Ten (10) years from the
date of original retail
purchase
Parts and Labor
(internal/functional
parts only)
Parts and Labor Parts only (Consumer
will be charged for
labor)
Part only (Consumer will
be charged for labor)

65
WARRANTY
ENGLISH
For complete warranty details and customer assistance, please call or visit our website:
Call 1-800-243-0000 (24 hours a day, 365 days a year) and select the appropriate option from the
menu, or visit our website at
http://www.lg.com
Or by mail: LG Customer Information Center:
P. O. Box 240007, 201 James Record Road Huntsville, Alabama 35813 ATTN: CIC
Write your warranty information below: _______________________________________________
Product Registration Information: _____________________________________________________
Model: ____________________________________________________________________________
Serial Number: _____________________________________________________________________
Date of Purchase: __________________________________________________________________
THIS LIMITED WARRANTY DOES NOT COVER:
1. Service trips to deliver, pick up, install, or repair the product; instruct the customer on operation
of the product; repair or replace fuses or correct wiring or plumbing, or correction of unauthorized
repairs/installation.
2. Failure of product to perform during power failures and interruptions or inadequate electrical service.
3. Damage caused by leaky or broken water pipes, frozen water pipes, restricted drain lines, inadequate
or interrupted water supply or inadequate supply of air.
4. Damage resulting from operating the product in a corrosive atmosphere or contrary to the
instructions outlined in the product owner’s manual.
5. Damage to the product caused by accidents, pests and vermin, lightning, wind, fire, floods, or acts of
God.
6. Damage resulting from misuse, abuse, improper installation, repair, or maintenance. Improper repair
includes use of parts not approved or specified by LG.
7. Damage or failure caused by unauthorized modification or alteration, or if it is used for other than the
intended purpose, or any water leakage where the unit was not properly installed.
8. Damage or failure caused by incorrect electrical current, voltage, or plumbing codes, commercial
or industrial use, or use of accessories, components, or consumable cleaning products that are not
approved by LG.
9. Damage caused by transportation and handling, including scratches, dents, chips, and/or other
damage to the finish of your product, unless such damage results from defects in materials or
workmanship and is reported within one (1) week of delivery (Call: 1-800-243-0000).
10. Damage or missing items to any display, open box, discounted, or refurbished product.
11. Products with original serial numbers that have been removed, altered, or can not be readily
determined. Model and Serial numbers, along with original retail sales receipt, are required for
warranty validation.
12. Increases in utility costs and additional utility expenses.
13. Replacement of light bulbs, filters, or any consumable parts.
14. Repairs when your product is used in other than normal and usual household use (e.g. commercial
use, offices, and recreational facilities) or contrary to the instructions outlined in the product owner’s
manual.
15. Costs associated with removal of your product from your home for repairs.
16. The removal and reinstallation of the product if it is installed in an inaccessible location or is not
installed in accordance with published installation instructions, including LG’s owner’s and installation
manuals.
17. Shelves, door bins, drawers, handles, accessories, and other parts besides those that were originally
included with this particular model.
18. Service trips to your home to teach you how to use the product.
19. Replacement of the water filter cartridge due to water pressure that is outside the specified
operating range or due to excessive sediment in the water supply.
The cost of repair or replacement under these excluded circumstances shall be borne
by the consumer.

66 WARRANTY
ENGLISH
WARRANTY (Canada)
WARRANTY: Should your LG Refrigerator (“Product”) fail due to a defect in material or workmanship
under normal home use during the warranty period set forth below, LG Canada will at its option
repair or replace the Product upon receipt of proof of original retail purchase. This warranty is valid
only to the original retail purchaser of the product and applies only to a Product distributed in Canada
by LG Canada or an authorized Canadian distributor thereof. The warranty only applies to Products
located and used within Canada.
Noises associated with normal operation and failure to follow instructions found in the use and care
and installation guides or operating the unit in an unsuitable environment will not be covered under
this warranty.
Replacement products and parts are warranted for the remaining portion of the original warranty
period or ninety (90) days, whichever is greater.
Replacement products and parts may be new or remanufactured.
LG Authorized Service Center warranties their repair work for thirty (30) days.
LG CANADA’S SOLE LIABILITY IS LIMITED TO THE WARRANTY SET OUT ABOVE. EXCEPT
AS EXPRESSLY PROVIDED ABOVE, LG CANADA MAKES NO AND HEREBY DISCLAIMS
ALL OTHER WARRANTIES AND CONDITIONS RESPECTING THE PRODUCT, WHETHER
EXPRESS OR IMPLIED, INCLUDING, BUT NOT LIMITED TO, ANY IMPLIED WARRANTY OR
CONDITION OF MERCHANTABILITY OR FITNESS FOR A PARTICULAR PURPOSE, AND
NO REPRESENTATIONS SHALL BE BINDING ON LG CANADA. LG CANADA DOES NOT
AUTHORIZE ANY PERSON TO CREATE OR ASSUME FOR IT ANY OTHER WARRANTY
OBLIGATION OR LIABILITY IN CONNECTION WITH THE PRODUCT. TO THE EXTENT THAT
ANY WARRANTY OR CONDITION IS IMPLIED BY LAW, IT IS LIMITED TO THE EXPRESS
WARRANTY PERIOD ABOVE. LG CANADA, THE MANUFACTURER OR DISTRIBUTOR SHALL
NOT BE LIABLE FOR ANY INCIDENTAL, CONSEQUENTIAL, SPECIAL, DIRECT OR INDIRECT
DAMAGES, LOSS OF GOODWILL, LOST PROFITS, PUNITIVE OR EXEMPLARY DAMAGES
OR ANY OTHER DAMAGE, WHETHER ARISING DIRECTLY OR INDIRECTLY FROM ANY
CONTRACTUAL BREACH, FUNDAMENTAL OR OTHERWISE, OR FROM ANY ACTS OR
OMISSIONS, TORT, OR OTHERWISE. This warranty gives you specific legal rights. You may
have other rights which may vary from province to province depending on applicable provincial
laws. Any term of this warranty that negates or varies any implied condition or warranty under
provincial law is severable where it conflicts with provincial law without affecting the remainder
of this warranty’s terms.
WARRANTY PERIOD: (Note: If the original date of purchase can not be verified,
the warranty will begin sixty (60) days from the date of manufacture)
Refrigerator/
Freezer
Sealed System
(Condenser, Dryer, Connecting Tube,
Refrigerant and Evaporator)
Linear Compressor
One (1) year from
the date of original
retail purchase
One (1) year from
the date of original
retail purchase
Seven (7) years from
the date of original
retail purchase
Ten (10) years from the
date of original retail
purchase
Parts and Labor
(internal/functional
parts only)
Parts and Labor Parts only (Consumer
will be charged for
labor)
Part only (Consumer will
be charged for labor)

67
WARRANTY
ENGLISH
For complete warranty details and customer assistance, please call or visit our website:
Call 1-888-542-2623 (24 hours a day, 365 days a year) and select the appropriate option from the
menu, or visit our website at http://www.lg.com
Write your warranty information below: _________________________________________________
Product Registration Information: _______________________________________________________
Model: ______________________________________________________________________________
Serial Number: _______________________________________________________________________
Date of Purchase: ____________________________________________________________________
THIS LIMITED WARRANTY DOES NOT COVER:
1. Service trips to deliver, pick up, or install the product; instructing a customer on operation of
the product; repair or replacement of fuses or correction of wiring or plumbing, or correction of
unauthorized repairs/installation.
2. Failure of the product to perform during power failures and interruptions or inadequate electrical
service.
3. Damage caused by leaky or broken water pipes, frozen water pipes, restricted drain lines, inadequate
or interrupted water supply or inadequate supply of air.
4. Damage resulting from operating the Product in a corrosive atmosphere or contrary to the
instructions outlined in the Product owner’s manual.
5. Damage to the Product caused by accidents, pests and vermin, lightning, wind, fire, floods, or acts of
God.
6. Damage resulting from the misuse, abuse, improper installation, repair, or maintenance of the
Product. Improper repair includes use of parts not approved or specified by LG Canada.
7. Damage or product failure caused by unauthorized modification or alteration, or use for other than its
intended purpose, or resulting from any water leakage due to improper installation.
8. Damage or Product failure caused by incorrect electrical current, voltage, or plumbing codes,
commercial or industrial use, or use of accessories, components, or cleaning products that are not
approved by LG Canada.
9. Damage caused by transportation and handling, including scratches, dents, chips, and/or other
damage to the finish of your product, unless such damage results from defects in materials or
workmanship and is reported within one (1) week of delivery.
10. Damage or missing items to any display, open box, discounted, or refurbished Product.
11. Products with original serial numbers that have been removed, altered, or cannot be readily
determined. Model and Serial numbers, along with original retail sales receipt, are required for
warranty validation.
12. Increases in utility costs and additional utility expenses.
13. Replacement of light bulbs, filters, or any consumable parts.
14. Repairs when your Product is used in other than normal and usual household use (including, without
limitation, commercial use, in offices or recreational facilities) or contrary to the instructions outlined
in the Product owner’s manual.
15. Costs associated with removal of the Product from your home for repairs.
16. The removal and reinstallation of the Product if it is installed in an inaccessible location or is not
installed in accordance with published installation instructions, including the Product owner’s and
installation manuals.
17. Shelves, door bins, drawers, handles, and accessories to the Product. Also excluded are parts
besides those that were originally included with the Product.
18. Service trips to your home to teach you how to use the product.
19. Replacement of the water filter cartridge due to water pressure that is outside the specified
operating range or due to excessive sediment in the water supply.
All costs associated with the above excluded circumstances
shall be borne by the consumer.

MANUEL DU PROPRIÉTAIRE
RÉFRIGÉRATEUR À
PORTE-FENÊTRE
Veuillez lire ce manuel attentivement avant l’utilisation et
conservez-le pour référence en tout temps.
LUPXS3186N
LUPXC2386N
P/No. : MFL68302707 www.lg.com
FRANÇAIS

2TABLE DES MATIÈRES
FRANÇAIS
TABLE DES MATIÈRES
3
CARACTÉRISTIQUES DU PRODUIT
4
CONSIGNES IMPORTANTES DE
SÉCURITÉ
7 COMPOSANTS
7 Extérieur du réfrigérateur
8 Intérieur du réfrigérateur
9 INSTALLATION
9 Vue d’ensemble de l’installation
10 Spécifications
11 Déballage de votre réfrigérateur
11 Choisir le bon emplacement
11 - Mise au sol
12 - Température ambiante
12 - Mesure des espaces
12 Enlèvement/Montage des portes
17 Connexion de la canalisation d’eau
17 - Avant de commencer
18 - Pression de l’eau
18 - Ce dont vous aurez besoin
19 - Instructions d’installation de la ligne d’eau
20 Mise en marche
21 Nivellement
21 Alignement de la porte
21 - Ajustement de la hauteur de la porte
22 MODE D’EMPLOI
22 Avant l’utilisation
23 Affichage Éclipse
23 -
Fonctionnalités de l’affichage Éclipse
25 -
Utilisation de l’affichage intérieur
26 Fonctions intelligentes
31 Utilisation du bac à glaçons
31 - Détachement du bac à glaçons
31 - Montage du bac à glaçons
32 Machine à glaçons automatique
34 Distributeur de glaçons et d’eau
35 Stockage des aliments
35 - Lieu de conservation des aliments
36 - Conseils pour le stockage des aliments
36 - Stockage d’aliments congelés
37 Réglage des étagères du réfrigérateur
37 - Détachement de l’étagère
37 - Montage de l’étagère
38 - Précautions à prendre lors de la fermeture
de la porte
38 Garde-manger CustomChill™
38 - Paramétrage du garde-manger
CustomChill™
39 Compartiment de bac à légumes
39 - Retrait du compartiment de bac à légumes
39 - Assemblage des compartiments de bac à
légumes
40 - Retrait de la boîte de support du
compartiment
40 - Assemblage de la boîte de support du
compartiment de bac à légumes
41 Removing the CustomChill™ Pantry Insert
41 Conteneur en acier FRESH
41 InstaView™Door-in-Door®
42 Balconnet EasyLift
42 Tiroir du congélateur
42 - Retrait des tiroirs du congélateur
46 - Assemblage du tiroir du congélateur
46 - Enlever le support du tiroir
44 - Monter le support du tiroir
44 Balconnets du réfrigérateur/congélateur
46 ENTRETIEN
46 Nettoyage
47 Remplacement du filtre à air
48 Remplacement du filtre à eau
52 SMART DIAGNOSIS
52 Utilisation de Smart Diagnosis™
53 DÉPANNAGE
64 GARANTIE
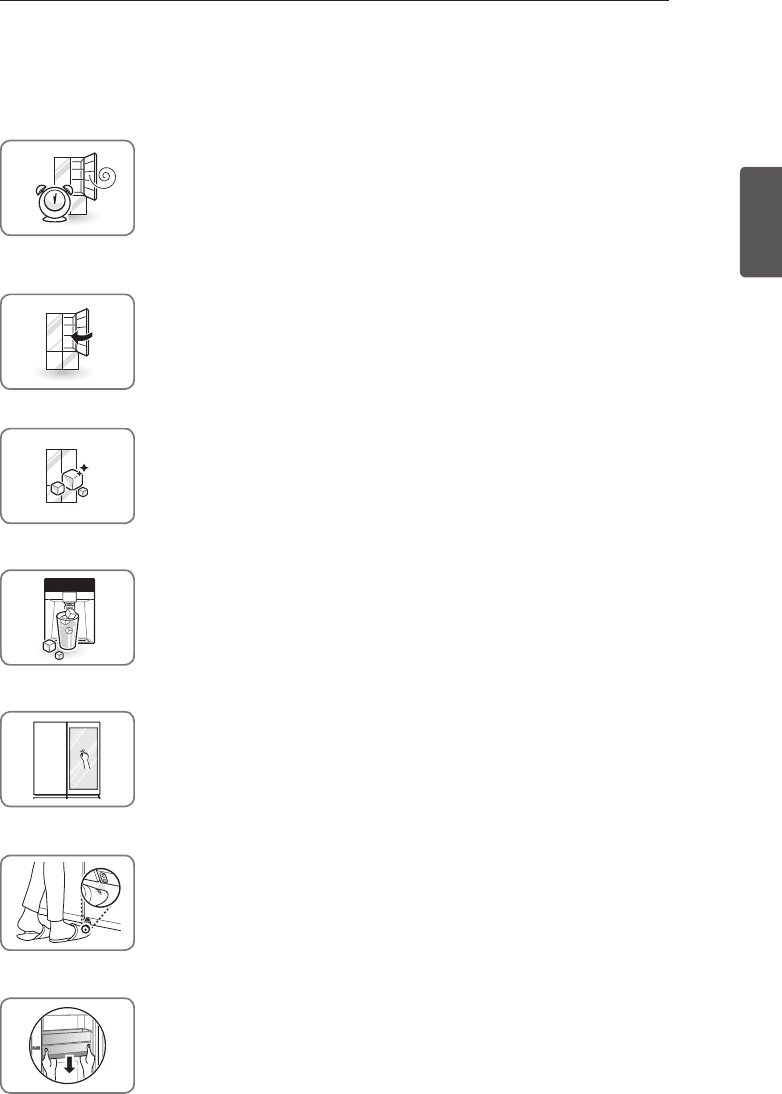
3
CARACTÉRISTIQUES DU PRODUIT
FRANÇAIS
CARACTÉRISTIQUES DU PRODUIT
Selon le modèle, certaines des fonctions suivantes pourraient ne pas être disponibles.
ALARME DE PORTE
La fonction d’alarme de porte est conçue pour empêcher tout
dysfonctionnement réfrigérateur qui pourrait se produire si une porte du
réfrigérateur ou un tiroir du congélateur restaient ouverts. Si une porte ou
un tiroir du réfrigérateur sont laissés ouverts pendant plus de 60 secondes,
un signal sonore d’avertissement retentit par intervalles de 30 secondes.
GLACE PLUS
La production de glace peut être augmentée d’environ 20 pour cent lorsque
la section du congélateur est maintenue à la température la plus froide pour
une période de 24 heures.
CHARNIÈRES À FERMETURE AUTOMATIQUE
Une simple poussée et les portes du réfrigérateur se ferment
automatiquement. (Les portes ne se ferment automatiquement que
lorsqu’elles sont ouvertes à un angle inférieur à 30°.)
EAU FILTRÉE ET DISTRIBUTEUR À GLAÇONS
Le distributeur d’eau fournit de l’eau fraîche et glacée.
Le distributeur de glaçons fournit des glaçons et de la glace pilée.
InstaView™Door-in-Door®
Jetez un coup d’œil pour vérifier si vous avez suffisamment de moutarde ou
des boissons gazeuses fraîches sans ouvrir la porte et en évitant que l’air ne
s’échappe.
PORTE À OUVERTURE AUTOMATIQUE
Lorsque vous avez de l’épicerie plein les mains, ouvrez la porte du
réfrigérateur automatiquement en plaçant un pied près du capteur de porte
automatique.
RAILS DE COMPARTIMENT À REPLI
Utilisez les barres métalliques sur le compartiment DID comme diviseurs de
compartiment ou comme rails pour conserver les grands articles en place.
4CONSIGNES IMPORTANTES DE SÉCURITÉ
FRANÇAIS
CONSIGNES IMPORTANTES DE SÉCURITÉ
LIRE TOUTES LES INSTRUCTIONS AVANT D’UTILISER L’APPAREIL.
Ce guide contient de nombreux messages de sécurité importants. Toujours lire et suivre tous les messages de sécurité.
AVERTISSEMENT
Vous pouvez être tué ou gravement blessé si vous ne suivez pas ces
instructions.
ATTENTION
Indique une situation extrêmement dangereuse qui, si elle n’est pas évitée, peut
entraîner des blessures mineures ou modérées, ou endommager le produit.
AVERTISSEMENT
Pour réduire le risque d’incendie, d’électrocution ou de blessures lors de l’utilisation de votre
produit, des préATTENTIONs de base devraient être prises, y compris les suivantes:
Alimentation
NE JAMAIS débrancher le réfrigérateur en tirant sur le cordon d’alimentation. Toujours tenir fermement la
y
fiche et la retirer de la prise.
Si le cordon d’alimentation est abîmé, il doit être remplacé par le fabriquant, par son service après-vente ou
y
par une personne également qualifiée afin d’éviter tout danger. Ne pas utiliser un cordon qui présente des
fissures ou des traces de frottement sur sa longueur ou à l’extrémité de la fiche ou du connecteur.
Ne pas utiliser une prise de courant non certifiée.
y
Débrancher le cordon d’alimentation immédiatement en cas de panne ou d’orage.
y
Brancher dans la prise d’alimentation avec le cordon d’alimentation vers le bas.
y
Installation
Contactez un centre de service après-vente agréé avant d’installer ou de déplacer le réfrigérateur.
y
Lorsque vous déplacez votre réfrigérateur loin du mur, faites attention de ne pas rouler au-dessus ou
y
endommager le cordon d’alimentation.
Avant l’utilisation, veillez à brancher ce réfrigérateur à une prise électrique dédiée et mise à la terre
y
de 115 V, 60 Hz, CA uniquement. Il incombe à l’utilisateur de remplacer une prise murale standard à
2-broches avec une prise murale standard à 3 broches.
N’installez pas le réfrigérateur à un endroit où il risque de tomber.
y
Utilisation
NE LAISSEZ PAS les enfants grimper, se tenir debout ou se suspendre aux portes ou aux clayettes du
y
réfrigérateur. Ils pourraient endommager le réfrigérateur et se blesser gravement.
Ne placez pas d’objets lourds sur le distributeur du réfrigérateur et ne vous y suspendez pas.
y
Ne pas placer d’objets lourds ou dangereux (bouteilles de liquide) sur le réfrigérateur.
y
Ne pas mettre d’animaux vivants à l’intérieur du réfrigérateur.
y
Ne pas laisser les enfants monter dans le produit lorsqu’il est en cours d’utilisation.
y
En cas de fuite de gaz (propane, GPL), aérez suffisamment la pièce et contactez un centre de service
y
après-vente agréé avant de reprendre l’utilisation. Ne pas toucher ni démonter la prise électrique du
réfrigérateur.
Dans le cas d’une fuite de fluide réfrigérant, déplacer les objets inflammables loin du réfrigérateur. Aérez
y
suffisamment la pièce et contactez un centre de service après-vente agréé.
Ne pas utiliser ni mettre des substances inflammables (produits chimiques, médicaments, cosmétiques,
y
etc.) près du réfrigérateur et ne pas les stocker à l’intérieur du réfrigérateur. Ne pas placer le réfrigérateur
à proximité de gaz inflammables.
Ne remplissez pas trop les balconnets et ne serrez pas trop les aliments dedans. Vous risquez sinon
y
d’endommager le balconnet ou de vous blesser si les aliments sont retirés avec force.
Ceci est le symbole d’alerte de sécurité. Il vous alerte de messages de sécurité qui vous informent de
dangers qui peuvent vous tuer ou vous blesser, blesser autrui ou causer des dommages au produit.
Tous les messages de sécurité seront précédés par le symbole d’alerte de sécurité et par le mot
AVERTISSEMENT OU ATTENTION. Ces mots signifient :

5
CONSIGNES IMPORTANTES DE SÉCURITÉ
FRANÇAIS
Ne frappez pas le panneau de la porte en verre avec une force excessive. Ne frappez pas des objets
y
tels que des ustensiles de cuisine ou des bouteilles en verre sur le panneau de la porte en verre. Le
verre pourrait se briser provoquant un risque de blessure ou de dommage à l’appareil.
N’utilisez pas ce réfrigérateur à des fins spécifiques telles que stockage de médicaments ou de
y
matériaux d’essai, utilisation sur un bateau, etc.
Débrancher le cordon d’alimentation avant de nettoyer ou de réparer le réfrigérateur.
y
Lorsque vous remplacez l’ampoule dans le réfrigérateur, débranchez le réfrigérateur ou éteignez
y
l’appareil.
Ne pas modifier ou étendre le cordon d’alimentation.
y
Ne pas utiliser de séchoir pour sécher l’intérieur. Ne pas allumer une bougie pour enlever l’odeur à
y
l’intérieur.
Pour votre sécurité, cet appareil doit être correctement mis à la terre. Faites vérifier la prise murale et
y
le circuit électrique par un électricien qualifié pour vous assurer que la prise est correctement mise à
la terre.
Ne pas utiliser une prise qui puisse être éteinte avec un interrupteur. Ne pas utiliser de rallonge. Il
y
incombe à l’utilisateur de remplacer une prise murale standard à 2-broches avec une prise murale
standard à 3 broches.
Ne pas couper ou enlever la troisième broche (terre) du cordon d’alimentation, en aucune circonstance.
y
Ne pas utiliser une prise d’adaptateur et brancher le cordon d’alimentation à une rallonge multi-prise.
y
Débranchez immédiatement le cordon d’alimentation si vous entendez un bruit curieux, sentez une
y
odeur étrange ou détectez de la fumée en provenance du réfrigérateur.
Couper l’alimentation si de l’eau ou de la poussière pénètre dans le réfrigérateur. Appeler un agent de
y
service.
Ne pas démonter ou modifier le réfrigérateur.
y
Ne pas mettre les mains, les pieds ou des objets métalliques en-dessous ou derrière le réfrigérateur.
y
Ne pas faire fonctionner le réfrigérateur ni toucher le cordon d’alimentation avec les mains mouillées.
y
Dans les réfrigérateurs des machines à glaçons automatiques, éviter tout contact avec les pièces
y
mobiles du mécanisme d’éjection ou avec l’élément chauffant qui libère les glaçons. Ne pas placer les
doigts ou les mains sur le mécanisme automatique de fabrication de glace tandis que le réfrigérateur
est branché
Pendant la distribution de glace par le distributeur, ne pas utiliser de la céramique de cristal.
y
Ne pas toucher les surfaces froides dans le compartiment du congélateur avec les mains mouillées ou
y
humides, quand votre réfrigérateur est en marche.
Ne pas mettre de récipients en verre, de bouteilles en verre ou de sodas dans le congélateur.
y
Cet appareil n’est pas destiné à être utilisé par des personnes (enfants compris) avec des capacités
y
physiques, sensorielles ou mentales limitées, ou un manque d’expérience et de connaissances, à
moins qu’elles n’aient été encadrées ou aient reçu des instructions concernant l’utilisation de l’appareil
par une personne responsable de leur sécurité.
Ne recongelez pas des aliments complètement décongelés. Vous risqueriez de graves problèmes de
y
santé.
Si vous vous débarrassez de votre vieux réfrigérateur, assurez-vous que le liquide de refroidissement
y
CFC soit retiré pour une élimination appropriée par un réparateur qualifié. Si vous versez du réfrigérant
CFC, vous pouvez être condamné à une amende ou à l’emprisonnement en conformité avec la
législation pertinente sur l’environnement.
Les réfrigérateurs jetés ou abandonnés sont dangereux, même s’ils sont déposés pour seulement
y
quelques jours. Lors de l’élimination du réfrigérateur, retirer les matériaux d’emballage de la porte ou
décoller les portes, mais laisser les étagères en place afin que les enfants ne puissent pas y pénétrer
facilement.
En cas de branchement sur un circuit protégé par des fusibles, utilisez un fusible temporisé.
y
LIRE TOUTES LES INSTRUCTIONS AVANT D’UTILISER L’APPAREIL.
Pour réduire le risque d’incendie, d’électrocution ou de blessures lors de l’utilisation de votre
produit, des préATTENTIONs de base devraient être prises, y compris les suivantes:
AVERTISSEMENT
Ce produit contient des produits chimiques pouvant, d’après l’État de Californie, causer le cancer ou des
malformations congénitales ou autres troubles de la reproduction.
Lavez-vous les mains après usage.

6CONSIGNES IMPORTANTES DE SÉCURITÉ
FRANÇAIS
ATTENTION
Installation
Le réfrigérateur doit être installé conformément aux instructions d’installation qui ont été collées
y
à l’avant du réfrigérateur.
Soyez prudent lorsque vous déballez et installez le réfrigérateur. Débarrassez-vous
y
immédiatement des emballages (en plastique ou autres) pour qu’ils soient hors de portée des
enfants.
L’appareil doit être placé de sorte à pouvoir accéder facilement à la prise murale.
y
Utilisation
Fermer soigneusement la porte lorsque les enfants sont à proximité.
y
Éloignez vos doigts des zones de coincement; les espaces entre les portes et les armoires sont
y
inévitablement réduits. Faites attention lorsque vous fermez les portes et que des enfants sont
à proximité.
Veillez à ranger soigneusement les aliments afin qu’ils ne puissent pas tomber et provoquer des
y
blessures.
Ne pas utiliser d’aérosols à proximité du réfrigérateur.
y
Éviter de poser des objets sur le réfrigérateur.
y
Entretien
Ne pas utiliser de détergents puissants comme de la cire ou des diluants de nettoyage. Nettoyez
y
avec un chiffon doux.
Nettoyez régulièrement les corps étrangers (tels que poussière et eau) sur les broches de la
y
fiche d’alimentation et les zones de contact.
N’essayez pas d’entreposer, de démonter ou de réparer le réfrigérateur vous-même.
y
Retirer la poussière et les corps étrangers des broches.
y
Utiliser un chiffon sec pour nettoyer la fiche d’alimentation.
y
Si le réfrigérateur est débranché, attendez cinq minutes au moins avant de le rebrancher.
y
Si vous remarquez une odeur de produit chimique, de plastique brûlé ou que vous voyez de la
y
fumée, débranchez immédiatement le réfrigérateur et contactez votre service après-vente LG
Electronics.
LIRE TOUTES LES INSTRUCTIONS AVANT D’UTILISER L’APPAREIL.
Pour réduire le risque d’incendie, d’électrocution ou de blessures lors de l’utilisation de votre
produit, des préATTENTIONs de base devraient être prises, y compris les suivantes:
CONSERVEZ CES INSTRUCTIONS

7
COMPOSANTS
FRANÇAIS
COMPOSANTS
Utilisez cette page pour vous familiariser davantage avec les parties et les caractéristiques de votre
réfrigérateur.
*L’apparence et les spécifications du produit réel peuvent différer selon le modèle.
Extérieur du réfrigérateur
Réfrigérateur
Conserve les aliments.
Congélateur
Congèle les aliments.
Panneau de commande
Affiche les fonctions de l’appareil
à glaçons et les modes de
distribution ainsi que l’état du filtre
à eau.
Distributeur d’eau filtrée et
de glaçons
Distribue de l’eau purifiée et de
la glace.
InstaView™
Door-in-Door®
Affichage Éclipse
Affiche la température cible du
réfrigérateur et du congélateur,
l’état du filtre à air et de la
connexion du réseau.
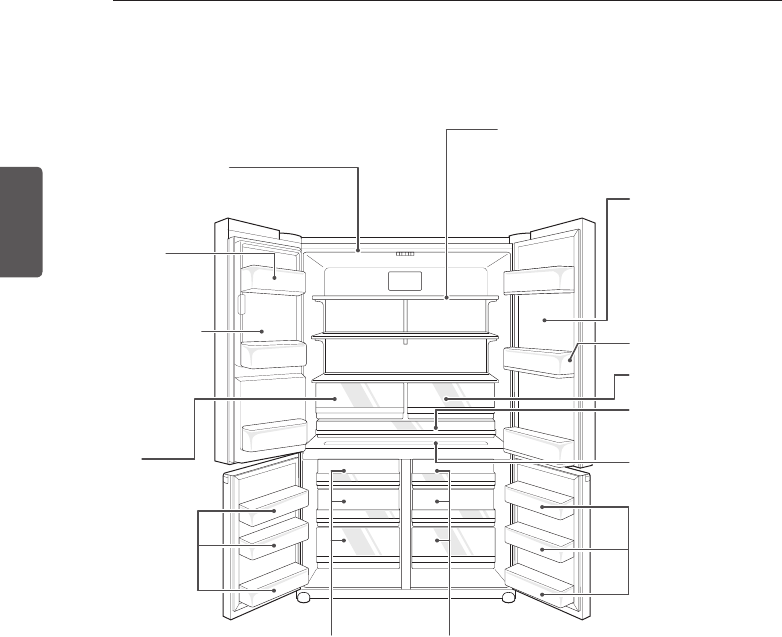
8COMPOSANTS
FRANÇAIS
Intérieur du réfrigérateur
Lampes intérieures LED
La lampe intérieure s’allume à
l’intérieur du réfrigérateur.
Étagère réglable de réfrigérateur
Les étagères de votre réfrigérateur sont
ajustables pour remplir vos besoins de stockage
individuels.
Balconnets des
réfrigérateur
Grand compartiment
fraîcheur
Balconnets des
congélateur
Conteneur en acier
FRESH
Garde-manger
CustomChill™
Tiroirs du
congélateur
Tiroirs du
congélateur
Bac à glace intérieur
Les glaçons
sont produits
automatiquement.
InstaView™Door-in-Door®
Regardez ce qu’il
y a à l’intérieur du
compartiment Door-in-
Door sans ouvrir la porte.
Il maintient l’air froid à
l’intérieur et économise
l’énergie.
Compartiment pour
condiments
Grand
compartiment
fraîcheur
Balconnets des
congélateur
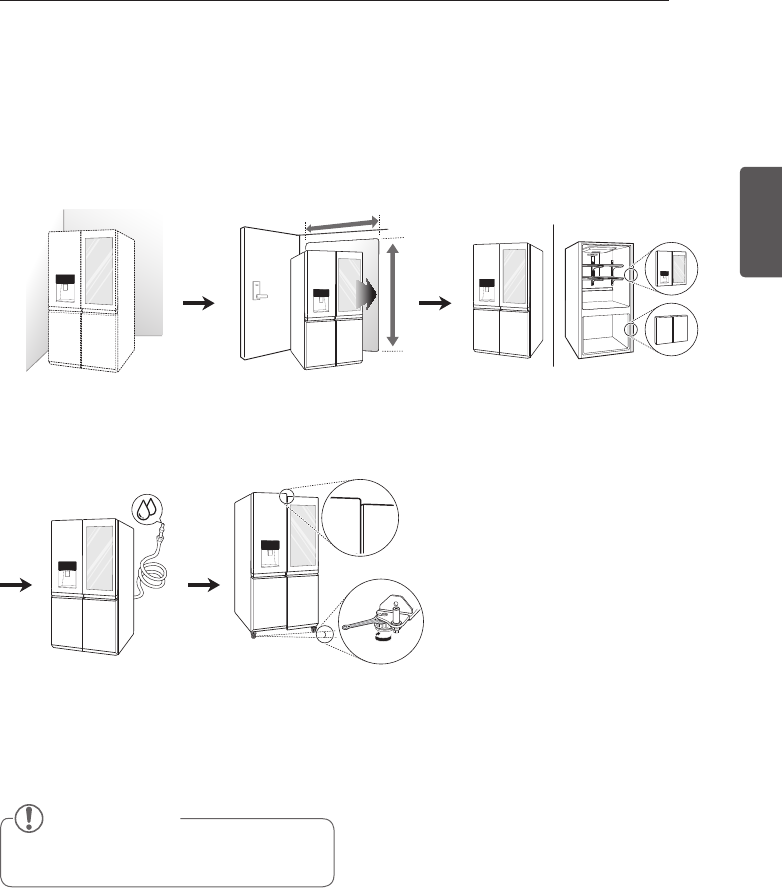
9
INSTALLATION
FRANÇAIS
INSTALLATION
Vue d’ensemble de l’installation
Veuillez d’abord lire les instructions d’installation après l’achat de ce produit ou son transport vers
un autre emplacement.
REMARQUE
Seulement connecter à l’alimentation d’eau
potable.
1 Déballez votre
réfrigérateur
4 Connexion de
l’alimentation en eau
et de la canalisation
d’eau
2 Choisissez un
emplacement approprié
5 Nivellement et
alignement de la porte.
3 Démontage/Montage
10 INSTALLATION
FRANÇAIS
Spécifications
L’apparence et les spécifications énumérées dans ce manuel peuvent varier à cause des
améliorations constantes du produit.
Modèle de réfrigérateur à congélateur inférieur LUPXS3186N
Description Réfrigérateur à porte à deux battants
Exigences électriques 115 VAC @ 60 Hz
Pression de l’eau Min.
/ Max.
20 - 120 psi (138 - 827 kPa)
Dimensions
35 7/8” (W) X 36 1/2” (D) X 70 1/4” (H), 51 1/8” (D avec porte ouverte)
912 mm (W) X 929 mm (D) X 1784 mm (H), 1298 mm (D avec porte ouverte)
Poids net 483 lb. (219 kg)
Modèle de réfrigérateur à congélateur inférieur LUPXC2386N
Description Réfrigérateur à porte à deux battants
Exigences électriques 115 VAC @ 60 Hz
Pression de l’eau Min.
/ Max.
20 - 120 psi (138 - 827 kPa)
Dimensions
35 7/8”(W) x 29 5/8”(D) x 70 1/4”(H) x 44 3/16”(D avec porte ouverte)
912mm (W) X 754 mm (D) X 1784 mm (H), 1123 mm (D avec porte ouverte)
Poids net 430 lb. (195 kg)
11
INSTALLATION
FRANÇAIS
Choisir le bon emplacement
Choisir un emplacement où
y
l’alimentation en eau puisse être
facilement connectée pour la machine à
glaçons automatique.
Déballage de votre réfrigérateur
AVERTISSEMENT
Utiliser deux ou plusieurs personnes
y
pour déplacer et installer le réfrigérateur.
Ne pas le faire pourrait provoquer un
démembrement, une électrocution, ou une
blessure mortelle.
Votre réfrigérateur est lourd. Lors du
y
déplacement du réfrigérateur pour le
nettoyage ou le service, veiller à protéger le
plancher. Toujours déplacer le réfrigérateur
en position verticale. Ne pas remuer ou
faire marcher le réfrigérateur lorsque vous
essayez de le déplacer car le plancher
pourrait être endommagé.
Maintenir les produits inflammables et
y
les vapeurs, tels que l’essence, loin du
réfrigérateur. L’incapacité à le faire pourrait
provoquer un démembrement, une
électrocution, ou une blessure. mortelle.
Enlever le ruban adhésif et toute étiquette
temporaire de votre réfrigérateur avant de l’utiliser.
Ne pas enlever les étiquettes d’avertissement,
l’étiquette du numéro de modèle et de série, ou
la fiche technique qui est située sous l’avant du
réfrigérateur.
Pour supprimer toute bande adhésive ou colle
restante, frotter la surface vivement avec le
pouce. Les résidus de ruban adhésif ou de colle
peuvent également être enlevés en frottant une
petite quantité de savon à vaisselle liquide sur
l’adhésif avec les doigts. Essuyez-les avec de l’eau
chaude et séchez.
Ne pas utiliser d’instruments tranchants, d’alcool
à friction, de liquides inflammables ou de
nettoyants abrasifs pour enlever le ruban adhésif
ou de la colle. Ces produits peuvent endommager
la surface de votre réfrigérateur.
Les étagères des réfrigérateurs sont installées
dans la position de transport. Veuillez réinstaller
les étagères selon vos besoins individuels.
Mise au sol
Pour éviter le bruit et les vibrations, l’appareil
doit être mis à niveau et installé sur un plancher
stable. Si nécessaire, ajuster les pieds de
nivellement pour compenser les inégalités du
sol. La face avant devrait être légèrement plus
élevée que l’arrière pour faciliter la fermeture
de la porte. Les pieds de nivellement peuvent
être facilement tournés en inclinant légèrement
le boîtier. Tourner les pieds de nivellement vers
la droite pour soulever l’unité ou vers la gauche
pour l’abaisser. (Voir Nivellement et alignement
des portes.)
REMARQUE
L’installation sur des tapis, des surfaces
molles, une plate-forme ou une structure
faiblement soutenue.
Le réfrigérateur devrait toujours être
y
branché sur sa propre prise individuelle
correctement mise à la terre, d’une
valeur nominale de 115 Volts, 60 Hz,
C.A. uniquement, et fusionnée à 15 ou
20 ampères. Cela offre les meilleures
performances et évite de surcharger
les circuits électriques qui pourraient
provoquer un incendie par surchauffe des
fils. Il est recommandé de prévoir un circuit
distinct pour alimenter uniquement pour
cet appareil.
AVERTISSEMENT
Pour réduire le risque de choc électrique,
ne pas installer le réfrigérateur dans un
endroit mouillé ou humide.
REMARQUE
La pression d’eau doit être comprise
entre 1,38 et 8,27 bars sur les modèles
non équipés d’un filtre à eau et entre
2,76 et 8,27 bars sur les modèles
équipés d’un filtre à eau.

12 INSTALLATION
FRANÇAIS
Température ambiante
Installez cet appareil dans un endroit où la
température est comprise entre 55°F (13°C)
et 110°F (43°C). Si la température autour de
l’appareil est trop basse ou trop élevée, la
capacité de refroidissement peut être affectée.
Mesure des espaces
Une distance trop réduite des éléments
adjacents peut réduire a capacité de
congélation et augmenter les charges de
consommation d’électricité . Laisser au moins
24 pouces (61cm) à l’avant du réfrigérateur
pour ouvrir les portes et au moins 2 pouces
(5,08 cm) entre l’arrière du réfrigérateur et le
mur.
2” (5,08 cm)
24” (61 cm)
Enlèvement/Montage des portes
2 Retirez les vis de la charnière du couvercle
sur le réfrigérateur. Soulevez le crochet
(non visible), situé sur le côté du couvercle
au coin inférieur avec un tournevis à tête
plate.
Enlèvement de la porte gauche du
réfrigérateur
1 La prise d’eau est connectée à la partie
supérieure droite de la surface arrière du
réfrigérateur. Enlever l’anneau de la zone
du joint. Tenez la prise d’eau et poussez
doucement le Collet pour détacher la ligne
d’approvisionnement comme figuré en .
REMARQUE
Le détachement de la ligne d’alimentation
en eau est applicable uniquement lors
du détachement de la porte gauche du
réfrigérateur.
Collet
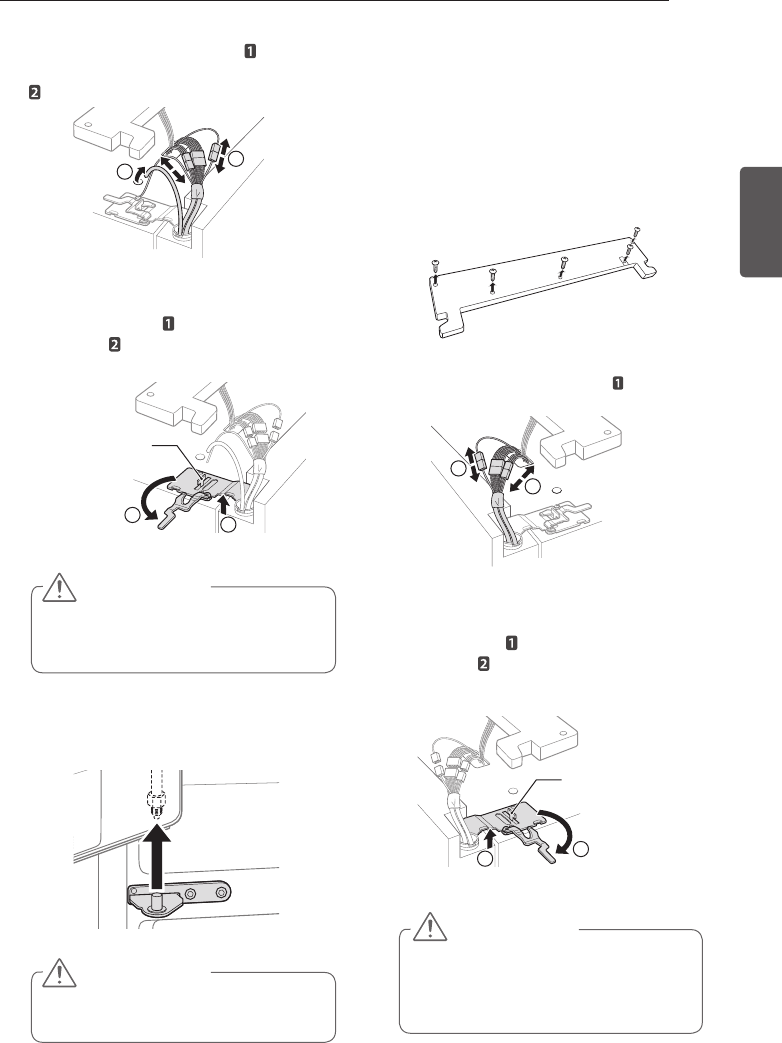
13
INSTALLATION
FRANÇAIS
ATTENTION
Lorsque vous soulevez la charnière du
verrou, veuillez à ce que la porte ne tombe
pas vers l’avant.
ATTENTION
Placez la porte, côté intérieur vers le haut
sur une surface anti-éraflure.
ATTENTION
Lorsque vous soulevez la charnière du
levier de verrouillage de la charnière,
veillez à ce que la porte ne tombe pas
vers l’avant.
3 Retirez le couvercle et le tube .
Déconnectez tous les faisceaux de câbles
.
4 Faire pivoter le levier de la charnière dans
le sens antihoraire . Soulevez la charnière
supérieure du levier de verrouillage de la
charnière.
1
2
1
2
Levier de verrouillage
de la charnière
5 Soulevez la porte de l’axe central de la
charnière et enlevez la porte.
Retrait de la porte du côté droit du
réfrigérateur
1 Retirez les vis de la charnière du couvercle
sur le réfrigérateur. Soulevez le crochet
(non visible), situé sur le côté du couvercle
au coin inférieur avec un tournevis à tête
plate.
2 Détachez le faisceau de câble .
1
1
3 Faites pivoter le levier de la charnière dans
le sens horaire . Soulevez la charnière
supérieure du levier de verrouillage de la
charnière.
1
2
Levier de verrouillage
de la charnière
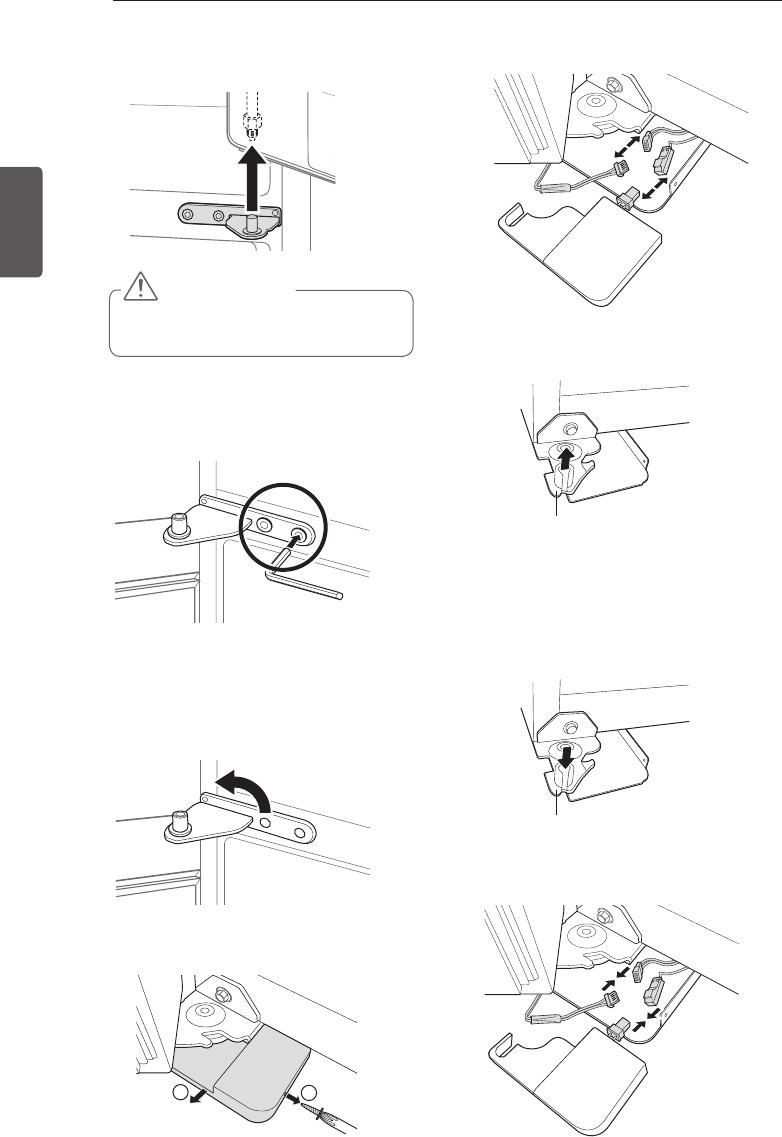
14 INSTALLATION
FRANÇAIS
ATTENTION
Placez la porte, côté intérieur vers le
haut sur une surface anti-éraflure.
4 Soulevez la porte de l’axe central de la
charnière et enlevez la porte.
3 Dévissez la vis qui fixe le couvercle de la
charnière inférieure et retirez le couvercle.
4 Déconnectez tous les faisceaux de câble.
5 Retirez la porte en la soulevant de l’axe de
la charnière inférieure.
Assemblage des portes du
congélateur
1 Abaissez la porte dans l’axe de la charnière
inférieure.
2 Connectez tous les faisceaux de câble.
1
2
Charnière inférieure
Charnière inférieure
Retrait des portes du congélateur
1 Retirez les deux vis de charnière.
2 Tournez la charnière pour soulever
l’extrémité pivotante afin que la porte
puisse être soulevée. Soulevez la porte de
l’axe de la charnière inférieure et retirez la
porte.
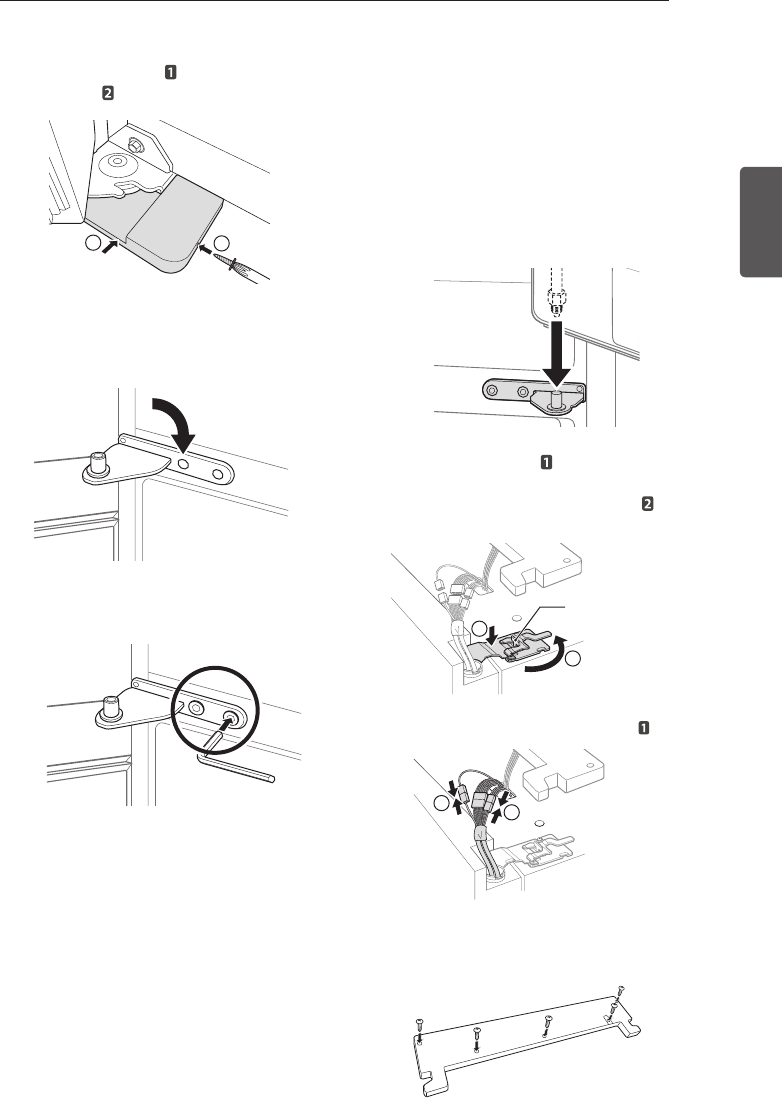
15
INSTALLATION
FRANÇAIS
Installez tout d’abord la porte du côté droit du
réfrigérateur.
1 Assurez-vous que le manchon en plastique
est inséré dans la partie inférieure de la
porte. Abaissez la porte sur l’axe central de
la charnière du milieu tel qu’illustré sur la
figure.
2 Ajustez la charnière sur le levier de
verrouillage de la charnière et positionnez-
la en place. Faites pivoter le levier dans
le sens antihoraire pour fixer la charnière.
3 Connectez les faisceaux de câble .
4 Positionnez le couvercle en place. Insérez
et serrez les vis du couvercle.
3 3 Positionnez le couvercle de la charnière
inférieure en place et serrez la vis du
couvercle .
4 Positionnez l’axe de la charnière centrale
de sorte à soutenir la porte et insérez les
deux vis de charnière.
5 Vissez les deux vis de charnière.
Assemblage de la porte du côté droit
du réfrigérateur
2
1
Levier de verrouillage
de la charnière
2
1
1
1
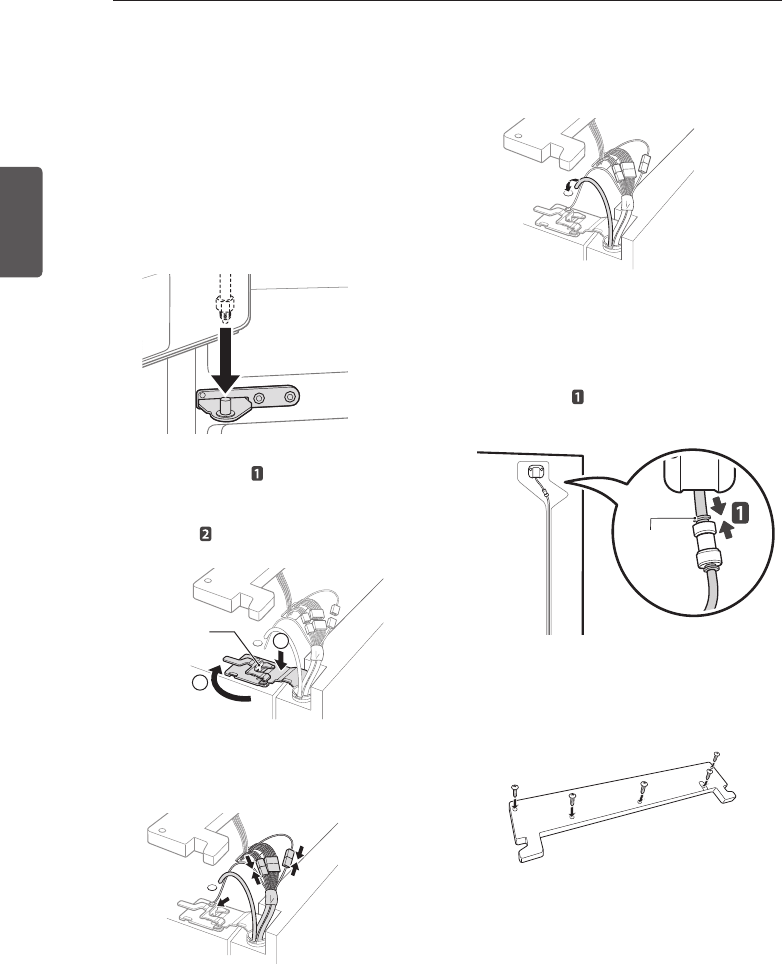
16 INSTALLATION
FRANÇAIS
Installez la porte du côté gauche du
réfrigérateur après que la porte de droite soit
installée.
1 Assurez-vous que le manchon en plastique
est inséré dans la partie inférieure de la
porte. Installez la porte du réfrigérateur sur
l’axe central de la charnière.
2 Ajustez la charnière sur le levier de
verrouillage de la charnière et positionnez-
la en place. Faites pivoter le levier dans le
sens horaire et ajustez la charnière.
Assemblage de la porte du côté
gauche du réfrigérateur
3 Connectez tous les faisceaux de câble.
2
1
Levier de verrouillage
de la charnière
4 Poussez le tube d’approvisionnement en
eau dans le trou sur le dessus du boîtier et
tirez à travers la plaque arrière.
5 Maintenez la connexion
d’approvisionnement en eau et poussez
délicatement dans la douille pour connecter
la ligne d’approvisionnement en eau tel
qu’illustré en . Insérez le tube au moins à
5/8 po (15 mm) dans le connecteur.
6 Positionnez le couvercle en place. Insérez
et serrez les vis du couvercle.
Douille
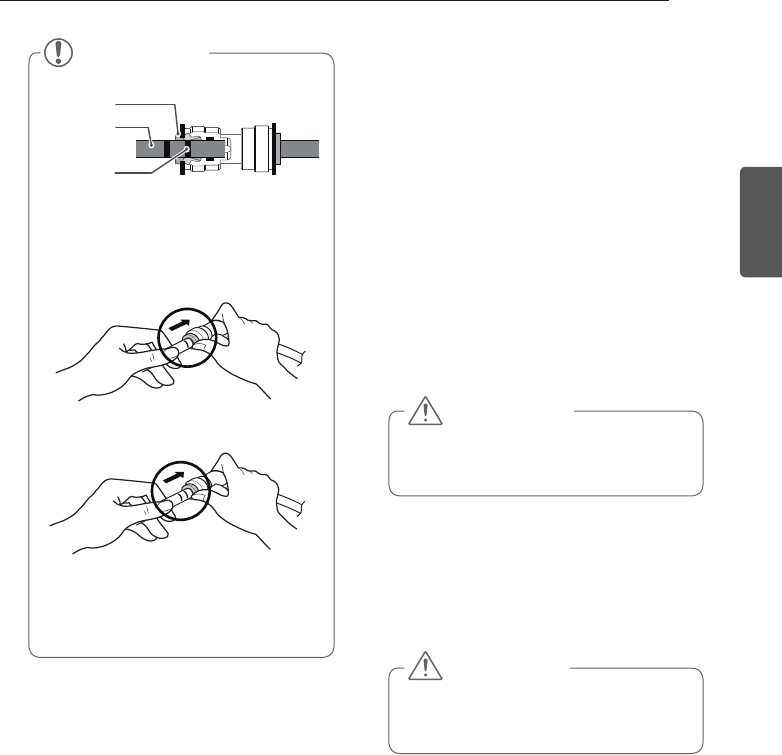
17
INSTALLATION
FRANÇAIS
REMARQUE
1) Insérez doucement le tuyau jusqu’à ce
qu’il ne reste plus qu’un seul trait de
graduation visible.
(Correcte)
(Incorrecte)
2) Tirer sur le tube pour s’assurer que le
tube soit bien serré.
Bague de
serrage
Tuyau
Insertion
de ligne
Connexion de la canalisation
d’eau
Avant de commencer
Cette installation de canalisation d’eau n’est pas
couverte par la garantie du réfrigérateur. Suivez
attentivement ces instructions afin de minimiser
le risque de dégâts d’eau coûteux.
Le martellement de l’eau (eau frappant dans
les tuyaux) dans la tuyauterie de la maison peut
causer des dommages aux pièces de votre
réfrigérateur et peut provoquer des fuites ou des
inondations. Contactez un plombier qualifié pour
corriger le martellement de l’eau avant d’installer
la ligne l’alimentation d’eau sur le réfrigérateur.
Si vous voulez utiliser votre réfrigérateur
avant d’avoir raccordé la conduite d’eau,
assurez-vous que l’interrupteur de la fabrique
de glace sur le panneau de commandes est
en position d’arrêt.
ATTENTION
Ne pas installer les tuyaux de la machine à
glaçons dans les zones où la température
descend en dessous de zéro.
ATTENTION
Pour éviter les brûlures et les dommages
au produit, ne relier la ligne d’eau du
réfrigérateur qu’à une prise d’eau froide.

18 INSTALLATION
FRANÇAIS
ATTENTION
Porter des lunettes de protection lors de
l’installation pour éviter les blessures.
Pression de l’eau
La pression d’eau doit être comprise entre 1,38 et
8,27 bars sur les modèles non équipés d’un filtre
à eau et entre 2,76 et 8,27 bars sur les modèles
équipés d’un filtre à eau.
Si un système de filtration d’eau par osmose
inverse est connecté à votre alimentation d’eau
froide, cette installation de canalisation d’eau
n’est pas couverte par la garantie du réfrigérateur.
Respectez attentivement les instructions pour
minimiser le risque de dégâts des eaux onéreux.
Si un système de filtration d’eau par osmose
inverse est connecté à votre alimentation en eau
froide, la pression d’eau au niveau du système par
osmose inverse doit être comprise au minimum
entre 2,76 et 4,14 bars (40~60 psi), soit moins de
2 à 3 secondes pour remplir une tasse de 20 cl.
Si la pression d’eau depuis le système par
osmose inverse est inférieure à 1,38 bar (20 psi),
soit plus de 4 secondes pour remplir une tasse de
20 cl, procédez comme suit.
Vérifiez pour voir si le filtre à sédiments dans
y
le système d’osmose inverse est bloqué.
Remplacez le filtre si nécessaire.
Laissez le réservoir sur le système par
y
osmose inverse se remplir de nouveau après
une utilisation intense.
Si le problème concernant la pression de
y
l’osmose inverse persiste, appelez un
plombier qualifié.
Toutes les installations doivent être
y
conformes aux exigences du code de
plomberie local.
Ce dont vous aurez besoin
Tuyaux en cuivre,
y ¼ po. diamètre extérieur,
pour relier le réfrigérateur à
la prise d’eau. Veillez à ce
que les deux extrémités des
tuyaux soient coupées au
carré.
Pour déterminer de combien de tuyaux vous
y
avez besoin : mesurez la distance de la vanne
d’eau à l’arrière du réfrigérateur au tuyau
d’alimentation d’eau. Ensuite, ajoutez 8 pieds
(2,4m). Assurez-vous que vous disposez de
suffisamment de tuyaux supplémentaires
(environ 8 pieds [2,4 m] enroulés en 3 tours
d’environ 10 po. [25 cm] diamètre) pour
permettre au réfrigérateur d’être retiré du
mur après l’installation.
Perceuse électrique.
y
Clef ajustable ou clef de
y
½“
Tournevis à lame plate et
y
pour vis cruciformes.
Deux boulons de
y
compression de diamètre extérieur ¼ “ et 2
ferrules (mancheons) pour connecter le tube en
cuivre à la vanne d’arrêt et à la vanne d’eau
du réfrigérateur.
REMARQUE
Une vanne d’eau à étrier auto-perceuse
ne devrait pas être utilisée.
Si votre canalisation en cuivre existante a
y
un raccord évasé à l’extrémité, vous aurez
besoin d’un adaptateur (disponible dans les
magasins de fournitures de plomberie) pour
connecter la ligne d’eau au réfrigérateur
OU BIEN vous pouvez
couper la coupe évasée
avec un découpeur de
tube et puis utiliser un
raccord de compression.
Connecter
yla vanne d’arrêt à la ligne d’eau
froide. La vanne d’arrêt doit avoir une prise
d’eau avec un diamètre intérieur minimal de
5/32 po. au point de connexion à la LIGNE
D’EAU FROIDE. Les vannes d’arrêt à étrier
sont comprises dans
beaucoup de kits
d’approvisionnement
d’eau. Avant de
l’acheter, assurez-vous
qu’une vanne à étrier est conforme aux
codes de plomberie locaux.
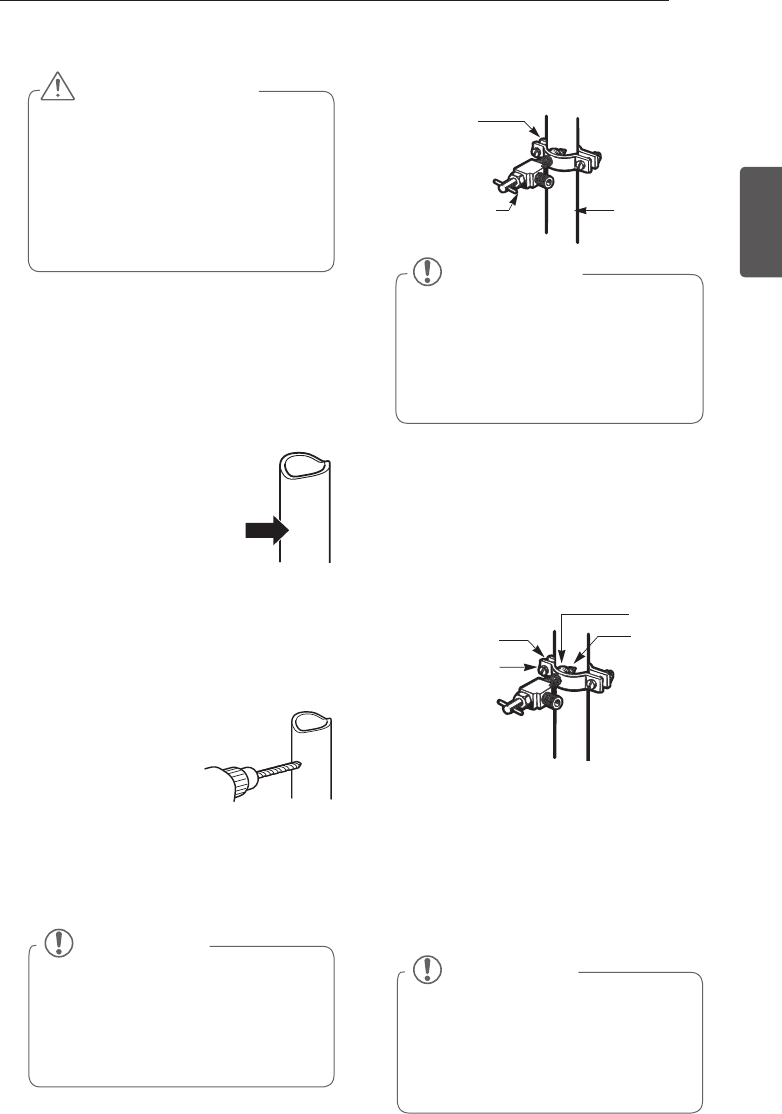
19
INSTALLATION
FRANÇAIS
REMARQUE
La ligne de raccordement ne peut pas
être composée de tubes en plastique
blancs. Les plombiers agréés ne doivent
utiliser que des tuyaux en cuivre NDA
n° 49595 ou 49599 ou des tuyaux en
polyéthylène réticulés (PEX).
Instructions d’installation de la ligne d’eau
Installer la vanne d’arrêt sur la fréquence la
plus proche en utilisant la ligne d’eau potable.
1 FERMER LA PRISE D’EAU PRINCIPALE
Ouvrir le robinet le plus proche pour
soulager la pression sur la ligne.
2
CHOISIR L’EMPLACEMENT DE LA VANNE
Choisir un emplacement
pour la vanne qui soit
facilement accessible. Il
est préférable de la relier
sur le côté d’un tuyau
d’eau vertical. Lorsqu’il
est nécessaire de la relier
à un tuyau d’eau horizontal, réalisez la
connexion sur le haut ou sur le côté, plutôt
que sur le bas, pour éviter de recevoir des
sédiments du tuyau d’eau.
3 PERCER LE TROU POUR LA VANNE
Percer un trou de ¼
“ dans le tuyau d’eau
en utilisant une pièce
pointue. Enlevez toutes
les bavures résultant
de forage du trou dans
le tuyau. Faites attention à ne pas laisser
l’eau drainer par le trou. Le défaut de
percer un trou de ¼ “ peut entraîner une
production de glace réduite ou des glaçons
plus petits.
AVERTISSEMENT
Lorsque vous utilisez un appareil
électrique (comme une perceuse
électrique) lors de l’installation,
assurez-vous que le dispositif soit
alimenté par batterie, ait une double
isolation ou soit mis à la terre d’une
manière qui permettra d’éviter le
risque de choc électrique.
5 RESSERRER LA BRIDE DE SERRAGE
Serrer les vis du jusqu’à ce que la rondelle
de fermeture commence à enfler.
REMARQUE : Ne serrez pas la bride
excessivement ou vous pourriez écraser le
tuyau.
6 DIRIGER LES TUBES
Faire passer le tuyau entre la ligne d’eau
froide et le réfrigérateur.
Faire passer le tuyau par un trou percé
dans le mur ou le plancher (derrière
le réfrigérateur ou armoire de cuisine
adjacente), aussi près que possible du mur.
REMARQUE
Assurez-vous qu’il y ait assez de tuyaux
supplémentaires (environ 8 pieds
enroulés en 3 tours d’environ 10 cm de
diamètre) pour permettre de décoller
le réfrigérateur du mur après son
installation.
4 RESSERRER LA VANNE D’ARRÊT
Resserrer la vanne d’arrêt du tuyau d’eau
froide avec le collier de serrage
Collier de
serrage
Vanne d’arrêt
type étrier Tube vertical
d’eau froide
REMARQUE
Les codes de plomberie de la
Commonwealth of Massachusetts
248CMR doivent être respectés.
L’utilisation de robinets en étrier est
illégale au Massachusetts. Consultez
votre plombier agréé.
Collier de serrage
Vis de serrage
Rondelle
Extrémité
de la prise
d’eau
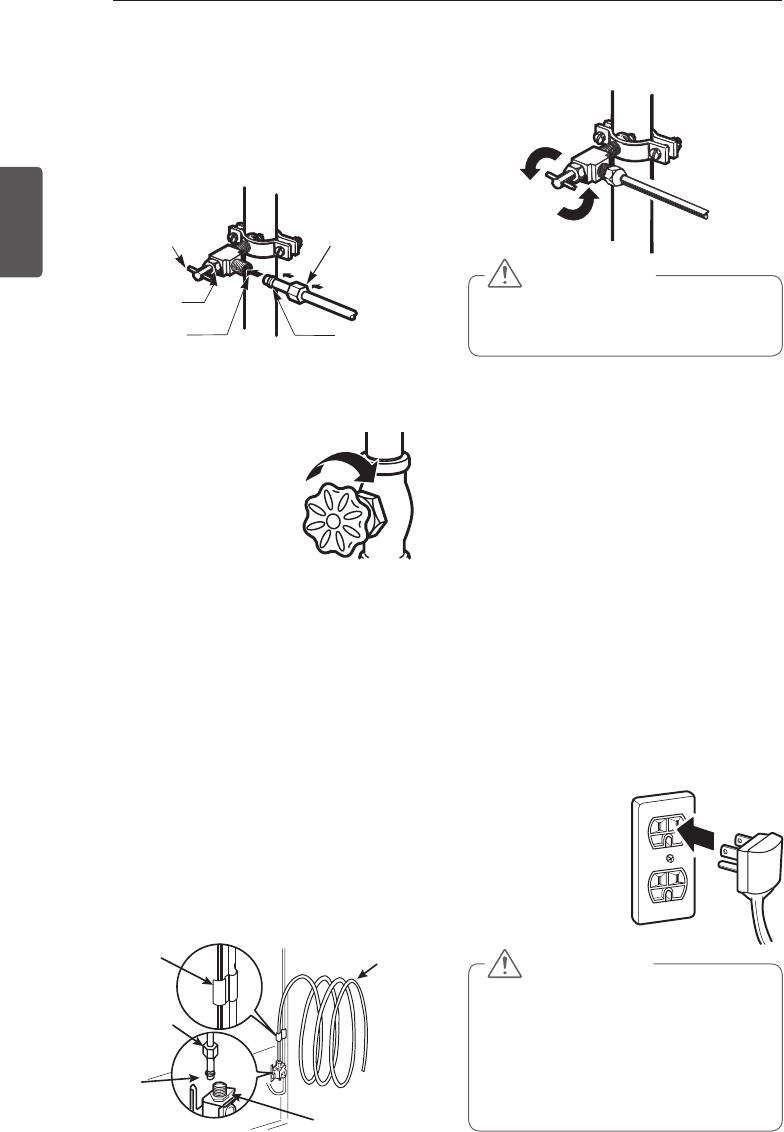
20 INSTALLATION
FRANÇAIS
7 RELIER LE TUBE À LA VANNE
Placer un écrou de compression et une
bague (manchon) pour le tube de cuivre à
l’extrémité de la tuyau et le connecter à la
vanne d’arrêt. Veiller à ce que le tuyau soit
entièrement inséré dans la vanne. Serrer
l’écrou à compression.
8 RINCER LES TUBES
Ouvrir la prise d’eau principale et rincer
le tuyau jusqu’à ce que
l’eau soit claire.
Fermer le robinet d’eau
après qu’environ un
quart de l’eau ait été
rincée à travers le tuyau.
9 BRANCHER LE TUYAU AU
RÉFRIGÉRATEUR
REMARQUE : Avant de faire la connexion
au réfrigérateur, assurez-vous que le cordon
d’alimentation électrique ne soit pas branché
dans la prise murale.
a. Enlever le capuchon flexible en
plastique de la vanne d’eau.
b. Placer l’écrou à compression et la
bague (manchon) à l’extrémité du tuyau
comme indiqué.
c. Insérer l’extrémité du tuyau de cuivre
dans la connexion aussi loin que
possible. En tenant le tuyau, serrez la
fixation.
Vanne d’arrêt
type étrier
Écrou
d’emballage
Vanne de sortie
Écrou à
compression
Ferrule
(manchon)
Collier de
serrage Tube de ¼”
Écrou à
compression
Connexion au
réfrigérateur
Ferrule
(manchon)
10 FERMER L’EAU À LA VANNE D’ARRÊT
Serrer tous les raccords qui fuient.
11 BRANCHER LE RÉFRIGÉRATEUR
Disposer la bobine de tuyaux de sorte
qu’elle ne vibre pas contre l’arrière du
réfrigérateur ou contre le mur. Poussez le
réfrigérateur contre le mur.
12 DÉMARRER LA MACHINE À GLAÇONS
Placer l’interrupteur de la machine à glaçons
sur la position MARCHE. La machine à
glaçons ne commence à fonctionner que
lorsqu’elle a atteint sa température de
fonctionnement de 15 °F (-9 °C) ou une
température inférieure. Elle commencera à
fonctionner automatiquement si l’interrupteur
de la machine à glaçons est sur la position
MARCHE (I).
Mise en marche
1 Brancher le
réfrigérateur.
ATTENTION
Vérifier pour voir si des fuites se
produisent sur les connexions de la
ligne d’eau.
ATTENTION
Connectez-vous à une sortie de puissance
y
nominale.
Demandez à un électricien certifié de
y
vérifier la prise murale et que le câblage
soit correctement mis à la terre.
Ne pas endommager ni couper la borne
y
de terre de la prise de courant.