LG Electronics USA G710TM Multi-band GSM/EDGE/UMTS/LTE Phone with Bluetooth, WLAN, and RFID User Manual
LG Electronics MobileComm USA, Inc. Multi-band GSM/EDGE/UMTS/LTE Phone with Bluetooth, WLAN, and RFID Users Manual
UserManual.wiki
>
LG Electronics USA
>
G710TM User Manual
Users Manual
Navigation menu
Upload a User Manual
Namespaces
Wiki Guide
HTML
PDF
Info
Views
User Manual
Discussion / Help
Navigation


![Custom-designed Features 36Notes on Water Resistant PropertiesThis product is water and dust resistant in compliance with the Ingress Protection rating IP68.Your product has undergone testing in a controlled environment and is proven to be water and dust resistant in certain circumstances (meets the requirements of classification IP68 as described by the international standard IEC 60529 - Degrees of Protection provided by Enclosures [IP Code]; test conditions: 15-35°C/59-95 ºF,86-106kPa,1.5meter,for30minutes).Donotexposethedeviceinconditionsthataredifferentfrom the test conditions. Results may vary in actual use.WARNINGDespite a rating of IP68, your device is not impervious to conditions not tested in LG’s controlled environment. Please note that any damages that occur due to such causes changes the color of the LDI (Liquid Damage Indicator). If the color of LDI located inside the product changes, the product is to be considered ineligible for any free-of-charge repair services provided under the product’s limited warranty.Avoid exposing the product to environments with excessive dust or moisture. Do not use the product in the following environments:Do not immerse the product in any liquid chemicals (soap, etc.) other than water. Do not immerse the product in salt water, including seawater.Do not immerse the product in a hot spring.Do not swim with this product.Donotplacetheproductdirectlyonsand(suchasatabeach)ormud.](https://usermanual.wiki/LG-Electronics-USA/G710TM/User-Guide-3819387-Page-37.png)
![Custom-designed Features 37Do not immerse your product in water deeper than approximately 1.5meters.Do not immerse your product in water for longer than 30minutes.• If your product becomes wet be sure to wipe the microphone, speaker, and stereo jack with a dry cloth before use.• Should your product or your hands become wet, dry them before handling the product.• Do not use the product in places where it may be sprayed with high pressure water (e.g. near a faucet or shower head) or submerge it in water for extended periods of time, as the product is not designed to withstand high water pressure.• This product is not resistant to shock. Do not drop the product or subject it to shock. Doing so might damage or deform the main unit, causing water leakage.• The product’s water and dust resistant features may be damaged by dropping or receiving an impact.• If the product gets wet, use a clean, soft cloth to dry it thoroughly.• The touch screen and other features may not work properly if the device is used while wet.• Your product is water resistant only when the SIM/Memory card tray is properly inserted into the product.• Do not open or close the SIM/Memory card tray while the product is wet or immersed in water. Exposing the open tray to water or moisture may damage the product.• The SIM/Memory card tray contains rubber [packing] to help prevent dust, water, or moisture from entering the product. Do not damage the rubber [packing] as this may allow dust, water, or moisture to enter your product and cause damage.• Failure to follow the provided instructions may invalidate your device’s limited warranty.](https://usermanual.wiki/LG-Electronics-USA/G710TM/User-Guide-3819387-Page-38.png)


![For Your Safety 174Do wireless devices pose any special risks to children?The FDA/FCC website states that “the scientific evidence does not show a danger to users of wireless communication devices, including children.” The FDA/FCC website further states that “some groups sponsored by other national governments have advised that children be discouraged from using wireless devices at all.” For example, the Stewart Report from the United Kingdom [“UK”] made such a recommendation in December 2000. In this report a group of independent experts noted that no evidence exists that using a cell phone causes brain tumors or other ill effects. [The UK’s] recommendation to limit cell phone use by children was strictly precautionary; it was not based on scientific evidence that any health hazard exists. A copy of the UK’s leaflet is available at http://www.dh.gov.uk (search “mobile”), or you can write to: NRPB, Chilton, Didcot, Oxon OX11 ORQ, United Kingdom. Copies of the UK’s annual reports on mobile phones and RF are available online at http://www.hpa.org.uk/radiation/ (search “mobile”). Parents who wish to reduce their children’s RF exposure may choose to restrict their children’s wireless device use.Where can I get further information about RF emissions?For further information, see the following additional resources (websites current as of April 2005):U.S. Food and Drug AdministrationFDA Consumer magazine November-December 2000 Telephone: (888) INFO-FDA http://www.fda.gov (Under “c” in the subject index, select Cell Phones Research.)U.S. Federal Communications Commission445 12th Street, S.W. Washington, D.C.20554 Telephone: (888) 225-5322 http://www.fcc.gov/oet/rfsafetyRoyal Society of Canada Expert Panels on Potential Health Risks of Radio Frequency Fields from Wireless Telecommunication Devices283 Sparks Street Ottawa, Ontario K1R 7X9 Canada Telephone: (613) 991-6990 http://www.rsc.ca/index.php?page=Expert_Panels_RF&Lang_id=120](https://usermanual.wiki/LG-Electronics-USA/G710TM/User-Guide-3819387-Page-175.png)
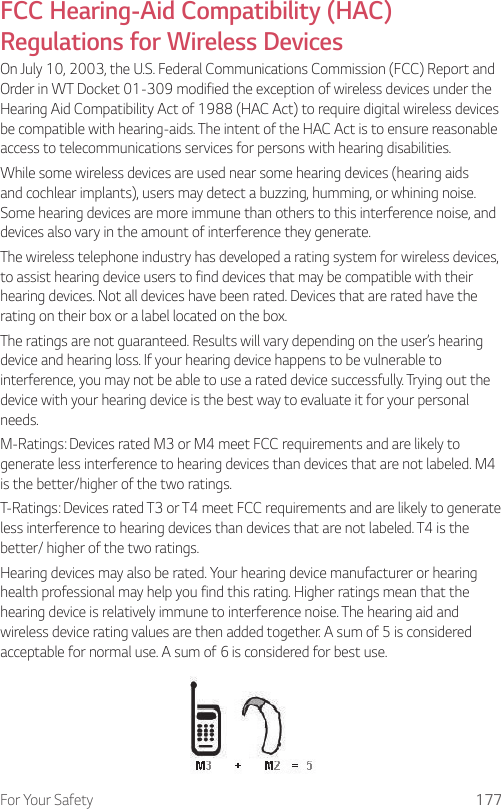
![For Your Safety 178In the above example, if a hearing aid meets the M2 level rating and the wireless device meets the M3 level rating, the sum of the two values equal M5. This should provide the hearing aid user with “normal usage” while using their hearing aid with the particular wireless device. “Normal usage” in this context is defined as a signal quality that’s acceptable for normal operation.The M mark is intended to be synonymous with the U mark. The T mark is intended to be synonymous with the UT mark. The M and T marks are recommended by the Alliance for Telecommunications Industries Solutions (ATIS). The U and UT marks are referenced in Section 20.19 of the FCC Rules. The HAC rating and measurement procedure are described in the American National Standards Institute (ANSI) C63.19 standard.To ensure that the Hearing Aid Compatibility rating for your device is maintained, secondary transmitters such as Bluetooth® and WLAN components must be disabled during a call.For information about hearing aids and digital wireless devices:Wireless Devices and Hearing Aid Accessibility http://www.accesswireless.org/Gallaudet University, RERC http://tap.gallaudet.edu/Voice/FCC Hearing Aid Compatibility and Volume Control https://www.fcc.gov/general/hearing-aid-compatibility-and-volume-controlThe Hearing Aid Compatibility FCC Order http://hraunfoss.fcc.gov/edocs_public/attachmatch/FCC-03-168A1.pdfHearing Loss Association of America [HLAA] http://hearingloss.org/content/telephones-and-mobile-devicesCaution! Avoid Potential Hearing LossProlonged exposure to loud sounds (including music) is the most common cause of preventable hearing loss. Some scientific research suggests that using portable audio devices, such as portable music players and cellular telephones, at high volume settings for long durations may lead to permanent noiseinduced hearing loss. This includes the use of headphones (including headsets, earbuds and Bluetooth or other wireless devices). Exposure to very loud sound has also been associated in some studies with tinnitus (a ringing in the ear), hypersensitivity to sound and distorted hearing. Individual susceptibility to noise-induced hearing loss and other potential hearing problems varies.](https://usermanual.wiki/LG-Electronics-USA/G710TM/User-Guide-3819387-Page-179.png)


![LIMITED WARRANTY STATEMENT 196Your device has been designed to provide you with reliable, worry-free service. If for any reason you have a problem with your equipment, please refer to the manufacturer’s warranty in this section.Limited Warranty StatementARBITRATION NOTICE: THIS LIMITED WARRANTY CONTAINS AN ARBITRATION PROVISION THAT REQUIRES YOU AND LG TO RESOLVE DISPUTES BY BINDING ARBITRATION INSTEAD OF IN COURT, UNLESS YOU CHOOSE TO OPT OUT. IN ARBITRATION, CLASS ACTIONS AND JURY TRIALS ARE NOT PERMITTED. PLEASE SEE THE SECTION TITLED “PROCEDURE FOR RESOLVING DISPUTES” BELOW.Warranty LawsThe following laws govern warranties that arise in retail sales of consumer goods:• The California Song-Beverly Consumer Warranty Act [CC §§1790 et seq],• The California Uniform Commercial Code, Division Two [Com C §§2101 et seq], and• The federal Magnuson-Moss Warranty Federal Trade Commission Improvement Act [15 USC §§2301 et seq; 16 CFR Parts 701– 703]. A typical Magnuson-Moss Act warranty is a written promise that the product is free of defects or a written promise to refund, repair, or replace defective goods. [See 15 USC §2301(6).] Remedies include damages for failing to honor a written warranty or service contract or for violating disclosure provisions. [See 15 USC §2310(d).] Except for some labeling and disclosure requirements, the federal Act does not preempt state law. [See 15 USC §2311.]1. WHAT THIS WARRANTY COVERS:LG offers you a limited warranty that the enclosed subscriber unit and its enclosed accessories will be free from defects in material and workmanship, according to the following terms and conditions:(1) The limited warranty for the product extends for TWELVE (12) MONTHS beginning on the date of purchase of the product with valid proof of purchase, or absent valid proof of purchase, FIFTEEN (15) MONTHS from date of manufacture as determined by the unit’s manufacture date code.(2) The limited warranty extends only to the original purchaser of the product and is not assignable or transferable to any subsequent purchaser/end user.(3) This warranty is good only to the original purchaser of the product during the warranty period as long as it is in the U.S., including Alaska, Hawaii, U.S. Territories and Canada.](https://usermanual.wiki/LG-Electronics-USA/G710TM/User-Guide-3819387-Page-197.png)