LG Electronics USA GM205 Cellular/ PCS GSM Phone with Bluetooth User Manual
LG Electronics USA Cellular/ PCS GSM Phone with Bluetooth Users Manual
UserManual.wiki
>
LG Electronics USA
>
GM205 User Manual
Users Manual
Navigation menu
Upload a User Manual
Namespaces
Wiki Guide
HTML
PDF
Info
Views
User Manual
Discussion / Help
Navigation
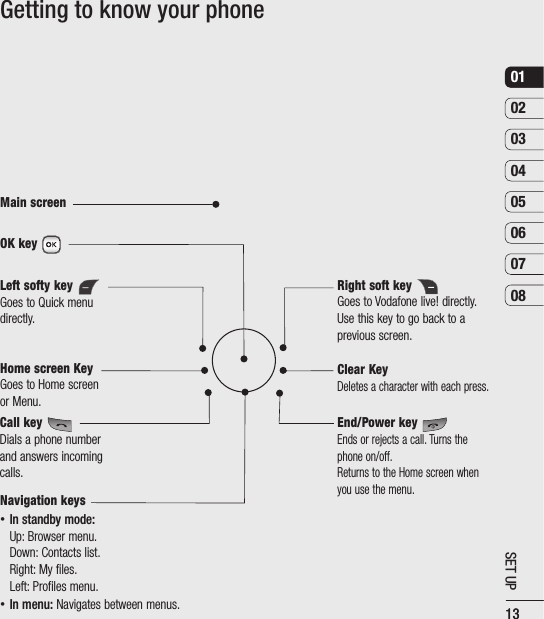


![430102030405060708GET CREATIVEVideo options menuIn the Videos folder highlight a video and press Options to bring up the following list of options.Send - Send the selected video to a friend via Multimedia message, Email or Bluetooth.Use as - Use as Voice ringtoneMove - Move to Handset memory or External memoryCopy - Copy to Handset memory or External memoryDelete - Delete the video clipMark/Unmark - Select more than one video clip before selecting Delete.File - Rename the video or view the information (Name, Size, Date, Time, Type and Copyright). Create new folder - Create a new folder within the main Videos folder.Sort by - Arrange your videos by Date, Type or Name.Grid view/ List view - Change the way you view your videos.Memory manager - You can view the memory status (handset or external memory card).GamesYou can easily download games and play the default games. If you want to download games select Download games in this menu.ApplicationsYou can easily download other applications when you select the embedded link in this menu.SVG contentsThe SVG contents folder contains all of your default and downloaded SVG and SVGZ files. When a file is selected, the following options will be displayed by pressing the left soft key [Options]. Play/Pause - Pause or resume playback.Pause or resume playback. Send - Send the file as a message or viaSend the file as a message or via Bluetooth. Go to list - Return to your list of SVG files.Return to your list of SVG files. Landscape view - View your SVG inView your SVG in landscape view mode. (This only appears if you select Options without pausing). Mute/Unmute - Switch the sound on/off.Switch the sound on/off. File info - View brief information about theView brief information about the file.](https://usermanual.wiki/LG-Electronics-USA/GM205/User-Guide-1067358-Page-34.png)

![LG GM205 | User Guide56SETTINGSSettingsBrowser settings - You can change the settings for browser connectivity and display. Profiles - Select the appropriate profile by pressing . Appearance settings - Here, you can set character encoding and scroll speed, or turn images and java script on or off. Cache - Enabling Cache allows you to store accessed pages to your phone. Once a page has been stored in the Cache it will greatly enhance the page loading speed on subsequent browsing of the same page. Cookies - Enabling Cookies allows you to store cookies sent from the server. Disabling this function will prevent cookies from being stored on your phone. Security - Choose Certificates list or Session clear Certificates can be viewed from the list. Secure (WTLS/TLS) session data can be cleared using this option. Session data should be cleared to establish a new secure session Reset settings - Select this to reset your phone to its default browser configuration.Streaming settings - If you want to set different network setting to play streaming content, you can set different network settings.Changing your Bluetooth settings1 Open Settings and select Connectivity, then choose Bluetooth.2 Choose Settings. Make your changes to: My device visibility - Set [My device visibility] [Visible] so that other devices can detect your phone when they are searching for a Bluetooth device. If you select Hidden, other devices will not be able to detect your phone when they are searching for a Bluetooth device.My device name - You can name or rename your phone as it will appear on other devices. Your phone’s name will be shown on other devices only when My device visibility is set to Visible.Supported services - You can view the list of devices such as headsets and handsfree kits supported by this Bluetooth enabled phone.My address - Check your Bluetooth address here.Note : To improve security, we recommend that once you have configured or paired with a device, Visibility be set to Hidden. For incoming connections, regardless of whether or not the other device has been paired with your phone, you can choose to accept or reject the connection](https://usermanual.wiki/LG-Electronics-USA/GM205/User-Guide-1067358-Page-47.png)