LG Electronics USA GS505 Cellular/PCS GSM/EDGE and AWS WCDMA Phone with Bluetooth User Manual GS505 OPEN UK 0115 indd
LG Electronics USA Cellular/PCS GSM/EDGE and AWS WCDMA Phone with Bluetooth GS505 OPEN UK 0115 indd
Users Manual

GS505 User Guide
Congratulations on your purchase of the advanced and
compact GS505 phone by LG, designed to operate with the
latest digital mobile communication technology.
Some of the contents in this manual may differ from your phone depending
on the software of the phone or your service provider.
Disposal of your old appliance
1 When this crossed-out wheeled bin
symbol is attached to a product it means
the product is covered by the European
Directive 2002/96/EC.
2 All electrical and electronic products
should be disposed of separately from the
municipal waste stream via designated
collection facilities appointed by the
government or the local authorities.
3 The correct disposal of your old appliance
will help prevent potential negative
consequences for the environment and
human health.
4 For more detailed information about
disposal of your old appliance, please
contact your city office, waste disposal
service or the shop where you purchased
the product.

Part 15.21 statement
" Change or Modifications that are not expressly approved by the manufacturer could void
the user's authority to operate the equipment. “
Part 15.105 statement
This equipment has been tested and found to comply with the limits for a class B digital
device, pursuant to Part 15 of the FCC Rules.
These limits are designed to provide reasonable protection against harmful interference in
a residential installation. This equipment generates uses and can radiate radio frequency
energy and, if not installed and used in accordance with the instructions, may cause harmful
interference to radio communications. However, there is no guarantee that interference will
not occur in a particular installation. If this equipment does cause harmful interference or
television reception, which can be determined by turning the equipment off and on, the user
is encouraged to try to correct the interference by one or more of the following measures:
- Reorient or relocate the receiving antenna.
- Increase the separation between the equipment and receiver.
- Connect the equipment into an outlet on a circuit different from that to
which the receiver is connected.
- Consult the dealer or an experienced radio/TV technician for help.

Part 15 Class B Compliance
This device and its accessories comply with part15 of FCC rules.
Operation is subject to the following two conditions:
(1) This device & its accessories may not cause harmful interference.
(2) This device & its accessories must accept any interference received,
including interference that may cause undesired operation.
Body-worn Operation
This device has been tested for typical body-worn operations
with the distance of 0.79inches (2.0cm) from the user’s body.
To comply with FCC RF exposure requirements, a minimum separation distance
of 0.79inches(2.0cm) must be maintained from the user's body.
Additionally, Belt clips, holsters & other body-worn accessories may not contain
metallic components.

10 LG GS505 | User Guide
Lock/ Unlock key
Earpiece
Handsfree or Stereo earphone
connector
Charger, Data cable (USB cable)
TIP: Before connecting the
USB cable, wait until the
phone has powered up and
has registered on the network.
Call key
Dials a phone number and answers incoming calls.
Multi-tasking key
End/ Power key
• Rejects a call.
• Press once to return to the home screen.
• Turns the phone on/off.
Volume keys
• When the screen is idle: Touch
tone or ring tone volume, press
long the down key to Silent on/off.
• During a call: earpiece volume.
• When playing a track: controls
the volume continuously.
Camera key
• Go to camera menu
directly by pressing and
holding the key.
•
Press twice to go to Sweet
draw. You can edit the
image and send it in this
menu.
Notice : This application
(or function) may not be
used for infringement
upon the copyright of
any third party.
Getting to know your phone

11
WARNING: Putting a heavy object on the phone or sitting on it
can damage its LCD and touch screen functionality. Do not cover the
proximity sensor with a protective lm or cover. It can cause the sensor
to malfunction.
Open view
Battery cover
Battery
SIM card
socket
Camera lens
Memory card socket

12 LG GS505 | User Guide
Installing the SIM and battery
Remove the battery cover and
the battery
Slide down the battery cover and
pull out the battery.
WARNING: Do not remove
the battery when the phone
is switched on, as this may
damage the phone.
Install the USIM card
Slide the USIM card into the USIM
card holder. Make sure the gold
contact area on the card is facing
downwards. To remove the USIM
card, gently pull it outwards.
1
2
Install the battery
Insert the top of the battery
into the top edge of the battery
compartment first. Ensure that the
battery contacts align with the
phone’s terminals. Press the bottom
of the battery down until it clips
into place.
3
13
Slide back the cover of the charger
connector on the side of your
GS505. Insert the charger and plug
it into a mains electricity socket.
Your GS505 must be charged until
the “Battery full“ message appears
on the screen.
NOTE: The battery must be fully
charged initially to improve battery
lifetime. Disregard the first “Battery
full” message and keep the phone
on charge overnight (or for up to
14 hours).
Charging your phone

14 LG GS505 | User Guide
Memory card
Installing a memory card
You can expand the available
memory space on your phone by
using a memory card.
NOTE: A memory card is an optional
accessory.
Slide the memory card into the slot
at the top, until it clicks into place.
Make sure the gold contact area is
facing downwards.
WARNING: Slide into
the memory card to the slot,
otherwise, the card can be
damaged.
Formatting the memory card
Your memory card may already be
formatted. If it isn’t, you will need
to format it before you can start to
use it.
NOTE: All files get deleted while
formatting.
From the home screen select
and choose Phone settings from
the SETTINGS tab.
Scroll and touch Memory
manager then scroll and select
External memory.
Touch Format and then confirm
your choice.
1
2
3

15
Enter the password, if one has
been set. The card will then be
formatted and ready to use.
NOTE: If there is existing content
on your memory card, the folder
structure may be different after
formatting since all files will have
been deleted.
Transferring your contacts
To transfer your contacts from your
SIM to your phone:
From the Phone tab, scroll to
Contacts and select then
Change location.
Touch Copy to Handset.
Choose Mark all or select names
one by one and touch Copy to
handset.
4
1
2
3

16 LG GS505 | User Guide
Using your touch screen
Touch screen tips
To select an item, touch the
centre of the icon.
Do not press too hard. The
touchscreen is sensitive enough
to pick up a light, firm touch.
Use the tip of your finger to
touch the option you require. Be
careful not to touch any other
keys.
Whenever your GS505 is not
in use, it will return to the lock
screen.
Control the touch screen
The controls on the GS505 touch
screen change dynamically
depending on the task you are
carrying out.
•
•
•
•
Opening Applications
To open any application, simply
touch its icon.
Scrolling
Drag from side to side to scroll.
On some screens, such as the call
history list, you can also scroll up
or down.

17
Menu map
Touch in the home screen to open a Top menu. From here you can access
further menus: Phone, Multimedia, Personalize and Settings.
Settings
Help
Sounds
Display
Bluetooth
Call
myFaves
Phone
More
Multimedia
Music Player
Take Photo
Record Video
Camera Album
Applications
Games
T-Mobile
T-Mobile
Phone
Contacts
Call history
Messaging
Audio Postcard
Web2go
IM
Email
Visual Voicemail
Personalize
Sound
Pictures
Video
More
Telenav GPS Navigator
Alarm Clock
Calendar
Organizer
18 LG GS505 | User Guide
Using the Multi - tasking
function
Press the multitasking hard key
to open the Multitasking menu.
From here you can view some
applications that are running and
access them with one touch.
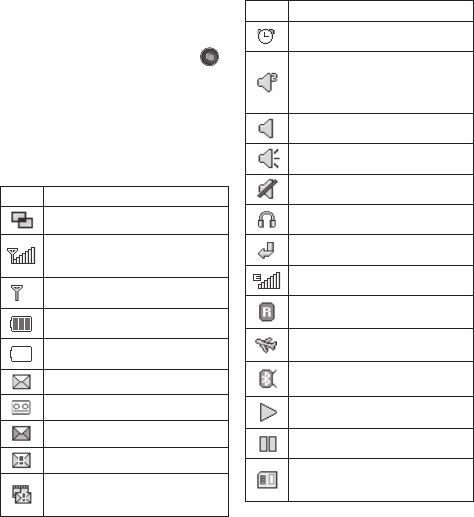
Viewing the status bar
Icon Description
Multitasking
Network signal strength
(number of bars will vary)
No network signal
Remaining battery life
Battery empty
New text message
New voice message
Message inbox is full
Message sending failed
Multimedia message sending
failed
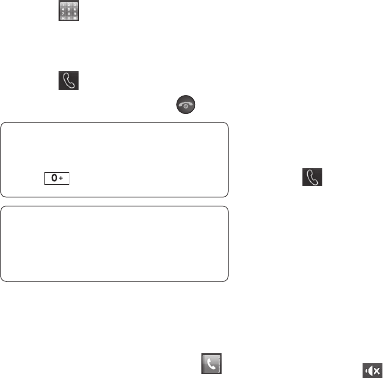
Icon Description
An alarm is set
Customised Profile in use
(The number in the icon will
vary)
Normal profile in use
Outdoor profile in use
Silent profile in use
Headset in use
Calls are diverted
EDGE in use
Roaming
Flight mode is on
Bluetooth is active
BGM play
BGM pause
Memory card is enabled
for use
Your home screen
19
Calls
Making a call
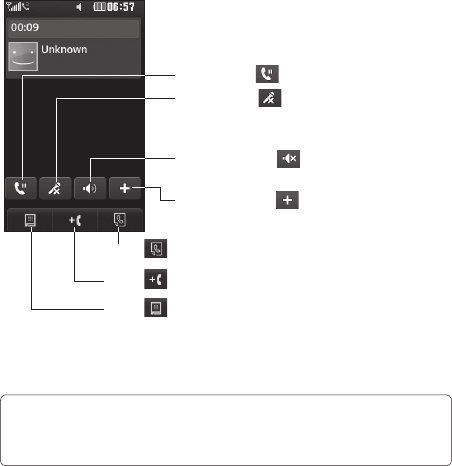
Touch to open the keypad.
Key in the number using the
keypad.
Touch to initiate the call.
To end the call, press the key.
TIP! To enter + for making
an international call, press and
hold .
TIP! Press the power key to lock
the touchscreen to prevent calls
being made by mistake.
Making a call from your
contacts
From the home screen touch
to open the Contacts.
Tap the Name field box on the
top of the screen and enter the
first few letters of the contact
you would like to call using the
keypad.
1
2
3
4
1
2
From the filtered list, touch the
Call icon next to the contact you
want to call. The call will use the
default number if there is more
than one for that contact.
Or, you can touch the contact
name and select the number to
use if there is more than one for
that contact to use. You can also
touch to initiate the call to
the default number.
Answering and rejecting a
call
When your phone rings, touch the
Smart key to answer the call.
To mute the ringing, slide up the
cover. This will unlock the phone if it
is locked, then tap . This is useful
if you forgot to change your profile
to Silent for a meeting. Touch Reject
to reject an incoming call.
3
4
20 LG GS505 | User Guide
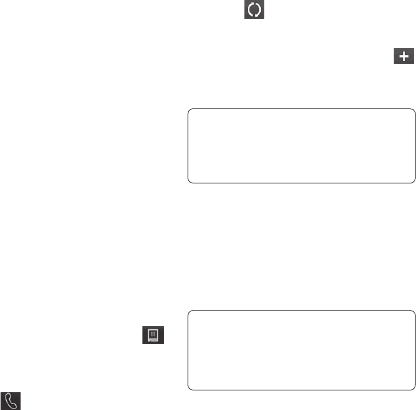
In-call options
TIP! To scroll through a list of options or your list
of contacts, touch the last item visible and slide your nger up the
screen. The list will move up so more items become visible.
Hold - Touch to put a call on hold.
Mute - Touch to turn off the
microphone so the person you are
talking to cannot hear you.
Speaker - Touch to turn the speaker
phone on.
Options - Touch to bring up a list of
further in-call options.
Touch to search your contacts during a call.
Touch to add another person to the call.
Touch to open a numerical keypad for making a
second call. This function also allows you to navigate
menus with numbered options when you dial automated
telephone services, such as call centres.
Calls
21
Speed dialling
You can assign a frequently-called
contact to a speed dial number.
Select Contacts in the Phone tab
and select Speed dials.
Your voicemail is already set to
speed dial 1. You cannot change
this. Touch any other number to
assign it a speed dial contact.
Your Contacts will open. Select
the contact you want to assign
to that number by touching their
phone number once. To find a
contact, tap the Name field box
and enter the first letter of the
name of the contact required.
Making a second call
During your initial call, touch
and type the number you want
to call.
Touch to connect the call.
Both calls will be displayed on
the call screen. Your initial call
1
2
3
1
2
3
will be locked and the caller put
on hold.
To change between the calls,
touch or press the number of
the held call.
To end one or both calls press
and select End followed by All,
Held or Active.
TIP! Touch any single call
log entry to view the date, time
and duration of the call.
NOTE: You will be charged for each
call you make.
Viewing your call logs
Touch Call History in the Phone tab.
TIP! Touch any single call log
entry to view the date, time and
duration of the call.
4
5

22 LG GS505 | User Guide
Using call divert
Touch Call settings in the
SETTINGS tab.
Touch Call divert.
Choose whether to divert all
voice calls, when the line is busy,
when there is no answer or when
you cannot be contacted.
Enter the number you want to
divert to.
Touch Request to activate.
NOTE: Charges are incurred for
diverting calls. Please contact your
network provider for details.
TIP! To turn o all call
diverts, select Deactivate all
from the Call divert menu.
Using call barring
Touch Call settings in the
SETTINGS tab.
Touch Call barring.
1
2
3
4
5
1
2
Choose any or all of the six
options:
All outgoing
Outgoing international
Outgoing international calls
except home country
All incoming
Incoming when abroad
Deactivate all
Enter the call barring password.
Please check with your network
operator about this service.
TIP! Select Fixed
dial numbers from the Call
settings options to turn on and
compile a list of numbers which
can be called from your phone.
You’ll need your PIN2 code from
your operator. Only numbers
included in the xed dial list can
be called from your phone.
3
4
Calls
23
Changing the common call
setting
Touch Call in the Settings tab.
Scroll and touch Common
settings. From here you can
adjust the settings for:
Call reject - Slide the switch to
ON to highlight the Reject list.
You can touch the text box to
choose from all calls, specific
contacts or groups, or those from
unregistered numbers (those
not in your contacts) or with no
caller ID. Touch Save to change
the setting.
Send my number - Choose
whether your number will
be displayed when you call
someone.
Auto redial - Slide the switch left
for ON or right for OFF.
1
2
Minute minder - Slide the switch
left to ON to hear a tone every
minute during a call.
BT answer mode - Select Hands-
free to be able to answer a call
using a Bluetooth headset, or
select Handset to press a key on
the handset to answer a call.
Save new number - Select Yes to
save a new number.

24 LG GS505 | User Guide
Searching for a contact
There are two ways to search for a
contact:
Touch Contacts in the Phone tab.
Touch Search.
You see a list of contacts. Typing
in the first letter of a contact’s
name in the Name field will jump
the menu to that alphabetical
area of the list.
TIP! The alphabetical keypad
is displayed once you tap the
Name eld.
Adding a new contact
Touch Contacts in the Phone tab
and touch Add contact.
Choose whether to save the
contact to your Handset or SIM.
Enter your first and last name.
1
2
3
1
2
3
You can enter up to five different
numbers per contact. Each entry
has a preset type Mobile, Home,
Office, Pager, Fax and General.
Add an email addresses. You can
enter up to two different email
addresses per contact.
Assign the contact to one or
more groups. You can assign
up to three groups per contact.
Choose between No group,
Family, Friends, Colleagues,
School or VIP.
You can also add a Ringtone,
Birthday, Anniversary,
Homepage, Home address,
Company name, Job title,
Company address, Memo and
Livecon.
Touch Save to save the contact.
4
5
6
7
8
Contacts

25
Creating a group
Touch Contacts in the Phone tab.
And touch Groups.
Touch Add group or touch
and select Add group.
Enter a name for your new group.
You can also assign a ringtone to
the group.
Touch Save.
NOTE: If you delete a group, the
contacts which were assigned to
that group will not be lost. They
will remain in your Contacts.
Changing your contact
settings
You can adapt your contact settings
so that your Contacts suits your
own preferences.
Touch Contacts in the Phone tab
and touch Settings.
From here, you can adjust the
following settings:
1
2
3
4
1
2
Contact list settings - Adjust
the Contacts location, Name
display and Quick command
key settings.
Copy - Copy your contacts from
your handset to your SIM or from
your SIM to your handset. You
can choose one at a time, or all
at once.
Move - This works in the same
way as Copy, but the contact will
only be saved to the location
you’ve moved it to.
Send all contacts via Bluetooth
- Send all of your contacts to
another device using Bluetooth.
You will be prompted to turn on
Bluetooth if you select this option.
Backup contacts - See
Backing up and restoring the
information on your phone.

26 LG GS505 | User Guide
Restore contacts - See
Backing up and restoring the
information on your phone.
Clear contacts - Delete all your
contacts. Choose between
Handset and SIM and touch Yes
if you are sure you want to wipe
your contacts.
Viewing information
Touch Contacts in the Phone tab
and touch Information.
From here you can view your
Service dial numbers, your Own
number, your Memory info.
(showing your memory usage)
and My business card.
TIP! To add your own
business card, select My
business card and enter your
details as you would for any
contact. Touch Save to nish.
1
2
Contacts
27
Messaging
Your GS505 combines SMS and
MMS into one intuitive and easy-to-
use menu.
Sending a message
Touch Messaging in the Phone
tab. And touch New message
to begin composing a new
message.
Touch Insert to add an image,
video, sound, template and so on.
Touch Recipient at the bottom of
the screen to enter the recipients.
Then enter the number or touch
to select a contact. You can
even add multiple contacts.
Touch Send when ready.
WARNING: If an image,
video or sound is added to an
SMS it will be automatically
converted to an MMS and you
will be charged accordingly.
1
2
3
4
Entering text
There are five ways to enter text:
Keypad, Keyboard, Handwriting-
Screen, Handwriting-Box,
Handwriting-Double Box.
You can choose your input method
by tapping and Input method.
Touch to turn on T9 mode.
This icon is only shown when
you choose Keypad as the input
method.
Touch to choose the writing
language.
Touch to change between
numbers, symbols and text input.
Use Shift key to change between
capital or lowercase input.
Messaging

28 LG GS505 | User Guide
T9 mode
The T9 mode uses a built-in
dictionary to recognise the words
you’re writing based on the
sequence of keys you’ve touched. It
predicts the word you are inputting
and suggests alternatives.
Handwriting recognition
In Handwriting mode you simply
write on the screen and your GS505
will convert your handwriting into
your message. Select Handwriting-
Screen or Handwriting-Box
according to your preferred view.
Setting up your email
Touch Email in the Phone tab.
If the email account is not set up,
start the email set up wizard and
finish it.
You can check and edit settings by
selecting . You can also check
the additional settings that were
filled in automatically when you
created the account.
Retrieving your emails
You can automatically or manually
check your account for new emails.
To check manually:
Touch Email in the Phone tab.
Touch the account you want to
use .
Sending an email using your
new account
Touch New e-mail and a new
email will open.
Complete the message.
Touch Send and your email will
be sent.
1
2
1
2
3
Messaging

29
Changing your email settings
Touch Email in the Phone tab.
Touch and select E-mail
settings and then you can adapt
the following settings:
E-mail accounts
Preferred e-mail
Allow reply e-mail - Choose
to allow the sending of read
confirmation messages.
Request reply e-mail - Choose
whether to request read
confirmation messages.
Retrieve interval - Choose how
often your GS505 checks for new
email messages.
Retrieve amount - Choose the
number of emails to be retrieved
at any one time.
Include message in Fwd. &
Reply - Choose to include the
original message in your reply.
1
2
Include attachment - Choose to
include the original attachment in
any reply.
Auto retrieval in roaming -
Choose whether to retrieve your
messages automatically when
abroad (roaming).
New e-mail notification -
Choose whether to be alerted to
new emails.
Signature - Switch this feature
ON and create an email signature.
Priority - Choose the priority level
of your email messages.
Mail sending size - Set the
maximum size of sending mail.
E-mail counter - Input the date
you want. You can check emails
you sent during that period.
30 LG GS505 | User Guide
Message folders
There are five folders in Messaging
menu.
Inbox - All the messages you
receive are placed into your inbox.
Drafts - If you do not finish writing
a message, you can save what you
have done in this folder.
Outbox - This is a temporary
storage folder while messages are
being sent.
Sent items - All the messages you
have sent are placed in this folder.
My folders - Create folders to store
your messages.
Changing your text message
settings
Touch Messaging in the Phone tab
and touch Settings. Select Text
message. You can make changes to:
Text message centre - Enter the
details of your message centre.
Delivery report - Slide the switch
left to receive confirmation that
your messages have been delivered.
Validity period - Choose how long
your messages are stored at the
message centre.
Message types - Convert your
text into Text, Voice, Fax, X.400 or
E-mail.
Character encoding - Choose how
your characters are encoded. This
impacts the size of your messages
and therefore data charges.
Send long text as - Choose to send
long messages as Multiple SMS or
as an MMS.
Changing your multimedia
message settings
Touch Messaging in the Phone
tab. Scroll and choose Settings and
Multimedia message. You can make
changes to:
Retrieval mode - Choose between
Home network or Roaming
Messaging

31
network. If you then choose
Manual you will receive only
notifications of MMS and you can
then decide whether to download
them in full.
Delivery report - Choose to request
and/or allow a delivery report.
Read reply - Choose to request
and/or allow a reply.
Priority - Choose the priority level
of your MMS.
Validity period - Choose how
long your message is stored at the
message centre.
Slide duration - Choose how long
your slides appear on the screen.
Creation mode - Choose your
message mode.
Delivery time - Choose how long to
wait before a message is delivered.
Multi msg centre - Choose one
from the list or add a new message
centre.
Changing your other settings
Touch Messaging in the Phone tab.
And touch Settings.
Voicemail - Touch to add a
new Voicemail service. Contact
your network operator for more
information about the service they
provide.
Service message - Choose to
receive or block service messages.
You can also set your message
security by creating trusted and
untrusted lists of senders in Service
security option.
Message counter - Choose to set
period for counting messages.
Info. service - Choose whether to
turn Cell broadcast on/off and select
your channels and languages.
32 LG GS505 | User Guide
Social network services (SNS)
Manage your social network service
settings using the GS505. You can
view your friends’ updates and
update your own Facebook status.
Select SNS, then touch Add
Account.
Add communities from Orkut,
Facebook, Twitter, Picasa, Flickr,
Myspace.
Messaging
33
Camera
Taking a quick photo
Press the key on the right
side of the phone.
When the camera has focused on
your subject, touch the on
the right-center of the screen to
take a photo. You can also press
the key on the side of the
phone firmly.
TIP! To switch to the camera
mode or video mode, slide
up/down the camera or video
icon on the centre-right of the
viewnder.
Once you’ve taken the photo
Your captured photo will appear
on the screen. The image name is
shown with four icons on the right-
hand side.
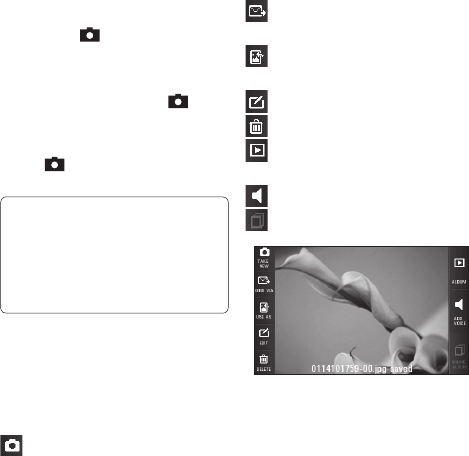
Touch to take another photo
immediately. Your current photo will
be saved.
1
2
Touch to send the photo as a
message, email or via Bluetooth.
Touch to set a Home screen
image.
Touch to edit the photo.
Touch to delete the image.
Touch to view a gallery of your
saved photos.
Touch to add voice.
Online Album
34 LG GS505 | User Guide
Getting to know the viewfinder
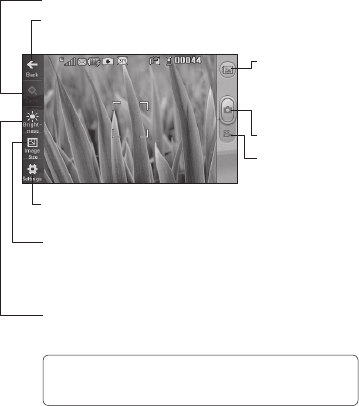
Gallery -This enables you to access
your saved photos from within the
camera mode. Simply touch, and your
gallery will appear on the screen.
Taking a photo
Video mode - Slide down this icon to
switch to video mode.
Settings - Touch this icon to open the settings menu. See Using the
advanced settings.
Image Size - Change the size of the photo to save memory space or take a
picture preset to the correct size for a contact. Select a pixel value from the
six numerical options: 3M (2048x1536), 2M (1600x1200), 1M (1280x960), VGA
(640x480), Home screen (WQVGA), QVGA (320x240).
Brightness - A low contrast image will appear foggy, whereas a high contrast
image will appear much sharper.
Zoom - zoom in or zoom out.
Back - Touch to return to the previous menu.
TIP! You can bring up the options by tapping the screen.
They automatically turn o after a few seconds.
Camera

35
Adjusting the exposure
The exposure defines the difference
between light and dark areas in
an image. A low contrast image
will appear foggy, whereas a high
contrast image will appear much
sharper.
Touch .
Slide the contrast indicator along
the bar towards for a lower
exposure and hazier image
or towards for a higher
exposure and a sharper image.
Using the advanced settings
From the viewfinder, touch to
open all advanced settings options.
You can change the camera setting
by scrolling the wheel. After
selecting the option, touch the OK
button.
1
2
Colour Effect - Choose a colour
tone to apply to the photo you’re
taking. There are four colour tone
options: Off, Black & White,
Negative or Sepia.
White balance - Choose from Auto,
Incandescent, Sunny, Fluorescent
or Cloudy.
Night mode - Useful to use in dark
places.
Self-timer - The self-timer allows
you to set a delay before the camera
takes the picture, after the capture
button is pressed. Choose from 3
seconds, 5 seconds or 10 seconds.
Great for the group photo you want
to be part of.
Quality - Choose between Super
fine, Fine and Normal. The finer the
quality the sharper a photo will be,
but the file size will increase. This
means you’ll be able to store fewer
photos in your memory.

36 LG GS505 | User Guide
View mode - Choose from Full
screen or Full image.
Select storage - Choose whether
to save your photos to the Handset
memory or to the External memory.
Show captured image - Choose to
view the picture with options after
taking a photo.
Hide icons - Choose the camera
settings icons to be hidden
manually or automatically.
Shutter sound - Select one of the
three shutter sounds.
Grid screen - Choose from Off,
Simple cross or Trisection.
Noise reduction -
Reset settings - Reset all the
camera settings.
Viewing your saved photos
You can access your saved photos
from within the camera mode.
Just touch and your gallery
will appear on the screen.
1
Camera
37
Video camera
Making a quick video
Press the camera key on the
right side of the phone for a few
seconds.
TIP! To switch to the camera
mode or video mode, slide up/
down the camera or video icon on
the right centre of the viewnder.
Holding the phone horizontally,
point the lens towards the
subject of the video.
Press the camera key on the
phone once to start recording. Or
touch the red dot .
Rec will appear at the bottom
of the viewfinder with a timer at
the bottom showing the length
of the video.
To pause the video, touch and
resume by selecting .
Touch on screen or press
the a second time to stop
recording.
1
2
3
4
5
6
After making a video
A still image representing your
captured video will appear on the
screen. The name of the video runs
along the bottom of the screen
together with seven icons down the
left and right sides .
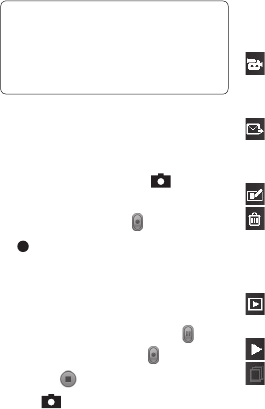
Touch to shoot another video
immediately. Your current video will
be saved.
Touch to send the video as a
Message or Email or by Bluetooth
or YouTube.
Touch to rename the video.
Touch to delete the video you
have just made and confirm by
touching Yes. The viewfinder will
reappear.
Touch to view a gallery of saved
videos and images.
Touch to play the video.
Online Album
38 LG GS505 | User Guide
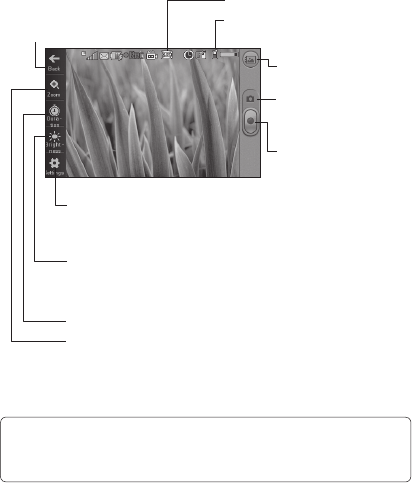
Getting to know the viewfinder
TIP! You can close all shortcut options for a clearer viewnder screen.
Simply touch the centre of the viewnder once. To recall the options,
touch the screen again.
Image size
Saving to handset memory/
external memory
Back
Settings - Touch this icon to open the
settings menu. See Using the advanced
settings.
Brightness - A low contrast video will
appear foggy, whereas a high contrast
video will appear much sharper.
Duration
Zoom - zoom in or zoom out.
Gallery
Camera mode - Touch this icon to
switch to camera mode.
Start recording
Video camera
39
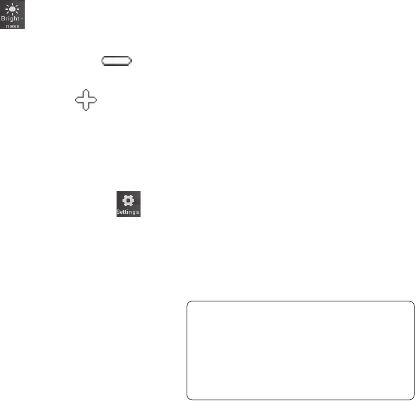
Adjusting the exposure
The exposure defines the difference
between light and dark areas in an
image. A low contrast image will
appear foggy, whereas a high contrast
image will appear much sharper.
Touch .
Slide the exposure indicator
along the bar, towards for
a lower exposure and fuzzier
image, or towards for a
higher contrast and sharper
image.
Using the advanced settings
Using the viewfinder, touch
to open all the advanced settings
options.
You can adjust the video camera
setting by scrolling the wheel. After
selecting the option, touch the OK
button.
1
2
Colour Effect - Choose a colour
tone to use on your new video. Off,
Black & White, Negative, Sepia.
White balance - The white balance
ensures that any white in your
videos is realistic. In order for your
camera to correctly adjust the
white balance, you may need to
determine the light conditions.
Choose from Auto, Incandescent,
Sunny, Fluorescent or Cloudy.
Quality - Choose between Super
fine, Fine and Normal. The finer the
quality, the sharper a video will be,
but the file size will increase. As a
result, you will be able to store fewer
videos in the phone’s memory.
Set time - Set a time limit for your
video. Choose whether or not to
send the video as an MMS.
TIP! If you choose MMS
duration, choosing a lower
image quality will enable you to
shoot a longer video.

40 LG GS505 | User Guide
Select storage - Choose whether
to save your videos to the Handset
memory or to the External memory.
Voice - Choose whether or not to
record a video with sound.
Hide icons - Choose the camera
settings icons to be hidden
manually or automatically.
Reset settings - Reset all the video
camera settings.
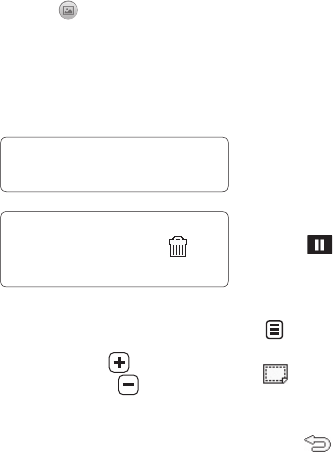
Watching your saved videos
In the viewfinder, touch .
Your gallery will appear on the
screen.
Touch a video once to bring it to
the front of the gallery. It start to
play automatically.
1
2
3
Video camera
41
Your photos and videos
Viewing your photos and
videos
Touch on the camera preview
screen.
Your gallery will appear on the
screen.
Touch the video or photo to open
it fully.
TIP! Flick left or right to
view other photos or videos.
TIP! To delete a photo or
video, open it and select .
Touch Yes to conrm.
Using zoom when viewing a
photo
To zoom in press repeatedly.
To zoom out press . Use the
thumbnail in the bottom right
corner to move the focus area.
1
2
3
Adjusting the volume when
viewing a video
To adjust the volume of a video
while it is playing, touch the volume
bar on the screen bottom after
pressing the loudspeaker symbol.
Alternatively, use the volume keys
on the side of the phone.
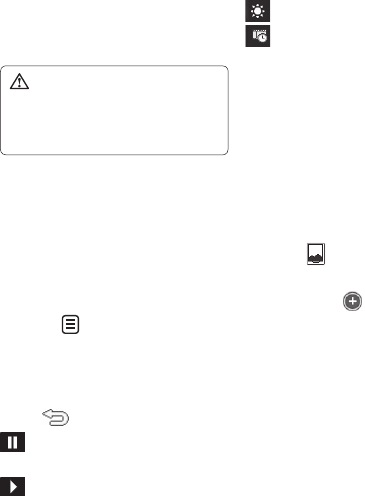
Capturing an image from a
video
Select the video you would like
to capture an image from.
Touch to pause the video
on the frame you’d like to convert
to an image and touch the upper
left side of the screen to open the
menu.
From the options menu select
.
The image will appear on the
screen, with its image name.
Touch to return to the video.
1
2
3
4
5
42 LG GS505 | User Guide
The image will be saved in your
My stuff folder and appear in
the gallery.
WARNING: Some
functions will not work properly
if the multimedia le has not
been recorded on the phone.
Viewing your photos as a
slide show
Slideshow mode will show all the
photos in your gallery one at a time
as a slideshow. Videos can not be
viewed as a slideshow.
Touch in the Gallery, then
scroll and select Slide show.
The slideshow will begin.
There are options within slideshows:
Touch to go back.
Touch to pause the slideshow
on a particular photo.
Touch again to resume
playback.
6
1
2
Touch to show random.
Touch to increase or decrease
the speed of the slideshow.
Setting a photo as wallpaper
Touch Gallery in the
ENTERTAINMENT tab.
Touch the photo you would like
to set as wallpaper.
Touch the screen to open the
menu.
Touch .
You can change the size of the
picture with .
When you are happy with the
picture touch Set.
Choose from the options what
you want to change: All, Widget,
Speed dial.
1
2
3
4
5
6
7
Your photos and videos
43
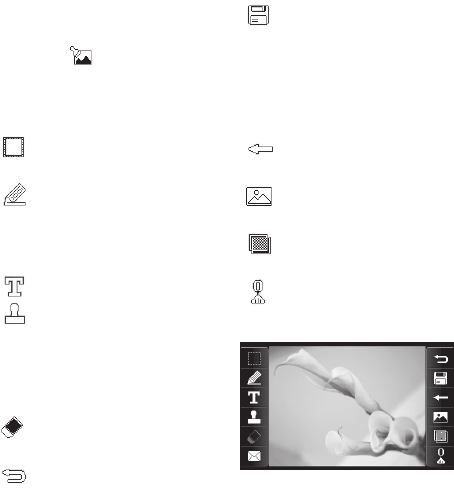
Editing your photos
Open the photo you’d like to edit
and touch to bring up the
options.
Touch the icons to alter your
photo:
Move your finger across the
screen to select the area.
Draw something on your
photo freehand. Select the line
thickness from the four options,
then the colour you want to use.
Add writing to the picture.
Decorate your photo with
stamps. Choose from the different
stamps and colours and touch
your photo where you want to
place them.
Erase whatever you draw. You
can also select the eraser size.
Touch to return to the
gallery.
1
2
Save the changes you have
made to the photos. Select
to save the changes over the
Original file, or as a New file. If
you select New file, enter a file
name.
Undo the last effect or edit
you made to the photo.
Touch to open further effect
options including Rotate.
Touch to open the Filter
options.
You can adjust the selected
photo.

44 LG GS505 | User Guide
Adding text to a photo
From the editing screen, touch
.
Select Signature to add
unframed text or choose one of
the speech bubble shapes.
Enter your text using the keypad
and touch Save.
Move the text by touching it and
sliding it to where you want it.
Cropping a photo
From the editing screen, touch
.
Choose the shape you want to
use to crop the picture.
Drag the box over the area you
want to crop.
When you are finished with your
selection, touch .
1
2
3
4
1
2
3
4
Adding an effect to a photo
From the editing screen, touch
.
Choose to apply any of the
options to the photo:
Face beautify - Automatically
detect a face in the image and
brighten it up.
Tunnel effect - Lomo camera
effect.
Colour negative - Colour
negative effect.
Black and white - Black and
white colour effect.
Sepia - Give a Sepia effect.
Blur - Give a blurred effect.
Sharpen - Move the marker along
the bar to sharpen the focus
of the photo. Select OK icon to
apply the changes or choose
to cancel.
Mosaic blur - Touch to apply
a blurred mosaic effect to the
photo.
1
2
Your photos and videos

45
Oil painting - Give an Oil painting
effect.
Sketch - Apply an effect that
makes the picture look like a
sketch.
Emboss - Give an Emboss effect.
Solarize - Change the effect of
exposure to the light.
Vivid - Give an effect of clearness
and brilliance.
Moonlight - Change the light to
look like moonlight.
Antique - Give an old-looking
effect.
Glow - Give a light beam effect.
Cartoon - Give a cartoon effect.
Water color - Give a watercolour
effect.
To undo an effect simply touch
Undo .
3
Trimming the length of your
video
Open the video you’d like to edit,
select and touch the screen to
bring up the options.
Select and choose Trim.
Touch and mark the new start
and end points using .
Touch Play cropped to ensure
you are happy with the new cut.
Touch Save or, alternatively,
touch to return to the
gallery and discard the changes.
Merging two videos together
Open the video you’d like to edit,
select and touch the screen to
bring up the options.
Select and choose Video
merge.
1
2
3
4
5
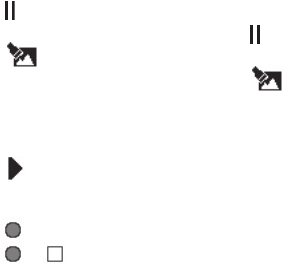
1
2

46 LG GS505 | User Guide
The My stuff folder will open,
select either My Videos or My
memory card (if fitted). Choose
the video you would like to
merge and touch Select.
Touch and slide the photo
to merge it to the end or the
beginning of the video.
Touch Effect to choose how the
videos merge together: None,
Pan zoom, Oval, Uncover, Blind,
Checker board, Dissolve, Split
or Shape diamond.
Press Save followed by Yes to
save the new merged video.
Choose to save over the original
file or as a new file.
Repeat these steps to merge
more videos.
Merging a photo with a video
Open the video you’d like to edit,
select and touch the screen to
bring up the options.
3
4
5
6
7
1
Select and choose Image
merge.
The My stuff folder will open
select either My Images or My
memory card (if fitted). Choose
the photo you would like to
merge into your video and touch
Select.
Touch and slide the photo
to merge it to the end or the
beginning of the video.
Touch Effect to choose how the
photo and video merge together:
None, Pan zoom, Oval, Uncover,
Blind, Checker board, Dissolve,
Split or Shape diamon.
Press Save followed by Yes.
Choose to save over the original
file or as a new file.
Repeat these steps to merge
more photos.
2
3
4
5
6
7
Your photos and videos
47
Adding a voice recording
Open the video you’d like to edit,
select and touch the screen to
bring up the options.
Select and choose Voice
recording.
The quality of the original audio
will be affected by adding a voice
recording. Touch Yes to continue.
Touch to view your video.
When you get to the part you’d
like to record your voice over,
press .
Press or to stop
recording and playback.
Touch Preview to ensure you are
happy with the voice recording.
Touch Save followed by Yes to
save. Choose to save over the
original file or as a new file.
Repeat these steps to add more
voice recordings to the video.
1
2
3
4
5
6
7
8
Adding a soundtrack to your
video
Open the video you’d like to edit,
select and touch the screen to
bring up the options.
Select and choose Audio
dubbing.
The My stuff folder will open
select either My sounds or My
memory card (if fitted). Choose
the track you would like to add to
your video and touch Select.
The original audio of your video
will be erased. Touch Yes to
continue.
If the audio is shorter than the
video choose whether to play
Once or to Repeat it.
Choose to save over the original
file or as a new file.
1
2
3
4
5
6
48 LG GS505 | User Guide
Adding text to a video
Open the video you’d like to edit,
select and touch the screen to
bring up the options.
Select and choose Text
overlay.
Enter your text using the keypad
and select Save.
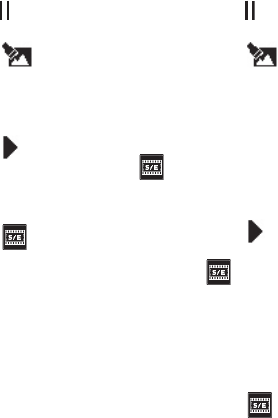
Touch and mark when you’d
like the text to appear using .
Touch the area of the screen
you’d like the text to appear in.
Touch to mark when you’d
like the text to disappear.
Touch Preview to ensure you are
happy with the text overlay.
Touch Save followed by Yes.
Choose to save over the original
file or as a new file.
Repeat these steps to add more
text.
1
2
3
4
5
6
7
8
9
Overlaying a photo
Open the video you’d like to edit,
select and touch the screen to
bring up the options.
Select and choose Image
overlay.
The My stuff folder will open
select either My images or My
memory card (if fitted). Choose
the photo you would like to
overlay your video and touch
Select.
Touch and mark when you’d
like the photo to appear using
.
Touch the area of the screen
you’d like the photo to appear
in. If the photo is too big it will
overlay the whole screen, not just
the area selected.
Touch to mark when you’d
like the photo to disappear.
Touch Preview to ensure you are
happy with the photo overlay.
1
2
3
4
5
6
7
Your photos and videos

49
Touch Save followed by Yes.
Choose to save over the original
file or as a new file.
Repeat these steps to add more
photos.
Changing the speed of your
video
Open the video you’d like to edit,
select and touch the screen to
bring up the options.
Select and choose Time
scaling.
Select one of the four speed
options: x4, x2, x1/4, x1/2.
Choose to save over the original
file or as a new file.
NOTE: Only 3gp Video file can be
edited.
8
9
1
2
3
4

50 LG GS505 | User Guide
Multimedia
You can store multimedia files in
your phone’s memory so you have
easy access to all your pictures,
sounds, videos and games. You can
also save your files to a memory
card. Using a memory card allows
you to free up space in your phone’s
memory.
To access the Multimedia menu,
touch
To access the Multimedia menu,
select My stuff from
ENTERTAINMENT tab. You can open
a list of the folders that store all your
multimedia files.
TIP! To delete any les in
My stu , touch then Delete.
Pictures
Images contains a list of pictures
including default images pre-loaded
onto your phone, images you have
downloaded and those taken on
your phone’s camera.
My images options menu
The options available to you in
Images depend on the type of
image you have selected. All options
will be available for pictures you
have taken on the phone’s camera,
but only the Use as, Slide show and
File info. options are available for
default images.
Sending a photo
To send a photo just select
picture you want.
Touch Send. Choose between
Message, Email or Bluetooth.
If you choose Message or Email,
your photo will be attached to a
message and you can write and
send the message as normal.
If you choose Bluetooth, your
phone will search for a device to
send the picture to.
1
2
3

51
Using an image
You can choose images to use as
wallpapers and screensavers, or
even to identify a caller.
Touch then select My stuff
from ENTERTAINMENT tab.
Touch Images.
Select an image and touch .
Touch Use as and choose
between:
Wallpaper - Set a wallpaper for
the key lock screen.
Contacts image - Allocate
an image to a person in your
contacts list, so the picture is
displayed when they call you.
Start up image - Set an image
to appear when you switch the
phone on.
Shut down image - Set an image
to appear when you switch the
phone off.
1
2
3
4
Printing an image
Touch then select My stuff
from ENTERTAINMENT tab.
Touch Images.
Select an image and touch .
Touch Print, then choose
between Bluetooth and
PictBridge.
Moving or copying an image
An image can be moved or copied
between the phone memory and
the memory card. You may want to
do this to clear some space in one of
the memories, or to safeguard your
images against loss.
Touch then select My stuff
from ENTERTAINMENT tab.
Touch My images.
Touch .
Select Move or Copy.
1
2
3
4
1
2
3
4

52 LG GS505 | User Guide
Creating a slide show
If you want to view all the images
on your phone, you can create a
slide show to save you having to
open and close each individual
image.
Touch then select My stuff
from ENTERTAINMENT tab.
Touch Images.
Touch then Slide show.
Geo-tagging
Turn on the camera and enjoy the
capabilities of your phone’s location-
based services. Take pictures
wherever you are and tag them with
the location. If you upload tagged
pictures to a blog that supports
Geo-tagging, you can see the
pictures displayed on a map.
Sounds
The Sounds folder contains
Downloaded sounds, Default
sounds and Voice recordings.
1
2
3
From here you can manage or send
sounds or set them as ringtones.
Using a sound
Touch then select My stuff
from ENTERTAINMENT tab.
Touch Sounds.
Select Default sounds or
Download sound.
Select a sound and touch the
play icon. It will start to play.
You can use the sound for various
tones by selecting the Use as
menu.
Choose between Voice ringtone
and Message tone.
Videos
The My videos folder shows a list
of videos you have downloaded or
recorded on your phone.
Watching a video
Touch then select My stuff
on the ENTERTAINMENT tab.
1
2
3
4
5
6
1
Multimedia

53
Touch Videos.
Select a video to play.
Sending a video clip
Select a video and touch .
Touch Send and choose between
Message, Email and Bluetooth.
If you choose Message or Email,
your video clip will be attached
to the message, which you can
write and send as normal. If you
choose Bluetooth, your phone
will search for a device to send
the video to.
Games and Applications
You can download new games and
applications to your phone to keep
you enjoy.
Playing a game
Touch then select Games &
Apps on the ENTERTAINMENT
tab.
2
3
1
2
3
1
Touch Games or Applications
menu.
Touch to launch a game or an
application.
Installing a Java game and
application
Touch then select My stuff
on the ENTERTAINMENT tab.
If you insert new memory card,
touch External Memory menu.
Select the file(*.jad or *.jar) you
want to download and install
the file.
NOTE: The Java program files are
in .jad or .jar format. The .jad file
should contain its own .jar file.
Once installed, the Java program
can be viewed in the Games or
Applications menu where you
can select, execute, or delete.
2
3
1
2
3
4

54 LG GS505 | User Guide
TIP! You can also download
Java MIDlet in your phone
by using the WAP (Wireless
Application Protocol) services.
Please note that additional costs
may be incurred when using
online services.
Viewing an SWF/ SVG file
Touch then select My stuff
from ENTERTAINMENT tab.
Touch Flash contents.
Select the file you want to view.
Documents
This is possible with your Excel,
PowerPoint, Word, Text and pdf files.
Viewing a file
Touch then select My stuff
from ENTERTAINMENT tab.
Touch Documents.
Select a document and touch
View.
1
2
3
1
2
3
Transferring a file to your
phone
Bluetooth is probably the easiest
way of transferring a file from your
computer to your phone. You can
also use LG PC Suite via your sync
cable.
To transfer files (e.g. music) using
Bluetooth:
Make sure your phone and
computer have Bluetooth
switched on and are within range
of each other.
Use your computer to send the
file via Bluetooth.
When the file is sent, accept it on
your phone by touching Yes.
The file should appear in your
Documents or Others folder.
1
2
3
4
Multimedia

55
Others
The Others folder is used to store
files that are not pictures, audio
files, videos, games or applications.
It is used in the same way as the
Documents folder. You may find
that when you transfer files from
your computer to your phone that
they appear in the Others folder.
If this happens, you can move them.
Creating a movie
Touch then select Muvee
studio from ENTERTAINMENT
tab.
Touch to add an image. Tap
the checkbox for the images
you want to include, then select
Insert .
Touch the style tab to choose a
Muvee style. The default style is
Classic Sepia.
Touch Default sound to change
the sound.
1
2
3
4
Touch to see what you’ve
created.
Touch then Play order to
create an order. You can make it
random or sequencial.
Touch then Save Location to
choose where to save the movie.
Music
Your LG GS505 has a built-in music
player that lets you play all your
favourite tracks. To access the music
player, touch then select Music
from ENTERTAINMENT tab. From
here, you can access a number of
folders:
Recently played - Plays the songs
you have played recently.
All tracks - Contains all the songs
you have on your phone except the
pre-loaded default music.
Artists - Browse through your music
collection by artist.
5
6
7

56 LG GS505 | User Guide
Albums - Browse through your
music collection by album.
Genres - Browse through your
music collection by genre.
Playlists - Contains all the playlists
you have created.
Ringtone creator - You can edit the
song and save it if yon want to set
ringtone. It can be found in profile
menu of settings.
Shuffle tracks - Play your tracks in a
random order.
NOTE:
The copyright of music les
can be protected by international
treaties and national copyright
laws. It may be necessary to obtain
permission or a license to reproduce
or copy music. In some countries
national law prohibits private
copying of copyrighted material.
Before downloading or copying
the le, please check the national
legislation of the applicable country
concerning the use of such material.
Transferring music onto your
phone
The easiest way to transfer music
onto your phone is via Bluetooth or
the data cable.
You can also use LG PC Suite. To
transfer music using Bluetooth:
Make sure both devices have
Bluetooth switched on and are
connected to each other.
Select the music file on the
other device and select send via
Bluetooth.
When the file is sent, you will
have to accept it on your phone
by touching Yes.
The file should appear in Music >
All tracks.
1
2
3
4
Multimedia
57
Playing a song
Touch then select Music
from the ENTERTAINMENT tab.
Select one of the folders and the
song you want to play.
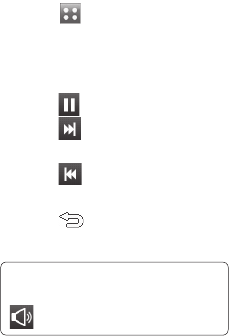
Touch to pause the song.
Touch to skip to the next
song.
Touch to go back to the
previous song.
Touch to return to the Music
menu.
TIP! To change the volume
while listening to music, touch
.
1
2
3
4
5
6
Creating a playlist
You can create your own playlists by
choosing a selection of songs from
the Playlists folder.
Touch Music in the
ENTERTAINMENT tab.
Touch Playlists, then Add new
playlist, enter the playlist name
and touch Save.
The All tracks folder will show all
the songs in your phone. Touch
all of the songs that you would
like to include in your playlist; a
tick will show next to the track
names.
Touch Done.
1
2
3
4

58 LG GS505 | User Guide
FM Radio
Your LG GS505 has an FM radio
feature so you can tune into your
favourite stations to listen on the
move.
NOTE: You will need to attach your
headphones to listen to the radio.
Insert them into the headphone
socket (this is the same socket that
you plug your charger into).
Searching for stations
You can tune your phone to radio
stations by searching for them
either manually or automatically.
They will then be saved to specific
channel numbers, so you don‘t have
to keep re-tuning. You must first
attach the headset to the phone as
this acts as the aerial.
To auto tune:
Scroll and touch FM radio in the
ENTERTAINMENT tab, then .
1
Touch Auto scan. A confirmation
message appears. Select
Yes, then the stations will
be automatically found and
allocated to a channel in your
phone.
NOTE: You can also manually tune
into a station by using and
displayed in the centre of the
screen. If you press and hold and
, the stations will be automatically
found.
Resetting channels
Scroll and touch FM radio in the
ENTERTAINMENT tab, then .
Choose Reset channel to reset
the current channel or choose
Reset all channels to reset all of
the channels. Each channel will
return to the starting 87.5Mhz
frequency.
2
1
2
Multimedia

59
Adding an event to your
calendar
Touch Organiser in the UTILITIES
tab and select Calendar.
Select the date you would like to
add an event to.
Touch then Add event.
Touch Category then choose
from Appointment, Anniversary
or Birthday.
Enter Subject.
Check and enter the date and
the time you would like your
event to begin. For Appointment
and Anniversary enter the time
and date your event finishes in
the lower two time and date
boxes. Enter the location if it is an
Appointment.
Set Alarm and Repeat.
Select Save and your event
will be saved in the calendar. A
square cursor will mark the day
1
2
3
4
5
6
7
8
that any events have been saved
to and a bell will ring at the start
time of your event, so that you
can stay organised.
Adding an item to your to
do list
Touch Organiser in the UTILITIES
tab.
Select Tasks and touch Add to
do.
Set the date for the task, add
notes and select a priority level:
High, Medium or Low.
Save your task by selecting Save.
Using date finder
Date finder is a handy tool to help
you calculate what the date will be
after a certain amount of days has
passed. For example, 60 days from
10.10.07 will be 09.12.2007.
Touch Organiser in the UTILITIES
tab.
1
2
3
4
1
Organiser

60 LG GS505 | User Guide
Select Date finder.
Set the required date in the From
tab.
Set the number of days in the
After tab.
The Target date will be shown
below.
Adding a memo
Touch Memo in the UTILITIES tab.
Touch Add memo.
Type your memo, then touch
Save.
Your memo will then appear
on the screen in the Memo
application.
Setting your alarm
Touch Alarms in the UTILITIES
tab. Widget alarm should appear
in the list as default and you can
not delete it.
Touch Add alarm.
Set the time you would like the
2
3
4
5
1
2
3
4
1
2
3
alarm to sound in the Time field
box.
Choose how you would like your
alarm to repeat in the Repeat
box: Not repeated, Daily, Mon ~
Fri, Mon ~ Sat, Sat ~ Sun, Except
holiday or Choose weekday.
The icons then indicate the
weekday you select.
Select Alarm type to select the
type of alarm you want.
Choose Alarm bell and select a
sound from the folder. To listen
to sounds, touch the sound,
followed by .
Add a memo for the alarm in the
Memo box.
Finally, you can set the snooze
interval to 5, 10, 20, or 30
minutes, 1hour or off.
Once you have set your alarm,
touch Save.
NOTE: You can set up to 5 alarms
including Widget alarm.
4
5
6
7
8
9
Organiser
61
TIP! Slide the switch ON/OFF to
the alarm to set it.
Adding a memo with the
drawing panel
Scroll and touch Drawing Panel
in the UTILITIES tab .
Touch Add drawing.
Draw your memo on the touch
screen LCD followed by .
Touch Yes, then your memo
will appear on the screen in the
Drawing Panel application.
Voice recorder
Use your voice recorder to record
voice memos or other audio files.
Touch Voice recorder in the
UTILITIES tab and select , then
Settings to change Settings:
Duration – Set the recording
duration. Choose from No limit,
MMS or 1 minute.
Quality – Select the sound quality.
1
2
3
4
Choose from Super fine, Fine or
Normal.
Memory in use –Select where
to save the audio files. Choose
between External memory and
Handset memory.
Recording a sound or voice
Touch to begin recording.
Touch to pause recording.
Touch to end recording.
Touch to listen to your
recording.
Using your calculator
Touch Tools in the UTILITIES tab.
Select Calculator.
Touch the numeric keys using the
keypad to input numbers.
For simple calculations, touch the
function you require (+, –, ×, ÷),
followed by =.
For more complex calculations,
touch and choose from sin,
1
2
3
4
1
2
3
4
5

62 LG GS505 | User Guide
cos, tan, log, ln, exp, sqrt, deg
or rad etc.
Converting a unit
Touch Tools in the UTILITIES tab.
Select Unit converter.
Choose whether you would l
ike to convert Currency, Area,
Length, Weight, Temperature,
Volume or Velocity.
You can then select the unit, and
enter the value you would like
to convert from, followed by the
unit you would like to convert to.
The corresponding value will
appear on the screen.
Adding a city to your World
clock
Touch Tools in the UTILITIES tab.
Select World clock.
Touch the , followed by New
city.
Scroll the globe, touch the area
1
2
3
4
5
1
2
3
4
you want and choose the city on
the map.
Or touch the and type the
name of the city you require in
the search field box.
Using the stopwatch
Touch Tools in the UTILITIES tab.
Select Stopwatch.
Touch Start on the bottom of the
screen to begin the timer.
Touch Lap if you want to record
a lap time.
Touch Stop to end the timer.
Touch Resume to restart the
stopwatch at the time you
stopped it at, or touch Reset to
begin the time again.
Sweet draw
Start application
Auto save
5
1
2
3
4
5
6
Organiser

63
You can synchronise your PC with
your phone. This will ensure all your
important details and dates match,
and also act as a back up to help put
your mind at ease.
TIP! You will need to install the
application PC Suite provided
on the CD-ROM or available as
a download from http://update.
lgmobile. com. (From www.
lgmobile.com PRODUCTS
> Manual & Software > Go
to Manual & S/W Download
Section)
Installing the LG PC Suite on
your computer
From the home screen, touch
and then click Connectivity.
Select USB connection and click
PC Suite.
Connect handset and PC via USB
cable and wait for a while.
1
2
3
Installation guide message will
be displayed.
Caution! If installation guide
message is not displayed on
your PC, please check your
CD-ROM setting on Windows.
Insert the supplied CD-ROM or
the click the download button
to directly download the LG PC
Suite program from the internet.
Click on the LG PC Suite Installer
which will appear on your screen.
Connecting your phone and
PC
Select PC Suite mode in
Connectivity menu and then
connect the USB cable to your
phone and your PC.
LG PC Suite will be automatically
activated on your PC.
Your phone and PC are now
connected.
4
5
6
1
2
3
PC Suite

64 LG GS505 | User Guide
Backing up and restoring
your phone’s information
Connect your phone to your PC
as outlined above.
Click on the Backup icon, and
select Backup or Restore.
Choose whether to back
up Contents Data and/or
Phonebook/Schedule/Todo/
Memo Data. Select the location
you want to back up the
information to, or restore it from.
Click OK.
Your information will be backed
up.
Viewing phone files on your
PC
Connect your phone to your PC
as outlined above.
Click on the Manage Photos,
Videos or Music icon.
Images, audio files and videos
you have saved on your phone
1
2
3
4
1
2
3
will be displayed on the screen in
the LG Phone folder.
TIP! Viewing the contents of
your phone on your PC helps
you to manage les you no
longer need.
Synchronising your contacts
Connect the phone to your PC.
Click on the Contacts icon.
Click Sync Contacts button your
PC will now import and display
all the contacts saved on your
phone.
Click on Menu and select Export.
You can now select where you
want to save your contacts to.
Synchronising the messages
Connect the phone to your PC.
Click on the Messages icon.
All your phone messages will
be displayed in folders on the
screen.
1
2
3
4
1
2
3
PC Suite

65
Use the toolbar at the top of
the screen to edit and rearrange
messages.
Music Sync
This menu lets you add music
to your BL40. Before you start
transferring music from your PC
to your phone, make sure your
computer has the following set-up
and accessory is at hand:
Microsoft Windows XP or Vista
Windows Media Player 10 or above
USB data cable
microSD card (If you wish to use
external memory as the music
storage.)
WARNING
Do not disconnect your phone
during the transfer.
4
•
•
•
•
Transferring music using
Windows Media Player
From the home screen select ,
then scroll through Connectivity
in the Settings tab.
Select USB connection mode
and choose Music sync.
Connect your handset and PC
using a compatible USB cable.
When you try to connect the
handset to your PC, your handset
will read: “Music Sync“ followed
by Connected.
The PC will prompt you to
launch your preferred music
management software.
Select Window Media Player.
Go to the Sync Tab, then drag
and drop the music you wish to
transfer to your handset into the
Sync List panel.
Click on the Start Sync button.
This starts the transfer process.
1
2
3
4
5
6
7
8

66 LG GS505 | User Guide
WARNING
Do not disconnect your phone
during the transfer.
DivX Converter
Install the DivX converter, which
is supplied on the same CD-ROM
as the PC Suite software. DivX will
convert media files on your PC to a
format that lets you upload them
and view them on your phone.
Once installed, select DivX from the
Program Files on your PC, then DivX
converter followed by Converter.
Use the arrows in the application
to change the conversion format
to Mobile. If you right click on
the application box and select
Preferences, you can change the
location where the converted files
are saved.
Drag and drop the files into the
application for initial analysis. Then
select Convert for the process
to begin. When the process is
complete a Conversion complete
pop up will be displayed.
ABOUT DIVX VIDEO: DivX® is
a digital video format created by
DivX,Inc. This is an official DivX
Certified device that plays DivX
video. Visit www.divx.com for more
information and software tools to
convert your files into DivX video.
ABOUT DIVX VIDEO-ON-DEMAND:
This DivX Certified® device must
be registered in order to play DivX
Video-on-Demand (VOD) content. To
generate the registration code, locate
the DivX VOD section in the device
setup menu. Go to vod.divx.com with
this code to complete the registration
process and learn more about DivX
VOD.
Pat. 7,295,673
PC Suite

67
Browser
Browser gives you a fast, full-colour
world of games, music, news, sport,
entertainment and loads more,
straight to your mobile phone.
Wherever you are and whatever
you’re into.
Accessing the web
From the home screen select
then scroll to Browser on the
UTILITIES tab.
To go straight to the browser
home page, select Home.
Alternatively, select Enter
address and type in the URL,
followed by Connect.
NOTE: You will incur extra cost by
connecting to these services and
downloading content. Check data
charges with your network provider.
1
2
Adding and accessing
bookmarks
For easy and fast access to your
favourite websites, you can add
bookmarks.
Touch Browser in the UTILITIES
tab.
Select Bookmarks. A list of your
Bookmarks will appear on the
screen.
To add a new bookmark, touch
Add bookmark. Enter a name for
your bookmark followed by the
URL in the corresponding field
box.
Touch Save. Your Bookmark
will now appear in the list of
bookmarks.
To access the bookmark simply
touch the Connect icon next
to the bookmark or touch the
bookmark title and then touch
Connect. You will be connected
to your bookmark.
1
2
3
4
5
The web

68 LG GS505 | User Guide
Using the RSS reader
RSS (Really Simple Syndication) is a
family of web feed formats used to
publish frequently updated content,
such as blog entries, news headlines
or podcasts. An RSS document,
called a feed, web feed or channel,
contains either a summary of
content from an associated website
or its full text. RSS makes it possible
for people to keep up-to-date
with their favourite web sites in an
automated way that is easier than
checking manually.
The user subscribes to a feed by
entering its link into the reader
or by clicking an RSS icon in a
browser that starts the subscription
process. The reader checks the
user’s subscribed feeds regularly for
new content and downloads any
updates that it finds.
Accessing a saved page
From the home screen select
then scroll to Browser on the
UTILITIES tab.
Select Saved pages.
Select the page you want to view
and it will open.
Viewing your browser history
From the home screen select
then scroll to Browser on the
UTILITIES tab. Select History.
The web pages you have
accessed recently will be
displayed. To access any of these
pages, simply select it.
Changing web browser
settings
From the home screen select
then scroll to Browser on the
SETTINGS tab.
Select Browser settings.
1
2
3
1
2
1
2
The web
69
You can edit the Profile,
Appearance settings, Cache/
Cookies or Security.
You can simply set these on or off
by touching the switch icon.
Using your phone as a
modem
Your GS505 can be used as a
modem for your PC, giving you
email and internet access even
when you don’t have any wired
connection. You can do this via the
USB cable or by Bluetooth.
Using the USB cable:
Ensure you have the LG PC Suite
installed on your PC.
Connect your GS505 and your PC
using the USB cable and launch
the LG PC Suite software.
Click Communication on your
PC. Then click Settings and select
Modem.
Choose LG Mobile USB Modem
3
4
1
2
3
4
and select OK. It will now appear
on the screen.
Click Connect and your PC will
connect via your GS505.
Using Bluetooth:
Ensure Bluetooth is switched On
and Visible for both your PC and
GS505.
Pair your PC and GS505 so that a
passcode is required to connect
them.
Use the Connection wizard on
your LG PC Suite to create an
active Bluetooth connection.
Click Communication on your
PC. Then click Setting.
Click Modem.
Choose Standard Modem over
Bluetooth link and click OK. It
will now appear on the screen.
Click Connect and your PC will
connect via your GS505.
5
1
2
3
4
5
6
7
70 LG GS505 | User Guide
Access to Google Service
You can launch google services in
this application. Touch Google in
the Utilities tab.
Maps: You can access maps from
your mobile devices.
Search: Google Mobile Web Search
allows you to search for websites
that are specifi cally designed for
mobile phones and devices.
Mail: The Gmail for mobile
application is a downloadable
Java application, offering the
best possible Gmail experience
for supported mobile devices. To
download, visit http://gmail.com/
app from your mobile browser.
YouTube: You can watch videos on
YouTube Mobile from your mobile
device. You may want to contact
your carrier for more information
about the availability of data
streaming on your mobile device.
Blogger: You can manage your
account and share your blog. It is
available to upload a picture and
video.
The web

71
Personalising your profiles
You can quickly change your profile
on the Home screen.
You can personalise each profile
setting using the settings menu.
Touch Profiles in the SETTINGS
tab.
Choose the profile you want to
edit.
You can then change all the
sounds and alert options
available in the list, including
your Ringtone and Volume,
Message tone settings and
more.
Changing your screen
settings
From the home screen, select
From the home screen, select
then scroll to Screen
settings on the SETTINGS tab.
You can choose the option menu
from:
1
2
3
1
2
Wallpaper - Widget homescreen
or Speed dial homescreen or Lock
screen.
Livesquare - Touch Livesquare
guide to check its functions.
Top menu - Choose the style of
the top menu, choose Zigzag or
Scrolling or Screen by screen.
Lock screen - Choose the unlock
type on the lock screen”
Dialling - Adjust the number
colour.
Font - Adjust the font size and
style.
Backlight - Choose how long the
backlight stays on.
NOTE: The longer the backlight
stays on, the more battery power
it uses and you may need to
recharge your phone more often.
Brightness - Adjust the screen
brightness.
Settings

72 LG GS505 | User Guide
Greeting message - Choose ON
or OFF and fill in the greeting
message in the text field.
Start-up/Shut down - Choose
the theme for your start-up/shut
down screen.
Changing your phone
settings
Use the freedom of adapting the
GS505 to your own preferences.
From the home screen, select
From the home screen, select
then scroll to Phone
settings on the SETTINGS tab.
Select a menu from the list
below:
Date & Time - Adjust your date
and time settings or choose
to auto update the time when
travelling or for daylight saving.
Power save - Choose to switch
the value power saving settings
to On or OFF.
1
2
Languages - Change the
language on your GS505’s display.
Motion silent - Make the GS505
go into the mute or snooze
settings by flipping it over when
it is ringing.
Auto key lock - Lock the keypad
automatically on the home
screen.
Security - Adjust your security
settings, including PIN codes and
handset lock.
Memory info - See Using
memory manager.
Reset settings - Restores all
settings to their factory defaults.
Handset information - View
GS505 technical information.
Changing your touch settings
From the home screen select
then scroll to Phone settings on
SETTINGS tab.
Settings
73
Changing your connectivity
settings
Your connectivity settings have
already been set up by your
network operator, so you can enjoy
your new phone immediately. To
change any settings, use this menu:
Touch Connectivity in the
SETTINGS tab.
Network settings
Select network - If you
select Automatic, the GS505
automatically searches for
the network and registers the
handset to the network. This is
recommended for best service
and quality.
If you select Manual, all the
currently available networks are
shown and you can select one of
them for registration.
Preferred lists - You can add a
preferred network to connect
to. If the network is searching
automatically, simply choose one
from the network list and if not,
add a new network manually.
Internet profiles - This menu shows
the Internet profiles. You cannot
delete or edit default configurations
depending on your country variant.
Access points - Your network
operator has already saved this
information. You can add new
access points using this menu.
Packet data conn. - Choose when
your device should be connected to
network for packet data.
USB connection mode - Choose a
Data service from the options and
synchronise your GS505 using the
LG PC Suite software to copy files
from your phone.
If you use Music sync with Windows
Media Player, select Music sync
in this menu. Music sync is only
available for music content.

74 LG GS505 | User Guide
Java settings - Allows you to set
profiles for connections made
by Java programs and to view
certificates.
Streaming settings - Your network
operator has already saved this
information. You can edit it if you
want to make changes.
Using memory manager
Your GS505 has three available
memories: the phone itself, the SIM
Card and an external memory card
(which you may need to purchase
separately). You can use memory
manager to determine how each
memory is used and see how much
space is available.
From the home screen select
then scroll to Phone settings on
the SETTINGS tab. Select Memory
info.
Handset common memory - View
the memory available on your
GS505 for Pictures, Sounds, Videos,
MMS, Email, Java applications and
others.
Handset reserved memory - View
the memory available on your
handset for SMS, Contacts, Calendar,
Tasks, Memo, Alarm, Call history,
Bookmarks and Miscellaneous
items.
SIM memory - View the memory
available on your SIM Card.
External memory - View the
memory available on your external
memory card (you may need
to purchase the memory card
separately).
Primary storage setting - Choose
the location you prefer items to
be saved to between Handset and
External memory.
Settings

75
Using flight mode
Turn flight mode on by selecting
Turn flight mode on by selecting
then Settings. Touch Profiles
and select Flight mode.
Flight mode prevents you making
calls, connecting to the Internet,
sending messages or using
Bluetooth.
Sending and receiving your
files using Bluetooth
To send a file:
Open the file you want to send,
typically this will be a photo,
video or music file.
Choose Send.
Choose Bluetooth.
If you have already paired the
Bluetooth device, your GS505
will not automatically search
for other Bluetooth devices. If
not, your GS505 will search for
other Bluetooth enabled devices
within range.
1
2
3
Choose the device you want to
send the file to.
Your file will be sent.
TIP! Check the progress bar to
make sure your le is sent.
To receive a file:
To receive files, your Bluetooth
must be both ON and Visible.
See Changing your Bluetooth
settings below for more
information.
A message will prompt you to
accept the file from the sender.
Touch Yes to receive the file.
You will see where the file has
been saved. For image files,
you can choose to View the
file or Use as wallpaper. Files
will usually be saved to the
appropriate folder in My stuff.
4
5
1
2
3

76 LG GS505 | User Guide
Changing your Bluetooth
settings:
Touch Bluetooth in the SETTINGS
tab. And select and choose
Settings.
Make your changes to:
My device visibility - Choose to
be Visible, Hidden or Visible for
1 min.
My device name - Enter a name
for your GS505.
Supported services - Select how
to use Bluetooth in association
with different services.
Remote SIM Mode - Turn on
or off.
My address - Show your
Bluetooth address.
Pairing with another
Bluetooth device
By pairing your GS505 and another
device, you can set up a passcode
protected connection.
Check that your Bluetooth is ON
and Visible. You can change your
visibility in the Settings menu.
Touch Search.
Your GS505 will search for
devices. When the search is
completed, Refresh will appear
on screen.
Choose the device you want to
pair with and enter the passcode,
then touch OK.
Your phone will then connect
to the other device, on which
you will need to enter the same
passcode.
Your passcode protected
Bluetooth connection is now
ready.
1
2
3
4
5
6
Settings
77
Using a Bluetooth headset
Check your Bluetooth is On and
Visible.
Follow the instructions that
came with your headset to put
it in pairing mode and pair your
devices.
Touch Ask before connect or
Always connect and touch Yes
to Connect now. Your GS505 will
automatically switch to Headset
profile.
1
2
3
78 LG GS505 | User Guide
Software Update
LG Mobile Phone Software
Update Program
For more information on installing
and using this program, please visit
http://update.lgmobile.com.
This feature allows you to update
your software to the latest version
quickly and conveniently over the
Internet without needing to visit
our service centre.
As the mobile phone software
update program requires your full
attention throughout the update
process, please make sure you
check all instructions and notes
that appear at each step before
moving on to the next step.
Please note that removing the
USB data communication cable or
batteries during the update may
seriously damage your mobile
phone. As the manufacturer takes
no responsibility for loss of data
during the update process, you are
advised to back up any important
information in advance for
safekeeping.