LG Electronics USA GW382F Cellular/PCS GSM/EDGE/WCDMA Phone with Bluetooth User Manual 1
LG Electronics USA Cellular/PCS GSM/EDGE/WCDMA Phone with Bluetooth Users Manual 1
UserManual.wiki
>
LG Electronics USA
>
GW382F User Manual
>
Users Manual 1
Contents
1.
Users Manual 1
2.
Users Manual 2
Users Manual 1
Navigation menu
Upload a User Manual
Namespaces
Wiki Guide
HTML
PDF
Info
Views
User Manual
Discussion / Help
Navigation
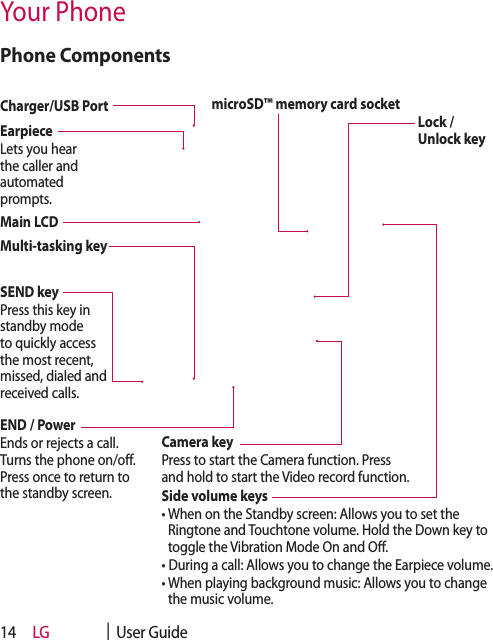
![LG | User Guide24General FunctionsMaking a Call1 Make sure your phone is powered on.2 Touch and enter a phone number using the touch pad or slide open the qwerty pad and enter a phone number using the qwerty keys. To edit a number on the display screen, simply press the key to erase one digit at a time. – Press and hold the key to erase the entire number.3 Press the [SEND] key to call the number. Or touch on the touch pad.Making a Call with the Send Key1 Press the [SEND] key, and the most recent missed, dialed and received phone numbers will be displayed.2 Select the desired number.3 Press the [SEND] key or touch .Making International Calls1 When entering a phone number, press the key and the international access character ‘+’ will appear. When using the touch pad to dial, touch and hold .2 Enter the country code, area code and the phone number.3 Press the [SEND] key to call the number. Or touch on the pad.](https://usermanual.wiki/LG-Electronics-USA/GW382F.Users-Manual-1/User-Guide-1259927-Page-14.png)
![25Ending a CallWhen you have finished a call, press the [END] key.Making a Call from the ContactsYou can store frequently called names and phone numbers in the SIM card as well as in the phone memory known as the Contacts.You can dial a number by simply selecting a name in the contacts and pressing the [SEND] key.Making a Video CallYou can make a video call in a 3G-covered service area if the user you are calling also has a 3G video phone in a 3G-covered service area. You can also receive video calls. To make a video call, do the following.1 Enter the phone number, as before.2 To start the video function, touch and choose Make Video Call. You will be notified that you will need to close other applications to make the video call.3 Adjust the camera position if necessary.4 If you do not want to use the speakerphone, ensure you have the headset plugged in.5 Press to finish the call, or close the handset.Note: Your Telstra NextG LG GW382f is only designed to make video calls in portrait orientation.](https://usermanual.wiki/LG-Electronics-USA/GW382F.Users-Manual-1/User-Guide-1259927-Page-15.png)
![LG | User Guide26Changing your video call settings1 Press for longer or for while, select , and choose .2 Select Video call.3 Choose the settings of your video calling. Determine whether to Use Substitute Image and select one, switch on the Mirror (so you can see yourself on screen).Making a video call from ContactsIt is easy to call anyone whose number you have stored in your Contacts.Press the down navigation key to access the contacts list. Scroll to your chosen contact. Press the right soft key Options and select Make Video call. Press the key to finish the call.Answering a CallWhen you receive a call, the phone rings and the phone icon appears on the screen. If the caller can be identified, the caller’s phone number (or name if stored in your Address Book) is displayed.1 Press the [SEND] or unlock the screen and touch . If Any Key has been set as the Answer Mode, any key press will answer a call except for the [END] key, , and .2 End the call by pressing the [END] key.Note: You can answer a call while using the Address Book or other menu features.Getting Started](https://usermanual.wiki/LG-Electronics-USA/GW382F.Users-Manual-1/User-Guide-1259927-Page-16.png)
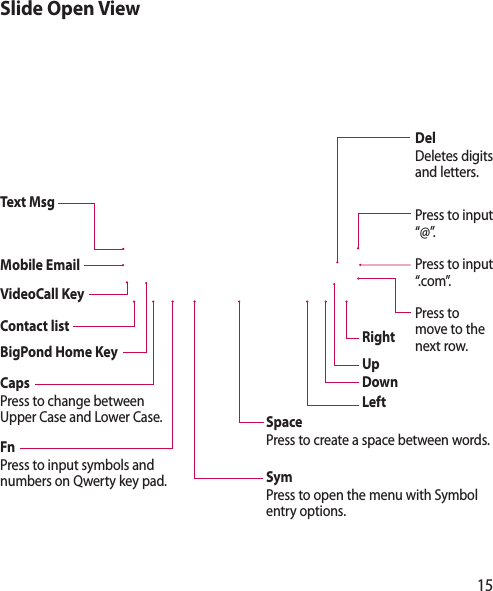
![312 Enter the whole word before editing or deleting any letters.3 Complete each word with a space by touching .To delete letters, touch . Touch and hold down to erase the entire text entry.Note: Pressing the [END] key will save your unsaved message in the Drafts folder. Using the ABC ModeUse the touch pad keys to enter your text.1 Touch the touch key labeled with the required letter: • Once for the first letter • Twice for the second letter • And so on2 To insert a space, touch . To delete letters, touch . Touch and hold down to erase the entire text entry.Note: Refer to the table below for more information on the characters available using the keys. Touch to input a Upper Case letter. To change text entry mode from Lower Case to Upper Case, touch twice and the key will turn to orange color - indicating that Caps Lock has been activated.Key Characters in the Order DisplayUpper Case Lower Case1. , ' @ ? ! - : / 1 . , ' @ ? ! - : / 12A B C 2 a b c 23D E F 3 d e f 34G H I 4 g h i 45J K L 5 j k l 56M N O 6 m n o 67P Q R S 7 p q r s 78T U V 8 t u v 89W X Y Z 9 w x y z 90Space Key, 0 (Long press)Space Key, 0 (Long press)](https://usermanual.wiki/LG-Electronics-USA/GW382F.Users-Manual-1/User-Guide-1259927-Page-21.png)
![LG | User Guide38ManagementThis menu allows you to copy information from your SIM card, e.g. name, handset number, etc. to your handset. If a name is duplicated during the copying operation, the information is also duplicated.You can also copy entries from the SIM card to the phone memory and entries from the handset memory to the SIM card (not all the data will be copied).From this menu, you are also able to delete entries in the SIM card and the Handset. Service NumbersYou can view the list of Service Dialing Numbers (SDN) assigned by your network provider. Such numbers could include the emergency services, directory assistance and voice mail numbers.You may see the names of the available services. Select a service dial number and press the [[SEND] key.Please check with your network service provider for details of this service.My NumbersThis displays your own phone numbers stored in your phone/SIM card. You can send this via Text Message, Multimedia Message and Bluetooth.Address Book](https://usermanual.wiki/LG-Electronics-USA/GW382F.Users-Manual-1/User-Guide-1259927-Page-28.png)
![39In-Call MenuYour phone provides a number of control functions that you can use during a call. To access these functions during a call, touch to unlock the screen and then touch .During a CallThe menu displayed on the handset screen during a call is different from the default main menu displayed when in the Standby screen, and these options are described below.Making a Second CallYou can select a number you wish to dial, to make a second call. 1 Unlock the Screen. During a call, an In-Call menu will available.2 Press , enter the 2nd phone number and press . or Press to select a contact from your Address Book and then press the Call button . When the second call is connected, the first call is automatically placed on hold.Swapping Between Two CallsBy using one of the two methods below, you can switch between two on-going calls.1 Press [SEND] key.2 Touch and select “Swap Calls”.](https://usermanual.wiki/LG-Electronics-USA/GW382F.Users-Manual-1/User-Guide-1259927-Page-29.png)
![LG | User Guide40Answering an Incoming CallTo answer an incoming call when the handset is ringing, simply press the [SEND] key or touch . The handset is also able to warn you of an incoming call while you are already on a call. A tone will sounds in the earpiece, and the display will show that a second call is waiting. This feature, known as Call Waiting, is only available if your network supports it.If Call Waiting is turned on, you can put the first call on hold and answer the second call by pressing the [SEND] key.Rejecting an Incoming CallYou can reject an incoming call without answering by simply pressing the [END] key or touching .Muting the MicrophoneYou can mute the microphone during a call by touching . The handset can be unmuted by touching again. When the handset is muted, the caller cannot hear you, but you can still hear the caller.Using the SpeakerphoneYou can use the integrated Speakerphone during a call by touching . The loudspeaker is automatically deactivated when you end the call. WARNING: Due to increased volume levels, do not place the phone near your ear while the speakerphone is enabled.In-Call Menu](https://usermanual.wiki/LG-Electronics-USA/GW382F.Users-Manual-1/User-Guide-1259927-Page-30.png)

![51Inserting Multimedia files in outgoing messages is easy. Press the button and select an option from below:• Picture: You can preview the selected picture. Touch to insert the selected picture.• Audio: You can insert from your saved Audio files.• Video: You can insert from your saved Video clips.• New Picture: You can insert a new image taken from the camera by touching [Capture]. Note: Refer to page 77 for camera options.• New Audio: You can record a new audio clip by touching . - Record Mode: MMS mode record time is about 6 minutes and the General mode provides a longer recording time. - Quality: Set the audio quality to Fine, Normal or Economy. - Select Storage Defaults: You can assign the default storage to Phone Memory or Memory Card.• New Video: You can record a new video. The options are similar to those when inserting a New Picture.](https://usermanual.wiki/LG-Electronics-USA/GW382F.Users-Manual-1/User-Guide-1259927-Page-41.png)
![LG | User Guide56OutboxOutbox is a temporary storage place for messages waiting to be sent. When you press the [SEND] key, you can make a call to the number of the recipient number of the selected message.If the message is not sent from the Outbox, you will receive a sound alert along with a Message Sending Failure notice on the screen. Another attempt will be made to send the failed message and after two unsuccessful attempts, the message will no longer be sent automatically. In order to send the message that has failed, you must touch to resend the message.After the maximum number of Send attempts has been reached, the Send function has failed. If you were trying to send a text message, open the message and check that the Sending options are correct.Outbox list will display messages in sending failed, sending or waiting, sent order. Touch to use options available from Outbox list.• Delete: Deletes a message you choose.• Sort by: Sorts by name, title and date.• Delete All: Delete all messages.Those options are available when you choose a message in Outbox.• Make Video Call: You can make a video call to the sender.• View Status: Shows message status as failed, sent or error.• Edit: Allows you to edit the selected message.Messaging](https://usermanual.wiki/LG-Electronics-USA/GW382F.Users-Manual-1/User-Guide-1259927-Page-46.png)