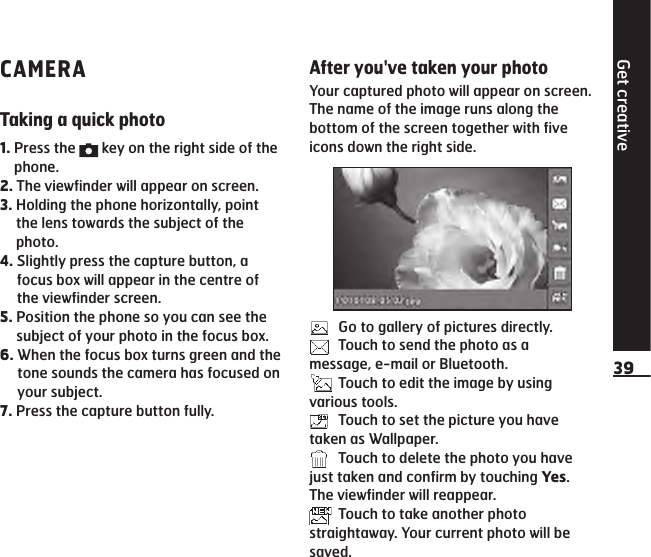
LG Electronics USA GW520 Cellular/ PCS GSM/ EDGE Phone with Bluetooth User Manual GW520 Eng 0212 indd

LG Electronics USA Cellular/ PCS GSM/ EDGE Phone with Bluetooth GW520 Eng 0212 indd

Users Manual

ENGLISH GW520   USER GUIDESome of the contents in this manual may differ from your phone depending on the software of the phone or your service provider.Disposal of your old appliance1.  When this crossed-out wheeled bin symbol is attached to a product it means the product is covered by the European Directive 2002/96/EC.2.  All electrical and electronic products should be disposed of separately from the municipal waste stream via designated collection facilities appointed by the government or the local authorities.3.  The correct disposal of your old appliance will help prevent potential negative consequences for the environment and human health.4.  For more detailed information about disposal of your old appliance, please contact your city office, waste disposal service or the shop where you purchased the product.
Part 15.21 statement" Change or Modifications that are not expressly approved by the manufacturer could void        the user's authority to operate the equipment. “Part 15.105 statement This equipment has been tested and found to comply with the limits for a class B digitaldevice, pursuant to Part 15 of the FCC Rules. These limits are designed to provide reasonable protection against harmful interference in a residential installation. This equipment generates uses and can radiate radio frequency energy and, if not installed and used in accordance with the instructions, may cause harmfulinterference to radio communications. However, there is no guarantee that interference willnot occur in a particular installation. If this equipment does cause harmful interference or television reception, which can be determined by turning the equipment off and on, the user is encouraged to try to correct the interference by one or more of the following measures:- Reorient or relocate the receiving antenna.- Increase the separation between the equipment and receiver.- Connect the equipment into an outlet on a circuit different from that towhich the receiver is connected.- Consult the dealer or an experienced radio/TV technician for help.This device is not intended for sale in the USA.
Part 15 Class B ComplianceThis device and its accessories comply with part15 of FCC rules.Operation is subject to the following two conditions:(1) This device & its accessories may not cause harmful interference.(2) This device & its accessories must accept any interference received, including interference that may cause undesired operation.Body-worn OperationThis device has been tested for typical body-worn operations with the distance of 0.79inches (2.0cm) from the user’s body. To comply with FCC RF exposure requirements, a minimum separation distance of 0.79inches(2.0cm) must be maintained from the user's body.Additionally, Belt clips, holsters & other body-worn accessories may not containmetallic components.
Set up11GETTING TO KNOW YOUR PHONE1. INNER CAMERA LENS2. END/POWER KEY°   Ends or rejects a call. Turns the phone on/off. Press once to return to the standby screen.3. CLEAR KEY4. CALL KEY°   Dials a phone number and answers incoming calls.Placing a heavy object on the phone or sitting on it while it is in your pocket can damage the phone's LCD and touch screen functionality.5.  CHARGER, CABLE, HANDSFREE CONNECTORTo connect the USB cable, wait until the phone has powered up and has registered to the network.6. SIDE KEYS°   When the screen is idle: volume of key tone.°   During a call: volume of the earpiece.7.  MICRO SD MEMORY CARD SOCKET8. LOCK/ UNLOCK KEY9. MULTITASKING KEY10. CAMERA KEY
Set up12INSTALLING THE USIM AND BATTERY1. REMOVE THE BATTERY COVERPress and hold down the battery release button at the top of the phone and lift off the battery cover. 2. REMOVE THE BATTERYHold the top edge of the battery and lift it from the battery compartment using the battery cover.Do not use your fingernail when removing the battery.Do not remove the battery when the phone is switched on, as this may damage the phone.3. INSTALL THE USIM CARDSlide the USIM card into the USIM card holder. Make sure that the gold contact area on the card is facing downwards. To remove the USIM card, pull it gently in the opposite direction.
Set up134. INSTALL THE BATTERYInsert the top of the battery first into the top edge of the battery compartment. Ensure that the battery contacts align with the terminals on the phone. Press down the bottom of the battery until it clips into place.5. REPLACE THE COVERPlace the cover over the battery and slide up into position.6. CHARGING YOUR PHONESlide back the cover of the charger socket on the side of your GW520. Insert the charger and plug into a mains electricity socket. Your GW520 will need to be charged until a message reading "Battery full" appears on screen.
Set up14MEMORY CARDINSTALLING A MEMORY CARDYou can expand the memory space available on your phone using a memory card. 1.  Remove the battery cover as shown on page 14.2.  Slide the memory card into the slot at the top, until it clicks into place. Make sure that the gold contact area is facing downwards.FORMATTING THE MEMORY CARDYour memory card may already be formatted. If your card isn't already  formatted, you will need to do so before you can begin using it.1.  From the standby screen select  , then touch   Setting and choose Phone settings.2.    Touch  Memory manager then chose External memory.3.  Touch Format and then confirm your choice.4.   Enter the password, if one is set, and your card will be formatted and ready to use.To change your default storage destination, open Memory manager from the Phone settings menu and select Primary storage settings.If your memory card has existing content on, it will automatically be filed in the correct folder, for example, videos will be stored in the My Videos folder.
Set up15TRANSFERRING YOUR CONTACTSTo transfer your contacts from your USIM to your phone:1.  From the Communicate tab, select Contacts and choose Settings.2.  Touch Copy.3.  Choose Handset to USIM and touch Done.4.  Choose Select all or choose names one by one and touch OK.
Your standby screen16Whenever your GW520 is not in use it will return to your home screen. From here you can access all menu options, make a quick call and view the status of your phone - as well as many other things.TOUCH SCREEN TIPSThe home screen is also a great place to get accustomed to the touch screen.To select an item, touch the icon accurately. Your GW520 will vibrate slightly when it recognises you’ve touched an option.To scroll through lists, touch the last item visible and slide your finger up the screen. The list will move up so more items are visible.°   There’s no need to press too hard, the touchscreen is sensitive enough to pick up on a light yet firm touch.°  Use the tip of your finger to touch the option you require. Be careful not to touch any other keys around it.°  When the screen light is off, press the Unlock/Lock key on the right hand side to restore the home screen.°  Don’t cover the phone with a case or cover as the touchscreen will not work with any material covering it.Quick keys
Your standby screen17THE QUICK KEYSThe quick keys provide easy, one-touch access to your most used functions.Touch to bring up the touch dialling pad to make a call. Input the number as you would using a normal key pad and touch Call or press the   hard key.Touch to open your Contacts menu. To search for the number you want to call enter the name of the contact using the touchpad. You can also create new contacts and edit existing ones. See page 30 for details. Touch to access the Messaging options menu. From here you can create a new SMS. See page 33 for details.Touch to open the full Top menu which is separated into four sub-menus. Touch each sub-menu’s vertical tab to view further options.
USING TOUCHSCREEN MORE CONVENIENTLYYour LG GW520 is a small masterpiece, combining stylish design and a crystal sharp, smart LCD. The touch reactive LCD gives an interactive and ultra-convenient experience. Activating top menus directly You can access and use the Dialling, Messaging, Contacts menu by a simple touch of the screen.Touchscreen tipsIf you unlock the screen, the screen will switch to the interactive touchscreen keypad.To select an item touch the icon on the touchscreen. Your GW520 will vibrate when it recognises you’ve touched an option.Your standby screen18
Your standby screen19THE STATUS BARThe status bar uses various icons to indicate things like signal strength, new messages and battery life as well as telling you whether your Bluetooth or GPRS is active.Below is a table which explains the meaning of icons you’re likely to see in the status bar.Icon DescriptionMultitaskingNetwork signal strength (number of bars will vary)No network signalRemaining battery lifeBattery emptyNew text messageMultimedia MessageNew voice messageMessage inbox is fullMessage sending failedAn alarm is setNormal profile in useIcon DescriptionOutdoor profile in useSilent profile in useCalls are divertedEDGE in useRoamingFlight mode is onBluetooth is activeSet the scheduleView the status of external memoryHSDPA in usePlay the MP3 filePause the MP3 fileWifi on
Your standby screen20CHANGING YOUR STATUS FROM THE STATUS BARTouch the current status icon that represents your current setting in the status bar to open the Status Summary. It shows the current Time, Network, SVC ID, Battery, Handset memory, External Memory, Profile, MP3, Bluetooth and Wifi status. You can set Profile type, play/pause MP3 and activate/deactivate Bluetooth and Wifi.USING THE MULTITASKING FUNCTIONPress   side key to open the Multitasking menu. From here you can view all the applications you have running and access them with one touch.From any application, press the Multitasking key and select Home screen to return to the standby screen without exiting or closing the application.When you have an application running in the background (e.g. a game or the FM radio),   will appear in the status bar.
Menu map21Touch   in the standby screen to open a Top menu. From here you can access further menus: Communicate, Entertainment, Utilities and Settings. Communicate1 Dialling2 Speed dials3 Contacts4 Call history5 New message6 New Email7 Message box8 Messaging Utilities1 Browser2 World time3 Organiser4 Alarms5 Memo6 Voice recorder7 Tools8 STK (SIM Tool Kit) Entertainment1 Gallery2 My stuff3 Camera4 Video camera5 Muvee studio6 Music7 FM radio8 Games & apps Settings1 Profiles2 Screen settings3 Phone settings4 Call settings5 Touch settings6 Connectivity7 Bluetooth8 Wi-Fi
The basics22CALLSMAKING A CALL OR VIDEO CALL1.  Touch   to open the keypad.2.  Key in the number using the keypad. To delete a digit press the clear key.3.  Touch the   hard key to initiate the call.4.  To end the call press the   hard key.°   : Makes a voice call°   : Makes a video call°   : Delete a number or character°   : Exits the dialling keypadTo enter + for making an international call, touch   for two seconds.Touch the lock/unlock key to lock the touchscreen to prevent calls being made by mistake.You can Make video call, Send message, Save number or Search contacts by tapping   .CHANGING THE SETTING OF DIALLING KEYPAD DISPLAY1.  Touch   to open the keypad.2.  Touch   and select Dial screen setting to change the display of diallinng pad.3.  You can change the font style, size and colour. MAKING A CALL FROM YOUR CONTACTS1.  From the standby screen touch   to open the address book, or touch Contacts in Communicate tab.2.  You can choose from Add contact, Search, Groups, and Settings. 3.  Choose Search, touch Name and enter the first few letters of the contact you would like to call. 4.  From the filtered list, touch the contact you’d like to call and select the number to use if you have more than one saved.5.  Touch Call.
You can search your contacts from the call screen. Touch   and choose Search contacts. Scroll through your contacts or enter the first few digits of a number to filter the list.ANSWERING AND REJECTING A CALLWhen your phone rings press the   hard key to answer the call.Tap   to mute the ringing. This is great if you’ve forgotten to change your profile to Silent for a meeting.Press the   hard key to reject an incoming call.The basics23
Adjusting the call volumeTo adjust the volume during a call, use the up and down buttons on the left side of the phone. Speed diallingYou can assign a frequently-called contact to a speed dial number.1.  From the standby screen touch   to open the menu.2.  Touch Speed dials.3.  Your Voicemail and Videomail are already set to speed dial 1. You cannot change this. Touch any other number to assign it a speed dial contact.4.  Your address book will open. Select the contact you’d like to assign to that number by touching the phone number once.To call a speed dial number, touch   from the standby screen then press and hold the assigned number until the contact appears on screen. The call will initiate automatically, there’s no need to press  .Making a second call1.  During your initial call, touch   and select the number you want to call.2.  Dial the number or search your contacts (see Making a call or video call on page 24 for details).3.  Press   to connect the call.4.  Both calls will be displayed on the call screen. Your initial call will be locked and the caller put on hold.5.  To change between the calls, touch  and choose Swap call or press the number of the held call.6.  To end one or both calls press   and select End call followed by All calls, Held call or Active call.You can combine your calls by selecting  then Join. Check that your network provider supports conference calling.You will be charged for each call you make.The basics24
The basics25Turning off DTMFDTMF allows you to use numerical commands to navigate menus within automated calls. DTMF is switched on as default. To turn it off during a call (to make a note of a number for example) touch   and select DTMF off.Viewing your call logsTo scroll through a list of options, touch the last item visible and slide your finger up the screen. The list will move up so more items are visible.Touch   and select   Communicate and tap Call history. Choose to view:°  All calls: View a complete list of all your dialled, received and missed calls.°  Dialled calls: View a list of all the numbers you have called.°  Received calls: View a list of all the numbers that have called you.°  Missed calls: View a list of all the calls you have missed.From any call log touch  and Delete all to delete all the recorded items.Touch any single call log entry to view the date, time and duration of the call.Using call divert1.  Touch   , select   Setting and choose Call settings.2.  Touch Call Divert and choose Video calls and/or Voice calls.3.  Choose whether to divert all calls, when the line is busy, when there is no answer or when you are not reachable. 4.  Input the number you’d like to divert to.5.  Touch Request to activate.Charges are incurred for diverting calls. Please contact your network provider for details.To turn off all call diverts, choose Deactivate all from the Call divert menu.
The basics26Using call barring1.  Touch   , select   Setting and choose Call settings.2.  Touch Call barring and choose Video calls and/or Voice calls.3.  Choose any or all of the six options:All outgoingOutgoing internationalOutgoing international calls except home countryAll incomingIncoming when abroad4.  Enter the call barring password. Please check with your network operator for this service. Select Fixed dial number to turn on and compile a list of numbers which can be called from your phone. You’ll need your PIN2 code from your operator. Only numbers included in the fixed dial list can be called from your phone.Changing the common call setting1.  Touch   , select   Setting and choose Call settings.2.  Touch Common settings (you may have to scroll down to see this). From here you can amend the settings for:°  Call reject: Slide the switch to highlight the Reject list. You can touch the text box to choose from all calls, specific contacts or groups, or those from unregistered numbers (those not in your contacts). Touch Save to change the setting.°  Send my number: Choose whether your number will be displayed when you call someone.°  Auto redial: Slide the switch left for On or right for Off.°  Answer mode: Choose whether to answer the phone using the send key or any key.°  Minute minder: Slide the switch left to On to hear a tone every minute during a call.°  BT answer mode: Select Hands-free to be able to answer a call using a Bluetooth headset, or select Handset to press a key on the handset to answer a call.°  Save new number: Select Yes to save a new number. °  Select line: You can send your phone number depending on two line service such as line 1 or line 2.
The basics27To scroll through a list of options, touch the last item visible and slide your finger up the screen. The list will move up so more items are visible.Changing your video call settings1.  Touch   , select   Setting and choose Call settings.2.  Touch Video call.3.  Choose the settings for your video calling. Determine whether to Use private picture/ My image size and select one, and/or switch on the Mirror.
The basics28CONTACTSSearching for a contactThere are two ways to search for a contact:From the standby screen1.  From the standby screen touch then   to open the address book. To delete a digit press the Clear    hard key.2.  Touch Call or the   hard key to initiate the call.You can search by group by selecting Groups. This will bring up a list of all your groups.From the main menu1.  Touch  , select   Communicate. 2.  Touch Contacts.3.  Your address book will bring up a list of the contacts corresponding to the letters you’ve entered.To scroll through your list of contacts, touch the last item visible and slide your finger up the screen. The list will move up so more items are visible.Adding a new contact1.  From the standby screen touch   and select Add contact.2.  Choose whether to save the contact to your Handset or USIM.3.  Enter the first and last name of your new contact. You do not have to enter both, but you must enter one or the other.4.  Enter up to five different numbers and assign a type for each. Choose from Mobile, Home, Office, Pager, Fax, VT and General. Touch OK.5.  Add an email.6.  Assign the contact to one or more groups. Choose from No group, Family, Friends, Colleagues, School or VIP.7.  You can also add a Ringtone, Birthday, Anniversary, Homepage, Home address, Company name, Job title, Company address and a Memo.8.  Touch Save to save the contact.You can create customised groups for your contacts, see Creating a group on page 31.
The basics29Contact optionsThere are many things you can do when viewing a contact. Here’s how to access and use the options menu:1.  Open the contact you’d like to use. See Searching for a contact on page 30.2.  You can call or send a message directly from here.3.  Press   to open the list of options. From here you can:°  Make a video call: Video call the contact.°  Edit: Change any of the contact’s details.°  Delete: Delete the contact. Touch Yes if you are sure.°  Copy or Move to USIM/Handset: Choose to move or copy to the USIM card or handset (depending on where you originally saved the contact).°  Send business card: Send the contact’s details to another person as a business card. Choose to send as a Text message, Multimedia message, Email or via Bluetooth.Send message - Send a message to the contact. If the contact has an email address, select whether you’d like to send an email or SMS/MMS. See page 35 for details on how to send messages.Creating a group1.  From the standby screen touch   and select Groups.2.  Touch   .3.  Select Add group.4.  Enter a name for your new group.5.  Touch Save.If you delete a group, the contacts which were assigned to that group will not be lost. They will remain in your address book.You can edit an existing group by highlighting it and touching  . Choose to Add members to the group from your contacts, assign a Group ringtone, Rename the group or Delete a group.
The basics30Changing your contact settingsYou can adapt your contact settings so that your address book suits your own preferences.To scroll through a list of options, touch the last item visible and slide your finger up the screen. The list will move up so more items are visible.1.  From the standby screen   touch   and select Settings.2.  From here you can adjust the following settings:°  Contact list settings: Choose whether to view contacts saved to both your Handset & USIM, Handset only or USIM only.You can also choose to show the first name or last name of a contact first.°  Synchronise contact: Connect to your server to synchronise your contacts. °  Copy: Copy your contacts from your USIM to your handset or from your handset to your USIM. Choose to do this one at a time, or all at once. If you select one at a time, you’ll need to select each contact to copy one by one.°  Move: This works in the same way as Copy, but the contact will only be saved to the location you’ve moved it to. So, if you move a contact from the USIM to the handset it will be deleted from the USIM memory.°  Send all contacts via Bluetooth: Send all of your contacts to another device using Bluetooth. You will be prompted to turn on Bluetooth if you select this option.°  Backup contacts: See Backing up and restoring your phone’s information on page 76.°  Restore contacts: See Backing up and restoring your phone’s information on page 76.°  Clear contacts: Delete all your contacts. Touch Yes if you are sure you want to wipe your address book.Viewing information1.   From the standby screen touch   touch  and Information.2.  From here you can view your Service dial numbers, your Own number, your Memory info. (how much memory space you’ve got left) and My business card.If you’ve yet to add a business card for yourself, select My business card and enter all your details as you would for any contact. Touch Save to finish.
The basics31MESSAGINGMessagingYour GW520 combines SMS, MMS and email into one intuitive and easy to use menu.There are two ways to enter the messaging centre:1.  Touch   from the standby screen.2.  Touch   from the standby screen, then select   Communicate then Messaging.Sending a message1.  Touch New message in Communicate tab to open a blank message or select Create new message in Messaging menu.2.  From here you can send a text message or Multimedia message. To send an email, choose New Email in Communicate tab. 3.  Touch Insert, to add an image, video, sound or template.4.  Touch To1 at the top of the screen to enter the recipient’s number, or touch the search icon to open your address book. Touch Send. Enter the phone number or touch Contacts to open your contacts list. You can add multiple contacts.You will be charged per 160 character text message for each person that you send the message to.If an image, video or sound is added to an SMS it will be automatically converted to an MMS and you will be charged accordingly.Quick reply - Send a reply promptly to the selected message using a template.
The basics32Entering textThere are three ways to enter text: T9 text mode/ Normal text mode/Qwerty keypad.Tap the screen once, the keyboard appears.   Touch to turn on T9 predictive text.   You can choose the writing language.  Tap to change numbers, symbols and texts keypad. Use   to scroll through the different keyboard types in each text entry mode (for example, capitals or lower case).To enter a space touch  .To delete character or remove the sentece, touch clear   .Simply touch each letter to write your message and press:  to switch to upper case   to add a spaceT9 predictive In T9 mode you will see   .T9 mode uses a built-in dictionary to recognise words you’re writing based on the key sequences you touch. Simply touch the number key associated with the letter you want to enter, and the dictionary will predict the word you want to use. For example, press 8, 3, 5, 3, 7, 4, 6, 6, 3 to write ‘telephone’.If the word you want doesn’t appear, touch Spell. If you touch Spell you can then enter the word using Abc manual mode and your word or name will be added to the dictionary.Abc manualIn Abc mode you will see   . In Abc mode you must touch the key repeatedly to enter a letter. For example, to write ‘hello’, touch 4 twice, 3 twice, 5 three times, 5 three times again, then 6 three times.
The basics33QWERTY KEYPADEntering textYou can enter alphanumeric characters using the phone’s keypad. For example, storing names in Contacts, writing a message and creating scheduling events in the calendar all require entering text. The following text input methods are available in the phone: ABC manual mode and 123 mode.Some fields may allow only one text input mode (e.g. telephone number in address book fi elds).To input a symbol in the text entry field, press the   key and select a symbol, then select OK.Scroll using the navigation keys to show more symbol options.Complete each word with a space by pressing  .To delete a character, press   key.Text input mode using the keypadWhen you are required to enter text, for example when writing a message, the keypad will default to ABC mode. If you are entering a number, for example when making a call, the keypad number keys will default to numbers.In ABC mode you can enter numbers by first pressing   and then the number you require.Sending an email using your new accountTo send/receive an email, you should set up an email account (see below).1.  Touch   from the standby screen, and select Messaging.2.  Choose Create new message- Email and a new email will open. Or, if you select New Email in Communicate tab, you can enter this menu directly.3.  You can enter the recipient’s address and write your message. You can also attach images, videos, sounds or other file types.4.  Enter your message using the keypad.5.  Select Options and choose an attachment to add: Image/Video/Sound/Template/Emoticon/Bcc/Singture/Name&Number/More (Business card/Schedule/Memo/To do /My business card/FlashContents/Documents/Other files).
The basics34Setting up your emailYou can stay in touch on the move using email on your GW520. It’s quick and simple to set up a POP3 or IMAP4 email account.If you complete sett up e-mail account, “Update inbox now?” message will be displayed. You can receive the e-mail of selected account.To scroll through a list of options, touch the last item visible and slide your finger up the screen. The list will move up so more items are visible.1.  Touch   from the standby screen, and touch Messaging.2.  Select Settings.3.  Touch Mailbox then Email accounts.4.  Touch Add account.5.  You can now choose how your account works: °  Email address: Enter the e-mail address.°  Password: Enter the account’s password.°  Username: Enter the account’s username.°  Mailbox type: Enter the mailbox type, POP3 or IMAP4.°  Incoming server: Enter the incoming email server address°  Outgoing server: Enter the outgoing email server address°  SMTP authentication: Choose the security settings for the outgoing mail server°  Account nameNow your account is set up, it will appear in the list of accounts in your Email folder.Retrieving your emailYou can automatically or manually check your account for new emails. See Changing your email settings on page 37 to check automatically.To check manually:1.  Touch   then Messaging. 2.  Select Mailbox.3.  Touch the account you want to use then  .4.  Choose Retrieve or Sync and your GW520 will connect to your email account and retrieve your new messages.
The basics35Changing your email settingsYou can change your email settings according to your own preferences.To scroll through a list of options, touch the last item visible and slide your finger up the screen. The list will move up so more items are visible.1.  Touch   from the standby screen, and touch Messaging.2.  Select Settings.3.  Touch Email and then you can adapt the following settings:°  Email accounts: Set up the Email account.°  Allow reply Email: Choose to allow the sending of read confirmation messages.°  Request reply Email: Choose whether to request read confirmation messages.°  Retrieve interval: Choose how often your GW520 checks for new email messages.°  Retrieve amount: Choose the number of emails to be retrieved at one time.°  Include message in Fwd & Reply: Choose to include the original message in your reply.°  Include attachment: Choose to include the original attachment in any reply.°  Auto Retrieval in Roaming: Choose whether to retrieve your messages automatically when abroad (roaming).°  New email notification: Choose whether to be alerted to new emails.°  Signature: Create an email signature and switch this feature on.°  Priority: Choose the priority level of your email messages. Message foldersYou’ll recognise the folder structure used on your GW520, which is fairly self-explanatory.°  Inbox: All the messsages you receive are placed into your inbox From here you can view, delete and more, see Managing your messages below for details. You can enter this menu through Message box.°  Mailbox: All the emails you receive on your GW520 will be placed in your mailbox.°  Drafts: If you don’t have time to finish writing a message, you can save what you’ve done so far here.°  Outbox: This is a temporary storage folder while messages are being sent.°  Sent items: All the messages you have sent are placed in this folder.°  My Folders: Create folders to store your messages.
The basics36Managing your messagesYou can use your Inbox to manage your messages.To scroll through a list of options, touch the last item visible and slide your finger up the screen. The list will move up so more items are visible.1.  Touch Messaging then Inbox. Or, you can enter this menu through Message box in Communicate tab.2.  Touch   and then choose to:°  Delete: Delete marked messages.°  Change view: You can change the style of message display.°  Create new message: Open a new blank message or email.°  Move to my folders: Move the marked messages to My folders.°  Filter: View your message by type. This will group only text message separately from MMS.°  Delete all: Delete all of the messages.If you see the message No space for USIM messages you should delete some messages from your inbox.If you see the message No space for messages you can delete either messages or saved files to create space. Using templatesCreate templates for the SMS and MMS messages you send most frequently. You’ll find some templates already on your phone, you can edit these if you wish.1.  Touch Messaging then choose Templates.2.  Choose Text templates or Multimedia templates. You can then touch   to Add new, Delete or Delete all templates.Using emoticonsLiven up your messages using emoticons. You’ll find some commonly used emoticons already on your phone.1.  Touch Messaging then choose Emoticons.2.  Touch   to Add new, Delete or Delete all emoticons.
The basics37Changing your text message settingsYour GW520 message settings are pre-defined so that you can send messages immediately. These settings can be changed according to your preferences.To scroll through a list of options, touch the last item visible and slide your finger up the screen. The list will move up so more items are visible.Touch Messaging then choose Settings and Text message. You can make changes to:°  Text message centre: Enter the details of your message centre.°  Delivery report: Slide the switch to the left to receive confirmation that your messages have been delivered.°  Validity period: Choose how long your messages are stored at the message centre.°  Message types: Convert your text into Voice, Fax, X.400 or Email.°  Character encoding: Choose how your characters are encoded. This impacts the size of your messages and therefore data charges.°  Send long text as: Choose to send long messages as Multiple SMS or as MMS.Changing your multimedia message settingsYour GW520 message settings are pre-defined so that you can send messages immediately. These settings can be changed according to your preferences.Touch Messaging then choose Message settings and Multimedia message. You can make changes to:°  Retrieval mode: Choose Home or Roaming network. If you then choose Manual you will receive only notifications of MMS and you can then decide whether to download them in full.°  Delivery report: Choose to allow and/or request a delivery report.°  Read reply: Choose to allow and/or send a read reply.°  Priority: Choose the priority level of your MMS.°  Validity period: Choose how long your message is stored at the message centre.°  Slide duration: Choose how long your slides appear on screen.°  Creation mode: Choose your message creation mode.°  Delivery time: Choose how long before a message is delivered.°  Multi msg. centre: Enter the details of your message centre.
The basics38Changing your other settingsTouch Messaging , choose Settings then:°  Voicemail: Touch   to add a new Voicemail service. Contact your network operator for more information on the service they provide.°  Service message: Choose to receive or block service messages. You can also set your message security by creating trusted and untrusted lists of senders.°  Info service: Choose your reception status, language and other settings.
Get creative39CAMERATaking a quick photo1.  Press the   key on the right side of the phone.2.  The viewfinder will appear on screen.3.  Holding the phone horizontally, point the lens towards the subject of the photo.4.  Slightly press the capture button, a focus box will appear in the centre of the viewfinder screen.5.  Position the phone so you can see the subject of your photo in the focus box.6.  When the focus box turns green and the tone sounds the camera has focused on your subject.7.  Press the capture button fully.After you've taken your photoYour captured photo will appear on screen. The name of the image runs along the bottom of the screen together with five icons down the right side.  Go to gallery of pictures directly.  Touch to send the photo as a message, e-mail or Bluetooth.  Touch to edit the image by using various tools.  Touch to set the picture you have taken as Wallpaper.  Touch to delete the photo you have just taken and confirm by touching Yes. The viewfinder will reappear.  Touch to take another photo straightaway. Your current photo will be saved.
Get creative40Getting to know the viewfinderSettings - Touch this icon to open the settings menu. See Using the advanced settings on page 49 for details.Camera mode - Camera mode is selected.Flash statusSizeBack - Touch here to return to the standby screen.GalleryFlash - See Using the flash on page 43.Shot type - See Choosing a shot type on page 43. Shutter - Take the picture View mode - Full screen/ Full imageZoom - Touch   to zoom in or   to zoom out. Alternatively you can use the side volume keys.Video camera mode - Convert from camera to video camera mode.The shortcut options disappear after a few seconds automatically. Simply touch the centre of the viewfinder once. To recall the options touch the screen again.
Get creative41Using the flashThe flash is set to auto as default, but there are other options.1.  Select   from the right side of the viewfinder to enter the flash sub-menu.2.  There are three flash options:°  Auto: Your camera will assess the lighting needed to take a good picture and use the flash as necessary.°  Always on: The flash will always be on.°  Always off: The camera will never flash. This is useful if you want to save battery power.°  When taking: The camera will flash when taking a picture.3.  Touch the flash option you’d like to use.4.  When you’ve made your selection the flash menu will automatically close, ready for you to take your picture.5.  The flash status icon in the viewfinder will change according to your new flash mode.Choosing a shot type1.  Touch   to open the available shot types.2.  Choose from three options:°  Normal shot: This is the default shot type, the photo will be taken in the normal way, as outlined in taking a quick photo.°  Burst shot: This enables you to take nine shots automatically in very quick succession.°  Panorama: This shot type is great for taking a photo of a large group of people or for capturing a panoramic view.
Get creative42Taking a burst shot1.  Touch   open the available shot types and select Burst shot then choose the number of shots.2.  Position the subject in the viewfinder and press the capture button as you would to take a normal photo.3.  You can save one of the shots. Select the one you want to keep by touching the thumbnail: once to view and touch Save to save.Taking a panoramic shotCapture life as it appears using a panoramic shot. The camera will let you take three photos, all aligned, and combine them into one wide angle image.1.  Touch   to open the available shot types and select Panorama shot.2.  Take the first photo as normal. A ghosted version of the right side of the image will appear in the viewfinder.3.  When you take the second and third photo, line the ghost of the previous image up with the image in the viewfinder.4.  In the photo gallery, the photos will be saved as panoramic image.Due to the image size the panoramic photo will appear slightly distorted in the Gallery view. Touch it twice to view it properly.Adjusting the exposureExposure defines the difference between light and dark in an image. A low contrast image will appear foggy, whereas a high contrast image will appear much sharper.1.  From the viewfinder touch to open allthe advanced settings options.2.  Touch Exposure.3.  Slide the contrast indicator along the bar, towards   for a lower exposure, hazier image or towards   for a higher exposure, sharper image.
Get creative43Using the advanced settingsFrom the viewfinder touch   to open all the advanced settings options.Preview settings°  Exposure: Exposure value refers to the amount of light for a given exposure. When the main subject is darker than the background, increase exposure value. If the subject is much lighter than the background, decrease exposure value.°  Size: Change the size of the photo to save on memory space or take a picture preset to the correct size for contact. See Changing the image size on page 46.°  Colour Effect: Choose a colour tone to apply to the photo you’re taking. See Choosing a colour effect on page 46.°  White balance: Choose from Auto, Incandescent, Sunny, Flourescent or Cloudy.°  Macro: Switch on to take close up shots.°  Self-timer: The self-timer allows you to set a delay after the capture button is pressed. Choose from 3 seconds, 5 seconds or 10 seconds. Great for that group photo you want to be part of.°  ISO: ISO determines the sensitivity of the camera’s light sensor. The higher the ISO, the more sensitive the camera will be. This is useful in darker conditions when the flash can’t be used. Choose an ISO value from Auto, ISO 100, ISO 200, ISO 400 or ISO 800.°  Quality: Choose between Super fine, Fine and Normal. The finer the quality the sharper a photo will be, but the file size will increase as a result, which means you’ll be able to store fewer photos in your memory.°  Inner/Outer Camera: For self portraits, switch to the LG GW520’s inner camera. Other settings°  Memory: Choose whether to save your photos to the Handset memory or to the External memory.°  Image stabilization: Enables you to take a photo without camera instability or shake. °  Focus: Choose from On or Off.°  Shutter sound: Select one of the three shutter sounds.°  Grid screen: Choose from Off, Simple cross or Trisection °  Reset settings: Reset all the camera settings. When you exit the camera all your settings will return to default, except image size and image quality. Any non-default settings you require will need to be reset, for example colour tone and ISO. Check them before you shoot your next photo.
The settings menu is super imposed over the viewfinder, so when you change elements of the image colour or quality you’ll be able to see the image change in preview behind the settings menu.Changing the image sizeThe more pixels, the larger the file size, which in turn means they take up more of your memory. If you want to fit more pictures on to your phone you can alter the pixel number to make the file size smaller.1.  From the viewfinder touch   in the top left corner.2.  Select Size from the Preview menu.3.  Select a pixel value from the six numerical options (5M: 2592x1944, 3M: 2048x1536, 2M: 1600x1200, 1M: 1280x960, 640x480, 320x240) or choose the preset:Choosing a colour effect1.  From the viewfinder touch   in the top left corner.2.  Select Colour Effect from the Preview menu.3.  There are five colour tone options: Off, Black & White, Negative or Sepia. 4.  When you’ve made your selection the colour tone menu will be closed after selcting back icon, ready for you to take your picture.You can change a photo taken in colour to black and white or sepia after it’s taken, but you cannot change a picture taken in black and white or sepia back to colour.Get creative44
Get creative45VIDEO CAMERAShooting a quick video1.  Touch Video camera in Entertainment tab.2.  The video camera’s viewfinder will appear on screen.3.  Holding the phone horizontally, point the lens towards the subject of the video.4.  Press the capture button once to start recording.5.  REC will appear at the top of the viewfinder and a timer at the bottom showing the length of your video.6.  To pause the video touch  and resume by selecting  .7.  Touch   on screen or press the capture button a second time to stop recording.After you've shot your videoA still image representing your captured video will appear on screen. The name of the video runs along the bottom of the screen together with five icons down the right side .  Touch to play the video.  Touch to send the video as Message, Email or by Bluetooth. See page 33 for Sending a message, or page 85 for Sending and receiving your files using Bluetooth.   Touch to edit video file.  Touch to view a gallery of saved videos.   Touch to delete the video you have just made and confirm by touching Yes. The viewfinder will reappear.   Touch to shoot another video straight away. Your current video will be saved.
Get creative46Getting to know the viewfinderSettings - Touch this icon to open the settings menu. See Adjusting the exposure on page 49 for details.Video mode - Video mode is selected.Back - Touch here to return to the standby screen.GalleryBrightness - See Adjusting the Exposure on page 49.Recording speedRecording stopRecording start Saving to handset memory/external memoryZoom - Touch   to zoom in or   to zoom out. Alternatively you can use the side volume keys.Camera mode - Change from video camera to camera mode.The shortcut options disappear after a few seconds automatically. Simply touch the centre of the viewfinder once. To recall the options touch the screen again.
Get creative47Adjusting the ExposureExposure defines the difference between light and dark in an image. A low contrast image will appear foggy, whereas a high contrast image will appear much sharper.1.  Touch   .2.  Slide the exposure indicator along the bar, towards   for a lower exposure, hazier image, or towards   for a higher contrast, sharper image.Using the advanced settingsFrom the viewfinder touch Settings to open all the advanced settings options.Preview settings°  Video size: Change the size of the video to save on memory space. See Changing the video image size on page 50.°  Colour Effect: Choose a colour tone to apply to the video you’re taking. See Choosing a colour tone on page 50.°  White balance: The white balance ensures that any white in your videos is realistic. In order for your camera to correctly adjust the white balance you may need to determine the light conditions. Choose from Auto, Incandescent, Sunny, Fluorescent or Cloudy.°  Quailty: Choose between Super fine, Fine and Normal. The finer the quality the sharper a video will be, but the file size will increase as a result, which means you’ll be able to store fewer videos in the phone’s memory.°  Set time: Set a duration limit for your video. Choose from No limit, or MMS to limit the size to be able to send the video as an MMS.If you choose MMS duration, try choosing a lower image quality to enable you to shoot a longer video.°  Inner camera: Switch to your GW520’s inner camera to record a video of yourself. Other settings°  Memory: Choose whether to save your videos to the Handset memory or to the External memory.°  Voice: Choose Mute to record a video without sound.°  Reset settings: Reset all the video camera settings.
Changing the video image sizeThe more pixels, the larger the file size, which in turn means they take up more memory. If you want to fit more videos onto your phone you can alter the pixel number to make the file size smaller.1.  From the viewfinder touch Settings in the top left corner.2.  Select Video size from the Preview menu.3.  Select a pixel value from the five options:720x480(D1), 640x480(VGA) - The highest quality widescreen option.400X240 (Wide) - This is also widescreen, but of a lower resolution.640x480 (VGA) - Standard sized VGA. 320x240 (QVGA) - Smaller image size, therefore smaller file size. Great for saving on memory space.176x144 (QCIF) - Smallest image size and therefore smallest file size.4.  Select the size option you’d like to use.For video format conversion software, see the CD you received with your GW520.Choosing a colour tone1.  From the viewfinder touch   in the top left corner.2.  Select Colour Effect from the settings menu.3.  There are five colour tone options, Off, Black & White, Negative, Sepia.4.  Touch the colour tone you’d like to use.You can change a video shot in colour to black and white or sepia after it’s taken, but you cannot change a video shot in black and white or sepia back to colour.You can still alter the image size, video quality, duration, mute, white balance, colour tone and the memory by touching Settings in the same way as when using the main camera.Get creative48
YOUR PHOTOS AND VIDEOSViewing your photos and videos1.  Touch   on your camera preview screen.2.  Your gallery will appear on screen.3.  Touch the video or photo twice to open it fully.4.  Videos will begin to play automatically. To pause playback touch the screen to bring up the options and select   .Flick left or right to view other photos or videos.To delete a photo or video, open it and select   . Touch Yes to confirm.Using zoom when viewing a photoUse the fingers diagonally on the image to zoom in or zoom out. Adjusting the volume when viewing a videoTo adjust the volume of the audio on a video whilst it is playing, slide the marker up and down the volume bar on the left side of the screen. Viewing your photos as a slide showSlideshow mode will show all the photos in your gallery one at a time as a slideshow. Videos can not be viewed as a slideshow.1.  Touch the photo you would like to begin the slideshow twice to open it.2.  Select   .3.  The slideshow will begin.There are options within slideshows: Touch again to resume playback. Touch to pause the slideshow on a particular photo. Random On/ Off Touch to increase or decrease the speed of the slideshow.Setting a photo as wallpaper1.  Touch the photo you would like to set as wallpaper twice to open it.2.  Touch   .3.  The screen will switch to portrait mode. You can change the size of the picture.4.  When you are happy with the picture touch Set.Get creative49
Get creative50Editing your photosThere are loads of great things you can do to your photos to change them, add to them or liven them up a little.1.  Open the photo you’d like to edit and touch Edit to bring up the options.2.  Touch the icons to adapt your photo:  Crop your photo. Choose a square or circular crop area and move your finger across the screen to select the area.  Draw something on your photo freehand. Select the thickness of the line from the four options and the colour you would like use.  Put writing on the picture. See Adding text to a photo on page 53.  Decorate your photo with stamps. Choose from the different stamps available and touch your photo wherever you’d like them to be.   Remove the drawing line.  Touch to return to the gallery.  Save the changes you have made to the photos. Select to save the changes over the Original file, or as a New file. If you select New file enter a file name.  Undo the last Effect or edit you made to the photo.  Add an effect to a photo by using various tools.  Touch to open further effect options including Rotate. There are also more advanced editing options. See Morphing a photo, Adding a colour accent and Swapping the colours in a photo on page 55.  See Adding an effect to a photo on page 53.
Get creative51Adding text to a photo1.  From the editing screen, touch   .2.  Select Signature to add unframed text or choose one of the speech bubble shapes then touch OK.3.  Enter your text using the keypad and touch Done.4.  Move the text bubble by touching it and sliding it to the place you’d like it to be.Adding an effect to a photo1.  From the editing screen, touch   .2.  Choose to apply any of the eighteen options to the photo. Select OK icon to apply the changes or choose   to cancel.°  Face Beautify: Automatically detect a face in the image and brighten it up.°  Tunnel effect: Change the effect so that the picture appears to have been taken in a tunnel.°  Colour negative:  Colour negative effect.°  Black and white: Black and white colour effect. °  Sepia: Sepia effect. °  Blur: Apply a blurred effect. °  Sharpen: Move the marker along the bar to sharpen the focus of the photo. °  Mosaic blur: Touch to apply a blurred mosaic effect to the photo. °  Oil painting: Oil painting effect. °  Sketch: Apply an effect to make the picture look like a sketch. °  Emboss: Emboss effect.°  Solarize: Change the effect of exposure to the light °  Vivid: An effect of clearness and brilliance. °  Moonlight: Change the light to look like moonlight.°  Antique: An old image effect.  °  Glow: A light beam effect. °  Cartoon: A cartoon effect. °  Water color: Adjust water color painting. 3.  To undo an effect simply touch Undo.You can add more than one effect to a photo.Resizing a photo1.  From the editing screen touch    .2.  Choose Resize.3.  Touch your desired size to change the size of the photo.
Get creative52Morphing a photoMorphing a photo is great for changing the facial expressions of friends, or just for distorting a photo for artistic effect.1.  From the editing screen touch   .2.  Choose Morphing and four crosses will appear on the photo.3.  Move the crosses around the photo so they are on the part you’d like to morph. For example, if you are morphing a face, place a cross on the outside corner of each eye and one each side of the lips.4.  Select a face to represent how you’d like to morph the photo.5.  Select Save to save the changes.Adding a colour accent to a photo1.  From the editing screen, touch   .2.  Choose Colour accent.3.  Select part of the photo. A traced line will appear around everything in that area which is of the same or similar colour.For example, someone’s hair or the colour of their jumper.4.    Touch  Done.5.  All colour will be removed from the photo, apart from the section marked for colour accenting.6.  Alter the intensity of the accenting by sliding the marker up or down the intensity bar.7.  Select Save to save the changes.
Get creative53Swapping the colours in a photo1.  From the editing screen, touch   .2.  Choose Colour swapping.3.  Select part of the photo. A traced line will appear around everything in that area which is of the same or similar colour.For example, someone’s hair or the colour of their jumper.4.    Touch    and select a colour.5.  Press OK.6.  The part of the photo selected for colour accenting will change to the selected colour.7.  Select Save to save the changes.Watching your videos on your TVConnect your GW520 to your TV using the TV output cable. Open the video you’d like to watch on TV, press   and select  .The TV output cable is available for purchase separately.All formats except 320x240 and 176x144 are compatible with watching on TV.Editing your videosThe editing features are available for all video types except 640X384 and 640x480.Don’t record in these formats if you plan to edit your video.
Get creative54Trimming the length of your video1.  Open the video you’d like to edit, select  and touch the screen to bring up the options.2.    Select   and choose Trim.3.  Touch   and mark the new start and end points using   .4.  Touch Preview to ensure you are happy with the new cut.5.  Touch Save or, alternatively, touch   to return to the gallery and discard the changes.Merging two videos together1.  Open the video you’d like to edit, select  and touch the screen to bring up the options.2.  Select   and choose Video merge.3.  The My videos folder will open. Choose the video you would like to merge and touch Select.4.  Touch and slide the photo to merge it to the end or the beginning of the video.5.  Touch Effect to choose how the videos merge together: None, Fade out, Pan zoom, Oval, Uncover, Blind, Checker board, Dissolve, Split or Shape diamond.6.  Press   followed by Yes to save the new merged video. Choose to save over the original file or as a new file.7.  Repeat these steps to merge more videos.
Get creative55Merging a photo with a video1.  Open the video you’d like to edit, select  and touch the screen to bring up the options.2.  Select   and choose Image merge.3.  The My images folder will open. Choose the photo you would like to merge into your video and touch Select.4.  Touch and slide the photo to merge it to the end or the beginning of the video.5.  Touch Effect to choose how the photo and video merge together: None, Fade out, Pan zoom, Oval, Uncover, Blind, Checker board, Dissolve, Split or Shape diamond.6.  Press   followed by Yes. Choose to save over the original file or as a new file.7.  Repeat these steps to merge more photos.Adding text to a video1.  Open the video you’d like to edit, select  and touch the screen to bring up the options.2.  Select   and choose Text overlay.3.  Enter your text using the keypad and select Save.4.  Touch   and mark when you’d like the text to appear using  .5.  Touch the area of the screen you’d like the text to appear in.6.  Touch   to mark when you’d like the text to disappear.7.  Touch Preview to ensure you are happy with the text overlay.8.  Touch Save followed by Yes. Choose to save over the original file or as a new file.9.  Repeat these steps to add more text.
Overlaying a photo1.  Open the video you’d like to edit, select  and touch the screen to bring up the options.2.  Select   and choose Image overlay.3.  The My images folder will open. Choose the photo you would like to overlay your video and touch Select.4.  Touch   and mark when you’d like the photo to appear using   .5.  Touch the area of the screen you’d like the photo to appear in. If the photo is too big it will overlay the whole screen, not just the area selected.6.  Touch   to mark when you’d like the photo to disappear.7.  Touch Preview to ensure you are happy with the photo overlay.8.  Touch   followed by Yes. Choose to save over the original file or as a new file.9.  Repeat these steps to add more photos.Adding a voice recording1.  Open the video you’d like to edit, select  and touch the screen to bring up the options.2.  Select   and choose Voice recording.3.  The quality of the original audio will be affected by adding a voice recording. Touch Yes to continue.4.  Touch   to view your video. When you get to the part you’d like to record your voice over, press  .5.  Press   to stop recording and playback.6.  Touch Preview to ensure you are happy with the voice recording.7.  Touch   followed by Yes to save. Choose to save over the original file or as a new file.8.   Repeat these steps to add more voice recordings to the video.Get creative56
Adding a soundtrack to your video1.  Open the video you’d like to edit, select  and touch the screen to bring up the options.2.  Select   and choose Audio dubbing.3.  The My sounds folder will open. Choose the track you would like to add to your video and touch Select.4.  The original audio of your video will be erased. Touch Yes to continue.5.   If the audio is shorter than the video choose whether to play Once or to Repeat it.6.   Choose to save over the original file or as a new file.Changing the speed of your video1.  Open the video you’d like to edit, select  and touch the screen to bring up the options.2.  Select   and choose Time scaling.3.  Select one of the four speed options: x4, x2, x1/4, x1/2.4.  Choose to save over the original file or as a new file.Adding a dimming effect1.  Open the video you’d like to edit, select  and touch the screen to bring up the options.2.  Select   and choose Dimming effect.3.  Choose to save over the original file or as a new file.4.  Your video will now fade in at the start and fade out at the end.Get creative57
Get creative58MULTIMEDIAYou can store any multimedia files into your phone’s memory so that you have easy access to all of your pictures, sounds, videos and games. You can also save your files to a memory card. The advantage of using a memory card is that you can free up space on your phone’s memory.To access the Multimedia menu, touch   then   Entertainment. Touch My stuff to open a list of folders storing all of your multimedia files.Pictures My images contains a list of pictures including default images pre-loaded onto your phone, images downloaded by you and images taken on your phone’s camera.My images option menusThe options which are available to you in My images depend on what type of image you have selected. All of the options will be available for pictures you have taken on the phone’s camera, but only the Use as, Print, Sort by and Memory manager options are available for default images.When looking at a picture, turn the phone to landscape to bring up further options on the right side of the screen. Choose from send, slideshow, gallery, edit and delete.°  Send: Send the image to a friend.°  Move: Move an image from the phone memory to a memory card or vice versa.°  Copy: Copy an image from the phone memory to a memory card or vice versa.°  Delete: Delete an image.°  Rename: Rename an image.°  Print: Print the selected image using a printer supported by Bluetooth.°  Create new folder: Create a new folder within the My images folder.°  Slide show: Create slide show of selected images.°  Grid view/ List view: Grid view to List view or vice versa.°  Folder info.: View the information of each folder.°  Memory manager: View the memory status.°  Delete all: Delete all of your images.
Get creative59Sending a photo1.  Touch   then   Entertainment.2.  Touch My stuff then choose My images.3.  Touch Send and choose from Multimedia message, Email or Bluetooth.  4.  If you choose Message or Email, your photo will be attached to a message and you can write and send the message as normal. If you choose Bluetooth, you will be prompted to turn Bluetooth on and your phone will search for a device to send the picture to.Using an imageYou can choose images to use as wallpapers and screensavers or even to identify a caller.1.  Touch   then   Entertainment.2.  Touch My stuff then My images.3.   Select an image and touch   .4.  Touch Use as and choose from:°  Wallpaper: Set a wallpaper for the standby screen.°  Contacts image: Allocate an image to a particular person in your contacts list so that the picture shows when they call you.°  Incoming call: Set an image to appear during incoming call. °  Outgoing call: Set an image to appear during outgoing calls.
Get creative60Marking up your imagesA low- light photo can be adjusted without lowering the quality of the picture.1.  Touch   then   Entertainment.2.  Touch My stuff then My images.Printing an image1. Touch   then Entertainment.2. Touch My stuff then My images.3. Select an image and touch  .4.  Touch Print then choose between Bluetooth and PictBridge. You can to print via bluetooth or by connecting to a PictBridge compatible printer.Moving or copying an imageYou can move or copy an image between the phone memory and the memory card. You might want to do this to either free up some space in one of the memory banks or to safeguard your images from being lost.1.  Touch   then   Entertainment.2.  Touch My stuff then My images.3.  Select an image and touch   .4.  Select Move or Copy.Creating a slide showIf you want to look at all of the images on your phone, you can create a slide show to save you from having to open and close each individual image.1.  Touch   then   Entertainment.2.  Touch My stuff then My images.3.  Touch   then Slide show.Checking your memory statusYou can check to see how much of your memory space you have used and how much you have left to use.1.  Touch   then   Entertainment.2.  Touch My stuff then My images.3.  Touch   then Memory manager.4.    Choose  Handset memory or External memory.If you do not have a memory card inserted, you will not be able to select External memory.
Get creative61SoundsThe My sounds folder contains the Downloaded sounds, Default sounds and Voice recordings. From here you can manage, send or set sounds as ringtones.Using a sound1.  Touch   then   Entertainment.2.  Touch My stuff then My sounds.3.  Select Default sounds or Voice recordings.4.  Select a sound and and it will begin to play.5.  Touch   and select Use as.6.  Choose from Voice ringtone, Video ringtone, Message tone, Start-up or Shut down.Videos The My videos folder shows a list of downloaded videos and videos you have recorded on your phone.Watching a video1.  Touch   then   Entertainment.2.  Touch My stuff then My videos.3.  Select a video to play.Using options while video is pausedTouch   while in pause mode and choose from:°  Send: Send the video in a message or via Bluetooth, Email.°  Delete: Delete the video.°  Use as : Select the ringtone.°  Edit : Offers a range of editing options°  TV out: Enables you to watch the video on the TV using a cable. °  File info.: View the Name, Size, Date, Type, Duration and Protection.The TV output cable is available for purchase separately.
Get creative62Sending a video clip1.  Select a video and touch   .2.  Touch Send and choose from Message, Email or Bluetooth. 3.  If you choose Message or Email, your video clip will be attached to the message and you can write and send the message as normal. If you choose Bluetooth, you will be prompted to turn Bluetooth on and your phone will search for a device to send the video to.Using the video options menuFrom the My videos  folder, you can choose from the following options:°  Send: Send a video to a friend.°  Move: Move a video clip from the phone memory to a memory card or vice versa.°  Copy: Copy a video clip from the phone memory to a memory card or vice versa.°  Delete: Delete a video.°  Rename: Rename a video.°  Create new folder: Create a new folder within the My videos folder.°  Sort by: Sort videos into order by Date, Type or Name.°  List view/ Grid view: View the menu by list type or grid type.°  Folder info.: View the information of each folder.°  Memory manager: View the memory status.°  Delete all: Delete all videos.Games and Applications You can download new games and applications to your phone to keep you amused when you have time to spare.Playing a game1.  Touch   then   Entertainment.2.  Touch Games & Apps.3.  Touch My games and apps.4.  Touch Games or Applications folder.5.  Choose and touch a game or an application to launch.Using the options menuWithin Games and Application folders, the following options are available:°  Create new folder: Create a folder within Games or Applications°  Sort by: Sort the games and applications by Date, Size or Name.°  Memory manager: View the memory status handset or external memory.
Get creative63Installing a Java game and application1.  Touch   then   Entertainment.2.  Touch My stuff then Others or My memory card. If you insert new memory card, you can select My memory card menu.3.  Select the file(*.jad or *.jar) you want to install and touch Install.Flash contentsThe Flash contents folder contains all of your default and downloaded SWF files.Viewing an SWF file1.  Touch   then   Entertainment.2.  Touch My stuff then Flash contents.3.  Select the file to view.Using options while viewing the SWF fileTouch   and choose from:°  Play/Pause: Play or pause the flash file.°  Mute: Switch the sound off.°  Send: Send the file as a MMS, Email or via Bluetooth. °  Main screen theme: Set the file as your wallpaper.°  File info.: View the Name, Size, Date, Time, Type and Protection of the file.°  Delete: Remove the selected file.DocumentsFrom the Documents menu, you can view all of your document files. From here you can view Excel, Powerpoint, Word, Text andpdf files. You can use the fingers diagonally on document to zoom in or zoom out.Transferring a file to your phoneBluetooth is probably the easiest way to transfer a file from your computer to your phone. You can also use LG PC Suite via your sync cable.To transfer using Bluetooth:1.  Make sure your phone and computer have Bluetooth switched on and are visible to one another.2.  Use your computer to send the file via Bluetooth.3.  When the file is sent you will have to accept it on your phone by touching Yes.4.  The file should appear in your Documents or Others folder.
Get creative64Viewing a file1.    Touch   then   Entertainment.2.  Touch My stuff then Documents.3.  Select a document and touch View.OthersThe Others folder is used to store files which are not pictures, sounds, videos, games or applications. It is used in the same way as the Documents folder. You may find that when you transfer files from your computer to your phone that they appear in the Others folder rather than the Documents folder. If this happens you can move them.To Move a file from Others to Documents:1.  Touch   then   Entertainment.2.  Touch My stuff then Others.3.  Select a file and touch   .4.  Touch Move, then touch Move again.Creating a movie1.  Touch   then   Entertainment.2.  Touch Muvee studio.3.  Touch   to add an image. Touch the images you want to include then select Insert .4.  Touch style tab to choose a Muvee style.5.  Touch Play button to see what you’ve created.6.  Touch   then Order to make an order.7.    Touch   then Save Location to choose where to save the movie. Touch Music type to choose between Use To Send and Use To Save.
Get creative65MusicYour LG GW520 has a built-in music player so you can play all your favourite tracks. To access the music player, touch   then   Entertainment then Music. From here you can access a number of folders:°  Recently played: View all of the songs you have played recently. °  All tracks: Contains all of the songs you have on your phone.°  Artists: Browse through your music collection by artist.°  Albums: Browse through your music collection by album.°  Genres: Browse through your music collection by genre.°  Playlists: Contains any playlists you have created.°  Shuffle tracks: Play your tracks in a random order.Transferring music onto your phoneThe easiest way to transfer music onto your phone is via Bluetooth or your sync cable.You can also use LG PC Suite, see page 76 for details. To transfer using Bluetooth:1.  Make sure both devices have Bluetooth switched on and are visible to one another.2.  Select the music file on the other device and choose to send it via Bluetooth.3.  When the file is sent you will have to accept it on your phone by touching Yes.4.  The file should appear in Music > All tracks.
Get creative66Playing a song1.  Touch   then   Entertainment.2.  Touch Music, then All tracks.3.  Select the song you want to play and touch Play.4.  Touch   to pause the song.5.  Touch   to skip to the next song.6.    Touch   to skip to the previous song.7.    Touch   to return to the Music menu.To change the volume while listening to music, touch  .Using options while playing musicTouch   and choose from:°  Minimize: Make the music player screen disappear so that you can continue using your phone as normal.°  Go to my music: View your music files°  Equalizer: Adjust the sound preferences°  Send: Send the song as a message or via Bluetooth°  Use as: Use the song as a ringtone. Message tone, Start-up or Shut-down°  File info: View information including the Name, Size, Date, Time, Type, Duration, Protection and Copyright of the song.
Get creative67Creating a playlistYou can create your own playlists by choosing a selection of songs from the All tracks folder.1.  Touch   then   Entertainment.2.  Touch Music, then Playlists.3.  Touch Add new playlist, enter the playlist name and touch Save.4.  The All tracks folder will show. Touch all of the songs that you would like to include in your playlist; a tick will show next to the track names.5.  Touch Done.To play a playlist, select it and touch Play.To add a second playlist, touch Add new playlist.Editing a playlistFrom time to time, you may want to add new songs or delete songs from a playlist. When you want to do this, you can edit the playlist.1.  Touch   then   Entertainment.2.  Touch Music, then Playlists.3.  Select the playlist.4.  Touch   and select:°  Add new songs: To add more songs to the playlist. Mark the ones you want and touch Done.°  Remove: Remove a song from the playlist. Touch Yes to confirm.°  Memory status: View the memory status.°  Remove all: Remove all tracks from the playlist.Deleting a playlist1.  Touch   then   Entertainment.2.  Touch Music, then Playlists.3.  Touch   then Delete or Delete all to delete all of the playlists.
Using the radioYour LG GW520 has an FM radio feature so you can tune into your favourite stations to listen to on the move.You will need to insert your headphones in order to listen to the radio. Insert them into the headphone socket (this is the same socket that you plug your charger into).Searching for stationsYou can tune radio stations into your phone by searching for them either manually or automatically. They will then be saved to specific channel numbers so you don’t have to keep re-tuning. You can save up to 50 channels in your phone.To auto tune:1.  Touch   then   Entertainment.2.    Touch  FM radio then   .3.  Touch Auto scan then Yes. The stations found will automatically be allocated to channel numbers in your phone.You can also manually tune into a station by using   and   displayed next to the radio frequency or dragging the tuner on the touch screen.You can also search next station by using    and  .Resetting channels1.  Touch   then   Entertainment.2.  Touch FM radio then  .3.  Choose Reset to reset the current channel or choose Reset all to reset all of the channels. Each channel will return to the starting 87.5Mhz frequency.Listening to the radio1.  Touch   then   Entertainment.2.    Touch  FM radio then touch the channel number of the station you would like to listen to.To improve the radio reception, extend the headset cord, which functions as the radio antenna.Get creative68
Get organised69ORGANISERAdding an event to your calendar1.  From the standby screen select   , then touch   Utilities and choose Organiser.Select Calendar.2.   Select the date you would like to add an event to.3.    Touch   then Add event.4.  Touch Category then choose from Appointment, Anniversary or Birthday. Check the date and enter the time you would like your event to begin.5.  For appointments and anniversaries enter the time and date your event finishes in the lower two time and date boxes.6.  If you would like to add a subject or a note to your event, touch Note and type in your note, followed by Save.7.  Set Alarm and Repeat.8.    Select  Save and your event will be saved in the calendar. A square cursor will mark the day that any events have been saved to and a bell will ring at the start time of your event, so that you can stay organised.You can set a holiday in your calendar. Touch each day you are on holiday one at time, then touch   and select Set holiday. Each day will be shaded red. Changing your default calendar view1.  From the standby screen select   , then touch   Utilities and choose Organiser.Select Settings.2.  Touch Calendar and choose either Month view or Week view in Default view menu.3.  Set Week starts on to start the day of week.4.    Press  Save to confirm your choice.Adding an item to your to do list1.   From the standby screen select   , then touch Utilities and choose Organiser.2.  Select Add to do.3.   Set the date for the to do item, add notes and select a priority level: High, Medium or Low.4.   Save your to do list item by selecting Save.
Get organised70Sharing a to do item1.   From the standby screen select   , then   Utilities and choose Organiser. Select To d o.2.   Select the to do item you would like to share, then touch   .3.    Select  Send. You can choose to share your to do item by Text message, Multimedia msg., Email or Bluetooth.Tip: You can back up and synchronise your calendar with your computer.Using date finderDate finder is a handy tool to help you calculate what the date will be after a certain amount of days has passed. For example, 60 days from 10.10.07 will be 09.12.2007.This is great for keeping tabs on deadlines.1.   From the standby screen select   , then touch   Utilities and choose Organiser.2.    Select  Date finder.3.    In  the  From tab set your required date.4.    In  the  After tab set the number of days.5.    The  Target date will be shown below.Setting your alarm1.   From the standby screen select   , then touch   Utilities and choose Alarms.2.    Touch  Add alarm.3.   Set the time you would like the alarm to sound and touch Set time.4.   Choose whether you would like your alarm to repeat Once, Daily, Mon - Fri, Mon - Sat, Sat - Sun, Except holiday or Choose weekday. The icons indicate the weekday you select.5.    Select  Set alarm type to select a type for your alarm.6.    Touch  Alarm tone then choose a sound from My sounds or My memory card. To listen to sounds touch the sound, followed by  . 7.   Add a memo for the alarm. Touch Save when you have finished typing the memo.8.  Finally you can set the snooze interval at 5, 10, 20, 30 minutes, 1hour or off. 9.  Once you have set your alarm, touch Save.
Get organised71Adding a memo1.   From the standby screen select   , then touch   Utilities and choose Add Memo.2.    Type your memo, followed by Save.3.   Your memo will appear on screen next time you open the Memo application.You can edit an existing memo. Select the one you want to edit and type your changes.Voice recorderUse your voice recorder to record voice memos or other sounds.1.    Touch   then   Utilities.2.    Touch  Voice recorder then   and choose from:°  Settings-  Duration: Set the recording duration. Choose from MMS message size, 1 minute or No limit.-  Quality: Select the sound quality. Choose from Super Fine, Fine or Normal.-  Memory in use: Check the current status of memory.°  Go to my sounds: Open the Voice recordings folder in My sounds.Recording a sound or voice1.     Touch   then   Utilities.2.     Touch  Voice recorder.3.    Touch   to begin recording.4.     Touch   to end recording.5.    Touch   to listen to your recording.
Get organised72Sending the voice recording1.  Once you have finished recording, touch  .2.  Touch Send via and choose from Message, Email or Bluetooth. If you choose Message or Email, the recording will be added to the message and you can write and send it as normal. If you choose Bluetooth, you will be prompted to turn Bluetooth on.After you have finished recording, touch  and choose Send via, File > Rename, Delete, Use as (to use the recording as your ringtone Settings) or Go to my sounds.Using your calculator1.  From the standby screen select   , then touch   Utilities and choose Tools.2.  Select Calculator.3.  Touch the numeric keys to input numbers.4.  For simple calculations, touch the function you require (+, –, *, /), followed by =.5.  For more complex calculations, touch  and choose from sin, cos, tan, log, ln, exp, deg or rad etc..Converting a unit1.  From the standby screen select   , then touch   Utilities and choose Tools.2.  Select Converter.3.  Choose whether you would like to convert Currency, Surface, Length, Weight, Temperature, Volume or Velocity.4.  You can then select the unit, and enter the value you would like to convert from, followed by the unit you would like to convert to.5.  The corresponding value will appear on the screen.Using the stopwatch1.  From the standby screen select   , then touch   Utilities and choose Tools.2.  Select Stopwatch.3.  Touch Start to begin the timer.4.  Touch Lap if you want to record a lap time.5.  Touch Stop to end the timer.6.  Touch Resume to restart the stopwatch at the time you stopped it at, or touch Reset to begin the time again.
Get organised73Adding a city to your world time1.   From the standby screen select   , then touch   Utilities and choose Tools.2.    Select  World time.3.    Touch  the   icon, followed by Add city. Start searching the city you require.
Get organised74PC SYNCYou can synchronise your PC with your phone to make sure all your important details and dates match, but also to backup your files to put your mind at ease.Installing LG PC Suite on your computer1.  From the standby screen select   , then   Settings.2.  Select Connectivity, then USB connection mode.3.  Touch PC suite.4.   Insert the supplied CD into your PC. Click on the LG PC suite Installer which will appear on your screen.5.  Select the language you would like the installer to run in and click OK.6.  Follow the instructions on screen to complete the LG PC Suite Installer wizard.7.  Once installation is complete, the LG PC Suite icon will appear on your desktop.Connecting your phone and PC1.  Connect the USB cable to your phone and your PC.2.  Double click on the LG PC Suite icon on your desktop.3.  Click on Connection Wizard, then USB.4.  Click on Next, then Next again, then Finish.Your phone and PC are now connected.Backing up and restoring your phone’s information1.  Connect your phone to your PC as outlined above.2.  Click on the Backup icon, and select Backup or Restore.3.  Mark the contents you would like to back up or restore. Select the location you would like to backup information to, or restore information from. Click OK.4.  Your information will be backed up.
Get organised75Viewing your phone files on your PC1.  Connect your phone to your PC as outlined above.2.  Click on the Contents icon.3.  All of the documents, flash contents, images, sounds and videos you have saved onto your phone will be displayed on the screen in the LG Phone folder.Viewing the contents of your phone on your PC helps you to arrange files, organise documents and remove contents you no longer need.Synchronising your contacts1.  Connect your phone to your PC.2.  Click on the Contacts icon.3.  Your PC will now import and display all contacts saved to your USIM card and handset.4.  Click on File and select Save. You can now select where you would like to save your contacts to.To backup contacts saved to your USIM card, click on the SIM card folder on the left side of your PC screen. Select Edit at the top of the screen, then Select all.Right-click your contacts and select Copy to contact. Now click on the Handset folder on the left of your screen and all your numbers will be displayed.Synchronising your messages1.  Connect your phone to your PC.2.  Click on the Messages icon.3.  All of your PC and phone messages will be displayed in folders on your screen.4.  Use the tool bar at the top of your screen to edit and rearrange messages.Using your phone as a mass storage deviceYour phone can only be used as a mass storage device if you have a memory card inserted.1.  Disconnect your phone from your PC.2.   From the standby screen select   , then touch Settings .3.  Select Connectivity, then USB connection mode.4.  Touch Mass storage.5.  Connect your phone to your PC. Your phone will read: Connecting as Mass Storage… followed by Connected as Mass Storage Mode. Do not disconnect during transfer.6.  All of your phone files will automatically be stored onto your PC hard drive.Your phone must be unplugged from your PC to initiate Mass Storage.
Get organised76Mass storage backs up content saved on your memory card only, not your handset memory. To transfer the content of your handset memory (e.g. contacts) you’ll need to synchronise using PC Sync.Using iSyncInstall the iSync plug-in install file which is supported between Machintoshi PC and phone via Bluetooth or USB. Use the GW520.pkg program is supplied on the CD.To synchronise via Bluetooth, you have to set up pairing between Machintoch PC and phone. If you want to set up via USB, select iSync menu in USB connection mode.DivX ConverterInstall the DivX converter which is supplied on the same CD as the PC Sync software.Once installed select DivX from the Program Files on your PC, then DivX converter followed by Converter.This will open the Converter application. Use the arrows in the application to change the conversion format to Mobile. If you right click on the application box and select Preferences, you can change the location of where the converted files are saved.Once you are ready to convert your files, simply drag and drop the files into the application, for initial analysis. Following this, you will need to select Convert for the process to begin. When the process is finished a Conversion complete pop up will be displayed.The converted file can now be transferred to your phone, using the Mass Storage functionality (see page 77 for details) or Upload contents using the PC Sync software.
The web77THE WEBBrowser Browser gives you a fast, full colour world of games, music, news, sport, entertainment and loads more, straight to your mobile phone. Wherever you are and whatever you’re into. You can view the pages with the fingers diagonally to zoom in or out.Accessing the web1.  From the standby screen select   , then touch   Utilities and choose Browser.2.  To access the browser homepage directly, select Home. Alternately select Enter address and type in your desired URL, followed by Connect.An additional cost is incurred when connecting to this service and downloading content. Check your data charges with your network provider.Adding and accessing your bookmarksFor easy and fast access to your favourite websites, you can add bookmarks and save web pages.1.  From the standby screen select   , then touch   Utilities and choose Browser.2.  Select Bookmarks. A list of your Bookmarks will appear on the screen.3.  To add a new bookmark, touch Add bookmark. Enter a name for your bookmark followed by the URL.4.  Touch Save. Your Bookmark will now appear in the list of bookmarks.5.  To access the bookmark simply touch the bookmark and then touch connect. You will be connected to your bookmark.
The web78Using RSS readerRSS (Really Simple Syndication) is a family of web feed formats used to publish frequently updated content such as blog entries, news headlines or forecasts. An RSS document, which is called a feed, web feed, or channel, contains either a summary of content from an associated web site or the full text. RSS makes it possible for people to keep up with their favourite web sites in an automated manner that is easier than checking them manually. The user subscribes to a feed by entering the feed’s link into the reader or by clicking an RSS icon in a browser that initiates the subscription process. The reader checks the user’s subscribed feeds regularly for new content, downloading any updates that it finds.Saving a page1.  Access your required webpage as described above.2.  Touch   and select Save this page.3.  Enter a name for the webpage so you can easily recognise it.4.    Touch  Save.Accessing a saved page1.  From the standby screen select   , then touch   Utilities and choose Browser.2.  Select Saved pages.3.  Select the required page and it wil open.Viewing your browser history1.  From the standby screen select   , then touch   Utilities and choose Browser.Select History.2.   A list of web page titles you have accessed recently will be displayed. To access one of these pages, simply select the required page.
Changing the web browser settings1.  From the standby screen select   , then touch   Utilities and choose Browser.Select Settings.2.  You can choose to edit Profiles, Appearance settings, Cache, Cookies, Security, or to reset all settings, select Reset Settings.3.  You can simply set these to on or off by touching the icon. Using your phone as a modemYour GW520 can double as a modem for your PC, giving you email and internet access even when you can’t connect using wires. You can use either the USB cable or Bluetooth.Using the USB cable:1.  Ensure you have the LG PC Suite installed on your PC.2.  Connect your GW520 and your PC using the USB cable and launch the LG PC Suite software.3.  Click Communicate on your PC. Then click Settings and select Modem.4.  Choose LG Mobile USB Modem and select OK. It will now appear on screen.5.  Click Connect and your PC will connect through your GW520.For more information on synchronising using the LG PC Suite see page 77.Using Bluetooth:1.   Ensure Bluetooth is switched On and Visible for both your PC and GW520.2.   Pair your PC and GW520 so that a passcode is required for connection.3.  Use the Connection wizard on your LG PC Suite to create an active Bluetooth connection.4.    Click  Communicate on your PC. Then click Setting.5.    Click  Modem.6.  Choose Standard Modem over Bluetooth link and click OK. It will now appear on screen.7.  Click Connect and your PC will connect through your GW520.For more information on Bluetooth see page 85.The web79
SETTINGSWithin this folder you can adapt your settings to make your GW520 personal to you.For information on call settings see page 28.Changing your screen settings1.    Touch   then choose   Settings.2.    Touch  Screen settings and then choose from:°  Wallpaper: Choose the theme for your standby screen.°  Top menu: Phone displays menu in standby.°  Dialling: Adjust the number size and colour.°  Font: Adjust the font size.The longer the backlight is on for, the more battery power is used and you may need to charge your phone more often.°  Backlight: Choose how long the backlight remains on for.°  Brightness: Adjust the screen brightness. °  Handset theme: Quickly change the whole look of your screen.°  Greeting message: Choose on or off and fill in the greeting message.3.     Touch  Save to save your settings.Personalising your profilesYou can quickly change your profile on the standby screen. Simply touch the status summary bar on the top and touch the profile tab. Using the settings menu you can personalise each profile setting.1.    Press   and then choose   Settings.2.    Touch  Profiles and then choose the profile you want to edit. 3.   You can then change all of the sounds and alert options available in the list, including your Voice/Video call ring tone and volume, message alerts, screen sound settings and more.Changing your phone settingsEnjoy the freedom of adapting how your GW520 works to your own preferences.To scroll through a list of options, touch the last item visible and slide your finger up the screen. The list will move up so more items are visible.1.    Touch   then choose   Settings.2.    Touch  Phone settings then choose from the list below.°  Date & Time: Adjust your date and time settings or choose to auto update the time when you travel or for daylight saving.Settings80
Settings81°  Power save: Choose to switch the factory set power saving settings On, Off and Auto.°  Languages: Change the language of your GW520’s display.°  Autokeylock: Lock the keypad automatically in standby screen.°  Security: Adjust your security settings, including PIN codes and handset lock.°  Memory manager: See Using memory manager on page 84 for more information.°  Reset settings: Reset all the settings to their factory definitions.°  Information: View the technical information for your GW520.Changing the setting of touchpadYou can change the setting value of touchpad. Touch   and then choose Touch settings.°  Touch type: Change the touching type such as vibration, tone, vibration & tone, No feedback.°  Touch tone: Change the tone when touching the screen.°  Tone volume: Controls the volume of tone.°  Touch vibration: Change the type of vibration°  Vibration volume: Controls the strength of vibration.Changing your connectivity settingsYour connectivity settings have already been set up by your network operator, so you can enjoy your new phone from the off. If you want to change any settings, use this menu.Touch   then   Settings. Touch Connectivity.°  Network settings: Your GW520 connects automatically to your preferred network.To change these settings use this menu.°  Internet profiles: Set the profiles to connect to the internet.°  Access points: Your network operator has already saved this information. You can add new access points using this menu.°  Packet data conn.: Set the packet data connection.°  USB connection mode: Choose PC suite and synchronise your GW520 using the LG PC Suite software to copy files from your phone.  If you use Music sync with Windows Media Player, select Music sync in this menu. Music sync is only available for music content. You can synchronize data with external memory card or Phone Internal memory or both.Choose PictBridge to print out the data in My stuff menu. Always ask means that the menu will always offer a choice of
Settings82USB connections.°  TV out: Choose PAL or NTSC for connecting your GW520 to a TV.°  Synch service: The Server sync function synchronises the data in a phone and the data on a server such as contact address information, schedule items, to do items and memo items via a wireless network.Synch service is dependent upon the network service.°  Streaming settings: Your network operator has already saved this information. You may edit it if you’d like to make changes.°  Divx VOD registration: Install the DivX converter which is supplied on the same CD as the PC Sync software.Once installed select DivX from the Program Files on your PC, then DivX converter followed by Converter. The TV output cable is available for purchase separately.-  ABOUT DIVX VIDEO: DivX® is a digital video format created by DivX, Inc. This is an official DivX Certified device that plays DivX video.-  ABOUT DIVX VIDEO-ON-DEMAND: This DivX® Certified device must be registered with DivX in order to play DivX Video-on-Demand (VOD) content. First generate the DivX VOD registration code for your device and submit it during the registration process. [Important: DivX VOD content is protected by a DivX DRM (Digital Rights Management) system that restricts playback to registered DivX Certified devices. If you try to play DivX VOD content not authorized for your device, the message “Authorization Error” will be displayed and your content will not play.] Learn more at www.divx.com/vod.Using memory managerYour GW520 has three memories available: the phone, the USIM Card and an external memory card (you may need to purchase the memory card separately).You can use memory manager to determine how each memory is used and see how much space is available.Touch   followed by   Settings. Select Phone settings then Memory Manager.
Settings83°  Handset common memory: View the memory available on your GW520 for Pictures, Sounds, Video, Flash, MMS, Email, Java applications and others.°  Handset reserved memory: View the memory available on your handset for SMS, Contacts, Calendar, To do list, Memo, Alarm, Call history, Bookmarks and Miscellaneous items.°  SIM memory: View the memory available on your USIM Card.°  External memory: View the memory available on your external memory card (you may need to purchase the memory card separately).°  Primary storage settings: Choose the location you prefer items to be saved to.See page 14 for information on Installing a memory card.Using flight modeTurn on flight mode by selecting   then   Settings. Touch Profiles and choose Flight mode. Flight mode will not allow you to make calls, connect to the Internet, send messages or use Bluetooth.Sending and receiving your files using BluetoothBluetooth is a great way to send and receive files as no wires are needed and connection is quick and easy. You can also connect to a Bluetooth headset to make and receive calls.To send a file:1.   Open the file you want to send, typically this will be a photo, video or music file.2.    Touch   and choose Send.Choose Bluetooth.3.   If you have already paired the Bluetooth device, your GW520 will not automatically search for other Bluetooth devices. If not, your GW520 will search for other Bluetooth enabled devices within range.4.   Choose the device you want to send the file to and touch Select.5.   Your file will be sent.Keep an eye on the progress bar to make sure your file is sent.To receive a file:1.  To receive files your Bluetooth must be both On and Visible. See change your Bluetooth settings below for more information.2.  A message will prompt you to accept the file from the sender. Touch Yes to receive the file.
Settings843.  You will see where the file has been saved and you can choose to View the file or Use as wallpaper. Files will usually be saved to the appropriate folder in your Media Album.Changing your Bluetooth settings:1.  Touch   and choose   Settings.2.  Choose Bluetooth then touch   and choose Settings. Make your changes to:°  My device visibility: Choose to be Visible or Hidden or Visible for 1 min.°  My device name: Enter a name for your GW520.°  Supported services: Choose how to use Bluetooth in association with different services. °  Remote SIM Mode: On /Off°  My address: Show your Bluetooth address. Pairing with another Bluetooth deviceBy pairing your GW520 and another device, you can set up a passcode protected connection. This means your pairing is more secure.1.  Check your Bluetooth is On and Visible. You can change your visibility in the Settings menu.2.  Touch Search.3.  Your GW520 will search for devices. When the search is completed Refresh will appear on screen.4.  Choose the device you want to pair with and enter the passcode, then touch OK.5.  Your phone will then connect to the other device, on which you should enter the same passcode.6.  You passcode protected Bluetooth connection is now ready.Using a Bluetooth headset1.  Check your Bluetooth is On and Visible.2.  Follow the instructions that came with your headset to place your headset in pairing mode and pair your devices.3.  Touch Ask always or Allow without ask and touch Yes to Connect now Your GW520 will automatically switch to Headset profile.See page 28 for details on BT answer mode so that you can control how you answer calls when your Bluetooth headset is connected.
WIFIWireless Manager allows you to manage Wi-Fi Internet on your device. It allows the phone to connect to local wireless networks, or access the Internet wirelessly. Wi- Fi is faster and has a greater range than Bluetooth wireless technology.GW520 supports WEP, WPA-PSK/2 encryption not EAP, WPS encryption. If your Wi-Fi service provider or network administrator sets the encryption for network security, you should fill in the key in the pop-up window. If the encryption is not set, this pop-up window is not shown. If you don’t know the key, you need to ask for it from your Wi-Fi service provider or network administrator.Settings85

Navigation menu