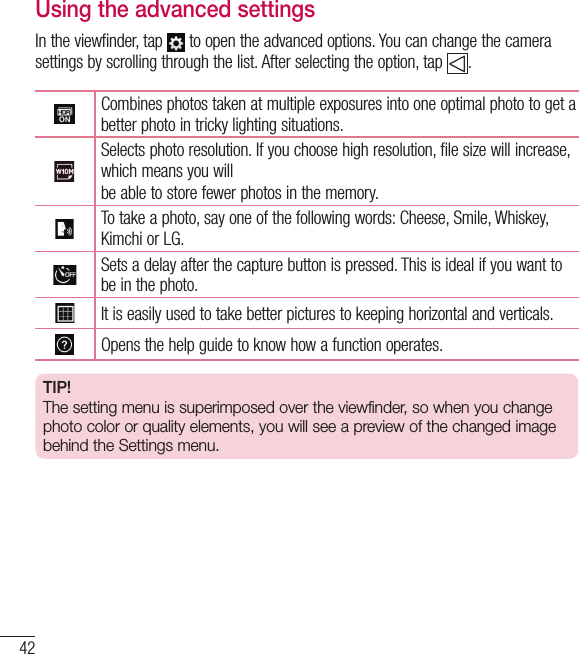
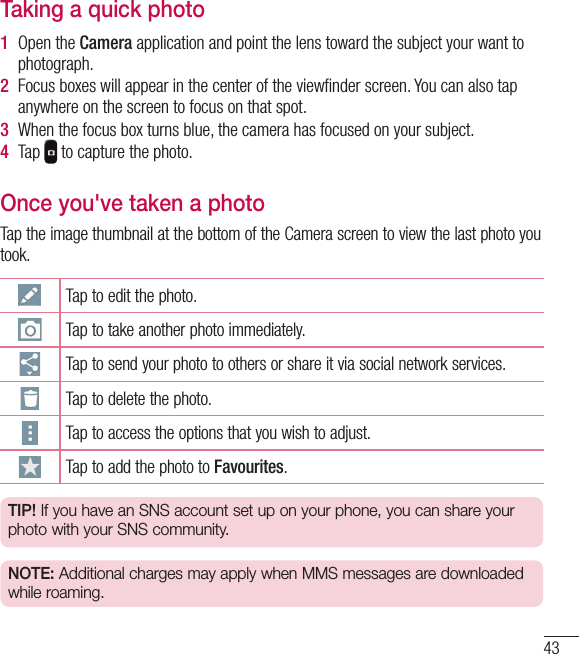
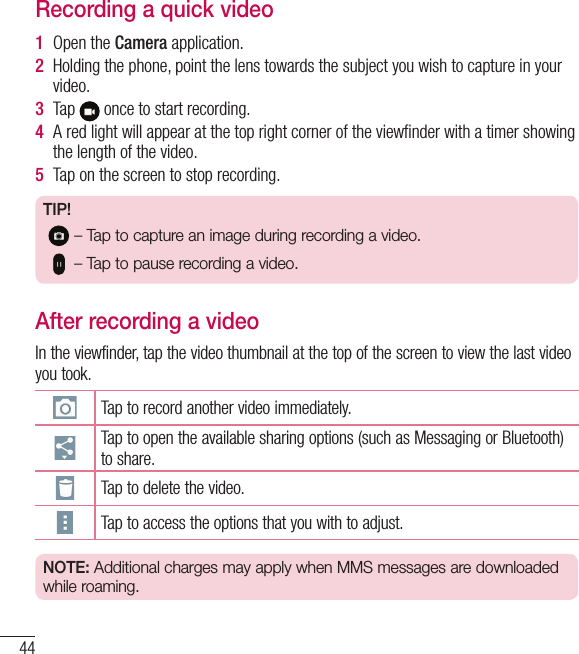
LG Electronics USA H955P Multi-band GSM/EDGE/WCDMA/LTE Phone with WLAN, Bluetooth, and RFID User Manual LG H955P ENG UG 150114 indd

LG Electronics MobileComm USA, Inc. Multi-band GSM/EDGE/WCDMA/LTE Phone with WLAN, Bluetooth, and RFID LG H955P ENG UG 150114 indd

Users Manual

www.lg.comMFL00000000 (1.0)ENGLISHLG-H955PUSER GUIDEThis model is not intended for sale in the USA
User Guide•  Screen displays and illustrations may differ from those you see on actual phone.•  Some of the contents of this guide may not apply to your phone, depending on the software and your service provider. All information in this document is subject to change without notice.•  This handset is not suitable for people who have a visual impairment due to the tap screen keyboard.•  Copyright ©2015 LG Electronics, Inc. All rights reserved. LG and the LG logo are registered trademarks of LG Group and its related entities. All other trademarks are the property of their respective owners.•  Google™, Google Maps™, Gmail™, YouTube™, Hangouts™ and Play Store™ are trademarks of Google, Inc.ENGLISH
2Table of contentsImportant notice .......................................4Getting to know your phone .....................8Phone layout ............................................8Installing the SIM or USIM card ..............10Charging your phone .............................11Unlocking the screen .............................12Your Home screen ...................................13Touch screen tips ..................................13Home screen .........................................14Returning to recently-used applications .16Notifi cations panel .................................16On-screen keyboard ..............................19Special Feature .......................................20Gesture View .........................................20Glance View ...........................................21Gesture shot ..........................................22KnockON ...............................................23Knock Code ...........................................23Dual Window .........................................24QuickMemo+ .........................................25QSlide ....................................................26QuickRemote .........................................27Google account setup .............................28Connecting to Networks and Devices ....29Wi-Fi .....................................................29Bluetooth ...............................................30Wi-Fi Direct ...........................................31SmartShare ...........................................31Transferring data between a PC and the device....................................................32Calls ........................................................33Making a call .........................................33Calling your contacts .............................33Answering and rejecting a call ...............33Making a second call .............................34Viewing your call logs ............................34Call settings ...........................................34Contacts ..................................................35Searching for a contact ..........................35Adding a new contact ............................35Favourites contacts ................................35Creating a group ....................................36Messaging ............................................... 37Sending a message ...............................37Threaded box  .......................................38Changing your message settings ...........38E-mail ......................................................39Managing an email account ...................39Working with account folders .................39Composing and sending email ...............40
3Camera and Video ...................................41Getting to know the viewfi nder ..............41Using the advanced settings ..................42Taking a quick photo  .............................43Once you've taken a photo.....................43Recording a quick video .........................44After recording a video...........................44Gallery ................................................... 48Multimedia ..............................................51Music ....................................................51Utilities ....................................................53Clock .....................................................53Calculator ..............................................54Calendar ................................................ 54Voice Recorder ......................................55Tasks ..................................................... 55Voice Search..........................................56Downloads ............................................56LG SmartWorld ......................................57The Web ..................................................58Internet .................................................. 58Chrome .................................................60Settings ...................................................61Networks ...............................................61Sound .................................................... 64Display ..................................................65General .................................................. 68PC software (LG PC Suite) ......................74For Windows OS ....................................74For Mac OS ............................................75Phone software update ..........................77Phone software update ..........................77About this user guide .............................79About this user guide .............................79Trademarks ...........................................80DivX HD .................................................80Dolby Digital Plus ...................................80Accessories .............................................81Troubleshooting ......................................82FAQ ..........................................................86For your safety ........................................93Safety instructions ...............................100
4Important noticePlease read this before you start using your phone!Please check to see whether any problems you encountered with your phone are described in this section before taking the phone in for service or calling a service representative.1. Phone memory When there is less than 10% of space available in your phone memory, your phone cannot receive new messages. You need to check your phone memory and delete some data, such as applications or messages, to make more memory available.To uninstall applications:1  Tap   >   > Apps tab >   > General tab > Apps.2  Once all applications appear, scroll to and select the application you want to uninstall.3  Tap Uninstall.2. Optimizing battery lifeExtend your battery's power by turning off features that you don't have to run constantly in the background. You can monitor how applications and system resources consume battery power.Extending your phone's battery life:•  Turn off radio communications when you are not using. If you are not using Wi-Fi, Bluetooth or GPS, turn them off.•  Reduce screen brightness and set a shorter screen timeout.•  Turn off automatic syncing for Gmail, Calendar, Contacts and other applications.•  Some applications you have downloaded may reduce battery power.•  While using downloaded applications, check the battery charge level.
5NOTE: If you accidently press the Power/Lock Key while the device is in your pocket, the screen will turn off automatically in order to save battery power.3.  Before installing an open source application and OS WARNINGIf you install and use an OS other than the one provided by the manufacturer it may cause your phone to malfunction. In addition, your phone will no longer be covered by the warranty. WARNINGTo protect your phone and personal data, only download applications from trusted sources, such as Play Store™. If there are improperly installed applications on your phone, the phone may not work normally or a serious error may occur. You must uninstall those applications and all associated data and settings from the phone.4.  Using the Hard Reset (Factory Reset)If your phone does not restore to its original condition, use a Hard Reset (Factory Reset) to initialize it.1  Turn the power off.2  Press and hold the Power/Lock key + Volume Down key on the back of the phone.3  Release the Power/Lock Key only when the boot logo is displayed, then immediately press and hold the Power/Lock Key again.4  Release all keys when the Factory hard reset screen is displayed.
65  Press the Power/Lock Key to continue or either of the Volume Keys to cancel.6  Press the Volume Keys to highlight YES once more, then press the Power/Lock Key to confi rm. WARNINGIf you perform a Hard Reset, all user applications, user data and DRM licenses will be deleted. Please remember to backup any important data before performing a Hard Reset.5.  Opening and switching applicationsMulti-tasking is easy with Android, you can keep more than one application running at the same time. There is no need to quit an application before opening another one. Use and switch between several open applications. Android manages each application, stopping and starting them as needed to ensure that idle applications don't consume resources unnecessarily.1  Tap  . A list of recently used applications will be displayed.2  Tap the application you want to access. This does not stop the previous app running in the background on the phone. Make sure to tap   to exit an app after using it.•  To remove an app from the recent apps list, swipe the app preview to the left or right. To clear all apps, tap Clear all. 6. When the screen freezesIf the screen freezes or the phone does not respond when you try to operate it:Press and hold the Power/Lock Key and the Volume Down Key for about 10 seconds to reset your phone. To turn your phone off, press and hold the Power/Lock Key and the Volume Down Key for about 20 seconds. If it still does not work, please contact the service center.Important notice
77.  Do not connect your phone when you power on/off your PCMake sure to disconnect your phone from the PC when powering your PC on or off as it might result in PC errors.
8Phone layoutTouch ScreenNotification LEDFront Camera LensHome KeyProximity SensorBack KeyEarpieceRecent KeyHeadset JackMicrophoneCharger/USB portMicrophoneInfrared LEDBack Key Returns to the previous screen. Also closes pop-up items such as menus, dialog boxes, and the on-screen keyboard. Touch and hold it to access Dual window.Home Key  Return to the Home screen from any screen.Recent Key Displays recently used applications. If you touch and hold this key, it opens available options menu.NOTE: Proximity sensor When receiving and making calls, the proximity sensor automatically turns the backlight off and locks the touch screen by sensing when the phone is near your ear. This extends battery life and prevents you from unintentionally activating the touch screen during calls.WARNINGPlacing a heavy object on the phone or sitting on it can damage the LCD and touch screen functions. Do not cover the LCD proximity sensor with protective film. This could cause the sensor to malfunction.Getting to know your phone
9Volume ButtonsPower/Lock ButtonNFC Touch PointLaser Detection AutoFocusSpeakerRear Camera LensFlashPower/Lock Button•  Switch your phone on/off by pressing and holding this key•  Short press to lock/unlock the screenVolume Buttons (While screen is switched off)•  Long Press Up to launch QuickMemo+•  Long Press Down to launch Camera WARNING•   This part encloses the battery compartment.•  Be careful not to damage the NFC touch point on the phone, which is part of the NFC antenna.NOTE: The back cover of this product applies a “self-healing” technology, which self-repairs minor scratches in just a few minutes. Minor scratches are those cause by ordinary and normal use of the phone. Scratches caused by abrasive surface, misuse, including but not limited to intentional scratches, and damages caused by a fall or dropping the product, may not disappear. The “self-healing” results may vary depending on the extent of the damage as well as other conditions. Any warranty on the “self-healing” is hereby expressly excluded.NOTE: LDAF Sensor (Laser Detection AutoFocus Sensor)By detecting the distance with laser, when you recording with the rear camera lens, LDAF Sensor enables you to focus the long or close range more fast and accurately.
10Installing the SIM or USIM cardBefore you can start exploring your new phone, you'll need to set it up.1  To remove the back cover, hold the phone fi rmly in one hand. With your other hand, lift off the back cover with your thumbnail as shown in fi gure below.2  Slide the SIM card into the lower slot for the SIM card as shown in fi gure. Make sure the gold contact area on the card is facing downwards.NOTE: Only microUSIM cards work with the device.Getting to know your phone
11NOTE: If you want to use the memory card, insert the memory card into the slot. Make sure the gold contact area is facing downwards.3  Align the back cover over the battery compartment (1) and press it down until it clicks into place (2).Charging your phoneCharge the battery before using it for the first time. Use the charger to charge the battery. A computer can be also used to charge the device by connecting them via the USB cable. WARNINGUse only LG-approved chargers, batteries and cables. If you use unapproved chargers, batteries or cables, it may cause battery charging delay or pop up message regarding slow charging, Or this can cause the battery to explode or damage the device, which are not covered by the warranty.The charger connector is at the bottom of the phone. Insert the charger and plug it into an electrical outlet.
12NOTE:  •  The battery must be fully charged initially to improve battery lifetime.•  Do not open the back cover while your phone is charging.Unlocking the screenAfter a period of inactivity, to conserve the battery, the screen you are currently viewing will be replaced by the lock screen.Unlocking the screen 1  Press the Power/Lock Button or double-tap the center of the screen.2  Swipe the screen in any direction to unlock it.Getting to know your phone
13Your Home screenTouch screen tipsHere are some tips on how to navigate on your phone.Tap or touch – A single finger tap selects items, links, shortcuts and letters on the on-screen keyboard.Touch and hold – Touch and hold an item on the screen by tapping it and not lifting your finger until an action occurs.Drag – Touch and hold an item for a moment and then, without lifting your finger, move your finger on the screen until you reach the target position. You can drag items on the Home screen to reposition them.Swipe or slide – To swipe or slide, quickly move your finger across the surface of the screen, without pausing when you first tap it (so you don’t drag an item instead).Double-tap – Double-tap to zoom on a webpage or a map.Pinch-to-Zoom – Use your index finger and thumb in a pinching or spreading motion to zoom in or out when using the browser or Maps, or when browsing pictures.Rotate the screen – From many applications and menus, the orientation of the screen adjusts to the device's physical orientation.NOTE:•  To select an item, tap the center of the icon.•  Do not press too hard; the tap screen is sensitive enough to pick up a light, yet firm tap.•  Use the tip of your finger to tap the option you want. Be careful not to tap any other keys.
14Home screenThe Home screen is the starting point for many applications and functions, and it allows you to add items like application shortcuts, or Google widgets to give you instant access to information and applications. This is the default canvas and accessible from any menu by tapping  .Status BarWidgetApplication IconsLocation IndicatorQuick Key AreaHome touch buttonsShows phone's status information including the time, signal strength, battery status, and notification icons.Widgets are self-contained applications that can be accessed through the Apps screen or on the Home screen or an extended home screen. Unlike a shortcut, the Widget appears as an on-screen application.Tap an icon (application, folder, etc.) to open and use it.Indicates which Home screen canvas you are viewing.Provides one-touch access to the function in any home screen canvas. Your Home screen
15Extended home screen  The operating system provides multiple Home screen canvases to provide more space for adding icons, widgets, and more. Slide your finger left or right across the Home screen. Customizing the Home screenYou can customize your Home screen by adding apps, widgets or changing wallpapers. Adding items on your Home screen1  Touch and hold the empty part of the Home screen. 2  In the Add Mode menu, select the item you wish to add. You will then see this added item on the Home screen.3  Drag it to the desired location and lift your fi nger.TIP! To add an application icon to the Home screen from the Apps menu, touch and hold the application you want to add.Removing an item from the Home screen Home screen > touch and hold the icon you want to remove > drag it to  .Adding an app as a Quick key From the Apps menu or on the Home screen, touch and hold an application icon and drag it to the Quick key area. Up to 7 apps can be added. Removing an app from the Quick key area Touch and hold the desired quick key and drag it to  .NOTE:   Apps key cannot be removed.
16Customizing apps icons on the Home screen1  Touch and hold an application icon until it is unlocked from its current position. Then drop it on the screen. The editing icon   will appear in the upper right corner of the application.2  Tap the application icon again and select the desired icon design and size. 3  Tap OK to save the change.Returning to recently-used applications1  Tap  . A list of recently used applications will be displayed.2  Tap an icon to open the application. Or tap   to return to your previous screen.Notifications panelNotifications alert  you the arrival of new messages, calendar events, and alarms, as well as to ongoing events, such as when you are on a call.When a notification arrives, its icon appears at the top of the screen. Icons for pending notifications appear on the left, and system icons such as  Wi-Fi or battery strength shown on the right.NOTE: The available options may vary depending on the region or service provider.Pending notificationsBluetooth, Wi-Fi & battery statusYour Home screen
17Opening the notifications panelSwipe down from the status bar to open the notifications panel. To close the notifications panel, touch and drag the screen toward the top of the screen.Quick Toggle AreaNotificationsClearTap each quick toggle key to turn it on/off. Touch and hold the key to access the settings menu of the function. To see more toggle keys, swipe left or right. Tap   to remove, add, or rearrange toggle keys.The current notifications are listed, each with a brief description. Tap a notification to view it. Tap to clear all the notifications.
18Indicator icons on the Status BarIndicator icons appear on the status bar at the top of the screen to report missed calls, new messages, calendar events, device status and more. The icons displayed at the top of the screen provide information about the status of the device. The icons listed in the table below are some of the most common ones.Icon Description Icon DescriptionNo SIM card inserted A song is currently playingNo network signal available Ringer is silencedAirplane mode is on Vibrate mode is onConnected to a Wi-Fi network Battery fully chargedWired headset connected Battery is chargingCall in progress Phone is connected to PC via USB cableMissed call Downloading dataBluetooth is on Uploading dataSystem warning  GPS is onAn alarm is set Data is synchronizingNew voicemail available Choose input methodYour Home screen
19New text or multimedia messageMedia server content sharing onNFC is on Wi-Fi hotspot is activeNOTE: The icons location in the status bar may differ according to the function or service.On-screen keyboardYou can enter text using the on-screen keyboard. The on-screen keyboard appears automatically on the screen when you need to enter text. To manually display the keyboard, simply tap a text field where you want to enter text.Using the keypad & entering text Tap once to capitalize the next letter you type. Double-tap for all caps. Tap to switch to handwriting mode. Tap to enter a space. Tap to create a new line. Tap to delete the previous character.Entering accented lettersWhen you select French or Spanish as the text entry language, you can enter special French or Spanish characters (e.g. "á").For example, to input "á", touch and hold the "a" key until the zoom-in key grows bigger and displays characters from different languages. Then select the special character you want.
20Gesture ViewYou can quickly check the photos taken with the front camera without tapping on the screen.1  Tap   >   > Apps tab >  . 2  Take a picture with the front camera.3  After taking the picture, check the result by bringing the phone close to your face.Taking a picture Quick preview Front camera modeNOTE:  •  This feature depends on the speed and angle of the gesture.•  This feature cannot be repeated twice.Special Feature
21Glance ViewWhen the phone screen is off, you can see the status bar, time and date by dragging your finger down on the screen.
22Gesture shotTake a picture with hand gesture. To take photo, raise your hand until front camera detects it and a box appears on the screen.Special Feature
23KnockONYou can lock or unlock the screen by just double-tap.Double-tap the center screen quickly to unlock the screen. To lock the screen, double-tap the status bar in any screen (except on the camera viewfinder) or empty area on the Home screen. NOTE: When turning the screen on, make sure you do not cover the proximity sensor. Doing so will turn the screen off immediately after turning it on in order to prevent abnormal turning on in your pocket or bag.Knock CodeThe Knock Code feature allows you to tap the screen with your own Knock Code pattern using the screen divided by 4 squares to easily turn the screen on or off. You can disable this feature in the Lock screen settings.NOTE:  •  If you enter the wrong Knock Code 6 times, it will compulsorily take you to your google account log in/backup PIN.•  Use the fingertip instead of finger nail to tap the screen for turning it on or off.•  When the Knock Code is not in use, you can use Knock On function by taping the screen.1  Tap   >   > Apps tab >   > Display tab > Lock screen > Select screen lock > Knock Code.2  Tap the squares in a pattern to set your Knock Code.Your Knock Code pattern can be 3 to 8 taps. Tap Done when you're fi nished.Unlocking the screen using the Knock CodeYou can unlock the screen by tapping the Knock Code pattern you already set, when the screen turns off.
24Dual WindowThe two split-screen can be viewed at the same time.1  Touch and hold the Back button to split the screen.2  Tap or drag app icon you want to use. : Tap to view menu icons, or drag to resize split screens. : Switch two screens. : View app list. : Change to full screen. : Close current app.NOTE: The Dual Window should be set before you use the function. 1  Tap   >   > Apps tab >   > General tab > Dual window.2  Checkmark the Dual window checkbox. Special Feature
25QuickMemo+The QuickMemo+ allows you to create memos and capture screen shots.Capture screens, draw on them and share them with family and friends with QuickMemo+.1  (While screen is switched off) Press and hold the Volume Up key.  OR OR Touch and slide the status bar downward and tap  .2  Select the desired menu option from Pen type, Colour, Eraser and create a memo.3  Tap   in the Edit menu to save the memo with the current screen. To exit QuickMemo+ at any time, tap  .
26QSlideFrom any screen, bring up a notepad, calendar, and more as a window inside your screen. ORTap to exit the QSlide and return to full window.Tap to adjust transparency.Tap to end the QSlide.Tap to adjust the size.1  Touch and slide the status bar downwards > tap QSlide or while using applications that support QSlide, tap  . The function will be continuously displayed as a small window on your screen.2  You can make a call, browse the Web, or choose other phone options. You can also use and tap the screen under the small windows when the transparency bar is not full  .NOTE: The QSlide can support up to one window at the same time.Special Feature
27QuickRemoteQuickRemote turns your phone into a Universal Remote for your home TV, Set top box, audio system.1  Touch and slide the status bar downwards and tap   > ADD REMOTE.OR Tap   >   > Apps tab >   > tap  . 2  Select the type and brand of device, then follow the on-screen instructions to confi gure the device(s).3  Touch and slide the status bar downwards and use QuickRemote functions.NOTE: The QuickRemote operates the same way as an ordinary remote control infrared (IR) signals. Be careful not to cover the infrared sensor at the top of the phone when you use the QuickRemote function. This function may not be supported depending on the model, the manufacturer or service company.
28Google account setupWhen you first turn on your phone, you have the opportunity to activate the network, to sign into your Google Account and select how you want to use certain Google services. Setting up your Google account: •  Sign into a Google Account from the prompted set-up screen. OR •  Tap   >   > Apps tab > select a Google application, such as Play Store > select OR CREATE A NEW ACCOUNT. If you have a Google account, enter your email address and tap NEXT.Once you have set up your Google account on your phone, your phone automatically synchronizes with your Google account on the Web.Your contacts, Gmail messages, Calendar events and other information from these applications and services on the Web are synchronized with your phone. (This will depend on your synchronization settings.)After signing in, you can use Gmail™ and take advantage of Google services on your phone.
29Connecting to Networks and DevicesWi-FiYou can use high-speed Internet access within the coverage of the wireless access point (AP).Connecting to Wi-Fi networks1  Tap   >   > Apps tab >   > Networks tab > Wi-Fi.2  Set Wi-Fi to ON to turn it on and start scanning for available Wi-Fi networks.3  Tap a network to connect to it.•  If the network is secured with a lock icon, you need to enter a password.4  The status bar displays icons that indicate Wi-Fi status.NOTE: If you are out of the Wi-Fi zone or have set Wi-Fi to OFF, additional charges may be applied by your mobile operator for mobile data use. TIP! How to obtain the MAC addressTap   >   > Apps tab >  > Networks tab > Wi-Fi >   > Advanced Wi-Fi > MAC address.
30BluetoothYou can use Bluetooth to exchange data between near devices.NOTE: •  LG is not responsible for the loss, interception or misuse of data sent or received via the Bluetooth feature.•  Always ensure that you share and receive data with devices that are trusted and properly secured. If there are obstacles between the devices, the operating distance may be reduced.•  Some devices, especially those that are not tested or approved by Bluetooth SIG, may be incompatible with your device.  Pairing up your phone with another Bluetooth device1  Tap   >   > Apps tab >   > Networks tab > Bluetooth.2  Set Bluetooth to ON to turn it.3  Tap Search for devices to view the devices in the Bluetooth Range.4  Choose the device you want to pair with from the list. Once the paring is successful, your device will connect to the other device. NOTE: Some devices, especially headsets or hands-free car kits, may have a fixed Bluetooth PIN, such as 0000. If the other device has a PIN, you will be asked to enter it.Sending data via Blutooth1  Select a fi le or item  such as a contact or media fi le.2  Select the option for sending data via Bluetooth.NOTE: The method for selecting an option may vary by data type. 3  Search for and pair with a Bluetooth-enabled device.Connecting to Networks and Devices
31Receiving data via Blutooth1  Tap   >   > Apps tab >   > Networks tab > Bluetooth.2  Set Bluetooth to ON to turn it.Wi-Fi DirectWi-Fi Direct supports a direct connection between Wi-Fi enabled devices without an access point.Turning on Wi-Fi Direct:1  Tap   >   > Apps tab >   > Networks tab > Wi-Fi.2  Tap   > Advanced Wi-Fi > Wi-Fi Direct.3  Select a device to connect with from the scanned device list.SmartShareYou can enjoy SmartShare feature on Gallery and Music.1  On the content you want to play or beam, tap   or   > SmartShare.2  Tap Play or Beam in the dialog box. •  Play: You can stream your content via TV, Bluetooth speaker, etc.•  Beam: You can send your content to Bluetooth devices or SmartShare Beam*-supported LG phones or tablets.*SmartShare Beam quickly transfers multimedia contents through Wi-Fi Direct. 3  Tap the device to play or receive on the list. •  If the device is not on the list, make sure on the device that Wi-Fi, Wi-Fi Direct, or Bluetooth connection is turned on. And tap Rescan.   4  Tap Send.
32Enjoying content from nearby devices such as a computer or mobile device on your phone 1  To connect the nearby devices to your phone, tap Nearby devices on Gallery, Music application as below.•  Ensure that your phone and nearby devices are connected to the same Wi-Fi network. •  Make sure DLNA feature on the nearby device is turned on. 2  Tap the device to connect. If the device is not on the list, tap Search nearby devices. After connection, you can enjoy the contents from the nearby device on your phone.Transferring data between a PC and the deviceYou can copy or move data between a PC and the device. Transferring data1  Connect your device to a PC using a USB cable.2  Slide down the notifi cations panel, and select the Media sync (MTP).3  Transfer data between a PC and the device.NOTE: •  LG Android Platform Driver on your PC.•  Check the requirement to use Media device (MTP).Items RequirementOS Microsoft Windows XP SP3, Vista or higherWindow Media Player version Windows Media Player 10 or higherConnecting to Networks and Devices
33CallsMaking a call1  Tap   to open the keypad.2  Enter the number using the keypad. To delete a digit, tap the  .3  Tap   to make a call.4  To end a call, tap the End icon  .TIP! To enter "+" to make international calls, touch and hold  .Calling your contacts1  Tap   to open your contacts.2  Scroll through the contact list or enter the fi rst few letters of the contact you want to call by tapping Search contacts.3  In the list, tap   you want to call.Answering and rejecting a callWhen you receive a call, swipe the   in any direction to Answer the incoming call.Swipe the   in any direction to Decline an incoming call.
34Making a second call1  During your fi rst call, tap   > Add call and dial the number. 2  Tap   to make the call.3  Both calls are displayed on the call screen. Your initial call is locked and put on hold.4  Tap the displayed number to toggle between calls. Or tap   to start a conference call.5  To end active calls, tap End.NOTE: You are charged for each call you make.Viewing your call logsOn the Home screen, tap   and choose the Call logs.View a complete list of all dialled, received and missed calls.TIP! •  Tap any call log entry to view the date, time and duration of the call.•  Tap the  , then tap Delete all to delete all the recorded items.Call settingsYou can configure phone call settings such as call forwarding, as well as other special features offered by your carrier. 1  On the Home screen, tap  .2  Tap .3  Tap Call settings and choose the options that you wish to adjust.Calls
35ContactsAdd contacts to your phone and synchronize them with the contacts in your Google account or other accounts that support contact syncing.Searching for a contactOn the Home screen1  Tap   to open your contacts. 2  Tap Search contacts and enter the contact name using the keyboard.Adding a new contact1  Tap  , enter the new contact's number, then tap the  . Tap Add to Contacts > New contact. 2  If you want to add a picture to the new contact, tap the image area. Choose from Take photo or Select from Gallery.3  Tap a category of contact information and enter the details about your contact.4  Tap Save.Favourites contactsYou can classify frequently called contacts as favourites.Adding a contact to your favourites1  Tap   to open your contacts.2  Tap a contact to view its details.3  Tap the star to the right corner of the contact's name. The star will turn yellow color.
36Removing a contact from your favourites list1  Tap   to open your contacts.2  Tap the Favourites tab, and choose a contact to view its details.3  Tap the yellow color star to the right corner of the contact's name. The star turns white color and the contact is removed from your favourites.Creating a group1  Tap   to open your contacts.2  Tap Groups and tap the  . Select New group.3  Enter a name for the new group. You can also set a ringtone for the newly created group.4  Tap Save to save the group.NOTE: If you delete a group, the contacts assigned to that group will not be lost. They will remain in your contacts.Contacts
37MessagingYour phone combines SMS and MMS into one intuitive, easy-to-use menu.Sending a message1  Tap   on the Home screen and tap   to open a blank message.2  Enter a contact name or contact number in the To fi eld. As you enter the contact name, matching contacts will appear. You can tap a suggested recipient. You can add more than one contact.NOTE: You will be charged for a text message for every person to whom you send the message.3  Tap the Enter message fi eld and begin composing your message.4  Tap   to open the options menu.TIP! You can tap the   icon to attach the file, that you want to share with message.5  Tap Send to send your message.6  Responses will appear on the screen. As you view and send additional messages, a message thread is created. WARNING: •  The 160-character limit may vary from country to country, depending on the language and how the SMS is coded.•  If an image, video or audio file is added to an SMS message, it is automatically converted into an MMS message and you are charged accordingly.
38Threaded box Messages (SMS, MMS) exchanged with another party can be displayed in chronological order so that you can conveniently see an overview of your conversation.Changing your message settingsYour phone message settings are pre-defined, so you can send messages immediately. You can change the settings according to your preferences.•  Tap the Messaging icon on the Home screen, tap   and then tap Settings.Messaging
39E-mailYou can use the E-mail application to read emails from services like Gmail. The E-mail application supports the following account types: POP3, IMAP and Exchange.Your service provider or system administrator can provide you with the account settings you need.Managing an email accountThe first time you open the E-mail application, a set-up wizard opens to help you to set up an email account.After the initial set-up, E-mail displays the contents of your inbox. Adding another email account:•  Tap   >   > Apps tab > E-mail > tap   > Settings >   Add account.Changing an email general settings:•  Tap   >   > Apps tab > E-mail > tap   > Settings > General settings.Deleting an email account:•  Tap   >   > Apps tab > E-mail > tap   > Settings > tap   > Remove account > Select the account to delete > Remove  > select Yes.Working with account foldersTap   >   > Apps tab > E-mail > tap   and select Folders.Each account has an Inbox, Outbox, Sent and Drafts folder. Depending on the features supported by your account's service provider, you may have additional folders.
40Composing and sending emailComposing and send a message1  While in the E-mail application, tap the  .2  Enter an address for the message's intended recipient. As you enter text, matching addresses will be proposed from your Contacts. Separate multiple addresses using semicolons.3  Tap the   to add a Cc/Bcc and tap   to attach fi les, if required.4  Enter the text of the message. 5  Tap  .TIP! When a new email arrives in your Inbox, you will be notified by a sound or vibration. E-mail
41To open the Camera application, tap   >   > Apps tab >  .Getting to know the viewfinder169278345Clear view on&off – Tap to display and hide the camera options on the screen.Flash – Tap to choose from Off , On , Auto . Swap camera – Tap to swap between the rear camera lens and the front camera lens.Shot mode – Tap to choose from Auto, Panorama or Dual.Settings – Tap to adjust the camera and video settings.Gallery – Tap to access your Gallery.Record – Tap to start recording a video.Capture – Tap to take a photo.Back key – Tap to close the selected menu or exit the Camera app.NOTE: Please ensure the camera lens is clean before taking pictures.Camera and Video
42Using the advanced settingsIn the viewfinder, tap   to open the advanced options. You can change the camera settings by scrolling through the list. After selecting the option, tap  .Combines photos taken at multiple exposures into one optimal photo to get a better photo in tricky lighting situations. Selects photo resolution. If you choose high resolution, file size will increase, which means you willbe able to store fewer photos in the memory.To take a photo, say one of the following words: Cheese, Smile, Whiskey, Kimchi or LG.Sets a delay after the capture button is pressed. This is ideal if you want to be in the photo.It is easily used to take better pictures to keeping horizontal and verticals. Opens the help guide to know how a function operates.  TIP!The setting menu is superimposed over the viewfinder, so when you change  photo color or quality elements, you will see a preview of the changed image behind the Settings menu.Camera and Video
43Taking a quick photo 1  Open the Camera application and point the lens toward the subject your want to photograph.2  Focus boxes will appear in the center of the viewfi nder screen. You can also tap anywhere on the screen to focus on that spot.3  When the focus box turns blue, the camera has focused on your subject.4  Tap   to capture the photo.Once you've taken a photoTap the image thumbnail at the bottom of the Camera screen to view the last photo you took. Tap to edit the photo.Tap to take another photo immediately.Tap to send your photo to others or share it via social network services.Tap to delete the photo.Tap to access the options that you wish to adjust.Tap to add the photo to Favourites. TIP! If you have an SNS account set up on your phone, you can share your photo with your SNS community.NOTE: Additional charges may apply when MMS messages are downloaded while roaming.
44Recording a quick video1  Open the Camera application. 2  Holding the phone, point the lens towards the subject you wish to capture in your video.3  Tap   once to start recording.4  A red light will appear at the top right corner of the viewfi nder with a timer showing the length of the video.5  Tap on the screen to stop recording.TIP!– Tap to capture an image during recording a video.– Tap to pause recording a video.After recording a videoIn the viewfinder, tap the video thumbnail at the top of the screen to view the last video you took.Tap to record another video immediately.Tap to open the available sharing options (such as Messaging or Bluetooth) to share.Tap to delete the video.Tap to access the options that you with to adjust. NOTE: Additional charges may apply when MMS messages are downloaded while roaming.Camera and Video
45Multi-point Auto FocusWhen you take a picture, the Multi-point Auto Focus (AF) function operates automatically and will allow you to see a clear image.Burst shotAllows you to take multiple shots quickly. Touch and hold  .Panorama mode Allows you to take a picture a long way over a wide area of land. 1  Tap   >   > Apps tab >  . 2  MODE > Panorama. 3  Tap   to start. 4  Pan your phone slowly to one direction. 5  Fit focus area to blue guideline to take photo. 6  Tap stop button when fi nished.
46DualThe Dual feature allows you to take a picture or record video with the front and rear cameras at the same time.1  Tap   >   > Apps tab >  .2  Tap MODE >  .NOTE: Drag the small screen to move it to your desired location. Touch and hold the small screen to resize it. Tap on the small screen to switch screens.3  Tap   to stop dual recording.Super ZoomingYou can use a zoom up to 8 times while taking pictures.TIP! This function operates automatically while zooming in and out.NOTE: Use a steady hand. This feature does not work with some functions Objects can be overlapped when taking a picture of fast-moving subjects.Camera and Video
47Live ZoomLive Zoom allows you to zoom in or zoom out on a portion of a video that is being played to make the desired section appear larger or smaller.When viewing a video, use your index finger and thumb in a pinching or spreading motion to zoom in or out.NOTE: Do not press too hard; the touch screen is sensitive enough to pick up a light, but firm touch.Dual PlayDual Play (connected wired or wirelessly to two displays) can be run on a different screen.NOTE: Connect two devices using wired (Slimport-HDMI) cable or a wirelessly (Miracast). The connectable device can be a TV or a monitor supported by an HDMI cable or Miracast. The Gallery, Video apps are supported on Dual Play. Tap the   once when two displays are a different status (i.e. the monitor is playing a video and your phone’s video app is displaying empty screen), then Dual Play will start. Not all videos are supported by Dual Play. Dual Play operates at 1280X720 or higher display resolution.
48GalleryOpen the Gallery application to view albums of your pictures and videos.1  Tap   >   > Apps tab >  .You can manage and share all your image and video fi les with Gallery.NOTE:•  Some file formats are not supported, depending on the software installed on the device.•  Some files may not play properly, depending on how they are encoded.Viewing picturesLaunching Gallery displays your available folders. When another application, such as E-mail, saves a picture, the download folder is automatically created to contain the picture. Likewise, capturing a screenshot automatically creates the Screenshots folder. Select a folder to open it.Pictures are displayed by creation date in a folder. Select a picture to view it full screen. Scroll left or right to view the next or previous image.Zooming in and outUse one of the following methods to zoom in on an image:•  Double-tap anywhere to zoom in.•  Spread two fingers apart on any place to zoom in. Pinch to zoom out, or double-tap to return.Camera and Video
49Playing videosVideo files show the   icon in the preview. Select a video to watch it and tap  . The Videos application will launch.1  Touch   > Apps tab >  . 2  Select the video you want to play./Touch to pause/resume video playback.Touch to go 10 seconds forward.Touch to go 10 seconds backward.Touch to manage the video volume.    Touch to lock/unlock a video screen.Touch to rotate a video screen.Touch to use QSlide.Tap to share your video via the SmartShare function.Tap to access the options that you wish to adjust.
50To change the volume while watching a video, press the up and down volume keys on the back of the phone.Editing photosWhen viewing an photo, tap  .Deleting photos/videosUse one of the following methods:•  In a folder, tap   and select photos/videos by ticking, and then tap on Delete.•  When viewing a photo, tap  .Setting as wallpaperWhen viewing a photo, tap   > Set image as to set the image as wallpaper or assign to a contact.NOTE:•  Some file formats are not supported, depending on the device software.•  If the file size exceeds the available memory, an error can occur when you open files.Camera and Video
51MusicYour phone has a built-in music player that lets you play all your favorite tracks. To access the music player, tap   >   > Apps tab >   .Playing a song1  Tap   >   > Apps tab >   . 2  Tap Songs.3  Select the song you want to play.Tap to pause playback.Tap to resume playback.Tap to skip to the next track in the album, playlist, or shuffle. Touch and hold to fast forward.Tap to restart the current track or skip to the previous track in the album, playlist, or shuffle. Touch and hold to rewind.Multimedia
52Tap to display the Volume slider bar, then adjust the playback volume on the slider bar.Tap to set audio effects.Tap to play the current playlist in shuffle mode (tracks are played in random order).Tap to toggle through the repeat modes to repeat all songs, repeat current song, or repeat off.Tap to share your music via the SmartShare funtion.Tap to add the song to your favourites.Tap to open the current playlist.Tap to access the options that you wish to adjust.To change the volume while listening to music, press the up and down volume keys on the back side of the phone.NOTE:•  Some file formats are not supported, depending on the device software.•  If the file size exceeds the available memory, an error can occur when you open files.NOTE: Music file copyrights may be protected by international treaties and national copyright laws. Therefore, it may be necessary to obtain permission or a licence to reproduce or copy music. In some countries, national laws prohibit private copying of copyrighted material. Before downloading or copying the file, check the national laws of the relevant country concerning the use of such material.Multimedia
53ClockThe Clock app to access the Alarms, Timer, World clock and Stopwatch functions. Access these functions by tapping the tabs across the top of the screen or swiping horizontally across the screen.Tap   >   > Apps tab >  .AlarmThe Alarms tab allows you to set varying alarm clocks.1  Open the Clock app, then select the Alarm tab.2  Tap the New alarm icon to add a new alarm, tap an alarm time to modify that alarm or tap a current alarm icon to activate an existing alarm.TimerThe Timer tab can be used to alert you with an audible signal when a set amount of time has passed.1  Open the Clock app, then select the Timer tab.2  Set the time on the digital timer. Tap the Hour, Minute or Second fi eld then enter the numbers as necessary.World colckThe World clock tab allows you to set up a list of cities to easily check current times in other time zones with a quick glance.1  Open the Clock app, then select the World clock tab.2  Tap the New city icon, search through the available cities, then tap the one you want.Utilities
54StopwatchThe Stopwatch tab allows you to use your phone as a Stopwatch.1  Open the Clock app, then select the World clock tab.2  Tap the Start button and tap the Stop button to stop the time.You can use the Lap function by tapping the Lap button to record multiple milestone times within the same timing session.3  Tap the Reset button to reset the Stopwatch or Tap the green Resume button to continue monitoring time.CalculatorThe Calculator app allows you to perform mathematical calculations using a standard calculator or a scientific calculator.1  Tap   >   > Apps tab >   .2  Tap the number keys to enter numbers.3  For simple calculations, tap the function you want to perform (+, –, x or ÷) followed by =.4  For more complex calculations, tap  , then tap Scientifi c calculator.5  To check the history, tap the icon  .CalendarThe Calendar app allows you to track your schedule of events(That you created or that you've been invited to), organized by day, week, month, year or agenda.1  Tap   >   > Apps tab >   .2  On the screen, you can fi nd the different view types for the Calendar (Day, Week, Month, Year, Agenda).3  Tap on the date for which you wish to add an event and tap  .Utilities
55Voice RecorderThe Voice Recorder app records audible files for you to use in a variety of ways.Recording a sound or voice1  Tap   >   >  .2  Tap   to begin recording.3  Tap   to end the recording.4  Tap   to listen to the recording.NOTE: Tap  to access your album. You can listen to the saved recording. The available recording time may differ from actual recording time.TasksThis task can be synchronized with MS Exchange account. You can create task, revise it and delete it in MS outlook or MS Office Outlook Web Access.Synchronizing MS Exchange1  Tap   >   > Apps tab >   .2  Tap General tab > Accounts & sync > Add account.3  Tap Microsoft Exchange to create Email address and Password.4  Make sure if you checkmark Sync task.NOTE: MS Exchange may not be supported depending on email server.
56Voice SearchUse this application to search webpages using voice.1  Tap   >   > Apps tab > Google folder >   .2  Say a keyword or phrase when Speak now appears on the screen. Select one of the suggested keywords that appear.NOTE: This application may not be available depending on the region or service provider.DownloadsUse this application to see what files have been downloaded through the applications.•  Tap   >   > Apps tab >   .NOTE: This application may not be available depending on the region or service provider.Utilities
57LG SmartWorldLG SmartWorld offers an assortment of exciting content – fonts, themes, games, applications.How to Get to LG SmartWorld from Your Phone1  Tap   >   > Apps tab > tap the   icon to access LG SmartWorld.2  Tap Sign in and enter ID/PW for LG SmartWorld. If you have not signed up yet, tap Register to receive your LG SmartWorld membership.3  Download the content you want.*  When you use Cellular network, data fee could be charged by data plan that you signed-up with carrier.* LG SmartWorld may not be available from all carriers or in all countries.NOTE: What if there is no   icon? 1  Using a mobile Web browser, access LG SmartWorld (www.lgworld.com) and select your country.2  Download the LG SmartWorld App.3  Run and install the downloaded fi le.4  Access LG SmartWorld by tapping the   icon.Special benefit only in LG SmartWorld1  Decorate your own style on your Smartphone, Use Home Theme & Keyboard Theme & Font that provided on LG SmartWorld. (However this service is available to specifi c device. please check in LG SmartWorld website whether it is feasible or not whether it is feasible or not)2  Enjoy LG SmartWorld's special service by joining promotion that consistently provided.
58The WebInternetUse this application to browse the Internet. Browser gives you a fast, full-color world of games, music, news, sports, entertainment and much more, right on your mobile phone wherever you are and whatever you enjoy.NOTE: Additional charges apply when connecting to these services and downloading content. Check data charges with your network provider.1  Tap   >   > Apps tab >   .Using the Web toolbarTap slide it upwards with your finger to open.Tap to go back one page.Tap to go forward one page, to the page you connected to after the current one. This is the opposite of what happens when you tap  , which takes you to the previous page.Tap to go to the Home page. Tap to add a new window.Tap to access bookmarks.Viewing webpagesTap the address field, enter the web address and tap Go.
59Opening a pageTo go to new page, tap     .To go to another webpage, tap  , scroll up or down, and tap the page to select it.Searching the web by voiceTap the address field, tap   , speak a keyword, and then select one of the suggested keywords that appear.NOTE: This feature may not be available depending on the region or service provider.BookmarksTo bookmark the current webpage, tap  > Add to bookmarks > OK.To open a bookmarked webpage, tap   and select one.HistoryTap   > History to open a webpage from the list of recently-visited webpages. To clear all history, tap    Yes.Using Popup BrowserUse this feature to access the Internet without closing the current application.While viewing content, such as contacts or notes that include web addresses, select a web address and then tap Popup Browser to open the pop-up browser. Touch and drag the browser to move it to another location.To view the browser in full screen, tap  .To close the browser, tap  .
60ChromeUse Chrome to search for information and browse webpages.1  Tap   >   > Apps tab >   .NOTE: This application may not be available, depending on your region and service provider.Viewing webpagesTap the Address field, and then enter a web address or search criteria.Opening a pageTo go to a new page, tab   > New tab.To go to another webpage, tap  , scroll up or down and tap the page to select it.The Web
61SettingsThis section provides an overview of items you can change using your phone's System settings menus. Accessing the Settings menu:Tap   > Tap and hold   > System settings.- or -Tap   >   > Apps tab >   . Networks< WIRELESS NETWORKS >Wi-FiTurns on Wi-Fi to connect to available Wi-Fi networks.BluetoothTurn the Bluetooth wireless feature on or off to use Bluetooth.Mobile dataDisplays the data usage and set mobile data usage limit.CallConfigure phone call settings such as call forwarding and other special features offered by your carrier. Voicemail – Allows you to select your carrier’s voicemail service.   Fixed dialing numbers – Turn on and compile a list of numbers that can be called from your phone. You’ll need your PIN2, which is available from your operator. Only numbers within the fixed dial list can be called from your phone.   Incoming voice call pop-up – Display incoming voice call pop-up when an app is in use.  Call reject – Allows you to set the call reject function.
62   Decline with message – When you want to reject a call, you can send a quick message using this function. This is useful if you need to reject a call during a meeting.  Call forwarding – Choose whether to divert all calls when the line is busy, when there is no answer or when you have no signal.  Auto answer – Set the time before a connected hands-free device automatically answers an incoming call.  Connection vibration – Vibrate your phone when the other party answers the call.  Noise suppression – Suppress background noise on my end during a call.  Voice clarity – Enhance voice quality in noisy environments so you can hear more clearly.   Save unknown numbers – Add unknown numbers to contacts after a call.   Power key ends call – Allows you to select your end call.  Call barring – Lock incoming, outgoing or international calls.  Call duration – View the duration of calls including Last call, Outgoing calls, Incoming calls and All calls.  Additional settings – Allows you to change the following settings.       Caller  ID – Choose whether to display your number in an outgoing call.     Call waiting – If call waiting is activated, the handset will notify you of an incoming call while you are on a call (depending on your network provider).< CONNECTIVITY >Share & connect  NFC – Your phone is an NFC-enabled mobile phone. NFC (Near Field Communication) is a wireless connectivity technology that enables two-way communication between electronic devices. It operates over a distance of a few centimeters. You can share your content with an NFC tag or another NFC support device by simply tapping it with your device. If you tap an NFC tag with your device, it will display the tag content on your device.Settings
63     To switch NFC on or off – From the Home screen, touch and slide the notification panel down with your finger, then select the NFC icon to turn it on.NOTE: When airplane mode is activated, the NFC application can be used.    Using NFC – To use NFC, make sure your device is switched on, and activate NFC if disabled.  Android Beam – When this feature is turned on, you can beam app content to another NFC-capable device by holding the devices close together.    Just bring the device together(typically back to back) and then tap your screen. The app determines what gets beamed.  SmartShare Beam – Enable to receive files from LG phones.  Media server – Share the phone display and sound on TV.  Miracast – Mirror phone screen and sound onto Miracast dongle or TV Wirelessly.   LG PC Suite – Connect LG PC Suite with your phone to easily Manage multimedia content and apps.Tethering & networks  USB tethering – Connect the USB cable to share the internet connection with the computer.  Wi-Fi hotspot – You can also use your phone to provide a mobile broadband connection. Create a hotspot and share your connection. Please "Sharing your phone's data connection" for more information.   Bluetooth tethering – Allows you to set your phone whether you are sharing the Internet connection or not.    Help – Tap to view help information on the Wi-Fi hotspot and Bluetooth tethering functions.  Airplane mode – After switching to Airplane mode, all wireless connections are disabled.
64NOTE: You must set a lock screen PIN or password before you can use credential storage.  Mobile networks – Set options for data roaming, network mode & operators, access point names (APNs) etc.   VPN – Displays the list of Virtual Private Networks (VPNs) that you've previously configured. Allows you to add different types of VPNs.Sound< BASIC >Sound profileChoose the Sound, Vibrate only or Do not disturb.VolumeAdjust the phone's volume settings to suit your needs and your environment.Vibration strengthAllows you to set the vibrate strength for calls, notifications, and touch feedback.< RINGTONES & VIBRATIONS >RingtoneSet the ringtone for calls. You can also add a ringtone by tapping   at the top right corner of the screen.Notification soundSet the notification sound. You can also add a notification sound by tapping   at the top right corner of the screen.Sound with vibrationCheckmark to set the phone to vibrate in addition to the ringtone when you receive calls.Vibration typeAllows you to choose the type of vibration. Settings
65< NOTIFICATIONS >Do not disturbTap to set notifications. You can have no interruptions from notifications.Lock screenAllows you to show all notifications on the Lock screen.AppsAllows you to set notifications for apps.< ADVANCED SETTINGS >Vibrate on tapCheckmark to vibrate when tapping the Home touch buttons and during other UI interactions.Sound effectsTap to set the dial pad touch tones, touch sounds, and screen lock sound. Dialpad touch sounds – Checkmark to play tones while using dial pad. Touch sounds – Checkmark to play sound when making screen selection.  Screen lock sound – Checkmark to play sound when locking and unlocking the screen.Message/call voice notificationsTap the Message/call voice notifications switch to toggle it On or Off. On allows your device to incoming call and message events automatically.Display< HOME & LOCK > Home screen Select Home – Set Home or EasyHome as default home.  Smart Bulletin – Tap the Smart Bulletin switch to toggle it On or Off. It includes an additional Home screen showing customized information. Checkmark LG Health, or Smart Tips.
66  Theme – Sets the screen theme for your device. You can download it from LG SmartWorld.  Wallpaper – Sets the wallpaper to use on your Home screen.   Screen swipe effect – Sets the effect when you swipe to change screens.   Allow Home screen looping – Checkmark to allow continuous Home screen scrolling (loop back to first screen after last screen).   Home backup & restore – Set to backup and restore Home app layout and wallpaper. Help – Displays information regarding the Home screen items and functions.Lock screen   Select screen lock – Set a screen lock type to secure your phone. Opens a set of screens that guide you through drawing a screen unlock pattern.   If you have enabled a Pattern lock type when you turn on your phone or wake up the screen, you will be asked to draw your unlock pattern to unlock the screen.  Smart Lock – Sets to keep your phone unlocked when you have a trusted Bluetooth device connected to it, when it's in a familiar location like your home or work, or when it recognizes your face.   Screen swipe effect – Sets the screen swipe effect options.NOTE: This setting name may be Pattern effect if the Screen lock is set to Pattern.  Wallpaper – Sets your Lock screen wallpaper. Shortcuts – Allows you to change the shortcuts on the Swipe Lock screen.  Weather animation – Checkmark to show weather animation for current location on lock screen.   Contact info for lost phone – Allows you to set the device owner’s name to be displayed on the Lock screen.  Lock timer – Sets the amount of time before the screen automatically locks after the screen has timed-out.Settings
67   Power button instantly locks – Checkmark to instantly lock the screen when the Power/Lock Key is pressed. This setting overrides the Security lock timer setting.Home touch buttonsSet the Home touch buttons displayed at the bottom of all of the screens. Set which ones are displayed, their position on the bar, and what they look like.< FONT >Font typeSets the type of font used for the phone and menus.Font sizeSets the size of the font displayed in the phone and menus.< OTHER SCREEN SETTINGS >BrightnessAdjusts the brightness of the screen. For best battery performance, use the dimmest comfortable brightness.Notification LEDTap the switch to toggle it On or Off. On will activate the LED light for the notifications you select, in the color you set for each one.Auto-rotate screenCheckmark to set the phone to automatically rotate the screen based on the phone orientation (portrait or landscape).Screen timeoutSets the amount of time before the screen times out.Screen modeSets the screen mode. Choose from Standard, Vivid and Natural.
68< ADVANCED SETTINGS >Screen-off effectSets the screen-off effect. Choose from Black hole, Retro TV and Fade out.DaydreamTap the Daydream switch to toggle it On or Off. On allows the set screensaver to be displayed when the phone is sleeping while docked and/or charging.Auto-adjust screen toneCheckmark to save battery power by adjusting screen brightness automatically with analysis of image colour.General< PERSONAL >Language & inputUse the Language & input settings to select the language for the text on your phone and to configure the on-screen keyboard, including words you've added to its dictionary. Language – Sets the language to use on your device. Default – Sets the default on-screen keyboard to use when entering text.  LG Keyboard – Checkmark to select the LG Keyboard to enter data. Tap the Settings icon to change the following settings:   Google voice typing – Checkmark to select Google voice typing to enter data. Tap the Settings icon (Settings icon)to change the Google voice settings. Voice Search – Sets voice search options.   Text-to-speech output – Sets the preferred speech engine and speech rate (very slow to very fast). Also plays a short demonstration of speech synthesis. Pointer speed – Sets the pointer speed on a slide bar.Settings
69LocationTurn on location service, your phone determines your approximate location using GPS, Wi-Fi and mobile networks.  Mode – Set the location mode from High accuracy (GPS and networks), Battery saving (Networks only) and Device sensors only (GPS only). Camera – Checkmark to tag photos or videos with their locations.   Google Location Reporting – Select whether to turn on or off Google Location Reporting options.Accounts & syncPermits applications to synchronize data in the background, whether or not you are actively working in them. Deselecting this setting can save battery power and lower (but  not eliminate) data usage.CloudAdd a cloud account to quickly and easily use cloud service on LG apps. AccessibilityUse the Accessibility settings to configure accessibility plug-ins you have installed on your phone.NOTE: Requires additional plug-ins to become selectable.One-handed operation  Dial keypad – Checkmark to enable you move the dial keypad to the right or left side of the device. Simply tap the arrow to move it to one side or the other.  LG keyboard – Checkmark to enable you move the keyboard to the right or left side of the device. Simply tap the arrow to move it to one side or the other.  Lock screen – Checkmark to enable you move the PIN Lock screen keypad to the right or left side of the device. Simply tap the arrow to move it to one side or the other. Help – Displays information regarding one-handed operation.
70Shortcut keyGet quick access to apps by pressing and holding the Volume keys when screen is off or locked. Tap the Shortcut key switch (Shortcut key switch image) at the top right corner of the screen to toggle it On or Off.< PRIVACY >Security  Content lock – Select lock types to lock files in Gallery. Choose from Password or Pattern.   Encrypt SD card storage – Allows you to encrypt SD card storage and keep data unavailable for other devices.  Phone Lock – Allows you to lock phone when powered on to protect data if lost or stolen.   Password typing visible – Show the last character of the hidden password as you type. Phone administrators – View or deactivate phone administrators. Unknown sources – Default setting to install non-Play store applications. Verify apps – Disallow or warn before installation of apps that may cause harm. Storage type – Hardware-backed. Trusted credentials – Display trusted CA certificates.  Install from storage – Choose to install encrypted certificates. Clear credentials – Remove all certificates. Trust agents – View or deactivate Trust agents.  Screen pin – You can enable your device to only show a certain app’s screen using screen pin. Settings
71< SMART FUNCTIONS >Gestures  Answer an incoming call – Checkmark to enable you to bring the phone to your ear to automatically answer the incoming call.   Fade out ringtone – Checkmark to enable you to pick up the phone from the flat surface to fade out the incoming call ringtone.   Silence incoming calls – Checkmark to enable you to flip the phone to silence incoming calls.   Snooze or stop alarm – Checkmark to enable you to simply flip the device to snooze or stop the alarm.  Pause video – Checkmark to enable you to simply flip the device to pause the currently playing video. Help – Opens a help guide on how to use the Gestures features of your device.   Motion sensor calibration – Allows you to improve the accuracy of the tilt and speed of the sensor.  QuickCircle  caseActivate to make features, such as music, weather, and clock, available in small view when using the QuickCircle case.Dual windowThe two split-screen can be viewed at the same time.  Split view – Checkmark to tap a link on the full screen or attachment from emails to run dual windows automatically. Help – Display tips for using dual window.
72< PHONE MANAGEMENT >Date & timeUse Date & time settings to set how dates will be displayed. You can also use these settings to set your own time and time zone rather than obtaining the current time from the mobile network.Storage INTERNAL STORAGE – View the internal storage usage.Battery  BATTERY INFORMATION – The Battery charge information is displayed on a battery graphic along with the percentage of the remaining charge and its status. Touch the Battery charge icon to display the Battery use screen to see battery usage level and battery use details. It displays which components and applications are using the most battery power. Tap one of the entries to see more detailed information. Battery usage – View the battery usage.   Battery percentage on status bar – Checkmark to display the battery level percentage on the Status Bar next to the battery icon.  BATTERY SAVER – Tap the Battery saver switch to toggle it On or Off. Tap Battery saver to access the following settings:   TURN BATTERY SAVER ON – Sets the battery charge percent level that will automatically turn on Battery saver. Choose from Immediately, 5% battery and 15% battery. Help – Display battery saving items information.Smart cleaningDisplay the space in use and free in your phone. Tap   at the top right corner of the screen to set notification interval and idle time period.AppsView and manage your applications.Settings
73Default message appSet Messaging or Hangouts as default app.Backup & resetChange the settings for managing your settings and data.   Backup my data – Set to backup your settings and application data to the Google server. Backup account – Set to backup your account.  Automatic restore – Set to restore your settings and application data when the applications are reinstalled on your device.   LG Backup service – Backs up all information on the device and restores it in the event of data loss or replacement.   Factory data reset – Reset your settings to the factory default values and delete all your data. If you reset the phone this way, you are prompted to re-enter the same information as when you first started Android.PrintingAllows you to print the content of certain screens (such as web pages displayed in Chrome) to a printer connected to the same Wi-Fi network as your Android device. About phoneView legal information and check your phone status and software version.
74For Windows OSLG PC Suite helps you manage media contents and applications in your phone by allowing you to connect to your phone to your PC.With the LG PC Suite software, you can...•  Manage and play your media contents (music, movie, pictures) on your PC.•  Send multimedia contents to your device.•  Synchronizes data (schedules, contacts, bookmarks) in your device and PC.•  Backup the applications in your device.•  Update the software in your device.•  Play multimedia contents of your PC from other device* Some functions may not be available, depending on the model.NOTE: You can use the Help menu from the application to find out how to use the LG PC Suite software.Installing the LG PC Suite SoftwareTo download the LG PC Suite software, please do the following: 1  Go to www.lg.com/us.2  Go to SUPPORT > MOBILE SUPPORT > PC Sync.3  Select the model information and click GO.4  Scroll down, select the PC SYNC tab > Windows > DOWNLOAD to download LG PC Suite.System Requirements for LG PC Suite software•  OS: Windows XP (Service pack 3) 32bit, Windows Vista, Windows 7, Windows 8•  CPU: 1 GHz or higher processors•  Memory: 512 MB or higher RAMs•  Graphic card: 1024 x 768 resolution, 32 bit color or higherPC software (LG PC Suite)
75•  HDD: 500 MB or more free hard disk space (More free hard disk space may be needed depending on the volume of data stored.)•  Required software: LG United drivers, Windows Media Player 10 or later.NOTE: LG United USB DriverThe LG United USB driver is required to connect an LG device and PC. It is installed automatically when you install the LG PC Suite software application.For Mac OSWith the LG PC Suite software, you can...•  Manage and play your media contents (music, movie, pictures) on your PC.•  Send multimedia contents to your device.•  Synchronizes data (schedules, contacts, bookmarks) in your device and PC.* Some functions may not be available, depending on the model.NOTE: You can use the Help menu from the application to find out how to use the LG PC Suite software.Installing the LG PC Suite SoftwareTo download the LG PC Suite software, please do the following:1  Go to www.lg.com/us.2  Go to SUPPORT > MOBILE SUPPORT > PC Sync.3  Select the model information and click GO.4  Scroll down, select the PC SYNC tab > Mac OS > DOWNLOAD to download LG PC Suite.System Requirements for LG PC Suite software•  OS: Mac OS X (10.6.8) or higher•  Memory : 2GB RAM or higher•  Graphics card: 1024 x 768 screen resolution or higher and 32-bit color
76•  Hard disc: Storage of 500 MB or higher (Additional space may be required for data)•  Required software: LG United Mobile driverNOTE: LG Integrated USB DriverThe LG integrated USB driver is required to connect an LG device and PC. It is installed automatically when you install the LG PC Suite software application.PC software (LG PC Suite)
77Phone software updateLG Mobile phone software update from the InternetFor more information about using this function, please visit http://www.lg.com/common/index.jsp   select your country and language. This feature allows you to conveniently update the firmware on your phone to a newer version from the Internet without needing to visit a service center. This feature will only be available if and when LG makes a newer firmware version available for your device.Because the mobile phone firmware update requires the user's full attention for the duration of the update process, please make sure you check all instructions and notes that appear at each step before proceeding. Please note that removing the USB data cable during the upgrade may seriously damage your mobile phone.NOTE: LG reserves the right to make firmware updates available only for selected models at its own discretion and does not guarantee the availability of the newer version of the firmware for all handset models.LG Mobile Phone software update via Over-the-Air (OTA)This feature allows you to conveniently update your phone's software to a newer version via OTA, without connecting using a USB data cable. This feature will only be available if and when LG makes a newer firmware version available for your device.You should first check the software version on your mobile phone: Settings > General tab > About phone > Update Center > Software Update > Check now for update.Phone software update
78NOTE: Your personal data from internal phone storage—including information about your Google account and any other accounts, your system/application data and settings, any downloaded applications and your DRM licence—might be lost in the process of updating your phone's software. Therefore, LG recommends that you backup your personal data before updating your phone's software. LG does not take responsibility for any loss of personal data.NOTE: This feature depends on your network service provider, region and country.Phone software update
79About this user guide•  Before using your device, please carefully read this manual. This will ensure that you use your phone safely and correctly.•  Some of the images and screenshots provided in this guide may appear differently on your phone.•  Your content may differ from the final product, or from software supplied by service providers or carriers, This content may be subject to change without prior notice. For the latest version of this manual, please visit the LG website at www.lg.com.•  Your phone's applications and their functions may vary by country, region, or hardware specifications. LG cannot be held liable for any performance issues resulting from the use of applications developed by providers other than LG.•  LG cannot be held liable for performance or incompatibility issues resulting from edited registry settings being edited or operating system software being modified. Any attempt to customize your operating system may cause the device or its applications to not work as they should.•  Software, audio, wallpaper, images, and other media supplied with your device are licensed for limited use. If you extract and use these materials for commercial or other purposes is, you may be infringing copyright laws. As a user, you are fully are entirely responsible for the illegal use of media.•  Additional charges may be applied for data services, such as messaging, uploading and downloading, auto-syncing, or using location services. To avoid additional charges, select a data plan to is suitable for your needs. Contact your service provider to obtain additional details.About this user guide
80Trademarks•  LG and the LG logo are registered trademarks of LG Electronics.•  All other trademarks and copyrights are the property of their respective owners.DivX HD This DivX Certified® device has passed rigorous testing to ensure it plays DivX® video.To play purchased DivX movies, first register your device at vod.divx.com. Find your registration code in the DivX VOD section of your device setup menu.DivX Certified® to play DivX® video up to HD 720p, including premium content.DivX®, DivX Certified® and associated logos are trademarks of DivX, LLC and are used under license.Dolby Digital Plus Manufactured under license from Dolby Laboratories. Dolby, Dolby Digital Plus, and the double-D symbol are trademarks of Dolby Laboratories.About this user guide
81These accessories are available for use with the your phone. (Items described below may be optional.)Travel adaptorQuick Start GuideStereo headsetData cableNOTE: •  Always use genuine LG accessories. •  Failure to do this may void your warranty.•  Accessories may vary in different regions.Accessories
82TroubleshootingThis chapter lists some problems you might encounter when using your phone. Some problems require you to call your service provider, but most are easy to fix yourself.Message Possible causes Possible corrective measuresSIM or USIM card errorThere is no SIM or USIM card in the phone or it is inserted incorrectly.Make sure that the SIM or USIM card is correctly inserted.No network connection/ Dropped networkSignal is weak or you are outside the carrier network.Move toward a window or into an open area. Check the network operator coverage map.Operator applied new services.Check whether the SIM or USIM card is more than 6~12 months old. If so, change your SIM or USIM card at your network provider's nearest branch. Contact your service provider.Codes do not matchTo change a security code, you will need to confirm the new code by re-entering it.If you forget the code, contact your service provider.The two codes you have entered do not match.
83Message Possible causes Possible corrective measuresNo applications can be setNot supported by service provider or registration required.Contact your service provider.Calls not availableDialling error  New network not authorized.New SIM or USIM card inserted. Check for new restrictions.Pre-paid charge limit reached.Contact service provider or reset limit with PIN2.Phone cannot be switched onOn/Off key pressed too briefly.Press the On/Off key for at least two seconds.Battery is not charged.Charge battery. Check the charging indicator on the display.
84Message Possible causes Possible corrective measuresCharging errorBattery is not charged. Charge battery.Outside temperature is too hot or cold.Make sure phone is charging at a normal temperature.Contact problem Check the charger and its connection to the phone.No voltage Plug the charger into a different socket.Charger defective Replace the charger.Wrong charger Use only original LG accessories.Number not allowedThe Fixed dialling number function is on.Check the Settings menu and turn the function off.Impossible to receive / send SMS & photosMemory full Delete some messages from your phone.Files do not openUnsupported file format Check the supported file formats.Troubleshooting
85Message Possible causes Possible corrective measuresThe screen does not turn on when I receive a call.Proximity sensor problemIf you use a protection tape or case, make sure it has not covered the area around the proximity sensor. Make sure that the area around the proximity sensor is clean.No sound Vibration modeCheck the settings status in the sound menu to make sure you are not in vibration or silent mode.Hangs up or freezesIntermittent software problemTry to perform a software update via the website.
86CategorySub-CategoryQuestion AnswerBTBluetoothDevicesWhat are the functions available via BluetoothYou can connect a Bluetooth audio device such as a Stereo/Mono headset or Car Kit.DataContactsBackupHow can I backup Contacts?The Contacts data can be synchronized between your phone and Gmail™.DataSynchronizationIs it possible to set up one-way sync with Gmail?Only two-way synchronization is available.DataSynchronizationIs it possible to synchronize all email folders?The Inbox is automatically synchronized. You can view other folders by tapping the   and select Folders to choose a folder.Google™ ServiceGmail Log-InDo I have to log into Gmail whenever I want to access Gmail?Once you have logged into Gmail, no need to log into Gmail again.Google™ ServiceGoogle AccountIs it possible to filter emails?No, email filtering is not supported via the phone.Phone FunctionEmailWhat happens when I execute another application while writing an email?Your email will automatically be saved as a draft.FAQ
87CategorySub-CategoryQuestion AnswerPhone FunctionRingtoneIs there a file size limitation for when I want to use  MP3 file as  ring tone?There is no file size limitation.Phone FunctionMessage TimeMy phone does not display the time of receipt for messages older than 24 hrs. How can I change this?You will only be able to see the times for messages received the same day.Phone FunctionNavigationIs it possible to install another navigation application on my phone?Any application that is available at Play Store™ and is compatible with the hardware can be installed and used.Phone FunctionSynchronisationIs it possible to synchronize my contacts from all my email accounts?Only Gmail and MS Exchange server (company email server) contacts can be synchronized.Phone FunctionWait and PauseIs it possible to save a contact with Wait and Pause in the numbers?If you transferred a contact with the W & P functions saved into the number, you will not be able to use those features. You will need to re-save each number.How to save with Wait and Pause:1.  From the Home screen, tap the  .2.  Dial the number, then tap the  .3.  Tap Add 2-sec pause or Add wait.
88CategorySub-CategoryQuestion AnswerPhone FunctionSecurityWhat are the phone’s security functions?You are able to set the phone to require that an Unlock Pattern be entered before the phone can be accessed or used.Phone FunctionUnlockPatternHow do I create the Unlock Pattern?1.  From the Home screen, tap and hold  .2.  Tap System settings > Display tab > Lock screen.3.  Tap Select screen lock > Pattern. The first time you do this, a short tutorial about creating an Unlock Pattern will appear.4.  Set up by drawing your pattern once, and once again for confirmation.Precautions to take when using the pattern lock.It is very important to remember the unlock pattern you set. You will not be able to access your phone if you use an incorrect pattern five times. You have five chances to enter your unlock pattern, PIN or password. If you have used all 5 opportunities, you can try again after 30 seconds. (Or, if you preset the backup PIN, you can use the backup PIN code to unlock the pattern.)FAQ
89CategorySub-CategoryQuestion AnswerPhone FunctionUnlockPatternWhat should I do if I forget the unlock pattern and I didn’t create my Google account on the phone?If you have forgotten your pattern:If you logged into your Google account on the phone but failed to enter the correct pattern 5 times, tap the forgot pattern button. You are then required to log in with your Google account to unlock your phone. If you have not created a Google account on the phone or you have forgotten it, you will have to perform a hard reset.Caution: If you perform a factory reset, all user applications and user data will be deleted. Please remember to backup any important data before performing a factory reset.Phone FunctionMemoryWill I know when my memory is full? Yes, you will receive a notification.Phone FunctionLanguage SupportIs it possible to change my phone's language?The phone has multilingual capabilities.To change the language:1.  From the Home screen, tap and hold   and tap System settings.2.  Ta p  General tab > Language & input > Language.3.  Tap the desired language.
90CategorySub-CategoryQuestion AnswerPhone FunctionVPNHow do I set up a VPN?VPN access configuration is different for each company. To configure VPN access from your phone, you must obtain the details from your company’s network administrator.Phone FunctionScreen time outMy screen turns off after only 15 seconds. How can I change the amount of time for the backlight to turn off?1.  From the Home screen, tap and hold  .2.  Tap System settings > Display tab.3.  Tap Screen timeout.4.  Tap the preferred screen backlight timeout time.Phone FunctionWi-Fi & mobile networkWhen Wi-Fi and mobile network are both available, which service will my phone use?When using data, your phone may default to the Wi-Fi connection (if Wi-Fi connectivity on your phone is set to On). However, there will be no notification when your phone switches from one to the other.To know which data connection is being used, view the mobile network or Wi-Fi icon at the top of your screen.Phone FunctionHome screenIs it possible to remove an application from the Home screen?Yes. Just touch and hold the icon until the dustbin icon appears at the top and center of the screen. Then, without lifting your finger, drag the icon to the trash can.FAQ
91CategorySub-CategoryQuestion AnswerPhone FunctionApplicationI downloaded an application and it causes a lot of errors. How do I remove it?1.  From the Home screen, tap and hold  .2.  Tap System settings > General tab > Apps > DOWNLOADED.3.  Tap the application, then tap Uninstall.Phone FunctionChargerIs it possible to charge my phone using a USB data cable without installing the necessary USB driver?Yes, the phone will be charged by the USB cable regardless of whether the necessary drivers are installed or not.Phone FunctionAlarmCan I use music files for my alarm?Yes. After saving a music file as a ringtone, you can use it as your alarm.1.  Touch and hold a song in a library list. In the menu that opens, tap Set as ringtone > Phone ringtone or Contact ringtone.2.  In the alarm clock setting screen, select the song as a ringtone.Phone FunctionAlarmWill my alarm be audible or will it go off if the phone is turned off?No, this is not supported.Phone FunctionAlarmIf my ringer volume is set to Off or Vibrate, will I hear my alarm?Your alarm is programmed to be audible even in these scenarios.
92CategorySub-CategoryQuestion AnswerPhone FunctionDisplayI tried to make the brightness of screen to the max but it still feels dark. How can i change the brightness of screen more brightly?1.  From the Home screen, tap and hold  .2.  Tap System settings > Display tab > Auto-adjust screen tone.3.  Tap the check box to cancel the function.Recovery SolutionHard Reset (Factory Reset)How can I perform a factory reset if I can’t access the phone’s setting menu?If your phone does not restore to its original condition, use a hard reset (factory reset) to initialize it.FAQ
93For your safetyImportant InformationThis user’s guide contains important information about the use and operation of this phone. Read all information carefully for optimal performance and to avoid any damage or misuse of the phone. Any changes or modifications not expressly approved in this user’s guide could void your warranty for this equipment.Before you beginSafety Guidelines WARNINGTo reduce the possibility of electric shock, do not expose your product to high humidity areas, such as bathroom or swimming pool. Keep the phone away from heat. Never store your phone in environment that may expose it to temperatures below 0°C or above 40°C, such as outdoor during snowstorm, or in your car in hot days. Exposure to cold or heat will result in malfunction, damage or permanent failure. Be careful when using your phone near other electronic devices. The RF emissions from mobile phones may affect nearby electronic equipment that not adequately shielded. You should consult manufacturers of any personal medical devices, as in the case of pacemakers and hearing aides, to determine whether they are susceptible to interference from cell phones.Turn off your phone in medical facilities or at gas stations. Never place your phone in microwaves, as it will cause the battery to explode. Important!Before using your phone, please read the SAFETY INFORMATION OF THE TELECOMMUNICATIONS INDUSTRY ASSOCIATION (TIA).
94Safety InformationRead these simple guidelines. Breaking the rules may be illegal or dangerous.More detailed information is provided in this user’s guide.•  Never use an unapproved battery that could cause damages to the phone or thebattery itself, or even explode.•  Never place your phone in a microwave oven, as this will result in an explosion of thebattery.•  Do not dispose of your battery in fire or with hazardous or flammable materials.•  Make sure the battery does not come into contact with sharp-edged items, such asanimal teeth or claws. This could cause a fire.•  Store the battery in a place out of the reach of children.•   Be careful so that children do not swallow any parts of the phone, such as rubberplugs (earpiece, parts that connect to the phone, etc.). This could cause asphyxiationor suffocation.•  Disconnect the plug and charger from the outlet when the phone shows that thebattery has been fully charged, because it may cause electric shock or fire hazard.•  When in the car, do not leave your phone, or install a hands-free kit, near the airbag. If wireless equipment is improperly installed, you can be seriously injured if the airbagis deployed.•   Do not use mobile phone while driving.•   Do not use the phone in areas where its usage is prohibited. (For example: inairplanes).•  Do not expose the battery charger or adapter to direct sunlight, or use it in placeswith high humidity, such as bathroom.•  Never store your phone in temperatures lower than -20°C or higher than 50°C.•  Do not use harsh chemicals (such as alcohol, benzene, solvents, etc.) or detergents toclean the phone. This could cause fire.•  Do not drop the phone, strike it, or shake it hard.For your safety
95Such actions may harm the phone’s internal circuit boards.•  Do not use your phone in high explosive areas, as this may generate sparks.•  Do not damage the power cord by bending, twisting, pulling, or heating it. Do not usethe plug if it is loose as it may cause fire or electric shock.•   Do not handle the phone with wet hands while it is charging. This can cause electricshock or seriously damage your phone.•  Do not disassemble the phone.•  Do not make or answer calls while charging the phone, which can cause a shortcircuit, electric shock, or fire.•  Use only batteries and chargers provided by LG. The warranty does not apply toproducts provided by other providers.•   Only authorized personnel should service the phone and its accessories.Installation or service may result in accidents and consequently invalidate thewarranty.•   Do not hold or let the antenna come in contact with your body during a call.•  Emergency calls can be made only within a service area. To make an emergency call, make sure you are within a service area and the phone is on.•   Use your accessories, such as headphones or headsets, with caution, ensuring thatthe cables are plugged properly and that they do not touch the antenna unnecessarily.Information about the RF exposure from FCC WARNINGRead this information before operating the phone.In August 1996, the Federal Communications Commission (FCC) of the United States, with its action in Report and Order FCC 96-326, adopted an updated safety standard for human exposure to radio frequency (RF) electromagnetic energy emitted by FCC regulated transmitters. Those guidelines are consistent with the safety standard
96previously set by both international and U.S. standards.The design of this phone complies with FCC guidelines and these international standards.Body-worn OperationThis device was tested for typical bodyworn operations with the back of the phone kept 0.39 inches (1cm) between the user’s body and the back of the phone. To comply with FCC RF exposure requirements, a minimum separation distance of 0.39 inches (1cm) must bemaintained between the user’s body and the back of the phone.Any beltclips, holsters, and similar accessories containing metallic components may not be used. Body-worn accessories that cannot maintain 0.39 inches (1cm) separation distance between the user's body and the back of the phone, and have not been tested for typical body-worn operations may not comply with FCC RF exposure limits and should be avoided.For your safetyPart15.19 statement This device  complies with part  15 of the FCC Rule s. Operation is subj ect to the following two conditions: (1) This device may not cause harmful interference, and (2) this device must accept any interference received, including interference that may cause undesired operation.Part15.21 statement Changes or modifications not expressly approved by the manufacturer could void the user’s aut hority to ope rate the equipme nt
97Battery Precautions•  Do not disassemble.•  Do not short-circuit.•  Do not expose to high temperatures, over 60 °C (140 °F).•   Do not incinerate.Battery Disposal•   Please dispose of your battery properly, or bring it to your wireless provider forrecycling.•  Do not dispose of your battery in fire or with hazardous or flammable materials.Part15.105 statement This equipment has been tested and found to comply with the limits for a Class B digital device, pursuant to part 15 of the FCC Rules. These limits are designed to provide reasonable protection against harmful interference in a residential installation. This equipment generates, uses and can radiate radio frequency energy and, if not installed and used in accordance with the instructions, may cause harmful interference to radio communications. However, there is no guarantee that interference will not occur in a particular installation. If this equipment does cause harmful interference to radio or television reception, which can be determined by turning the equipment off and on, the user is encouraged to try to correct the interference by one or more of the following measures:- Reorient or relocate the receiving antenna.- Increase the separation between the equipment and receiver.- Connect the equipment into an outlet on a circuit different from   that to which the receiver is connected.- Consult the dealer or an experienced radio/TV technician for help.
98Adapter Precautions (Charger)•   Using the wrong battery charger could damage your phone and void your warranty.•  The adapter or battery charger is only designed for indoor use.•  Do not expose the battery charger or adapter to direct sunlight, or use it in placeswith high humidity, such as the bathroom.Cautions for Battery•  Do not disassemble or open crush, bend or deform, puncture or shred.•  Do not modify or remanufacture, attempt to insert foreign objects into the battery, immerse or expose to water or other liquids, expose to fire, explosion or other hazard.•  Only use the battery for the system for which it is specified.•  Only use the battery with a charging system that has been qualified with the systemper this standard. Use of an unqualified battery or charger may present a risk of fire, explosion, leakage, or other hazard.•   Do not short circuit a battery or allow metallic conductive objects to contact batteryterminals.•   Replace the battery only with another battery that has been qualified with the systemper this standard, IEEE-Std-1725-200x. Use of an unqualified battery may present arisk of fire, explosion, leakage or other hazard.•    Promptly dispose of used batteries in accordance with local regulations.•   Battery usage by children should be supervised.•   Avoid dropping the phone or battery. If the phone or battery is dropped, especiallyon a hard surface, and the user suspects damage, take it to a service center forinspection.•   Improper battery use may result in a fire, explosion or other hazard.For your safety
99•   For those host devices that utilize a USB port as a charging source, the host device'suser manual shall include a statement that the phone shall only be connectedto products that bear the USB-IF logo or have completed the USB-IF complianceprogram.•  Always unplug the charger from the wall socket after the phone is fully charged tosave unnecessary power consumption of the charger.Avoid damage to your ear•   Damage to your hear can occur due to constant exposure to excessive high sound. We, therefore, recommend that you do not turn on or off the phone near your ear. We also recommend you be reasonable with the music and volume level.•   If you listen to music, please ensure that the volume level is adequate, so that you areaware of your surroundings. This is particularly important when attempting to cross a street.
100Exposure to Radio Frequency SignalYour wireless handheld portable telephone is a lowpower radio transmitter and receiver. When it is ON, it receives and also sends out radio frequency (RF) signals.In August, 1996, the Federal Communications Commissions (FCC) adopted RF exposure guidelines with safety levels for handheld wireless phones. Those guidelines are consistent with the safety standards previously set by both U.S. and international standards bodies:ANSI C95.1 (1992) *NCRP Report 86 (1986)ICNIRP (1996)Those standards were based on comprehensive and periodic evaluations of the relevant scientific literature. For example, over 120 scientists, engineers, and physicians from universities, government health agencies, and industry reviewed the available body of research to developthe ANSI Standard (C95.1).*  American National Standards Institute; National Council on Radiation Protection andMeasurements; International Commission on Non-Ionizing Radiation Protection.The design of your phone complies with the FCC guidelines (and those standards).Safety instructions
101Antenna CareUse only the supplied or an approved replacement antenna. Unauthorized antennas, modifications, or attachments could damage the phone and may violate FCC regulations.Phone OperationNORMAL POSITION: Hold the phone as you would any other telephone with the antenna pointed up and over your shoulder.Suggestions for a more efficient operationFor your phone to operate most efficiently:•  Do not touch the antenna unnecessarily, when the phone is in use. The contact withthe antenna affects call quality, and may cause the phone to operate at a higher power level than otherwise would be need.•  Use your phone in temperatures between 0ºC and 40ºC, if possible. Exposing yourphone to extremely low or high temperatures may result in damage, malfunction, or even explosion.DrivingCheck the laws and regulations related to the use of wireless phones in the areas where you drive. Always obey these regulations. Also, if using your phone while driving, make sure to:•   Pay full attention to driving; driving safely is your first responsibility;•   Use hands-free operation, if available;•   Pull off the road and park, before making or answering a call, if driving conditionsdemand so.
102Electronic DevicesMost modern electronic equipment is shielded from RF signals.However, certain electronic equipment may not be shielded against the RF signals from your wireless phone.PacemakerThe Medical Industry Manufacturers Association recommends a minimum distance of fifteen (15) centimeters, or six (6) inches, between a handheld wireless phone and a pacemaker, in order to avoid potential interference between them.These advices are consistent with independent researches, and with recommendations based on wireless technology research.People with pacemakers should:•  ALWAYS keep the phone at least fifteen centimeters (six inches) from their pacemaker, whenever the phone is turned on;•  Not carry the phone in a shirt pocket;•  Use the ear opposite to the pacemaker, to minimize the potential interference;•  If you have any reason to suspect that interference is taking place, switch off yourphone immediately.Hearing AidsSome digital wireless phones may interfere with some hearing aids. In the event of such interference, we recommend that you contact your service provider.Safety instructions
103Other Medical DevicesIf you use any other personal medical devices, consult your device manufacturer to determine if they are adequately shielded from external RF energy. Your doctor can help you obtain this information.Health Care FacilitiesTurn off your phone in health care facilities, whenever there are signs asking you to do so. Hospitals or health care facilities may use equipment that could be sensitive to external RF energy.Facilities with signsTurn off the phone in any facility where warning signs request you to do so.AirplanesFCC regulations prohibit the use of phones while in the air. Turn off your phone before boarding an airplane.
104Blasting AreasTo avoid interfering with blasting operations, turn your phone off when in a 'blasting area' or in areas with signs that read: 'Turn off two-way radios' . Obey all signs and instructions.Potentially Explosive AtmosphereTurn off the phone when in an area with a potentially explosive atmosphere, and obey all signs and instructions.Sparks in such areas could cause an explosion or fire that could result in personal injury or death.Areas with a potentially explosive atmosphere are often clearly marked, but not always. Among the potentially dangerous areas are:Fueling areas (such as gas stations), areas below deck on boats, facilities where chemical products are transferred or stored, vehicles using liquefied petroleum gas (as propane or butane), areas where the air contains chemicals or particles (such as grain, dust or metal powders), and any other areas where you would normally be advised to turn off your vehicle engine.For vehicles equipped with air bags Air bags inflate with strong force. Do not place objects in the area over the air bag or in its deployment area, including wireless equipment, either installed or portable.Serious injuries could occur if wireless equipment is improperly installed into the car when the air bag inflates.Safety instructions
105Safety InformationRead and observe the following information for the safe and proper use of your phone, and to prevent any damage.Also, keep the user's guide in an accessible place at all times after reading it.Charger, Adapter and Battery Security•  The charger and adapter are designed only for indoor use.•   Dispose of your battery properly, or bring it to your wireless provider for recycling.•   The battery doesn’t need to be fully discharged before recharging.•  Only use LG approved chargers that are specifically made for your phone model, since they are designed to maximize the battery life.•  Do not disassemble or short-circuit it.•  Replace the battery when it no longer provides acceptable performance. The batterycan be recharged several hundred times before replacement.•  Charge the battery after long periods without use to maximize its life.•   The battery life will vary depending on usage patterns and environmental conditions.•  Intensive use of backlighting, browser, and packet data connectivity affect battery lifeand talk/standby times.•  The role of self-protection interrupts the phone when its operation is in an abnormalstate. In this case, remove the battery from the phone, reinstall it, and turn on thephone.
106Explosion, Shock and Fire Danger•  Do not place the phone in a place exposed to excessive dust, and keep the minimumrequired distance between the power cord and heat sources.•  Unplug the power cord before cleaning the phone, and clean the power plugwhenever it is dirty.•  When using the power plug, make sure it is firmly connected. Otherwise, it canoverheat or start a fire.•  Placing the phone in a pocket or bag without covering the receptacle (power plugpin), metallic articles (such as a coin, clip or pen) may short-circuit the phone. Always cover the receptacle when not in use.•  Do not short-circuit the battery. Metal items, such as coins, paper clips, or pens, inyour pocket or bag may cause a shortcircuit between the + and - terminals of the battery (metal strips on the battery). The short-circuit of the terminals may damage the battery and cause an explosion.General Notice•  Using a damaged battery, or inserting it into the mouth can cause serious injuries.•   Do not place the phone in proximity to items containing magnetic components, suchas credit cards, calling cards, bank books, or subway tickets. The phone magnetismmay damage the data stored in the magnetic strip.•  Talking on the phone for a long period of time may reduce call quality, because of theheat generated during use.•   When the phone has not been in use for a long time, store it in a safe place, with thepower cord unplugged.•   Using the phone close to a receiving equipment (such as TV or radio) may causeinterference.Safety instructions
107•  Do not use the phone if the antenna is damaged. If a damaged antenna contacts skin, it may cause a slight singe. Contact an LG Authorized Service Facility to replace thedamaged antenna.•  Do not immerse your phone in water. If this happens, immediately turn it off andremove the battery. If your phone does not work, take it to an LG Authorized ServiceFacility.•   The power supply contains elements that could be harmful to your health, ifcomponents are handled directly. If this happens, we recommend immediate hand-washing.•  Do not paint the phone.•   Data stored in your phone might be deleted due to careless use, hardware repair orsoftware upgrade.Please backup your important phone numbers (ringtones, text or voice messages, images, and videos might also get deleted). The manufacturer is not liable fordamages due to loss of data.•  When using the phone in public places, you may set the ringer on vibrate to avoiddisturbing others.•  Do not switch the phone on/off while it is in your ear.Use your phone in temperatures between 0ºC and 40ºC, if possible. Exposing your phone to extremely low or high temperatures may result in damage, malfunction, or evenexplosion.
108Open Source Software Notice InformationTo obtain the source code under GPL, LGPL, MPL, and other open source licenses, that is contained in this product, please visit http://opensource.lge.com.In addition to the source code, all referred license terms, warranty disclaimers and copyright notices are available for download.LG Electronics will also provide open source code to you on CD-ROM for a charge covering the cost of performing such distribution (such as the cost of media, shipping, and handling) upon email request to opensource@lge.com. This offer is valid for three (3) years from the date on which you purchased the product. WARNINGNotice for Battery replacement •  For your safety, do not remove the battery incorporated in the product. If youneed to replace the battery, take it to the nearest authorized LG Electronics service point or dealer for assistance. •  Li-Ion Battery is a hazardous component which can cause injury.•  Battery replacement by non-qualified professional can cause damage to yourdevice.Safety instructions
109Laser safety statementCaution!This product employs a laser system. To ensure proper use of this product, please read this owner's manual carefully and retain for future reference. Should the unit require maintenance, contact an authorized service center. Use of controls, adjustments, or the performance of procedures other than those specified herein may result in hazardous radiation exposure. To prevent direct exposure to laser beam, do not try to open the enclosure or make direct contact with the laser.

Navigation menu