LG Electronics USA HD8280 CDMA Mobile Phone User Manual HD8280
LG Electronics USA CDMA Mobile Phone HD8280
UserManual.wiki
>
LG Electronics USA
>
HD8280 User Manual
User Manual
Navigation menu
Upload a User Manual
Namespaces
Wiki Guide
HTML
PDF
Info
Views
User Manual
Discussion / Help
Navigation
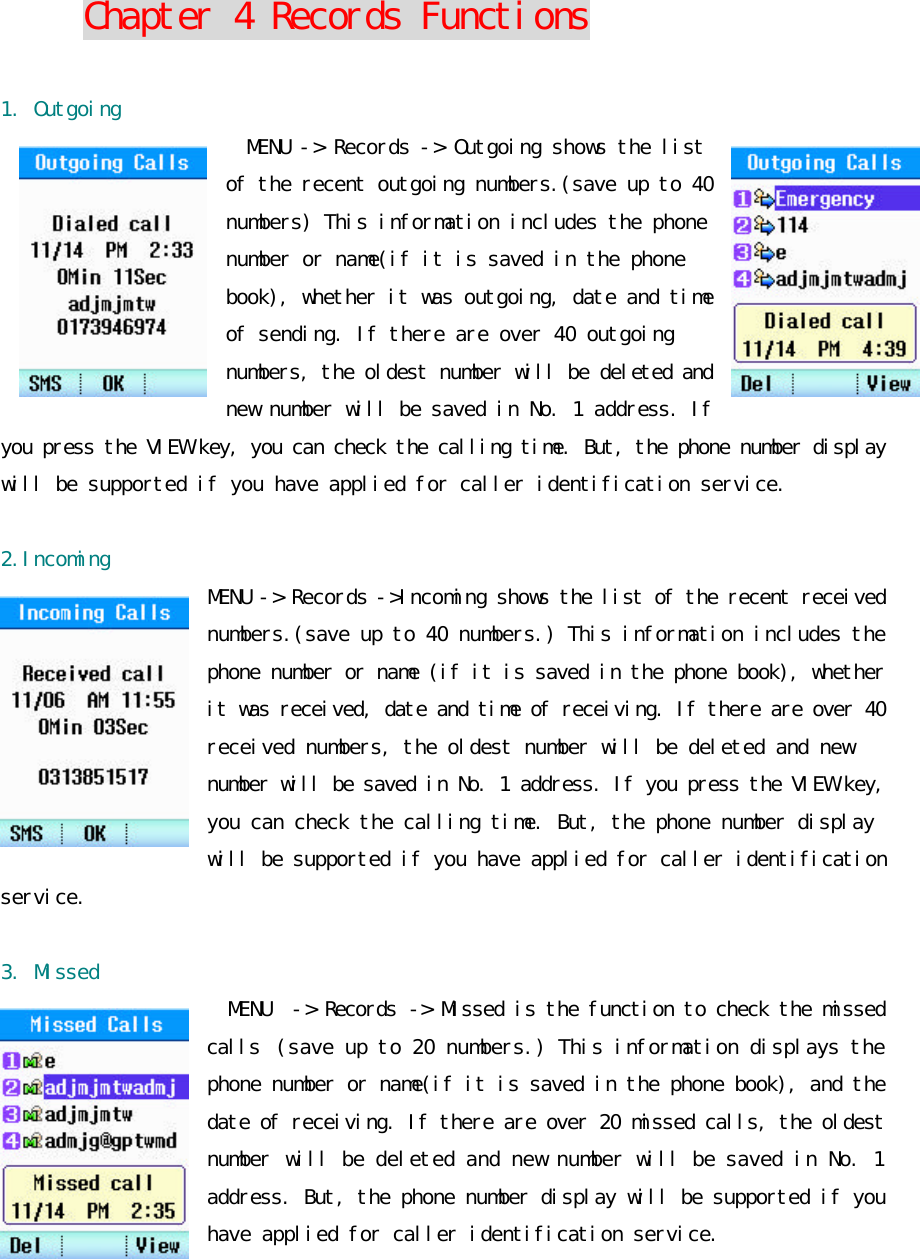
![- When the call is being connected, connect sound will be heard according to the setting. - The screen will display the call duration time and the time you make a call while you are talking over the phone. - Close the folder or press the [END/PWD] Key to end a call. If the earphone is insIf the other party ends a call first, it will be automatically disconnected. ※ The call is not disconnected even if you close the folder while the earphone is inserted. 2) How to Use One touch Key ① If the phone number of the other party you want to make a call is saved in the one touch numbers of the Phonebook, press the relevant address for 2 second to try to make a call to the number saved. There are 2 kinds of method of making a call in this case. ? If it is in ‘1’ address, press ‘1’ of the Keypad for 2 seconds. ? Or, press ‘1’ and then the SEND Key. ② If the digit of the address is over 2. ?‘If you make a call to the number in 20’ address, press ‘2’ short like ○1 above, and press ‘0’ long for about 2 seconds. ?Or, press ‘20’ and then the SEND Key to make a call. 3) How to Make a Call to the Recent Number ① Press the SEND Key in IDLE status. ② When a call history list appears, select the number you want and press the SEND to make a call. ※ 40 numbers will be displayed in Outgoing, 40 in Received, 20 in 20 and 20 in In Call. ※ The phone numbers will be divided into Received, Outgoing, Missed, In Call according to the icon. 4) How to Search and Make a Call to a Number Saved in Calls. ① For the recent outgoing call number, select the phone number you want in MENU ? Records? Outgoing, and press the SEND key to make a call. ② For the recent received call number, select the phone number you want in MENU ? Records ?](https://usermanual.wiki/LG-Electronics-USA/HD8280/User-Guide-386738-Page-4.png)
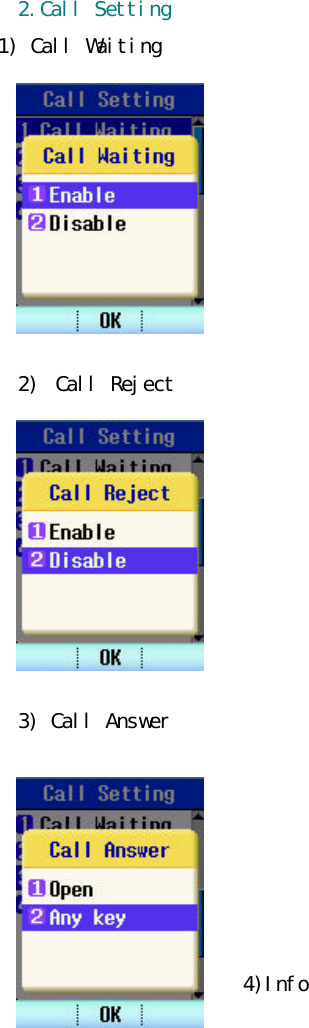
![Received, and press the SEND key to make a call. ③ For the recent missed call number, select the phone number you want in MENU ? Records ? Missed, and press the SEND key to make a call. 5) How to Search and Make a Call to a Number Saved in Phone Book. ① Press the ‘Find” key in the standby screen, or select Menu ? Names ? Find. ② Select the search item you want from By Name, By Num or By Group. ③ Enter the search keyword in the item selected to search. ④ Select the call number in the searched results and press the Send key. 6). How to Make a Call to SMS Incoming Number When SMS is displayed in the screen, press the SEND Key to connect a call to the Callback number. 4. How to Receive a Call 1) If you hear ringer sound or detect the vibration mode, open the Folder to receive a call. When the folder is open, press any key except the END Key to receive a call. If the earphone is inserted, press the SEND/END key of earphone key one time to receive a call. 2) When the call is over, press the [END/PWR] Key or close the Folder. If the other party ends a call first, it will be automatically disconnected. After a call is over, it displays the standby screen. ※ You can receive a call by opening the folder or pressing any key according to the setting of receiving a call. This can be set in Menu ?settings? Call Setting ? Call Answer. ? You can eliminate the bell sound if you press the END key one time when a ringer sound is heard. After that, you can receive a call by pressing any key except the END key. Press the END key one more time to disconnect a call if you don’t want to answer a call. ? If you set it to the manner mode, you can stop the vibration in the method same as the one above. The process after that is same as above. ? The alert of message will be given in vibration if it is in manner mode.](https://usermanual.wiki/LG-Electronics-USA/HD8280/User-Guide-386738-Page-5.png)
![5. How to Check a Missed Call If the user fails to answer a call, it displays the recent time and number of missed calls in the screen. When you press the OK Key or [END/PWD] Key, or close the folder, the message of absent call will disappear. (This function is supported only when you have applied for caller identification service.) You can check the phone number of missed calls in Names -> Missed. Press the SEND Key while the Missed message is displayed in the screen to connect a call to the number you missed. 6. Etiquette Function In etiquette mode, all Key MODE, alert sound, connect sound are muted, and the phone is changed to vibration mode regardless of the current receiving mode. Press the Asterisk(*) Key in lower left of the phone long for about 2 seconds in Ring MODE. Repeat the same to release. Unless it is released by pressing the Asterisk(*) Key, this setting will continue even if the power is OFF/ON. 7. Lock Function This function is to lock the phone so that the other person cannot use. Press the sharp(#) key in the lower right of the phone long for about 2 seconds to set the lock function. When the lock function is set, a call can be made to the emergency numbers saved in the Emergency Number. The password is set to 4 digits of ‘0000’ by default. EMER : This function is used to make a call to the numbers saved using the Emergency Call function. 3 numbers can be saved. Change the setting in MENU ? Settings ? Security ? Emergency Num ※ The call cannot be connected to other numbers except the emergency numbers saved in the Emergency. ※ Cncl : press this key and enter the password to release the lock status. ※ The password can be changed in Menu ? Settings -> Security ? New Lock Code 8. How to Use Ear Microphone. This function is to enable the user to make a call using the Ear Microphone so that the user can use the phone while driving or walking, without holding the phone with hands.](https://usermanual.wiki/LG-Electronics-USA/HD8280/User-Guide-386738-Page-6.png)