LG Electronics USA HGQQMSD10 Communication Gateway User Manual
LG Electronics USA Communication Gateway
User Manual
Simple Guide
EnerBox®2
Please read this manual carefully before operating your set and
retain it for future reference.
Some of the content in this guide may differ from your unit.
This communications gateway is for end-users. It consists of basic
information regarding the communication gateway. For gateway
installation and setup, refer to the installation instructions of AC
module system.
HGQQMSD10.AUSH
*mfl69963601*
Safety instructions
> CAUTION
yPlace the product in a safe place so that it does not fall.
–If dropped, the product could be damaged and even cause an injury.
yPlace and use the product indoor only.
–Otherwise, this may cause damage to the product.
yDo not connect the product to power strips, surge protector or surge protector-embedded
power strips. It is recommended the gateway is directly connected to a 120V AC outlet.
–Otherwise, communication interference may occur.
Please take note of the safety instructions to prevent any potential accident or misuse of the
gateway.
Safety precautions are given in two forms, i.e. Warning and Caution as detailed below.
. WARNING Failure to follow the instructions may cause serious injury and even
death.
> CAUTION Failure to follow the instructions may cause injury to persons or
damage to the product.
. WARNING
yDo not place the product in direct sunlight or near heat sources such as radiator, res,
stoves, etc.
–This may cause re.
yDo not allow children to cling to the Product.
–This may cause the product to fall, causing injury or death.
yDo not place the product on a place which can be reached by oil or steam such as a cooking
table or humidier.
–An electric shock or re may occur.
yDo not use the product in damp places like a laundry room or bathroom.
–Moisture may cause a glitch or an electric shock.
yPlug the power cord tightly into the outlet.
–Loose connection of the power cord could cause a re.
yDo not place heavy objects on the power cord.
–This may cause re or electric shock.
yNever touch the power cord with your hands wet.
–Otherwise, an electric shock may occur.
yOperate the product at the proper voltage (AC 120 V).
–Excessive voltage may result in damage on the product, electric shock or re.
yPull the plug, not the cord, to disconnect the power.
–Otherwise, a re may occur or the product may get damaged.
yDo not impair the cord by bending or pressing it too hard. Keep children and pets from
damaging the power cord.
–An impaired cord could damage the product parts causing a re or an electric shock.
yDo not insert a metal chopstick or other conductors into a hole of the outlet when the
power cable is connected to the outlet. Do not touch the plug right after disconnecting it
from the outlet.
–Otherwise, an electric shock may occur.
yPlease use the power cord certied by LG Electronics.
–Using a non-certied product may result in a re and electric shock.
yDo not disassemble, repair, or revamp the product.
–An electric shock or re may occur.
–If you need a checking, adjustment, or repair, contact the service center.
yDo not place anything containing liquid on top of the product, such as a vase, ower pot,
cup, cosmetics, or medicine; or ornaments, candles, etc.
–This may cause re or electric shock, or injury due to falling.
yDo not spray water directly to the product when cleaning. Do not allow water to get into
the product or do not allow it to get wet.
–This may cause re or electric shock.
yTo avoid damage and explosion of the gateway, do not use at temperatures outside of
0 °C to 60 °C (32 °F to 140 °F).
www.lg.com
Copyright © 2017 LG Electronics Inc. All Rights Reserved.
You are cautioned that changes or modications to this unit not expressly approved by the
party responsible for compliance could void the user’s authority to operate this equipment.
This equipment has been tested and found to comply with the limits for a Class B digital
device, pursuant to Part 15 of the FCC Rules. These limits are designed to provide reasonable
protection against harmful interference in a residential installation. This equipment generates,
uses and can radiate radio frequency energy and, if not installed and used in accordance with
the instructions, may cause harmful interference to radio communications. However, there
is no guarantee that interference will not occur in a particular installation. If this equipment
dose cause harmful interference to radio or television reception, which can be determined by
turning the equipment off and on, you are encouraged to try to correct the interference by
one or more of the following measures:
–Reorient or relocate the receiving antenna.
–Increase the separation between the equipment and the receiver.
–Connect the equipment into an outlet on a circuit different from that to which the receiver is
connected.
–Consult the dealer or an experienced radio/TV technician for help.
This device complies with part 15 of the FCC rules. Operation is subject to the following
two conditions: (1) This device may not cause harmful interference, and (2) This device must
accept any interference received, including interference that may cause undesired operation.
Federal Communications Commission(FCC) Statement
OSS Notice Information
Indoor use only
FCC Caution: for indoor use only, use outdoors or in other modes not covered by this manual
may violate the FCC regulation and violate the use authority to use the product.
Specially, within the 5.15-5.25GHz band, U-NII device is restricted to indoor operations to
reduce any potential for harmful interference to co-channel MSS operations.
FCC RF Radiation Exposure Statement:
This equipment complies with FCC radiation exposure limits set forth for an uncontrolled
environment.
This equipment should be installed and operated with minimum distance 20cm between
the radiator and your body. End users must follow the specic operating instructions for
satisfying RF exposure compliance.
This transmitter must not be co-located or operating in conjunction with any other antenna
or transmitter.
CAUTION: Regulations of the FCC and FAA prohibit airborne operation of radio-frequency
wireless devices because their signals could interfere with critical aircraft instruments.
Printed in Korea
(Ver. 1.0)
To obtain the source code under GPL, LGPL, MPL and other open source licenses, that is
contained in this product, please visit http://opensource.lge.com. In addition to the source
code, all referred license terms, warranty disclaimers and copyright notices are available for
download. LG Electronics will also provide open source code to you on CD-ROM for a charge
covering the cost of performing such distribution (such as the cost of media, shipping and
handling) upon email request to opensource@lge.com. This offer is valid for three(3) years
from the date on which you purchased the product.
Warranty
If you want to check the product quality assurance,
please visit http://enervu.lg-solar.com/support.
Warranty Reference Table
Standard Warranty Term 5 Years
WARNING : This product can expose you to chemicals including carbon black,
which is known to the State of California to cause cancer, and Tuluene, which is known
to the State of California to cause birth defects or other reproductive harm, For more
information go to www.P65Warnings.ca.gov.
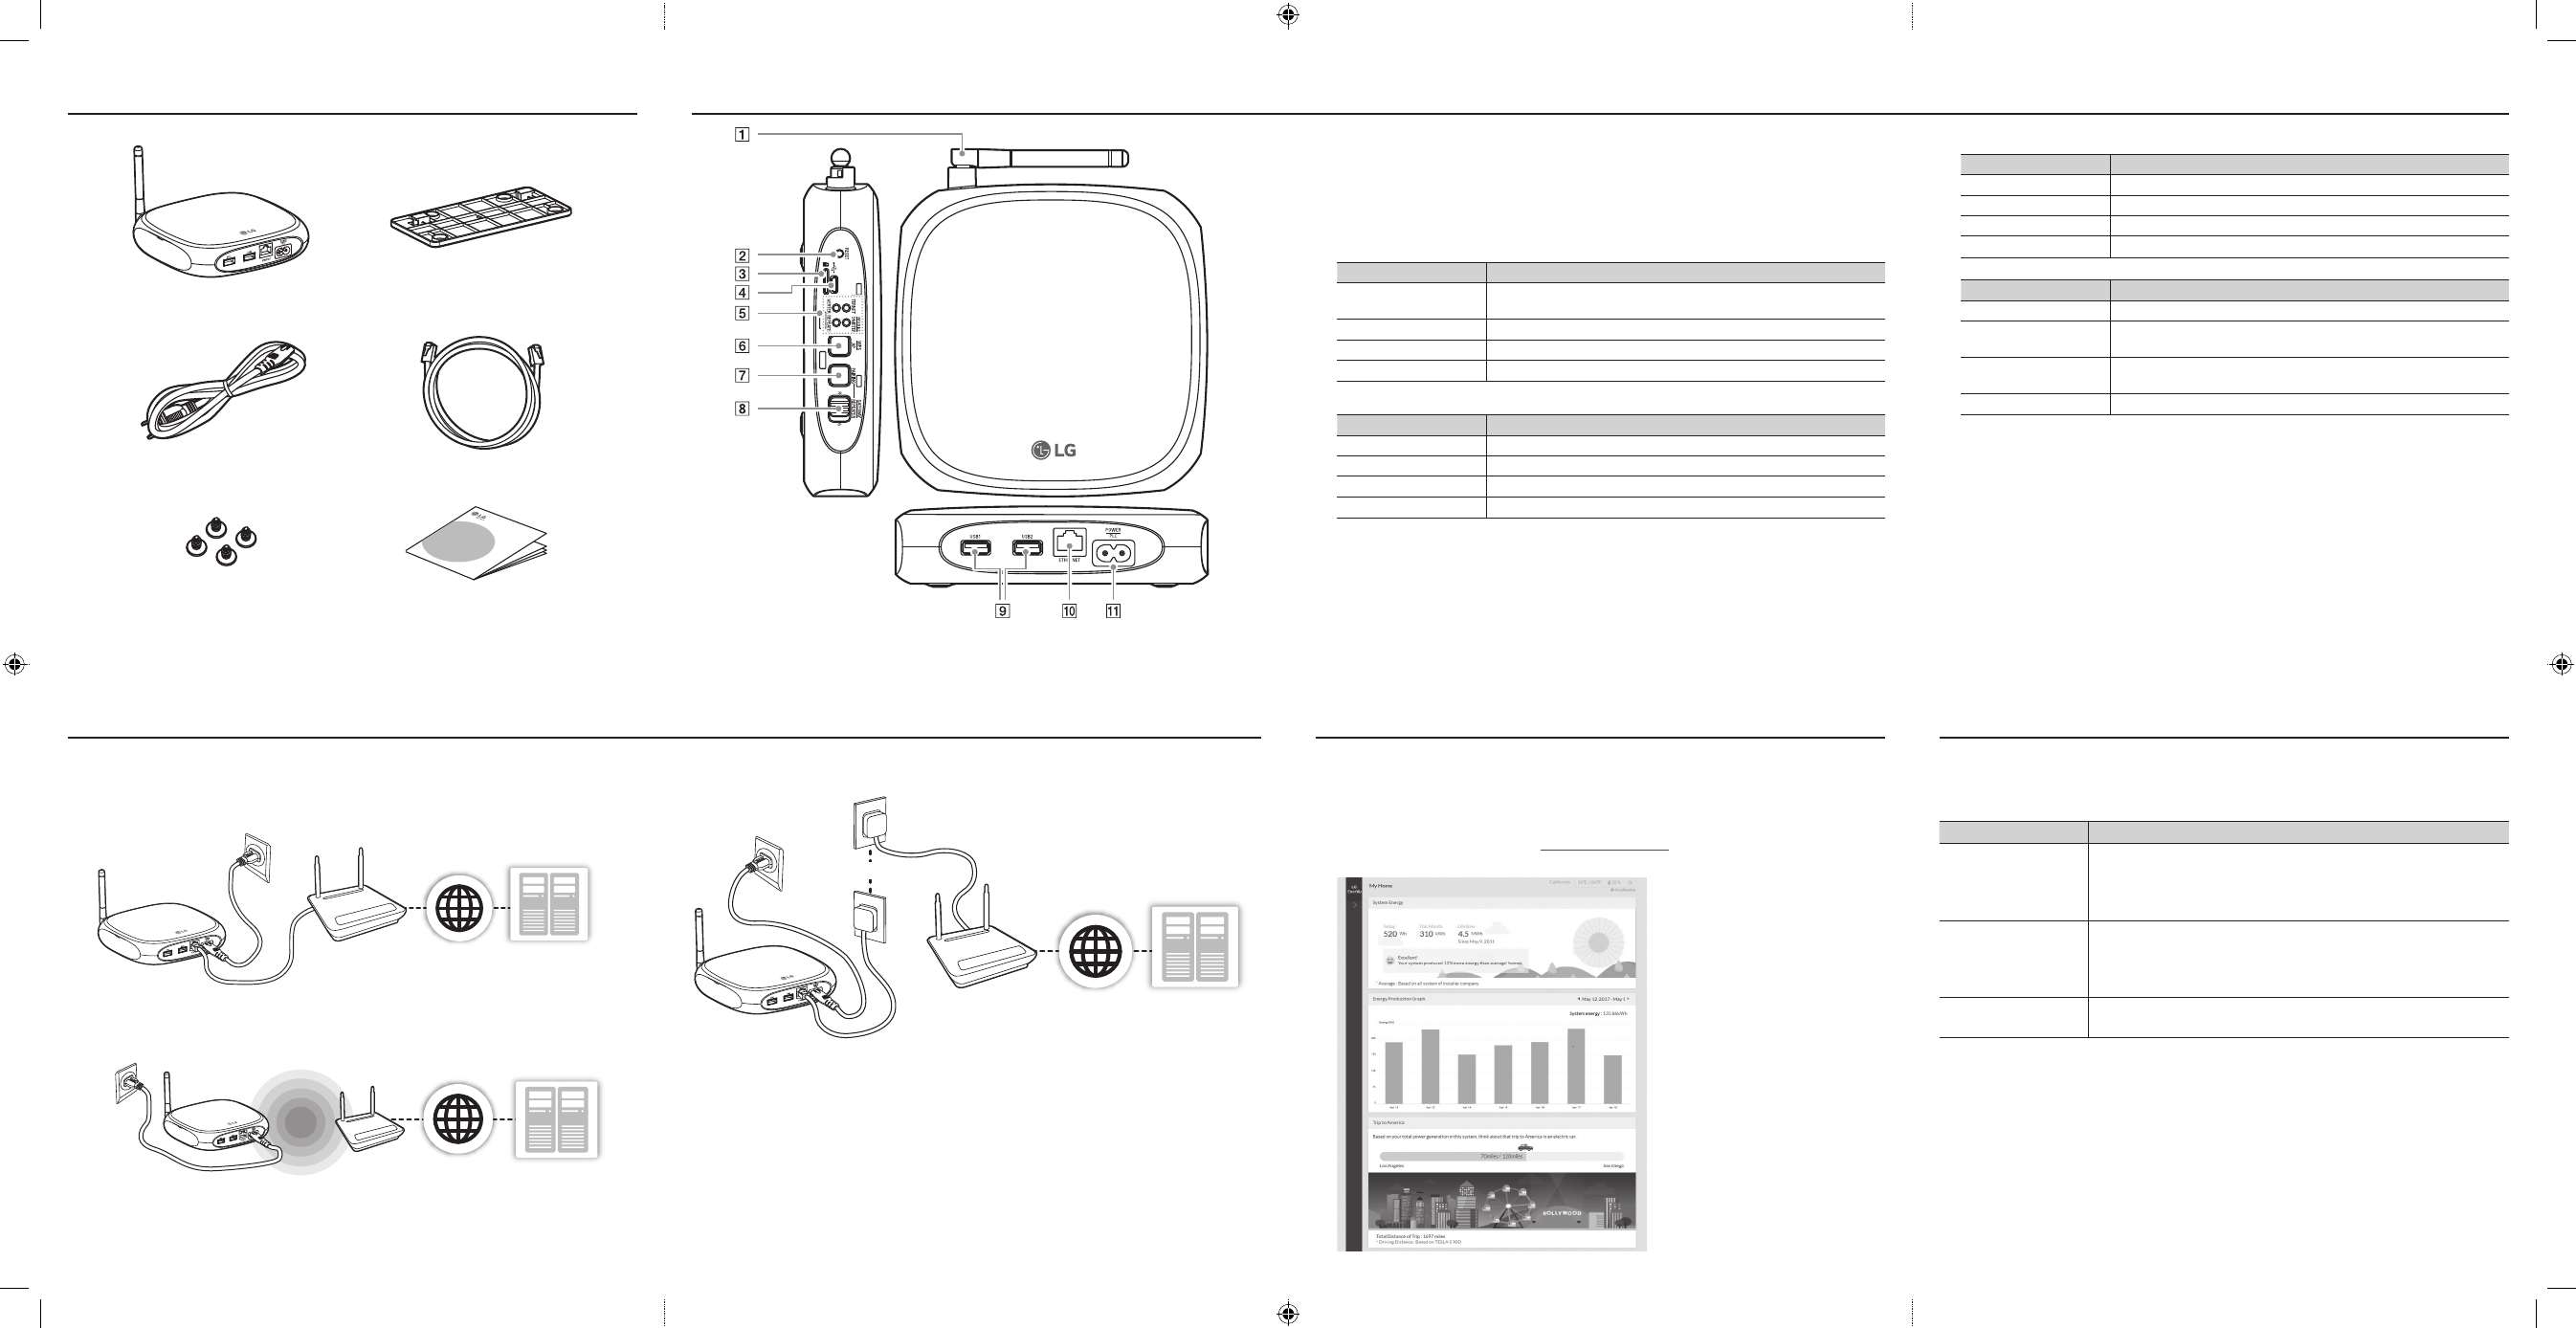
Components
Connections Web Monitoring Troubleshooting
Part Names and Functions
EnerBox®2 Communication Gateway Wall mount bracket
AC cable LAN cable
Wall mount bracket screws (4EA) Simple Guide
Connect the EnerBox®2 to the broadband router with one of the methods described in this
guide. Refer to the installation guide provided separately for more details about installation.
Wired connection
EnerBox®2
Broadband
Router
AC Outlet
Wired
Network Connection
Internet SERVER
1. Connect the POWER port of the EnerBox®2 to AC outlet by using supplied AC cable.
2. Connect the ETHERNET port of the unit to your broadband router by using supplied LAN cable.
Wireless connection
EnerBox®2
Broadband
router Internet SERVER
Wireless
Communication
AC Outlet
1. Connect the POWER port of the EnerBox®2 to AC outlet by using supplied AC cable.
2. Press and hold WPS/AP button for more than 3 seconds and also press the WPS button on your broadband
router. Contact service center when wireless connection fails.
PLC Bridge connection
EnerBox®2
Broadband
Router
AC Outlet
Internet SERVER
PLC Bridge
1. Connect the POWER port of the EnerBox®2 to AC outlet by using supplied AC cable.
2. Connect the ETHERNET port of the EnerBox®2 to a PLC bridge port by using the supplied LAN cable.
3. Connect the broadband router to a PLC bridge port by using a LAN cable.
EnerBox®2 communication gateway is designed to collect information of energy production
and send it to server. So that user can monitor the energy production status in the web
browser on your PC or Mobile device through the internet.
1. On your internet-connected PC or Mobile device, open a browser.
2. On your browser, visit LG EnerVu page at http://enervu.lg-solar.com.
You need to create an account for web monitoring. Follow the instructions of website.
For problems with the gateway, follow the troubleshooting guide below. If the problem is still
not solved, unplug the gateway and contact the service center.
(1-888-865-3026, lg.solar@lge.com)
LED Status Solution
INTERNET LED
(AMBER)
The gateway is connected to Home AP, but the Home AP does not
connected to the internet. Check the internet connection of the
Home AP. If the problem is still not solved after checking, contact
the service center.
INVERTER LED
(AMBER)
The gateway cannot communicate with one Micro Inverter or more.
It may happen occasionally depending on the network condition.
If this symptom continues more than an hour, contact the service
center.
INVERTER LED
(OFF)
If the LED is turned off before sunset, the Micro Inverter is not
communicating. Contact the service center.
yIt is recommended to install the EnerBox®2 near the distribution box for stable
communication.
yThe EnerBox®2 will not log energy production, if the EnerBox®2 is turned off or AC cable is
disconnected.
A Antenna
B RESET button : Press the button to reset the product.
C Micro SD Card slot : Spare slot (for engineer)
D Micro USB Port : Spare port (for engineer)
E LEDs
MOBILE/S•METER (S•METER : Smart Meter) : Displays status of AP/ZigBee mode.
Status Description
OFF - AP mode is not operating.
- ZigBee is not connected.
AMBER (ON) Operating in AP mode.
GREEN (Blinking) ZigBee(S•Meter) is in paring.
GREEN (ON) ZigBee(S•Meter) is connected.
REPEATER : Displays status of Repeater paring / Gateway join.
Status Description
OFF Gateway and Repeater are not conected.
AMBER(Blinking) Gateway and Repeater are in unparing.
GREEN (Blinking) Gateway and Repeater are in paring.
GREEN (ON) Gateway and Repeater are connected.
INTERNET : Displays status of network connection.
Status Description
OFF No Connection (Network)
AMBER (ON) Only connected to the local area network.
GREEN (Blinking) Connecting to network by WPS.
GREEN (ON) Network connected
INVERTER : Displays status of Micro Inverter communication.
Status Description
OFF No Connection (Micro Inverter module)
AMBER (Blinking) Scanning Micro Inverter modules. No Micro Inverter module has been
detected.
GREEN (Blinking) Scanning Micro Inverter modules. One or more Micro Inverter module has
been detected.
GREEN (ON) Communicating with all registered Micro Inverter modules
F WPS/AP button : Press the button briey to use the gateway as an access point. Press and hold the
button for more than 3 seconds to connect to the Wi-Fi network with WPS function.
G PARING button : Press the button briey to connect the gateway and repeater. If the connection failed,
press and hold the button for more than 3 seconds to reset and try again.
H GATEWAY/REPEATER switch : Switch the operating mode to G (Gateway mode) or R (Repeater
mode).
I USB ports : Spare ports (for communication module expansion)
J ETHERNET port : Connect to the network router using supplied LAN cable.
K POWER/PLC port : Connect to a power outlet with supplied AC cable for power supply and PLC
communication.