LG Electronics USA HSTND-3971-G LED MONITOR User Manual
LG Electronics USA LED MONITOR
UserManual.wiki
>
LG Electronics USA
>
HSTND 3971 G User Manual
User Manual
Navigation menu
Upload a User Manual
Namespaces
Wiki Guide
HTML
PDF
Info
Views
User Manual
Discussion / Help
Navigation

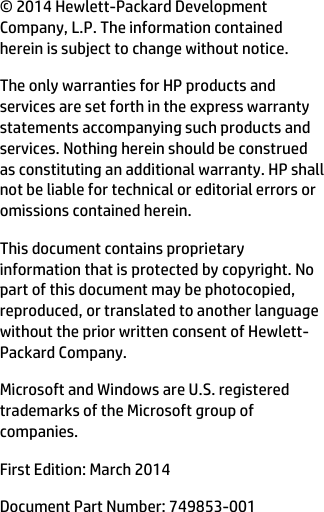


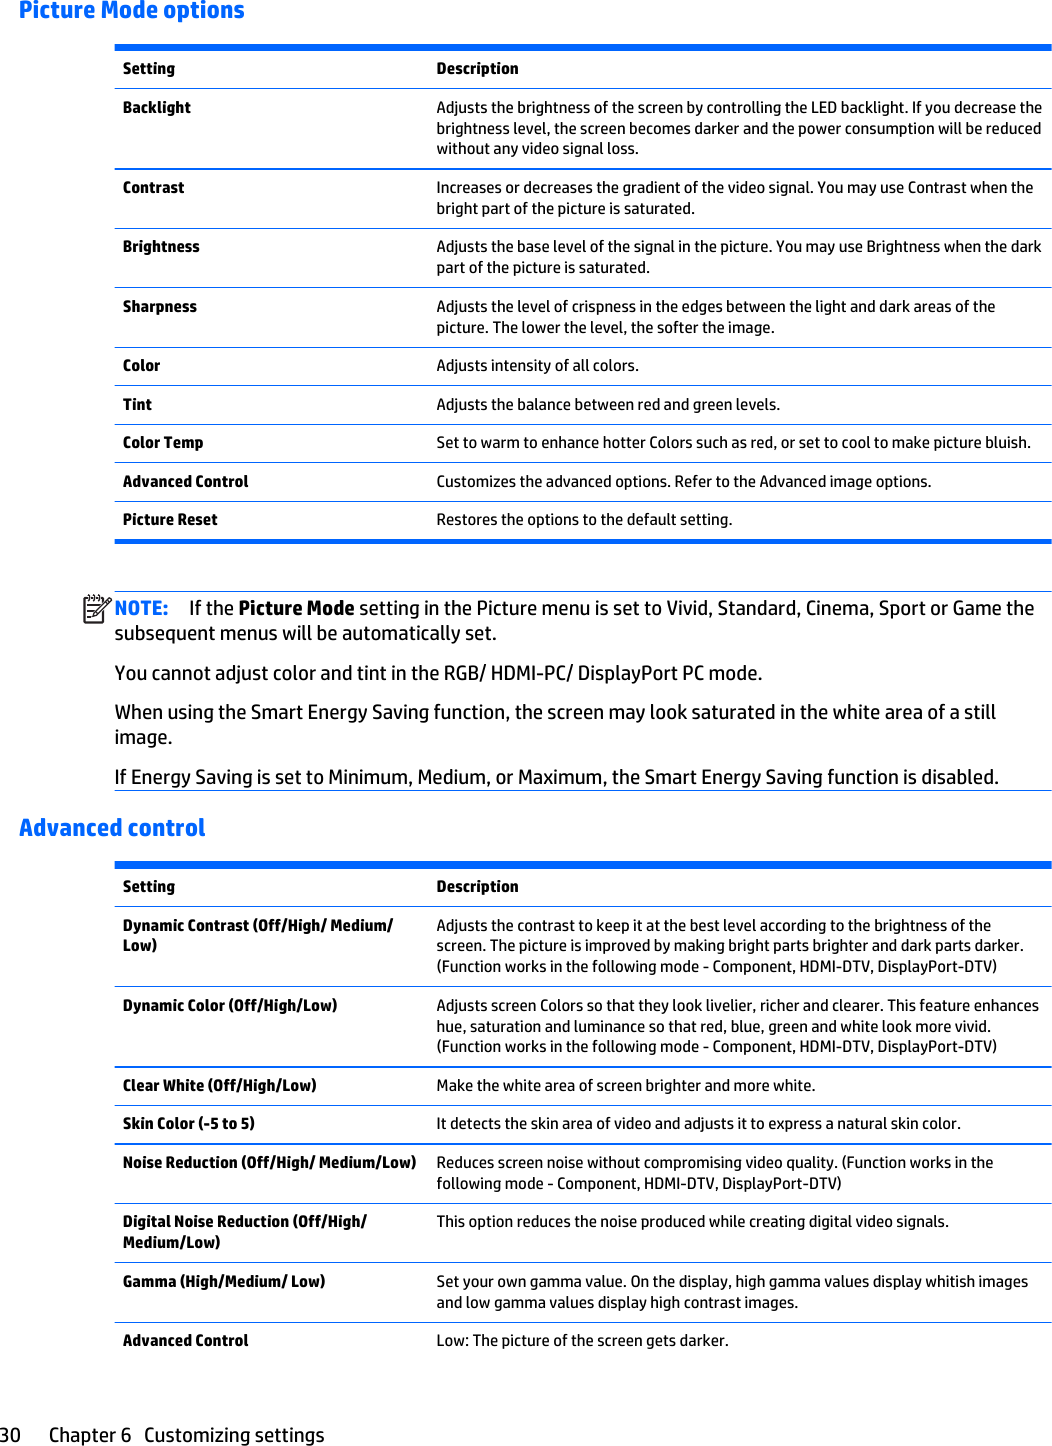
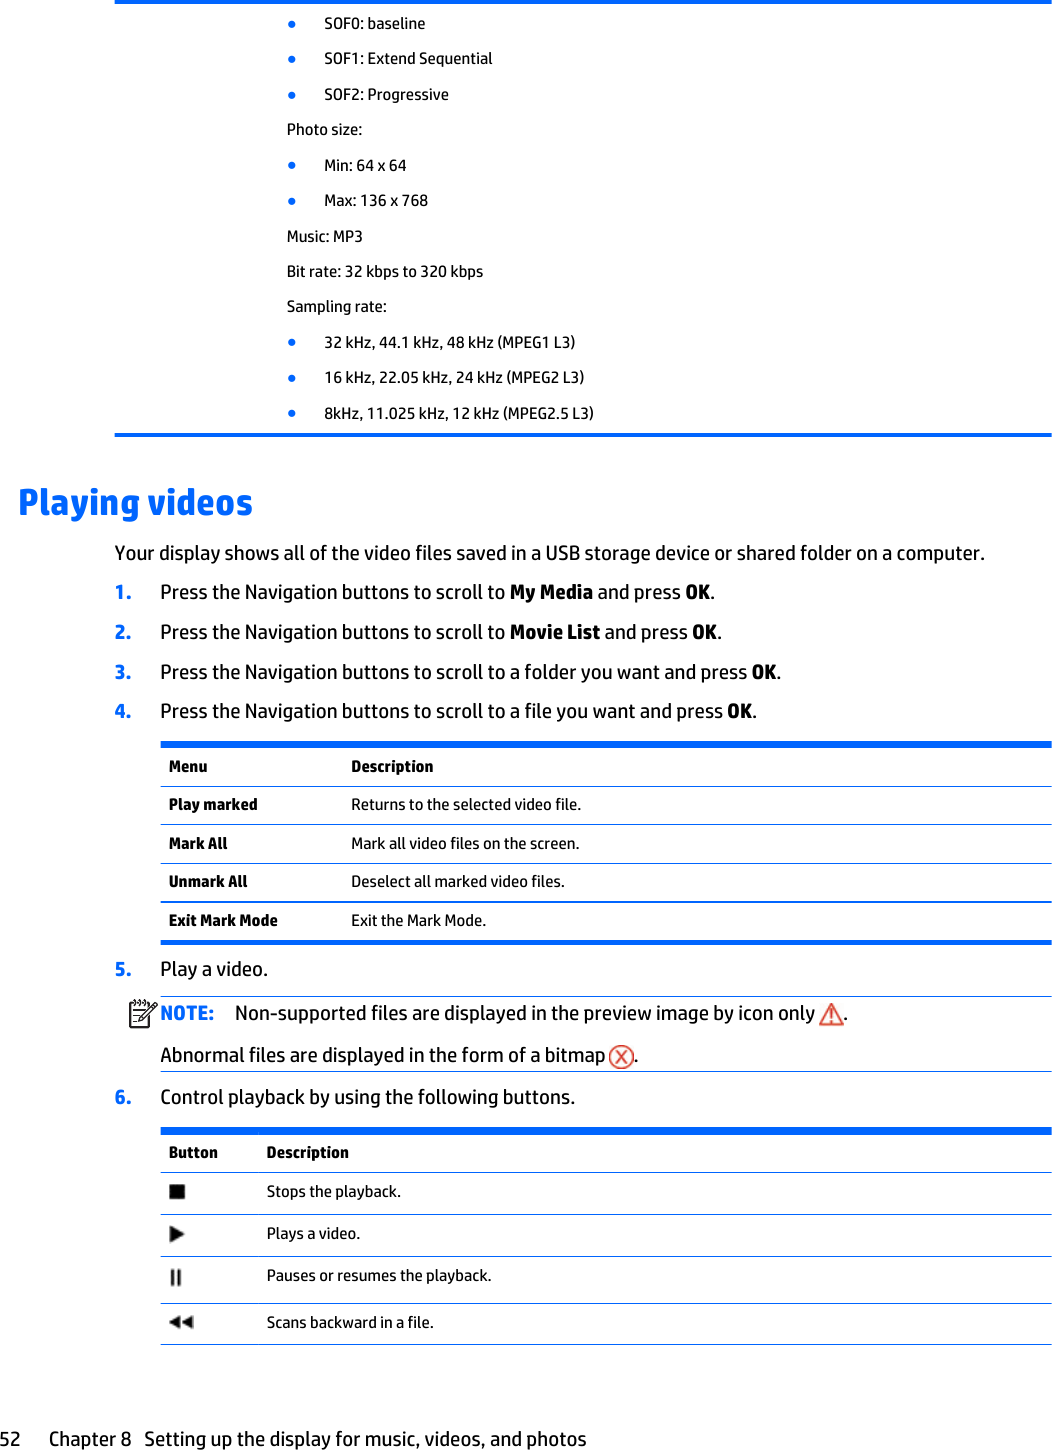
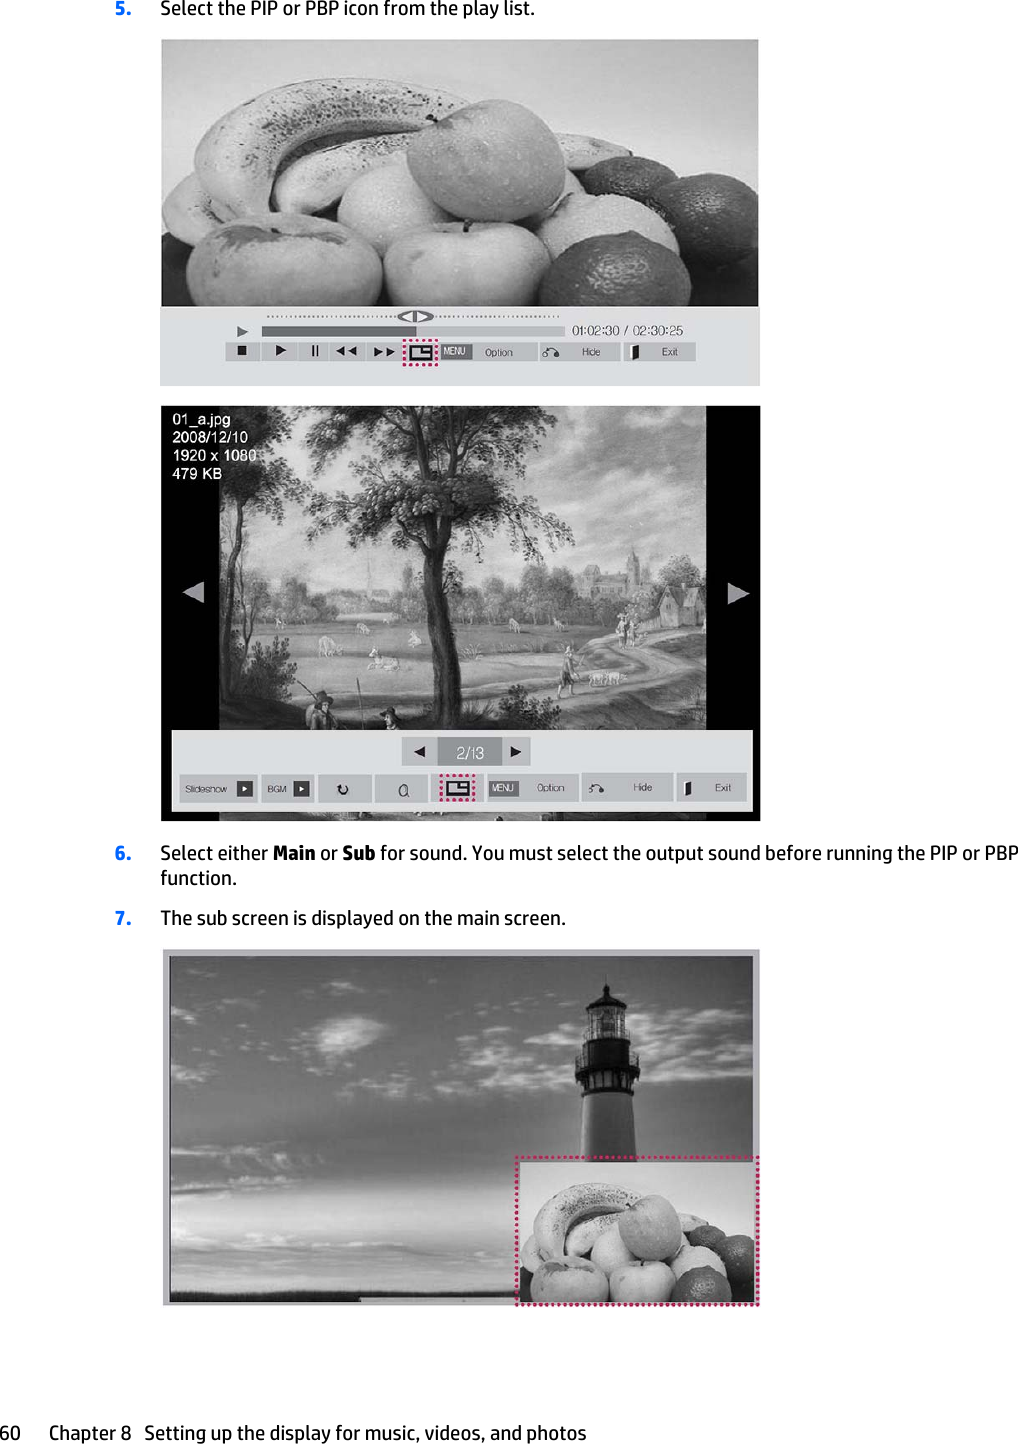
![AdvancedControlCustomizes the advanced options.Picture Reset Restores the options to the default setting.6. When you are finished, press EXIT. When you return to the previous menu, press BACK.Customizing computer display optionsCustomize options of each image mode for the best image quality.This function works in the following mode: RGB[PC] mode.1. Press MENU to access the main menus.2. Press the Navigation buttons to scroll to PICTURE and press OK.3. Press the Navigation buttons to scroll to Screen and press OK.4. Select and adjust following options, and then press OK.Option DescriptionResolution Selects a proper resolution. See Customizing settings on page 28.Auto Config. Sets to adjust the screen position, clock, and phase automatically. The displayed image may beunstable for a few seconds while the configuration is in progress.Position/ Size/Phase Adjusts the options when the picture is not clear, especially when characters are shaky, after theauto configuration.Reset Restores the options to the default setting.5. When you are finished, press EXIT. When you return to the previous menu, press BACK.Adjusting soundSelecting a sound modePlay the sound in its optimized settings by selecting one of the preset sound modes.1. Press MENU to access the main menus.2. Press the Navigation buttons to scroll to AUDIO and press OK.3. Press the Navigation buttons to scroll to Sound Mode and press OK.4. Press the Navigation buttons to scroll to an image mode you want and press OK.Mode DescriptionStandard Select when you want standard quality sound.Music Select when you listen to music.Cinema Select when you watch videos.Sport Select when you watch sports events.Game Select when you want to enjoy dynamic sound when playing a game.5. When you are finished, press EXIT. When you return to the previous menu, press BACK.Adjusting sound 23](https://usermanual.wiki/LG-Electronics-USA/HSTND-3971-G/User-Guide-2208140-Page-33.png)

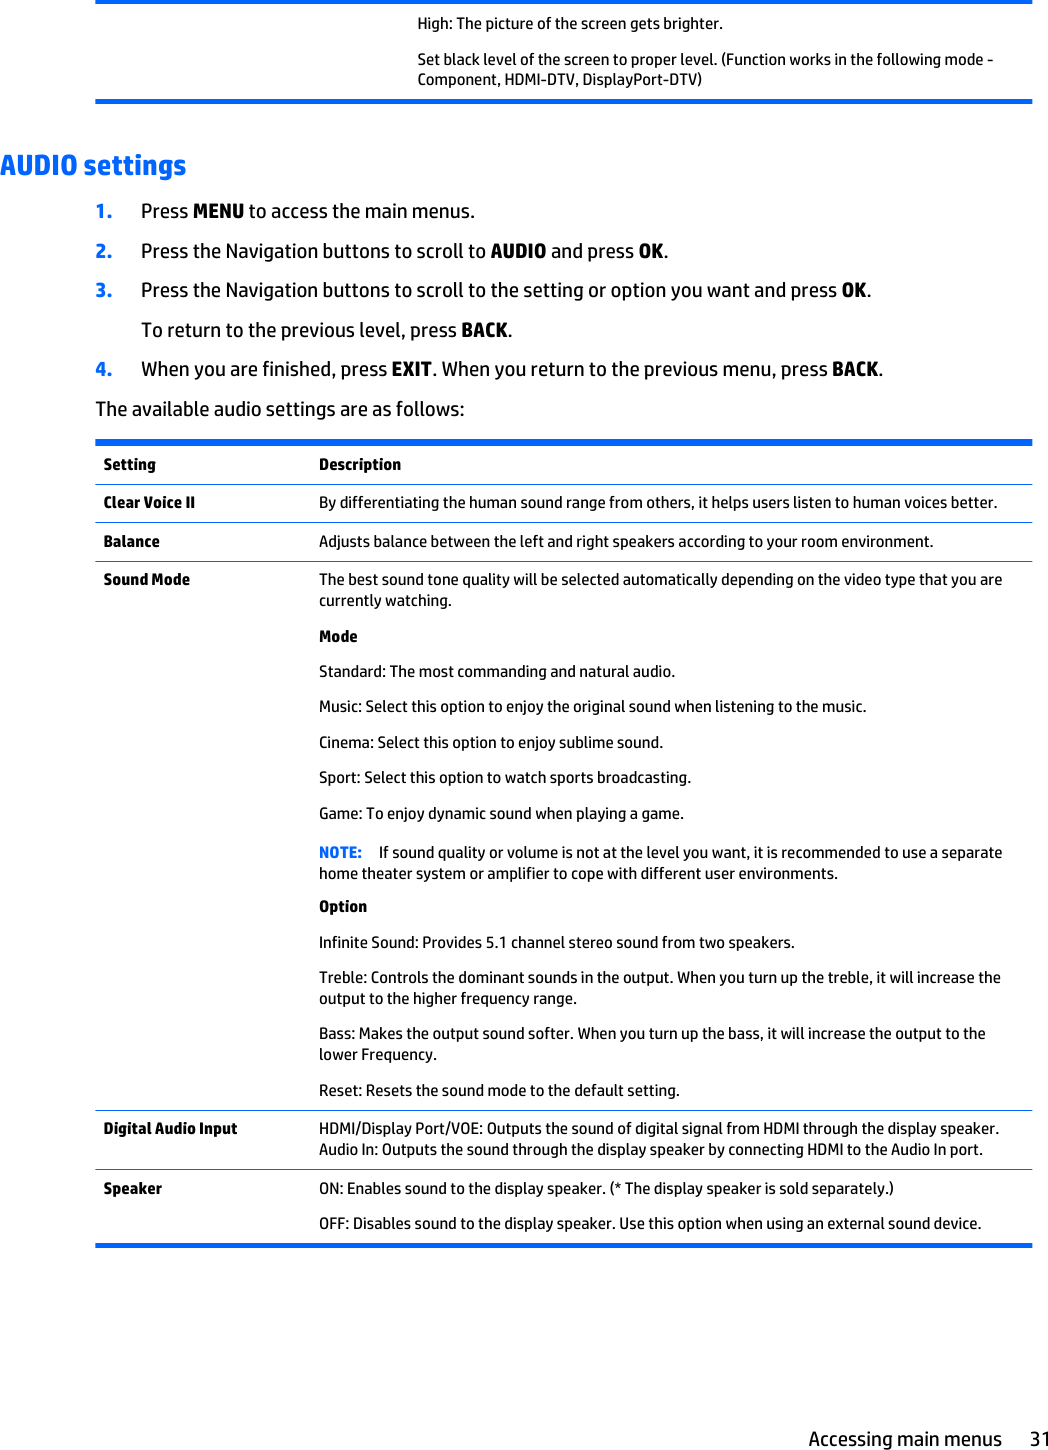


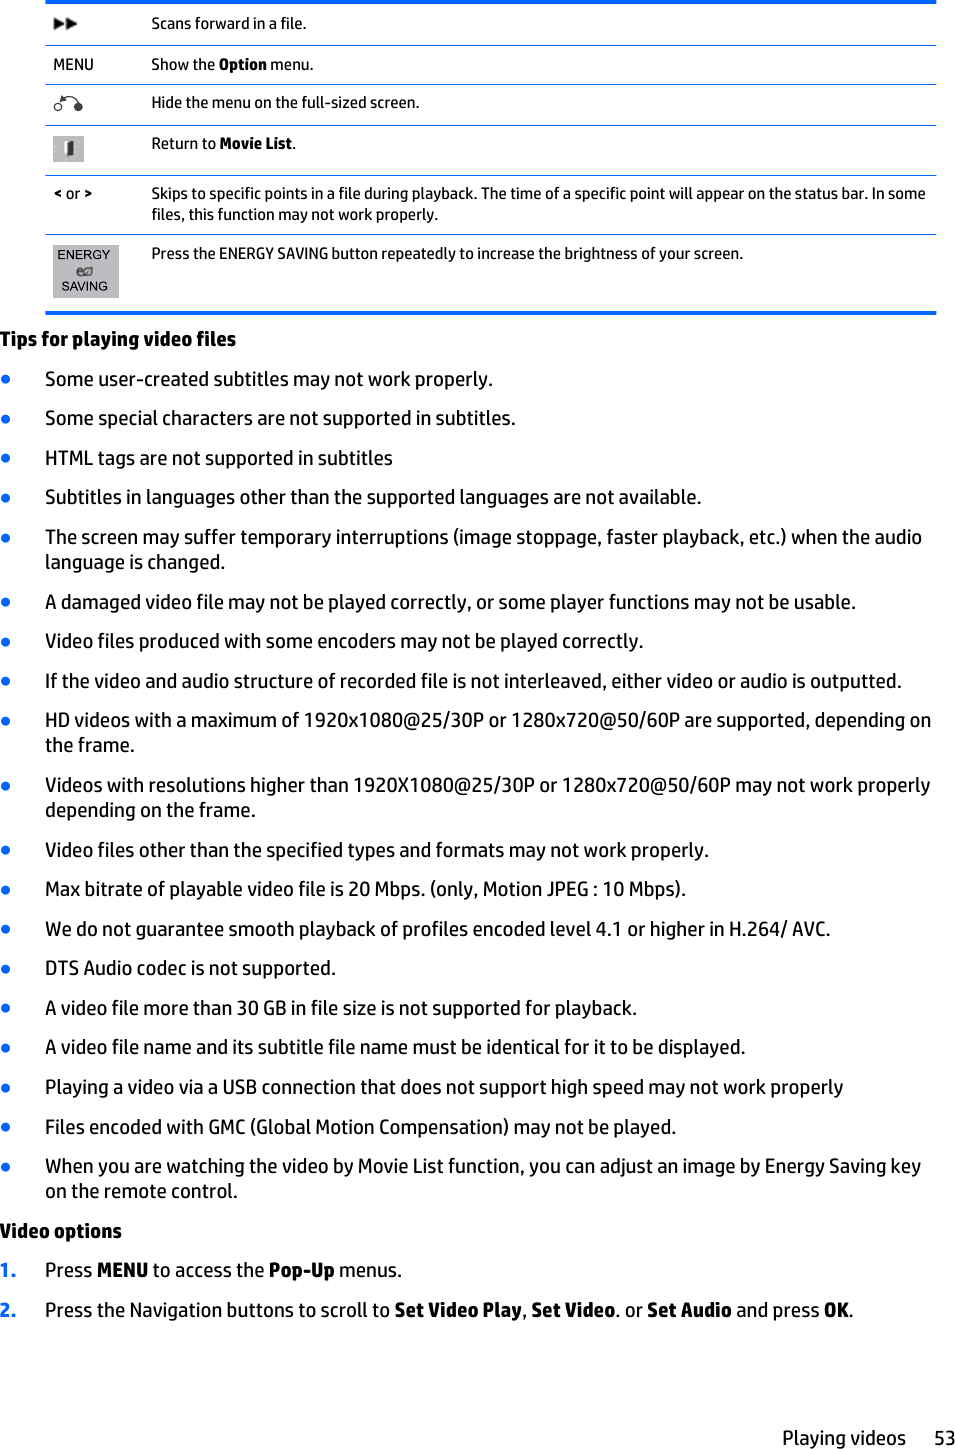
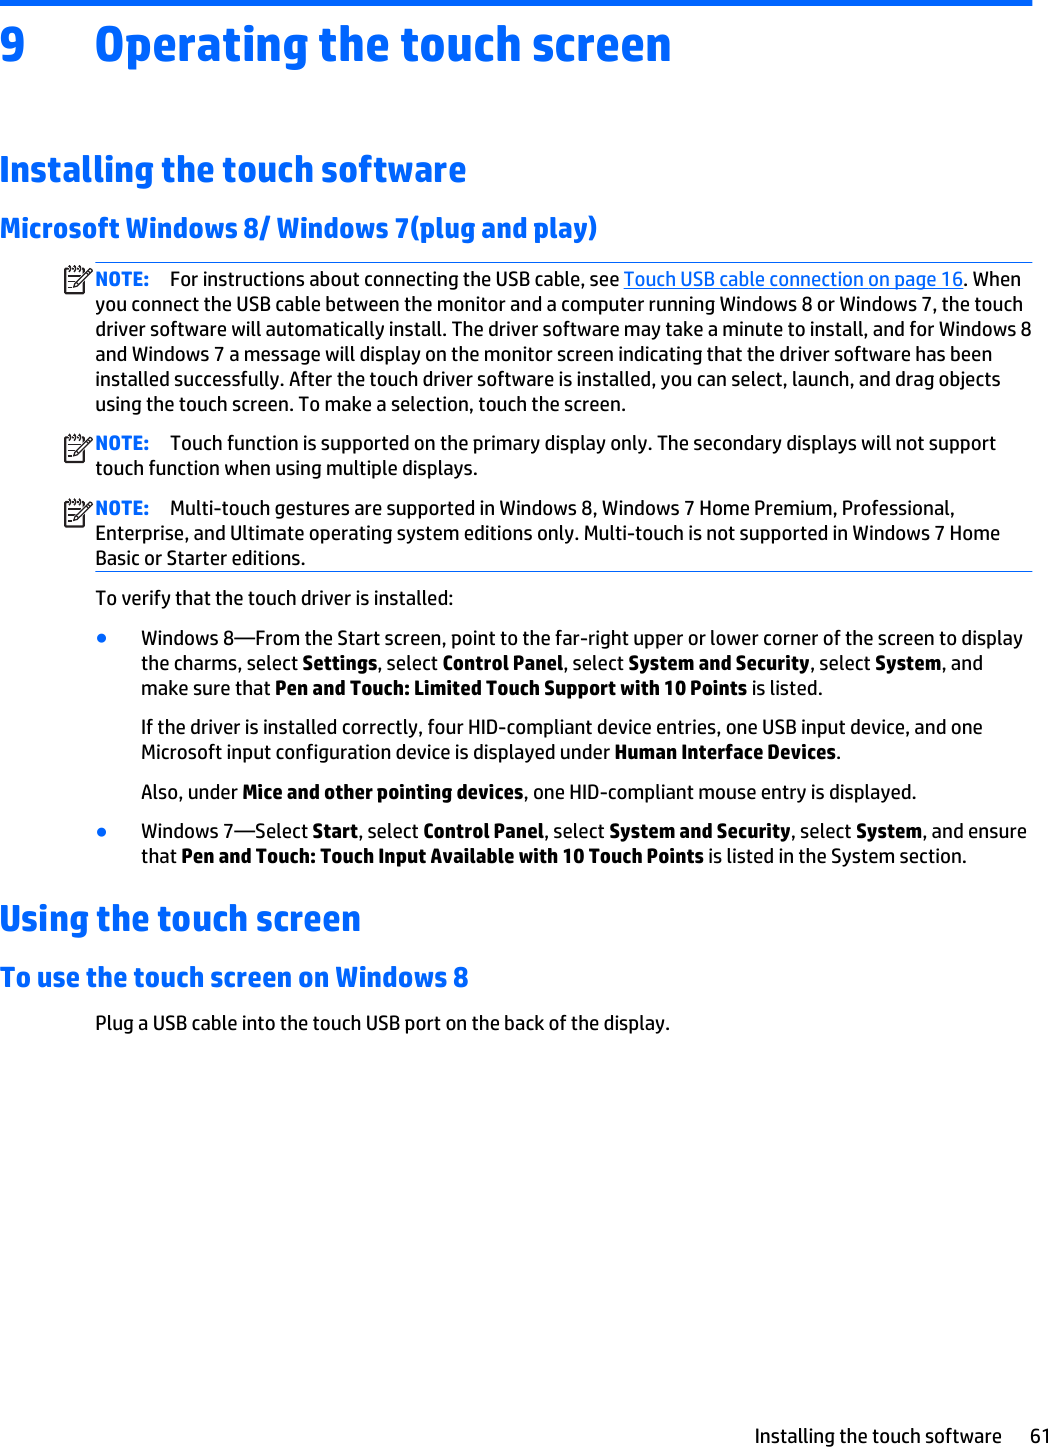


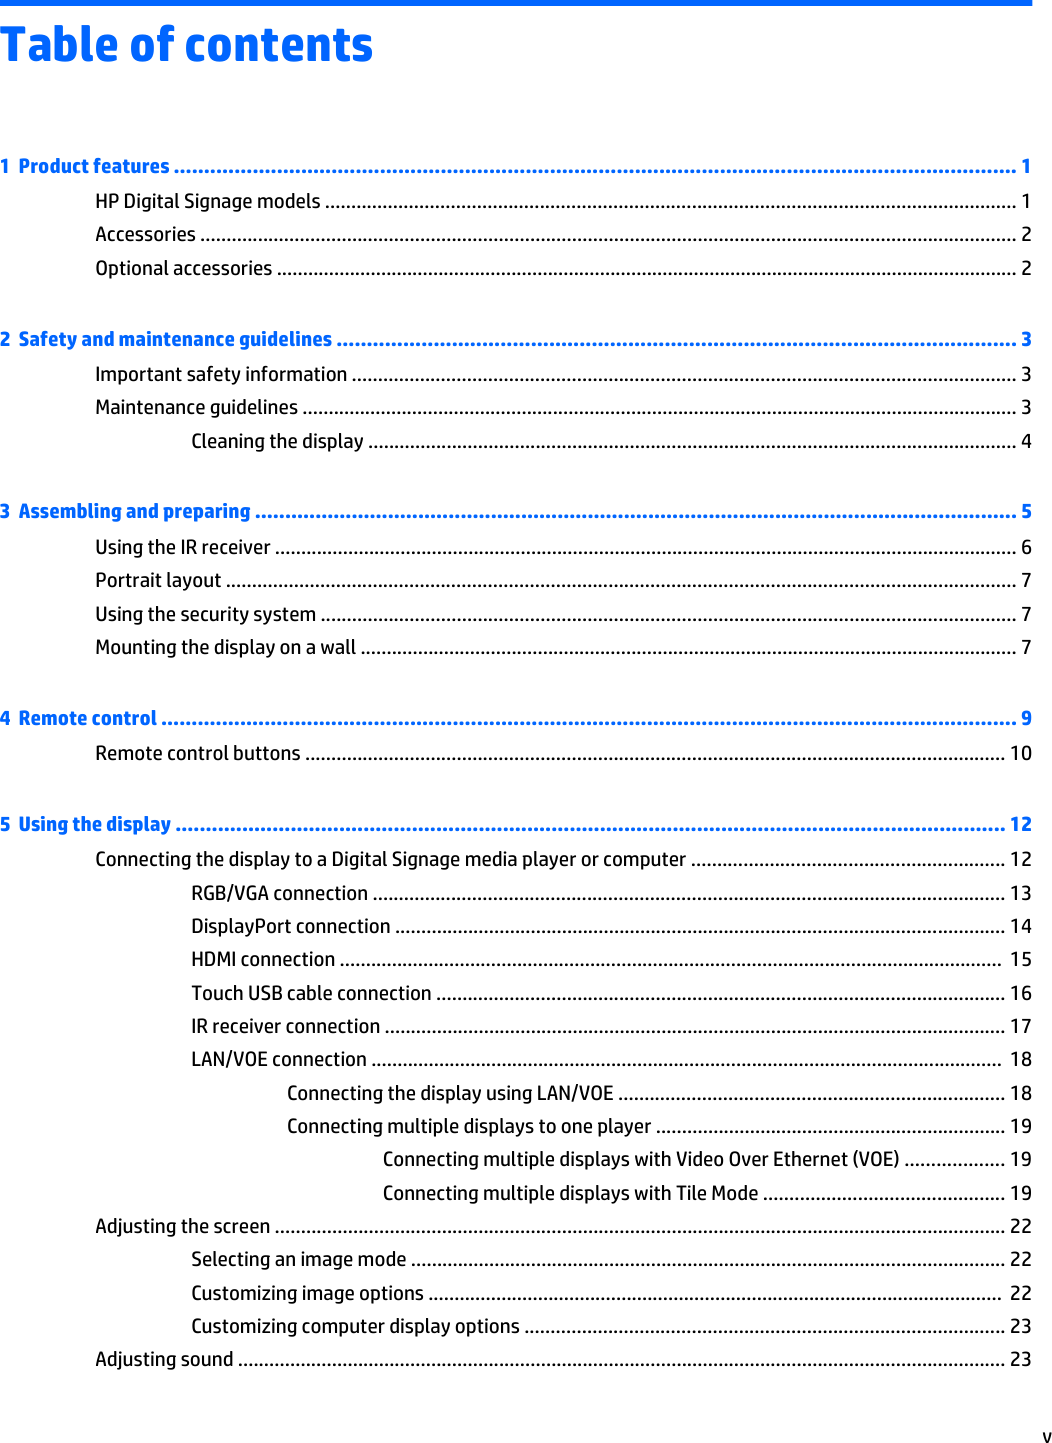
![NOTE: During USB operations such as EMF, all commands except Power(k a) and Key(m c) are not executedand treated as NG.Transmission / Receiving protocolTransmission[Command1][Command2][ ][Set ID][ ][Data][Cr]* [Command1]: First command to control the set.* [Command2]: Second command to control the set.* [Set ID]: Set ID with which you want to communicate. Enter [Set ID] = ‘00(0x00’ to communicate with all setsregardless of their Set ID numbers.* [Data]: Information passed to the set.* [Data1]: Information passed to the set.* [Data2]: Information passed to the set.* [Data3]: Information passed to the set.* [Cr]: Carriage Return. ASCII code ‘0x0D’.* [ ]: ASCII code space ‘0x20’Acknowledgement[Command2][ ][Set ID][ ][OK/NG][Data][x]* When the product receives data normally, it sends an acknowledgement (ACK) in the format above. If data isin read mode, it indicates the data that shows the current status. If data is in read mode, it simply indicatesthe data that is sent from the computer.* If a command is sent with Set ID '00' (=0x00), the data is reflected to all display and they do send anacknowledgement (ACK).* If the data value 'FF' is sent in control mode via RS-232C, the current setting value of a function can bechecked (only for some functions).* Some commands are not supported depending on the model.01. Power (Command: k a)To control the Power On/Off the display.Transmission[k][a][ ][Set ID][ ][Data][Cr]Data00 : Power off01 : Power onAcknowledgement[a][ ][Set ID][ ][OK/NG][Data][x]84 Appendix C Controlling multiple products](https://usermanual.wiki/LG-Electronics-USA/HSTND-3971-G/User-Guide-2208140-Page-94.png)
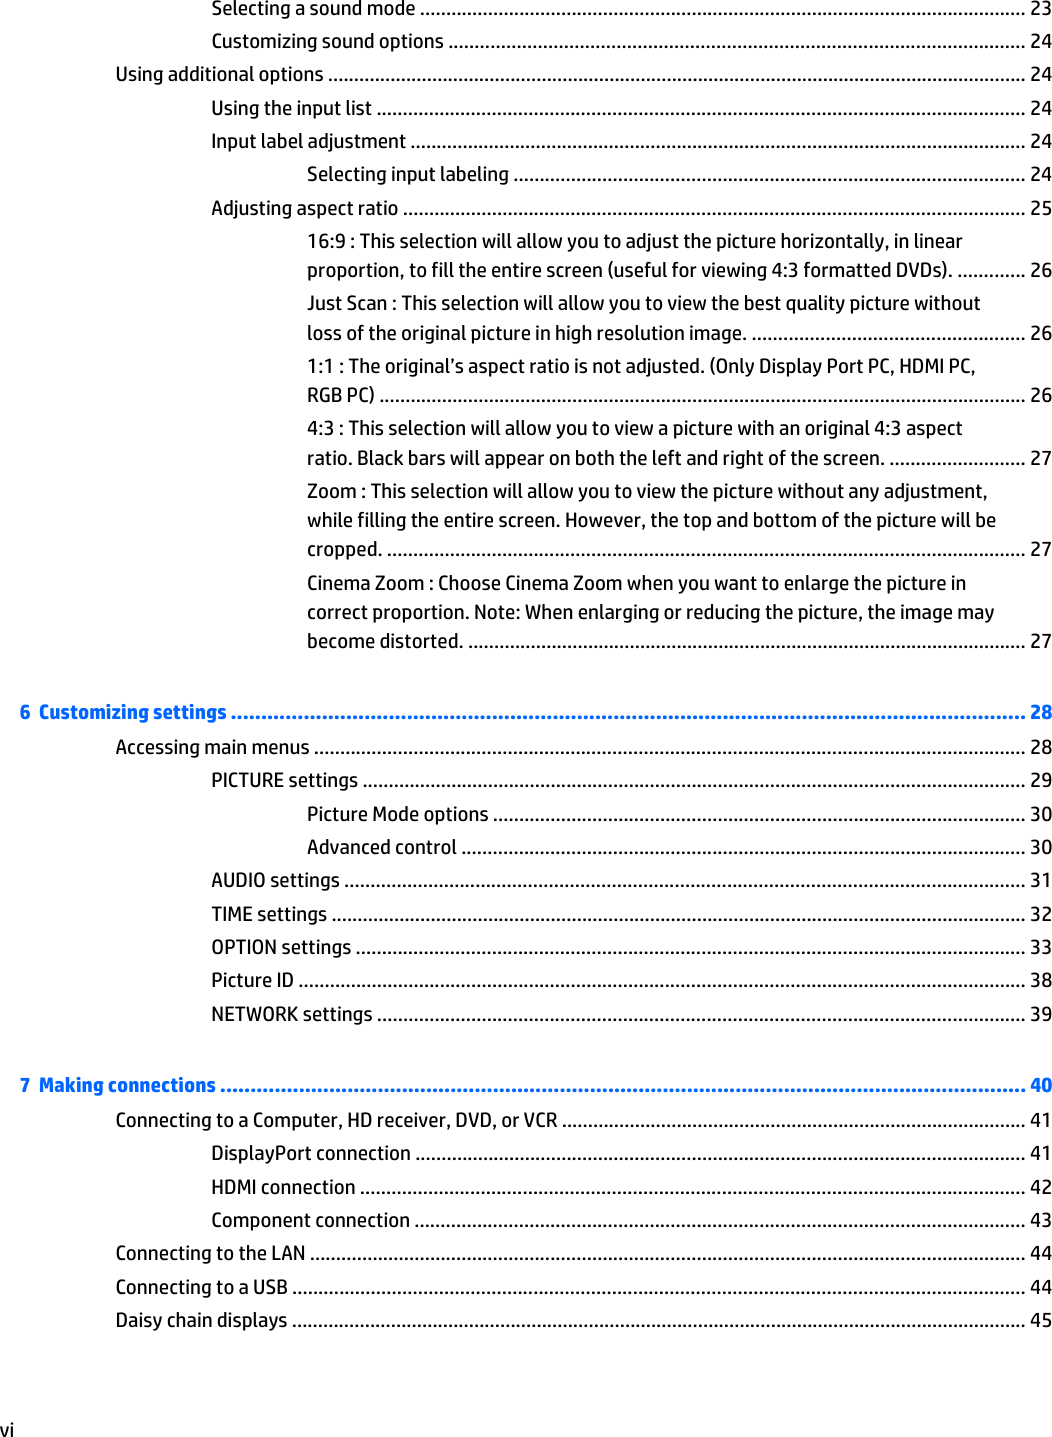
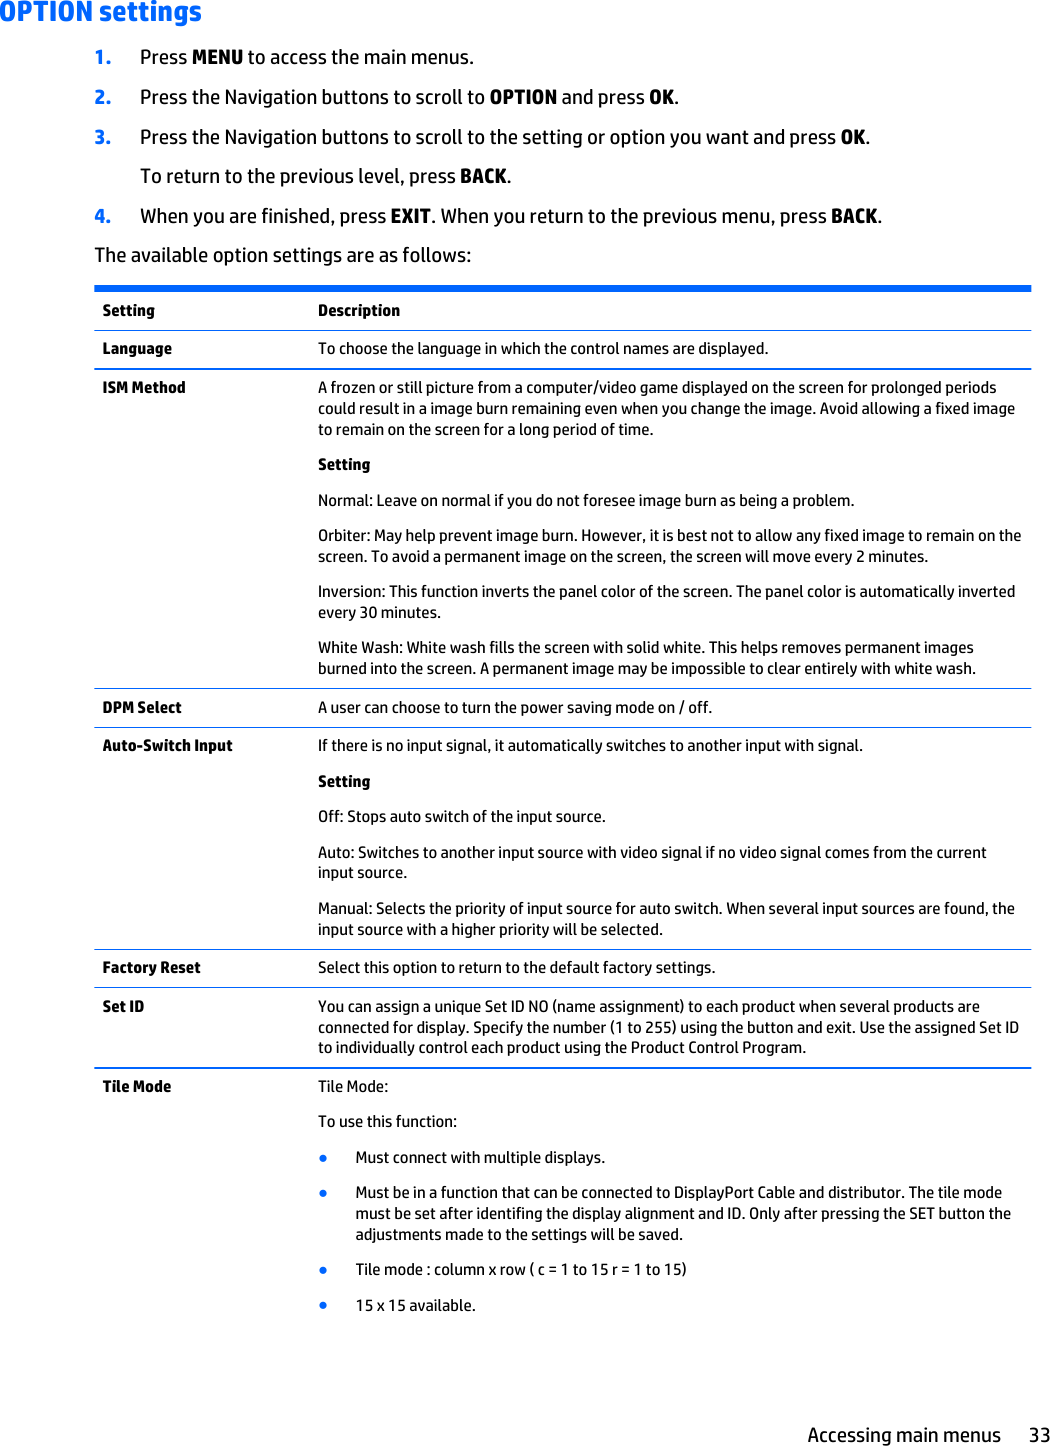
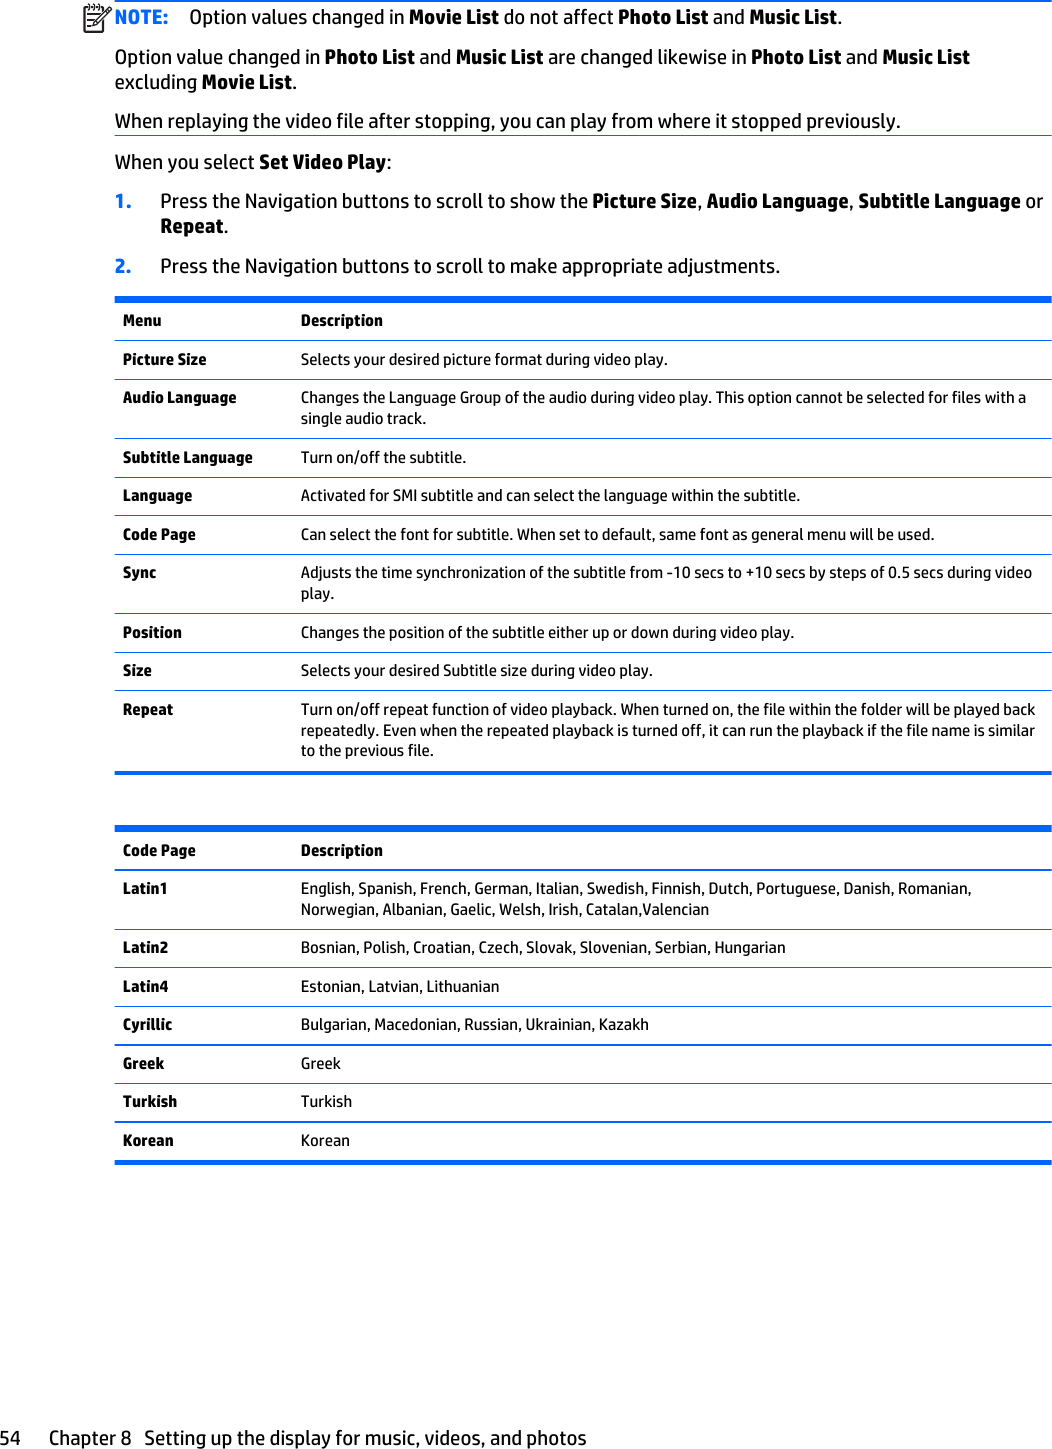
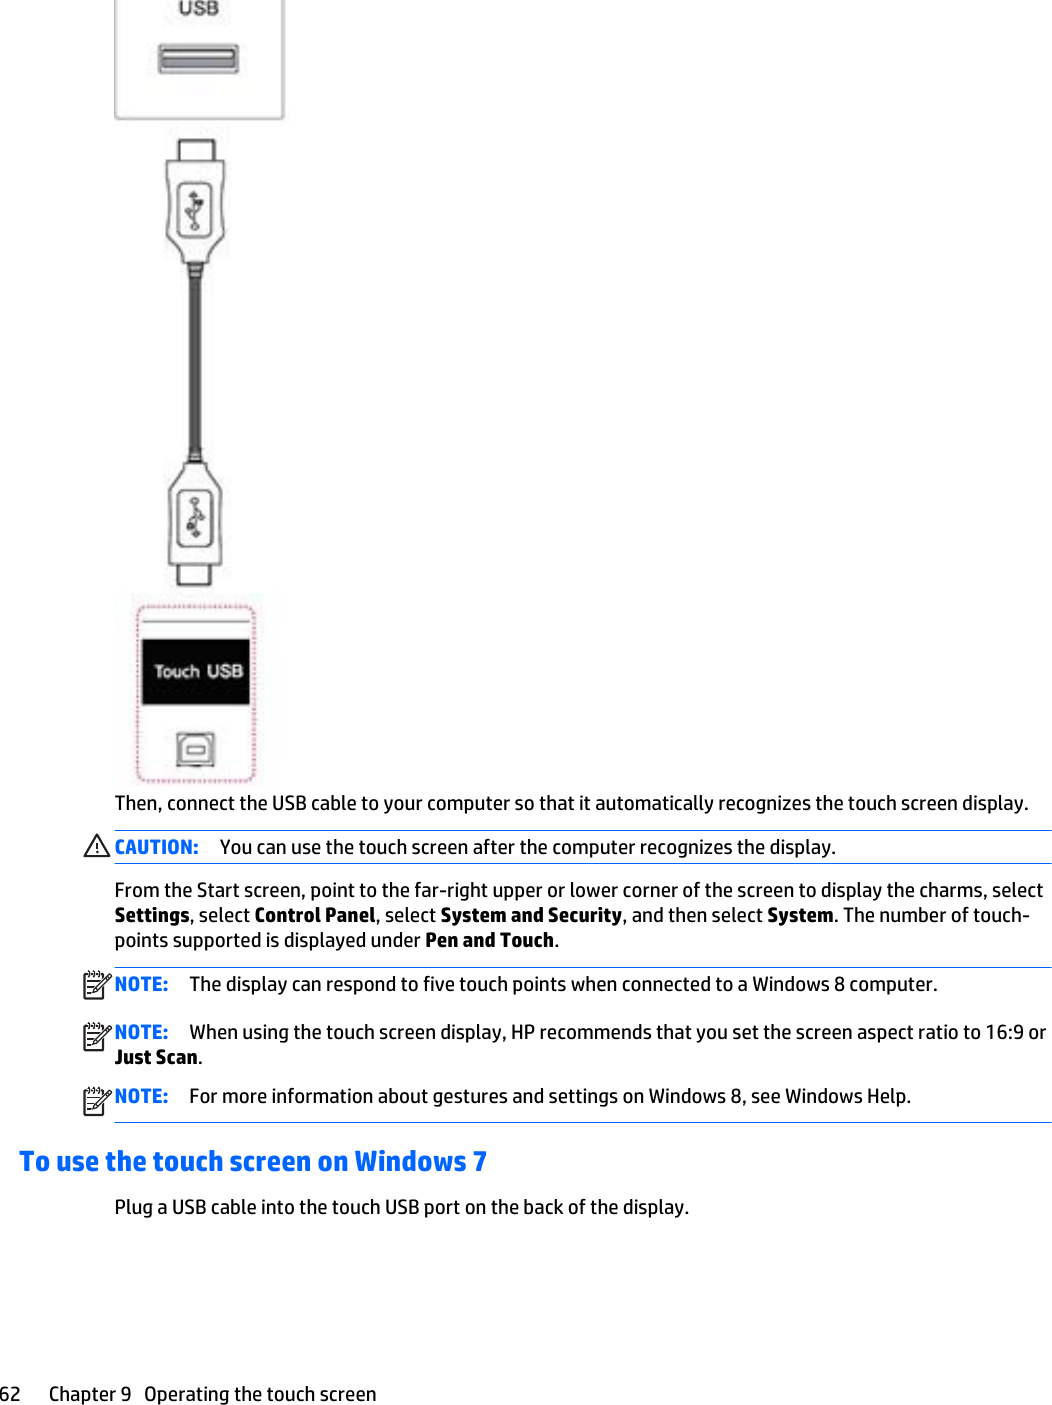
![* Only when the display is fully powered on, the Acknowledgement signal is returned properly. * There maybe a certain time of delay between the Transmission and Acknowledgement signals.02. Input Select (Command: k b)To select the Input Source for display.Transmission[k][b][ ][Set ID][ ][Data][Cr]Data07: RGB (PC)08: HDMI (DTV)09: HDMI (PC)Oa: DisplayPort (DTV)Ob: DisplayPort (PC)0c: VOE (PC)0d: VOE (DTV)Acknowledgement[b][ ][Set ID][ ][OK/NG][Data][k]*Some input signals may not be supported depending on the model.03. Aspect Ratio (Command: k c)To adjust the screen format.Transmission[k][c][ ][Set ID][ ][Data][Cr]Data01: 4:302: 16:904: Zoom09: Just scan (720p or more)(Component, HDMI/ Display Port DTV)* RGB, HDMI/Display Port PC mode(1:1)10 to 1F: Cinema Zoom 1 to 16(AV, Component, HDMI DTV)* Available data types differ depending on the input signal. For more information, see the aspect ratio sectionof this guide.* The aspect ratio may differ depending on the model's input configuration.AcknowledgementTransmission / Receiving protocol 85](https://usermanual.wiki/LG-Electronics-USA/HSTND-3971-G/User-Guide-2208140-Page-95.png)
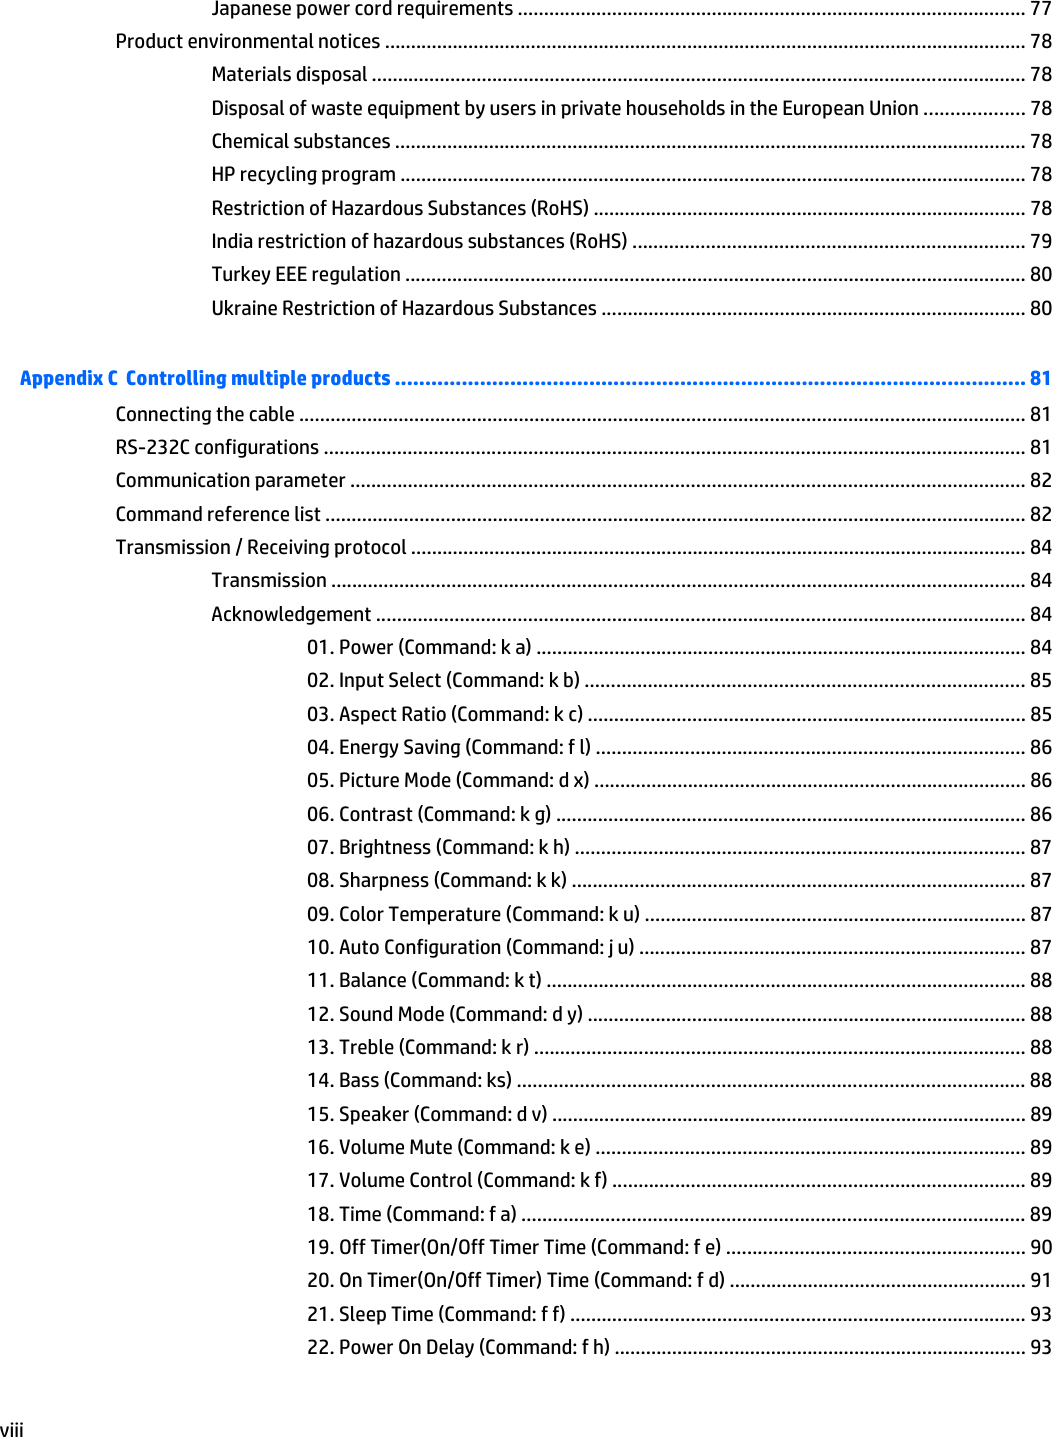
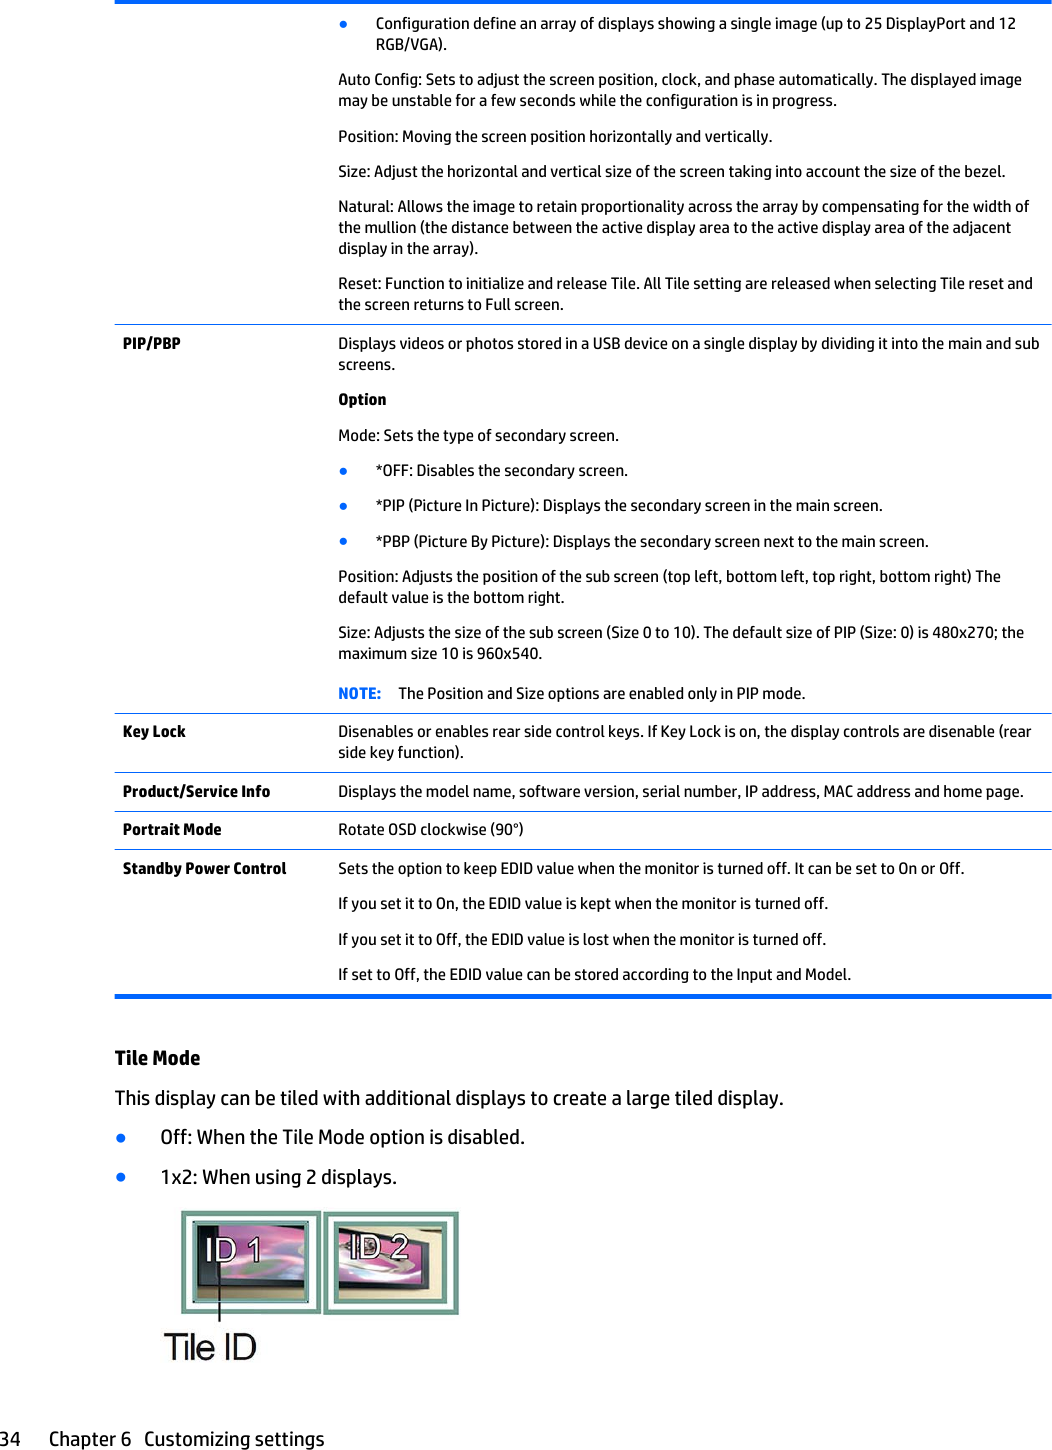
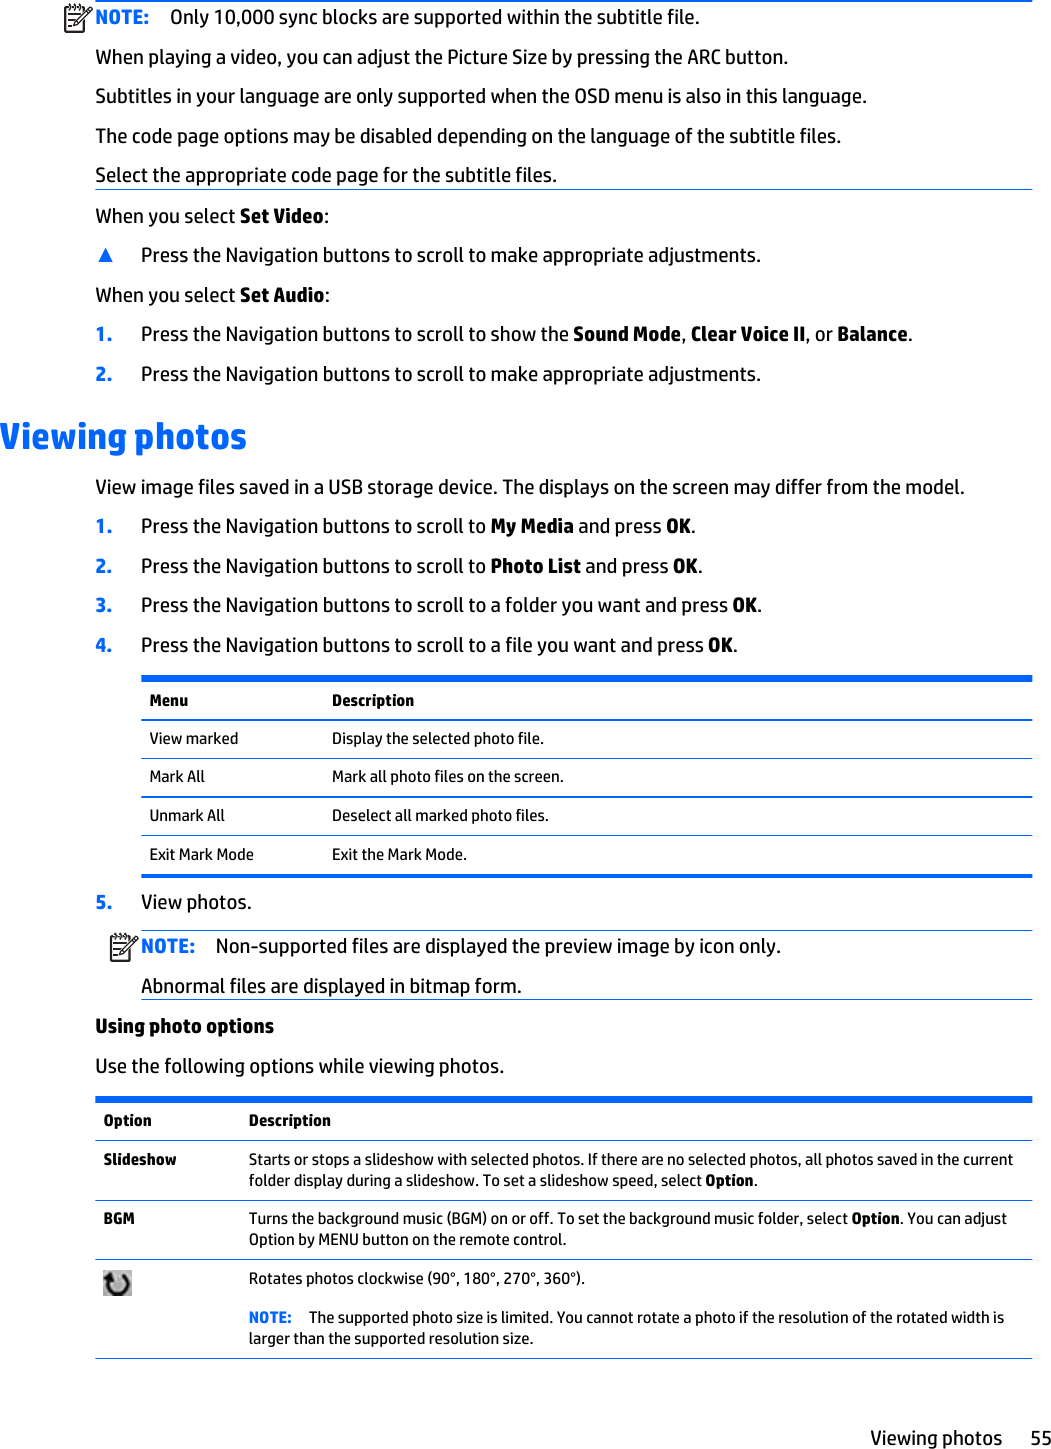
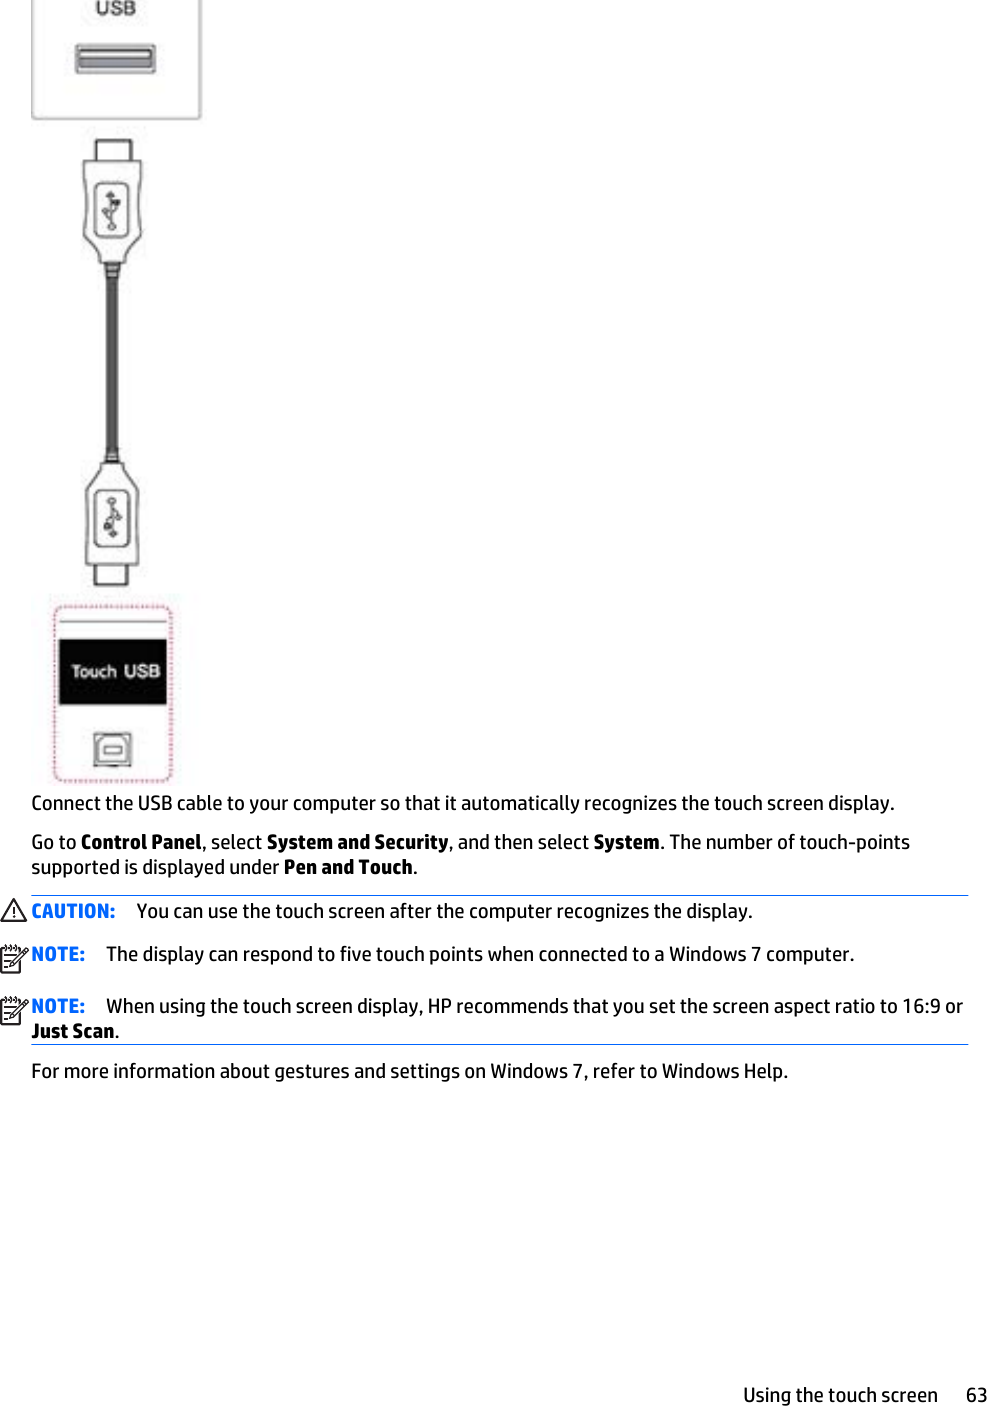
![[c][ ][Set ID][ ][OK/NG][Data][x]04. Energy Saving (Command: f l)To set the Energy Saving function.Transmission[f][l][ ][Set ID][ ][Data][Cr]Data00: Off01: Minimum - Level 202: Medium – Level 203. Maximum – Level 305. Screen OffAcknowledgement[l][ ][Set ID][ ][OK/NG][Data][x]** It may not be supported depending on the model.05. Picture Mode (Command: d x)To select the Picture Mode.Transmission[d][x][ ][Set ID][ ][Data][Cr]Data00: Vivid01: Standard02: Cinema03. Sport04: GameAcknowledgement[x][ ][Set ID][ ][OK/NG][Data][x]06. Contrast (Command: k g)To adjust the screen contrast.Transmission[k][g][ ][Set ID][ ][Data][Cr]00 to 64: Contrast 0 to 100Acknowledgement[g][ ][Set ID][ ][OK/NG][Data][x]86 Appendix C Controlling multiple products](https://usermanual.wiki/LG-Electronics-USA/HSTND-3971-G/User-Guide-2208140-Page-96.png)
![07. Brightness (Command: k h)To adjust the screen brightness.Transmission[k][h][ ][Set ID][ ][Data][Cr]Data00 to 64: Brightness 0 to 100Acknowledgement[h][ ][Set ID][ ][OK/NG][Data][x]08. Sharpness (Command: k k)To adjust the screen sharpness.* This function is available only in AV/Component input.Transmission[k][k][ ][Set ID][ ][Data][Cr]Data00 to 64: Sharpness 0 to 100Acknowledgement[k][ ][Set ID][ ][OK/NG][Data][x]09. Color Temperature (Command: k u)To adjust the screen color temperature.* This function is available only in AV/Component input.TransmissionData[k][u][ ][Set ID][ ][Data][Cr]00 to 64: Warm 50 to Cool 50Acknowledgement[u][ ][Set ID][ ][OK/NG][Data][x]10. Auto Configuration (Command: j u)To adjust the picture position and minimize image shaking automatically.(Only available for RGB-PC input.)Transmission[j][u][ ][Set ID][ ][Data][Cr]Data01: SetTransmission / Receiving protocol 87](https://usermanual.wiki/LG-Electronics-USA/HSTND-3971-G/User-Guide-2208140-Page-97.png)
![Acknowledgement[u][ ][Set ID][ ][OK/NG][Data][x]11. Balance (Command: k t)To adjust the sound balance.Transmission[k][t][ ][Set ID][ ][Data][Cr]Data00 to 64: Left 50 to Right 50Acknowledgement[t][ ][Set ID][ ][OK/NG][Data][x]12. Sound Mode (Command: d y)To adjust the sound mode.Transmission[d][y][ ][Set ID][ ][Data][Cr]Data01: Standard02: Music03: Cinema04: Sport05: GameAcknowledgement[y][ ][Set ID][ ][OK/NG][Data][x]13. Treble (Command: k r)To adjust the Treble values.Transmission[k][r][ ][Set ID][ ][Data][Cr]Data00 to 64: Treble 0 to 100Acknowledgement[r][ ][Set ID][ ][OK/NG][Data][x]14. Bass (Command: ks)To adjust the Bass values.Transmission88 Appendix C Controlling multiple products](https://usermanual.wiki/LG-Electronics-USA/HSTND-3971-G/User-Guide-2208140-Page-98.png)
![[k][s][ ][Set ID][ ][Data][Cr]Data00 - 64: Bass 0 to 100Acknowledgement[s][ ][Set ID][ ][OK/NG][Data][x]15. Speaker (Command: d v)To select the speaker on/off.Transmission[d][v][ ][Set ID][ ][Data][Cr]Data00: Off01 : OnAcknowledgement[v][ ][Set ID][ ][OK/NG][Data][x]16. Volume Mute (Command: k e)To adjust the sound balance.Transmission[k][e][ ][Set ID][ ][Data][Cr]Data00: Mute (Volume Off)01: Current volume (Volume On)Acknowledgement[e][ ][Set ID][ ][OK/NG][Data][x]17. Volume Control (Command: k f)To set the playback volume.Transmission[k][f][ ][Set ID][ ][Data][Cr]Data00 to 64: Volume 0 to 100Acknowledgement[f][ ][Set ID][ ][OK/NG][Data][x]18. Time (Command: f a)To set the Time 1 (Year/ Month/ Day) values.Transmission / Receiving protocol 89](https://usermanual.wiki/LG-Electronics-USA/HSTND-3971-G/User-Guide-2208140-Page-99.png)
![Transmission[f][a][ ][Set ID][ ][Year][ ][Month][ ][Day of Month][] [Hour][][Minute][][Daylight Savings Time][Cr]DataYear00 to 63: 2000 to 2099Month01 to 0C: January to DecemberDay of Month01 to 1E: 1 to 31Hour00 to 17: 00 to 23 hoursMinutes00 to 3B: 00 to 59 minutesDaylight Saving Time00: Off (only)Acknowledgement[a][][Set ID][][OK/NG][Year][Month][Day of Month][Hour][Minute][Daylight Saving Time][x]19. Off Timer(On/Off Timer Time (Command: f e)To set the Off Timer(Repeat Mode/ Time) function.Transmission[f][e][ ][Set ID][ ][Data1][ ][Data2][ ][Data3][Cr]Data11. f1h to f7h (Read data)F1: Read the 1st Off Time dataF2: Read the 2nd Off Time dataF3: Read the 3rd Off Time dataF4: Read the 4th Off Time dataF5: Read the 5th Off Time dataF6: Read the 6th Off Time dataF7: Read the 7th Off Time data2. e1h-e7h (Delete one index), e0h (Delete all indexes)E0: Delete all Off Time dataE1: Delete the 1st Off Time dataE2: Delete the 2nd Off Time data90 Appendix C Controlling multiple products](https://usermanual.wiki/LG-Electronics-USA/HSTND-3971-G/User-Guide-2208140-Page-100.png)
![E3: Delete the 3rd Off Time dataE4: Delete the 4th Off Time dataE5: Delete the 5th Off Time dataE6: Delete the 6th Off Time dataE7: Delete the 7th Off Time data3. 01h to 06h (Set the day of week for Off Time)00: Off01: Once02. Daily03: Monday to Friday04: Monday to Saturday05: Saturday to Sunday06. Sunday07. Monday08. Tuesday09. Wednesday0A. Thursday0B. Friday0C. SaturdayData200 to 17: 00 to 23 HoursData300 to 3B: 00 to 59 Minutes* To read or delete the Off Time list, set FFH for [Data2] and [Data3].(Example 1: fe 01 f1 ff ff - Read the 1st Off Time data.)(Example 2: fe 01 e1 ff ff - Delete the 1st Off Time data.)(Example 3: fe 01 04 02 03 - Set the Off Time to "Monday to Saturday, 02:03".)* This function is supported only when 1 (Year/Month/ Day) and 2 (Hour/Minute/Second) are set.Acknowledgement[e][ ][Set ID][ ][OK/NG][Data1][Data2][Data3][x]20. On Timer(On/Off Timer) Time (Command: f d)To set the On Timer(On/Off Timer) function.Transmission[f][d][ ][Set ID][ ][Data1][ ][Data2][ ][Data3][Cr]Transmission / Receiving protocol 91](https://usermanual.wiki/LG-Electronics-USA/HSTND-3971-G/User-Guide-2208140-Page-101.png)
![Data400 to 17: 00 to 23 HoursData500 to 3B: 00 to 59 Minutes* When you read or delete the current on time list, all of [Data2] [Data3] [Data4][Data5] have to be ffh.(Example 1: fd 01 f1 ff ff ff ff - when you read the 1st index On Time list)(Example 2: fd 01 e1 ff ff ff ff - when you delete the 1st index On Time list)(Example 3: fd 01 f1 3f 01 02 03 - when you write 1st index of On Time Data, "Monday to Sunday every week,02:03"* When reading data, ffh is inputted for [Data2][Data3][Data4][Data5]. In other cases, all are treated as NG.Acknowledgement[e][ ][Set ID][ ][OK/NG][Data1][Data2][Data3][Data4][Data5] [x]21. Sleep Time (Command: f f)To set the Sleep Time.Transmission[f][f][ ][Set ID][ ][Data][Cr]Data00: Off (Sleep Timer off)01: 10 min.02: 20 min.03: 30 min.04: 60 min.05: 90 min.06: 120 min.07: 180 min.08: 240 min.Acknowledgement[f][ ][Set ID][ ][OK/NG][Data][x]22. Power On Delay (Command: f h)To set the schedule delay when the power is turned on. (Unit: Second)Transmission[f][h][ ][Set ID][ ][Data][Cr]Data00 to 64: min. 0 to max. 100 (sec.)Transmission / Receiving protocol 93](https://usermanual.wiki/LG-Electronics-USA/HSTND-3971-G/User-Guide-2208140-Page-103.png)
![Acknowledgement[h][ ][Set ID][ ][OK/NG][Data][x]23. Language (Command: f i)To set the language for OSD.Transmission[f][i][ ][Set ID][ ][Data][Cr]Data00: English01: French02: German03: Spanish04: Italian05: Portuguese06: Chinese (Simplified)07: Japanese (not supported)08: Korean (not supported)09: Dutch10: Chinese (Traditional)Acknowledgement[i][ ][Set ID][ ][OK/NG][Data][x]24. ISM method (Command: j p)To select ISM method for avoiding having a fixed image remain on screen.Transmission[j][p][ ][Set ID][ ][Data][Cr]Data01: Inversion02: Orbiter04: White Wash08. NormalAcknowledgement[p][ ][Set ID][ ][OK/NG][Data][x]* The number of data items differs depending on the model.25. Reset (Command: f k)To execute the Picture, Screen, Audio and Factory reset function.94 Appendix C Controlling multiple products](https://usermanual.wiki/LG-Electronics-USA/HSTND-3971-G/User-Guide-2208140-Page-104.png)
![Transmission[f][k][ ][Set ID][ ][Data][Cr]Data00: Picture Reset01: Screen Reset02: Factory Reset03: Audio ResetAcknowledgement[k][ ][Set ID][ ][OK/NG][Data][x]26. Tile Mode (Command: d d)To set a Tile Mode and Tile Column/ Row values.Transmission[d][d][ ][Set ID][ ][Data][Cr]Data00 to FF: 1st byte - Tile Row2nd byte - Tile Column*00, 01, 10, 11 means Tile Mode Off.Acknowledgement[d][ ][Set ID][ ][OK/NG][Data][x]** It may not be supported depending on the model.27. Tile ID Set (Command: d i)To set Tile ID.Transmission[d][i][ ][Set ID][ ][Data][Cr]Data01 to E1: Tile ID 01 to 225**FF: Check Tile ID** Data could not be set over (Tile Column) x (Tile Row).** It may not be supported depending on the model.Acknowledgement[i][ ][Set ID][ ][OK/NG][Data][x]*NG will be return if data is over (Tile Column) x (Tile Row), except 0xFF.28. Tile H Position (Command: d e)To adjust the Tile Horizontal position.Transmission / Receiving protocol 95](https://usermanual.wiki/LG-Electronics-USA/HSTND-3971-G/User-Guide-2208140-Page-105.png)
![* This function is available only when the Natural option of the Tile Mode is set to Off while the Tile Mode setto On.Transmission[d][e][ ][Set ID][ ][Data][Cr]Data00 to 20 (00H - 14H)*Left/Right values depend on Tile H size.** It may not be supported depending on the model.Acknowledgement[e][ ][Set ID][ ][OK/NG][Data][x]29. Tile V Position (Command: d f)To adjust the Tile Vertical position.* This function is available only when the Natural option of the Tile Mode is set to Off while the Tile Mode setto On.Transmission[d][f][ ][Set ID][ ][Data][Cr]Data0 to 20 (00H - 14H)* Bottom/Top values depend on Tile Vertical size.** It may not be supported depending on the model.Acknowledgement[f][ ][Set ID][ ][OK/NG][Data][x]30. Tile H Size (Command: d g)To adjust the Tile Horizontal size.*Set Tile H Position to 0x32 before setting Tile H Size.* This function is available only when the Natural option of the Tile Mode is set to Off while the Tile Mode setto On.Transmission[d][g][ ][Set ID][ ][Data][Cr]Data0 to 50 (00H - 32H)Acknowledgement[g][ ][Set ID][ ][OK/NG][Data][x]31. Tile V Size (Command: d h)To adjust the Tile Vertical size.96 Appendix C Controlling multiple products](https://usermanual.wiki/LG-Electronics-USA/HSTND-3971-G/User-Guide-2208140-Page-106.png)
![*Set Tile V Position to 0x00 before setting Tile V Size.* This function is available only when the Natural option of the Tile Mode is set to Off while the Tile Mode setto On.Transmission[d][h][ ][Set ID][ ][Data][Cr]Data00 to 50 (00H to 32h)** It may not be supported depending on the model.Acknowledgement[h][ ][Set ID][ ][OK/NG][Data][x]32. Natural Mode (In Tile Mode) (Command : d j)To display the image naturally, the part of the image that would normally be displayed in the gap betweenthe displays is omitted.Transmission[d][j][ ][Set ID][ ][Data][Cr]Data00: Off01: OnAcknowledgement[j][ ][Set ID][ ][OK/NG][Data][x]33. DPM Select (Command: f j)To set the DPM (Display Power Management) function.Transmission[f][j][ ][Set ID][ ][Data][Cr]Data00: Off01: OnAcknowledgement[j][ ][Set ID][ ][OK/NG][Data][x]34. Temperature Value (Command: d n)To check the inside temperature value.Transmission[d][n][ ][Set ID][ ][Data][Cr]DataTransmission / Receiving protocol 97](https://usermanual.wiki/LG-Electronics-USA/HSTND-3971-G/User-Guide-2208140-Page-107.png)
![FF: Check the statusAcknowledgement[n][ ][Set ID][ ][OK/NG][Data][x]* Temperature is displayed in hexadecimal.35. Remote Controller Lock/ Key Lock (Command: k m)When the remote control and front keys are locked in standby mode, the power cannot be turned on usingthe remote control or front power button.Transmission[k][m][ ][Set ID][ ][Data][Cr]Data00: Off (Lock Off)01: On (Lock On)* Display will not be turned on by power on key of remote controller and front panel control keys, if key islocked on in standby mode.Acknowledgement[m][ ][Set ID][ ][OK/NG][Data][x]36. Key (Command: m c)To send a key code of the IR remote control.Transmission[m][c][ ][Set ID][ ][Data][Cr]DataIR_KEY_CODEAcknowledgement[c][ ][Set ID][ ][OK/NG][Data][x]For a key code, see the IR Code.* Some key codes are not supported depending on the model.37. OSD Select (Command: k l)To select OSD (On Screen Display) on/off.Transmission[k][l][ ][Set ID][ ][Data][Cr]Data00: Off01: OnAcknowledgement98 Appendix C Controlling multiple products](https://usermanual.wiki/LG-Electronics-USA/HSTND-3971-G/User-Guide-2208140-Page-108.png)
![[l][ ][Set ID][ ][OK/NG][Data][x]38. Operating time return (Command: d l)To check the panel used time.Transmission[d][l][ ][Set ID][ ][Data][Cr]DataFF: Read the statusAcknowledgement[l][ ][Set ID][ ][OK/NG][Data][x]* Returned data means used hours in hexadecimal.39. Serial No. (Command: f y)To check the Serial Numbers.Transmission[f][y][ ][Set ID][ ][Data][Cr]DataFF: Check the product Serial NumberAcknowledgement[y][ ][Set ID][ ][OK/NG][Data][x]* Data is ASCII code.40. S/W Version (Command: f z)To check the Software Version.Transmission[f][z][ ][Set ID][ ][Data][Cr]DataFF: Check the Software versionAcknowledgement[z][ ][Set ID][ ][OK/NG][Data][x]41. Backlight (Command: m g)To adjust the screen backlight.Transmission[m][g][ ][Set ID][ ][Data][Cr]Data00 to 64: Backlight 0 to 100Transmission / Receiving protocol 99](https://usermanual.wiki/LG-Electronics-USA/HSTND-3971-G/User-Guide-2208140-Page-109.png)
![Acknowledgement[g][ ][set ID][][OK/NG][Data][x]** It may not be supported depending on the model.42. Display Name (Command: v a)To fill the Display Name field for VOE.Transmission[v][a][ ][Set ID][ ][Data][Cr]DataThe data is always ff(in Hex).Acknowledgement[a][ ][Set ID][ ][OK/NG][Data][x]DataThe data format is ASCII Code.43. Abnormal State (Command: k z)Used to Read the power off status when Stand-by mode.Transmission[k][z][ ][Set ID][ ][Data][Cr]Dataff: ReadAcknowledgement[z][ ][Set ID][ ][OK/NG][Data][x]Data00 : Normal (Power on and signal exist)01 : No signal (Power on)02 : Turn the display off by remote control03 : Turn the display off by sleep time function04 : Turn the display off by RS-232C function08 : Turn the display off by off time function09 : Turn the display off by auto off function* Subnet Mask, NSM Setup (Command: v l)To set the subnet mask for Network Sign Manager.Transmission[v][l][ ][Set ID][ ][Data] [Cr]Data100 Appendix C Controlling multiple products](https://usermanual.wiki/LG-Electronics-USA/HSTND-3971-G/User-Guide-2208140-Page-110.png)
![The data is always ff(in Hex).Acknowledgement[l][ ][00][ ][OK/NG][Data][x]Data"hhhhhhhh" where h is a hex value44. Display Location (Command: v b)To fill the Display Location field for VOE.Transmission[v][b][ ][Set ID][ ][Data] [Cr]DataThe data is always ff(in Hex).Acknowledgement[b][ ][Set ID][ ][OK/NG][Data][x]DataThe data format is ASCII Code.45. Player Name (Command: v d)To fill the Player Name field for VOE.Transmission[v][d][ ][Set ID][ ][Data] [Cr]DataThe data is always ff(in Hex).Acknowledgement[d][ ][Set ID][ ][OK/NG][Data][x]DataThe data format is ASCII Code.46. DHCP (VOE) (Command: v e)Set DHCP on or off for VOE.Transmission[v][e][ ][Set ID][ ][Data] [Cr]Data00: Disable01: EnableAcknowledgement[e][ ][Set ID][ ][OK/NG][Data][x]Transmission / Receiving protocol 101](https://usermanual.wiki/LG-Electronics-USA/HSTND-3971-G/User-Guide-2208140-Page-111.png)
![47. Scheduling Input Select (Command : f u) (Main Picture Input)To select input source for TV depending on day.Transmission[f][u][ ][Set ID][ ][Data1][ ][Data2][Cr]Data1f1h to f4h(write/read one index)f1 : read 1st index of On Time Inputf2 : read 2nd index of On Time Inputf3 : read 3rd index of On Time Inputf4 : read 4th index of On Time InputData2Data (Hex) INPUT07 : RGB08 : HDMI(DTV)09 : HDMI(PC)A : Display port (DTV)B : Display port (PC)C : VOE(PC)D : VOE(DTV)Acknowledgement[u][ ][Set ID][ ][OK/NG][Data 1][Data 2][x]48. IP Address, VOE Setup (Command: v f)Set the IP address for VOE.Transmission[v][f][ ][Set ID][ ][Data][Cr]Data (Add schedule)The data is always ff(in Hex).Acknowledgement[f][][Set ID][][OK/NG][Data][x]Data"hhhhhhhh" where h is a hex value49. Auto Detection (Command: f g)Set Auto Detection.Transmission102 Appendix C Controlling multiple products](https://usermanual.wiki/LG-Electronics-USA/HSTND-3971-G/User-Guide-2208140-Page-112.png)
![[f][g][ ][Set ID][ ][Data][Cr]Data00: Off01: OnAcknowledgement[g][ ][Set ID][ ][OK/NG][Data][x]50. Subnet mask, VOE Setup (Command: v g)To set the subnet mask for VOE.Transmission[v][g][ ][Set ID][ ][Data][Cr]DataThe data is always ff(in Hex).Acknowledgement[g][ ][Set ID][ ][OK/NG][Data][x]Data"hhhhhhhh" where h is a hex value51. IP Address, NSM Setup (Command: v k)To set the IP Address for Network Sign Manager.Transmission[v][k][ ][Set ID][ ][Data][Cr]DataThe data is always ff(in Hex).Acknowledgement[k][ ][Set ID][ ][OK][Data][x]Data"hhhhhhhh" where h is a hex value52. Mac Address, VOE Setup (Command: v h)To set the Mac address for VOE.Transmission[v][h][ ][Set ID][ ][Data][Cr]DataThe data is always ff(in Hex).Acknowledgement[h][ ][Set ID][ ][OK][Data][x]Transmission / Receiving protocol 103](https://usermanual.wiki/LG-Electronics-USA/HSTND-3971-G/User-Guide-2208140-Page-113.png)
![Data"hhhhhhhh" where h is a hex value53. Check VOE Availability (Command: v i)To check whether display is free or attached to a media player by VOE. When the display is attached, noconfiguration may be performed..Transmission[v][i][ ][Set ID][ ][Data][Cr]DataThe data is always ff(in Hex).Acknowledgement[i][ ][Set ID][ ][OK][Data][x]Data0: Free1: Busy (Configuring display not allowed)54. Mac Address, NSM setup (Command: v j)To set the Mac address for Network Sign Manager.Transmission[v][j][ ][Set ID][ ][Data][Cr]DataThe data is always ff(in Hex).Acknowledgement[j][ ][Set ID][ ][OK][Data][x]Data"hhhhhhhh" where h is a hex value55. Product Name. (Command : f v)To read the product name.NOTE: NSM uses the Product Name to determine which command format to use for some controls.Transmission[f][v][][Set ID][][Data] [Cr]DataThe data is always ff(in Hex).Acknowledgement[v][][Set ID][][OK/NG][Data][x]Data104 Appendix C Controlling multiple products](https://usermanual.wiki/LG-Electronics-USA/HSTND-3971-G/User-Guide-2208140-Page-114.png)