LG Electronics USA IPS234TA LCD Monitor User Manual
LG Electronics USA LCD Monitor
Contents
- 1. User Manual
- 2. regulatory information
- 3. IPS234TA__User Manual
User Manual

www.lg.com
OWNER’S MANUAL
LED LCD MONITOR
IPS224T
IPS234T
Please read this manual carefully before operating
your set and retain it for future reference.
LED LCD MONITOR MODEL
ENGLISH

ENG
ENGLISH
CONTENTS
3 ASSEMBLINGANDPREPAR-
ING
3 Unpacking
4 Partsandbuttons
5 SettinguptheMonitorset
5 - AttachingtheStandBase
5 - DetachingtheStandBase
6 - Mountingonatable
6 - Usingthecableholder
8 - Mountingonawall
9 USINGTHEMONITORSET
9 ConnectingtoaPC
9 - D-SUBconnection
9 - DVI-Dconnection
11 CUSTOMIZINGSETTINGS
12 CustomizingSettings
12 - MenuSettings
13 -PICTURE
14-COLOR
15-DISPLAY
15 -VOLUME
16 -OTHERS
17 MY KEY Setting
18- FUNC.Setting
19 TROUBLESHOOTING
20 SPECIFICATIONS
21 IPS224T
22 IPS234T
23 PresetModes(Resolution)
23 Indicator
24 PROPERPOSTURE
24 ProperpostureforusingtheMonitorset.
2TABLE OF CONTENTS
19 - SUPER ENERGY SAVING
18 - PICTURE MODE
20 - DUAL DISPLAY
20 - DUAL WEB
21 - MY KEY SETTING
ENG
ENGLISH
ASSEMBLING AND PREPARING
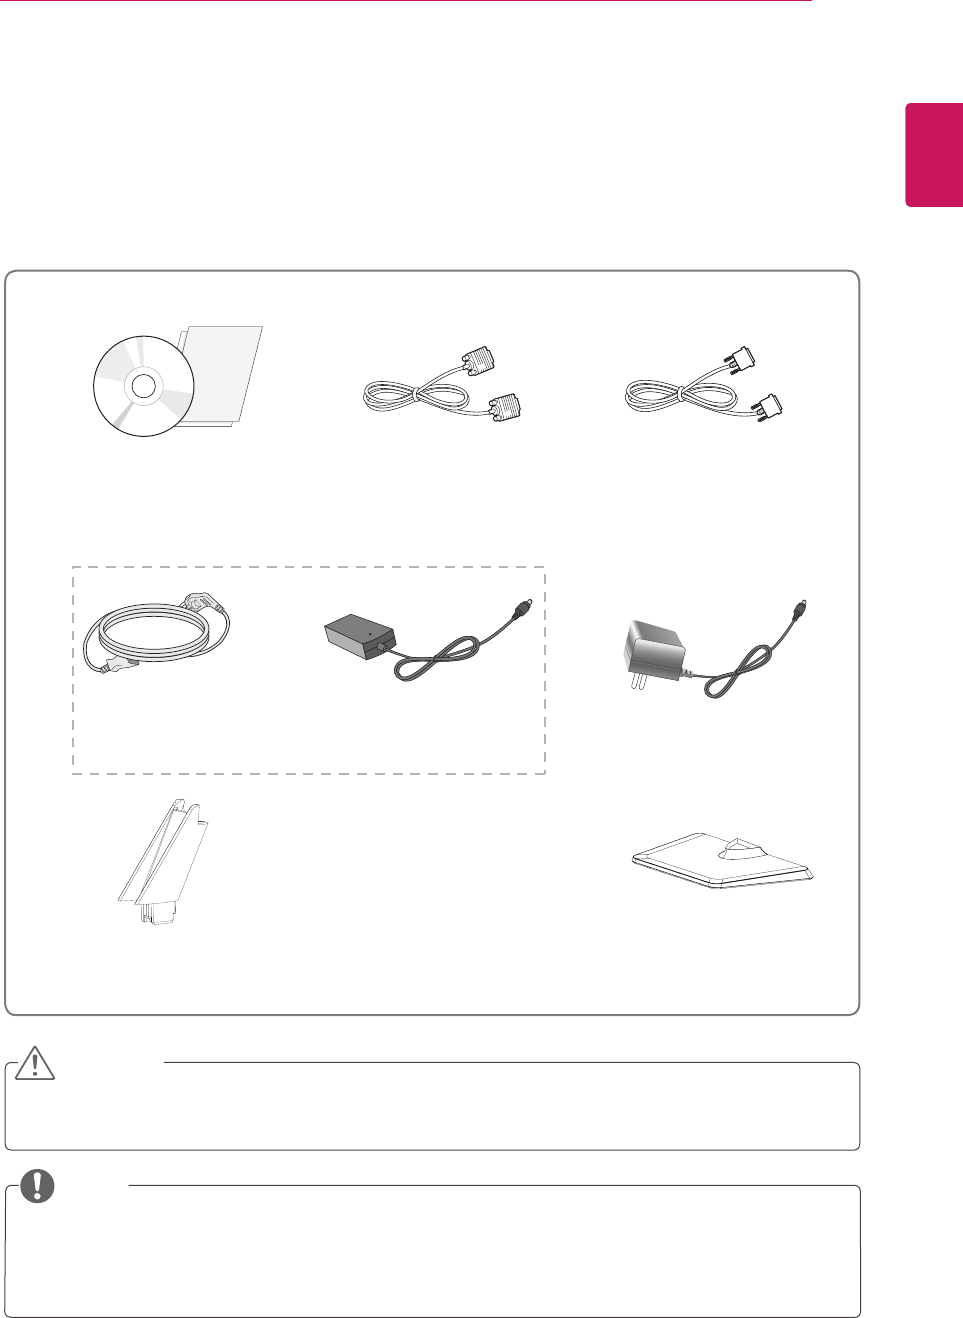
Unpacking
Check your product box for the following items. If there are any missing accessories, contact the local
dealer where you purchased your product. The illustrations in this manual may differ from the actual product
and accessories.
yDo not use any unapproved accessories to ensure the safety and product life span.
yAny damages or injuries by using unapproved accessories are not covered by the warranty.
yThe accessories supplied with your product may vary depending on the model.
yProduct specifications or contents in this manual may be changed without prior notice due to upgrade
of product functions.
CAUTION
NOTE
Stand Body Stand Base
CD(Owner's Manual) /
Card
DVI-D Cable
(This cable is not included
in all countries.)
( Depending on the country ) ( Depending on the country )
Power Cord AC-DC Adapter AC-DC Adapter
or
D-SUB Cable
(This cable is not included
in all countries.)
3
ASSEMBLING AND PREPARING
ENG
ENGLISH
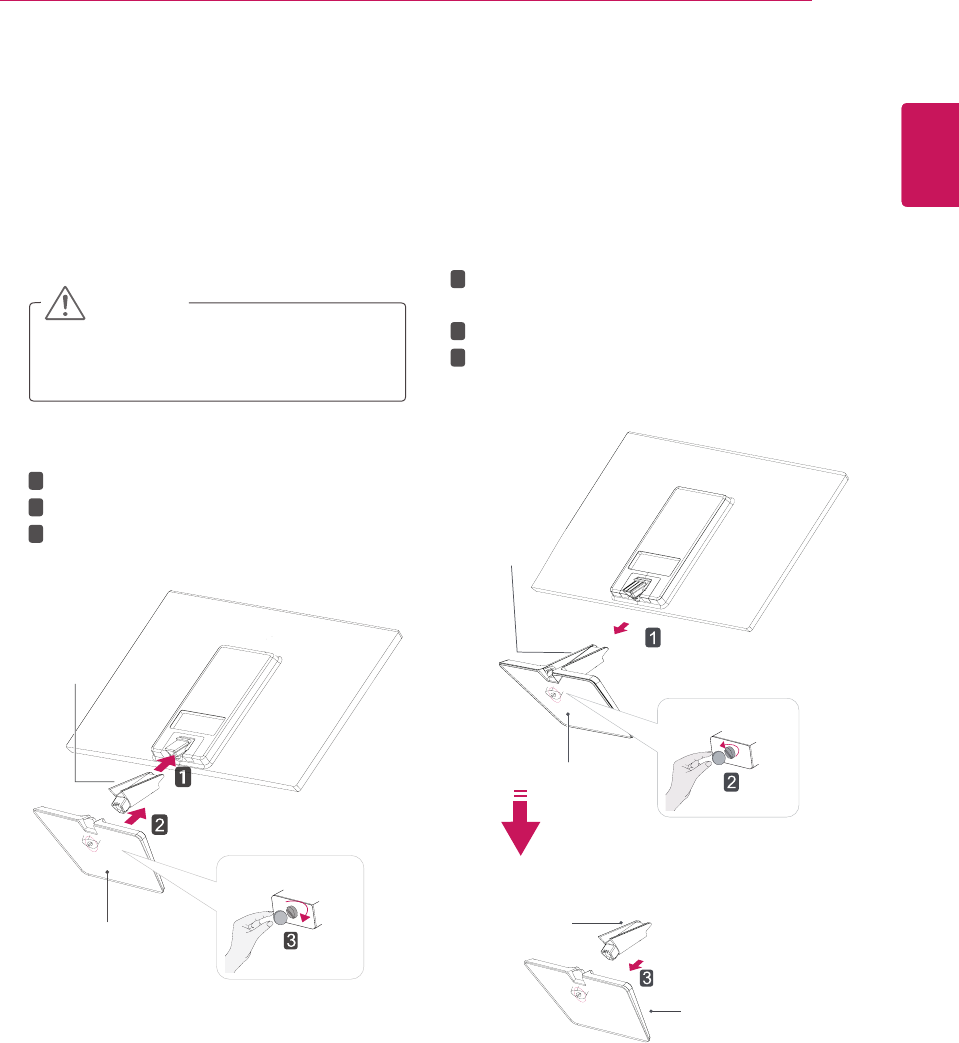
AttachtheStandBodytothemonitorset.
AttachtheStandBase.
Tightenthescrewtotherightwithacoin.
SettinguptheMonitorset
AttachingtheStandBase
1 PlacetheMonitorsetwiththescreenside
downonaflatandcushionedsurface.
Layafoammatorsoftprotectivecloth
onthesurfacetoprotectthescreenfrom
damage.
CAUTION
2
StandBase
StandBody
1
2
3
DetachingtheStandBase
1 PlacetheMonitorsetwiththescreenside
downonaflatandcushionedsurface.
2
StandBase
StandBase
StandBody
StandBody
PullouttheStandBodyandStandBasefrom
themonitorset.
Turnthescrewtotheleftwithacoin.
PullouttheStandBase.
1
2
3
5
ASSEMBLING AND PREPARING
6
ENG
ENGLISH
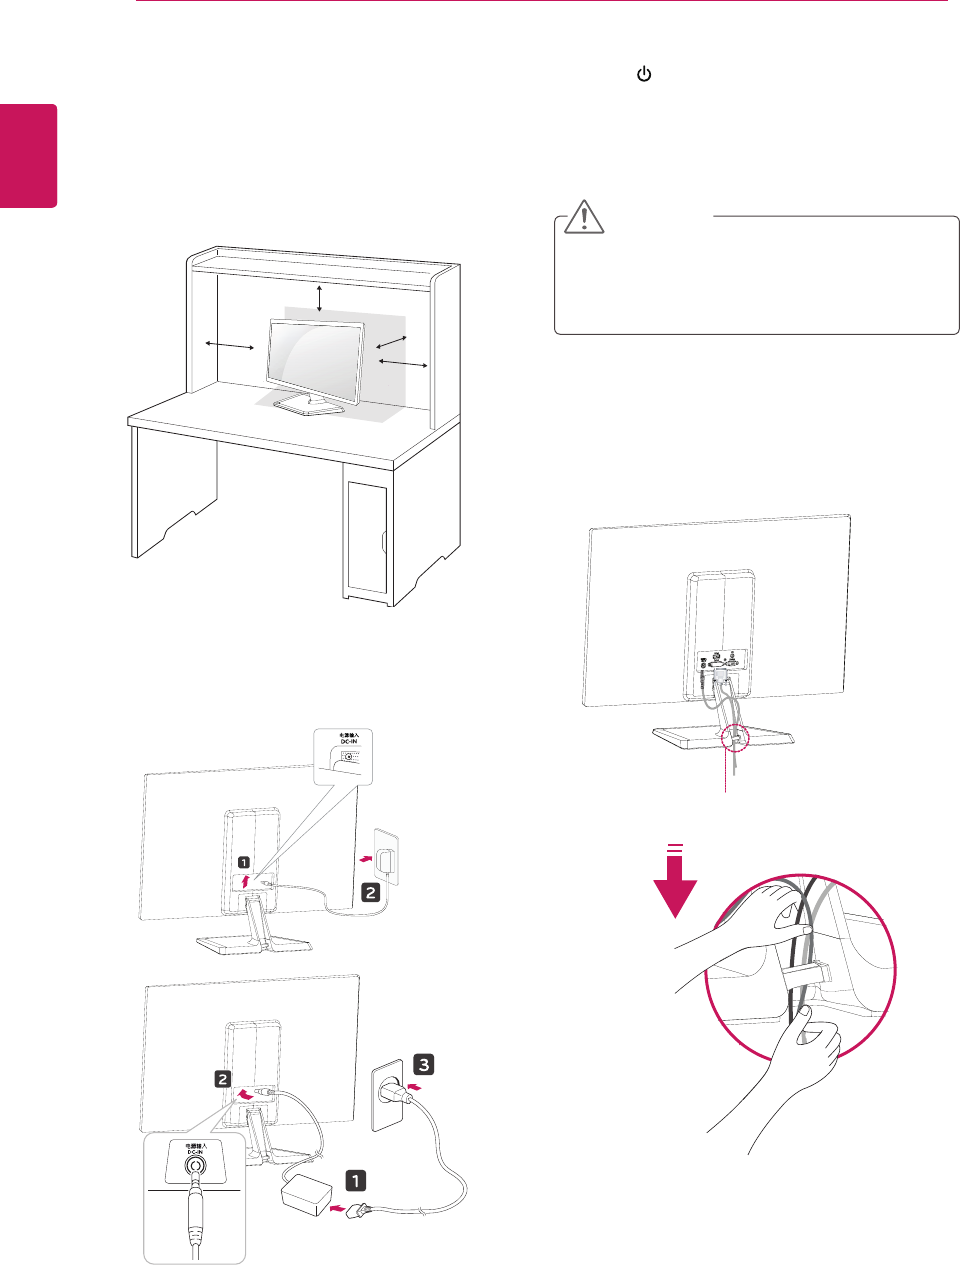
Mountingonatable
1 LiftandtilttheMonitorsetintoitsupright
positiononatable.
Leavea10cm(minimum)spacefromthewall
forproperventilation.
Usingthecableholder
2 ConnecttheAC-DCAdapterandPowerCord
toawalloutlet.
3 Press (Power)buttononthebottomswitch
paneltoturnthepoweron.
10 cm
10 cm
10 cm
10 cm
Unplugthepowercordbeforemovingthe
Monitortoanotherlocation.Otherwiseelectric
shockmayoccur.
CAUTION
Cableholder
or
ASSEMBLING AND PREPARING
7
ENG
ENGLISH
ASSEMBLING AND PREPARING
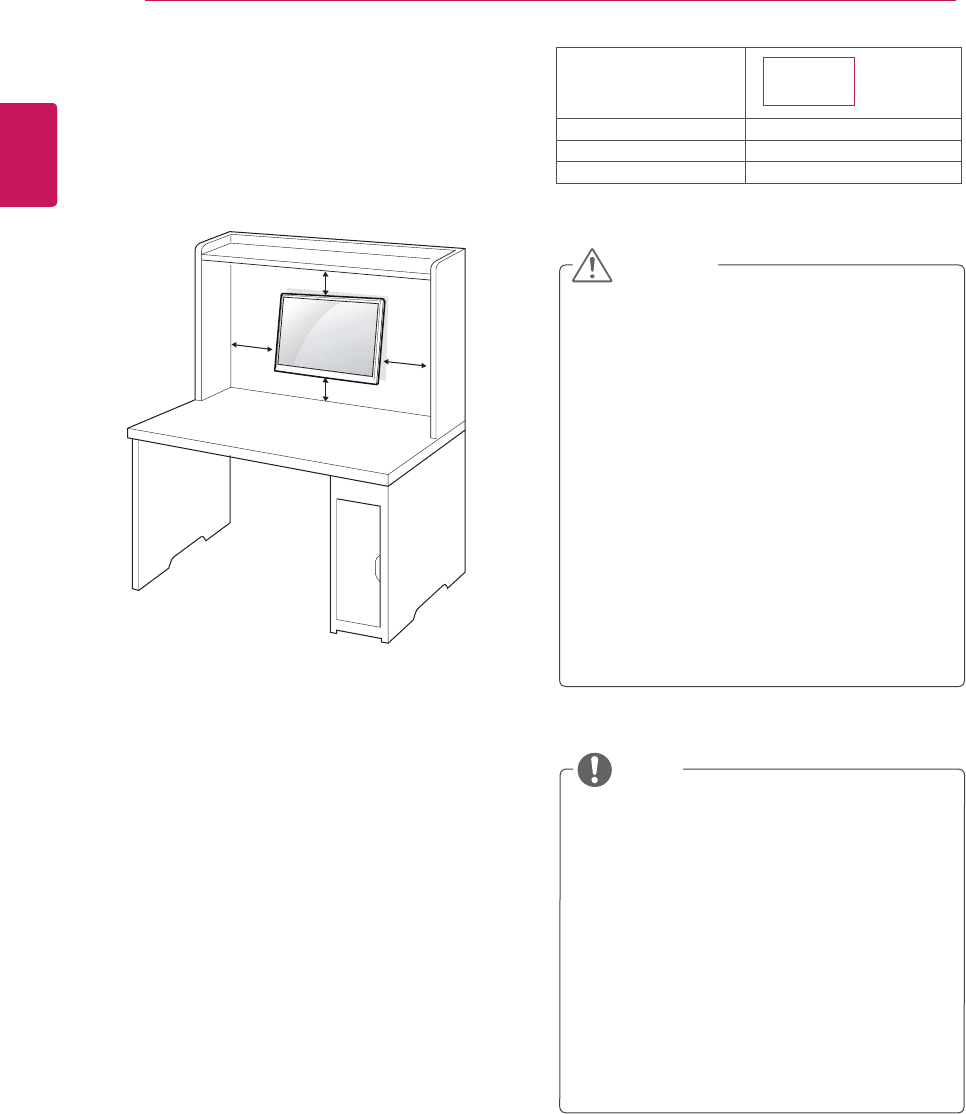
UsingtheKensingtonsecuritysystem
TheKensingtonsecuritysystemconnectoris
locatedatthebackoftheMonitorset.Formore
informationofinstallationandusing,refertothe
manualsuppliedwiththeKensingtonsecurity
systemorvisit
http://www.kensington.com
.
ConnecttheKensingtonsecuritysystemcable
betweentheMonitorsetandatable.
TheKensingtonsecuritysystemisoptional.
Youcanobtainitfrommostelectronicsstores.
NOTE
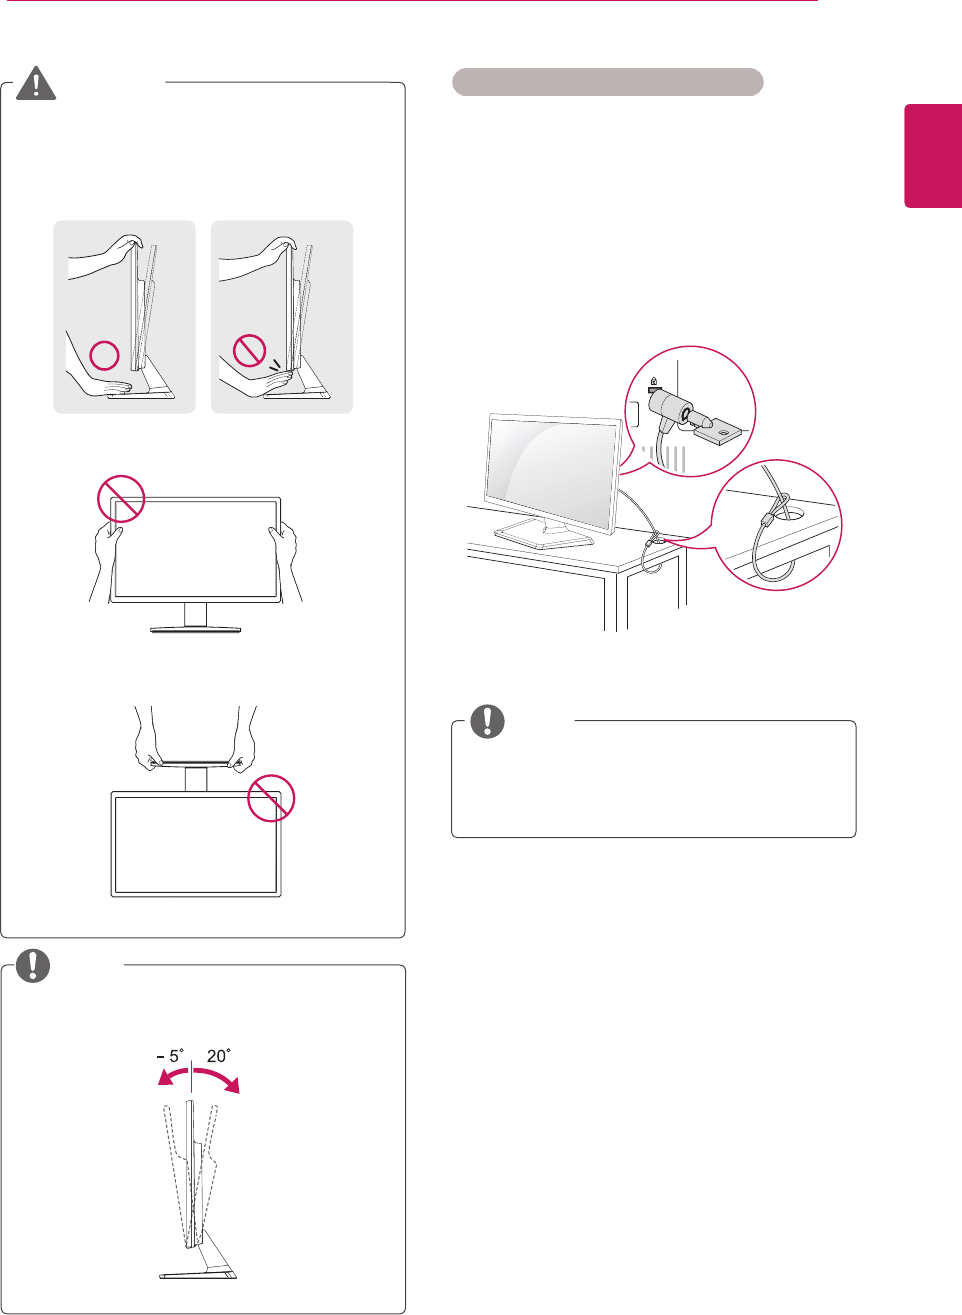
Whenyouadjusttheangle,donotholdthe
bottomoftheMonitorsetframeasshownon
thefollowingillustration,asmayinjureyour
fingers.
Donottouchorpressthescreenwhen
adjustingtheangleofthemonitor.
Donotholdthissetlikebelowpicture.Monitor
screencandetachfromstandbaseandinjure
yourbody.
WARNING
Tiltfrom+20to-5degreesupordowntoadjust
theangleoftheMonitorsettosuityourview.
NOTE
Front Rear
8
ENG
ENGLISH
ASSEMBLING AND PREPARING
Mountingonawall
Forproperventilation,allowaclearanceof10cm
oneachsideandfromthewall.Detailed
instructionsareavailablefromyourdealer,seethe
optionalTiltWallMountingBracketInstallationand
SetupGuide.
IfyouintendtomounttheMonitorsettoawall,
attachWallmountinginterface(optionalparts)to
thebackoftheset.
WhenyouinstalltheMonitorsetusingawall
mountinginterface(optionalparts),attachit
carefullysoitwillnotdrop.
1Please,Usethescrewandwallmountinterface
inaccordancewithVESAStandards.
2Ifyouusescrewlongerthanstandard,the
monitormightbedamagedinternally.
3Ifyouuseimproperscrew,theproductmightbe
damagedanddropfrommountedposition.In
thiscase,LGElectronicsisnotresponsiblefor
it.
4VESAcompatible.
5PleaseuseVESAstandardasbelow.
784.8mm(30.9inch)andunder
*WallMountPadThickness:2.6mm
*Screw:Φ4.0mmxPitch0.7mmx
Length10mm
787.4mm(31.0inch)andabove
*PleaseuseVESAstandardwallmountpad
andscrews.
10 cm
10 cm
10 cm
10 cm
Disconnectthepowercordfirst,andthen
moveorinstalltheMonitorset.Otherwise
electricshockmayoccur.
IfyouinstalltheMonitorsetonaceilingor
slantedwall,itmayfallandresultinsevere
injury.
UseonlyanauthorizedLGwallmount
andcontactthelocaldealerorqualified
personnel.
Donotovertightenthescrewsasthismay
causedamagetotheMonitorsetandvoid
yourwarranty.
Useonlyscrewsandwallmountsthat
meettheVESAstandard.Anydamages
orinjuriesbymisuseorusinganimproper
accessoryarenotcoveredbythewarranty.
UsethescrewsthatarelistedontheVESA
standardscrewspecifications.
Thewallmountkitwillincludeaninstallation
manualandnecessaryparts.
Thewallmountbracketisoptional.Youcan
obtainadditionalaccessoriesfromyourlocal
dealer.
Thelengthofscrewsmaydifferdepending
onthewallmount.Besuretousetheproper
length.
Formoreinformation,refertothe
instructionssuppliedwiththewallmount.
CAUTION
NOTE
Model
VESA(AxB) 75x75
Standardscrew M4
Numberofscrews 4
IPS224T
IPS234T
9
ENG
ENGLISH
USINGTHEMONITORSET
ConnectingtoaPC
YourMonitorsetsupportsPlug&Play*.
*Plug&Play:APCrecognizesaconnected
devicethatusersconnecttoaPCandturn
on,withoutdeviceconfigurationoruser
intervention.
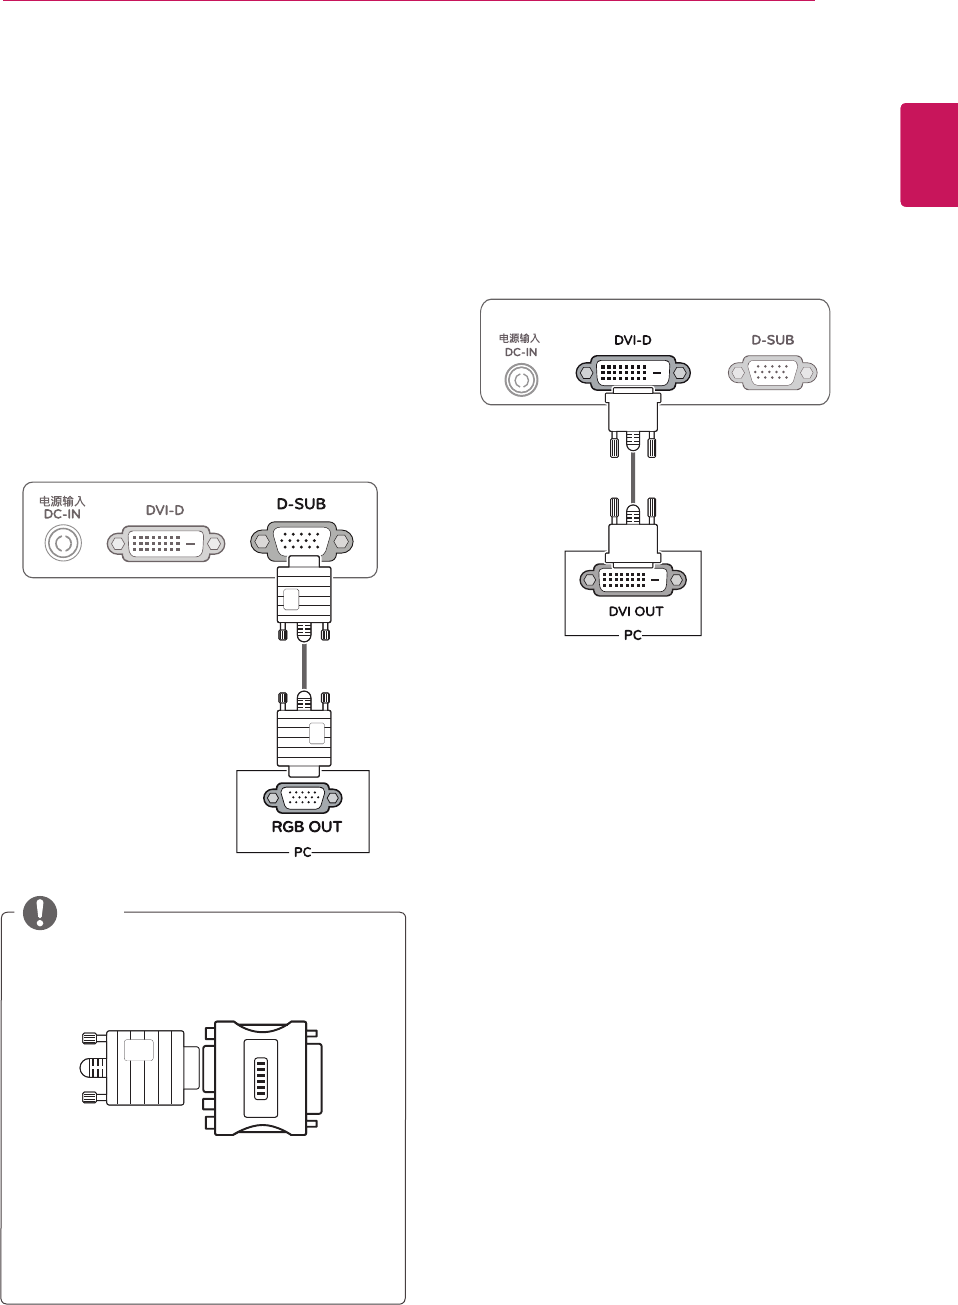
D-SUBconnection
TransmitsanalogvideofromyourPCtothe
Monitorset.ConnectthePCandtheMonitorset
withthesuppliedD-sub15pinsignalcableas
showninthefollowingillustrations.
Macadapter
ForAppleMacintoshuse,aseparateplug
adapterisneededtochangethe15pin
highdensity(3row)D-SUBVGAconnector
onthesuppliedcabletoa15pin2row
connector.
WhenusingaD-Subsignalinputcable
connectorforMacintosh
NOTE
DVI-Dconnection
TransmitsadigitalvideosignalfromyourPCto
theMonitorset.ConnectthePCandtheMonitor
setwithaDVIcableasshowninthefollowing
illustrations.
USING THE MONITOR SET
10
ENG
ENGLISH
USING THE MONITOR SET
WhenyouwanttousetwoPCinourMonitor,
pleaseconnectthesignalcable(D-SUB/
DVI-D)respectivelyinMonitorset.
IfyouturntheMonitorsetonwhileitiscold,
thescreenmayflicker.Thisisnormal.
Somered,green,orbluespotsmayappear
onthescreen.Thisisnormal.
"SelfImageSetting"Function.
Thisfunctionprovidestheuserwithoptimal
displaysettings.Whentheuserconnects
themonitorforthefirsttime,thisfunction
automaticallyadjuststhedisplaytooptimal
settingsforindividualinputsignals.(Only
supportedinAnalogMode)
‘AUTO’Function.
Whenyouencounterproblemssuchas
blurryscreen,blurredletters,screenflicker
ortiltedscreenwhileusingthedeviceor
afterchangingscreenresolution,pressthe
AUTOfunctionbuttontoimproveresolution.
(OnlysupportedinAnalogMode)
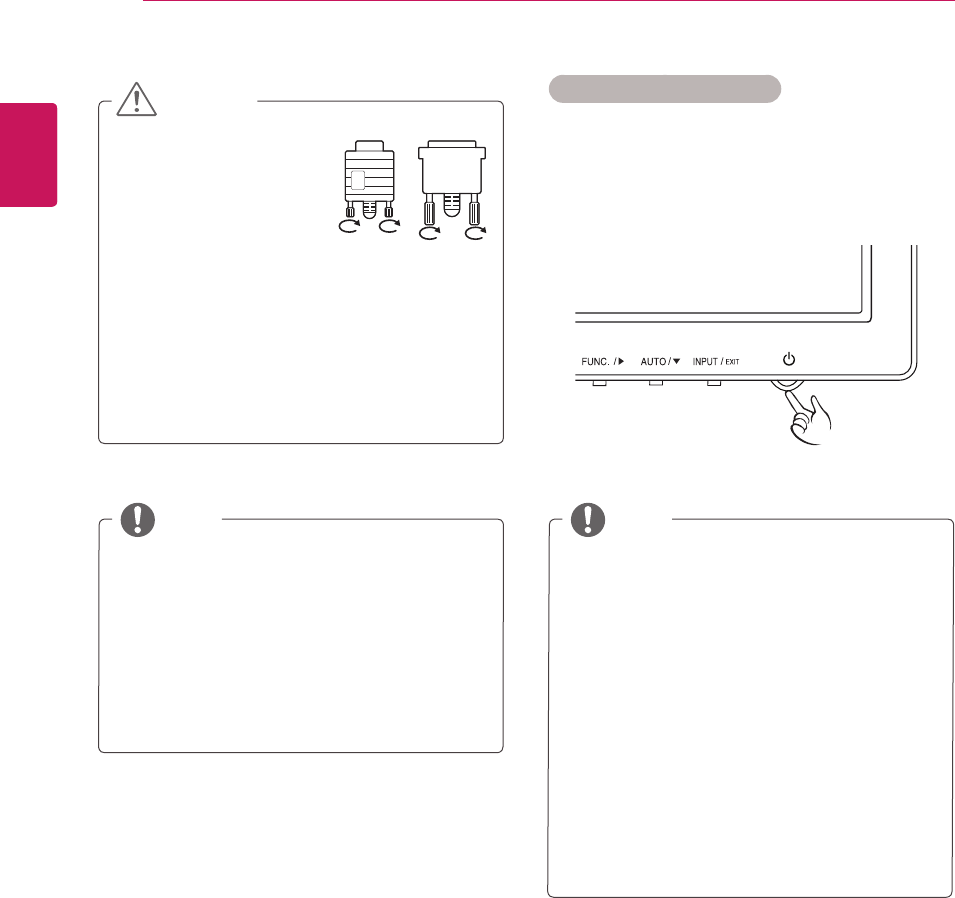
NOTE NOTE
Connectthesignal
inputcableandtighten
itbyturningthescrews
clockwise.
Donotpressthescreenwithyourfingerfor
alongtimeasthismayresultintemporary
distortiononthescreen.
Avoiddisplayingafixedimageonthe
screenforalongperiodoftimetoprevent
imageburn.Useascreensaverifpossible.
CAUTION SelfImageSettingFunction
Pressthepowerbuttononthebottompanelto
turnthepoweron.Whenmonitorpoweristurned
on,the"SelfImageSetting"Functionisexecuted
automatically.(OnlysupportedinAnalogMode)
11
ENG
ENGLISH
CUSTOMIZINGSETTINGS
1 PressthedesiredbuttononthebottomoftheMonitorset.
2 ChangethevalueofthemenuitembypressingthebuttonsonthebottomoftheMonitorset.
Toreturntotheuppermenuorsetothermenuitems,usetheuparrow( )button.
3 SelectEXITtoleavetheOSDmenu.
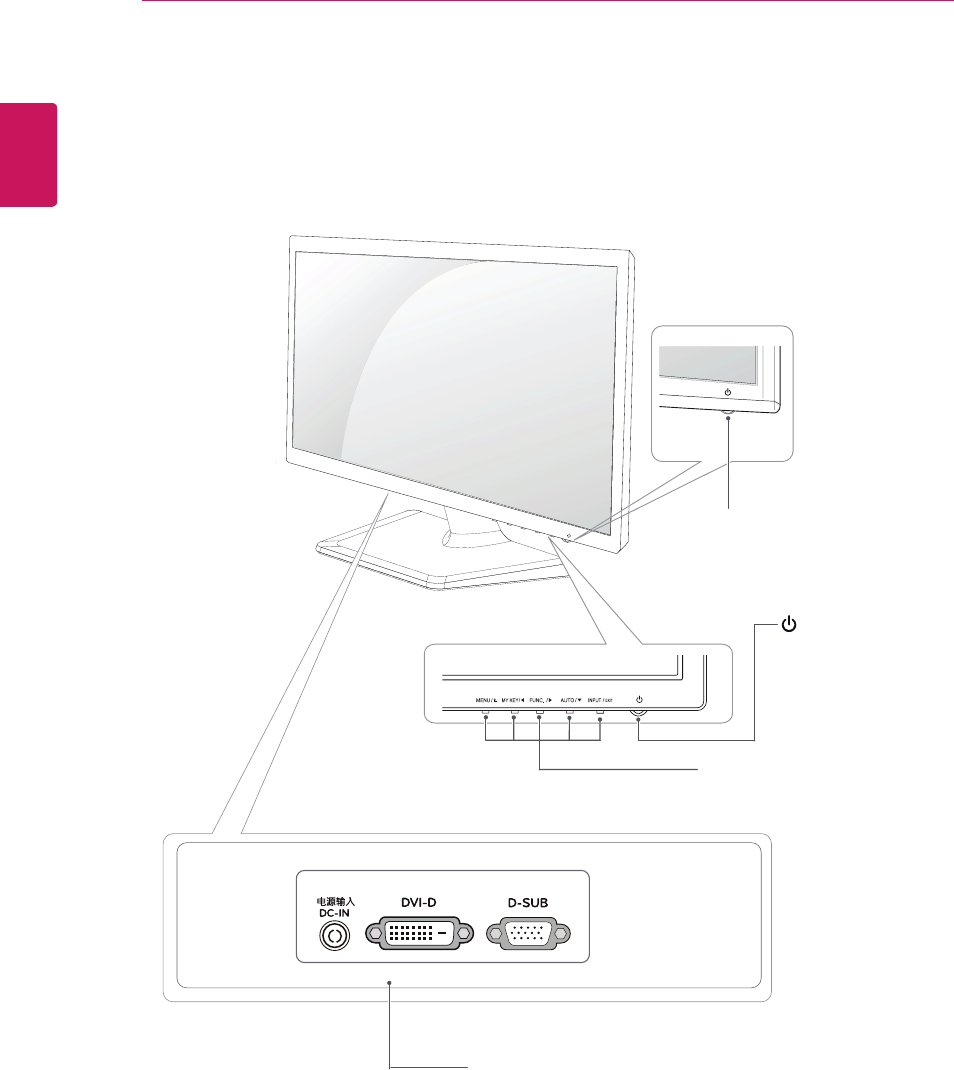
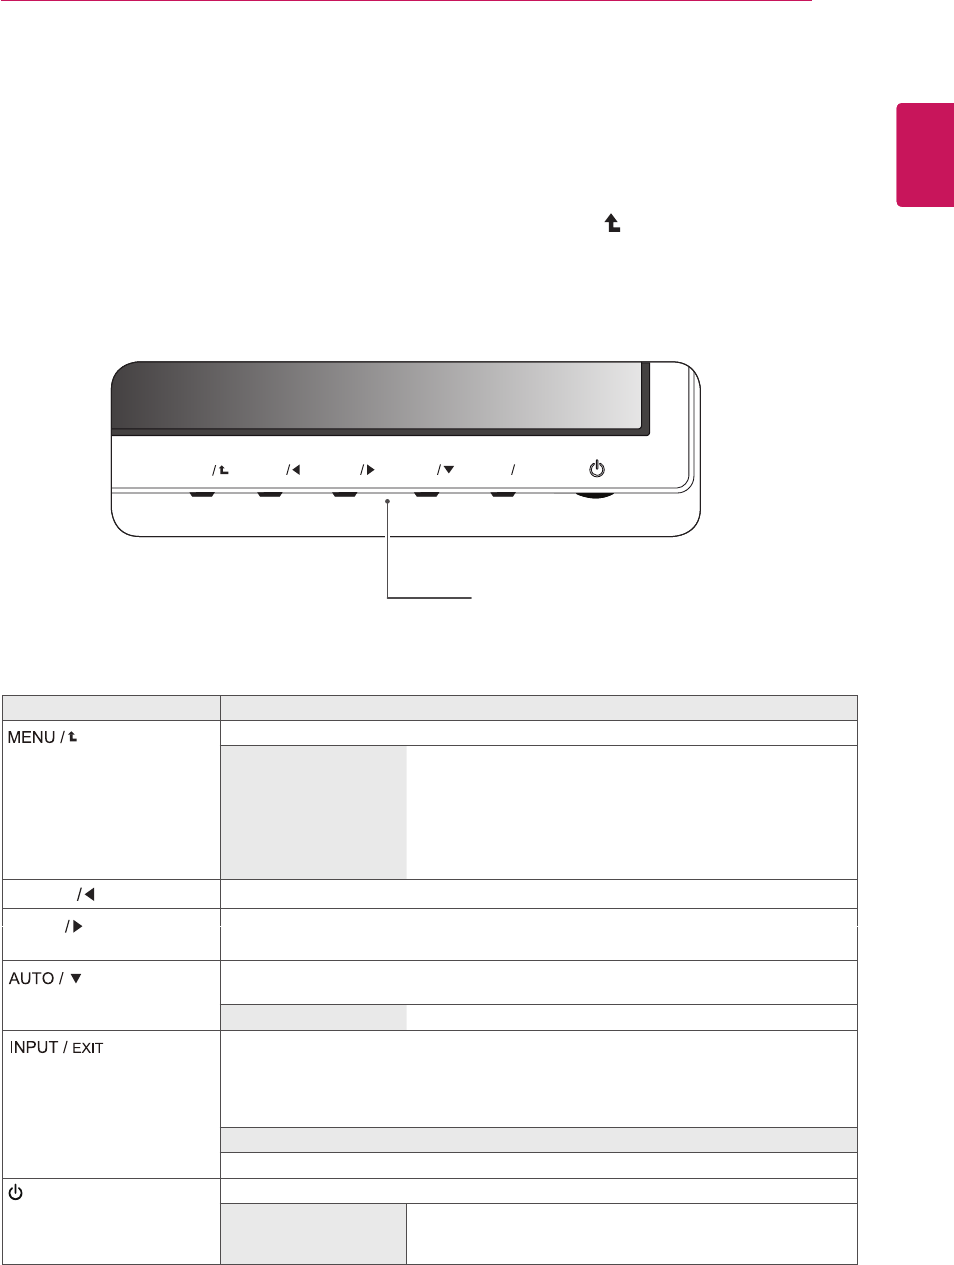
MonitorsetButtons
Button Description
Accessesthemainmenus.(Seep.13)
OSDLOCKED/
UNLOCKED
Thisfunctionallowsyoutolockthecurrentcontrolsettings,so
thattheycannotbeinadvertentlychanged.
PressandholdtheMENUbuttonforseveralseconds.
Themessage"OSDLOCKED"shouldappear.
YoucanunlocktheOSDcontrolsatanytimebypushing
theMENUbuttonforseveralseconds.Themessage"OSD
UNLOCKED"shouldappear.
UsethisbuttontoenterMY KEYmenu.Formoreinformation.(Seep.17)
Whenadjustingyourdisplaysettings,alwayspresstheAUTObuttonontheMONITOR
SETUPOSD.(OnlysupportedinAnalogMode)
Thebestdisplaymode 1920x1080
Youcanchoosetheinputsignal.
• Whentwoinputsignalsareconnected,youcanselecttheinputsignal(D-SUB/DVI)
youwant.
• Whenonlyonesignalisconnected,itisautomaticallydetected.Thedefaultsettingis
D-SUB.
EXIT
ExittheOSD(OnScreenDisplay).
(PowerButton) Turnsthepoweronoroff.
PowerIndicator Thepowerindicatorstaysredifthedisplayisrunningproperly
(OnMode).IfthedisplayisinSleepMode,thepowerindicator
blinksred.
MENU
MY KEY
AUTO
INPUT
EXIT
FUNC.
MY KEY
FUNC.
UsethisbuttontoenterPICTURE MODE,SUPER ENERGY SAVING,DUAL DISPLAY,
DUAL WEB,MY KEY SATTINGmenus.(Seep.18)
CUSTOMIZING SETTINGS
12
ENG
ENGLISH
CUSTOMIZING SETTINGS
CustomizingSettings
MenuSettings
1 PressMENUbuttononthebottomoftheMonitorset
todisplaytheMENUOSD.
2 Settheoptionsbypressingthe◄or►or▼
buttons.
3 Selectthe"NEXTMENU"buttontoenterthemore
optionsettings.
4 SelectEXITtoleavetheOSDmenu.
Toreturntotheuppermenuorsetothermenuitems,
usetheuparrow( )button.
Eachoptionisexplainedbelow.
MENU > NEXT MENU Analog Digital Description
PICTURE SHARPNESS ● ● To adjust the clearness of the screen .
COLOR GAMMA
● ● To customize the color of the screen
COLOR TEMP
SIX COLOR
COLOR RESET
DISPLAY HORIZONTAL ●To adjust the position of the screen
VERTICAL
CLOCK ●To improve the clarity and stability of the screen
PHASE
OTHERS LANGUAGE ● ● To customize the screen status for a user's operating
environment
POWER INDICATOR
WHITE BALANCE ●
●
●
Analog: D-SUB(Analog signal) input.
Digital: DVI-D(Digital signal) input.
MENU Analog Digital Description
BRIGHTNESS ● ● Toadjustthebrightness,contrastofthescreen
CONTRAST ● ●
WIDE/ORIGINAL
● ●
WIDE
Switchtofullscreenmodeaccordingtoinputimagesignal.
ORIGINAL
Changetheinputimagesignalratiotooriginal.
*ThisfunctionworksonlyifinputresolutionislowerthanMonitorsetratio
(16:9).
RESET ● ● Restoreallfactorydefaultsettings.Pressthe◄,►buttonstoreset
immediately.
MENU
EXIT
R
WIDE/ORIGINAL
RESET
CONTRAST
BRIGHTNESS
NO
NEXT MENU
1/2
70
100
1/2
WIDE
MENU > NEXT MENU > PICTURE
SHARPNESS 5
EXIT
13
ENG
ENGLISH
CUSTOMIZING SETTINGS
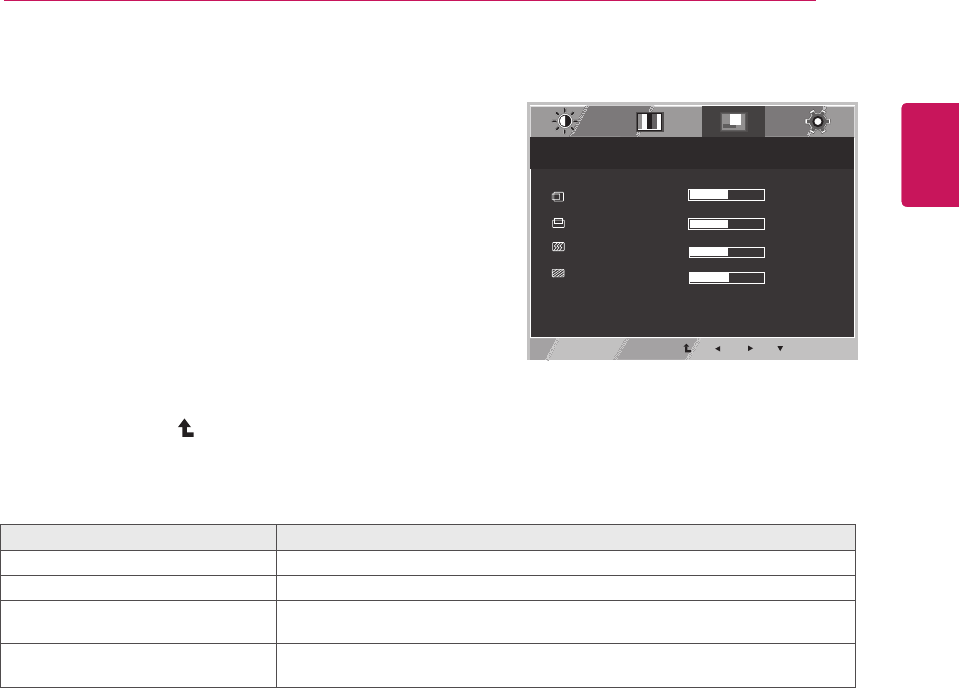
PICTURE
1 PressMENUbuttononthebottomoftheMonitorset
todisplaytheMENUOSD.
2 Selectthe"NEXTMENU"buttontoenterthemore
optionsettings.
3 EntertoPICTUREbypressingthe▼button.
4 Settheoptionsbypressingthe◄or►or▼
buttons.
5 SelectEXITtoleavetheOSDmenu.
Toreturntotheuppermenuorsetothermenuitems,
usetheuparrow( )button.
Eachoptionisexplainedbelow.
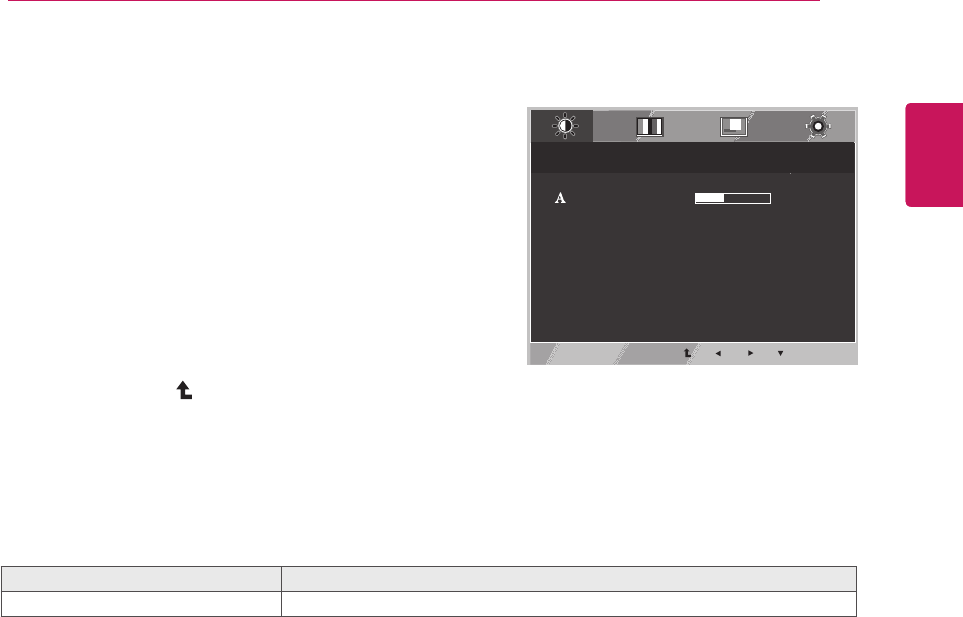
MENU>NEXTMENU>PICTURE Description
SHARPNESS Toadjusttheclearnessofthescreen.
MENU > NEXT MENU > PICTURE
SHARPNESS 5
EXIT
14
ENG
ENGLISH
CUSTOMIZING SETTINGS
COLOR
1 PressMENUbuttononthebottomoftheMonitorset
todisplaytheMENUOSD.
2 Selectthe"NEXTMENU"buttontoenterthemore
optionsettings.
3 SelectCOLORbypressingthe►button.
4 EntertoCOLORbypressingthe▼button.
5 Settheoptionsbypressingthe◄or►or▼
buttons.
6 SelectEXITtoleavetheOSDmenu.
Toreturntotheuppermenuorsetothermenuitems,
usetheuparrow( )button.
Eachoptionisexplainedbelow.
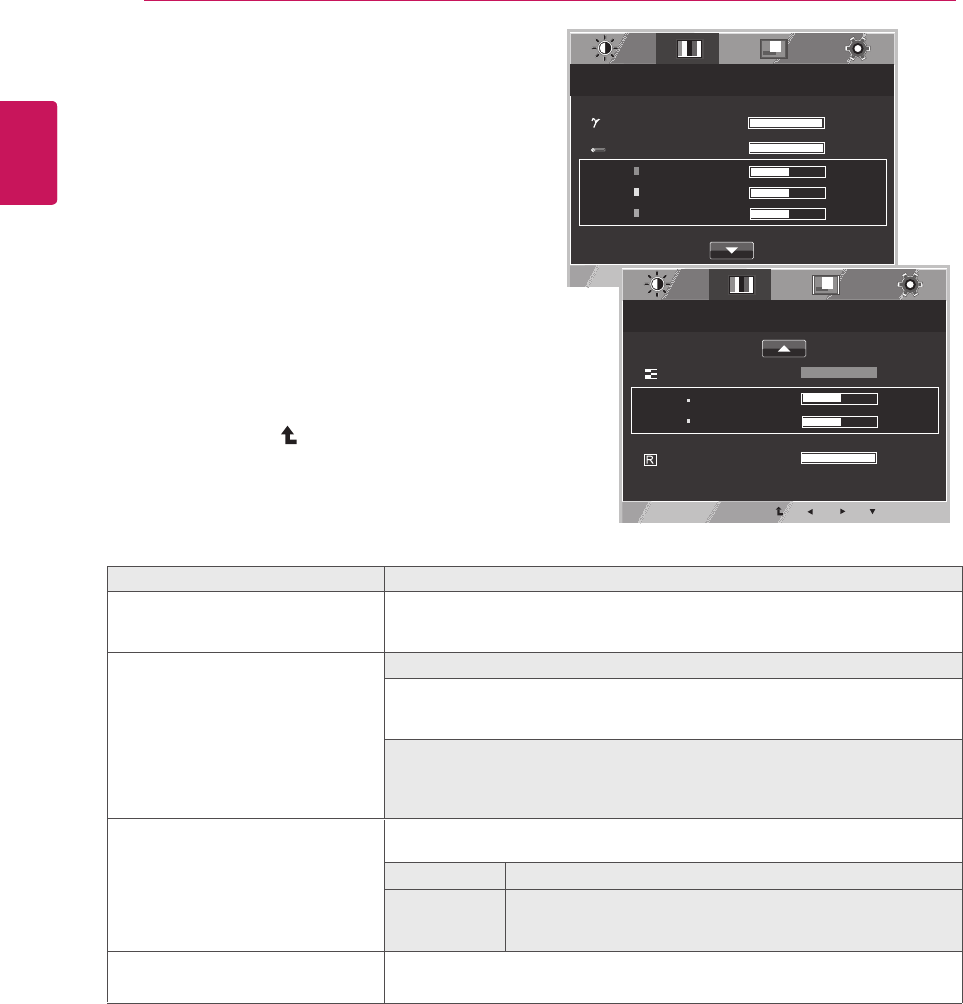
MENU > NEXT MENU > COLOR Description
GAMMA Set your own gamma value. : GAMMA 0, GAMMA 1, GAMMA 2 on the monitor,
high gamma values display whitish images and low gamma values display
blackish images.
COLOR TEMP CUSTOM
• RED:Set your own red color levels.
• GREEN: Set your own green color levels.
• BLUE: Set your own blue color levels.
Select the screen color.
WARM: Set the screen to warm color temperature (more red).
MEDIUM: Set the screen to medium color temperature.
COOL: Set the screen to cool color temperature (more blue).
SIX COLOR Sets and stores the hue and saturation for six colors(RED/ GREEN/BLUE/
CYAN/MAGENTA/YELLOW) to satisfy the color requirements of a user.
HUE Adjusts the screen hue.
SATURATION
Adjusts the color sharpness on the screen. Lower values make
the color sharpness weaker and colors lighter while higher
values make the color sharpness stronger and colors dark.
COLOR RESET Resets the color settings to the factory default settings for the current
input device.
MENU > NEXT MENU > COLOR
GAMMA GAMMA 1 2/3
COLOR TEMP CUSTOM 1/4
RED 50
GREEN 50
BLUE 50
EXIT
MENU > NEXT MENU > COLOR
SIX COLOR RED 1/6
HUE 50
SATURATION 50
COLOR TEMP NO 1/2
EXIT
15
ENG
ENGLISH
CUSTOMIZING SETTINGS
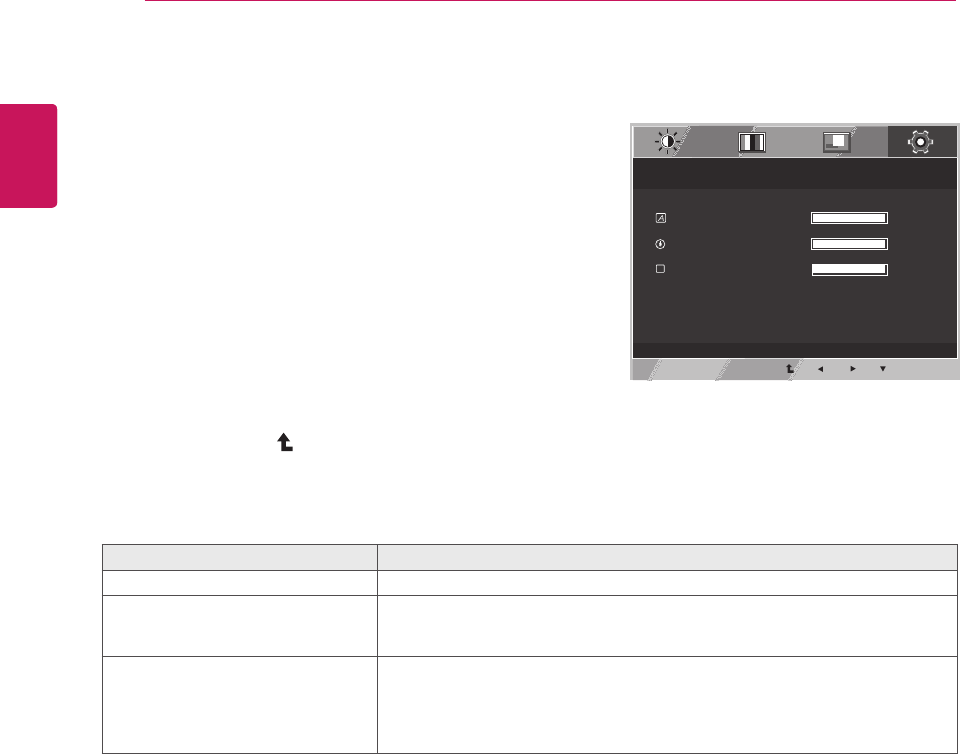
DISPLAY
1 PressMENUbuttononthebottomoftheMonitorset
todisplaytheMENUOSD.
2 Selectthe"NEXTMENU"buttontoenterthemore
optionsettings.
3 SelectDISPLAYbypressingthe►button.
4 EntertoDISPLAYbypressingthe▼button.
5 Settheoptionsbypressingthe◄or►or▼
buttons.
6 SelectEXITtoleavetheOSDmenu.
Toreturntotheuppermenuorsetothermenuitems,
usetheuparrow( )button.
Eachoptionisexplainedbelow.
MENU>NEXTMENU>DISPLAY Description
HORIZONTAL Tomoveimageleftandright.
VERTICAL Tomoveimageupanddown.
CLOCK Tominimizeanyverticalbarsorstripesvisibleonthescreenbackground.The
horizontalscreensizewillalsochange.
PHASE Toadjustthefocusofthedisplay.Thisitemallowsyoutoremoveanyhorizontal
noiseandclearorsharpentheimageofcharacters.
MENU > NEXT MENU > DISPLAY
HORIZONTAL 50
VERTICAL 50
CLOCK 50
PHASE 50
EXIT
16
ENG
ENGLISH
CUSTOMIZING SETTINGS
OTHERS
1 PressMENUbuttononthebottomoftheMonitorset
todisplaytheMENUOSD.
2 Selectthe"NEXTMENU"buttontoenterthemore
optionsettings.
3 SelectOTHERSbypressingthe►button.
4 EntertoOTHERSbypressingthe▼button.
5 Settheoptionsbypressingthe◄or►or▼
buttons.
6 SelectEXITtoleavetheOSDmenu.
Toreturntotheuppermenuorsetothermenuitems,
usetheuparrow( )button.
Eachoptionisexplainedbelow.
MENU>NEXTMENU>OTHERS Description
LANGUAGE Tochoosethelanguageinwhichthecontrolnamesaredisplayed.
POWER
INDICATOR
Usethisfunctiontosetthepowerindicatoronthebottomsideofthemonitorto
ONorOFF.IfyousetOFF,itwillgooff.
IfyousetONatanytime,thepowerindicatorwillautomaticallybeturnedon.
WHITE
BALANCE
Iftheoutputofthevideocardisdifferenttherequiredspecifications,thecolor
levelmaydeteriorateduetovideosignaldistortion.Usingthisfunction,the
signallevelisadjustedtofitintothestandardoutputlevelofthevideocardin
ordertoprovidetheoptimalimage.Activatethisfunctionwhenwhiteandblack
colorsarepresentinthescreen.
MENU > NEXT MENU > OTHERS
LANGUAGE ENGLISH 1/17
POWER INDICATOR ON 1/2
W
WHITE BALANCE NO 1/2
D-SUB 1920 X 1080 60HZ
EXIT
17
ENG
ENGLISH
CUSTOMIZING SETTINGS
MY KEYSetting
1 Press buttonon
thebottomoftheMonitorsettodisplaythe
MY KEYOSD.
2 Settheoptionsbypressingthe◄or►or▼buttons.
3 SelectEXITtoleavetheOSDmenu.
Each option is explained below.
MY KEY Description
MY KEY SETTING MY KEY is short key. You can select one of FUNC. (PICTURE MODE,
SUPER ENERGY SAVING, DUAL DISPLAY, DUAL WEB) as your favorite feature.
BACK Select BACK to return MY KEY menu.
MY KEY
MY KEY > PICTURE MODE
EXIT
MY KEY SETTING
YOU CAN DESIGNATE A FEATURE IN "FUNC." AS "MY KEY".
TEXT PHOTO CINEMA GAME
CUSTOM
MY KEY > WHAT IS MY KEY
"MY KEY" IS A SHORT KEY
FOR QUICK ACCESS.
YOU CAN SAVE ONE OF "FUNC."
FEATURES AS FAVORITE.
GO TO "MY KEY SETTING" IN "FUNC."
MENU TO CHANGE FAVORITE SETTING.
MY KEY SETTING
BACK
EXIT
18
ENG
ENGLISH
CUSTOMIZING SETTINGS
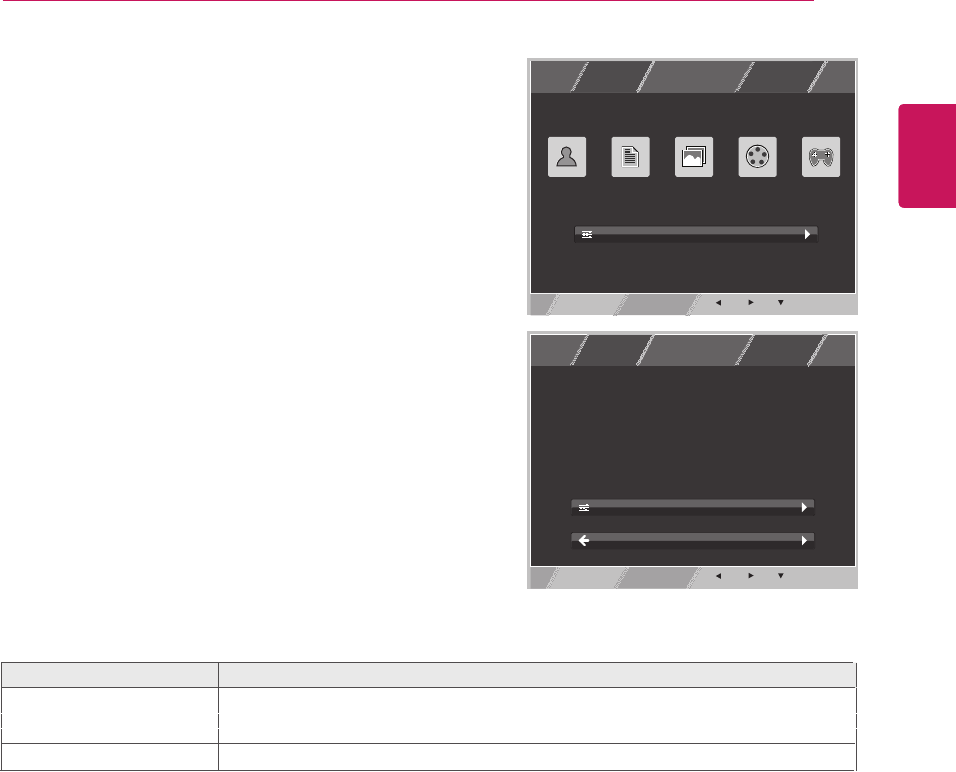
FUNC.Setting
1 Press FUNC.buttonon
thebottomoftheMonitorsettodisplaythe
FUNC.OSD.
2 Enterto PICTURE MODEbypressingthe▼button.
3 Settheoptionsbypressingthe◄or►or▼
buttons.
4 SelectEXITtoleavetheOSDmenu.
Toreturntotheuppermenuorsetothermenuitems,
usetheuparrow( )button.
EXIT
FUNC. > PICTURE MODE
TEXT PHOTO CINEMA GAME
CUSTOM
Eachoptionisexplainedbelow.
PICTUREMODE Description
CUSTOM Itisamodethattheusercanadjusteachelement.ItcanadjustthecolormodeoftheMainMenu.
TEXT Itisamodethatthescreenisadjustedtothebestforthetextworks.
PHOTO Itisamodethatthescreenisadjustedtothebesttoviewpictures.
CINEMA Itisamodethatthescreenisadjustedtothebesttoviewthevideos.
GAME Itisamodethatthescreenisadjustedtothebesttoplayagame.
PICTURE MODE
ENG
ENGLISH
CUSTOMIZING SETTINGS
1 Press FUNC.buttonon
thebottomoftheMonitorsettodisplaythe
FUNC.OSD.
2 Select bypressingthe►button.
3 Enterto bypressingthe▼button.
4 Settheoptionsbypressingthe◄or►or▼
buttons.
5 SelectEXITtoleavetheOSDmenu.
Toreturntotheuppermenuorsetothermenuitems,
usetheuparrow( )button.
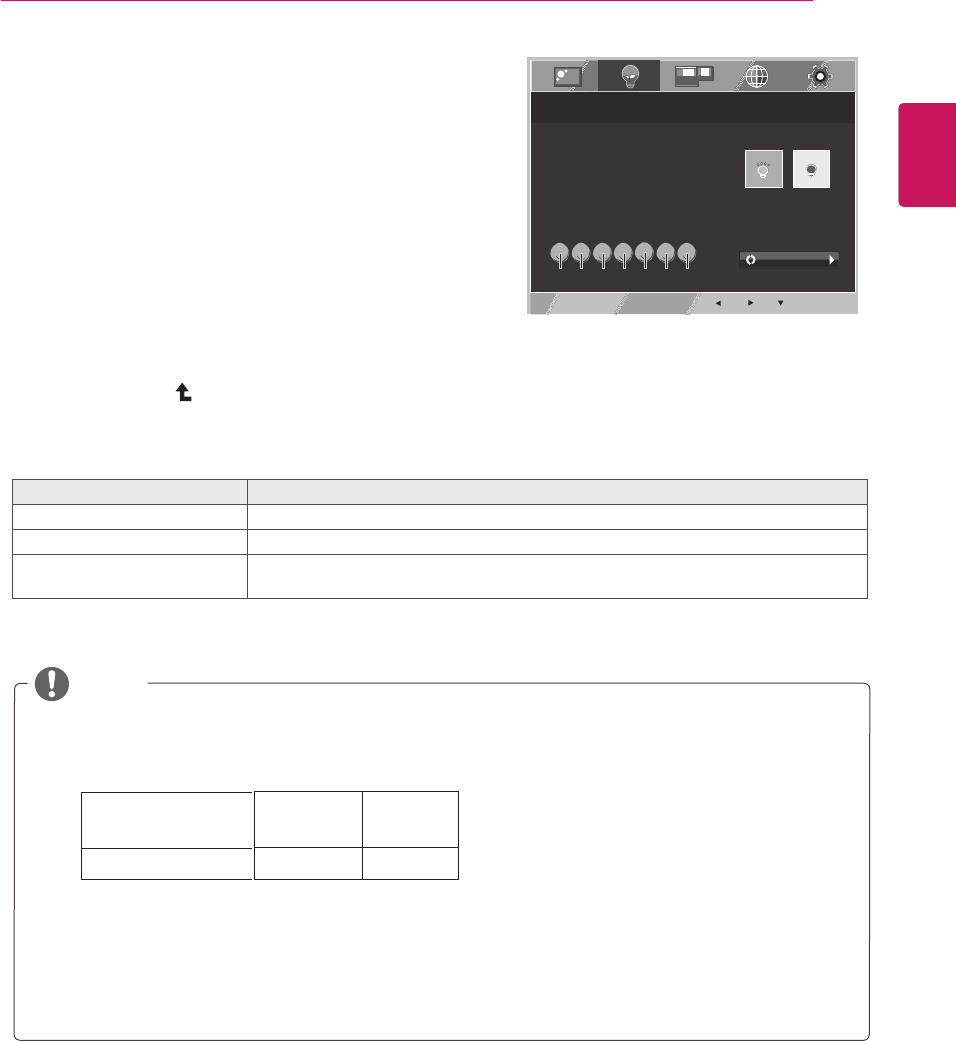
SUPER ENERGY SAVING
SUPER ENERGY SAVING
SUPER ENERGY SAVING
EXIT
FUNC. > SUPER ENERGY SAVING
ON OFF
YOU SAVED 0.00 TREES !!
POWER REDUCTION:
CO2 REDUCTION:
0W
0g
SUPER ENERGY SAVING
IS ACTIVE
RESET
Eachoptionisexplainedbelow.
SUPERENERGYSAVING Description
ON
EnablesSUPERENERGYSAVINGyoucansaveenergywiththisenergy-efficientfunction
OFF DisablesSUPERENERGYSAVING.
RESET ResetsthevaluesoftotalenergyconsumptionreductionandCO2emissionreduction
estimates.
TOTALPOWERREDUCTION:Howmuchpowerissavedwhileusingthemonitor.
TOTALCO2REDUCTION:ChangetheTOTALPOWERREDUCTIONtoCO2.
SAVINGDATA(W/h)
SavingDatadependsonthePanel.So,thosevaluesshouldbedifferentfromeachpanelandpanel
vendor.
LGcalculatedthesevaluesbyusing“broadcastvideosignal”
(includingbroadcastvideo:IEC62087)
SUPERSAVINGreferstohowmuchpowercanbesavedusingtheSUPERENERGYSAVING
function.
NOTE
546 mm 584 mm
(21.5 inch) (23 inch)
6 W/h 7 W/h
SUPER SAVING
19
CUSTOMIZING SETTINGS
Each option is explained below.
Description
DUAL DISPLAY
OFF If select OFF, DUAL DISPLAY off.
EXTENDED
primary monitor.
By selecting EXTENDED, user can use secondary monitor as extended mode of
CLONE
monitor.
By selecting CLONE, user can use secondary monitor as clone mode of primary
1 Press FUNC.buttonon
thebottomoftheMonitorsettodisplaythe
FUNC.OSD.
2 Select bypressingthe►button.
3 Enterto bypressingthe▼button.
4 Settheoptionsbypressingthe◄or►or▼
buttons.
5 SelectEXITtoleavetheOSDmenu.
Toreturntotheuppermenuorsetothermenuitems,
usetheuparrow( )button.
DUAL DISPLAY
DUAL DISPLAY
DUAL DISPLAY
EXIT
FUNC. > DUAL DISPLAY
OFF
EXTENDED
CLONE
Eachoptionisexplainedbelow.
1 Press FUNC.buttonon
thebottomoftheMonitorsettodisplaythe
FUNC.OSD.
2 Select bypressingthe►button.
bypressingthe▼button.
3 Enterto
4 Settheoptionsbypressingthe◄or►or▼
buttons.
5 SelectEXITtoleavetheOSDmenu.
Toreturntotheuppermenuorsetothermenuitems,
usetheuparrow( )button.
DUAL WEB
DUAL WEB
DUAL WEB
Description
DUAL WEB
OFF If select OFF,DUAL WEB is off.
ON
move windowson screen. Help user to control dividedwindows ratio.
Help user to browse web efficiently by dividing in half. Help to arrange and
* Before using below functions, please install DUAL PACKAGE program.
EXIT
FUNC. > DUAL WEB
ON OFF
* Before using below functions, please install DUAL PACKAGE program.
NOTE
yWhen monitor goes to power saving mode with pc saving option
-> Pressing any button -> OSD appear and user should press dual button -> User can bring back to
normal mode.
20
ENG
ENGLISH
ENG
ENGLISH
CUSTOMIZING SETTINGS
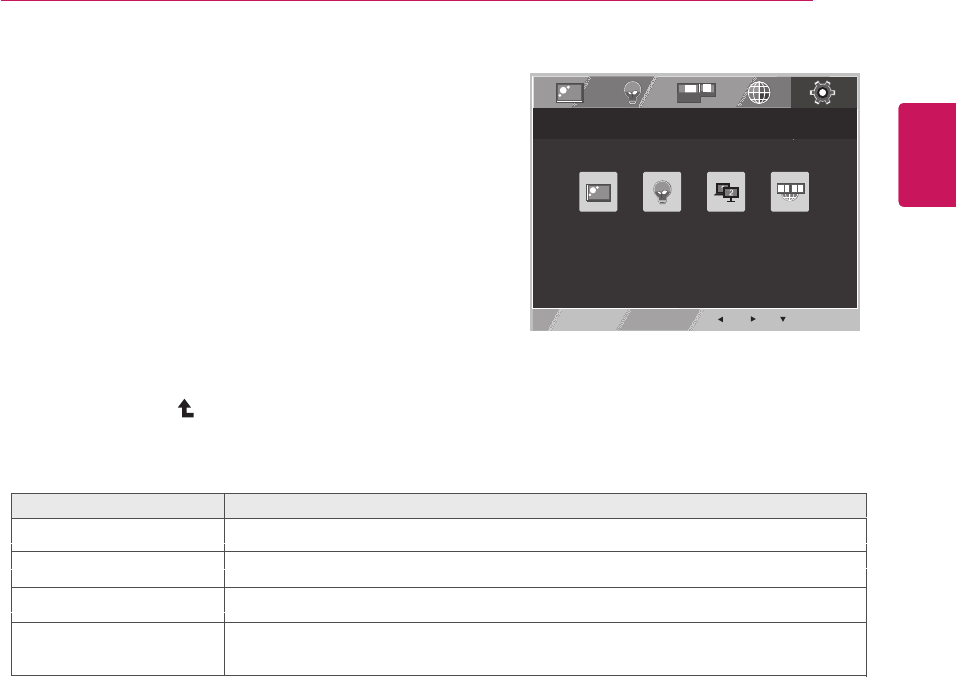
1 Press FUNC.buttonon
thebottomoftheMonitorsettodisplaythe
FUNC.OSD.
2 Select bypressingthe►button.
bypressingthe▼button.
3 Enterto
4 Settheoptionsbypressingthe◄or►or▼
buttons.
5 SelectEXITtoleavetheOSDmenu.
Toreturntotheuppermenuorsetothermenuitems,
usetheuparrow( )button.
MY KEY SETTING
MY KEY SETTING
MY KEY SETTING
Eachoptionisexplainedbelow.
EXIT
FUNC. > MY KEY SETTING
PICTURE
MODE
YOU CAN DESIGNATE A FEATURE IN FUNC. AS MY KEY
SUPER
ENERGY
SAVING
DUAL
DISPLAY
DUAL
WEB
21
MY KEY SETTING Description
PICTURE MODE
SUPER ENERGY SAVING
DUAL DISPLAY
DUAL WEB
User can use CLONE or EXTENDED in another monitor.
Enables SUPER ENERGY SAVING you can save energy with this energy-effcient function.
PICTURE MODE adjust the Monitor set for the best picture appearance.
Help user to browse web efficiently by dividing in half and some other
convenience in browsing dual pages.
TROUBLESHOOTING
Checkthefollowingbeforecallingforservice.
Noimageappears
Isthepowercordofthedisplay
connected?
Checkandseeifthepowercordisconnectedproperlytothepower
outlet.
Isthepowerindicatorlighton?
PressthePowerbutton.
Isthepoweronandthepower
indicatorRed?
Adjustthebrightnessandthecontrast.
Isthepowerindicatorflickering?
Ifthedisplayisinpowersavingmode,trymovingthemouseor
pressinganykeyonthekeyboardtobringupthescreen.
TrytoturnonthePC.
Doyouseean"OUTOFRANGE"
messageonthescreen?
ThismessageappearswhenthesignalfromthePC(videocard)is
outofhorizontalorverticalfrequencyrangeofthedisplay.Seethe
'Specifications'sectionofthismanualandconfigureyourdisplay
again.
Doyouseea"NOSIGNAL"
messageonthescreen?
Whenthemonitorison"No-Signal"in5minutes,themonitorgoesto
DPMmode.
Doyouseea"OSDLOCKED"messageonthescreen?
Doyousee“OSDLOCKED”when
youpushMENUbutton?
Youcansecurethecurrentcontrolsettings,sothattheycannotbe
inadvertentlychanged.YoucanunlocktheOSDcontrolsatanytime
bypushingtheMENUbuttonforseveralseconds:themessage“OSD
UNLOCKED”willappear.
Displayimageisincorrect
DisplayPositionisincorrect.
PresstheAUTObuttontoautomaticallyadjustyourdisplayimageto
theidealsetting.
Onthescreenbackground,vertical
barsorstripesarevisible.
PresstheAUTObuttontoautomaticallyadjustyourdisplayimageto
theidealsetting.
Anyhorizontalnoiseappearingin
anyimageorcharactersarenot
clearlyportrayed.
PresstheAUTObuttontoautomaticallyadjustyourdisplayimageto
theidealsetting.
CheckControlPanel►Display►Settingsandadjustthedisplay
totherecommendedresolutionoradjustthedisplayimagetotheideal
setting.Setthecolorsettinghigherthan24bits(truecolor).
22TROUBLESHOOTING
ENG
ENGLISH
23
Displayimageisincorrect
Thescreencolorismonoor
abnormal.
Checkifthesignalcableisproperlyconnectedanduseascrewdriver
tofastenifnecessary.
Makesurethevideocardisproperlyinsertedintheslot.
Setthecolorsettinghigherthan24bits(truecolor)atControlPanel
►Settings.
Thescreenblinks.
Checkifthescreenissettointerlacemodeandifyes,changeittothe
recommendresolution.
Doyouseean"Unrecognizedmonitor,Plug&Play(VESADDC)monitorfound"message?
Haveyouinstalledthedisplay
driver?
BesuretoinstallthedisplaydriverfromthedisplaydriverCD(or
diskette)thatcomeswithyourdisplay.Or,youcanalsodownloadthe
driverfromourwebsite:http://www.lg.com.
MakesuretocheckifthevideocardsupportsPlug&Playfunction.
CheckControlPanel►Display►Settingsandseeifthefrequencyortheresolutionwere
changed.Ifyes,readjustthevideocardtotherecommendresolution.
Iftherecommendedresolution(optimalresolution)isnotselected,lettersmaybeblurredandthe
screenmaybedimmed,truncatedorbiased.Makesuretoselecttherecommendresolution.
ThesettingmethodcandifferbycomputerandO/S(OperationSystem),andresolutionmentioned
abovemaynotbesupportedbythevideocardperformance.Inthiscase,pleaseasktothecomputer
orthevideocardmanufacturer.
CAUTION
TROUBLESHOOTING
ENG
ENGLISH
SPECIFICATIONS
24SPECIFICATIONS
ENG
ENGLISH
Display Screen Type 54.6 cm (21.5 inch) Flat Panel Active matrix-TFT LCDAnti-
Glare coating
Visible diagonal size: 54.6 cm
Pixel Pitch 0.247 mm x 0.247 mm (Pixel Pitch)
Sync Input Horizontal Frequency 30 kHz to 83 kHz (Automatic)
Vertical Frequency 56Hz to 75Hz (D-SUB, DVI-D)
Input Form Separate Sync. Digital
Video Input Signal Input 15 pin D-SUB Connector /DVI-D Connector (Digital)
Input Form RGB Analog (0.7 Vp-p/ 75 ohm), Digital
Resolution Max D-SUB(Analog) : 1920 x 1080 @ 60 Hz
DVI (Digital) : 1920 x 1080 @ 60 Hz
Recommend VESA 1920 x 1080 @ 60 Hz
Plug & Play DDC 2B(Analog,Digital)
Power
Consumption
On Mode : 25 W(Typ.)
Sleep Mode ≤ 0.3 W
Off Mode ≤ 0.3 W
Power Input 19 V 1.2 A
AC-DC Adapter Type ADS-40SG-19-3 19025G, manufactured by SHENZHEN HONOR ELECTRONIC
or Type ADS-40FSG-19 19025GPG-1, manufactured by SHENZHEN HONOR ELECTRONIC
or Type ADS-40FSG-19 19025GPBR-1, manufactured by SHENZHEN HONOR ELECTRONIC
or Type ADS-40FSG-19 19025GPI-1,manufactured by SHENZHEN HONOR ELECTRONIC
or Type ADS-40FSG-19 19025GPCU-1, manufactured by SHENZHEN HONOR ELECTRONIC
or Type LCAP21, manufactured by LIEN CHANG ELECTRONIC ENTERPRISE
or Type LCAP26-A, manufactured by LIEN CHANG ELECTRONIC ENTERPRISE
or Type LCAP26-E, manufactured by LIEN CHANG ELECTRONIC ENTERPRISE
or Type LCAP26-I, manufactured by LIEN CHANG ELECTRONIC ENTERPRISE
or Type LCAP26-B, manufactured by LIEN CHANG ELECTRONIC ENTERPRISE
OUTPUT: 19 V 1.3 A
Dimensions
(Width x Height x
Depth)
With Stand 50.9 cm x 38.7 cm x 18.1 cm
Without Stand 50.9 cm x 31.3 cm x 5.5 cm
Weight 2.6 kg
Tilt Range -5° to 20°
Environmental
conditions
Operating Temperature
Operating Humidity
10°C to 35 °C
10 % to 80 %
Storage Temperature
Storage Humidity
-20°C to 60 °C
5 % to 90 % non-Condensing
Stand Base Attached ( ), Detached (O)
Power cord Wall-outlet type
Product specifications shown above may be changed without prior notice due to upgrade of product
functions.
IPS224T
25
SPECIFICATIONS
SPECIFICATIONS
ENG
ENGLISH
Display Screen Type 58.4 cm (23 inch) Flat Panel Active matrix-TFT LCDAnti-
Glare coating
Visible diagonal size: 58.4 cm
Pixel Pitch 0.265 mm x 0.265 mm (Pixel Pitch)
Sync Input Horizontal Frequency 30 kHz to 83 kHz (Automatic)
Vertical Frequency 56Hz to 75Hz (D-SUB, DVI-D)
Input Form Separate Sync. Digital
Video Input Signal Input 15 pin D-SUB Connector /DVI-D Connector (Digital)
Input Form RGB Analog (0.7 Vp-p/ 75 ohm), Digital
Resolution Max D-SUB(Analog) : 1920 x 1080 @ 60 Hz
DVI (Digital) : 1920 x 1080 @ 60 Hz
Recommend VESA 1920 x 1080 @ 60 Hz
Plug & Play DDC 2B(Analog,Digital)
Power
Consumption
On Mode : 27 W(Typ.)
Sleep Mode ≤ 0.3 W
Off Mode ≤ 0.3 W
Power Input 19 V 1.6 A
AC-DC Adapter Type ADS-40SG-19-3 19032G, manufactured by SHENZHEN HONOR ELECTRONIC
or Type ADS-40FSG-19 19032GPG-1, manufactured by SHENZHEN HONOR ELECTRONIC
or Type ADS-40FSG-19 19032GPBR-1, manufactured by SHENZHEN HONOR ELECTRONIC
or Type ADS-40FSG-19 19032GPI-1, manufactured by SHENZHEN HONOR ELECTRONIC
or Type ADS-40FSG-19 19032GPCU-1, manufactured by SHENZHEN HONOR ELECTRONIC
or Type LCAP21A, manufactured by LIEN CHANG ELECTRONIC ENTERPRISE
or Type LCAP26A-A, manufactured by LIEN CHANG ELECTRONIC ENTERPRISE
or Type LCAP26A-E, manufactured by LIEN CHANG ELECTRONIC ENTERPRISE
or Type LCAP26A-I, manufactured by LIEN CHANG ELECTRONIC ENTERPRISE
or Type LCAP26A-B, manufactured by LIEN CHANG ELECTRONIC ENTERPRISE
OUTPUT: 19 V 1.7 A
Dimensions
(Width x Height x
Depth)
With Stand 54.4 cm x 40.6 cm x 18.1 cm
Without Stand 54.4 cm x 33.2 cm x 5.5 cm
Weight 2.9 kg
Tilt Range -5° to 20°
Environmental
conditions
Operating Temperature
Operating Humidity
10°C to 35 °C
10 % to 80 %
Storage Temperature
Storage Humidity
-20°C to 60 °C
5 % to 90 % non-Condensing
Stand Base Attached ( ), Detached (O)
Power cord Wall-outlet type
Product specifications shown above may be changed without prior notice due to upgrade of product
functions.
IPS234T
ENG
ENGLISH
26SPECIFICATIONS
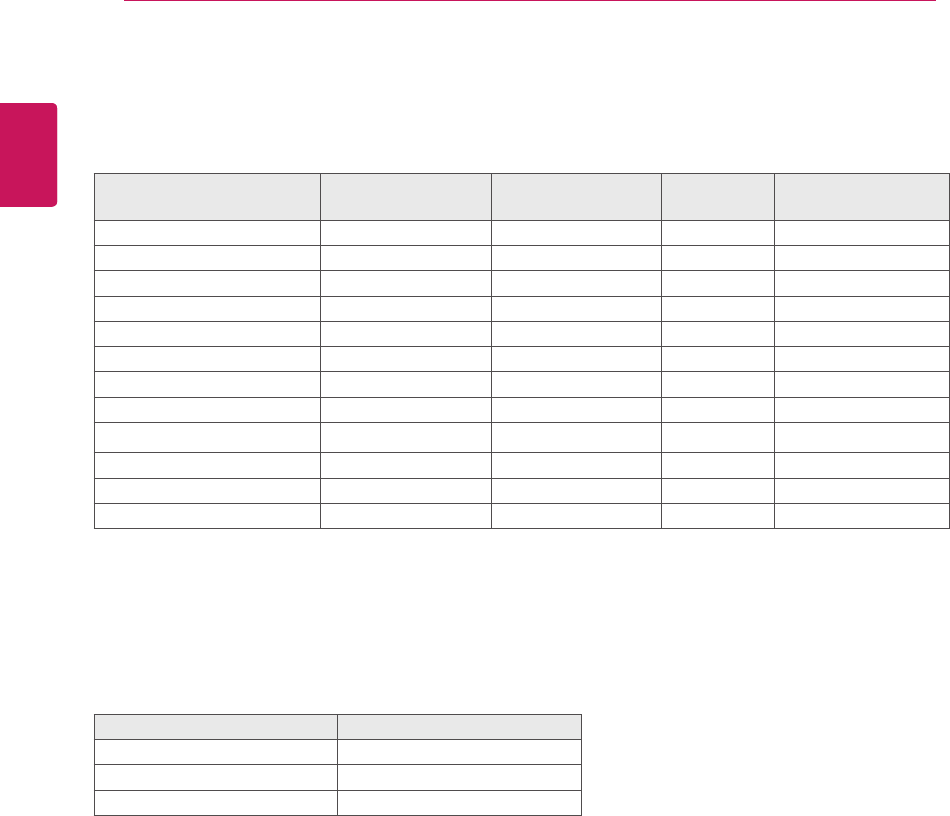
Preset Modes (Resolution)
IPS224T/IPS234T
Display Modes (Resolution) Horizontal
Frequency(kHz)
Vertical
Frequency(Hz) Polarity(H/V)
720 x 400 31.468 70 -/+
640 x 480 31.469 60 -/-
640 x 480 37.500 75 -/-
800 x 600 37.879 60 +/+
800 x 600 46.875 75 +/+
1024 x 768 48.363 60 -/-
1024 x 768 60.023 75 +/+
1152 x 864 67.500 75 +/+
1280 x 1024 63.981 60 +/+
1280 x 1024 79.976 75 +/+
1680 x 1050 65.290 60 -/+
1920 x 1080 67.500 60 +/+ Recommend Mode
Indicator
Mode LED Color
On Mode Red
Sleep Mode Blinking Red
Off Mode Off
27
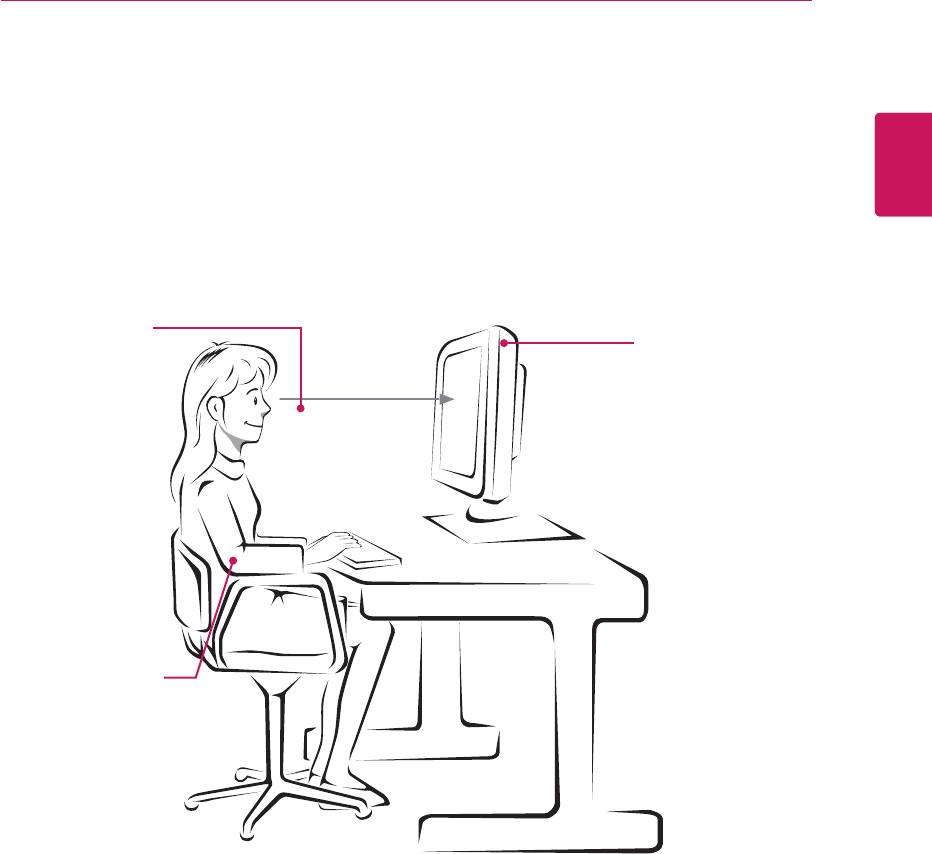
PROPER POSTURE
Proper posture for using the Monitor set.
PROPER POSTURE
Adjust the
Monitor set and
your posture to
allow you to view
images at the
optimal viewing
angle.
Place your hands
gently on the
keyboard, keeping
your arms bent at
the elbows and
horizontally outright.
Adjust the location of the
Monitor set to avoid it
reflecting light.
ENG
ENGLISH
Make sure to read the Safety Precautions before
using the product.
Keep the Owner’s Manual (CD) in an accessible
place for future reference.
The model and serial number of the SET is
located on the back and one side of the SET.
Record it below should you ever need service. As an ENERGY STAR Partner LGE
U. S. A.,Inc. has determined that this
product meets the ENERGY STAR
guidelines for energy efficiency.
ENERGY STAR is a set of power-saving
guidelines issued by the U.S.Environmental
Protection Agency(EPA).
MODEL
SERIAL