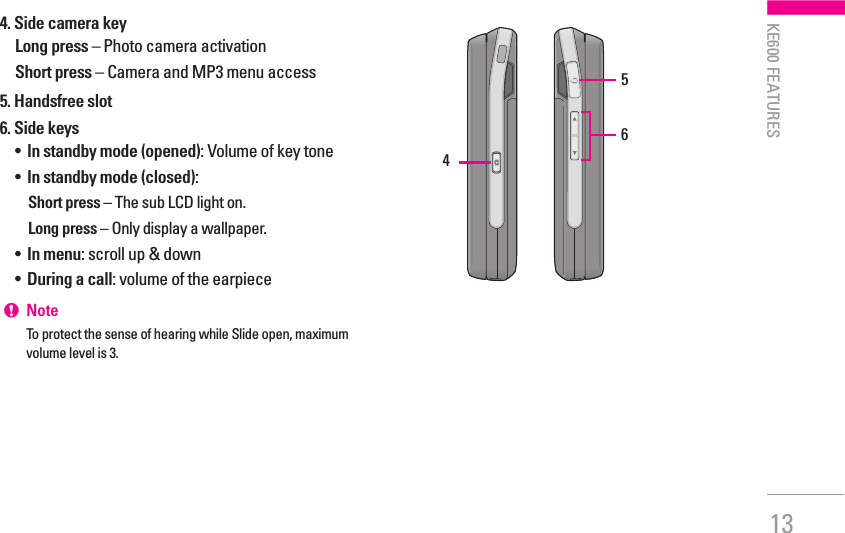
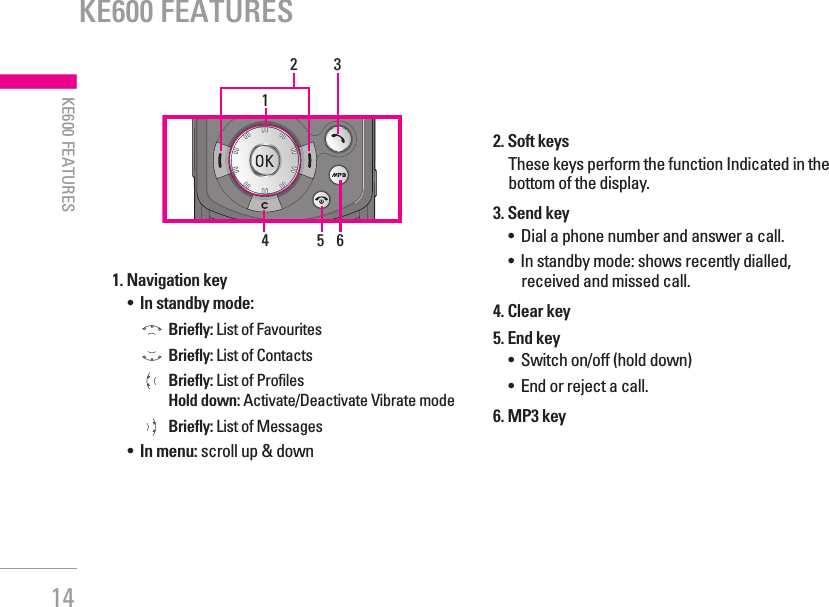
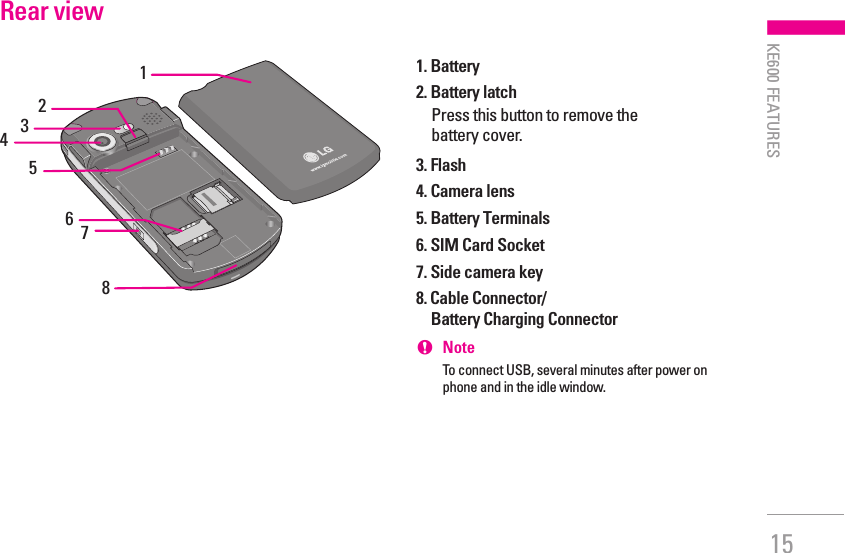
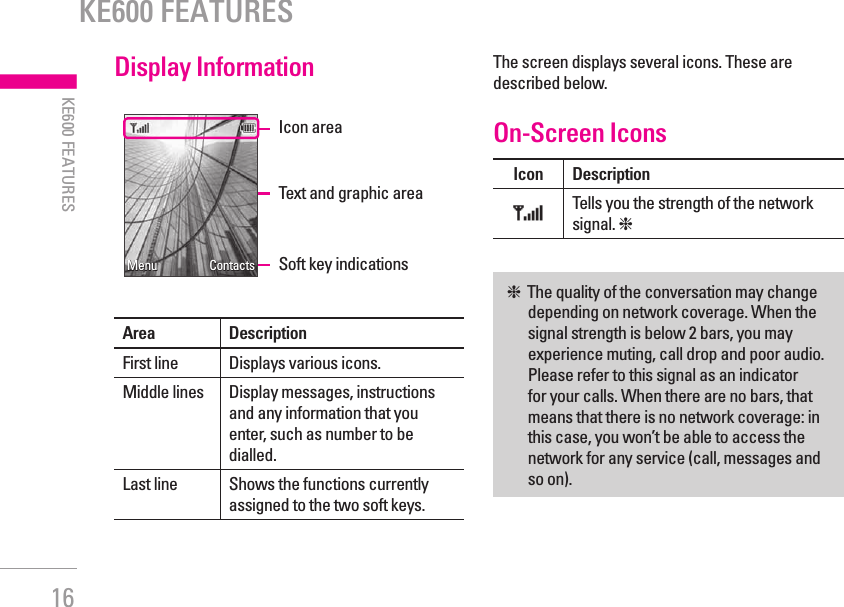
LG Electronics USA KE600 Tri-Band RF EDGE PCS Phone User Manual 00000 KE600 indd
LG Electronics USA Tri-Band RF EDGE PCS Phone 00000 KE600 indd
UserManual.wiki
>
LG Electronics USA
>
KE600 User Manual
Manual
Navigation menu
Upload a User Manual
Namespaces
Wiki Guide
HTML
PDF
Info
Views
User Manual
Discussion / Help
Navigation
![2CONTENTS| CONTENTSINTRODUCTION ..........................................................5FOR YOUR SAFETY .....................................................6GUIDELINES FOR SAFE AND EFFICIENT USE .....7KE600 FEATURES ......................................................12Part of the phone .................................................................. 12Rear view ............................................................................... 15Display Information ............................................................. 16On-Screen Icons .................................................................. 16INSTALLATION ..........................................................18Installing the SIM card and the handset battery ......... 18Charging the Battery ........................................................... 19Disconnecting the charger ................................................ 20GENERAL FUNCTIONS ............................................21Making a Call ......................................................................... 21Answering a Call .................................................................. 22Entering Text .......................................................................... 23SELECTING FUNCTIONS AND OPTIONS ...........26IN-CALL MENU ..........................................................27During a Call .......................................................................... 27Conference Calls .................................................................. 28MENU TREE ................................................................30MESSAGING ..............................................................32New message [Menu 1-1] ................................................. 32Inbox [Menu 1-2] .................................................................. 35Email box [Menu 1-3] .......................................................... 36Drafts [Menu 1-4] ................................................................. 36Outbox [Menu 1-5] ............................................................... 37Sent [Menu 1-6] .................................................................... 37Voice mail [Menu 1-7] ......................................................... 37Info message [Menu 1-8] ................................................... 38Templates [Menu 1-9] ......................................................... 39Settings [Menu 1-0] ............................................................. 39CALL HISTORY ...........................................................43All calls [Menu 2-1] .............................................................. 43Missed calls [Menu 2-2] ..................................................... 43](https://usermanual.wiki/LG-Electronics-USA/KE600/User-Guide-672353-Page-2.png)
![3| CONTENTSDialled calls [Menu 2-3] ...................................................... 43Received calls [Menu 2-4] ................................................. 43Call duration [Menu 2-5] ..................................................... 44Call costs [Menu 2-6] .......................................................... 44Data information [Menu 2-7] ............................................. 44CONTACTS .................................................................45Search [Menu 3-1] ............................................................... 45Add new [Menu 3-2] ............................................................ 45Caller groups [Menu 3-3] ................................................... 46Speed dial [Menu 3-4] ......................................................... 46Own number [Menu 3-5] .................................................... 47My business card [Menu 3-6] ........................................... 47Settings [Menu 3-7] ............................................................. 47MULTIMEDIA .............................................................49Camera [Menu 4-1] .............................................................. 49Video camera [Menu 4-2] .................................................. 51MP3 [Menu 4-3] .................................................................... 52Radio [Menu 4-4] .................................................................. 55Personal music Composer [Menu 4-5] ........................... 57Djing [Menu 4-6] ................................................................... 57Voice recorder [Menu 4-7] ................................................ 57MY STUFF ....................................................................58Videos [Menu 5-1] ................................................................ 58Images [Menu 6-2] ............................................................... 59Sounds [Menu 5-3] .............................................................. 60Others [Menu 5-4] ................................................................ 61Games & Apps [Menu 5-5] ................................................ 61External Memory [Menu 5-6] ............................................ 61BROWSER ...................................................................63Home [Menu 6-1] ................................................................. 63Bookmarks [Menu 6-2] ....................................................... 64Go to URL [Menu 6-3] .......................................................... 64Settings [Menu 6-4] ............................................................. 64TOOLS ..........................................................................67Favourites [Menu 7-1] ......................................................... 67Alarm clock [Menu 7-2] ...................................................... 67Calendar [Menu 7-3] ........................................................... 67Calculator [Menu 7-4] ......................................................... 68](https://usermanual.wiki/LG-Electronics-USA/KE600/User-Guide-672353-Page-3.png)
![4CONTENTS| CONTENTSMemo [Menu 7-5] ................................................................ 70Tip calculator [Menu 7-6] ................................................... 70Stop watch [Menu 7-7] ....................................................... 70Unit converter [Menu 7-8] .................................................. 71World time [Menu 7-9] ........................................................ 71SIM-Menu [Menu 7-0] ........................................................ 71PROFILES ....................................................................72Activate [Menu 8-X-1] ......................................................... 72Personalise [Menu 8-X-2] .................................................. 72Rename [Menu 8-X-3] ......................................................... 73SETTINGS ...................................................................74Date & Time [Menu 9-1] ..................................................... 74Power saving [Menu 9-2] ................................................... 74Display [Menu 9-3] ............................................................... 74Language [Menu 9-4] .......................................................... 75Connectivity [Menu 9-5] ..................................................... 75Calling [Menu 9-6] ................................................................ 79Security [Menu 9-7] ............................................................. 81Memory status [Menu 9-8] ................................................ 83Reset setting [Menu 9-9] .................................................... 83ACCESSORIES ...........................................................84TECHNICAL DATA ....................................................85](https://usermanual.wiki/LG-Electronics-USA/KE600/User-Guide-672353-Page-4.png)

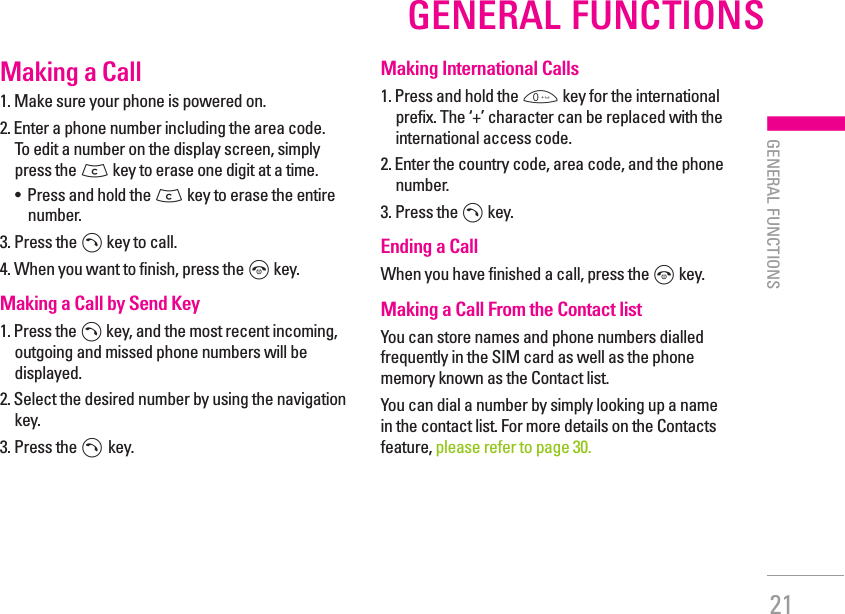
![22| GENERAL FUNCTIONSGENERAL FUNCTIONSAdjusting the VolumeDuring a call, if you want to adjust the earpiece volume, use the side keys of the phone.In idle mode, you can adjust the key volume using the side keys.Answering a CallWhen you receive a call, the phone rings and the flashing phone icon appears on the screen. If the caller can be identified, the caller’s phone number (or name if stored in your Address Book) is displayed.1. Open the flip and press the key or the left soft key to answer an incoming call. If the Any Key menu option [Menu #-3-2], see p. 70, has been set to any key press will answer a call except for the key or the right soft key.! NoteTo reject an incoming call, press and hold the side keys on the left side of the phone.2. End the call by closing the phone or pressing the E key.! NoteYou can answer a call while using the Address Book or other menu features. In case phone is connected with PC via USB cable, incoming call will be rejected, but after disconnecting phone from PC you can see Missed call window.Vibrate Mode (Quick)Vibrate Mode can be activated by pressing and holding the left navigation key.Signal StrengthIf you are inside a building, being near a window may give you better reception. You can see the strength of your signal by the signal indicator ( ) on your phone’s display screen.](https://usermanual.wiki/LG-Electronics-USA/KE600/User-Guide-672353-Page-22.png)
![25| GENERAL FUNCTIONS2. To insert a space, press the 0 key once. To delete letters, press the C key. Press and hold down the C key to erase the letters continuously.! NoteRefer to the table below for more information on the characters available using the keys.Key Characters in the order displayUpper Case Lower Case1. , / ? ! - : ’ ” 1 . , / ? ! - : ’ ” 12A B C 2 a b c 23D E F 3 d e f 34G H I 4g h i 45J K L 5j k l 56M N O 6m n o 67P Q R S 7 p q r s 78T U V 8t u v 89W X Z Y 9 w x y z 90Space 0 Space 0 Using the 123 (Numbers) ModeThe 123 Mode enables you to enter numbers in a text message (a telephone number, for example).Press the keys corresponding to the required digits before manually switching back to the appropriate text entry mode.Using the Symbol ModeThe Symbol Mode enables you to enter various symbols or special characters.To enter a symbol, press the # key. Use the navigation keys to select the desired symbol and press the [OK] key.](https://usermanual.wiki/LG-Electronics-USA/KE600/User-Guide-672353-Page-25.png)
![27Your phone provides a number of control functions that you can use during a call. To access these functions during a call, press the left soft key < [Options].During a CallThe menu displayed on the handset screen during a call is different than the default main menu displayed when in idle screen, and the options are described below.Making a Second Call (Network Dependent)You can get a number you wish to dial from the Address Book to make a second call.Swapping Between Two CallsTo switch between two calls, press S key or the left soft key, and then select Swap.Answering an Incoming CallTo answer an incoming call when the handset is ringing, simply press the S key. The handset is also able to warn you of an incoming call while you are already on a call. A tone sounds in the earpiece, and the display will show that a second call is waiting.This feature, known as Call Waiting, is only available if your network supports it. For details of how to activate and deactivate it see Call Waiting (Menu #-3-4, see p. 77) If Call Waiting is on, you can put the first call on hold and answer the second, by pressing the left soft key <.Rejecting an Incoming CallYou can reject an incoming call without answering by simply pressing the E key. During a call, you can reject an incoming call by pressing the E key.IN-CALL MENU| IN-CALL MENU](https://usermanual.wiki/LG-Electronics-USA/KE600/User-Guide-672353-Page-27.png)
![28Muting the MicrophoneYou can mute the microphone during a call by pressing the [Options] key then selecting [Mute]. The handset can be unmuted by pressing the [Unmute]. When the handset is muted, the caller cannot hear you, but you can still hear them.DTMF tones while callingTo switch on DTMF tones while calling (e.g. to use the phone with an automatic switchboard) press the key [Options] followed by Send DTMF – DTMF on. Select DTMF off to disable DTMF tones. DTMF tones are normally on.Conference CallsThe conference service provides you with the ability to have a simultaneous conversation with more than one caller, if your network service provider supports this feature. A conference call can only be set up when you have one active call and one call on hold, both calls having been answered. Once a conference call is set up, calls may be added, disconnected or separated (that is, removed from the conference call but still connected to you) by the person who set up the conference call. These options are all available from the In-Call menu. The maximum callers in a conference call are five. Once started, you are in control of the conference call, and only you can add calls to the conference call.Making a Second CallYou can make a second call while currently on a call. Enter the second number and press the S. When the second call is connected, the first call is automatically placed on hold. You can swap between calls, by pressing the S key.Setting Up a Conference CallTo set up a conference call, place one call on hold and while the active call is on, press the left soft key and then select the Join menu of Conference call.IN-CALL MENU| IN-CALL MENU](https://usermanual.wiki/LG-Electronics-USA/KE600/User-Guide-672353-Page-28.png)
![29Activate the Conference Call on HoldTo activate a conference call on hold, press the S key. Alternatively press the left soft key [Options] and select Join all/Hold all calls. Other users on hold will stay connected. To return to conference call mode, press the left soft key < [Options] followed by Conference call.Adding Calls to the Conference CallTo add a call to an existing conference call, press the left soft key, and then select the Join menu of Conference call.Private Call in a Conference CallTo have a private call with one caller from a conference call, display the number of the caller you wish to talk to on the screen, then press the left soft key. Select the Private menu of Conference call to put all the other callers on hold.Ending a Conference CallCurrently displayed caller from a conference call can be disconnected by pressing the E key.| IN-CALL MENU](https://usermanual.wiki/LG-Electronics-USA/KE600/User-Guide-672353-Page-29.png)
![32New message [Menu 1-1]This menu includes functions related to SMS (Short Message Service), MMS (Multimedia Message Service), Email, voice mail, as well as the network’s service messages.Write text message [Menu 1-1-1]You can write and edit text message, checking the number of message pages.1. Enter the New messages menu by pressing the left soft key < [Select].2. If you want to write a new message, select Write text message.3. To make text input easier, use T9.4. Press [Insert] to attach the followings.• Insert- Images: You can insert the Default graphics or graphics in My pictures that are available for short messages.- Sounds: You can insert sounds that are available for short messages.- Text templates: You can use Text templates already set in the phone.- Contacts: You can add phone numbers or e-mail addresses in address book.- Symbol: You can add special characters.- My business card: You can add your Business card to the message.5. If you want to set option for your text, or to finish your writing, press the left soft key < [Options].Options• Send: Sends text messages.1. Enter numbers of recipient.2. Press D key to add more recipients.3. You can add phone numbers in the address book.4. Press the left soft key < after entering numbers. All messages will be automatically saved in the outbox folder, even after a sending failure.MESSAGING| MESSAGING| MESSAGING](https://usermanual.wiki/LG-Electronics-USA/KE600/User-Guide-672353-Page-32.png)
![33• Save to drafts: Stores messages in Drafts.• Font & Alignment: You can select Size and Style of fonts, and the alignment of text.• Colour: You can select Colour of foreground and background.• Add T9 dictionary: You can add your own word. This menu can be shown only when edit mode is Predictive (ABC/abc/123).• T9 languages: Select the language for T9 input mode. You can also deactivate T9 input mode by selecting ‘T9 off’.• Exit: If you press Exit while writing a message, you can end the writing message and back to the Message menu. The message you have written is not saved.! NoteThe phone which supports EMS release 5 is available to send colour pictures, sounds, text styles, etc.. The other party may not receive pictures, sounds or text styles you sent properly if the phone does not support such options.Write multimedia message [Menu 1-1-2]You can write and edit multimedia messages, checking message size.1. Enter the New message menu by pressing the left soft key < [Select].2. If you want to write a new message, select Write multimedia message.3. You can create a new message or choose one of the multimedia message templates already made.4. Press Insert to add Image, Sound, External memory, Contacts, Symbol, New photo, New sound, Text templates, My business card.Maximum available file size, that can be inserted to MMS-message, is 100 kb.Options• Send: You can send multimedia messages to multiple recipients, priorities your message, and make it sent later as well.MESSAGING| MESSAGING| MESSAGING](https://usermanual.wiki/LG-Electronics-USA/KE600/User-Guide-672353-Page-33.png)
![34MESSAGING| MESSAGING| MESSAGING! NoteAll messages will be automatically saved in the outbox folder, even after a sending failure.• Preview: You can preview multimedia messages you wrote.• Save: You can save multimedia messages To drafts or As template.• Edit subject: Modifies multimedia messages you chose.• Add slide: You can add a slide before or after current slide.• Move to slide: You can move to previous or next slide.• Delete slide: You can delete current slides.• Set slide format- Set timer: You can set timer for slide, text, picture and sound.• Add T9 dictionary: You can add your own word. This menu can be shown only when edit mode is Predictive (ABC/abc/123).• T9 languages: Select the language for T9 input mode. You can also deactivate T9 input mode by selecting ‘T9 off’.• Exit: You can get back to the Message menu.! NoteIf you select the picture (50K) on writing multimedia message, loading duration will take around 10 seconds at least. Furthermore, you can’t activate any key during loading time. After 10 seconds, it is available to write multimedia message.Write email message [Menu 1-1-3]To send/receive an email, you should set up the email account. Refer to Email on page 50 first.1. You can input up to 12 email addresses in the To and Cc field.! TipTo input “@”, press the * and select “@”.2. Key in the subject of the mail and press OK.3. After writing an email message, press the left soft key < [Options]. You can access the following option menus.](https://usermanual.wiki/LG-Electronics-USA/KE600/User-Guide-672353-Page-34.png)
![35MESSAGING| MESSAGING| MESSAGING• Send: Sends the email message.• Edit recipients: You can edit recipients.• Edit subject: You can edit the subject.• Save to drafts: Select this to save the message in Drafts.• T9 dictionary: Select the language for T9 input mode. You can also deactivate the T9 input mode by selecting ‘T9 off’.• Exit: If you select this while writing the message, you can exit from writing message and go back to the previous screen. The message you have written is not stored.4. You can attach files by pressing the right soft key > [Attach].! Note• For each e-mail account you may save up to 50 messages (totally 150 for three accounts). In Inbox folder you may save not more than 30 messages, in Drafts and Outbox folders - 5 messages, and in Sent folder up to 10 messages. In case Drafts Outbox or Sent folder is full, and you try to save new message to one of this folders, first saved message will be automatically deleted.• Maximum size for one sent message is 300 kb with attachments, and maximum size for one received message is 100 kb. In case you have received message with more than 5 attachments, only 5 of them will be received. Some attachment may display incorrectly.Inbox [Menu 1-2]You will be alerted when you have received messages. They will be stored in Inbox.In Inbox, you can identify each message by icons. For detail, see the icon directive.Icon Icon directiveMultimedia messageShort messageSIM messageRead multimedia messageRead text messagePush messageNotified multimedia message](https://usermanual.wiki/LG-Electronics-USA/KE600/User-Guide-672353-Page-35.png)
![36MESSAGING| MESSAGING| MESSAGINGIf the phone shows ‘No space for SIM message’, you have to delete only SIM messages from Inbox. If the phone displays ‘No space for message’, you can make space of each repository as deleting messages, media and applications.• SIM messageSIM message means the message exceptionally stored in SIM card. You can move this message to the phone.For notified multimedia message, you have to wait for downloading and processing of the message.To read a message, select one of the messages by pressing the left soft key <.• View: You can view the received messages.• Delete: You can delete the current message.• Reply: You can reply to the sender.• Forward: You can forward the selected message to another party.• Return call: You can call back to the sender.• Information: You can view information about received messages; Sender’s address, Subject (only for Multimedia message), Message date & time, Message type, Message size.• Delete all: You can delete all messages.Email box [Menu 1-3]When you access this menu, you can either connect to your remote mailbox to retrieve your new email messages, or you can view the previously retrieved email messages without logging in to the email server.You can check the saved emails, drafts, outbox, and sent emails. In the Inbox, up to 30 emails are stored.Drafts [Menu 1-4]Using this menu, you can preset up to five multimedia messages that you use most frequently. This menu shows the preset multimedia message list.](https://usermanual.wiki/LG-Electronics-USA/KE600/User-Guide-672353-Page-36.png)
![37MESSAGING| MESSAGING| MESSAGINGThe following options are available.• View: You can see the multimedia messages.• Edit: Modifies the massage you choose.• Delete: Deletes the message you choose.• Information: To view the information of the message.• Delete all: Deletes all of the messages in the folder.Outbox [Menu 1-5]This menu allows to view the message which is about to send or is failed sending. After sending the message successfully, the message will be moved to sent menu.Icon Icon directiveMMS UnsentMMS delivery confirmedSMS unsentSMS delivery confirmed• View: You can view the message.• Forward: You can send the message. After sending the message, this will be moved to sent menu.• Delete: You can delete the message.• Information: You can check information of each message.• Delete all: You can delete all messages in outbox.Sent [Menu 1-6]This menu allows you to view the messages which are already sent. You can check the time and the contents of message.Voice mail [Menu 1-7]Once this menu has been selected, simply press the left soft key < [OK] to listen to voice mail. You can also hold down the 1 key in standby mode to listen to voice mail.](https://usermanual.wiki/LG-Electronics-USA/KE600/User-Guide-672353-Page-37.png)
![38MESSAGING| MESSAGING| MESSAGING! NoteWhen you receive a voice mail, your phone displays the icon and you hear an alert. Please check with your network provider for details of their service in order to configure the handset correctly.Info message [Menu 1-8] (Dependent to network and subscription)Info service messages are text messages delivered by the network to GSM. They provide general information such as weather reports, traffic news, taxis, pharmacies, and stock prices. Each type of has the number; therefore, you can contact service provider as long as you have input the certain number for the information. When you have received an info service message, you can see the popup message to show you that you have received a message or the info service message is directly displayed. To view the message again or not in standby mode, follow the sequence shown below;Read [Menu 1-8-1]1. When you have received an info service message and select Read to view the message, it will be displayed on the screen. You can read another message by scrolling L , R or < [Next].2. The message will be shown until another message is reached.Topics [Menu 1-8-2] (Dependent to network and subscription)• Add new: You can add Info service message numbers in the Phone memory with its nickname.• View list: You can see Info service message numbers which you added. If you press < [Options], you can edit and delete info message category which you added.• Active list: You can select info service message numbers in the active list. if you activate an info service number, you can receive messages sent from the number.](https://usermanual.wiki/LG-Electronics-USA/KE600/User-Guide-672353-Page-38.png)
![39MESSAGING| MESSAGING| MESSAGINGTemplates [Menu 1-9]Text templates [Menu 1-9-1]You have 6 text templates as below;• Please call me back.• I’m late. I will be there at• Where are you now?• I am on the way.• Top urgent. Please contact.• I love you.Multimedia templates [Menu 1-9-2]After saving new template, you can use the following options.• View: You can see multimedia templates.• Delete: You can delete multimedia templates.• Add new: Allows you to add new multimedia templates.• Write messages: You can write and send multimedia messages.• Edit: You can edit multimedia templates.• Delete all: Allows you to delete all multimedia messages.Settings [Menu 1-0]Text message [Menu 1-0-1]• Message types: Text, Voice, Fax, Natl. paging, X.400, E-mail, ERMES Usually, the type of message is set to Text. You can convert your text into alternative formats. Contact your service provider for the availability of this function.• Validity period: This network service allows you to set how long your text messages will be stored at the message centre.• Delivery report: If you set to Yes, you can check whether your message is sent successfully.• Reply charging: When a message is sent, it allows the recipients to reply and charge the cost of the reply to your telephone bill.](https://usermanual.wiki/LG-Electronics-USA/KE600/User-Guide-672353-Page-39.png)
![40• SMS centre: If you want to send the text message, you can receive the address of SMS centre through this menu.Mulitimedia message [Menu 1-9-2]• Priority: You can set the priority of the message you choose.• Validity period: This network service allows you to set how long your text messages will be stored at the message centre.• Subject: You can enter multimedia messages subject when this menu is on.• Delivery report: If it is set to Yes in this menu, you can check whether your message is sent successfully.• Auto retrieve: If you select On, you receive multimedia messages automatically. If you select Off, you receive only notification message in the inbox and then you can check this notification. If you select Home network only, you receive multimedia messages depends on Homenetwork.• Network settings: If you select multimedia message server, you can set URL for multimedia message server.• Permitted message typesPersonal: Personal message.Advertisements: Commercial message.Information: Necessary information.Email [Menu 1-9-3]This menu allows you to edit, delete or add an email account.• Account: You can set up to 3 email accounts by selecting Add new. Using the Edit menu, you can set the following values.• Set as default• Edit- Title: Account name.- User ID: Enter your email ID.- Password: Enter your email password.- Email address: Enter the email address given to you by your service provider.MESSAGING| MESSAGING| MESSAGING](https://usermanual.wiki/LG-Electronics-USA/KE600/User-Guide-672353-Page-40.png)
![41- Outgoing server: Enter the SMTP address and Port number of computer that sends your email.- Incoming server: Enter the POP3 address and Port number of the that receives your email.- Leave msg on server: Select Yes to leave the messages on the server.- Insert signature: Select Yes to attach your signature to your email messages.- Access point: Allow you to select the access point from the list.- SMTP port number: Allow you to edit SMTP port number.- POP3 port number: Allow you to edit POP3 port number.- Outgoing server ID/PW: Enter the ID and password for sending your email.• Delete: Deletes the selected account from the list.• Access point: You can edit the access points. There are default access points for some operators, stored in phone memory.• Title: Access point name.• APN: Input the APN of Access point.• User ID: Enter the User ID of your access point.• Password: Enter the Password of your access point.• Signature: You can make your signature.Voice mailbox number [Menu 1-9-4]You can receive the voicemail if your network service provider supports this feature. When a new voicemail is arrived, the symbol will be displayed on the screen. Please check with your network service provider for details of their service in order to configure the phone accordingly.• Home: You can listen to voice mails by selecting Home.• Roaming: Even when you are in abroad, you can listen to voice mails if roaming service is supported.MESSAGING| MESSAGING| MESSAGING](https://usermanual.wiki/LG-Electronics-USA/KE600/User-Guide-672353-Page-41.png)
![42Info message [Menu 1-9-5]• ReceiveYes: If you select this menu, your phone will receive Info service messages.No: If you select this menu, your phone will not receive Info service messages any more.• AlertYes: Your phone will beep when you have received Info service message numbers.No: Your phone will not beep even though you have received info service messages.• LanguagesYou can select the language you want by pressing [On/Off]. Then, the info service message will be shown in the language that you selected.Push messages [Menu 1-9-6]You can set the option whether you will receive the message or not.MESSAGING| MESSAGING](https://usermanual.wiki/LG-Electronics-USA/KE600/User-Guide-672353-Page-42.png)
![43CALL HISTORY| CALL HISTORYYou can check the record of missed, received, and dialled calls only if the network supports the Calling Line Identification (CLI) within the service area.The number and name (if available) are displayed together with the date and time at which the call was made. You can also view call times.All calls [Menu 2-1]You can view all lists of outgoing or incoming calls.Missed calls [Menu 2-2]This option lets you view the last 10 unanswered calls. You can also:• View the number if available and call it, or save it in the Address Book• Enter a new name for the number and save both in the Address Book• Send a message by this number• Delete the call from the listDialled calls [Menu 2-3]This option lets you view the last 20 outgoing calls (called or attempted). You can also:• View the number if available and call it or save it in the Address Book• Enter new name for the number and save both in the Address Book• Send a message by this number• Delete the call from the listReceived calls [Menu 2-4]This option lets you view the last 10 incoming calls. You can also:• View the number if available and call it or save it in the Address Book• Enter new name for the number and save both in the Address Book• Send a message by this number• Delete the call from the list](https://usermanual.wiki/LG-Electronics-USA/KE600/User-Guide-672353-Page-43.png)
![44Call duration [Menu 2-5]Allows you to view the duration of your incoming and outgoing calls. You can also reset the call times.The following timers are available:• Last call: Length of the last call.• All calls: Total length of all calls made and incoming calls since the timer was last reset.• Received calls: Length of the incoming calls.• Dialled calls: Length of the outgoing calls.• Reset all: Allows you to clear the length of all calls by pressing the left soft key < [Yes].Call costs [Menu 2-6]Allows you to check the cost of your last call, all calls, remaining and reset the cost. To reset the cost, you need to PIN2 code.Data information [Menu 2-7]CALL HISTORY| CALL HISTORY](https://usermanual.wiki/LG-Electronics-USA/KE600/User-Guide-672353-Page-44.png)
![45CONTACTS| CONTACTSSearch [Menu 3-1]1. Select Search by press the left soft key < [Contacts] or [OK].2. Enter the name that you want to search.! NoteInstant searching is available by inputting the initial letter of the name or number you want to search.3. If you want to edit, delete, copy an entry, or to add the voice to one, select left soft key < [Options]. The following menu will be displayed.• Edit: You can edit the name, number, group, character and picture by using the navigation key.• Write messages: After you have found the number you want, you can send a text/multimedia message to the selected number.• Send via Bluetooth: You can send the data of phone book to devices which is compatible with bluetooth through bluetooth.• Copy to handset: You can copy an entry from SIM to phone or from phone to SIM.• Assign speed dial: You can assign the entry as a speed dial.• View caller groups: For further details see [Menu 2-3].• Delete: You can delete an entry.Add new [Menu 3-2]You can add phonebook entry by using this function. Phone memory capacity is 1000 entries. SIM card memory capacity depends on the cellular service provider. The number of character is SIM dependent feature.! NoteMaximum stored name and number length depends on SIM-card type.1. Select Add new by press left soft key < [Select] or [OK].](https://usermanual.wiki/LG-Electronics-USA/KE600/User-Guide-672353-Page-45.png)
![462. Select the memory you want to save: SIM or Phone. If you set to Phone, you need to select which number you want as a main number.a. Press < [OK] to input a name.b. Press < [Save], then you can input a number.c. You can set a group for the entry by pressing L , R.d. You can set a character and a picture for the entry by pressing L , R.Caller groups [Menu 3-3]You can list up to the members per each group. There are 7 groups you can make lists to.• Member list: Shows the group members you have selected.• Group ring tone: Allows you to specify ring tone for the group members’ call.• Group icon: Allows you to select the icon dependent on Group.• Add member: You can add group members. Each group member shouldn’t be exceeded 20.• Remove member: You can remove the member from the Group member list. But the name and the number will be remained in phonebook.• Rename: You can change a group name.• Remove all: Allows you to delete all the members in the group.Speed dial [Menu 3-4]You can assign any of the keys 2 to 9 with a Name list entry. You can call directly by pressing this key.1. Open the phonebook first by pressing the right soft key > [Contacts] in standby mode.2. Scroll to Speed dial, then press the left soft key < [Select].3. If you want to add speed dial, select (empty). Then, you can search the name in phonebook.CONTACTS| CONTACTS](https://usermanual.wiki/LG-Electronics-USA/KE600/User-Guide-672353-Page-46.png)
![474. After assigning the number as speed dial, you can change and delete the entry. You can also make a call or send a message by this number.Own number [Menu 3-5] (Sim dependent)You can save and check your own number in SIM card.My business card [Menu 3-6]This option allows you to create your own business card featuring Name and an mobile phone number. To create a new business card, press the left soft key < [Edit] and enter the information into the fields.Settings [Menu 3-7]1. Press the right soft > [Contacts] in standby mode.2. Scroll to Settings, then press the left soft key < [Select].• Default memoryScroll to highlight Default memory, and then press the left soft key < [Select].- If you select Always ask, when adding entry, the phone will ask where to store.- If you select SIM or Phone, the phone will store an entry to SIM or phone.• View optionsScroll to highlight View options, and then press the left soft key [Select].- Name only: Set the phonebook list with displaying only name.- Name & number: Set the phonebook list with displaying name and number.- With pictures: Set the phonebook list with the information of character and picture.| CONTACTS](https://usermanual.wiki/LG-Electronics-USA/KE600/User-Guide-672353-Page-47.png)
![48• Copy/Move allYou can copy/move entries from SIM card memory to Phone memory and vice versa.1. Open the Phonebook first by pressing the right soft key > [Contacts] in standby mode.2. Scroll to Copy/Move all, and then press the left soft key < [Select] to enter this menu.- SIM to Phone: You can copy the entry from SIM Card to Phone memory.- Phone to SIM: You can copy the entry from Phone memory to SIM Card.• Memory in useThis feature allows you to see how many free and in-use are in your phonebook.• Clear contactsYou can delete all entries in SIM and Phone. This function requires Security code.1. Press the right soft key > [Contacts] in standby mode and select Delete all, press < [Select].2. Then select a memory to erase.3. Enter security code and Press the left soft key < [OK] or the right soft key > [Back].• Service dial numberUse this function to access a particular list of services provided by your network operator (if supported by the SIM card).CONTACTS| CONTACTS](https://usermanual.wiki/LG-Electronics-USA/KE600/User-Guide-672353-Page-48.png)
![49You can enjoy your multimedia function such as camera, voice recorder, MP3 for your fun and convinience.! Note• When the status of the battery indicates low, you may not use Camera or Multimedia function.• While using Multimedia function, the status of the battery is changeable.Camera [Menu 4-1]To take a picture with Folder opened1. Select Take photo, and then press <. If you want to reach this menu directly, press q for a long time.2. Focus on the subject to capture the image, and then press the O key.3. If you want to save it, press the left soft key < or the O key.! Note• You can control the image size, brightness, colour and zooming by pressing the navigation key. (U or D)• Mode [ ]: Allows to take multishot photos successively.- Still shot: 72x72, 176x220, 320x240, 640x480, 1280x720, 1280x960, 1600x1200- Multishot: 320x240- Frameshot: 176x220• Scene [ ]: Allows you to take a picture by using this menu u at night.• Effect [ ]: 4 settings are available: Color, Sephia, Black & white, Negative.• Flash [ ]: Allow you to set the flash when you take a photo in dark place.• Zoom [ ]: Allows you to set the zooming value from x1 to x2, x3, x4 depends on resolution.• Brightness [ ]: Use the right/left navigation keys to adjust lighting. 5 lighting levels are available: -2, -1, 0, 1, 2.MULTIMEDIA| MULTIMEDIA](https://usermanual.wiki/LG-Electronics-USA/KE600/User-Guide-672353-Page-49.png)
![50• Size [ ]: Allows you to set the image size to one of Hi (1600x1200), (1280x960), (1280x720), Med (640x480), Low (320x240), (176x220), (72x72) main screen, contact, and front screen. If you want to take panorama(1280x720), you should swivel the folder. Frame shots are only available with the 176x220 pixel resolution.• Timer [ ]: Allows you to select the delay time (Off, 3 Seconds, 5 Seconds, 10 seconds). Then the phone takes a photo after the specified time.• Quality [ ]: Allows you to set the image quality from Normal, Fine and Superfine.• White Balance [ ]: Allows you to change the settings according to the enviroment.• Auto focus [ ]: Automatically adjusts the focus for a clear, sharp with a single press of a button.• Metering [ ]: determines the lighting based on a little part of the subject. You can select the Centred, pot and combined which is to be exposed correctly.• Memory in use [ ]: You can select a storage space; Phone or Memory card.• Album [ ]: Allow you to see photos saved in your phone.! Note In My album you may look only photos made by handset’s camera.• Exit [ ]: Back to the screen mode to take photos.When you are in Photo Camera capture mode, you may adjust zoom by pressing side Up/Down navigation keys.! Note To make panorama photo (1280x720 resolution) you should swivel and close flip.After finishing all the setting, focus on the subject to capture and press the Camera key or OK key. With a click, the image is captured and the following menu bar appears.MMS messageSave DeleteMULTIMEDIA| MULTIMEDIA](https://usermanual.wiki/LG-Electronics-USA/KE600/User-Guide-672353-Page-50.png)
![51To take a picture with Folder closed1. Press [q] for a long time.2. A list will be displayed on the sub LCD.• MP3: Activates the MP3 mode.• Take picture: Activates the Take photo mode.• Slide show: View the pictures in Album as a slide show.Digital Camera ModeTo enter Digital Camera Mode from idle mode you should swivel and close flip.Handset will automatically enter Digital Camera Mode.- To enter camera’s main menu, press and hold side camera button.- With side up/down buttons you may scroll through settings items. After necessary item is selected, press side camera button, and you will access detailed settings of this selected item. With side up/down buttons select necessary setting and press side camera button for confirmation.- To exit to camera capture mode you should press and hold side camera button.- To make photo, simply press side camera button.! Note When you are in Digital Camera Mode, and there’s no action for some time, phone will automatically exit to idle mode.• Torch: Activates the flash light.• Back: Go back to the previous menu.Video camera [Menu 4-2]1. Select Video camera menu.2. To be able to record, you must reverse the display of the phone and close.3. You can also amend the brightness, size, quality and other settings by pressing and holding down the q for seconds. Video camera settings menu is the same with Photo camera settings, except following items:• Size: You may select following resolution: 128x96, 176x144 and 208x160.| MULTIMEDIA](https://usermanual.wiki/LG-Electronics-USA/KE600/User-Guide-672353-Page-51.png)
![52• Record time: You may select recording time from the list: 1 min, 5 min, 30 min, 90 min and unlimited.Once the settings are displayed on the screen, you can scroll through them using the side keys. Scroll to the setting you wish to change, press the q and it will bring up the setting values. Use the side keys to scroll to your preferred choice and then press the [ to select.4. To start recording press q. As soon as it starts to record a timer will be displayed.5. Press the q to end the recording and this will now be saved.MP3 player [Menu 4-3]The KE600 has an integrated MP3 player built-in. You can enjoy listening to MP3 music files on a memory in your phone using a compatible headset or via the internal loudspeaker.! NoteBecause of the small dimension of the speaker, in some cases the audio could be distorted, especially at maximum volume and when there are lots of bass sounds. Therefore, we recommend you to use the stereo headset in order to appreciate the high quality of your music.The music player supports:• MPEG-1 Layer III, MPEG-2 Layer III, MPEG-2.5 Layer III: Sampling frequency up from 8KHz to 48KHz. Bit rate up to 320Kbps, stereo.• AAC: ADIF, ADTS formats (Sampling frequency from 8KHz to 48KHz)• AAC+: V1: (Bit rate 16~128Kbps) V2 : (Bit rate 16~48Kbps) (Sampling frequency from 8KHz to 48KHz)• MP4, M4A: Sampling frequency up from 8KHz to 48KHz, Bit rate up to 320Kbps, stereo.• WMA: Sampling frequency up from 8KHz to 48KHz, Bit rate up to 320Kbps, stereo.MULTIMEDIA| MULTIMEDIA](https://usermanual.wiki/LG-Electronics-USA/KE600/User-Guide-672353-Page-52.png)
![53! NoteKE600 doesn’t support the variable bit rate of all mentioned file types. Therefore, you can’t change the file from MP3 format to AAC.You can transfer MP3 files from a compatible PC to the memory in your phone using the Mass Storage.When you connect the phone to a PC using the USB cable (supplied in the same package), and then you can show removable disk through windows explorer. After you copy songs in removable disk, you should execute safe remove from your system.! Note• You should copy MP3 to My media\Music folder. If you copy another folder, you can’t see MP3 files.• The PC should run Windows 98 SE, Windows ME, Windows 2000, Windows XP operating system.MP3 player [Menu 4-3-1]The following screen is shown up.Repeat Loop Play all A ➝ B Repeat all Repeat once! NoteIn case that any invalid file is included in the playlist, an error message will be popped up and go back to the prior screen.Player skinStereoShufflePlaymodeStatus of the music controllerProgressive barRunning timeEqualizer setting valueVolume level 6 volume levels including muteFile name (23/45)Options MuteFile name with the extension| MULTIMEDIA](https://usermanual.wiki/LG-Electronics-USA/KE600/User-Guide-672353-Page-53.png)
![541. Press MP3 menu, and then select MP3 player.2. Press the left soft key < [Options] to access the following menus.• View playlist: You can select another music you want on playing MP3 file.• Area repeat: The special area part of the current music is repeated when you select ON of the menu.• Set as ringtone: You can set as a ringtone the current music on playing MP3 file• Settings: There are many setting menus, and you refer the Settings part at the next page.Playlist [Menu 4-3-2]This menu allows to view the whole play list. You can move the track by pressing the navigation key. In addition, if you select option menu, you can delete the file or view its information.Settings [Menu 4-3-3]• EqualizerThis menu helps you to adjust various of environment on listening to the music. This phone supports four preset menus. When you enter this menu, you can view current value of equalizer, and change the equalizer here. We support some equalizers like General, Classic, Jazz, Pop, Rock, and Bass.• PlaymodeThis menu allows to set the play mode: Play all, Repeat all, Repeat one.• Set shuffleIt you selece On, you can listen to the music at random.• Visual effectYou can select the visual effect menus: Light, Bounce and Guitarist. This menu allows to change the background of main LCD and sub LCD on playing MP3 file.MULTIMEDIA| MULTIMEDIA](https://usermanual.wiki/LG-Electronics-USA/KE600/User-Guide-672353-Page-54.png)
![55• Flip setting:- Continue playing: Although you close the flip on playing, the play mode is continued without a pause.- Stop playing: When you close the flip, you can stop the play mode.! NoteMusic is copyright protected in international treaties and national copyright laws. It may be necessary to obtain permission or a license to reproduce or copy music. In some countries national law prohibits private copying of copyrighted material. Please check the national legislation of the applicable country concerning the use of such material.Radio [Menu 4-4]You can search radio stations and enjoy listening to the radio.Listen radio [Menu 4-4-1]Connect the FM Radio headset into headset jack on the right side of the phone to activate this menu.1. Search the desired radio station using the left/right navigation keys.Key operationsRepeat LoopLeft/Right navigation keys(Long press) Scans downward/upward to the next receivable radio station.(Short press) Changes the frequency 0.1 MHz at a time.Up/Down navigation keysIncreases/Decreases the volume level (6 volume levels including mute).Frequency displayPreset channel displayStereo indicatorFrequency status barVolume level Preset channel stationsOptions Back| MULTIMEDIA](https://usermanual.wiki/LG-Electronics-USA/KE600/User-Guide-672353-Page-55.png)
![56! NoteTo improve the radio reception, extend the headset cord which functions as the FM antenna.2. Press and hold down the corresponding number key of a channel to store the currently selected radio station into. “Done” message will be popped up and the selected channel will be coloured.3. After presetting radio channels, you can listen to other channel by pressing the corresponding number key (short press).4. You can access the following option menus by pressing the left soft key [Options].• Exit radio: Stops the radio play and goes back to standby mode.• Radio alarm: To set the radio alarm. The steps to set the radio alarm are same to the ones to set the alarm clock.• Save channel: To save the radio station. The list of 10 channel status appears. After selecting an (empty) channel, press the left soft key [Save]. If you select an occupied channel, “Replace?” message will be popped up. And if you select Yes, the channel will be replaced by the new station.• Delete channel: After selecting the channel to delete, press the left soft key [Delete]. You’ll be asked to confirm this action.• Activate speaker: Select this to listen to the radio through the built-in speaker. To turn off the speaker, select “Deactivate speaker”.Channels [Menu 4-4-2]Opens up the channel list.After storing radio stations to the preset channels, you can listen to the radio by electing the desired channel.MULTIMEDIA| MULTIMEDIA](https://usermanual.wiki/LG-Electronics-USA/KE600/User-Guide-672353-Page-56.png)
![57Personal music Composer [Menu 4-5]Compose Melody [Menu 4-5-1]My Melody [Menu 4-5-2]Settings [Menu 4-5-3]Arrange [Menu 4-5-4]Metronome (Fast/Normal/Slow) [Menu 4-5-5]Helps [Menu 4-5-6]Djing [Menu 4-6]Djing list [Menu 4-6-1]Settings [Menu 4-6-2]Default sound effect [Menu 4-6-3]Help [Menu 4-6-4]Voice recorder [Menu 4-7]The voice memo feature you to record up to 20 voice messages and each memo is up to 20 Seconds.Record [Menu 4-7-1]You can record voice memo in Voice recorder menu.1. Once recording is started, the message Recording and the remaining time is displayed.2. If you want to finish recording, press the left soft key < [Save].3. Key in Voice memo title, press the left soft key < [OK].View list [Menu 4-7-2]The phone shows voice memo list. You can playback and delete the recorded voice memo. The following [Options] menus are available• Play: Allows to listen to the recorded voice memo.• Send: Allows to send the multimedia message and e-mail.• Delete: Allows to delete voice memo.• Delete all: Allows to delete all voice memos.| MULTIMEDIA](https://usermanual.wiki/LG-Electronics-USA/KE600/User-Guide-672353-Page-57.png)
![58MY STUFF| MY STUFF! NoteDo not change the defualt folder name, or it does not work properly.Videos [Menu 5-1]Show the list of 3GP, 3G2 files at My media\Videos in Multimedia memory. Supported only .3gp files, that are encoded with MPEG4 and h.263 video-codecs and AMR audio-codec.• Play: You can play the video file when pressing OK key or selecting Play menu of Option menus. To play recorded video with 208x160 resolution you should swivel abd close flip.• Send via Bluetooth: Send the selected file to another device via bluetooth.! NoteYou may send files via Bluetooth only if they are stored in phone memory, not on memory card. To send file from external memory, please, firstly copy it to internal phone memory.• Copy to External memory: Copy the selected file to the same folder at Multimedia memory/External memory.! WarningIf you remove a external memory during copying a file, it makes a serious damage at phone.• Move to External memory: Move the selected file to the same folder at Multimedia memory/External memory.! WarningIf you remove a external memory during moving a file, it makes a serious damage at phone.• Rename: Change the file name of selected file. The maximum length of characters is 200. And You can not change the extension of file.! WarningYou can’t use the following characters, \ / : * ? “ < > | • Delete: Delete a file.](https://usermanual.wiki/LG-Electronics-USA/KE600/User-Guide-672353-Page-58.png)
![59| MY STUFF• Delete all: Delete all files in the list• Information: Show the file information.• Playing video files in DiCa mode.- To stop playing press side camera button. To continue it press this button one more time.- To exit from play mode press and hold side camera button.- To scroll video file use up/down side navigation buttons.Images [Menu 6-2]Show the list of JPG files at My media\Photos in Multimedia memory.• View: You can see the JPG file when pressing OK key or selecting View menu of Option menus.! NoteThe maximum size of JPG file you can see is 460Kbytes.• Send via email: Send the selected file to another device via email if the file size is less than 300Kbytes. • Send via Bluetooth: Send the selected file to another device via Bluetooth.! Note• You may send files via Bluetooth only if they are stored in phone memory, not on memory card. To send file from external memory, please, firstly copy it to internal phone memory.• In Photos folder in internal and in external memory only .JPG (.JPEG) files can be stored. In Images folder in internal and in external memory you may store .GIF, .JPG (.JPEG) and other image format files.• To setup .JPG (.JPEG) file from Photo folder as wallpaper, go to Menu-Multimedia-Photo album and then please select Set as wallpaper in Options menu.• Copy to External memory: Copy the selected file to the same folder at Multimedia memory/External memory.](https://usermanual.wiki/LG-Electronics-USA/KE600/User-Guide-672353-Page-59.png)
![60• Move to External memory: Move the selected file to the same folder at Multimedia memory/External memory.• Rename: Change the file name of selected file. The maximum length of characters is 200. And You can not change the extension of file.• Delete: Delete a file.• Delete all: Delete all files in the list• Information: Show the file information.Sounds [Menu 5-3]Show the list of MP3, MP4, AAC, M4A, WMA files at My media\Music in Multimedia memory.• Play: You can play the MP3 file when pressing OK key or selecting Play menu of Option menu.• Send via Bluetooth: Send the selected file to another device via Bluetooth.! NoteYou may send files via Bluetooth only if they are stored in phone memory, not on memory card. To send file from external memory, please, firstly copy it to internal phone memory.• Copy to External memory: Copy the selected file to the same folder at Multimedia memory/External memory.• Move to External memory: Move the selected file to the same folder at Multimedia memory/External memory.• Rename: Change the file name of selected file. The maximum length of characters is 200. And You can not change the extension of file.• Delete: Delete a file.• Delete all: Delete all files in the list• Information: Show the file information.MY STUFF| MY STUFF](https://usermanual.wiki/LG-Electronics-USA/KE600/User-Guide-672353-Page-60.png)
![61Others [Menu 5-4]Show the list of files at My media\Others in Multimedia memory.• Play: You can play a file if its type is the one of 3GP, 3G2, MP3, MP4, AAC, M4A and WMA.• View: You can see a file if its type is the one of JPG, GIF, WBMP, PNG and TXT.• Send via Bluetooth: Send the selected file to another device via Bluetooth.! Note• You may send files via Bluetooth only if they are stored in phone memory, not on memory card. To send file from external memory, please, firstly copy it to internal phone memory.• When you connect phone with PC via bluetooth, to Music, Video, Others and Text folders you can write and receive files, and from Photo, Sounds and Images folders you may only receive files, copy files to this folders from PC is impossible. All supported file types you may copy from PC to phone’s Others folder, and then you may view or play these files. When connecting with PC via USB cable in internal phone memory you may see only Photo, Music, Others, Text and Video folders, and on external memory card you may see all folders.Games & Apps [Menu 5-5]In this menu, you can manage the Java applications installed in your phone. You can play or delete downloaded applications, or set the connect option. This menu will connect to the [Menu 1-1], see p. 29.External Memory [Menu 5-6]This menu allows you to view Videos, Photos, Music, Text, Images, Sounds and Others in memory card. If the external memory is not available, a pop up message “Please insert external memory” is displayed.! NoteRemovable disk will be not available, if in phone Sim card absence.! New Fantastic LGThere is mass storage function in KE600. if you connect the USB cable, you can use the phone as a Removable Disk.You can download MP3 files, and photos, video, txt files etc. this gives you fast access from PC to Phone, by just connecting the USB cable.| MY STUFF](https://usermanual.wiki/LG-Electronics-USA/KE600/User-Guide-672353-Page-61.png)
![63| BROWSERBROWSERYou can access various WAP (Wireless Application Protocol) services such as banking, news, weather reports and flight information. These services are specially designed for mobile phones and they are maintained by WAP service providers.Check the availability of WAP services, pricing and tariffs with your network operator and/or the service provider whose service you wish to use. Service providers will also give you instructions on how to use their services.Once connected, the homepage is displayed. The content depends on the service provider. To exit the browser at any time, press the (E) key. The phone will return to the idle menu.Navigating with the WAP browserYou can surf the Internet using either the phone keys or the WAP browser menu.Using the phone keysWhen surfing the Internet, the phone keys function differently to phone mode.Key DescriptionU D Scrolls each line of the content areaCReturns to the previous pageOSelects options and confirms actionsUsing the WAP browser menuThere are various menu options available when surfing the Mobile Web.! Note The WAP browser menus may vary, depending on your browser version.Home [Menu 6-1]Connects to a homepage. The homepage will be the site which is defined in the activated profile. It will be defined by the service provider if you have not defined it in the activated profile.](https://usermanual.wiki/LG-Electronics-USA/KE600/User-Guide-672353-Page-63.png)
![64Bookmarks [Menu 6-2]This menu allows you to store the URL of favourite web pages for easy access at a later time.To create a bookmark1. Press the left soft key < [Options].2. Select Add new and press the OK key.3. After entering the desired URL and title, press the OK key.After selecting a desired bookmark, the following options are available.• Connect: Connects to the selected bookmark.• Add new: Select this to create a new bookmark.• Edit: You can edit the URL and/or the title of the selected bookmark.• Delete: Deletes the selected bookmark.• Delete all: Deletes all the bookmarks.Go to URL [Menu 6-3]You can connect directly to the site you want. After entering a specific URL, press the OK key.Settings [Menu 6-4]You can set the profile, cache, cookie and security related to internet service.Profiles [Menu 6-4-1]A profile is the network information used to connect to the Internet.There are default profiles for some operators, stored in phone memory. It’s impossible to rename default profiles.Each profile has submenus as follows:• Activate: Activates the selected profile.• Settings: Use this to edit and change WAP settings for the selected profile.BROWSER| BROWSER](https://usermanual.wiki/LG-Electronics-USA/KE600/User-Guide-672353-Page-64.png)
![66• Rename: You can change the profile name.• Add new: You can add a new profile.• Delete: Deletes the selected profile from the list.Cache [Menu 6-4-2]The information or services you have accessed are saved in the cache memory of the phone.Cookie [Menu 6-4-3]The information or services you have accessed are saved in the cache memory of the phone.Clear cache [Menu 6-4-4]Removes all context saved in cache.! NoteA cache is a buffer memory, which is used to save data temporarily.Clear cookie [Menu 6-4-5]Removes all context saved in cookie.Security [Menu 6-4-6]A list of the available certification is shown.• Authority: You can see the list of authority certificates that have been stored in your phone.• Personal: You can see the list of personal certificates that have been stored in your phone.BROWSER| BROWSER](https://usermanual.wiki/LG-Electronics-USA/KE600/User-Guide-672353-Page-66.png)
![67| TOOLSTOOLSFavourites [Menu 7-1]This option allows you to add your own favourites to the list already provided. Once you create your own menu, you can access the desired function quickly in the idle screen by pressing the up navigation key.! NoteThe menu of SMS, MMS and MP3 is already provided in your own favourites.Alarm clock [Menu 7-2]You can set up to 5 alarm clocks to go off at a specified time.1. Select On and enter the alarm time you want.2. Select the repeat period: Once, Mon-Fri, Mon-Sat, Everyday.3. Select the alarm tone you want and press < [OK].4. Edit the alarm name and press < [OK].Calendar [Menu 7-3]When you enter this menu a calendar will show up. On top of the screen there are sections for date. Whenever you change the date, the calendar will be updated according to the date. And square cursor will be used to locate the certain day. If you see marked date in the calendar, it means that there is a schedule or memo that day. This function helps to remind you of your schedule and memo. The phone will sound an alarm tone if you set this for the note.To change the day, month, and year.Key Description Key Description1 3 Yearly U D Weekly* # Monthly L R DailyIn the scheduler mode, press left soft key < [Options] as follows;](https://usermanual.wiki/LG-Electronics-USA/KE600/User-Guide-672353-Page-67.png)
![68Add new [Menu 7-3-1]Allows you to add new schedule and memo for the chosen day. You can store up to 20 notes.Input the subject and then press left soft key < [OK]. You enter the appropriate information in the follow section; Time, Repeat and Alarm.View daily schedules [Menu 7-3-2]View all schedules and memo for the chosen day. Use U , D to browse through the note lists. If you set alarm for the note, the alarm icon is displayed.If you want to view the note in detail, press left soft key O [Select]. Press left soft key < [Options] to delete, edit the note you selected.Delete past [Menu 7-3-3]You can delete the past schedule that has been already notified you.Delete all [Menu 7-3-4]You can delete for the all notes.Go to date [Menu 7-3-5]You can go the chosen date directly.Set alarm tone [Menu 7-3-6]You can set the alarm tone of each chosen date.Calculator [Menu 7-4]Bluetooth enables compatible mobile devices, peripherals and computers that are in close proximity to communicate directly with each other without wires. This handset supports built-in Bluetooth connectivity, which makes it possible to connect them with compatible Bluetooth headsets, computer applications and so on.TOOLS| TOOLS](https://usermanual.wiki/LG-Electronics-USA/KE600/User-Guide-672353-Page-68.png)
![69Paired devices [Menu 7-4-1]You can view all devices which are compatible with bluetooth phone.! NoteDue to a compatibility problem, some devices may not support this function.Handsfree devices [Menu 7-4-2]You can view the list of handsfree devices which is compatible with bluetooth phone.If you enter Paired devices or Handsfree devices menu, you access the options as follow.• Connect/Disconnect: Allows to connect the other bluetooth devices.• Add new: Allows to search new bluetooth device.• Assign name: Allows to change the name of bluetooth.• Set as authorised/Set as unauthorised: Allows to set the authorised connection between each bluetooth devices.• All service: Allows to view all services which are supported by bluetooth device.• Delete: Allows to delete the bluetooth device.• Delete all: Allows to delete all bluetooth devices.Settings [Menu 7-4-3]You can register new device which is compatible with bluetooth. If you already have added the device, you can search it after entering a password.• Set bluetoothYou can activate or cancel bluetooth function.• My handset’s visibilityYou can set the function that your phone is shown on the other bluetooth devices.• My handset’s nameYou can set the name of bluetooth device. The default name is LG KE600.| TOOLS](https://usermanual.wiki/LG-Electronics-USA/KE600/User-Guide-672353-Page-69.png)
![70Supported services [Menu 7-4-4]You can see own bluetooth service list, like a File transfer, Image printing, Pc sync and so on.Memo [Menu 7-5]1. Select the Memo by pressing the left soft key < [Select].2. If the entry is empty, press the left soft key < [Write].3. Input the memo and then press left soft key < [OK].! NoteIf you want to change the text input mode, press the # in order.Tip calculator [Menu 7-6]This contains the standard functions such as +, –, x, ÷ : Addition, Subtraction, Multiplication, and Division.Furthermore, you can use the various function of calculator such as +/–, sin, cos, tan, log, in, exp, sqrt.1. Input the numbers by pressing numeric keys.2. Use a navigation key to select a sign for calculation.3. Then input the numbers.4. Press O key to view the result.5. To input the decimal number, press * key. If you press # key, you can enter ( ).6. To end Calculator, press the right soft key > [Back].Stop watch [Menu 7-7]TOOLS| TOOLS](https://usermanual.wiki/LG-Electronics-USA/KE600/User-Guide-672353-Page-70.png)
![71Unit converter [Menu 7-8]This converts any measurement into a unit you want. There are 9 types that can be converted into units: Currency, Surface, Length, Weight, Temperature, Volume, Velocity, Shoes and Clothes.1. You can select one of four unit types by pressing < [Select] key.2. Select the unit you want to convert by pressing U and D. It’s impossible to input “-” symbol in unit converter.3. Select the standard value by using L , R.World time [Menu 7-9]You can view clocks of the world’s major cities.1. Select the city belonged to the time zone by pressing L , R key.2. You can set the current time to the city time you select by pressing the left soft key < [Set].SIM-Menu [Menu 7-0]This menu depends on SIM and the network services.| TOOLS](https://usermanual.wiki/LG-Electronics-USA/KE600/User-Guide-672353-Page-71.png)
![72PROFILES| PROFILESIn Profiles, you can adjust and customise the phone tones for different events, environments, or caller groups.There are six preset profiles: General, Silent, Vibrate only, Outdoor, Headset and Offline. Each profile can be personalised. Press the left soft key [Menu] and select Profiles using up/down navigation keys.Activate [Menu 8-X-1]1. A list of profiles is displayed.2. In the Profiles list, scroll to the profile you want to activate and press the left soft key < [Select] or OK key.3. Then, select Activate.Personalise [Menu 8-X-2]Scroll to the desired profile in the Profile list. After pressing the left soft key < or the OK key, select Personalise. The profile setting option opens. Set the option as required.• Call alert type: Set the alert type for incoming calls.• Ring tone: Select the desired ring tone from the list.• Ring volume: Set the volume of the ringing tone.• Message alert type: Set the alert type for messages.• Message tone: Select the alert tone for messages.• Keypad tone: Select the desired keypad tone.• Keypad volume: Set the volume of keypad tone.• Flip tone: Allows to set the flip tone for adjusting environment.• Effect sound volume: Set the volume of effect sound.• Power on/off volume: Set the volume of the ringing tone when switching the phone on/off.• Auto answer: This function will be activated only when your phone is connected to the handsfree kit.](https://usermanual.wiki/LG-Electronics-USA/KE600/User-Guide-672353-Page-72.png)
![73| PROFILES- Off: The phone will not answer automatically.- After 5 secs: After 5 seconds, the phone will answer automatically.- After 10 secs: After 10 seconds, the phone will answer automatically.Rename [Menu 8-X-3]You can rename a profile and give it any name you want.! NoteVibrate only, Silent and Headset profiles cannot be renamed.1. To change the name of a profile, scroll to the profile in the profile list and after pressing the left soft key < or the OK key, select Rename.2. Key in the desired name and press the OK key or the left soft key < [OK].](https://usermanual.wiki/LG-Electronics-USA/KE600/User-Guide-672353-Page-73.png)
![74SETTINGS| SETTINGSDate & Time [Menu 9-1]You can set functions relating to the date and time.Date [Menu 9-1-1]• Set dateYou can enter the current date.• Date formatYou can set the Date format such as DD/MM/YYYY, MM/DD/YYYY, YYYY/MM/DD.(D: Day / M: Month / Y: Year)Time [Menu 9-1-2]• Set timeYou can enter the current time.• Time formatYour can set the time format between 24-hour and 12-hour.Power saving [Menu 9-2]If you set On, you can save the power when you don’t use the phone.Display [Menu 9-3]Wallpaper [Menu 9-3-1]You can select the background pictures in standby mode.• Main LCD• Front LCDDefaultYou can select a picture or an animation of wallpaper by pressing L or R.My folderYou can select a picture or an animation as wallpaper.](https://usermanual.wiki/LG-Electronics-USA/KE600/User-Guide-672353-Page-74.png)
![75| SETTINGSMenu Colour [Menu 9-3-2]Your phone provides you with 4 menu colour themes. Set the menu colour by scrolling and pressing the left soft key < [Select].Standby text [Menu 9-3-3]If you select On, you can edit the text which is displayed in standby mode.Backlight [Menu 9-3-4]You can set the light-up duration of the display.Brightness [Menu 9-3-5]You can set the brightness of LCD: 100%, 80%, 60%, 40%Network name [Menu 9-3-6]If this function is activated, network name will be displayed on main LCD.Language [Menu 9-4]You can change the language for the display texts in your phone. This change will also affect the Language Input mode.Connectivity [Menu 9-5]Bluetooth [Menu 9-5-1]Bluetooth enables compatible mobile devices, peripherals and computers that are in close proximity to communicate directly with each other without wires. This handset supports built-in Bluetooth connectivity, which makes it possible to connect them with compatible Bluetooth headsets, computer applications and so on.! Note• If you use LG PC Sync via bluetooth, you can exchange the data only within phonebook• When you receive data from another Bluetooth device, the phone requests confirmation. After confirming the transfer, the file will be copied on to your phone.](https://usermanual.wiki/LG-Electronics-USA/KE600/User-Guide-672353-Page-75.png)
![76• Depending on the file type, it will be stored in the following folders:- MP3 (.mp3, mp4, aac, m4a, wma): Music folder.- Video (.3GP): Video folder.- Phonebook contacts (.VCF): Phonebook.- Text (.txt): Text folder.- Other files (.*.*): File storage folder.• Supported Bluetooth software (Bluetooth stacks) for DUN: Recommended drivers WidComm Bluetooth for Windows 1.4 and 3.0• Set BluetoothYou can activate or cancel the bluetooth function.• Paired devices/Handsfree devicesYou can view all devices which your KE600 is already paired to. If you enter Paired devices or Handsfree devices menu, you access the options - Connect/Disconnect: Allows to connect the your paired bluetooth devices.- Add new: Allows to search new bluetooth devices and add them to your phone’s list of paired devices. When you select Add new your handset will start to search for Bluetooth devices within range. Once the device you wish to pair appears on the list press the right soft key [Stop]. Scroll to the desired device and press the left soft key [Pair]. You will then be asked to enter a passcode. The passcode can be any code you wish to use (the same passcode must be used by both devices) or is one that is pre-determined by the manufacturer of the device you are trying to pair with. Please check the User Manual of the device you are initiating the pair with to see if it already has a predetermined passcode in place.- Assign name: Allows you to change the name of the paired Bluetooth device and how it is displayed on the handset.- Set as authorised/Set as unauthorized: Allows you to set an authorised connection between each Bluetooth device. For example if you regularly use a Bluetooth headset with your phone then setting the connection as authorised will mean the headset will automatically connect to the handset each time the headset is powered on.SETTINGS| SETTINGS](https://usermanual.wiki/LG-Electronics-USA/KE600/User-Guide-672353-Page-76.png)
![77- All services: Allows to view all services which are supported by bluetooth device.- Delete: Allows to delete a paired bluetooth device.- Delete all: Allows to delete all a paired bluetooth devices.• Settings- My handset’s visibility: This indicates whether or not your handset will be visible to other Bluetooth devices.- My handset’s name: You can set the name of bluetooth device. The default name is LG KE600.• Supported servicesDisplays a list of Bluetooth services the handset supports.- Headset- Handsfree kit- File transfer- Image printing- Dial-up networking- Business card transfer- Browsing other device- Serial Port ProfileRemovable disk [Menu 9-5-2]• Data transfer• Format diskSync service [Menu 9-5-3]You can access the network services through Modem. If you want to use LG PC Sync, Contents bank or Internet Cube, you should access Modem Menu and plug the cable.Network [Menu 9-5-4]You can select a network which will be registered either automatically or manually.Usually, the network selection is set to Automatic.• Network selectionYou can select a network type.| SETTINGS](https://usermanual.wiki/LG-Electronics-USA/KE600/User-Guide-672353-Page-77.png)
![78- Automatic : If you select Automatic mode, the phone will automatically search for and select a network for you. Once you have selected “Automatic”, the phone will be set to “Automatic” even though the power is off and on.- Manual: The phone will find the list of available networks and show you them. Then you can select the network which you want to use if this network has a roaming agreement with your home network operator. The phone let you select another network if the phone fails to access the selected network.- Preferred: You can set a list of preferred networks and the phone attempts to register with first, before attempting to register to any other networks. This list is set from the phone’s predefined list of known networks.• Band selection- EGSM/DCS: Depending on Network situation, you can select EGSM/DCS.- PCS only: Depending on Network situation, you can select PCS only.GPRS attach [Menu 9-5-5]You can set GPRS service depending on various situations.• Switch onIf you select this menu, the phone is automatically registered to a GPRS network when you switch the phone on. Starting a WAP or PC dial-up application created the connection between phone and network and data transfer is possible. When you end the application, GPRS connection is ended but the registration to the GPRS network remains.• When neededIf you select this menu, the GPRS connection is established when you connect a WAP service and closed when you end the WAP connection.Network profile [Menu 9-5-6]• Data connections SETTINGS| SETTINGS](https://usermanual.wiki/LG-Electronics-USA/KE600/User-Guide-672353-Page-78.png)
![79Calling [Menu 9-6]You can set the menu relevant to a call by pressing [Select] in the Setting menu.Call divert [Menu 9-6-1]The Call divert service allows you to divert incoming voice calls, fax calls, and data calls to another number. For details, contact your service provider.• All voice callsDiverts voice calls unconditionally.• If busyDiverts voice calls when the phone is in use.• If no replyDiverts voice calls which you do not answer.• If out of reachDiverts voice calls when the phone is switched off or out of coverage.• All data callsDiverts to a number with a PC connection unconditionally.• All fax callsDiverts to a number with a fax connection unconditionally.• Cancel allCancels all call divert service.The submenusCall divert menus have the submenus shown below.- ActivateActivate the corresponding service.To voice mail centreForwards to message centre. This function is not shown at All data calls and All fax calls menus.To other numberInputs the number for diverting.To favourite numberYou can check recent 5 diverted numbers.- CancelDeactivate the corresponding service.| SETTINGS](https://usermanual.wiki/LG-Electronics-USA/KE600/User-Guide-672353-Page-79.png)
![80- View statusView the status of the corresponding service.Answer mode [Menu 9-6-2]• Flip openIf you select this menu, you can receive an incoming call when you open the flip.• Any keyIf you select this menu, you can receive a call by pressing any key except E [End] key.• Send key onlyIf you select this menu, you can receive a call by only pressing S [Send] key.Send my number [Menu 9-6-3] (network and subscription dependent)• Set by networkIf you select this, you can send your phone number depending on two line service such as line 1 or line 2.• OnYou can send your phone number to another party. Your phone number will be shown on the receiver’s phone.• OffYour phone number will not be shown.Call waiting [Menu9-6-4] (network dependent)• ActivateIf you select Activate, you can accept a waiting (receiving) call.• CancelIf you select Cancel, you cannot recognize the waiting (receiving) call.• View statusShows the status of Call waiting.SETTINGS| SETTINGS](https://usermanual.wiki/LG-Electronics-USA/KE600/User-Guide-672353-Page-80.png)
![81Minute minder [Menu 9-6-5]If you select On, you can check the call duration by a beep sound given every minute during a call.Auto redial [Menu 9-6-6]• OnWhen this function is activated, the phone will automatically try to redial in the case of failure to connect a call.• OffYour phone will not make any attempts to redial when the original call has not connected.Send DTMF [Menu 9-6-7]You can send touch tones during an active call to control your voice mailbox or other automated phone services.• InformationDTMF tone: Dual Tones Multiple Frequency.Security [Menu 9-7]PIN code request [Menu 9-7-1]In this menu, you can set the phone to ask for the PIN code of your SIM card when the phone is switched on.If this function is activated, you’ll be requested to enter the PIN code.1. Select PIN code request in the security settings menu, and then press < [Select].2. Set Enable/Disable.3. If you want to change the setting, you need to enter PIN code when you switch on the phone.4. If you enter wrong PIN code more than 3 times, the phone will lock out. If the PIN is blocked, you will need to key in PUK code.5. You can enter your PUK code up to 10 times. If you put wrong PUK code more than 10 times, you can not unlock your phone. You will need to contact your service provider.| SETTINGS](https://usermanual.wiki/LG-Electronics-USA/KE600/User-Guide-672353-Page-81.png)
![82Handset lock [Menu 9-7-2]You can use a security code to avoid unauthorized use of the phone. Whenever you switch on the phone, the phone will request security code if you set phone lock to When switch on.If you set phone lock to When SIM changed, your phone will request security code only when you change your SIM card.Call barring [Menu 9-7-3]The Call barring service prevents your phone from making or receiving certain category of calls. This function requires the call barring password. You can view the following submenus.• All outgoing callsThe barring service for all outgoing calls.• Outgoing internationalThe barring service for all outgoing international calls.• Outgoing international except home countryThe barring service for all international outgoing calls except home network.• All incomingThe barring service for all incoming calls.• Incoming when roamingThe barring service for all incoming calls when roaming.• Cancel all barringsYou can cancel all barring services.• Change passwordYou can change the password for Call Barring Service.The submenus:- ActivateAllows to request the network to set call restriction on.- CancelSet the selected call restriction off.- View statusView the status whether the calls are barred or not.SETTINGS| SETTINGS](https://usermanual.wiki/LG-Electronics-USA/KE600/User-Guide-672353-Page-82.png)
![83Fixed dial number [Menu 9-7-4] (SIM dependent)You can restrict your outgoing calls to selected phone numbers. The numbers are protected by your PIN2 code.• EnableYou can restrict your outgoing calls to selected phone numbers.• DisableYou can cancel fixed dialling function.• Number listYou can view the number list saved as Fixed dial number.Change code [Menu 9-7-5]PIN is an abbreviation of Personal Identification Number to prevent use by unauthorized person. You can change the access codes: Security code, PIN code, PIN2 code.1. If you want to change the Security code/PIN1/ PIN2 code input your original code, and then press < [OK].2. Input new Security code/PIN1/PIN2 code and verify them.Memory status [Menu 9-8]You can check free space and memory usage of each repository, Internal memory and Multimedia memory. You can go to each repository menu.Reset setting [Menu 9-9]You can initialize all factory defaults. You need Security code to activate this function.• Restore default settings: Allows you to restore default settings.• Clear multimedia memory: Allows you to format the multimedia memory and create a default directory.| SETTINGS](https://usermanual.wiki/LG-Electronics-USA/KE600/User-Guide-672353-Page-83.png)