LG Electronics USA KF310 PCS GSM/ EDGE Phone with Bluetooth User Manual
LG Electronics USA PCS GSM/ EDGE Phone with Bluetooth Users Manual
UserManual.wiki
>
LG Electronics USA
>
KF310 User Manual
Users Manual
Navigation menu
Upload a User Manual
Namespaces
Wiki Guide
HTML
PDF
Info
Views
User Manual
Discussion / Help
Navigation
![8For Your SafetyImportant InformationThis user guide contains important information on the use andoperation of this phone. Please read all the informationcarefully for optimal performance and to prevent any damageto or misuse of the phone. Any changes or modifications notexpressly approved in this user guide could void your warrantyfor this equipment.Before You StartSafety InstructionsWARNING! To reduce the possibility of electric shock, do notexpose your phone to high humidity areas, such as thebathroom, swimming pool, etc.Always store your phone away from heat. Never store yourphone in settings that may expose it to temperatures less than32°F or greater than 104°F, such as outside during extremeweather conditions or in your car on a hot day. Exposure toexcessive cold or heat will result in malfunction, damageand/or catastrophic failure.Be careful when using your phone near other electronicdevices. RF emissions from your mobile phone may affectnearby in adequately shielded electronic equipment. Youshould consult with manufacturers of any personal medicaldevices such as pacemakers and hearing aides to determine ifthey are susceptible to interference from your mobile phone.Turn off your phone in a medical facility or at a gas station.Never place your phone in a microwave oven as this willcause the battery to explode.IMPORTANT! Please read the TIA SAFETY INFORMATION onpage 78 before using your phone.Safety InformationRead these simple guidelines. Breaking the rules may bedangerous or illegal. Further detailed information is given in thisuser guide.]Never use an unapproved battery since this could damagethe phone and/or battery and could cause the battery toexplode.]Never place your phone in a microwave oven as it willcause the battery to explode.]Do not dispose of your battery by fire or with hazardous orflammable materials.]Make sure that no sharp-edged items come into contactwith the battery. There is a risk of this causing a fire.]Store the battery in a place out of reach of children.]Be careful that children do not swallow any parts such asrubber plugs (earphone, connection parts of the phone,etc.). This could cause asphyxiation or suffocation.](https://usermanual.wiki/LG-Electronics-USA/KF310/User-Guide-922725-Page-4.png)
![9For Your Safety]Unplug the power cord and charger during lightning stormsto avoid electric shock or fire.]When riding in a car, do not leave your phone or set up thehands-free kit near to the air bag. If wireless equipment isimproperly installed and the air bag is activated, you may beseriously injured.]Do not use a hand-held phone while driving.]Do not use the phone in areas where its use is prohibited.(For example: aircraft).]Do not expose the battery charger or adapter to directsunlight or use it in places with high humidity, such as abathroom.]Never store your phone in temperatures less than- 4°F orgreater than 122°F.]Do not use harsh chemicals (such as alcohol, benzene,thinners, etc.) or detergents to clean your phone. There is arisk of this causing a fire.]Do not drop, strike, or shake your phone severely. Suchactions may harm the internal circuit boards of the phone.]Do not use your phone in high explosive areas as the phonemay generate sparks.]Do not damage the power cord by bending, twisting, pulling,or heating. Do not use the plug if it is loose as it may causea fire or electric shock.]Do not place any heavy items on the power cord. Do notallow the power cord to be crimped as it may cause fire orelectric shock.]Do not handle the phone with wet hands while it is beingcharged. It may cause an electric shock or seriouslydamage your phone.]Do not disassemble the phone.]Do not place or answer calls while charging the phone as itmay short-circuit the phone and/or cause electric shock orfire.]Only use the batteries, antennas, and chargers provided byLG. The warranty will not be applied to products provided byother suppliers.]Only authorized personnel should service the phone and itsaccessories. Faulty installation or service may result inaccidents and consequently invalidate the warranty.]Do not hold or let the antenna come in contact with yourbody during a call.]An emergency call can be made only within a service area.For an emergency call, make sure that you are within aservice area and that the phone is turned on.](https://usermanual.wiki/LG-Electronics-USA/KF310/User-Guide-922725-Page-5.png)
![11For Your SafetyVehicle Mounted External Antenna(optional, if available)A minimum separation distance of 8 inches (20cm) must bemaintained between the user/bystander and the vehiclemounted external antenna to satisfy FCC RF exposurerequirements. For more information about RF exposure, visitthe FCC website at www.fcc.govFCC Part 15 Class B ComplianceThis device and its accessories comply with part 15 of FCCrules. Operation is subject to the following two conditions: (1) This device and its accessories may not cause harmfulinterference, and (2) this device and its accessories mustaccept any interference received, including interference thatmay cause undesired operation.Cautions for Battery]Do not disassemble.]Do not short-circuit.]Do not expose to high temperature: 60°C (140°F).]]Do not incinerate.Battery Disposal]Please dispose of your battery properly or bring to yourlocal wireless carrier for recycling.]Do not dispose in fire or with hazardous or flammablematerials.Adapter (Charger) Cautions]Using the wrong battery charger could damage your phoneand void your warranty.]The adapter or battery charger is intended for indoor useonly.Do not expose the adapter or battery charger to direct sunlightor use it in places with high humidity, such as the bathroom.](https://usermanual.wiki/LG-Electronics-USA/KF310/User-Guide-922725-Page-7.png)

![34MultimediaMultimedia2. If you do not want to use the speakerphone, ensure you have the headset plugged in.3. To start the video function, press the left soft key [Options] and select Video call.v You will be notified that you will need to close other applications to make the video call.Notev The video call may take some time to connect. Please be patient. The connection time will also depend on how quickly the other party answers the call. While the video call is connecting, you will see your own image; after the other party has answered, their image will be displayed on the screen.4. Adjust the camera position if necessary.5. Press e to finish the call, or close the handset.Making a voice/video call from ContactsIt is easy to call anyone whose number you have stored in your Contacts.1. Press d to access the contacts list.2. Scroll to the contact to make a call.3. Press s to make a voice call. Press the left soft key and select Make video call to make a video call.4. Press e to finish the call.Making international calls1. Press and hold 0 for the international prefix. The ‘+’ character prefixes the international access code.](https://usermanual.wiki/LG-Electronics-USA/KF310/User-Guide-922725-Page-25.png)
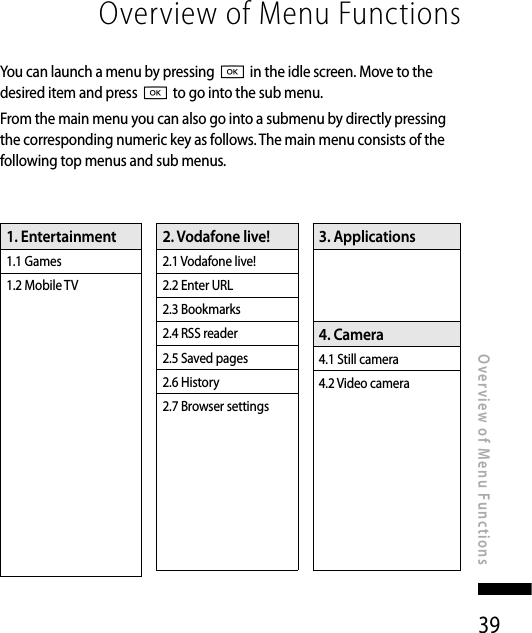
![41Entertainment [Menu 1]EntertainmentGames Menu 1.1You can easily download games and play the default games. If you want to download games. select Download games in this menu.Mobile TV Menu 1.2You can access Mobile TV by selecting this menu.](https://usermanual.wiki/LG-Electronics-USA/KF310/User-Guide-922725-Page-32.png)
![42Vodafone live! [Menu 2]Vodafone live! Menu2.1You can launch the web browser and access the homepage of the activated profile on Browser settings.v You can also directly access Vodafone live! by pressing the right soft key in idle mode.Enter URL Menu 2.2You can manually enter a URL address and access the associated web page.v To enter a symbol, press the left soft key [Options] and select 5.Insert symbol from Options menu to display the symbol table.v To switch input mode, press the left soft key [Options] and select 6. Input method.Bookmarks Menu 2.3You can store frequently accessed or favourite URLs/Pages. New Folder, Add new, Edit, Delete, Move, Send or Mark/Unmark operations can be performed on Bookmarks. Several preconfigured URLs are stored as bookmarks.Adding a new bookmark1. Press the left soft key [Options] and select 1. Add new from Options menu.2. Enter the title and associated URL information.3. Press O to save.Connecting to a desired bookmarkPress to connect a desired bookmark.Sending the bookmark to others Select Send from Options menu. You can send it via Message or Email.Vodafone live!](https://usermanual.wiki/LG-Electronics-USA/KF310/User-Guide-922725-Page-33.png)
![45Applications [Menu 3]ApplicationsYou can easily download other applications when you select the embedded link in this menu.Please note that additional cost may be incurred when using online services. You can create a folder using the left soft key [Options].](https://usermanual.wiki/LG-Electronics-USA/KF310/User-Guide-922725-Page-36.png)
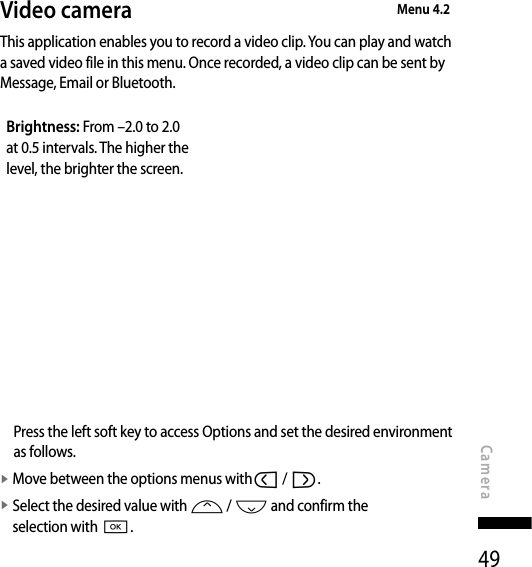
![46Camera [Menu 4]Ca meraStill camera Menu 4.1This application enables you to take a still picture. You can take a picture in the size you want, and use it for the address book photo, home screen and other more general purposes. Once taken, the picture can be sent by Message, Email, or Bluetooth O.Brightness: From –2.0 to 2.0 at 0.5 intervals. The higher the level, the brighter the screen. Press the left soft key to access Options and set the desired environment as follows.v Move between the options menus withl / r.v Select the desired value with u / d and confirm the selection with O.](https://usermanual.wiki/LG-Electronics-USA/KF310/User-Guide-922725-Page-37.png)
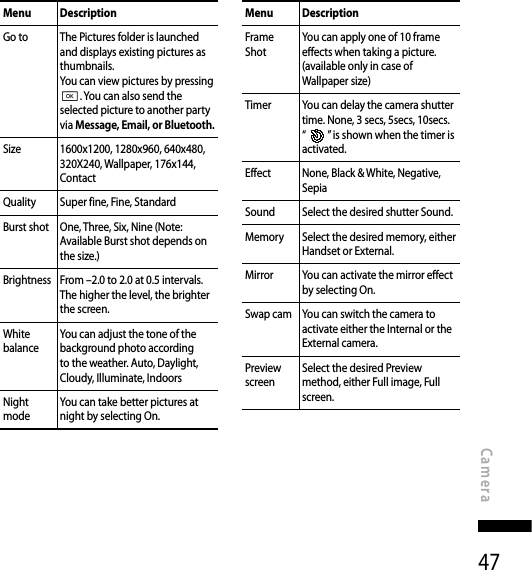
![48Camera2. After finishing all the settings, press the right soft key [Close].3. Focus the camera on what you want to take and press O.4. Press O to save the picture. It is saved in the Pictures folder of My Files.Notev Press the right soft key [Back] to go back to the preview mode without saving the picture.Ca mera](https://usermanual.wiki/LG-Electronics-USA/KF310/User-Guide-922725-Page-39.png)
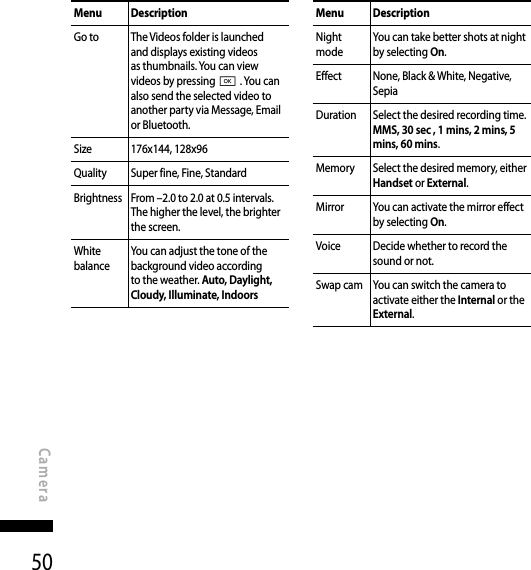
![512. After finishing all the settings, press the right soft key [Close].3. Focus the camera on what to record and press O to start recording. And press O to stop recording.v You can pause the recording by pressing the left soft key [Pause].4. Press O to save the video clip. It is saved in the Videos folder of My Files.Notev Press the right soft key [Back] to go back to the preview mode without saving the video clip.Ca mera](https://usermanual.wiki/LG-Electronics-USA/KF310/User-Guide-922725-Page-42.png)
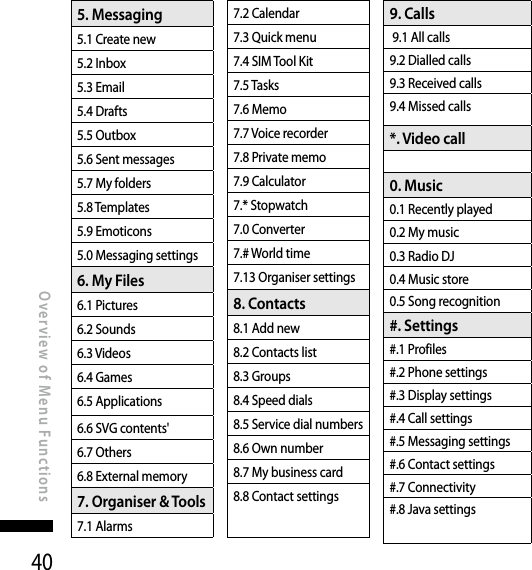
![52Messaging [Menu 5]MessagingCreate new Menu 5.1Message (Menu 5.1.1)You can write and edit a message containing a combination of text, image, video and audio.1. Enter your message in the Message field.Option menus in Message fieldv Insert: You can perform the following actions:1. Image: You can insert an image. (Existing image/Take picture)2. Video: You can insert a video clip. (One video clip per slide)3. Sound: You can insert a sound file. (One sound per slide)4. Symbols: You can insert symbols. After entering the corresponding number keys, press O.5. Template: You can insert a text template saved on the phone. After selecting a template, press O. The selected template is inserted into the Message window.6. Emoticon: You can insert an moticon on writing a message.7. Name & number: After searching the name and the number in phonebook, you can insert the entry.8. New slide: Select this to add a new slide.9. Subject: Select this to insert a subject.v Save to drafts: Select this to save the message to drafts.v Input method: Select the desired dictionary mode.v Writing language: You can select the language for writing a message.](https://usermanual.wiki/LG-Electronics-USA/KF310/User-Guide-922725-Page-43.png)
![53v Add to dictionary: You can add a word to the dictionary.2. Press the right soft key [Back] to exit the menu or go to previous menu after setting submenus.3. Press the confirmation key [Send] to send the message. The message will automatically be saved in the Sent Items folder. If the message has not been sent, it will remain in the Outbox with a failed status.Email (Menu 5.1.2)To send/receive an Email, you should set up the Email account. (Refer to page 56-59 for how to set up an Email account.)1. Enter the Email addresses of the recipients in the To, Cc, Bcc fields. You can search the Contacts by pressing O.Notev Enter the reference Email address to forward the Email in Cc(Carbon copy) field.v Enter a hidden reference Email address to forward the Email without forwarding information in Bcc(Blind Carbon Copy) field.v Only valid Email addresses are allowed for the recipient (To), reference address (Cc) and hidden reference address (BCC) fields. When an Email address has been specified, another field where you can specify another address appears. You can specify up to 20 recipients for the To and Cc address fields and 10 recipients for the BCC address field.2. Move the cursor to the Subject field and key in the subject.3. You can enter the message contents by moving the cursor to the Message field.Messaging](https://usermanual.wiki/LG-Electronics-USA/KF310/User-Guide-922725-Page-44.png)
![544. Use the following functions by using the left soft key [Options].v Search contacts: Select this menu to insert Email addresses saved in Contacts. (Only shown in Option menu when cursor is located in To/Cc/Bcc fields.)v Recently used: You can use the latest Email address you saved temporarily. (Only shown in Option menu when cursor is located in To/Cc/Bcc fields.) v Insert: Select this menu to insert special characters, templates, and contacts. It is also possible to attach multimedia files (Image, videos and sounds).v Save to drafts : Select this menu to save the message in Drafts.v View attachment: Shows the attached files. (This item is only available when some files have been attached.)v Remove: Deletes the attachment file. (This item is only available when the files are already attached.)v Input method: Select the desired dictionary mode.v Writing language: You can change the writing language.v Add to dictionary: You can add a new word to the dictionary.v Set mail priority: You can configure the priority of the Email you wish to send.5. When you have finished writing an Email, press O to send the Email.MessagingMessaging](https://usermanual.wiki/LG-Electronics-USA/KF310/User-Guide-922725-Page-45.png)
![55Voice message (Menu 5.1.3)You can send the message with a recorded voice.1. Enter the voice message menu.2. Press the centre key to record your voice message.3. Press the centre key to stop the recording. For sending the message directly, press the centre key once again.4. If you want to preview the message or save it to drafts, press the left soft key [Options].Inbox Menu 5.21. You can view received messages. Select a message and then press Oto view the message.2. You can view the previous or next message by using l / r.3. To view a multimedia message (Notification), select Retrieve in the message notification view screen. The file is then transmitted, and you can view the file when the transmission is complete.You can use the following functions by using the left soft key [Options] in the Inbox.v Reply: Creates a reply to the sender or all recipients of the selected message.v Forward: Forwards the selected message.Notev Not supported for multimedia message (Notification) and WAP push messages.v Call: You can make a voice call or a video call.Messaging](https://usermanual.wiki/LG-Electronics-USA/KF310/User-Guide-922725-Page-46.png)
![56v Delete: Deletes the current message.v Create new message: You can write a new message or an Email.v Mark/Unmark: You can select one or more messages for multiple deletion.v Copy&Move: In case of SMS, you can copy the message into USIM or move the message into my folders/USIM.v Move to my folders: In case of MMS, you can move the message into my folders.v Filter: Displays messages by desired message types.v Message Info.: In case of SMS, you can check the message type, subject, type, from,to, time, priority, size and number of slide from, date and time and where it is saved.Notev You can check the saved emails in Email [Menu 5.6].Email Menu 5.3Viewing Email message list1. Select an Email account and then pressO to view the received Email list.MessagingMessaging](https://usermanual.wiki/LG-Electronics-USA/KF310/User-Guide-922725-Page-47.png)
![572. In Email list, you can use the following functions by using the left soft key [Options].v Reply: Creates a reply to the selected Email.v Forward: Forwards the selected Email message to others.v Retrieve (POP3 only): Retrieves new Email messages.v Copy to (IMAP only): Copies the selected email .v Search: Searches the Email you want to find out.v Delete: Deletes the Email.v Delete from server (POP3 only): Deletes the message or Email from server.v Message synchronisation (IMAP only): Synchronises Email to retrieve Email server.v Create new message: Creates a Message, Email, Voice message.v Mark/Unmark: Use mark/unmark option for multiple deletion.v Set as read/unread: You can set the selected Email to read or unread.v Sort by: You can sort Email according to the conditions.v Expunge (IMAP only): Removes the selected Email data at a time.v Message information: Brief information on the message including size, type, date, time and filenames.Messaging](https://usermanual.wiki/LG-Electronics-USA/KF310/User-Guide-922725-Page-48.png)
![58Viewing an Email message1. Select one of the received Emails and press the View key to receive the contents of the Email.2. The contents of the received Email are automatically displayed in the View screen.3. In the Email View screen, you can select the following functions by using the left soft key [Options].v Reply: Creates a reply to the selected Email.v Forward: Forwards the selected Email message to others.v Save address: Saves the sender's address to Contacts.v Delete: Deletes the Email.v Extract: Extracts the number, Email address or Web address from Email message.v View attachment: Shows the attached file.v View recipients: Shows the Email addresses of the recipients and reference (Cc).v Create new message: Creates a Message, Email,Postcard,Voice message.v Message infomation: Brief information on the message including size, type, date, time and filenames.Drafts Menu 5.4You can view saved messages. Select a message and then press Oto edit the message.You can use the following functions by using the left soft key [Options].v Send: Sends the selected message.v Call: You can make a voice call or a video call.v Delete: Deletes the selected message.MessagingMessaging](https://usermanual.wiki/LG-Electronics-USA/KF310/User-Guide-922725-Page-49.png)
![59v Create new message: You can write a message or an Email.v Mark/Unmark: You can select one or more messages for multiple deletion.v Filter: Displays messages by desired message types.v Message info.: In case of SMS, you can check the message type, subject, from, date, time, size and where it's saved.Outbox Menu 5.5The Outbox is a temporary storage place for messages waiting to be sent. Failed messages are also placed in Outbox. For example, Emails will be placed in Outbox if the Email account is not correctly configured.1. Select a message.2. You can use the following functions by using the left soft key [Options].[For sending / waiting messages]v Create new message: You can write a new message or an Email.v Cancel sending: You can stop sending/waiting status.v Message information: You can check the message type, subject, from, date, time, size and where it's saved.[For a failed message]v Resend: Resends the selected message.v Delete: Deletes the current message.v Save to drafts: You can send the message to drafts.v Create new message: You can write a new message or an Email.v Message information: You can check the message type, subject, from, date, time, size and where it's saved.Messaging](https://usermanual.wiki/LG-Electronics-USA/KF310/User-Guide-922725-Page-50.png)
![60Sent messages Menu 5.6Shows the messages you sent (Message/Email/Postcard/Voice message).[Options]v Reply: Creates a reply to sender or all recipients of the selected message.v Forward: Forwards the selected message.v Edit: You can edit the selected message.v Call: You can make a voice call or a video call.v Delete: Deletes the selected message.v Create new message: You can write a Message or an Email.v Mark/Unmark: You can select one or more messages for multiple deletion.v Copy&Move: In case of SMS, you can copy the message into USIM or move the message into my folders/ USIMv Filter: Displays messages by desired message types.v Message Info.: You can check the message type, subject, from, date, time, size and where it is saved.My folders Menu 5.7 You can move messages existed in Inbox or Sent messages into My folders, and then you can move those messages existed in My folders into the original message box.MessagingMessaging](https://usermanual.wiki/LG-Electronics-USA/KF310/User-Guide-922725-Page-51.png)
![61Templates Menu 5.8Text templates (Menu 5.8.1)You can add, edit, and delete frequently used useful phrases using the left soft key [Options].Notev Depending on your service provider, useful phrases are saved as a default.Multimedia templates (Menu 5.8.2)You can create, edit and view available templates when creating multimedia messages. Five types of template (Birthday, Greeting, Holiday, Thanks, Sorry) are saved by default.The following options are available.v Add new: You can create a new multimedia template.v Write multimedia message: Creates a multimedia message with the selected template.v Edit: Edits the selected template.Emoticons Menu 5.9You can add, edit and delete emoticons. You can insert the emoticon which you preferred on writing a message. If you press confirmation key, you can view the icon.Messaging settings Menu 5.0Text message (Menu 5.0.1)You can configure text message related options.Messaging](https://usermanual.wiki/LG-Electronics-USA/KF310/User-Guide-922725-Page-52.png)
![644. Priority: You can select the priority level of the messages (Low, Normal and High).5. Validity period: Allows you to configure the term of validity for a message when transmitting a multimedia message. The message would be saved in the multimedia message server only for the configured term.6. Slide duration: Allows you to configure the duration of each page when writing a message.7. Creation mode: Allows to select the contents type supported by MMS. (Restricted, Warning and Free)8. Delivery time: Configures the delivery time of message to the recipient. The Multimedia message centre will deliver the message after the delivery time.9. Multimedia msg. centre: Allows you to configure network information such as the MMSC and the WAP gateway, to send a multimedia message.Using the left soft key [Options], you can activate, add, view or delete a profile. A profilename selected by a checkmark is thecurrently configured value. You can viewand edit the contents of the profile by using option menu.v Title: Profile name.v MMSC URL: Enter the multimedia message centre URL.v Internet profiles: choose the Internet Profile from the list.Press the right soft key [Save] to save the changes and complete Multimedia msg. centre setting.MessagingMessaging](https://usermanual.wiki/LG-Electronics-USA/KF310/User-Guide-922725-Page-55.png)
![65Email (Menu 5.0.3)You can configure settings for receiving and transmitting emails.1. Vodafone Mail: Access to Vodafone Mail. (Note: This service is not available in all countries. Please contact your service provider for further information.)2. Email accounts: You can create or configure an Email account including the Email server and user ID. You can edit a selected Email account by pressing the left soft key[option]- 2.Edit. You can select an Email account to be used to send an Email using . You can select the following functions using the left soft key [Options].v Add new: Create a new Email account.v Edit: To edit the selected Email account.v View: Views a selected Email account.v Mark/Unmark: Use mark/unmark option for multiple deletion.v Delete: Deletes a selected Email account. All the emails included in the account will be deleted.3. Allow reply Email: Determines whether to allow sending a read confirmation mail for a read confirmation mail request.4. Request reply Email: Determines whether to request a read confirmation mail.5. Retrieve interval: You can configure Retrieve interval to retrieve emails automatically from the incoming mail server. When a new Email arrives, an icon appears at the top of the screen. You can select the auto receiving time slot to Off, 15 minutes, 30 minutes, 1 hour, 2 hours, 4 hours or 8 hours. Messaging](https://usermanual.wiki/LG-Electronics-USA/KF310/User-Guide-922725-Page-56.png)
![67Title Enter a title.Maximum receive sizeSelect the maximum Email receive size using the left soft key. The permissible maximum receive size is no more than 1MBMailbox typeSelect the Email inbox type either POP3 or IMAP4 using the left soft key.Save to serverDetermine whether to leave a copy of messages on the incoming server or not using the left soft key. When the mailbox type is set to IMAP4, a copy of messages are always saved to the server.Save sent mail intoSelect where to save the sent mails (when the mailbox type is set to IMAP4). When the mailbox type is POP3, sent mails are always saved into handset.Access pointsSelect an access point to connect to the Internet. You can select a configured access point using the left soft key.Auto retrieveYou can configure Auto retrieve to retrieve emails automatically from the incoming mail server.Advanced settingsSets the configuration to connect Email server.Title Enter a title.SMTP port numberEnter the mail server port number. In general, the SMTP (Outgoing mail server port number) is 25.Incoming server portEnter the mail server port number. In general, the incoming mail server port number is 110(POP3) or 143(IMAP4).SMTP authenticat ionDecide whether the outgoing mail server to require authentication or not using the left soft key. When the SMTP authentication is set to On, you can enter the SMTP Username and SMTP Password for SMTP authentication.SMTP UsernameEnters SMTP user name to require authentification.SMTP PasswordEnters SMTP password to require authentification.APOP secure loginDecide whether to activate APOP secure login or not using the left soft key. When the mailbox type is IMAP4, APOP secure login is always set to OFF.3. Press the centre soft key [Save] to complete the Email account configuration.Messaging](https://usermanual.wiki/LG-Electronics-USA/KF310/User-Guide-922725-Page-58.png)
![70My Files [Menu 6]Pictures Menu 6.1The Pictures folder consists of embedded links for downloading pictures through the Internet and Default images.Pictures taken using the camera are stored in the Pictures folder and you can create new folders to manage them. You can also send multiple files to other people.To view the picture in details, press the confirmation key.When a file is selected, the following options will be displayed by pressing the left soft key [Options].v Send: You can send the selected image via Message, Email or Bluetooth.v Use as- Wallpaper: You can set an image as the home screen theme.- Contacts image: You can set the image of selected entry in contacts. When incoming a call, the image saved in contact is displayed.- Start-up: You can set an image as shut up screen theme.- Shut down: You can set an image as shut down image.v Move: Enables the file to be moved to other folder.v Copy: Enables the file to be copied to other folder.v Delete: Deletes the selected image.v Mark/Unmark: Using the Mark function, you can send, delete, move and copy multiple files.v File- Rename: You can rename the image.- Edit: Enables the image to be edited.My Files](https://usermanual.wiki/LG-Electronics-USA/KF310/User-Guide-922725-Page-61.png)
![71Notev Edit menu is not displayed in default images folder.- File info.: Shows information on the selected image file.v Create new folder: You can create a new folder within the folder currently selected.v Slide show: You can view the images as a slide show.v Sort by: You can sort the files by date, file type or name.v List view/Grid view: You can view the images as a List view or Grid view.v Memory manager: You can view the memory status (handset or external memory card).Sounds Menu 6.2The Sounds folder consists of embedded links for downloading ringtones and music as well as folders containing the Default sounds and Voice recordings. Here you can manage, send or set sounds as ringtones.When a file is selected, the following options will be displayed by pressing the left soft key [Options].v Use as- Voice ringtone: You can set the sound file as a ringtone when incoming a voice call.- Video ringtone: You can set the sound file as a ringtone when incoming a video call.- Message tone: You can set the sound file as a ringtone when receiving a message.My Files](https://usermanual.wiki/LG-Electronics-USA/KF310/User-Guide-922725-Page-62.png)
![72- Start-up: You can set the sound file as a ringtone when handset starts up.- Shut down: You can set the sound file as a ringtone when handset shut down.v Sort by: You can sort the files by date, file type or name.v File info.: Shows the information on the selected sound file.v Memory manager: You can view the memory status (handset or external memory card).Videos Menu 6.3Here you can manage or send downloaded or captured videos clips.If you press O, you can activate the video file.The following are available using the left soft key [Options] in the Video list.v Send: You can send the selected video clip via Message, Email or Bluetooth if not protected by Digital Rights Management (DRM).v Use as: You can set the video file as voice ringtone or video ringtone.v Move: Moves the file into handset memory or external memory.v Copy: Copies the file in handset memory or external memory.v Delete: Deletes the selected video.v Mark/Unmark: Using the Mark function, you can send, delete, move and copy multiple files.My FilesMy Files](https://usermanual.wiki/LG-Electronics-USA/KF310/User-Guide-922725-Page-63.png)
![73v File- Rename: You can rename the video.v File info.: You can check information on video.v Create new folder: You can create a new folder.v Sort by: You can sort files by name, date, or file type.v List view/Grid view: You can view the images as a List view or Grid view.v Memory manager: Displays the memory status (handset or external memory card).You can view a video using the video player. Video files are displayed in the list as thumbnails. You can select a desired video by using the u / d/l/ r. Select a desired video and select Play to view the recorded video.Select the left soft key [Send] to attach the selected video to a message, Email or Bluetooth.When option Play is selected, the video clip will be played with the Media Player. To pause the playback, Opress during the playback. To resume the paused playback, press Oonce again.When viewing video clips in the Media Player, the following options are available:v Landscape view: You can view the video in wide view mode.Notev You can also view the video in wide view mode by pressing #key.My Files](https://usermanual.wiki/LG-Electronics-USA/KF310/User-Guide-922725-Page-64.png)
![74v Mute/Unmute: If the Volume is set to more than 0, Mute mode is activated and if the Volume is set to 0, the Unmute mode is activated.v Capture: You can save what is on the paused screen as an image file (only possible in Pause mode).v Repeat: You can set the repeat option (Off/One/All).v File info.: You can check information on files being played.v Send: You can send the video via Message, Email or Bluetooth if the file is not protected by Digital Rights Management (DRM).v Delete: Deletes the selected video.v Use as: You can set the video file as voice ringtone or video ringtone. This menu is dependent upon the contents.Games Menu 6.4You can easily download games and play the default games. If you want to download games. select Download games in this menu.Applications Menu 6.5You can easily download other applications when you select the embedded link in this menu. You can create a folder using left soft key [Options].Notev In Games and Applications menu, Additional cost may be incurred when using online services.My FilesMy Files](https://usermanual.wiki/LG-Electronics-USA/KF310/User-Guide-922725-Page-65.png)
![75SVG contents' Menu 6.6The SVG contents' folder contains all of your default and downloaded SWF/SVG files.When a file is selected, the following options will be displayed by pressing the left soft key [Options].v Play/Pause: Pause or resume playback.v Send: Send the file as a message or via Bluetooth.v Go to list: Return to your list of SWF/SVG files.v Landscape view: View your SWF/SVG in landscape view mode. (this only appears if you select Options without pausing).v Mute/Unmute: Switch the sound on/off.v File info.: View the Name, Size, Date, Type , Protect, installof the file.v Send: Send the file as a message or Email or via Bluetooth.v Use as wallpaper: Set the SWF/SVG file as a wallpaper.v Delete: Delete a SWF/SVG file.Others Menu 6.7Other files except pictures, sounds, videos, games & applications are stored in this folder.External memory Menu 6.8If you purchase an optional external microSD memory card, you can manage more content. Refer to the section How to use a microSD memory card on page 21 and 22 to learn how to insert and remove the memory card. You can manage content as you do on your phone.My Files](https://usermanual.wiki/LG-Electronics-USA/KF310/User-Guide-922725-Page-66.png)
![76Alarms Menu 7.1If you set the alarm, the appears on the indicator bar. The specified alarm sounds at the scheduled time. Press O to stop the alarm, and the alarm is released. Press the right soft key [Snooze] and choose the snooze interval. The alarm sound stops and resumes after the selected Snooze duration. You can configure up to 5 alarms.1. Select your desired alarm to configure in the alarm list. If there is no alarm, press the left soft key [Add] to add a new alarm.2. Set/Cancel alarm: Set or cancel the alarm using the options for specifying whether the alarm is on or by choosing the alarm time.3. Input alarm time: Input your desired alarm time by specifying Hour and Minute. Choose either ‘AM’ or ‘PM’ which is visible if 12 hour format is specified for the phone.4. Select repeat mode: Select the desired repeat mode using l / ror select the desired one from the list by pressing left soft key [List].5. Select bell: Select the bell to ring at the alarm time opening the list by pressing left soft key [Edit].6. Input memo: Input alarm name.7. Snooze: You can set the snooze duration for the alarm.8. When you have finished setting the alarm, press the centre key [Save].Notev The alarm will go off even when the phone is switched off.Organiser & Tools [Menu 7]Organiser & Tools](https://usermanual.wiki/LG-Electronics-USA/KF310/User-Guide-922725-Page-67.png)
![77Calendar Menu 7.2Schedule inquiry and search 1. Reference by Months You can refer to your schedule by months. The cursor is on the current date, and the registered date is marked.The schedule saved for the date where the cursor is located is represented by a grey box. Pressing the shortcut key 1 moves to the previous year and pressing 3 move to the next year and pressing 5 moves to today. Pressing 7 moves to the previous month, and 9 moves to the next month. Pressing * moves to the weekly calendar. You can move the dateusing u / d/l/ r. 2. Detailed referenceYou can refer to a detailed schedule, that is the whole contents of the schedule configured by the user. You can send the schedule to another phone or an Internet site through SMS (Text message) or MMS (Multimidia message) or Email or Bluetooth using the left soft key [Options].Add new eventYou can add an event. You can configure the start date, end date, start time, end time, contents, type of event, repetition, alarm of the schedule.v Set Category: Appointment, Anniversary, Birthdayv Set repeat: Once, Daily, Weekly, Monthly, Annually, User settingOrganiser & Tools](https://usermanual.wiki/LG-Electronics-USA/KF310/User-Guide-922725-Page-68.png)
![78v Set alarm: No alarm, On time, 15 mins before, 30 mins before, 1 hour before, 1 day before, 3 days before, 1 week before Delete all schedulesYou can delete all saved schedule contents using this function.Set up and release holidayYou can set up or release user holidays. Press the left soft key [Options] and select Set holiday. The selected date will be displayed in red.To release the holiday, press the left soft key [Options] and select Clear holiday.Schedule noticationIf the user has configured the alarm setting, the specified alarm sound will ring. If the notification time is before the schedule start time, you can set up the alarm again.Quick menu Menu 7.3You can specify functions to save in the Quick menu. If you save the functions frequently used in the Quick menu, you can quickly start the functions simply by pressing key.SIM Tool Kit Menu 7.4 (SIM dependent)Depending on whether you have SAT support services or not (i.e. USIM Application Toolkit) on the USIM card, this menu may be different. If the USIM card supports SAT services, this menu will be the operator-specific service name stored on the USIM card, for instance “Special”. Please refer in that case to the information provided with your USIM card for further information on how to use the related options.Organiser & ToolsMultimedia](https://usermanual.wiki/LG-Electronics-USA/KF310/User-Guide-922725-Page-69.png)
![79Tasks Menu 7.5You can view, edit and add tasks to do. Tasks are displayed in time order. Tasks that have been completed or not completed are displayed in different ways.AddTo add a task, press the left soft key [Options] in the Tasks list management screen and select Add new event option. Then input the date, description and priority for the task.When you have finished entering the data, press the centre key [Save] to save the new task.Detailed view and EditTo view detailed task contents, locate the cursor on the desired item in the Tasks list, and then press the centre key. You can send, edit and delete a task using the left soft key [Options].Set job statusTasks set as finished are displayed as crossed out below the unfinished tasks in the Tasks list. You can set Finished tasks to Not finished by selecting Options.Memo Menu 7.6Using the memo management function, you can view and manage saved memo contents, and add new memo.Organiser & Tools](https://usermanual.wiki/LG-Electronics-USA/KF310/User-Guide-922725-Page-70.png)
![80Add memoTo add a new memo, press [Add new memo] in Options. Enter the contents of the memo. You can save the memo to the list by pressing the centre key [Save].Edit and delete memoHighlight the desired memo and press O to view its contents. You can edit or delete the contents of a memo using the left soft key [Options]. You can return to the memo management screen by pressing right soft key [Back].You can select Multiple or All memos using the Mark/Unmark option and then delete a memo using the Delete option.Voice recorder Menu 7.71. Press the left soft key [Option] to display the option pop up menu before recording.2. Move to the desired menu item using u/d and pressO.v Duration: You can set the recording duration to MMS msg. size, 30 secs, or 1 min, No limit.v Quality: You can select a recording quality from Super fine, Fine, and Normal.v Memory in use: Choose whether to save your photos to the Handset memory or to the External memoryv Go to my sounds: Opens the Voice recordings folder in Sounds.3. PressingO starts recording. When a recording is started, the recording time appears on the LCD. To cancel the recording, press the Back.Organiser & ToolsMultimedia](https://usermanual.wiki/LG-Electronics-USA/KF310/User-Guide-922725-Page-71.png)
![814. When you finish the recording, pressOto exit. The recorded file is automatically saved in the Voice recordings folder in My files. If you pressOagain, you can start recording new voice.5. Press the left soft key to select the various options after the voice recording.6. Select the desired menu usingu/dand pressO.v Play: You can play the voice.v Send: To send the recorded file. Select one from Message, Email and Bluetooth using u/dand pressO.v File: You can change the name of file and view the information.v Delete: Select this menu to delete a recorded file.v Use as: You can set the recorded file athe Voice Ringtone, Video Ringtone.v Go to my sounds: Opens the Voice recordings folder in My Files.7. Press the right soft key to close the sub-menu popup window.Private memo Menu 7.8You can write the private memo to protect your privacy. You enter the security code to use this menu.Add private memoTo add a new memo, press the left soft key [Add] or [Options]. Enter the contents of the memo. You can save the memo to the list by pressing the centre key [Save].Organiser & Tools](https://usermanual.wiki/LG-Electronics-USA/KF310/User-Guide-922725-Page-72.png)
![82Edit and delete a private memoHighlight the desired memo and pressO to view its contents. You can edit or delete the contents of a memo using the left soft key [Options]. You can return to the memo management screen by pressing right soft key [Back]. You can select Multiple or All memos using the Mark/Unmark option and then delete a memo using the Delete option.Calculator Menu 7.9The calculator module allows you to perform basic arithmetic functions such as addition, subtraction, multiplication, and division as well as some scientific functions. (sin, cos, tan, log, ln, exp, sqrt, deg, rad)1. Press the left soft key [Options].2. Select the appropriate function.You can enter numbers by using the number keys, and the operators by using u / d/l/ r . You can enter a decimal point by pressing #. Whenever you press c, characters are sequentially deleted in reverse order. Whenever you holdcdown, all the characters are deleted in reverse order in one go.When calculation is complete and the result is displayed on the screen, pressing a symbol saves the result into the symbol, and continues calculation.Stopwatch Menu 7.*This menu allows you to record the elapsed time of an event.Organiser & ToolsOrganiser & Tools](https://usermanual.wiki/LG-Electronics-USA/KF310/User-Guide-922725-Page-73.png)
![83Converter Menu 7.0Using this menu, users can convert Currency, Surface, Length, Weight, Temperature, Volume and Velocity.1. Select the unit menu.2. Users can set a exchange rate using option menu.3. Enter the current rate, and then you can convert from one currency to another.4. You can view the value of units.5. Press [Reset] to clear the current input Field.6. To exit the conversion function, press the [Back] key.World time Menu 7.#The World time provides time information on major cities worldwide.1. You can select a desired city as a base using the left soft key Options → Add city → Press the left soft key [Map].2. You can Change the city using the left soft key Options → Change city or Change current city.3. You can apply to Daylight Saving time using the left soft key Options → Daylight saving.4. You can Select the Analog clock mode Options → Analog clock.Organiser & Tools](https://usermanual.wiki/LG-Electronics-USA/KF310/User-Guide-922725-Page-74.png)
![85Contacts [Menu 8]Co nt act sAdd new Menu 8.1You can register a new contact address. You can enter the name, different phone numbers and Email addresses of a new contact. You can also assign the contact to groups, include an image or avatar, assign a specific ringtone and even enter a memo for the contact. Other available fields include Home page URL, Home address, Company name, Job title and company address. You can enter and manage contact addresses depending on the memory usage.Contacts list Menu 8.2Performs the contact address search function. The search operation is performed based on a first name as a default. The current search method and results found are displayed in the Search window. You can make a phone call or send a message to the selected phone number. A Contacts search can be performed based on the phone number or group information.Notev In Settings menu, the search operation can be performed based on the last name.](https://usermanual.wiki/LG-Electronics-USA/KF310/User-Guide-922725-Page-76.png)
![89Calls [Menu 9]CallsAll calls Menu 9.1Allows you to view the missed, received, and dialled call records. You can make a call, or send a message to the number you have selected from the records. You can also save the number in Contacts.Dialled calls Menu 9.2Allows you to view dialled call records, make a call, send a message, and save the number in Contacts.Received calls Menu 9.3Allows you to view received call records, make a call, send a message, and save the number in Contacts.Missed calls Menu 9.4Allows you to view missed call records, make a call, send a message, and save the number in Contacts.](https://usermanual.wiki/LG-Electronics-USA/KF310/User-Guide-922725-Page-80.png)
![90Video call [Menu *]Video callYou can make a video call using this menu.1. Enter the number you want to dial.v You can key in the number.v You can select the number from Search contacts using the left soft key [Options]2. Press the centre key [Video call] to make a video call.During a video callWhen you are in a video call, the screen will show the contact's name and duration of call, contact's image, volume indicator, video control panel, and your image.You can access the following option menus by pressing the left soft key [Options].v Speaker on/off or Bluetooth talk/Handset talkv Hold/Resumev Capturev Camera in/outv View sender numberv Go to contactsv Go to messagesv End callv SettingsIncoming video callWhen a video call is received, the caller's information is displayed as following.v Picture/Animation: Displays picture ID, graphic image configured in Contacts, or default animation indicating the incoming call.v Caller's name and number: Shows incoming caller's number. If the number is stored in Contacts, displays the name of the contacts.](https://usermanual.wiki/LG-Electronics-USA/KF310/User-Guide-922725-Page-81.png)
![91Picture ID and animation setting is used in the order of Contacts, video file used in Group ringtone, and video file used in Profile.Also, sound can be set for the incoming video call. The sound setting is used in the order of Contacts, Group ringtone, and Profile.You can accept the incoming call by pressing the centre key [Accept]. Also you can accept the incoming call and show the private image by pressing the left soft key [Private].The incoming call ringing can be silenced by pressing the right soft key [Silent]. It can be also silenced by long press on on the left side of the phone.When ringing is silenced, press the right soft key [Reject] to reject the call.Video call](https://usermanual.wiki/LG-Electronics-USA/KF310/User-Guide-922725-Page-82.png)
![92Recently played Menu 0.1This menu shows the last 20 tracks that were played. And, if it starts to play, the menu "Now playing" will be displayed.You can activate media player on playing through Now playing menu.My music Menu 0.2All tracks (Menu 0.2.1)You can view all the music files stored in the phone/external memory.Artists (Menu 0.2.2)You can view and play music sorted by Artists.Albums (Menu 0.2.3)You can view and play music sorted by Albums.Genres (Menu 0.2.4)You can view and play music sorted by Genres.Playlists (Menu 0.2.5)You can create your own playlists by choosing tracks from the All tracks menu list.Shue tracks (Menu 0.2.6)If you want to play the music continuously and randomly, select this option.Music [Menu 0]Music](https://usermanual.wiki/LG-Electronics-USA/KF310/User-Guide-922725-Page-83.png)
![94Settings [Menu #]SettingsProfiles Menu #.1You can select ringtone or vibration for an incoming call and configure the sound and volume of the ringtone, key tone, and sound effect, according to a profile. The profiles provided include [Normal], [Silent], [Outdoor], [Flight mode], [Customised 1], [Customised 2], and [Customised 3]. Select a profile, and press O to activate the profile. After pressing the left soft key [Options], select the Edit menu for the [Normal], [Outdoor], [Customised 1], [Customised 2] and [Customised 3] profile to change the configuration. A different list of options is available for each profile that has been selected for editing.v Alert byThis option determines the incoming call notification mode. You can select from [Ring], [Vibration], [Silent], [Ring & vibration], [Ring after vibration], [Max Ring & Vibration].v Voice ringtoneYou can select the ringtone for incoming voice calls.v Video ringtone You can select the ringtone for incoming video calls.v VolumeSet the ringtone volume.v Message alertYou can set how often the phone is to inform you of a received message until it is read.](https://usermanual.wiki/LG-Electronics-USA/KF310/User-Guide-922725-Page-85.png)
![102v Clock font colour: You can select the colour of displaying the clock.Start up pictureYou can select the image to be displayed while the phone is being switched on.Power o pictureYou can select the image to be displayed while the phone is being switched off.Menu style (Menu #.3.2)You can select the desired menu style from Grid style and List style.Font (Menu #.3.3)You can set the font style, dialling font size, and dialling font colour using l / r.Backlight (Menu #.3.4)You can set the backlight duration and the brightness on the Home screen and the duration on the Keypad individually.Handset theme (Menu #.3.5)Select the desired handset theme from White and Black."Welcome message (Menu #.3.6)After selecting On, you can write a welcome message.Call settings Menu #.4Call durations (Menu #.4.1)You can view call time by types. Press the left soft key [Options] to choose either partial initialisation or entire initialisation. Initialization will require your Security code.SettingsSettings](https://usermanual.wiki/LG-Electronics-USA/KF310/User-Guide-922725-Page-93.png)
![106Data volume (Menu #.4.4)Allows you to check the sent, received and all data volume transferred.Press the left soft key [Clear all] to choose entire initialization. You can also use the [Clear] for the initialization of the selected volume type. Initialization will require your Security code.Call costs (Menu #.4.5)1. This function displays the call costs of the Last call and All calls.2. To initialise, press the centre key [Edit] and enter the PIN2 code.3. You can select either Units or Currency in Set call cost. According to your setting, the call cost is displayed during a call (If USIM and Network support Advice Of Charge(AOC)).4. In the Set limit configuration, select On to configure the cost limit. When a cost limit is configured, and the call costs reach the limit, making a call will not be allowed.Diverts (Menu #.4.6)Call divert menus for voice and video calls are provided.If you press O, you can activate call divert menu.Voice callsAll voice callsWhen busyNo answerNot reachableSettingsSettings](https://usermanual.wiki/LG-Electronics-USA/KF310/User-Guide-922725-Page-97.png)
![1071. When the number list is not exsistedConverts to an editor for entering a divert number. You can input the number to divert a call directly or search it in phonebook. If you press [Divert], the phone will send the request to service provider after entering the number. While waiting for the result from the network, a Requesting message and animation appears.2. When the number list is exsistedDisplays To other number menu including of the number list. While waiting for the result from the network, a Requesting message and animation appears.3. Option menuAfter activating All voice calls menu, selecting the Options menu at the bottom of the menus displays the Deactivate, Deactivate all, View status and clear list menus.The View status menu shows the settings on the network. If you select this menu, Requesting. message and animation appear. Then the network settings are displayed when the information is received from the network. If you select the Deactivate menu, the call divert numbers registered in the network are deleted after user confirmation. Clear list menu will delete all divert number list.Settings](https://usermanual.wiki/LG-Electronics-USA/KF310/User-Guide-922725-Page-98.png)
![108Video callsAll video calls1. When the number list is not exsistedConverts to an editor for entering a divert number. You can input the number to divert a call directly or search it in phonebook. If you press O [Divert], the phone will send the request to service provider after entering the number. While waiting for the result from the network, a Requesting message and animation appears.2. When the number list is exsistedDisplays To other number menu including of the number list. While waiting for the result from the network, a Requesting message and animation appears.3. Option menuAfter activating the All video calls menu, selecting the Options menu at the bottom of the menus displaysthe Deactivate, Deactivate all, View status and clear list menus. If you select the Deactivate menu, the call divert numbers registered in the network are deleted after user confirmation. Selecting the Cancel all menu will display the operation result after showing the Requesting message and animation. Clear list menu will delete all divert number list.When busy1. When the number list is not exsistedIt operates the same as All voice calls menu.SettingsSettings](https://usermanual.wiki/LG-Electronics-USA/KF310/User-Guide-922725-Page-99.png)

![114- My device visitility: Set [My handset’s visibility] to [Show to all] so that other devices can detect your phone when they are searching for a Bluetooth device. If you select [Hidden], other devices will not be able to detect your phone when they are searching for a Bluetooth device.- My device name: You can name or rename your phone as it will appear on other devices. Your phone's name will be shown on other devices only when [My handset’s visibility] is set to [Show to all].- Supported services: You can view the list of devices sich as hedsets and handsfree kits supported by this Bluetooth enabled phone.- My address: You can check the address of Bluetooth.Notev When user uses Bluetooth Device in the handset, the security of the handset is at risk. Therefore, we recommend that Bluetooth visibility be set to Hidden after configuration or device pairing. For incoming files via Bluetooth regardless of paired devices, you can choose to accept or reject the connection, after checking the sender details.3. Search and pair new device<Searching new device>You can search new device as following menu.• Menu → #. Settings → 7. Connectivity → 1. Bluetooth → 2. Search new deviceSettingsSettings](https://usermanual.wiki/LG-Electronics-USA/KF310/User-Guide-922725-Page-105.png)

![117<Deleting devices>1. Select a device to delete from the Paired devices screen.2. You can delete a device by pressing the Delete key or by selecting Options → Delete. To delete all paired devices, select Options → Delete All.<Transmitting data using Bluetooth>1. To transmit data from your phone to another Bluetooth device, first select the application where the target data is saved. For example, to send data in the My Files to another device, select Menu → 6. My Files → 1. Pictures / 2. Sounds / 3. Videos/ 5. Bluetooth data / 6. Other files / 7. External memory → Select data to transmit → Send → 3. Bluetooth2. Transmitting data1) Paired device found is displayed. If the desired device does not exist in the list, select [Refresh].2) Select the device to which you want to transmit data from the devices on the screen and press O.3) If the other party selects [Yes] for [Connection request], the data is transmitted.Settings](https://usermanual.wiki/LG-Electronics-USA/KF310/User-Guide-922725-Page-108.png)
![122Access points (Menu #.7.6)This menu shows the access point list. You can create new profiles, delete or edit them by using the Option Menu. However, you cannot delete or edit default configurations depending on country variant.You can edit the following configuration items by pressing the left soft key [Option] and Edit.Access title Connection ss Point profile name.Bearer Choose the bearer from the list. (Default is UMTS.)Authentica tionChoose the authentication from the list. (Default is No auth)APN APN name to access network. Information provided by service provider.v Press confirm key to save any configuration changes.Packet Data Conn. (Menu #.7.7)If you select 'When available' menu, the phone is automatically registered to a GPRS network when you switch the phone on. But you select "When needed", the GPRS connection is established when you connect a WAP or application service and closed when you end the WAP or applicaion connection.Browser settings (Menu #.7.8)ProlesSelect the appropriate profile by pressing O. This will activate the profile to initiate browser launch.Appearance settings- Character encodingSets the browser default character set to one of the following.SettingsSettings](https://usermanual.wiki/LG-Electronics-USA/KF310/User-Guide-922725-Page-113.png)
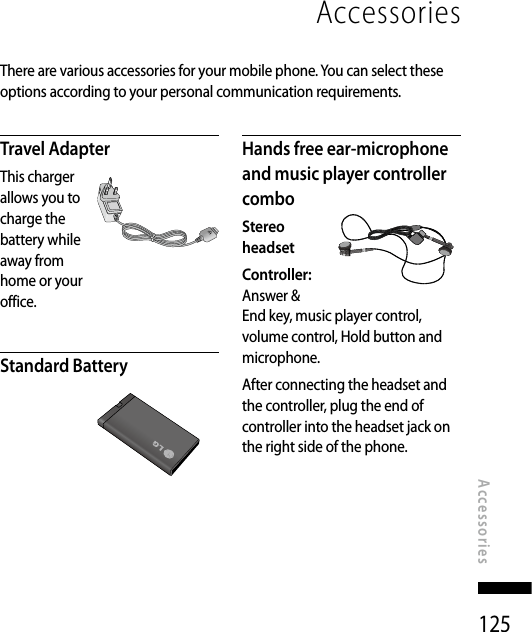
![1262. Press the O [Save] to save any configuration changes.You can edit and delete a profile by selecting Edit and Delete from the Options menu.Notev Always use genuine LG accessories.v Failure to do so may invalidate your warranty.v Accessories may vary in different regions: please check with our regional service company or agent for further information.AccessoriesAccessories](https://usermanual.wiki/LG-Electronics-USA/KF310/User-Guide-922725-Page-117.png)