LG Electronics USA KF700 PCS GSM/ EDGE Phone with Bluetooth User Manual KF700 UK 080116 indd
LG Electronics USA PCS GSM/ EDGE Phone with Bluetooth KF700 UK 080116 indd
UserManual.wiki
>
LG Electronics USA
>
KF700 User Manual
>
Users Manual 2
Contents
1.
Users Manual 1
2.
Users Manual 2
Users Manual 2
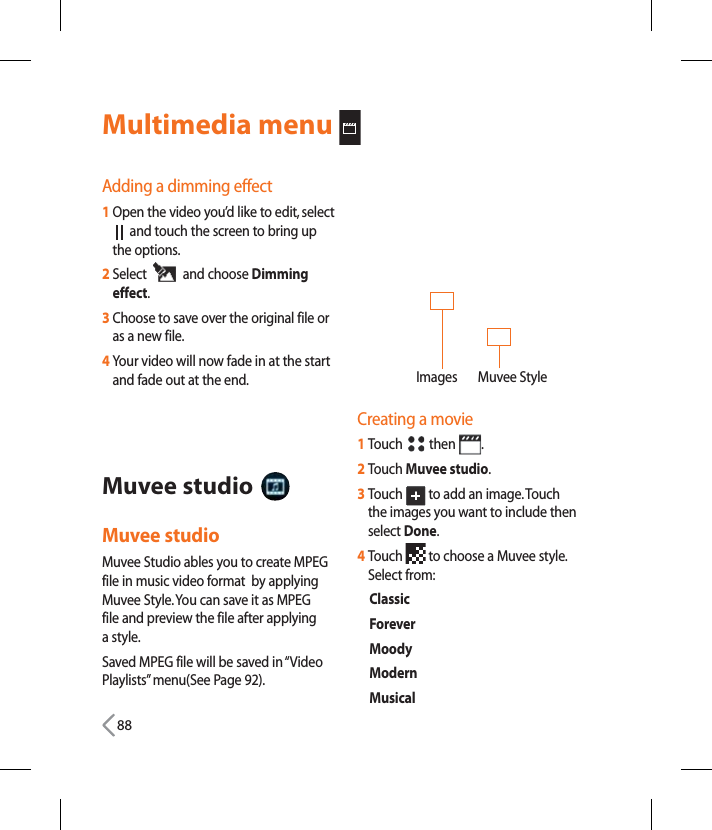
Navigation menu
Upload a User Manual
Namespaces
Wiki Guide
HTML
PDF
Info
Views
User Manual
Discussion / Help
Navigation
![43Create new message Sending a messageYou can write and edit text message, checking the number of message pages.1. To make text input easier, use T9.2. If you tap icon, you can view submenus as follow:ß Insert: You can insert images, video, sounds, symbols, template, emoticon, name & number, new slide or subject.ß Save to drafts: You can save the message in drafts.ß Input method: Select the desired dictionary mode.ß Writing language: You can select the language.ß Add to dictionary: You can add a word to the dictionary. EmailTo send an email, you should first set up an email account (For further details on how to set up an email account, see the page 45).Message edit1. Select Email from the Create new Message menu.2. You can input up to 20 addresses in the To, Cc fields and up to 10 addresses in the Bcc field.3. Input the title of the mail to be sent in the Subject field.4. Input the content of the mail to be sent in the Message field.5. You can attach up to 10 files in a message.6. When you have finished writing a message, select the [send].You can send the message to outbox for Background sending.](https://usermanual.wiki/LG-Electronics-USA/KF700.Users-Manual-2/User-Guide-913853-Page-2.png)
![44 InboxYou will be alerted when you have received messages. They will be stored in the Inbox.In the Inbox, you can identify each message by icons.If the phone shows ‘No space for USIM message’, you have to delete some messages from the Inbox. If the phone displays ‘No space for message’, you can make space of each repository by deleting messages, media and applications.* USIM messageUSIM message means the message exceptionally stored in USIM card. You can move this message to the phone.For notified multimedia message, you have to wait for downloading and processing of the message.To read a message, select one of the messages by tapping the [View] icon.ß Reply to: You can reply to the sender.ß Forward: You can forward the selected message to another party.ß Make voice call: You can make a voice call.ß Make video call: You can make a video call.ß Delete: You can delete the current message.ß Creat new message: You can write a new message or an email.ß Copy: In case of SMS, you can copy the message into handset or USIM.ß Move: In case of SMS, you can move the message into handset or USIM.ß Filter: Displays messages by desired message types.ß Mark/Unmark: You can select one or more messages for multiple deletion.ß Message information: You can view information about received messages.Call menu](https://usermanual.wiki/LG-Electronics-USA/KF700.Users-Manual-2/User-Guide-913853-Page-3.png)
![46ß View to address: Shows the email addresses of the recipients and reference (Cc).ß Message information: Brief information on the message including size, type, date, time and filenames.DraftsUsing this menu, you can preset up to five multimedia messages that you use most frequently. This menu shows the preset multimedia message list.The following options are available.ß Send: You can send the selected message.ß Delete: Deletes the message you choose.ß Create new message: You can write a new message or an email.ß Mark/Unmark: You can select one or more messages for multiple deletion.ß Filter: Displays messages by desired message types.ß Message information: To view the information of the message.OutboxThe Outbox is a temporary storage place for messages waiting to be sent. Failed messages are also placed in Outbox. For example, Emails will be placed in Outbox if the Email account is not correctly configured.Tap the icon, you can view submenus as follow:[For sending / waiting messages]ß Create new message: You can write a new message or an Email.ß Cancel sending: You can stop sending/waiting status.ß Message information: You can check the message type, date and time and where it’s saved.[For failed message]ß Resend: Resends the selected message.Call menu](https://usermanual.wiki/LG-Electronics-USA/KF700.Users-Manual-2/User-Guide-913853-Page-5.png)
![47ß Delete: Deletes the current message.ß Save to drafts: You can move the selected message to Drafts.ß Create new message: You can write a new message or an Email.ß Message information: You can check the message type, date and time and where it’s saved.Sent itemsThis menu allows you to view the messages which are already sent. You can check the time and the contents of message.Templates Text templateYou can add, edit, and delete frequently used useful phrases using the left soft key [Options].TIP! Depending on your service provider, useful phrases are saved as a default. Multimedia templatesYou can create, edit and view available templates when creating multimedia messages. Five types of template (Birthday, Greeting, Holiday, Thanks, Sorry) are saved by default.The following options are available.ß Add new: You can create a new multimedia template.ß Write multimedia message: Creates a multimedia message with the selected template.ß Edit: Edits the selected template.ß Delete: Deletes the selected template. (Not available for default five templates)ß Delete all: Deletes all created templates. (Not available for default five templates)](https://usermanual.wiki/LG-Electronics-USA/KF700.Users-Manual-2/User-Guide-913853-Page-6.png)
![50Validity periodThis menu allows you to configure the term of validity for a message when transmitting a Multimedia message. The message will be saved in the Multimedia server only for the configured term.Slide durationThis menu allows you to configure the duration of each page when writing the message.Creation modeAllows you to configure the message mode.Delivery timeConfigures the delivery time of message to the recipient. The Multimedia message centre will deliver the message after the delivery time.Multi msg centreAllows you to configure network information such as the MMSC and the WAP gateway, to send a multimedia message.Using the left soft key [Options], you can activate, add or delete a profile. A profile name selected by a checkmark is the currently configured value. You can view and edit the contents of the profile in edit mode by pressing the right soft key [Edit]. The edit screen also appears when creating a new profile under Options. The meaning of each item is given below.ß Title: Profile name.ß MMSC URL: Enter the multimedia message centre URL.ß MMS Proxy: Enter the WAP gateway address and port number.ß Connection mode: Select one of the connection mode. (TCP with Proxy, TCP without Proxy, UDP)ß Access point: Specify the access point name. (see WAP connection settings.)Tap the [Save] icon to save the changes and complete Multimedia msg. centre setting.Call menu](https://usermanual.wiki/LG-Electronics-USA/KF700.Users-Manual-2/User-Guide-913853-Page-9.png)
![51 EmailYou can configure settings for receiving and transmitting emails.1. Email accounts: You can create or configure an email account including the email server and user ID. You can edit a selected email account by tapping the icon and select the [Edit].Tap the icon, you can view submenus as follow:ß Add new: Create a new email account.ß Edit: To edit the selected email account.ß View: You can see the Email.Creating a new email account1. Select Add new from the Email account menu options.2. The following items need to be configured. Title - Enter a name for this account. My name - Enter your name. Username - Enter the account’s username. Password - Enter the account’s password. Email address - Enter the account’s email address. Reply email address - Enter the ‘reply to’ email address. Outgoing mail server - Enter the account’s details. Incoming mail server - Enter the account’s details. Maximum receive size - Choose the size limit of your emails, the maximum is 1MB.Mailbox type - Enter the mailbox type, POP3 or IMAP4. Save to server - Choose whether to save your emails to the server. For IMAP4 accounts copies are always saved. Save sent mail into - Choose where to save your IMAP4 emails. For POP3 accounts copies are always saved on the phone.](https://usermanual.wiki/LG-Electronics-USA/KF700.Users-Manual-2/User-Guide-913853-Page-10.png)
![52 Access point - Choose your Internet access point. Press to use a preset access point. Auto retrieve - Choose whether to fetch your new emails automatically. Advanced settings - Choose whether to use the advanced settings. SMTP port number - Normally, this will be 25. Incoming server port - Normally, this is 110 for POP3 accounts and 143 for IMAP4 accounts. SMTP authentication - Choose the security settings for the outgoing mail server. SMTP username - Enter the SMTP username. SMTP password - Enter the SMTP password. APOP secure login - Choose to activate APOP secure login for a POP3 account. IMAP4 accounts are always set to off.3. Tap the [Save] icon to complete the email account configuration.Editing an email account1. Select a desired email account from the email account list and tap the icon and select the [Edit].2. You can edit desired fields by moving the cursor up and down.3. When configuration is complete, Tap the [Save] icon to complete the email account configuration.TIP! When you try to change the mailbox type, all emails downloaded before would be deleted.2. Allow reply Email: Determines whether to allow sending a read confirmation mail for a read confirmation mail request.3. Request reply Email: Determines whether to request a read confirmation mail.4. Retrieve interval: You can select the auto receiving time slot to Off, 15 minutes, 30 minmutes, 1 hour, 2 hours, 4 hours or 8 hours.Call menu](https://usermanual.wiki/LG-Electronics-USA/KF700.Users-Manual-2/User-Guide-913853-Page-11.png)


![99 Saving a page1 Access your required webpage as described above.2 Touch and select Save this page.3 Enter a name for the webpage so you can easily recognise it.4 Touch Save.TIP! This menu will also allow you to edit titles of saved pages, protect or unprotect the screen memo, and delete saved pages. Accessing a saved page1 From the standby screen select , then touch and choose Browser. 2 Select Saved pages.3 Select the required page and touch , followed by Open. Viewing your browser history1 From the standby screen select , then touch and choose Browser.Select History.2 A list of web page titles you have accessed recently will be displayed. To access one of these pages, simply select the required page and touch Connect.Settings ProfilesSelect the appropriate profile by tapping the [Activate] icon. This will activate the profile to initiate browser launch. Character encodingSets the browser default character set to one of the following.: Automatic, English(ASCII), English(ISO), English(LATIN), Unicode(UCS2 BE), Unicode(UCS2 LE), Unicode(UCS2 Auto), Unicode(UTF-16 BE), Unicode(UTF-16 LE), Unicode(UTF-16 Auto), Unicode(UTF-8).](https://usermanual.wiki/LG-Electronics-USA/KF700.Users-Manual-2/User-Guide-913853-Page-58.png)

![117Connectivity Network settingsSelect networkß Automatic: This function automatically searches for the network and registers the handset to the network.ß Manual: This function enables you to search the network list and specify which network to attempt registration with.Location modeYou may have multiple data connections active at the same time when you are using your phone in Automatic, 3G only, 3G/GSM and GSM1900 networks.Preferred listsIf the network is searching automatically, you can add a preferable network to be connected to. And the following options are available.ß Add new: You can add a new network using the followings.- Search: You can select one from the network list stored in the phone.- Enter new network: You can enter the country code (MCC) and the network code (MNC) to add. After setting, tap the [OK] icon.ß Edit: You can modify the information of the selected network.ß Delete: Deletes the selected network.ß Move up: Moves the selected network upward.ß Move down: Moves the selected network downward. Access pointsThis menu shows the access point list. You can create new profiles, delete or edit them by using the Option Menu. However, you cannot delete or edit default configurations depending on country variant.You can edit the follwing configuration items by using the .](https://usermanual.wiki/LG-Electronics-USA/KF700.Users-Manual-2/User-Guide-913853-Page-76.png)
![118Connection title - Access Point profile name.Bearer - Choose the bearer from the list. (Default is UMTS.)Authentication - Choose the authentication from the list. (Default is No auth)User name - Information provided by service provider.Password - Information provided by service provider.APN - APN name to access network. Information provided by service provider.ß Tap [Save] to save any configuration changes. USB connection modeYou can choose one mode of Data service and Mass storage.When you have finished using the phone memory, take the following steps.You can use PictBridge printer in Data service modeCaution! Before you remove the cable, it is necessary to keep the following steps. Or, the integrity of transferred data is not guaranteed.1. Click on the notification area.[Unplug or Eject Hardware]2. Select USB Mass Storage Device, click on Stop.The following message will appear: “The ‘USB Mass Storage Device’ device can now be safely removed from the system” 3. Then remove the cable.TIP! When you save a PC file into the mass storage, the filename must consist of up to 62 characters and 255 characters or less including the path of directory may be displayed on your phone.Setting menu](https://usermanual.wiki/LG-Electronics-USA/KF700.Users-Manual-2/User-Guide-913853-Page-77.png)