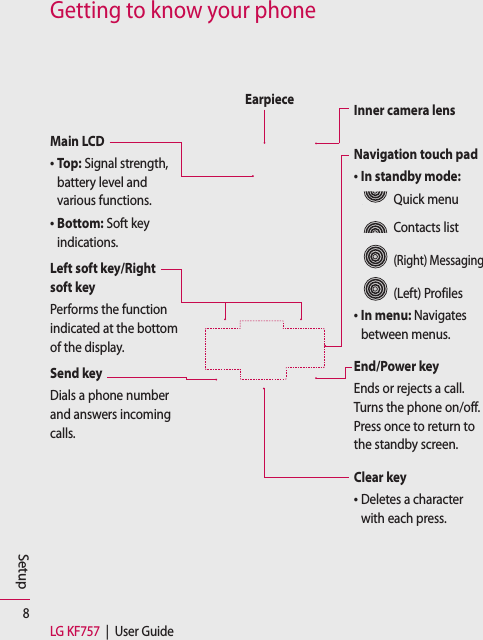
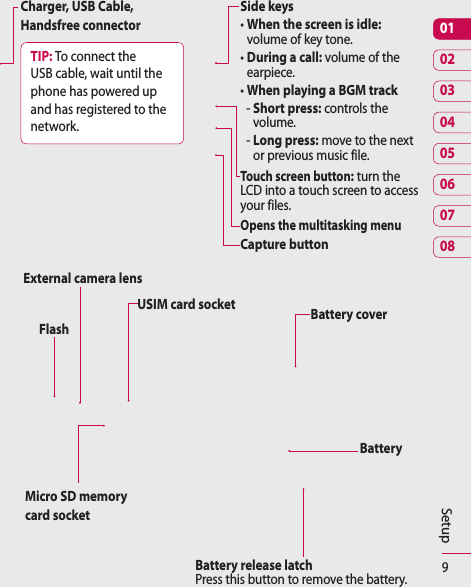
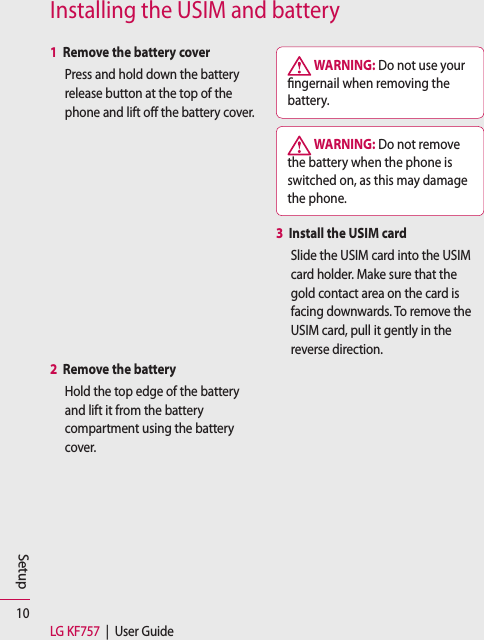
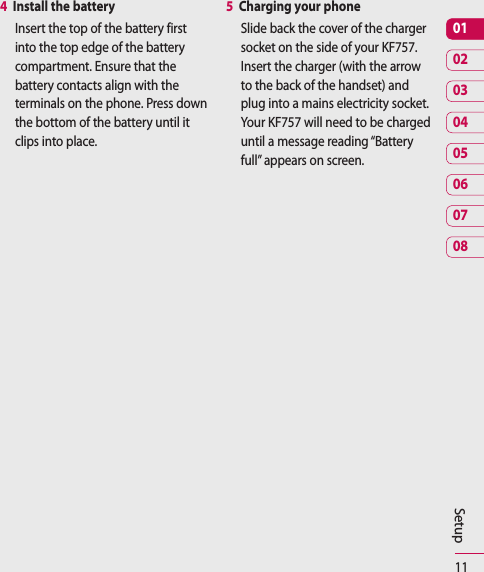
LG Electronics USA KF757 PCS GSM/ EDGE Phone with Bluetooth User Manual 1

LG Electronics USA PCS GSM/ EDGE Phone with Bluetooth Users Manual 1

Contents

Users Manual 1

Part 15.21 statement " Change or Modifications that are not expressly approved by the manufacturer could void     the user's authority to operate the equipment. "   Part 15.105 statement This equipment has been tested and found to comply with the limits for a class B digital device,pursuant to Part 15 of the FCC Rules.These limits are designed to provide reasonable protection against harmful interference in a residential installation. This equipment generates uses and can radiate radio frequency energy and, if not installed and usedin accordance with the instructions, may cause harmful interference to radio communications. However, there is no guarantee that interference will not occur in a particular installation. if this equipment does cause harmful interference or television reception, which can be determined by turning the equipment off and on, the user is encouraged to try to correct the interference by one or more of the following measures:- Reorient or relocate the receiving antenna.- Increase the separation between the equipment and receiver.- Connect the equipment into an outlet on a circuit different from that to   which the receiver is connected- Consult the dealer or an experienced radio/TV technician for help.
LIMITED WARRANTY STATEMENT  1. WHAT THIS WARRANTY COVERS: LG offers you a limited warranty that the enclosed subscriber unit and its enclosed accessories will be free from defects in material and workmanship, according to the following terms and conditions: (1) The limited warranty for the product extends for ONE (1) year beginning on the data of purchase of the product. (2) The limited warranty extends on to the original purchaser of the product and is not assignable or transferable to any subsequent purchaser/end user. (3) This warranty is good only to the original purchaser of the product during the warranty period as long as it is in the U.S., including Alaska, Hawaii, U.S. Territories and Canada. (4) The external housing and cosmetic parts shall not be covered under these limited warranty terms. (5) Upon request from LG, the consumer must provide information to reasonably prove the date of purchase. (6) The customer shall bear the cost of shipping the product to the Customer Service Department of LG. LG shall bear the cost of shipping the product back to the consumer after the completion of service under this limited warranty.  2. WHAT THIS WARRANTY DOES NOT COVER: (1) Defects or damages resulting from use of the product in other than its normal and customary manner. (2) Defects or damages from abnormal use, abnormal conditions, improper storage, exposure to moisture or dampness, unauthorized modifications, unauthorized connections, unauthorized repair, misuse, neglect, abuse, accident, alteration, improper installation, or other acts which are not the fault of LG, including damage caused by shipping blown fuses spills of food or liquid. (3) Breakage or damage to antennas unless caused directly by defects in material or workmanship. (4) That the Customer Service Department at LG was net notified by consumer of the alleged defect or malfunction of the product during the applicable limited warranty period. (5) Products which have had the serial number removed or made illegible. (6) The limited warranty is in lieu of all other warranties, express or implied either in fact or by operations law, statutory or otherwise, including, but limited to any implied warranty of marketability or fitness for a particular use. (7) Damage resulting from use of non-LG approved accessories. (8) All plastic surfaces and all other externally exposed parts that are scratched or damaged due to normal customer use. (9) Products operated outside published maximum ratings. 3 (10) Products used or obtained in a rental program. (11) Consumables (such as fuses).  3. STATE LAW RIGHTS: No other express warranty is applicable to this product. THE DURATION OF ANY IMPLIED WARRANTIES, INCLUDING THE IMPLIED WARRANTY OF MARKETABILITY, IS LIMITED TO THE DURATION OF THE EXPRESS WARRANTY HEREIN. LG INFOCOMM INC. SHALL NOT BE LIABLE FOR THE LOSS OF THE USE OF THE PRODUCT, INCONVENIENCE, LOSS OR ANY OTHER DAMAGES, DIRECT OR CONSEQUENTIAL, RISING OUT OF THE USE OF, OR INABILITY TO USE, THIS PRODUCT OR FOR ANY BREACH OF ANY EXPRESS OR IMPLIED WARRANTY, INCLUDING THE IMPLIED WARRANTY OF MARKETABILITY APPLICABLE TO THIS PRODUCT. Some states do not allow the exclusive of imitation of incidental or consequential damages or limitations on how long an implied warranty lasts; so these limitations or exclusions may not apply to you. This warranty gives you specific legal rights and you may also have other rights which vary from state to state. 4. HOW TO GET WARRANTY SERVICE: To obtain warranty service, please call the following web address: www.lgeservice.com
8For Your SafetyImportant InformationThis user guide contains important information on the use andoperation of this phone. Please read all the informationcarefully for optimal performance and to prevent any damageto or misuse of the phone. Any changes or modifications notexpressly approved in this user guide could void your warrantyfor this equipment.Before You StartSafety InstructionsWARNING! To reduce the possibility of electric shock, do notexpose your phone to high humidity areas, such as thebathroom, swimming pool, etc.Always store your phone away from heat. Never store yourphone in settings that may expose it to temperatures less than32°F or greater than 104°F, such as outside during extremeweather conditions or in your car on a hot day. Exposure toexcessive cold or heat will result in malfunction, damageand/or catastrophic failure.Be careful when using your phone near other electronicdevices. RF emissions from your mobile phone may affectnearby in adequately shielded electronic equipment. Youshould consult with manufacturers of any personal medicaldevices such as pacemakers and hearing aides to determine ifthey are susceptible to interference from your mobile phone.Turn off your phone in a medical facility or at a gas station.Never place your phone in a microwave oven as this willcause the battery to explode.IMPORTANT! Please read the TIA SAFETY INFORMATION onpage 78 before using your phone.Safety InformationRead these simple guidelines. Breaking the rules may bedangerous or illegal. Further detailed information is given in thisuser guide.]Never use an unapproved battery since this could damagethe phone and/or battery and could cause the battery toexplode.]Never place your phone in a microwave oven as it willcause the battery to explode.]Do not dispose of your battery by fire or with hazardous orflammable materials.]Make sure that no sharp-edged items come into contactwith the battery. There is a risk of this causing a fire.]Store the battery in a place out of reach of children.]Be careful that children do not swallow any parts such asrubber plugs (earphone, connection parts of the phone,etc.). This could cause asphyxiation or suffocation.
9For Your Safety]Unplug the power cord and charger during lightning stormsto avoid electric shock or fire.]When riding in a car, do not leave your phone or set up thehands-free kit near to the air bag. If wireless equipment isimproperly installed and the air bag is activated, you may beseriously injured.]Do not use a hand-held phone while driving.]Do not use the phone in areas where its use is prohibited.(For example: aircraft).]Do not expose the battery charger or adapter to directsunlight or use it in places with high humidity, such as abathroom.]Never store your phone in temperatures less than- 4°F orgreater than 122°F.]Do not use harsh chemicals (such as alcohol, benzene,thinners, etc.) or detergents to clean your phone. There is arisk of this causing a fire.]Do not drop, strike, or shake your phone severely. Suchactions may harm the internal circuit boards of the phone.]Do not use your phone in high explosive areas as the phonemay generate sparks.]Do not damage the power cord by bending, twisting, pulling,or heating. Do not use the plug if it is loose as it may causea fire or electric shock.]Do not place any heavy items on the power cord. Do notallow the power cord to be crimped as it may cause fire orelectric shock.]Do not handle the phone with wet hands while it is beingcharged. It may cause an electric shock or seriouslydamage your phone.]Do not disassemble the phone.]Do not place or answer calls while charging the phone as itmay short-circuit the phone and/or cause electric shock orfire.]Only use the batteries, antennas, and chargers provided byLG. The warranty will not be applied to products provided byother suppliers.]Only authorized personnel should service the phone and itsaccessories. Faulty installation or service may result inaccidents and consequently invalidate the warranty.]Do not hold or let the antenna come in contact with yourbody during a call.]An emergency call can be made only within a service area.For an emergency call, make sure that you are within aservice area and that the phone is turned on.
10For Your SafetyFCC RF Exposure InformationWARNING! Read this information before operating the phone.In August 1996, the Federal Communications (FCC) of he UnitedStates, with its action in Report and Order FCC 96-326, adoptedan updated safety standard for human exposure to radiofrequency (RF) electromagnetic energy emitted by FCCregulated transmitters. Those guidelines are consistent withthe safety standard previously set by both U.S. andinternational standards bodies.The design of this phone complies with the FCC guidelines andthese international standards.CAUTIONUse only the supplied and approved antenna. Use ofunauthorized antennas or modifications could impair callquality, damage the phone, void your warranty and/or result inviolation of FCC regulations. Do not use the phone with adamaged antenna. If a damaged antenna comes into contactwith skin, a minor burn may result. Contact your local dealerfor a replacement antenna.Body-worn OperationThis device was tested for typical body-worn operations withthe back of the phone kept 0.79 inches (2cm) between theuser’s body and the back of the phone. To comply with FCC RFexposure requirements, a minimum separation distance of 0.79inches(2cm) must be maintained between the user's bodyand the back of the phone. Third-party belt-clips, holsters, andsimilar accessories containing metallic components should notbe used. Body-worn accessories that cannot maintain 0.79inches(2cm) separation distance between the user's bodyand the back of the phone, and have not been tested for typicalbody-worn operations may not comply with FCC RF exposurelimits and should be avoided.
11For Your SafetyVehicle Mounted External Antenna(optional, if available)A minimum separation distance of 8 inches (20cm) must bemaintained between the user/bystander and the vehiclemounted external antenna to satisfy FCC RF exposurerequirements. For more information about RF exposure, visitthe FCC website at www.fcc.govFCC Part 15 Class B ComplianceThis device and its accessories comply with part 15 of FCCrules. Operation is subject to the following two conditions: (1) This device and its accessories may not cause harmfulinterference, and (2) this device and its accessories mustaccept any interference received, including interference thatmay cause undesired operation.Cautions for Battery]Do not disassemble.]Do not short-circuit.]Do not expose to high temperature: 60°C (140°F).]]Do not incinerate.Battery Disposal]Please dispose of your battery properly or bring to yourlocal wireless carrier for recycling.]Do not dispose in fire or with hazardous or flammablematerials.Adapter (Charger) Cautions]Using the wrong battery charger could damage your phoneand void your warranty.]The adapter or battery charger is intended for indoor useonly.Do not expose the adapter or battery charger to direct sunlightor use it in places with high humidity, such as the bathroom.
8LG KF757  |  User GuideSetupGetting to know your phoneMain LCD•  Top: Signal strength, battery level and various functions.•  Bottom: Soft key indications.Left soft key/Right soft keyPerforms the function indicated at the bottom of the display.Send keyDials a phone number and answers incoming calls.Inner camera lensNavigation touch pad•  In standby mode: Quick menu Contacts list (Right) Messaging (Left) Profiles•  In menu: Navigates between menus.End/Power keyEnds or rejects a call. Turns the phone on/off. Press once to return to the standby screen.Clear key•  Deletes a character with each press.Earpiece
90102030405060708SetupCharger, USB Cable, Handsfree connectorTIP: To connect the USB cable, wait until the phone has powered up and has registered to the network.Side keys•  When the screen is idle: volume of key tone.•  During a call: volume of the earpiece.•  When playing a BGM track-  Short press: controls the volume.-  Long press: move to the next or previous music file.Touch screen button: turn the LCD into a touch screen to access your files.Opens the multitasking menuCapture buttonBattery coverBatteryUSIM card socketExternal camera lensFlashMicro SD memory card socketBattery release latchPress this button to remove the battery.
10LG KF757  |  User GuideSetupInstalling the USIM and battery1  Remove the battery coverPress and hold down the battery release button at the top of the phone and lift off the battery cover.2  Remove the batteryHold the top edge of the battery and lift it from the battery compartment using the battery cover. WARNING: Do not use your ngernail when removing the battery. WARNING: Do not remove the battery when the phone is switched on, as this may damage the phone.3   Install the USIM cardSlide the USIM card into the USIM card holder. Make sure that the gold contact area on the card is facing downwards. To remove the USIM card, pull it gently in the reverse direction.
110102030405060708Setup4  Install the batteryInsert the top of the battery first into the top edge of the battery compartment. Ensure that the battery contacts align with the terminals on the phone. Press down the bottom of the battery until it clips into place.5  Charging your phoneSlide back the cover of the charger socket on the side of your KF757. Insert the charger (with the arrow to the back of the handset) and plug into a mains electricity socket. Your KF757 will need to be charged until a message reading “Battery full” appears on screen.
12LG KF757  |  User GuideSetupMemory cardInstalling a memory cardYou can expand the memory available on your phone using a memory card. The KF757 will support up to a 4GB memory card. TIP: A memory card is an optional accessory.1   Remove the battery cover as before.2   Lift the memory card cover and insert a micro SD card with the gold contact area facing downwards. Close the memory card cover so that it clicks shut.3   Replace the battery cover.Formatting the memory cardIf your memory card is already formatted, you can begin using it straight away. If your card isn’t formatted, you will need to do so.1   From the standby screen press  then select Settings.2   Select Memory manager then choose External memory. 3   Select Format and then confirm your choice.4   Enter the password, if one is set, and your card will be formatted and ready to use.TIP! To change your default storage destination, open Memory manager from the Phone settings menu and select Primary storage settings.NOTE: If your memory card has existing content it will automatically be filed in the correct folder, for example, videos will be stored in the My Videos folder.
130102030405060708Setup
14LG KF757  |  User GuideSetupMenu mapGames & apps1  M-Toy2   My games & apps3   SettingsCalling1  Make video call2   Call logs3   Call durations4  Data volume5  Call costs6  Call divert7  Call barring8  Fixed dial numbers9  Call waiting0  Common settings*  Video call settingsOrganiser1  Calendar2  To do3  Memo4  Secret memo5  Date finder6  SettingsMultimedia1  Touch media2  Camera3  Video camera4  Music5  FM radio6   Voice recorder7  Media editor8  Movie makerMessaging1   Create new message2   Inbox3  Mailbox4  Drafts5  Outbox6  Sent items7   My folders8  Templates9  Emoticons0  SettingsMy stuff1  My images2   My sounds3  My videos4   Games & Apps5  Flash contents6  Documents7   Others8  My memory card
150102030405060708SetupYahoo!1 oneSearchContacts1  Add new2  Search3  Speed dials4  Groups5   Service dial numbers6  Own number7  My business card8  SettingsTools1  Quick menu2  Alarms3  Calculator4  Stopwatch5   Converter6  World time7  SIM serviceBrowser1  Home2  Enter address3  Bookmarks4  RSS reader5   Saved pages6  History7  SettingsConnectivity1   Bluetooth2   Server sync3  USB connection mode4  TV out5  PIN for DivX connectionSettings1  Profiles2   Phone3  Screen4   Date & Time5  Network6  Internet profile7  Access points8   Packet data conn.9  Security0  Memory manager*  Streaming settings#  Reset settings
16LG KF757  |  User GuideYour standby screenYour standby screenWhenever your KF757 isn’t in use it will return to your standby screen. From here you can access menu options, make a quick call and change your profile - as well as many other things.Touch screen tipsIf you press the touch screen button on the right-hand side of the phone the screen will switch to an interactive touch screen keypad.Press and hold the touch screen button from the standby screen to enter a further multimedia menu.To select an item, touch the icon on the touch screen. Your KF757 will vibrate slightly when it recognises that you’ve touched an option.•   There’s no need to press too hard as the touchscreen is sensitive enough to pick up on a light touch.•   Use the tip of your finger to touch the option you require. Be careful not to touch any other keys.•   Don’t cover the phone with a case or cover, as the touch screen will not work with any material covering it.•   The touch pad below the screen can be used as a four way arrow pad to navigate you through the phone menus.TIP! Use the touch screen for fast and easy access to your music, Photo, M-Toy, Document and FM radio.Touch padNOTE: When the screen light goes off, you can press the camera key on the right hand side of the phone to restore the standby screen.
170102030405060708Your standby screenAdvice to the customerIn order to allow better antenna sensitivity LG suggest that you hold the handset as shown below.XPlease do not cover the antenna area with your hand during a call or when using a Bluetooth connection. It may reduce signal quality.The status barThe status bar indicates, using various icons, things like signal strength, new messages and battery life as well as telling you whether your Bluetooth or GPRS is active.Below is a table which explains the meaning of icons you’re likely to see in the status bar.Icon DescriptionMultitaskingNetwork signal strength (number of bars will vary)No network signalBattery emptyIcon DescriptionNew text messageNew emailAn alarm is setNormal profile in useSilent profile in useExternal memoryCalls are divertedGPRS availableEDGE in useRoamingBluetooth is activeCalls are rejected3G available
18LG KF757  |  User GuideThe basicsMaking a voice call1   Enter the number including the full area code.   To delete a digit press  . To delete all digits press and hold .2   Press   to make the call.3   Press   or close the handset to finish the call.Making a video callYou can make a video call in a 3G-covered service area if the user you are calling also has a 3G video phone in a 3G-covered service area. You can also receive video calls. To make a video call, do the following.1   Enter the phone number, as before.2   If you do not want to use the speakerphone, ensure you have the headset plugged in.3   To start the video function, press the left soft key Options and select Make video call. You will be notified that you will need to close other applications to make the video call.NOTE: The video call may take some time to connect. Please be patient. While the video call is connecting, you will see your own image; after the other party has answered, their image will be displayed on the screen.4   Adjust the camera position if necessary.5   Press   to finish the call, or close the handset.Making a voice/video call from ContactsIt’s easy to call anyone whose number you have stored in your Contacts.1   Press the down key on the navigation touch pad to access the contacts list.2   Scroll to the contact to make a call.3   Press   to make a voice call. Press the left soft key and select Make video call to make a video call.4   Press   to finish the call.Calls
190102030405060708The basicsMaking international calls1   Press and hold   for the international prefix. The ‘+’ character prefixes the international access code.2   Enter the country code, area code, and the phone number.3   Press  .Answering and rejecting a callWhen your phone rings press the  hard key to answer the call.Press Mute to mute the ringing. This is great if you’ve forgotten to change your profile to Silent for a meeting!Press the End key to reject the incoming call.Speed diallingYou can assign a frequently-called contact to a speed dial number.1   Press   and select Contacts.2   Select Speed dials.3   Your Voicemail is set to speed dial 1. Select any other number to assign it to a speed dial contact.4   Your address book will open. Select the contact you’d like to assign to that number.To call a speed dial number:  1   Press the assigned number then press the send key  , or .2    Press and hold the assigned number until the contact appears on screen.Making a second call1   During your initial call, press OK, then Options, and select Add new call.2   Dial the number or search your contacts (see page 18 for details on how to make a call from Contacts).3   Press   to connect the call.4   Both calls will be displayed on the call screen. Your initial call will be locked and the caller put on hold.5   Select Swap to change between the calls.6   To end one or both calls select Options ➝ End followed by All or Active.NOTE: You will be charged for each call you make.
20LG KF757  |  User GuideThe basicsCallsDTMF tonesDTMF allows you to use numerical commands to navigate menus within automated messages. DTMF is switched on as default.Viewing your call logsPress  , then select Calling ➝ Call logs.Choose to view:All calls - View a complete list of all of your dialled, received and missed calls.Dialled calls - View a list of all the numbers you have called.Received calls - View a list of all the numbers that have called you.Missed calls - View a list of all the calls you have missed.Press  , select Calling.From Calling you can also choose to view:Call durations - View the duration of all your sent and received calls.Data volume - View the amount in kilobytes of all your received and sent data.Call costs - View the charges applied to your dialled numbers (this service is network-dependant. Some operators are unable to support it).TIP! From any calls list, touch the left soft key and Clear all to delete all the recorded items.Using call divert1   Press  , then select Calling.2   Select Call divert and choose Voice calls and/or Video calls.3   Choose when to divert all calls; when the line is busy, when there is no answer or when you are not reachable.4   Input the number you’d like to divert to.5   Select Activate.NOTE: Charges may be incurred for diverting calls. Please contact your network provider for details.TIP! To turn o all call diverts, choose Deactivate all.
210102030405060708The basicsUsing call barring1   Press  , select Calling.2   Select Call barring and choose Voice calls and/or Video calls.3   Choose any or all of the five options:All outgoingOutgoing internationalOutgoing international calls except home countryAll incomingIncoming when abroad4   Enter the call barring password. Please check with your network operator for this service.TIP! Select Fixed dial number to turn on and compile a list of numbers that can be called from your phone. You’ll need your PIN2 code from your operator. When activated, only numbers included in the xed dial list can be called from your phone.Changing the common call settings1   Press  , then select Calling.2   Select Common settings. From here you can amend the settings for:Call reject - Select On or Off and choose to reject all calls, those from specific groups, contacts, unregistered numbers (those not in your list of contacts) or those with no caller ID.Send my number - Choose whether your number will be displayed when you call someone.Auto redial - Choose On or Off.Answer mode - Choose whether to answer the phone by pressing the Send key, by pressing any key, or by opening the slide.Minute minder - Select On to hear a tone every minute during a call.BT answer mode - Choose how to answer a call when using a Bluetooth headset. Select Handsfree or handset.
22LG KF757  |  User GuideThe basicsCallsSave new number - Saves numbers you use that aren’t already stored in Contacts.Slide close setting - Select End call to be able to disconnect a call by closing the slide.Voice clarity- Select Yes to listen to the voice clearly.Changing your video call settings1   Press  , then select Calling.2   Select Video call settings.3   Determine whether to Use private picture and/or, switch on the Mirror.
230102030405060708The basicsContactsSearching for a contactThere are two ways to search for a contact:From the standby screen1   From the standby screen touch the down key on the touch pad to open the address book.2   Press the number key corresponding to the first letter of the contact you’d like to view. So, for ‘Home’ press 4 (GHI) twice.TIP! You can search by group by touching the left soft key and selecting Search by group. This will bring up a list of all your groups.From the main menu1   Select Contacts.2   Select Search and enter the first few letters of the contact you’d like to find using the keypad. 3   Your address book will bring up a list of the contacts corresponding to the letters you’ve entered.Adding a new contact1   Press   and select Contacts.2  Select Add new.3   Choose whether to save the contact to your Handset or USIM.4   Enter the first and last name of your new contact. You do not have to enter both, but you must enter one or the other.5   Enter up to five different numbers and assign a type for each. Choose from Mobile, Home, Office, Pager, Fax, VT and General.6   Add up to two email addresses.7   You can assign the contact to a group. Choose from No group, Family, Friends, Colleagues, School or VIP.8   You can also add a Homepage, Home address, Company name, Job title, Company address and a Memo.TIP! You can create customised groups for your contacts. See Creating a group on page 24.
24LG KF757  |  User GuideThe basicsContactsContact optionsThere are many things you can do when viewing a contact. Here’s how to access and use the options menu:1   Open the contact you’d like to use. See Searching for a contact on page 23.2   Press the left soft key to open the list of options. From here you can:Edit - Change any of the contact’s details.Send message - Send a message or an email to the contact. See page 27 for details on how to send messages.Send business card - Send the contact’s details to another person as a business card. Choose to send as a Text message, Multimedia msg, Email or via Bluetooth.Make voice call - Call the contact.Make video call - Make a video call to the contact.Edit - You can edit the contact. Mark/Unmark - Mark your contacts for multiple seletion.Search by - You can search the entry by number or group.Save to USIM/ Handset - Choose to move or copy to the USIM card or handset (depending on where you originally saved the contact).Delete - Delete the contact.Text input - You can set the text input method.Creating a group1   Press   and select Contacts.2   Select Groups and touch the left soft key.3   Select Add new group.4   Enter a name for your new group.5   Touch Done.NOTE: If you delete a group, the contacts which were assigned to that group will not be lost. They will remain in your address book.TIP! You can edit an existing group by highlighting it and touching the left soft key. Choose to Add a member to the group from your contacts, assign a Group ringtone, Rename the group or Delete the group.
250102030405060708The basicsUsing service dial numbersYou can view the list of Service Dial Numbers (SDN) assigned by your service provider (if supported by the USIM card). Such numbers include emergency, directory enquiries and voicemail numbers. After selecting a service number, press   to dial that service.Viewing your own numberSelect Own number in the Contacts menu to view your number.Creating a business cardYou can create your own business card by selecting My business card, then Add. Enter your name, number, email address and image.Changing your contact settingsYou can adapt your contact settings so that your address book works according to your preferences.1   Press   and select Contacts.2   Select Settings. From here you can adjust the following settings:Contact list settings - Choose whether to view contacts saved to both your Handset & USIM, Handset only or USIM only. You can also select to show the first name or last name of a contact first, and to show a contact picture.Synchronise contacts - Connect to your server to synchronise your contacts. See Synchronising your contacts on page 65.Copy - Copy your contacts from your USIM to your handset or from your handset to your USIM. Choose to do this one by one, or all together.Move - This works in the same way as Copy, but the contact will only be saved to the location you’ve moved it to. If you move a contact from the USIM to the handset it will be deleted from the USIM memory.Send all contacts via Bluetooth -  Send all contacts information to another handset by Bluetooth.Back up contacts - See Backing up and restoring your phone’s information on page 64.
26LG KF757  |  User GuideThe basicsContactsRestore contacts - See Backing up and restoring your phone’s information on page 64.Clear contacts - Delete all your contacts.Memory info. - You can check how much memory you’ve got left on your handset or your USIM.
270102030405060708The basicsMessagingMessagingYour KF757 combines SMS, MMS and email into one intuitive and easy to use menu.Sending a message1   Select Messaging then choose Create new message.2   Choose Message to send an SMS or MMS. A new SMS will open.3   Select Options, then Insert, to add an image, video, sound or subject.4   Press   Send. Enter the phone number or select Contacts to open your contacts list. You can add multiple contacts. WARNING: You will be charged per 160 character text message for each person that you send the message to. WARNING: If an image, video or sound is added to an SMS it will be automatically convert to an MMS and you will be charged accordingly.Entering textThere are two ways to enter text:T9 predictive and Abc manual.To switch between text entry methods, press and hold the   key when you have a blank message open.To change between upper, lower and title case press the   key.To delete a character use the   hard key below the screen.To enter a symbol select Options and Insert.T9 predictiveT9 mode uses a built-in dictionary to recognise words you’re writing based on the key sequences you touch. Simply touch the number key associated with the letter you want to enter, and the dictionary will recognise the word once all the letters are entered. For example, press 8, 3, 5, 3, 7, 4, 6, 6, 3 to write ‘telephone’.
28LG KF757  |  User GuideThe basicsMessagingAbc manualIn Abc mode you must press the key repeatedly to enter a letter. For example, to write ‘hello’, press 4 twice, 3 twice, 5 three times, 5 three times again, then 6 three times.Setting up your emailYou can stay in touch on the move using email on your KF757. It’s quick and simple to set up a POP3 or IMAP4 email account.1   Select Messaging then select Settings.2   Select Email, then Email accounts.3   You can now choose how your account works:Title - Enter a name for this account.My name - Enter your name.Username - Enter the account username.Password - Enter the account password.Email address - Enter the account email address.Reply email address - Enter the ‘reply to’ email address.Outgoing mail server - Enter the account details.Incoming mail server - Enter the account details.Maximum receive size - Choose the size limit of your emails, the maximum is 1MB.Mailbox type - Enter the mailbox type, POP3 or IMAP4.Save to server - Choose whether to save your emails to the server. For IMAP4 accounts copies are always saved.Save sent mail into - Choose where to save your IMAP4 emails. For POP3 accounts copies are always saved on the phone.Access point - Choose your Internet access point. Auto retrieve - Choose whether to fetch your new emails automatically.Advanced settings - Choose whether to use the advanced settings.Incoming server port - Normally, this is 110 for POP3 accounts and 143 for IMAP4 accounts.
290102030405060708The basicsSMTP authentication - Choose the security settings for the outgoing mail server.APOP secure login - Choose to activate APOP secure login for a POP3 account. IMAP4 accounts are always set to off.Now your account is set up, it will appear in the list of accounts in your Email folder.Retrieving your emailYou can automatically or manually check your account for new email. See ‘Changing your email settings’  to check automatically.To check manually:1   Select Messaging then Mailbox.2   Select the account you want to use.3   Choose Retrieve and the phone will connect to your email account and retrieve your new messages.Sending an email using your new account1   Select Messaging, then choose Create new message.2   Choose Email and a new email will open.3   Use Options to enter the recipient‘s address and to write your message. Use Insert to attach images, videos, sounds or other file types.4   Select Send and your email will be sent.TIP! You can email Word, Excel, Power Point and PDF documents to your KF757 so you can review them on the move.Changing your email settingsYou can adapt your email settings so that it works according to your preferences.1   Select Messaging then open Settings.2   Select Email and then you can adapt the following settings:Allow reply email - Choose to allow the sending of ‘read confirmation’ messages.Request reply email - Choose whether to request ‘read confirmation’ messages.Retrieve interval - Choose how often your KF757 checks for new email messages.
30LG KF757  |  User GuideThe basicsMessagingInclude message in Fwd & Reply -  Choose whether or not to include the original message.Include attachment - Choose whether or not to include the original attachment.Auto Retrieval in Roaming -  Choose whether or not to automatically retrieve your messages when abroad.New email notification - Choose whether or not to be alerted to new emails.Signature - Create an email signature and switch this feature on.Priority - Choose the priority level of your email messages.Message foldersInbox - All the messages you receive are placed into your inbox. Here you can read, reply to and forward your messages.Mailbox - All emails you receive are placed into your Mailbox.Drafts - If you don’t have time to finish writing a message, you can save what you’ve done so far here.Outbox - This is a temporary storage folder for messages that are being sent.Sent items - All the messages you send are placed into your Sent items folder.Managing your messages1   Select Messaging then Inbox.2   Select Options and then choose to:Reply - Send a reply to the selected message.Forward - Send the selected message on to another person.Call - Call the person who sent you the message. Delete - Delete the message.Create new message - Open a new, blank message or email.Mark/Unmark - Mark your messages for multiple deletion.Copy & Move - Copy or move the message to your phone, USIM or My folders. Filter - View your message by type. This will group SMS separately from MMS.
310102030405060708The basicsMessage info. - See additional information for the message, including the time it was sent.If you see the message No space for USIM message you should delete some messages from your inbox.If you see the message No space for messages you can delete either messages or saved files to create space.Using templatesCreate templates for the SMS and MMS messages you send most frequently. You’ll find some templates already on your phone, and you can edit these if you wish.1   Select Messaging then choose Templates.2   Choose Text templates or Multimedia templates. You can then select Options to Add new, Edit, Delete or Delete all templates.Using emoticonsLiven up your messages using emoticons. You’ll find some commonly used emoticons already on your phone.1   Select Messaging then choose Emoticons.2   Select Options to Add new, Edit, Delete or Delete all emoticons.Changing your text message settingsYour KF757 message settings are pre-defined so that you can send messages immediately. If you’d like to change the settings, you can do so as follows.Select Messaging, then choose Settings, then Text message. You can make changes to:Text message centre - Enter the details for your message centre.Delivery report - Choose to receive confirmation that your message was delivered.Validity period - Choose how long your message is stored at the message centre.Message types - Convert your text into Voice, Fax, X.400 or Email.Character encoding - Choose how the characters in your messages are encoded, this impacts the size of your message and therefore data charges.
32LG KF757  |  User GuideThe basicsMessagingSend long text as - Choose to send as Multiple SMS or as an MMS.Changing your multimedia message settingsYour KF757 message settings are pre-defined so that you can send messages immediately. If you’d like to change the settings, you can do so as follows.Select Messaging, then choose Settings, then Multimedia message. You can make changes to:Retrieval mode - Choose Home or Roaming network. If you then choose Manual you will receive only notifications of MMS and you can then decide whether or not to download them in full.Delivery report - Choose to allow and/or request a delivery report.Read reply - Choose to allow and/or send a read reply.Priority - Choose the priority level of your MMS.Validity period - Choose how long your message is stored at the message centre.Slide duration - Choose how long your slides appear on screen.Creation mode - Choose your message mode.Delivery time - Deliver your message at a specific time.Multi msg. centre - Enter the details for your message centre.Changing your other settingsSelect Messaging, choose Settings then:Info. service - Choose your reception status, language and other settings.Service message - Choose to receive or block service messages. You can also set your message security by creating trusted and untrusted lists of senders.
330102030405060708Get creativeTaking a quick photo1   Press and hold the capture button on the right-hand side of the handset and the camera’s viewfinder will appear on the screen.2   Holding the phone horizontally, point the lens towards the subject of the photo.3   Slightly depress the capture button and a focus box will appear in the centre of the viewfinder screen.4   Position the phone so you can see the subject of your photo in the focus box.5   When the focus box turns green, the camera has focused on your subject.6   Press the capture button fully.After you’ve taken your photoYour captured photo will appear on the screen. The name of the image runs along the bottom of the screen together with five icons down the right side. New imagesBackOptionsBack   Go back to previous menu.  View the pictures you have taken in your Album.  Send the photo as an MMS, Email or via Bluetooth. See page 27 for Sending a message, page 72 for Sending and receiving your files using Bluetooth.  Take another photo straight away. Your current photo will be saved.  Use the image as wallpaper, as a Contact image, or in your Start-up or Shut down screen.  Delete the photo you have just taken. The viewfinder will reappear.TIP! In camera mode select the Play icon to open the photo album. See page 38, Viewing your saved photos, for details.Camera
34LG KF757  |  User GuideGet creativeUsing the flashThe flash is set to off as default, but there are other options.1   Select   from the top right corner of the viewfinder to enter the flash sub-menu.2   There are three flash options:  On - Your camera will always flash when taking a picture. Auto - Your camera will assess whether or not the flash is necessary for a good picture. Off - The camera will never flash. This is useful if you want to save battery power. Select the flash option you’d like to use.3   When you’ve made your selection the flash menu will automatically close, ready for you to take your picture, and the flash icon in the viewfinder will change according to your chosen flash mode.NOTE: Whenever you exit the camera, the flash setting will revert to off mode. You’ll need to switch the flash back on if you still need it when you reopen the camera.Adjusting the brightnessContrast defines the difference between light and dark in an image. A low contrast image will appear foggy, whereas a high contrast image will appear much sharper.1   Select Brightness in Settings.2   Slide the contrast indicator along the bar, towards   for a lower contrast, hazier image or towards  for a higher contrast, sharper image.Choosing a shot mode1   Select Settings to view the available shot modes.2   Choose from the four options:Normal - This is the default shot type. The photo will be taken in the normal way, as outlined in Taking a quick photo on page 33.Continuous shot - This enables you to take nine shots automatically in very quick succession. See Using continuous shot mode below for details.Frame shot - Choose from one of the fun frames to transform your friend into a pirate or just to Camera
350102030405060708Get creativedecorate their surroundings.Panorama - This shot type is great for taking a photo of a large group of people or for capturing a panoramic view. See Taking a panoramic shot below for more details.Music video shot - This shot type allows to take a shot with music or voice.Using continuous shot modeContinuous shot mode is great for taking photos of moving objects or at sporting events.1   Select Continuous shot.2   Position the subject in the viewfinder and press the capture button as you would to take a normal photo.3   The camera will take nine shots in quick succession and display the first with eight thumbnails on the screen.4   Select the shot you want to keep by selecting the thumbnail.5   A tick will appear next to the image thumbnail. Select Save to exit.Using a frame shot modeFrame shot can be used to transform your friend into a pirate, or just to decorate their surroundings with a frame.1   Select Frame shot menu.2   Position the subject in the fun frame and press the capture button.3   Save the image by selecting Save.Taking a panoramic shotCapture life as it appears using panoramic shot. The camera will let you take three photos, all aligned, and combine them into one image so that your wide angle view becomes a panoramic photo.1   Select Panorama.2   Take the first photo as normal. A ghosted version of the right side of the image will appear in the viewfinder.3   When you take the second and third photos, line the ghost of the previous image up with the next image in the viewfinder.4   In the photo album, the photos will be saved as three separate images and one panoramic image.
36LG KF757  |  User GuideGet creativeCameraNOTE: Due to the image size the panoramic photo will appear slightly distorted in the Album view.Using the advanced settingsFrom the viewfinder select Settings.Size - Change the size of the photo. See Changing the image size on page 37.Scene mode - Set the the camera to adjust for the environment. Choose from Auto, Portrait, Landscape, Night, Beach, Sports, and Party.Brightness - Set the brightness of the image in the viewfinder of the camera.Effect - Choose a colour tone to apply to the photo you’re taking. See Choosing a colour tone on page 37.White Balance - The white balance ensures that any white in your photo is realistic. In order for your camera to correctly adjust the white balance you may need to determine the light conditions. Choose from Auto, Daylight, Cloudy, Illuminate and Indoors.Timer - The self-timer allows you to set a delay after the capture button is pressed. Choose from 3 seconds, 5 seconds or 10 seconds. Great for a group photo that you want to be part of too!Shot mode - See page 34.ISO - ISO determines the sensitivity of the camera’s light sensor. The higher the ISO, the more sensitive the camera will be to light. This is useful in darker conditions when the flash can’t be used. Choose an ISO value from  Auto, ISO 100, ISO 200, ISO 400 or ISO 800.Quality - Controls the quality of image.Memory in use - Choose whether to save your photos to the Handset memory or to the External memory.Hide icons - Hide the icons to the side of the viewfinder.Focus mode - Set the camera to focus automatically.Sound - Select one of three different shutter sounds.
370102030405060708Get creativeNOTE: Always select Save after selecting a new setting to implement the changes you’ve made.TIP! When you exit the camera, all your settings will return to default, except image size and image quality. Any non-default settings you require will need to be reset, for example, colour tone and ISO. Check them before you take your next photo.TIP! The settings menu is superimposed over the viewnder, so when you change elements of the image colour or quality, you’ll be able to see the image change in preview behind the settings menu. Remember to select Save before exiting to apply any changes.Changing the image sizeThe more pixels, the larger the file size, which in turn means they will take up more of your memory. If you want to fit more pictures on your phone or memory card you can alter the number of pixels to make the file size smaller.1   From the viewfinder select Settings in the bottom left corner.2   Select Size.3   Select a pixel value from the six numerical options (5M: 2592x1944, 3M: 2048x1536, 2M: 1600x1200, 1M: 1280x960, 640x480, 320x240) or choose the preset:Contact - This sets the camera to take a photo the perfect size to be added to a phone contact.4   Select the size option you’d like to use and press Select to implement your changes. The settings menu will automatically close, ready for you to take your picture.Choosing a colour tone1   From the viewfinder, select Settings.2   Select Effect.3   There are twelve colour tone options: Off, Black & White, Negative, Sepia, Blue, Emboss, Sketch, Purpulish, Bluish, Monochrome, Edgemap, or Posterize.4   Choose the colour tone you’d like to use and press Select.
38LG KF757  |  User GuideGet creativeCamera5   When you’ve made your selection, the colour tone menu will automatically close, ready for you to take your picture.TIP! You can change a photo taken in colour to black and white or sepia, taken but you cannot change a picture taken in black and white or sepia back to colour.Viewing your saved photos1   You can access your saved photos from within the camera mode and from the Album at the top of the icon menu.2   Your album will appear on the screen.3   Highlight the photo you want to view to bring it to the front of the album.4   Select the photo to open it fully.Setting a photo as a wallpaper or contact imageFrom your image album, select an image and Use as to use the image as a wallpaper or contact image.NOTE: Contact images can only be added to contacts saved to your phone, not your SIM.TIP! You can also access your photos using the touch screen. Press and hold the touch screen button on the right-hand side of the phone and touch the Photo icon. You can then scroll through your pictures by touching the screen.
390102030405060708Get creativeVideo cameraShooting a quick video1   Move the camera mode switch to  and press the centre button. The video camera’s viewfinder will appear on screen.2   Holding the phone horizontally, point the lens towards the subject of the video.3   Press the capture button once to start recording.4   REC will appear at the bottom of the viewfinder. Press the capture button again to stop recording.After you’ve shot your videoA still image representing your captured video will appear on screen. The name of the image runs along the bottom of the screen together with five icons down the right side.  View your video album.  Play the file.  Re-record the video.  Send the video as an MMS, as an Email or via Bluetooth. See page 27 for Sending a message, or page 72 for Sending and receiving your files using Bluetooth.  Delete the video you have just made. The viewfinder will reappear.TIP! Select the album icon to open the video album. See Watching your saved videos on page 41 for details.Adjusting the brightnessContrast defines the difference between light and dark in an image. A low contrast image will appear foggy, whereas a high contrast image will appear much sharper.1   Select  .2   Slide the contrast indicator along the bar, towards   for a lower contrast, hazier image, or towards    for a higher contrast, sharper image.Using the advanced settingsFrom the viewfinder select Settings.Size - Change the size of the video. See Changing the video image size on page 40.Scene mode - Set the image for adjusting the environment. Choose from Auto, Portrait, Landscape, Night, Beach, Sports, and Party.

Navigation menu