LG Electronics USA KF900 Cellular/ PCS GSM/ EDGE/ Phone with WLAN and Bluetooth User Manual KE850 UK 0814
LG Electronics USA Cellular/ PCS GSM/ EDGE/ Phone with WLAN and Bluetooth KE850 UK 0814
UserManual.wiki
>
LG Electronics USA
>
KF900 User Manual
Users Manual
Navigation menu
Upload a User Manual
Namespaces
Wiki Guide
HTML
PDF
Info
Views
User Manual
Discussion / Help
Navigation


![8For Your SafetyImportant InformationThis user guide contains important information on the use andoperation of this phone. Please read all the informationcarefully for optimal performance and to prevent any damageto or misuse of the phone. Any changes or modifications notexpressly approved in this user guide could void your warrantyfor this equipment.Before You StartSafety InstructionsWARNING! To reduce the possibility of electric shock, do notexpose your phone to high humidity areas, such as thebathroom, swimming pool, etc.Always store your phone away from heat. Never store yourphone in settings that may expose it to temperatures less than32°F or greater than 104°F, such as outside during extremeweather conditions or in your car on a hot day. Exposure toexcessive cold or heat will result in malfunction, damageand/or catastrophic failure.Be careful when using your phone near other electronicdevices. RF emissions from your mobile phone may affectnearby in adequately shielded electronic equipment. Youshould consult with manufacturers of any personal medicaldevices such as pacemakers and hearing aides to determine ifthey are susceptible to interference from your mobile phone.Turn off your phone in a medical facility or at a gas station.Never place your phone in a microwave oven as this willcause the battery to explode.IMPORTANT! Please read the TIA SAFETY INFORMATION onpage 78 before using your phone.Safety InformationRead these simple guidelines. Breaking the rules may bedangerous or illegal. Further detailed information is given in thisuser guide.]Never use an unapproved battery since this could damagethe phone and/or battery and could cause the battery toexplode.]Never place your phone in a microwave oven as it willcause the battery to explode.]Do not dispose of your battery by fire or with hazardous orflammable materials.]Make sure that no sharp-edged items come into contactwith the battery. There is a risk of this causing a fire.]Store the battery in a place out of reach of children.]Be careful that children do not swallow any parts such asrubber plugs (earphone, connection parts of the phone,etc.). This could cause asphyxiation or suffocation.](https://usermanual.wiki/LG-Electronics-USA/KF900/User-Guide-1021483-Page-3.png)
![9For Your Safety]Unplug the power cord and charger during lightning stormsto avoid electric shock or fire.]When riding in a car, do not leave your phone or set up thehands-free kit near to the air bag. If wireless equipment isimproperly installed and the air bag is activated, you may beseriously injured.]Do not use a hand-held phone while driving.]Do not use the phone in areas where its use is prohibited.(For example: aircraft).]Do not expose the battery charger or adapter to directsunlight or use it in places with high humidity, such as abathroom.]Never store your phone in temperatures less than- 4°F orgreater than 122°F.]Do not use harsh chemicals (such as alcohol, benzene,thinners, etc.) or detergents to clean your phone. There is arisk of this causing a fire.]Do not drop, strike, or shake your phone severely. Suchactions may harm the internal circuit boards of the phone.]Do not use your phone in high explosive areas as the phonemay generate sparks.]Do not damage the power cord by bending, twisting, pulling,or heating. Do not use the plug if it is loose as it may causea fire or electric shock.]Do not place any heavy items on the power cord. Do notallow the power cord to be crimped as it may cause fire orelectric shock.]Do not handle the phone with wet hands while it is beingcharged. It may cause an electric shock or seriouslydamage your phone.]Do not disassemble the phone.]Do not place or answer calls while charging the phone as itmay short-circuit the phone and/or cause electric shock orfire.]Only use the batteries, antennas, and chargers provided byLG. The warranty will not be applied to products provided byother suppliers.]Only authorized personnel should service the phone and itsaccessories. Faulty installation or service may result inaccidents and consequently invalidate the warranty.]Do not hold or let the antenna come in contact with yourbody during a call.]An emergency call can be made only within a service area.For an emergency call, make sure that you are within aservice area and that the phone is turned on.](https://usermanual.wiki/LG-Electronics-USA/KF900/User-Guide-1021483-Page-4.png)
![11For Your SafetyVehicle Mounted External Antenna(optional, if available)A minimum separation distance of 8 inches (20cm) must bemaintained between the user/bystander and the vehiclemounted external antenna to satisfy FCC RF exposurerequirements. For more information about RF exposure, visitthe FCC website at www.fcc.govFCC Part 15 Class B ComplianceThis device and its accessories comply with part 15 of FCCrules. Operation is subject to the following two conditions: (1) This device and its accessories may not cause harmfulinterference, and (2) this device and its accessories mustaccept any interference received, including interference thatmay cause undesired operation.Cautions for Battery]Do not disassemble.]Do not short-circuit.]Do not expose to high temperature: 60°C (140°F).]]Do not incinerate.Battery Disposal]Please dispose of your battery properly or bring to yourlocal wireless carrier for recycling.]Do not dispose in fire or with hazardous or flammablematerials.Adapter (Charger) Cautions]Using the wrong battery charger could damage your phoneand void your warranty.]The adapter or battery charger is intended for indoor useonly.Do not expose the adapter or battery charger to direct sunlightor use it in places with high humidity, such as the bathroom.](https://usermanual.wiki/LG-Electronics-USA/KF900/User-Guide-1021483-Page-6.png)

![In-Call Menu23Your phone provides a number of controlfunctions that you can use during a call. To accessthese functions during a call, press the left softkey [Options].DURING A CALLThe menu displayed on the handset screen duringa call is different than the default main menudisplayed when in idle screen, and the options aredescribed below.SPEAKER PHONEDuring call you can activate speaker phone bypressing the LOCK key and then pressing the key.MAKING A SECOND CALL(NETWORK DEPENDENT)You can get a number you wish to dial from thephonebook to make a second call. During a call, ifyou press profile key, you can activate the dialpad.SWITCHING BETWEENTWO CALLSTo switch between two calls, press key orthe left soft key, and then select Swap call.ANSWERING AN INCOMINGCALL To answer an incoming call when the handset isringing, simply press the key. The handset isalso able to warn you of an incoming call whileyou are already on a call. A tone sounds in theearpiece, and the display will show that a secondcall is waiting.This feature, known as Call waiting, is onlyavailable if your network supports it. If Callwaiting is on, you can put the first call on hold andanswer the second, by pressing the left soft key.REJECTING AN INCOMINGCALLYou can reject an incoming call without answeringby simply pressing the key.During a call, you can reject an incoming call bypressing the key twice. MUTING THE MICROPHONEYou can mute the microphone during a call bytapping the [Mute] key in the bottom right. Thehandset can be unmuted by tapping the[Unmute]. When the handset is muted, the callercannot hear you, but you can still hear them.DTMF TONES WHILECALLINGTo switch on DTMF tones while calling (e.g. to usethe phone with an automatic switchboard) tap[Options] followed by Send DTMF – DTMF on.Select DTMF off to disable DTMF tones. DTMFtones are normally on.If you activate Key lock, you can select Mutekey.](https://usermanual.wiki/LG-Electronics-USA/KF900/User-Guide-1021483-Page-20.png)
![In-Call Menu24CONFERENCE CALLSThe conference service provides you with theability to have a simultaneous conversation withmore than one caller, if your network serviceprovider supports this feature. A conference callcan only be set up when you have one active calland one call on hold, both calls having beenanswered. Once a conference call is set up, callsmay be added, disconnected or separated (that is,removed from the conference call but stillconnected to you) by the person who set up theconference call. These options are all availablefrom the In-Call menu. The maximum callers in aconference call are five. Once started, you are incontrol of the conference call, and only you canadd calls to the conference call.MAKING A SECOND CALLYou can make a second call while currently on acall. Enter the second number and press the . When the second call is connected,the first call is automatically placed on hold. Youcan swap between calls, by pressing the key.SETTING UP ACONFERENCE CALLTo set up a conference call, place one call on holdand while the active call is on, press the left softkey and then select the Join menu of Conferencecall.ACTIVATE THECONFERENCE CALL ONHOLDTo activate Hold on a conference call, press thekey. Alternatively press the left soft key[Options] and select Conference/Hold all calls.Other users on hold will stay connected. To returnto conference call mode, tap [Options]followed by Conference call.ADDING CALLS TO THECONFERENCE CALLTo add a call to an existing conference call, tapthe left soft key, and then select the Join menu ofConference call.PRIVATE CALL IN ACONFERENCE CALLTo have a private call with one caller from aconference call, display the number of the calleryou wish to talk to on the screen, then tap the leftsoft key. Select the Private menu of Conferencecall to put all the other callers on hold.To activate the keypad in a call, press the on the side.The display and keypad backlights will turnoff after a few seconds while in a call if nokeys are pressed. To turn on the backlightpress any key. DTMF is not sent when thebacklight is off.To activate the keypad in a call, press the on the side.](https://usermanual.wiki/LG-Electronics-USA/KF900/User-Guide-1021483-Page-21.png)

![Contacts30CONTACTS (Menu 2)1. Tap icon or menu icon in standby mode.2. Select Contacts menu.Search (Menu 2.1)1. Tap Search in Contacts menu.2. You can view the list of contacts you saved.3. If you want to edit, delete, or copy an entry,select icon. The following menu will bedisplayed.°New message: After you have found thenumber you want, you can send a text/multimedia message, or an e-mail to theselected number.°Delete: You can delete an entry.°Edit: You can edit the name, number, group,character and picture by using the navigationkey.°New contact: You can add new entry.°Send contact via Text/Multimedia/E-mail/Bluetooth: You can send the data of phonebookto other devices which is compatible withBluetooth. You can also send text/multimedia/E-mail message with an entry saved inphonebook.°Copy to SIM/phone: You can copy the entryfrom SIM card or phone memory.°Multiple delete: You can delete the multipleentries at the same time.°Search by 3x4: You can search the entry byentering the name. This menu is displayed onactivating search editor. New contact (Menu 2.2)You can add phonebook entry by using thisfunction. The phone memory capacity is 1000entries. The SIM card memory capacity dependson the SIM. The number of characters is a SIMdependent feature.1. Select New contact.2. Select the memory you want to save: SIM orPhone.a. Tap the blank of name to input a name andtap [OK].b. Input a number and tap [Save].c. You can set a group for the entry by scrollinga bar.d. you can select a ringtone.e. You can set a character and a picture for theentry by scrolling a bar.Speed dials (Menu 2.3)You can assign any of the keys 2 to 9 with a Namelist entry. You can call directly by tapping andholding this key. After assigning the number asspeed dial, you can change and delete the entry.You can also send a message to this number.1. Select Speed dials.2. If you want to add a speed dial, select (Empty).Then, you can search the name in thephonebook.3. Select [Assign] in the middle of the bottomline.Maximum stored name and number lengthdepends on SIM-card type.The step of c, d, and e only can be set fornumbers stored on the phone, not on theSIM.](https://usermanual.wiki/LG-Electronics-USA/KF900/User-Guide-1021483-Page-27.png)


![Message37°Delete all: Deletes all of the messages in thefolder.Outbox (Menu 4.7)This menu allows to view the message which isabout to send or is failed sending. After sendingthe message successfully, the message will bemoved to sent menu.°Resend: You can send the message. Aftersending the message, this will be moved to sentbox.°Edit: Modifies the massage you choose.°Information: You can check information of eachmessage.°Delete: You can delete the message.°Multiple delete: After selecting the messagesyou want to remove, press OK and you candelete the selected messages.°Delete all: You can delete all messages inoutbox.Sent (Menu 4.8)This menu allows you to view the messages whichare already sent. You can check the time and thecontents of message.Voice mail (Menu 4.9)Once this menu has been selected, simply tap[OK] to listen to voice mail. You can also tap andhold down the key in dial mode to listen tovoice mail.Info service (Menu 4.0)(Dependent to network and subscription)Info service messages are text messagesdelivered by the network to the your phone. Theyprovide general information such as weatherreports, traffic news, taxis, pharmacies, and stockprices. Each type of has the number; therefore,you can contact the service provider as long asyou have input the relevant number for theinformation you want. When you have received aninfo service message, you can see the popupmessage to show you that you have received amessage or the info service message is directlydisplayed. To view the message again or not instandby mode, follow the sequence shown below;Read (Menu 4.0.1)1. When you have received an info servicemessage and select Read to view the message,it will be displayed on the screen. You can readanother message by scrolling .2. The message will be shown until anothermessage is reached.Topic (Menu 4.0.2)(Dependent to network and subscription)°Add new: You can add Info service messagenumbers in the phone memory with itsnickname.°View list: You can see info service messagenumbers which you added. If you tap icon,you can edit and delete info message categorywhich you added.°Active list: You can select info service messagenumbers in the active list. If you activate an infoservice number, you can receive messages sentfrom the number.When you receive a voice mail, your phonedisplays the icon and you hear an alert.Please check with your network provider fordetails of their service in order to configurethe handset correctly.](https://usermanual.wiki/LG-Electronics-USA/KF900/User-Guide-1021483-Page-34.png)
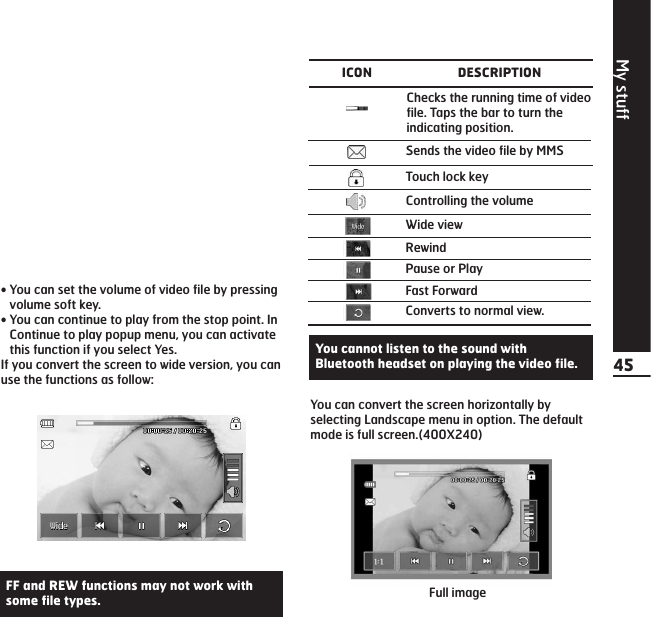
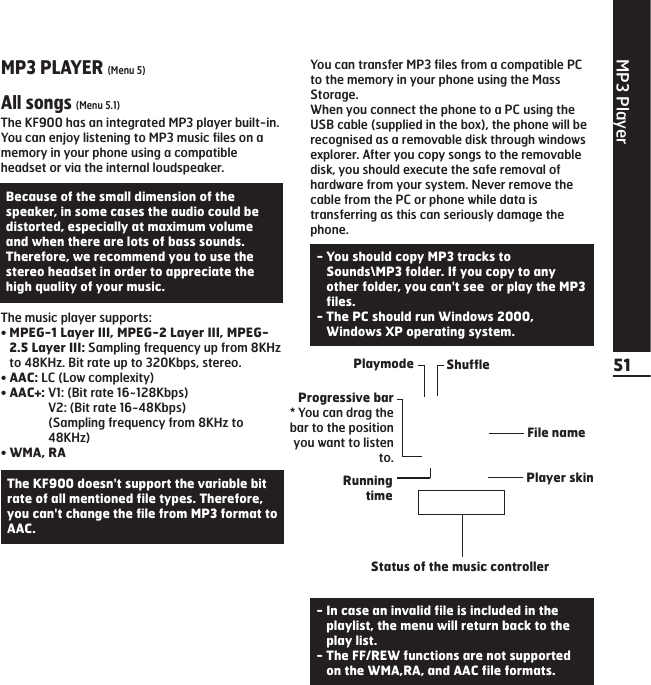
![MP3 Player521. Press the MP3 key on the side of the phone toopen the MP3 player. Then select the play list toplay.2. Press the left soft key [Options] to accessthe following menus.°Set as ringtone: You can set as a ringtone thecurrent music on playing MP3 file.°Settings: You can set up various functions suchas shuffle, repeat.°Multi select: You can select multiple files at thesame time to remove or add them.°Add to playlist: You can add the selected file toa playlist.Playlist (Menu 5.2)This menu allows to view the whole play list. Youcan move the track by pressing the navigationkey. In addition, if you select the option menu, youcan delete the file or view its information.°Move up: Moves up the item in a list.°Move down: Moves down the item in a playlist.°Remove: Deletes a file in a playlist. °Remove all: Deletes all files in a playlist. Settings (Menu 5.3)°ShuffleIt you select On, the tracks will be playedrandomly.°RepeatThis menu allows to set the play mode: Off,Repeat all, Repeat one.°Player skinYou can select the visual effect menus: Whiteskin and Black skin. This menu allows you tochange the background of the display.- Music is copyright protected in internationaltreaties and national copyright laws. It maybe necessary to obtain permission or alicense to reproduce or copy music. In somecountries national law prohibits privatecopying of copyrighted material. Pleasecheck the national legislation of theapplicable country concerning the use ofsuch material.When an MP3 is playing on the MP3 player,if you press MP3 short key, you can use BGMmode. In BGM mode MP3 can be playedwhile other functions are being used. BGMcan be stopped on the MP3 player screen.](https://usermanual.wiki/LG-Electronics-USA/KF900/User-Guide-1021483-Page-49.png)
![FM Radio53FM RADIO (Menu 6)Radio (Menu 6.1)You can search radio stations and enjoy listeningto the radio.1. Tap the corresponding number key of a channelto store the currently selected radio stationinto.2. After presetting the radio channels, you canlisten to all the preset channels.3. You can adjust frequency and change the radiostation in the selected channel. You can searchfor the next station by tapping for at least twoseconds or pressing the side keys. 4. You can access the following option menus bypressing the left soft key [Options].°Auto scan: If you select "Auto Scan Now?" toOn, it automatically sets the radio channels.When "Save this Station?" message appears, ifyou select Yes, the selected frequency will bestored.°Reset channels: You can reset all channels at87.5Mhz.- To improve the radio reception, extend theheadset cord which functions as the FMantenna.- You cannot use the FM radio without theheadset.- You can lock the FM radio function bypressing side lock key.- You cannot switch on the backlight bypressing the clear key or touching thekeypad if the function is locked.](https://usermanual.wiki/LG-Electronics-USA/KF900/User-Guide-1021483-Page-50.png)

![Settings61Auto key lock (Menu 3.5.2)If you activate this function, the key will be lockedautomatically in standby mode without requestingthe action of key.Handset lock (Menu 3.5.3)You can use a security code to avoidunauthorized use of the phone. Whenever youswitch on the phone, the phone will requestsecurity code if you set phone lock to Whenswitch on.If you set phone lock to When SIM changed, yourphone will request security code only when youchange your SIM card.Call barring (Menu 3.5.4)The Call barring service prevents your phone frommaking or receiving certain category of calls. Thisfunction requires the call barring password. Youcan view the following submenus.°All outgoing callsThe barring service for all outgoing calls.°Outgoing internationalThe barring service for all outgoinginternational calls.°Outgoing international when roamingThe barring service for all internationaloutgoing calls except home network.°All incomingThe barring service for all incoming calls.°Incoming when roamingThe barring service for all incoming calls whenroaming.°Cancel allYou can cancel all barring services.°Change passwordYou can change the password for Call BarringService.The submenus:- ActivateAllows to request the network to set callrestriction on.- CancelSet the selected call restriction off.- View statusView the status whether the calls are barred ornot.Fixed dial number (Menu 3.5.5)(SIM dependent)You can restrict your outgoing calls to selectedphone numbers. The numbers are protected byyour PIN2 code.°OnYou can restrict your outgoing calls to selectedphone numbers.°OffYou can cancel fixed dialling function.°Number listYou can view the number list saved as fixed dialnumber.Change codes (Menu 3.5.6)PIN is an abbreviation of Personal IdentificationNumber to prevent use by unauthorized person.You can change the access codes: Security code,PIN1 code, PIN2 code.1. If you want to change the Security code/PIN1/PIN2 code input your original code, and thentap [OK].2. Input new Security code/PIN/PIN2 code andverify them.The default security code for this phone is0000. The PIN 1 and PIN 2 and related tothe SIM card and your service provider.](https://usermanual.wiki/LG-Electronics-USA/KF900/User-Guide-1021483-Page-58.png)