LG Electronics USA KG290 PCS GSM Phone with Bluetooth User Manual KG290 Safety 070521
LG Electronics USA PCS GSM Phone with Bluetooth KG290 Safety 070521
UserManual.wiki
>
LG Electronics USA
>
KG290 User Manual
Users Manual
Navigation menu
Upload a User Manual
Namespaces
Wiki Guide
HTML
PDF
Info
Views
User Manual
Discussion / Help
Navigation
![8For Your SafetyImportant InformationThis user guide contains important information on the use andoperation of this phone. Please read all the informationcarefully for optimal performance and to prevent any damageto or misuse of the phone. Any changes or modifications notexpressly approved in this user guide could void your warrantyfor this equipment.Before You StartSafety InstructionsWARNING! To reduce the possibility of electric shock, do notexpose your phone to high humidity areas, such as thebathroom, swimming pool, etc.Always store your phone away from heat. Never store yourphone in settings that may expose it to temperatures less than32°F or greater than 104°F, such as outside during extremeweather conditions or in your car on a hot day. Exposure toexcessive cold or heat will result in malfunction, damageand/or catastrophic failure.Be careful when using your phone near other electronicdevices. RF emissions from your mobile phone may affectnearby in adequately shielded electronic equipment. Youshould consult with manufacturers of any personal medicaldevices such as pacemakers and hearing aides to determine ifthey are susceptible to interference from your mobile phone.Turn off your phone in a medical facility or at a gas station.Never place your phone in a microwave oven as this willcause the battery to explode.IMPORTANT! Please read the TIA SAFETY INFORMATION onpage 78 before using your phone.Safety InformationRead these simple guidelines. Breaking the rules may bedangerous or illegal. Further detailed information is given in thisuser guide.]Never use an unapproved battery since this could damagethe phone and/or battery and could cause the battery toexplode.]Never place your phone in a microwave oven as it willcause the battery to explode.]Do not dispose of your battery by fire or with hazardous orflammable materials.]Make sure that no sharp-edged items come into contactwith the battery. There is a risk of this causing a fire.]Store the battery in a place out of reach of children.]Be careful that children do not swallow any parts such asrubber plugs (earphone, connection parts of the phone,etc.). This could cause asphyxiation or suffocation.](https://usermanual.wiki/LG-Electronics-USA/KG290/User-Guide-800587-Page-4.png)
![9For Your Safety]Unplug the power cord and charger during lightning stormsto avoid electric shock or fire.]When riding in a car, do not leave your phone or set up thehands-free kit near to the air bag. If wireless equipment isimproperly installed and the air bag is activated, you may beseriously injured.]Do not use a hand-held phone while driving.]Do not use the phone in areas where its use is prohibited.(For example: aircraft).]Do not expose the battery charger or adapter to directsunlight or use it in places with high humidity, such as abathroom.]Never store your phone in temperatures less than- 4°F orgreater than 122°F.]Do not use harsh chemicals (such as alcohol, benzene,thinners, etc.) or detergents to clean your phone. There is arisk of this causing a fire.]Do not drop, strike, or shake your phone severely. Suchactions may harm the internal circuit boards of the phone.]Do not use your phone in high explosive areas as the phonemay generate sparks.]Do not damage the power cord by bending, twisting, pulling,or heating. Do not use the plug if it is loose as it may causea fire or electric shock.]Do not place any heavy items on the power cord. Do notallow the power cord to be crimped as it may cause fire orelectric shock.]Do not handle the phone with wet hands while it is beingcharged. It may cause an electric shock or seriouslydamage your phone.]Do not disassemble the phone.]Do not place or answer calls while charging the phone as itmay short-circuit the phone and/or cause electric shock orfire.]Only use the batteries, antennas, and chargers provided byLG. The warranty will not be applied to products provided byother suppliers.]Only authorized personnel should service the phone and itsaccessories. Faulty installation or service may result inaccidents and consequently invalidate the warranty.]Do not hold or let the antenna come in contact with yourbody during a call.]An emergency call can be made only within a service area.For an emergency call, make sure that you are within aservice area and that the phone is turned on.](https://usermanual.wiki/LG-Electronics-USA/KG290/User-Guide-800587-Page-5.png)
![11For Your SafetyVehicle Mounted External Antenna(optional, if available)A minimum separation distance of 8 inches (20cm) must bemaintained between the user/bystander and the vehiclemounted external antenna to satisfy FCC RF exposurerequirements. For more information about RF exposure, visitthe FCC website at www.fcc.govFCC Part 15 Class B ComplianceThis device and its accessories comply with part 15 of FCCrules. Operation is subject to the following two conditions: (1) This device and its accessories may not cause harmfulinterference, and (2) this device and its accessories mustaccept any interference received, including interference thatmay cause undesired operation.Cautions for Battery]Do not disassemble.]Do not short-circuit.]Do not expose to high temperature: 60°C (140°F).]]Do not incinerate.Battery Disposal]Please dispose of your battery properly or bring to yourlocal wireless carrier for recycling.]Do not dispose in fire or with hazardous or flammablematerials.Adapter (Charger) Cautions]Using the wrong battery charger could damage your phoneand void your warranty.]The adapter or battery charger is intended for indoor useonly.Do not expose the adapter or battery charger to direct sunlightor use it in places with high humidity, such as the bathroom.](https://usermanual.wiki/LG-Electronics-USA/KG290/User-Guide-800587-Page-7.png)
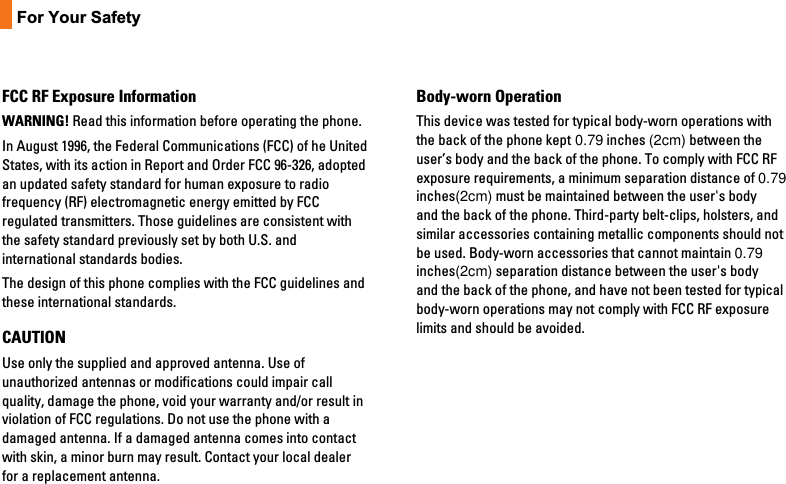
![17KG290 FeaturesNote]The quality of the conversation may changedepending on network coverage. When the signalstrength is below 2 bars, you may experience muting,call drop and poor audio. Please refer to this signalas an indicator for your calls. When there are nobars, that means that there is no network coverage:in this case, you won’t be able to access the networkfor any service (call, messages and so on).Icon/Indicator DescriptionHeadset menu in profile.You can divert a call.Indicates that the phone is accessingthe WAP.Indicates that you are using GPRS.](https://usermanual.wiki/LG-Electronics-USA/KG290/User-Guide-800587-Page-9.png)
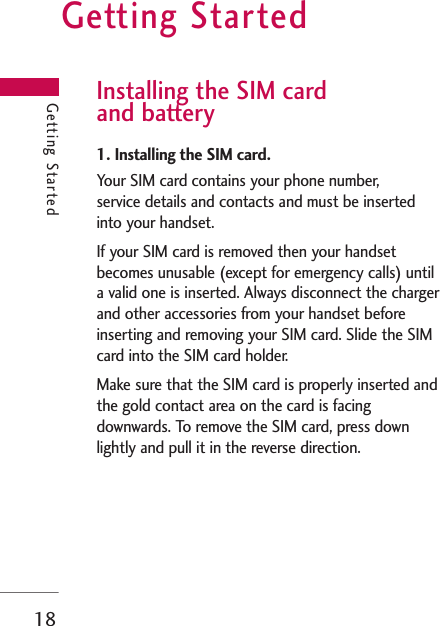
![Charging the BatteryBefore connecting the travel adapter to the phoneyou must first install the battery.1. With the arrow facing you as shown in the diagrampush the plug on the battery adapter into thesocket on the left side of the phone until it clicksinto place.2. Connect the other end of the travel adapter to the mains socket. 3. The moving bars on the battery icon will stop after charging is complete.4. Ensure the battery is fully charged before usingthe phone for the first time.Getting Started20Getting StartedNote]Only use the charger included in the box.](https://usermanual.wiki/LG-Electronics-USA/KG290/User-Guide-800587-Page-12.png)
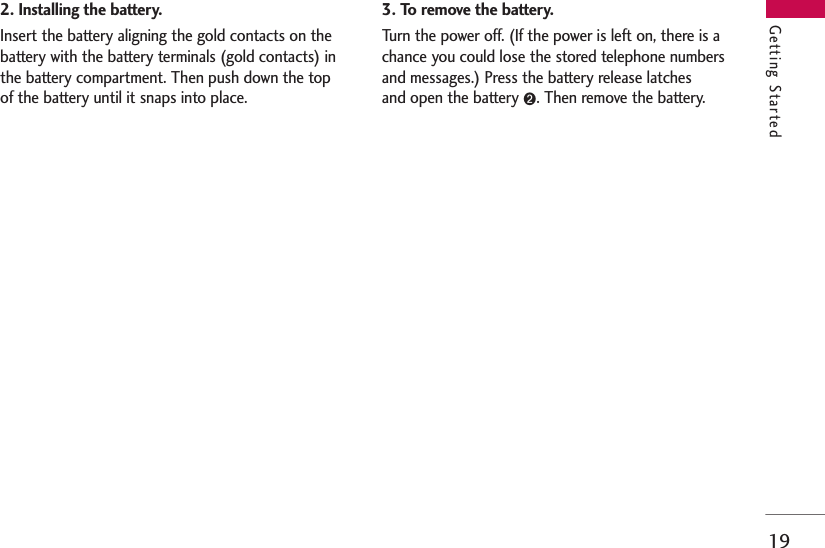
![21Getting StartedDisconnecting the chargerDisconnect the travel adapter from the phone as shown in the diagram below.Access codesYou can use the access codes described in thissection to avoid unauthorised use of your phone.The access codes (except the PUK and PUK2 codes)can be changed by using the Change codes feature[Menu 9.1.5].PIN code (4 to 8 digits)The PIN (Personal Identification Number) codeprotects your SIM card against unauthorised use.The PIN code is usually supplied with the SIM card.When the PIN Code Request is set to On, yourphone will request the PIN code every time it isswitched on. When the PIN Code Request is set toOff, your phone connects to the network directlywithout the PIN code.PIN2 code (4 to 8 digits)The PIN2 code, supplied with some SIM cards, isrequired to access functions such as Fixed DialNumber. These functions are only available ifsupported by your SIM card.WARNING! • Unplug the power cord and charger during lightning stormsto avoid electric shock or fire.• Make sure that no sharp-edged items such as animal teethor nails, come into contact with the battery. This may cause a fire.CAUTION!• Do not force the connector as this may damage the phoneand/or the travel adapter.• If you use the battery pack charger when abroad, use anattachment plug adaptor for the proper configuration.• Do not remove your battery or the SIM card while charging.](https://usermanual.wiki/LG-Electronics-USA/KG290/User-Guide-800587-Page-13.png)
![General Functions23General FunctionsMaking and answering calls Making a voice call1. Enter the number including the full area code, or select the phone number from call logs bypressing .]To delete a digit press .To delete all digits press and hold .2. Press to make the call.3. Press to finish the call, or close the handset.Making a voice call from Contacts orclose the handset It is easy to call anyone whose number you havestored in your Contacts.1. Press to access the contacts list. 2. Scroll to the contact to make a call.3. Press to make a voice call. 4. Press to finish the call.Making international calls1. Press and hold for the international prefix.The ‘+’ character prefixes the international accesscode.2. Enter the country code, area code, and the phonenumber.3. Press .Adjusting the volumeDuring a call, if you want to adjust the earpiecevolume, use on the left side of the handset. In idle mode with the phone open, you can adjustthe key volume using .Answering a callWhen you receive a call, the phone rings and theflashing phone icon appears on the screen. If thecaller can be identified, the caller’s phone number (or name if stored in your Contacts) is displayed.1. Open the phone and press to answer anincoming call. If the answer mode is set to Pressany key, any key will answer a call except for .](https://usermanual.wiki/LG-Electronics-USA/KG290/User-Guide-800587-Page-15.png)
![General Functions24General FunctionsNote]To reject an incoming call, press or the right soft keytwice.]If you set Answer mode as Flip open (Menu 9.4.6), you can answer the call simply by opening the phone.2. End the call by closing the handset or pressing .Signal strength You can check the strength of your signal by thesignal indicator ( ) on the LCD screen of yourphone. Signal strength can vary, particularly insidebuildings. Moving close to a window may improvereception.Entering text You can enter alphanumeric characters using thekeypad.For example, storing names in Contacts, writing amessage, creating a personal greeting or schedulingevents in the calendar all require entering text.The following text input methods are available withthe handset.Note]You can answer a call while using Contacts or other menufeatures.]When the compatible headset is connected, you can alsoanswer a call using the headset key, as well as using thephone. To reject an incoming call, press .]You can mute the ringtone when a call comes in by pressingand holding the volume down side key.T9 mode This mode lets you enter words with only onekeystroke per letter. Each key on the keypad hasmore than one letter. The T9 mode automaticallycompares your keystrokes with an internaldictionary to determine the correct word, thus requiring far fewer keystrokes than thetraditional ABC mode. This is sometimes known as predictive text.ABC mode This mode lets you enter letters by pressing thekey labelled with the required letter once, twice,three or four times until the letter is displayed.123 mode (Number mode) Type numbers using one keystroke per number. To change to 123 mode in a text entry field, pressuntil 123 mode is displayed.](https://usermanual.wiki/LG-Electronics-USA/KG290/User-Guide-800587-Page-16.png)
![25General FunctionsChanging the text input mode 1. When you are in a field that allows characters tobe entered, you will notice the text input modeindicator in the upper right corner of the LCDscreen.2. Press to switch between T9Abc, T9abc,T9ABC, ABC, Abc, abc and 123.Using the T9 ModeThe T9 predictive text input mode allows you toenter words easily with a minimum number of keypresses. As you press each key, the handset begins to display the characters that it thinks you are typingbased on a built-in dictionary. As new letters areadded, the word changes to reflect the most likelycandidate from the dictionary.1. When you are in the T9 predictive text inputmode, start entering a word by pressing keys to . Press one key per letter.]The word changes as letters are typed. Ignore what’s on the screen until the word istyped completely.]If the word is still incorrect after typingcompletely, press once or more to scrollthrough the other word options.ExamplePress to type Good.Press to get Home.]If the desired word is missing from the wordchoices list, add it by using the ABC mode.2. Enter the whole word before editing or deletingany keystrokes.3. Complete each word with a space by pressing .To delete letters, press . Press and hold downto erase entire words.Using the ABC ModeUse to to enter your text.1. Press the key labelled with the required letter:]Once for the first letter.]Twice for the second letter.]And so on.](https://usermanual.wiki/LG-Electronics-USA/KG290/User-Guide-800587-Page-17.png)
![General Functions26General Functions2. To insert a space, press once. To deleteletters, press . Press and hold down toclear the display. Refer to the following table for more information onthe characters available using the alphanumeric keys.Note]The characters assigned to the keys and their order ofappearance depends on the language selected using theoption Input method. The table above provides thecharacters set for English language.Using the 123 (Number) modeThe 123 mode enables you to enter numbers in atext message (a telephone number, for example).Press the keys corresponding to the required digitsbefore manually switching back to the appropriatetext entry mode.Using the symbol modeThe symbol mode enables you to enter varioussymbols or special characters. To enter a symbol,Options > Add > Symbol. Use the navigation and numeric keys to select the desired symbol and press .Lower CaseUpper Case. , / ? ! - : ' " 1. , / ? ! - : ' " 1a b c 2 à â æ çA B C 2 À Â Æ Çd e f 3 é è ê ëD E F 3 É È Ê Ëg h i 4 î ïG H I 4 Î Ïj k l 5J K L 5m n o 6 ñ ô ö œM N O 6 Ñ Ô Ö Œp q r s 7P Q R S 7t u v 8 ûT U V 8 Ûw x y z 9 w yW X Y Z 9 W YSpace 0Space 0Characters in the order displayKeyˆ ˆ ˆ ˆ](https://usermanual.wiki/LG-Electronics-USA/KG290/User-Guide-800587-Page-18.png)
![Entertainment28EntertainmentGames & Apps Menu 1.1 • Games: In this menu, you can manage the Javaapplications installed in your phone. You can playor delete downloaded applications, or set theconnect option. The downloaded applications areorganised in folders. After selecting a folder, press [Options] and then submenus available to several options are displayed.]Open: You can see the stored games.]New folder: Create a new slide.]Delete all: You can delete all.Java settings Menu 1.2 Activating a profile1. Move the cursor to the profile which you wouldlike to activate.2. Press or select Activate from the Optionsmenu.Adding a new profile1. Select New profile from the Options menu. 2. Press the right soft key [Done] to save anyconfiguration changes.You can view, edit or delete~by selecting View, Editand Delete from Options menu. You can also reset all profile information fromOptions > Reset all menu. JavaTM, is a technology developed by SunMicrosystems. Similar to the way you woulddownload the Java Applet using the standard MSInternet Explorer browsers, Java MIDlet can bedownloaded using a WAP enabled phone.Depending on the service provider, all Java basedprograms such as Java games can be downloadedand run on a phone. Once downloaded, the Javaprogram can be viewed in the Games & Appsmenu where you can select, execute, or delete.The Java program files saved in the phone are in.JAD or .JAR format.](https://usermanual.wiki/LG-Electronics-USA/KG290/User-Guide-800587-Page-20.png)
![Vodafone Live!29Vodafone Live!Homepage Menu 2.1You can launch the web browser and access thehomepage of the web service provided by Vodafone.]You can also directly access Vodafone live! bypressing the right soft key in idle mode.Enter URL Menu 2.2Enter address You can manually enter a URL address and access theassociated web page.]To enter a symbol, press to display the Symboltable.]To switch input mode, press .Bookmarks Menu 2.3You can store frequently accessed or favouriteURLs/Pages. Several preconfigured URLs are storedas bookmarks.Adding a new bookmark1. Select New Bookmark from the Options menu.2. Enter the title and associated URL information.3. Press the left soft key [OK] to save.Connecting to a desired bookmarkPress or select Connect from the Options menu.Adding a new folder1. Select New folder from the Options menu.2. Enter the title.3. Press the left key [OK] to save.History Menu 2.4Shows the list of web page's titles accessed recently.You can access the web page easily.Saved pages Menu 2.5The phone can save the page on display as an offlinefile. Up to 20 pages can be saved.](https://usermanual.wiki/LG-Electronics-USA/KG290/User-Guide-800587-Page-21.png)
![Multimedia32MultimediaCamera Menu 4.1 Press the Menu key and select Camera using thenavigation keys. Or you can directly open the cameramodule by a press of the Camera key in standbymode. The camera module opens and you’ll see theview to be captured.1. Press the left soft key to access Menuand set thedesired environment as follows. ]Move between the options menus with / .]Select the desired value with / and confirmthe selection with the left soft key or .preview optionmenu barResolution640x480, 320x240, 160x120Normal, Fine, Super fine You can delay the camera shutter time. off, 3Secs, 5Secs, 10 Secs“ ” is shown when the timer is activated.You can view Full image or Full screen. One, Three, Six(Note: Available multishot depends on the size.)off, Sepia, Mono, NegativeYou can adjust the tone of the backgroundphoto according to the weather.Auto, Daylight, Incandescent, Cloudy,FluorescentSelect the desired shutter sound.Select the reset setting or notQualityTimerView mode MultishotEffectWhitebalanceSutter toneResetsetting](https://usermanual.wiki/LG-Electronics-USA/KG290/User-Guide-800587-Page-24.png)
![33Multimedia2. After finishing all the settings, press the right softkey [Close].3. Focus the camera on what you want to take andpress .4. Press to save the picture. It is saved in thePictures folder of My Files. Voice recorder Menu 4.2In this feature you can record over 10 voice memos,up to a maximum of 60 seconds each.](https://usermanual.wiki/LG-Electronics-USA/KG290/User-Guide-800587-Page-25.png)
![Messaging34MessagingCreate new Menu 5.1Text message (Menu 5.1.1)You can write and edit text messages up to 10 pages.1. Enter the Te x t menu by pressing [OK].2. To make text input easier, use T9. For details, referto page 21 through 24 (Entering text).3. Press [Options > Add] to attach the following ;Add]Symbol: You can add special characters.]Image: You can insert the Default graphics orgraphics in My pictures that are available for shortmessages.]Sound: You can insert sounds that are available forshort messages.]Text templates: You can use Text templatesalready set in the phone.]Contact: You can add phone numbers or e-mailaddresses in the address book.]My business card: You can add your Business cardto the message.5. After you have completed the message, to selectthe required option, press the left soft key [Options].Options]Send to: Sends text messages.1. Enter numbers of recipient. Also, you can selectOptions and choose from Contacts, or Recentmessages to send a text message.2. Press key to add more recipients.3. Once the numbers have been entered, press theleft soft key to send the message. All messageswill automatically be saved in the outbox folder,even after a sending failure.All messages will automatically be saved in theoutbox folder, even after a sending failure.]Save to drafts: Stores messages in the Draftsfolder.]Input method: Select the desired language for T9input mode.](https://usermanual.wiki/LG-Electronics-USA/KG290/User-Guide-800587-Page-26.png)
![35Messaging]Text entry: You can choose languages and alsodeactivate the T9 input mode my selecting 'T9off'. You can add to dictionary.]Clear text: You can delete all of the words written.]Exit: If you press Exit whilst writing a message, youwill be taken back to the message menu. Also thewritten message will not have been saved.Note]This phone supports EMS release 5, so is available tosend colour pictures, sounds, text styles, etc.. If theother parties handsets do not support such options, thepictures, sounds or texts sent may not be displayedcorrectly on their phones.Multimedia message (Menu 5.1.2)A multimedia message can contain text, image,and/or sound clip.1. Enter the Multimedia menu by pressing [OK].2. To make text input easier, use T9. 3. Press Options menu to Add picture, sound,symbol, text template, Contact, My businesscard. Maxium available file size, that can beinserted to MMS-message, is 100kb.4. After you have completed the message, to selectthe required option, press the left softkey[Options].Options]Send to: You can send multimedia messages tomultiple recipients, as well as save it to send al alater time. ]Add picture: You can add the saved pictures ornew pictures. ]Add sound: You can add the saved sounds or newsounds.]Add others: You can add the Symbol, Texttemplate, Contact, My business card or New slide.]Input method: Select the desired language for T9input mode. ]Preview: You can preview multimedia message youhave created.]Save: You can save multimedia messages To draftsor As template.]Text entry: You can choose languages and alsodeactivate the T9 input mode my selecting 'T9off'. You can add to dictionary.](https://usermanual.wiki/LG-Electronics-USA/KG290/User-Guide-800587-Page-27.png)
![]Others: You can set a timer for slide text or editsubject. ]Exit: Will take you back to the Message menu. Inbox Menu 5.2You will be alerted when you have received messages.They will be stored in the Inbox.In the Inbox, you can identify each message by theiricons. For detail, see the icon directive.]Icon directiveIf the phone shows ‘No space for SIM message’, youonly have to delete the SIM messages from the Inbox.If the phone displays ‘No space for message’, you willthen need to delete messages, media or applicationsto free up space.Note]SSIIMM mmeessssaaggee::SIM message means the message isexceptionally stored in the SIM card.When you are notified that you have received amultimedia message, you have to wait for themessage to be downloaded before you can view it.For notification setting, see (Menu 5.0.2.7) fordetail.To read a message, select one of the messages bypressing .]View: You can view the selected message.]Reply With: You can reply to the sender.]Reply all (applicable to Multimedia messageonly): You can replay multimedia messages.]Delete: You can delete the current message.Messaging36MessagingIcon DescriptionMultimedia messageRead Multimedia messageShort messageRead Short messageNotified multimedia messageRead notified multimedia message](https://usermanual.wiki/LG-Electronics-USA/KG290/User-Guide-800587-Page-28.png)
![37Messaging]Retrive (In the case of notification message):If Multimedia message is set to Auto download off,you can get only Notification. To receive amessage, you need to select [Receive].]Forward: You can forward the selected message toanother party.]Make call: You can call the sender back.]Save number: You can save the message's number.]Information: You can view information aboutreceived messages; Sender's address, Subject (onlyfor Multimedia message), Message date & time,Message type, Message size.]Delete more: Deletes multiple or all the messagesfrom inbox folder.Drafts Menu 5.3 You can view the messages saved as a draft. The draftmessages are listed with the date and time when theywere saved. Scroll through the list using up/downnavigation keys.Each draft has the following options. Press[Options].]View: You can view the selected message.]Edit: You can edit the selected message.]Delete: Deletes the selected message from thedrafts folder.]Information: You can view the information ofselected message: subject (only for multimediamessage), the date and time when saved, messagetype and size, the priority (only for multimediamessage).]Delete more: Deletes multiple or all the messagesfrom drafts folder.Outbox Menu 5.4 The Outbox is a temporary storage place formessages waiting to be sent. Failed messages are alsoplaced in the Outbox.]View: You can view the message.]Delete: You can delete the message.](https://usermanual.wiki/LG-Electronics-USA/KG290/User-Guide-800587-Page-29.png)
![]Resend: You can resend the message.]Edit: You can edit the message.]Information: You can check the information ofeach message.]Delete more - Multi delete: Deletes selected drafts at one time.- Delete all: You can delete all the messages in theoutbox.Sent Menu 5.5Shows the messages you sent (Message).[Options]]View: Opens the selected message.]Delete: Deletes the current message.]Forward: Forwards the selected message.]Information: Brief information on the message. ]Delete more: Deletes multiple or all the messagesfrom sent folder.Media album Menu 5.6(Note: This service is not available in all countries.Please contact your service provider for furtherinformation.)Accessses the remote media album.Listen voicemail Menu 5.7 This menu provides you with a quick way of accessingyour voice mailbox (if provided by your network).Before using this feature, you must enter the voicemail number obtained from your network operator. When a new voice message is received, the symbol will be displayed on the screen. A long pressof the key will take you directly into yourvoicemail. Please check with your service operator fordetails of their service in order to configure thehandset correctly.Messaging38Messaging](https://usermanual.wiki/LG-Electronics-USA/KG290/User-Guide-800587-Page-30.png)
![39MessagingInfo messages Menu 5.8 (Dependent to network andsubscription)Info service messages are text messages delivered bythe network to your handset. They provide generalinformation such as weather reports, traffic news,taxis, pharmacies, and stock prices. When you receivean info service message, you will see a popupmessage show you that or the info service message isdirectly displayed. To view the message again followthe sequence shown below;Read (Menu 5.8.1) 1. When you have received an info service messageand select Read to view the message, it will bedisplayed on the screen. You can read anothermessage by scrolling , or [OK].2. The message will be shown until another messageis selected.Templates Menu 5.9 Text (Menu 5.9.1) You can add, edit, and delete frequently used usefulphrases using the left soft key [Options].The followings are pre-defined text templates.• Please call me back.• I’m late. I will be there at• Where are you now?• I am on the way.• Top urgent. Please contact.• I love you. The following options are available.]View: Select this to view the selected template.]Edit: Use this to edit the selected template.NoteDepending on your service provider, useful phrases are savedas a default.](https://usermanual.wiki/LG-Electronics-USA/KG290/User-Guide-800587-Page-31.png)
![]Send via- Text message: Use this to send the selectedtemplate message by SMS.- Multimedia message: Use this to send theselected template message by MMS.]Delete: Deletes the selected template from thetext template list.]New template: Use this to create a new template.]Delete all: Deletes all templates.Multimedia (Menu 5.9.2)After you have saved a new template, you can use thefollowing options.]View: You can see multimedia templates.]Edit: You can edit multimedia templates.]Send: You can write and send multimediamessages.]Delete: You can delete multimedia templates.]Create template: Allows you to add newmultimedia templates.]Delete all: Allows you to delete all multimediamessages.Message settings Menu 5.0Text message (Menu 5.0.1)]Message centre number: Saves or changes thenumber of your SMS centre when sending textmessages. You must obtain this number from yourservice provider.]Delivery report: If you set to Yes, you can checkwhether your message is sent successfully.]Validity period: This network service allows you toset how long your text messages will be stored atthe message centre.]Reply charging: When a message is sent, it allowsthe recipients to reply and charge the cost of thereply to your telephone bill. ]Message types:Text, Voice, Fax, Natl. paging, X.400, Email,ERMESMessaging40Messaging](https://usermanual.wiki/LG-Electronics-USA/KG290/User-Guide-800587-Page-32.png)
![41MessagingUsually, the type of message is set to Text. You canconvert your text into alternative formats. Contactyour service provider for the availability of thisfunction.Multimedia message (Menu 5.0.2)]Subject: You can enter multimedia messagessubject when this menu is on.]Slide duration: You can set the duration of slidesby the second.]Priority: You can set the priority of the messageyou choose.]Validity period: This network service allows you toset how long your text messages will be stored atthe message centre.]Delivery report: If it is set to Yes in this menu,you can check whether your message is sentsuccessfully.]Read report: You can check if your message isread by the recipient. This feature is dependent onthe network.]Auto download: If you select On, you will receivemultimedia messages automatically. If you selectOff, you will receive only a notification message inthe inbox and then you can check this notification.If you select Home network only, you will receivemultimedia messages only when you are registeredto your home network (not roaming).]Network profiles: If you select the multimediamessage server, you can set the URL for themultimedia message server.]Permitted message typePersonal: Personal message.Advertisements: Commercial message.Information: Necessary information.Voicemail number (Menu 5.0.3) You can receive voicemail if your network serviceprovider supports this feature. When a new voicemailis received, a symbol will be displayed on the screen.Please check with your network service provider fordetails of their service in order to configure thephone accordingly.](https://usermanual.wiki/LG-Electronics-USA/KG290/User-Guide-800587-Page-33.png)
![Push message (Menu 5.0.4) You can set the option whether you will receive themessage or not.Info message (Menu 5.0.5) ]Receive- Ye s : If you select this menu, your phone willreceive Info service messages.- No: If you select this menu, your phone will notreceive Info service messages any more.]Alert- Ye s : Your phone will beep when you have receivedInfo service messages.- No: Your phone will not beep even though youhave received info service messages.]Topics- View list: You can see Info service messagenumbers which you have added. If you press[Options], you can edit and delete info messagecategories which you have added.- Active list: You can select info service messagenumbers in the active list. if you activate an infoservice number, you can receive messages sentfrom the number.]Languages- You can select the language you want by pressing[ ]. Then, the info service message will beshown in the language that you have selected.Messaging42Messaging](https://usermanual.wiki/LG-Electronics-USA/KG290/User-Guide-800587-Page-34.png)
![My Files43My FilesPictures Menu 6.1 The Pictures folder consists of embedded links for downloading pictures through the Internet andDefault images.Pictures taken using the camera are stored in thePictures folder and you can create new folders tomanage them. When a download link is selected, the followingoptions will be displayed by pressing the left soft key[Options].]Connect: You can connect the Internet. ]View: You can view the picture.]Set as: You can set as wallpaper or contact image.]File info: You can view the file information. ]Slide show: You can view slide show.]New folder: You can create a new folder within thefolder currently selected.]Delete more:- Multi delete: Deletes the selected image. - Delete all: Deletes all images. ]Sort by: You can sort the files by date,type orname. Sounds Menu 6.2 Here you can manage, send or set sounds asringtones.When a download link is selected, the followingoptions will be displayed by pressing the left soft key[Options].]Connect: You can connect the Internet. ]Play: You can play the sound.]Set as: You can set as ringtone or contact ring.]File info: You can view the file information. ]New folder: You can create a new folder within thefolder currently selected.]Delete more: - Multi delete: Deletes the selected image. - Delete all: Deletes all images. ]Sort by: You can sort the files by date,type orname.](https://usermanual.wiki/LG-Electronics-USA/KG290/User-Guide-800587-Page-35.png)
![Tools45Tools SIMToolkit (depend on SIM)Menu 7.1 Alarm clock Menu 7.2 If you set the alarm, the appears on the indicatorbar. The specified alarm sounds at the scheduledtime. Press right soft key [Quit] to stop the alarm,and the alarm is released. Press the left soft key[Snooze]. The alarm sound stops and resumes afterthe selected Snooze duration. You can configure upto 5 alarms.1. Select your desired alarm to configure in the alarmlist. If there is no alarm, press the right soft key[New] to add a new alarm.2. Set/Cancel alarm: Set or cancel the alarm usingthe options for specifying whether the alarm is onor by choosing the alarm time.3. Input alarm time: Input your desired alarm timeby specifying Hour and Minute. Choose either‘AM’ or ‘PM’ which is visible if 12 hour format isspecified for the phone.4. Select repeat mode: Select the desired repeatmode using / or select the desired one fromthe list by pressing .5. Select Alarm Tone: Select the alarm tone to ringat the alarm time opening the list by pressing theleft soft key [Options] > Sounds 6. Title: Input alarm name.7. When you have finished setting the alarm, pressthe left soft key [Save].Calendar Menu 7.3 You can refer to your schedule by months. Thecursor is on the current date, and the registered dateis marked. The schedule saved for the date where the cursor islocated is represented by an icon. Pressing theshortcut key moves to the previous year andpressing move to the next year. Pressingmoves to the previous month, and moves to thenext month. You can move the date using the ///.Note]The alarm will go off even when the phone is switched off.](https://usermanual.wiki/LG-Electronics-USA/KG290/User-Guide-800587-Page-37.png)
![You can enter a schedule or memo in the schedulerby pressing the left soft key [Options].]View: Shows the schedule note or memo for thechosen day. Press the left soft key [Options] toedit or delete the note you selected.]New schedule: Select this to enter a new scheduleor memo. After a schedule note is entered on adate, the date is shown in a different colourand appears on the right bottom of thescreen. This function reminds you of yourschedule. And the phone will sound an alarm toneif you set the phone to do so.]Scheduler tone: Adjust the Scheduler tone.]All schedules: Shows all the notes that are enteredin the phone. Use the up/down navigation keys tobrowse through the note lists.]Go to date: Shows schedule of the date you put.]Delete more- Delete old: Select this to delete the expiredschedule notes that you have already beennotified of.- Delete all: Select this to delete all the schedulenotes and memos.Tasks Menu 7.4 You can view, edit and add tasks to do. Tasks aredisplayed in time order. Tasks that have beencompleted or not completed are displayed indifferent ways.Options]View: To view detailed task contents, locate thecursor on the desired item in the Tasks list, andthen press . ]New task: To input the date, description andpriority for the task and input the status. Whenyou have finished entering the data, press the leftsoft key [Save] key to save the new task.]Status: You can view the status of task selected.]Delete: You can delete the task.You can display the tasks in progress or completed. ]Edit: You can edit a task using the leftkey[Otions].Tools 46Tools](https://usermanual.wiki/LG-Electronics-USA/KG290/User-Guide-800587-Page-38.png)
![47Tools ]Calendar: You can view tasks of the day selected.]Delete more: You can select Multiple or Allcomplete tasks to delete. And you can delete oldtasks or all.Memo Menu 7.5 Using the memo management function, you can viewand manage saved memo contents and add newmemo.Enter the contents of the memo. You can save thememo to the list by pressing the [OK] key.Add memoTo add a new memo, press the right soft key [Add].Enter the contents of the memo. You can save thememo to the list by pressing the right soft key[Done].Edit and delete memoHighlight the desired memo and press to view itscontents. You can edit or delete the contents of amemo using the left soft key [Options]. You canselect Multiple or All memos using the Mark/Unmarkoption and then delete a memo.Calculator Menu 7.6 The calculator module allows you to perform basicarithmetic functions such as addition, subtraction,multiplication, and division as well as some scientificfunctions.1. Press the left soft key.2. Select the appropriate function.You can enter numbers by using the number keys,and the operators by using the / / /direction keys. You can enter a decimal point bypressing . Whenever you press , charactersare sequentially deleted in reverse order. Wheneveryou hold down, all the characters are deleted inreverse order in one go.When calculation is complete and the result isdisplayed on the screen, pressing a symbol saves theresult into the symbol and continues calculation.Converter Menu 7.7Using this menu, users can convert Currency, Area,Length, Weight, Temperature, Volume and Velocity.](https://usermanual.wiki/LG-Electronics-USA/KG290/User-Guide-800587-Page-39.png)
![Tools 48ToolsCurrency (Menu 7.7.1)1. Select Currency menu.2. Select the desired unit.3. Enter the standard unit and view the convertedvalue.4. To exit Currency conversion function, press [Back]key. Area (Menu 7.7.2)1. Select Area menu.2. Select the desired unit.3. Enter the standard unit and view the convertedvalue.4. To exit the Area conversion function, press [Back]key.Length (Menu 7.7.3)1. Select the length menu.2. Select the desired unit.3. Enter the standard unit and view your convertedvalue.4. To exit the length conversion function, press the [Back] key.Weight (Menu 7.7.4)1. Select the Weight menu.2. Select the desired unit.3. Enter the standard unit and view the convertedvalue.4. To exit the Weight conversion function, press the [Back] key.Temperature (Menu 7.7.5)1. Select the Temperature menu.2. Position the cursor on the desired unit by usingthe up or down arrow keys.3. Enter the standard unit and view the convertedvalue.4. To exit the Temperature conversion function, pressthe [Back] key.](https://usermanual.wiki/LG-Electronics-USA/KG290/User-Guide-800587-Page-40.png)
![49Tools Volume (Menu 7.7.6)1. Select the Volume menu.2. Select the desired unit.3. Enter the standard unit and view the convertedvalue.4. To exit the volume conversion function, press the[Back] key.Velocity (Menu 7.7.7)1. Select the Velocity menu.2. Select the desired unit.3. Enter the standard unit and view the convertedvalue.4. To exit the Velocity conversion function, press the[Back] key.World clock Menu 7.8 The World clock function provides time informationon major cities worldwide.You can view the time of the desired country or cityby navigating using /. You can select a desired city as a base using the rightsoft key [Home].Stopwatch Menu 7.91. Press [Start] to take time and record the lap timeby pressing [Lap].2. Press [Stop] to ascertain the record of lap time.3. Press [Reset] to default condition.](https://usermanual.wiki/LG-Electronics-USA/KG290/User-Guide-800587-Page-41.png)
![51ContactsContacts settings Menu 8.7 Screen display (Menu 8.7.1) ]Name only: Set the phonebook list by displayingthe name only.]With number: Set the phonebook list bydisplaying the name and number.]With number and pictures: Set the phonebooklist with the information and picture of contact.Save new Contacts to (Menu 8.7.2)If you select SIM or Handset, the phone will store anentry to the SIM or phone.View Contacts from (Menu 8.7.3)The contact viewing source can be defined. If youselect Handset memory, for example, you can onlysee contacts from the phonebook in the handset.Three types of memory locations are supported:Phone memory, SIM memory, and All (both phoneand SIM memory).Information Menu 8.8]Service dial number: Use this function to access aparticular list of services provided by your networkoperator (if supported by the SIM card).]Own number: You can save and check your ownnumber in SIM card.]My Business card: This option allows you tocreate your own business card featuring Name anda mobile phone number. You can send a businesscard via the Multimedia or Text message also.](https://usermanual.wiki/LG-Electronics-USA/KG290/User-Guide-800587-Page-43.png)
![Settings52SettingsPhone settings Menu 9.1Many features of your phone can be customised tosuit your preferences. All of these features areaccessed via the Phone settings menu.Time & Date (Menu 9.1.1) Set date (Menu 9.1.1.1)1. Select the Date item from the Date & Time listand then press .2. Select the date format using /.3. Enter Day, Month and Year using the numberkeys.4. Press the left soft key [OK] to set the date withthe specified value.Date format (Menu 9.1.1.2)You can set the date format. Set time (Menu 9.1.1.3)You can enter the current time. Time format (Menu 9.1.1.4)You can set the time format between 24-hour and12-hour. Languages (Menu 9.1.2) Select the display language. You can selectAutomatic language option to change displaylanguage to the SIM card supported language.PIN code request (Menu 9.1.3)In this menu, you can set the phone to ask for thePIN code of your SIM card when the phone isswitched on. If this function is activated, you’ll berequested to enter the PIN code.1. Select PIN code request in the phone settingsmenu, and then press [OK].2. Set On/Off.3. If you want to change the setting, you need toenter PIN code when you switch on the phone.4. If you enter the wrong PIN code more than 3times, the phone will lock out. If the PIN isblocked, you will need to key in the PUK code.](https://usermanual.wiki/LG-Electronics-USA/KG290/User-Guide-800587-Page-44.png)
![53Settings5. You can enter your PUK code up to 10 times. Ifyou enter the wrong PUK code more than 10times, you can not unlock your phone. You willneed to contact your service provider.Phone lock (Menu 9.1.4)You can lock your phone. The following 4 lockfunctions are available.When power on: Locks the handset whenever thehandset is switched on.When SIM changed: Locks the handset when thephone's SIM card has been changed.Off: Deactivates the lock function.You are requested to enter the security code toconfirm the selection.]To unlock the handset, you need to enter thesecurity code.Change codes (Menu 9.1.5)You can change the PIN, PIN2, Security code, themobile phone password and the call barringpassword.PIN codePIN is the abbreviation for Personal IdentificationNumber, and is used to restrict use by anunauthorised user.PIN code change procedure1. Select ‘PIN code’ from the ‘Change codes’ list andthen press .2. Enter the current PIN code and press .3. Enter the new PIN code and press .4. Enter the new PIN code once again and press .]If the PIN code is different from that of step 3,the procedure is restarted from step 3.5. When the PIN code is changed properly, aChangedmessage is displayed. If you enter anincorrect PIN code in step 2, the procedure isrestarted from step 2, and the number of attemptsyou have left to enter the number is decreased by 1.](https://usermanual.wiki/LG-Electronics-USA/KG290/User-Guide-800587-Page-45.png)
![Settings54SettingsPIN2 codePIN2 is the abbreviation for Personal IdentificationNumber 2, and is used to restrict use byunauthorised users as with the PIN. The PIN2 codechange procedure is the same as the one for the PINcode. 3 incorrect PIN2 code entries would invalidatethe PIN2 code. In this case, you have to enter thePUK2 code in order to use the PIN2 code again. Themaximum number of times you may try to enter thePUK2 code is 10, like PUK1. 10 incorrect PUK2 codeentries would invalidate the PIN2 code.Security codeThe security code is used to change the mobilephone password. The maximum number of attemptsto enter the security code is not limited as it is withPIN and PIN2.Sound profiles Menu 9.2In Sound profiles, you can adjust and customise thephone tones for different events, environments, orcaller groups. There are five preset profiles: Normal,Silent, Vibrate only, Outdoor and Headset. Each profile can be personalised(Except Vibrate only,Silent menu).Display settings Menu 9.3This menu allows you to personalise the display optionsof the screens and of the menus entire graphic interface.Wallpaper (Menu 9.3.1) You can select an image to be displayed on the mainscreen.Backlight timer (Menu 9.3.2)You can set the backlight duration on the Homescreen and Keypad individually.Brightness (Menu 9.3.3)The screen brightness can be adjusted.Note]Three incorrect PIN code entries in the PIN code entrywindow would invalidate the PIN code. In this case, youhave to enter the PUK (PIN Unblock Key) code toconfigure the PIN code again. The maximum number oftimes you may enter the PUK code is 10. (Note: If youenter an incorrect PUK code10 times, the SIM card will beblocked and must be replaced.)](https://usermanual.wiki/LG-Electronics-USA/KG290/User-Guide-800587-Page-46.png)
![Settings56Settings5. Incoming when abroadWhen is selected, it operates in the same wayas the Outgoing calls menu.Select the Activate menu to receive the Barringpassword from the user and activate the barringservice on the network.The Cancel menu sets the selected call restrictionoff. The View status menu enables users to view the current network configuration. Selecting Viewstatus menu displays the Requesting message with animation and the result of the operationwhen the network answers.6. Cancel all barrings You can cancel all barring services.7. Change password You can change the password for Call BarringService.Show my number (Menu 9.4.3)]Set by network: Configures with the defaultsettings determined by the service provider.]On: Configures to send my phone number whenmaking an outgoing call.]Off: Configures not to send my phone numberwhen making an outgoing call.Call duration (Menu 9.4.4) You can view call time by types.The following timers are available:]Last call: Shows the latest call time in units ofhours/minutes.]All calls: Shows total call time.]Dialled calls: Shows outgoing call time.]Received calls: Shows incoming call time.Fixed dial number (Menu 9.4.5) ]ON/OFF: Select whether to activate or not. PINauthentication is required.]Number list: Displays the current Fixed dialist. Youcan edit, add, or delete fixed dial numbers. PIN2authentication is required to edit the list. And theconfiguration information is saved on the SIM.](https://usermanual.wiki/LG-Electronics-USA/KG290/User-Guide-800587-Page-48.png)
![57SettingsAnswer mode (Menu 9.4.6)Allows you to set the answering method. You canchoose between Flip open, Any key and Send keyonly.Call costs (Menu 9.4.7) 1. This function displays the call costs of the Last call, All calls and Cost settings.2. To initialise, press the right soft key [Clear] andenter the PIN2 code.3. You can select either Units or Currency in Set callcost. According to your setting, the call cost isdisplayed during a call (If SIM and Networksupport Advice Of Charge(AOC)).4. In the Set limit configuration, select On toconfigure the cost limit. When a cost limit isconfigured, and the call costs reach the limit,making a call will not be allowed.Call divert (Menu 9.4.8)The Call divert service allows you to divert incomingvoice calls, fax calls, and data calls to anothernumber. For details, contact your service provider.]All voice calls: Diverts all voice callsunconditionally.]If busy: Diverts voice calls when the phone is inuse.]If no reply: Diverts voice calls which you do notanswer.]If out of reach: Diverts voice calls when the phoneis switched off or out of coverage.]All data calls: Diverts to a number with a PCconnection unconditionally.]All fax calls: Diverts to a number with a faxconnection unconditionally.]Cancel all: Cancels all call divert service.The submenusCall divert menus have the submenus shown below.]Activate: Activates the corresponding service.- To voice mailbox: Forwards to message centre.This function does not apply to All data calls andAll fax calls menus.- To other number: Input the number for calldiverting.](https://usermanual.wiki/LG-Electronics-USA/KG290/User-Guide-800587-Page-49.png)
![Settings58Settings- To favourite number: You can check recent fivediverted numbers.]Cancel: Deactivate the corresponding service.]View status: View the status of the correspondingservice.Call waiting (Menu 9.4.9) ]Activate: Activates call waiting service. Selectingthis item, displays requesting message andanimation. When the network answers, the result ofthe operation is displayed.]Cancel: Deactivates Call waiting service. Selectingthis item displays requesting message andanimation. When the network answers, the result ofthe operation is displayed.]View status: Displays activated Call waiting servicegroup item of the network. Selecting this itemdisplays requesting message and animation. Whenthe network answers, the result of the operation isdisplayed.Select line (Menu 9.4.0) This menu is shown only if the SIM supports twosubscriber numbers, that is, two phone lines. Selectwhich phone line (between Line 1 and Line 2) youwant to use for making calls and sending shortmessages. Calls on both lines can be answeredirrespective of the selected line.Others (Menu 9.4.*)Auto redialAllows you to set the auto redial function when a callattempt has failed. Minute minderDetermines whether to sound a 1 minute tone every1 minute when you are on the phone. Send DTMF tones DTMF tones allow your phone to make use of anautomated switchboard.](https://usermanual.wiki/LG-Electronics-USA/KG290/User-Guide-800587-Page-50.png)
![59SettingsMessage settings Menu 9.5 For detailed information, please refer to page 40.(Menu 5.0) Contacts settings Menu 9.6For detailed information, please refer to page 51.(Menu 8.7)Browser settings Menu 9.7 For detailed information, please refer to page 30.(Menu 2.6)Network settings Menu 9.8The Network settings feature enables you to indicatewhether the network used when roaming(outsideyour home area) is selected automatically, manuallyor preferably.Note]You can select a network other than your home networkonly if it has a valid roaming agreement with your homenetwork.Network selection (Menu 9.8.1)Automatic (Menu 9.8.1.1)Use this to set the phone to automatically search forand select one of the networks available in your area.Manual(Menu 9.8.1.2)]Manual: If you want to select the desired networkmanually from a list of networks, you can activatethis function. If the connection to the manuallyselected network is lost, the phone will give off aerror tone and ask you to select a network again.The selected network must have a roamingagreement with your home network. The phone willlet you select another network if the phone fails toaccess the initial selected network. The phone willdefault back to Automatic if it is switched off.Preferred (Menu 9.8.1.3)You can set a list of preferred networks and thephone attempts to register with first, beforeattempting to register to any other networks. This listis set from the phone’s predefined list of knownnetworks.](https://usermanual.wiki/LG-Electronics-USA/KG290/User-Guide-800587-Page-51.png)
![Accessories61AccessoriesThere are various accessories for your mobile phone. You can select these options according to your personal communication requirements.Standard BatteryPortable HandsfreeThis connects to yourphone, allowing handsfreeoperation.Travel Adapter This charger allows you tocharge the battery whilstaway from home or youroffice.Note]Always use genuine LG accessories.]Failure to do this may invalidate your warranty.]Accessories may be different in different regions; pleasecheck with our regional service company or agent forfurther inquires.](https://usermanual.wiki/LG-Electronics-USA/KG290/User-Guide-800587-Page-53.png)