LG Electronics USA KM900QA Cellular/ PCS WCDMA/ GSM/ EDGE Phone with WLAN, Bluetooth and FM Transmitter User Manual 2
LG Electronics USA Cellular/ PCS WCDMA/ GSM/ EDGE Phone with WLAN, Bluetooth and FM Transmitter Users Manual 2
Contents
- 1. Users Manual 1
- 2. Users Manual 2
- 3. Users Manual 3
Users Manual 2
37
01
02
03
04
05
06
07
08
The basics
WARNING: You may
nd it easier to use a stylus in
this mode, please remember
to press lightly to protect your
screen from damage.
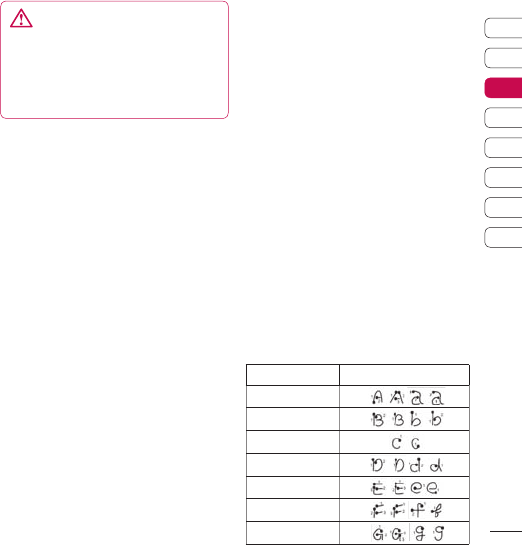
Handwriting recognition translates
stylus gestures into letters,
numbers or other character, and
displays these characters as text.
Handwriting recognition is only
active where text can be entered.
Note: Most letters can be written
using different stroke styles. See
the tables below. The arrow selects
whether the letter is upper or lower
case, not the style of writing.
Alphabet
If you select capital letter mode
(ABC), letters you type will be
inserted as capital letters even if you
write in small letters, and vice versa.
Letter Strokes
A
B
C
D
E
F
G
38 LG KM900G | User Guide
The basics
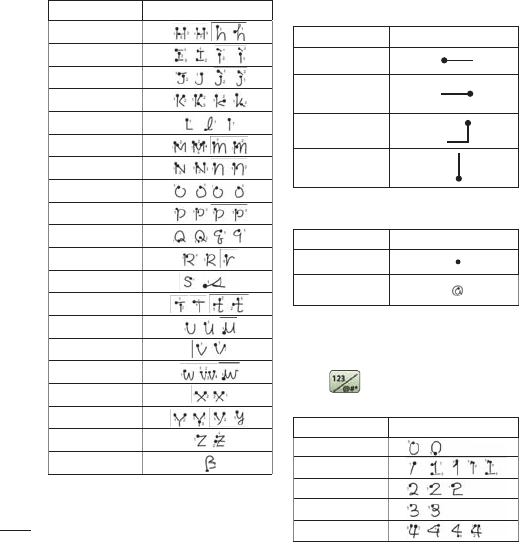
Letter Strokes
H
I
J
K
L
M
N
O
P
Q
R
S
T
U
V
W
X
Y
Z
ß
Accented characters
Accent Strokes
Space
Backspace
Enter
Switching the
text mode
Punctuation marks
Mark Strokes
Full stop
At
@
Note: Start each stroke at the dot.
Numbers
Touch to switch from text entry to
number entry.
Number Strokes
0
1
2
3
4
Messaging
39
01
02
03
04
05
06
07
08
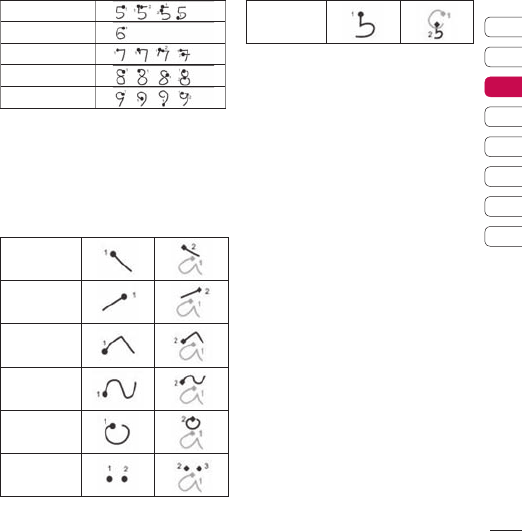
The basics
5
6
7
8
9
Accented letters
Write the character as described above,
then write the accent above the entered
letter. Other such characters, for example,
ö and ü, follow the same principle.
grave
acute
circumflex
tilde
ring
dieresis
cedilla
40 LG KM900G | User Guide
The basics
Messaging
Setting up your email
You can stay in touch on the move
using email on your KM900G. It’s
quick and simple to set up a POP3
or IMAP4 email account.
TIP! To scroll through a list
of options, touch the last item
visible and slide your nger up
the screen. The list will move up
so more items are visible.
1 Touch from the home screen,
and touch Messaging.
2 Select Message settings then
Email.
3 Touch Add new.
4 You can now choose how your
account works:
Title - Enter a name for this
account.
My name - Enter your name.
Username - Enter the account’s
username.
Password - Enter the account’s
password.
Email address - Enter the
account email address.
Reply email address - Enter the
‘reply to’ email address.
Outgoing mail server - Enter the
outgoing email server address
Incoming mail server - Enter the
incoming email server address
Maximum receive size - Choose
the size limit of your emails, the
maximum is 2MB.
Mailbox type - Enter the mailbox
type, POP3 or IMAP4.
Save to server - Choose whether
to save your emails to the server.
For IMAP4 accounts copies are
always saved.

41
01
02
03
04
05
06
07
08
The basics
Save sent mail into - Select
whether to save sent emails
(when the mailbox type is set to
IMAP4). When the mailbox type is
POP3, sent mails are always saved
into handset.
Retrieve only new - Choose
whether to discard emails already
downloaded previously.
Access point - Choose your
Internet access point.
Email to retrieve - Choose the
way to download emails. Choose
from Header only or All including
body for POP3, header only,
header + body, or all for IMAP4.
Auto retrieve - Choose whether
to retrieve your new emails
automatically.
Advanced settings - Choose
whether to use the advanced
settings.
SMTP port number - Normally,
this will be 25.
SMTP TLS/SSL - Choose whether
to use TLS/SSL for outgoing
server.
Incoming server port - Normally,
this is 110 for POP3 accounts and
143 for IMAP4 accounts.
Incoming TLS/SSL - Choose
whether to use TLS/SSL for
incoming server.
SMTP authentication - Choose
the security settings for the
outgoing mail server
SMTP Username - Enter the
SMTP username.
SMTP Password - Enter the SMTP
password.
42 LG KM900G | User Guide
The basics
Messaging
APOP secure login - Choose to
activate APOP secure login for a
POP3 account. IMAP4 accounts
are always set to off.
Now your account is set up, it will
appear in the list of accounts in your
Email folder.
Retrieving your email
You can automatically or manually
check your account for new emails.
See Change your email settings on
page 42 to check automatically.
To check manually:
1 Touch then Messaging.
2 Select Mailbox.
3 Touch the account you want to
use then .
4 Choose Retrieve and your
KM900G will connect to your
email account and retrieve your
new messages.
Sending an email using your
new account
1 Touch in the Communicate
menu to open a new blank
message.
2 You can enter the recipient’s
address and write your message.
You can also attach images,
videos, sounds or other file types.
3 Touch Send and your email will
be sent.
TIP! You can upload Word,
Excel, PowerPoint and PDF
documents to your KM900G
so you can review them on the
43
01
02
03
04
05
06
07
08
The basics
Changing your email settings
You can change your email settings
according to your own preferences.
TIP! To scroll through a list
of options, touch the last item
visible and slide your nger up
the screen. The list will move up
so more items are visible.
1 Touch from the home screen,
and choose Messaging and
Message settings.
2 Select Email.
3 You can adapt the following
settings:
Email accounts - Manage your
email accounts.
Allow reply Email - Choose
to allow the sending of read
confirmation messages.
Request reply Email - Choose
whether to request read
confirmation messages.
Retrieve interval - Choose how
often your KM900G checks for
new email messages.
Retrieve amount - Choose the
number of emails to be retrieved
at one time.
Include message original
- Choose to include the original
message in your reply.
Include attachment - Choose to
include the original attachment in
any reply.
Auto retrieval in Roaming -
Choose whether to retrieve your
messages automatically when
abroad (roaming).
New email notification - Choose
whether to be alerted to new
emails.
Signature - Create an email
signature and switch this feature
on.
Priority - Choose the priority level
of your email messages.
Mail sending size - Choose the
size of email you send.
44 LG KM900G | User Guide
The basics
Message folders
You’ll recognise the folder structure
used on your KM900G, which is
fairly self-explanatory.
Create new message - Open a new
blank message.
Inbox - All the messsages you
receive are placed into your inbox
From here you can view, delete
and more, see Managing your
messages below for details.
Mailbox - All the emails you receive
on your KM900G will be placed in
your mailbox.
Drafts - If you don’t have time to
finish writing a message, you can
save what you’ve done so far here.
Outbox - This is a temporary
storage folder while messages are
being sent.
Sent items - Messages you send are
placed in this folder.
My Folders - Create folders to store
your messages.
Templates - Use a list of commonly
used text and multimedia message
templates.
Emoticons - Add and insert
emoticons for your messages.
Message settings - Change
the settings for your text and
multimedia messages.
Managing your messages
You can use your Inbox to manage
your messages.
TIP! To scroll through a list
of options, touch the last item
visible and slide your nger up
the screen. The list will move up
so more items are visible.
1 Touch then Inbox.
2 Touch and then choose to:
Delete - Delete marked messages.
Create new message - Open a
new blank message.
Messaging
45
01
02
03
04
05
06
07
08
The basics
Move to My folders - Move the
marked messages to My folders.
Search - Search the messages
using a date and /or a phone
number.
Filter - View your message
by type. This will group SMS
separately from MMS.
Delete all - Delete all of the
messages.
If you see the message No space for
USIM messages you should delete
some messages from your inbox.
If you see the message No space
for messages you can delete either
messages or saved files to create
space.
Using templates
Create templates for the SMS
and MMS messages you send
most frequently. You’ll find some
templates already on your phone,
you can edit these if you wish.
1 Touch then choose
Templates.
2 Choose Text templates or
Multimedia templates. You can
then touch to Add template,
Edit, Delete or Delete all
templates. To edit a message just
select it, make your changes and
touch Save.
Using emoticons
Liven up your messages using
emoticons. You’ll find some
commonly used emoticons already
on your phone.
1 Touch then choose
Emoticons.
2 Touch Add new, or touch to,
Delete or Delete all emoticons.
Changing your text message
settings
Your KM900G message settings
are pre-defined so that you can
send messages immediately. These
46 LG KM900G | User Guide
The basics
settings can be changed according
to your preferences.
TIP! To scroll through a list
of options, touch the last item
visible and slide your nger up
the screen. The list will move up
so more items are visible.
Touch then choose Messaging
settings and Text message. You
can make changes to:
Text message centre - Enter the
details of your message centre.
Delivery report - Slide the switch
left to receive confirmation that
your messages have been delivered.
Validity period - Choose how long
your messages are stored at the
message centre.
Message types - Convert your text
into Voice, Fax, X.400 or Email.
Character encoding - Choose how
your characters are encoded. This
impacts the size of your messages
and therefore data charges.
Send long text as - Choose to send
long messages as Multiple SMS or
as MMS.
Changing your multimedia
message settings
Your KM900G message settings
are pre-defined so that you can
send messages immediately. These
settings can be changed according
to your preferences.
Touch then choose Message
settings and Multimedia message.
You can make changes to:
Retrieval mode - Choose Home
or Roaming network. If you then
choose Manual you will receive only
notifications of MMS and you can
then decide whether to download
them in full.
Delivery report - Choose to allow
and/or request a delivery report.
Read reply - Choose to allow and/
or send a read reply.
Messaging
47
01
02
03
04
05
06
07
08
Camera
Taking a quick photo
TIP! The camera lens has
its own cover. Twist the cover
open to use the camera and
quickly open the viewnder.
1 Press the key on the right
side of the phone.
2 You will be prompted to open
the lens cover. The viewfinder will
appear on screen.
3 Holding the phone horizontally,
point the lens towards the subject
of the photo.
4 Slightly press the capture button,
a focus box will appear in the
centre of the viewfinder screen.
5 Position the phone so you can
see the subject of your photo in
the focus box.
6 When the focus box turns green,
the camera has focused on your
subject.
7 Press the capture button fully.
TIP! Touch Shot
You can take a photo by
touching screen also. After
selecting an object with touch,
you can see the subject in the
focus box. When the focus box
turns green you can take a
photo simply by removing their
nger from the screen.
TIP! Face Tracking
Automatically detects and
focuses on human faces to help
you to take clearer pictures.
Get creative
48 LG KM900G | User Guide
Get creative
Camera
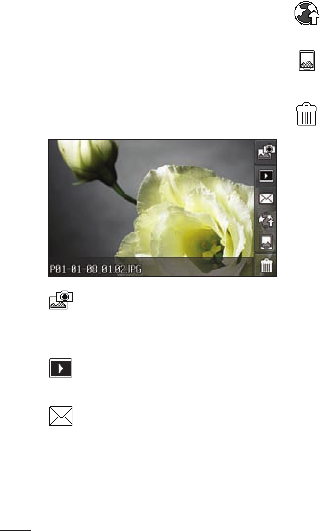
After you’ve taken your photo
Your captured photo will appear
on screen. The name of the image
runs along the bottom of the screen
together with five icons down the
right side.
Touch to take another photo
straightaway. Your current photo
will be saved.
Touch to view a gallery of
saved photos.
Touch to send the photo as a
Message, Email or Bluetooth. See
page 34 for Sending a message, and
page 109 for Sending and receiving
your files using Bluetooth.
Touch to upload to your
account blog.
Touch to set the picture you
have taken as Wallpaper.
Touch to delete the photo
you have just taken and confirm by
touching Yes. The viewfinder will
reappear.
49
01
02
03
04
05
06
07
08
Get creative
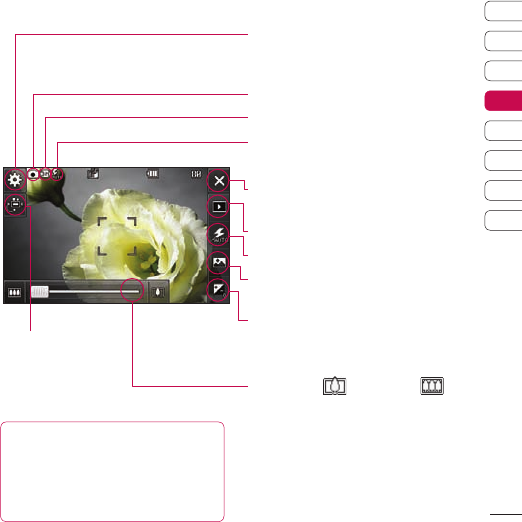
Getting to know the viewfinder
TIP! You can close
all the shortcut options for a clearer
viewnder screen. Simply touch the
centre of the viewnder once. To recall
the options touch the screen again.
Settings - Touch this icon to open the
settings menu. See Using the advanced
settings on page 52 for details.
Camera mode - Camera mode is selected.
Size
Flash status
Back - Touch here to return to the home
screen.
Gallery
Flash - See Using the flash on page 50.
Shot mode - See Choosing a shot mode
on page 50.
Exposure - See Adjusting the Exposure on
page 51.
Zoom - Touch to zoom in or to
zoom out. Alternatively you can use the side
volume keys.
Video - Touch to
switch to video
camera
50 LG KM900G | User Guide
Get creative
Using the flash
The flash is set to auto as default,
but there are other options.
1 Select from the right side of
the viewfinder to enter the flash
sub-menu.
2 There are three flash options:
Auto - Your camera will assess
the lighting needed to take a
good picture and use the flash as
necessary.
Red-eye reduction - The camera
will flash twice in order to reduce
red eye.
Always off - The camera will
never flash. This is useful if you
want to save battery power.
3 When you touch the option you
want to use the flash menu will
automatically close, ready for you
to take your picture.
4 The flash status icon in the
viewfinder will change according
to your new flash mode.
Choosing a shot mode
1 Touch to open the available
shot mode.
2 Choose from seven options:
Normal shot -This is the default
shot type, the photo will be taken
in the normal way, as outlined in
taking a quick photo.
Smile shot - This shot type
is great for taking a photo of
people. Focus on the subject and
press then the photo will be
taken automatically when it smile.
Beauty shot - This enables you
to take a photo of person’s face
clearly and brightly. Especially
useful when you are close up.
Art shot - Choose different
picture effects. (Original,
Black&White, Warm, Cold.)
Camera
51
01
02
03
04
05
06
07
08
Get creative
Continuous shot - This
enables you to take seven
shots automatically in very
quick succession. See Taking
a continuous shot below for
details.
Panorama - This shot type is
great for taking a photo of a large
group of people or for capturing
a panoramic view. See Taking a
panoramic shot on page 52 for
more details.
Frame shot - Choose from one
of the fun frames to transform
your friend or just decorate their
surroundings.
Adjusting the exposure
Exposure defines the difference
between light and dark in an image.
A low contrast image will appear
foggy, whereas a high contrast
image will appear much sharper.
1 Touch .
2 Slide the contrast indicator
along the bar, towards for
a lower exposure, hazier image
or towards for a higher
exposure, sharper image.
Taking a continuous shot
1 Touch to open the available
shot types and select Continuous
shot.
2 Position the subject in the
viewfinder and press the capture
button as you would to take a
normal photo.
3 The camera will take seven shots
in quick succession and display
the first with seven thumbnails
shown on the left side of the
screen.
4 Once you have highlighted the
image you want to keep, touch
. You will be given a chance
to save more than one of the
images.