LG Electronics USA KP330 Cellular/ PCS WCDMA/ GSM/ EDGE Phone with Bluetooth User Manual KP330 ENG 080827 1 1 indd
LG Electronics USA Cellular/ PCS WCDMA/ GSM/ EDGE Phone with Bluetooth KP330 ENG 080827 1 1 indd
UserManual.wiki
>
LG Electronics USA
>
KP330 User Manual
Users Manual
Navigation menu
Upload a User Manual
Namespaces
Wiki Guide
HTML
PDF
Info
Views
User Manual
Discussion / Help
Navigation
![8For Your SafetyImportant InformationThis user guide contains important information on the use andoperation of this phone. Please read all the informationcarefully for optimal performance and to prevent any damageto or misuse of the phone. Any changes or modifications notexpressly approved in this user guide could void your warrantyfor this equipment.Before You StartSafety InstructionsWARNING! To reduce the possibility of electric shock, do notexpose your phone to high humidity areas, such as thebathroom, swimming pool, etc.Always store your phone away from heat. Never store yourphone in settings that may expose it to temperatures less than32°F or greater than 104°F, such as outside during extremeweather conditions or in your car on a hot day. Exposure toexcessive cold or heat will result in malfunction, damageand/or catastrophic failure.Be careful when using your phone near other electronicdevices. RF emissions from your mobile phone may affectnearby in adequately shielded electronic equipment. Youshould consult with manufacturers of any personal medicaldevices such as pacemakers and hearing aides to determine ifthey are susceptible to interference from your mobile phone.Turn off your phone in a medical facility or at a gas station.Never place your phone in a microwave oven as this willcause the battery to explode.IMPORTANT! Please read the TIA SAFETY INFORMATION onpage 78 before using your phone.Safety InformationRead these simple guidelines. Breaking the rules may bedangerous or illegal. Further detailed information is given in thisuser guide.]Never use an unapproved battery since this could damagethe phone and/or battery and could cause the battery toexplode.]Never place your phone in a microwave oven as it willcause the battery to explode.]Do not dispose of your battery by fire or with hazardous orflammable materials.]Make sure that no sharp-edged items come into contactwith the battery. There is a risk of this causing a fire.]Store the battery in a place out of reach of children.]Be careful that children do not swallow any parts such asrubber plugs (earphone, connection parts of the phone,etc.). This could cause asphyxiation or suffocation.](https://usermanual.wiki/LG-Electronics-USA/KP330/User-Guide-1003529-Page-4.png)
![9For Your Safety]Unplug the power cord and charger during lightning stormsto avoid electric shock or fire.]When riding in a car, do not leave your phone or set up thehands-free kit near to the air bag. If wireless equipment isimproperly installed and the air bag is activated, you may beseriously injured.]Do not use a hand-held phone while driving.]Do not use the phone in areas where its use is prohibited.(For example: aircraft).]Do not expose the battery charger or adapter to directsunlight or use it in places with high humidity, such as abathroom.]Never store your phone in temperatures less than- 4°F orgreater than 122°F.]Do not use harsh chemicals (such as alcohol, benzene,thinners, etc.) or detergents to clean your phone. There is arisk of this causing a fire.]Do not drop, strike, or shake your phone severely. Suchactions may harm the internal circuit boards of the phone.]Do not use your phone in high explosive areas as the phonemay generate sparks.]Do not damage the power cord by bending, twisting, pulling,or heating. Do not use the plug if it is loose as it may causea fire or electric shock.]Do not place any heavy items on the power cord. Do notallow the power cord to be crimped as it may cause fire orelectric shock.]Do not handle the phone with wet hands while it is beingcharged. It may cause an electric shock or seriouslydamage your phone.]Do not disassemble the phone.]Do not place or answer calls while charging the phone as itmay short-circuit the phone and/or cause electric shock orfire.]Only use the batteries, antennas, and chargers provided byLG. The warranty will not be applied to products provided byother suppliers.]Only authorized personnel should service the phone and itsaccessories. Faulty installation or service may result inaccidents and consequently invalidate the warranty.]Do not hold or let the antenna come in contact with yourbody during a call.]An emergency call can be made only within a service area.For an emergency call, make sure that you are within aservice area and that the phone is turned on.](https://usermanual.wiki/LG-Electronics-USA/KP330/User-Guide-1003529-Page-5.png)
![11For Your SafetyVehicle Mounted External Antenna(optional, if available)A minimum separation distance of 8 inches (20cm) must bemaintained between the user/bystander and the vehiclemounted external antenna to satisfy FCC RF exposurerequirements. For more information about RF exposure, visitthe FCC website at www.fcc.govFCC Part 15 Class B ComplianceThis device and its accessories comply with part 15 of FCCrules. Operation is subject to the following two conditions: (1) This device and its accessories may not cause harmfulinterference, and (2) this device and its accessories mustaccept any interference received, including interference thatmay cause undesired operation.Cautions for Battery]Do not disassemble.]Do not short-circuit.]Do not expose to high temperature: 60°C (140°F).]]Do not incinerate.Battery Disposal]Please dispose of your battery properly or bring to yourlocal wireless carrier for recycling.]Do not dispose in fire or with hazardous or flammablematerials.Adapter (Charger) Cautions]Using the wrong battery charger could damage your phoneand void your warranty.]The adapter or battery charger is intended for indoor useonly.Do not expose the adapter or battery charger to direct sunlightor use it in places with high humidity, such as the bathroom.](https://usermanual.wiki/LG-Electronics-USA/KP330/User-Guide-1003529-Page-7.png)
![13How to use touch keysHow to use touch keysYour KP330 has touch keys on the slide. You can determine what you see on the main screen using the touch keys. Be sure to read “Tips for touch keys” before using touch keys.Tips for touch keysTouch keypad1. There’s no need to press too hard, the touch keys are sensitive enough to pick up on a light touch.Do not subject the product to severe impact, as this may damage the touch key sensors.2. Use the tip of your finger to touch the option you require. Be careful not to touch any other keys around it.3. When both the home screen and touch key lights are off, pressing a touch key will not turn on the home screen light. Press and the home screen light will turn back on (touch keys do not work when the touch key lights are off).4. When the slide is closed, to prevent indiscreet action of the touch keys whilst using the phone, the touch protection function is automatically enabled.(In this case, the touch keys will not work even if they are pressed)To disable touch protection when the slide is closed, press OK key on displaying Unlock key. And then, press the right soft key [Yes].](https://usermanual.wiki/LG-Electronics-USA/KP330/User-Guide-1003529-Page-10.png)
![21General functionsGeneral functionsMaking and answering callsEnsure you tell the other party before recording a voice call.Making and answering a video callYou can make a video call in a 3G covered service area. If the called user has a 3G video phone in a 3G covered service area, the call will be established. You can also answer a video call for video incoming call. To make/answer a video call, do the following.1. Input the phone number using the keypad, or select the phone number from the calls made/received lists.❖ To correct mistakes, press the key briefly to delete the last number, or press and hold the key to delete all numbers.2. If you do not want to use the speakerphone, ensure you have the headset plugged in.3. To start the video function, press the left soft key [Video Call].❖ You will be notified that you will need to close other applications to make the video call.NoteThe video call may take some time to connect. Please be patient. The connection time will also depend on how quickly the other party answers the call. While the video call is connecting, you will see your own images; after the other party has answered, their image will be displayed on screen.4. Adjust the camera position if necessary.5. You can access the following options by pressing the right soft key [Options].❖ End Call❖ Mute ❖ Hide My Picture❖ Hold❖ Capture❖ View sender number❖ Settings: You can set the camera related options.- Zoom: x1 / x2- Night Mode: On / Off- Quality: Super Fine / Fine❖ Others- Contacts: You can save the number in the Address Book.- Messaging: You can send a text message or a multimedia message.](https://usermanual.wiki/LG-Electronics-USA/KP330/User-Guide-1003529-Page-18.png)
![22General functionsGeneral functions6. Press the key to finish the call, or close the handset.Making a voice call1. Enter the number including the full area code.❖ To delete a digit, press the key.To delete all digits, press and hold the key.2. Press the key to make the call.3. Press the key to finish the call, or close the handset.NoteTo activate/deactivate the speakerphone during a call, press the OK key shortly.Making a voice/video call from ContactsIt is easy to call anyone whose number you have stored in your Contacts.Press the down navigation key to access the contacts list. Scroll to your chosen contact. Press the key to make a voice call, or press the right soft key [Video Call] key to make a video call. Press the key to finish the call.Making international calls1. Press and hold the key for the international prefix. The ‘+’ character can be replaced with the international access code.2. Enter the country code, area code, and the phone number.3. Press the key.Adjusting the volumeDuring a call, if you want to adjust the earpiece volume, use the side keys of the handset. In idle mode with the slide open, you can adjust the key volume using the side keys.Answering a callWhen you receive a call, the phone rings and the flashing phone icon appears on the screen. If the caller can be identified, the caller’s phone number (or name if stored in your Contacts) is displayed. You need to slide open in order to answer a call.1. Open the slide and press the key to answer an incoming call. If the answer mode is set to Press any key, any key will answer a call except for the key.](https://usermanual.wiki/LG-Electronics-USA/KP330/User-Guide-1003529-Page-19.png)
![25General functions3. Complete each word with a space by pressing the key.To delete letters, press the key. Press and hold down the key to erase entire words.Using the ABC ModeUse the to keys to enter your text.1. Press the key labelled with the required letter:❖ Once for the first letter❖ Twice for the second letter❖ And so on2. To insert a space, press the key once. To delete letters, press the key. Press and hold down the key to clear the display. Refer to the following table for more information on the characters available using the alphanumeric keys.Key Characters in the order displayLower case Upper case. , ` @ ? ! - : / 1 . , ` @ ? ! - : / 1a b c 2 A B C 2d e f 3 D E F 3g h i 4 G H I 4j k l 5 J K L 5m n o 6 M N O 6p q r s 7 P Q R S 7t u v 8 T U V 8w x y z 9 W X Y Z 9Space, 0 Space, 0Using the 123 (Number) modeThe 123 Mode enables you to enter numbers in a text message (a telephone number, for example). Press the keys corresponding to the required digits before manually switching back to the appropriate text entry mode.Using the symbol modeThe symbol mode enables you to enter various symbols or special characters. To enter a symbol, select the left soft key [Insert] and choose the Symbol. Use the navigation key and numeric keys to select the desired symbol and press the OK key.](https://usermanual.wiki/LG-Electronics-USA/KP330/User-Guide-1003529-Page-22.png)
![29MessagesMessagesNew Message Menu 2.1New Message (Menu 2.1.1)1. Press the OK key and select Messages ❏ New Message ❏ New Message.2. Enter your message in the Message field.3. You can insert the following in the message by pressing the left soft key [Insert].❖ Symbol: You can insert diverse symbols.❖ Picture: You can insert an image. (One image per slide)❖ Audio: You can insert a sound file. (One sound per slide)❖ Video: You can insert a video clip. (One video clip per slide)❖ New Picture: The camera module opens and you can take a picture. The picture can be inserted in the message by pressing the OK key [Insert]. (One picture per slide)❖ New Audio: The voice recorder module opens and you can record a sound. The recorded sound can be inserted in the message by pressing the OK key [Insert]. (One sound per slide)❖ New Video: The video recorder module opens and you can record a video. The recorded video can be inserted in the message by pressing the OK key [Insert]. (One video clip per slide)❖ Subject: Select this to insert a subject.❖ Others: Allows you to insert vCard, vCalendar, vNote or vTask.❖ Template: You can insert a text template, multimedia template or signature saved on the phone. After selecting one, press the OK key. The selected template is inserted into the Message window.❖ Contact: You can add a name and/or a number stored in the Contacts. Make your selection to send Name & Number press the OK key. The Contacts list opens and you can search the desired contact to be inserted.NoteIf you insert an image, a sound, or a video clip in a text message, the screen is changed to Multimedia Message screen.4. You can access the following options by pressing the right soft key [Options].❖ Save to Drafts: Select this to save the message to drafts.](https://usermanual.wiki/LG-Electronics-USA/KP330/User-Guide-1003529-Page-26.png)
![30Messages❖ Settings: You can configure text message related options.1. Validity Period: This network service allows you to set how long your text messages will be stored at the message centre.2. Delivery Receipt: By enabling this option, you can verify whether your message has been sent successfully.3. Reply via Same Message Centre: Determine whether to reply via same message centre or not.❖ Text Entry Mode: Select the desired text entry mode.❖ Text Entry Settings1. Text Entry Language: Select the desired text entry language.2. T9 Next Word Prediction: Select whether to enable T9 text entry mode to predict the next word or not.3. T9 Dictionary: Allows you to add words to the T9 dictionary. You can also delete, reset, and modify words in the T9 dictionary.❖ Cancel: Select this to cancel editing and go back to idle mode.5. Press the OK key [Send To] to send the message. The message will automatically be saved in the Sent folder. If the message has not been sent, it will remain in the Oubox with a failed status.Email (Menu 2.1.2)To send/receive an email, you should set up the email account. (Refer to page 38 for how to set up an email account.)1. Enter the email addresses of the recipients in the To, Cc, Bcc fields. You can search the Contacts by pressing the OK key.• Enter the reference email address to forward the email in Cc (Carbon copy) field.• Enter a hidden reference email address to forward the email without forwarding information in Bcc (Blind Carbon Copy) field.2. Move the cursor to the Subject field and key in the subject.3. You can enter the message contents by moving the cursor to the Message field.4. Use the following functions by using the right soft key [Options].❖ Insert: Select this menu to insert symbols, templates, emoticons and contacts. It is also possible to attach existing multimedia files (pictures videos and sounds) or create a new multimedia file to send.Messages](https://usermanual.wiki/LG-Electronics-USA/KP330/User-Guide-1003529-Page-27.png)
![31Messages❖ Preview: You can preview the created email before sending it.❖ Send: Sends the created email.❖ Save to drafts: Select this menu to save the message in Drafts.❖ View attachment: Shows the attached files before sending it. (This item is only available when some files have been attached.)❖ Set mail priority: You can select the priority level of the messages, low, normal or high.❖ Text Entry Mode: Select the desired text entry mode.❖ Text Entry Settings1. Text Entry Language: Select the desired text entry language.2. T9 Next Word Prediction: Select whether to enable T9 text entry mode to predict the next word.3. T9 Dictionary: Allows you to add words to the T9 dictionary. You can also delete, reset, and modify words in the T9 dictionary.5. When you have finished writing an email, press the left soft key [Send] to send the email.Inbox Menu 2.21. You can view saved messages. Select a message and then press the OK key [View] to view the message.2. You can view the previous or next message by using the left/right navigation keys.3. To view an multimedia message (Notification), select Retrieve in the message view screen. Then the file is transmitted, and you can view the file when the transmission is complete.4. To create a reply message to the selected message press the left soft key [Reply].You can use the following functions by using [Options] key.❖ Call: Call the person who sent you the message.❖ Save Contact Info: Save the contact. ❖ Delete: Deletes the current message.❖ Forward: Forwards the message to a receiver.❖ Reply All: Replies the message to a receiver.❖ Make video call: You can make a video call to the person in the record.](https://usermanual.wiki/LG-Electronics-USA/KP330/User-Guide-1003529-Page-28.png)
![32MessagesMessages❖ Information: You can check information of the selected message.❖ Multi Delete: You can use this for multiple deletion.❖ Delete All Read Messages: Deletes all read messages.❖ Delete All: Select this to delete all messages.Email Inbox Menu 2.3Viewing email message list1. Select an email account and then press the OK key to view the received email list.2. Using the Retrieve key, you can retrieve a new email list from the email server of the selected account.3. In email list, you can use the following functions by using the [Options] key.❖ Reply: Creates a reply to the selected email.- Sender: Creates a reply to the sender of the email only.- All: Creates a reply to all contacts of the email.❖ Forward: Forwards to the selected email to the recipient you entered.❖ View: Opens selected email.❖ Retrieve: Retrieves new email messages.❖ Write New Message: You can create Text Message, Multimedia Message or Email.❖ Mark/Unmark: Use mark/unmark option for multiple deletion.❖ Save in Contact: Save sender’s address to the contact..❖ Set as Read: You can set the selected email to Read.❖ Delete: Deletes an email. Deleted emails are temporarily saved in Trash.Viewing an email message1. Select one of the received emails and press the OK key to receive the contents of the email.2. The contents of the received email are automatically displayed in the View screen.3. You can view the contents of the previous or next email by using the left/right navigation keys.](https://usermanual.wiki/LG-Electronics-USA/KP330/User-Guide-1003529-Page-29.png)
![33MessagesWhen in the email View screen, you can select the following functions after pressing the [Options] key.❖ Reply: Creates a reply to the selected email.- Sender: Creates a reply to the sender of the email only.- All: Creates a reply to all contacts of the email.❖ Forward: Forwards the selected email message to another email address.❖ Save in Contact: Save sender’s address to the contact.❖ Write New Message: You can create Text Message, Multimedia Message or Email.❖ Use: You can extract the number, email address or web address.❖ View Attachment: Shows the attached file.❖ View to address: Shows the email addresses.❖ Delete: Deletes the selected email message.Trash1. You can restore or permanently delete deleted emails in Trash.2. Select Trash in the mailbox and press the OK key to view the deleted email list.3. Press the Delete key to delete a deleted email permanently.4. Press the Restore key to restore a deleted email.5. Using the Option key, you can select the following functions.❖ Restore: Restores a deleted email.❖ Delete: Deletes an email permanently.❖ Mark/Unmark: Use mark/unmark option for multiple deletion.NoteThe emails in Trash will not be received again.Drafts Menu 2.4You can view saved messages. Select a message and then press the OK key to view the message.You can use the following functions by using the [Options] key.❖ Call: You can call the number in the record.](https://usermanual.wiki/LG-Electronics-USA/KP330/User-Guide-1003529-Page-30.png)
![34MessagesMessages❖ Information: You can check the file information.❖ Multi Delete: You can delete multiple files at one time. After selecting files by pressing the OK key [Select], press the left soft key [Delete].❖ Delete All: Deletes all the drafts.❖ Make video call: You can make a video call to the number in the record.Outbox Menu 2.5The Outbox is a temporary storage place for messages waiting to be sent. Failed messages are also placed in Outbox. For example, Emails will be placed in Outbox if the Email account is not correctly configured.1. Select a message and then press the OK key to view the message.2. You can use the following functions by using the left soft key [Options].[For sending / waiting messages]❖ Cancel Sending: You can stop sending/waiting status.❖ Delete All: Deletes all the messages in the Outbox.[For sending a failed message]❖ Call: You can call the number in the record.❖ Delete: Deletes the current message.❖ Edit: You can edit the selected message.❖ Information: You can check the file information.❖ Delete All: Select this to clear up the Outbox.You can resend the selected message by pressing the left soft key [Resend].Sent Menu 2.6Shows the messages you sent (Text message/ Multimedia message/Email).Using the right soft key [Options], you can do the followings:❖ Call: You can call the number in the record.❖ Delete: Deletes the selected message.❖ Information: You can check the file information.❖ Delete All: Select this to clear up the the Sent folder.](https://usermanual.wiki/LG-Electronics-USA/KP330/User-Guide-1003529-Page-31.png)
![35Messages❖ Make video call: You can make a video call to the number in the record.You can forward the selected message using the left soft key [Forward].Voicemail Menu 2.7You can connect to the voice mail centre. If there is no selected voice mail centre address, you can insert a new voice mail centre.Videomail Menu 2.8This menu allows you to get the video mail if this feature is supported by the network service provider. Please check with your network service provider for details of their service in order to configure the handset accordingly.Templates Menu 2.9Text Templates (Menu 2.9.1)The following useful phrases are saved a default.• Please call me back.• I’m late. I will be there at• Where are you now?• I’m on the way.• Urgent! Please contact.• I love you.You can send a message using a template, delete or edit it using the right soft key [Options].You can also add frequently-used useful phrases using the left soft key [New].Multimedia Templates (Menu 2.9.2)You can create, edit and view available templates when creating multimedia messages.Signature (Menu 2.9.3)You can create your text signature and use the signature when you send messages. You can insert symbols, text templates, and contacts in the signature using the left soft key [Insert].Message Settings Menu 2.0Text Message (Menu 2.0.1)You can configure text message related options.](https://usermanual.wiki/LG-Electronics-USA/KP330/User-Guide-1003529-Page-32.png)
![37Messages7. Message Centre: Allows you to configure network information such as the MMSC and the WAP gateway, to send a multimedia message.You can change the active Message Centre using the left soft key [Activate] to activate a new profile you have created.You can also View the details of the active Message Centre by pressing the centre soft key [View].Pressing the right soft key [Options] will allow you add, edit or delete a profile (you cannot delete the default profile). A profile name is selected by a check mark is the currently configured value.Using the right soft key [Options] - New, you can add a new profile. You need to fill out the followings.❖ Name: Profile name.❖ MMSC URL: Enter the multimedia message centre URL.❖ Internet Profile: Specify the access point name. (see Connection - Setting - Network Profiles.)Press the left soft key [Save] to save the changes and complete Multimedia Message Centre setting.Email (Menu 2.0.3)You can configure settings for receiving and transmitting emails.1. Allow Reply Email: Determine whether to allow sending a read confirmation mail for a read confirmation mail request.2. Request Reply Email: Determine whether to request a read confirmation mail.3. Auto Retrieve: You can configure Auto retrieve to retrieve emails automatically from the incoming mail server. When a new email arrives, an icon appears at the top of the screen. You can select the auto receiving time slot to Off, 15 Minutes, 30 Mins or 1 Hour. Please note that additional charges may be incurred using the Auto retrieve feature.4. Include Message in Fwd & Reply: Determine whether to include the received message when you forward the message or reply to it.5. Insert Signature: You can configure a text signature to be attached to the end of an email. The configured signature text is automatically or manually attached to the end of the email when it is sent.](https://usermanual.wiki/LG-Electronics-USA/KP330/User-Guide-1003529-Page-34.png)
![386. Email Account: You can create or configure an email account including the email server and user ID. You can edit a selected email account by pressing the left soft key [Edit]. You can select an email account to be used to send an email using the OK key. You can select the following functions using the right soft key [Options].❖ Add New: Create a new email account.❖ Edit: To edit the selected email account.❖ Activate: Activates the selected account for outgoing mail.❖ Delete: Deletes a selected email account. All the emails included in the account will be deleted.7. Request Delivery Receipt: You can request the delivery receipt whether the receiver receives e-mail or not.Creating a new email account1. Select Add new from the Email account menu options.2. The following items need to be configured.• User Name: Enter the user name of the email account.• Password: Enter the email account password.• Email Address: Enter the email address for outgoing mail.• Reply Email Address: Enter the email address to reply to your email.• Outgoing Mail Server: Enter the outgoing email server.• Incoming Mail Server: Enter the incoming email Server.• SMTP Port Number: Enter the mail server port number. In general, the SMTP (Outgoing mail server port number) is 25.• Incoming Server Port: Enter the mail server port number. In general, the incoming mail server port number is 110 (POP3) or 143 (IMAP4).• Maximum Receive Size: Select the maximum email receive size using the left/right navigation keys. The permissible maximum receive size is no more than 500KB.• Mailbox Type: Select the email inbox type either POP3 or IMAP4 using the left/right navigation keys.MessagesMessages](https://usermanual.wiki/LG-Electronics-USA/KP330/User-Guide-1003529-Page-35.png)
![39Messages• Save to Server: Determine whether to leave a copy of messages on the incoming server or not using the left/right navigation keys. When the mailbox type is set to IMAP4, a copy of messages are always saved to the server.• Save sent mail into: Select where to save the sent mails (when the mailbox type is set to IMAP4). When the mailbox type is POP3, sent mails are always saved into handset.• Access Points: Select an access point to connect to the Internet. You can select a Configured access point using the left/right navigation keys.• Auto Retrieve: Decide whether to activate Auto retrieve or not using the left/right navigation keys. You can set the auto receiving time slot using the Auto Retrieve.• SMTP Authentication: Decide whether the outgoing mail server to require authentication or not using the left/right navigation keys. • APOP secure login: Decide whether to activate APOP secure login or not using the left/right navigation keys. When the mailbox type is IMAP4, APOP secure login is always set to OFF.3. Press the left soft key [Done] to complete the email account configuration.Editing an email account1. Select a desired email account from the email account list and press the left soft key [Edit].2. You can edit desired fields by moving the cursor up and down.3. When configuration is complete, press the left soft key [Done] to complete the email account configuration.NoteWhen you try to change the mailbox type, all emails downloaded before would be deleted.Voicemail (Menu 2.0.4)You can insert or modify voice mail centre.Videomail (Menu 2.0.5)You can add or modify video mail centre.](https://usermanual.wiki/LG-Electronics-USA/KP330/User-Guide-1003529-Page-36.png)
![40Service messages (Menu 2.0.6)You can configure the push message receipt option.Info. Service (Menu 2.0.7)❖ Receive: You can set the reception status.❖ Topics: You can view the topics. To create a new topic, press the right soft key [Options] then select Add Topic. If you already have topics, you can edit, delete, them by pressing the left soft key [Options].❖ Languages: This option lets you select the preferred languages. Cell broadcast messages will be displayed in the selected languages.MessagesMessages](https://usermanual.wiki/LG-Electronics-USA/KP330/User-Guide-1003529-Page-37.png)
![42CameraTake Photo Menu 4.1Using the camera module built into your phone, you can take pictures of people or events while on the move. Additionally, you can send photos to other people in a picture message. The right soft key [Options] will bring up the following options.❖ Photo Gallery: Allows you to see saved photos in your album.❖ Change to Video Mode: Goes to the video application, enables you to record a video clip.❖ Resolution: Sets the image size to 1600*1200, 1280*960, 640*480, 320*240 or 160*120. The selected image size appears on the capture screen.❖ Quality: You can select the desired quality of photo by selecting either Super Fine, Fine or Normal mode by using the navigation keys.❖ Use Front Camera: You can convert to the internal camera from the external one.❖ Multishot: Allows to take multishot-photos. The multishot function is only available when the resolution is set to 640*480 or below.❖ Self Timer: Determines the camera timer.❖ Advanced Settings- White Balance: This adjusts the Light Effect level and you can select from the following options: Auto, Daylight, Incandescent, Cloudy, Fluorescent and Night Mode.- Color Effects: Allows you to apply special effects to the picture. Press the left or right navigation key to find the tone you want to use from the following options: Color, Sepia, Mono and Negative.- Shutter Tones: Allows you to select a sound when you press the shutter (Tone 1 / Tone 2 / Tone 3).❖ Default Settings: This restores the default camera settings.NoteIf you insert the memory card, you can select the primary storage to select Memory card or Handset.Camera](https://usermanual.wiki/LG-Electronics-USA/KP330/User-Guide-1003529-Page-39.png)
![43CameraNote❖ In Take Photo mode, you can adjust the zoom scale by using the up/down navigation keys. The maximum zoom scale depends on the resolution.❖ If you insert the memory card, you can view Primary storage option. In this menu, you can select the storage for phone or external memory.In Take Photo mode, you can adjust the brightness by using the left/right navigation key.Record Video Menu 4.2You can record a video clip in this menu by pressing the Camera key. Before starting to record, press the right soft key [Options] to set the following values.Select the desired value and press the OK key to confirm.❖ Video Gallery: You can see saved video files.❖ Change to Photo Mode: Goes to the camera application which enables you to take a still picture.❖ Video Record Mode: Sets the recording mode to either MMS Video Mode or General Mode.❖ Quality: Determines the quality of a video clip.❖ Use Front Camera: You can convert to the internal camera from the external one.❖ White Balance: This adjusts the light effect level and you can select from the following options: Auto, Daylight, Incandescent, Cloudy, Fluorescent and Night mode.❖ Color Effects: Allows you to apply special effects to the video clip. Press the Left/Right Navigation Keys to find the tone you want to use from the following options: Color, Sepia, Mono and Negative.❖ Default Settings: This restores the default video camera settings.](https://usermanual.wiki/LG-Electronics-USA/KP330/User-Guide-1003529-Page-40.png)
![45My FilesMy FilesGraphics Menu 6.1This menu consists of embedded links for downloading images through the Internet, Take Photo menu, Make Animated GIF and Default images. Photos taken using the camera are stored in the Images folder and you can create new folders to manage them. You can also save selected files as animated GIFs using Make Animated GIF menu.When a file is selected, the following options are available using the right soft key [Options].❖ Set As: You can set the selected image file as Wallpaper or Picture ID.❖ Send Via: You can send the selected image via Message, Email or Bluetooth.❖ Delete (Not available for default images): Deletes the selected image.❖ Rename (Not available for default images): You can rename the image file.❖ Move (Not available for default images): You can move the file to Handset Memory, Memory Card.❖ Copy: You can copy the file to Handset Memory, Memory Card.❖ Sort By: You can sort the files by name, date, or file type.❖ Delete All: You can delete all the files. The default images will not be deleted.❖ Multi Select: You can select multiple files at one time to delete, send via Bluetooth, move or copy.❖ New Folder: You can create a new folder.❖ Icon View/List View: You can view the images as Icon view or List view.❖ Information: Shows information on the selected image file.Videos Menu 6.2This menu consists of embedded links for downloading videos through the Internet and Record Video menu. Video clips recorded using the camera are stored in Video folder and you can create new folders to manage them. Here, you can manage or send downloaded or recorded video clips.When a file is selected, the following options are available using the right soft key [Options].](https://usermanual.wiki/LG-Electronics-USA/KP330/User-Guide-1003529-Page-42.png)
![46My Files❖ Send Via: You can send the selected video clip via Message, Email or Bluetooth.❖ Delete (Not available for default videos): Deletes the selected video clip.❖ Rename (Not available for default videos): You can rename the video file.❖ Move (Not available for default videos): You can move the file to Handset Memory, Memory Card.❖ Copy: You can copy the file to Handset Memory, Memory Card.❖ Sort By: You can sort the files by name, date, or file type.❖ Delete All: You can delete all the files.❖ Multi Select: You can select multiple files at one time to delete, send via Bluetooth, move or copy.❖ New Folder: You can create a new folder.❖ Icon View/List View: You can view the files as Icon view or List view.❖ Information: Shows information on the selected video file.You can play the video clip by pressing the OK key [Play]. To pause the playback, press the OK key [Pause] during the playback. To resume the paused playback, press the OK key once again. You can access the following option menus by pressing the right soft key [Options].❖ Repeat: You can set the repeat option from One, All and Off.❖ Send Via: You can send the selected video clip via Message, Email or Bluetooth.❖ Capture: You can save what is on the paused screen as an image file.❖ Rename: You can rename the video file.❖ Landscape View: You can view the video in Landscape view.❖ Information: Shows information on the video file.Audio & Ringtones Menu 6.3This menu consists of embedded links for downloading sounds through the Internet and Record Voice menu. Voice clips recorded using the recorder are stored in Sounds folder and you can create new folders to manage them. Here, you can manage or send downloaded or recorded voice clips.My Files](https://usermanual.wiki/LG-Electronics-USA/KP330/User-Guide-1003529-Page-43.png)
![47My FilesWhen a file is selected, the following options are available using the right soft key [Options].❖ Set As: You can set the selected sound as Ringtone or Ringtone ID.❖ Send Via: You can send the selected sound via Message, Email or Bluetooth.❖ Delete (Not available for default sounds): Deletes the selected sound file.❖ Rename (Not available for default sounds): You can rename the sound file.❖ Move (Not available for default images): You can move the file to Handset Memory, Memory card.❖ Copy: You can copy the file to Handset Memory, Memory card.❖ Sort By: You can sort the files by name, date, or file type.❖ Multi Select: You can select multiple files at one time to delete, send via Bluetooth, move or copy.❖ New Folder: You can create a new folder.❖ Information: Shows information on the selected sound file.Music Player Menu 6.4All Songs (Menu 6.4.1)You can view the entire music files in the phone.Playlists (Menu 6.4.2)You can create your own playlists by choosing tracks from the All Songs menu list.Artists (Menu 6.4.3)You can view the list of songs according to the name of artists.Albums (Menu 6.4.4)You can view the list of songs according to the name of albums.Genres (Menu 6.4.5)You can view the list of songs according to the kinds of genre.](https://usermanual.wiki/LG-Electronics-USA/KP330/User-Guide-1003529-Page-44.png)
![48My FilesMy FilesGames Menu 6.5You can easily download games and other applications by selecting Download Games. The downloaded applications will be stored in the folder by default. Please note that additional cost may occur when using online services.Press the left soft key [Save] to save the configuration settings.1. Activating a Java account Move the cursor to the account which you would like to activate and press the left soft key [Activate].2. Editing a Java account Press the right soft key [Options] and select Edit. The default Java account cannot be edited.❖ Information: You can check the memory status and current Java version.Applications Menu 6.6In this menu, you can manage the Java applications installed in your phone. You can play or delete downloaded applications, or set the connect option.Other Files Menu 6.7Other files except images, videos, sounds, games & applications are stored in this folder.Memory Card Menu 6.8If you purchase an optional external microSD memory card, you can manage more content. Refer to the section “How to use a microSD memory card” to learn how to insert and remove the memory card. You can manage content as you do on your phone.](https://usermanual.wiki/LG-Electronics-USA/KP330/User-Guide-1003529-Page-45.png)
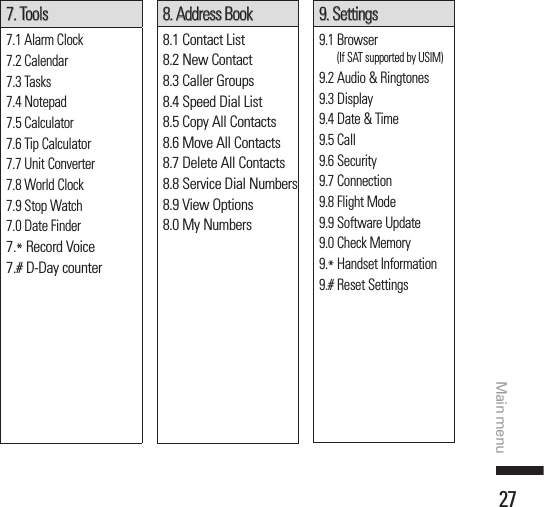
![49ToolsToolsAlarm Clock Menu 7.1If you set the alarm, [Alarm icon] appears on the Indicator bar. The specified alarm sounds at the scheduled time. Press the [OK] key to stop the alarm, and the alarm is released. Press the the right soft key [Snooze] to activate the snooze function. The alarm sound stops and resumes after the Snooze duration. You can configure up to 5 alarms.1. Select your desired alarm to configure in the alarm list. If there is no alarm, press the left soft key [New] to add a new alarm.2. Set/Cancel alarm: Set or cancel the alarm using the options for specifying whether the alarm is on or by choosing the alarm time.3. Input alarm time: Input your desired alarm time by specifying Hour and Minute. Choose either ‘AM’ or ‘PM’ visible if 12 hour format is specified for the phone.4. Repeat: Select desired repeat mode using the left and right direction keys or select the desired one from the list pressing the OK key.5. Alarm Tone: Select the bell to ring at the alarm time.6. Memo: Input alarm name.7. When you have completed alarm clock setting, press the left soft key [Save].Calendar Menu 7.2Schedule inquiry and search1. Reference by MonthsYou can refer to your schedule by months. The cursor is on the current date, and the registered date is underlined. The schedule saved for the date where the cursor is located is represented by an icon. Pressing the shortcut key moves to the previous year and pressing key move to the next year. Pressing key / moves to the previous month, and key / moves to the next month. You can move the date using the up, down, left, and right direction keys.](https://usermanual.wiki/LG-Electronics-USA/KP330/User-Guide-1003529-Page-46.png)
![50Tools2. Reference by DaysPressing the ‘View’ key in the reference by month moves to reference by day where you can refer to your schedule by days. You can refer to the moving date tab using the left and right key.As a search result, brief schedule contents, repetition set up configuration, and alarm set up configuration are displayed. You can send the schedule to another phone or an Internet site through Message, Email, Bluetooth.3. Detailed referenceYou can refer to a detailed schedule, that is the whole contents of the schedule configured by user. You can send the schedule to another phone or an Internet site through Message, Email, Bluetooth Message, Email or Bluetooth.After pressing the right soft key [Options], the following options are available.❖ Search: You can search the schedule by keying in some letters of the subject.❖ Set Holiday: You can set up or release user holidays. The selected date will be displayed in red.To release the holiday, press the right soft key [Options] and select Clear Holiday.❖ View All: You can view all the schedules.❖ Week View: Select this to display the calendar in weekly view.❖ Go to Date: Use this to jump to a specific date.Enter the date using the numeric keys and the left/ right direction keys.❖ Delete Schedules: You can delete elapsed(old), All schedules.❖ Settings: You can set the default view monthly or weekly and the start point of day or week.Tasks Menu 7.3You can view, edit and add tasks to do. Tasks are displayed in time order. Tasks that have been completed or not completed are displayed in different ways.AddTo add a task, press the left soft key [New] in the Tasks list management screen. Then input the date, description and priority for the task.When you have finished entering the data, press the left soft key [Save] to save the new task.Tools](https://usermanual.wiki/LG-Electronics-USA/KP330/User-Guide-1003529-Page-47.png)
![51ToolsDetailed view and EditTo view detailed task contents, locate the cursor on the desired item in the Tasks list, and then press the OK key. You can edit and delete a task using the OK [Options].Set job statusTasks set as finished are displayed as crossed out below the unfinished tasks in the Tasks list. You can set Finished tasks to Not finished by pressing the right soft key [Options] and selecting Status.Notepad Menu 7.4Using this function, you can view and manage saved notes, and add new notes.Add NoteTo add a new note, press the left soft key [New]. Enter the contents of the note. You can save the note to the list by pressing the OK key [Save].Edit, Send, and Delete NoteYou can access following options with the right soft key [Options] on the notepad screen.- Edit: You can edit the selected note.- Delete: To delete the selected note.- Send Via: You can send the note through Message, Email, Bluetooth.- Delete All: Use this to clear up the notepad.- Information: You can check the date and time when the note was made and the size.Calculator Menu 7.5The calculator module allows you to perform basic arithmetic functions such as addition, subtraction, multiplication, and division as well as some scientific functions.1. Press the right soft key [Function].2. Select appropriate function.You can input numbers using the number keys, and operators using the up, down, left, and right direction key. You can input a decimal point by pressing .Whenever you press, characters are sequentially deleted in reverse order.Whenever you hold down, all the characters are deleted in one go.](https://usermanual.wiki/LG-Electronics-USA/KP330/User-Guide-1003529-Page-48.png)
![52ToolsToolsWhen calculation is completed and the result is displayed on the screen, pressing a number clears the previous result and the calculator waits for new input, even if you did not press Clear key. When calculation is completed and the result is displayed on the screen, pressing a symbol saves the result into the symbol, and continues calculation.Tip Calculator Menu 7.6 This feature allows you to quickly and easily calculate the tip amount based on the total bill as well as the split of the total bill based on the number of people.Unit Converter Menu 7.7Using this menu, users can convert Area, Length, Weight, Temperature, Volume and Velocity.To convert any unit:1. Select the desired unit from Area, Length, Weight, Temperature, Volume, and Velocity and press the OK key.2. The unit converter screen opens. Move the cursor to output unit.3. Select the desired output unit using the left/right direction keys.4. After moving the cursor to input field, key in the quantity. You can see how much it is in the output field.NoteYou can input a decimal point by pressing .World Clock Menu 7.8The World Clock function provides time information on major cities worldwide. You can view the time of the desired country or city by navigating using the left/right direction keys. You can select a desired city as a base using the right soft key [Homezone].Stop Watch Menu 7.9This menu allows you to record the elapsed time of an event. The duration of an individual lap time (up to 20 times) and the total time can be saved.1. Select New Time and press the OK key [Start] to start timing. The running time is displayed as HH.MM.SS.hh (hours, minutes, seconds, hundredths of a second).](https://usermanual.wiki/LG-Electronics-USA/KP330/User-Guide-1003529-Page-49.png)
![53Tools2. During the timing, you can record an individual lap time by pressing the right soft key [Lap]. Up to 20 lap times can be recorded.3. You can stop or restart timing using the OK key. Press the left soft key [Reset] to reset the stop watch.4. You can save individual lap times and the total time by pressing the right soft key [Options] and selecting Save. Key in the title. You can check the saved times in Saved Times.Date Finder Menu 7.0The date finder shows the start date, the target date and the number of remaining days.Record Voice Menu 7.*You can record an audio clip in this menu. The recorded audio file is saved automatically in the Audio & Ringtones menu (Menu 6.3).The right soft key [Options] will bring up the following options.❖ Record Mode: Sets the recording mode to either MMS or General.❖ Quality: Determines the quality of an audio clip.❖ Primary Storage: You can set the primary storage of the recorded audio to the Handset Memory or the memory Card.D-Day Counter Menu 7.#1. To add a new D-Day Counter item, select the left soft key [New].2. Input the Date and notes when you add an item.3. Press the left soft key [Save] to save the item.4. You can do the followings with the right soft key [Options].❖ Edit: You can edit the selected item.❖ Delete: You can delete the selected item.❖ Show at Idle Screen: You can see the Remaining days for this item (D-Day) on the Idle screen at the bottom right corner.❖ Delete All: Deletes all saved items.](https://usermanual.wiki/LG-Electronics-USA/KP330/User-Guide-1003529-Page-50.png)
![57Settings• Search Text: You can search for the text you want.• Settings: You can set the Browser related options such as Character Encoding, Scrolling Control, Show Image, Primary Storage, Cache, Cookie, Clear Cache, Clear Cookie, Authwallet, Current certifi cate, Session info and Page info.• Exit: You can exit the the WAP browser menu.Bookmarks (Menu 9.1.2)You can store frequently accessed or favourite URLs/Pages. Several preconfigured URLs are stored as bookmarks.Adding a new bookmark1. Press the right soft key [Options] and select New.2. Enter the title and associated URL information.3. Press the left soft key [Save] to save.Connecting to a desired bookmarkPress the OK key [Connect].Sending the bookmark to othersPress the right soft key [Options] and select Send URL. You can send it via Message.Deleting a bookmarkSelect Delete from Options menu. Preconfigured URLs cannot be deleted.Saved Pages (Menu 9.1.3)The phone can save the page on display as an offline file. Up to 19 pages can be saved.Enter URL (Menu 9.1.4)You can manually enter a URL address and access the associated web page.❖ To enter a symbol, press or the right soft key [Options] and select Insert Symbols to display the Symbol table.❖ To switch input mode, press .Recent Pages (Menu 9.1.5)Shows the recently-browsed pages.Security (Menu 9.1.6)CertificatesIf stored, a list of root/ca certificates required for WTLS/TLS can be found here.Certificates can be viewed from the list.](https://usermanual.wiki/LG-Electronics-USA/KP330/User-Guide-1003529-Page-54.png)
![58SettingsSettingsClear SessionSecure (WTLS/TLS) session data can be cleared using this option. Session data should be cleared to establish a new secure session.Settings (Menu 9.1.7)AccountsYou can create or configure an Internet account.Adding a new account1. Select New from the Options menu.The following items need to be configured.• Account Name: Enter the account name you want.• Homepage: Enter the homepage address.• Internet Profi les: Select the internet profi le.2. Press the left soft key [Save] to save any configuration changes.You can edit and delete a profile by selecting Edit and Delete from the Options menu.Activating an accountAfter selecting the profile you would like to activate, press the left soft key [Activate].Primary StorageIf you have a memory card inserted, you can select either Handset or Memory Card.Java ScriptDecide whether to allow the “Java Script” function [On] or not [Off].Cache Settings• Clear Cache: Select this to clear all caches.• Allow Cache: Decide whether to allow the “Cache” function [On] or not [Off].Cookie Settings• Delete Cookies: Select this to clear all cookies.• Allow Cookies: Decide whether to allow the “Cookie” function [On] or not [Off].Character EncodingSets the browser default character set to one of the following:Automatic, English (ASCII), English (ISO), English (LATIN), Unicode(UCS2 BE), Unicode(UCS2 LE), Unicode(UCS2 Auto), Unicode(UTF-16 BE), Unicode(UTF-16 LE), Unicode(UTF-16 Auto), Unicode(UTF-8).](https://usermanual.wiki/LG-Electronics-USA/KP330/User-Guide-1003529-Page-55.png)
![59SettingsScrolling ControlAllows you to set the scroll speed by selecting the number of lines to scroll. (1 line, 2 lines, 3 lines)Show ImageAllows you to enable or disable the image display during browsing.NoteEnabling this function will delay displaying images until the completion of transmission.Disabling this function will prevent the browser from downloading images from the server, thus allowing faster transmission.AuthWalletDecide whether to allow the “AuthWallet” function [On] or not [Off].Audio & Ringtones Menu 9.2Shop Tones (Menu 9.2.1)You can access the WAP browser menu of Telstra and download various tones.Ringtones (Menu 9.2.2)This option determines the ring tone for incoming call. You can select the various ring tone. The key indicates as follow:• Play: You can listen to the ring tone you selected.• Set: You can set the ring tone you selected.• Options: You can sort by the ring tone according to the name, date and type. You can also view the information of ring tone.Volume (Menu 9.2.3)You can set the volume of Ring Tunes, Call, Multimedia and Key tone from 7 available levels.Message Alert Tones (Menu 9.2.4)This option determines the alert tone to be played by the phone upon receiving a message.Alert Type (Menu 9.2.5)This option determines the incoming call notification mode. You can select from [Ringtones], [Message Alert Tones], [Other Alert Tones].](https://usermanual.wiki/LG-Electronics-USA/KP330/User-Guide-1003529-Page-56.png)

![64SettingsSettingsPIN Code Request (Menu 9.6.3)You can activate a PIN (Personal Identification Number). You can check the current status of configuration from the status bar.PIN request and release proceduresItem DescriptionEnable PIN RequestYou have to input the PIN code each time the mobile phone is turned on.Disable PIN RequestYou do not have to input the PIN code when the mobile phone is turned on.1. Select ‘PIN Code Request’ item from the list, and press [Select]. Then a window allowing you to select ‘On’ or ‘Off’ appears.- Select ‘On’/‘Off’ from the list, press [Select], and input the current PIN code to set the PIN request. If ‘PIN Code Request’ is already enabled/disabled, an “Already activated”/ “Already cancelled” message will be displayed.2. 3 incorrect PIN code entries in the PIN code input window would invalidate the PIN code. In this case, you have to input the PUK (PIN Unblock Key) code to configure the PIN code again.3. The maximum allowed number of attempts of PUK input is 10 times. ATTENTION: after having entered 10 times an incorrect PUK code, the USIM card will be blocked and must be replaced.Press the C key in the PIN code input window to return to the previous step.Fixed Dial Number (Menu 9.6.4)(SIM dependent)You can restrict your outgoing calls to selected phone numbers. The numbers are protected by your PIN2 code.❖ On: You can restrict your outgoing calls to selected phone numbers.❖ Off: You can cancel fixed dialling function.❖ List view: You can view the number list saved as Fixed dial number.](https://usermanual.wiki/LG-Electronics-USA/KP330/User-Guide-1003529-Page-61.png)
![66SettingsSettingsPIN2 codePIN2 is the abbreviation of Personal Identification Number 2, and is used to restrict the use of unauthenticated users like PIN. The PIN2 code change procedure is the same as the one for the PIN code. 3 incorrect PIN2 code entries would invalidate the PIN2 code. In this case, you have to input the PUK2 code in order to use the PIN2 code again. The maximum allowed number of attempts of PUK2 code input is 10 times, like PUK1. 10 incorrect PUK2 code entries would invalidate the PIN2 code.Connection Menu 9.7Network Profiles (Menu 9.7.1)This menu shows the access point list. You can create new profiles, delete or edit them by using the Option menu. However, you cannot delete or edit default configurations.You can add a new profile by selecting the left soft key [New].• Connection title: Access Point profi le name.• Authentication: Choose the authentication from the list. (Default is “No auth”)• User name: Information provided by service provider.• Password: Information provided by service provider.• APN: APN name to access network. Information provided by service provider.❖ Press “Done” key to save any configuration changes.Internet Profiles (Menu 9.7.2)You can view and manage the internet profiles include of Telstra Internet. You can also add the new profile for the internet that you want.You can add a new profile by selecting the left soft key [Add].• Profile Name: Enter a new profile name.• Use proxy: Select On or Off.• Proxy Address: Enter the proxy address.• Proxy Port Number: Enter the proxy port number.• Network Profiles: Select the network profile.](https://usermanual.wiki/LG-Electronics-USA/KP330/User-Guide-1003529-Page-63.png)
![69SettingsNoteWe recommend that your phone and the Bluetooth device you are communicating with be within a range of 10 meters. The connection may be improved if there are no solid objects in between your phone and the other Bluetooth device.1. Getting started• Menu ❏ Settings ❏ Connection ❏ Bluetooth ❏ Bluetooth On/OffTo use the Bluetooth function, you must first set Bluetooth to “On”. Complete the above procedures to set Bluetooth to “On”.2. Configuring Bluetooth settings• Menu ❏ Settings ❏ Connection ❏ Bluetooth- Bluetooth: To use the Bluetooth function, set it to [On]. Otherwise, set it to [Off].If you select On, you can configure the Bluetooth settings.- My visibility: Set [My handset’s visibility status] to [Visible] so that other devices can detect your phone when they are searching for a Bluetooth device. If you select [Hidden], other devices will not be able to detect your phone when they are searching for a Bluetooth device.- My Device Name: You can name or rename your phone as it will appear on other devices. Your phone’s name will be shown on other devices only when [My handset’s visibility] is set to [Shown to All].- My Bluetooth Address: This is the Bluetooth address of your device. This is set when you phone is sold. You cannot change the Bluetooth address.3. Paired Devices (Pairing with a device)If a paired Bluetooth audio device already exists:Menu ❏ Settings ❏ Connection ❏ Bluetooth ❏ Paired Devices ❏ ConnectIf there is no paired Bluetooth device:Menu ❏ Settings ❏ Connection ❏ Bluetooth ❏ Paired Devices ❏ New❖ New: Using this menu, you can pair a new Bluetooth device with your phone.❖ Connect: Using this menu, you can connect an audio device.](https://usermanual.wiki/LG-Electronics-USA/KP330/User-Guide-1003529-Page-66.png)
![70SettingsSettings1. This item is only enabled in the Option menu when you have selected Audio device. If another device has been selected, this item is disabled.2. Move to [Connect] and select the OK key. Your phone is immediately connected to the audio device. You can select the following options.❖ Add new device: You can add a new device you want to pair with your phone.❖ Allow connection: You can allow the connection of the other device with your phone.❖ Rename: You can rename a paired phone as required.❖ Delete: Using this menu, you can delete the paired Bluetooth device.❖ Supported Services: You can view the information of the supported services.❖ Delete all: Using this menu, you can delete all of the paired Bluetooth devices.- To search for a Bluetooth device to connect, press the New key.- Screen shows “Searching for Device”. Bluetooth devices within a range of 10m will be found.- If Bluetooth devices are found, these devices are listed on the screen. If no Bluetooth device is found, you will be asked if you want to search again.- If you select a device from the listed devices, the device information (name, address, service class) will appear on the screen.4. Pairing procedure1. Select the device you wish to pair with from the discovered items, then press the OK key. A window will appear on the screen asking you to enter your password.2. After creating a password (of 1 to 16 digits), the user of the other device must enter the password for pairing. The user of the other device must know the password in advance for authentication.3. If the other party authenticates the connection, the paired device list is displayed on the screen and you can use your phone to communicate with the other device.5. Disconnecting devices1. Select a device to disconnect from the Paired devices screen.](https://usermanual.wiki/LG-Electronics-USA/KP330/User-Guide-1003529-Page-67.png)
![71Settings2. You can disconnect a device by pressing the Delete key or by selecting Options ❏ Delete. To disconnect all paired devices, select Options ❏ Delete All.6. Transmitting data using Bluetooth1. To transmit data from your phone to another Bluetooth device, first select the application where the target data is saved. For example, to send data in the Media album to another device, selectMenu ❏ My Files ❏ Graphic ❏ Select data to transmit ❏ Send via ❏ Bluetooth2. Transmitting data- If a paired Bluetooth device exists, 1) Select the desired device from the paired devices listed on the screen.2) If the other party selects [Yes] for [Bluetooth Authorisation required], the data is transmitted.- If there is no paired Bluetooth device,1) Select Search to search for nearby Bluetooth devices to connect.2) Select the device to which you want to transmit data from the devices on the screen and press the Push key.3) If the other party selects [Yes] for [Bluetooth Authorisation required], the data is transmitted.7. Receiving data using BluetoothMenu ❏ Settings ❏ Connection ❏ Bluetooth ❏ Paired Devices1. If you enable Bluetooth function as described above, you can connect your phone to other Bluetooth devices.2. If another party attempts to transmit data, the [Bluetooth Authorisation required] question will appear on the screen. If you select [Yes], the data will be transmitted to your phone. During data transmission, the Bluetooth icon flashes.8. Connecting a headset1. Menu ❏ Settings ❏ Connection ❏ Bluetooth2. Connect the headset according to the procedures described in the Pairing Devices section.3. To use the headset, select the headset from the registered devices, press the OK key [Connect].](https://usermanual.wiki/LG-Electronics-USA/KP330/User-Guide-1003529-Page-68.png)
![72SettingsSettings9. Connecting a handsfree kit1. Menu ❏ Settings ❏ Connection ❏ Bluetooth2. Connect the handsfree kit according to the procedures described in the Pairing Devices section.3. To use the handsfree kit, select the handsfree kit from the registered devices, then press the OK key [Connect].The Bluetooth® word mark and logos are owned by the Bluetooth SIG, Inc. and any use of such marks by LG Electronics is under license. Other trademarks and trade names are those of their respective owners.NoteKP330 does not support IrDA port.10. Using Supported service / Primary StoragesYou can view the list of devices such as headsets and handsfree kit supported by this Bluetooth enabled phone. You can also select the primary storage.Flight Mode Menu 9.8If you activate the Flight mode, you can use the phone without connecting the 3G wireless network. 3G wireless phone and RF signal from the phone connections are prevented, but you can still do tasks which do not require the use of wireless network. With flight mode you cannot make any calls including emergency calls or use other features that require network service.Software Update Menu 9.9This menu is used to resume a postponed software update. This feature is dependent on network. If new software exists, the server notifies devices using a WAP push message. You can update the software of your phone using this function.Check Memory Menu 9.0This function shows the usage of the memory of the mobile phone that can be used to save user data.User data is saved in a FLASH memory, a type of nonvolatile memory, keeping saved data permanently unless the data are deleted by user.](https://usermanual.wiki/LG-Electronics-USA/KP330/User-Guide-1003529-Page-69.png)