LG Electronics USA KT610 PCS GSM/ EDGE Phone with Bluetooth User Manual C3320
LG Electronics USA PCS GSM/ EDGE Phone with Bluetooth C3320
UserManual.wiki
>
LG Electronics USA
>
KT610 User Manual
>
Users Manual 2
Contents
1.
Users Manual 1
2.
Users Manual 2
Users Manual 2
Navigation menu
Upload a User Manual
Namespaces
Wiki Guide
HTML
PDF
Info
Views
User Manual
Discussion / Help
Navigation
![Multimedia46Multimedia]Random play:You can play music tracks in arandom order.]Loop:You can repeatedly play music, either aspecific track or all tracks.]Equaliser:You can enhance or diminish frequenciesduring music playback.]Add to track list:You can add the playing musictrack to a new or saved track list.]Use tone- Set as ringing tone:You can set the music trackas the ringing tone for the current profile.- Assign to contact:You can set the music trackas ringing tone for a contact.]Play in background:You can leave Music playeron in the background when using other applications.]View details:You can view detailed info about thecurrently playing track.]Additional details:You can view a web page formore info about the currently playing tack.Recorder Menu 6.3You can record speech or sound.You can record a phone call by selecting Recorderduring the call.1. Press the left soft key [Options] and select Settingsto select the recording quality and default memoryfor your sound clips.2. Press the left soft key [Options] and select Recordsound clipto start recording. When a recording isstarted, the recording time appears on the LCD.3. When you finish the recording, press the right softkey [Stop]. The recorded file is automatically savedin Sound clipsfolder in My stuff.Tip]You can also press to leave music playbackon in the background when making a call or usinganother application.Note]Obey all local laws governing the recording ofphone calls. Both parties of the call hear a toneevery 5 seconds during recording.](https://usermanual.wiki/LG-Electronics-USA/KT610.Users-Manual-2/User-Guide-920165-Page-1.png)
![47Multimedia4. To play the sound clip after recording, press .5. You can listen to previously recorded sound clips byselecting Go to My stuff.CameraMenu 6.4In this application, you can take photos or recordvideos.You can switch between camera and video recorderusing the up/down navigation keys.1. The viewfinder shows you the image to be captured.2. To zoom in/out, press the right/left navigation key.3. Using the left soft key [Options], the followings areavailable.]Capture:Select this to take a photo.]Show toolbar:After selecting this, you canswitch between Image and Video modes,activate night or sequence mode, or switchbetween main and secondary camera using the.]Video mode:Switches to Video mode.]Use secondary camera:Select this to use thesecondary camera.]Night mode:You can activate/deactivate thenight mode.]Sequence mode:You can take multiple photosin one go by selecting On. (Shortcut: Pressto activate the sequence mode in preview.)]Self-timer:To take a photo automatically after ashort time delay to, for example, include yourselfin the photo. Select the delay time and press theleft soft key [Activate].Note]To save the phone’s battery, Camera will go intostandby mode if the camera hardware cannot beactivated or if no keys are pressed for one minute.To continue taking photos or recording videos,press .](https://usermanual.wiki/LG-Electronics-USA/KT610.Users-Manual-2/User-Guide-920165-Page-2.png)
![Multimedia48Multimedia]Go to My stuff:To view images and videossaved on the phone or memory card.]Adjust:You can adjust the brightness, contrast,white balance and colour tone.]Settings:You can set the desired environment totake photos or record videos. After setting thedesired environment, press the right soft key[Back].- Image•Image quality: You can adjust the image quality.•Show captured image: Select No to take onephoto immediately after another. This way, yourphotos do not remain on the display after youtake them, and the camera is ready for use again.•Resolution (Camera 1): Select the desiredresolution for the external camera by pressing.•Resolution (Camera 2): Select the desiredresolution for the internal camera by pressing.•Default image name: To key in the default namefor your new photos, scroll to Text and press. Key in the name and press .•Memory in use: Select where to save yourphotos.]Help:Use this option to get to know the phonefeature.]Exit:Exits the application.:To activate night mode and take photos whenlighting is dim and the camera needs a longexposure time.:To edit brightness settings.: To activate sequence mode and take 6 photosin one go. Press to take the photos.: To edit contrast settings.Note]The better the image quality, the morememory the photo uses and the fewer photosyou can save on your phone or memory card.](https://usermanual.wiki/LG-Electronics-USA/KT610.Users-Manual-2/User-Guide-920165-Page-3.png)
![49Multimedia4. To take a photo, press . Photos areautomatically saved in Imagesfolder in My stuff.1. Press the down navigation keys to switch to videorecorder. The viewfinder shows you the image to berecorded.2. To zoom in/out, press the right/left navigation key.3. Using the left soft key [Options], the followings areavailable.]Record:Select this to record a video.]Show toolbar:After selecting this, you canswitch between Imageand Videomodes,activate night mode, or switch between main andsecondary camera using the .]Image mode:Switches to Imagemode.]Use secondary camera:Select this to use thesecondary camera.]Night mode:You can activate/deactivate thenight mode.]Mute: You can record a video without voicerecorded.]Go to My stuff:To view other videos saved onthe phone or memory card.]Adjust:You can adjust the brightness, contrast,white balance and colour tone.]Settings:You can set the desired environment totake photos or record videos. After setting thedesired environment, press the right soft key[Back].- Video•Length: Select between Maximumand Short. •Resolution (Camera 1): Select the desiredresolution for the external camera by pressing.•Resolution (Camera 2): Select the desiredresolution for the internal camera by pressing.Tip]To send the video clip in a multimediamessage, select Short to reduce the size ofthe video.](https://usermanual.wiki/LG-Electronics-USA/KT610.Users-Manual-2/User-Guide-920165-Page-4.png)
![Multimedia50Multimedia•Default video name: To key in the default namefor your new videos, scroll to Text and press. Key in the name and press .•Memory in use: Select where to save yourvideos.]Help:Use this option to get to know the phonefeature.]Exit:Exits the application.4. To record a video, press .5. To stop recording, press the right soft key [Stop].Videos are automatically saved in Video clipsfolderin My stuff.If you do now want to save a video,press . To play the video, press the left softkey [Options] and select Play.Flash Player Menu 6.5You can view and play Flash files made for mobiledevices.To switch between Flash files saved on your phonememory and memory card, press the left/rightnavigation keys.1. To open a folder or play Flash file, scroll to thefolder of file and press .2. Scroll to a Flash file and press the left soft key[Options]. The following options are available. ]Send:You can send the Flash file to compatibledevices.]Organise- Copy to folder:To save a copy of the file inanother folder.- Move to folder:To move the file to a differentfolder.- New folder:To create a folder to organize yourFlash files.3. To delete a Flash file, scroll to it and press .Note]Available options may vary.](https://usermanual.wiki/LG-Electronics-USA/KT610.Users-Manual-2/User-Guide-920165-Page-5.png)
![Organiser [ - 7]51OrganiserCalculator Menu 7.11. Key in the first number of the calculation.2. To select a function on the right-hand side of thedisplay, scroll to it and press the .3. Key in the next number of the calculation.4. Select any remaining operations and key in numbers.5. To execute the calculation, scroll to “=” and press.6. The result of the calculation remains in the editorfield and can be used as the first number of a newcalculation.Using the left soft key [Options], the followings areavailable.] Last result:You can retrieve the result of the lastcalculation and reuse it.] Memory- Save:To save the number displayed in the editorfield. You can only save one number at a time.- Recall:To retrieve the saved number.- Clear:To delete the saved number.] Clear screen:Select this to empty the screen for anew calculation.Clock Menu 7.2TimeYou can view the time, day of the week and date, or setand edit alarms or modify date and time settings.1. To set date and time, press the left soft key[Options] and select Settings.2. Scroll to the following settings and press .] Time:Key in the time and press .] Time zone:Scroll to your current location andpress .] Date:Key in the date and press .Tip]You can also press 1 to 4 times to add,subtract, multiply or divide.]To add a decimal point, press .](https://usermanual.wiki/LG-Electronics-USA/KT610.Users-Manual-2/User-Guide-920165-Page-6.png)
![Organiser52Organiser] Date format:You can change how dates aredisplayed. Scroll to the desired format and press.] Date separator:You can change the symbolthat separates days, months and years. Scroll tothe dot, colon, slash or dash and press .] Time format:Select24-houror 12-hour.] Time separator:Select the colon or dot as thesymbol that separates hours and minutes.] Clock type:Select either Analogueor Digital.] Alarm clock tone:Scroll to the tone that youwant to use for the alarm clock and press .] Workdays:To select your working days, scroll toeach day and press to mark it and pressthe left soft key [OK].] Network operator time:You can use thenetwork service to automatically update the time,date and time zone by selecting Auto-update. 3. Press the right soft key [Back] to save your settings.To quickly set a one -time alarm, press any number keyand key in the alarm time. To change the time of a setalarm, press the left soft key [Options] and selectReset alarm.Alarm1. In the Clockwindow, press the right navigation key.2. Press the left soft key [Options] and select Newalarm.3. Fill in the following fields.]Alarm time:Key in the alarm time and selectambetween pmusing .] Description:Key in the description.] Repeat:Scroll to the desired repeat option andpress to mark it and press the left soft key[OK].4. Press the left soft key [Done].Note]This service may not be available in all networks.Tip]To quickly set a one-time alarm, you can alsopress any number key and key in the alarm time.](https://usermanual.wiki/LG-Electronics-USA/KT610.Users-Manual-2/User-Guide-920165-Page-7.png)
![53OrganiserTo deactivate or delete an alarm, scroll to it and press.World1. In the Clockwindow, press the right navigation keytwice.2. Press the left soft key [Options].] Add city:You can add another city to the view.Scroll to the desired city and press .] Set as the current city:You can change thecity that determines the time and date in yourphone to the currently selected city.] Settings:You can change date and timesettings.3. To delete a city, scroll to it and press .Converter Menu 7.3You can convert Currency, Area, Energy, Length,Mass, Power, Pressure, Temperature, Time,Velocityand Volumefrom one unit (for example,gallons) to another (litres).Notes Menu 7.4You can view or write notes.1. To write a note, press any number key. The noteeditor opens automatically.Tip]To add a space between words, press .]To insert special characters, press . Scroll tothe desired character and press .]To use predictive text input when writing, go toMenu >Settings >General >Personalisation>Language >Predictive text. Press toselect On. You can also activate predictive textinput mode by pressing and selectingActivating predictive text.Tip]To find a particular city, press the left soft key[Options] and select Find. Key in the first lettersof that city’s name or the country in which it islocated. A list of cities that match your inputopens.](https://usermanual.wiki/LG-Electronics-USA/KT610.Users-Manual-2/User-Guide-920165-Page-8.png)
![Organiser54Organiser2. To save your note, press the right soft key [Done].3. Using the left soft key [Options], the followings areavailable.] Open:To view the note.] Send:To send a note to other devices.] New note:To write a new note.] Delete:Deletes the selected note.] Mark/Unmark:You can select multiple notesfor sending or deleting, for example. Once yourhave marked the desired notes, press the leftsoft key [Options] and select the desired action.] Synchronisation:To synchronise notes with atext application in another device.Calendar Menu 7.5You can edit and keep track of your schedule.Using the left soft key [Options], the followings areavailable.]Open: You can view schedule entries on theselected day.]New entry:You can create a calendar entry toremind yourself of an upcoming meeting, event ortask. Select the desired editor from Meeting,Memo, AnniversaryandTo-do.]Week view:To view your schedule for a specificweek.]To-do view:To view your task list.]Delete entry:You can delete only elapsed entriesby selecting Before dateor delete all the calendarentries by selecting All entries.]Go to date:To view a different month. Key in a datein that month and press .Tip]You can also add appointments by starting towrite with the number keys. The Meeting editoropens automatically.)Tip]To switch between different calendar view, press.](https://usermanual.wiki/LG-Electronics-USA/KT610.Users-Manual-2/User-Guide-920165-Page-9.png)
![55Organiser]Settings:You can change the Calendar alarm tone,opening view, first day of the week or title of theWeek view.File mgr.Menu 7.6You can browse and manage folders and files.1. To view the contents of a folder or file, scroll to itand press .2. To send a file to compatible devices, scroll to it andpress .3. Using the left soft key [Options], the followings areavailable.]Move to folder:To move the folder or file toanother folder. Scroll to the desired folder andpress .]Copy to folder:To save a copy of the folder orfile in another folder. Scroll to the desired folderand press .]New folder:To create a folder. Key in a name forthe folder and press .]Mark/Unmark:You can select multiple files.Once your have marked all desired notes, pressthe left soft key [Options] and select the desiredaction.]Rename:You can rename the folder.]Find:To search for specific folders or files. Selectthe memory you want to search. Key in thesearch text and press . Folders and fileswhose names contain the search test aredisplayed.]View details:You can view detailed informationon the folder.Tip]To view the previous or next month, pressup/down navigation key.]To go to today, press .Note ]Default folders such as Sound clips in My stuffcannot be moved or deleted.](https://usermanual.wiki/LG-Electronics-USA/KT610.Users-Manual-2/User-Guide-920165-Page-10.png)
![Organiser56Organiser]Memory details:To check the memoryconsumption in phone memory or a memorycard.4. To delete a folder or file, scroll to it and press .Memory Menu 7.7You can view the status of the memory card.Using the left soft key [Options], the followings areavailable.]Remove memory card:Select this to safely ejectthe memory card.]Back up phone memory:To back up importantinformation, such as your calendar entries orcontacts, to your memory card.]Restore from card:To restore the backup from thememory card to your phone.]Format memory card:To format a memory cardfor your phone.]Memory card name:You can change the name ofyour memory card.]Set password:To create a password for the memorycard. This helps protect the data on the memorycard because it means a password is requested whenthe card is inserted into another device.Note ]Do not remove the card before the phone notifiesyou that it is safe to do so.Note ]Do not format a memory card that containsimportant software or data as formatting destroysall that is saved on the card.Note ]The phone restarts after the restoration.Note ]To browse and manage folders and files on yourmemory card, press the right navigation key.](https://usermanual.wiki/LG-Electronics-USA/KT610.Users-Manual-2/User-Guide-920165-Page-11.png)
![57Organiser]Memory details:You can monitor the memoryconsumed by different applications and data on thememory card.Tip]You can select Remove password later. Thismeans the memory card is unlocked and nopassword is requested when it is inserted intoanother device. In this case, the data saved on thecard is not protected against unauthorised use.](https://usermanual.wiki/LG-Electronics-USA/KT610.Users-Manual-2/User-Guide-920165-Page-12.png)
![Profiles [ - 8]58ProfilesYou can manage the call, message, and other alertsettings of your phone.1. To change the profile, scroll to the desired profile,press the left soft key [Options]and selectActivate.2. To modify a profile, scroll to it, press the left softkey [Options], and select Personalise.]Ring tone:To change the ringing tone, scroll to thenew tone and press .]Video call tone:To change the ringing tone for avideo call, scroll to the new tone and press .]Ring type:To change the ringing type, scroll to thedesired type and press .]Ring volume: To increase or decrease the ringingtone volume, press the right or left navigation key.And press .]Message alert tone:To change the alert tone formessages you receive, scroll to the new tone andpress .]E-mail alert tone:To change the alert tone for e-mail messages you receive, scroll to the new toneand press .Note]To change profiles in any view, briefly press thePower key on the right side of the phone. Scroll tothe profile you want to use and press .]To quickly activate the Silent profile in standbymode, press and hold . To return to Generalprofile, again press and hold .]In Offline profile, you cannot make or receive callsor use other features that require networkcoverage.Tip]To listen to a tone before selecting it, scroll to thetone. After a moment, playback will start. To endplayback, press any key.Tip]When you select Ascending, the ringing volumestarts from level one and increases level by level tothe maximum volume you set in the next setting.](https://usermanual.wiki/LG-Electronics-USA/KT610.Users-Manual-2/User-Guide-920165-Page-13.png)
![Profiles59]Vibrating alert:To have your phone vibrate forincoming calls and messages, select On.]Keypad tones:To change the volume level of thekeypad tones, scroll to the new level and press .]Warning tones: To set the phone to sound warningtones, select On.]Alert for:To set the phone to ring only when callsarrive from members of a specific contact group orgroups, scroll to each group and press to markit. Once you have selected the desired groups, pressOK.To save your settings, press Back.3. To create a new profile with your own soundsettings, press the left soft key [Options]andselect Create new.Note]The General and Offline profiles cannot berenamed.]Some settings are not available with the Offlineprofile.](https://usermanual.wiki/LG-Electronics-USA/KT610.Users-Manual-2/User-Guide-920165-Page-14.png)
![Settings [ - 9]60SettingsGeneralYou can edit the general settings of your device orrestore the original default device settings.PersonalisationTo edit settings related to the display, standby modeand general functionality of your device.]Display:You can edit brightness, list font size andother display settings. After setting each value, pressthe right soft key [Back].]Standby mode:To select the general theme foryour device, edit the theme settings and display orhide the operator logo. After setting each value,press the right soft key [Back].]Tones:To edit settings for the various soundsproduced by your phone.]Themes:To change the look of your device'sdisplay.Brightness To darken or brighten the display, press theleft/right navigation key and press OK.List font size You can adjust the size of the text and iconson the display: Large, Normal or Small.To decrease or increase the power saver time-out, press the left/right navigation key andpress OK.To key in a note or select an image to greetyou when you switch on the phone, scroll toText or Image and press OK.Light time-out To increase or decrease the period of time forwhich the light stays on when you stop usingthe phone, press the left/right navigation keyand press OK.Power savertime-outWelcomenote / logoActive standby To display today's entries from Calendar,show your To-do tasks and make shortcuts todifferent applications available from standbymode, select On.Shortcuts To change the shortcuts available in standbymode from the selection keys on the bottomof the display and when you press thenavigation key in any direction.To select the application shortcuts thatappear on the display in Active standby, scrollto each shortcut setting and press .Scroll to the desired application and press. (Note: You can also set the functionsassigned to soft keys when Active standby isset to On.)Active standbyapps.](https://usermanual.wiki/LG-Electronics-USA/KT610.Users-Manual-2/User-Guide-920165-Page-15.png)
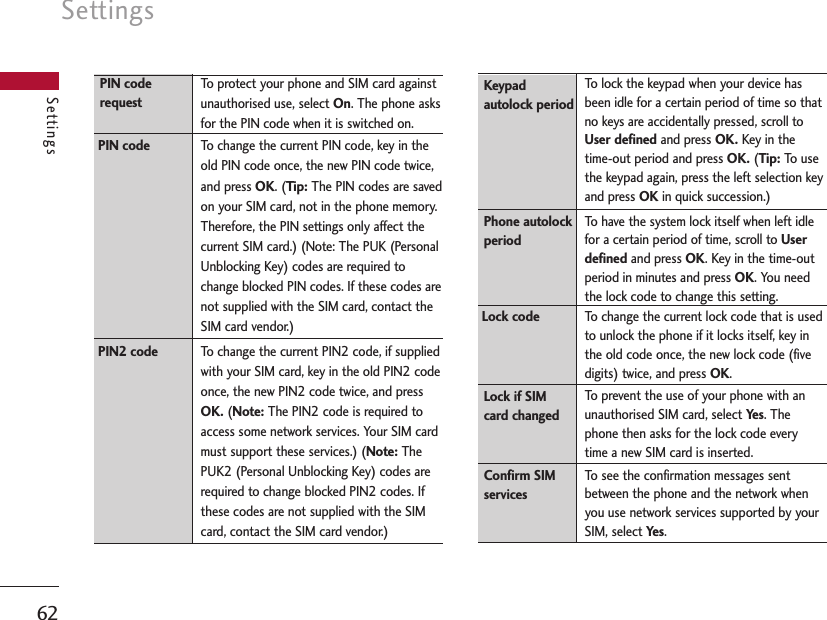
![61Settings]Language:To select the languages for the phonetexts and for you to write messages, notes and othertexts. After setting each value, press the right softkey [Back].Date and timeTo edit time and date settings.EnhancementYou can edit settings related to the variousenhancements such as Headsetand Wireless car kityou can use with your device. In most enhancementsettings, you can select the profile to use and answerincoming calls automatically whenever you use theenhancement. Some enhancement connectors do notindicate which type of an enhancement is connected tothe device. ]Headset]Wireless car kitSecurityYou can edit settings related to the security of yourpersonal information on your phone or SIM card anddata connections between your device and the network.]Phone and SIM card:To change the PIN and othersecurity codes and edit other security settings foryour phone and SIM card.Phone language Scroll to the desired language for the displaytexts and press OK. If you select Automatic,the language is selected according to theinformation on your SIM card.Scroll to the desired language for writing textand press OK.To use predictive text input by default, selectOn. (Note: A predictive text dictionary is notavailable for all languages.)WritinglanguageDefault profile Scroll to the profile to use with the headsetand press .To answer calls automatically after fiveseconds when you use the headset, select On.AutomaticanswerDefault profile Scroll to the profile to use with the car kit andpress .To answer calls automatically after fiveseconds when you use the car kit, select On.AutomaticanswerPredictivetextNote]Please refer to page 83 for more information.](https://usermanual.wiki/LG-Electronics-USA/KT610.Users-Manual-2/User-Guide-920165-Page-16.png)
![63Settings]Certificate managementTo view and manage the digital certificates in yourphone.]Security moduleTo view or edit security modules.Factory settingsTo restore the default settings of your device orremove any operator settings, press the left soft key[Yes] and key in the lock code.PhoneYou can edit the general settings related to making andreceiving calls.Call settings]Send my caller ID:Scroll to Yesto display yourcaller identity to the people you call, Noto hide itor Set by networkto follow the default setting ofyour home network.]Call waiting:To be notified of incoming calls whileyou have a call in progress, select Activate.]Reject call with SMS:To send an explanatory textmessage to callers when you reject their call, selectYes.]Message text:Key in the text for the message tosend to rejected callers.]Image in video call:To send a still image to videocallers if you disable sending your video during thecalls, scroll to Use selectedand press OK. Selectthe desired image.]Automatic redial:To have your phone redial whennumbers are busy or calls are not answered, selectOn.]Show call duration:To have the length of a calldisplayed during the call, select Yes.]Summary after call:To have the duration of a callbriefly displayed after the call, select On.]Speed dialling:To call the phone numbers to whichyou have assigned speed dialling keys by pressingand holding the speed dial key, select On.]Anykey answer:To answer incoming calls bypressing any key except the End and Power keys,select On.](https://usermanual.wiki/LG-Electronics-USA/KT610.Users-Manual-2/User-Guide-920165-Page-18.png)
![Settings64Settings]Line in use (shown if ALS is supported by SIM):Select either of your phone lines as the primary linefor making calls and sending messages.]Line change (shown if ALS is supported by SIM):To prevent the primary line from being changed,select Disable.You need your PIN2 code to changethis setting.Call divertYou can divert incoming calls to your voice mailbox orto another phone number.]Voice calls:You can divert incoming voice calls toyour voice mailbox or to another phone number.Scroll to the following divert options and press .Select Activate>To voice mailboxor To othernumber.- All voice calls:Diverts all incoming calls.- If busy:Diverts incoming calls when you have anactive call or reject a call.- If not answered:Diverts calls after your phonerings for a specified time. Scroll to the time andpress OK.- If out of reach:Diverts calls when the phone iseither switched off or out of network coverage.- If not available:To activate the last threesettings, to divert if busy, not answered or out ofreach.To cancel the diverting of calls, scroll to the activedivert options, press the left soft key [Options]andselect Cancel.To check your current diverts, scroll to the call divertoptions, press the left soft key [Options]and selectCheck status.]Data and video calls:You can divert incoming dataand video calls to another phone number. Scroll tothe following divert options and press . SelectActivate. Key in the number and press OK.- All data and video calls:Diverts all incomingcalls.Note]The accessibility of some Call settings depends onthe availability and your subscription to thenetwork services. Contact your service providerfor more information.](https://usermanual.wiki/LG-Electronics-USA/KT610.Users-Manual-2/User-Guide-920165-Page-19.png)
![65Settings- If busy:Diverts incoming calls when you have anactive call.- If not answered:Diverts calls after your phonerings for a specified time. Scroll to the time andpress OK.- If out of reach:Diverts calls when the phone iseither switched off or out of network coverage.- If not available:To activate the last three settings,to divert if busy, not answered or out of reach.To cancel the diverting of calls, scroll to the activedivert options, press the left soft key [Options]andselect Cancel.To check your current diverts, scroll to the divertoptions, press the left soft key [Options]and selectCheck status.To save your settings, press the right sot key [Back].Call barring You can restrict the receiving of calls: Outgoingcalls/ International calls/ International callsexcept to home country/ Incoming calls/Incoming calls when abroad.To edit mobile call barring settings, you need apassword. You obtain the barring password from yourservice provider upon subscription to this networkservice.Call barring affects all voice and data calls, exceptemergency calls.Scroll to barring options, press and select:]Activate to restrict calls.]Cancel to undo call restriction.]Check status to see if calls are restricted or not.To undo mobile call barring, press the left soft key[Options] and select Cancel all barrings.To change the barring password, press the left softkey [Options] and select Edit barring password.Key in the old password once, the new passwordtwice and press OK. To save your settings, press theright soft key [Back].](https://usermanual.wiki/LG-Electronics-USA/KT610.Users-Manual-2/User-Guide-920165-Page-20.png)
![Settings66SettingsNetworkYou can select the network type, the manner ofselecting networks and indicate when your phone isused in a Micro Cellular Network.]Network mode: Press , scroll to the networktype and press .]Operator selection: Define how to choose betweendifferent available networks when travelling, forexample.- Manual: You can select the network yourself.Scroll to the desired network and press .- Automatic:To have the network selectedautomatically.]Cell info display: To indicate when your phone isused in a Micro Cellular Network (MCN), select On.The MCN indicator is only displayed in standby mode.To save your settings, press the left soft key [Back].ConnectionYou can edit access point and other connection settings.BluetoothYou can edit settings for Bluetooth connectivity. For further information, please refer to page 93.Bluetooth provides you with wireless connections toother Bluetooth devices such as computers or otherphones.Note]This setting may be preset for your phone and notavailable for editing.Tip]Manual selection can be useful when you knowthat one network is less expensive than another orthat it provides faster data transmission.Tip]In a network based on MCN technology, localcalls may cost less.Note]To view or edit other settings, press the left/rightnavigation keys.](https://usermanual.wiki/LG-Electronics-USA/KT610.Users-Manual-2/User-Guide-920165-Page-21.png)
![Settings67Within a maximum range of 10 metres, you can transferdata, such as messages or images, between your phoneand other Bluetooth devices.]Bluetooth:To enable wireless connections to otherBluetooth devices, select On.]My phone's visibility:Set the visibility of yourphone to other Bluetooth devices.- Shown to all:Allows other Bluetooth devices tofind your phone whenever Bluetooth is switched on.- Define period:You can set a specific timeperiod during which your phone is visible to otherdevices. After the time expires, your phone ishidden.- Hidden:To prevent other Bluetooth devices fromfinding your phone.]My phone's name:You can change the name ofyour phone, which is visible to other devices thatsearch for Bluetooth devices. Key in the new nameand press OK.USBYou can change the device type to which you normallyconnect your phone with the USB cable.]USB mode- PC Suite:To connect PC Suite to your phone viathe USB cable. With PC Suite, you can back updata from your phone to a PC and restore it backto your phone, synchronise data between yourphone and PC, transfer files and use it for otherpurposes. You need to install PC Suite on yourPC.Note]Your Paired devices can still connect to yourphone even if you select Hidden.Tip]Give a unique name to your phone to make sure itis easy to recognise when there are severalBluetooth devices in the vicinity.](https://usermanual.wiki/LG-Electronics-USA/KT610.Users-Manual-2/User-Guide-920165-Page-22.png)
![Settings68Settings- Data transfer:To access and transfer data, suchas text or music files, between your memory cardand a compatible device, such as a computer,using USB. For Data transferwith a USBconnection, you do not need to install anythingon your phone or the other device.]Ask on connection:Select Yesto select the USBmodeevery time you use the USB cable to connectyour phone to another device.Access pointsYou can view, create, and manage access points. Anaccess point is where your phone connects to thenetwork by way of a data call or packet data. To use e-mail and multimedia services or to browse web pages,you must first define internet access points for theseservices.1. To create a new access point, press the left soft key[Options]and select New access point.2. Scroll to the following settings and press toedit.]Connection name:Key in a name that is easy toremember and press OK.]Data bearer:Scroll to Data calland press .Note]Some or all access points may be preset for yourphone, and you may not be able to create, edit, orremove them.Tip]To use an existing access point as the basis of thenew access point, select Duplicate access point.Note]Contact your service provider for the correctaccess point settings.Note]When you synchronise data between your phoneand PC, the synchronisation must be started fromthe PC.](https://usermanual.wiki/LG-Electronics-USA/KT610.Users-Manual-2/User-Guide-920165-Page-23.png)
![69Settings]Dial-up number:Key in the modem telephonenumber of the access point.]User name:Key in your user name, if required bythe service provider. Press OK.]Prompt password:Select Yesto key in yourpassword each time you log into a server, or Notosave the password in your phone memory andautomate the login.]Password:Key in your password for the service andpress OK.]Authentication:Select Secureto always useencryption when sending your password, or Normalto use encryption when possible when sending yourpassword.]Homepage:Key in the web address of the pagethat appears when you connect to the web with thisaccess point.]Data call type:Select Analogue.]Maximum data speed:Scroll to the data transferspeed to which you want to limit the connection andpress . If you select Automatic, the datatransfer rate is determined by the network, and itmay be affected by the amount of data transferred inthe network.]Connection name:Key in a name that is easy toremember and press OK.]Data bearer:Scroll to Packet dataand press OK.]Access point name:Key in the name provided byyour service provider and press OK.]User name:Key in your user name, if required bythe service provider. Press OK.]Prompt password:Select Yesto key in yourpassword each time you log into a server, or Notosave the password in your phone memory andautomate the login.Tip]Use + in front of international numbers.Note]Some service providers may charge you more forhigher data rates.](https://usermanual.wiki/LG-Electronics-USA/KT610.Users-Manual-2/User-Guide-920165-Page-24.png)
![Settings70Settings]Password:Key in your password for the service andpress OK.]Authentication:Select Secureto always useencryption when sending your password, or Normalto use encryption when possible when sending yourpassword.]Homepage:Key in the web address of the pagethat appears when you connect to the web with thisaccess point.3. To save your settings, press the right soft key[Back].The icons on the left-hand side of the access pointsindicate their data bearers.To edit an access point, scroll to it and press .To delete an access point, scroll to it and press .Packet dataYou can set when to use packet data connections andkey in the access point to be used if you use yourphone as a modem for a computer.]Packet data connection:Define when to usepacket data connections.- When available:Registers to the packet datanetwork when you switch on your phone in anetwork that supports packet data.- When needed:Establishes a packet dataconnection only when an application or actionrequires it.]Access point:If you use the phone as a modem toenable packet data connectivity from a computer,scroll to this and press . Key in the access pointname and press OK.Contact your service providerfor the access point name for modem connections.To save your settings, press the right soft key [Back].Note]For further information, please refer to the Helpoption on the handset.Note]This setting affects all access points for packetdata connections.](https://usermanual.wiki/LG-Electronics-USA/KT610.Users-Manual-2/User-Guide-920165-Page-25.png)
![71SettingsSIP settingsYou can create or edit session initiation protocol (SIP)profiles, which are necessary for making Internet calls,for example.The Session Initiation Protocol (SIP) is used forcreating, modifying, and terminating communicationssessions, such as internet calls, with one or moreparticipants. SIP profiles include settings for thesesessions. (The SIP profile used by default for acommunication session is underlined.)To create a SIP profile, press the left soft key[Options] and select New SIP profile >Defaultprofileor Use default profileto select a profile asthe basis for the new profile.To edit a SIP profile, scroll to it and press .To select the SIP profile you want to use by default forcommunications sessions, scroll to the profile, pressthe left soft key [Options]and select Defaultprofile.To delete a SIP profile, scroll to it and press .ConfigurationsYou can view or delete trusted servers from which yourphone may receive configuration settings. You canreceive messages from your network operator, serviceprovider, or company information managementdepartment. These messages contain configurationsettings for trusted servers and are automatically savedin Configurations.From trusted servers you mayreceive configuration settings for access points,multimedia or e-mail services, and synchronisationsettings.To delete configurations for a trusted server, scroll tothe server and press . The configuration settingsfor other applications provided by this server are alsodeleted.Note]SIP profiles may be preset in your device or youmay receive them from your service provider. Youmay not be able to edit or manage SIP profiles.](https://usermanual.wiki/LG-Electronics-USA/KT610.Users-Manual-2/User-Guide-920165-Page-26.png)
![Settings72SettingsApplicationsYou can edit the settings of different applications.RealPlayerYou can change RealPlayer video or connectionsettings.]Video:You can set the image contrast and selectwhether video clips are automatically replayed whenthey finish playing.- Contrast:To make the image lighter or darker,press the left/right navigation keys.- Loop:To automatically replay video clips whenthey finish playing, select On.]Streaming:You can select whether or not to use aproxy server and change the default networkconnection settings.- Proxy:You can select whether to use a proxyserver and key in the proxy server ’s IP addressand port number.- Network:You can change the access point toconnect to internet and set the port range usedwhen connecting.CameraYou can edit image or video settings. For furtherinformation, please refer to p.55-58.Voice recorderYou can select the recording quality and defaultmemory for your sound clips.]Recording quality:To record sound clips you canthen easily include in your multimedia messages andsend to other devices, select MMS compatible.]Memory in use:Select Phone memoryorMemory cardas the default memory in which tosave your sound clips.Note]For example, you may need to delete trustedserver configurations and the configurationsettings provided by it when you change yourservice provider.](https://usermanual.wiki/LG-Electronics-USA/KT610.Users-Manual-2/User-Guide-920165-Page-27.png)
![73SettingsApp. managerYou can edit the Application manager settings.Some software packages that you install in your devicemay contain certificates for additional security.]Software installation:Select Signed onlyto installapplications with verified digital signatures only.]Online certificate check:You can check thevalidity of certificates when installing applications.- Must be passed:Checks certificate validity wheninstalling an application. If validity cannot beverified, the installation will be cancelledautomatically.- On:Checks certificate validity when installing anapplication. If validity cannot be verified, you willbe asked whether you want to continue installingthe application.- Off:Select this if you trust the validity of thecertificate.]Default web address:If the software packagecertificate does not include a web address to checkits validity, its validity can be checked via the defaultweb site. To change the default address, select this.Key in the new address and press .LogYou can set the time period to keep log events and todisplay call duration during calls. Scroll to the numberof days after which logged communication events areautomatically deleted and press .Note]These settings do not affect Java applications.Note]If you select No log, all log contents arepermanently deleted.Tip]You may also edit the settings of otherapplications installed in your device by yourservice provider that appear on the list.](https://usermanual.wiki/LG-Electronics-USA/KT610.Users-Manual-2/User-Guide-920165-Page-28.png)
![Tools [ - ]74ToolsCall mailbox Menu *.1You can use the network service of voice mail thatworks as an answering machine for your phone.A call mailbox is a network service that works as ananswering machine where people who are unable toreach you can leave messages. If your phone prompts you for the call mailbox numberthat you cannot recall, press the left soft key [Find] tosearch for it in Contacts.Using the left soft key [Options], you can access thefollowings.]Define number:Key in the phone number of yourcall mailbox.]Call voice mailbox:Makes a call to the voicemailbox.]Change number:You can change the phonenumber of your call mailbox.Speed dial Menu *.2You can assign speed dialling keys (from to )to phone numbers in your contacts directory.Some number keys may be assigned as speed dials tospecial phone numbers. For example, number isreserved for your call mailbox.To assign speed dialling keys:1. Scroll to an available speed dialling number andpress .2. Select Assign.3. Select the contact to whom you want to assign thespeed dial. Select the phone number.Tip]With the call diverting network service, you candirect incoming calls to your call mailbox. [Menu>Settings >Phone >Call divert >Voice calls](Please refer to page 72.)Tip]To quickly call your call mailbox in standby mode,press and .](https://usermanual.wiki/LG-Electronics-USA/KT610.Users-Manual-2/User-Guide-920165-Page-29.png)
![75ToolsYou can call a phone number linked to a speed diallingkey in standby mode by pressing the speed dial andthen .To assign a speed dialling key to a different phonenumber:1. Scroll to the speed dialling number and press theleft soft key [Options].2. Select Change.3. Select the new contact and number.You can remove a number linked to a speed dial bypressing the left soft key [Options] and selectingRemove.The contact and phone number you remove will remainin your Contacts.Themes Menu *.3You can change the look of your phone’s display.In Themes, you can select different themes, whichconsist of various settings that affect the appearanceof your phone’s display. Some themes may also includeringtones or message alert tones.GeneralYou can preview or change the theme used for allapplications that do not have their own themes ordownload more themes to your phone.Menu viewYou can change the display appearance of applicationsin Menubetween Gridand Listformation.WallpaperYou can change the background image on the displayin standby mode.To change the background image on the display instandby mode, scroll to Image and press . Scroll tothe desired image and press the left soft key [Select].Note]To call a number linked to a speed dialling key justby pressing and holding the speed dial in standbymode, open Settings >Phone > Call >Speeddialing and select On.](https://usermanual.wiki/LG-Electronics-USA/KT610.Users-Manual-2/User-Guide-920165-Page-30.png)
![Tools76ToolsPower saverYou can change the option that appears as powersaver when your device has been idle and no keys havebeen passed for some time.]Date and time:Uses the current date as powersaver.]Text:You can key in the text to appear as the powersaver.]Animation:You can select an animation as yourpower saver. Scroll to the desired animation andpress .Using the left soft key [Options], you can access thefollowings.]Preview:You can see a preview of the power saver.]Settings:You can view or edit the power saversettings.Actv. keys Menu *.4You can view and manage usage rights for media files inyour phone. Some media files, such as images, music orvideo clips are protected by digital usage rights.The activation keys for such files may allow or restricttheir usage. For example, with some activation keys youmay listen to a music track only a limited number oftimes. During one playback session you may rewind,fast-forward or pause the track, but once your stop it,you have used one of the instances allowed.Valid keysTo view detailed info about your usage rights for amedia file, such as their validity status and whether youcan send the media file to other devices, scroll to thecorresponding activation key and press .Tip]You can key in the Power saver time-out afterwhich the power saver is turned on, in Menu >Settings >General >Personalisation >Display.Note]You can also choose any other power saver youmay have installed on your phone.](https://usermanual.wiki/LG-Electronics-USA/KT610.Users-Manual-2/User-Guide-920165-Page-31.png)
![77ToolsUsing the left soft key [Options], you can access thefollowings.]Get new key:You can buy usage rights for a mediafile.]Reload:To update the info about whether themedia files connected to the activation keys aresaved on the phone and the validity of the keys.To delete the activation key for a media file and themedia file itself, scroll t o the key and press .Invalid keysTo view detailed info about your expired or missingusage rights for a media file, scroll to thecorresponding activation key and press .Using the left soft key [Options], you can access thefollowings.]Get new key:You can buy more instances or extendthe usage period for a media file.]Reload:To update the info about whether themedia files connected to the activation keys aresaved on the phone and the validity of the keys.Tip]In the activation key details view, you can see thevalidity status of the key, details about your usagerights and restrictions for the correspondingmedia file and where the media file is currentlysaved on your device.Tip]Activation keys expire when you run out ofinstances when you are allowed to use a media fileor the time period for using the file ends.]In the activation key details view, you can see thevalidity status of the key, details about your usagerights and restrictions for the correspondingmedia file and where the media file is saved onyour device.Note]You may not be able to buy more instances orextend the usage period for all media files.](https://usermanual.wiki/LG-Electronics-USA/KT610.Users-Manual-2/User-Guide-920165-Page-32.png)
![Tools78ToolsNot in useUnused activation keys are usually for media files thathave been deleted from the device or saved on aremoved memory card.To view detailed info about an activation key not inuse, scroll to it and press .Using the left soft key [Options], you can access thefollowings.]Reload:To update the info about whether themedia files connected to the activation keys aresaved on the phone and the validity of the keys.]Restore activation keys:Select this to reinstate theactivation keys saved in a backup file on your device.Help Menu *.5You can read instructions about using the applicationsand functions of your phone.About Menu *.6You can see the copyright information of this product.](https://usermanual.wiki/LG-Electronics-USA/KT610.Users-Manual-2/User-Guide-920165-Page-33.png)
![Connectivity [ - 0]79ConnectivityIM(Instant Messasging) Menu 0.1You can converse with individual or multiple IM usersby exchanging instant messages.To converse with IM users and to view and edit your IMcontacts, you must first log into the IM service. Pressthe left soft key [Options]and select Log in. Whenyou register for this service, your service providerinforms you of your user name, password and theappropriate settings to log in.Using the left soft key [Options], you can access thefollowings.]Change own availability:You can change youronline status, which is shown to other IM users.]Log in/ Log out:To connect to the IM server ordisconnect from the IM server.]Settings:You can edit IM application or serversettings.ConversationsYou can start or continue a conversation with an IMuser.To start a conversation, press the left soft key[Options]and select New conversation.]Enter user ID:You can key in the ID of the IM user.]Select from contacts:You can select the otherparty of the conversation from your IM contacts.Tip]To automatically connect to the IM server whenyou open the application, press the left soft key[Options] and select Settings >IM login type>On app. start-up.Note]To converse with other IM users, you must firstlog in to the IM service. Press the left soft key[Options] and select Log in.Tip]Each user ID is unique and is provided by theservice provider during registration. To search forIM users and user IDs, open IM contacts andpress the left soft key [Options] and select NewIM contact >Search from server.](https://usermanual.wiki/LG-Electronics-USA/KT610.Users-Manual-2/User-Guide-920165-Page-34.png)
![Connectivity80ConnectivityTo continue a conversation, scroll to it and press .Key in a message and press to send it.To end a conversation, scroll to it and press .To view an invitation to join a group conversation,scroll to it and press . Press the left soft key[Options]to Jointhe group or Rejectthe invitationand send a message to its sender.Using the left soft key [Options] in a conversation orinvitation, you can access the followings.]Save:To save a received image in My stuff.]Insert smiley:You can add a string of textcharacters that form a face that expresses a mood toyour message.]Send image:You can send a saved image (FromMy stuff)or new image (New image).]Forward:You can forward the message to anotherIM contact or group.]Add to IM contacts:You can add the other partyto your IM contacts.]Record chat:You can save a copy of theconversation.]Stop recording:Select this to stop saving theconversation.]Blocking options:You can prevent you fromreceiving messages from the other party or anotherIM user or view a list of your blocked IM users.]Change own availability:You can change youronline status, which is shown to other IM users.]End conversation:Select this to finish theconversation.]Writing language:You can change the language inwhich you write your messages.Note]All conversations end when you log into adifferent IM server, when you log into the sameserver with a different user name or when you exitthe application.Note]To delete the invitation without sending arejection to its sender, scroll to it and press .](https://usermanual.wiki/LG-Electronics-USA/KT610.Users-Manual-2/User-Guide-920165-Page-35.png)
![81ConnectivityIM contactsYou can create, edit or view the online status of yourIM contacts.To open or close a contact list, scroll to it and press.To create an IM contact, press the left soft key[Options]and select New IM contact.]Add from Contacts:To select a contact from yourContactsdirectory and search for the contact onthe IM server.]Enter manually:To key in the contact info.]Search from server:To find IM users.To save the new contact, press Done.Scroll to your own status, contact list or contact andpress the left soft key Options.You can access thefollowings.]Change own availability:You can change youronline status, which is shown to other IM users.]Status message: You can key in a more detailednote about your availability shown to other IM users.]Open conversation:Select this to start or continueconversation with the contact.]Edit:You can change your own Aliasname that isvisible in other IM users' devices.]New contact list:You can create a contact list for aspecific group of IM cont acts.]Contact details:You can view detailed informationabout the group.Note]To view your IM contacts, you need to log intothe IM service.Tip]An indicator on the left-hand side of the contactname shows the online status of your IM contacts.Tip]To find a specific contact or contact list, key inthe first letters of the contact or list name. Thecontacts and contact lists whose names matchyour input appear on the display.](https://usermanual.wiki/LG-Electronics-USA/KT610.Users-Manual-2/User-Guide-920165-Page-36.png)
![Connectivity82Connectivity]Reload users' availability:Select this to update theonline status of your IM contacts.]Contact options:You can edit or delete thecontact, move it to another contact list or receive anote when the contact's online status changes.]Belongs to groups:You can see the IM groups thecontact has joined.]Blocking options:You can prevent you fromreceiving messages from the other party or anotherIM user or to view a list of your blocked IM users.]Log out:Select this to disconnect from the IMserver.]Settings:You can edit IM application or serversettings.To delete an IM contact, scroll to the contact andpress .IM groupsYou can start or continue a group conversation withmultiple IM users.To create an IM group, press the left soft key[Options]and select Create new group.To join an IM group or to continue a groupconversation, scroll to the group and press . Keyin a message and press to send it.Tip]To update online statuses automatically, selectSettings >IM settings >Availability reloading>Automatic.Note]IM contacts and IM groups may not be availableif you have not logged into an IM server or if theserver does not support IM groups.Tip]To join an IM group that is not saved to yourphone, press the left soft key [Options] andselect Join new group. Key in the group ID andpress .]To search for IM groups and group IDs, press theleft soft key [Options] and select Search.](https://usermanual.wiki/LG-Electronics-USA/KT610.Users-Manual-2/User-Guide-920165-Page-37.png)
![83ConnectivityScroll to an IM group and press the left soft key[Options]to access the followings.]Leave IM group:Select this to end participation inthe group conversation.]Group- Details:You can view detailed information aboutthe group.- Save:Select this to save the group.- View participants:You can view the currentmembers of the group.- Settings:You can edit group settings.]Change own availability:You can change youronline status, which is shown to other IM users.]Log out:Select this to disconnect from the IMserver.]Settings:You can edit IM application or serversettings.To remove an IM group, scroll to it and press .To open an image included in a message, scroll to itand press .Press the left soft key [Options]to access thefollowings.]Save:You can save an image in My stuff.]Reply: To send a message only to the sender of theselected message.]Forward:To forward the selected message toanother IM group or contact.- Insert smiley: You can add a string of textcharacters that form a face expressing a mood toyour message.- Send image:You can send a saved image (FromMy stuff)or new image (New image).- Send invitation:You can invite an IM user tojoin the group.Note]You can only select this option if you have editingrights to the group.Note]You cannot remove a group to which you are stilljoined. Press the left soft key [Options] andselect Leave IM group before removing it.](https://usermanual.wiki/LG-Electronics-USA/KT610.Users-Manual-2/User-Guide-920165-Page-38.png)
![Connectivity84Connectivity- Send private message:You can send a messageto selected members of the group. Select therecipients. Key in the message and press .- Leave IM group:Select this to end yourparticipation in the group conversation.- Group•Save:Select this to save the group.•View participants:You can view the currentmembers of the group.•Settings:You can edit group settings.- Change own availability:You can change youronline status, which is shown to other IM users.- Record chat:You can save a copy of the groupconversation. Key in a name for the conversationand press .- Stop recording:Select this to stop saving theconversation.- Writing language:You can change the languagein which you write your messages.Recorded chatsYou can view previous IM conversations you havesaved.To view a recorded chat or an IM conversation, scrollto it and press the navigation centre key.Using the left soft key [Options], you can access thefollowings.]Send:You can send the conversation to othercompatible devices.]Change own availability:You can change youronline status, which is shown to other IM users.]Log in:Select this to connect to an IM server.]Log out:Select this to disconnect from the IMserver.]Settings:You can edit IM application or serversettings.Note]You can only select this option if you haveediting rights to the group.](https://usermanual.wiki/LG-Electronics-USA/KT610.Users-Manual-2/User-Guide-920165-Page-39.png)
![85ConnectivityTo delete a recorded chat, scroll to it and press .Conn.mgr. Menu 0.2You can manage active data connections.To view detailed connection info, such as the duration,speed of data transfer, and the amount of data sent orreceived, scroll to the connection and press .To end a connection, scroll to it and press .To end all connections, press the left soft key[Options] and select Disconnect all.Bluetooth Menu 0.3You can make a wireless connection to othercompatible devices such as computers.Bluetooth provides you with wireless connections toother Bluetooth devices such as computers or otherphones.Within a maximum range of 10 metres, you can transferdata, such as messages or images, between your phoneand other Bluetooth devices.] Bluetooth:To enable wireless connections to otherBluetooth devices, select On.] My phone's visibility:Set the visibility of yourphone to other Bluetooth devices.- Shown to all:Allows other Bluetooth devices tofind your phone whenever Bluetooth is switchedon.- Define period:You can set a specific timeperiod during which your phone is visible to otherdevices. After the time expires, your phone ishidden.Tip]To delete several chats at once, scroll to each oneand press the left soft key [Options] and selectMark/Unmark >Mark to put a tick next to it.Once you have ticked everything that you want todelete, press .Tip]You can also play phone -to-phone games viaBluetooth.](https://usermanual.wiki/LG-Electronics-USA/KT610.Users-Manual-2/User-Guide-920165-Page-40.png)
![Connectivity86Connectivity- Hidden:To prevent other Bluetooth devices fromfinding your phone.] My phone's name:You can change the name ofyour phone, which is visible to other devices thatsearch for Bluetooth devices. Key in the new nameand press OK.1. Open the application that contains the item youwant to send.2. Scroll to the item, press the left soft key [Options]and select Send >Via Bluetooth.3. The phone searches for Bluetooth devices withinrange and lists them.Scroll to the desired device and press to set upthe connection.Note]Your Paired devices can still connect to yourphone even if you select Hidden.Tip]Give a unique name to your phone to make sure itis easy to recognise when there are severalBluetooth devices in the vicinity.Note]If you have sent items using Bluetooth before, thepreviously selected devices are included in the list.To search for more Bluetooth devices, go to Moredevices and press .]If the other device requires pairing, agree on acommon passcode with its owner, key in the codeand press OK. Once the connection is established,the other device is saved in your Paired devices.]To use a Bluetooth audio enhancement such asBluetooth handsfree or headset:- Pair your phone with the enhancement. See theenhancement's user guide for the passcode andfurther instructions.- To connect to the audio enhancement, press theenhancement power key if the enhancement isnot already on. Some audio enhancementsconnect automatically to your phone. Otherwise,open Paired devices, scroll to the enhancementand press the left soft key [Options] and selectConnect to audio device.](https://usermanual.wiki/LG-Electronics-USA/KT610.Users-Manual-2/User-Guide-920165-Page-41.png)
![87Connectivity1. Press the right navigation key to move to the Paireddeviceswindow.2. Press the left soft key [Options]and select Newpaired device.The phone starts to search forBluetooth devices within range.3. Scroll to the device with which you want to pair andpress .4. Agree on a common passcode with the owner of theother device and key it in. Press OK.If you trust a paired device, you can allow it to connectautomatically to your phone. Scroll to the device, pressthe left soft key [Options]and select Set asauthorised.This way, you do not have to accept adevice manually every time you connect to it.To give a nickname to a paired device that is displayedonly in your phone, scroll to the device, press the leftsoft key [Options], and select Assign short name.To delete pairing with a device, scroll to the device andpress .USB Menu 0.4You can transfer data to and from another device usingthe USB wire provided in the sales pack.You can change the device type to which you normallyconnect your phone with the USB cable.USB mode]PC Suite:To connect PC Suite to your phone viathe USB cable. With PC Suite, you can back up datafrom your phone to a PC and restore it back to yourphone, synchronise data between your phone andPC, transfer files and use it for other purposes. Youneed to install PC Suite on your PC.Note]Some devices have fixed passcodes.Note]When you synchronise data between your phoneand PC, the synchronisation must be started fromthe PC.](https://usermanual.wiki/LG-Electronics-USA/KT610.Users-Manual-2/User-Guide-920165-Page-42.png)
![Connectivity88Connectivity]Data transfer:To access and transfer data, such astext or music files, between your memory card and acompatible device, such as a computer, using USB.For Data transferwith a USB connection, you donot need to install anything on your phone or theother device.Ask on connectionSelect Yesto select the USB modeevery time youuse the USB cable to connect your phone to anotherdevice.Sync Menu 0.5You can synchronise data in your phone’s contacts,calendar, notes and text message applications withcorresponding applications on a computer or Internetserver. Synchronisation settings are saved in syncprofiles.Scroll to a sync profile and press the left soft key[Options]. You can access the followings.]Synchronise:Synchronises the applicationsincluded in the profile with a remote database.]Edit sync profile:You can edit properties ofselected sync profile.]New sync profile:You can create a sync profile.]View log:You can see the number of added,updated and deleted entries in the latestsynchronization with the profile.To delete a synchronization profile, scroll to it andpress .Note]The available applications you can synchronisemay vary. Contact your service provider for moreinformation.Note]You cannot remove a PC Suite profile. Because itis an essential item to sync between phone andPC Suite.Tip]You may want to create multiple sync profile foran application to vary the data bearer or remotedatabase with which you synchronise your device.](https://usermanual.wiki/LG-Electronics-USA/KT610.Users-Manual-2/User-Guide-920165-Page-43.png)
![Browser [ - #]89BrowserBrowsing the webYou can browse web pages in this menu. You can alsoaccess this menu by pressing and holding instandby mode. Key in the page address and press theleft soft key [Go to].When you start to key in the address, addresses ofpages you have previously visited that match yourinput appear. To open a page, scroll to the address andpress the left soft key [Go to].To open a web link, scroll to it and press .You can access the followings by pressing the left softkey [Options].]Open link]Downloads:You can view files you are currentlydownloading from the web.]Go to web address:Select this to open anotherweb page.]Bookmarks:You can view the list from which youcan open your favourite web pages.]Save as bookmark:You can save the web addressof a page in your phone and make opening it quickand easy.Tip]To zoom the page in or out, press or .To open your Bookmarks.To search for specific text on the page.To return to the previous pageTo switch between your open windowsTo toggle page overview on and offTo go to a different web pageTo go to your homepageTo close the current window if you have more thanone open windowTip]You can download items, such as ringing tonesand operator logos, via the browser. Oncedownloaded, they are handled by the respectiveapplications. For example, a downloaded photo issaved in My stuff.](https://usermanual.wiki/LG-Electronics-USA/KT610.Users-Manual-2/User-Guide-920165-Page-44.png)
![Browser90Browser]Rotate screen:Select this to rotate display.]Navigation options- Reload:Downloads the latest version of thepage.- History:You can view a chronological list ofpages you have visited during the currentbrowsing session.- Page overview:You can view a small thumbnailimage of the page.]Zooming options:You can increase or decrease thesize of images or text.]Window- Allow pop-ups:Allows for automatic opening ofmultiple windows.]Clear privacy data- All:Deletes info saved in cache, cookies, history,automatic bookmarks, and forms during yourcurrent browsing session.- Clear cache:Select this to empty the temporarymemory that stores info about your visits todifferent web sites.- Delete cookies:Erases the info the networkserver collects about your visits to various webpages.- History:Erases the list of web pages you havevisited during this browsing session.- Form/password data:Select this to delete allinfo you may have entered in any web formsduring this browsing session.Note]If you access confidential info that requirespasswords such as your bank account, clear thecache after each use.Tip]Cookies are necessary if you shop on the web toretain the items you buy until you reach thecashier page, for example. However, the info maybe misused, and you may receive unwantedadvertisements in your phone, for example.](https://usermanual.wiki/LG-Electronics-USA/KT610.Users-Manual-2/User-Guide-920165-Page-45.png)
![91Browser]Tools- Show toolbar:Select this to show the toolbarwith various functions on the page. To select afunction in the toolbar, scroll to it and press.- Change connection:You can change your activeconnection to the web.- Disconnect:Select this to end your connectionto the web.- Save page:You can save the web page in yourphone for offline viewing.- Send:You can send the URL address of the pageto compatible devices.]Find:You can search for specific text or the numbersor addresses the page may contain. You can use thenumbers and addresses to call, send messages, openweb pages, or create contact cards, for example.]Settings:You can edit the Web settings.Saved pagesYou can view a saved web page. After scrolling to it,press .To find a specific saved page, key in the first letters ofthe page title. The list scrolls to pages whose titlesmatch your input.Scroll to a saved page and press the left soft key[Options]to access the followings.]Saved pages- Move to folder:You can move the page to adifferent folder.- New folder:You can create a folder to organiseyour saved pages.]Clear privacy data- All:Deletes info saved in cache, cookies, history,automatic bookmarks, and forms during yourcurrent browsing session.Tip]To save a web page for offline viewing, open thepage when browsing, press the left soft key[Options] and select Tools >Save page.](https://usermanual.wiki/LG-Electronics-USA/KT610.Users-Manual-2/User-Guide-920165-Page-46.png)
![Browser92Browser- Clear cache:Select this to empty the temporarymemory that stores info about your visits todifferent web sites.- Delete cookies:Select this to erase the info thenetwork server collects about your visits tovarious web pages.- History:Erases the list of web pages you havevisited during this browsing session.- Form/password data:Deletes all info you mayhave entered in any web forms during thisbrowsing session.]Mark/Unmark:You can select or cancel selectionof multiple saved pages. A check mark is placed onthe right-hand side of each selected page.]Settings:You can edit the Web settings.To remove a saved page, scroll to it and press .Auto. BookmarksYou can returns to a web page you have recentlyvisited. After scrolling to the desired page address,press .Scroll to a bookmark and press the left soft key[Options]to access the followings.]Back to page:You can return to the page youvisited before opening Bookmarks.]Bookmark manager- Move:Select this to rearrange your bookmarks.- Move to folder:Select th is to save thebookmark in another folder.- New folder:You can create a folder to organiseyour bookmarks.Note]If you access confidential info that requirespasswords such as your bank account, clear thecache after each use.Tip]Cookies are necessary if you shop on the web toretain the items you buy until you reach thecashier page, for example. However, the info maybe misused, and you may receive unwantedadvertisements in your phone, for example.](https://usermanual.wiki/LG-Electronics-USA/KT610.Users-Manual-2/User-Guide-920165-Page-47.png)
![93Browser- Edit:You can change the title, URL address,access point, user name, or password of thebookmark.]Mark/Unmark:You can select or cancel selectionof multiple bookmarks. A check mark is placed onthe right -hand side of each selected bookmark.]Navigation options- Go to web address:You can open another webpage.- Homepage:Select this to open your homepage.]Clear privacy data- All:Deletes info saved in cache, cookies, history,automatic bookmarks, and forms during yourcurrent browsing session.- Clear cache:Select this to empty the temporarymemory that stores info about your visits todifferent web sites.- Delete cookies:Erases the info the networkserver collects about your visits to various webpages.- History:Erases the list of web pages you havevisited during this browsing session.- Form/password data:Deletes all info you mayhave entered in any web forms during thisbrowsing session.]Tools- Change connection:You can change your activeconnection to the web.- Disconnect:Select this to end your connectionto the network.- Send:You can send the bookmark to compatibledevices.Note]If you access confidential info that requirespasswords such as your bank account, clear thecache after each use.Tip]Cookies are necessary if you shop on the web toretain the items you buy until you reach thecashier page, for example. However, the info maybe misused, and you may receive unwantedadvertisements in your phone, for example.](https://usermanual.wiki/LG-Electronics-USA/KT610.Users-Manual-2/User-Guide-920165-Page-48.png)
![Browser94Browser]Details- Security:You can see detailed info aboutconnection security.]Settings:You can edit the Web settings.To delete a bookmark, scroll to it and press .Browser feedsYou can download and manage feeds and blogs.Blog is short for weblog, which is a continuouslyupdated web diary meant to be viewed by any webuser.To download a feed or blog, scroll to it and press.You can access the following by press the left soft key[Options].]Refresh: Updates a feed or blog.]Refresh all:Updates all items in Browser feeds.]Manage feed- Move:To select this to move a feed or blog toanother location in the folder.- New folder:You can create a folder to organiseyour feeds and blogs.- Move to folder:Select this to move the feed ofblog to another folder.- Edit:You can change the title or URL address ofa feed.]Mark/Unmark:You can select or cancel selectionof multiple feeds. A check mark is placed on theright-hand side of each selected feed.]Back to page:Returns to the page you visitedbefore opening Browser feeds.Tip]Feeds are xml files in various web pages thatusually contain headlines and articles often aboutrecent news or other topics. To subscribe tointeresting feeds on web pages when browsing,press the left soft key [Options] and selectSubscribe.](https://usermanual.wiki/LG-Electronics-USA/KT610.Users-Manual-2/User-Guide-920165-Page-49.png)
![95Browser]Clear privacy data- All:Deletes info saved in cache, cookies, history,automatic bookmarks, and forms during yourcurrent browsing session.- Clear cache:Select this to empty the temporarymemory that stores info about your visits todifferent web sites.- Delete cookies:Erases the info the networkserver collects about your visits to various webpages.- History:Erases the list of web pages you havevisited during this browsing session.- Form/password data:Deletes all info you mayhave entered in any web forms during thisbrowsing session.]Settings:Edits the Web settings.Note]If you access confidential info that requirespasswords such as your bank account, clear thecache after each use.Tip]Cookies are necessary if you shop on the web toretain the items you buy until you reach thecashier page, for example. However, the info maybe misused, and you may receive unwanted advertisements in your phone, for example.](https://usermanual.wiki/LG-Electronics-USA/KT610.Users-Manual-2/User-Guide-920165-Page-50.png)
![Installations96InstallationsApp. mgr.You can install and update Java and other applicationsor components compatible with the Symbian operatingsystem. You can receive software installation packagesvia e-mail or multimedia messaging, transfer them froma computer or download them from the Web.To download and install software from the Web, selectDownload apps.Scroll to an application and press the left soft key[Options] to access the followings.]Install:You can install the application in your device.]Open:You can edit security settings for a Javamidlet.]View details:You can view the type, size, supplier,certificate or other information about theapplication.]Send:You can send the application to compatibledevices.]Remove:You can remove an installed applicationfrom your phone.]View log:You can see a list of the applications youhave installed or removed.]Settings: You can edit Application manager settings.Note]Only install applications from sources that offersufficient protection against harmful software.]You can also install software in other applications,such as e-mail messages. Scroll to the softwarepackage and press to start the installation.Note]You can also remove an application by pressing.]If you remove an application, you may not be ableto open files that it created.Note]You can see Gmail, Google Maps and Ouickofficeicons in Installations. These application are installedautomatically with your phone start. And you canuse Google menu on the menu-5 Google and youcan view documents with Ouickoffice on the menu-7 Organiser-File mgr.](https://usermanual.wiki/LG-Electronics-USA/KT610.Users-Manual-2/User-Guide-920165-Page-51.png)
![Installing LG PC Suite 97Installing LG PC Suite Installing LG PC Suite]Remove the USB cable between your mobile phoneand the PC.]Install the LG PC Suite application.]When setup is complete, the Get Connectedapplication will run automatically.]Connect the phone and the PC as shown on thescreen.]Select the cable connection for USB and connectthe phone and the PC with the USB cable.]Select the PC Suite in the Select mode displayed onthe phone.]Windows will install drivers in the PC five times intotal.]When all steps are completed successfully, you willsee a Setup Complete message from the GetConnected application.]From the next time, you can connect the phone andthe PC without repeating this procedure.Uninsalling LG PC Suite]Remove the USB cable between your mobile phone andthe PC.]To run the Uninstall LG PC Suite, click the Window StartButton >All Programs >LG PC suite >Uninstall LG PC Suite.Note]When you uninstall LG PC Suite, you should removeboth the application and driver. To finish uninstallingthe suite, you must restart your computer.]If you have a problem when you reinstall LG PCSuite after removal, remove the following items fromAdd or Remove Programs, and then restartWindows.- LG Connectivity Cable Driver- LG PC Suite- PC Connectivity Solution]When you try to connect the phone and the PCwith Bluetooth, the suite may not appear on theGet Connected application depending on thefeatures of the Bluetooth device. Then, the suitemay appear by clicking the Search Again button.]For more information, see Help on the LG PC Suitemenu.](https://usermanual.wiki/LG-Electronics-USA/KT610.Users-Manual-2/User-Guide-920165-Page-52.png)
![Accessories98AccessoriesTravel Adapter This charger allows you to charge the battery while away from home or your office.Standard BatteryData cable/CDYou can connect your phone to PC to exchange the data between them. Hands free ear-microphone and controller comboStereo headsetController:Answer & End key,volume control, Hold button and microphone.After connecting the headset and the controller, plugthe end of controller into the headset jack on the rightside of the phone.There are various accessories for your mobile phone. You can select these options according to your personalcommunication requirements.Note]Always use genuine LG accessories.]Failure to do so may invalidate your warranty.]Accessories may vary in different regions: pleasecheck with our regional service company or agentfor further information.](https://usermanual.wiki/LG-Electronics-USA/KT610.Users-Manual-2/User-Guide-920165-Page-53.png)
