LG Electronics USA KU250 PCS GSM Phone with Bluetooth User Manual
LG Electronics USA PCS GSM Phone with Bluetooth
UserManual.wiki
>
LG Electronics USA
>
KU250 User Manual
Users Manual
Navigation menu
Upload a User Manual
Namespaces
Wiki Guide
HTML
PDF
Info
Views
User Manual
Discussion / Help
Navigation
![8For Your SafetyImportant InformationThis user guide contains important information on the use andoperation of this phone. Please read all the informationcarefully for optimal performance and to prevent any damageto or misuse of the phone. Any changes or modifications notexpressly approved in this user guide could void your warrantyfor this equipment.Before You StartSafety InstructionsWARNING! To reduce the possibility of electric shock, do notexpose your phone to high humidity areas, such as thebathroom, swimming pool, etc.Always store your phone away from heat. Never store yourphone in settings that may expose it to temperatures less than32°F or greater than 104°F, such as outside during extremeweather conditions or in your car on a hot day. Exposure toexcessive cold or heat will result in malfunction, damageand/or catastrophic failure.Be careful when using your phone near other electronicdevices. RF emissions from your mobile phone may affectnearby in adequately shielded electronic equipment. Youshould consult with manufacturers of any personal medicaldevices such as pacemakers and hearing aides to determine ifthey are susceptible to interference from your mobile phone.Turn off your phone in a medical facility or at a gas station.Never place your phone in a microwave oven as this willcause the battery to explode.IMPORTANT! Please read the TIA SAFETY INFORMATION onpage 78 before using your phone.Safety InformationRead these simple guidelines. Breaking the rules may bedangerous or illegal. Further detailed information is given in thisuser guide.]Never use an unapproved battery since this could damagethe phone and/or battery and could cause the battery toexplode.]Never place your phone in a microwave oven as it willcause the battery to explode.]Do not dispose of your battery by fire or with hazardous orflammable materials.]Make sure that no sharp-edged items come into contactwith the battery. There is a risk of this causing a fire.]Store the battery in a place out of reach of children.]Be careful that children do not swallow any parts such asrubber plugs (earphone, connection parts of the phone,etc.). This could cause asphyxiation or suffocation.](https://usermanual.wiki/LG-Electronics-USA/KU250/User-Guide-786433-Page-4.png)
![9For Your Safety]Unplug the power cord and charger during lightning stormsto avoid electric shock or fire.]When riding in a car, do not leave your phone or set up thehands-free kit near to the air bag. If wireless equipment isimproperly installed and the air bag is activated, you may beseriously injured.]Do not use a hand-held phone while driving.]Do not use the phone in areas where its use is prohibited.(For example: aircraft).]Do not expose the battery charger or adapter to directsunlight or use it in places with high humidity, such as abathroom.]Never store your phone in temperatures less than- 4°F orgreater than 122°F.]Do not use harsh chemicals (such as alcohol, benzene,thinners, etc.) or detergents to clean your phone. There is arisk of this causing a fire.]Do not drop, strike, or shake your phone severely. Suchactions may harm the internal circuit boards of the phone.]Do not use your phone in high explosive areas as the phonemay generate sparks.]Do not damage the power cord by bending, twisting, pulling,or heating. Do not use the plug if it is loose as it may causea fire or electric shock.]Do not place any heavy items on the power cord. Do notallow the power cord to be crimped as it may cause fire orelectric shock.]Do not handle the phone with wet hands while it is beingcharged. It may cause an electric shock or seriouslydamage your phone.]Do not disassemble the phone.]Do not place or answer calls while charging the phone as itmay short-circuit the phone and/or cause electric shock orfire.]Only use the batteries, antennas, and chargers provided byLG. The warranty will not be applied to products provided byother suppliers.]Only authorized personnel should service the phone and itsaccessories. Faulty installation or service may result inaccidents and consequently invalidate the warranty.]Do not hold or let the antenna come in contact with yourbody during a call.]An emergency call can be made only within a service area.For an emergency call, make sure that you are within aservice area and that the phone is turned on.](https://usermanual.wiki/LG-Electronics-USA/KU250/User-Guide-786433-Page-5.png)
![11For Your SafetyVehicle Mounted External Antenna(optional, if available)A minimum separation distance of 8 inches (20cm) must bemaintained between the user/bystander and the vehiclemounted external antenna to satisfy FCC RF exposurerequirements. For more information about RF exposure, visitthe FCC website at www.fcc.govFCC Part 15 Class B ComplianceThis device and its accessories comply with part 15 of FCCrules. Operation is subject to the following two conditions: (1) This device and its accessories may not cause harmfulinterference, and (2) this device and its accessories mustaccept any interference received, including interference thatmay cause undesired operation.Cautions for Battery]Do not disassemble.]Do not short-circuit.]Do not expose to high temperature: 60°C (140°F).]]Do not incinerate.Battery Disposal]Please dispose of your battery properly or bring to yourlocal wireless carrier for recycling.]Do not dispose in fire or with hazardous or flammablematerials.Adapter (Charger) Cautions]Using the wrong battery charger could damage your phoneand void your warranty.]The adapter or battery charger is intended for indoor useonly.Do not expose the adapter or battery charger to direct sunlightor use it in places with high humidity, such as the bathroom.](https://usermanual.wiki/LG-Electronics-USA/KU250/User-Guide-786433-Page-7.png)


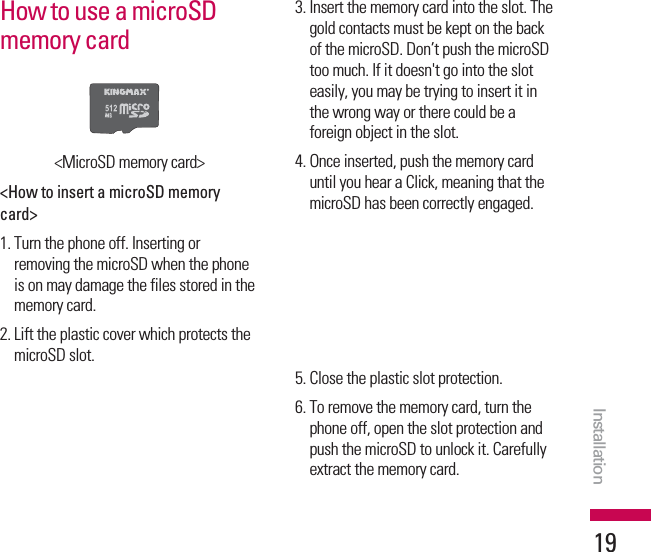
![This operation should only be done whenyou insert the memory card for the firsttime. During formatting various folders willbe created for different data types.Turning the handset on/offTurning your handset onEnsure that your USIM card is in yourhandset and the battery is charged. Pressand hold until the power comes on.Enter the USIM PIN code that wassupplied with your USIM card if the PINcode request is set to On. (Note: Pleaserefer to page 79)After a few seconds you will be registeredon the network.Turning your handset off Press and hold until the power goesoff. There may be a few seconds delaywhile the handset powers down.Do not turn the handset on again duringthis time.Access codesYou can use the access codes described inthis section to avoid unauthorised use ofyour phone. The access codes (except thePUK and PUK2 codes) can be changed byusing the Change codes feature [Menu#.1.4.3].PIN code (4 to 8 digits)The PIN (Personal Identification Number)code protects your USIM card againstunauthorised use. The PIN code is usuallysupplied with the USIM card. When thePIN code request is set to On, yourphone will request the PIN code every timeit is switched on. When the PIN coderequest is set to Off, your phone connectsto the network directly without the PINcode.WELCOME21](https://usermanual.wiki/LG-Electronics-USA/KU250/User-Guide-786433-Page-20.png)
![2. If you do not want to use thespeakerphone, ensure you have theheadset plugged in.3. To start the video function, press the leftsoft key [Options] and select Videocall.vYou will be notified that you willneed to close other applications tomake the video call.4. Adjust the camera position if necessary.5. Press to finish the call, or closethe handset.Making a voice/video call fromContactsIt is easy to call anyone whose number youhave stored in your Contacts.1. Press to access the contacts list.2. Scroll to the contact to make a call.3. Press to make a voice call. Pressthe left soft key and select Make videocall to make a video call.4. Press to finish the call.Making international calls1. Press and hold for theinternational prefix. The ‘+’ characterprefixes the international access code.2. Enter the country code, area code, andthe phone number.3. Press .NotevThe video call may take some timeto connect. Please be patient. Theconnection time will also depend onhow quickly the other party answersthe call. While the video call isconnecting, you will see your ownimage; after the other party hasanswered, their image will bedisplayed on the screen.General functions27](https://usermanual.wiki/LG-Electronics-USA/KU250/User-Guide-786433-Page-26.png)
![My games & apps Menu 1.1You can easily download games and otherapplications in this menu. It has twofolders, Games and Applications, asdefault. Each folder has an embedded linkfor downloading games or applications.Please note that additional costs may beincurred when using online services. Youcan create a folder using the left soft key[Options].Settings Menu 1.2Activating a profile1. Move the cursor to the profile you wouldlike to activate.2. Press .Adding a new profile1. Select Add new from the Options menu.The following items need to beconfigured.Service Enter an account namename for the profile.Connection modeChoose from the given list ofconnection modes. (Default isTCP with Proxy or TCP withoutProxy)IP addressEnter the WAP Gateway IPaddress provided by theoperator. (e.g. 195. 115. 025.129)Proxy server portPort details are provided by theoperator, depending upon theConnection mode.Access pointChoose from the given list ofaccess points. (For more detailson adding or editing a newaccess point, refer to page 98.)2. Press the [Save] to save anyconfiguration changes.You can edit and delete a profile byselecting Edit and Delete from theOptions menu.Games & AppsGames & Apps37](https://usermanual.wiki/LG-Electronics-USA/KU250/User-Guide-786433-Page-36.png)
![Make Video call Menu 2.1You can make a video call using this menu.1. Enter the number you want to dial. vYou can key in the number.vYou can select the number fromSearch contacts using the left softkey [Options]vYou can find the number from calllogs by pressing [Video call].2. Press the ceter key [Video call] to makea video call.During a video callWhen you are in a video call, the screenwill show the contact's name and durationof call, contact's image, volume indicator,video control panel, and your image.You can access the following optionmenus by pressing the left soft key[Options].vMute/UnmutevSpeaker (On /Off)vBluetooth/Handset talk (When theBluetooth headset is connected)vHold/ResumevCapturevView sender numbervGo to contactsvGo to messagesvSettingsvEnd callIncoming video callWhen a video call is received, the caller'sinformation is displayed as following.vPicture/Animation: Displays pictureID, graphic image configured inContacts, or default animationindicating the incoming call.vCaller's name and number: Showsincoming caller's number. If the numberis stored in Contacts, displays the nameof the contacts.CallingCalling38](https://usermanual.wiki/LG-Electronics-USA/KU250/User-Guide-786433-Page-37.png)
![Picture ID and animation setting is used inthe order of Contacts, video file used inGroup ringtone, and video file used inProfile.Also, sound can be set for the incomingvideo call. The sound setting is used in theorder of Contacts, Group ringtone, andProfile.You can accept the incoming call bypressing the center key [Accept]. Also youcan accept the incomming call and showthe private image by pressing the left softkey [Private].The incoming call ringing can be silencedby pressing the right soft key [Silent]. It canbe also silenced by long press on onthe left side of the phone. When ringing issilenced, press the right soft key [Reject] toreject the call.Call logs Menu 2.2Missed calls (Menu 2.2.1)Allows you to view missed call records,make a call, send a message, and save thenumber in Contacts.Received calls (Menu 2.2.2)Allows you to view received call records,make a call, send a message, and save thenumber in Contacts.Dialled calls (Menu 2.2.3)Allows you to view dialled call records,make a call, send a message, and save thenumber in Contacts.All calls (Menu 2.2.4)Allows you to view the missed, received,and dialled call records. You can make acall, or send a message to the number youhave selected from the records. You canalso save the number in Contacts.Calling39](https://usermanual.wiki/LG-Electronics-USA/KU250/User-Guide-786433-Page-38.png)
![Call duration Menu 2.3You can view call time by types. Press theleft soft key [Options] to choose eitherpartial initialisation or entire initialisation.Also press right soft key [Clear] to initialisea selected duration type. Initialization willrequire your Security code.The following timers are available:vLast call: Shows the latest call time inunits of hours/minutes/seconds.vReceived calls: Shows incoming calltime.vDialled calls: Shows outgoing calltime.vAll calls: Shows total call time.Data volume Menu 2.4Allows you to check the sent, received andall data volume transferred.Press the left soft key [Clear all] to chooseentire initialization. You can also use theconfirm key [Clear] for the initialization ofthe selected volume type. Initialization willrequire your Security code.Call costs Menu 2.51. This function displays the call costs ofthe Last call and All calls.2. To initialise, press the center key [Clear]and enter the PIN2 code.3. You can select either Units orCurrency in Set call cost. Accordingto your setting, the call cost is displayedduring a call (If USIM and Networksupport Advice Of Charge(AOC)).4. In the Set limit configuration, select Onto configure the cost limit. When a costlimit is configured, and the call costsreach the limit, making a call will not beallowed.CallingCalling40](https://usermanual.wiki/LG-Electronics-USA/KU250/User-Guide-786433-Page-39.png)
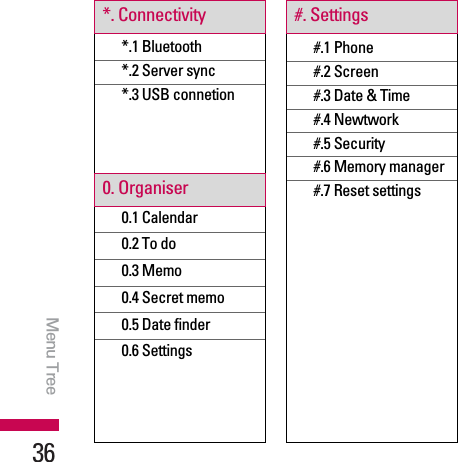
![Call divert Menu 2.6Call divert menus for voice and video callsare provided.If you press , you can activate calldivert menu.Voice calls (Menu 2.6.1)vAll voice callsvWhen busyvNo answervNot reachable1. When the number list is notexsistedConverts to an editor for entering adivert number. You can input thenumber to divert a call directly or searchit in phonebook. If you press [Divert], the phone will send the requestto service provider after entering thenumber. While waiting for the resultfrom the network, a Requestingmessage and animation appears.2. When the number list is exsistedDisplays To other number menuincluding of the number list. Whilewaiting for the result from the network,a Requesting message and animationappears.3. Option menuAfter activating All voice calls menu,selecting the Options menu at thebottom of the menus displays theDeactivate, Deactivate all, View statusand clear list menus. The View status menu shows thesettings on the network. If you selectthis menu, Requesting. message andanimation appear. Then the networksettings are displayed when theinformation is received from thenetwork. If you select the Deactivatemenu, the call divert numbers registeredin the network are deleted after userconfirmation. Clear list menu will deleteall divert number list.Calling41](https://usermanual.wiki/LG-Electronics-USA/KU250/User-Guide-786433-Page-40.png)
![Video calls (Menu 2.6.2)vAll video calls1. When the number list is notexsistedConverts to an editor for entering adivert number. You can input thenumber to divert a call directly or searchit in phonebook. If you press [Divert], the phone will send the requestto service provider after entering thenumber. While waiting for the resultfrom the network, a Requestingmessage and animation appears.2. When the number list is exsistedDisplays To other number menuincluding of the number list. Whilewaiting for the result from the network,a Requesting message and animationappears.3. Option menuAfter activating the All video calls menu,selecting the Options menu at the bottomof the menus displays the Deactivate,Deactivate all, View status and clear listmenus.If you select the Deactivate menu, the calldivert numbers registered in the networkare deleted after user confirmation.Selecting the Cancel all menu will displaythe operation result after showing theRequesting message and animation. Clearlist menu will delete all divert number list.vWhen busy1. When the number list is notexsistedIt operates the same as All voice callsmenu.2. When the number list is exsistedIt operates the same as All voice callsmenu.CallingCalling42](https://usermanual.wiki/LG-Electronics-USA/KU250/User-Guide-786433-Page-41.png)
![You can select ringtone or vibration for anincoming call and configure the sound andvolume of the ringtone, key tone, andsound effect, according to a profile. Theprofiles provided include [Normal], [Silent],[Vibrate only], [Outdoor], [Headset],[Customised 1], [Customised 2], and[Customised 3]. Select a profile, and pressto activate the profile. After pressing theleft soft key [Options], select the Edit menufor the [Normal], [Outdoor], [Headset],[Customised 1], [Customised 2] and[Customised 3] profile to change theconfiguration. A different list of options isavailable for each profile that has beenselected for editing.vAlert byThis option determines the incoming callnotification mode. You can select from[Ring], [Vibration], [Silent], [Ring &vibration], [Ring after vibration], [MaxRing & Vibration].vVoice ringtoneYou can select the ringtone for incomingvoice calls.vVideo ringtoneYou can select the ringtone for incomingvideo calls.vVolume|Set the ringtone volume.vMessage alertYou can set how often the phone is toinform you of a received message untilit is read.vMessage toneYou can select a file from among yourown personal files or from the defaultfiles, to be played by the phone uponreceiving a message.vKey toneYou can set the key tone to be playedwhen pressing the keys.ProfilesProfiles49](https://usermanual.wiki/LG-Electronics-USA/KU250/User-Guide-786433-Page-48.png)
![Menu DescriptionBrightnessFrom –2.0 to 2.0 at 0.5intervals. The higher the level,the brighter the screen.White balanceYou can adjust the tone of thebackground photo according tothe weather. Auto, Daylight, Cloudy,Illuminate, IndoorsNight modeYou can take better pictures atnight by selecting On.Frame ShotYou can apply one of 10 frameeffects when taking a picture.(available only in case ofWallpaper size)TimerYou can delay the camerashutter time. None, 3 secs.,5secs., 10 secs. “ ” is shownwhen the timer is activated.EffectNone, Black & White, Negative,SepiaSoundSelect the desired shuttersound.MemorySelect the desired memory,either Handset or External.MirrorYou can activate the mirroreffect by selecting On.Menu DescriptionSwap camYou can switch the camera toactivate either the Internal orthe External camera.Preview screen2. After finishing all the settings, press theright soft key [Close].3. Focus the camera on what you want totake and press .4. Press to save the picture. It issaved in the Pictures folder of My Files.NotevPress the right soft key [Back] togo back to the preview modewithout saving the picture.MultimediaMultimedia52](https://usermanual.wiki/LG-Electronics-USA/KU250/User-Guide-786433-Page-51.png)
![Menu DescriptionWhite balanceYou can adjust the tone of thebackground video according tothe weather. Auto, Daylight,Cloudy, Illuminate, Indoors Night modeYou can take better shots atnight by selecting On.EffectNone, Black & White, Negative,SepiaDurationSelect the desired recordingtime. MMS, 30 secs., 1min,2mins., 5mins., 60 mins.MemorySelect the desired memory,either Handset or External.MirrorYou can activate the mirroreffect by selecting On.SoundDecide whether to record thesound or not.Swap camYou can switch the camera toactivate either Internal orExternal.2. After finishing all the settings, press theright soft key [Close].3. 3. Focus the camera on what to recordand press to start recording. Andpress to stop recording.vYou can pause the recording bypressing the left soft key [Pause].4. Press to save the video clip. It issaved in the Videos folder of My Files.NotevPress the right soft key [Back] togo back to the preview modewithout saving the video clip.MultimediaMultimedia54](https://usermanual.wiki/LG-Electronics-USA/KU250/User-Guide-786433-Page-53.png)
![Music Menu 4.3Now playing (Menu 4.3.1)This menu will be activated when thereare some tracks currently played.Recent tracks (Menu 4.3.2)This menu shows the last 20 tracks thatwere played.All tracks (Menu 4.3.3)You can view all the music files stored inthe phone/external memory. Playlists (Menu 4.3.4)You can create your own playlists bychoosing tracks from the All tracks menulist.Artists (Menu 4.3.5)You can view and play music sorted byArtists.Albums (Menu 4.3.6)You can view and play music sorted byAlbums.Genres (Menu 4.3.7)You can view and play music sorted byGenres.Shuffle tracks (Menu 4.3.8)If you want to play the music continuouslyand randomly, select this option. Voice recorder Menu 4.41. Press the left soft key [Option] to displaythe option pop up menu beforerecording.2. Move to the desired menu item using/ and press . vQuality: You can select a recordingquality from High, Medium, and Low.Multimedia55](https://usermanual.wiki/LG-Electronics-USA/KU250/User-Guide-786433-Page-54.png)
![vAdd to dictionary: You can add aword to the dictionary.vCancel:2. Press the right soft key [Back] to exit themenu or go to previous menu aftersetting submenus.3. Press the confirmation key [Send] tosend the message. The message willautomatically be saved in the Sent Itemsfolder. If the message has not beensent, it will remain in the Outbox with afailed status.E-Mail (Menu 5.1.2)To send/receive an e-mail, you should setup the e-mail account. (Refer to page57~59 for how to set up an E-Mailaccount.)1. Enter the e-mail addresses of therecipients in the To, Cc, Bcc fields. Youcan search the Contacts by pressing.NotevEnter the reference e-mail addressto forward the e-mail in Cc(Carboncopy) field.vEnter a hidden reference e-mailaddress to forward the e-mailwithout forwarding information inBcc(Blind Carbon Copy) field.vOnly valid e-mail addresses areallowed for the recipient (To),reference address (Cc) and hiddenreference address (BCC) fields.When an e-mail address has beenspecified, another field where youcan specify another addressappears. You can specify up to 20recipients for the To and Ccaddress fields and 10 recipientsfor the BCC address field.MessagesMessages58](https://usermanual.wiki/LG-Electronics-USA/KU250/User-Guide-786433-Page-57.png)
![2. Move the cursor to the Subject field andkey in the subject.3. You can enter the message contents bymoving the cursor to the Message field.4. Use the following functions by using theleft soft key [Options].vInsert: Select this menu to insertspecial characters, templates, andcontacts. It is also possible to attachmultimedia files (pictures, videos andsounds).vSearch contacts: Select this menu toinsert e-mail addresses saved inContacts. (Only shown in Option menuwhen cursor is located in To/Cc/Bccfields.)vRecently used: You can use the lateste-mail address you saved temporarily.vSave to drafts: Select this menu tosave the message in Drafts.vView attachment: Shows theattached files. (This item is onlyavailable when some files have beenattached.)vRemove: Deletes the attachment file. vInput method: Select the desireddictionary mode.vAdd to dictionary: You can add anew word to the dictionary.vWriting language: You can changethe writing language.vSet mail priority: You can configurethe priority of the e-mail you wish tosend.5. When you have finished writing an e-mail, press to send the e-mail.Postcard (Menu 5.1.3)NotevThis service is not available in allcountries. Please contact yourservice provider for furtherinformation.Messages59](https://usermanual.wiki/LG-Electronics-USA/KU250/User-Guide-786433-Page-58.png)
![1. Enter the Postcard menu.2. Press the left soft key [Insert picture].You can insert a stored image or newlytaken picture. If you press the right softkey, you can go back to the previousmenu.3. After an image is inserted, the formatwill be changed to Postcard format .4. Fill out the fields: Name, Additional info,Address, Post code, City, State, Country.5. Press the confirmation [Send] to sendthe created postcard.Voice message (Menu 5.1.4)You can send the message with arecorded voice.1. Enter the voice message menu.2. Press the center key to record your voicemessage.3. Press the center key to stop therecording. For sending the messagedirectly, press the center key once again.4. If you want to preview the message orsave it to drafts, press the left soft key[Options].Inbox Menu 5.21. You can view received messages. Selecta message and then press to viewthe message.2. You can view the previous or nextmessage by using / .3. To view a multimedia message(Notification), select Retrieve in themessage notification view screen. Thefile is then transmitted, and you canview the file when the transmission iscomplete.You can use the following functions byusing the left soft key [Options] in theInbox.MessagesMessages60](https://usermanual.wiki/LG-Electronics-USA/KU250/User-Guide-786433-Page-59.png)
![vReply: Creates a reply to the sender orall recipients of the selected message.vForward: Forwards the selectedmessage.vVideo call: You can make a video call.vDelete: Deletes the current message.vCreate new message: You can writea new message or an E-mail.vCopy: In case of SMS, you can copythe message into handset or USIM.vMove: In case of SMS, you can movethe message into handset or USIM.vFilter: Displays messages by desiredmessage types.vMark/Unmark: You can select one ormore messages for multiple deletion.vMessage info.: You can check themessage type, date and time andwhere it is saved.Mailbox Menu 5.3NotevYou can check the saved E-mailsin E-mail [Menu 5.6].NotevNot supported for multimediamessage (Notification) and WAPpush messages.Messages61](https://usermanual.wiki/LG-Electronics-USA/KU250/User-Guide-786433-Page-60.png)
![Drafts Menu 5.4You can view saved messages. Select amessage and then press to edit themessage.You can use the following functions byusing the left soft key [Options].vSend: Sends the selected message.vDelete: Deletes the selected message.vCreate new message: You can writea new message or an E-mail.vMark/ Unmark: You can select one ormore messages for multiple deletion.vFilter: Displays messages by desiredmessage types.vMessage information: You can checkthe message type, date, time, size andwhere it's saved.Outbox Menu 5.5The Outbox is a temporary storage placefor messages waiting to be sent. Failedmessages are also placed in Outbox. Forexample, E-mails will be placed in Outboxif the E-mail account is not correctlyconfigured.1. Select a message.2. You can use the following functions byusing the left soft key [Options].[For sending / waiting messages]vCreate new message: You can writea new message or an E-mail.vCancel: You can stop sending/waitingstatus.[For a failed message]vResend: Resends the selectedmessage.vDelete: Deletes the current message.vSave to drafts: You can send themessage to drafts.MessagesMessages62](https://usermanual.wiki/LG-Electronics-USA/KU250/User-Guide-786433-Page-61.png)
![vCreate new message: You can writea new message or an E-mail.vMessage info.: You can check themessage type, date, time, size andwhere it's saved.Sent Items Menu 5.6Shows the messages you sent (Message/E-mail/Postcard/Voice message).[Options]vReply: Creates a reply to sender or allrecipients of the selected message.vForward: Forwards the selectedmessage.vEdit: You can edit the selectedmessage.vDelete: Deletes the selected message.vCreate new message: You can writea new message.vCopy: In case of SMS, you can copy themessage into handset or USIM.vMove: In case of SMS, you can movethe message into handset or USIM.vMark/Unmark: You can select one ormore messages for multiple deletion.vFilter: Displays messages by desiredmessage types.vMessage info.: You can check themessage type, date, time, size andwhere it is saved.Templates Menu 5.7Text templates (Menu 5.7.1)You can add, edit, and delete frequentlyused useful phrases using the left soft key[Options].Messages63](https://usermanual.wiki/LG-Electronics-USA/KU250/User-Guide-786433-Page-62.png)
![vRequest report: Determines whetherto request a delivery confirmation mailfor a Multimedia message.vAllow report: Determines whether toallow sending a delivery confirmationmail for a delivery confirmation mailrequest.3. Read reply: Allows you to determinewhether to request a read confirmationmail to a recipient, and whether to allowsending a read confirmation mail to asender.vRequest reply: Determines whether torequest a read confirmation mail for aMultimedia message.vAllow reply: Determines whether toallow sending a read confirmation mailfor a read confirmation mail request.4. Priority: You can select the prioritylevel of the messages (Low, Normal andHigh).5. Validity period: Allows you toconfigure the term of validity for amessage when transmitting amultimedia message. The messagewould be saved in the multimediamessage server only for the configuredterm.6. Slide duration: Allows you toconfigure the duration of each pagewhen writing a message.7. Creation mode: Allows to select thecontents type supported by MMS.(Restriced,Warning and Free)8. Delivery time: Configures the deliverytime of message to the recipient. TheMultimedia message centre will deliverthe message after the delivery time.9. Multi. msg. centre: Allows you toconfigure network information such asthe MMSC and the WAP gateway, tosend a multimedia message. Using the left soft key [Options], you canactivate, add or delete a profile. Aprofile name selected by a checkmark isMessagesMessages66](https://usermanual.wiki/LG-Electronics-USA/KU250/User-Guide-786433-Page-65.png)
![the currently configured value. You canview and edit the contents of the profilein edit mode by pressing the right softkey [Edit]. The edit screen also appearswhen creating a new profile underOptions. The meaning of each item isgiven below.vTitle: Profile name.vMMSC URL: Enter the multimediamessage centre URL.vMMS Proxy: Enter the WAP gatewayaddress and port number.vConnection mode: Select one of theconnection mode. (TCP with Proxy, TCPwithout Proxy, UDP)vAccess points: Specify the accesspoint name. (see WAP connectionsettings.)Press the right soft key [Done] to save thechanges and complete Multimedia msg.centre setting.E-mail (Menu 5.9.3)You can configure settings for receivingand transmitting e-mails.1. Vodafone Mail: Access to VodafoneMail.2. E-mail accounts: You can create orconfigure an e-mail account includingthe e-mail server and user ID. You canedit a selected e-mail account bypressing the left soft key[option]- 2.Edit.You can select an e-mail account to beused to send an e-mail using . Youcan select the following functions usingthe left soft key [Options].vAdd new: Create a new e-mailaccount.NotevThis service is not available in allcountries. Please contact yourservice provider for furtherinformation.Messages67](https://usermanual.wiki/LG-Electronics-USA/KU250/User-Guide-786433-Page-66.png)
![Title Enter a title.Revtrieve intervalAdvanced settingsSMTP port numberEnter the mail server portnumber. In general, the SMTP(Outgoing mail server portnumber) is 25.Incoming server portEnter the mail server portnumber. In general, theincoming mail server portnumber is 110(POP3) or143(IMAP4).SMTP authenticationDecide whether the outgoingmail server to requireauthentication or not using theleft soft key. When the SMTPauthentication is set to On, youcan enter the SMTP Usernameand SMTP Password for SMTPauthentication.SMTP usernameSMTP passwordAPOP secure loginDecide whether to activateAPOP secure login or not usingthe left soft key. When themailbox type is IMAP4, APOPsecure login is always set toOFF.3. Press the center soft key [Save] tocomplete the e-mail accountconfiguration.Editing an e-mail account1. Select a desired e-mail account from thee-mail account list and press the leftsoft [Options] then select Edit.2. You can edit desired fields by movingthe cursor up and down.3. When configuration is complete, pressthe center soft key [Save] to completethe e-mail account configuration.NotevWhen you try to change themailbox type, all e-mailsdownloaded before would bedeleted.MessagesMessages70](https://usermanual.wiki/LG-Electronics-USA/KU250/User-Guide-786433-Page-69.png)
![My images Menu 6.1The Pictures folder consists of embeddedlinks for downloading pictures through theInternet and Default images. Picturestaken using the camera are stored in thePictures folder and you can create newfolders to manage them. Yo can also sendmultiple files to other people.To view the picture in details, press theconfirmation key.When a file is selected, the followingoptions will be displayed by pressing theleft soft key [Options].vView: You can see the JPG file whenpressing OK key or selecting View menuof Option menus.vDelete: Delete a file.vSet as-Full image wallpaper: Currentlyselected image can be set as awallpaper.-Landscape wallpaper: Currentlyselected image can be displayedhorizontally as a wallpaper.-Picture ID: Currently selected imagecan be set as a Picture ID.vSend via: Allows you to send a imagethrough MMS/Bluetooth/Email.vSend: You can send the selected imagevia Message, Postcard, E-mail orBluetooth.vUse as -Home screen: You can set an imageas the home screen theme.-Contacts image: You can set theimage of selected entry in contacts.When incoming a call, the imagesaved in contact is displayed.-Start up image: You can set animage as shut up screen theme.-Power off image: You can set animage as shut down image.vMove: Enables the file to be moved toother folder.My stuffMy stuff72](https://usermanual.wiki/LG-Electronics-USA/KU250/User-Guide-786433-Page-71.png)
![vCopy: Enables the file to be copied toother folder.vDelete: Deletes the selected image.vMark/Unmark: Using the Markfunction, you can send, delete, moveand copy multiple files.vFile-Rename: You can rename the image.-Edit: Enables the image to be edited.-File info.: Shows information on theselected image file.vCreate new folder: You can create anew folder within the folder currentlyselected.vSlide show: You can view the imagesas a slide show.vSort by: You can sort the files by date,file type or name.vList view/Grid view: You can view theimages as a List view or Grid view.vMemory status: You can view thememory status (handset or externalmemory card).My sounds Menu 6.2The Sounds folder consists of embeddedlinks for downloading ringtones and musicas well as folders containing the Defaultsounds and Voice recordings. Here you canmanage, send or set sounds as ringtones.When a file is selected, the followingoptions will be displayed by pressing theleft soft key [Options].vUse as-Voice ringtone: You can set thesound file as a ringtone whenincoming a voice call.-Video ringtone: You can set thesound file as a ringtone whenincoming a video call.My stuff73](https://usermanual.wiki/LG-Electronics-USA/KU250/User-Guide-786433-Page-72.png)
![-Message tone: You can set thesound file as a ringtone whenreceiving a message.-Start up sound: You can set thesound file as a ringtone when handsetstarts up.-Power off sound: You can set thesound file as a ringtone when handsetshut down.vSort by: You can sort the files by date,file type or name.vFile info.: Shows the information on theselected sound file.vMemory status: You can view thememory status (handset or externalmemory card).My videos Menu 6.3Here you can manage or send downloadedor captured videos clips. If you press [Connect], you canactivate the video file.The following are available using the leftsoft key [Options] in the Video list.vSend: You can send the selected videoclip via Message, E-mail , Bluetooth ormedia album if not protected by DigitalRights Management (DRM).vUse as: You can set the video file asvoice ringtone or video ringtone.vMove: Moves the file into handsetmemory or external memory.vCopy: Copies the file in handsetmemory or external memory.vDelete: Deletes the selected video.vMark/Unmark: Using the Markfunction, you can send, delete, moveand copy multiple files.My stuffMy stuff74](https://usermanual.wiki/LG-Electronics-USA/KU250/User-Guide-786433-Page-73.png)
![vFile-Rename: You can rename the video.-Info.: Shows information on theselected video file.vCreate new folder: You can create anew folder.vSort by: You can sort files by name,date, or file type.vMemory status: Displays the memorystatus (handset or external memorycard).You can view a video using the videoplayer. Video files are displayed in the listas thumbnails. You can select a desiredvideo by using the / / / .Select a desired video and select Play toview the recorded video.Select the left soft key [Send] to attach theselected video to a message, E-mail orBluetooth.When option 1. Play is selected, the videoclip will be played with the Media Player.To pause the playback, press duringthe playback. To resume the pausedplayback, press once again.To capture the screen shot, press the rightsoft key [Capture] when the playback ispaused.To view the current playback in full screen,press the right soft key during theplayback.To return to the previous screen size, pressthe right soft key once again in full screenmode.When viewing video clips in the MediaPlayer, the following options are available:] Wide view: You can view the video inwide view mode.] Mute/Unmute: If the Volume is set tomore than 0, Mute mode is activated andif the Volume is set to 0, the Unmute modeis activated.My stuff75](https://usermanual.wiki/LG-Electronics-USA/KU250/User-Guide-786433-Page-74.png)
![vCapture: You can save what is on thepaused screen as an image file (onlypossible in Pause mode).vSet repeat: You can set the repeatoption (None/Current file/All files).vFile info.: You can check information onfiles being played (File name, Size, Date,Type, Duration, Protection).vSend: You can send the video viaMessage, E-mail or Bluetooth if the fileis not protected by Digital RightsManagement (DRM).vDelete: Deletes the selected video.vMove to-Previous file: Plays the previousvideo file.-Next file: Plays the next video file.My games & apps Menu 6.4You can easily download games and otherapplications in this menu. It has twofolders, Games and Applications, asdefault. Each folder has an embedded linkfor downloading games or applications.Please note that additional cost may beincurred when using online services. Youcan create a folder using the left soft key[Options].Others Menu 6.5Other files except pictures, sounds, videos,games & applications are stored in thisfolder.My stuffMy stuff76](https://usermanual.wiki/LG-Electronics-USA/KU250/User-Guide-786433-Page-75.png)
![Quick menu Menu 7.1You can specify functions to save in theQuick menu. If you save the functionsfrequently used in the Quick menu, you canquickly start the functions simply bypressing key.Alarms Menu 7.2If you set the alarm, the @ appears on theindicator bar. The specified alarm soundsat the scheduled time. Press to stopthe alarm, and the alarm is released. Pressthe right soft key [Snooze] and choose thesnooze interval. The alarm sound stopsand resumes after the selected Snoozeduration. You can configure up to 5 alarms.1. Select your desired alarm to configure inthe alarm list. If there is no alarm, pressthe left soft key [Add] to add a newalarm.2. Set/Cancel alarm: Set or cancel thealarm using the options for specifyingwhether the alarm is on or by choosingthe alarm time.3. Input alarm time: Input your desiredalarm time by specifying Hour andMinute. Choose either ‘AM’ or ‘PM’which is visible if 12 hour format isspecified for the phone.4. Select repeat mode: Select thedesired repeat mode using / orselect the desired one from the list bypressing left soft key [List].5. Select bell: Select the bell to ring atthe alarm time opening the list bypressing left soft key [Edit].6. Input memo: Input alarm name.7. Snooze: You can set the snoozeduration for the alarm.8. When you have finished setting thealarm, press the center key [Save].ToolsTools78](https://usermanual.wiki/LG-Electronics-USA/KU250/User-Guide-786433-Page-77.png)
![Calculator Menu 7.3The calculator module allows you toperform basic arithmetic functions such asaddition, subtraction, multiplication, anddivision as well as some scientificfunctions. (sin, cos, tan, log, ln, exp, sqrt,deg, rad)1. Press the left soft key [Options].2. Select the appropriate function.You can enter numbers by using thenumber keys, and the operators by using/ , / . You can enter adecimal point by pressing .Whenever you press , characters aresequentially deleted in reverse order.Whenever you hold down , all thecharacters are deleted in reverse order inone go. When calculation is complete andthe result is displayed on the screen,pressing a symbol saves the result into thesymbol, and continues calculation.Converter Menu 7.4Using this menu, users can convertCurrency, Surface, Length, Weight,Temperature, Volume and Velocity.Currency (Menu 7.4.1)1. Select the Currency menu.2. Users can set a currency exchange rateusing option menu "Change currency".3. Enter currency rates for up to 6currencies equivalent to GBP and thenpress [Save].Then you can convert from one currencyto another.NotevThe alarm will go off even whenthe phone is switched off.Tools79](https://usermanual.wiki/LG-Electronics-USA/KU250/User-Guide-786433-Page-78.png)
![4. You can view the value of up to 6currency units.5. Press [Reset] to clear the current inputField.6. To exit the currency conversion function,press the [Back] key.Surface (Menu 7.4.2)1. Select Surface menu.2. Select the desired unit to convert using[List].3. Enter the standard unit and view theconverted value.4. Press [Reset] to clear the current inputField, and locate the cursor in the inputfield.5. To exit the Surface conversion function,press [Back] key.Surface (Menu 7.4.3)1. Select the length menu.2. Select the desired unit to convert using[List].3. Enter the standard unit and view yourconverted value.4. Press [Reset] to clear the current inputfield and locate the cursor in the inputfield.5. To exit the length conversion function,press the [Back] key.Weight (Menu 7.4.4)1. Select the Weight menu.2. Select the desired unit to convert using[List].3. Enter the standard unit and view theconverted value.4. Press [Reset] to clear the current inputField, and locate the cursor in the inputfield.ToolsTools80](https://usermanual.wiki/LG-Electronics-USA/KU250/User-Guide-786433-Page-79.png)
![5. To exit the Weight conversion function,press the [Back] key.Temperature (Menu 7.4.5)1. Select the Temperature menu.2. Position the cursor on the desired unit byusing the up or down arrow keys.3. Enter the standard unit and view theconverted value.4. Press [Reset] to clear the current inputfield and locate the cursor in the inputfield.5. To exit the Temperature conversionfunction, press the [Back] key.6. You can insert negative values byselecting [-].Volume (Menu 7.4.6)1. Select the Volume menu.2. Select the desired unit to convert using[List].3. Enter the standard unit and view theconverted value.4. Press [Reset] to clear the current inputfield and locate the cursor in the inputfield.5. To exit the volume conversion function,press the [Back] key.Velocity (Menu 7.4.7)1. Select the Velocity menu.2. Select the desired unit to convert using[List].3. Enter the standard unit and view theconverted value.4. Press [Reset] to clear the current inputfield and locate the cursor in the inputfield.5. To exit the Velocity conversion function,press the [Back] key.Tools81](https://usermanual.wiki/LG-Electronics-USA/KU250/User-Guide-786433-Page-80.png)
![Homepage Menu 9.1You can launch the web browser andaccess the homepage of the web serviceprovided by Vodafone.vYou can also directly access Vodafonelive! by pressing the right soft key in idlemode.Enter URL Menu 9.2You can manually enter a URL addressand access the associated web page.vTo enter a symbol, press the left soft key[Options] and select 1.Insert symbolfrom Options menu to display thesymbol tablevTo switch input mode, press the left softkey [Options] and select 2. Inputmethod.Bookmarks Menu 9.3You can store frequently accessed orfavourite URLs/Pages. Send, Add new,Edit, Mark/Unmark or Delete operationscan be performed on Bookmarks. Severalpreconfigured URLs are stored asbookmarks.Adding a new bookmark1. Press the left soft key [Options] andselect 2.Add new from Optionsmenu.2. Enter the title and associated URLinformation.3. Press .to save.Connecting to a desired bookmarkPress to connect a desired bookmark.Sending the bookmark to othersSelect Send from Options menu. Youcan send it via Message or E-mail.BrowserBrowser86](https://usermanual.wiki/LG-Electronics-USA/KU250/User-Guide-786433-Page-85.png)
![- My visibility: Set [My handset’svisibility] to [Show to all] so that otherdevices can detect your phone when theyare searching for a Bluetooth device. Ifyou select [Hidden], other devices will notbe able to detect your phone when theyare searching for a Bluetooth device.- My name: You can name or rename yourphone as it will appear on other devices.Your phone's name will be shown onother devices only when [My handset’svisibility] is set to [Show to all].- Bluetooth usage: To use the Bluetoothfunction, set it to [On]. Otherwise, set itto [Off]. 3. Supported services devicePairing Devices(Pairing with a device)If a paired Bluetooth device alreadyexists.•Menu o#. Settings > 7.Connectivity o1. Bluetooth o1. Paired devices oOption oAdd new deviceIf there is no paired Bluetooth device.NotevWhen user uses Bluetooth Devicein the handset, the security of thehandset is at risk. Therefore, werecommend that Bluetoothvisibility be set to Hidden afterconfiguration or device pairing. Forincoming files via Bluetoothregardless of paired devices, youcan choose to accept or reject theconnection, after checking thesender details.Connectivity91](https://usermanual.wiki/LG-Electronics-USA/KU250/User-Guide-786433-Page-90.png)
![<Deleting devices>1. Select a device to delete from the Paireddevices screen.2. You can delete a device by pressing theDelete key or by selecting Options >Delete. To delete all paired devices,select Options > Delete All.<Transmitting data using Bluetooth>1. To transmit data from your phone toanother Bluetooth device, first select theapplication where the target data issaved. For example, to send data in theMy Files to another device, select Menu> 6. My Files > 1. Pictures / 2. Sounds /3. Videos/ 5. Bluetooth data / 6. Otherfiles / 7. External memory > Select datato transmit > Send > 3. Bluetooth2. Transmitting data1) Last device found is displayed. If thedesired device does not exist in thelist, select [More devices].2) Select the device to which you wantto transmit data from the devices onthe screen and press .3) If the other party selects [Yes] for[Connection request], the data istransmitted.<Receiving data using Bluetooth>Menu o#. Settings o7. Connectivityo1. Bluetooth o1. Paired devicesIf another party attempts to transmit data,the [Connection request] question willappear on the screen. If you select [Yes],the data will be transmitted to your phone.During data transmission, the Bluetoothicon flashes.<Bluetooth data storage folder>You can check the received data byselecting Menu o6. My Files o5.Bluetooth data.Connectivity93](https://usermanual.wiki/LG-Electronics-USA/KU250/User-Guide-786433-Page-92.png)
![Calendar Menu 0.1Schedule inquiry and search1. Reference by MonthsYou can refer to your schedule bymonths. The cursor is on the currentdate, and the registered date is marked. The schedule saved for the date wherethe cursor is located is represented by agrey box. Pressing the shortcut keymoves to the previous year andpressing move to the next yearand pressing moves to today.Pressing moves to the previousmonth, and moves to the nextmonth. Pressing moves to theweekly calendar. You can move the dateusing / / / .2. Detailed referenceYou can refer to a detailed schedule,that is the whole contents of theschedule configured by the user. Youcan send the schedule to another phoneor an Internet site through SMS (Textmessage) or MMS (Multimidiamessage) or E-mail or Bluetooth usingthe left soft key [Options].Add new eventYou can add an event. You can configurethe start date, end date, start time, endtime, contents, type of event, repetition,alarm of the schedule.vSet type: Appointment, Birthday,AnniversaryvSet repeat: Once, Daily, Weekly,Monthly, Annually, User settingvSet alarm: No alarm, On time, 15 minsbefore, 30 mins before, 1 hour before, 1day before, 3 days before, 1 weekbeforeOrganiserOrganiser98](https://usermanual.wiki/LG-Electronics-USA/KU250/User-Guide-786433-Page-97.png)
![Delete schedule1. Delete previous schedulesYou can delete all previous schedulesusing this function.2. Delete all schedulesYou can delete all saved schedulecontents using this function.Set up and release holidayYou can set up or release user holidays.Press the left soft key [Options] and selectSet holiday.The selected date will be displayed in red.To release the holiday, press the left softkey [Options] and select Clear holiday.Schedule notificationIf the user has configured the alarmsetting, the specified alarm sound willring. If the notification time is before theschedule start time, you can set up thealarm again.To do Menu 0.2You can view, edit and add tasks to do.Tasks are displayed in time order. Tasksthat have been completed or notcompleted are displayed in different ways.AddTo add a task, press the left soft key[Options] in the Tasks list managementscreen and select Add new event option.Then input the date, description andpriority for the task.When you have finished entering the data,press the center key [Save] to save thenew task.Detailed view and EditTo view detailed task contents, locate thecursor on the desired item in the Tasks list,and then press the center key. You cansend, edit and delete a task using the leftsoft key [Options].Organiser99](https://usermanual.wiki/LG-Electronics-USA/KU250/User-Guide-786433-Page-98.png)
![Set job statusTasks set as finished are displayed ascrossed out below the unfinished tasks inthe Tasks list. You can set Finished tasksto Not finished by selecting Options.Memo Menu 0.3Using the memo management function,you can view and manage saved memocontents, and add new memo.Add memoTo add a new memo, press the left softkey [Add] or [Add new memo] in Options.Enter the contents of the memo. You cansave the memo to the list by pressing thecenter key [Save].Edit and delete memoHighlight the desired memo and press to view its contents. You can edit or deletethe contents of a memo using the left softkey [Options]. You can return to the memomanagement screen by pressing right softkey [Back]. You can select Multiple or Allmemos using the Mark/Unmark option andthen delete a memo using the Deleteoption.Secret memo Menu 0.4You can write the secret memo to protectyour privacy. You enter the security code touse this menu.Add private memoTo add a new memo, press the left softkey [Add] or [Options]. Enter the contentsof the memo. You can save the memo tothe list by pressing the center key [Save].OrganiserOrganiser100](https://usermanual.wiki/LG-Electronics-USA/KU250/User-Guide-786433-Page-99.png)
![Edit and delete a private memoHighlight the desired memo and press to view its contents. You can edit or deletethe contents of a memo using the left softkey [Options]. You can return to the memomanagement screen by pressing right softkey [Back]. You can select Multiple or Allmemos using the Mark/Unmark option andthen delete a memo using the Deleteoption.Date finder Menu 0.5Settings Menu 0.6Calendar (Menu 0.6.1)You can set the configurations to view thecalendar.vDefault view: You can set the defaultvalue to view a calendar; Month view,Week viewvWeek start time: 1AM, 2AM, 3AM,4AM, 5AM, 6AM, 7AM, 8AM, 9AM,10AM, 11AM, 12PMvWeek starts on: You can set thedefault day to start a week; Sunday,MondayBackup calendar & to do (Menu 0.6.2)You can create the backup files of thecalendar or tasks entries saved in thephone when you insert an externalmemory.Organiser101](https://usermanual.wiki/LG-Electronics-USA/KU250/User-Guide-786433-Page-100.png)
![Time (Menu #.3.1)1. Select the Time item from the Date &time list, and then press .2. Move to your desired field, Hour,Minute, or am/pm field using thenavigation keys. (When you haveselected 12 hour as Time format)3. Enter Hour, and Minutes using thenumber keys.4. Select the time format using ,.5. Scroll down to select the hour indicatorformat i.e. Off, Cuckoo clock or Chimebell.6. Press the right soft key [Done] to set thetime with the specified value.Date (Menu #.3.2)1. Select the Date item from the Date &time list, and then press .2. Select the date format using ,.3. Enter Day, Month and Year using thenumber keys.4. Press the right soft key [Done] to set thedate with the specified value.Auto update date/time (Menu #.3.3)When Auto Update is configured to On,the time and date are automaticallyupdated according to the current timezone. If Confirm first is selected, the timeand date update is confirmed before it isupdated automatically.Daylight saving (Menu #.3.4)Select whether to activate the daylightsaving function or not. You can set theSummer time difference of selected homecity for 1 hour or 2 hours.Settings105](https://usermanual.wiki/LG-Electronics-USA/KU250/User-Guide-786433-Page-104.png)
![vMove up: Moves the selected networkupward.vMove down: Moves the selectednetwork downward.Access points (Menu #.4.4)This menu shows the access point list. Youcan create new profiles, delete or editthem by using the Option Menu. However,you cannot delete or edit defaultconfigurations depending on countryvariant.You can edit the following configurationtiems by pressing the left soft key [Option]and Edit.Connection title Access Point profile name.Bearer Choose the bearer from thelist. (Default is UMTS.)Authentication Choose the authenticationfrom the list. (Default is Noauth)User name Information provided byservice provider.Password Information provided byservice provider.APN APN name to accessnetwork. Informationprovided by serviceprovider.Press confirm key to save anyconfiguration changes.Streaming (Menu #.4.5)If you want to set different network settingto play streaming content, you can setdifferent network settings.Settings107](https://usermanual.wiki/LG-Electronics-USA/KU250/User-Guide-786433-Page-106.png)
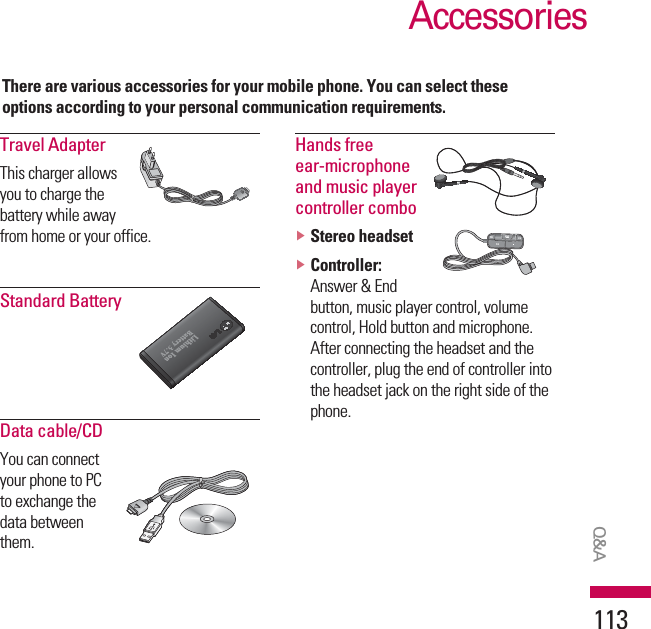
![Note]Always use genuine LGaccessories.]Failure to do this may invalidateyour warranty.]Accessories may vary in differentregions: please check with ourregional service company or agentfor further information.Accessories114](https://usermanual.wiki/LG-Electronics-USA/KU250/User-Guide-786433-Page-113.png)