LG Electronics USA L03B PCS GSM Phone User Manual L 06A Sake Cover Press E
LG Electronics USA PCS GSM Phone L 06A Sake Cover Press E
Users Manual

Part 15.21 statement
" Change or Modifications that are not expressly approved by the manufacturer could void
the user's authority to operate the equipment. “
Part 15.105 statement
This equipment has been tested and found to comply with the limits for a class B digital device, pursuant to
Part 15 of the FCC Rules. These limits are designed to provide reasonable protection against harmful interference
in a residential installation. This equipment generates uses and can radiate radio frequency energy and, if not installed
and used in accordance with the instructions, may cause harmful interference to radio communications. However, there
is no guarantee that interference will not occur in a particular installation. if this equipment does cause harmful
interference or television reception, which can be determined by turning the equipment off and on, the user is
encouraged to try to correct the interference by one or more of the following measures:
- Reorient or relocate the receiving antenna.
- Increase the separation between the equipment and receiver.
- Connect the equipment into an outlet on a circuit different from that to which the receiver is connected.
- Consult the dealer or an experienced radio/TV technician for help.
This device is not intended for sale in the USA.

Part 15 Class B Compliance
This device and its accessories comply with part15 of FCC rules.
Operation is subject to the following two conditions:
(1) This device & its accessories may not cause harmful interference.
(2) This device & its accessories must accept any interference received,
including interference that may cause undesired operation.
Body-worn Operation
This USB modem has been tested for typical body-worn operations
with the distance of 0.79inches (2.0cm) from the user’s body.
To comply with FCC RF exposure requirements, a minimum separation distance
of 0.79inches(2.05cm) must be maintained from the user's body.

27
Before Using the Handset
Part Names and Functions ・・・・・・・・・・・・・・・・・・・・・・・・・・ 28
Viewing Display ・・・・・・・・・・・・・・・・・・・・・・・・・・・・・・・・・・・・・ 33
Illumination ・・・・・・・・・・・・・・・・・・・・・・・・・・・・・・・・・・・・・・・・・・ 36
Using Touch Panel ・・・・・・・・・・・・・・・・・・・・・・・・・・・・・・・・・・ 36
Selecting Menu ・・・・・・・・・・・・・・・・・・・・・・・・・・・・・・・・・・・・・ 37
Using UIM (FOMA Card) ・・・・・・・・・・・・・・・・・・・・・・・・・・・・ 43
Attaching/Removing Battery Pack ・・・・・・・・・・・・・・・・・ 46
Charging ・・・・・・・・・・・・・・・・・・・・・・・・・・・・・・・・・・・・・・・・・・・・ 47
Checking Battery Level ・・・・・・・・・・・・・・・ Battery level 50
Turning Power ON/OFF ・・・・・・・・・・・・・Power ON/OFF 51
Changing Screen Display to English or Korean
・・・・・・・・・・・・・・・・・・・・・・・・・・・・・・・・・・・・・Select language 52
Making Initial Settings ・・・・・・・・・・・・・・・・・・・・・・・・・・・・・・ 52
Setting Date and Time ・・・・・・・・・・・・・・Set Date&Time 53
Notifying the Other Party of Your Phone Number
・・・・・・・・・・・・・・・・・・・・・・・・・・・・・・・・ Caller ID notification 54
Checking Your Own Phone Number ・・・ Own Number 54

28
Before Using the Handset
Part Names and Functions
* The FOMA antenna is inside the FOMA terminal. To communicate in better condition,
avoid covering the antenna part with your hands.
b
Front
b
Front with the FOMA
terminal closed
b
Rear
b
Left side
b
Right side
*
29
Before Using the Handset
Continue on the next page
Using earphones
Connect earphones compatible with the external connector
terminal (optional).
If you use the incompatible earphones, connect the conversion
plug adapter (optional) to the earphones.
Earphone
terminal
(Flat type)
Flat plug for the Flat-plug
Earphone/Microphone with
Switch
Plug
Example: Connecting the Flat-plug Earphone/
Microphone with Switch (optional)
a
Infrared Port
• When performing infrared communications, point this towards
the other device.→P328
b
Inner camera
• Capture your own image or moving picture.→P222, P227
• Show your own image during a videophone call.
c
Illumination sensor
• Detect surrounding brightness with the sensor and adjust the
display brightness automatically.→P110
• Do not cover this sensor with a hand or do not attach a sticker,
etc. The brightness may not be detected.
d
Earpiece/Speaker
• The other party's voice comes out from here.
• Ring tones, alarm tones, and melodies sound from here.
• The other party's voice comes out from here during a Hands-
free call.
e
Display→P33
fZ
/
O
GoogleTM service key
• Display the Google
TM
service menu (P334). (If there is a
function in use, it may not be displayed.)
• Press this for 1+ seconds to exit each function and return to
the Stand-by display.
g
Mouthpiece
• During a call, transmit your voice through this.
• During a moving picture capture, this works as a microphone.
h
Navigation key
Used to move the cursor, scroll through the screen, or execute
the selected operation.
C
• Execute the selected operation.
• Press this for 1+ seconds in Stand-by to set/cancel the IC card
lock.→P292
U
• Move the cursor up.
• Press this in Stand-by to display Schedule.
• Press this while MUSIC player, etc. is running to increase the
volume.
D
• Move the cursor down.
• Press this in Stand-by to display the Phonebook list screen
(P91), and press for 1+ seconds to display the Add to
phonebook screen (P84).
•
Press this while MUSIC player, etc. is running to reduce the
volume.
L
• Move the cursor left. Also, return to the previous screen.
• Press this in Stand-by to display the Received calls list screen
(P62), and press for 1+ seconds to display the Received mail
list screen (P167).
R
• Move the cursor right. Also, go to the next screen.
•
Press this in Stand-by to display the Redial list screen (P60), and
press for 1+ seconds to display the Sent mail list screen (P167).
Continued on next page

30
Before Using the Handset
iM
Menu key/Upper left soft key
• Press this in Stand-by to display the Main menu (P37).
•
Execute the operation indicated for the upper left soft key.→P32
jg
Mail key/Lower left soft key
•
Press this in Stand-by to display the Mail menu screen (P137),
and press for 1+ seconds to check new messages.→P150, P173
•
Execute the operation indicated for the lower left soft key.→P32
kA
Start key
• Make/answer a voice or videophone call.→P56, P72
• Press this in Stand-by to display the Phone number entry
screen (P56).
l
Dial keys
• Press to enter a phone number or characters.→P443
• Press
0
for 1+ seconds in Stand-by to enter "+".→P68
m*
Public mode (Drive mode) key
• Enter "
:
"/"*".
• Press this for 1+ seconds in Stand-by to set/cancel Public
mode (Drive mode).→P76
nI
i-mode/i-αppli key/Upper right soft key
• Press this in Stand-by to display the i-mode menu screen
(P182), and press for 1+ seconds to display the i-αppli
Software list screen (P275).
•
Execute the operation indicated for the upper right soft key.→P32
•
During character entry, use this to switch the input mode
(Hiragana/Katakana/alphabetic and numeric characters).→P376
oT
Camera/TV key
• Press this in Stand-by to display the Still image capture screen
(P222), and press for 1+ seconds to display the 1Seg watch
screen (P245).
• During character entry, use this to switch the input mode
(pictographs/symbols/emoticons).→P381
pQ
Clear/i-Channel key
• Return to the previous state or return to the Stand-by display.
•
Press this in Stand-by to display the Channel list screen (P203).
qP
Power/Exit key
• Press this for 2+ seconds to turn the power on/off.→P51
• Used to end a call or terminate a function.
r#
Manner mode key
• Enter "#".
• Press this for 1+ seconds in Stand-by to set/cancel Manner
mode.→P105
s
Strap hole
t
Illumination
• View the time with the FOMA terminal closed. Also, notify of
incoming calls or mails, the status of the FOMA terminal, etc. by
illumination patterns.→P36
u
External connector terminal
• The integrated terminal used for charging and connecting
earphones.
• Connect the AC adapter (optional), DC adapter (optional), FOMA
USB Cable with Charge Function 01/02 (optional), or Earphone
Plug Adapter for External connector terminal (optional).
v
Charger terminal
Terminal for charging with the desktop holder.
wN
Multitask key
• Press this for 1+ seconds to display the New task screen.
→P349
• Display the Task list screen.→P350
xY
Lock key
• Set/cancel the lock for the touch panel and keys.→P125
y
Outer camera
• Capture a still image or moving picture such as landscape, etc.
→P222, P227
• Capture surrounding image during a videophone call.
z
Photo light/Light
• Light up when capturing a still image/moving picture.
• You can light this up when using the camera.

31
Before Using the Handset
Continue on the next page
A
Back cover
• Remove this when inserting/removing the UIM or battery pack.
→P43, P46
• Do not remove the sticker attached at the back side of the
Back cover. If removing it, the IC card contents may not be read
or written.
B
mark
• The IC card is included (cannot be removed). Hold this on the
scanning device to use as Osaifu-Keitai.→P291
C
microSD card slot
• Insert a microSD card.→P318
DFE
Volume key
Use to adjust the volume, etc.
• Press these during a call to adjust the receiver volume.
• Press
E
for 1+ seconds to display the Record message list
screen (P79).
• Press these on the Playback screen of MUSIC player, etc. to
adjust the playback volume.
• Press these on the List screen to move the cursor or scroll the
screen to the next page.
EG
Camera/TV key
• Press this in Stand-by to display the Still image capture screen
(P222), and press for 1+ seconds to display the 1Seg watch
screen (P245).
• Press this on the Still image/Moving picture capture screen to
work as shutter and capture images/moving pictures.
→P223, P228
F
1Seg antenna
• Receive 1Seg broadcasting.→P240
* This is not the FOMA antenna.
Opening the FOMA Terminal
You can use this FOMA terminal with the FOMA terminal
closed, opened, and in Turn View Style mode.
• It is recommended to keep the FOMA terminal closed when you
carry the terminal.
Turn View Style
Open the FOMA terminal up to the angle shown
below and rotate the display 180 degrees to
the right
Fold the display forward
Continued on next page
32
Before Using the Handset
Note
• When changing the FOMA
terminal in Turn View Style mode,
do not rotate the display to the
left or further than 180 degrees.
Also, do not hit the edge of the
display on the terminal body or
keys. Scratch or damage may
result.
• When changing in Turn View
Style mode, take care not to
pinch your fingers.
When rotating the display
Soft Keys
Available operations on the currently opened screen
are displayed as Soft keys at the bottom of the screen.
To execute the soft key operation, press the following
corresponding keys or directly touch the soft key display.
• The Soft key description differs depending on the function or display
status.
a
Operation performed using
M
appears.
b
Operation performed using
C
appears.
• The mark ( ) also appears to indicate the available direction
for scrolling or item selection.
c
Operation performed using
I
appears.
d
Operation performed using
g
appears.
e
Operation performed using
T
appears.
Note
• In Turn View Style mode, some Soft keys may not appear, or
descriptions may change compared to the state when the
FOMA terminal is opened.
Notation for Soft Key Operations
This manual describes the Soft key operations as follows.
M
[Menu]
Corresponding key
Soft key display
33
Before Using the Handset
Continue on the next page
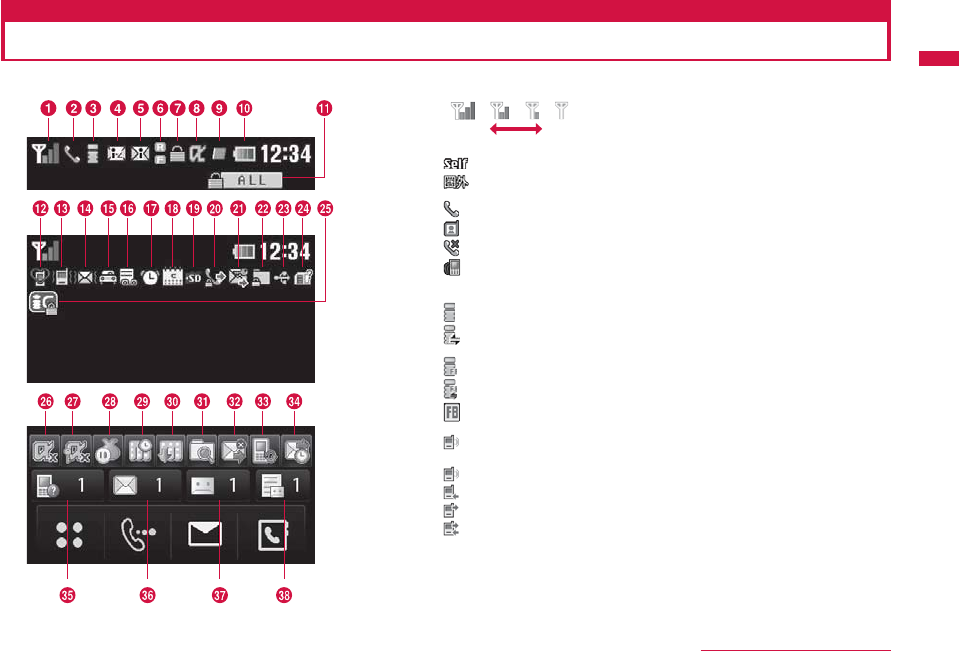
Viewing Display
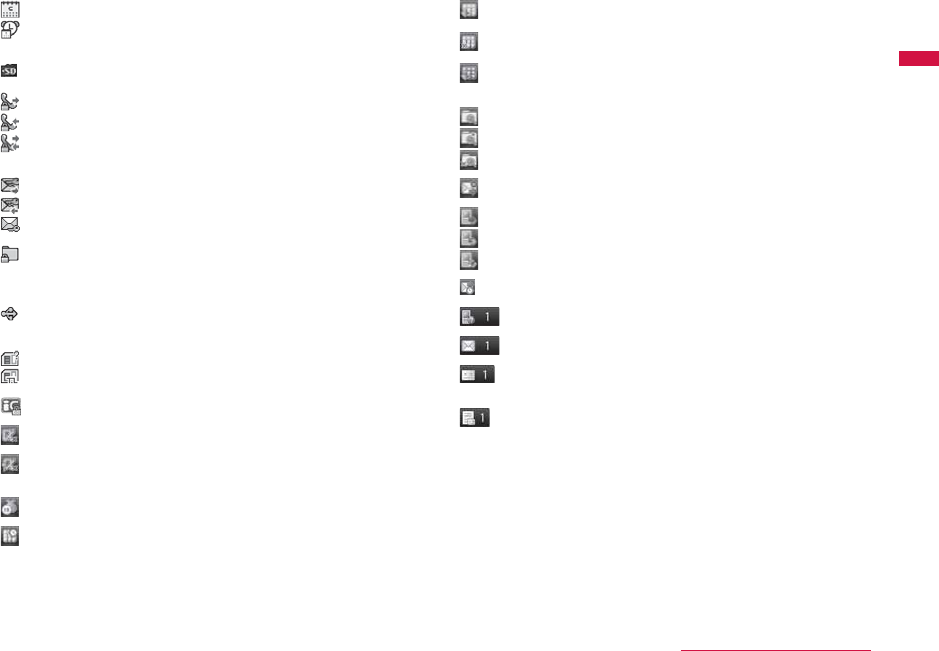
The descriptions of the icons appearing at the top of the screen are as follows.
a
Strong Weak
Signal strength→P51
Self mode set→P124
Out of service area or no signal reception→P51
b
Voice call in progress→P57
Videophone call in progress→P57
Reject all calls function set→P128
Infrared remote controller operation in progress
→P330
c
(Blinking) i-mode connection in progress→P183
(Blinking) i-mode communication/i-Channel message
reception in progress→P183
(Blinking) Full browser connection in progress
(Blinking) Full browser communication in progress
Full browser connection in progress (no
communication for a certain period of time)
(Blinking) Packet connection via PC, etc/disconnection in
progress
Packet communication via PC, etc. in progress
Packet reception via PC, etc. in progress
Packet transmission via PC, etc. in progress
Packet reception/transmission via PC, etc. in
progress
Continued on next page
34
Before Using the Handset
d
(White) i-mode mails stored at the i-mode center→P149
(Pink) i-mode center mailbox full
(White) MessageR stored at the i-mode center→P173
(Pink) MessageR at the i-mode center full
(White) MessageF stored at the i-mode center→P173
(Pink) MessageF at the i-mode center full
(White) i-mode mails and MessageR/F stored at the i-mode
center
(Pink) i-mode mails and MessageR/F at the i-mode center
full
e
(White) Unread i-mode mails→P147
(White) Unread SMS→P177
(White) Unread i-mode mails and SMS
(Pink) Inbox in the FOMA terminal full of unread mails and
protected mails.
SMS in the UIM full
Inbox in the FOMA terminal full of unread mails and
protected mails. SMS in the UIM full
f
(White) Unread MessageR→P174
(Pink) MessageR in the FOMA terminal full
(White) Unread MessageF→P174
(Pink) MessageF in the FOMA terminal full
g
SSL-compatible page displayed or loading→P185
h
i-αppli running→P275
i-α ppliDX running→P275
(Gray) i-αppli Stand-by display displayed→P285
(Gray) i-α ppliDX Stand-by display displayed→P285
i
A function (task) activated→P349
Multiple functions (tasks) activated
A function (task) and background playback
activated
Multiple functions (tasks) and background playback
activated
(Blinking) Alarm started when no tone sounds due to another
function (task) activated
j
− Battery level→P50
k
Lock all set→P121
l
(Pink) Manner mode set→P105
(White) Original manner mode set→P105
m
The ring tone for voice/videophone call muted, and
vibration active→P101, P102
The ring tone for voice/videophone call and
vibration active→P101, P102
The ring tone for voice/videophone call muted, and
vibration inactive→P101, P102
n
The ring tone for Mail or MessageR/F muted, and
vibration active→P101, P102
The ring tone for Mail or MessageR/F and vibration
active→P101, P102
The ring tone for Mail or MessageR/F muted, and
vibration inactive→P101, P102
o
Public mode (Drive mode) set→P76
p
Record message active→P78
q
Alarm set→P351
35
Before Using the Handset
Continue on the next page
r
Today's schedule/To do set→P353, P357
Today's schedule/To do with alarm set
→P353, P357
s
microSD card inserted→P318
t
Outgoing voice/videophone calls restricted→P123
Incoming voice/videophone calls restricted→P123
Incoming and outgoing voice/videophone calls
restricted→P123
u
Outgoing mails restricted→P123
Incoming mails restricted→P123
Incoming and outgoing mails restricted→P123
v
• "Data access lock" set to "ON"→P124
• "Secret mode" set to "Secret mode"→P127
• "Secret mode" set to "Secret data only"→P127
w
Communication mode set and USB cable
connected
x
UIM not inserted/error occurred in the UIM→P43
Terminal link applied
y
IC card lock set
z
i-αppli auto start failed→P286
A
i-αppli Stand-by display released due to security
error→P286
B
Call costs exceeded the limit→P363
C
Reserving Music&Video Channel program download
→P254
D
Music&Video Channel program download
completed →P254
Music&Video Channel program download failed
→P254
Downloading Music&Video Channel program
→P254
E
Pattern definition update completed→P462
Pattern definition update recommended
Pattern definition update failed
F
i-mode mail Auto send failed
G
The rewrite notice icon→P461
The update notice icon→P462
Reserving software update→P463
H
i-mode mail Auto send reserved→P139
I
Missed call (with the number of calls)
J
Unread mail (with the number of mails)
K
Voice mail message (with the number of
messages)→P392
L
Record message (with the number of messages)
Continued on next page
36
Before Using the Handset
Note
• Some characters or symbols appearing on the display may be
partially deformed or abbreviated.
• Icons appearing on the display are based on the default
settings. The display of the FOMA terminal may differ from
the one in the manual depending on setting changes after
purchase.
• The display of the FOMA terminal employs high-precision
production technology, however, there may be instances where
some dots may not light up while others may constantly light
up. Note that this is not a failure.
Illumination
Pressing F or E when or while the FOMA terminal is closed displays
the clock for approximately 5 seconds.
Incoming calls or mails, the status of the FOMA terminal, etc. are
also notified by illumination patterns. (The following images are
examples of illumination.)
Clock display Incoming voice call/
videophone call Unread mail/
MessageR/F
Music playback Alarm sounding Missed call
Charging
Note
• While another illumination notifying of missed call or unread
mail, etc. is lighting up, the clock cannot be displayed.
• Illumination patterns can be changed depending on the item.
→P113
• Illumination lights up or blinks only with the FOMA terminal
closed.
• Illumination notifying of missed call or unread mail/message
lights up or blinks for up to approximately 1 hour at
approximately 10 seconds interval.
Using Touch Panel
The display of this FOMA terminal works as the touch panel.
Touch the screen directly to perform various operations.
• When the FOMA terminal opens, both touch and key operations
are available. However, depending on the functions, only either
operation may be possible.
• This manual describes procedures mainly with key operations.
• While the touch panel light is turned off, touch panel operations are
disabled. Turn the light on with the following operations.
- Press any key
- Open/close the FOMA terminal
Cautions on using the touch panel
• The touch panel may not function in the following cases. Also,
operations may not be performed correctly.
- Operations with a foreign object put on the panel
- Operations with the protective sheet or stickers attached
• Do not press the touch panel with a sharp-pointed object such
as nail, pen, pin, etc. or finger strongly.

37
Before Using the Handset
Continue on the next page
Touch the panel softly and
release your finger
Ex.: Select an item or execute
the selected operation
Keep touching the touch
panel and move your finger
Ex.: Adjust volume
• This operation is described as
"touch" in this manual. • This operation is described as
"slide" in this manual.
Touch the panel softly and sweep upward or downward
Ex: Scroll at high speed when there are too many items, etc.
to be displayed on a screen (This operation may be disabled
depending on the screen.)
Note
• Touch panel operations can be notified with sound or vibration.
→P104
• Touch operation is not available on sites which use Flash
movies, and i-Channel or i-αppli screens.
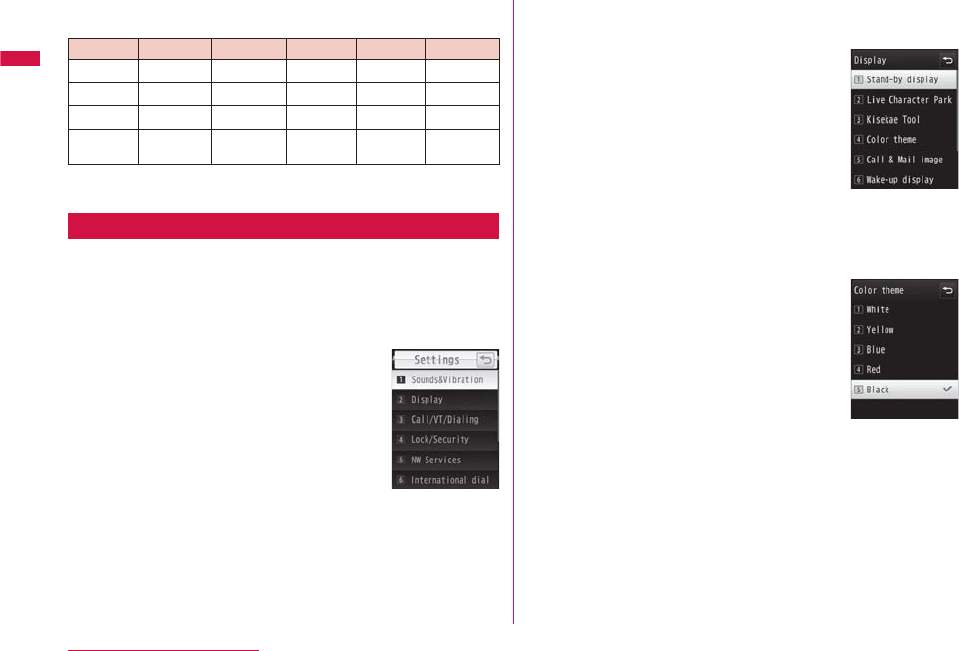
Selecting Menu
The FOMA terminal allows you to access or set a function,
and save items, etc. from the Main menu or sub menu.
• This FOMA terminal supports Kisekae Tool (P111). If the Menu
screen design is changed by using Kisekae Tool, menu structure
may change, depending on menu types, according to the frequency
of use.
Selecting Functions from Main Menu
You can select a function using the following 3 methods.
- Navigation key
- Dial keys
- Touch panel
Using steps for accessing the Main menu in Stand-by
and displaying the setting screen for "Color theme" as an
example, this section explains each operation method.
• This manual explains how to select functions using the navigation
keys.
Main menu
Continued on next page
38
Before Using the Handset
b
Functions and corresponding keys displayed on the
Main menu
Function Operation Function Operation Function Operation
Mail
1
i-mode
2
i-αppli
3
Phonebook
4
Data Box
5
MUSIC
6
LifeKit
7
Media
8
1Seg
9
Settings
*
Own
Number
0
Osaifu-
Keitai
#
• Depending on the Main menu design you use, the description of
menu name may differ.
Using Navigation Key
Press
M
in Stand-by
Main menu appears.
In the Main menu, use
K
to move the cursor
to "Settings" and press
C
[Select]
Setting screen
On the Settings screen, use
H
to move the
cursor to "Display" and press
C
[Select]
Display screen
On the Display screen, use
H
to move the
cursor to "Color theme" and press
C
[Select]
Color theme
screen
39
Before Using the Handset
Continue on the next page
Using Dial Keys
Press
M
in Stand-by
On the Main menu screen, press
*
corresponding to "Settings"
On the Settings screen, press
2
corresponding to "Display"
On the Display screen, press
4
corresponding to "Color theme"
Using Touch Panel
Touch in Stand-by
• Alternatively, press
M
to display the Main menu.
On the Main menu screen, touch the icon for
"Settings"
The cursor is moved to "Settings".
Touch the icon for "Settings" again
On the Settings screen, touch "Display"
The cursor is moved to "Display".
Touch "Display" again
On the Display screen, touch "Color theme"
The cursor is moved to "Color theme".
Touch "Color theme" again
Selecting a Function from Sub Menu
When "Menu" appears on a soft key, you can access a sub
menu to perform various functions.
• The sub menu items vary depending on the function or the FOMA
terminal settings/saved items, etc.
Items with
second
hierarchy
M
[Menu]
Sub menu
Phone number
entry screen
■ List screen sub menu
The list screen sub menu contains options such as "Delete"
that apply only to the highlighted item and ones such as
"Delete all" that apply to all items. When performing the
operation that applies to only an item, move the cursor to
the relevant item, and then press
M
[Menu].
Note
• You can move the cursor using
H
while the sub menu
appears. Also, you can select an item by pressing the dial key
corresponding to the menu number.
• For an item with the second hierarchy, move the cursor and
press
C
[Select]/
R
to display the second hierarchy item.
• Press
M
[Close] to close the sub menu.
40
Before Using the Handset
Using Hot Keys to Access a Function
You can use each function by touching 4 hot keys displayed
in Stand-by.
a
Display the Main menu.
b
Display the Phone number entry screen. Touch for
1+ seconds to display the Recent call list screen.
c
Display the Mail menu screen (P137). Touch for 1+ seconds
to check new messages (P150, P173).
d
Display the Phonebook list screen (P91). Touch for
1+ seconds to display the Add to phonebook screen (P84).
Note
• Hot key operations are available only by touching the touch
panel directly.
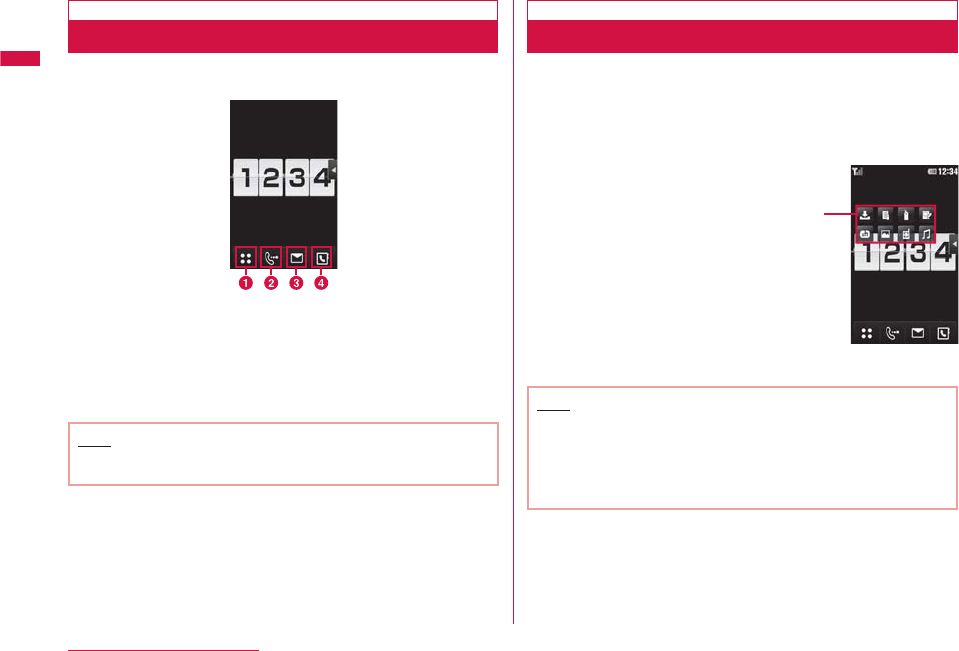
Using Shortcuts to Access a Function
You can set shortcuts in Stand-by to access each function
quickly by selecting the shortcut icons.
• Setting shortcuts→P106
Stand-by display ▶
C
▶ Select a shortcut
icon
Shortcuts
Shortcut icons
Note
• You can perform operations by touching a shortcut icon twice
directly.
• To change the setting, touch a shortcut icon for 1+ seconds.
Select the icon with "×" to delete the function from the
shortcuts. Select "Edit shortcut" to display the Stand-by display
setting screen.→P106
41
Before Using the Handset
Continue on the next page
Basic Operations for Each Screen
Returning to the Previous Screen/Stand-by Display
If you selected undesired menu item and want to return to
the previous screen, or cancel/end the operation and return
to the Stand-by display, perform the following operations.
•
Q: Return to the previous screen. (Touch for touch panel operations.)
•
Z(for 1+ seconds)
/O
(for 1+ seconds)/P
: Return to the
Stand-by display. If a confirmation to exit appears, select "Yes" to
cancel the operation.
Note
• Depending on the current operation on the FOMA terminal,
pressing P/Z/O/Q may not return to the Stand-by
display/previous screen.
Operations for Setting Items
Each setting field on a setting screen shows currently set item.
To change settings, perform any of the following operations.
Select the setting
field to change and
select an item on
the list
Move the cursor to
the setting field to
change and use
J
to change the setting
Move the cursor to
the setting field to
change and use
C
to switch the setting
H
▶
C
▶
H
▶
CH
▶
JH
▶
C
Authentication
Depending on the function or service to
use, a password entry screen (P118)
may appear for the authentication
purpose. If the entry screen appears,
use dial keys to enter the password and
press
C
[OK]. If correctly entered, you
can complete the steps or continue to
the next step.
• The entered password appears as "*"
(asterisk) marks.
Password entry
screen (Ex.:
Terminal security
code entry screen)
Note
•
To cancel the password entry and close the entry screen, touch .
42
Before Using the Handset
Notation for Menu Operations
This manual explains operations to be performed mainly from
the Stand-by display. Basically, descriptions of operations are
simplified as follows.
Example of Operation Description
M
▶ "Settings" ▶ "Display" ▶ "Call & Mail image"
a
Key illustration to press for operation.
b
Function name for the main menu. Use
K
to move the cursor
to the function name and press
C
[Select] to select.
c
Menu item names. This manual also uses the phrase
"Perform the following operation" or "select XXX". Use
H
to
move the cursor to an item and press
C
[Select] to select.
Example of Sub Menu Description
Items displayed on the sub menu may vary depending on the
settings or saved items of the FOMA terminal.
[Sort]
a
Set conditions and sort files.
b
[Memory info.]
Handset memory : Display the status of storage space, etc.
in "Data Box".
c
External memory : Display the status of storage space, etc.
of the microSD card.
a
Item name. Press
H
/
F
/
E
to move the cursor to the item and
press
C
[Select] to select.
b
Functional description of the item.
c
Item names, functional description, and operation description of
items displayed when the items are selected.
Note
• If multiple sub menus such as the Redial list screen or Redial
detail screen are collectively described, some sub menus
that do not actually appear may be included depending on the
settings or screens.
43
Before Using the Handset
Continue on the next page
Notations
b
Description of operations starting from other than the
Stand-by display
At the beginning of the operation, the status of the FOMA
terminal or the screen to be displayed such as "Ringing" or
"List screen" is described.
b
Omitting
C
[Select] in the "Select" operation
As shown in
b
and
c
of "Example of Operation
Description" (P42), when selecting a target function from
icons or lists, operations such as
C
[Select] are omitted
from description.
Similarly, in the cases such as password entry or fixing
entered characters, the operations such as
C
[OK] are
omitted.
b
Omitting
C
in the operation to make into
The operation to select items with and press
C
to
change to is described as "Mark" omitting the operation
of
C
.
Using UIM (FOMA Card)
The UIM is an IC card that contains subscription information
such as your phone number. You can use communication
functions such as calling, mail, and i-mode, etc. by inserting
the UIM into the FOMA terminal. You can insert the UIM into
other FOMA terminals to use for various purposes.
For details on how to handle the UIM, see the UIM instruction
manual.
Inserting/Removing
• After operations described in "Turning Power OFF" (P51), turn over
the FOMA terminal and remove the battery pack, then insert or
remove the UIM.→P47
Inserting
When inserting the UIM, close the FOMA terminal and hold it
with both hands.
With the IC side (gold) of the UIM down, while
pushing the UIM surface, insert the UIM slowly
until it is fixed Notch
Note
• Do not use excessive force when inserting the UIM to avoid
damaging it.
44
Before Using the Handset
Removing
When removing the UIM, close the FOMA terminal and hold it
with both hands.
While sliding the UIM, pull it out slowly
Note
• Do not misplace the removed UIM.
Security Codes
You can set 2 security codes to the UIM: "PIN1 code" and
"PIN2 code".→P119
UIM Security Function
The FOMA terminal incorporates the UIM security function
(UIM operational restriction function) to protect your data
and files.
• When you download data or files from sites or acquire data
attached to mail with the UIM inserted into the FOMA terminal, the
UIM operational restriction function is automatically set to these
data or files.
• Data or files with the UIM operational restriction function set are
accessible only when the same UIM used when downloading data or
files is inserted.
• The following data/files are restricted:
- File attached to i-mode mail
- MessageR/F with file (melodies/images) attached
- Screen memo
- Images inserted in Deco-mail or signature
- i-motion
- i-αppli (including i-αppli Stand-by display)
- Image (including animation and Flash movie)
- Chaku-Uta
®
/Chaku-Uta Full
®
song
- Melody
- Kisekae Tool
- Mail template with motion-restricted data
- Music&Video Channel program
* "Chaku-Uta" is a registered trademark of Sony Music
Entertainment Inc.
45
Before Using the Handset
Continue on the next page
• Hereafter, the UIM that was inserted when you downloaded or
obtained data or files is referred to as "your UIM" and any other UIM
as "another UIM".
Replacing the UIM
Your UIM
Another UIM
If the UIM used for
obtaining data or mails
is inserted, you can
browse or play back UIM
restricted data.
If the UIM used for
obtaining data or mails is
not inserted, you cannot
browse or play. back UIM
restricted data.
Note
• When you set data/file restricted with this function to the
Stand-by display, etc., the setting will return to the default
if another UIM is inserted or if no UIM is inserted. When you
re-insert your UIM, the setting will revert to the original state
you set.
• Pre-installed i-αppli programs are not restricted. However, if you
delete i-αppli and download it, the newly-downloaded i-αppli will
be restricted.
• The following data/files are not restricted with this function:
- Data/files obtained via infrared communication, a microSD
card, or data communication
- Images captured/edited using this FOMA terminal
• Even if a UIM different from the one used when data/files were
obtained is inserted, the data/files restricted with this function
can be deleted.
• Settings that are saved on the UIM are as follows:
- Phone number display - SMS Center settings
- PIN1 and PIN2 codes - Select language
- SMS Validity Period
• If the UIM is inserted into another i-Channel-compatible terminal,
the ticker will not appear. If you press
Q
in Stand-by and
display the channel list, the latest information is downloaded
and the ticker appears.
UIM Types
Note that the specifications of the "UIM (blue)" differ from
those of the "UIM (green/white)" as follows:
Function UIM
(blue) UIM
(green/white) Reference
Number of phone
number digits to be
saved to the UIM
Phonebook
Up to 20 digits Up to 26 digits P87
WORLD WING Not available Available P408
Service Numbers Not available Available P399
Continued on next page
46
Before Using the Handset
WORLD WING
WORLD WING is DOCOMO's FOMA international roaming
service that allows you to use the same mobile phone
number registered in Japan to make and receive calls
even overseas using the UIM (green/white) and supported
terminals.
• If you subscribed to the FOMA service after September 1,
2005, a separate subscription is not required. However,
if you declared that you did not require this service at the
FOMA service subscription or canceled this service, a
separate subscription is required.
• If you initially subscribed to the FOMA service before
August 31, 2005 and have not subscribed to "WORLD
WING", a separate subscription is required.
• This service is not available for some billing plans.
• If your UIM (green/white) is lost or stolen overseas,
contact DOCOMO immediately and temporarily
suspend your subscription. For contact information, see
General Inquiries at the back of this manual. Call and
communication charges after the FOMA terminal was lost
or stolen are still charged to you.
Attaching/Removing Battery
Pack
• Turn off the FOMA terminal and hold it in your hand with the terminal
closed.
Attaching
While pushing the
Back cover in the
direction of
a
, slide it
in the direction of
b
and hold it up in the
direction of
c
With "
A
" side up, align
the metal contacts of
the battery pack and
the FOMA terminal
in the direction of
a
, then insert the
battery pack in the
direction of
b
• When attaching the battery
pack, push it underneath the
tab and push it down.
Tabs
47
Before Using the Handset
Continue on the next page
With approx. 3mm
space kept to the
Back cover, align
it to the ditch of
the FOMA terminal,
and while pushing
it in the direction
of
a
, slide it in
the direction of
b
and insert it until it
clicks
Back cover
Approx. 3mm
Note
• Attaching the battery pack forcibly with the UIM not properly
inserted may damage the UIM.
• Attaching the battery pack forcibly may damage the FOMA
terminal.
Removing
While pushing the
Back cover in the
direction of
a
, slide it
in the direction of
b
and hold it up in the
direction of
c
and
remove
Hold the battery
pack with a finger
by the recess of
the FOMA terminal,
and while pushing
the battery pack
in the direction
of a, hold it up in
the direction of b
and remove in the
direction of c
Recess
Charging
Use the specified AC adapter (optional) or DC adapter
(optional) to charge the FOMA terminal. Use the exclusive
battery pack L05 for the FOMA terminal.
■ Battery pack life
• The battery pack is a consumable. The available usage time
decreases every time the battery pack is recharged.
• When the usable time after each recharging shortens by
approximately half compared to a new battery pack, it is
recommended that the battery pack be replaced with a new one
as soon as possible. The battery pack may swell as the battery
life is near its end depending on the battery pack condition, but
it is not a malfunction.
• If you use i-αppli or videophone, etc., or watch 1Seg for long
periods of time while the battery pack is being charged, the
battery life may be shortened.
For environmental protection, be sure to
bring the exhausted battery pack to NTT
DOCOMO, the sales agent, or recycle shop.
Continued on next page
48
Before Using the Handset
■ Charging
• For details, see the instruction manuals for the FOMA AC
Adapter 01/02 (optional), FOMA AC Adapter 01 for Global use
(optional), and FOMA DC Adapter 01/02 (optional).
• The FOMA AC Adapter 01 can be used only for 100V AC. The
FOMA AC Adapter 02 and the FOMA AC Adapter 01 for Global
use support the voltage from 100V to 240V AC.
• The adapter plug shape is for 100V AC (for domestic use).
To use an AC adapter that supports from 100V to 240V AC
overseas, the compatible conversion plug adapter is required.
Do not charge the battery pack with a transformer designed for
overseas trips.
• To charge the battery pack with the AC or DC adapter, make
sure that the battery pack is inserted into the FOMA terminal.
• Plug or unplug the connector slowly and securely avoiding
excessive force.
• If you start charging the fully drained battery pack, the FOMA
terminal may not be turned on for a while.
• If you make a call or packet communication while charging, the
inside of the FOMA terminal may become hot and charging may
stop. In this case, end the functions in use and wait until the
FOMA terminal becomes cool down, and then try charging again.
■ Do not charge the battery pack for a long time (several
days) with the FOMA terminal power on.
• If the FOMA terminal is left with the power on for long periods
of time during charging, you may not be able to use the FOMA
terminal for long duration as expected and the low battery
alarm may sound, because the FOMA terminal receives the
power from the battery pack after charging is completed. In this
case, recharge the battery pack properly. Before recharging the
battery pack, disconnect the AC adapter or DC adapter from the
FOMA terminal and reconnect it.
■ Approximate battery pack usage time
The usage time may vary depending on the operating
environment and the battery pack deterioration.
Continuous
stand-by
time
FOMA/
3G 3G/GSM
setting:
3G
Moving: Approx. 280 hours
3G/GSM
setting:
AUTO
Stationary: Approx. 320 hours
Moving: Approx. 210 hours
GSM 3G/GSM
setting:
AUTO
Stationary: Approx. 220 hours
Continuous
call time FOMA/3G Voice call: Approx. 220 minutes
Videophone call: Approx. 80 minutes
GSM Voice call: Approx. 180 minutes
1Seg watching time Approx. 140 minutes
• Continuous call time is approximate duration for calling with
normal radio wave reception level.
•
Continuous stand-by time is approximate usage time when
moving with normal radio wave reception level. Depending on
the battery level, set functions, operating environment such as
ambient temperature, or radio wave reception level (poor or weak
radio wave reception level), stand-by time may be reduced by
half. During i-mode communication, the call (communication)/
stand-by time becomes shorter. Even if you do not make calls or
i-mode communications, the call (communication)/stand-by time
shortens when you compose i-mode mail, start i-αppli or i-αppli
Stand-by display, perform data communications or Multiaccess,
use the camera, play back moving picture or music, or watch
1Seg, etc.
• Depending on network conditions at your location, usage time
may become shorter than the described values.
• Continuous stand-by time in a stationary is the average usage
time in stationary state with normal radio wave reception level
with the FOMA terminal closed.
• Continuous stand-by time in a moving state is the average
usage time in a state combining "stand still", "in motion", and
"out of service area" in an area with normal radio wave reception
level with the FOMA terminal closed.
• 1Seg watching time is approximate time when watching with
normal radio wave reception level and using the Flat-plug Stereo
Earphone Set P01 (optional).
49
Before Using the Handset
Continue on the next page
• The call/communication or stand-by time may be reduced to
about half, or 1Seg watching time may shorten depending on
the battery level, set functions, operating environment such as
ambient temperature, or radio wave reception level (poor or weak
radio wave reception level).
■ Estimated battery pack charging time
FOMA AC Adapter 01/02 Approx. 180 minutes
FOMA DC Adapter 01/02 Approx. 180 minutes
•
The estimated charging time is the duration of time to charge a fully
drained battery pack with the FOMA terminal turned off.
The charging time becomes longer with the FOMA terminal turned on.
Charging with AC Adapter and Desktop Holder
Insert the AC adapter connecter, with the inscribed arrow
side up, straight into the desktop holder.
Insert the power plug of the AC adapter into an outlet.
Align charger terminals of the desktop holder and FOMA
terminal (
a
), then insert in the direction of the allow
b
.
• The illumination lights up and charging starts. When charging
completes, the illumination turns off. (If unread mails or missed
calls exist, the illumination lights up according to "Lighting LED"
settings.)
After charging completes, grasp the head of the FOMA
terminal and lift it out while holding the desktop holder with
fingers.
Power plug
Charger
terminal
Desktop
holder
100V AC
outlet
Release buttons
Illumination
Connector
Inscription
Charging only with AC Adapter
Open the external connector terminal cover (
a
) and flip it
over (
b
). Then, insert the AC adapter connector, with the
inscribed arrow side up, straight into the FOMA terminal
external connector.
Insert the power plug of the AC adapter into an outlet.
• The illumination lights up and charging starts. When charging
completes, the illumination turns off. (If unread mails or missed
calls exist, the illumination lights up according to "Lighting LED"
settings.)
After charging completes, pull the AC adapter connector
straight out while pressing the release buttons.
Illumination
External
connector
terminal
cover Release buttons
Inscription Connector
• Make sure to insert/pull out the AC adapter connector straight
with the correct side up. Forcibly trying to remove the adapter may
cause damage.
b
DC adapter (optional)
The DC adapter supplies power to the FOMA terminal from
a cigarette lighter socket (12V/24V) of a car with the
battery pack inserted in the FOMA terminal.
For details, see the FOMA DC Adapter 01/02 instruction
manual.
Continued on next page
50
Before Using the Handset
Note
• When the power is turned on, you can set the FOMA terminal
to sound the charge start tone or charge complete tone. The
setting of "Popup tone" is applied.→P101
• You can set the FOMA terminal to charge with the Display
backlight on.→P110
• While charging, the battery level icon changes in the order of
→ → → in an animation display. After charging
completes, lights up.
<DC adapter>
• A fuse (2A) is a consumable item. Purchase a replacement fuse
from a car parts shop.
Battery level
Checking Battery Level
An icon indicating the battery level (appears at the top of the
screen).
: The battery is full.
: The battery is getting low.
: The battery is almost running out.
Charge the battery.
: The battery is almost running out. The
FOMA terminal will automatically turn off
in a moment. Charge the battery.
Note
• When an icon indicating battery level is or , camera
functions (including the bar code reader) and infrared
communication functions are unavailable.
• When the color of the icon indicating battery level is other
than and you activate 1Seg/MUSIC player, the notification
indicating the low battery level appears (may not appear when
the battery level is ).
Checking Battery Level with Sound and
Display
The battery level can be checked with display and sound.
M
▶ "Settings" ▶ "Others" ▶ "Battery level"
A confirmation appears and a tone sounds
according to the battery level. The battery
level screen disappears in approximately
3 seconds.
Three beeps : The battery is full.
Two beeps : The battery is getting low.
One beep : The battery is almost running
out. Charge the battery.
Note
• When "Dial sound" is set to (Silent) or "Manner mode" is
activated, you will not hear the beep.
When the battery is running out
A message, "Low battery. Charge or change
battery" appears and the battery alert tone
sounds. (Depending on the settings, the tone
may not sound.) at the top the screen
blinks. After a little while, the FOMA terminal
turns off automatically.
51
Before Using the Handset
Continue on the next page
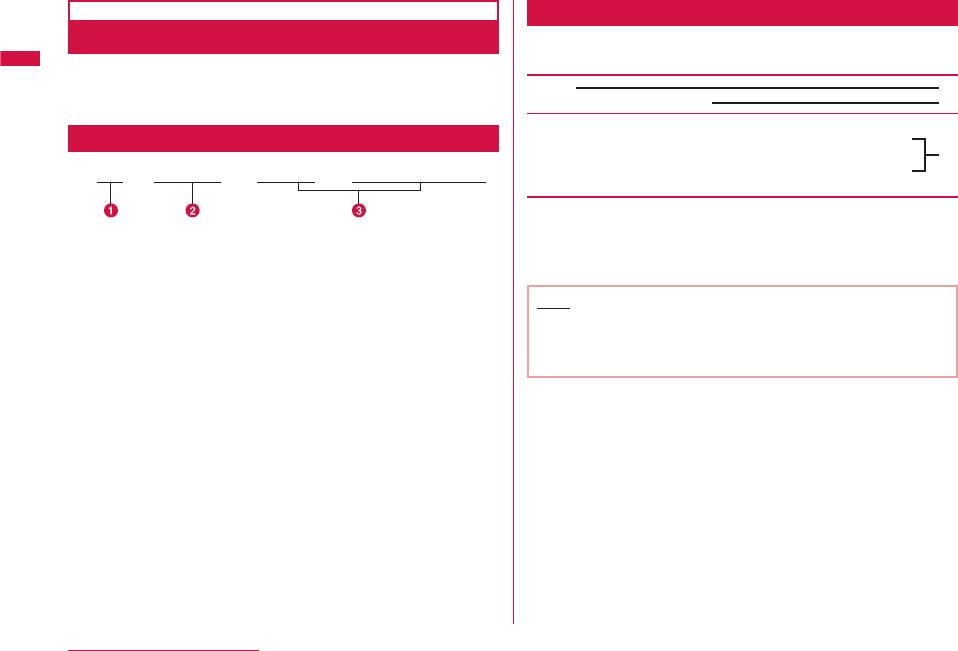
Power ON/OFF
Turning Power ON/OFF
Turning Power ON
When the FOMA terminal is turned off,
P
(for 2+ seconds)
After the wake-up screen appears, the Stand-
by display appears.
Stand-by display
Note
• If the UIM is not inserted, the message, "Insert UIM" appears.
• When replacing the UIM, enter 4- to 8-digit Terminal security
code after turning the power on. When entered the correct
Terminal security code, the Stand-by display appears. If failed
to enter the code 5 times in a row, the power is turned off. (You
can turn the power on again.)
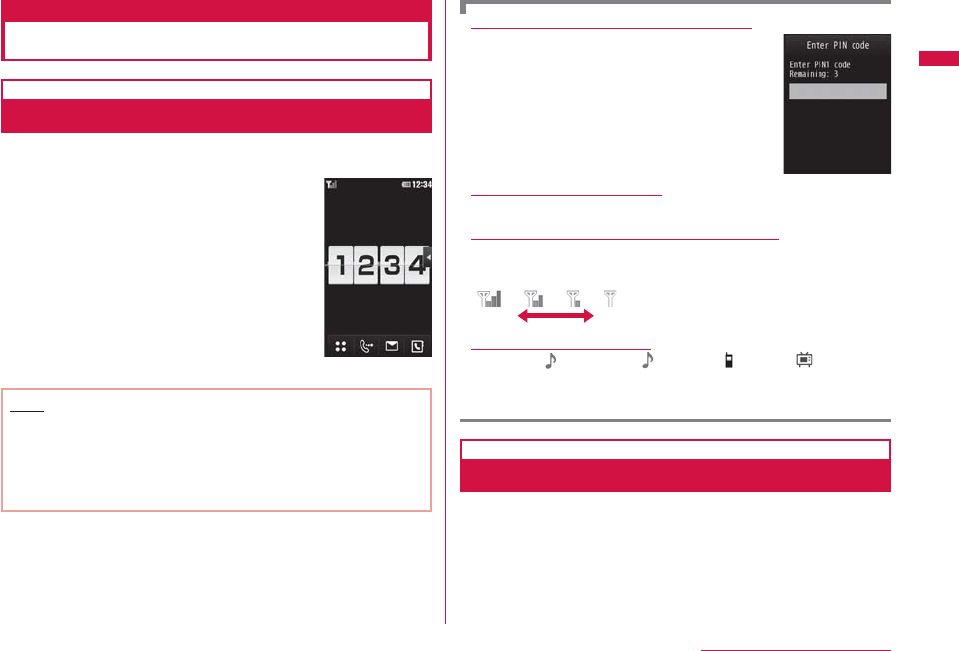
When "PIN1 code request" is set to "ON"
The PIN1 code entry screen appears. When
the PIN1 (P119) code is entered, the Wake-up
screen and then the Stand-by display appear.
You can make emergency calls (to 110, 119,
or 118) even while the PIN1 entry screen
appears.→P120
When "Lock all" is activated
The Terminal security code entry is required.
When "圏外" appears at the top of the screen
The FOMA terminal is out of service area or in a poor signal area.
Move to a location where the icon indicating the signal strength
appears. The signal strength is indicated in 4 levels as follows:
→ → →
Strong Weak
Viewing the Welcome mail
By default, " Welcome Mail " "Welcome ドコモ動画 " is saved.
Press
C
repeatedly to display the mail. Alternatively, perform
operations in "Displaying Received Mail" (P154) to display the
mail.
Turning Power OFF
When the FOMA terminal is turned on,
P
(for 2+ seconds) in Stand-by
The exit screen appears and the power is turned off.
52
Before Using the Handset
Select language
Changing Screen Display to
English or Korean
You can switch the display language on the FOMA terminal to
Japanese, English, or Korean.
M
▶ "設定(Settings)" ▶ "Select language" ▶
"日本語(Japanese)"/"English"/"ഡӵৰ(Korean)"
Note
• When the language is switched to English or Korean, "Select
language" is displayed as "マルチリンガル".
• The setting of this function is stored on the FOMA terminal
and UIM in use. If another UIM is inserted, the setting on the
inserted UIM takes priority. If the UIM with Korean language set
is inserted into the Korean-incompatible FOMA terminal, the
display language is set to Japanese or English.
Making Initial Settings
After the FOMA terminal is turned on, make initial settings
of "Set Date&Time", "Change security code", "KeyPad Sound
(Keypad tone)", and "Calibration".
Turn the power on ▶ "Yes"
Set the date&time (P53)
Set the Terminal Security code (P120)
Set the keypad tone (Select "ON" or "OFF")
• If "OFF" is selected, the keypad tone volume is set to
(Silent).→P101
Adjust the touch panel (P115)
• When initial settings complete, the software update
confirmation may appear. Perform operations according to
on-screen instructions.
Note
• While All lock, etc. is activated, the initial settings function is
not activated.
• To cancel the initial settings, press
Q
/
P
. When the power
is turned on next time, the rest of the settings resumes.
53
Before Using the Handset
Continue on the next page
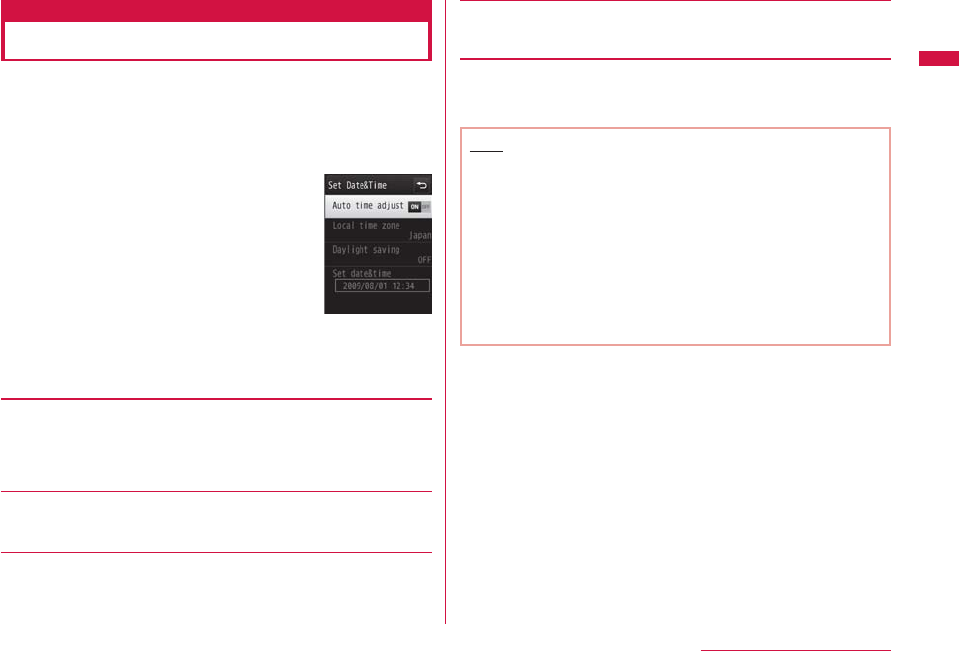
Set Date&Time
Setting Date and Time
You can set the FOMA terminal to update the time
automatically. Also, you can set the local time zone, daylight
saving, and date&time.
M
▶ "Settings" ▶ "Date&Time" ▶ "Set
Date&Time"
Date&Time
settings screen
Perform the following operations
[Auto time adjust]
Set whether to adjust the time on the FOMA terminal based on the
time information from the network.
ON : Adjust the date and time automatically.
OFF : Does not adjust the date and time automatically.
[Local time zone]
*
Set the time zone for the date and time.
Press
M
[<Prev.] or
I
[Next>] to switch the list by page.
[Daylight saving]
*
Set the daylight saving time.
[Set date&time]
*
Set date and time manually.
• You can set the date between 1980/01/01 and 2099/12/31.
* Available when "Auto time adjust" is set to "OFF".
I
[Done]
Note
<Auto time adjust>
• Time or time differences can be adjusted when the power is
turned on.
• If time is not adjusted for a while after the power is turned on,
turn the power on again.
• Time may not be adjusted depending on the signal strength,
etc.
• When using the FOMA terminal overseas, the time or time zone
may not be adjusted depending on the network service to use.
Also, the time may not be properly displayed. Set the time of
the location where you stay with the World time.→P364
• An error of a few seconds may occur.
54
Before Using the Handset
Caller ID notification
Notifying the Other Party of
Your Phone Number
You can set the FOMA terminal to show/hide your caller ID
on the network in advance.
• Your caller ID (phone number) is important information. Please take
care when sending your caller ID.
• Caller ID notification cannot be set when "圏外" appears.
M
▶ "Settings" ▶ "NW Services" ▶ "Caller ID
notification" ▶ Perform the following operations
[Activate/Deactivate]
Set to show/hide the caller ID.
[Check setting]
Check the current setting status.
Note
• Your caller ID is displayed only when the other party's phone
allows the display of caller ID.
• You can set the Caller ID notification for each call.→P66
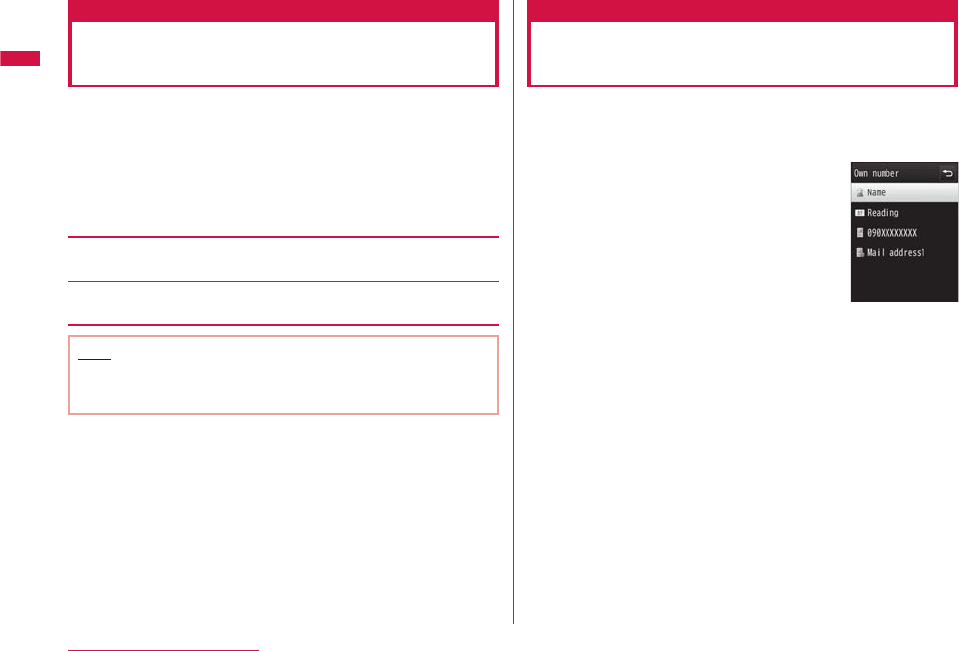
Own Number
Checking Your Own Phone
Number
You can check your phone number (own number) saved on
the UIM.
M
▶ "Own Number"
b
To display the saved detail information
Pressing
C
[Detail] and entering
the Terminal security code on the
Own number screen displays the Own
number detail screen. You can also
save information other than the own
number.→P361
• If a phone number other than your own
number, mail address, or URL is saved,
you can make a call, create i-mode mail,
or access a site by moving the cursor
and pressing
C
.
Own number
screen

55
Voice/Videophone Calls
Making Calls/Videophone Calls
Videophone Calls ・・・・・・・・・・・・・・・・・・・・・・・・・・・・・・・・・・・・ 56
Making a Call/Videophone Call ・・・・・・・・・・・・・・・・・・・・・・ 56
Making a Call Using Redial/Received Calls ・・・・・・・・・ 60
Making a Call Using Recent Calls ・・・・・・Recent calls 64
Using Chaku-moji ・・・・・・・・・・・・・・・・・・・・・・・ Chaku-moji 64
Setting Caller ID to Send/Not to Send for Each Call
・・・・・・・・・・・・・・・・・・・・・・・・・・・・・・・・・・・・・・・・・・・・184/186
66
Sending Touch-tone Signals ・・・・・・・・・・・・・・・・・ Pause 67
Making International Calls ・・・・・・・・・・・ WORLD CALL 67
Setting Prefix to Be Added to a Phone Number
・・・・・・・・・・・・・・・・・・・・・・・・・・・・・・・・・・・・・・・・・・・ Prefix dial 70
Making a Call Specifying a Sub Address
・・・・・・・・・・・・・・・・・・・・・・・・・・・・・・・・ Sub address setting 71
Setting an Alarm until Connection is Reestablished
・・・・・・・・・・・・・・・・・・・・・・・・・・・・・・・・・・・・ Reconnect alarm 71
Reducing Surrounding Noise to Make Voice Clear
・・・・・・・・・・・・・・・・・・・・・・・・・・・・・・・・・・・・・ Noise reduction 72
Receiving Calls/Videophone Calls
Receiving a Call/Videophone Call ・・・・・・・・・・・・・・・・・・・ 72
Setting How to Answer Incoming Voice Calls
・・・・・・・・・・・・・・・・・・・・・・・・・・・・・・・・・・・・・・・ Answer mode 74
Ending/Holding Call by Closing the FOMA Terminal
・・・・・・・・・・・・・・・・・・・・・・・・・・・・・・・・・・・・・・・・Close setting 74
Adjusting Earpiece Volume ・・・・・・・ Receiver volume 74
When You Can/Could not Answer a
Voice/Videophone Call
Putting a Call on Hold when You Cannot Answer
Immediately ・・・・・・・・・・・・・・・・・・・・・・・・・・・・・・・・・ Holding 75
Setting Answer Holding Tone ・・・・・・・・・・On hold tone 75
Setting Holding Tone・・・・・・・・・・・・・・・・・・・Holding tone 75
Using Public Mode ・・・・・・・・・・・・・・・・・・・・・・・・・・・・・・・・・・ 76
Checking Missed Calls ・・・・・・・・・・・・・・・・・・ Missed call 77
Recording Voice Messages when You Cannot
Answer the Call ・・・・・・・・・・・・・・・・・・・ Record message 77
Recording a Message when You Cannot Answer
Incoming Call ・・・・・・・・・・・・・・ Quick Record Message 79
Playing/Deleting Record Message
・・・・・・・・・・・・・・・・・・・・・・・・Play/Delete record message 79
Videophone Settings
Setting Image to Send ・・・・・・・・・・・・・・・・・・・・・・・・・・・・・・ 80
Changing Videophone Settings ・・・・・Videophone set 80
Setting Answer Method of Videophone Call during
i-mode ・・・・・・・・・・・・・・・・・・・・・・・・ V-phone while packet 81
56
Voice/Videophone Calls
Videophone Calls
The videophone call can be used with a mobile phone that
supports DOCOMO's videophone call.
• DOCOMO's videophone call complies with "ISO 3GPP
*1
standardized
3G-324M
*2
". DOCOMO's videophone calls cannot connect with
mobile phones that support a different videophone call system.
*1 3GPP (3rd Generation Partnership Project)
The regional standards organization for developing common
technical specifications for the third generation mobile
communication systems (IMT-2000).
*2 3G-324M
The international standard of 3rd Generation Mobile
Videophone.
• There are 2 different videophone call communication rates, 64K
(64kbps) and 32K (32kbps), this FOMA terminal cannot use
videophone call at 32K.
• This FOMA terminal does not support remote monitoring.
• The battery pack life may shorten if you make a videophone call
for a long time while charging. The power may turn off during a
videophone call, if you make the call with the charging adapter
connected when the battery level is low.
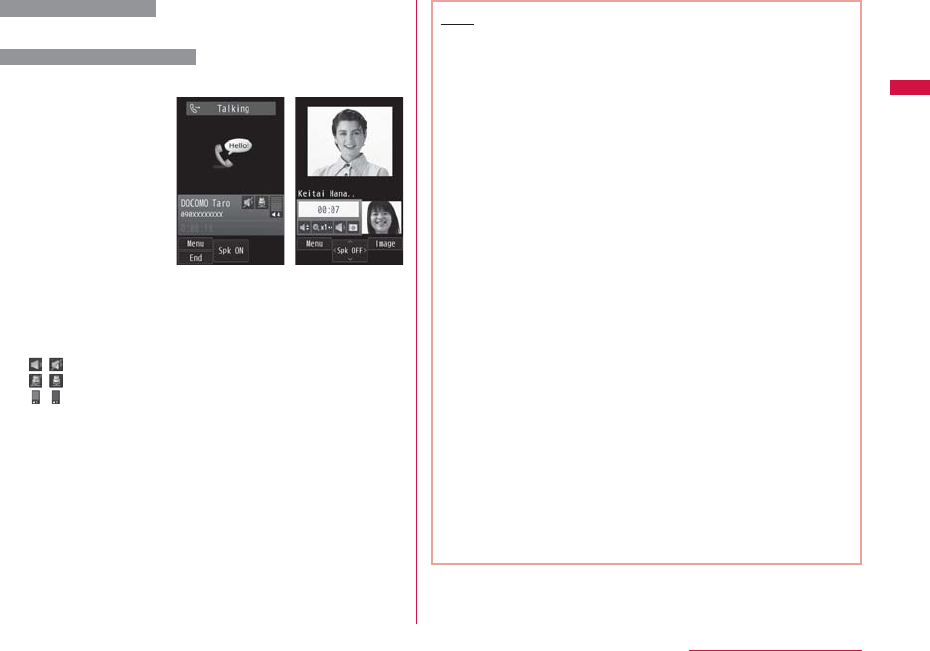
Videophone Call Screen Components
a
Main window
The other party's image appears by
default.
b
Sub window
Your image appears by default.
c
Call duration
Displayed in the format of minutes:
seconds.
d
Settings icons
/ Zoom adjustment→P59
/ Display Hands-free ON/OFF
state→P57
/ Picture mode (Camera image/Substitute image)→P59
Making a Call/Videophone Call
Enter a phone number
• Up to 80 digits can be entered and
displayed.
• Enter a number from "0" to "99" to
view the Phonebook entry of the
corresponding memory number.→P97
• Start from the area code even for a
local call.
•
I
[Save]: Add a new or extra phone
number to the Phonebook.→P89 Phone number
entry screen
57
Voice/Videophone Calls
Continue on the next page
To make a voice call
A
or
C
[Call]
To make a videophone call
g
[V. phone]
A ringing tone sounds
from the earpiece, and the
"Calling..." dialing screen is
displayed until the other
party answers the call.
•
C
[Spk ON/Spk OFF]:
Switch Hands-free ON
and OFF.
• Pressing a dial key,
*
,
or
#
during a call
allows you to send touch-
tone signals. Voice call screen Videophone call
screen
b
During a video call
The following icons show the state of the settings on the
Voice call screen.
• / Display Hands-free ON/OFF State
• / Mute/Unmute→P59
• / Receiver volume→P74
b
During a videophone call
•
I
[Image/Camera]: Switch the image to send between the
substitute image and the camera image.
To terminate the call,
P
Note
• If you hear the voice guidance for the Caller ID request, make
the call again sending your caller ID.
• You cannot switch between a voice/videophone call during a
call using this FOMA terminal.
• Closing the FOMA terminal during a call terminates the call
when "Close setting" is set to "End the call", and holds the call
when set to "On Hold". However, if the Flat-plug Earphone/
Microphone with Switch (optional) is connected, closing the
FOMA terminal does not terminate the call or place the call on
hold.
• The low battery alert sounds from the earpiece if the battery
becomes low during a call. You can continue the call; however,
the call will be terminated momentarily and the power is
automatically turned off.
• This FOMA terminal does not support Hands-free devices via a
USB connection (such as In-Car Hands-Free Kit 01).
<Videophone>
• A call cannot be connected if you make a videophone call to a
mobile phone that does not support videophone calls, or if the
other party's mobile phone is out of service area or turned off.
If you make a videophone call to a phone that does not support
videophone calls when you have set "Auto redial as voice"
to "ON", the call will be disconnected before the connection
is established, and the FOMA terminal automatically redials
the number as a voice call. However, if the other party uses
an ISDN 64K connection, or ISDN videophone that does not
support the 3G-324M standard (as of June, 2009), or you
dialed a wrong number, the above action may not be taken.
Note that communication charges may apply.
• If you make a videophone call to an emergency number such as
"110", "119", or "118", a voice call will be made automatically.
• Incoming i-mode mail or MessageR/F during a videophone call is
stored at the i-mode center. SMS can be received even during a
videophone call.
• Digital call charge applies for sending the substitute image.
Continued on next page
58
Voice/Videophone Calls
Correcting an entered phone number
To delete an entered digit, use
J
to move the cursor to a digit
to delete, and press
Q
.
Screen display during dialing
The other party's name is displayed if the other party's phone
number is saved in the Phonebook.
If a videophone call could not be made
The following messages appear if a videophone call could not
be made (depending on the other party's mobile phone model or
subscribed network services, the displayed messages may not
describe the actual situation).
Message Description
Check number,
then redial The phone number is not valid.
Busy The other party is on a call (this message
may appear when the other party's
mobile phone is performing packet
communication depending on the mobile
phone).
The other party is in packet
communication.
Out of service
area/power off The other party's mobile phone is either
out of service area or turned off.
Set Caller ID to ON The caller ID was not sent (when the call
is made to the number for visualnet, etc.).
Your call is being
forwarded The call is being forwarded.
Redial using voice
call The Call forwarding service is activated,
and the forwarding destination does not
support videophone calls.
Upper limit has
been exceeded.
Connection failed
Your usage fees have exceeded the limit
of your plan (Type limit or Family Wide
limit).
Message Description
Please make your
call from i-mode The videophone call was not dialed
from the official i-mode site information
provider (when the call is made to V-live).
Failed to connect Set "Caller ID notification" to "Notify" and
redial.
• This message may appear for other
reasons, as well.
Phone Number Entry Screen Sub Menu
Phone number entry screen (P56) ▶
M
[Menu]
▶ Perform the following operations
[Add to phonebook]
Add an entry to the Phonebook.→P88
[Video phone call]
Make a videophone call.
[Caller ID]
Set whether to notify your caller ID when you make a call.→P66
[Int. call]
After selecting the country code to make a call, "009130010"
(WORLD CALL) and the country code are inserted at the beginning of
the phone number.→P67
[Select prefix]
Add prefix number at the beginning of the entered phone number.
This can be added only once.→P68
[Multi number]
If you subscribe to Multi Number, select the number to use when
making a call.→P401

59
Voice/Videophone Calls
Continue on the next page
[Chaku-moji]
Send Chaku-moji.→P65
Voice Call Screen Sub Menu
Voice call screen (P57) ▶
M
[Menu] ▶
Perform the following operations
[New call]
*1
Place the active call on hold, and dial another party.
[End active call]
Terminate the call.
[Hold]
Place the active call on hold. To cancel, press
A
or
C
[Active].
[Mute/Unmute]
Enable/Disable to mute your voice on the other party's mobile phone.
[Send my info]
Create i-mode mail with your number (Own number) entered in the
message text.→P138
[Search phonebook]
*2
Search for a Phonebook entry.→P92
*1 Not available if you do not subscribe to Call waiting service.
*2 Not available when the Phonebook is accessed. To use this
function, terminate applicable functions from the Task list
screen.→P350
Videophone Call Screen Sub Menu
Videophone call screen (P57) ▶
M
[Menu] ▶
Perform the following operations
[End call]
Terminate the call.
[Hold]
Place the active call on hold. To cancel, press
A
or
C
[Active].
If you press
I
[Image] to cancel the hold, the substitute image is
sent to the other party.
[Substitute image/Camera image]
Switch the image to send between the substitute image and the
camera image.
[Camera settings]
Configure the camera for videophone calls. Use
J
to select an icon,
and use
H
to select an item. After setting, press
M
[Close].
Zoom : Zoom the camera image (×1/×2).
Brightness : Adjust the brightness (High/Medium/Low) of the
camera image.
Night mode : Set this when using the camera in a dark place, etc.
[Videophone set]
Set the display and lighting for videophone calls. After setting, press
Q
to return to the Videophone call screen.
Display setting
Other - Me : Display the other party's image on the main window
and your image on the sub window.
Me - Other : Display your image on the main window and the other
party's image on the sub window.
Other only : Display only the other party's image.
Me only : Display only your image.
Light
Always ON : Always light up during a call.
Terminal setting : Use "Backlight" settings.→P110
Continued on next page
60
Voice/Videophone Calls
[Screen size]
Set the display size of the main window.
[Visual preference]
Set quality of the image sent to the other party.
Prefer img qual : The image with maximized image quality is
sent. This option is effective when there is little
motion.
Normal : Set standard quality and motion for the sent
image.
Prefer motion spd : Set priority to motion for the sent image.
This option is effective when there is a lot of
motions.
[Switch camera]
Switch the camera to send the image to the other party between the
Inner camera and the Outer camera.
[Search phonebook]
*
Search for a Phonebook entry.→P92
[Own number]
Display your phone number (Own number).
* Not available when the Phonebook is accessed. To use this
function, terminate applicable functions from the Task list
screen.→P350
Making a Call Using Redial/
Received Calls
Redial and the Received call logs can be used to make calls.
Also, the Recent calls (both sent and received) can be used
to make calls.
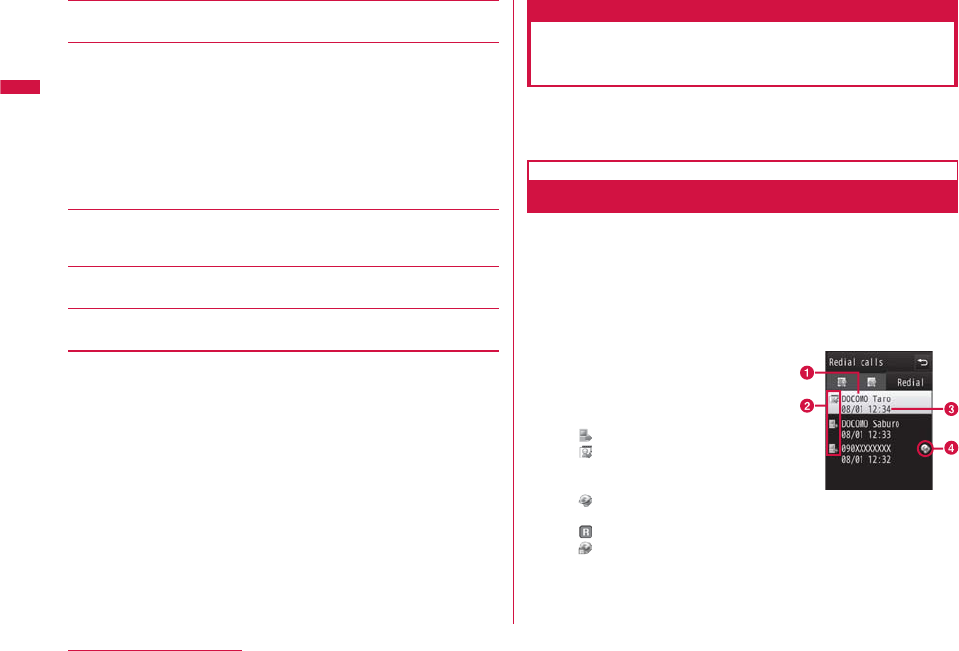
Redial calls
Calling the Same Party Again
Redial maintains a list of the last 30 voice or videophone
calls. The phone number and the calling date and time are
recorded in the call logs.
• If more than 30 calls are made, the log is deleted from the oldest.
• If you call the same phone number repeatedly, only the latest one
is recorded.
Stand-by display ▶
R
a
Name saved in the Phonebook
If the caller's name is not saved
in the Phonebook, the phone
number is displayed.
b
Outgoing phone call type
Make a voice call
Make a videophone call
c
Call date and time
d
Dialing an international call
Make a call overseas from
Japan Redial list screen
Make a call from overseas during international roaming
Make an international call from overseas during
international roaming
61
Voice/Videophone Calls
Continue on the next page
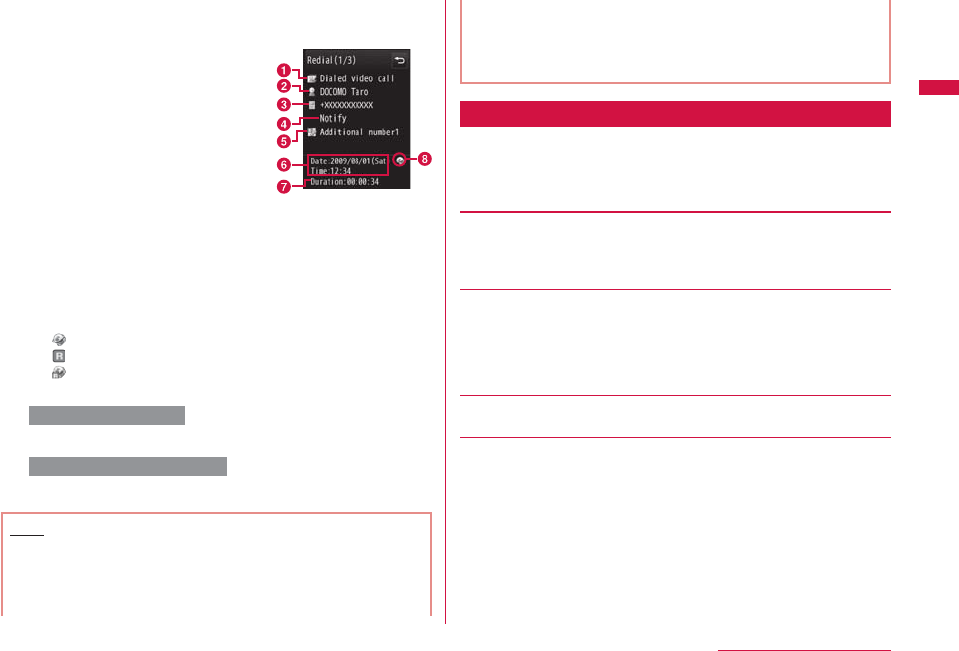
Move the cursor to the number to redial ▶
C
[Detail]
a
Outgoing phone call type
b
The name saved in the Phonebook
If the number is not saved in the
Phonebook, "Unregistered" is
displayed.
c
The other party's phone number
d
"Caller ID" setting when dialing
Appear when you make a call with
the caller ID (P58) set to "Notify".
e
Multi Number used for dialing
*
Display the Multi Number used
to dial by the registered name in
"Number setting" (P401).
* Appear when you subscribe to the
Multi Number service.
Redial detail
screen
f
Call date and time
g
Call duration
h
Outgoing international call
Make a call overseas from Japan
Make a call from overseas during international roaming
Make an international call from overseas during
international roaming
To make a voice call
A
or
C
[Call]
To make a videophone call
g
[V. phone]
Note
• You can make a voice call by selecting an entry on the Redial
list screen and pressing
A
, and make a videophone call by
pressing
g
[V. phone].
•
If the same phone number is saved repeatedly in the Phonebook,
the name found first in the Reading search is displayed.
• A call dialed with "184" or "186" is recorded as a separate
Redial entry.
• Press
I
[Mail] on the Redial list screen/Redial detail screen to
create i-mode mail to the phone number on the selected Redial
entry.
Redial List Screen/Redial Detail Screen Sub Menu
Redial list screen (P60)/Redial detail screen
(P61) ▶
M
[Menu] ▶ Perform the following
operations
[Call function]
Voice call : Make a voice call.
Videophone call : Make a videophone call.
Customize call : Change the redial phone number and make a call.
[Mail]
Compose mail : Create i-mode mail addressed to the redial phone
number.→P138
• If the mail address is saved in the Phonebook, the
saved mail address is used as a recipient.
Compose SMS : Create SMS addressed to the redial phone number.
[Add to phonebook]
Add the redial phone number to the Phonebook.→P88
[Change list]
*
Switch logs to display.
Recent mails : Display the Recent mail list screen.→P166
Recent calls : Display the Recent call list screen.→P64
Received mail : Display the Received mail list screen.→P166
Received calls : Display the Received call list screen.→P62
Sent mail : Display the Sent mail list screen.→P166
Continued on next page
62
Voice/Videophone Calls
[Delete]
Delete the selected redial log.
• Multiple redial logs can be deleted on the list screen.
Delete one* : Delete the selected redial log.
Selected* : Select and delete multiple logs.
▶ Mark logs to delete ▶
I
[Delete]
• Press M[SelAll/ClrAll] to select/clear all.
Delete all* : Delete all redial logs.
* Not displayed on the detail screen.
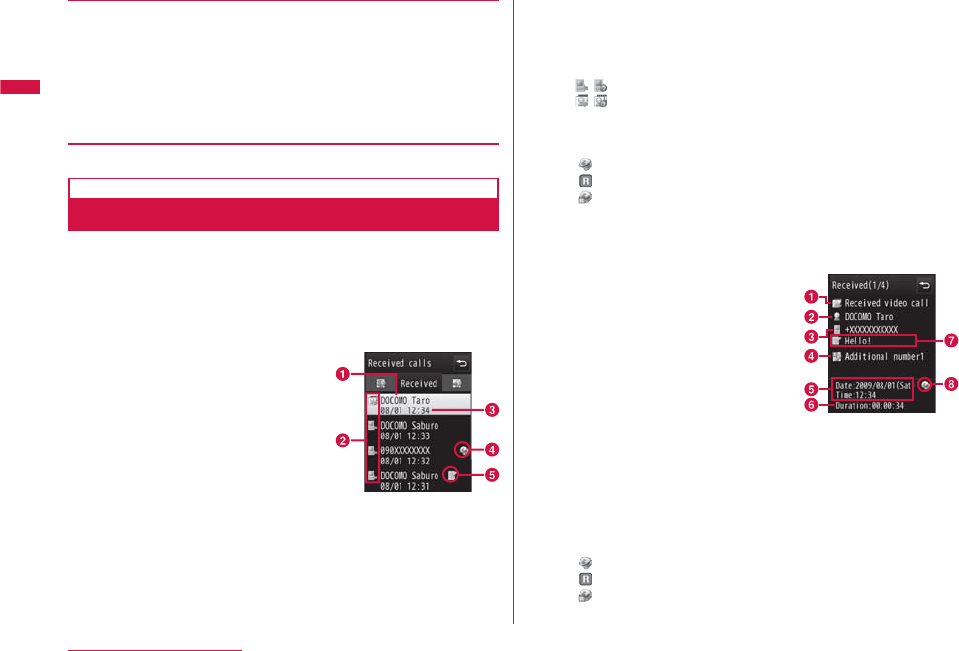
Received calls
Making a Call Using Received Calls
The Received call logs maintains a list of the last 30
incoming calls and videophone calls. Phone numbers and
received dates/times are stored in a call log.
• If more than 30 calls are received, the most recent 30 calls are
retained.
Stand-by display ▶
L
Received calls
list screen
a
The party's name saved in the Phonebook
If the caller's name is not saved, the phone number is
displayed. If the caller did not send the caller ID, the reason
for no caller ID is displayed.
b
Incoming phone call type
/ Answered/Missed voice call (including rejected calls)
/ Answered/Missed videophone call (including rejected
calls)
c
Received date and time
d
Incoming international call
Incoming international call from overseas
Incoming call during international roaming overseas
Incoming international call during international roaming
overseas
e
Received Chaku-moji
Move the cursor to a log entry ▶
C
[Detail]
a
Incoming phone call type
b
The name saved in the Phonebook
If the phone number is not in
the Phonebook, "Unregistered"
is displayed, and if the caller ID
was not received, "User unset" is
displayed.
c
The other party's phone number
d
Multi Number received
*
Display the received Multi Number
as the registered name in "Number
setting" (P401).
* Appear when you subscribe to the
Multi Number service.
Received calls
detail screen
e
Received date and time
f
Call duration/Ring time (Missed call)
g
Received message with Chaku-moji
h
Incoming international call
Incoming international call from overseas
Incoming call during international roaming overseas
Incoming international call during international roaming
overseas

63
Voice/Videophone Calls
Continue on the next page
To make a voice call
A
or
C
[Call]
To make a videophone call
g
[V. phone]
Note
• You can make a voice call by selecting an entry on the
Received calls list screen and pressing
A
, and make a
videophone call by pressing
g
[V. phone].
• The reason for no caller ID is displayed in the log entry of the
call without caller ID.→P129
• If the same phone number is saved repeatedly in the
Phonebook, the name found first in the Reading search is
displayed.
• A call log for the number that used dial-in service may be
displayed differently from the actual number.
• Press
I
[Mail] on the Received calls list/detail screen to
create i-mode mail to the phone number in the selected
received call log entry.
Received Calls List Screen/Received Calls Detail
Screen Sub Menu
Received calls list screen (P62)/Received
call detail screen (P62) ▶ M[Menu] ▶
Perform the following operations
[Call function]
Voice call : Make a voice call.
Videophone call : Make a videophone call.
Customize call : Change the phone number in Received calls and
make a call.
[Mail]
Compose mail : Create i-mode mail addressed to the phone number
in Received calls.→P138
• If the mail address is saved in Phonebook, the
saved mail address is used as a recipient.
Compose SMS : Crease SMS addressed to the phone number in
Received calls.
[Add to phonebook]
Add the phone number in Received calls to the Phonebook.→P88
[Change list]
*
Switch logs to display.
Recent mails : Display the Recent mail list screen.→P166
Recent calls : Display the Recent call list screen.→P64
Received mail : Display the Received mail list screen.→P166
Redial : Display the Redial list screen.→P60
Sent mail : Display the Sent mail list screen.→P166
Continued on next page
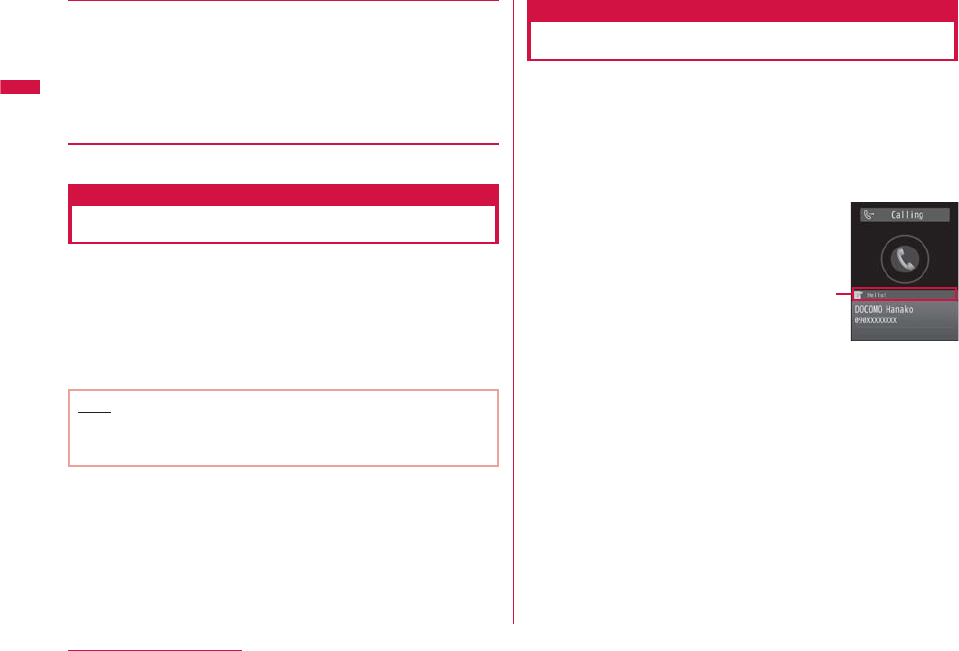
64
Voice/Videophone Calls
[Delete]
Delete the selected received call log.
• Multiple redial logs can be deleted on the list screen.
Delete one* : Delete the selected received call log.
Selected* : Select and delete multiple logs.
▶ Mark logs to delete ▶
I
[Delete]
• Press M[SelAll/ClrAll] to select/clear all.
Delete all* : Delete all received call logs.
* Not displayed on the detail screen.
Recent calls
Making a Call Using Recent Calls
Up to 60 incoming and outgoing calls can be recorded in
"Recent".
• If more than 60 calls are recorded, the most recent 60 calls are
retained.
Stand-by display ▶ Use
J
to display "Recent"
For further operations and the descriptions of screen components,
refer to Redial calls (P60) and Received calls (P62) sections.
Note
• The Recent call list screen/detail screen sub menu operations
are the same as the Redial and Received call list screen/detail
screen.→P61, P63
Chaku-moji
Using Chaku-moji
Send a message at the same time when making a voice or
videophone call to tell the other party the point to talk.
• Up to 10 full-pitch/half-pitch characters, pictographs and symbols
can be sent.
•
Charges apply on the sender side, and not apply on the receiver side.
• For details about Chaku-moji or its compatible model, visit the
DOCOMO's web site or see "Mobile Phone User's Guide [Network
Services]".
Chaku-moji
• While All lock is activated or Phonebook function is locked with
Data access lock, Chaku-moji is not displayed even if it is received.
After canceling the lock, the message is displayed on the Received
call detail screen.
65
Voice/Videophone Calls
Continue on the next page
Editing and Setting Message
Saving Message
• Up to 10 messages can be saved.
M
▶ "Settings" ▶ "NW Services" ▶
"Chaku-moji" ▶ "Create message"
Move the cursor to the number to save or edit
▶
I
[Edit] ▶ Enter or edit a message
• To delete the saved Chaku-moji, move the cursor to Chaku-moji
to delete ▶
M
[Menu] ▶ "Delete"/"Delete all" ▶ "Yes".
Setting whether to Display Received Chaku-moji
M
▶ "Settings" ▶ "NW Services" ▶
"Chaku-moji" ▶ "Message display set" ▶
Select an item
Display all messages : Display Chaku-moji from all senders.
Only number in PB : Display Chaku-moji only from senders
saved in the Phonebook.
Calls with caller ID : Display Chaku-moji only from senders
with caller ID.
Hide all messages : Do not display Chaku-moji.
Dialing with Message
Enter a phone number ▶
M
[Menu] ▶
"Chaku-moji" ▶ Perform the following
operations
• You can send Chaku-moji to the party saved on the Phonebook
by entering a memory number with Quick dial (P97) ▶
M
[Menu] ▶ "Chaku-moji".
[Create message]
Enter a message.
[Select message]
Select from saved messages.
[Sent message]
Select from sent messages. Up to latest 10 messages are saved.
A
or
C
[Call]
b
To make a videophone call
Press g[V. phone].
Continued on next page
66
Voice/Videophone Calls
Note
• When the recipient received Chaku-moji, "Transmission
completed" appears and transmission charge applies.
• Under the following conditions on the receiver side,
"Transmission failed" appears and transmission charge does
not apply.
- Chaku-moji incompatible terminal
- Chaku-moji restricting to be sent in Message display setting
- Staying overseas
*
- While Public mode (Drive mode) is set
*
- When the answer time of Record message is set to 0 sec
*
- Out of service area or the power is turned off
*
* The sent result does not appear.
• Depending on the signal conditions, the sent result may not
appear even when Chaku-moji arrived at the other party's
terminal. In this case, transmission charges apply.
• Chaku-moji cannot be sent/received for overseas usage.
184/186
Setting Caller ID to Send/
Not to Send for Each Call
There are 2 ways to show/hide the caller ID for each call:
adding "184"/"186", and using the sub menu on the Phone
number entry screen.
Adding 184/186 to Send/Not to Send
Caller ID
Enter "184" (Do not notify)/"186" (Notify) ▶
Enter the phone number
To make a voice call
A
To make a videophone call
g
[V. phone]
Using Sub Menu to Send/Not to Send
Caller ID
Example: To use the Phone number entry screen sub menu
Enter the phone number ▶
M
[Menu] ▶
"Caller ID" ▶ "Not notify"/"Notify"/"Cancel"
To make a voice call
A
or
C
[Call]
To make a videophone call
g
[V. phone]
Note
• You can set to show/hide the caller ID to the network in
advance.→P54
67
Voice/Videophone Calls
Continue on the next page
Pause
Sending Touch-tone Signals
Enter "P" and a number after the phone number and make a
voice call to send the number after "P" as touch tone signal
(DTMF). You can use this for services such as online ticket
reservation or bank balance inquiry.
• The signal may not be received depending on the device on the
receiving side.
Enter the phone number ▶ Press
*
3 times
and enter "P" ▶ Enter the number to send ▶
A
After the call is connected, the number after "P" is displayed and
press
A
to send the displayed number.
WORLD CALL
Making International Calls
WORLD CALL is an international call service available on
DOCOMO mobile phones.
If you subscribe to FOMA service, also subscribe "WORLD
CALL" together. (However a customer who subscribe to the
service without "WORLD CALL" is the exception.)
• This service is available in approximately 240 countries and regions
around the world.
• Charges for "WORLD CALL" are added to the monthly FOMA service
call charges.
• No initial fee nor fixed monthly charges apply.
• This service is not available with some billing plans.
• Even if the caller ID notification is set, the caller ID may not be
notified or phone number is not displayed correctly, depending on
the telecommunication carrier. In this case, you cannot make a call
from the Received calls screen.
• For details on WORLD CALL, contact "General Inquiries" at the back
of this manual.
• When using international carriers other than DOCOMO, please
contact the carrier directly.
You can make an "International videophone call" to parties who
use a videophone call-compatible terminal of an international
carrier that supports FOMA's videophone call by pressing
M
[Menu] ▶ "Video phone call" after the following dialing
procedures.
• For information on the countries where connection can be made
and telecommunication carriers, visit the DOCOMO International
Services website.
• The other party's image displayed on the FOMA terminal may
blur, or the call may not be connected depending on the other
party's terminal.
Making an International Call by Entering
the Phone Number
Enter a phone number in the following order.
Enter "010 - Country code - Area code (City
code) - Other party's phone number"
• If the Area code (City code) starts with "0", remove "0". (In a few
countries/regions such as Italy, "0" must not be removed).
• Alternatively, enter 009130 - 010 - Country code - Area code
(City code) - Other party's phone number.
A
b
To make an international videophone call
Press
g
[V. phone].
68
Voice/Videophone Calls
Making an International Call Using "+"
Entering "+" at the beginning of a phone number replaces "+"
with an international access code automatically.
• The WORLD CALL (009130010) is set to be added automatically
by default.→P69
Press
0
(for 1+ seconds) to enter "+" ▶
Enter "Country code - Area code (City code)
- Phone Number"
• You can also press
*
twice to input "+".
• If the Area code (City code) starts with "0", remove "0". (In a few
countries/regions such as Italy, "0" must not be removed).
A
Dial : Make an international call
after converting "+" into an
international access code.
Original number : Make an international call
to the number entered on
the terminal.
Cancel : Cancel dialing.
Dialed call
confirmation
screen
b
To make an international videophone call
Press
g
[V. phone].
Select a dialing method
Note
• This option is available only inside the FOMA network service
area.
• If the phone number starts with "+81", "+" will not be converted
into an international access code.
Making an International Call Adding
International Access Code
You can select an international access code from the sub
menu and add it to the entered phone number.
Enter "Country code - Area code (City code) -
Other party's phone number"
• If the Area code (City code) starts with "0", remove "0". (In a few
countries/regions such as Italy, "0" must not be removed.)
M
[Menu] ▶ "Select prefix" ▶ Select an
international access code
The selected international access code is inserted at the
beginning of the entered phone number.
A
b
To make an international videophone call
Press
g
[V. phone].
Note
• By default, WORLD CALL (009130010) is registered to
"Prefix 1".→P70
69
Voice/Videophone Calls
Continue on the next page
Making an International Call Easily
The International dial settings can be changed.
• Even if the caller ID notification is set, the caller ID may not be
notified or phone number is not displayed correctly, depending on
the telecommunication carrier. In this case, you cannot make a call
using the Received calls.
Setting to Add the International Access Code
Automatically <Auto assist>
You can set whether to add an international access code
automatically instead of "+" when you make a call by entering
"+" at the beginning of the phone number.
M
▶ "Settings" ▶ "International dial" ▶
"Auto assist" ▶ "Auto"/"OFF"
Auto : Convert "+" automatically to the number specified in
IDD prefix.
OFF : "+" is not converted.
Setting International Access Codes <IDD prefix>
When "Auto assist" is set to "Auto", specify the international
access code to be added automatically. Save 1 country code
required when you make an international call.
M
▶ "Settings" ▶ "International dial" ▶ "IDD
prefix" ▶ Perform the following operations
[IDD prefix name]
Enter IDD prefix name of International call used for Auto assist.
[IDD prefix code]
Enter IDD prefix code of International call used for Auto assist.
Setting to Add Assist of Country Code Automatically
<Auto international dial>
Set whether to automatically replace leading "0", if entered,
of a phone number with "+ Country code" during international
roaming. Also, you can specify the Country code to be added
automatically.
M
▶ "Settings" ▶ "International dial" ▶
"Auto Int'l dial" ▶ Perform the following
operations
Auto international
dial screen
[Auto Int'l dial]
Set whether to add a Country code automatically.
[Country code]
Set a Country code to add.
Continued on next page
70
Voice/Videophone Calls
Note
• Country code is not added automatically in the following cases.
- When entered "+" at the beginning of the phone number
- When selecting a phone number from a message body or site,
etc. and dialing
- When dialing from i-αppli
Registering a Country Code <Country code list>
Up to 50 Country codes required to make an international
call can be saved.
M
▶ "Settings" ▶ "International dial" ▶
"Country code list"
Country code list
screen
Select unregistered item ▶ Perform the
following operations
[Country name]
Save a name of the Country code. Up to 7 full-pitch or 14 half-pitch
characters can be entered.
[Country code]
Save up to 5 digits.
I
[Done]
• The newly saved Country code is displayed first, and the
already saved codes are displayed after the second entry.
Editing Country code
Select the Country code to edit on the Country code list screen
▶ "Edit" ▶
I
[Done].
Deleting Country code
Select the Country code to delete on the Country code list
screen ▶ "Delete" ▶ "Yes".
Note
• You can also edit the pre-installed Country codes.
• When "Auto Int'l dial" is set in "Auto Int'l dial" (P69), you cannot
delete the Country code specified in "Country code".
Prefix dial
Setting Prefix to Be Added to a
Phone Number
Up to 3 numbers (prefixes) to be added to the beginning
of the phone number such as an international access code,
"184", or "186" can be saved.
M
▶ "Settings" ▶ "Call/VT/Dialing" ▶
"Prefix dial"
Select a Prefix entry field ▶ Enter the number
▶
C
[Set]
• Up to 10 digits can be entered as a prefix.
71
Voice/Videophone Calls
Continue on the next page
Note
• Do not include pauses, etc. to the prefix. If they are present, the
call cannot be connected with prefix.
Sub address setting
Making a Call Specifying a Sub
Address
You can set whether digits after "
:
" is identified as a sub
address when entering a phone number with "
:
". A sub
address is used to access a specific device connected to an
ISDN line or to select contents on "V-live".
M
▶ "Settings" ▶ "Call/VT/Dialing" ▶
Move the cursor to "Sub address setting" ▶
C
[ON/OFF]
ON : Identify the address after "
:
" as a sub address.
OFF : The address after "
:
" is not identified as a sub address.
Note
• "
:
" is not identified as a delimiter of a sub address if:
- "
:
" is entered at the beginning of the phone number.
- A specific number such as "184" or "186" is entered at the
beginning of the phone number and "
:
" is entered right after it.
Reconnect alarm
Setting an Alarm until
Connection is Reestablished
You can set an alarm that keeps sounding until a voice
or videophone call is reconnected when the call was
disconnected due to weak signals.
M
▶ "Settings" ▶ "Call/VT/Dialing" ▶ "Call
feature" ▶ "Reconnect alarm" ▶ Select an
Alarm
Alarm OFF : Mute an alarm.
Low alarm : Set to low alarm.
High alarm : Set to high alarm.
Note
• Available duration for reconnection varies depending on the
status of usage and signal.
• If the signal suddenly worsens, the call may be disconnected
without the alarm sounding.
• The call charge applies during the reconnection attempt.
• While the call is disconnected, the other party hears nothing.
72
Voice/Videophone Calls
Noise reduction
Reducing Surrounding Noise to
Make Voice Clear
Noise reduction suppresses background noises. The other
party can hear your voice clearer even in a noisy place.
M
▶ "Settings" ▶ "Call/VT/Dialing" ▶ "Call
feature" ▶ Move the cursor to "Noise reduction"
▶
C
[ON/OFF]
ON : Activate Noise reduction.
OFF : Deactivate Noise reduction.
Receiving a Call/Videophone Call
An incoming call arrives
The ring tone sounds.
•
P
: Place the call on
hold.→P75
b
During a videophone
call
•
C
[Image]: Answer
the call using the
substitute image.
Videophone call
incoming call
screen
Voice call
incoming call
screen
A
Answer the call.
•
C
[Spk ON/Spk OFF]: Switch Hands-free ON and OFF.
• Press a dial key,
*
, or
#
during a call to send touch-tone
signals.
b
During a videophone call
•
I
[Image/Camera]: Switch the image to send between the
alternate image and the camera image.
To terminate the call,
P
When the caller sent the caller ID
If the caller is registered in the Phonebook, the phone number and
registered name are displayed.
When the caller did not send the caller ID
The reason for no caller ID is displayed instead of a phone
number.→P129
Note
• The incoming call actions such as a ring tone or vibration vary
depending on the settings or the saved information in the
Phonebook.→P84, P100, P102
• When "Manner mode" is activated, the ring tone does not sound.
However, if "Original manner" is activated, incoming call is
notified according to the settings.→P105
• Closing the FOMA terminal during a call terminates the call
when "Close setting" is set to "End the call", and holds the call
when it is set to "On hold". However, if the Flat-plug Earphone/
Microphone with Switch (optional) is connected, closing the
FOMA terminal does not terminate the call or place the call on
hold.
73
Voice/Videophone Calls
Continue on the next page
• If you subscribe to the Voice mail, Call waiting or Call forwarding
service, and set "Arrival call act" to "Answer" and "Set in-call
arrival act" to "Activate", in-call arrival tone sounds when a call
arrives during another call. If the tone sounds during a call, the
network services are available.→P400
However, the tone does not sound while a call is placed on
response hold, or a message is being recorded (P78) because
calls cannot arrive under these situations.
• When the Public mode (Drive mode) is activated, an incoming
call is not indicated (the ring tone does not sound, either).
Also, even if a call arrives when the display is turned off, the
display backlight will not be turned on.
• If you subscribe to Multi Number, the name registered in
"Number setting" (P401) appears according to the number
received.
• You can enable "Set mute ring(sec.)" to delay the incoming call
actions for a call made from the other party not saved in the
Phonebook or without the caller ID.→P130
• Use the following functions to reject incoming calls from a
caller not saved in the Phonebook or from a specific caller.
- Reject unknown→P130
- Reject on List→P127
• You cannot switch between a voice/videophone call during a
call using this FOMA terminal.
• The low battery alert sounds from the earpiece if the battery
becomes low during a call. You can continue the call; however,
the call will be terminated momentarily and the power is
automatically turned off.
• This FOMA terminal does not support Hands-free devices via a
USB connection (such as In-Car Hands-Free Kit 01).
• When "Answer mode" is set to "Open flip", you can answer a call
by opening the FOMA terminal. If set to "Any key answer", you
can answer a call by pressing a dial key,
*
, or
#
.→P74
<Videophone call>
• When the Voice mail service is activated with a videophone call,
an SMS notifies you of a new record message.
• Even if the Call forwarding service is activated, an incoming
videophone call is not forwarded if the forwarding destination
is not a videophone device supporting 3G-324M. Check the
capabilities of the forwarding destination device before setting
Call forwarding.
• Incoming i-mode mail or MessageR/F during a videophone call is
stored at the i-mode center. SMS can be received even during a
videophone call.
• You cannot receive videophone calls of the communication
speed of 32K (32kbps).
Incoming Call Screen Sub Menu
M
[Menu] on the Incoming call screen (P72) ▶
Perform the following operations
[Voice mail]
*1
Connect the incoming call to the Voice mail service center.
[Call rejection]
Reject an incoming call and hang up.
[Call forwarding]
*2
Forward an incoming call to the specified number.
[Silent]
Stop the ring tone or vibration.
Press
A
to answer the call.
*1 Not available if you do not subscribe to the Voice mail service.
*2 Not available if you do not subscribe to the Call forwarding
service or you have not specified a forwarding number.
74
Voice/Videophone Calls
Answer mode
Setting How to Answer Incoming
Voice Calls
You can set to answer an incoming call by opening the FOMA
terminal (Open flip) or pressing a dial key (Any key answer)
other than
A
or
C
[Answer].
M
▶ "Settings" ▶ "Call/VT/Dialing" ▶
"Incoming call" ▶ "Answer mode" ▶ Perform
the following operations
[Open flip]
Answer a call by opening the FOMA terminal.
[Any key answer]
Answer a call by pressing a dial key,
*
, or
#
in addition to
A
or
C
[Answer].
[Send key only]
Answer a call by pressing
A
or
C
[Answer].
Close setting
Ending/Holding Call by Closing
the FOMA Terminal
M
▶ "Settings" ▶ "Call/VT/Dialing" ▶ "Call
feature" ▶ "Close setting" ▶ Select a condition
when the terminal is closed
End the call : Terminate the call.
On hold : Place the active call on hold.
Mute :
Continue the call. The other party cannot hear
your voice.
Receiver volume
Adjusting Earpiece Volume
The receiver volume can be adjusted in 7 levels from 1 to 7.
Voice/Videophone call screen (P57) ▶
F
/
E
•
F
: Increase the volume.
•
E
: Decrease the volume.
Note
• The adjusted receiver volume will be retained even after the call.
• "Receiver volume" in "Volume" (P102) is also changed.
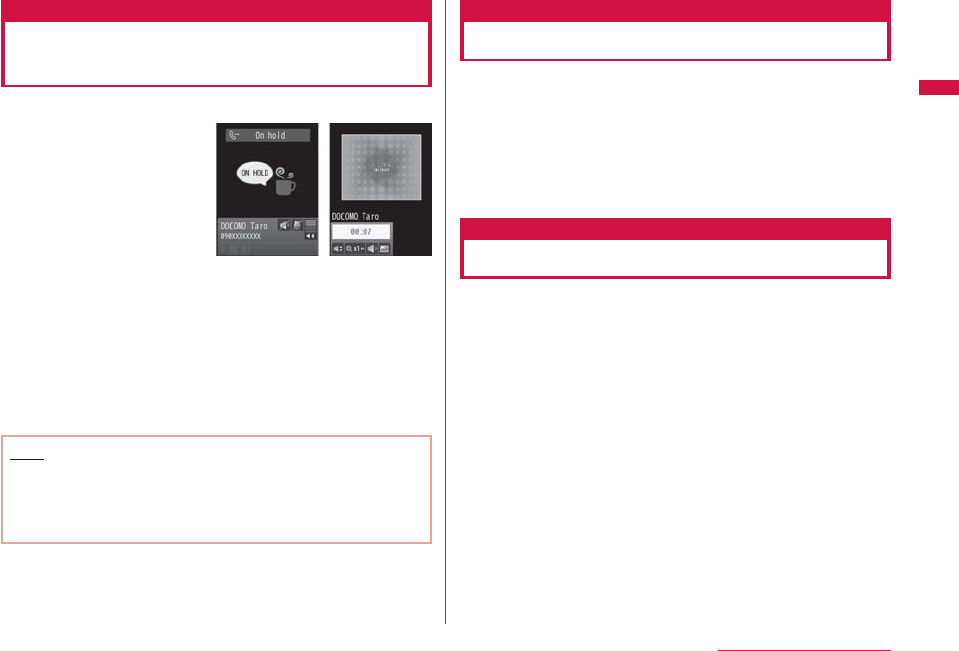
75
Voice/Videophone Calls
Continue on the next page
Holding
Putting a Call on Hold when You
Cannot Answer Immediately
Incoming call screen (P72) ▶
P
The tone set in "On hold
tone" (P75) is played. The
image set in "Response
hold image" (P80) appears
for videophone calls.
Videophone call
response hold
screen
Voice call
response hold
screen
When you can resume the call,
A
• You can also cancel the hold on a videophone call by pressing
C
[Answer]. If you press
I
[Image] to cancel the hold, the
alternate image will be sent to the other party.
b
To terminate a voice call/videophone call
Press
P
.
Note
• The other party is charged during a hold.
• If you subscribe to the Voice mail service/Call forwarding
service, you can connect the incoming call to the Voice mail
service center/forward the incoming call to the specified phone
number.→P392, P396
On hold tone
Setting Answer Holding Tone
You can select one of the 3 answer holding tones (guidance)
to play to the caller when you place the incoming call on hold.
M
▶ "Settings" ▶ "Call/VT/Dialing" ▶
"Incoming call" ▶ "On hold tone" ▶
"Hold tone 1"/"Hold tone 2"/"Hold tone 3"
•
I
[Play]: Play back the hold tone.
Holding tone
Setting Holding Tone
You can select one of the 3 holding tones to play to the caller
when you place the call on hold.
M
▶ "Settings" ▶ "Call/VT/Dialing" ▶
"Call feature" ▶ "Holding tone" ▶
"Hold tone 1"/"Hold tone 2"/"Hold tone 3"
•
I
[Play]: Play the hold tone.
76
Voice/Videophone Calls
Using Public Mode
Public mode is an automatic response service to assist in
observing manners in public locations.
• Public mode includes the following 2 types.
- Drive mode
- Power Off
• Voice mail service (*1), Call forwarding service (*1), and Caller ID
request service (*2) take priority over Public mode.
*1 For voice calls with the ring time set to other than "0 Sec." the
service is activated after the guidance for Public mode.
*2 If the other party sends the caller ID, Public mode is activated.
• Public mode is not activated for calls you reject using Nuisance call
blocking service.
Public mode (Drive mode)
Using Public Mode (Drive Mode)
The voice guidance is played to the caller indicating that
you cannot answer the call as you are driving or at a place
where you cannot talk (such as on a train, bus, or in a movie
theater), and the call is disconnected.
• You can set or cancel Public mode (Drive mode) only in Stand-by
(even when "圏外" is displayed).
• This option is not available during data communication.
*
(for 1+ seconds)
When a call arrives, the voice guidance is played in Japanese
saying that "The person you are calling is currently driving or in
the area where mobile phones should not be used. Please call
again later".
When activating Public mode (Drive mode)
When a call arrives to your FOMA terminal, the ring tone does
not sound. appears on the Stand-by display, and the call is
recorded in the Received call log.
The voice guidance indicating that you are driving or you are at
a location where you cannot use mobile phones is played to the
caller, and the call is disconnected.
Deactivating Public mode (Drive mode)
Press
*
(for 1+ seconds) in Stand-by.
Note
• appears at the top of the screen when Public mode (Drive
mode) is activated.
• Even when Public mode (Drive mode) is activated, you can make
calls as usual.
• If Manner mode is activated concurrently, Public mode (Drive
mode) settings take precedence.
• Tones other than from operations (ring tones or alarms, etc.) do
not sound when Public mode (Drive mode) is activated.
• If mail arrives when Public mode (Drive mode) is activated,
incoming mail actions such as sounding the ring tone, or
vibrating the FOMA terminal will not take place.
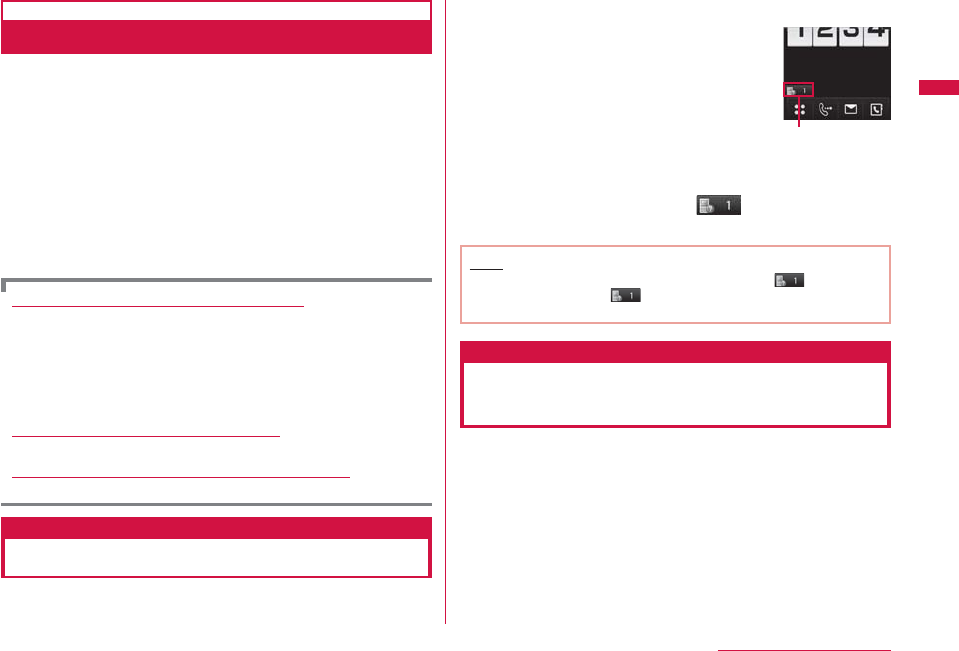
77
Voice/Videophone Calls
Continue on the next page
Public mode (Power OFF)
Using Public Mode (Power OFF)
When a call arrives while the power is turned off, the voice
guidance is played to the caller indicating that you are at a
place where mobile phones must be turned off (such as in
hospitals, in aircraft, or near priority seats on a train) and
cannot answer the call, and the call is disconnected.
Enter "
:
25251" ▶
A
Public mode (Power OFF) is activated (there is no change for the
Stand-by display).
After Public mode (Power OFF) is activated, when a call arrives
while the power is turned off, the voice guidance is played in
Japanese saying that "The person you are calling is currently
in the area where mobile phone use is prohibited and cannot
answer the call. Please call again later".
When activating Public mode (Power OFF)
Public mode (Power OFF) is activated until it is deactivated by dialing
":25250". Turning the power on does not deactivate the mode.
Public mode (Power OFF) voice guidance is played even when
you are out of service area or in a place with weak signals. The
voice guidance indicating that you are at a location where you
must turn the terminal off is played to the caller, and the call is
disconnected.
Deactivating Public mode (Power OFF)
Enter "
:
25250" and press
A
.
Checking the status of Public mode (Power OFF)
Enter "
:
25259" and press
A
.
Missed call
Checking Missed Calls
If you could not answer a call, the Missed call notification
screen appears on the Stand-by display. The Received calls
list screen can be accessed from the icon to check the caller.
An incoming call terminates
The Missed call icon appears on the Stand-by
display. The number of the icon indicates
number of missed calls.
Missed call icon
(The number
indicates the
number of calls)
C
▶ Use
K
to select
The Received calls list screen (P62) appears.
Note
• After displaying the Received calls list screen, disappears.
You can also select and press
Q
for 1+ seconds to
clear the icon.
Record message
Recording Voice Messages when
You Cannot Answer the Call
When Record message is activated and if you cannot answer
a voice call, the voice guidance is played and the caller's
message is recorded.
• Up to 5 messages and approximately 15 seconds per message
can be recorded.
• Record message does not start when a videophone call arrives. The
FOMA terminal answers the call in the normal way.
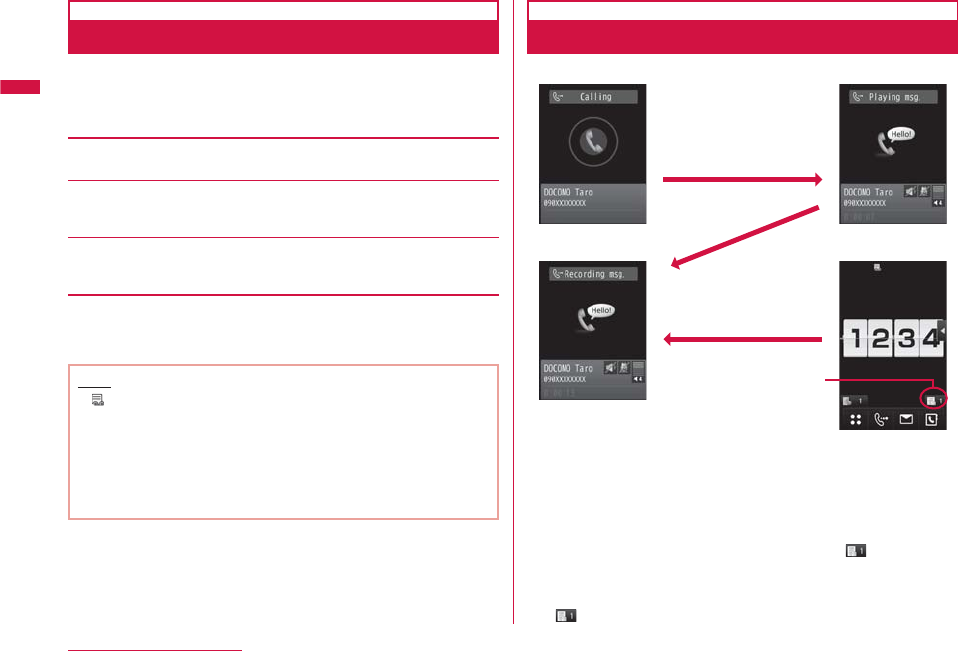
78
Voice/Videophone Calls
Setting Record Message
M
▶ "Media" ▶ "Record message" ▶
"Record msg. setting" ▶ Perform the following
operations
[Activate record msg.]
When activate Record message, set to "ON".
[To answer]
*
Enter the time after a call arrives and before Record message starts
between 0 and 120 seconds.
[Answer message]
*
Select an answer message.
•
I
[Play]: Check the answer message.
* Available when "Activate record msg." is set to "ON".
I
[Done]
Note
• appears at the top of the screen when the Record message
is activated.
<To answer>
• If the set response time is longer than the ring time set for the
Voice mail/Call forwarding services, a network service takes
precedence.
•
If the response time is set shorter than the time set in "Set mute
ring(sec.)" (P130), Record message starts without ringing.
When Record Message is Activated
When a voice call arrives, the caller's voice is recorded.
Recording a
message Stand-by display
appears
The set time
has elapsed
Recorded
A new Record message
icon appears
(The number indicates
the number of calls)
A call arriving Playing a
response message
■ To talk with the caller while the response message is
played or a message is being recorded
Press
A
or
C
[Active].
■ To play a recorded message
In Stand-by, press
C
▶ use
K
to select or press
E
for 1+ seconds to display the Record message list screen
(P79).
• Press
C
[Play] to play a recorded message.
• will disappear after the recorded message is deleted.

79
Voice/Videophone Calls
Continue on the next page
Note
• "Record message" is disabled when "圏外" is displayed, the
power is turned off or Public mode (Drive mode) is activated.
• If a call arrives when the response message is being played or
when a message is being recorded in Record message, the call
is rejected.
Quick Record Message
Recording a Message when You
Cannot Answer Incoming Call
Even when Record message is disabled, you can record the
caller's message with easy operation.
Incoming call screen (P72) ▶
E
(for 1+seconds)
Caller's voice will be recorded after streaming a guidance.
Note
• If 5 messages are already recorded, Record message will not
start and the caller's message cannot be recorded.
Play/Delete record message
Playing/Deleting Record
Message
M
▶ "Media" ▶ "Record message" ▶
"Record msg. list"
•
I
[Delete]: Delete the selected recorded
message.
b
To delete all recorded messages
On the Record message list screen,
press
M
[Menu] ▶ "Delete all".
Record msg. list
screen
Move the cursor to the recorded message ▶
C
[Play]
The recorded message is played.
•
C
[Stop]: Stop playing the message.
•
Q
: Return to the Record message list screen.
• Use
H
/
F
/
E
to adjust the volume.
80
Voice/Videophone Calls
Setting Image to Send
Substitute image
Setting Substitute Image
M
▶ "Settings" ▶ "Call/VT/Dialing" ▶
"Videophone" ▶ "Substitute image" ▶ "Default"/
"Select image"
• When "Select image" is selected, select from the images saved
in "My picture" of "Data Box".→P296
Response hold image
Setting Response Hold Image
M
▶ "Settings" ▶ "Call/VT/Dialing" ▶
"Videophone" ▶ "Response hold image" ▶
"Default"/"Select image"
• When "Select image" is selected, select from the images saved
in "My picture" of "Data Box".→P296
Holding image
Setting Holding Image
M
▶ "Settings" ▶ "Call/VT/Dialing" ▶
"Videophone" ▶ "Holding image" ▶ "Default"/
"Select image"
• When "Select image" is selected, select from the images saved
in "My picture" of "Data Box".→P296
Videophone set
Changing Videophone Settings
M
▶ "Settings" ▶ "Call/VT/Dialing" ▶
"Videophone" ▶ "Videophone set" ▶ Perform
the following operations
[Display setting]
Set images to be displayed on the main window and sub window for
videophone calls.
Other - Me : The other party's image is displayed on the main
window, and your image on the sub window.
Me - Other : Your image is displayed on the main window, and the
other party's image on the sub window.
Other only : Display only the other party's image.
Me only : Display only your image.
[Send camera image]
Set whether to send your image to the other party. When "OFF" is
set, the other party receives the substitute image.
[Screen size]
Set the display size of the main window.
81
Voice/Videophone Calls
Continue on the next page
[Visual preference]
Set quality of the image sent to the other party.
Prefer img qual : Send image with maximized image quality. This
option is effective when there is little motion.
Normal : Set standard quality and motion for the sent
image.
Prefer motion spd : Set priority to motion for the sent image.
This option is effective when there is a lot of
motions.
[Light]
Set light setting for the screen during a call.
Always ON : Always light up on during a call.
Terminal setting : Use "Backlight" settings.→P110
[Auto redial as voice]
Set whether to automatically redial with voice call if the mobile phone
of the other party does not support videophone call.
[Hand-free switch]
Set whether to use Hands-free during a videophone call.
[V-phone while packet]
Set the answer method when a videophone call arrives during i-mode
connection.→P81
V-phone while packet
Setting Answer Method of
Videophone Call during i-mode
When a videophone call arrives while connecting to i-mode
or sending/receiving mails, the setting of this function is
applied.
M
▶ "Settings" ▶ "Call/VT/Dialing" ▶
"Videophone" ▶ "Videophone set" ▶
"V-phone while packet" ▶ Select an item
V-phone priority : The videophone incoming call
screen appears. When answering
the call, i-mode communication is
disconnected.
Packet download priority : Reject an incoming videophone call.
V-phone answerphone : Connect to the Voice mail service
automatically.
Call forwarding : Connect to the Call forwarding
service automatically.
Note
• If you do not subscribe to the Voice mail or Call forwarding
service, "Packet download priority" setting is applied even if
"V-phone answerphone" or "Call forwarding" is set.


83
Phonebook
Phonebook Available for the FOMA Terminal ・・・・・・・ 84
Adding Entries to the FOMA Terminal Phonebook
・・・ 84
Adding Entries to UIM (FOMA Card) Phonebook ・・・・ 87
Adding Phonebook Entries from Redial/Received
Calls etc. ・・・・・・・・・・・・・・・・・・・・・・・・・・・・・・・・・・・・・・・・・・・・ 88
Changing a Group Name ・・・・・・・・・・・・・・・・・・・・・・・・・・・・ 89
Making a Call from Phonebook
・・・ Search phonebook 91
Editing Phonebook Entries ・・・・・・・・・・・・・・・・・・・・・・・・・・ 96
Deleting Phonebook Entries ・・・・・・・・・・・・・・・・・・・・・・・・ 96
Checking Phonebook Storage Status
・・・・・・・・・・・・・・・・・・・・・・・・・・・・・・・・・・・・No. of phonebook 97
Setting Phonebook ・・・・・・・・・・・・・・・・・・・・・・・・・・・・・・・・・・ 97
Making a Call with a Few Key Operation
・・・・・・・・・・・・・・・・・・・・・・・・・・・・・・・・・・・・・・・・・・・・Quick dial 97
Displaying Call/Mail History・・・・・・・・・・・・・・・・・・・・・・・・・ 98
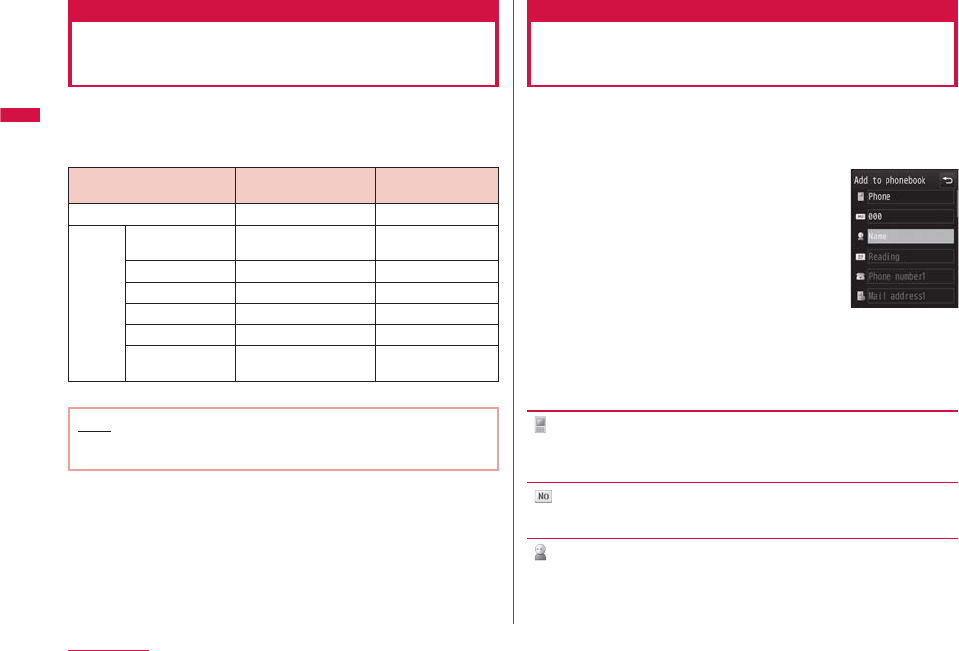
84
Phonebook
Phonebook Available for the
FOMA Terminal
The FOMA terminal contains 2 types of Phonebooks: The
Phonebook saved on the FOMA terminal and the UIM
Phonebook saved on the UIM. The following items can be
saved/set for each Phonebook.
Item FOMA terminal
Phonebook UIM Phonebook
Number of entries Up to 1,000 entries
*
Up to 50 entries
Entry
details Name
(Reading) 1 entry 1 entry
Phone number 5 entries 1 entry
Mail Address 3 entries 1 entry
Group 31 groups 11 groups
Image 1 entry None
Other settings Secret code, Ring
tone, Mail tone, etc. None
* Depending on the saved details, 1,000 entries may not be saved.
Note
• If you insert your UIM into another FOMA terminal, you can use
your Phonebook data on the UIM.
Adding Entries to the FOMA
Terminal Phonebook
• Note that the service counter such as the docomo Shop may not
be able to copy Phonebook data from your existing FOMA terminal
to the new one, depending on the specifications.
Stand-by display ▶
D
(for 1+ seconds)
Add to phonebook
screen
(FOMA terminal)
Perform the following operations
[ (Save to)]
Select the save location. This section explains the case where
"Phone" is selected as the save location. When "UIM" is selected as
the save location, the Add to UIM Phonebook screen appears.→P87
[ (Memory No.)]
The smallest un-assigned number is allocated automatically. You can
also change it to your favorite number from 000 to 999 manually.
[ Name]
Enter up to 16 full-pitch or 32 half-pitch characters. Enter with
Kanji, Hiragana, pictographs, symbols, alphanumeric characters, or
Katakana, etc.
85
Phonebook
Continue on the next page
[ Reading]
Enter or edit as required. Enter up to 32 half-pitch characters.
Enter with Katakana, alphanumeric characters, or symbols.
[ Phone number]
Enter up to 26 digits.
▶ Enter a phone number ▶ Select an icon
• On the Phone number entry screen, you can press
M
[Menu] to
select "Int. call", "Select prefix", or "Cancel". Press
I
[Cancel] to
cancel the entry.
[ Mail address]
Enter up to 50 half-pitch characters. Enter with alphanumeric
characters or symbols.
▶ Enter a mail address ▶ Select an icon
[ Secret code]
*1
Set the secret code.
▶ Enter the Terminal security code ▶ Select an icon for the phone
number/mail address ▶ Enter the secret code
• On the Secret code screen, press
C
[Release] to cancel the
setting.
[ (Select a group)]
Select one from "No group" or "グループ1 (Group 1)" to "グループ30
(Group 30)". Groups can be used for the Group search (P92), etc.
[ Image]
*3
Set an image or i-motion to be displayed when making/receiving calls
or when checking a Phonebook entry.
My picture : Select an image saved in "My picture" of "Data
Box".→P296
i-motion : Select a moving picture/i-motion saved in
"i-motion" of "Data Box".→P307
Take picture : Activate the camera, and set the captured still
image.→P222
Terminal setting
*2
: Use "Call & Mail image" settings.→P109
[ Ringtone]
*3
Select a ring tone for incoming voice/videophone call from the caller
saved in the Phonebook.
Music : Select a Chaku-Uta Full
®
song saved in "Music"
of "Data Box".→P270
Go to Step 3 in "Setting a Chaku-Uta Full
®
Song
as a Ring Tone" (P266).
Melody : Select a melody saved in "Melody" of "Data Box".
→P314
i-motion : Select a moving picture/i-motion saved in
"i-motion" of "Data Box".→P307
Terminal setting
*2
: Use "Select ring tone" settings.→P100
[ Mail image]
*3
Select an image or i-motion to be displayed when a mail arrives.
• Available items are the same as for " Image".
[ Mail ringtone]
*3
Select a ring tone for incoming mail from the sender saved in the
Phonebook.
• Available items are the same as for " Ringtone".
[ URL]
Enter up to 256 half-pitch characters.
[ Zip code]
Enter up to 7 half-pitch characters.
[ Home address]
Enter up to 100 full-pitch or 200 half-pitch characters. Enter with
Kanji, Hiragana, pictographs, symbols, alphanumeric characters, or
Katakana, etc.
[ Company name]
Enter up to 50 full-pitch or 100 half-pitch characters. Enter with
Kanji, Hiragana, pictographs, symbols, alphanumeric characters, or
Katakana, etc.
Continued on next page
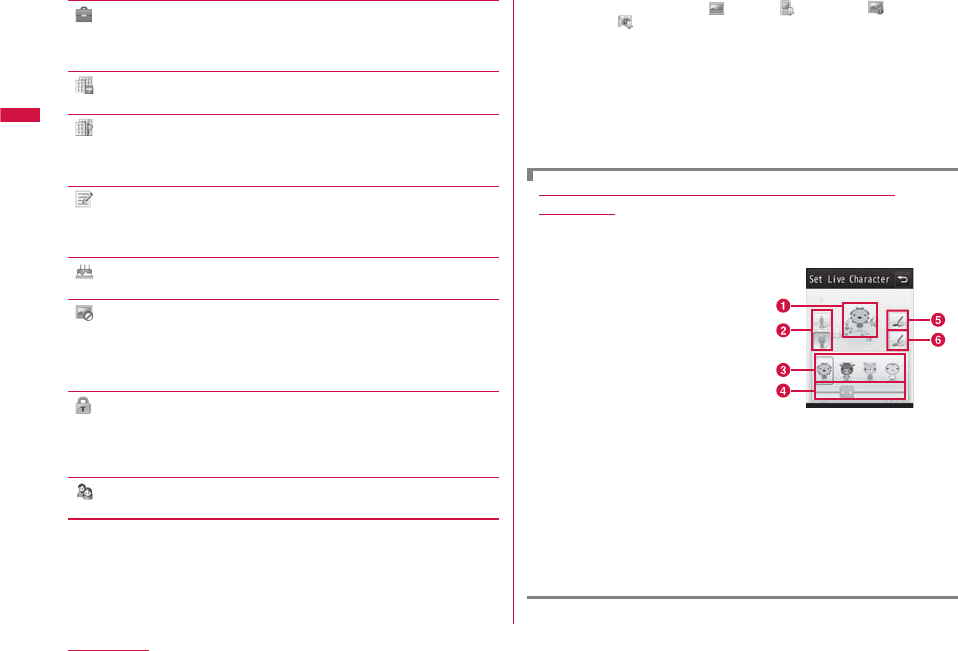
86
Phonebook
[ Job title]
Enter up to 50 full-pitch or 100 half-pitch characters. Enter with
Kanji, Hiragana, pictographs, symbols, alphanumeric characters, or
Katakana, etc.
[ Co. zip code]
Enter up to 7 half-pitch characters.
[ Co. address]
Enter up to 100 full-pitch or 200 half-pitch characters. Enter with
Kanji, Hiragana, pictographs, symbols, alphanumeric characters, or
Katakana, etc.
[ Memo]
Enter up to 100 full-pitch or 200 half-pitch characters. Enter with
Kanji, Hiragana, pictographs, symbols, alphanumeric characters, or
Katakana, etc.
[ Birthday]
Enter birthday.
[ Substitute image]
Set the substitute image for a videophone call.
Data box : Select an image saved in "My picture" of
"Data Box".→P296
Terminal setting : Use "Substitute image" settings.→P80
[ Secret]
This option appears when "Secret mode" (P127) is set to "Secret
mode".
Select "ON" if you save the Phonebook entry to be created as secret
data.
[ (Select Live Character)]
Select a Live Character used in Live Character Park.→P86
*1 For details about the Secret code, see "Mobile Phone User's
Guide [i-mode] FOMA version".
*2 If you change any one of " Image", " Ringtone", " Mail
image", or " Mail ringtone" of the Phonebook while a moving
picture/i-motion with video/sound is set for "Select ring tone"
(P100) and "Call & Mail image" (P109), the default sound or
image is set to "Image" or "Ringtone" that is not changed.
*3 If you set a moving picture/i-motion with video/sound either for
the image or ring tone, the same moving picture/i-motion is set
for the other item automatically.
I
[Done]
Changing Live Character of the entry saved on the
Phonebook
• To select a character type displayed in Live Character Park, set
in "Setting Live Character Park Theme"→P338
• Only touch operation is available.
* The screenshot is an example
when the character type is set to
"Animal".
a
Selected Live Character
b
Character type
Change a character type to set.
c
Live Character list
d
Scroll bar
Slide to scroll the Live Character list display.
e
Change color to the one displayed on the Live Character list
Restore the changed color of Live Character.
f
Change color
Change the color of the clothes (or hair) of the selected Live
Character in random order each time this item is touched.
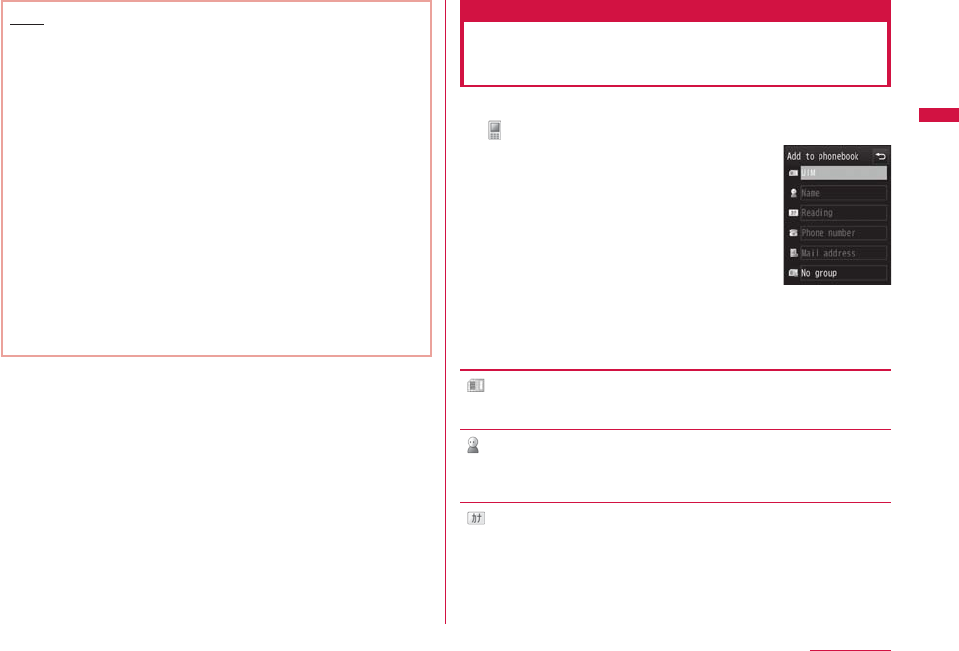
87
Phonebook
Continue on the next page
Note
<Secret code>
• If the mail address is saved to the Phonebook in the format of
"Phone number + secret code@docomo.ne.jp", you may not send
mail or reply to that contact. Change the mail address format
to "Phone number@docomo.ne.jp" first, then register the Secret
code.
<Secret>
• When "Secret mode" (P127) is set to "Secret data only", the
Phonebook entry is saved as secret data.
• The secret entry is displayed only when "Secret mode" is set to
"Secret mode" or "Secret data only".
• Secret entries cannot be saved to the UIM Phonebook.
• The names saved in the secret entries are displayed in the
Redial log, history, or mail list/detail screen only when "Secret
mode" is set to "Secret mode" or "Secret data only". The phone
numbers and mail addresses are displayed when "Secret mode"
is set to "OFF".
• When "Secret mode" is set to "OFF" and you receive a call or
mail from the secret contact, the name or image saved to the
Phonebook is not displayed and the set ring tone does not
sound.
Adding Entries to UIM
(FOMA Card) Phonebook
Add to phonebook screen (P84) ▶
(Save to) field ▶ "UIM"
Add to phonebook
screen (UIM)
Perform the following operations
[ (Save to)]
Select the save location. When "Phone" is selected as the save
location, the FOMA terminal Phonebook entry screen appears.→P87
[ Name]
Enter up to 10 full-pitch or 21 half-pitch characters. Enter with
Kanji, Hiragana, pictographs, symbols, alphanumeric characters, or
Katakana, etc.
[ Reading]
Enter or edit as required. Enter up to 12 full-pitch or 25 half-pitch
characters. Enter with full-pitch Katakana, half-pitch alphanumeric
characters, or half-pitch symbols.
Continued on next page
88
Phonebook
[ Phone number]
For a green/white UIM, up to 26 digits can be entered. For a blue
UIM, up to 20 digits can be entered.
• On the Phone number entry screen, you can press
M
[Menu] to
select "Int. call", "Select prefix", or "Cancel". To cancel the entry,
press
I
[Cancel].
[ Mail address]
Enter up to 50 half-pitch characters. Enter with alphanumeric
characters or symbols.
[ (Select a group)]
Select one from "No group" or "グループ1 (Group 1)" to "グループ10
(Group 10)". Groups can be used for the Group search (P92).
I
[Done]
Adding Phonebook Entries from
Redial/Received Calls etc.
You can save entries to the Phonebook from the list or detail
screen of the call history, mail, or message that contains a
phone number or mail address records. You can also save a
currently entered/displayed phone number, etc. on the Phone
number entry screen or site, etc.
Display the screen containing items to save
b
To save phone numbers from the Redial list screen
(P60)/Redial detail screen (P61)/Received calls list
screen (P62)/Received calls detail screen (P62)
Press
M
[Menu] ▶ "Add to phonebook".
• To save phone numbers from the Redial list screen/
Received calls list screen, select the target number first.
• If the phone number is already saved in the Phonebook, "Add
to phonebook" is not available.
b
To save phone numbers from the Phone number entry
screen
Press
I
[Save].
b
To save a sender or recipient mail address
On the Mail detail screen, press
M
[Menu] ▶ "Save" ▶
"Address".
• If there are several mail addresses, select the one to save
first.
b
To save addresses/phone numbers included in the
body text in a mail
Move the cursor to the address/phone number to save
to the Phonebook ▶
M
[Menu] ▶ "Save" ▶ "No./addr.
in body".
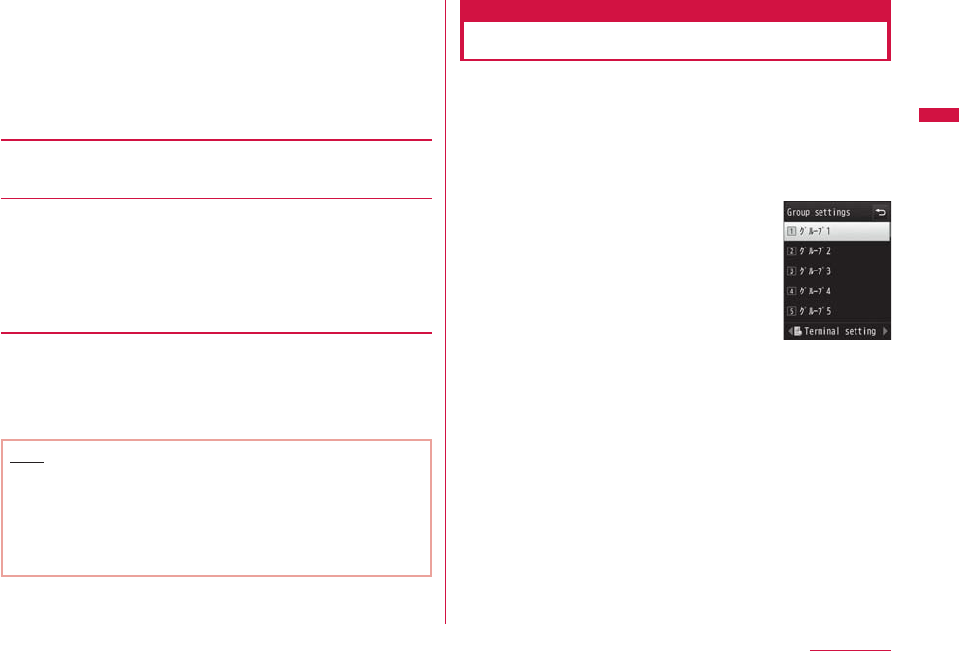
89
Phonebook
Continue on the next page
b
To save addresses/phone numbers displayed on a
site/Screen memo
Move the cursor to the address/phone number to save
to the Phonebook ▶
M
[Menu] ▶ "Add to Phonebook"
▶ "Yes".
Perform the following operations
[New registration]
Add a new entry to the Phonebook. Go to Step 3.
• The Add to phonebook screen appears with the new entry entered.
[Add registration]
Save additional items to the saved entry. Press
T
[Srch by]
on the
Phonebook entry screen to change the Phonebook search mode.→P92
▶ Select a Phonebook entry to which the item is to be added
• The Add to phonebook screen appears with the item added.
• If you add an item to the UIM Phonebook, the Add to phonebook
screen appears with the items overwritten when the above step is
performed.
Modify/save the Phonebook entry ▶
I
[Done]
• For saving procedure, refer to Step 2 in "Adding Entries to the
FOMA Terminal Phonebook" (P84).
• When saving additional data to an entry, the confirmation
whether to overwrite appears. Select "Yes" to overwrite.
Note
•
The data can also be saved to the Phonebook from the Scanned
data screen with the bar code reader or Live Character Park
screen.→P235, P337
• If you attempt to save characters longer than the maximum
number of characters allowed, a warning screen notifying of the
problem appears, then, the truncated string will be displayed on
the Add to phonebook screen.
Changing a Group Name
You can group the entries on the FOMA terminal Phonebook
and the UIM Phonebook. Up to 31 groups can be saved on
the FOMA terminal Phonebook, and up to 11 groups can be
saved on the UIM Phonebook (including "No group").
• "No group" cannot be edited.
• Only a name can be edited on the UIM Phonebook.
M
▶ "Phonebook" ▶ "Group settings"
•
g
[Phone/UIM]: Switch between the
FOMA terminal and the UIM group setting
list screens.
•
J
: View the settings of the selected
group.
Group setting list
screen
Continued on next page
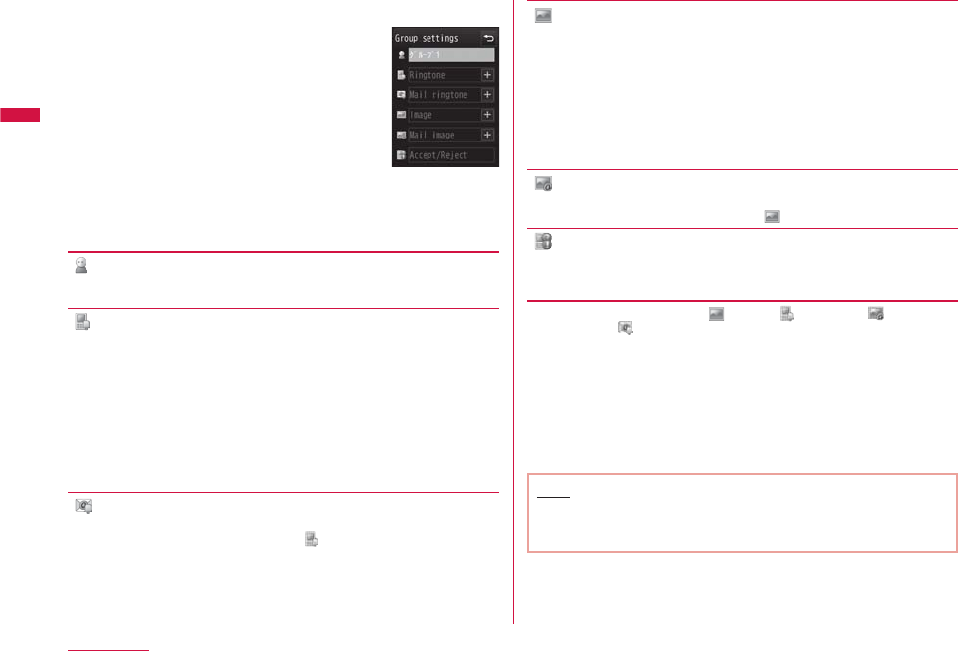
90
Phonebook
Move the cursor to the target group
▶
C
[Set]
Group settings
screen
Perform the following operations
[ (Group name)]
Enter up to 10 full-pitch or 21 half-pitch characters. Enter with Kanji,
Hiragana, pictographs, symbols, or Katakana, etc.
[ Ringtone]
*2
Set the ring tone for a call.
Music : Select a Chaku-Uta Full
®
song saved in "Music"
of "Data Box".→P270
Go to Step 3 in "Setting a Chaku-Uta Full
®
Song
as a Ring Tone" (P266).
Melody : Select a melody saved in "Melody" of "Data Box".
→P314
i-motion : Select a moving picture/i-motion saved in
"i-motion" of "Data Box".→P307
Terminal setting
*1
: Use "Select ring tone" settings.→P100
[ Mail ringtone]
Set the ring tone for incoming mail.
• Available items are the same as for " Ringtone".
[ Image]
*2
Add an image to a group. The image is displayed when making/
receiving calls or checking Phonebook data.
My picture : Select an image saved in "My picture" of "Data
Box".→P296
i-motion : Select a moving picture/i-motion saved in
"i-motion" of "Data Box".→P307
Take picture : Activate the camera and set the captured
image. →P222
Terminal setting
*1
: Use "Call & Mail image" settings.→P109
[ Mail image]
Select an image or i-motion to be displayed when a mail arrives.
• Available items are the same as for " Image".
[ Accept/Reject]
Set whether to accept/reject calls for groups.
▶ Enter the Terminal security code ▶ "Not set"/"Reject call"/
"Accept call"
*1 If you change any one of " Image", " Ringtone", " Mail
image", or " Mail ringtone" of the Phonebook while a moving
picture/i-motion with video/sound is set for "Select ring tone"
(P100) and "Call & Mail image" (P109), the default sound or
image is set to "Image" or "Ringtone" that is not changed.
*2 If you set a moving picture/i-motion with video/sound either for
the image or ring tone, the same moving picture/i-motion is set
for the other item automatically.
I
[Done]
Note
<Accept/Reject>
• The setting in "Accept/Reject call" (P95) in the Phonebook
takes priority.
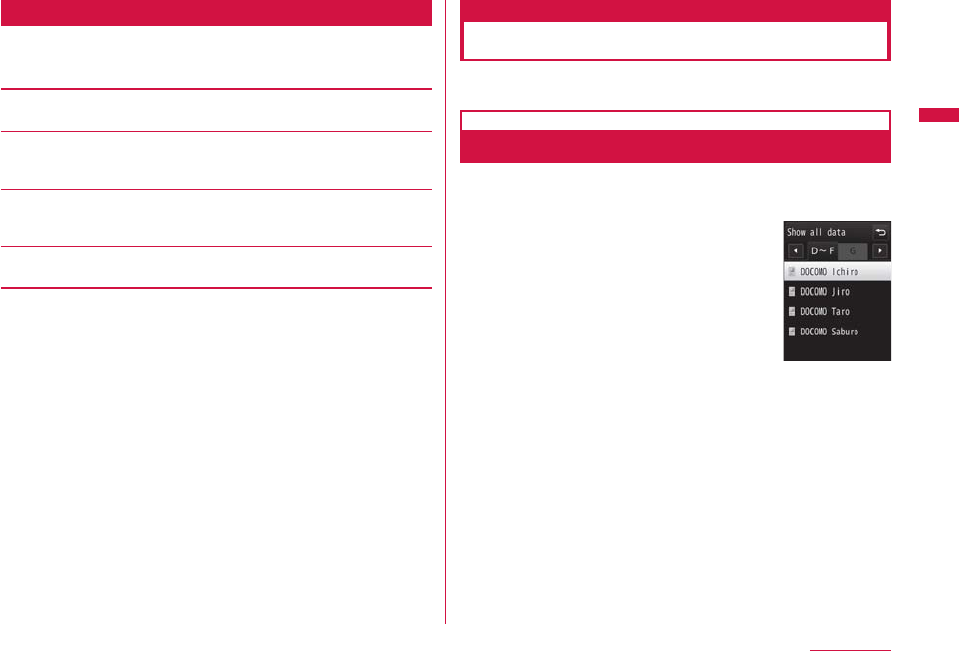
91
Phonebook
Continue on the next page
Group Setting List Screen Sub Menu
Group setting list screen (P89) ▶
M
[Menu] ▶
Perform the following operations
[Set]
Change the selected group settings.→P90
[Move]
Change the display position of the selected group.
▶ Select the new display position ▶
C
[OK]
[Reset]
Reset the selected group settings. The group name is restored to
default.
[Reset all]
Reset all group settings and group order.
Search phonebook
Making a Call from Phonebook
• To search Phonebook entries set as secret, set "Secret mode" to
"Secret mode" beforehand.→P127
Making a Call from Phonebook
You can make a call by invoking the Phonebook.
Stand-by display ▶
D
The entries searched by the default search
mode appear on the Phonebook entry list
screen.→P97
Phonebook list
screen (Ex.: When
searching all
entries)
Move the cursor to a party to call
▶
A
b
To make a videophone call
Press
g
[V. Phone].
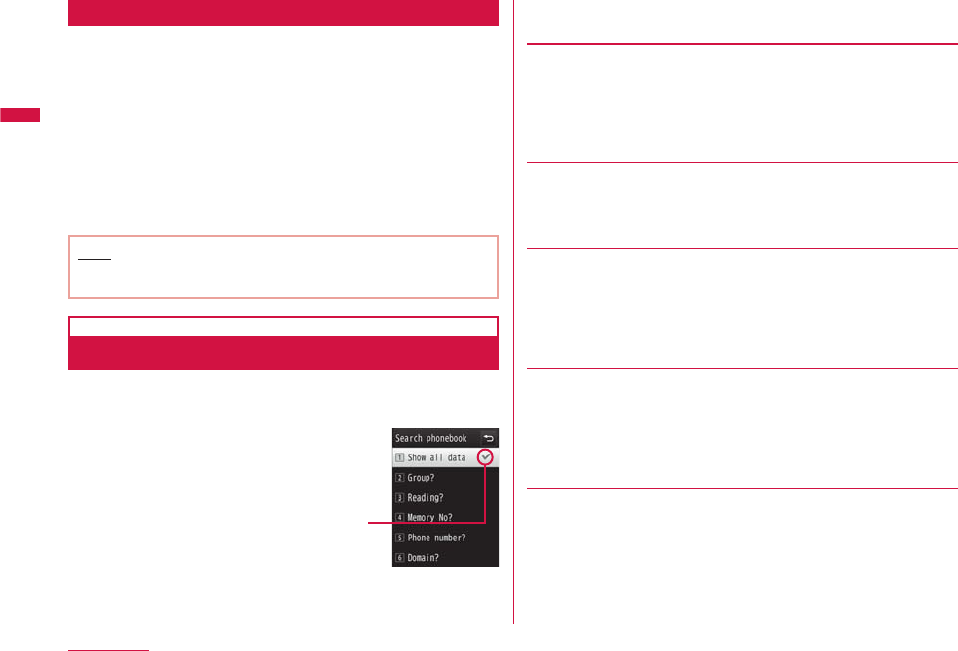
92
Phonebook
Operations on Phonebook Detail Screen
When selecting a party on the Phonebook list screen, the
Phonebook detail screen is displayed.
Select a phone number and press
C
[Call] to make a call.
• You can make a call after selecting a phone number and use
T
[Disp.] to display the phone number.
b
When multiple phone numbers are saved
• Use
H
to select a phone number and press
C
[Call].
• Press
A
to display the saved phone numbers on the
Phone number selection screen in a list. Alternatively, use
H
to select a phone number and press
C
[Call] to make
a call.
Note
• If "Secret mode" is set to "Secret data only" (P127), only secret
Phonebook entries (P86) can be searched/displayed.
Searching Phonebook
You can use various ways to search Phonebook entries.
M
▶ "Phonebook" ▶ "Search phonebook"
•
I
[Default]: Set the
highlighted option as
the search mode for the
Phonebook list screen
displayed when you press
D
, etc. in Stand-by.
Search
phonebook screen
The default
search
mode is
indicated.
Perform the following operations
[Show all data]
Display all Phonebook entries divided into reading lines (あ-わ lines,
A-Z) and "他 (others)" (for readings other than the Japanese Kana
syllables).
• Use
J
to switch the reading line.
• Press the keys
1
to
0
(あ-わ lines) to switch the display to
"Reading search" mode. Operations are same as "Reading search".
[Group?]
Search and display Phonebook entries by group (Group list screen).
Use
J
or
g
[UIM/Phone] to switch between the FOMA terminal
Phonebook and the UIM Phonebook. Use
H
▶
C
[Select] to select
a group and display Phonebook entries saved in the group.
[Reading?]
Enter part of "Reading" and search all Phonebook entries. Enter up to
32 half-pitch characters for reading.
• All Phonebook entries are displayed when a reading is not entered.
• You can also search readings using other than the leading
character.
• Press
I
[Chara] to switch the input mode.
[Memory No?]
Display Phonebook entries on the FOMA terminal by every 50 entries
from memory no. "0" in order.
• Use
J
to switch the memory number.
• The UIM Phonebook cannot be displayed.
• Phonebook entries can also be displayed by entering memory
numbers with dial keys.
[Phone number?]
Enter part of the saved phone number and search all Phonebook
entries. Enter up to 26 digits.
• All Phonebook entries are displayed when a phone number is not
entered.
• You can search phone numbers using other than the leading digit.
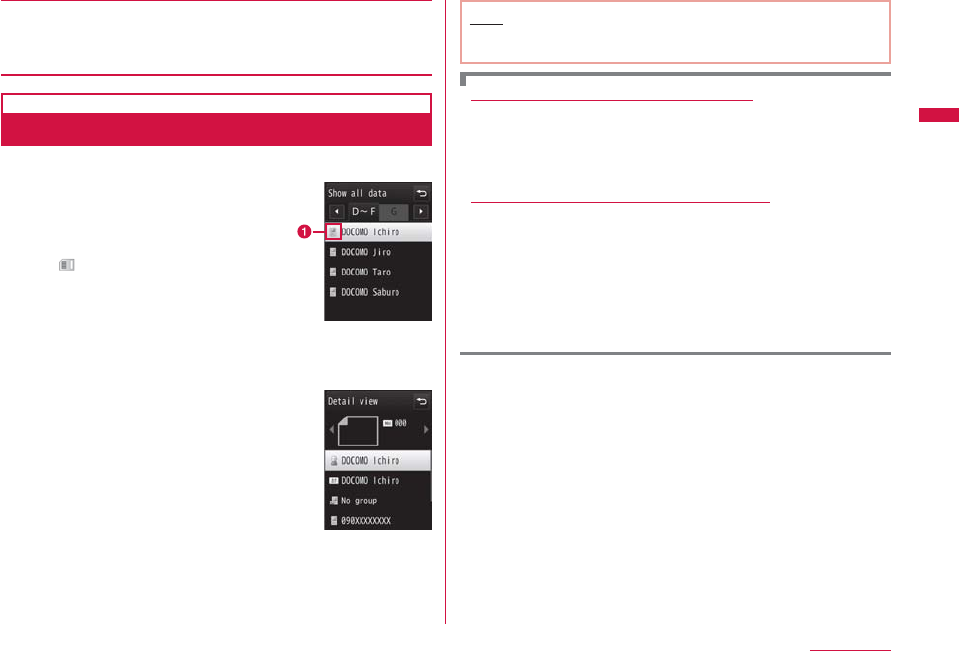
93
Phonebook
Continue on the next page
[Domain?]
Display Phonebook entries that contain mail addresses by domain.
• Use
J
to switch the domain.
• Register a domain to search beforehand.→P97
Viewing Phonebook Entries
Stand-by display ▶
D
a
Save locations on the Phonebook
• If saved on the FOMA terminal
Phonebook, the icon assigned to
"Phone number1" appears.
• If saved on the UIM Phonebook,
appears.
Phonebook
list screen
Select a Phonebook entry
• When an image is set to the phonebook
entry, the set image is displayed.
• Icons displayed for each item are same as
those for the Add to phonebook screen.
→P84
Phonebook
detail screen
Note
• During background playback, moving pictures/i-motion saved on
the Phonebook are not played.
Operations on the Phonebook list screen
Select the Phonebook entry in which a phone number and a
mail address are saved and press
A
to make a call, and
press
I
[Mail] to create mail. If multiple phone numbers or
mail addresses are saved, the Phone number or mail address
selection screen appears.
Operations on the Phonebook detail screen
When selecting a saved phone number, mail address, etc., you
can perform the following operations.
C
[Call] : Make a voice call to the selected phone number.
C
[Mail] : Create an i-mode mail addressed to the selected
mail address.→P138
C
[Connect] : Connect to the site of the selected URL.
C
[Play] : Play the selected ring tone.
C
[Disp.] : Display the selected videophone substitute image.

94
Phonebook
Phonebook List Screen Sub Menu
Phonebook list screen (P93) ▶
M
[Menu] ▶
Perform the following operations
[Mail/URL]
Create mail or access URL.
Compose mail : Create an i-mode mail addressed to the mail
address or phone number of the selected
Phonebook entry.→P138
Attach to mail : Create an i-mode mail with the selected
Phonebook entry attached.→P138
Compose SMS : Create an SMS message addressed to the phone
number saved in the selected Phonebook entry.
→P176
Connect to URL : Connect to the site of the URL saved in the
selected Phonebook entry.
[Call function]
Select the calling method. If multiple phone numbers are saved, after
selecting the calling method, select the number to call on the Phone
number selection screen.
Video phone call : Make a videophone call.
Customize call : Change the saved phone number and make a call.
Int. call(Japan) : Add the country code for Japan "+81"
automatically at the beginning of the phone
number when you make a call from overseas to a
phone number in Japan saved in the Phonebook.
• If the beginning of the phone number is "0", it is
automatically deleted.
[Add new]
Create a new Phonebook entry.→P84
[Edit]
Edit the selected Phonebook entry.→P96
[Copy]
Copy or back up the selected entry.
to the UIM
*1
: Copy the selected Phonebook entry to the UIM.
to the phone
*2
: Copy the selected Phonebook entry to the
FOMA terminal.
to microSD : Copy the selected Phonebook entry to a
microSD card.
Multiple choice : Select multiple entries from the FOMA terminal
or UIM and copy to other locations (FOMA
terminal/UIM/microSD).
▶ Select a copy source ▶ Mark entries to copy
▶
I
[Copy] ▶ Select a copy destination
Backup : Back up all Phonebook data saved on the FOMA
terminal to a microSD card.
• Images saved in the Phonebook cannot be
copied.
Connect to center : Save Phonebook entries on the FOMA terminal
to the Data Storage Center.→P131
[Search by]
Search the Phonebook in another search mode.→P92
[Send Ir data]
Send a Phonebook entry to an external device via infrared
communication.→P328
Focused data : Send the selected Phonebook entry.
all in phone : Send all data saved on the FOMA terminal
Phonebook.
all in UIM : Send all data saved on the UIM Phonebook.
95
Phonebook
Continue on the next page
[Delete]
Delete saved data from the Phonebook.→P96
[Create domain list]
*3
Create the domain to be searched by domain search.→P97
*1 Appear for the FOMA terminal Phonebook.
*2 Appear for the UIM Phonebook.
*3 Appear only for the domain search.
Phonebook Detail Screen Sub Menu
Phonebook detail screen (P93) ▶
M
[Menu] ▶
Perform the following operations
[Mail/URL]
Create mail or access URL.
Compose mail : Create an i-mode mail addressed to the mail
address or phone number saved in the displayed
Phonebook entry.→P138
Attach to mail : Create an i-mode mail with the displayed
Phonebook entry attached.→P138
Compose SMS : Create an SMS message addressed to the phone
number in the displayed Phonebook entry.→P176
Connect to URL : Access the site of the URL saved in the
displayed Phonebook entry.
[Call function]
Select the calling method.
Video phone call : Make a videophone call.
Customize call : Change the saved phone number and make a call.
Int. call(Japan) : Add the country code for Japan "+81"
automatically at the beginning of the phone
number when you make a call from overseas to a
phone number in Japan saved in the Phonebook.
• If the beginning of the phone number is "0", it is
automatically deleted.
[Edit]
Edit the displayed Phonebook entry.→P96
[Copy]
Copy the displayed Phonebook entry.
Copy item : Select and copy items from the saved Phonebook
entry displayed.
to the UIM
*1
: Copy the displayed Phonebook entry to the UIM.
to the phone
*2
: Copy the displayed Phonebook entry to the FOMA
terminal.
to microSD : Copy the displayed Phonebook entry to a microSD
card.
[Send Ir data]
Send the displayed Phonebook entry via infrared communication.
→P328
[Accept/Reject call]
Set to accept or reject calls per phone number saved on the FOMA
terminal Phonebook.
You can select this only when you move the cursor to a phone
number beforehand.
• A phone number saved in "Reject on list" (P128) cannot be set to
"Accept call".
▶ Enter the Terminal security code ▶ "Not set"/"Reject call"/
"Accept call"
[Delete]
Delete the displayed Phonebook entry.
*1 Appear for the FOMA terminal Phonebook.
*2 Appear for the UIM phonebook.
96
Phonebook
Editing Phonebook Entries
Phonebook detail screen (P93) ▶
M
[Menu] ▶
"Edit" ▶ Edit each item
Use the same steps in "Adding Entries to the FOMA Terminal
Phonebook" (P84) or "Adding Entries to UIM (FOMA Card)
Phonebook" (P87) to edit items.
b
To change the memory number and save the entry
If you change the memory number and save the entry,
the original entry remains with the original memory
number and the edited entry is saved with a new
memory number.
(Memory No.) ▶ enter any un-assigned memory
number (000-999).
After editing,
I
[Done] ▶ "Yes"
Deleting Phonebook Entries
Example: To delete an entry from the Phonebook entry list
screen
Move the cursor to an entry to delete on the
Phonebook list screen (P93) ▶
M
[Menu] ▶
Perform the following operations
[Delete]
One : Delete the selected Phonebook entry.
Selected : Select multiple entries from the FOMA terminal
or UIM.
▶ "Phone"/"UIM" ▶ Mark entries to delete ▶
I
[Delete] ▶ "Yes"
all in phone : Delete all Phonebook entries saved on the FOMA
terminal.
The Terminal security code is required to delete.
all in UIM : Delete all Phonebook entries saved on the UIM.
The Terminal security code is required to delete.
"Yes"
The selected/displayed Phonebook entry is deleted.
b
To delete a Phonebook entry from the Phonebook
detail screen
You can delete only one Phonebook entry at a time
from the Phonebook detail screen. On the Phonebook
detail screen, press
M
[Menu] ▶ "Delete" ▶ "Yes".
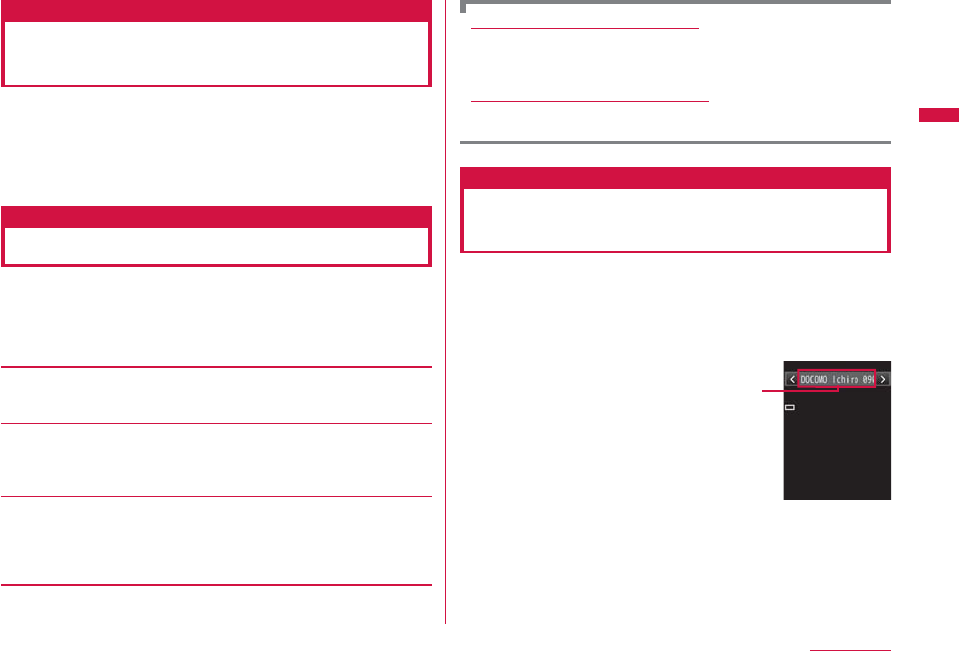
97
Phonebook
Continue on the next page
No. of phonebook
Checking Phonebook Storage
Status
You can check the memory status on the FOMA terminal/UIM
Phonebook.
M
▶ "Phonebook" ▶ "No. of phonebook"
• "Secret entry" is displayed when "Secret mode" is set to
"Secret mode" or "Secret data only".
Setting Phonebook
You can set Phonebook entries or images to be invoked from
the Stand-by display.
M
▶
"Phonebook"
▶
"Phonebook settings"
▶
Perform the following operations
[Default mode]
Set the search mode for the Phonebook list screen displayed when
you press
D
in Stand-by.
[Create domain list]
Create a domain to be searched by the domain search.
▶ Move the cursor to unregistered item ▶
C
[Add] ▶ Enter a
domain name
[Accept/Reject list]
Phone numbers saved on the Accept/reject call list in "Accept/reject
call" are displayed.
▶ Enter the Terminal security code ▶ "Accept list"/"Reject list"
• Press
M
[Menu] to perform "Add", "Delete", or "Delete all" operation.
Editing the entered domain name
Move the cursor to the domain to edit on the domain list ▶
C
[Edit] ▶ edit the domain name.
"@docomo.ne.jp" on the domain list cannot be edited.
Deleting the entered domain name
Move the cursor to the domain to delete on the domain list ▶
g
[Delete] ▶ "Yes".
Quick dial
Making a Call with a Few Key
Operation
In Stand-by, enter a 1- to 2-digit number with the dial keys
to quickly make a call to the phone number corresponding
to the memory number of "0" to "99" on the FOMA terminal
Phonebook.
Enter a 1- to 2-digit number
• Use
J
to display Quick
dial numbers in turn.
The content of the
entry of the memory
no. corresponding
to the entered
number appears.
A
b
To make a videophone call
Press
g
[V. phone].
Continued on next page
98
Phonebook
Note
• If "Quick dial" is set to "OFF", this function does not work.
→P109
• If you use a 3-digit memory number with the first or second digit
started with "0" such as "001" or "011", "0" is not necessary to
be entered.
• This function does not work for the UIM Phonebook.
Displaying Call/Mail History
M
▶ "Phonebook" ▶ "Call/Mail history" ▶
Select a log to display
Received calls : Display received logs for voice/videophone
calls.→P62
Redial : Display redial logs for voice/videophone calls.
→P60
Received mails : Display received mail logs.→P166
Sent mails : Display sent mail logs.→P166
Note
• Received calls can also be displayed by pressing
L
in Stand-
by.
• Redial can also be displayed by pressing
R
in Stand-by.

99
Sound/Screen/Light Settings
Sound Settings
Changing Ring Tone ・・・・・・・・・・・・・・・ Select ring tone 100
Setting Volume of Ring Tone, Alarm, etc. ・・・ Volume 101
Informing You of Incoming Calls and Alarms by
Vibration ・・・・・・・・・・・・・・・・・・・・・・・・・・・・・・・・・・・ Vibrator 102
Changing Ringing Tone ・・・・・・・・・Melody Call setting 102
Setting Effect Tone ・・・・・・・・・・・・・・Select effect tone 103
Informing You of Touch Panel Operation by Sound or
Vibration ・・・・・・・・・・・・・・・・・・・・・・・・・・・・Touch settings 104
Sounding Alarm when a Line is Likely to be
Disconnected ・・・・・・・・・・・・・・・・・・・・・・・・・Quality alarm 104
Setting Ring Time for Incoming Mail
・・・・・・・・・・・・・・・・・・・・・・・・・・・・・・・・・・・・Mail ring duration 104
Sounding Ring Tone only from Earphones
・・・・・・・・・・・・・・・・・・・・・・・・・・・・・・Headset usage setting 105
Muting Ring Tone from the FOMA Terminal
・・・・・・・・・・・・・・・・・・・・・・・・・・・・・・・・・・・・・・・・Manner mode 105
Changing Manner Mode Settings
・・・・・・・・・・・・・・・・・・・・・・・・・・・・・・・・・・・・Manner mode set 105
Screen/Light Settings
Changing Stand-by Display ・・・・・・・ Stand-by display 106
Setting Image for Incoming Calls
・・・・・・・・・・・・・・・・・・・・・・・・・・・・・・・・・・・・Call & Mail image 109
Setting Dialing Screen Display ・・・・・・・・・・・・Quick dial 109
Setting Wake-up Display ・・・・・・・・・・・Wake-up display 110
Displaying Image Set to Phonebook on Incoming
Call Screen ・・・・・・・・・・・・・・・・・・・・・ Show ph. book img 110
Setting Display Backlight ・・・・・・・・・・・・・・・・・Backlight 110
Displaying in Power Save Mode
・・・・・・・・・・・・・・・・・・・・・・・・・・・・・・・・・・ Power saver mode 111
Setting a Color Theme for Display ・・・・・ Color theme 111
Using Kisekae Tool ・・・・・・・・・・・・・・・・・・・ Kisekae Tool 111
Changing Display of Main Menu ・・・・・・Menu settings 112
Setting Incoming Illumination Patterns
・・・・・・・・・・・・・・・・・・・・・・・・・・・・・・・・・・・・・・・・ Lighting LED 113
Setting Clock Display ・・・・・・・・・・・ Date&Time format 115
Adjusting Touch Panel ・・・・・・・・・・・・・・・・・・・Calibration 115
100
Sound/Screen/Light Settings
Select ring tone
Changing Ring Tone
You can change the ring tone for voice/videophone calls,
mail, etc.
• In addition to the pre-installed ring tones and melodies, i-motion,
melodies and Chaku-Uta
®
songs, Chaku-Uta Full
®
songs downloaded
from i-mode sites or the Internet web sites can be set as ring
tones.
M
▶ "Settings" ▶ "Sounds&Vibration" ▶
"Select ring tone" ▶ Perform the following
operations
[Voice call]
Select the ring tone for a voice call.
Music : Select from Chaku-Uta Full
®
songs saved in "Music" of
"Data Box".→P270
Go to Step 3 in "Setting a Chaku-Uta Full
®
Song as a Ring
Tone" (P266).
i-motion : Select from moving pictures/i-motion saved in "i-motion"
of "Data Box".→P307
Melody : Select from melodies saved in "Melody" of "Data Box".
→P314
[Video call]
Select the ring tone for a videophone call.
• Available items are the same as for "Voice call".
[Mail]
Select the ring tone for i-mode mail.
• Available items are the same as for "Voice call".
[MessageR]
Select the ring tone for MessageR.
• Available items are the same as for "Voice call".
[MessageF]
Select the ring tone for MessageF.
• Available items are the same as for "Voice call".
[SMS]
Select the ring tone for a SMS.
• Available items are the same as for "Voice call".
• When Stand-by i-αppli is set, the Receive results screen for SMS
does not appear, and the ring tone and vibrator for SMS do not
work.
I
[Done]
Note
• The following file formats can be set for a ring tone (however,
some files such as restricted files or files that contain only
video or sound may not be set).
SMF, MFi, and MP4 (Mobile MP4)
• When moving pictures/i-motion is set for ring tones (Chaku-
motion), "Call & Mail image" (P109) is also changed to the
same.
• If you set a moving picture/i-motion with video for "Mail",
"MessageR", "MessageF", or "SMS", the same moving picture/
i-motion is set for all these items. You cannot set each item
individually.
• If music, melody or moving pictures/i-motion with video are
set as a ring tone, the incoming screen will be reset to default
screen when you change the ring tone to moving pictures/
i-motion without video.
• Image only moving pictures/i-motion cannot be set as ring
tones.
101
Sound/Screen/Light Settings
Continue on the next page
Pre-installed Ring Tone List
i-motion
Alarm 01-04 映画「ATOM」予告
編第一弾 Message 01-08
Ring 20-25
Melody
Alarm 05 Message 09-10 Power off 01-02
Power on 01-02 Ring 01-19
Volume
Setting Volume of Ring Tone,
Alarm, etc.
M
▶ "Settings" ▶ "Sounds&Vibration" ▶
"Volume"
Perform the following operations
•
J
: Adjust the volume of the selected item. When the volume
level is set to the lowest, (Silent) is displayed and the tone
does not sound. Every time the volume is adjusted, the tone for
the item sounds at the new volume (except "Receiver volume").
• For "Incoming call", the ring tone/effect tone set in "Voice call"
sounds; for "Mail/Message/SMS", the tone set in "Mail" sounds;
for "Power ON/OFF", the tone set in "Power ON" sounds.
* The default ring tone sounds for "Alarm/Schedule".
[Incoming call]
*
Adjust the ring tone volume for incoming voice/videophone calls.
[Mail/Message/SMS]
*
Adjust the ring tone volume for Mail or MessageR/F.
[Alarm/Schedule]
*
Adjust the alarm tone volume for Alarm/Schedule.
[Keypad tone]
Adjust the volume of keypad tone except dial tone.
[Flip tone]
Adjust the volume when the FOMA terminal is opened/closed.
[Dial sound]
Adjust the dial sound volume.
Continued on next page
102
Sound/Screen/Light Settings
[Power ON/OFF]
Adjust the sound volume when the FOMA terminal is turned on/off.
[Popup tone]
Adjust the sound volume when the popup window is displayed.
[Receiver volume]
Adjust the receiver volume. The sound cannot be muted.
* When the volume level is set to the highest, → (Step up) is
displayed to increase the sound progressively.
I
[Done]
Note
• Adjusting the receiver volume during a call→P74
Vibrator
Informing You of Incoming Calls
and Alarms by Vibration
You can set the FOMA terminal to vibrate when a call or mail
arrives or at a schedule alarm time.
M
▶ "Settings" ▶ "Sounds&Vibration" ▶
"Vibrator" ▶ Perform the following operations
[Incoming call]
Set the vibration pattern for an incoming voice/videophone call.
[Mail/Message/SMS]
Set the vibration pattern when mail/MessageR/F is received.
[Alarm/Schedule]
Set the vibration pattern for the Alarm/Schedule alert.
[Pop-up]
Set whether to vibrate the FOMA terminal when the Popup screen
appears.
[Power ON/OFF]
Set the vibration pattern when the FOMA terminal is turned on/off.
I
[Done]
Melody Call setting
Changing Ringing Tone
This service enables you to play a melody to the other party
when a voice call arrives.
• Melody Call is not played for videophone calls.
• Melody Call is a fee-based service that requires subscription.
• For details about Melody Call, see "Mobile Phone User's Guide
[Network Services]".
M
▶ "Settings" ▶ "Call/VT/Dialing" ▶
"Incoming call" ▶ "Melody Call setting" ▶ "Yes"
The FOMA terminal connects to the Melody Call setting site.
• Packet communication charges do not apply for the setting
site. However, the charges apply for connecting to other sites.
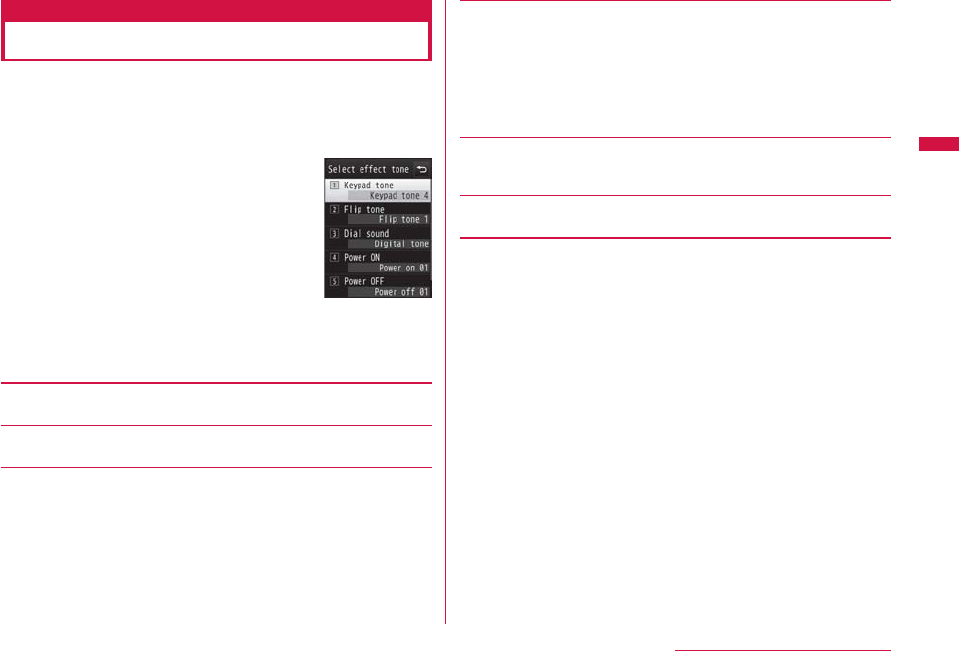
103
Sound/Screen/Light Settings
Continue on the next page
Select effect tone
Setting Effect Tone
You can set the effect tone when a key is pressed or
operation is performed.
M
▶ "Settings" ▶ "Sounds&Vibration" ▶
"Select effect tone"
Effect tone
selection screen
Perform the following operations
[Keypad tone]
*
Select an effect tone when a key is pressed except Dial sound.
[Flip tone]
*
Select an effect tone when the FOMA terminal is opened/closed.
[Dial sound]
*
Select an effect tone when a dial key,
*
, or
#
is pressed in the
Stand-by display or the Phone number entry screen (P56). If set to
"Japanese", "English", or "Korean", the numbers entered with dial keys
will be read out.
[Power ON]
Select an effect tone when the terminal is turned on.
Music : Select from Chaku-Uta Full
®
songs saved in "Music" of
"Data Box".→P270
Go to Step 3 in "Setting a Chaku-Uta Full
®
Song as a Ring
Tone" (P266).
Melody : Select from melodies saved in "Melody" of "Data Box".
→P314
[Power OFF]
Select an effect tone when the terminal is turned off.
• Available items are the same as for "Power ON".
[Low battery alert]
Set whether to sound an alarm when the battery level becomes low.
* On the selection screen of the setting item, press
T
[Play] to
check the sound each time an effect tone is selected. To mute the
sound, press
T
[Mute]. If "Silent" is set for "Volume", an effect tone
cannot be checked.
I
[Done]
104
Sound/Screen/Light Settings
Touch settings
Informing You of Touch Panel
Operation by Sound or Vibration
M
▶ "Settings" ▶ "Sounds&Vibration" ▶
"Touch settings" ▶ Perform the following
operations
[Touch type]
Select an action when the touch panel is touched.
OFF : Does not perform actions.
Sound : Sound the tone selected for "Touch sound".
Vibration : Vibrate at the pattern selected for "Touch vibration".
Sound + Vib. : Perform actions with the sound selected for "Touch
sound" and vibration selected for "Touch vibration".
[Touch sound]
Select an effect tone when the touch panel is touched.
[Touch vibration]
Select a vibration pattern when the touch panel is touched.
[Touch sound level]
Adjust the sound level.
[Touch vib. level]
Adjust the vibration level when the touch panel is touched.
I
[Done]
Quality alarm
Sounding Alarm when a Line is
Likely to be Disconnected
The FOMA terminal notifies you of a call almost disconnected
due to poor signal quality with an alarm tone.
• If the signal rapidly deteriorates, the call may be disconnected
without sounding an alarm tone.
M
▶ "Settings" ▶ "Call/VT/Dialing" ▶ "Call
feature" ▶ "Quality alarm" ▶ "Alarm OFF"/"Low
alarm"/"High alarm"
Mail ring duration
Setting Ring Time for Incoming Mail
You can set how many times or how long the ring tone
sounds when mail arrives.
M
▶ "Settings" ▶ "Sounds&Vibration" ▶
"Mail ring duration" ▶ Perform the following
operations
[Mail ring]
Select an effect tone sounded when the terminal is turned on.
OFF : Set to mute a ring tone.
1 cycle : Set to sound a ring tone once for up to approximately
30 seconds according to the set ring tone length
such as music or melodies.
Select time : Set a ring tone duration.
▶
D
▶
C
▶ Enter a ring tone duration
I
[Done]
105
Sound/Screen/Light Settings
Continue on the next page
Headset usage setting
Sounding Ring Tone only from
Earphones
You can set the ring tone or alarm tone to sound only from
the earphones when the earphone/microphone (optional), etc.
is connected.
M
▶ "Settings" ▶ "Sounds&Vibration" ▶
"Headset usage setting"
C
[Select]
▶
"Headset only"/"Headset+speaker"
I
[Done]
Note
• While Manner mode is activated, ring tone, etc. sounds only
from the earphones.
Manner mode
Muting Ring Tone from the
FOMA Terminal
Turn off the tones that sound from the FOMA terminal so as
not to disturb others.
#
(for 1+ seconds)
Canceling Manner mode
In Stand-by, press
#
(for 1+ seconds).
Note
• 2 types of Manner mode are equipped: "General manner" and
"Original manner".→P105
• appears at the top of the screen when manner mode is
activated.
• A playback confirmation screen appears when you attempt to
play a melody, moving picture/i-motion while Manner mode is
activated.
• Even when Manner mode is activated, the camera shutter tone
sounds.
•
The vibration pattern while "General manner" is active follows
"Vibrator". If "Vibrator" is set to "OFF", "Incoming call" is notified
with the vibration "Pattern 1", "Mail/Message/SMS" is notified
with "Message 1", and "Alarm/Schedule" is notified with "Alarm 1".
Manner mode set
Changing Manner Mode Settings
Select the Manner mode action from "General manner" or
"Original manner". Original manner enables you to change the
each setting of Manner mode.
Example: To change the settings of Original manner
M
▶ "Settings" ▶ "Sounds&Vibration" ▶
"Manner mode set" ▶ Move the cursor to
"Original manner" ▶
I
[Edit]
b
To select the Manner mode type
Move the cursor to "General manner"/"Original manner"
▶ press
C
[Select].
The Manner mode setting is ended.
Continued on next page
106
Sound/Screen/Light Settings
Perform the following operations
•
J
: Select the vibration pattern or volume of the selected
item. When the volume level is the lowest, (Silent) is
displayed and the sound is muted.
[Vibration]
Use
C
[ON/OFF] to set.
ON : As same as "General manner", the vibration pattern follows
"Vibrator", and incoming voice, videophone calls, mails, or
messages are notified with vibration. If "Vibrator" is set to
"OFF", "Incoming call" is notified with the vibration "Pattern
1", "Mail/Message/SMS" is notified with "Message 1", and
"Alarm/Schedule" is notified with "Alarm 1".
OFF : The FOMA terminal does not vibrate.
[Incoming call vol.]
*
Adjust the ring tone volume for incoming voice/videophone calls.
[Mail/SMS vol.]
*
Adjust the ring tone volume for Mail/MessageR/F/SMS.
[Alarm/Schedule vol.]
*
Adjust the alarm tone volume for Alarm/Schedule.
[Effect/Popup tone]
Adjust the effect tone or volume when the popup is displayed.
[Low battery alert]
Set whether to sound an alarm when the battery level becomes low.
* When the volume level is set to the highest, →(Step up) is
displayed to increase the sound progressively.
I
[Done]
Stand-by display
Changing Stand-by Display
You can set the items (wallpaper, clock, calendar, schedule,
shortcut, etc.) to be shown on the Stand-by display.
M
▶ "Settings" ▶ "Display" ▶
"Stand-by display"
Stand-by display
setting screen
Perform the following operations
•
M
[Preview]: The selected preview screen is displayed. Press
Q
to return to the Stand-by display setting screen.
107
Sound/Screen/Light Settings
Continue on the next page
[Wallpaper]
TOUCH : Select an image to change when the Stand-by display is
touched.
• Press I[Backgnd] to set a slideshow in background.
→P107
Image : Select an image saved in "My picture" of "Data Box".
→P296
• A slideshow created from My picture cannot be selected
with this operation. Make the Stand-by display setting
from the Slideshow list screen (P305).
i-motion : Select a moving picture/i-motion saved in "i-motion" of
"Data Box".→P307
i-αppli : Select a Stand-by i-αppli saved on the FOMA terminal.
→P285
[Display items]
Set the display such as clock, calendar, shortcut, etc. in the Stand-
by display.
• If "TOUCH" is selected for "Wallpaper", this item is unavailable.
Do not show : Items such as clock, calendar, etc. are not displayed.
Analog clock : Select an item from Analog clock.
Digital clock : Select an item from Digital clock.
Calendar : Select to display only "Calendar" or "Calendar +
Schedule".
Shortcut : Display shortcuts.
▶ Select a registration field ▶
C
[Add] ▶ Select a
function ▶
I
[Done]
• Up to 8 functions can be saved as a shortcut.
• Press
M
[Menu] to delete saved function or reset
to default settings.
[Battery icon]
Select a battery icon.
[Antenna icon]
Select an antenna icon.
I
[Done]
Note
• After changing to the option other than "Kisekae settings" for
"Battery icon" and "Antenna icon, these icons return to "Kisekae
settings" by setting all in "Kisekae Tool" (P111).
Setting Slideshow of Touch Image
If "TOUCH" is selected for "Wallpaper", up to other 10 images
can be displayed as slideshow in background of the touch
image.
• If "Splash clock" or "Game" is selected for the touch image, a
slideshow cannot be set.
Stand-by display setting screen (P106)
▶ "Wallpaper" ▶ "TOUCH" ▶
I[Backgnd]
▶ Perform the following operations
[Slideshow image]
Select a background image.
▶ Move the cursor to a list number ▶
C
[Add] ▶ Move the cursor
to a folder ▶
C
[Open] ▶ Select an image ▶ Repeat the operation
to add an image ▶
I
[Done]
•
M
[Delete]: Delete the selected image.
•
C
[Change]: Change the selected image.
[Slideshow speed]
Select a slideshow speed.
[Random slideshow]
Set whether to display slideshow images in random order.
Continued on next page

108
Sound/Screen/Light Settings
I
[Done]
Setting "Dual clock"
Selecting "Dual clock" in "Digital clock" displays the dates and
times of 2 countries or areas, and cities.
Select the country or area, and city of the clock displayed at the
bottom of the dual clock.
▶ Use
K
to move to the target area ▶
C
[Zoom in] ▶ Use
K
to move to the target city ▶
C
[Set]
• Press
I
[Search] to display the city name list. You can also
enter the city name with dial keys and search for a target city.
• Press
M
[Menu] to search for a city or set Daylight Saving to
ON/OFF.
Note
• Some data may not be displayed in the Stand-by display.
• The moving picture/i-motion or Flash movie set as the Stand-
by display starts when the FOMA terminal is opened and the
moving picture/i-motion stops when the terminal is closed. Also,
press
P
to play or stop it.
• Web To function is not available from a moving picture/i-motion
set as the Stand-by display.
• When displaying the Stand-by display, a Flash movie such as a
clock, or GIF animation stops after played for a certain period
of time.
<When setting "TOUCH">
• Under the setting of "4 season", "SAKURA", "SummerBeach",
"MOMIJI", and "Yuki" are automatically switched depending on
the month.
• Under the setting of "4 season", "SAKURA", "SummerBeach",
"MOMIJI", or "Yuki", part of touch image disappears and the
clock appears when the display is touched once. The entire
touch image and the clock disappear and only the background
image appears when the display is touched once again.
• If the background image and the text color of the clock
are overlapped, the clock becomes invisible. Change the
background setting or touch image.
• Under the setting of "Splash clock", the clock moves to the
position you touch.
• Under the setting of "Game", you can play game on the Stand-
by display such as concentration or hidden catch, etc.
<When setting "Analog clock" or "Digital clock">
• If the time zone is set to other than GMT+9 in "Auto time
adjust" (P53) or "Local time zone" (P53), the clock is
automatically changed to "Dual clock".
•
After this option is set, press
C
in Stand-by ▶ move the cursor
to the clock display ▶
C
to display the following screen.
- "Dual clock"
The Date&Time settings screen (P53) appears when the
Home clock (the upper clock) is selected, and the Stand-by
display setting screen appears when the Sub clock (the lower
clock) is selected.
- Other clocks
The Alarm list screen (P351) is displayed. (If the date is
selected, the Calendar screen of the schedule (P354) is
displayed.)
<When setting "Calendar">
•
After this option is set, press
C
in Stand-by ▶ move the
cursor to the calendar display ▶
C
to display the Calendar
screen of the schedule (P354).
• After "Calendar + Schedule" is set, press
C
in Stand-by ▶
move the cursor to the schedule ▶
C
to display the Schedule
list screen (P355).
109
Sound/Screen/Light Settings
Continue on the next page
Call & Mail image
Setting Image for Incoming Calls
Set an image displayed on the screen for incoming calls, etc.
M
▶ "Settings" ▶ "Display" ▶ "Call & Mail
image"
Perform the following operations
•
M
[Preview]: The preview screen of the selected image is
displayed, and press
Q
to stop the preview.
[Incoming voice call]
Set an image displayed on the screen when a voice call arrives.
Image : Select an image saved in "My picture" of "Data Box".
→P296
i-motion : Select a moving picture/i-motion saved in "i-motion" of
"Data Box".→P307
[Incoming video call]
Set an image displayed on the incoming videophone call screen.
• Available items are the same as for "Incoming voice call".
[Mail sending]
Select an image displayed when sending a mail from "My picture" of
"Data Box".→P296
[Mail receiving]
Select an image displayed when receiving a mail and MessageR/F
from "My picture" of "Data Box".→P296
[Mail complete]
Set an image displayed on the completion of receiving a mail and
MessageR/F.
• Available items are the same as for "Incoming voice call".
[Check new messages]
Select an image displayed on the completion of checking new
message from "My picture" of "Data Box".→P296
I
[Done]
Note
• A sound only moving picture/i-motion cannot be set to the
incoming call screen.
•
If a moving picture/i-motion with sound is set to the incoming
call screen, the "Select ring tone" (P100) is also changed to the
same.
• If a moving picture/i-motion with sound is set as an incoming
image, the ring tone settings are automatically reset to the
default when you change it to a still image or moving picture/
i-motion without sound.
Quick dial
Setting Dialing Screen Display
Set whether to search and display the Phonebook entry
corresponding to the memory number when entered between
a 1-digit and 2-digit number in Stand-by.
M
▶ "Settings" ▶ "Display" ▶ Move the
cursor to "Quick dial" ▶
C
[ON/OFF]
110
Sound/Screen/Light Settings
Wake-up display
Setting Wake-up Display
Set an image displayed on the screen when the FOMA
terminal is started up.
M
▶ "Settings" ▶ "Display" ▶ "Wake-up
display"
•
M
[Preview]: The preview screen of the selected image is
displayed, and press to stop
Q
the preview.
C
[Select] ▶ Select an image
• To select from other folders, press Q and then select an
image.
I
[Done]
Note
• Flash movies cannot be set as a wake-up screen.
Show ph. book img
Displaying Image Set to Phonebook
on Incoming Call Screen
Display the image set to the Phonebook entry when a call
arrives from the number saved in the Phonebook with caller
ID shown.
M
▶ "Settings" ▶ "Call/VT/Dialing" ▶
"Incoming call" ▶ Move the cursor to "Show ph.
book img" ▶
C
[ON/OFF]
Note
• The image display priority for an incoming call is as follows:
a
Image set to a Phonebook entry
b
Image set to a Group in the Phonebook
c
Image set for the Call & Mail image
Backlight
Setting Display Backlight
You can set the Display backlight.
M
▶ "Settings" ▶ "Display" ▶ "Backlight" ▶
Perform the following operations
[Display duration]
Set the backlight duration of the display from between 10 seconds
and 10 minutes, or Always ON.
• When the set time elapsed after the last operation, the screen
becomes dark. When approximately more 5 seconds elapsed, the
backlight turns off completely. (While i-Channel ticker is displayed,
the backlight does not turn off completely until at least 1 minute
elapsed after the last operation.)
[Display brightness]
Set the backlight level of the display.
• If "Auto brightness" is set, the illumination sensor detects
surrounding brightness and adjusts the display brightness
automatically.
111
Sound/Screen/Light Settings
Continue on the next page
[AC connected]
Set the lighting when the AC charger is connected.
Display setting : Use the settings in "Display duration" and "Display
brightness".
Always ON : Light is always on.
I
[Done]
Note
• During the voice call, the backlight turns off after approximately
5 seconds, regardless of the "Display duration" setting.
Power saver mode
Displaying in Power Save Mode
You can set the backlight brightness of the display to the
lowest power saving level.
M
▶ "Settings" ▶ "Others" ▶
"Power saver mode" ▶ "ON"/"OFF"
Color theme
Setting a Color Theme for Display
You can select a color theme.
M
▶ "Settings" ▶ "Display" ▶ "Color theme"
Select a color
•
M
[Preview]: The preview screen is displayed.
Kisekae Tool
Using Kisekae Tool
If you use "Kisekae Tool", items such as ring tone, Stand-by
display, icon menu can be changed at a time.
• Downloading Kisekae Tool→P195
• Available items vary depending on Kisekae Tool.
- Stand-by display
- Custom menu
- Incoming voice call image
- Incoming vt call image
- Mail sending image
- Mail receiving image
- Mail complete image
- Check new message (Image)
- Antenna icon
- Battery icon
- Color theme
- Voice call
- Video call
- Mail/Message/SMS
- MessageR
- MessageF
- SMS
- Alarm
• If the Menu screen design is changed by using Kisekae Tool, menu
structure may change, depending on menu types, according to the
frequency of use. In addition, numbers assigned to menu items
(item numbers) may not be applied.
• Pre-installed Kisekae Tool can display menu items in Japanese,
English, and Korean (except for "L03B-direct"). Downloaded Kisekae
Tool may not display menu items in English and Korean.
M
▶ "Data Box" ▶ "Kisekae Tool"
Continued on next page
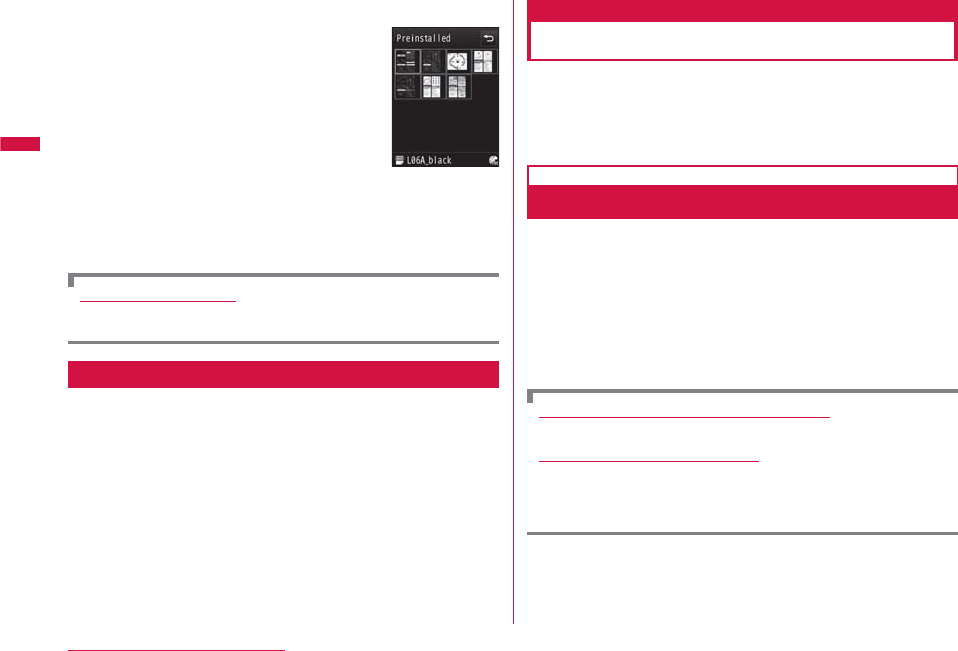
112
Sound/Screen/Light Settings
"i-mode"/"Preinstalled"
i-mode : Select from Kisekae Tool
downloaded from the site.
Preinstalled : Select from preinstalled
Kisekae Tool.
• Select "Search by i-mode" and connect to
the i-mode site to search Kisekae Tool.
Kisekae Tool
list screen
Select Kisekae Tool ▶ I[Set all] ▶ "Yes"
•
C
[View]: View the contents of the selected Kisekae Tool by
item.
Resetting the settings
Press
M
[Menu] on the Kisekae Tool list screen ▶ "Reset screen
display / sound setting" ▶ enter the Terminal security code.
Kisekae Tool List Screen Sub Menu
Kisekae Tool list screen (P112) ▶ Move the
cursor to Kisekae Tool ▶
M
[Menu]
• The Kisekae Tool list screen sub menu is the same as for "Still
Image File List Screen Sub Menu" (P298) except for "Set all"
and "Reset screen display / sound setting". However, "Send
via", "Set as", and "Store in center" are not displayed.
Menu settings
Changing Display of Main Menu
You can switch between the following 2 types of the Main
menu.
• Custom menu: Menu items can be changed.
• Basic menu: Menu items cannot be changed, but icons or
background images can be changed.
Changing Menu Items of Custom Menu
You can change the menu items of the Custom menu
depending on Kisekae Tool.
You can call up the function with a few steps by changing
menu items to frequently used ones.
• Menu items cannot be changed from the default Custom menu.
M
▶ Move the cursor to the function to
change ▶
M
[Menu] ▶ "Assign function" ▶
Select a function ▶ "Yes"
Resetting the Custom Menu to the default
M
▶
M
[Menu] ▶ "Reset function assignment" ▶ "Yes"
Deleting the Menu operation log
Depending on Kisekae Tool, Custom menu items are
automatically sorted according to the menu operation log.
Perform the following operations to delete menu operation log.
M
▶
M
[Menu] ▶ "Reset menu operation log" ▶ "Yes"
113
Sound/Screen/Light Settings
Continue on the next page
Changing Icons or Background Images of
Basic Menu
M
▶
T
[Basic]
Move the cursor to an icon to change ▶
M
[Menu] ▶ "Icon settings" ▶ Select a new
icon
• To select other folders, press Q and then select an icon.
b
To change the background image
Press
M
[Menu] ▶ "Set background" ▶ select an
image.
Note
• JPEG or GIF images in 130×130 dots or smaller can be used
as an icon. The image size larger than this size is automatically
reduced. The image of the first frame is displayed for an image
in animation GIF format.
Setting Preferentially Displayed Menu
You can set Menu displayed when pressing
M
in Stand-by.
M
▶
M
[Menu] ▶ "Menu priority" ▶
"Custom menu"/"Basic menu" ▶ "Yes"
Switching Menu
While displaying Menu, press
T
[Basic/Custom].
Lighting LED
Setting Incoming Illumination
Patterns
You can set the incoming or alarm illumination to ON/OFF, or
set illumination patterns for each item.
M
▶ "Settings" ▶ "Display" ▶ "Lighting LED"
▶ Perform the following operations
• M[Preview]: Check the illumination set to the selected item.
[Lighting LED]
Set whether to light/blink the illumination light.
[Incoming voice call]
*
Set an illumination pattern for an incoming voice call.
[Incoming video call]
*
Set an illumination pattern for an incoming video call.
[New mail]
*
Set an illumination pattern for incoming mail/MessageR/F.
Continued on next page
114
Sound/Screen/Light Settings
[New Voice mail]
*
Set an illumination pattern to indicate that a new message is
recorded at the Voice mail center.
• This option is valid only when "Tone/Vibration message notification"
is set to "Yes".→P393
[New Record message]
*
Set an illumination pattern to indicate that a new message is
recorded.
[Alarm]
*
Set an illumination pattern at Alarm time.
[IC card(Felica)]
*
Set whether to light or blink an illumination when using the IC card.
[Missed call]
*
Set whether to light or blink an illumination when you missed a call.
[Unread message]
*
Set whether to light or blink an illumination when unread mails, SMS,
or messages exist.
[Low battery]
*
Set whether to light or blink an illumination when the battery level
becomes low.
* Available when "Lighting LED" is set to "ON"
I
[Done]
Note
• The illuminations for "Missed call" and "Unread message"
light/blink for up to 1 hour at 10 seconds interval, and other
illuminations light/blink for up to 30 seconds.
115
Sound/Screen/Light Settings
Continue on the next page
Date&Time format
Setting Clock Display
You can set the display format for date and time.
M
▶ "Settings" ▶ "Date&Time" ▶ "Date&Time
format" ▶ Perform the following operations
[Date format]
Set the display format for the date.
[Time format]
Set the display format for the time.
I
[Done]
Note
• YYYY=year, MM=month, and DD=day in the display.
Calibration
Adjusting Touch Panel
You can set the display format for date and time.
M
▶ "Settings" ▶ "Others" ▶ "Calibration"
Touch the center of "+" at the upper left, upper
right, lower left, lower right, and middle
"Yes" ▶ Check the calibration with the same
operation as Step 2 ▶ "OK"
• If "No" is selected, go to Step 4 without checking the
calibration.
"Yes"


117
Security Settings
Security Code
Security Codes Used on the FOMA Terminal ・・・・・・・ 118
Changing Terminal Security Code
・・・・・・・・・・・・・・・・・・・・・・・・・・・・・・・Change security code 120
Setting PIN Codes ・・・・・・・・・・・・・・・・・・・・・・・・ PIN code 120
Unblocking a Blocked PIN ・・・・・・・・・・・・・・・・・・・・・・・・・・・ 121
Restricting Operations and Functions
on Mobile Phone
Various Lock Functions ・・・・・・・・・・・・・・・・・・・・・・・・・・・・・ 121
Restricting Others from Using ・・・・・・・・・・・・・・Lock all 121
Restricting Making/Receiving Calls ・・・・・・・・・・・・・・・・・ 123
Restricting Display of Phonebook and Schedule etc.
・・・・・・・・・・・・・・・・・・・・・・・・・・・・・・・・・・・・Data access lock 124
Restricting Display of Live Character Park
・・・・・・・・・・・・・・・・・・・・・・・・・・・・Live Character Park lock 125
Preventing the Touch Panel/Key Misoperations
・・・・・・・・・・・・・・・・・・・・・・・・・・・・・・・・・・・・・・・・・・ Touch lock 125
Restricting Outgoing/Incoming Calls
and Messages
Automatically Setting Touch Lock
・・・・・・・・・・・・・・・・・・・・・・・・・・・・・・・・・・・・・ Auto touch lock 126
Setting Display for Redial and Received Calls
・・・・・・・・・・・・・・・・・・・・・・・・・・・・・・・ Display Call/Mail logs 126
Displaying Information Set as Secret
・・・・・・・・・・・・・・・・・・・・・・・・・・・・・・・・・・・・・・・・ Secret mode 127
Rejecting a Call from Specified Number
・・・・・・・・・・・・・・・・・・・・・・・・・・・・・・・・・・・・・・・・Reject on list 127
Rejecting All Incoming Calls ・・・・・・・・・Reject all calls 128
Setting Actions when Calls Arrive from Anonymous
Callers ・・・・・・・・・・・・・・・・・・・・・・・・・・・ Anonymous caller 129
Muting Ring Tone for a Caller Unset in Phonebook
・・・・・・・・・・・・・・・・・・・・・・・・・・・・・・・・・ Set mute ring(sec.) 130
Rejecting a Call from a Caller Unset in Phonebook
・・・・・・・・・・・・・・・・・・・・・・・・・・・・・・・・・・・・・Reject unknown 130
Using Data Security Service
・・・・・・・・・・・・・・・・・・・・・・・・・・・・・・・Data Security Service 131
Resetting Various Functions ・・・・・・・・Reset Settings 132
Deleting Saved Data All at Once ・・・・・ Clear memory 132
Other Security Settings
Other Security Settings ・・・・・・・・・・・・・・・・・・・・・・・・・・・・ 133
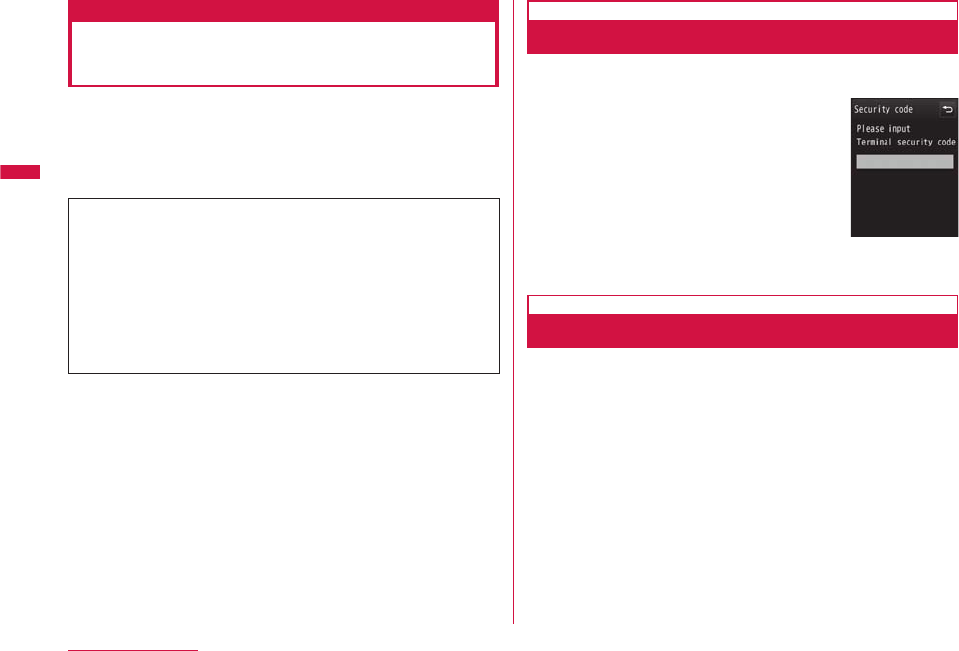
118
Security Settings
Security Codes Used on the
FOMA Terminal
Some functions of the FOMA terminal require a password.
In addition to the Terminal security code, the Network
security code, the i-mode password, etc. are offered. These
passwords help you utilize your FOMA terminal.
• The entered passwords such as the Terminal security code, Network
security code, and i-mode password are displayed as "*".
Cautions on security codes
• Avoid setting a password using your birthday, part of your phone
number, your address or room number, "1111" or "1234", which
can be easily guessed by others. Be sure to write down the set
passwords and store them in a separate location.
• Do not reveal your passwords to others. DOCOMO is not
responsible for damage caused by misuse of your security codes
by others.
• If you forget your passwords, you need to bring your ID (driver's
license, etc.), the FOMA terminal and UIM to the docomo Shop.
For details, contact "General Inquiries" at the back of this manual.
Terminal Security Code
The Terminal security code is set to "0000" by default; you
can change the code yourself.→P120
If the Terminal security code entry screen
appears, enter the 4- to 8- digit code and
press
C
[OK].
Terminal security
code entry
screen
Network Security Code
The Network security code is a 4-digit number to be used for
confirming subscriber's identity at an acceptance of order at
the docomo Shop, docomo Information Center, or "お客様サポー
ト (user support)" and accessing network services. You can
set any number at subscription, and can change the number
yourself.
If you have "docomo ID/Password" for "My docomo" which
is a total support site for a PC, you can change the Network
security code from a PC. From i-mode, you can change the
Network security code by accessing "お客様サポート (user
support)" then "各種設定(確認・変更・利用) (subscriptions &
procedures)".
• For "My docomo" and "お客様サポート (user support)", see the
backside of the back of this manual.
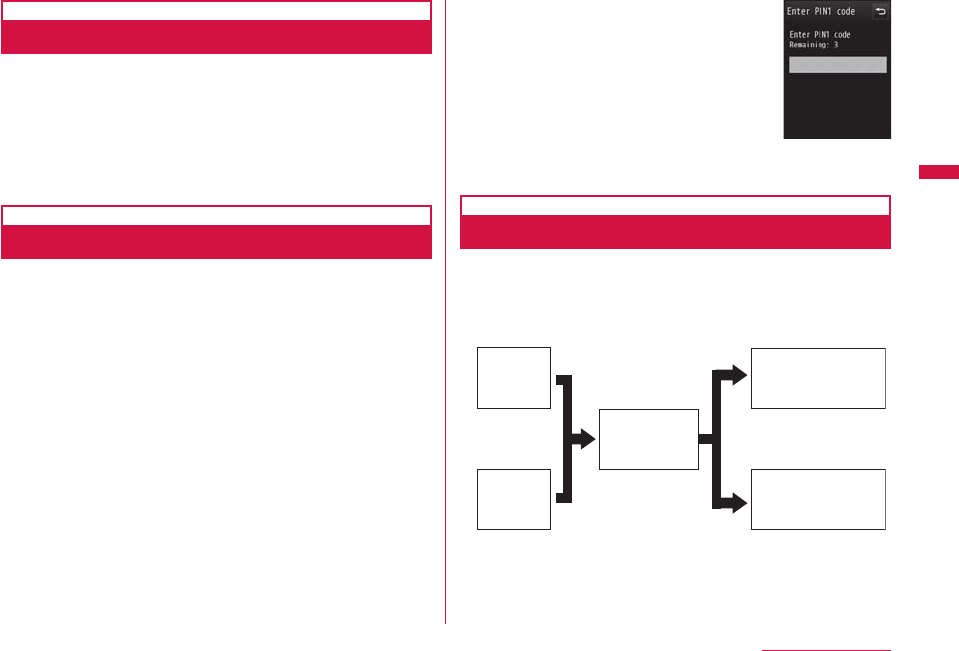
119
Security Settings
Continue on the next page
i-mode Password
The 4-digit "i-mode password" is required to register/remove
contents in My Menu, or subscribe to/cancel message
service, fee-based i-mode services. (Some other information
service providers may set individual passwords.)
The i-mode password is set to "0000" by default; you
can change it yourself. From i-mode, you can change the
password by accessing "iMenu" ▶ "English" ▶ "Options" ▶
"Change i-mode Password".
PIN1/PIN2 Codes
You can set PIN1 and PIN2 codes to the UIM. These
codes are set to "0000" by default. You can change them
yourself.→P120
The PIN1 code is a 4- to 8- digit number (code) required
to identify the user every time the UIM is inserted into the
FOMA terminal or the terminal power is turned on in order to
prevent unauthorized use.
The PIN1 code entry is required to make or receive calls, and
operate the terminal. The PIN2 code is a 4- to 8- digit number
used to reset accumulated call charges, etc.
If the PIN1/PIN2 code entry screen
appears, enter the 4- to 8- digit PIN1/PIN2
code and press
C
[OK].
• Use the PIN1 and PIN2 codes you set
previously if you purchase a new FOMA terminal
and use the current UIM.
PIN1 code entry
screen (Ex.: For
PIN1 code)
PUK Code (PIN Unblock Code)
The PUK code is an 8-digit number used to unblock the PIN1
or PIN2 code.→P121
You cannot change it yourself.
• If you fail to enter the correct PUK code 10 times in a row, the UIM
is locked.
OK
Enter PUK
code (PIN
Unblock Code)
Enter
PIN1 code
Enter
PIN2 code
Set new
PIN1/PIN2 code
Contact the
docomo Shop
Failed 10
times in a row
Failed 3 times
in a row
120
Security Settings
Change security code
Changing Terminal Security Code
You can change the Terminal security code.
M
▶ "Settings" ▶ "Lock/Security" ▶
"Change security code"
Enter the current Terminal security code
The Change security code screen appears.
Enter a new Terminal security code
Re-enter the Terminal security code entered in
Step 3
PIN code
Setting PIN Codes
PIN1 code request
Requiring the PIN1 Code when the
Terminal is Turned On
Set to display the PIN1 code entry screen when the FOMA
terminal is turned on, and reject the use of the FOMA
terminal unless entering the PIN1 code.
M
▶ "Settings" ▶ "Lock/Security" ▶
"PIN code" ▶ Enter the Terminal security code
▶ "PIN1 code request" ▶ "ON"/"OFF" ▶
Enter PIN1 code
Making emergency calls (110, 119, or 118) when the
PIN1 entry screen is open
You can make emergency calls (110, 119, or 118) even when
the PIN1 code entry screen appears right after the FOMA
terminal is turned on.
▶
I
[ER. call] ▶ Select an emergency number ▶
C
[OK]
Change PIN1/PIN2 code
Changing PIN1/PIN2 Code
• Set "PIN1 code request" to "ON" before changing the PIN1 code.
M
▶ "Settings" ▶ "Lock/Security" ▶ "PIN
code" ▶ Enter the Terminal security code
"Change PIN1 code"/"Change PIN2 code" ▶
Enter the current PIN1/PIN2 code
The new PIN1/PIN2 code entry screen appears.
Enter the new PIN1/PIN2 code (4 to 8 digits)
The new PIN1/PIN2 code re-entry screen appears.
Re-enter the PIN1/PIN2 code entered in Step 3

121
Security Settings
Continue on the next page
Unblocking a Blocked PIN
If you enter an incorrect PIN1/PIN2 code 3 times in a row
and the PIN lock screen appears, enter the PUK code to
release the lock.
• You need to set a new PIN1/PIN2 code after unblocking the PIN
code.
PIN lock screen
▶
Enter the PUK code (8 digits)
The new PIN1/PIN2 code entry screen appears.
Enter the new PIN1/PIN2 (4 to 8 digits)
The re-entry screen for confirmation appears.
Re-enter the PIN1/PIN2 code entered in Step 2
Various Lock Functions
Lock
function Description
Reference
Lock all You can lock the FOMA terminal to
prevent unauthorized use. P121
Omakase
Lock If you lost the FOMA terminal, you can
lock the terminal by remote control. P122
Call/Mail
lock To prevent unauthorized use of the FOMA
terminal, you can disable outgoing calls,
address entries with dial keys, incoming
calls or display of mail messages.
P123
Self mode You can disable all network functions,
such as making/receiving calls, using
i-mode, or sending/receiving mails.
P124
Lock
function Description
Reference
Data
access lock You can specify certain functions to lock. P124
Live
Character
Park lock
You can hide Live Character Park. P125
Auto touch
lock
You can set the FOMA terminal to
automatically lock the touch operations
and Keypad to avoid being used in Turn
View Style mode and leave the FOMA
terminal for a certain seconds without any
operations.
P126
Display Call/
Mail logs You can hide redialed call, received call,
sent mail, received mail logs. P126
Secret
mode You can hide secret Phonebook entries or
schedule events. P127
Lock all
Restricting Others from Using
You can lock the FOMA terminal to prevent anyone from
using it.
• When Lock all is activated, any operations other than turning power
ON/OFF, making emergency calls, answering incoming voice/
videophone calls, and canceling Lock all are disabled.
M
▶ "Settings" ▶ "Lock/Security" ▶ "Lock" ▶
"Lock all" ▶ Enter the Terminal security code ▶
"Yes"/"No"
Continued on next page
122
Security Settings
Note
• Even if mail or MessageR/F arrives while Lock all is activated,
the Receive results screen or icon is not displayed.
• While Lock all is activated, the i-Channel ticker does not appear.
Calling emergency numbers (110, 119, or 118) during
Lock all
Emergency numbers (110, 119, or 118) can be called during Lock all.
▶
I
[Emergency]
▶
Select an emergency number
▶
C
[OK]
Canceling Lock all
▶
Touch "Unlock"/Press any key ▶ Enter the Terminal security code
If you fail to enter the correct Terminal security code 5 times in a
row, the terminal automatically turns power off.
Omakase Lock
Using Omakase Lock
You can lock your personal information such as Phonebook
entries and the IC card functions of Osaifu-Keitai by contacting
DOCOMO when you lost the FOMA terminal and other cases.
Your important privacy and Osaifu-Keitai will be protected.
If Omakase Lock cannot be set at the subscription and
communication becomes available within a year, the lock is
automatically activated. However if you cancel or halt the
contract, change your phone number, or issue a new UIM due
to loss (only when locked the terminal by specifying numbers),
the lock will not be automatically activated even within a year.
The FOMA terminal can be unlocked upon your request.
*
If you are the docomo Premier Club member, no charges apply to use
this service as many times as you want. If you are not the docomo
Premier Club member, charges apply (however, if you subscribe to
this service upon or during suspension of the FOMA terminal, no
charges apply.) Also, if you subscribe to Keitai Anshin Pack (Mobile
Phone Security Package), you can use this service within the Keitai
Anshin Pack flat rate fee.
Setting/canceling Omakase Lock
0120−524−360 Available 24 hours a day
(In Japanese only)
* Setting/canceling the lock is available from the My docomo site
using a PC.
* For details about Omakase Lock, see "Mobile Phone User's Guide
[i-mode] FOMA version".
When Omakase Lock is set, "Omakase Lock activated" appears.
• During Omakase Lock, operations except answering voice/
videophone calls or turning power ON/OFF are unavailable and each
function (including the IC card functions) cannot be used.
• Receiving voice/videophone calls is available. However, only phone
number appears and the name or image saved in the Phonebook
does not appear.
• The received mails during Omakase Lock are stored in the i-mode
center.
• Turning power ON/OFF is available. However, turning power OFF
does not cancel the lock.
• The UIM or microSD card cannot be locked.
123
Security Settings
Continue on the next page
Note
• Even when other functions are activated, relevant functions are
ended and the lock is activated.
• Even while other lock function is set, Omakase Lock can be
used. However, if Omakase Lock is set during Public mode
(Drive mode), voice/videophone calls also cannot be received.
• When the FOMA terminal is out of service area, turned OFF, or
used overseas, the lock cannot be activated nor deactivated.
Also, depending on the usage status of the FOMA terminal, the
lock may not be activated.
• If you subscribe to Dual Network Service and the mova service
is in use, the lock cannot be activated.
•
Even when the subscriber is different from the user of the
FOMA terminal, the lock is activated upon the request from the
subscriber.
• Omakase Lock can be canceled only if the UIM phone number
that is the same as the one used when Omakase Lock is
activated is inserted in the FOMA terminal. If the lock cannot be
canceled, contact "General Inquiries" at the back of this manual.
Restricting Making/Receiving
Calls
Call/Mail lock
Disabling Outgoing or Incoming
Communications
You can disable making calls, entering an address with dial
keys, answering calls, or displaying mails.
M
▶ "Settings" ▶ "Lock/Security" ▶ "Lock" ▶
"Call/Mail lock" ▶ Enter the Terminal security
code ▶ Perform the following operations
[Call/Mail lock set]
Set whether to activate the Call/Mail lock.
[Dialing call]*
Disable the following operations.
• Making calls by entering numbers with dial keys
• Making calls via the received call logs
• Making calls to redial phone numbers (making a call to a number
saved in the Phonebook or an emergency number such as "110",
"119", or "118" is available)
• Saving, editing, or deleting a Phonebook entry (including
exchanging data via infrared communication, or copying/moving to
the microSD card)
[Send mail]*
Disable the following operations.
• Entering a mail address with dial keys.
• Sending mail to an address in the redial or received mail logs
(sending mails to an address saved in the Phonebook is available).
• Performing data communications connecting to a PC, etc.
• Saving, editing, or deleting a Phonebook entry (including
exchanging data via infrared communication, or copying/moving to
the microSD card).
[Incoming call]*
Disable incoming calls. While this function is activated, a missed call
icon does not appear and the received call log cannot be viewed.
[Rcv. mail display]*
Disable viewing sent/received mails and MessageR/F. While this
function is activated, an icon indicating incoming mail does not
appear, and mails and received mail log in the FOMA terminal cannot
be viewed.
* Can be set when "Call/Mail lock set" is set to "ON".
I
[Done]
124
Security Settings
Self mode
Stopping All Incoming/Outgoing
Transmissions
You can disable all network functions, such as making/
receiving calls, using i-mode, or sending/receiving mails.
Infrared data communication is also unavailable.
M
▶ "Settings" ▶ "Call/VT/Dialing" ▶ "Self
mode" ▶ "Yes"/"No"
Note
• Self mode is deactivated if you call an emergency number
("110", "119", or "118").
• While Self mode is activated, callers will hear a message
indicating that the FOMA terminal is turned off or out of service
area.
• The Voice mail service and the Call forwarding service still work
in Self mode.
• All mails and MessageR/F received while in Self mode are
stored at the i-mode center and SMS is stored at the SMS
center. To receive them, deactivate Self mode and check new
messages/SMS.
• If a call arrives while Self mode is activated, a missed call icon
does not appear on the Stand-by display after the Self mode is
deactivated.
Data access lock
Restricting Display of
Phonebook and Schedule etc.
You can lock specified functions to reject the use unless the
Terminal security code is entered, or restrict the use of the
FOMA terminal.
M
▶ "Settings" ▶ "Lock/Security" ▶ "Lock"
▶ "Data access lock" ▶ Enter the Terminal
security code ▶ Perform the following
operations
[Data access lock]
Set whether to activate the Data access lock.
[Phonebook]*
Set to disable the Phonebook until the Terminal security code is
entered.
• In the Redial list or logs, the phone number or mail address of the
caller/sender will be displayed instead of the name saved in the
Phonebook.
• Receiving Phonebook entries using infrared communication
becomes unavailable.
[Data Box]*
Set to disable the files in Data Box until the Terminal security code
is entered.
• Receiving data such as images or melodies to be saved in Data
Box using infrared communication becomes unavailable.
[Record message]*
Set to disable the Record message until the Terminal security code
is entered.
• If the Record message is set to "ON" and locked, does not
appear in the Stand-by display even when a message is recorded.
125
Security Settings
Continue on the next page
[Schedule]*
Set to disable the Schedule function until the Terminal security code
is entered.
• An alarm set for a Schedule event does not sound.
• Receiving schedule events using infrared communication becomes
unavailable.
[i-mode]*
Set to disable the i-mode function until the Terminal security code is
entered.
• i-mode connections from other than the i-mode menu screen, such
as "Web To" become unavailable.
• i-Channel ticker is not displayed.
• Pattern definition for the scanning function becomes unavailable.
• Receiving bookmarks using infrared communication becomes
unavailable.
• Communication from i-αppli is available.
• i-αppli update is available from i-αppli menu.
[i-αppli]*
Set to disable the i-αppli until the Terminal security code is entered.
• Receiving i-αppli data using infrared communication becomes
unavailable.
• If i-αppli is set as the Stand-by display, it will disappear from the
Stand-by display.
* Can be set when "Data access lock" is set to "ON".
I
[Done]
Note
• You can access the functions by entering the Terminal security
code when:
- You access a function from the Main menu or Custom menu.
- You press a key assigned to access the function in Stand-by.
- You access a function from the New task screen (P349) or
Task list screen (P350).
Live Character Park lock
Restricting Display of Live
Character Park
You can restrict the display of Live Character Park unless
the Terminal security code is entered.
• Only available to display the Live Character Park screen from the
Stand-by display. If performed from the Live Character Park screen,
the screen returns straight to the Live Character Park screen.
M
▶ "Settings" ▶ "Lock/Security" ▶ "Lock" ▶
"Live Character Park lock" ▶ Enter the Terminal
security code
Perform this operation to switch ON and OFF.
Touch lock
Preventing the Touch Panel/Key
Misoperations
Disable the use by locking touch panel and keys at the time
of the FOMA terminal in Turn View Style mode.
Setting Touch Lock
While the FOMA terminal is in Turn View Style
mode ▶
Y
Releasing Touch Lock
While the FOMA terminal is in Turn View Style
mode ▶ Touch
Y
(for 1+ seconds)/ (for
1+ seconds)
• You can also release the Touch lock by opening the FOMA
terminal.
Continued on next page
126
Security Settings
Note
• While 1Seg, Camera, or music playback function (except BGM),
etc. is in use, Touch lock is not applied.
• If a call arrives during Touch lock, the Incoming call screen, etc.
appears and operations become available temporarily.
• During background playback, you can adjust the volume by
pressing
F
/
E
even if Touch lock is set.
• If Auto touch lock (P126) is set, Touch lock is applied
automatically after a certain period of time.
• Touch lock cannot be set in some occasions such as during a
call, while making a call, or communicating.
Auto touch lock
Automatically Setting Touch
Lock
You can automatically lock and disable touch operations and
keys if the FOMA terminal does not operate for a certain
period of time with the FOMA terminal in Turn View Style
mode.
M
▶ "Settings" ▶ "Lock/Security" ▶ "Auto
touch lock" ▶ Select a lock method
OFF : Do not activate Auto touch lock.
After 15 sec. : Activate Touch lock 15 seconds after the last
operation of the FOMA terminal in Turn View
Style mode.
After 30 sec. : Activate Touch lock 30 seconds after the last
operation of the FOMA terminal in Turn View
Style mode.
After 60 sec. : Activate Touch lock 60 seconds after the last
operation of the FOMA terminal in Turn View
Style mode.
When LCD off : Activate Touch lock when the display turns off
in Turn View Style mode.
Display Call/Mail logs
Setting Display for Redial and
Received Calls
You can disable the display of redial, received call, sent mail,
and received mail logs.
M
▶ "Settings" ▶ "Lock/Security" ▶
"Display Call/Mail logs" ▶ Enter the Terminal
security code
Move the cursor to an item to set ▶
C
[ON/OFF]
The items set to "OFF" cannot be displayed.
Redial logs : Set whether to display the redial logs.
Rcv. call logs : Set whether to display the received call logs.
Sent mail logs : Set whether to display the sent mail logs.
Rcv. Mail logs : Set whether to display the received mail logs.
Note
• If "Rcv. call logs" is set to "OFF", the recorded message list is
not displayed.
127
Security Settings
Continue on the next page
Secret mode
Displaying Information Set as
Secret
You can set whether to display secret Phonebook entries/
Schedule events.
M
▶ "Settings" ▶ "Lock/Security" ▶ "Secret
mode" ▶ Enter the Terminal security code ▶
Select a Secret mode setting
OFF : Display only general data other than secret
data.
Secret mode : Display secret and general data.
Secret data only
: Display only secret data.
Reject on list
Rejecting a Call from Specified
Number
You can reject calls from the specific parties saved on the
list.
• This function is available only when the caller sends caller ID.
• It is recommended that you set the Caller ID request service
concurrently.
Saving Phone Numbers to Reject
You can save and edit up to 20 phone numbers to reject.
M
▶ "Settings" ▶ "Call/VT/Dialing" ▶
"Incoming call" ▶ "Accept/Reject call" ▶ Enter
the Terminal security code ▶ "Edit reject list"
Reject list screen
Continued on next page

128
Security Settings
Select an empty list number ▶ Enter a phone
number to reject ▶ "Silent"/"Disconnect call"
Silent : Mute the ring tone.
Disconnect call : Incoming call actions are not performed.
•
M
[Search]: Invoke a phone number to reject from the
Phonebook.
Deleting a saved phone number
Select a number to delete on the Reject list screen ▶ select
"Delete".
Editing a saved phone number
Select a number to edit on the Reject list screen ▶ select "Edit".
Setting the Reject on List
M
▶ "Settings" ▶ "Call/VT/Dialing" ▶
"Incoming call" ▶ "Accept/Reject call" ▶ Enter
the Terminal security code ▶ "Accept/Reject
set" ▶ "Reject on list"
b
To cancel the rejection
Select "Accept" on the screen after selecting "Accept/
Reject set".
Note
• When the Reject on list is activated, and a call from a party
saved as "Disconnect call" arrives, appears on the Stand-by
display and the call is recorded in the Received call log as a
missed call. The other party hears a busy signal.
• i-mode mail or SMS messages are received regardless of the
rejection settings.
Reject all calls
Rejecting All Incoming Calls
You can mute the ring tone for all incoming calls or
disconnect calls before incoming call actions are performed.
M
▶
"Settings"
▶
"Call/VT/Dialing"
▶
"Incoming
call"
▶
"Accept/Reject call"
▶
Enter the Terminal
security code
▶
"Accept/Reject set"
▶
"Reject all
calls"
▶
"Silent"/"Disconnect call"
Silent : Mute the ring tone for all incoming calls.
Disconnect call : Do not perform incoming call actions for all
incoming calls.
b
To cancel the rejection
Select "Accept" on the screen after selecting "Accept/
Reject set".
Note
• When a call arrives while "Disconnect call" is set, the call is not
notified and appears on the Stand-by display. The call is
recorded in the Received call log as a missed call. The other
party hears a busy signal.
• i-mode mail or SMS messages are received regardless of the
rejection settings.
129
Security Settings
Continue on the next page
Anonymous caller
Setting Actions when Calls
Arrive from Anonymous Callers
You can set whether to accept or reject calls without caller
ID per reason for anonymous call.
M
▶ "Settings" ▶ "Call/VT/Dialing" ▶
"Incoming call" ▶ "Anonymous caller" ▶
Enter the Terminal security code ▶ Perform the
following operations
[User unset]
Set options for incoming calls without caller ID at the caller's will.
Response : Set response method for anonymous caller.
Disable : Cancel the setting.
Reject call : Reject incoming calls.
Silent alert : Mute the ring tone. You can select an image for the
incoming call from images saved in "My picture" of
"Data Box".→P296
Alert setting : Select an image and ring tone for the incoming call
from data in "Data Box".
Incoming call
image : Set an image for anonymous caller.
▶ "Terminal setting"/"Image"/"i-motion" ▶ Select an
image
Ring tone : Set ring tone for anonymous caller.
▶ "Terminal setting"/"MUSIC"/"i-motion"/"Melody" ▶
Select a ring tone
• If Chaku-Uta Full
®
saved in "MUSIC" is selected, go
to Step 3 in "Setting a Chaku-Uta Full
®
Song as a
Ring Tone" (P266).
[Pay phone]
Set options for calls made from payphones.
• Set items and operations are the same as in "User unset".
[Not support]
Set options for calls for which caller ID cannot be sent such as calls
made from overseas or from a land-line phone via forwarding services.
(Caller ID may be sent depending on the carrier.)
• Set items and operations are the same as in "User unset".
Note
• If an anonymous call set to "Reject call" arrives while the
Anonymous caller is activated, the call is not notified and
appears on the Stand-by display. The call is recorded in
Received call log as a missed call. The other party hears a
busy signal. Calls are rejected even when the Voice mail or
Call forwarding service is activated. However, if Ringing time is
set to 0 second or the FOMA terminal is out of service area or
turned power off, network services are activated.
• i-mode mail or SMS messages are received regardless of the
rejection settings.
• If "Select ring tone" (P100) or "Call & Mail image" (P109)
is set with a moving picture/i-motion with audio/video for a
specific caller and change either of them, the default sound or
image, even if the response method is set to "Alert setting", is
played for "Ring tone" or "Incoming call image" with the setting
unchanged.
• If a moving picture/i-motion with video/sound is set as either
"Incoming call image" or "Ring tone", the same moving picture/
i-motion is set for the other item.
<User unset>
• If the Caller ID request service is activated, it takes priority over
the settings of "Anonymous caller". The caller hears the voice
guidance for a Caller ID request.
130
Security Settings
Set mute ring(sec.)
Muting Ring Tone for a Caller
Unset in Phonebook
You can set the FOMA terminal not to ring immediately when
a call arrives from a caller not saved to the Phonebook or
without caller ID. This prevents nuisance calls such as "one-
ring call" that are disconnected after a short ringing time.
M
▶ "Settings" ▶ "Sounds&Vibration" ▶
"Set mute ring(sec.)" ▶ Perform the following
operations
[Set mute ring time]
Set whether to enable the Set mute ring time.
[Mute time]*
Set the time for which the ring tone is muted before the ringing
action starts between 1 and 99 seconds.
[Missed call logs]*
Set whether to display the Received call logs for the call that was
terminated in the time specified in "Mute time".
* Can be set when "Set mute ring time" is set to "ON".
I
[Done]
Note
• When a relevant call arrives while this function is activated,
incoming call actions, such as sounding the ring tone, do not
take place for the set time; however, the Incoming call screen
appears.
• This function operates even when "Secret mode" is set to "OFF"
or a call from a operates Phonebook entry arrives.
<Set mute ring time>
• If this option is set longer than the response time of the Voice
mail/Call forwarding service, network services start without the
ringing action.
• If this option is set longer than "To answer" time of "Record
message", the Record message starts without the ringing
action.
• You cannot set "Set mute ring time" when "Reject unknown" is
set to "ON".
Reject unknown
Rejecting a Call from a Caller
Unset in Phonebook
You can set to reject calls from callers not saved to the
Phonebook or without caller ID.
• It is recommended that you set the Caller ID request service
concurrently.
M
▶ "Settings" ▶ "Call/VT/Dialing" ▶
"Incoming call" ▶ "Accept/Reject call" ▶ Enter
the Terminal security code ▶ Move the cursor
to "Reject unknown" ▶
C
[ON/OFF]
131
Security Settings
Continue on the next page
Note
• The FOMA terminal does not perform incoming call actions for
a rejected incoming call, however, the call is recorded in the
Received call log. The other party hears a busy signal.
• Calls are rejected even when the Voice mail or Call forwarding
service is activated. However, if the ringing time is set to 0
second, network services start.
• i-mode or SMS messages are received regardless of the
rejection settings.
• You cannot activate "Reject unknown" when "Set mute ring
time" is set to "ON" or "Data access lock" is set to "ON" with
"Phonebook" marked.
Data Security Service
Using Data Security Service
This service enables you to back up the Phonebook, images
and mails ("Saved data") at the DOCOMO's Data Center so
that the Saved data can be restored if you lose your FOMA
terminal or when changing models. Also, you can notify all
connected parties of your mail address change at a time. No
packet communication charges apply for sending the multi-
address notice mail. If you have a PC (My docomo), you can
use this service more conveniently.
• For details about the Data Security Service, see "Mobile Phone
User's Guide [i-mode] FOMA version".
• The Data Security Service is a fee-based service requiring a
separate subscription (The i-mode contract is necessary for this
subscription).
Saving the FOMA Terminal Phonebook at
the Data Security Center
M
▶ "LifeKit" ▶ "Data security service" ▶
"Connect to center" ▶ Enter the Terminal
security code ▶ "Yes"
Note
•
You cannot save the UIM Phonebook.
•
If another Phonebook is saved already, the data is updated.
•
Note that if you use this service after deleting the Phonebook entries
in the FOMA terminal, the Phonebook entries saved at the Data
Center are deleted likewise.
•
You can restore the Phonebook or use Set auto-update from iモ
ードの電話帳お預かりサイト (i-mode's Data Security Service). "iMenu"
▶
"English"
▶ "My Menu"
▶
select "電話帳お預かり (Data Security
Service)".
Displaying Exchanging History
Display exchanging history with the Data Center.
M
▶ "LifeKit" ▶ "Data security service" ▶
"Exchanging history" ▶ Select an exchanging
history
• Move the cursor to an exchanging history and press
M
[Menu]
to select "Delete one" or "Delete all".
Setting whether to Send Images Set for the Phonebook
Set whether to save images set for the Phonebook entries to
the Data Center.
M
▶ "LifeKit" ▶ "Data security service" ▶
Move the cursor to "Sndg img in phonebook" ▶
C
[ON/OFF]
132
Security Settings
Saving Images/Mails to the Data Center
Example: To save images saved in "My picture"
M
▶ "Data Box" ▶ "My picture" ▶ Move the
cursor to a folder ▶
C
[Open]
M
[Menu] ▶ "Store in center" ▶ Mark images
to save ▶
I
[Done] ▶ Enter the Terminal
security code ▶ "Yes"
Note
• Only images and mail saved in the FOMA terminal can be saved.
• SMS reports cannot be saved.
• An image larger than 100KB cannot be saved.
• Files attached to i-mode mail will not be saved.
• SMS with Korean text cannot be saved.
Reset Settings
Resetting Various Functions
You can reset settings of various functions to the defaults.
• For functions that can be reset to the defaults, refer to "Menu List"
(P430).
M
▶ "Settings" ▶ "Others" ▶"Reset/Clear" ▶
"Reset Settings" ▶ "Yes" ▶ Enter the Terminal
security code
Note
• Perform "Reset Settings" with the battery level sufficient.
• During "Reset Settings", functions/communication cannot be
used.
Clear memory
Deleting Saved Data All at Once
You can delete saved data.
M
▶ "Settings" ▶ "Others" ▶ "Reset/Clear" ▶
"Clear memory"
Mark items to delete ▶
I
[Done] ▶ "Yes" ▶
Enter the Terminal security code
■ Data to be deleted
Item Data
Pre-installed
data Default data in "Data Box"*1
User data All data other than pre-installed data in "Data Box"
PIM data Data in "Phonebook"*2/"Schedule"/"Text memo"/
"Sketch memo"/"To do list"/"Remembering
dates"/"1Seg", data in Inbox/Outbox*3, data in
Bookmark, Screen memo, URL history, settings
in Additional service and Additional guide of the
network service
*1 Kisekae Tool data is not deleted.
*2 The total calls cost is not deleted.
*3 Inbox/Outbox folders, MessageR/F folders, and mail-connected
i-αppli folder are not deleted.
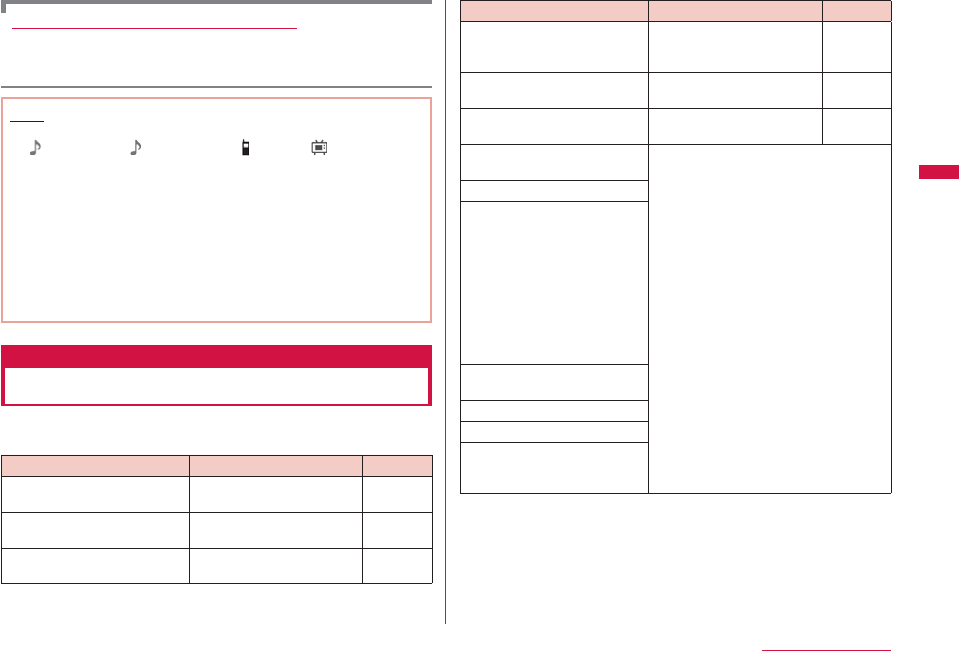
133
Security Settings
Continue on the next page
Deleting data saved on the microSD card
You can delete all data saved on the microSD card.
M
▶ "Settings" ▶ "Others" ▶ "Reset/Clear" ▶ "Clear microSD"
▶ "Yes" ▶ Enter the Terminal security code
Note
• Data saved on the UIM are not deleted.
• " Welcome Mail " and "Welcome ドコモ動画 " are deleted.
<Pre-installed data>
• Some files that are used for default settings are not deleted.
• The use of WOW LG
If you deleted pre-installed i-αppli, Deco-mail pictures, Deco-mail
pictograms, wallpapers (the Stand-by display), frames, stamps,
melodies, or i-motion and want to restore it, visit site, "WOW LG"
in iMenu and you can download.*
"iMenu" ▶ "メニューリスト (Menu list)" ▶ "ケータイ電話メーカー
(Mobile Phone Manufacturers)" ▶ "WOW LG"
*Packet communication charges apply for downloading.
Other Security Settings
In addition to the security settings described in this chapter,
the following functions/services are available.
Function name/Service name
Purpose
Reference
IC card lock
To prevent unauthorized
use of the IC card function
P292
Nuisance call blocking
service To reject "nuisance call" P397
Caller ID request service To reject a call from a
caller without caller ID P398
Function name/Service name
Purpose
Reference
Software Update To update software on
the FOMA terminal when
necessary
P459
Scanning function
To protect the FOMA
terminal from harmful data
P464
Receive option To accept only necessary
mails out of mass mails P149
i-mode Disaster Message
Board Service
See "Mobile Phone User's Guide
[i-mode] FOMA version".
Change your mail address
Spam Mail Prevention
(Reject Mail with URLs)
( Reject/Receive Mail
Settings)
(Kantan Mail Settings)
( Reject Mass i-mode Mail
Senders)
(SMS Rejection Settings)
( Reject Unsolicited Ad Mail)
( Confirm Settings)
Suspending/reactivating
mail functions
Limiting mail size
Keitai-Osagashi Service
imadoco kantan search
(Location Search Service
Lite)
Continued on next page

134
Security Settings
Note
• The order of precedence when the function to prevent nuisance
calls is set concurrently is the following:
a "Nuisance call blocking service"
b "Reject on list"
c "Reject unknown"
d "Accept/Reject call"
e "Anonymous caller"

135
Mail
Mail Functions of FOMA Terminal ・・・・・・・・・・・・・・・・・・・ 136
i-mode Mail ・・・・・・・・・・・・・・・・・・・・・・・・・・・・・・・・・・・・・・・・・・ 136
Displaying Mail Menu ・・・・・・・・・・・・・・・・・・・・ Mail menu 137
Composing i-mode Mail/Deco-Mail
Composing and Sending i-mode Mail
・・・・・・・・・・・・・・・・・・・・・・・・・ Compose/Send i-mode mail 138
Creating and Sending Deco-mail ・・・・・・・・・・Deco-mail 141
Using a Template to Create Deco-mail ・・・・ Template 144
Attaching a File ・・・・・・・・・・・・・・・・・・・・・・・・ Attachment 146
Receiving and Operating i-mode Mail
When You Receive i-mode Mail
・・・・・・・・・・・・・・・・・・・・・・・・・・Receive mail automatically 147
Receiving i-mode Mail Selectively ・・・ Receive option 149
Checking New i-mode Mail ・・・Check new messages 150
Replying to i-mode Mail ・・・・・・・・Reply to i-mode mail 151
Forwarding i-mode Mail to Other Address
・・・・・・・・・・・・・・・・・・・・・・・・・・・・・・・・・Forward i-mode mail 151
Adding Mail Addresses/Phone Numbers to
Phonebook ・・・・・・・・・・・・・・・・・・・・・・・・・・・・・・・・・・・・・・・・・・ 152
Playing/Saving an Attached File from i-mode
Mail ・・・・・・・・・・・・・・・・・・・・・・・・・・・・・・・・・・・・・・・・・・・・・・・・・ 152
Operating Mailbox
Displaying Mail in Inbox/Outbox or Unsent
Messages ・・・・・・・・・・Inbox/Outbox/Unsent message 154
Using Mail History
Using Mail History
・・・・・・・・・・・ Received mails/Sent mails/Recent mails 166
Configuring Mail Settings
Setting Mail Functions of the FOMA Terminal
・・・・・・・・・・・・・・・・・・・・・・・・・・・・・・・・・・・・・・・・・ Mail setting 168
Using Message Services
When You Receive Message ・・・・・ Receive Message 172
Checking New Message ・・・・・Check new messages 173
Displaying New Message ・・・・MessageR/MessageF 174
Using SMS
Composing and Sending SMS
・・・・・・・・・・・・・・・・・・・・・・・・・・・・・・・・ Compose/Send SMS 176
When You Receive SMS Messages ・・・Receive SMS 177
Checking New SMS Messages ・・・・Check new SMS 177
Setting SMS ・・・・・・・・・・・・・・・・・・・・・・・・・ SMS Settings 178
136
Mail
Mail Functions of FOMA Terminal
The FOMA terminal provides 2 mail types: i-mode mail and
SMS.
• Using i-mode mail requires i-mode subscription.
• Using SMS requires no i-mode subscription.
• If you send i-mode mail or SMS containing some symbols
(, , etc.) or pictographs, they may not be displayed properly on
a mobile phone other than i-mode terminal or on a PC.
• Mail function in Korean is supported only by SMS. If you receive
e-mail in Korean via i-mode mail, text will not be displayed properly.
i-mode Mail
Upon subscription to i-mode, you can send and receive
e-mail via the Internet, as well as between i-mode terminals.
In addition to the message text, a total of 2MB in 10 files
(pictures or moving pictures, etc.) can be attached. Also,
Deco-mail is supported, in which you can change the color
and size of message text or background color. You can also
use Deco-mail pictogram to send expressive mail easily.
• For details about i-mode mail, see "Mobile Phone User's Guide
[i-mode] FOMA version".
SMS
You can send and receive text messages using only mobile
phone numbers without subscription to i-mode.
Sending→P176, Receiving→P177, Checking→P177
SMS Addresses
The SMS address is the "subscribed mobile phone number".
•
You can send and receive SMS to/from terminals that use international
carriers other than DOCOMO. Visit the DOCOMO International Services
website for available countries and international carriers.
Number of Characters that Can be Sent or Received
The number of characters that can be sent and received in
SMS is as follows:
Receiver 21 characters (including "+")
SMS text Japanese (70 characters), Korean (70 characters)
English (160 characters)
Sending and Receiving SMS in Korean
You can send and receive SMS in Korean to/from terminals
that support Korean.
•
Use L-03B to send and receive international SMS in Korean to/from
Korean-support terminals of Korea and other international carriers.
Visit the DOCOMO International Services website for international
carriers that support international SMS. The number of characters
that can be sent depends on the situation of each recipient carrier.
For details, contact recipient carriers.
• SMS texts in Korean sent to a terminal which does not support
Korean will not be displayed properly on the terminal.
• Switching input modes in SMS message to Korean→P178
• Entering in Korean→P382

137
Mail
Continue on the next page
When SMS Cannot be Received
SMS delivered to the SMS center will be immediately sent
to your FOMA terminal. However, when your FOMA terminal
is turned off or out of service area, the SMS is stored in the
SMS center.
Note
• The maximum storage period of SMS in the SMS center is 72
hours. You can specify the storage period from "SMS validity
period".→P178
• Expired SMS is automatically deleted.
• SMS stored in the SMS center can be received by "Check new
SMS".→P177
• When SMS stored in the SMS center is delivered, it is deleted
from the SMS center.
Mail menu
Displaying Mail Menu
Stand-by display ▶
g
Mail menu screen
Perform the following operations
[Inbox]
Display the Inbox list screen.→P154
[Compose message]
Create new i-mode mail.→P138
[Unsent message]
Display the Unsent mail list screen.→P155
[Outbox]
Display the Outbox list screen.→P155
[Check new messages]
Receive i-mode mail stored in the i-mode center by checking new
messages.→P150
[Receive option]
Check subjects of i-mode mail stored in the i-mode center, and select
mail to be received, or deleted without reception from the i-mode
center.→P149
[SMS]
Compose new SMS, or receive SMS stored in the SMS center by
checking new SMS.→P176, P177
[Template]
Display a list of saved templates.→P145
[Mail setting]
Set mail functions.→P168
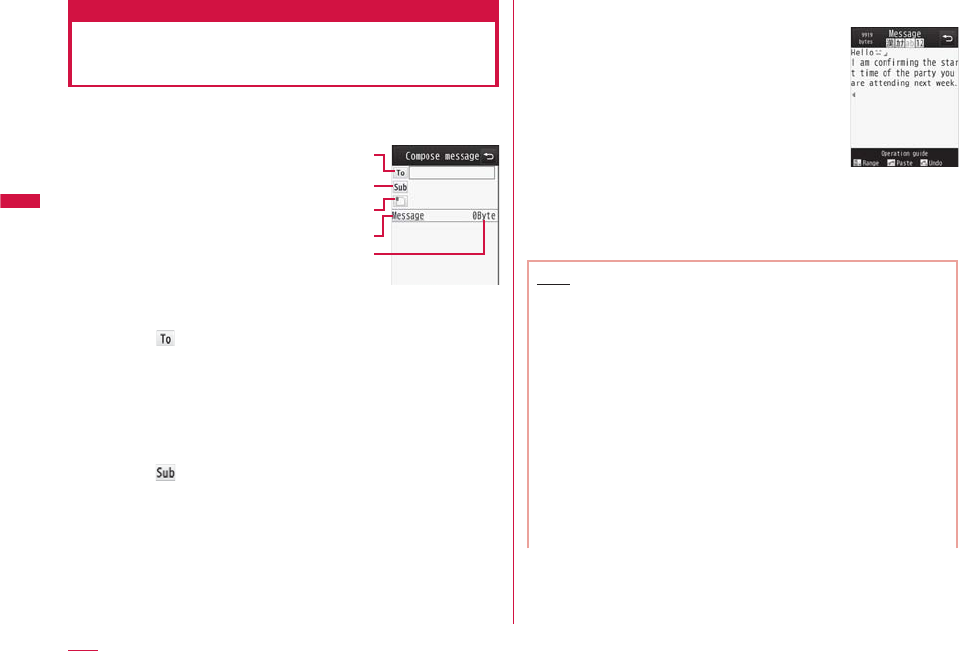
138
Mail
Compose/Send i-mode mail
Composing and Sending i-mode
Mail
Mail menu screen (P137) ▶ "Compose
message"
Compose
message screen
Receiver
Subject
Attachment
The total number of
bytes of characters
and decoration in
the message text
Message
Select field ▶ "Direct input" ▶ Enter the
address
• Up to 50 half-pitch characters can be entered.
• The address can be selected from Sent message log, Received
message log, Phonebook, or Mail group.→P139
• Also, press
T
[Ph. book] to select an address from the
Phonebook.
Select field ▶ Enter the subject
• Up to 15 full-pitch or 30 half-pitch characters can be entered.
Select [Message] field ▶ Enter the message
• Up to 5,000 full-pitch or 10,000
half-pitch characters can be entered.
Message text
entry screen
I
[Send]
• T
[Save]: Save as unsent message.
Note
• To decorate message text→P141
• To send with attachments→P146
• You can insert a line feed in the message text. The line feed is
counted as 1 full-pitch character.
• A space inserted by pressing
R
is counted as 1 half-pitch
character.
• Characters may not be sent to the receiver depending on the
signal strength.
• Half-pitch katakana and pictographs except for mail exchanged
between i-mode terminals may not be displayed correctly.
• The secret code is added automatically when mail is sent with
the secret code set. However, the address of the sent mail
does not display the added secret code.
• Even if i-mode mail is sent successfully, an error message
indicating failure of sending mail may appear depending on the
signal strength.

139
Mail
Continue on the next page
• If you use Deco-mail pictogram (Picto. D) in mail, the mail is
automatically sent as Deco-mail.
• If you send a mail with pictographs added to the subject or
message text to the other carrier's mobile phone, they will
be automatically replaced with the similar pictographs that
the carrier/mobile phone supports. However, they may not be
displayed properly depending on the mobile phone type or its
functions.
• i-mode mail that is successfully sent will be saved in Outbox.
If the total number or total size of the stored sent mail exceeds
the limit, the oldest mail will be deleted first. Protect sent mail
that you want to keep.
Compose Message Screen Sub Menu
Compose message screen (P138) ▶
M
[Menu] ▶ Perform the following operations
[Send]
Send mail.
[Auto send]
Send i-mode mail that was composed in out of service area
automatically when the terminal moves to the place where signal can
be received.
[Save]
Save mail being created or edited in Unsent message.
[Address]
Add address : Send mail to multiple addresses (multi-address
transmission). Up to 5 addresses can be added.
Sent msg. log : Select an address from Sent message log.
Rcv. msg. log : Select an address from Received message log.
Phonebook : Select an address from Phonebook.
Mail group : Select an address from Mail group.
Direct input : Enter the receiver address directly.
Delete address : Delete a selected receiver address.
Change rcv. type : Change the selected receiver address type.
Change to To : Change the selected receiver to To. The mail
address entered in the To field will be shown to
the recipient.
Change to Cc : Change the selected receiver to Cc. You can
specify additional addresses to send a copy of
the same mail to other recipients in addition to
the direct recipients. The mail address entered in
the Cc field will be shown to other recipients.
• The mail address may not be displayed
depending on the recipient's mobile phone,
device or mail software.
Change to Bcc : Change the selected receiver to Bcc. You can
specify addresses to hide from other recipients.
The mail addresses entered in the Bcc field will
not be shown to other recipients.
[Attachment]
Attach, view/play, or delete files.→P146
[Template]
Load template : Load a template to create Deco-mail.→P144.
Save as template : Save the current Deco-mail as a template.
[Header/Sign.]
Attach header : Attach the set header.
Attach sign. : Attach the set signature.
Continued on next page
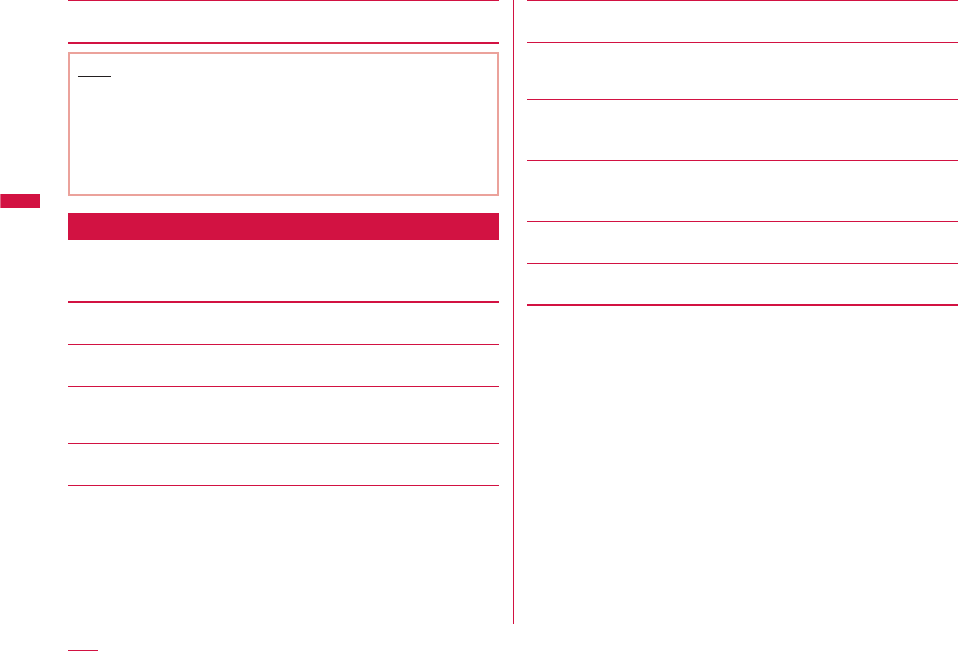
140
Mail
[Delete body]
Delete the message text.
Note
<Add address>
• When selecting a Phonebook entry with multiple mail addresses
saved, you need to further specify which addresses are to be
added for recipients.
<Template>
• If the message text is already entered, a confirmation whether
to delete the text appears. To load the template, select "Yes".
Message Text Entry Screen Sub Menu
Message text entry screen (P138) ▶
M
[Menu] ▶ Perform the following operations
[Decorate mail]
Open the palette to select the decoration to Deco-mail.→P142
[Common phrases]
Enter or edit Common phrases.→P381
[Edit character]
Select a character or decoration in message text to copy, cut, or
paste. Undo the last entry or pasting of characters.→P385
[Edit user dict.]
Edit a dictionary stored in the FOMA terminal.→P387
[Quote]
Quote the contents of a Phonebook entry, etc.→P380
[Input setting]
Configure the character entry settings.→P380
[Special input]
Enter a space, line feed, or enter characters using Kuten code.
→P380
[Header/Sign.]
Header : Attach the set header.
Signature : Attach the set signature.
[Jump]
Top : Move to the top of the displayed message text.
Bottom : Move to the end of the displayed message text.
[Image info.]
Display detailed information about an image behind the cursor.
[Preview]
Open the preview screen of the message text.
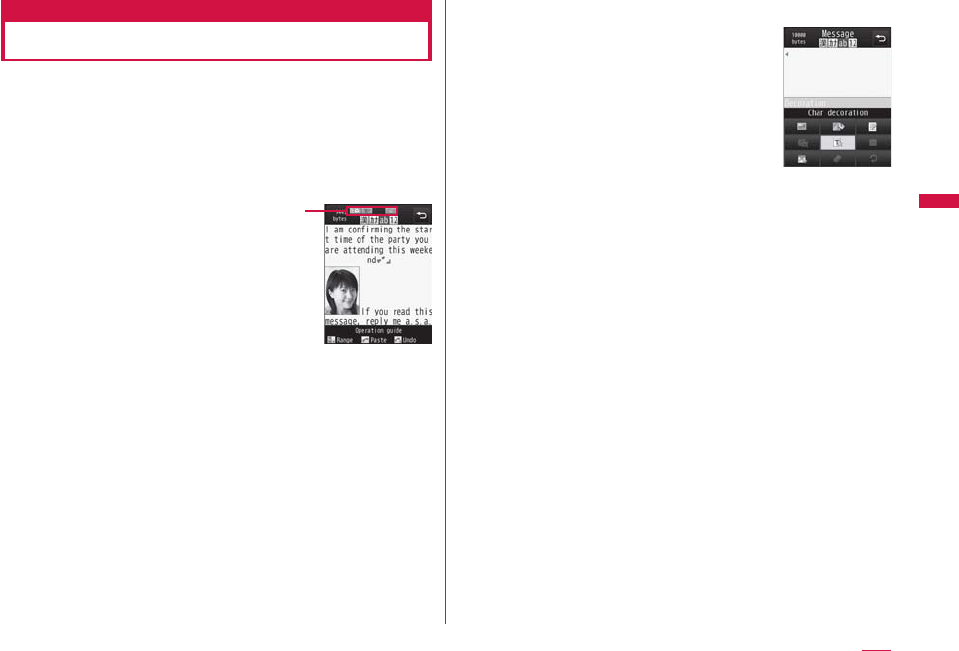
141
Mail
Continue on the next page
Deco-mail
Creating and Sending Deco-mail
You can create your own designed mail by adding
decorations such as changing font size, font color or
background color, or inserting images while editing an i-mode
mail message.
• Deco-mail up to 100KB can be sent.
• Up to 20 images within 90KB can be inserted.
• Some i-mode terminals may receive Deco-mail that is larger than
10,000 bytes as mail containing a URL to browse.
Message text
entry screen
The set decoration
appears at the
cursor position.
Mail menu screen (P137) ▶ "Compose
message"
Enter the receiver and subject
• Entering the receiver and subject→P138
Select [Message] field ▶
g
[Deco]
Palette display
screen
Use the palette to decorate the message text
• Decorating→P142
b
To specify a decoration before entering characters
For operations, refer to "Specifying a Decoration before
Entering Characters" (P143).
b
To enter characters before specifying a decoration
For operations, refer to "Entering Characters before
Specifying a Decoration" (P144).
M
[Close]
b
To view the Deco-mail message
Press
M
[Menu] ▶ "Preview".
C
[Set] ▶
I
[Send]
Continued on next page
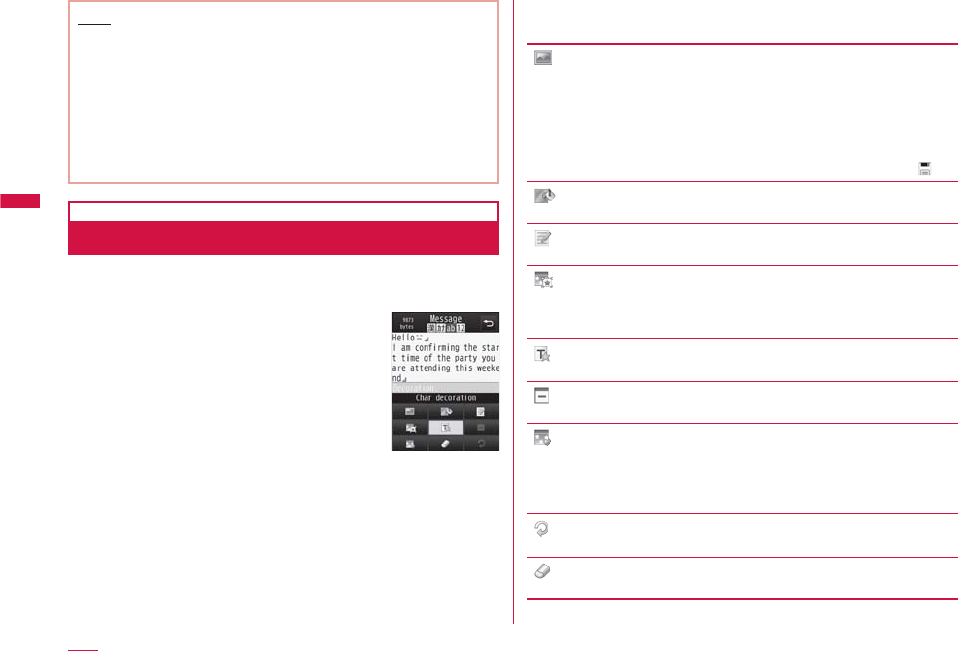
142
Mail
Note
• If you exchange Deco-mail with Deco-mail incompatible i-mode
terminals, the decorations may not be displayed correctly.
• After decorated text is deleted, the decoration data may remain
and this may result in a reduction in the number of characters
available to enter in the text field. Cancel any decoration before
deleting the text. When you delete the text by pressing
Q
for 1+ seconds, the text including any decoration data will be
deleted.
• If a template contains an image that cannot be sent via mail,
the image may be deleted.
Decorating
Message text entry screen (P138) ▶ g[Deco]
•
M
[Close]: Switch from palette functions to character entry.
Perform the following operations
[ (Insert image)]
Data box : Insert an image saved in "My picture" to
the message text.
▶ Move the cursor to the folder ▶
C
[Open] ▶ Select an image
Still image photography : Capture and insert a still image.
▶ Capture an image ▶
C
[Save] (If
capturing in Turn View Style mode, )
[ (Background color)]
Set a background color of the message text.
[ (Insert line)]
Insert a line in message text.
[ (Edit decoration)]
Specify the range of text to decorate.→P144
• This option cannot be selected when no text has been entered in
the message.
[ (Char decoration)]
Select decorations to apply to characters.→P143
[ (Cancel decoration)]
Delete decoration in the line at the cursor.
[ (My decoration)]
Apply My decoration : Apply a character decoration which is saved
beforehand.
Edit My decoration : Save your favorite character decoration.
→P143.
[ (Undo)]
Restore a set decoration to the previous state.
[ (Reset all settings)]
Delete all set decorations.
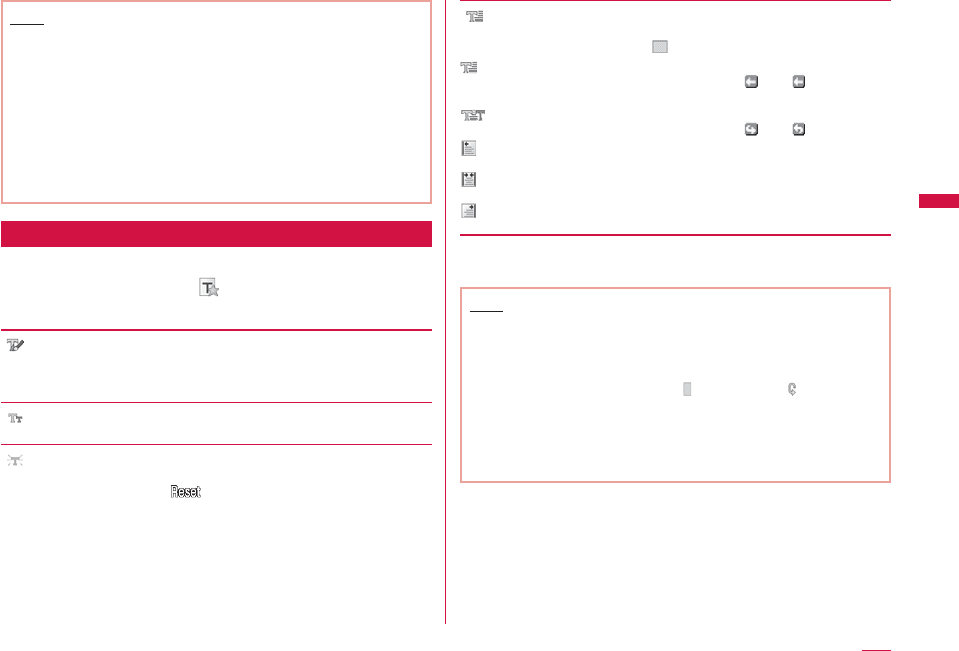
143
Mail
Continue on the next page
Note
• When characters with "Telop" or "Swing" set are selected and
copied or cut, "Telop" or "Swing" will not take effect.
<Insert image>
• Up to 90KB or 20 images can be inserted. The number of
available attachments may be reduced depending on the file
size. If the maximum number of images or size is exceeded, a
warning message appears.
• By default, images are saved in the "Decomail picture" and
"Decomail picto" folders.
• If the same image is inserted more than once, it is considered
that one image is inserted.
Specifying a Decoration before Entering Characters
Message text entry screen (P138) ▶
g
[Deco] ▶ Select (Char decoration) ▶
Perform the following operations
[ (Font color)]
Set the color for characters.
• You can also select a color from the palette by pressing
I
[Palette].
[ (Font size)]
Set a font size.
[ (Blink)]
Set the text to blink.
• To cancel blinking, select (Blink).
[ (Move/Align)]
Set the display of the text.
• To cancel the setting, select (Move Align (Default)).
(Telop) : Set the text to display from right to left as a telop.
• Characters entered between and appear as
a telop.
(Swing) : Set the text to swing.
• Characters entered between and swing.
(Left) : Align characters to be entered or images to be
inserted to the left.
(Center) : Align characters to be entered or images to be
inserted to the center.
(Right) : Align characters to be entered or images to be
inserted to the right.
C
[Set] ▶ Enter characters
Note
<Font size>
• The size of Deco-mail pictogram cannot be changed.
<Font color>
• Pictographs are also displayed in the specified color. To
restore the default color, select on the right of (Text color
(Unchange)) from the color palette.
<Blink>
• When characters set to blink are displayed on the preview
screen or the Compose message screen, the characters stop
blinking after a certain period of time.
144
Mail
Entering Characters before Specifying a Decoration
Message text entry screen (P138) ▶
g
[Deco] ▶ Select (Edit decoration)
Use
K
to move the cursor to start point ▶
C
[Select]
•
I
[SelAll]: Select the entire message.
•
g
[Top]: Move to the top of the message text.
•
T
[End]: Move to the end of the message text.
Use
K
to move the cursor to end point ▶
C
[Select] ▶ Specify a decoration
• You can also decorate text by performing the following steps:
M
[Menu] (for 1+ seconds) ▶ Use
K
to move the cursor to
start point ▶
C
[Select] ▶ Use
K
to move the cursor to end
point ▶
C
[Select] ▶ "Decoration" ▶ Specify a Decoration
Selecting "Cancel decoration" deletes the decoration applied
to the text.
Template
Using a Template to Create
Deco-mail
Templates are form data for Deco-mail with decorations
such as the font size and image insertion already set. In
addition to the pre-installed templates, you can use templates
downloaded from sites.
Compose message screen (P138)
▶
M
[Menu]
▶
"Template"
▶
"Load template"
▶
"Yes"
• If the mail has entered message text, the entered text will be
deleted and the template will be loaded.
Select a template
The selected template is inserted in the message text.
• To select a template while viewing, press I[Preview] and
switch templates using J.
• You can edit the message text after inserting a template.
Creating a New Template
Create user-defined templates. Created templates are saved
in "Template" of Mail menu.
Mail menu screen (P137) ▶ "Template" ▶
M
[Menu] ▶ "New Template"
Create templates
• Decorating→P142
Create a template ▶
C
[Set] ▶ Edit the title ▶
C
[Set] ▶ "Yes"
Note
• If message text in the mail is not decorated, a template cannot
be saved.
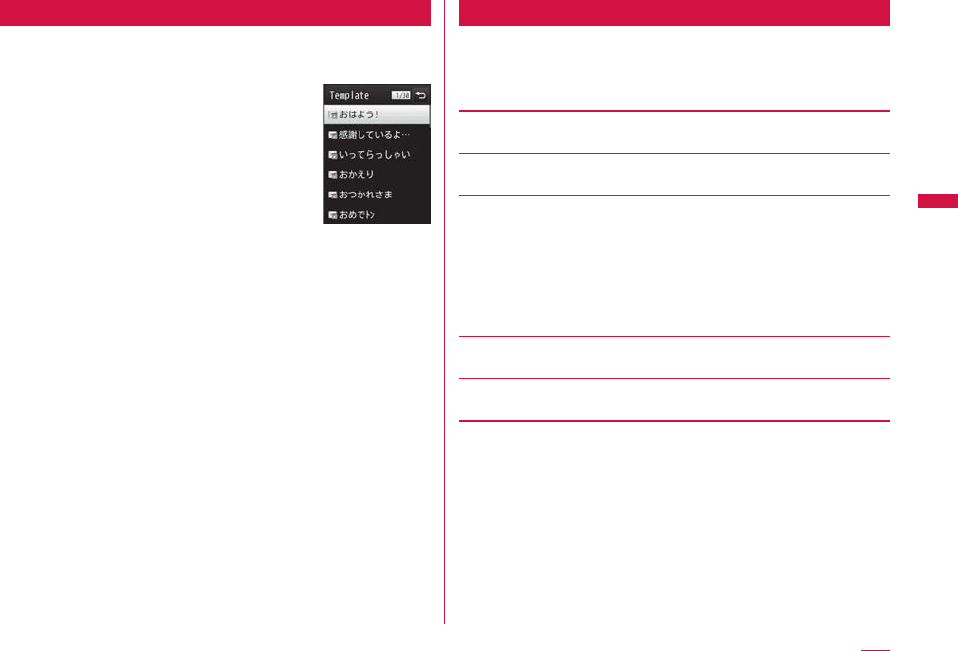
145
Mail
Continue on the next page
Editing Templates
You can edit user-defined templates.
Mail menu screen (P137) ▶ "Template"
Template list
screen
Select a template ▶
C
[Edit] ▶ Edit the
template
• Decorating→P142
C
[Set] ▶ "Overwrite save"/"New save"
Overwrite save : Save the edited template over the source
template.
New save : Save the edited template as a new template.
Edit the title ▶ C[Set]
"Yes"
Template List Screen Sub Menu
Template list screen (P145) ▶ Move the
cursor to a template ▶
M
[Menu] ▶ Perform
the following operations
[Compose mail]
Compose a new message with the selected template.
[New Template]
Create a new template.→P144
[Delete]
Delete one : Delete the selected template.
Del. Selected : Select and delete templates.
▶ Mark templates to delete ▶
I
[Done] ▶ "Yes"
• Press
M
[Menu] to select "Select all" or "Deselect
all".
Delete all : Delete all templates.
▶ Enter the Terminal security code ▶ "Yes"
[Edit title]
Edit the title of the selected template.→P145
[Detail info]
Display the properties of the selected template.
146
Mail
Attachment
Attaching a File
You can send i-mode mail with images or melodies attached.
• Up to 10 files, a total of 2MB, can be attached. The number of
available attachments may be reduced depending on the file size.
• The following file types can be attached:
- Images (JPEG, GIF)
- Moving picture/i-motion
- Motion Oekaki
TM
image
- Melody
- Phonebook
- Schedule event
- To do
- Bookmark
- Other files on microSD
• A file prohibited to be attached to mail or to be output from the
FOMA terminal cannot be attached.
Compose message screen (P138) ▶ Select
field ▶ Perform the following operations
[Image]
My picture : Select an image saved in "My picture" of "Data
box".→P296
Start camera : Capture and attach a still image.
▶ Capture a still image ▶
C
[Save] (If capturing in
Turn View Style mode, )
[Movie]
i-motion : Select a moving picture/i-motion saved in
"i-motion" of "Data Box".
Start camera : Capture and attach a moving picture.
▶ Capture a moving picture ▶
C
[Save] (If
capturing in Turn View Style mode, )
[Motion Oekaki]
microSD : Select a Motion Oekaki
TM
image or Flash movie
saved in "OTHER" folder of microSD card.
Start drawing : Start Motion Oekaki
TM
and attach a created image.
[Melody]
Select a melody saved in "Melody" of "Data Box".
▶ Move the cursor to a folder ▶
C
[Open] ▶ Select a melody
[Phonebook]
Select a Phonebook entry.
[Calendar]
Select a schedule event saved in the FOMA terminal.
▶ Select a date ▶ Select a Schedule event
[To do]
Select To do saved in the FOMA terminal.
[Bookmark]
i-mode : Attach a bookmark saved in "Bookmark" folder of
"i-mode".
Full browser : Attach a bookmark saved in "Bookmark" folder of "Full
browser".
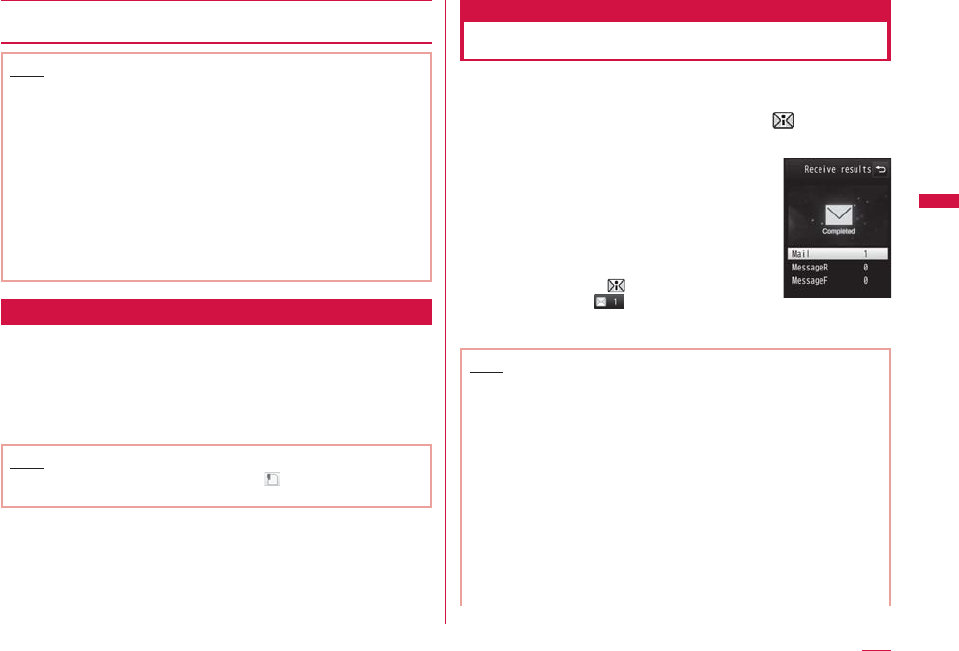
147
Mail
Continue on the next page
[Others]
Attach a file saved in "OTHER" folder of a microSD card.
Note
• GIF images and attached melodies cannot be received with an
i-mode terminal using the mova service.
• A moving picture/i-motion larger than 2MB cannot be attached.
Reduce the size under "Clipping" to the available size before
attaching it.→P312
• Depending on the recipient terminal, a moving picture may
be displayed coarsely or as sequential still images. When
sending a moving picture/i-motion larger than 500KB to i-mode
terminals other than 2MB-compatible ones, a moving picture
captured with following setting is recommended.
Size restriction: 500KB, Select size: QCIF (176×144),
Quality: Super fine
• Some i-motion may not be attached.
Playing/Displaying/Deleting an Attached File
Compose message screen (P138) ▶ Select a
desired attachment field with a file attached ▶
Perform the following operations
C
[Select]: Play/display the selected attachment.
g
[Delete]: Delete the selected attachment.
Note
• To add another attachment, select an field where no file is
attached.
Receive mail automatically
When You Receive i-mode Mail
When the FOMA terminal is in the service area, i-mode mail is
automatically sent from the i-mode center.
After the i-mode mail is received, appears
at the top of the screen
When the reception is completed, the
Receive results screen appears.
• The previous screen returns if no operation
is performed for approximately 30
seconds.
• Selecting "Mail" displays the Inbox list
screen.
• Until the detail screen of received i-mode
mail is displayed, appears at the top of
the screen and (the number indicates
the number of messages) appears in
Stand-by.
Receive results
screen
Note
• When new i-mode mail is delivered, other i-mode mail and
MessageR/F stored in the i-mode center are received at the
same time.
• When receive option for i-mode mail has been set, sent i-mode
mail is stored in the i-mode center. You can check the subject
of i-mode mail stored in the center before selecting and
receiving the mail.→P149
• If received mail was sent from a terminal that is capable
of setting To, Cc, or Bcc, you can check how the mail was
addressed to you on the FOMA terminal.→P156
• Melodies, moving pictures, and still images can be received
as attachments to i-mode mail. Incompatible files may be
automatically deleted at the i-mode center. If an attached file is
deleted, "添付ファイル削除 (Attached file deleted)" is added below
the subject.
Continued on next page
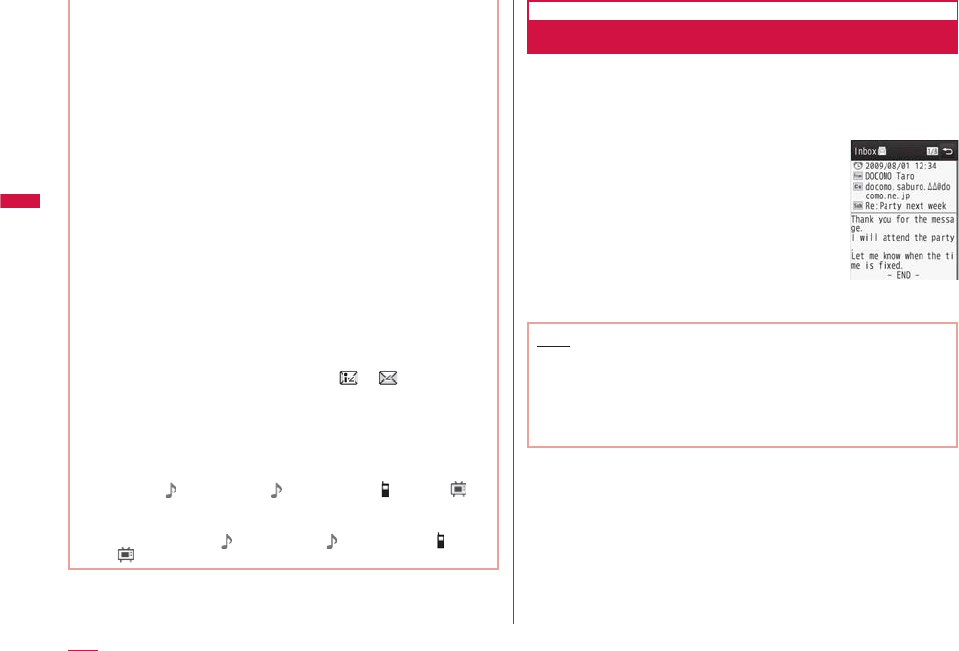
148
Mail
• Files attached to a mail cannot be saved in the FOMA terminal
when the FOMA terminal does not support the file type. Those
files can be saved to a microSD card or forwarded.→P151
• Up to 100KB of i-mode mail including attachments can be
automatically downloaded. Attachments larger than 100KB can
be manually downloaded from the i-mode center.→P152
• You can set whether to receive attached melodies or images
under "Receive attach file".→P168
• If the size of a received mail exceeds the number of characters
(data capacity) set under "iMenu" ▶ "English" ▶ "Options" ▶
"Mail Settings" ▶ "Other Settings" ▶ "Limit Mail Size", you can
select and download the attached file or the data whose name
appears in the message text.→P152
• If the total number or total size of the received mail (i-mode mail
and SMS) stored in the FOMA terminal exceeds the limit, the
oldest read message will be deleted first. Protect the received
messages you want to keep.
• Incoming mail is saved at the i-mode center when:
- Power is off - A videophone call in progress
- Self mode is activated - The terminal is out of service area
- Omakase Lock
- "Receive option set" is set to "ON"
- Inbox is full with protected or unread mail
• When mail is kept at the i-mode center, or appears.
When the terminal power is off or the terminal is out of service
area, these icons may not be displayed even there is i-mode
mail at the i-mode center.
• If multiple i-mode mail messages or MessageR/F are received
concurrently, the ring tone set to the last received i-mode mail
or MessageR/F sounds.
• By default, " Welcome Mail " and "Welcome ドコモ動画 "
are saved in Inbox. No communication charge applied for this
mail.
• You cannot reply to " Welcome Mail " and "Welcome ドコモ
動画 ".
Displaying New i-mode Mail
Receive results screen (P147) ▶ "Mail" ▶
Select a folder
Select mail to be displayed
• Displaying/playing/saving/deleting an
attached file→P153
Received mail
detail screen
Note
• Selecting mail icon in Stand-by also display mail.
• Images attached to i-mode mail may not be properly displayed.
• Attachments incompatible with the FOMA terminal cannot be
saved to "Data Box", however, they can be forwarded or saved
to a microSD card (when saving in a microSD card, the file
name will be changed to "OTHER001" to "OTHER999").
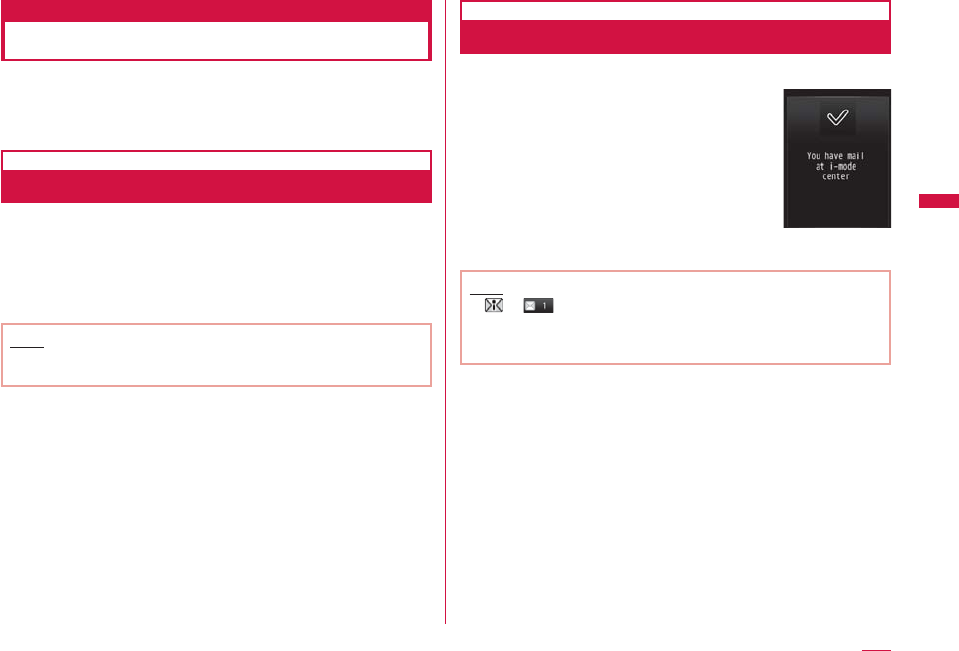
149
Mail
Continue on the next page
Receive option
Receiving i-mode Mail Selectively
You can check the subject of i-mode mail stored in the
i-mode center, and select mail to receive or delete at the
i-mode center before downloading new messages. To use the
Receive option, set "Receive option set" to "ON" in advance.
Setting Receive Option
After setting "Receive option set" to "ON", perform the
following to receive selected i-mode mail.
Mail menu screen (P137) ▶ "Receive option" ▶
C
[Select] ▶ "ON"
After this option is set, i-mode mail will not be received automatically.
Note
• To set "Receive option" to "OFF", perform from "Receive option
set" (P168).
When You Receive Mail
Notification of received mail screen appears
Press
C
[OK] or
Q
/
P
to close the
notification screen.
Notification of
received mail screen
Note
• or indicating the incoming i-mode mail will not be
displayed, and the mail ring tone will not sound.
• The i-Channel ticker stops while the Notification of received
mail screen is displayed.
150
Mail
Setting Receive Option for Mail
After "Receive option set" is set to "ON", perform the
following steps to select and receive i-mode mail.
Mail menu screen (P137) ▶ "Receive option"
For subsequent steps, see "Mobile Phone User's Guide [i-mode]
FOMA version".
b
Icons displayed on the Receive option screen indicating
attachments
Icon File type
An image is attached.
i-motion is attached.
A melody is attached.
Another type of file is attached.
Note
• Even if "Receive option set" is set to "ON", all messages will
be received when "Check new messages" is used. If you do
not want to receive mail, exclude "Mail" from the items to be
checked.→P168
• Receive option can also be performed from "iMenu". Select
"iMenu" ▶ "メニューリスト (Menu List)" ▶ "メール選択受信 (Receive
option)".
• If the total number or total size of the received mail (i-mode mail
and SMS) stored in the FOMA terminal exceeds the limit, the
oldest read message will be deleted first. Protect the received
messages you want to keep.
Check new messages
Checking New i-mode Mail
i-mode mails that could not be received for a reason, such
as because the FOMA terminal was out of service area, are
stored in the i-mode center. You can receive stored i-mode
mail by checking the i-mode center.
• appears at the top of the screen when mail is kept at the
i-mode center.
• You can select items to check (mail or MessageR/F) under "Check
new messages" (P168).
• You cannot check new messages when the FOMA terminal is out of
service area.
Mail menu screen (P137) ▶ "Check new
messages"
When checking is completed, the Check results screen appears.
Note
• Even when i-mode mail is kept at the i-mode center, may not
appear on the screen if mail arrived while the FOMA terminal
power was turned off.
151
Mail
Continue on the next page
Reply to i-mode mail
Replying to i-mode Mail
You can reply to the sender of i-mode mail. Replying can be
made by entering new text or quoting the text of received
i-mode mail.
Received mail detail screen (P154) ▶
M
[Menu] ▶ "Reply/Forward" ▶ "Reply"/"Reply
with quote"
• You can reply to mail also by pressing
I
[Reply] on the
Received mail detail screen.
• If the mail is sent to multiple receivers, you can select "Sender"
to reply only to the sender or select "All" to reply the sender
and all other receivers.
Enter the subject and the message text
• "Re:" is added to the subject.
• When replying with quotation, ">" is added at the beginning of
the quoted message.
• Editing the subject and message→P138
I
[Send]
Note
• After exceeding the storage capacity of Outbox, you cannot
send a reply. Delete mail saved in Outbox before replying.
• The reply to received Deco-mail with quotation has original
decoration and images entered in the message text. However,
images restricted to be output from the FOMA terminal will not
be entered.
Forward i-mode mail
Forwarding i-mode Mail to Other
Address
You can forward received i-mode mail to other addresses.
Received mail detail screen (P154) ▶
M
[Menu] ▶ "Reply/Forward" ▶ "Forward"
Enter the receiver
• "Fw:" is added to the subject.
• Editing the receiver and message text→P138
I
[Send]
Note
• When a file prohibited to be attached to mail or to be output
from the FOMA terminal is attached or pasted to an i-mode mail
to be forwarded, the file will be deleted.
• After exceeding the storage capacity of Outbox, you cannot
forward mail. Delete mail saved in Outbox before forwarding.
• If you forward a received Deco-mail, the original decoration and
images remain entered in the message text. However, images
restricted to be output from the FOMA terminal will not be
entered.
152
Mail
Adding Mail Addresses/Phone
Numbers to Phonebook
You can save mail addresses and phone numbers in received
mail to the Phonebook.
Saving an Address/Phone Number from the Message
Text
Received mail detail screen (P154) ▶ Move
the cursor to the address/number to save ▶
M
[Menu] ▶ "Save" ▶ "No./addr. in body"
Go to Step 2 in "Adding Phonebook Entries from Redial/Received
Calls etc." (P89).
Saving a Receiver, Sender Address, or Phone Number
Received mail detail screen (P154) ▶
M
[Menu] ▶ "Save" ▶ "Address"
If there are multiple recipients/senders, further select the
addresses/phone numbers to save.
Go to Step 2 in "Adding Phonebook Entries from Redial/Received
Calls etc." (P89).
Playing/Saving an Attached File
from i-mode Mail
You can play or save an image, melody, moving picture, or
i-motion attached or pasted to i-mode mail.
Retrieving Selected Attached File
When the size of a received message including attachments
larger than 100KB, you will need to download the
attachments from the i-mode center.
• All the attached files selected are downloaded regardless of the
setting of "Receive attach file" option in "Communication" of "Mail
setting".
• Expired files cannot be downloaded.
Received mail detail screen (P154) ▶ Select
a file name
Note
• When available space for Inbox is less than the file size, the
attachment cannot be retrieved.
153
Mail
Continue on the next page
Displaying/Playing/Saving/Deleting an
Attached File
Received mail detail screen (P154) ▶ Move the
cursor to the attached file
•
C
[Select]: Display/play the selected attachment.
M
[Menu] ▶ "Attach file" ▶ Perform the
following operations
[Save]
Save the selected attachment.
• In addition, select the destination when a microSD card is inserted
on the terminal.
[Delete]
Delete the selected attachment.
b
Savable file type and saving destination
File type
Destination
Image*
1
"i-mode" folder of "My picture" in "Data Box"
Image available
as Deco-mail
pictogram
"Decomail picto" of "My picture" of "Data Box"
Moving picture/
i-motion "i-mode" folder of
"i-motion" in "Data Box"
Melody "i-mode" folder of "Melody" in "Data Box"
Phonebook Phonebook
Schedule Schedule
To do To do list
File type
Destination
Bookmark "Bookmark" in "i-mode" or "Full browser"
Others*
2
―
*1 Images other than ones available as Deco-mail pictogram and
Flash movie
*2 Other files, such as Flash movies, are saved only on a microSD
card. However, depending on attachment, files cannot be saved.
Note
• Large i-mode mail may be rejected by the i-mode center, and an
error message may be returned to the source address.
• i-mode mail that is 100KB (with attachments included) or
smaller can be automatically downloaded. Attachments larger
than 100KB can be manually downloaded from the i-mode
center.
• You can set a size limit for i-mode mail messages.
• When the image size is larger than the screen, it is shrunk and
displayed.
• Some images and moving pictures/i-motion may not be
displayed or played.
• When "Melody auto play" is set to "ON", an attached melody is
played automatically when you open a received i-mode mail.
• A software that supports i-motion is required to play an i-motion
mail on a PC.
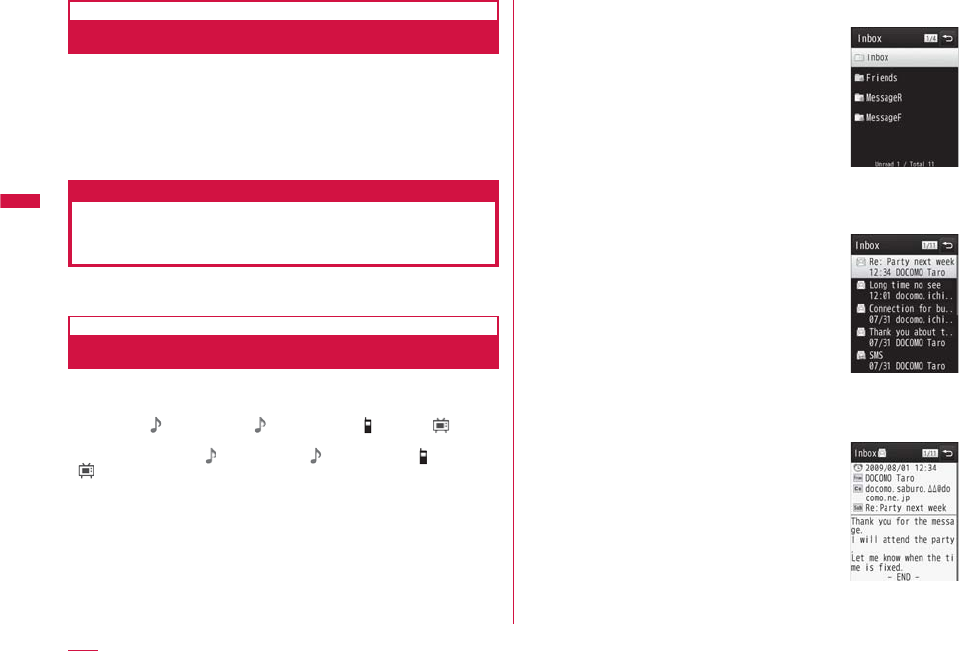
154
Mail
Saving Inline Images
Received mail detail screen (P154) ▶
M
[Menu] ▶ "Save" ▶ "Inline image"
Select an image ▶ "Yes"
• To set as Stand-by display, select "Yes".
Inbox/Outbox/Unsent message
Displaying Mail in Inbox/Outbox
or Unsent Messages
• To display contents of a folder with security set, enter the Terminal
security code.
Displaying Received Mail
• Up to 1,000 incoming i-mode mail and SMS messages can be
saved in Inbox. However, the savable number depends on the
amount of data.
• By default, " Welcome Mail " and "Welcome ドコモ動画 " are
saved. No communication charge applied for this mail.
• You cannot reply to " Welcome Mail " and "Welcome ドコモ動画
".
Mail menu screen (P137) ▶ "Inbox"
•
I
[ShowAll]: Display all received mail in list.
•
T
[Outbox]: Display the Outbox list
screen.→P155
Inbox list screen
Select a folder
•
I
[Reply]: Reply to the sender and
multiple recipients.→P151
•
T
[Delete]: Delete the selected mail.
•
g
[Search]: Search from the Phonebook,
Schedule, Address (Sent msg. log/Rcv.
msg. log/Phonebook/Direct input), or
Subject.
Received mail list
screen
Select a message
•
J
: Display the previous or next mail.
•
I
[Reply]: Reply to the sender and
multiple recipients.→P151
Received mail
detail screen
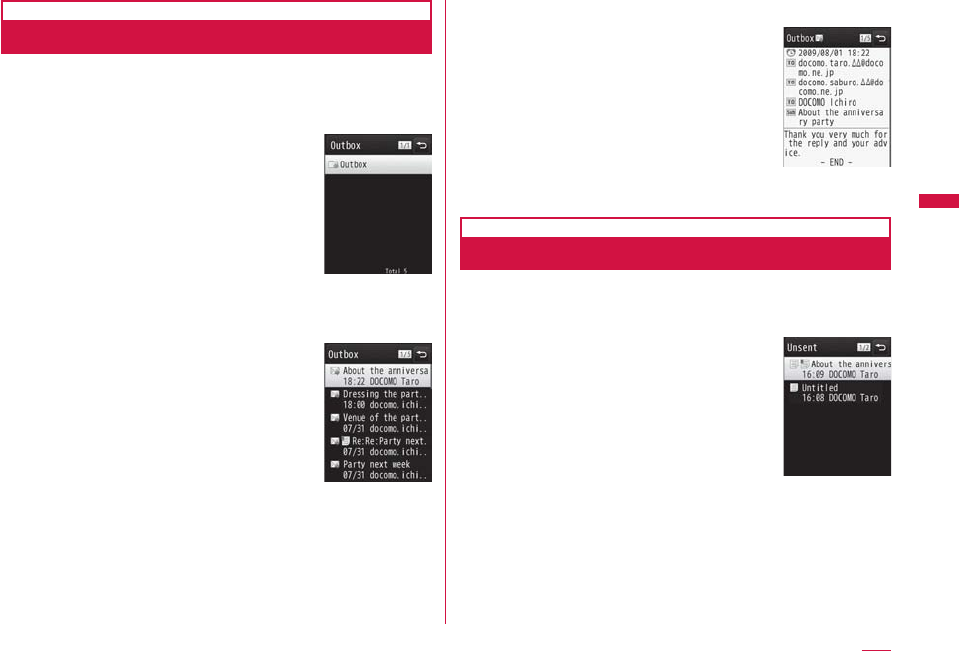
155
Mail
Continue on the next page
Displaying Sent Mail
• Up to 500 i-mode mail, SMS, and unsent messages can be saved
in Outbox. However, the savable number depends on the amount of
data.
Mail menu screen (P137) ▶ "Outbox"
•
I
[ShowAll]: Display all sent mail in list.
•
T
[Inbox]: Display the Inbox list screen.
→P154
Outbox list
screen
Select a folder
•
I
[Edit]: Display the Compose message
screen or the Compose SMS screen.
→P138, P176
•
T
[Delete]: Delete the selected mail.
•
g
[Search]: Search from the Phonebook,
Schedule, Address (Sent msg. log/Rcv.
msg. log/Phonebook/Direct input), or
Subject.
Sent mail list
screen
Select a message
•
J
: Display the previous or next mail.
•
I
[Edit]: Display the Compose message
or SMS screen.→P138, P176
Sent mail detail
screen
Displaying Unsent Messages
• The number of messages saved in Unsent message are included in
the maximum number of savable messages in Outbox.
Mail menu screen (P137) ▶ "Unsent message"
•
I
[Send]: Send the selected mail.
•
T
[Delete]: Delete i-mode mail, or SMS.
Unsent message
list screen
Select a message
The Compose message/SMS screen appears depending on the
type of the selected mail. You can edit unsent mail.
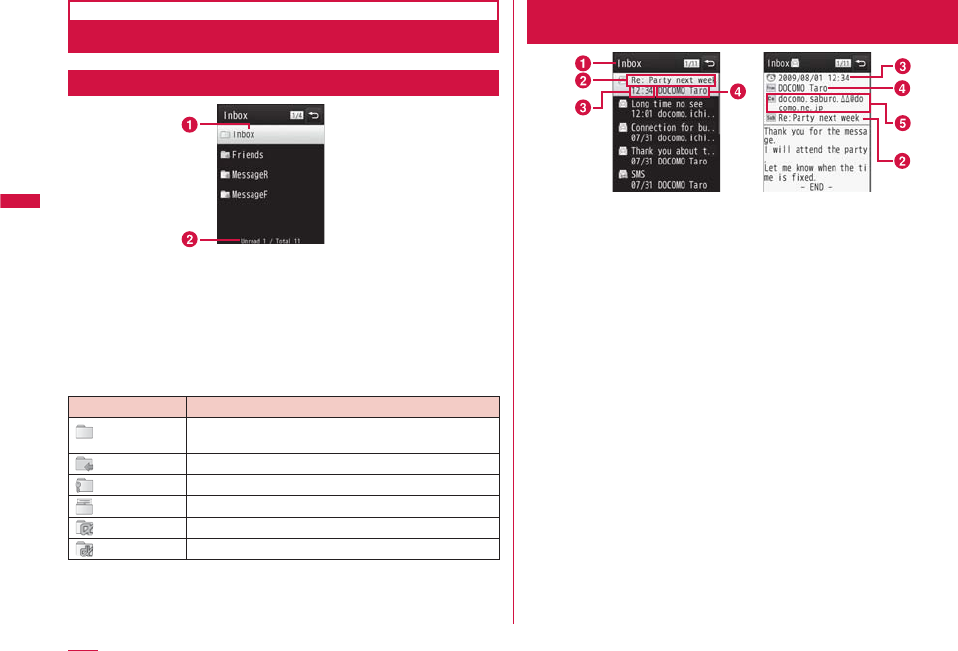
156
Mail
Received/Sent/Unsent Mail Screen Components
Inbox/Outbox List Screen
Ex.: Inbox list
screen
a
Folder name
b
Number of unread messages/total number of messages in
the folder
Appear on the Inbox list screen. For Outbox, only the total
number of messages in the folder is displayed.
b
Icons displayed on the Inbox/Outbox screen
Icon Description
"Inbox"/"MessageR"/"MessageF"/"Outbox"
(Default folders)
No messages
Security set
No unread mail
*Standard i-αppli
*i-α ppliDX
* Created automatically when mail-connected i-αppli is received.
Received Mail List Screen/Received Mail Detail
Screen
Received mail list
screen Received mail
detail screen
a
Displayed folder name
b
Subject
"SMS" is displayed for an SMS message.
c
Received date and time
On the Received mail list screen, the date is displayed for
messages received before today, and the time is displayed
for messages received today.
d
Sender's phone number/mail address
If the phone number or mail address is saved in the
Phonebook, the name in the Phonebook appears.
e
Address types and multiple recipients
If mail is sent to multiple addresses, their address types
(To or Cc) are displayed. If the mail address is saved in the
Phonebook, the name in the Phonebook appears.
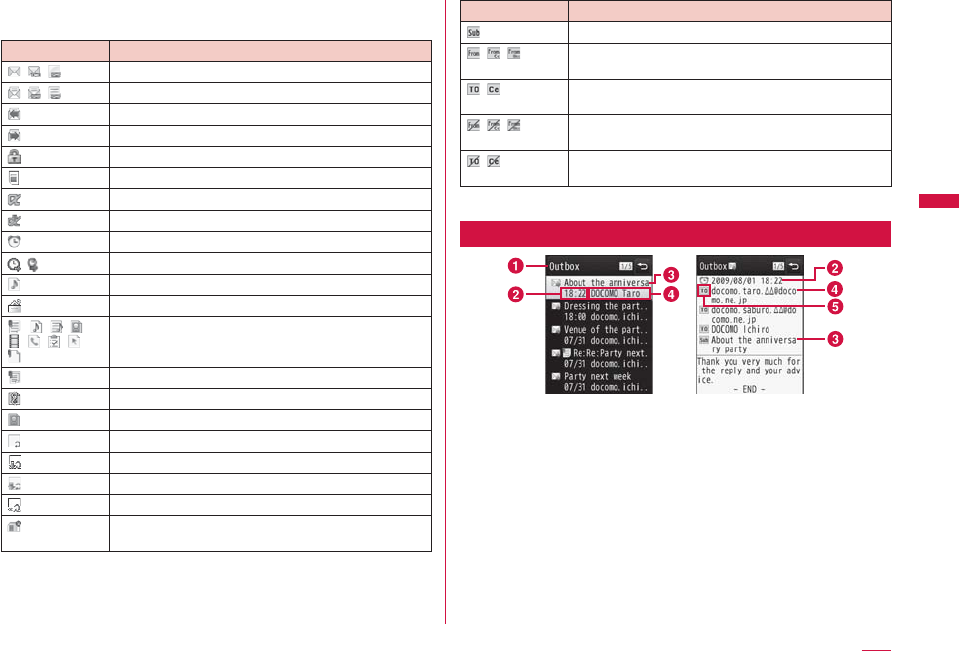
157
Mail
Continue on the next page
b
Icons displayed on the Received mail list screen/Received
mail detail screen
Icon Description
/ / Unread i-mode mail/SMS/SMS report request
/ / Read i-mode mail/SMS/SMS report
Replied
Forwarded
The message is protected.
Saved in the UIM.
Mail-connected i-αppli (Standard i-αppli)
Mail-connected i-αppli (i-α ppliDX)
Received date and time
( ) Different Time zone SMS received
Melody is attached.
i-αppli can be started from the message text.
( / / /
/ / / /
)
Melody (SMF)/melody (MFi)/still Image/moving
pictures/Phonebook entry/Schedule event/
bookmark/other file is attached.
Multiple files attached
Damaged file (Example: For a still image)
(Gray) Deleted attachment (Example: For a still image)
Attached file un-retrieved
Attached file deleted without retrieving
Attached file interrupted while retrieving
Acquisition failed.
Attached file with the UIM security function
activated
Icon Description
Subject
/ / The message sent with the address as To, Cc,
or Bcc
/Multiple recipient address types other than own
address (To/Cc)
/ / Sender mail address to which the reply cannot
be sent
/Multiple recipient addresses to which the reply
cannot be sent
* Different icons indicated with ( ) appear on a detail screen.
Sent Mail List Screen/Outbox Detail Screen
Sent mail list
screen Sent mail detail
screen
a
Displayed folder name
b
Sent date and time
On the Sent mail list screen, the date is displayed for
messages sent before today, and the time is displayed for
messages sent today.
c
Subject
"SMS" is displayed for an SMS message.
d
Recipient phone number/mail address
If the phone number or mail address is saved in the
Phonebook, the name in the Phonebook appears.
e
Receiver type
Indicate the receiver type of the sent mail (To, Cc, or Bcc).
Continued on next page
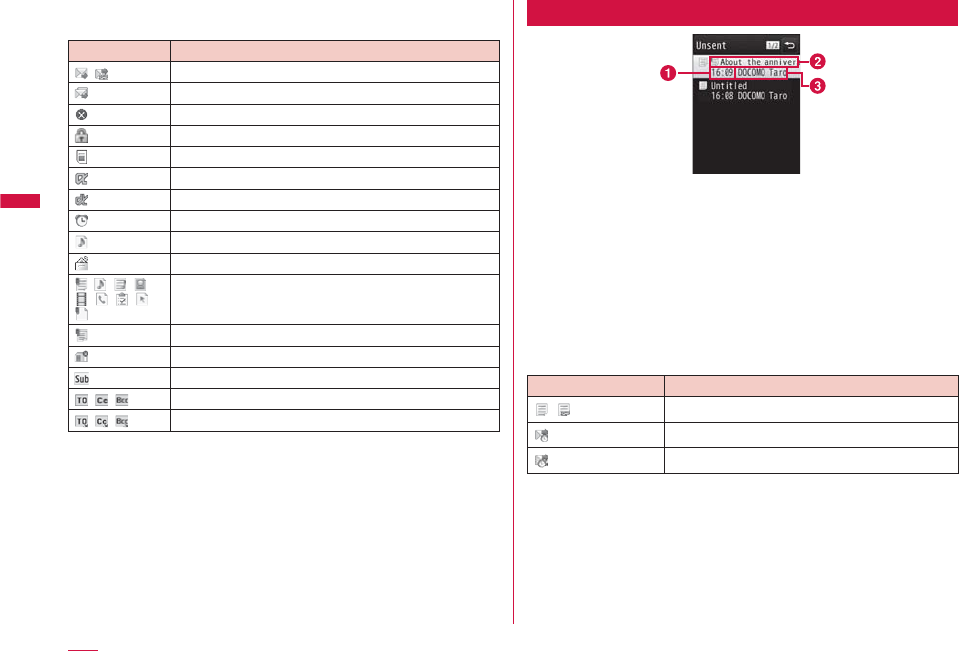
158
Mail
b
Icons displayed on the Sent mail list screen/Sent mail
detail screen
Icon Description
/Sent i-mode mail/SMS
i-mode mail sent to multiple recipients
Failed to be sent
The message is protected.
SMS saved in the UIM
Mail-connected i-αppli (Standard i-αppli)
Mail-connected i-αppli (i-α ppliDX)
Sent date and time
Melody is attached.
i-αppli can be started from the message text.
( / / /
/ / / /
)
Melody (SMF)/melody (MFi)/still image/moving
pictures/Phonebook entry/Schedule event/
Bookmark/other file is attached.
Multiple files attached
File with UIM security function attached
Subject
/ / Sent as To/Cc/Bcc
/ / Failed to send as To/Cc/Bcc
* Different icons indicated with ( ) appear on a detail screen.
Unsent Mail List Screen
Unsent mail list
screen
a
Saved date and time
The date is displayed for messages saved before today, and
the time is displayed for messages saved today.
b
Subject
"SMS" is displayed for an SMS message.
c
Recipient phone number/mail address
If the phone number or mail address is saved in the
Phonebook, the name in the Phonebook appears.
■ Icons displayed on the Unsent mail list screen
Icon Description
/Unsent i-mode mail/SMS
i-mode mail with auto send reserved
Auto send failed
* Other than the above, same icons as for sent mail are used.
159
Mail
Continue on the next page
Inbox/Outbox List Screen Sub Menu
Inbox list screen (P154)/Outbox list screen
(P155) ▶
M
[Menu] ▶ Perform the following
operations
[Manage folders]
New folder : Add a folder.
Delete folder : Delete the selected folder.
▶ Enter the Terminal security code ▶ "Yes"
Edit folder name
: Change the name of the selected folder.
Reorder folder : Select the display position of the selected folder
and sort.
Folder lock : Set or release security to the selected folder.
▶ Enter the Terminal security code
[Delete message]
Read in folder*: Delete all read messages in the Inbox folder.
▶ Enter the Terminal security code ▶ "Yes"
All without Protected : Delete all messages in the Inbox/Outbox
folders. (Except the protected messages)
▶ Enter the Terminal security code ▶ "Yes"
All with Protected : Delete all messages in the Inbox folder.
(Including the protected messages)
▶ Enter the Terminal security code ▶ "Yes"
[Send all Ir data]
Send all mail in Inbox/Outbox via infrared communication.→P329
▶ Enter the Terminal security code ▶ Enter the authentication
password ▶ "Yes"
[Copy all microSD]
Copy all messages in Inbox/Outbox to the microSD card.
▶ Enter the Terminal security code ▶ "Yes"
[Memory status]
Display number of messages in Inbox/Outbox and Unsent message
folders.
[Clear inbox]*
Delete the user-defined folders and mail saved in "Inbox" and
"user-defined" folder. (Except the protected messages and folders
containing the protected messages)
▶ Enter the Terminal security code ▶ "Yes"
* Not displayed for sent mail list screen.
Note
<Delete folder/Edit folder name/Reorder folder>
• This option is not available for the default "Inbox", "Outbox",
"MessageR", and "MessageF" folders. However, "Auto sort" is
available for the "MessageR" and "MessageF" folders.
<Delete message>
• A folder containing protected mail cannot be deleted.
• Protected mail and SMS saved in the UIM are not deleted.
• When unread mail exists, or when "Delete folder" is selected
for a folder containing mail, a confirmation for deletion appears.
Select "Yes" to delete.
<Send all ir data>
• If mail with a Flash movie (files with extension of swf including
Motion Oekaki
TM
files) larger than 100KB attached is sent, the
attached file is deleted.
Continued on next page

160
Mail
<Copy all microSD>
• If mail with a Flash movie (files with extension of swf including
Motion Oekaki
TM
files) larger than 100KB attached is copied,
the attached file is deleted.
Received Mail List Screen Sub Menu
Received mail list screen (P154)▶ Move the
cursor to mail ▶
M
[Menu] ▶ Perform the
following operations
[Reply/Forward]
Reply : Reply to the selected mail.→P151
Reply with quote : Reply to the selected mail by quoting the
received message text.→P151
Forward : Forward the received mail to another receiver.
[Delete]
Delete one : Delete the selected mail.
Delete selected : Select and delete mail.
▶ Mark mail to delete ▶
I
[Done] ▶ "Yes"
• Press
M
[Menu] to select "Select all" or
"Deselect all".
Delete all read : Delete all read mail in the folder.
▶ Enter the Terminal security code ▶ "Yes"
Delete all : Delete all mail in the folder.
▶ Enter the Terminal security code ▶ "Yes"
[Move]
Move one : Move the selected mail to another folder.
Move selected : Select and move mail to another folder.
▶ Mark mail to move ▶
I
[Done] ▶ Select a
destination folder
• Press
M
[Menu] to select "Select all" or
"Deselect all".
Move all : Move all mail in the folder to another folder.
[Protect]
Protect :
Protect one : Protect the selected mail.
Protect selected : Select and protect mail.
▶ Mark mail to protect ▶
I
[Done]
• Press
M
[Menu] to select "Select all" or
"Deselect all".
Protect all : Protect all mail in a folder.
Clear :
Clear one : Unprotect the selected mail.
Clear selected : Select and unprotect mail.
▶ Mark mail to unprotect ▶
I
[Done]
• Press
M
[Menu] to select "Select all" or
"Deselect all".
Clear all : Unprotect all mail in a folder.

161
Mail
Continue on the next page
[Store in center]
Save mail at the Data Center.
Save one : Save the selected mail.
▶ Enter the Terminal security code ▶ "Yes"
Save selected : Select and save mail.
▶ Mark mail to save ▶
I
[Done]
• If the number of saved mail is less than 10, press
M[SelAll/ClrAll] to select/clear all.
▶ Enter the Terminal security code ▶ "Yes"
[Sort]
Set conditions and sort mail.
[Filter]
Display messages that meet certain conditions.
Unread : Display only unread mail.
Read : Display only read mail.
Protected : Display only protected mail.
With attach file : Display only mail with a file attached.
Mail : Display only i-mode mail.
SMS : Display only SMS and SMS reports.
All : Display all mail in the folder.
[Export]
Ir exchange : Send the selected mail or all mail in the selected
folder via infrared communication.→P328
Copy to microSD : Copy the selected mail or all mail in the selected
folder to the microSD card. Copying all mail in
the folder requires you to enter the Terminal
security code.
UIM : Copy or move the selected SMS to the FOMA
terminal or the UIM.
[Search]
With phonebook : Search mail by the Phonebook group search.
With scheduler : Select date from the Schedule to search
received mail on the selected date.
Address :
Sent msg. log : Search mail by recipients' address in Sent mails.
Rcv. msg. log : Search mail by sender address in Received mails.
Phonebook : Search mail by searching all Phonebook entries.
Direct input : Enter address to search mail.
Subject : Enter subject to search mail.
Note
<Delete>
• If there are unread messages, a confirmation for deletion
appears. Select "Yes" to delete.
• Protected mail cannot be deleted.
<Protect>
• Up to 1,000 mail can be protected.
<Store in center>
• SMS with Korean text cannot be saved at the Data Center.
Continued on next page
162
Mail
<Export>
• If mail with a Flash movie (files with extension of swf including
Motion Oekaki
TM
files) larger than 100KB attached is sent via
infrared communication ("Ir exchange") or copied to microSD
("Copy to microSD"), the attached file is deleted.
Received Mail Detail Screen Sub Menu
Received mail detail screen (P154) ▶
M
[Menu] ▶ Perform the following operations
[Reply/Forward]
Reply or forward the displayed mail to another receiver.→P151
[Delete]
Delete the displayed mail.
[Move]
Move the displayed mail to another folder.
[Protect]
Protect or unprotect the displayed mail.
[Save]
Address : Save the mail address of the sender or multiple
recipients to the Phonebook.→P152
No./addr. in body : Save the phone numbers or mail addresses in
the displayed mail to the Phonebook.→P152
Inline image : Save images contained in the displayed mail.
→P154
Template : Save Deco-mail as a template.
▶ Edit the title ▶ "Yes"
[Copy]
Copy contents of the displayed mail.
Body : Select and copy contents of message text.→P385
Subject : Copy the subject.
Address : Copy address. If there are multiple addresses, select
an address from the Mail address list screen.
[Attach file]
Save or delete files attached to the displayed i-mode mail.→P153
[Export]
Ir exchange :
Send the displayed mail via infrared communication.
Copy to microSD : Copy the displayed mail to the microSD card.
UIM : Copy or move the displayed SMS to the FOMA
terminal or the UIM.
[Store in center]
Save the displayed mail at the Data Center.
▶ Enter the Terminal security code ▶ "Yes"
[Font size]
Set a font size for the message text on the Mail display screen.
Note
<Delete>
• Protected mail cannot be deleted.
<Protect>
• Up to 1,000 mail can be protected.

163
Mail
Continue on the next page
<Export>
• If mail with a Flash movie (files with extension of swf including
Motion Oekaki
TM
files) larger than 100KB attached is sent via
infrared communication ("Ir exchange") or copied to microSD
("Copy to microSD"), the attached file is deleted.
<Store in center>
• SMS with Korean text cannot be saved at the Data Center.
Sent Mail List Screen Sub Menu
Sent mail list screen (P155)▶ Move the cursor
to mail ▶
M
[Menu] ▶ Perform the following
operations
[Edit]
Edit and send sent mail.→P138, P176
[Delete]
Delete one : Delete the selected mail.
Delete selected : Select and delete mail.
▶ Mark mail to delete ▶
I
[Done] ▶ "Yes"
• Press
M
[Menu] to select "Select all" or
"Deselect all".
Delete all : Delete all mail in the folder.
▶ Enter the Terminal security code ▶ "Yes"
[Move]
Move one : Move the selected mail to another folder.
Move selected : Select and move mail to another folder.
▶ Mark mail to move ▶
I
[Done] ▶ Select a
destination folder
• Press
M
[Menu] to select "Select all" or
"Deselect all".
Move all : Move all mail in the folder to another folder.
[Protect]
Protect :
Protect one : Protect the selected mail.
Protect selected : Select and protect mail.
▶ Mark mail to protect ▶
I
[Done]
• Press
M
[Menu] to select "Select all" or
"Deselect all".
Protect all : Protect all mail in a folder.
Clear :
Cancel one : Unprotect the selected mail.
Cancel selected : Select and unprotect mail.
• The operations are the same as "Protect
selected".
Cancel all : Unprotect all mail in the folder.
[Store in center]
Save mail at the Data Center.
Save one : Save a selected mail.
▶ Enter the Terminal security code ▶ "Yes"
Save selected : Select and save mail.
▶ Mark mail to save ▶
I
[Done]
• If the number of saved mail is less than 10, press
M[SelAll/ClrAll] to select/clear all.
▶ Enter the Terminal security code ▶ "Yes"
[Sort]
Set conditions and sort mail.
Continued on next page
164
Mail
[Filter]
Display mail that meet certain conditions.
Protected : Display only protected mail.
With attach file : Display only mail with a file attached.
Mail : Display only i-mode mail.
SMS : Display only SMS.
All : Display all mail in the folder.
[Export]
Ir exchange : Send the selected mail or all mail in the selected
folder via infrared communication.→P328
Copy to microSD : Copy the selected mail or all mail in the selected
folder to the microSD card. Copying all mail in
the folder requires you to enter the Terminal
security code.
UIM : Copy or move the selected SMS to the FOMA
terminal or the UIM.
[Search]
With phonebook : Search mail by the Phonebook group search.
With scheduler : Select date from the Schedule to search mail
received on the selected date.
Address :
Sent msg. log : Search mail by recipients' address in Sent mails.
Rcv. msg. log : Search mail by sender address in Received mails.
Phonebook : Search mail by searching all Phonebook entries.
Direct input : Enter address to search mail.
Subject : Enter subject to search mail.
Note
<Delete>
• Protected mail cannot be deleted.
<Protect>
• Up to 500 mail can be protected.
<Store in center>
• SMS with Korean text cannot be saved at the Data Center.
<Export>
• If mail with a Flash movie (files with extension of swf including
Motion Oekaki
TM
files) larger than 100KB attached is sent via
infrared communication ("Ir exchange") or copied to microSD
("Copy to microSD"), the attached file is deleted.
Sent Mail Detail Screen Sub Menu
Sent mail detail screen (P155) ▶
M
[Menu] ▶
Perform the following operations
[Edit]
Edit and send sent mail.→P138, P176
[Delete]
Delete the displayed mail.
[Move]
Move the displayed mail to another folder.
[Protect]
Protect or unprotect the displayed mail.
165
Mail
Continue on the next page
[Save]
Address : Save the mail address to the Phonebook.→P152
No./addr. in body : Save the phone numbers or e-mail addresses in
the displayed mail to the Phonebook.→P152
Inline image : Save images contained in the displayed mail.
→P154
Template : Save Deco-mail as a template.
▶ Edit the title ▶ "Yes"
[Copy]
Copy contents of the displayed mail.
Body : Select and copy contents of message text.→P385
Subject : Copy the subject.
Address : Copy the address. If there are multiple recipients, select
addresses to copy.
[Attach file]
Save or delete files attached to the displayed i-mode mail.→P153
[Export]
Ir exchange :
Send the displayed mail via infrared communication.
Copy to microSD : Copy the displayed mail to the microSD card.
UIM : Copy or move the displayed SMS to the FOMA
terminal or the UIM.
[Store in center]
Save the displayed mail at the Data Center.
▶ Enter the Terminal security code ▶ "Yes"
[Font size]
Set a font size for the message text on the Mail display screen.
Note
<Delete>
• Protected mail cannot be deleted.
<Protect>
• Up to 500 mail can be protected.
<Export>
• If mail with a Flash movie (files with extension of swf including
Motion Oekaki
TM
files) larger than 100KB attached is sent via
infrared communication ("Ir exchange") or copied to microSD
("Copy to microSD"), the attached file is deleted.
<Store in center>
• SMS with Korean text cannot be saved at the Data Center.
Unsent Mail List Screen Sub Menu
Unsent mail list screen (P155) ▶ Move the
cursor to mail ▶
M
[Menu] ▶ Perform the
following operations
[Delete]
Delete one : Delete the selected mail.
Delete selected : Select and delete mail.
▶ Mark mail to delete ▶
I
[Done] ▶ "Yes"
• Press
M
[Menu] to select "Select all" or
"Deselect all".
Delete all : Delete all unsent mail.
▶ Enter the Terminal security code ▶ "Yes"
Continued on next page
166
Mail
[Store in center]
Save mail at the Data Center.
Save one : Save the selected mail.
▶ Enter the Terminal security code ▶ "Yes"
Save selected : Select and save mail.
▶ Mark mail to save ▶
I
[Done]
• If the number of saved mail is less than 10,
press M[SelAll/ClrAll] to select/clear all.
▶ Enter the Terminal security code ▶ "Yes"
[Sort]
Set conditions and sort mail.
[Filter]
Display mail that meet certain conditions.
Mail : Display only i-mode mail.
SMS : Display only SMS.
All : Display all unsent messages.
[Ir exchange]
Send the selected mail or all unsent mail via infrared
communication.→P328
[Copy microSD]
Copy the selected mail or all unsent mail to the microSD card.
Copying all unsent mail requires you to enter the Terminal security
code.
[Cancel auto send]
Cancel the auto send setting.
[Auto send fail reason]
Display the reason for auto send failure.
Note
<Store in center>
• SMS with Korean text cannot be saved at the Data Center.
<Ir exchange>
• If mail with a Flash movie (files with extension of swf including
Motion Oekaki
TM
files) larger than 100KB attached is sent, the
attached file is deleted.
<Copy microSD>
• If mail with a Flash movie (files with extension of swf including
Motion Oekaki
TM
files) larger than 100KB attached is copied,
the attached file is deleted.
Received mails/Sent mails/Recent mails
Using Mail History
Up to 30 entries will be saved in each the Received mail logs
and Sent mail log. Also, up to 60 entries of sent/received
mail will be saved in "Recent". These logs can be used to
compose mail and save addresses to the Phonebook.
• If the maximum number of recordable entries has been exceeded,
the oldest entry will be deleted first.
167
Mail
Continue on the next page
Example: To display the Received mails
Stand-by display ▶
L
(for 1+ seconds)
b
To display the Sent mails
Stand-by display ▶ press
R
(for 1+ seconds).
b
To display the Recent mails
Press
J
on the Received mail list
screen/Sent mail list screen.
•
I
[Mail]: Create mail to the receiver or
sender of the selected log entry.
•
g
[V. phone]: Make a videophone call to the
phone number of the selected log entry.
•
T
[Call]: Make a voice call to the phone
number of the selected log entry.
Ex.: Received mail
list screen
Select an entry in the log
•
C
[Call]: Make a call to the selected
number in the log.
•
I
[Mail]: Create mail to the receiver or
sender of the selected entry.
•
g
[V. phone]: Make a videophone call
to the phone number of the selected
log entry.
•
T
[Add]: Add the selected mail
address in the log to the Phonebook.
Go to Step 2 in Adding Phonebook
Entries from Dialed/Received Calls
etc." (P89).
Only unsaved mail addresses can be
saved.
a
The name saved in the Phonebook
b
Other party's mail address
c
Receive/sent date & time
Ex.: Received mail
detail screen
b
Icons displayed on the Received mails/Sent mails/Recent mails
Icon Description
Received mail
Sent mail
Received SMS
Sent SMS
Mail and SMS that were received/sent while roaming*
* The received/sent date and time is shown in the local time.
Received Mails/Sent Mails/Recent Mails Sub Menu
Use H to move the cursor to a log entry to
use ▶ M[Menu] ▶ Perform the following
operations
[Call function]
Voice call : Make a voice call to the phone number of the
selected log entry.
Videophone call : Make a videophone call to the phone number of
the selected log entry.
Customize call : Edit the phone number of the selected log entry
and dial.
[Mail]
*1
Compose mail : Create mail to the receiver or sender of the
selected log entry.
Go to Step 3 in "Composing and Sending i-mode
Mail" (P138).
Compose SMS : Create SMS to the receiver or sender of the
selected log entry. Go to Step 3 in "Composing
and Sending SMS" (P176).
[Add to phonebook]
Save the mail address of the selected log entry to the Phonebook.
Go to Step 2 in "Adding Phonebook Entries from Redial/Received
Calls etc." (P89).
• Only unsaved mail addresses can be saved.
Continued on next page
168
Mail
[Change list]*2
Recent calls : Display recent call log entries.
Recent mails : Display recent mail log entries.
Received calls : Display incoming call log entries.
Received mails : Display received mail log entries.
Redial : Display phone redial log entries.
Sent mails : Display sent mail log entries.
• The item for the currently displayed log is not displayed.
[Delete]*3
Delete the selected log entry.
[Delete]*2
Delete one : Delete the selected log entry.
Selected : Select and delete log entries.
▶ Mark mail to delete ▶
I
[Delete]
• Press M[SelAll/ClrAll] to select/clear all.
Delete all : Delete all log entries.
*1 On the detail screen of Received mails/Sent mails/Recent mails,
"Compose mail" is displayed instead.
*2 Not displayed on the detail screen of Received mails/Sent mails/
Recent mails.
*3 Displayed only on the detail screen of Received mails/Sent
mails/Recent mails.
Mail setting
Setting Mail Functions of the
FOMA Terminal
Communication
Configuring Communication Settings
Mail menu screen (P137) ▶ "Mail setting"
▶ "Communication" ▶ Perform the following
operations
[Receive option set]
To enable/disable the Receive option (P149), set whether to receive
i-mode mail automatically.
ON : Do not receive mail automatically.
OFF : Receive mail automatically.
[Receive attach file]
Specify attached files to be retrieved when i-mode mail is received.
▶ Mark items to download ▶
I
[Done]
[Check new messages]
Specify request items when using "Check new messages".
▶ Mark items to check ▶
I
[Done]
Note
<Receive option set>
•
When this option is set to "ON", i-mode mail cannot be received
automatically. Incoming i-mode mail is kept at the i-mode center,
and the Notification of received mail screen (P149) appears.
<Receive attach file>
• If the attached file set not to be received arrives, the file
name is displayed in the message text and you can receive by
selecting it.→P152
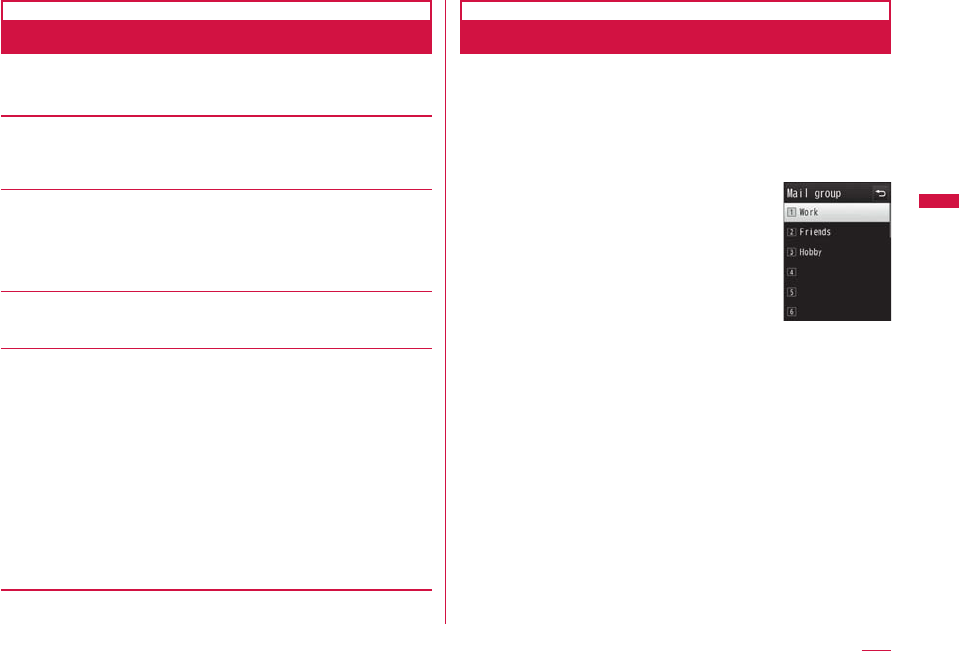
169
Mail
Continue on the next page
Display
Configuring Display Settings
Mail menu screen (P137) ▶ "Mail setting" ▶
"Display" ▶ Perform the following operations
[Font size]
Set a font size for text on the Mail detail screen.
• Pressing
1
,
2
, or
3
on the Received mail detail screen also
changes the font size.
[Folder lock]
Set security for Inbox/Outbox and Unsent message in Mail menu.
To display security-activated mail, the Terminal security code must
be entered.
▶ Enter the Terminal security code ▶ Mark items to set ▶
I
[Done]
[Melody auto play]
Set whether to automatically play attached or pasted melodies on
the Mail display screen.
[Receiving display]
Set whether to notify with a ring tone or Receive results screen when
i-mode mail or MessageR/F is received while operating the FOMA
terminal (displaying other than Stand-by display).
Alarm mode : Notify with a ring tone or the Receive results
screen.
• The Receive results screen is not displayed
depending on the function in use such as while
calling or activating Camera.
Operation mode : Prioritize the FOMA terminal operation and does
not notify with a ring tone or the Receive results
screen, etc.
• When receiving i-mode message or MessageR/F
while the display is turned off, the display does
not light up.
Mail group
Registering Mail Group
Register mail addresses to a mail group so that you can
easily specify a certain group of multiple recipients.
Up to 20 mail groups can be created. Up to 5 recipients can
be registered to a mail group.
Mail menu screen (P137) ▶ "Mail setting" ▶
"Mail group"
Mail group list
screen
I
[Add] ▶ Enter a mail group name
Select a registered mail group ▶ Move the
cursor to a receiver field ▶
C
[Add] ▶ Select
a registration method ▶
I
[Done]
Sent msg. log : Select an address from Sent mails.
Rcv. msg. log : Select an address from Received mails.
Phonebook : Select an address from the Phonebook.
Direct input : Enter an address directly.
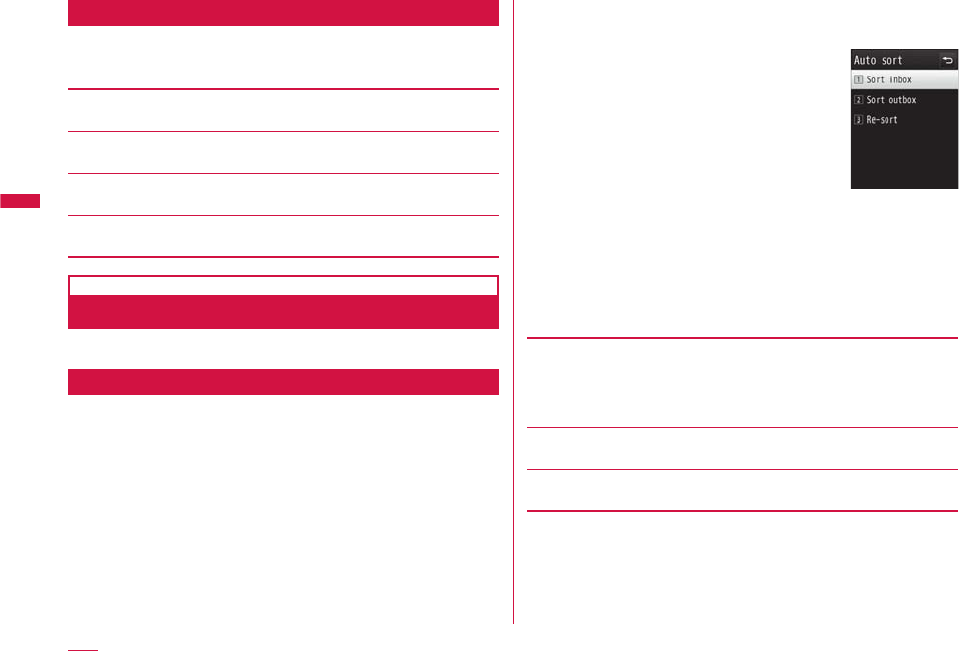
170
Mail
Mail Group List Screen Sub Menu
Mail group list screen (P169) ▶
M
[Menu] ▶
Perform the following operations
[Delete group]
Delete the selected mail group.
[Add group]
Create a new mail group.
[Rename group]
Edit the selected mail group name.
[Write Mail]
Create i-mode mail addressed to the selected mail group.→P138
Auto sort
Sorting Mail Automatically to Folders
Set conditions to automatically save mail in specified folders.
Setting Auto Sort Rule
Set conditions to sort mail to folders automatically.
• Create folders in "Inbox" or "Outbox" for sorting beforehand.
• Up to 30 sorting conditions can be saved.
Mail menu screen (P137) ▶ "Mail setting" ▶
"Auto sort"
Auto sort screen
"Sort inbox"/"Sort outbox" ▶ Select a Sort rule
field
Select the Sorting criteria field ▶ Perform the
following operations
[Address]
Set mail address or phone numbers as a condition to sort.
▶ "Direct input" ▶ Enter a mail address/phone number
• Select an address from Recent msg log, Recent dial log, or
Phonebook.→P139
[Phonebook Group]
Set a phonebook group as a condition to sort.
[Subject]
Set mail subject as a condition to sort.
Select the Folder to sort into field ▶ Select a
folder to sort into ▶
I
[Done]

171
Mail
Continue on the next page
Note
• To edit the sorting condition, select a sorting condition to edit
and set a rule again.
• The same sorting conditions as ones set to another folder
cannot be set.
• When setting a mail address as a sorting condition, the domain
name (the string after @) should be included. For example, when
setting from the Sent message log, or the Received message
log, if the mail is exchanged based on their phone numbers, the
address does not include the domain name. In this case, the
mail address is not recognized as a sorting condition.
• When setting a sorting condition to SMS, enter a phone number
for "Address". You cannot set "Phonebook Group"/"Subject" as a
sorting condition.
Re-sorting Mail
Re-sort saved mail according to a sorting condition.
Auto sort screen (P170) ▶ "Re-sort" ▶
"Inbox"/"Outbox"
Mark folders to re-sort ▶
I
[Done] ▶ "Yes"
• Press
M
[SelAll] to select all.
Deleting Auto Sort Rule
Auto sort screen (P170) ▶ "Sort inbox"/"Sort
outbox" ▶ Move the cursor to the Sort rule
field ▶
M
[Menu] ▶ Perform the following
operations
[Delete]
Delete one : Delete the selected sorting rule.
Delete selected : Select and delete the sorting rules.
▶ Mark sorting rules to delete ▶
I
[Done]
• Press
M
[SelAll] to select all.
Delete all : Delete all sorting rules.
Re-ordering Auto Sort Rule
The execution priority of the auto sort rule follows the display
sequence of the rules on the screen. Re-ordering the auto
sort rules changes the execution priority.
Auto sort screen (P170) ▶ "Sort inbox"/"Sort
outbox"
Move the cursor to the Sort rule field to re-
order ▶
I
[Reorder] ▶ Use
H
to move a sort
rule ▶
C
[Select]
172
Mail
Edit
Editing Header/Signature/Quotation
Mail menu screen (P137) ▶ "Mail setting" ▶
"Edit" ▶ Perform the following operations
[Edit header]
Set a header to be inserted to i-mode mail text.
▶
C
[Edit] ▶ Enter a header
[Edit signature]
Set a signature to be inserted to i-mode mail text.
▶
C
[Edit] ▶ Enter a signature
[Edit quotation]
Set a symbol indicating that a text is quoted from received mail when
replying with quoting.
▶
C
[Select] ▶ Enter a quotation mark ▶
I
[Done]
[Auto attach]
Set whether to automatically attach a header or signature when
composing i-mode mail.
▶ Mark items to be attached ▶
I
[Done]
Others
Configuring Other Settings
Mail menu screen (P137) ▶ "Mail setting" ▶
"Others" ▶ Perform the following operations
[Check settings]
Check the contents set in "Mail setting".
[Reset settings]
Reset the contents set in "Mail setting" to the default.
▶ Enter the Terminal security code ▶ "Yes"
Receive Message
When You Receive Message
When the FOMA terminal is in service area, MessageR/F is
sent automatically from the i-mode center. When MessageR/F
arrives, the display, ring tone, or vibration notifies you of new
messages.
• Up to 100 MessageR/F can be saved respectively. However, the
number of savable messages varies depending on the message
size.
Viewing New Message
When MessageR/F arrives, the latest message appears
automatically.
• "Auto-display setting" can be configured to allow the detail screen
to automatically open after receiving a MessageR/F.→P173
Automatically receive MessageR/F when it
arrives
• After receiving MessageR/F, the Receive results screen is
displayed.
• The previous screen returns if no operation is performed for
approximately 30 seconds.
173
Mail
Continue on the next page
Auto-display setting
Displaying Message Automatically
Set automatic display method of MessageR/F.
i-mode menu screen (P182) ▶ "i-mode setting"
▶ "Image&Effect set." ▶ "Auto-display setting"
▶ Perform the following operations
MessageR preferred : Display MessageR automatically
when MessageR and MessageF arrive
simultaneously.
MessageR only : Display
only MessageR automatically.
MessageF preferred : Display MessageF automatically
when MessageR and MessageF arrive
simultaneously.
MessageF only : Display
only MessageF automatically.
Auto-display OFF : Do not display
MessageR/F
automatically.
Melody auto play
Playing a Melody Automatically when
Message is Displayed
Set whether to automatically play a melody when
MessageR/F is displayed.
i-mode menu screen (P182) ▶ "i-mode setting"
▶ "Image&Effect set." ▶ "Melody auto play"
Switch between ON and OFF each time "Melody auto play" is
selected.
Check new messages
Checking New Message
MessageR/F that was not received because the FOMA
terminal was out of service area is stored at the i-mode
center, and , , or appears at the top on the screen.
Checking new messages downloads the stored MessageR/F.
• You cannot check new messages when the FOMA terminal is out of
service area.
• Set items to check (mail and MessageR/F) in "Check new
messages" (P168).
i-mode menu screen (P182) ▶ "Check new
messages"
When checking is completed, the Check results screen appears.
"MessageR"/"MessageF"
Note
• Incoming MessageR/F is stored at the i-mode center when:
- Power is OFF
- A videophone call in progress
- Self mode is activated
- The FOMA terminal is out of service area
- Omakase Lock is activated
- MessageR/F on the FOMA terminal is full
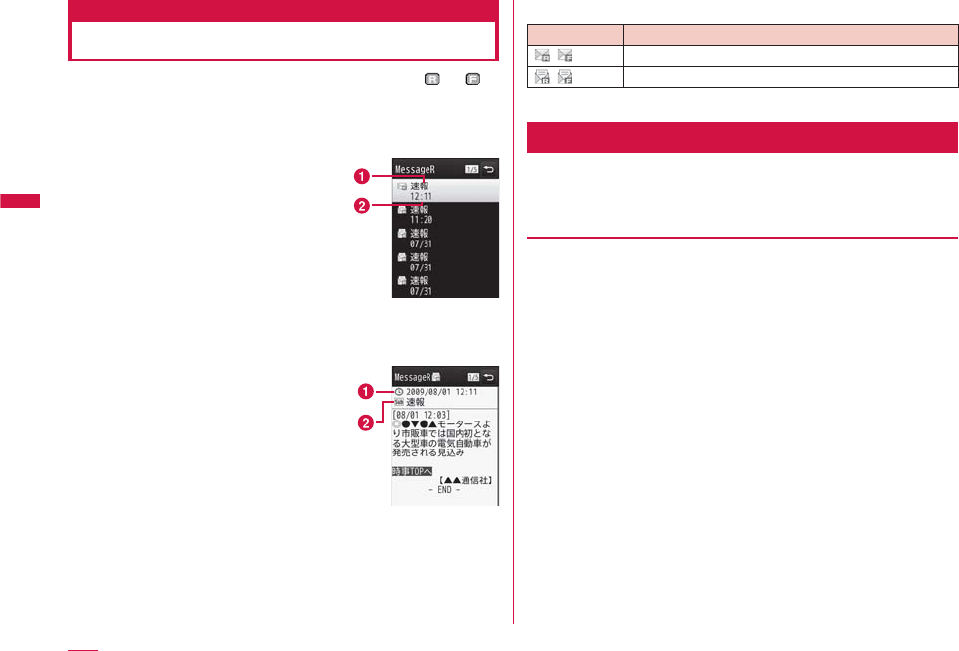
174
Mail
MessageR/MessageF
Displaying New Message
When MessageR/F arrives from the i-mode center, or
appears at the top of the screen.
i-mode menu screen (P182) ▶ "MessageR/F"
▶ "MessageR"/"MessageF"
•
T
[Delete]: Delete the selected
MessageR/F
a
Subject
b
Received date and time
On the MessageR/F list screen,
the messages received before
today are displayed with date and
ones received today are displayed
with time. Ex.: MessageR
list screen
Select MessageR/F
a
Received date and time
b
Subject
Ex.: MessageR
detail screen
b
Icons displayed on the MessageR/F list/detail screen
Icon Description
/Unread MessageR/F
/Read MessageR/F
* Icons other than above are the same as for Received mail.→P157
MessageR/F List Screen Sub Menu
MessageR/F list screen (P174) ▶ Move the
cursor to a message ▶
M
[Menu] ▶ Perform
the following operations
[Delete]
Delete one : Delete the selected MessageR/F.
Delete selected : Select and delete MessageR/F.
▶
Mark MessageR/F to delete
▶
I
[Done]
▶
"Yes"
• Press
M
[Menu] to select "Select all" or
"Deselect all".
Delete all read : Delete all read MessageR/F.
▶ Enter the Terminal security code ▶ "Yes"
Delete all : Delete all MessageR/F.
▶ Enter the Terminal security code ▶ "Yes"
175
Mail
Continue on the next page
[Protect]
Protect :
Protect one : Protect the selected MessageR/F.
Protect selected : Select and protect MessageR/F.
▶ Mark MessageR/F to protect ▶
I
[Done]
• Press
M
[Menu] to select "Select all" or
"Deselect all".
Protect all : Protect all MessageR/F.
Clear :
Clear one : Unprotect the selected MessageR/F.
Clear selected : Select and unprotect MessageR/F.
• The operation is the same as "Protect
selected".
Clear all : Unprotect all MessageR/F.
[Sort]
Set conditions and sort MessageR/F.
[Filter]
Display only the MessageR/F that meet sorting conditions.
Unread : Display only the unread MessageR/F.
Read : Display only the read MessageR/F.
Protected : Display only the protected MessageR/F.
All : Display all MessageR/F.
Note
<Delete>
• If there are unread MessageR/F, a confirmation for deletion
appears. Select "Yes" to delete.
• Protected mail cannot be deleted.
<Protect>
• Up to 100 MessageR/F can be protected respectively.
MessageR/F Detail Screen Sub Menu
MessageR/F detail screen (P174) ▶
M
[Menu]
▶ Perform the following operations
[Delete]
Delete the displayed MessageR/F.
[Protect]
Protect or unprotect the displayed MessageR/F.
[Save]
No./addr. in body : Save the mail address or phone numbers in
the
currently
displayed MessageR/F to the
Phonebook.→P152
Inline image :
Save or check information about an image
inserted in the currently displayed MessageR/F.
Background image : Save the background image used in the
currently
displayed MessageR/F.
[Attach file]
Save : Save an attached file of the currently displayed
MessageR/F.
Delete : Delete an attached file of the currently displayed
MessageR/F.
Note
<Delete>
• Protected message cannot be deleted.
<Protect>
• Up to 100 MessageR/F can be protected respectively.
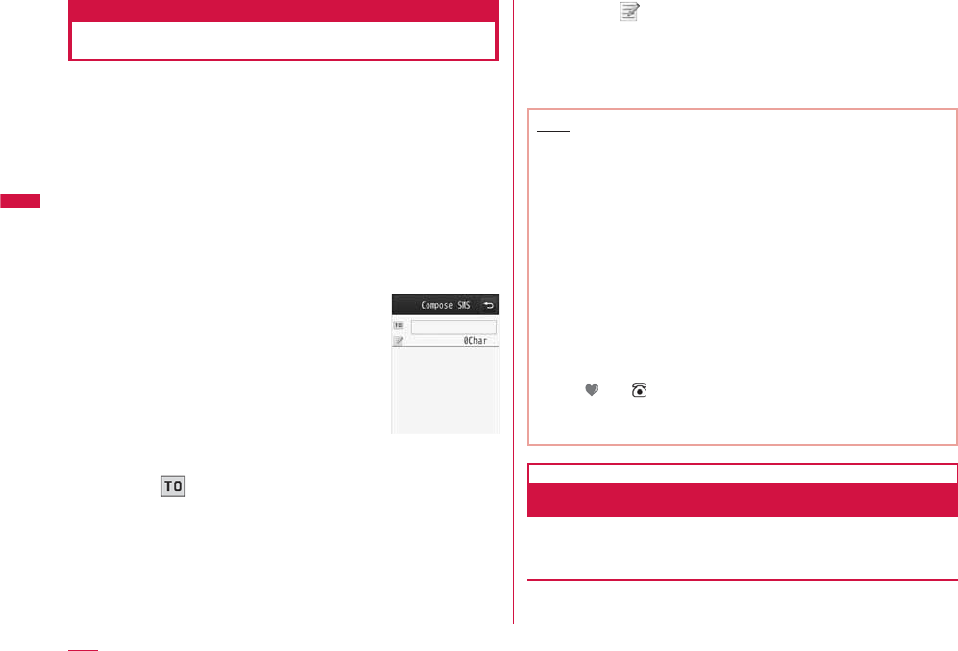
176
Mail
Compose/Send SMS
Composing and Sending SMS
•
You can send and receive SMS to/from terminals that use international
carriers other than DOCOMO. Visit the DOCOMO International Services
website for available countries and international carriers.
•
You can send and receive SMS in Korean to/from terminals that
support Korean.
•
Use L-03B to send and receive international SMS in Korean to/from
Korean-support terminals of Korea and other international carriers. Visit
the DOCOMO International Services website for international carriers
that support international SMS. The number of characters that can
be sent depends on the situation of each recipient carrier. For details,
contact recipient carriers.
•
Switching input modes in SMS message to Korean→P178
Mail menu screen (P137) ▶ "SMS" ▶
"Compose SMS"
•
g
[Ph. book]: Select a recipient from the
Phonebook.
Compose SMS
screen
Select field ▶ "Direct input" ▶ Enter the
phone number
• Up to 21 digits (including "+") can be entered.
• On the Phone number entry screen, press
M
[Menu] to select
"Int. call", "Select prefix", or "Cancel". To cancel the entry, press
I
[Cancel].
• The address can be selected from Sent message log or
Received message log, or Phonebook.→P139
Select field ▶ Enter the message
• The number of characters that can be entered differs
depending on the settings in "SMS input character".→P178
I
[Send]
Note
• For a destination of an international carrier other than
DOCOMO, enter in the order of "+" (press
0
for 1+ seconds),
"Country Code", and "other party's mobile phone number". For the
mobile phone number starting with "0", enter the phone number
excluding "0". Numbers may be entered in the order of "010",
"Country Code", and the "other party's mobile phone number" (to
reply to overseas SMS received, enter "010").
• Characters may not be sent correctly on receiver's side
depending on the signal strength, etc.
• When you send an SMS to a receiver who uses an international
carrier and some of the characters you send are not supported
by the carrier, those characters may not be displayed correctly.
• Even if you set "Caller ID notification" to "Not notify", your caller
ID is sent to the other party.
• You cannot reply to SMS sent with unknown ID or from a public
phone.
• When sending SMS, "Pictographs" and "Pictograph idioms" other
than and are displayed as half-pitch space in receiver's
screen.
• SMS texts in Korean sent to a terminal which does not support
Korean will not be displayed correctly on the terminal.
Compose SMS Screen Sub Menu
Compose SMS screen (P176) ▶
M
[Menu] ▶
Perform the following operations
[Send]
Send SMS.

177
Mail
Continue on the next page
[Save]
Save SMS being created or edited as an unsent message.
[Report request]
Set whether to request an SMS report when SMS is delivered.
→
P178
[Validity period]
Set the period of time that a sent SMS can be kept undelivered at
the SMS center.→P178
Receive SMS
When You Receive SMS Messages
When the FOMA terminal is in service area, SMS is
automatically received.
• Up to 1,000 received SMS messages including i-mode mail can be
saved. However, the savable number depends on the amount of the
data.
When SMS is received appears at the top of
the screen
When the reception is completed, the
Receive results screen appears.
• The previous screen returns if no operation
is performed for approximately 30
seconds.
• Selecting "SMS" opens the Inbox list
screen.
• Until the detail screen of received SMS
opens, appears at the top of the screen
and (the number indicates the
number of messages) appears in Stand-by. Receive results
screen
Note
• When Stand-by i-αppli is set, the Receive results screen for
SMS does not appear, and the ring tone and vibrator for SMS
do not work.
Viewing New SMS
Receive results screen (P177) ▶ "SMS" ▶
Select a folder
Select an SMS message to display
Received mail
detail screen
Check new SMS
Checking New SMS Messages
SMS that could not be received for a reason such as because
the FOMA terminal was out of service area, are stored at the
SMS center. You can receive stored SMS by checking the
SMS center.
• You cannot check new messages when the FOMA terminal is out of
service area.
Mail menu screen (P137) ▶ "SMS" ▶
"Check new SMS"
When the reception is completed, the Check results screen
appears.
178
Mail
SMS Settings
Setting SMS
SMS Report Request
Set whether to request an SMS report after the SMS is
delivered. If set to "ON", an SMS report indicating that the
SMS has been delivered to the receiver will be sent to you.
Mail menu screen (P137) ▶ "Mail setting" ▶
"SMS" ▶ "SMS report request" ▶ "ON"/"OFF"
Note
• An SMS report includes the sent time and the phone number of
the receiver.
SMS Validity Period
Set the period of time that a sent SMS will be kept
undelivered at the SMS center because the recipient terminal
is out of service area, etc.
• If "0 day" is selected, sending the SMS message is retried after a
while, then the message is deleted from the SMS center.
Mail menu screen (P137) ▶ "Mail setting" ▶
"SMS" ▶ "SMS validity period" ▶ Select the
period
SMS Input Character
Set the SMS input mode.
Mail menu screen (P137) ▶ "Mail setting" ▶
"SMS" ▶ "SMS input character" ▶ Select an
item to set
JP(70Chara) : Enter Japanese text. Up to 70 characters
can be entered.
JP/KR(70Chara) : Enter Japanese and Korean text. Up to 70
characters can be entered.
English(160Chara) : Enter English text. Up to 160 characters
can be entered.
SMS Center
* You usually do not need to change this setting.
Set the SMS center settings.
M
▶ "Settings" ▶ "International roaming"
▶ "Network" ▶ "SMS center" ▶ Perform the
following operations
[SMS Center]
DOCOMO : Set DOCOMO as the SMS center.
Others : Set a carrier other than DOCOMO as the SMS center.
[Address]
When "Others" is selected for "SMS Center", enter connection
address.

179
Mail
Continue on the next page
[Type of number]
Set this option when "Others" is selected for "SMS Center".
International : If the SMS center phone number is for international
calls, select this option.
Unknown : If you do not know whether the SMS center phone
number is for international calls, select this option.
I
[Done]


181
i-mode/i-motion/i-Channel
i-mode ・・・・・・・・・・・・・・・・・・・・・・・・・・・・・・・・・・・・・・・・・・・・・・・ 182
Displaying the i-mode Menu ・・・・・・・・・・・・i-mode Menu 182
Displaying a Site
Displaying a Site ・・・・・・・・・・・・・・・・・・・・・・・・・・・・・・・・・・・・ 183
Viewing and Operating Sites ・・・・・・・・・・・・・・・・・・・・・・・・ 186
Subscribing to a Site in My Menu ・・・・・・・・・ My Menu 187
Changing i-mode Password
・・・・・・・・・・・・・・・・・・・・・・・・・・・ Change i-mode Password 188
Displaying Internet Web Pages ・・・・Internet Access 188
Saving Web Pages or Sites for Quick Access
・・・・・・・・・・・・・・・・・・・・・・・・・・・・・・・・・・・・・・・・・・・ Bookmark 190
Saving Site Contents ・・・・・・・・・・・・・・・ Screen memo 192
Downloading Images, Melodies etc.
from Sites
Downloading Data from Sites ・・・・・・・・・・・・・・・・・・・・・・・ 194
Useful Functions of i-mode
Using Phone To/Mail To/Web To/Media To/i-αppli To Function
・・・
Phone To/Mail To/Web To/Media To/i-αppli To function
196
Setting i-mode
Setting i-mode ・・・・・・・・・・・・・・・・・・・・・・・i-mode setting 197
Using Certificates
Operating SSL Certificate ・・・・・ SSL Certificate Info 200
Using i-motion
i-motion ・・・・・・・・・・・・・・・・・・・・・・・・・・・・・・・・・・・・・・・・・・・・・ 201
Downloading i-motion from Sites
・・・・・・・・・・・・・・・・・・・・・・・・・・・・・・・・・・・i-motion Download 201
Using i-Channel
i-Channel ・・・・・・・・・・・・・・・・・・・・・・・・・・・・・・・・・・・・・・・・・・・・ 203
Displaying i-Channel ・・・・・・・・・・・・・・・・・・・・・・・・・・・・・・・・ 203
Setting i-Channel ・・・・・・・・・・・・・・・・・・i-Channel Setting 204
182
i-mode/i-motion/i-Channel
i-mode
i-mode makes use of the display of the FOMA terminal
supporting i-mode (i-mode terminal) to use online services
such as sites access, Internet access and i-mode mail.
• i-mode is a fee-based service requiring a separate subscription.
• For details about i-mode, see "Mobile Phone User's Guide [i-mode]
FOMA version".
Before using i-mode
• Contents of sites and Internet web sites (web pages) are
generally protected by copyright law. Data, such as text or
images you download to the i-mode terminal from sites or
web pages, can be used only for personal entertainment, and
the data cannot be used, in whole or in part, as it is or after
modification, for sale or redistribution, without the consent of
the copyright holders.
• If you insert another UIM or turn the FOMA terminal power on
without the UIM, depending on the model of the FOMA terminal,
still images, moving pictures, melodies downloaded from sites,
mail attachments (still images, moving pictures or melodies),
screen memos, and MessageR/F cannot be viewed or played.
• When a file with UIM restrictions is set as the Stand-by display
or ring tone, the setting will revert to its default if a different UIM
is inserted or the terminal power is turned on without a UIM.
i-mode Menu
Displaying the i-mode Menu
You can use i-mode functions from the i-mode menu.
Stand-by display ▶
I
i-mode menu
screen
Perform the following operations
[iMenu]
Connect to the i-mode center.→P183
[Bookmark]
Display the Bookmark folder list screen.→P190
[Screen memo]
Display the Screen memo list screen.→P193
[Last URL]
Open the last viewed i-mode site or web page.→P185
[Go to location]
Enter a URL to connect to the Internet.→P188
[i-Channel]
Display the i-Channel menu screen.→P204
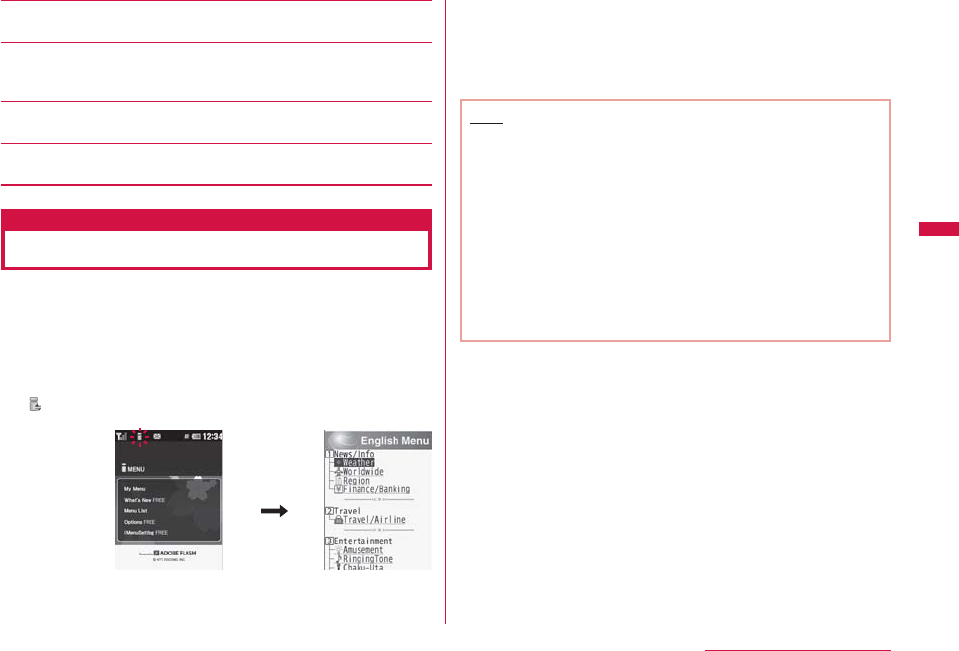
183
i-mode/i-motion/i-Channel
Continue on the next page
[MessageR/F]
Display a list of MessageR/F.→P174
[Check new messages]
Check whether i-mode mail or MessageR/F is stored at the i-mode
center.→P173
[i-mode setting]
Configure the FOMA terminal i-mode functions.→P197
[Full browser]
Display the Full browser menu screen.→P206
Displaying a Site
You can use various services offered by IP (Information
Providers).
• Services vary depending on the IP (Information Providers). Some
sites require a separate subscription.
i-mode menu screen (P182) ▶ "iMenu" ▶
"English" ▶ "Menu List"
appears at the top of the screen during i-mode
communication.
C
[Select]
• Press
I
[Stop] to cancel a page download.
Select an item (link)
•
I
[Reload]: If the current site is updated, reload the page.
•
g
[∧]: Scroll the screen up.
•
T
[∨]: Scroll the screen down.
•
P
: Exit i-mode. Select "Yes".
Note
• When a number appears in front of a link item, press the
corresponding dial key to access the linked site. Some sites
may not be possible to connect.
• Some sites may require "Phone/Terminal and UIM ID" to be sent
in order to gain access.
The "Phone/Terminal and UIM ID" is sent to the IP (Information
Provider) so that the IP can recognize you and provide
customized information or judge whether the contents that the
IP provides can be used on your mobile phone. The "Phone/
Terminal and UIM ID" is sent via the Internet to the IP and
may be seen by a third party. This action does not reveal your
address, age, or sex to the IP.
• Images that can be displayed are in JPEG, GIF, and SWF
formats.

184
i-mode/i-motion/i-Channel
Site Display Screen Sub Menu
While viewing a site ▶
M
[Menu] ▶ Perform
the following operations
[Bookmark]
Save : Save the URL of the displayed site as a Bookmark. Go to
Step 2 in "Adding to Bookmark" (P190).
List : Display the Bookmark folder list screen.→P190
[Screen memo]
Save : Save the displayed page as a Screen memo.→P192
List : Display the Screen memo list screen.→P193
[Save image]
Save images or background images contained in the displayed page.
→P194
[Show properties]
URL : Display the URL of the displayed page.
Page properties : Display the URL and title of the displayed page.
Certificates : If the displayed page supports SSL, the SSL
certificate is displayed.
[Go to location]
Enter URL : Enter a URL to access the web page. Go to Step 2 in
"Displaying Internet Web Pages" (P188).
Home : Connect to the URL set as "Home".
URL history : Select an entry in the URL history to access the web
page. Go to Step 2 in "Using URL History"(P189).
[Reload]
If the displayed site is updated, reload the page.
[Compose message]
Create i-mode mail with the URL of the displayed page pasted in the
message text. Go to Step 2 in "Composing and Sending i-mode Mail"
(P138).
Select from the following options when a linked item is selected.
This page : Paste the URL on the displayed page.
Link page : Paste the URL of the link.
[Add to Phonebook]
Save a phone number or mail address displayed on the site to the
Phonebook.→P187
[Display]
Change char code : If characters are not displayed correctly,
change the character encoding and display.
Retry : Play Flash movie/an animation contained in the
displayed page from the beginning.
[Settings]
Image display : Set whether to display images contained on the
displayed page.
Sound effect : Set whether to play sound effects of the Flash
movie contained in the displayed page.
i-motion type : Specify the i-motion type to download.→P202
[Switch to Full Browser]
Switch to Full browser.→P213
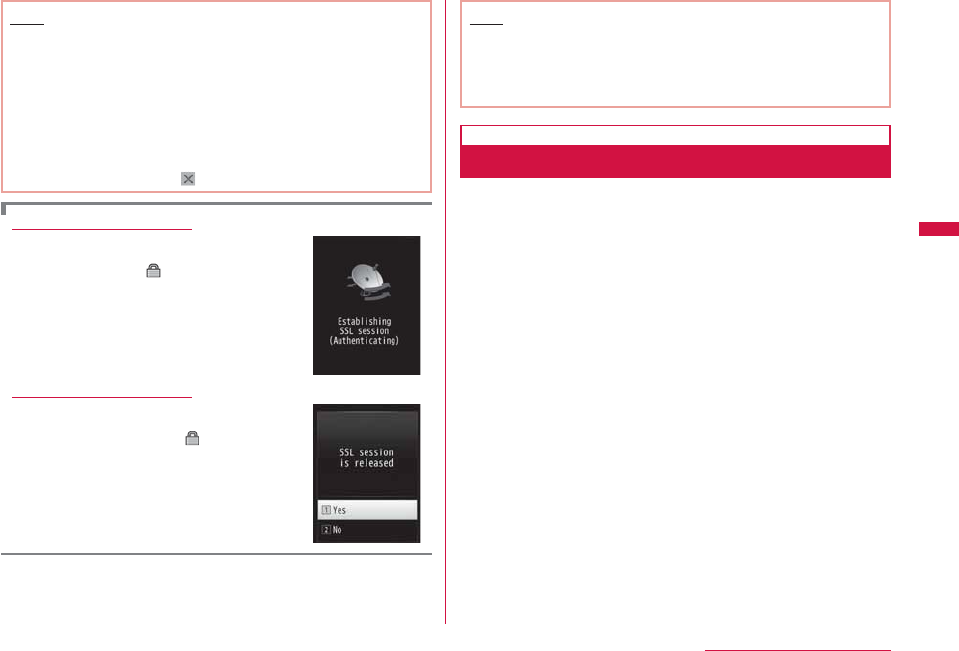
185
i-mode/i-motion/i-Channel
Continue on the next page
Note
<Change char code>
• If characters are not displayed correctly, repeat the steps.
However, after the character code is changed 4 times, the
default character encoding returns.
• Characters may not be displayed correctly even after repeatedly
changing the encoding.
• The new character encoding is valid only for the displayed page.
<Image display>
• Images may not be displayed correctly even when this option is
set to "ON". In this case, appears.
Downloading an SSL page
The screen shown on the right appears when
you access an SSL site. When accessed, the
SSL page opens and appears on the top of
the screen.
Returning to a normal site
The screen shown on the right appears when
you return to a non-SSL site. Select "Yes" to
return to a normal site, and disappears.
Note
• If the SSL certificate has already expired or the site does not
support SSL, a warning indicating that this site may not be
secure may appear. To connect, select "Yes". However, note
that your personal information (credit card number or contact
address) may not be sent safely.
Last URL
Opening the Last Viewed Web Page
After i-mode is terminated, the URL of the last opened page is
saved in "Last URL". You can re-connect to the last accessed
page using Last URL.
i-mode menu screen (P182) ▶ "Last URL" ▶
I
[Connect]
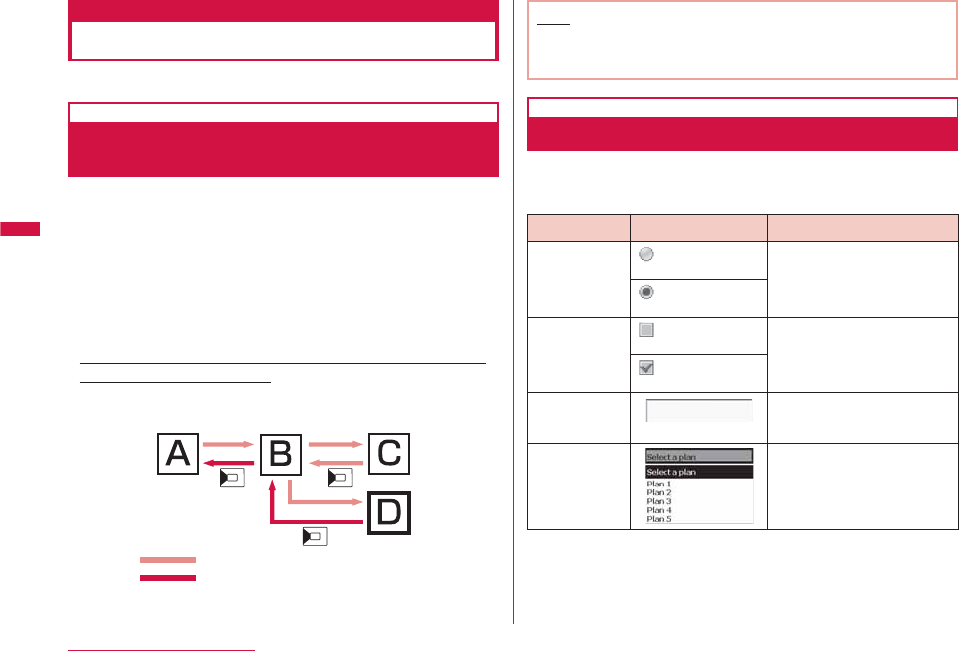
186
i-mode/i-motion/i-Channel
Viewing and Operating Sites
This section describes basic operations on sites.
Going Back to Previous Page/Going to
Next Page The FOMA Terminal
The FOMA terminal temporarily saves the displayed sites
data in a cache.
Data saved in the cache can be displayed, without revisiting
the site, by using
J
.
• However, communication is established if the data is larger than
the cache size, or if the site requires the latest information always
be loaded.
• Characters or settings entered at the site will not be stored in the
cache.
• Terminating i-mode deletes data from the cache.
Example: When pages are displayed in the order of Screen
"A" → "B" → "C" → "B" → "D"
If the pages are opened in the order "A"→"B"→"C", then returning to
"B", and opening "D", "C" is deleted from the cache. Pressing
J
displays "B"⇔"D".
… Display order of pages
… The order when displaying the
previous page from Screen "D"
Note
• Touch operation is not available on sites which use Flash
movies.
• Operation on sites may differ when a Flash movie is displayed.
Selecting Links or Items
You may need to perform operations using the following
items while connecting to i-mode. For details, see "Mobile
Phone User's Guide [i-mode] FOMA version".
Name Display example Details
Radio button
(Not selected) Select only 1 item.
(Selected)
Check box
(Not selected) Select multiple items.
(Selected)
Text box Enter text. Select a text
box to display the text entry
screen.
Pull down
menu Select an item from an
option list. Click pull-down
menu to display the option
list.
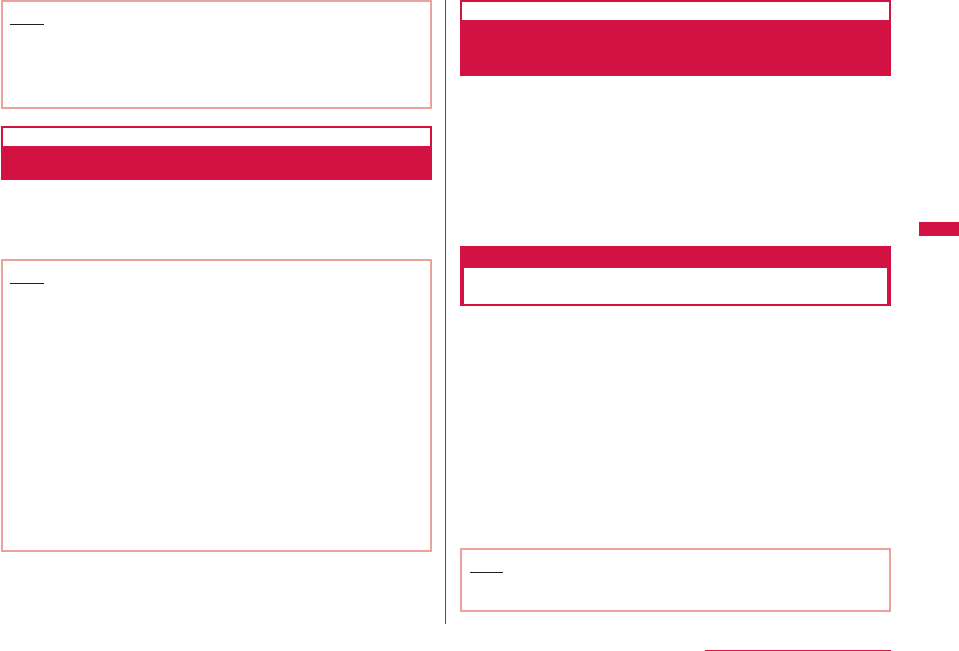
187
i-mode/i-motion/i-Channel
Continue on the next page
Note
<Text box>
• Perform the following operations to quote and enter information
saved in the FOMA terminal, such as Phonebook entries, your
own number, or data scanned with the bar code reader.
M
[Menu] ▶ "Quote" ▶ "Phonebook"/"Own number"/"Bar code"
Displaying Flash Movies
The FOMA terminal supports Flash movies, an animation
technology using images and sounds. You can access
sites that provide various kinds of animations. You can also
download a Flash movie and set it for the Stand-by display.
Note
• Even if a Flash movie is displayed, the animation may not work
correctly.
• Some Flash movies use data about your FOMA terminal. To
allow Flash movies to use the data, set "Use phone info." to
"ON".
• If the Flash movie contains audio, it will be played at the volume
set for "Incoming call". To mute sound effects, set "Sound
effect" to "OFF".→P198
• If you play a Flash movie with vibration set, the FOMA terminal
vibrates regardless of "Vibrator" (P102) settings on the FOMA
terminal.
• Flash movies are not displayed if "Images" is set to "OFF".
• Flash movies which are saved in Data Box, microSD card, or
Screen memo may appear differently depending on the saved
part.
• Flash sound effect or vibration does not work if they are set to
the Stand-by display/incoming call screen, etc.
Adding a Mail Address/Phone Number to
Phonebook
You can save a phone number or mail address displayed at a
site to the Phonebook.
While viewing a site ▶ Move the cursor to a
phone number/mail address ▶
M
[Menu] ▶
"Add to Phonebook" ▶ "Yes"
Go to Step 2 in "Adding Phonebook Entries from Redial/Received
Calls etc." (P89).
My Menu
Subscribing to a Site in My Menu
Frequently accessed sites can be saved in My Menu for quick
access.
• Up to 45 entries can be saved in My Menu.
• Some sites cannot be saved in My Menu.
Display a site to save ▶ "マイメニュー登録 (Save
in My Menu)"
• Item names may vary depending on the site.
Select i-mode password text box ▶ Enter the
i-mode password ▶ "決定 (OK)"
• The entered i-mode password is masked by asterisks "*".
• i-mode password→P188
Note
• When you subscribe to a fee-based site in "Menu List", the site
is automatically added to My Menu.
188
i-mode/i-motion/i-Channel
Accessing a Site from My Menu
i-mode menu screen (P182) ▶ "iMenu" ▶
"English" ▶ "My Menu" ▶ Select the site to
access
Change i-mode Password
Changing i-mode Password
"i-mode Password" (4 digits) is required to save to/delete
from My Menu, subscribe to/unsubscribe from message
services or fee-based i-mode sites, or configure mail settings.
The password is set to "0000" by default.
Change it to a number of your own choice for safety. Do not
reveal your i-mode password to others.
i-mode menu screen (P182) ▶ "iMenu" ▶
"English" ▶ "Options" ▶ "Change i-mode
Password"
Select the "Current Password" text box ▶
Enter the i-mode password (4 digits)
Select the "New Password" text box ▶ Enter a
new i-mode password (4 digits)
Select the "New Password (Confirmation)"
text box ▶ Enter the new i-mode password
(4 digits)
"Select"
Note
• If you forget the i-mode password, you need to bring a picture
ID such as your driver's license to the docomo Shop to have the
i-mode password reset to "0000".
Internet Access
Displaying Internet Web Pages
You can view a web page by entering its URL. Use half-pitch
alphanumeric characters and symbols to enter a URL.
i-mode menu screen (P182) ▶ "Go to location"
▶ "Enter URL"
Enter the URL
• Up to 2,033 half-pitch characters can be entered.
Note
• Web pages that do not support i-mode may not be displayed
correctly.
• When the same URL as a history entry is accessed, the old
URL is overwritten and the entry is displayed at the top of the
URL history as the latest URL.
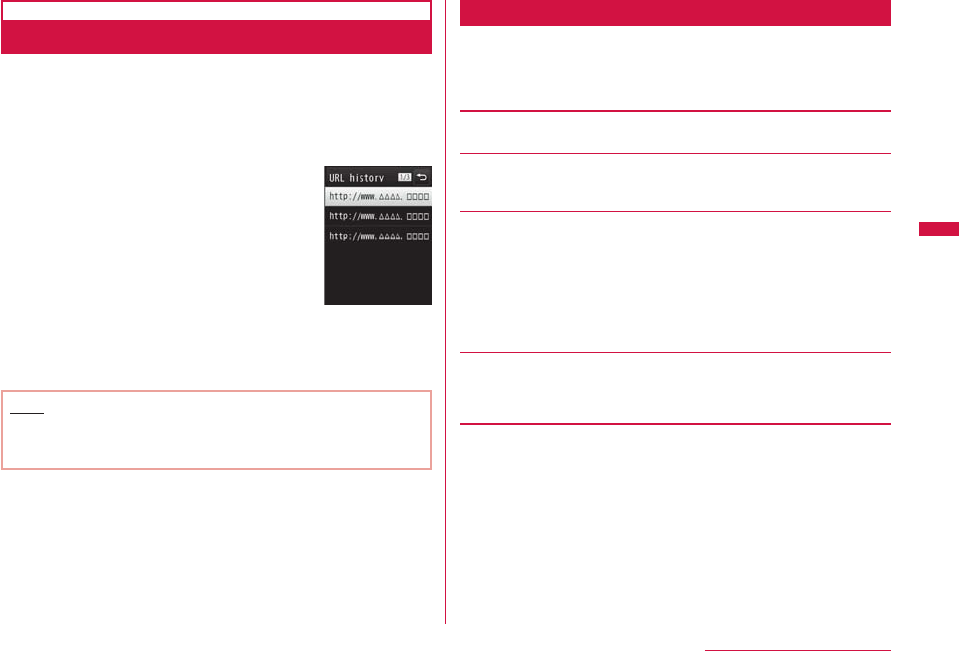
189
i-mode/i-motion/i-Channel
Continue on the next page
Using URL History
Up to 10 previously entered URLs are stored in the URL
history. You can access a web page by using the URL
history.
i-mode menu screen (P182) ▶ "Go to location"
▶ "URL history"
URL history list
screen
Select the URL to access
Note
• If more than 10 URLs are saved in the history, the oldest URL
will be overwritten first.
• The visited URL is displayed at the top of the URL history.
URL History List Screen Sub Menu
URL history list screen (P189) ▶ Move the
cursor to a URL history entry ▶
M
[Menu] ▶
Perform the following operations
[Connect]
Connect to the selected site in the URL history.
[Edit URL]
Edit and connect to the URL of the selected history.
▶ Edit URL ▶
C
[Set]
[Delete]
Delete one : Delete a selected URL history entry.
Del. selected : Select and delete entries in the URL history.
▶ Mark the URL history entries to delete ▶
I
[Delete] ▶ "Yes"
• Press
M
[SelAll/ClrAll] to select/clear all.
Delete all : Delete all entries in the URL history.
▶ Enter the Terminal security code ▶ "Yes"
[Compose message]
Create i-mode mail with the URL of the selected history entry pasted
in the message text. Go to Step 2 in "Composing and Sending i-mode
Mail" (P138).
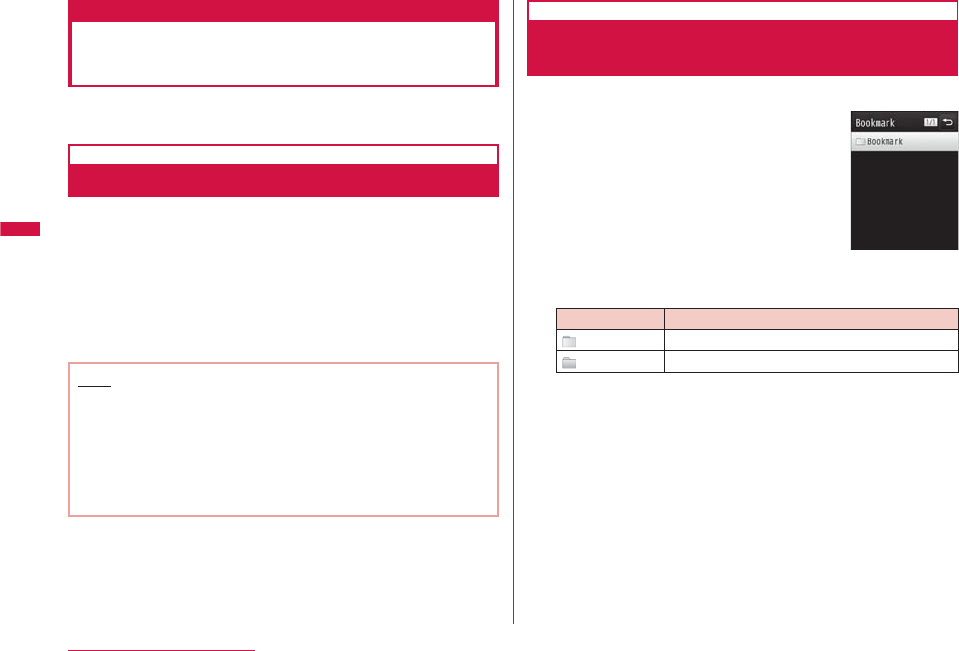
190
i-mode/i-motion/i-Channel
Bookmark
Saving Web Pages or Sites for
Quick Access
Save frequently accessed sites or web pages in Bookmark to
quickly display the pages.
Adding to Bookmark
• Up to 100 URLs can be saved in the Bookmark folders.
While viewing a site ▶
M
[Menu] ▶ "Bookmark"
▶ "Save"
C
[Select] ▶ Edit a title ▶
C
[Set] ▶
I
[Add] ▶ Select a destination folder
• If there is already the same URL saved, a confirmation to
overwrite appears. Select "Yes".
Note
• Up to 256 half-pitch characters can be entered for a URL
saved as a Bookmark.
• Up to 12 full-pitch or 24 half-pitch characters can be saved for
a Bookmark title.
• If the maximum number of Bookmarks has been saved, a
confirmation whether to select items to delete appears. To
select, "Yes" ▶ select a folder ▶ select Bookmark to delete ▶
select a destination folder.
Accessing a Homepage/Site from
Bookmark
i-mode menu screen (P182) ▶ "Bookmark"
•
I
[Add]: Add a folder. Up to 16 full-pitch or
32 half-pitch characters can be entered for
a folder name.
•
g
[Edit]: Edit the folder name of the
selected user-defined folder.
Bookmark folder
list screen
■ Icons displayed on the Bookmark folder list screen
Icon Description
(Gray) "Bookmark" (pre-installed folder)
(Yellow) User-defined folder

191
i-mode/i-motion/i-Channel
Continue on the next page
Select a folder
•
I
[URL]: Display the URL.
•
g
[Edit]: Edit the title.
Bookmark list
screen
Select the Bookmark URL to access
Bookmark Folder List Screen Sub Menu
Bookmark folder list screen (P190) ▶ Move
the cursor to a folder ▶
M
[Menu] ▶ Perform
the following operations
[Manage folder]
Create folder : Add a folder. Up to 16 full-pitch or 32 half-pitch
characters can be entered for a folder name.
Rename folder : Edit the selected folder name.
Sort folder : Sort the selected folder.
[Delete]
Delete one : Delete the selected folder.
▶ Enter the Terminal security code ▶ "Yes"
Delete all : Delete all Bookmarks.
▶ Enter the Terminal security code ▶ "Yes"
[Send all Ir data]
Send all Bookmarks via infrared communication.
▶ Enter the Terminal security code ▶ Enter the authentication
password ▶ "Yes"
[Copy all microSD]
Copy all Bookmarks to a microSD card.
▶ Enter the Terminal security code ▶ "Yes"
[Memory status]
Display the number of saved Bookmarks in the entire folder.
Note
<Rename folder/Sort folder/Delete one>
• The pre-installed "Bookmark" folder cannot be renamed, moved,
or deleted.
<Delete one>
• If there is a bookmark in the folder, a confirmation to delete
appears. Select "Yes" to delete in the entire folder.
Bookmark List Screen Sub Menu
Bookmark list screen (P191) ▶ Move the
cursor to a bookmark ▶
M
[Menu] ▶ Perform
the following operations
[Connect]
Connect to the selected Bookmark site.
[Edit title]
Edit the title or URL of the selected Bookmark.
▶ Edit the title or URL ▶
C
[Set]
Continued on next page
192
i-mode/i-motion/i-Channel
[Move]
Move this : Move the selected Bookmark to another folder.
Move selected : Select and move Bookmarks.
▶ Mark the Bookmarks to move ▶
I
[Move] ▶
Select a destination folder
• Press
M
[SelAll/ClrAll] to select/clear all.
Move all : Move all Bookmarks in the folder to another folder.
[Delete]
Delete one : Delete the selected Bookmark.
Del. selected : Select and delete Bookmarks.
▶ Mark the Bookmarks to delete ▶
I
[Delete]
▶ "Yes"
• Press
M
[SelAll/ClrAll] to select/clear all.
Delete all : Delete all Bookmarks.
▶ Enter the Terminal security code ▶ "Yes"
[URL Info]
Display the URL of the selected Bookmark.
[Copy URL]
Copy the URL of the selected Bookmark.
[Compose message]
Create i-mode mail with the selected Bookmark attached. Go to Step
2 in "Composing and Sending i-mode Mail" (P138).
[Ir exchange]
Send : Send the selected Bookmark via infrared communication.
Send all : Send all bookmarks in the folder via infrared
communication.
▶ Enter the Terminal security code ▶ Enter the
authentication password ▶ "Yes"
[Copy microSD]
Copy one : Copy selected Bookmark to microSD card.
Copy all : Copy all Bookmarks in the folder to microSD card.
▶ Enter the Terminal security code ▶ "Yes"
[Memory status]
Display the number of saved Bookmarks in the folder.
Screen memo
Saving Site Contents
You can save the displayed page as a Screen memo. Pages
saved as Screen memo can be opened without connecting to
i-mode.
Saving Screen Memos
• Up to 50 Screen memos can be saved. However, the actual number
of savable pages may be reduced depending on the saved data
size.
• Up to approximately 100KB per page can be saved.
While viewing a site ▶
M
[Menu] ▶ "Screen
memo" ▶ "Save" ▶ "Yes"
Note
• If the maximum number of Screen memos have already been
saved, a confirmation whether to select a screen memo to
delete appears. To select, "Yes" ▶ select a screen memo to
delete.
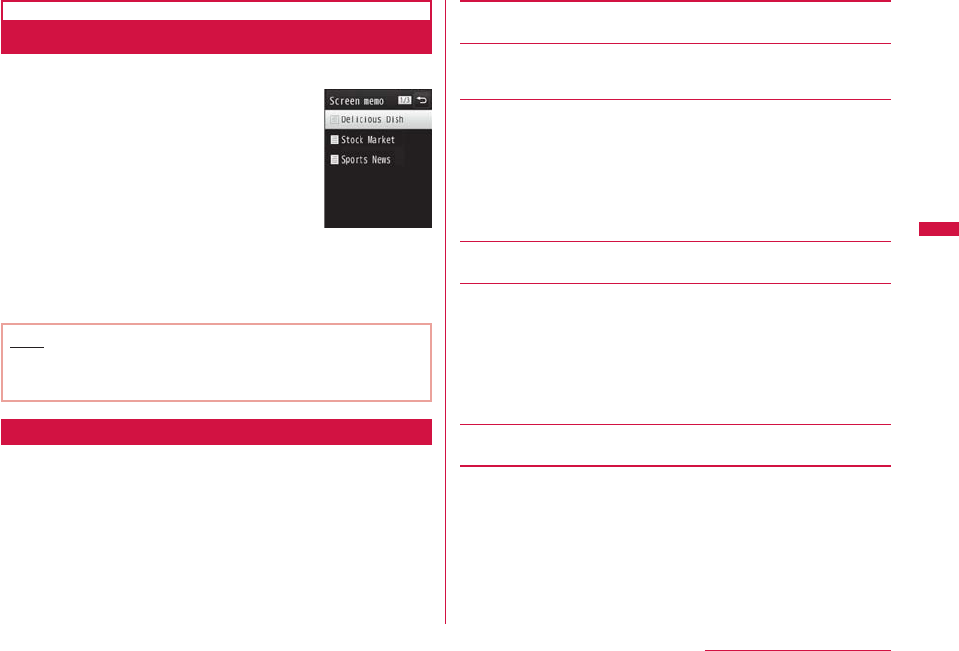
193
i-mode/i-motion/i-Channel
Continue on the next page
Viewing Screen Memos
i-mode menu screen (P182) ▶ "Screen memo"
•
I
[Delete]: Delete the selected Screen
memo.
•
T
[URL]: Display the URL.
Screen memo list
screen
Select the Screen memo to display
The Screen memo detail screen is displayed.
Note
• The page saved as a Screen memo has the information at the
time it was saved. The Screen memo may not contain the latest
information.
Screen Memo List Screen Sub Menu
Screen memo list screen ▶ Move the cursor to
the Screen memo ▶
M
[Menu] ▶ Perform the
following operations
[Display]
Display the selected Screen memo.
[Edit title]
Edit the title of the selected Screen memo. Up to 12 full-pitch or 24
half-pitch characters can be entered for a title.
[Delete]
Delete one : Delete the selected Screen memo.
Del. selected : Select and delete Screen memos.
▶ Mark the Screen memos to delete ▶
I
[Delete] ▶ "Yes"
• Press
M
[SelAll/ClrAll] to select/clear all.
Delete all : Delete all Screen memos.
▶ Enter the Terminal security code ▶ "Yes"
[URL Info]
Display the URL of the selected Screen memo.
[Protect on/off]
One ON/OFF : Disable/Enable protection for the selected Screen
memo.
Select ON/OFF: Select and protect or unprotect a Screen memo.
▶ Mark Screen memos to protect ▶
I
[Done]
• Press
M
[SelAll/ClrAll] to select/clear all.
Unprotect all : Unprotect all Screen memos.
▶ Enter the Terminal security code
[Memory status]
Display the number of Screen memos.
194
i-mode/i-motion/i-Channel
Screen Memo Detail Screen Sub Menu
Screen memo detail screen ▶
M
[Menu] ▶
Perform the following operations
[Save image]
Save an image or background image contained in the current Screen
memo. Go to Step 2 in "Downloading Images from Sites or Screen
Memos" (P195).
[Show properties]
URL : Display the URL of the displayed Screen memo.
Page properties : Display the title and the URL of the displayed
Screen memo.
Certificates : If the displayed Screen memo supports SSL, the
SSL certificate is displayed.
[Add to Phonebook]
Save a phone number or mail address on the site to the Phonebook.
→P187
[Retry]
Play a Flash movie or an animation contained in the Screen memo
from the beginning.
[Sound effect]
Set whether to play sound effects of the Flash movie contained in
the displayed Screen memo.
ON : Play the Flash movie sound effects.
OFF : Do not play the Flash movie sound effects.
[Edit title]
Edit the title of the displayed Screen memo. Up to 12 full-pitch or 24
half-pitch characters can be entered for a title.
[Delete]
Delete the displayed Screen memo.
[Protect ON/OFF]
Protect or unprotect the displayed Screen memo.
Note
<Delete>
• Protected Screen memos cannot be deleted. Unprotect them
before deleting.
<Protect ON/OFF>
• Up to 10 Screen memos can be protected. The number of
protectable Screen memos may vary depending on the data
size.
Downloading Data from Sites
You can download files or data such as images or melodies
from sites and save them to the FOMA terminal or microSD
card.
• Savable data (file) type and maximum savable size per file are as
follows:
- Image (JPEG, GIF, or SWF format), i-melody, template: 100KB
- Kisekae Tool: 2MB
- Dictionary: 32KB
Save image
Downloading Images from Sites or Screen
Memos
Save images on the displayed site or contained in Screen
memo to the FOMA terminal or a microSD card.
• Obtained images are saved in the "i-mode" folder in "My picture" of
"Data Box" or microSD card.
195
i-mode/i-motion/i-Channel
Continue on the next page
Example: To save the image displayed on a site
While viewing a site ▶
M
[Menu] ▶ "Save
image"
"Select image" ▶ Select an image to save
b
To save the background image from a site
Select "Save backgnd".
A savable image
is framed by a
dotted border.
"Yes"
• Further select the destination when a microSD card is inserted
on the FOMA terminal. However, images in SWF format is
automatically saved to the FOMA terminal.
• If you saved the image on the FOMA terminal, a confirmation
appears asking whether to set the saved image as Stand-by
display. Select "Yes" to set it.
Note
• Images cannot be saved if "Images" is set to "OFF".
• Some images saved on the FOMA terminal may not be
displayed properly even if they are displayed on the site.
• Some obtained images may not be displayed correctly.
• Image files in JPEG, GIF, or Progressive JPEG* formats
cannot be displayed after they are saved with the size (pixels)
exceeding the following. However, they can be output to
external devices such as by attaching to mail.
- JPEG or Progressive JPEG image files that exceed 2592×
1944 dots
- GIF image files that exceed 800×600 dots
* Progressive JPEG is an image format that is used on
the Internet. The image looks coarse at the beginning of
the download and the image sharpness improves as the
download progresses.
Downloading Data from a Site
Savable data type and the saving destination are as follows.
Data (file) type Destination
i-melody "i-mode" folder in "Melody" of "Data Box" or
microSD card
Template "Template" in Mail menu (P144)
Kisekae Tool "i-mode" folder in "Kisekae Tool" of "Data Box"
Dictionary "Download dictionary" (P389)
While viewing a site ▶ Select data
When download completes, a confirmation appears.
Continued on next page
196
i-mode/i-motion/i-Channel
"Save"
• To cancel saving, select "Back".
• You can check data by selecting "View", "Play", or "Preview"
depending on the data type.
b
To save i-melody
Further select the destination if a microSD card is
inserted on the FOMA terminal.
b
To save a template
Select "Save" ▶ change the file name ▶ "Yes".
b
To save a dictionary
Select the destination.
Note
<i-melody>
• Download may not be possible depending on the site.
• Some downloaded melodies may not be played correctly.
• In some downloaded melodies, playback part may be specified.
Those melodies will be played entirely at playback, however,
when the melody is set for a ring tone etc., only the specified
part is played.
<Template>
• When downloading templates, select "Compose mail" to create
Deco-mail using downloaded template.
<Dictionary>
• Using downloaded dictionaries→P389
Phone To/Mail To/Web To/Media To/i-αppli To function
Using Phone To/Mail To/Web
To/ Media To/i-αppli To Function
When a phone number, mail address or URL is highlighted
on a site or in mail, you can use it to easily make a call,
send i-mode mail, or access the web page. Also, when 1Seg
information is highlighted, you can watch 1Seg or set timer
for starting 1Seg.
• Phone To, AV Phone To, Mail To, Web To, or Media To function in
mail sent from a PC may not be available.
Phone To/AV Phone To Function
Make a voice call (Phone To)/videophone call (AV Phone To)
to the highlighted phone number on a site or in mail.
Select a phone number ▶ Perform the following
operations
Voice call : Make a voice call.
Video call : Make a videophone call.
SMS : Create an SMS message addressed to the
selected phone number.
Add phonebook : Add the selected phone number to the
Phonebook.
Go to Step 2 in "Adding Phonebook
Entries from Redial/Received Calls etc."
(P88).
Copy : Copy the selected phone number.
Note
• The Phone To/AV Phone To function may not be available
depending on the site.
• For mail, the order of displayed items varies.
197
i-mode/i-motion/i-Channel
Continue on the next page
Mail To Function
You can send a mail to an i-mode mail address highlighted on
a site page or in mail.
Select a mail address
Go to Step 3 in "Composing and Sending i-mode Mail" (P138).
Note
• The Mail To function may not be available depending on the
site.
Web To Function
Access a URL highlighted on a site or in mail.
Select a URL
• For mail, further press
C
[Connect].
Note
• The Web To function may not be available depending on the
site.
• The appearance of the URL varies depending on the site.
• The Web To function may be available using a highlighted item
other than a URL.
Media To Function
You can watch 1Seg or set timer for starting 1Seg.
Select 1Seg information ▶ "Yes"
Note
• The Media To function may not be available when other
functions are running.
i-αppli To Function
You can start i-αppli from a URL highlighted on a site or in
i-mode mail.
• If "Set i-αppli To" (P285) or "Mail i-αppli To" in "Set i-αppli To" is not
marked, the i-αppli will not start.
Select i-αppli information ▶ "Yes"
Note
• Some i-αppli, which immediately start directly from the site
using the i-αppli To function, may not be saved.
i-mode setting
Setting i-mode
Set functions of i-mode or MessageR/F.
Communication
Configuring Communication Settings
i-mode menu screen (P182) ▶ "i-mode setting"
▶ "Communication" ▶ Perform the following
operations
[Connection timeout]
Set the timeout duration until the connection is automatically
terminated if there is no response due to network traffic.→P199
[Check new messages]
Specify request items when using "Check new messages".
▶ Mark the items to check ▶
I
[Done]
198
i-mode/i-motion/i-Channel
Image&Effect set.
Configuring Image and Effect Settings
i-mode menu screen (P182) ▶ "i-mode setting"
▶ "Image&Effect set." ▶ Perform the following
operations
[Images]
Set whether to display images or Flash movies contained on sites or
in Screen memos.
[Sound effect]
Set whether to play sound effects of Flash movies contained on sites
or in Screen memos.
[Font size]
Set the font size for sites or Screen memos.
[Scroll]
Set the number of lines to scroll with each press of
H
on sites or
Screen memos.
[Use phone info.]
When a Flash movie is displayed on a site or in a Screen memo,
information saved on the FOMA terminal may be required. Set
whether to use the information from the FOMA terminal then.
[Auto-display setting]
Set how MessageR/F is displayed automatically.→P173
[Melody auto play]
Set whether to automatically play a melody when MessageR/F is
displayed.→P173
Note
<Images>
• Images may not be displayed correctly even when "Images" is
set to "ON". In this case, appears.
<Sound effect>
• Even if "Sound effect" is set to "ON", some sound effects may
not sound depending on the Flash movie.
<Use phone info.>
• If set to "ON", the battery level, signal strength, Date & Time,
Ring Volume, Language, and terminal model information may
be sent to IP (Information Provider) via the Internet, and a third
party may intercept the information.
Home
Configuring Home Setting
Set the home URL by selecting "Home" from the Site display
screen sub menu.
i-mode menu screen (P182) ▶ "i-mode setting"
▶ "Home"
Select "Enable" ▶ "http://" field ▶ Enter the
URL ▶
I
[Done]
Note
• If set to "Disable", selecting "Home" does not open the specified
page. The URL entered in the "http://" field will remain intact.
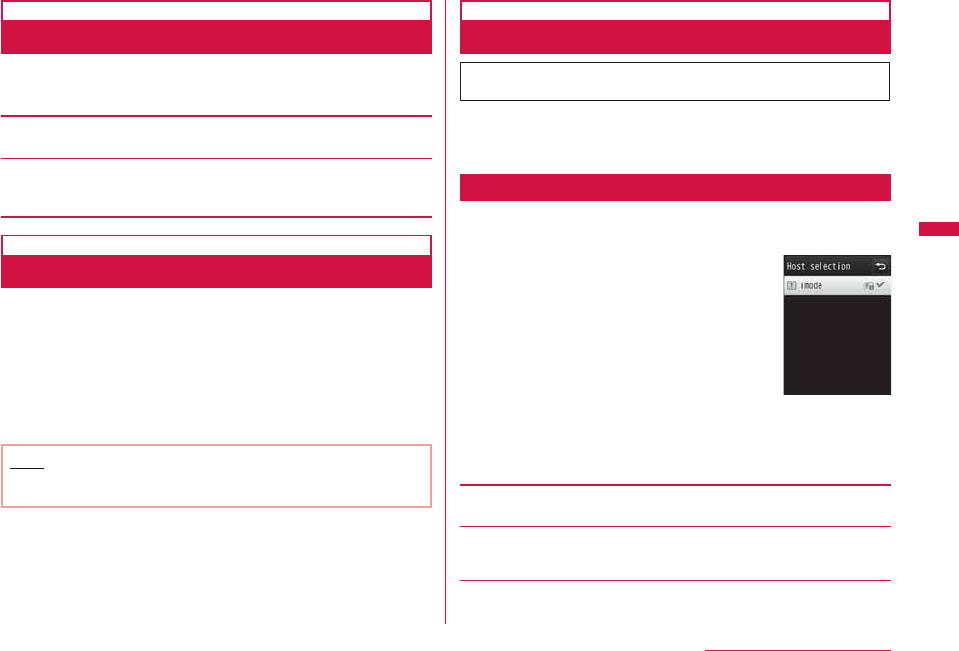
199
i-mode/i-motion/i-Channel
Continue on the next page
Others
Configuring Other Settings
i-mode menu screen (P182) ▶ "i-mode setting"
▶ "Others" ▶ Perform the following operations
[Check settings]
Check the options set in "i-mode setting".
[Reset settings]
Reset the options set in "i-mode setting" to the default.
▶ Enter the Terminal security code ▶ "Yes"
Connection timeout
Setting Connection Timeout
Set the timeout duration until the connection is automatically
terminated if there is no response due to network traffic.
i-mode menu screen (P182) ▶ "i-mode setting"
▶ "Communication" ▶ "Connection timeout" ▶
"60 seconds"/"90 seconds"/"Unlimited"
• If set to "Unlimited", the connection will not be automatically
terminated.
Note
• Even if set to "Unlimited", the connection attempt may be
terminated depending on the signal strength etc.
Host selection
Changing Access Point from i-mode
* If you use the DOCOMO i-mode service, changing the
access point is not required.
Set an Access Point Name (APN) used when you use services
other than i-mode (DOCOMO). i-mode and i-mode mail become
unavailable when you connect to an APN other than DOCOMO.
Adding Access Points
M
▶ "Settings" ▶ "International roaming" ▶
"Network" ▶ "Host selection"
Host selection
screen
I
[Add] ▶ Enter the Terminal security code ▶
Perform the following operations
[Host name]
Enter the access point name within 15 full-pitch or 30 half-pitch characters.
[Host number]
Enter the number of the access point within 99 half-pitch alphanumeric
characters.
[Host address]
Enter the access point address within 30 half-pitch alphanumeric characters.
Continued on next page
200
i-mode/i-motion/i-Channel
[Host address 2]
Enter the access point address for i-Channel within 30 half-pitch
alphanumeric characters.
I
[Done]
Changing Access Point
Host selection screen (P199) ▶ Select the
access point to change
Host Selection Screen Sub Menu
Host selection screen (P199) ▶ Move the
cursor to the access point ▶
M
[Menu] ▶
Perform the following operations
• Not available while "i-mode" is selected.
[Add new]
Add a new access point.→P199
[Edit]
Edit the access point settings.
▶ Enter the Terminal security code ▶ Edit the access point settings
▶
I
[Done]
[Delete]
Delete the selected access point.
▶ "Yes" ▶ Enter the Terminal security code
[View]
Display the selected access point settings.
•
C
[Edit]: Edit the access point settings.
Note
• When an access point is changed, the i-Channel ticker does not
appear. When the information is auto-updated or you download
the latest information by pressing
Q
in Stand-by, the ticker
will appear automatically.
• If the set access point is deleted, "imode" will be set as the
default host.
SSL Certificate Info
Operating SSL Certificate
You can view an SSL certificate, or set a certificate valid or
invalid.
i-mode menu screen (P182) ▶ "i-mode setting"
▶ "Certificates"
•
C
[Select]: Display the contents of the selected certificate.
Move the cursor to the certificate ▶
I
[Invalid/Valid]
• Press
M
[Menu] and select "Certificate Info" or "Valid/Invalid".
Icon Description
Valid certificate
Invalid certificate
Certificates used for SSL communication
These certificates are issued by an authentication company, and
are saved on the FOMA terminal by default.
201
i-mode/i-motion/i-Channel
Continue on the next page
i-motion
i-motion is a moving picture with video and sound. They can
be obtained from i-motion sites, played, saved, and set as the
Stand-by display or a ring tone, etc.
i-motion Types
There are 2 types of i-motion.
b
Standard type
There are 2 formats of the Standard type.
a
The format in which an i-motion can be played after
download (Up to10MB)
b
The format in which an i-motion can be played during
the download (Up to 10MB)
• Some standard type i-motion cannot be saved.
b
Streaming type
This type allows you to play i-motion while downloading
data. Up to 10MB of i-motion can be played. The data is
deleted after playback. It cannot be saved on the FOMA
terminal.
Note
• i-motion that can be downloaded and played are in MP4 (Mobile
MP4) format. i-motion in ASF format cannot be downloaded or
played.
i-motion Download
Downloading i-motion from Sites
Up to 2,000 i-motion can be saved. However, the savable
number depends on the amount of the data.
• Downloaded i-motion is saved in the "i-mode" folder in "i-motion" of
"Data Box" or microSD card.
While viewing a site ▶ Select i-motion
• When "Auto-replay setting" is set to "ON", i-motion is played
automatically after downloaded.
Operations during playback→P308
b
Streaming-type i-motion
• The Playback confirmation screen appears. Select "Yes" to
play i-motion during the download.
• When "i-motion type" is set to "Standard type", you cannot
play i-motion. Switch to "Std/Streaming", then download
i-motion again.→P202
After download,
Q
▶ "Save"
Play : Play downloaded i-motion.
File property : Display information about downloaded i-motion.
Back : Return to the Site display screen without
saving i-motion.
• Further select the destination when a microSD card is inserted
on the FOMA terminal.
Continued on next page
202
i-mode/i-motion/i-Channel
Note
• Depending on the connected site or i-motion, some i-motion
may not be downloaded or played during the download.
• If you play i-motion while downloading data, i-motion may stop
playing or the image may become distorted due to signal
strength etc.
• Some i-motion cannot be saved on the FOMA terminal.
• Some i-motion have playback restrictions. appears for
i-motion with playback count. appears for i-motion with
playback period or playback limit. i-motion which has restricted
term for playback cannot be played before/after the term.
• Some downloaded i-motion may not be played correctly.
When a Link is Set in Ticker
When a ticker is set in i-motion, the ticker is displayed during
playback. If a phone number, a mail address, or a URL is set
in the ticker, you can use Phone To, AV Phone To, Mail To, or
Web To functions after the i-motion playback is finished.
i-motion playback ends ▶ Select an item
Auto-replay setting
Setting whether to Play i-motion
Automatically
Set whether to play i-motion automatically when downloading
from a site or mail.
i-mode menu screen (P182) ▶ "i-mode setting"
▶ "i-motion setting" ▶ "Auto-replay setting"
Switch between ON and OFF each time "Auto-replay setting" is
selected.
i-motion type
Specifying Type of Downloading i-motion
Set the type of the new i-motion to download from a site.
i-mode menu screen (P182) ▶ "i-mode setting"
▶ "i-motion setting" ▶ "i-motion type" ▶ Select
a type
Standard type : Download only standard-type i-motion.
Std/Streaming : Download standard or streaming-type i-motion.
Note
• To download streaming-type i-motion, "Std/Streaming" must be
set.
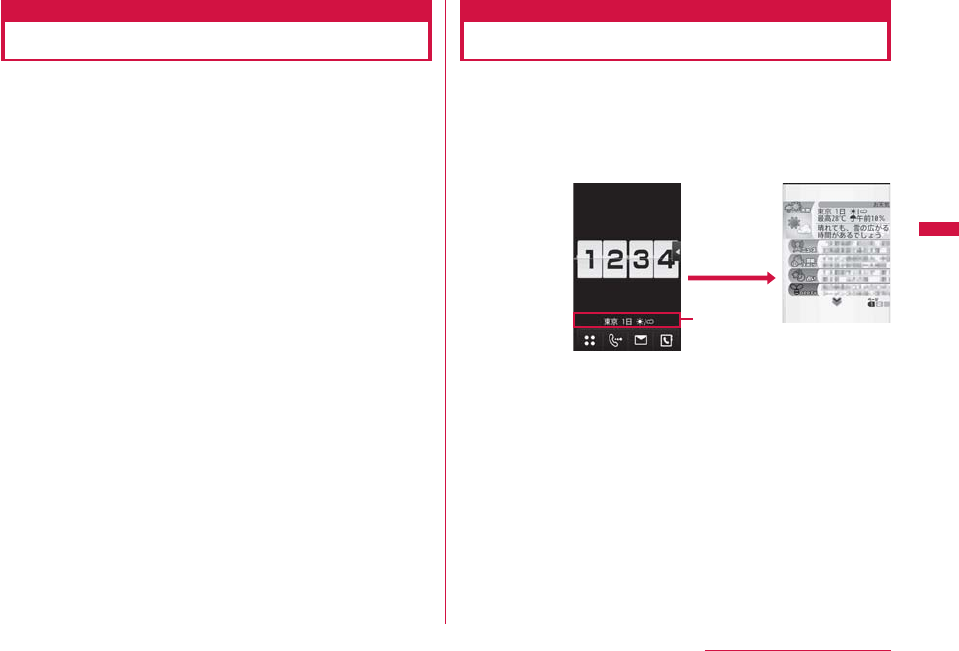
203
i-mode/i-motion/i-Channel
Continue on the next page
i-Channel
i-Channel is a service which provides information such as
news or weather forecasts to i-Channel compatible terminals.
Automatically received latest information is displayed and
runs as a ticker on the Stand-by display. Also, pressing
Q
displays the latest information in the channel list. (Display
channel list→P203)
• i-Channel is a fee-based service requiring a separate subscription
(The i-mode contract is required for this subscription).
i-Channel has 2 types of channel: "Basic channels" provided
by DOCOMO and "Favorite channels" provided by IP
(Information Provider). Packet communication charge does
not apply to automatic update of information delivered to
"Basic channels". You can register your favorite channels on
"Favorite channels". For this channel, packet communication
charge applies for automatic update of information. Note
that packet communication charges apply to view detailed
information for both channels. To use International roaming
service, packet communication charges apply for both
automatic updating and viewing detailed information.
• For details about i-Channel, see "Mobile Phone User's Guide [i-mode]
FOMA version".
• The i-Channel service is provided in Japanese only.
Displaying i-Channel
If you subscribe to i-Channel, information appears as a ticker
on the Stand-by display as the information is received.
• To automatically display the ticker, set "Ticker display" to "ON".
→P204
• When Public mode (Drive mode) is set, the ticker is not displayed.
Stand-by display ▶
Q
Q
Ticker
Ticker
Channel list
screen
Select a channel item
Connect to the site and detailed information is displayed.
•
L
: Return to the Channel list screen.
Continued on next page
204
i-mode/i-motion/i-Channel
Note
• While information is being received, blinks.
• Even when the information arrives, a ring tone does not sound
nor does the terminal vibrate. The illumination does not light/
blink either.
• Information may not be received when the FOMA terminal power
is turned off, while the FOMA terminal is out of service area, or
when the signal reception is weak. Press
Q
in Stand-by to
receive information, then the obtained information is displayed
automatically as the ticker on the Stand-by display. Also,
information may not be received if the default settings are kept.
In this case, press
Q
in Stand-by to receive and automatically
display the information as the ticker on the Stand-by display.
• In some conditions, information may be received only when a
channel list is displayed.
• If you change the access point in "Host selection", the access
point of i-Channel is also changed (normally, you do not need to
change these settings).
• The ticker will not appear after i-Channel is unsubscribed.
• When i-motion is set to the Stand-by display, the ticker will not
appear during playback.
• There may be a message notifying of failure to acquire channel
information if:
- the i-Channel access point has been changed
- the UIM has been replaced
• Touch operation is not available on i-Channel screen.
i-Channel Setting
Setting i-Channel
You can set whether to display the ticker on the Stand-by
display or to set the ticker display speed. Also you can delete
all i-Channel information on the FOMA terminal.
Stand-by display ▶
I
▶ "i-Channel" ▶ Perform
the following operations
[i-Channel list]
Display the Channel list screen.→P203
[Ticker setting]
Ticker display : Set whether to display a ticker on the Stand-by
display.
Ticker speed : Set the ticker display speed.
Font size : Set the ticker font size.
Font color : Set the ticker font color.
[Reset i-Channel]
Delete i-Channel data downloaded on the FOMA terminal and restore
Ticker setting to defaults.
Note
<Ticker display>
• If you unsubscribe the i-mode service before unsubscribing
i-Channel, the "Ticker display" setting remains.

205
Full Browser
Displaying Web Pages Designed for PC
・・・・・・・・・・・・・・・・・・・・・・・・・・・・・・・・・・・・・・・・・ Full browser 206
Setting Full Browser ・・・・・・・・・ Full Browser Settings 214
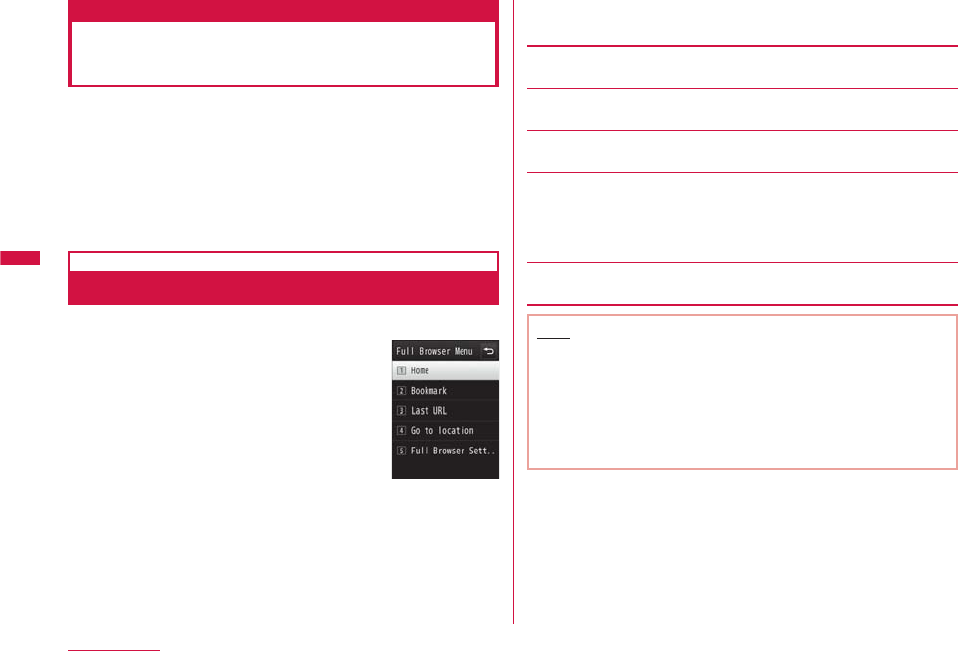
206
Full Browser
Full browser
Displaying Web Pages Designed
for PC
With Full browser, FOMA terminal can display web pages
designed for PC.
• Some pages may not be displayed correctly.
• Up to approximately 500KB per page can be displayed.
• Note that accessing web pages containing lots of images or
performing communication with large amount of data such as data
download makes communication charge high. For details about
packet communication and billing plan, see "Mobile Phone User's
Guide [i-mode] FOMA version".
Displaying Full Browser Menu
i-mode menu screen (P182) ▶ "Full browser"
Full browser
menu screen
Perform the following operations
[Home]
Display a web page which URL is set as "Home".
[Bookmark]
Display the Bookmark folder list screen.
[Last URL]
Display the last accessed web page.
[Go to location]
Input address : Enter a URL to access a web page.→P207
URL history : Select an entry in the URL history to access a
web page. Go to Step 2 in "Using URL History"
(P189).
[Full Browser Settings]
Set Full browser functions.→P214
Note
• SSL/TLS-supporting web pages can be displayed with Full
browser.
• SSL/TLS are methods to protect privacy and communicate
safely with authentication/encryption technologies. SSL/TLS
pages prevent others from eavesdropping, spoofing, and
altering information during communication by exchanging
encrypted data, and enable you to exchange your personal
information such as credit card number and address safer.
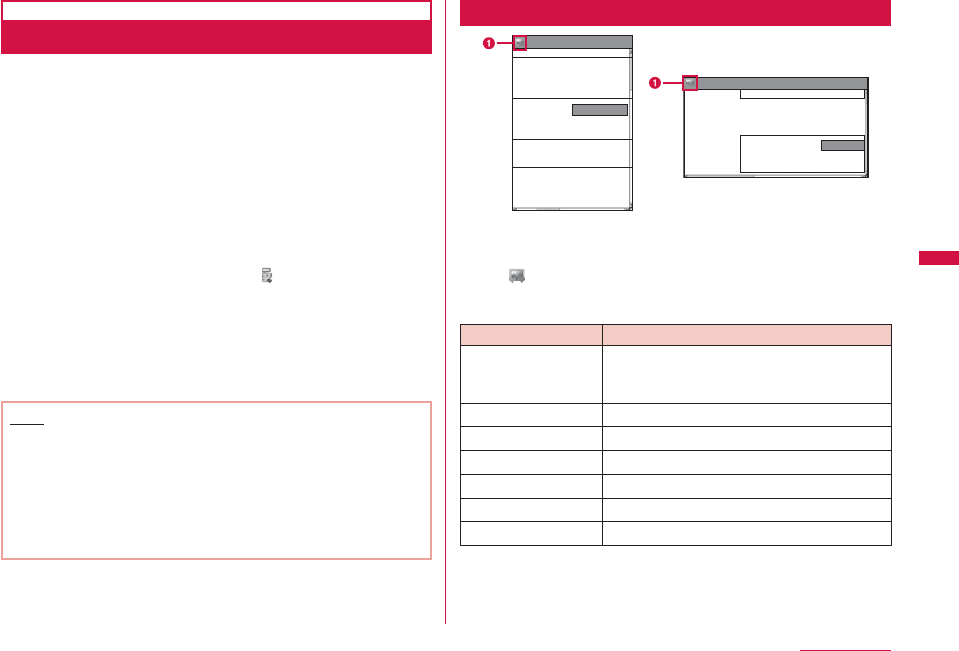
207
Full Browser
Continue on the next page
Displaying a Web Page by Entering URL
Full browser menu screen (P206) ▶ "Go to
location"
"Input address" ▶
C
[Select] ▶ Enter the URL
▶
I
[Connect]
• When "Access Setting" (P214) of Full browser is set to "Not
Use", the Access setting screen is displayed to confirm
whether to use Full browser when activating Full browser.
Selecting "Yes" sets the Access setting to "Use" and displays
a web page. This setting is valid even after Full browser is quit.
Some web pages may take a while to be displayed.
• Up to 2,033 half-pitch characters can be entered.
• During Full browser communication, appears at the top of
the screen.
• To cancel the page retrieval while retrieving, press
I
[Stop].
• Once a URL is input, you can use the URL history to open its
web page by selecting on the Full browser menu screen (P206)
▶ "Go to location" ▶ "URL history". For details, refer to "Using
URL History" (P189) in i-mode section.
• To close a web page, press
P
▶ "Yes".
Note
• Some web pages automatically establish communication.
When starting communication, a confirmation appears. Select a
communication method on a confirmation screen.
Yes (once)
: Connect this time only.
Yes (permanently)
: After this, connect automatically without confirmation.
No : Do not connect.
Full Browser Screen
XXXXXX XXXXX
XXXXXXXXXXXXX
XXXXXXXXXXXX
XXXXXX
XXXXXX
XXXXXX
XXXXXX
XXXXXX
XXXXXX
XXXXXX
XXXXXX
XXXXXX XXXXX XXXXX
Displaying a web page
(horizontal)
Displaying a web page
(vertical)
a
Display mode
: Displayed only in PC layout mode→P215
b
Key operations while viewing a web page
Operation Description
H
(In Keitai mode),
K
(In PC layout mode),
F
/
E
Scroll the screen to the direction of the key
press
g
[∧]*Scroll the screen up
T
[∨]*Scroll the screen down
M
[Menu]*Display sub menu
I
[Action]*Display action menu
C
Select a link
Dial keys,
*
,
#
*Shortcut Operations→P208
* Available only in a vertical screen.
208
Full Browser
Shortcut Operations
Some operations can be done directly by pressing dial keys
while displaying a web page. The following operations are
assigned to each key by default. The assigned operations
can also be modified.
b
Shortcut operations
Operation Description
1
(Zoom out) Minify the view
2
(Scroll up) Scroll up on the screen
3
(Zoom in) Magnify the view
4
(Scroll left) Scroll left on the screen
5
(PagePilot) Display the whole page→P210
6
(Scroll right) Scroll right on the screen
7
(Back to previous page) Display the previous page
8
(Scroll down) Scroll down on the screen
9
(Go to next page) Display the next page
0
(Bookmark list) Display the list of saved
Bookmarks
*
(Switch to the left widow) Display the left window while
displaying multiple windows.
#
(Switch to the right widow) Display the right window while
displaying multiple windows.
Changing operations assigned to shortcuts
a While viewing a web page ▶
M
[Menu] ▶ "Shortcut List"
The Shortcut list screen appears.
b Move the cursor to a shortcut to change its assigned
operation ▶
C
[Edit] ▶ Move the cursor to an operation to
assign ▶
C
[Done]
Note
• Images that can be displayed are in JPEG, GIF, BMP, and PNG
formats.
• The following functions are not supported.
- Displaying Flash movies - Plug-ins - Playing sound
- Saving Screen memo - Phone To (AV Phone To)
• When user certificate stored in FOMA terminal is required for
SSL/TLS communication, certificate selection screen appears.
• Tilting the FOMA terminal to the left automatically switches to
the horizontal screen.
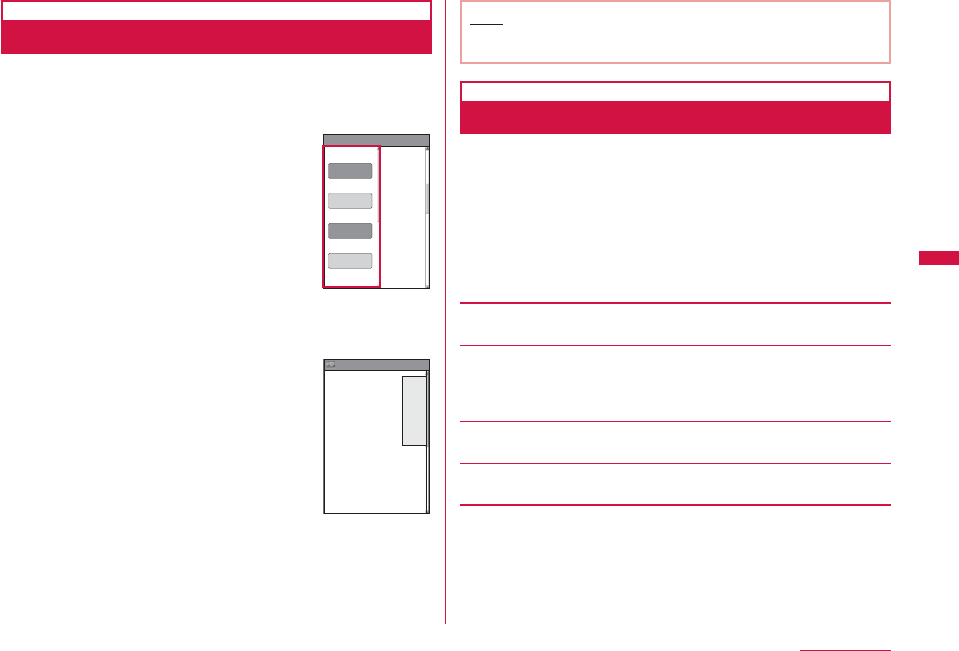
209
Full Browser
Continue on the next page
Displaying a Framed Web Page
A web page composed of multiple frames can be displayed.
Display a web page composed of multiple
frames
Frame page
●XX
XXXX
XXXX
●XX
XXXX
XXXX
●XX
XXXX
XXXX
XXXX
△△△△
△△△△
△△△△
△△△△
△△△△
All frames
screen
Select a frame to display as full frame
• To return to the All frames screen,
press
Q
.
Frame page
●XX
XXXXXXX
XXXXXXX
●XX
XXXXXXX
XXXXXXX
●XX
XXXXXXX
XXXXXXX
Full frame
screen
Note
• For a web page composed of many frames, all frames may not
be displayed.
Displaying in Multiple Windows
You can open multiple windows at a time and display those
by switching.
• Up to 5 windows can be opened. The maximum number of window
may not be opened depending on frame numbers or contents of the
pages.
While viewing a web page ▶
M
[Menu] ▶
"Window Operat." ▶ "New Window" ▶ Perform
the following operations
[Open]
Display the Bookmark folder list screen.
[Go to location]
Input address : Enter a URL to access a web page.→P207
URL history : Select an entry in the URL history to access a web
page. Go to Step 2 in "Using URL History" (P189).
[Home]
Display a web page whose URL is set as "Home".
[Link]
Display a linked page
Continued on next page
210
Full Browser
Note
• Tabs are displayed on the top of the
screen.
To switch windows, press
M
[Menu]
▶ "Window Operat." ▶ "Change
Window" ▶ select a window name
to display. The tab of the displayed
web page appears to the front.
XX XX XX
XXXXXX
XXXXXX
XXXXXX
XXXXXX
XXXXXX
XXXXXX
XXXXXX
XXXXXX
X XXX XXX
Tab
Operations in Full Browser
The operations in Full browser is basically same as those on
sites accessed from Go to location menu of i-mode (P186).
Here describes different parts of the operation.
Full Browser Screen Sub Menu
While viewing a web page ▶
M
[Menu] ▶
Perform the following operations
[Goto Page]
Back : Display the previously accessed web pages.
Forward : When displaying web pages backwards, display next
page of the displayed web page.
Visit History : Access a web page by using the URL history.
Home : Display a web page whose URL is set as "Home".
[Reload]
Reload the displayed web page.
[Bookmark]
Register a web page as Bookmark or display the list screen of the
Bookmark folder.
[Go to location]
Input address : Enter a URL to access a web page.→P207
Home : Display a web page whose URL is set as "Home".
URL history : Select an entry in the URL history to access a web
page. Go to Step 2 in "Using URL History" (P189).
[Display]
Set display settings for web pages.
Zoom :
Zoom In : Magnify the view of the web page.
Zoom Out : Minify the view of the web page.
Zoom : Set zoom factor for web page display.
Display Mode : Change display mode of a web page.→P215
PagePilot : Minify the whole view of the displayed web page and
select a range to display.
▶ Move the cursor to the part to display ▶
C
[Select]
All frames : Display the All frames screen when the Full frame
screen is displayed.
Goto on Page : Display the top/end of the web page.
Go to Top : Go to the top of the displayed web page.
Go to End : Go to the end of the displayed web page.

211
Full Browser
Continue on the next page
Search : Search text in the displayed web page. When
the search text is found, the matched text is
highlighted.
▶ Select the Search text field ▶ Enter the text to
search ▶
I
[Done]
To search the exact match word only, mark
"Whole Words Only".
To search a word distinguishing upper case from
lower case, mark "Case Sensitive".
To display search result in sequence, press
M
[Prev]/
I
[Next].
Press
Q
to quit the search.
Character code : Change character code of the displayed web
page.
Every time you change the character code, the
code switches in order of Shift-JIS → EUC → JIS
→ UTF-8.
Play animation : Play GIF animation displayed from the beginning
frame.
Title Info : Display the title of the displayed web page.
URL Info :
URL Info : Display the URL of the displayed web page.
• To copy the URL, press
M
[Menu] ▶ "Copy".
Link Info : Display the URL of the selected link.
• To copy the URL, press
M
[Menu] ▶ "Copy".
SSL Info : Display the certificate of the web page.
[Window Operat.]
New Window : Open another web page loaded from the Open/Go
to location/Home/Link in a new window.→P209
Open as Back : Open another web page loaded from the Open/Go
to location/Home/Link in a background window.
→P209
Open Link : Display the selected link in a new window.
• If a moving picture is linked, a new window is
closed and a moving picture application starts.
Close Window : Close the displayed web site.
Change Window : Select a web page from the list of pages
displayed in multi windows.
[Save Image]
Save images on a web page to the FOMA terminal or microSD card.
▶ Select an image to save ▶ "Yes"
• If microSD card is inserted, further select save location.
[Text]
Text Copy : Copy text on a web page.
Select start point of a range including text to copy ▶
Select end point ▶ Select start point ▶ Select end
point
• Press
I
[SelAll] to copy all text.
Text Paste : Paste copied text to the selected text box.
Continued on next page
212
Full Browser
[Compose msg]
Create i-mode mail with the URL of the displayed web page in the
message text. Go to Step 2 in "Composing and Sending i-mode Mail"
(P138).
Select from the following options when a linked item is selected.
This page : Paste the URL of the displayed web page.
Link page : Paste the URL link on the selected web page.
[Setting]
Image display : Set whether to display images.
Set as Home : Set the displayed web page as "Home".
TLS : Set whether to use TLS. Normally, changing this
setting is not necessary.
[Shortcut List]
Check operations assigned to the dial keys in list. The assigned
operations can be modified as well.→P208
Note
• For some web pages, characters may not appear correctly or
their view may differ from the web pages displayed on PC. When
characters appear incorrectly, "Character code" (P211) may fix
the problem.
• When no data is obtained for a web page due to communication
error etc., may appear on the screen. In this case, reloading
the web page (P210) may fix the problem.
<Save Image>
• Images that can be saved are in JPEG, GIF, BMP, PNG formats
and up to 100KB.
• For BMP and PNG formats, images are automatically saved in
"OTHER" folder of microSD card. These images cannot be saved
in the FOMA terminal.
• Images may not be saved depending on the site.
<Text>
• In some pages, text cannot be copied.
Full Browser Screen Action Menu
While viewing a web page ▶
I
[Action] ▶
Perform the following operations
[Open Link]
Display a linked page
[Link Info]
Display the URL of selected link.
[Save Image]
Save the selected image to the FOMA terminal or microSD card.
→P211
[Text Paste]
Paste copied text to the selected text box.
[Zoom In]
Magnify the view of the web page.
[Zoom Out]
Minify the view of the web page.
[Display Mode]
Change display mode of a web page.→P215
213
Full Browser
Continue on the next page
[PagePilot]
Minify the whole view of the displayed web page and select a range
to display.→P210
[Go to Top]
Go to the top of the displayed web page.
[Go to End]
Go to the end of the displayed web page.
[Text Copy]
Copy text on a web page.→P211
Note
• Some menu items may not appear depending on the operating
condition.
Uploading Images
You can upload JPEG/GIF images saved in the FOMA
terminal to a web page.
• Upload method varies depending on web pages. Follow the
instructions on the screen.
Note
• Up to 80KB of an image can be uploaded. However, when
multiple images and characters are included, the maximum size
is 100KB altogether.
• Uploading may not be available on some web pages.
• Images which are restricted to be transferred from the FOMA
terminal cannot be uploaded.
Bookmark
Adding to Bookmark
While viewing a web page ▶
M
[Menu] ▶
"Bookmark" ▶ "Add"
Select the Title field ▶ Edit a title ▶
I
[Add] ▶
Select the folder to save
Note
• The operations available for Bookmark folder list or Bookmark
list are the same as for i-mode.→P190
Switching to Full Browser from i-mode
You can switch i-mode view to Full browser.
• Some web pages may not appear or may not appear correctly.
• Note that the billing system for Full browser is different from the
one for i-mode, and accessing web pages containing lots of images
or performing communication with large amount of data such as
data download makes communication charge high. For details about
packet communication charges and billing plan, see "Mobile Phone
User's Guide [i-mode] FOMA version".
While viewing an i-mode site ▶
M
[Menu] ▶
"Switch to Full Browser" ▶ "OK"
214
Full Browser
Full Browser Settings
Setting Full Browser
Set browser functions.
Communication
Configuring Communication Settings
Full browser menu screen (P206) ▶ "Full
Browser Settings" ▶ "Communication" ▶
Perform the following operations
[Access Setting]
Check the information about using Full browser.
• When you use Full browser changing settings, please read the
information in the Access Setting carefully.
[Cookie Setting]
Set whether to validate Cookie. Cookie is the scheme to store
information such as user name, access date, or number of accesses
in the FOMA terminal temporarily when accessing web pages and
use those data when accessing the same page next time.
• DOCOMO is not responsible if your information is passed to a third
party by validating Cookie.
• When selected "Valid (notify)", you can select the option from
"Sending", "Receiving", or "Sending/receiving".
[Delete Cookie]
Delete Cookie.
▶ Enter the Terminal security code ▶ "Yes"
[Referer Setting]
Set whether to send Referer (information that where a page is linked
from) when accessing a web page by selecting a link.
• DOCOMO is not responsible if your information is passed to a third
party by sending Referer.
[TLS]
TLS is a method to protect privacy and communicate safely with
authentication/encryption technologies. Set whether to use TLS.
Normally, changing this setting is not necessary.
Note
<Access Setting>
• If inserting another UIM, Access Setting becomes invalid.
<Cookie Setting>
• If inserting another UIM, Cookie Setting becomes "Invalid".
• If changing the setting from "Invalid" to "Valid"/"Valid (notify)",
and if UIM information does not match, the Terminal security
code is required.
215
Full Browser
Continue on the next page
Image&Effect set.
Configuring Image and Effect Settings
Full browser menu screen (P206) ▶ "Full
Browser Settings" ▶ "Image&Effect set." ▶
Perform the following operations
[Zoom]
Set zoom factor for a web page display.
[Display Mode Setting]
Set display method of a web page.
PC layout mode : Display a web page in the same way as you view
on PC. Scrolling up/down, or to the right/left is
available.
Keitai mode : Display a web page fit to the display width.
Scrolling up and down is available.
[Set Image display]
Set whether to display images.
[Bookmark Display]
Set display method for saved Bookmark folder.
[Window Open Guard Setting]
Set the action when getting an instruction to open a new window
from JavaScript on a web page.
Valid : A new window does not open.
Invalid : A confirmation appears when opening a new window.
[Script Setting]
Set whether to validate JavaScript. JavaScript is a program which
works on web pages.
• Some web pages may not appear correctly with "Invalid" set.
Home URL
Configuring the Home Setting
Full browser menu screen (P206) ▶
"Full Browser Settings" ▶ "Home URL"
C
[Select] ▶ Enter URL ▶
I
[Done]
• Up to 2,033 half-pitch characters can be entered.
Others
Configuring Other Settings
Full browser menu screen (P206) ▶ "Full
Browser Settings" ▶ "Others" ▶ Perform the
following operations
[Check Settings]
Display the list of Full browser settings.
[Reset Settings]
Reset the Full browser settings.
▶ Enter the Terminal security code ▶ "Yes"

217
Camera
Copyrights and Portrait Rights
You have no right to copy, modify, or distribute contents
such as text, image, music, or software downloaded from
web sites on the Internet, or images captured with this
product without permission from the copyright holder except
when the copy or quote is for personal use that is allowed
under copyright laws. Note that it may be prohibited to
capture or record live performances or exhibitions even for
personal use. Refrain from taking portraits of other people
and uploading such portraits to web sites without their
consent, as this violates portrait rights.
Please be considerate of other people's privacy
when capturing and sending pictures using camera-
equipped mobile phones.
Before Using Camera ・・・・・・・・・・・・・・・・・・・・・・・・・・・・・・・ 218
Capturing Still Images ・・・・・・・・・・・・・・・・・ Photo-mode 222
Capturing Moving Pictures ・・・・・・・・・・・・ Movie-mode 227
Changing Settings for Shooting ・・・・・・・・・・・・・・・・・・・・ 230
Changing Camera Settings ・・・・・・・ Camera settings 232
Using Bar Code Reader ・・・・・・・・・・・・Bar code reader 234

218
Camera
Before Using Camera
Notes for Capturing Images
• The camera employs high-precision technology, but some pixels
or lines may seem brighter or darker than others. Also, when you
capture images in places with insufficient lighting, noises such as
white lines increase. This is not a malfunction.
• Clean the lens with a soft cloth before capturing. If the lens is
stained with fingerprints or oil, the captured image may be out of
focus or blurred.
• Do not leave the FOMA terminal in a warm place or under a direct
sunlight for a long period of time. The image or video to capture
may deteriorate.
• If you capture under a fluorescent light, mercury lamp, or sodium
lamp flickering at high speed, flickering such as stripes may
appear. The color tone of still images or moving pictures may vary
depending on the capturing timing.
• Do not expose the lens to direct sunlight for a long period of time
and do not point at the sun or a bright light directly. The image may
become discolored or the camera may malfunction.
• Do not cover the lens with your finger, hair, or the strap when
capturing.
• Capturing a fast moving object may result in an image slightly off
from the image displayed on the screen at the time of capturing, or
the image may be blurred.
• When the battery level is low, you may not be able to save captured
still images or moving pictures. Check the battery level before using
the camera.
• Captured still images or moving pictures may differ from the actual
subjects in brightness or color tone.
• Even in Manner mode, the shutter tone sounds at a fixed volume.
The shutter tone sounds from the speaker even when a Flat-plug
Earphone/Microphone with Switch (optional) is connected to the
FOMA terminal.
Using Camera
You can use camera with the terminal closed or opened.
This manual describes operations in horizontal capture mode
(in Turn View Style) as a priority.
Also, you can select the Inner or the Outer camera,
depending on the situation.
b
Outer camera
Useful for taking pictures of scenery or other people. The
screen output is similar to what you see (normal image).
The Auto focus adjusts the focus of still image capturing
with the Outer camera.→P225 Outer camera
Photo light/Light
b
Inner camera
Useful for taking pictures of yourself. Inverted (mirrored)
images are shown in the frame. Captured image can be
saved as either mirrored image or normal image.→P224
Inner Camera
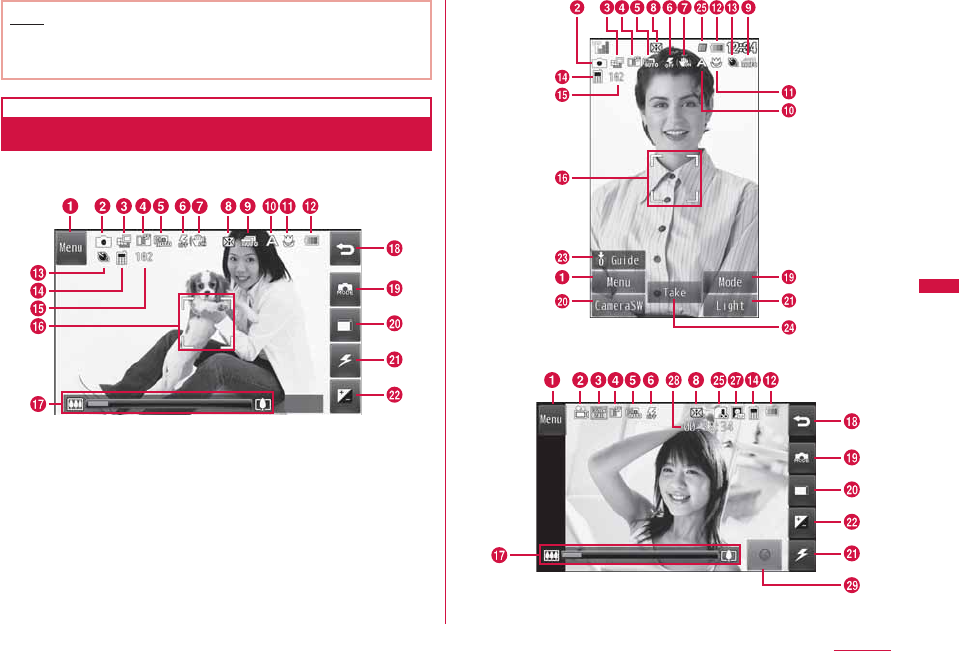
219
Camera
Continue on the next page
Note
• Photo light turns orange or blinks when capturing a still image/
moving picture.
• The light can only be used for the Outer camera.
Capture Screen Components
The meanings of marks (icons and others) on the Still image/
Moving picture capture screen are as follows:
Still image capture screen
(horizontal capture mode)
Still image capture screen
(vertical capture mode)
Moving picture capture screen
(horizontal capture mode)
Continued on next page
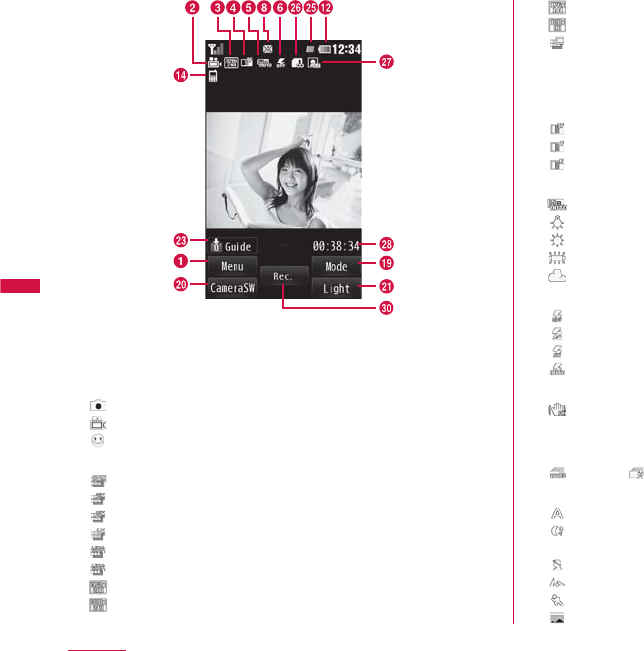
220
Camera
Moving picture capture screen
(vertical capture mode)
a
Menu
b
Camera-mode→P223, P228
Photo-mode
Movie-mode
Funny face shot
c
Image size→P232, P233
5.1M (2560×1920)
3M (2048×1536)
2M (1600×1200)
1M (1280×960)
VGA (640×480) (Outer camera)
VGA (480×640) (Inner camera)
CIF (352×288)
QVGA (320×240)
QCIF (176×144)
Sub-QCIF (128×96)
Wallpaper (800×480)
* Numbers in parentheses of still image files indicate as in
horizontal capture mode. The right and left numbers switch
when capturing in vertical capture mode.
d
Quality→P233, P234
Super fine
Fine
Normal
e
White balance
Auto
Incandescent
Sunny
Fluorescent
Cloudy
f
Light→P222, P227
OFF
When capturing
Always ON
AUTO
g
Shake reduction
ON
h
Receiving mail→P34
i
Continuous mode→P232
Auto Manual
j
Scene mode→P232
Auto
Night scene
• Set this mode when capturing in a dark place, etc.
Portrait
Landscape
Sports
Sunset
221
Camera
Continue on the next page
k
Macro→P233
ON
l
Battery level→P50
m
Auto timer→P232
3sec 10sec 15sec
n
Memory in use→P233, P234
Handset memory
External memory (microSD card)
o
Number of available shots→P448, P469
p
Focus frame→P225
The frame color changes to indicate status when the Auto
focus is in operation.
q
Zoom bar→P230
r
Exit key
Return to the previous screen.
s
Camera-mode
Photo-mode
Movie-mode
Bar code reader
Funny face shot
Album
t
CameraSW→P223, P227
u
Light
OFF
When capturing
Always ON
AUTO
v
Brightness→P231
w
Display key operation guide
x
Capturing→P223
y
Task status→P34
z
Size restriction→P234
No restriction For mail long For mail short
A
Type→P234
Sound+Video Movie only Sound only
B
Total recordable time
C
Start recording button→P227
D
Recording→P228
Note
• In horizontal capture mode, items a, q to v, B, and C
disappear in approximately 3 seconds after the Still image
capture screen/Moving picture capture screen is displayed.
Touch the screen to display.
222
Camera
Save Format of Still Images and Moving
Pictures
Still image file Moving picture file
File format JPEG MP4 (Mobile MP4)
Resolution*Outer
camera 5.1M (2560×1920)
3M (2048×1536)
2M (1600×1200)
1M (1280×960)
VGA (640×480)
CIF (352×288)
QVGA (320×240)
QCIF (176×144)
Sub-QCIF (128×96)
Wallpaper
(800×480)
QVGA (320×240)
QCIF (176×144)
Sub-QCIF
(128×96)
Inner
camera VGA (480×640)
CIF (352×288)
QVGA (320×240)
QCIF (176×144)
Sub-QCIF (128×96)
QVGA (320×240)
QCIF (176×144)
Sub-QCIF
(128×96)
Encoding
Format −Video: MPEG-4
Sound: AMR
File
Extension .jpg .3gp
* Numbers in parentheses of still image files indicate as in horizontal
capture mode. The right and left numbers switch when capturing in
vertical capture mode.
Still image file Moving picture file
Display
name of the
file
The year, month, date, hour, and minute at the time
of capture are added automatically.
Example: If taken at 10:10:10 on 2009/8/1
Photo-mode: "P2009_0801_101010"
Movie-mode: "V2009_0801_1010_X" (X is a
sequential number)
* If memory in use is "External memory" (microSD
card) and type is "Sound+Video" or "Movie
only", the file is named as "MOLXXX" (XXX is a
sequential number). If the type is "Sound only", the
file is named as "MMFXXXX" (XXXX is a sequential
number).
Maximum
file size Approx. 5.1MB QCIF: Approx. 58MB
Photo-mode
Capturing Still Images
• Captured still images are saved in the "Camera" folder in "My
picture" of "Data Box" on the FOMA terminal. To change the saving
destination to a microSD card, set in "Memory in use" (P233).
Stand-by display ▶
G
Still image capture screen
223
Camera
Continue on the next page
b
Touch/Key operations on the Still image capture screen
(horizontal capture mode)
Operation Description
G
Shutter
Zoom bar,
F
/
E
Zoom
"Menu" Display setting menu
Exit Photo-mode
(Camera-mode) Change Camera-mode
(Switch camera)
Switch between the Inner camera and the
Outer camera
(Light) Set lighting condition
(Brightness) Display the Brightness adjustment bar
b
Key operations on the Still image capture screen (vertical
capture mode)
Operation Description
C
[Take],
G
Shutter
J
,
F
/
E
Zoom
H
Adjust brightness
1
,
I
[Mode] Change Camera-mode
M
[Menu] Display setting menu
T
[Light] Set lighting condition
Q
Exit Photo-mode
g
[CameraSW] Switch between the Inner camera and the
Outer camera
0
Display key operation guide
2
Select size→P232
3
Shot mode→P232
4
Scene mode→P232
Operation Description
5
Effect→P232
6
White balance→P232
7
Funny face shot→P226
8
Macro→P233
9
Auto timer→P233
*
Memory in use→P233
#
Display captured images in "My picture" of
"Data Box"
A
Auto focus→P233
Point the camera to a subject ▶
G
The shutter tone sounds and the
still image is captured.
The Confirm save screen appears,
and you can select whether to
save the image.
Confirm save screen
(Ex.: Outer camera)
Continued on next page
224
Camera
b
Touch operations on the Still image confirm save screen
(horizontal capture mode)
Operation Description
Create an i-mode mail with captured image
attached
,
*2
Return to the Still image capture screen without
saving the captured image
Save the captured image
Save and upload the captured image to Picasa
*1
Save the captured image as a mirror image
*1
Check the captured image by switching to
normal/mirror image
*2
Save all continuous pictures captured
*2
Delete the selected image
*1 Appear only with the Inner camera.
*2 Appear only in the Continuous mode.
b
Key operations on the Still image confirm save screen
(vertical capture mode)
Operation Description
I[Picasa] Save and upload the captured image to Picasa
T
[Mail] Create an i-mode mail with captured image
attached
C
[Save] Save the captured image
Q
,
I
[New]
*2
Return to the Still image capture screen without
saving the captured image
M
[Menu]
*1
<Save mirror image>
Save the captured image as a mirror image
<View normal image>
Check the captured image by switching to
normal image
C
[Save all]
*2
Save all continuous pictures captured
Operation Description
g
[Delete]
*2
Delete the selected image
*1 Appear only with the Inner camera.
*2 Appear only in the Continuous mode.
/
G
The captured image is
automatically saved in the
destination specified under
"Memory in use" (P233) and the
Complete save screen will be
displayed.
• When using the Inner camera,
images on the capture screen
and the Confirm save screen
are displayed as a mirror image,
however, the image will be saved
as a normal image. To save the
image as a mirror image, set
"Auto Saving" to "OFF" and touch
on the Confirm save screen.
Complete save screen
(Ex.: Outer camera)
b
Touch/Key operations on the Still image complete save
screen (horizontal capture mode)
Operation Description
Create an i-mode mail with captured image attached
/
G
Return to the Still image capture screen
Set the captured image as wallpaper, etc. to the
Stand-by display
Edit the captured image
Delete the captured image
Upload the captured image to Picasa
225
Camera
Continue on the next page
b
Key operations on the Still image complete save screen
(vertical capture mode)
Operation Description
I[Picasa] Upload the captured image to Picasa
T
[Mail] Create an i-mode mail with captured image
attached
Q
,
C
[New] Return to the Still image capture screen
M
[Menu] <Use as>
Set the captured image as wallpaper, etc. to the
Stand-by display
<Edit>
Edit the captured image
<Delete>
Delete the captured image
<Album>
Display captured images in "My picture" of "Data
Box"
Auto focus
When you capture images with the Outer camera, Auto focus
operates and the subject in the center of the screen can be
automatically focused on. When
G
is pressed on the Still image
capture screen, auto adjustment starts, then the focus frame
turns red. The focus frame turns green when focused, and
shutter clicks.
For images captured with "Continuous mode"
• The captured image is displayed on the left side and the
touched image is displayed in the center of the screen.
• To save all captured images, touch .
•
To select and send images via mail, touch images to send ▶ .
• To select and delete images, touch images to delete ▶ .
When "Auto Saving" (P233) is set to "ON"
Pressing
G
captures a still image and automatically saves it in
the destination specified under "Memory in use". (P233)
After the Complete save screen appears, the Still image capture
screen returns. However, in the Continuous mode, the screen that
notifies of saving appears instead.
Note
• Even when Manner mode is activated, the shutter tone sounds
when capturing.
• If capturing with "Select size" set to "5.1M (2560×1920)" or
capturing using the Inner camera, the zoom feature cannot be
used.
<Picasa>
• The FOMA terminal connects to the Picasa site. Log in the site
and upload files by mail attachment. The captured image is
retained up to the compose message screen for uploading so
make sure the receiver's address.
• A file of more than 2MB cannot be uploaded.
• For details, visit Picasa site (http://picasa.google.co.jp/) via
PC, etc.
226
Camera
Panorama Shot
You can create a panoramic image from 3 captured still
images taken by moving the FOMA terminal rightward.
• This option is available when the image size is "VGA (640×840)" to
"Sub-QCIF (128×96)"
• This option is not available for the Inner camera.
Stand-by display ▶
G
"Menu" ▶ "Preview" ▶ "Shot mode" ▶
"Panorama shot"
Panorama shot screen
Indicate where the
current frame is
G
Move the FOMA terminal rightward ▶
G
Move the FOMA terminal rightward ▶
G
A panoramic image made up of the 3 images is displayed.
/
G
Note
• The right edge of the previously taken image is displayed at the
left edge of the current capture screen, helping you to frame for
the next shot.
• Touching while capturing starts over capturing.
Funny Face Shot
If you point the camera to a subject, the camera recognizes
faces and you can convert them into various funny faces.
• About image size, you can select for the Inner camera from "VGA
(480×640)" to "QVGA(320×240)", for the Outer camera from
"Wallpaper (800×480)" to "QVGA (320×240)".
Stand-by display ▶
G
▶ (Camera-mode) ▶
"Funny face shot"
Select a funny face type
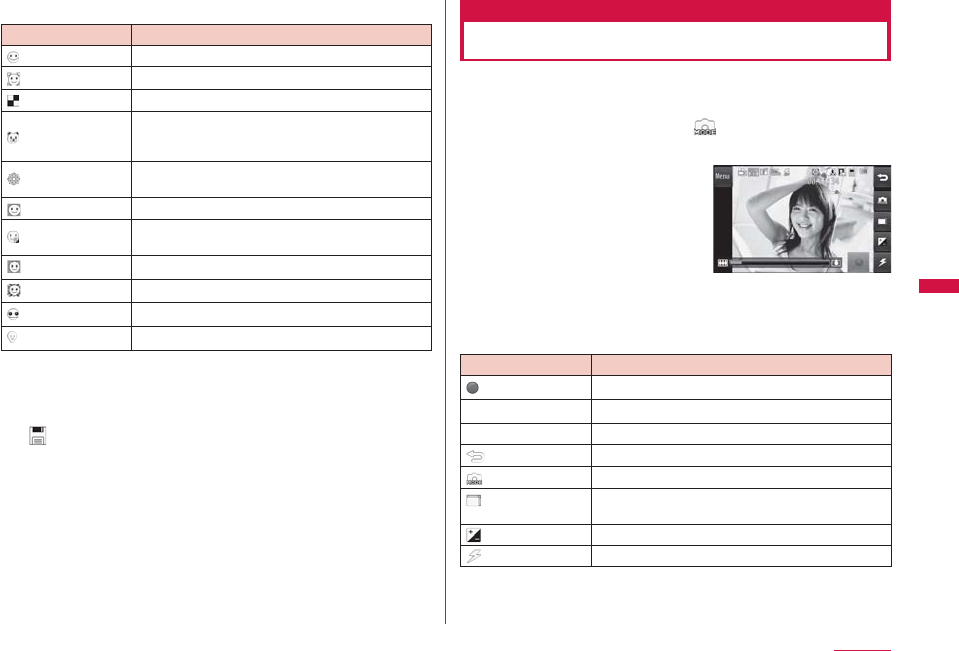
227
Camera
Continue on the next page
b
Funny face type
Type Description
(OFF) Cancel Funny face shot mode.
(Bighead) Change shape of head as enlarged.
(Mosaic) Apply mosaic to face.
(Animal mask) If this type is selected, animal mask type is
displayed. Select a mask type to cover face
with the selected animal mask.
(Snow) Apply effect as if the snow is falling on the
entire image.
(Monotone) Apply black-and-white effect.
(Facial color) Apply effect to make face look like beautiful
skin.
(Outfocus) Blur face outline.
(Radialblur) Blur face outline radially.
(Fisheye) Apply effect as if captured with Fisheye lends.
(Concave) Apply face to look shrunk.
Point the camera to the subject ▶
G
Once your face is recognized, the effect is displayed on the
screen.
/
G
Movie-mode
Capturing Moving Pictures
• Captured moving pictures are saved in the "Camera" folder in
"i-motion" of "Data Box" on the FOMA terminal. To change the saving
destination to a microSD card, set in "Memory in use" (P234).
Stand-by display ▶
G
▶ (Camera-mode) ▶
"Movie-mode"
Moving picture capture
screen
b
Touch/Key operations on the Moving picture capture
screen (horizontal capture mode)
Operation Description
/
G
Start recording
Zoom bar,
F
/
E
Zoom (available while capturing)
"Menu" Display setting menu
Exit Movie-mode
(Camera-mode) Change Camera-mode
(Switch camera) Switch between the Inner camera and the
Outer camera
(Brightness) Display the Brightness adjustment bar
(Light) Set lighting condition
Continued on next page
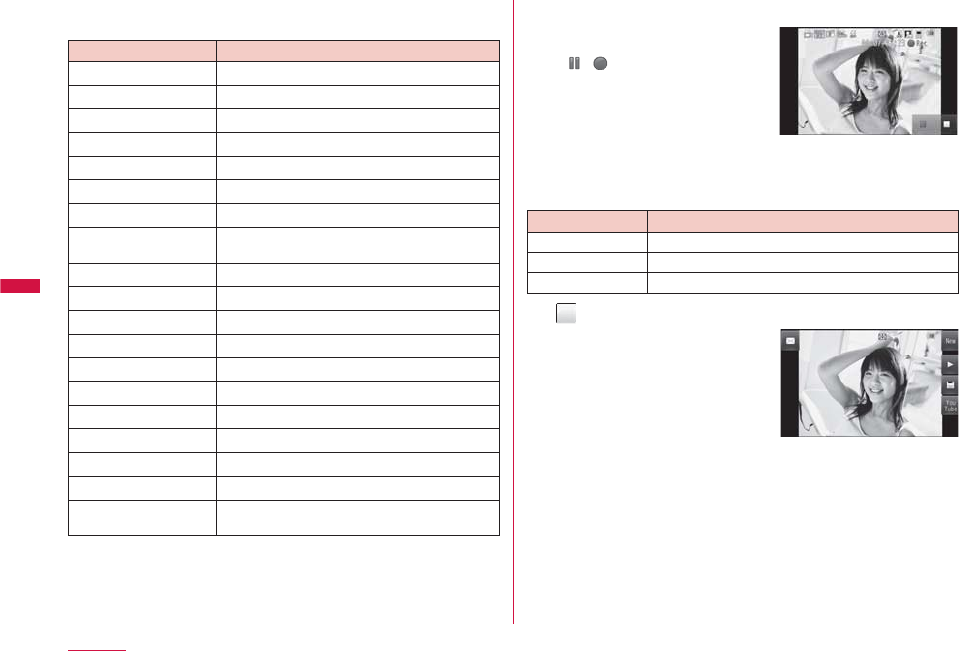
228
Camera
b
Key operations on the Moving picture capture screen
(vertical capture mode)
Key Description
C
[Rec.],
G
Start recording
J
,
F
/
E
Zoom (available while capturing)
H
Adjust brightness
1
,
I
[Mode] Change Camera-mode
M
[Menu] Display setting menu
T
[Light] Set lighting condition
Q
Exit Movie-mode
g
[CameraSW] Switch between the Inner camera and the
Outer camera
0
Display the key operation guide
2
Select size→P233
3
Auto Saving→P234
4
Video quality→P234
5
Effect→P233
6
White balance→P234
7
Type→P234
8
Common mode→P234
9
Flicker tuning→P234
*
Memory in use→P234
#
Display captured images in "My picture" of
"Data Box"
Point the camera to the subject ▶
G
The tone sounds and capturing
moving picture starts.
• / : Pause/resume the
recording.
* Pause is not available when
"Type" is "Sound only".
Capturing moving picture
screen
b
Key operations while capturing moving pictures (vertical
capture mode)
Operation Description
M
[Pause] Pause/Resume capturing
C
[Stop] Stop capturing
Q
,
I
[Cancel] Cancel capturing
/
G
The tone sounds and capturing
moving picture ends. The photo
light turns off. After a moving
picture is captured, the Confirm
save screen appears, and you can
select whether to save the moving
picture.
Confirm save screen
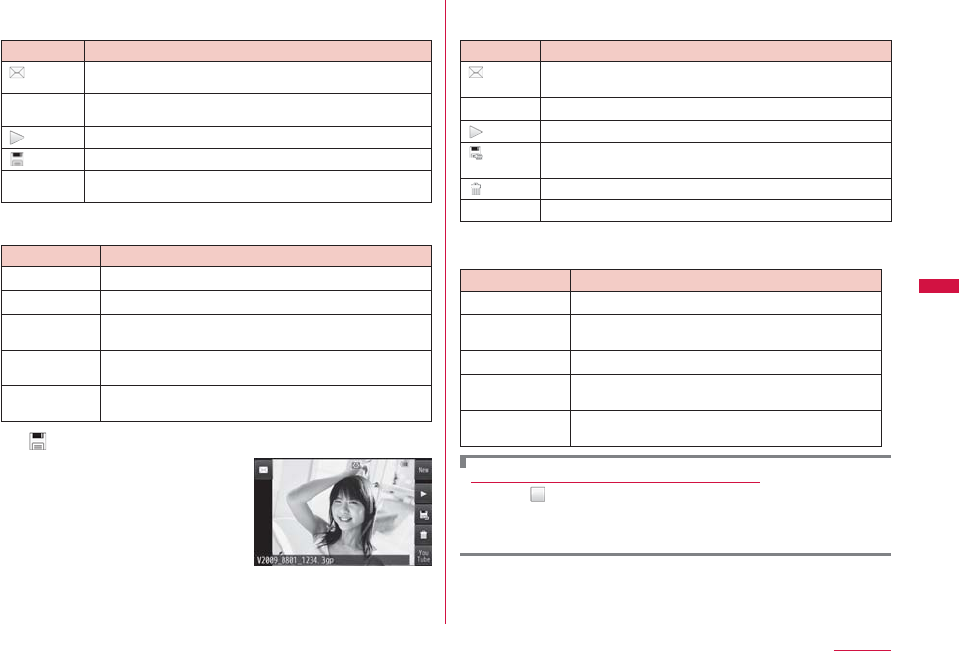
229
Camera
Continue on the next page
b
Touch operations on the Moving picture confirm save
screen (horizontal capture mode)
Operation Description
Create an i-mode mail with captured moving picture
attached
"New" Return to the Moving picture capture screen without
saving the captured moving picture
Preview the captured moving picture
Save the captured moving picture
"YouTube" Save and upload the captured moving picture to
YouTube
b
Key operations on the Moving picture confirm save screen
(vertical capture mode)
Operation Description
C
[Save] Save the captured moving picture
M[Play] Preview the captured moving picture
I
[YouTube] Save and upload the captured moving picture to
YouTube
T
[Mail] Create an i-mode mail with captured moving picture
attached
Q
Return to the Moving picture capture screen
without saving the captured moving picture
/
G
The captured moving picture is
automatically saved in the save
location specified under "Memory
in use" (P234) and the Complete
save screen appears.
• When using the Inner camera,
images on the capture screen
are displayed as a mirror image,
however, images will be saved as
a normal image. Complete save screen
b
Touch/Key operations on the Moving picture complete
save screen (horizontal capture mode)
Operation Description
Create an i-mode mail with captured moving picture
attached
"New",
G
Return to the Moving picture capture screen
Preview the captured moving picture
Set the captured moving picture as wallpaper, etc. to
the Stand-by display
Delete the captured moving picture
"YouTube" Upload the captured moving picture to YouTube
b
Key operations on the Moving picture complete save
screen (vertical capture mode)
Operation
Description
Q
,
C
[New] Return to the Moving picture capture screen
M[Use as] Set the captured moving picture as wallpaper,
etc. to the Stand-by display
g
[Delete] Delete the captured moving picture
I
[YouTube] Save and upload the captured moving picture
to YouTube
T
[Mail] Create an i-mode mail with captured moving
picture attached
When "Auto Saving" (P234) is set to "On"
Pressing /
G
stops the recording and automatically saves it in
the destination specified under "Memory in use" (P234).
The Complete save screen appears and the Moving picture capture
screen returns.
Continued on next page
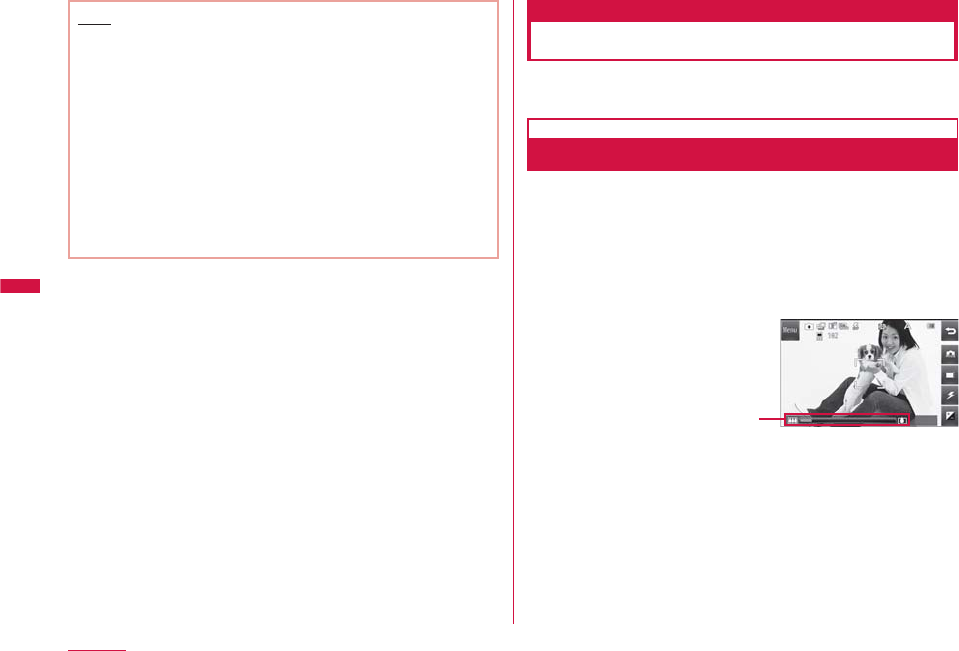
230
Camera
Note
•
Even when Manner mode is activated, the shutter tone sounds
when capturing starts and ends.
•
Moving picture capturing will be terminated when it is interrupted by
a call arrival. After the call is terminated, the Confirm save screen
appears, and you can save the moving picture recorded until the
interruption.
•
Playing moving pictures on a PC.→P447
<YouTube>
• The FOMA terminal connects to the YouTube site. Upload files
by mail attachment. The captured moving picture is retained up
to the compose message screen for uploading so make sure
the receiver's address.
• A file of more than 2MB cannot be uploaded.
• For details, visit YouTube site (http://www.youtube.com/) via
PC, etc.
Changing Settings for Shooting
Set the Camera functions according to the capturing
conditions.
Using Zoom
Set the image zoom magnification.
• When capturing a still image, if capturing with "Select size" set to
"5.1M (2560 ~1920)" or capturing using the Inner camera, the zoom
feature cannot be used.
Still image capture screen (P222)/Moving
picture capture screen (P227) ▶ Slide the
Zoom bar to adjust zoom magnification
• Move the Zoom bar pressing
F
or
E
, or with your finger
touching the touch panel.
For vertical capture mode, using
J
also slides the zoom bar.
Zoom setting
(Ex.: Still image capture screen)
Zoom bar
231
Camera
Continue on the next page
b
Outer camera maximum magnification
Camera
-mode Image size*Zoom Maximum
magnification
Photo-mode
5.1M (2560×1920) − −
3M (2048×1536)
10 steps
Approx. 1.2 times
2M (1600×1200) Approx. 1.6 times
1M (1280×960)
Approx. 2.0 times
VGA (640×480)
CIF (352×288)
QVGA (320×240)
QCIF (176×144)
Sub-QCIF (128×96)
Wallpaper
(800×480) Approx. 1.6 times
Movie-mode QVGA (320×240) Approx. 2.0 times
QCIF (176×144) Approx. 3.6 times
Sub-QCIF (128×96) Approx. 5.0 times
* Numbers in parentheses indicate as in horizontal capture mode.
The right and left numbers switch when capturing in vertical
capture mode.
b
Outer camera maximum magnification
Camera
-mode Image size*Zoom Maximum
magnification
Movie-mode QVGA (320×240) 10 steps Approx. 2.0 times
QCIF (176×144) Approx. 3.3 times
Sub-QCIF (128×96) Approx. 5.0 times
* Numbers in parentheses indicate as in horizontal capture mode. The
right and left numbers switch when capturing in vertical capture
mode.
Adjusting Brightness
Adjust the image brightness (exposure). You can adjust
brightness in 9 steps.
Still image capture screen (P222)/Moving
picture capture screen (P227)
Display the Brightness adjustment bar
b
Horizontal capture mode
Touch .
b
Vertical capture mode
Press
H
.
Slide the Brightness adjustment bar to adjust
brightness
• Move the Brightness adjustment
bar with your finger touching the
touch panel.
In horizontal capture mode,
pressing F or E also allows to
slide.
For vertical capture mode, using
J
also slides the brightness
adjustment bar.
Brightness setting
(Ex.: Still image capture screen)
Brightness adjustment bar
232
Camera
Setting Auto Timer
Set the number of seconds from the time the shutter is
pressed until an image is captured.
• The Auto timer is not available for moving picture capturing.
Still image capture screen (P222) ▶ "Menu" ▶
"Preview" ▶ "Auto timer"
"3sec"/"10sec"/"15sec"
(the number indicates the number of seconds) appears at the
top of the screen.
• To release Auto timer, set to "OFF".
G
Auto timer starts. An image is captured automatically after the
set number of seconds.
After the shutter key is pressed, photo light blinks in orange and
the timer sound rings until the image is captured.
Camera settings
Changing Camera Settings
Still Image Capture Screen Setting Menu
Still image capture screen (P222) ▶ "Menu" ▶
"Preview"/"Others" ▶ Perform the following operations
[Select size]
Set the image size to capture.
[Shot mode]
Normal : Capture one still image.
Continuous mode : Press the shutter key to capture images
continuously.
• You can capture up to 6 continuous images
smaller than "CIF (352×288)", or up to
4 images of "CIF (352 ×288)".
• When "Auto" is selected, you can capture
continuous images by pressing the shutter
key once. When "Manual" is selected, you can
capture continuous images by pressing the
shutter key repeatedly.
Shoot with frame : Add a frame to the subject when capturing an
image. Select a frame from "My picture".
▶ Move the cursor to a folder ▶ [Open] ▶
Select a frame
Panorama shot*: Capture a panoramic image.→P226
[Scene mode]*
Capture a still image suitable for the capturing conditions.
[Effect]
Add an effect when capturing a still image.
[White balance]
Set hue/tint for the image. When set according to the capturing
conditions, a naturally colored image can be produced.
233
Camera
Continue on the next page
[Macro]*
Set close-up capturing.
• Become focused when distance between the Camera and subject is
approximately 10cm.
[Auto timer]
Select the number of seconds from the time the shutter is pressed
until an image is captured.
[Image quality]
Select the image quality used when saving the still image.
[Auto Saving]
Set whether to save the still image automatically.
[Memory in use]
Set the save location for the still image.
[Shake reduction]*
Set whether to enable the shake reduction function.
[Auto focus]*
Set the Auto focus.
• When "Face tracking" is selected, a face is recognized and focused
automatically. Up to 3 faces can be detected.
[Shutter sound]
Set the shutter tone.
[Flicker tuning]
The flicker on the screen under a fluorescent light, etc. may be
reduced.
Auto : Suppress the flicker automatically.
50Hz : Select this option in an area where the frequency of the
power is 50Hz.
60Hz : Select this option in an area where the frequency of the
power is 60Hz.
[Reset settings]
Restore the still image capture settings to default.
* Not available for the Inner camera.
Note
<Continuous mode>
• This option is available when the image size is "CIF (352×288)"
or smaller.
• When "Auto" is selected, the Outer camera captures at intervals
of approximately 0.7 seconds, and the Inner camera at intervals
of approximately 0.2 seconds.
• When "Continuous mode" is set, "Auto timer" is disabled.
• If you press while capturing, you can end capturing and the
Confirm save screen appears.
<Shoot with frame>
• This option is available when the image size is "CIF (352×288)"
to "Sub-QCIF (128×96)" and "Wallpaper (800×480)" (Available
only for the Outer camera).
<Auto focus>
• When "Manual" is selected, the focus adjustment bar appears
on the Still image capture screen in horizontal capture mode.
Move the bar with your finger touching the touch panel. When
capturing in vertical capture mode, use H to display/adjust
the focus adjustment bar.
Moving Picture Capture Screen Setting Menu
Moving picture capture screen (P227) ▶
"Menu" ▶ "Preview"/"Others" ▶ Perform the
following operations
[Select size]
Set the moving picture size to capture.
[Effect]
Add an effect when capturing moving pictures.
Continued on next page
234
Camera
[White balance]
Set hue/tint for the image. When set according to the capturing
conditions, a naturally colored moving picture can be produced.
[Video quality]
Set the image quality used when saving the moving picture.
[Size restriction]
Restrict the file size of a moving picture.
[Memory in use]
Set the save location for a moving picture.
[Auto Saving]
Set whether to save the moving picture automatically.
[Type]
Set whether video and sound are to be included in a moving picture.
[Common mode]
Set file size suitable for attaching to i-mode mail (up to 500KB).
• If set to "On", you can select image size from "QCIF (176×144)" or
"Sub-QCIF (128×96)" and the Image quality is set to "Super fine"
and the Size restriction is set to "For mail short".
[Flicker tuning]
The flicker on the screen under a fluorescent light, etc. may be
reduced.
Auto : Suppress the flicker automatically.
50Hz : Select this option in the location where the frequency of the
power is 50Hz.
60Hz : Select this option in the location where the frequency of the
power is 60Hz.
[Reset settings]
Restore the moving picture capture settings to default.
Note
<Flicker tuning>
• If you record the moving picture in the size of "QVGA
(320×240)" in a room where 50Hz fluorescent light is used,
flicker may not be reduced.
Bar code reader
Using Bar Code Reader
You can scan information embedded in a JAN code or QR
code using the Outer camera. You can create i-mode mail
or connect to the Internet using the scanned information.
You can also save or play the scanned information, image or
melody.
• UP to 5 pieces of scanned information can be saved.
• Scan the code when the entire code is displayed on the screen.
• Hold the camera parallel to the code.
b
JAN codes
JAN code is a bar code representing numbers using
vertical bars in different thickness and spaces. 8-digit
(JAN8) or 13-digit (JAN13) bar code can be scanned.
• The scanned result of the following JAN code is
"4942857123456".

235
Camera
Continue on the next page
b
QR codes
QR code is one of the 2 dimensional codes that express
text including alphanumeric characters, Kanji, Kana, or
pictographs in the vertical and horizontal patterns. Some
QR codes have an image or melody embedded, and some
are split QR codes where multiple images contain 1 larger
piece of information.
• The scanned result of the following QR code is "株式会社NTTドコ
モ (NTT DOCOMO, INC.)".
Scanning Codes
• When scanning bar cords, use the Outer camera and hold the FOMA
terminal approximately 10cm away from the code to scan.
M
▶ "LifeKit" ▶ "Bar code reader"
Scan screen
b
Key operations on the Scan screen
Operation Description
C
[Scan] Start Auto focus
M
[Mode] Change Camera-mode
I
[List] List the saved scanned data
T
[Light] Light ON/OFF
g[ ], Q
Exit Bar code reader
Display the code to scan within the screen ▶
C
[Scan]
After the auto focusing, scan the code.
When scanning completes, a tone sounds
and the scanned data appears.
• When the bar code reader is activated,
scanning starts automatically. When
focused, scan the code automatically
without pressing
C
[Scan].
• If you can not scan the code with auto
focus, press
C
[Retry] to scan the code
again.
• When Manner mode is activated, the tone
does not sound.
Scanned data
screen (Ex.: For a
melody)
Depending on the type of scanned data,
performs the following operations
• Depending on the scanned data, the screen or operation may
differ.
• Always save the scanned data if you want to use it later.
• Up to 16 split QR codes can be continuously scanned and
combined.→P237
Continued on next page

236
Camera
b
For phone number
Select the displayed phone number to open the Phone
number entry screen with the scanned phone number
already entered.
If "Add to phonebook", etc. appears, select it to save to
the Phonebook.
b
For mail address
Select the displayed mail address to create i-mode mail
with the scanned mail address already entered.
If "Compose message", etc. appears, select it to create
i-mode mail with the scanned mail address or subject
already entered .
If "Add to phonebook", etc. appears, select it to save to
the Phonebook.
b
For URL
Select the displayed URL to access the URL.
If "Add bookmark", etc. appears, select it to save as
Bookmark.
b
For text
The scanned characters are displayed.
b
For image
The scanned image is displayed.
b
For melody
Press
C
[Play] to play the scanned melody.
If you press
C
[Stop] during a playback, the melody
stops.
b
For i-αppli
If "Start iappli", etc. appears, select it to launch.
Note
<Common functions>
• Bar codes other than JAN codes, QR codes, and 2 dimensional
codes cannot be scanned.
• Bar codes may not be correctly scanned because of scratch,
smudge, damage, printing quality, or reflection of light.
• Some codes may not be scanned depending on the type, size,
or QR code version.
• If trying to save more than 5 pieces of data, a confirmation
asking whether to delete older data first appears. To save the
new data, select "Yes" ▶ select data to delete ▶ select "Yes".
• If Bar code reader cannot scan the code within approximately
30 seconds after being activated, a message indicating that
scanning failed appears. If the Bar code reader cannot scan the
code after a certain period of time, it automatically terminates.
<Compose message>
• If the address has invalid characters, nothing is entered in the
address.
<Make call>
• Valid characters are numbers and symbols [#,
:
, +, −, P,
(, and )]. If the phone number contains characters other than
these, the call cannot be made.
<Start i-αppli>
• If "Barcode i-αppli To" (P283) is not set, you cannot start an
i-αppli from scanned data.
237
Camera
Continue on the next page
Scanned Data Screen Sub Menu
• Displayed items vary depending on the type of scanned data.
Scanned data screen (P235) ▶
M
[Menu] ▶
Perform the following operations
[Copy]
Copy selected URL, phone number, or address on the scanned result
screen.
[Play]
Play the scanned data.
[Save to list]
Save the scanned data in a list.
[Save to Databox]
Save the scanned image or melody to "Data Box".
[Add to phonebook]
Save the scanned name, phone number, URL, or mail address to
Phonebook.
[Add bookmark]
Save the scanned URL to "Bookmark".
[Retry]
Scan the code again.
Scanning split QR codes
a
Perform Steps 1 and 2 in "Scanning Codes" (P235)
b
After the message "Scan next bar code" appears, scan the
next code
c
Repeat Step
b
• Press
Q
to cancel scanning or
C
[Retry] to readjust the Auto
focus.
File name of the scanned data
The scanned data is automatically named using the year, month,
date, hour, and minute. The file cannot be renamed.
Example: If taken at 10:10 on 2009/8/1
JAN code:
"P2009_0801_1010_X.JAN" (X is a sequential number)
QR code:
"P2009_0801_1010_X.QR" (X is a sequential number)
Using/Deleting Saved Data
Scan screen (P235) ▶
I
[List]
b
To activate scan screen
Press
M
[Menu] ▶ "Scan".
b
To delete 1 item of saved scanned data
Move the cursor to data to delete ▶
M
[Menu] ▶
"Delete one" ▶ "Yes".
b
To delete all saved scanned data
Press
M
[Menu] ▶ "Delete all" ▶ enter the Terminal
security code ▶ "Yes".
Select the scanned data
For further operations, refer to Step 3 in "Scanning Codes"
(P235) depending on the type of data.


239
1Seg
1Seg ・・・・・・・・・・・・・・・・・・・・・・・・・・・・・・・・・・・・・・・・・・・・・・・・ 240
Before Using 1Seg ・・・・・・・・・・・・・・・・・・・・・・・・・・・・・・・・・・ 242
Setting Channels ・・・・・・・・・・・・・・・・・Channel settings 243
Watching 1Seg ・・・・・・・・・・・・・・・・・・・・・ Activate 1Seg 245
Using i-αppli Program Guide ・・・・・・・・ Program guide 248
Setting Timer for Watching 1Seg Program
・・・・・・・・・・・・・・・・・・・・・・・・・・・・・・・・・・・・・・・・ TV timer list 248
Using Data Broadcasting ・・・・・・・ Data broadcasting 250
Using TVlink ・・・・・・・・・・・・・・・・・・・・・・・・・・・・・・・・・ TVlink 251
Setting 1Seg ・・・・・・・・・・・・・・・・・・・・・・・・1Seg settings 252

240
1Seg
1Seg
1Seg is a digital terrestrial broadcasting service for mobile
devices and provides data broadcasting as well as video
and sound broadcasting. Use i-mode to acquire the detail
information on TV programs, join panel shows, or enjoy TV
shopping.
• For details about "1Seg" service, visit the web site below.
The Association for Promotion of Digital Broadcasting
PC: http://www.dpa.or.jp/english/
i-mode: http://www.dpa.or.jp/1seg/k/ (Japanese only)
Using 1Seg
• 1Seg is a service provided by TV broadcasters (broadcast
stations). Communication charge does not apply to receive video
and sound. For viewing fee of NHK, contact NHK.
• The information displayed on a data broadcasting domain has 2
types; "data broadcasting" and "data broadcasting site". "Data
broadcasting" is displayed on broadcast wave together with video
and sound, and "data broadcasting site" is accessed by connecting
to a site provided by TV broadcasters (broadcast stations) from
data broadcasting information. And it may be connected to "i-mode
site". Accessing to a site requires a separate i-mode subscription.
• Packet communication charges apply to view a "data broadcasting
site" or "i-mode site". Some sites (fee-based i-mode sites) require an
information fee for use.
About Signal
1Seg is one of the broadcasting services, and receives
a signal (broadcast wave) different from FOMA service.
Therefore, regardless of whether the FOMA terminal is
in/out of service are, you cannot receive 1Seg broadcasting
in place the signal cannot reach or during the hours the
broadcasting is out of service.
Also, in the following places, the signal status may become
weak or the signal may not be received even if the FOMA
terminal is within a digital terrestrial broadcasting service
area.
• Place that is far from the tower which sends the broadcast wave
• Place where the signal is interrupted due to the landscape or
buildings such as mountain areas or behind a building
• Place where the signal is weak or does not reach such as a tunnel,
basement, or recess of a building
To improve the reception status, fully extend the 1Seg
antenna. Changing the direction of antenna, holding the
FOMA terminal apart from or close to your body or moving to
another place may also improve the reception status.

241
1Seg
Continue on the next page
Display when Using 1Seg for the First Time
When 1Seg is activated for the first time after purchase, a
confirmation of disclaimer appears.
Confirm each term and press
C
[OK]. After this, the
confirmation does not appear.
About Broadcast Storage Area
Broadcast storage area is a storage area in the terminal
specific for 1Seg. Information you entered following the data
broadcasting instruction is stored on the broadcast storage
area based on the TV broadcasters (broadcast stations)
setting. The stored information may include personal data
such as your answer results of quizzes, membership number,
gender, age, and occupation. The saved information may be
displayed on a data broadcasting site when viewing, or may
be sent to the TV broadcasters (broadcast stations) without
you re-entering it.
• To erase broadcast storage area→P252
• When you replaced or removed the UIM, a confirmation asking
whether to initialize the broadcast storage area appears. Select
"Yes" to initialize the broadcast storage area. Selecting "No"
disables services using the broadcast storage area.
■ Display when reading the broadcast storage area
If you use the information saved in the broadcast storage
area while watching a program, a confirmation "Use saved
information? It may include information used by the same
broadcasting group" appears. Select "Yes" to disable the
subsequent confirmation on reading the saved information
performed while watching the same program. Select "Yes
(permanently)" to disable the subsequent confirmation on
any program.

242
1Seg
Before Using 1Seg
Procedures for Watching 1Seg
Example: When watching 1Seg for the first time
Step 1 : Channel settings→P243
Save channel lists corresponding to your area.
Step 2 : Activate 1Seg→P245
Save channel lists corresponding to your area.
1Seg Antenna
Fully extend the 1Seg antenna when watching 1Seg.
b
To extend the 1Seg antenna
a
Pinch the head of the 1Seg
antenna
a
, and pull it out in
the direction of the arrow
b
b
Fully extend the 1Seg
antenna
c
Hold the lower part of the 1Seg
antenna to change direction
• Forcibly trying to change the
direction of the 1Seg antenna
could deform or damage it.
b
To put the 1Seg antenna back
a
Hold the lower part of the
1Seg antenna and pull it down
straight
• Forcibly trying to put the 1Seg
antenna in could deform or
damage it.
b
Rotate the head of the 1Seg
antenna to fit the depression
243
1Seg
Continue on the next page
Receiving a Call or Message while Watching 1Seg
While watching 1Seg, the FOMA terminal suspends 1Seg
program when following events occur. After the other task is
terminated, the FOMA terminal resumes the 1Seg program.
• The operations suspended with sound and video are the following:
- Receiving a voice/videophone call
- Receiving mail/SMS (when "Receiving display" is set to "Alarm
mode")
- Sounding an Alarm, or alarms set for Schedule event, To do task,
or Booked program
Note
• If 1Seg is used for a long time while charging, the battery life
may become shorter than estimated.
• Put the 1Seg antenna back in when 1Seg is not used.
Channel settings
Setting Channels
Configuration of Channel settings beforehand to save a
channel list is required to watch 1Seg.
• Up to 10 channel list items can be saved. If you set a channel list
for other areas where you visit, you can watch the local TV program
there.
• Up to 62 channels can be saved in 1 channel list.
M
▶ "1Seg" ▶ "Channel settings"
If there is no channel list saved
The New channel creation screen appears.
If there is more than 1 channel list is saved
Move the cursor to "Not registered" ▶
M
[Menu] ▶ "Add new"
Perform the following operations
[Select area]
Select an area from area list registered in the FOMA terminal.
▶ Select a region to register ▶ Select a prefecture ▶
C
[Select]
▶ "Yes"
[Auto channel set]
Automatically set channels which can be received in your area.
▶ "Yes" ▶
C
[Save] ▶ "Yes"
• To cancel, press
g
[Cancel] ▶ "Yes".
• Press
T
[Retry] before saving to retry the setting.
Note
• "Select area" may not be configured properly depending on your
area. In this case, perform "Auto channel set".
• Make sure to perform the setting of "Auto channel set" within a
digital terrestrial broadcasting service area.
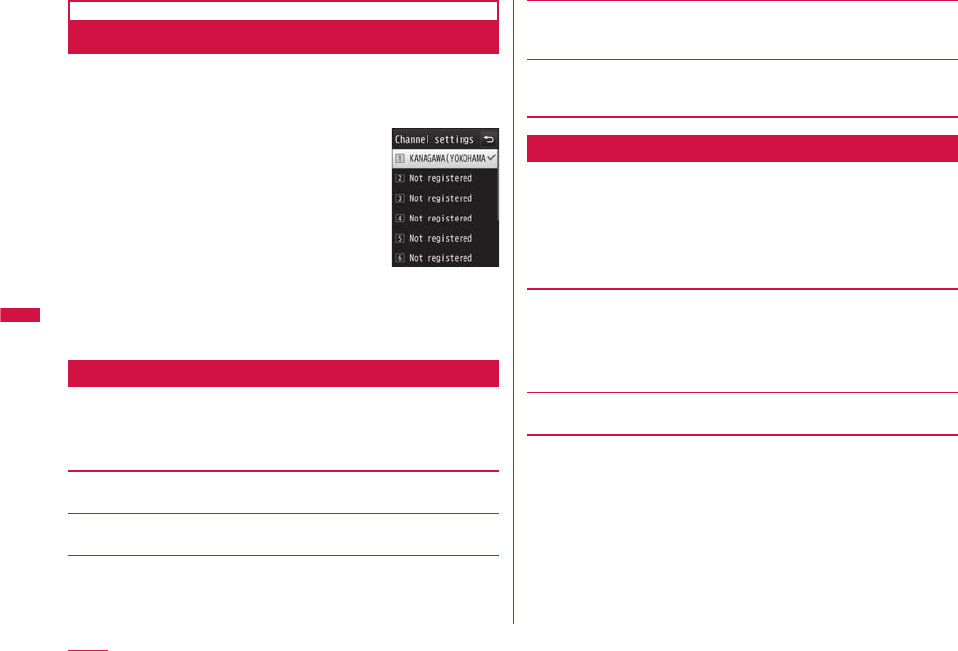
244
1Seg
Selecting a Channel List to Use
When multiple channel lists are saved, switch channel lists to
be used from those saved.
M
▶ "1Seg" ▶ "Channel settings"
The channel list in use is marked.
•
I
[Detail]: Display the detail screen of
the selected channel list.
Channel list
screen
Select a channel list to use
Channel List Screen Sub Menu
Channel list screen (P244) ▶ Move the cursor
to a channel list ▶
M
[Menu] ▶ Perform the
following operations
[Add new]
Add a channel to the selected channel list.→P243
[Detail]
Display the detail screen of the selected channel list.
[Rename]
Change name of the selected channel list.
[Delete]
Delete the selected channel list.
• Currently used channel list cannot be deleted.
[Delete all]
Delete the all channel lists.
▶ Enter the Terminal security code ▶ "Yes"
Channel List Detail Screen Sub Menu
Channel list screen (P244) ▶ Move the cursor
to a channel list ▶
I
[Detail] ▶
M
[Menu]
•
C
[Watch]: Display the selected channel.
Perform the following operations
[Replace remote no.]
Replace the remote controller number of the selected channel.
▶ Select a channel to change ▶ Select a new remote controller
number ▶ "Yes"
• If a destination number has a channel saved, the channel is
replaced with the target channel.
[Delete]
Delete the selected channel.
245
1Seg
Continue on the next page
Activate 1Seg
Watching 1Seg
• Perform channel settings before watching 1Seg.→P243
T
(for 1+ seconds)
• The confirmation of disclaimer is displayed only at the first
time. Read through the agreement and press
C
[OK].
• To terminate 1Seg, select
P
▶ "Yes".
1Seg Watch Screen Components
1Seg watch screen
(Vertical screen) Data broadcasting
(Full screen)
1Seg watch screen
(Horizontal screen (Standard))
a
Video
• Touch here to display Volume adjustment and Channel
selection icons.
b
Subtitles
c
Data broadcasting
d
Remote control no.
e
Strength of broadcast wave
Strong Weak
f
Operation mode
: TV : Data broadcasting
g
Channel name and program name
h
Volume
i
: Mute
j
In Multiple sound broadcasting
k
Main/Sub sound display
: Main+Sub sound : Main sound
: Sub sound
Continued on next page
246
1Seg
b
Key operations on the 1Seg screen
Operation Description
TV
(Vertical) TV
(Horizontal)
Data
broadcasting
HJ
ーAdjust volume
F
/
E
E
*
(1+ seconds)
F
(1+ seconds)
E
*
(1+ seconds)
Mute
JH
ーSelect a channel
Dial key,
*
,
#
J
(1+ seconds)
H
(1+ seconds)
ーSearch receivable
channels→P246
ー
C
ーShow/hide program
name, etc.
I
[Disp]
Switch vertical/
horizontal (Standard)/
horizontal (Full screen)
A
ー
A
Switch TV and data
broadcasting
ーー
H
▶
C
Select a data
broadcasting item
I
[Disp]
(1+ seconds)
ー
I
[Disp]
(1+ seconds)
Switch normal
screen/full screen of
data broadcasting
g
ーDisplay program guide
P
▶ "Yes" Terminate 1Seg
* Turn to
F
in Turn View Style mode.
Note
• You can activate 1Seg from a link of 1Seg information
displayed in a site or mail (Media To).→P196
• Intermittent sound or image may be heard or seen due to
broadcast wave receptions. Also, a block-shaped noise may be
displayed or the image may not be displayed.
• The screen orientation automatically switches to horizontal by
tilting the FOMA terminal to the left.
• Placing the position of the FOMA terminal in horizontal direction
while data broadcasting is displayed, only video is displayed.
Searching Available Channels <Channel Search>
Search available channels in order of frequency and display
them.
1Seg watch screen (P245) ▶
J
(for 1+
seconds in vertical),
H
(for 1+ seconds in
horizontal)
Display available channels if any.
M
[Menu] ▶ select "Add to
channel list" to add to the channel list.
b
To cancel the channel search
Press
M
[Cancel]/
Q
▶ "Yes".
Note
• When "Tuning..." is displayed for a long time in an area where
broadcast wave is weak, the channel search allows you to
search available channels.
• When moving to other area, the terminal may receive a channel
which is not saved in the Channel settings.

247
1Seg
Continue on the next page
1Seg Watch Screen Sub Menu
1Seg watch screen (P245) ▶
M
[Menu] ▶
Perform the following operations
[Channel settings]
Display the Channel list screen.→ P244
[TVlink]
Display a TVlink list.
[DBC]
Make data broadcasting setting.
Image display : Set Image display ON/OFF.
Effect sound : This option is not available.
Certificate info : Display certificate at SSL communication.
Reload : Reload and display image.
Back to DBC : Return to data broadcasting.
[Switch TV/DBC]
Switch TV and data broadcasting.
[Display settings]
Set the display of the screen.
TV disp. Mode : Set the display of the screen.
DBC disp. Mode : Set the display of the data broadcasting.
Subtitles : Switch subtitle ON/OFF.
• Even if set to ON, subtitle may not be displayed
depending on a program.
Backlight : Set the backlight level of the display.
[Sound settings]
Set sound.
Mute(Unmute) : Mute/unmute the sound.
Main/Sub sound : Set main/sub sound.
Switch sound : Change the sound of multi sound broadcasting
program.
[Program guide]
Display program guide.→P248
[Recom. channel mail]
You can create a mail with the channel information you are watching.
If the destination FOMA terminal supports Media To function, the
information can be selected to activate 1Seg.
[Add to channel list]
Add the currently watching channel to the channel list.→P246
[Select service]
You can switch programs if these programs are in the same channel.
[Program info.]
Display the detail information about the program you are watching.
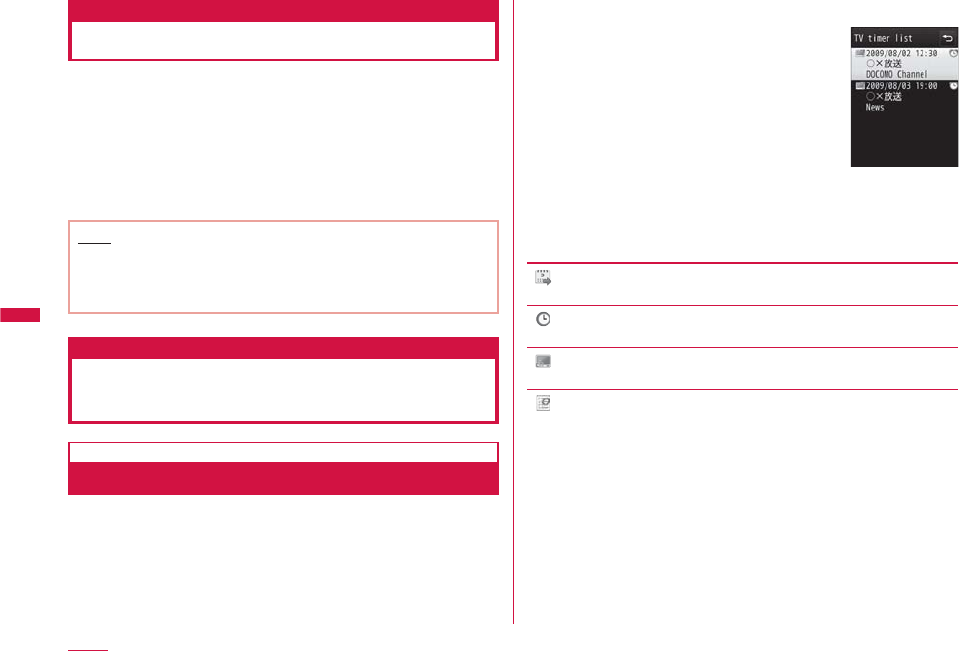
248
1Seg
Program guide
Using i-αppli Program Guide
By using i-αppli Program guide, you can select a program
from the program guide to start 1Seg or set timer for
starting 1Seg.
M
▶ "1Seg" ▶ "Program guide"
Press
M
[TV] to watch the program which is being broadcast on
the selected channel.
For further operations, refer to "Gガイド番組表リモコン (G-GUIDE
Program List Remote Controller)" (P283).
Note
• Pressing
g
on the 1Seg watch screen (in vertical) also
displays program guide.
• You can set i-αppli Program guide in "Program guide key
setting" in "Software set"→P278
TV timer list
Setting Timer for Watching
1Seg Program
Setting Timer to Start a 1Seg Program
Set "Announce on" to notify you of a program start by alarm
1 minute before the program starts.
• You can set or view timer from Schedule (P353).
• Up to 20 entries can be set.
M
▶ "1Seg" ▶ "TV timer list"
TV timer list
screen
I
[New] ▶ Perform the following operations
•
g
[Cancel]: Cancel adding a new booking.
[ (Set date)]
Specify the booking date.
[ (Set time)]
Specify the start time of the booking program.
[ (Channel)]
Select a channel.
[ Program title]
Up to 120 full-pitch or 240 half-pitch characters can be entered.
249
1Seg
Continue on the next page
[ (Announce on/off)]
Set whether to notify by alarm 1 minute before the program start.
If set to "Announce on", perform the following steps to select the
alarm tone.
▶
D
▶
C
[List] on the field ▶ Select a type of the alarm tone
Music : Select a music data saved in "Music" of "Data Box".
→P270
Go to Step 3 in "Setting a Chaku-Uta Full
®
Song as a Ring
Tone" (P266).
i-motion : Select a moving picture/i-motion saved in "i-motion" of
"Data Box".→P307
Melody : Select a melody saved in "Melody" of "Data Box".→P314
[ (Set repeat)]
Set repeat booking of a program that is broadcasted regularly. Select
"None" for not to repeat.
If "Weekdays" is selected, perform the following steps to specify the
day of the week.
▶
D
▶
C
[List] on the field ▶ Mark days of the week ▶
I
[Done]
You can set period if other than "None" is selected.
▶
D
▶
C
[List] on the field ▶ "Set expiration" ▶ Use
D
to
select the date setting field ▶ Select expiration date
I
[Done]
Note
• You cannot book a 1Seg program that starts now or within
1 minute.
• You can book a 1Seg program from a link of 1Seg information
displayed in a site or mail (Media To).→P196
• If "Announce on/off" is set to "Announce off", an alarm will not
sound. And 1Seg will not be activated.
When the alarm reaches the booked time
If "Announce on" is set, you will be notified by alarm 1 minute
before the starting time. The Alarm screen appears, the alarm
tone sounds, and the illumination lights up.
Press
I
[Watch] to start the 1Seg program. After started,
select
P
▶ "Yes" to terminate 1Seg.
• Press
C
[OFF] to stop the alarm (1Seg will not be activated at
the specified time.).
When multiple timer are set for the same time
Press
I
[Detail] on the Alarm screen ▶ select a program to
watch.
Checking Booking Information
TV timer list screen (P248) ▶ Select a booked
program to check
Booking program detail screen appears.
b
To edit the booking information
Press
C
[Edit].→P248
b
To delete the booking
Press
g
[Delete].
b
To add a new booking
Press
I
[New].→P248
250
1Seg
TV Timer List/Detail Screen Sub Menu
TV timer list screen (P248)/detail screen ▶
M
[Menu] ▶ Perform the following operations
[Add new]
Book a new 1Seg program to watch.
[Edit]
Edit the selected timer.→P248
[Delete]
Delete the selected booked program.
You can select followings on the TV timer list screen.
One : Delete the selected booked program.
Selected : Select and delete booked programs.
▶ Mark booked programs to delete ▶ g[Delete] ▶ "Yes"
• Press
M
[Sel. all/Clr. all] to select/clear all.
All : Delete all booked programs.
▶ "Yes" ▶ Enter the Terminal security code
Data broadcasting
Using Data Broadcasting
1Seg provides data broadcasting in addition to video and
sound. You can use various information containing images or
moving pictures such as a site connected with a program.
• You cannot watch data broadcasting in horizontal screen.
A
on 1Seg watch screen
appears and you can operate data broadcasting items.
• Press
A
to switch TV and data broadcasting.
• You can also switch TV and data broadcasting by touching
video/data broadcasting display area.
• Press
I
[Disp] for 1+ seconds to switch full screen and
normal screen of data broadcasting.
Select an item
• Some items connect to a data broadcasting site or an i-mode
site.
• Select "Yes" or "Yes (permanently)" if a confirmation whether
to establish i-mode connection appears. Selecting "Yes
(permanently)" disables the subsequent confirmations on the
same function, and the information of data broadcasting and
data broadcasting site may automatically be updated. Note
that packet communication charges may apply in such cases.
Note
• Even if you switch to data broadcasting from TV, the sound of
1Seg streams.
251
1Seg
Continue on the next page
TVlink
Using TVlink
Depending on a data broadcasting or data broadcasting site,
a URL or memo information can be saved as TVlink. If saved,
you can display the target information from a TVlink list.
Saving as a TVlink
Select an item that can be saved as a TVlink in
data broadcasting ▶ "Yes"
Displaying Saved TVlink
M
▶ "1Seg" ▶ "TVlink"
The TVlink list screen appears.
• You can also display a TVlink list by pressing
M
[Menu] ▶
"TVlink" on 1Seg watch screen.
Select a TVlink ▶ "Yes"
TVlink List Sub Menu
TVlink list screen ▶
M
[Menu] ▶ Perform the
following operations
[TVlink info]
Display the TVlink detail information.
[Delete]
Delete a selected TVlink.
[Delete all]
Delete all saved TVlinks.
Note
• The URL or memo information saved as a TVlink is available
only from 1Seg. Not available from i-mode or Full browser.
252
1Seg
1Seg settings
Setting 1Seg
M
[Menu] ▶ "1Seg" ▶ "1Seg settings" ▶
Perform the following operations
[Subtitles]
Show/hide subtitles.
[Backlight]
Set the backlight level of the Display.
[Set image display]
Set the display of the data broadcasting site.
[Set effect sound]
This option is not available.
[Close setting]
Set whether to continue sound output even when the FOMA terminal
is closed.
[Main/Sub sound]
Set Main/Sub sound.
[Reset permission display]
Set to display the hidden confirmation.
[Reset 1Seg settings]
Restore the settings in "Subtitles", "Backlight", "Set image display",
"Set effect sound" and "Main/Sub sound" to their defaults.
▶ Enter the Terminal security code ▶ "Yes"
[Erase storage area]
Delete the storage area.
▶ Move the cursor to a broadcast station to delete the storage
area ▶
M
[Menu] ▶ "Delete"/"Delete all"
• The Terminal security code is required to delete all.
[1Seg settings status]
You can check 1Seg settings.
253
Music
Precautions for Music Data
• In this manual, Chaku-Uta Full
®
songs, WMA (Windows Media Audio)
files, and SD-Audio data (music data compatible with SD-Audio
standard) are collectively referred to as "music data".
• This FOMA terminal can play WMA files, protected by copyright
protection technology, Chaku-Uta Full
®
songs, and SD-Audio data.
• Before downloading music data from web sites, read the license
agreement (license and prohibited activities, etc.) carefully.
• Information unique to your FOMA terminal is used to play WMA
files, protected by copyright protection technology. If the
information unique to your FOMA terminal is changed due to failure,
repair, or changing model, WMA files saved before the change was
made may not play.
• Music data saved in the FOMA terminal or on a microSD card can
be played for personal use only. When playing music, do not violate
a third party's intellectual property rights such as copyright, and
other rights. Do not copy or move music data saved in the FOMA
terminal or on a microSD card to other media, such as a PC.
• DOCOMO assumes no responsibility for handling CCCD (copy
controlled CD) materials, or cases you cannot convert music data
to SD-Audio data.
• Precautions for Using or Handling a microSD Card→P317
Music&Video Channel
Music&Video Channel ・・・・・・・・・・・・・・・・・・・・・・・・・・・・・・・ 254
Setting Programs ・・・・・・・・・・・・・・・・・・・・・・・・・・・・・・・・・・・ 254
Playing Programs ・・・・・・・・・・・・・・・・・・・・・・・・・・・・・・・・・・・ 256
Operating the Music&Video Channel from Data Box
・・・・・・・・・・・・・・・・・・・・・・・・・・・・・・・・・・・・・・・・・・・・・・・・・・・・・・ 259
Music Player
Playing Music ・・・・・・・・・・・・・・・・・・・・・・・・・・・・・・・・・・・・・・・ 260
Music Player ・・・・・・・・・・・・・・・・・・・・・・・・・・・・・・・・・・・・・・・・ 261
Saving Music Data ・・・・・・・・・・・・・・・・・・・・・・・・・・・・・・・・・・ 261
Playing Music Data ・・・・・・・・・・・・・・・・・・ MUSIC player 263
Using Playlist ・・・・・・・・・・・・・・・・・・・・・・・・・・・・・・・・・・・・・・・ 267
Managing Music Data ・・・・・・・・・・・・・・・・・・・・・・・・・・・・・・・ 270
Using Other Functions while Listening to Music
・・・・・・・・・・・・・・・・・・・・・・・・・・・・・・・・・・Play in background 272
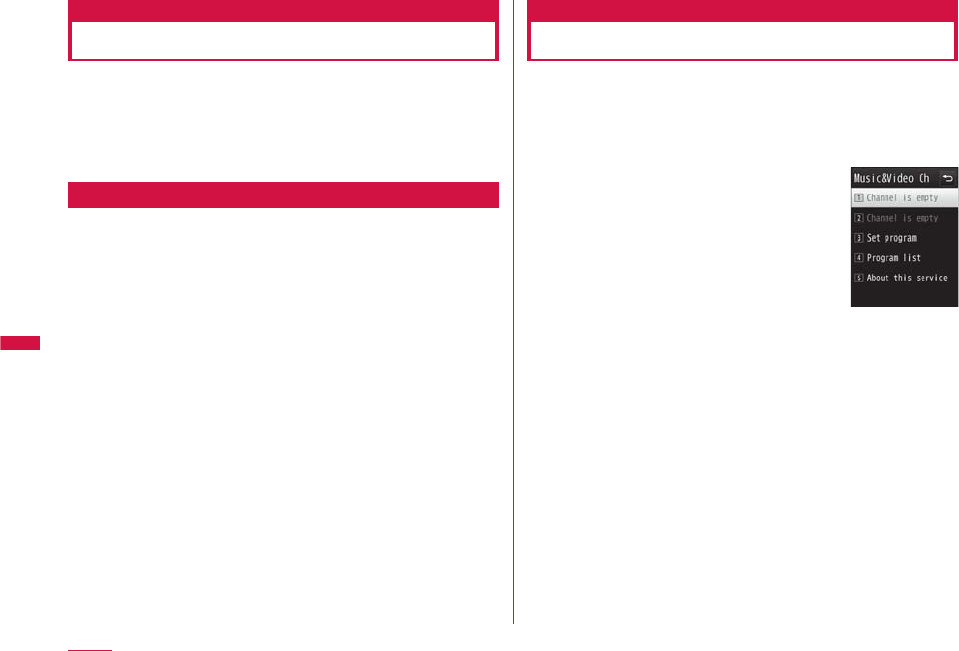
254
Music
Music&Video Channel
Music&Video Channel is a service that automatically
downloads set music programs of up to approximately 1 hour
at night. Also, you can enjoy high-definition moving picture
programs of up to 30 minutes. The programs are updated
regularly. You can enjoy the programs at any time, such as
while commuting.
Before Using Music&Video Channel
• Music&Video Channel is a fee-based service requiring a separate
subscription. (The i-mode and Pake-hodai, Pake-hodai full, or Pake-
hodai double contracts are required for the subscription. The usage
fee may reach the upper limit if using Pake-hodai double, even if you
use the service only several times.)
• In addition to the usage fee for the Music&Video Channel, some
programs may require additional information fees.
• After subscribing to the Music&Video Channel, if you insert the
UIM into a FOMA terminal that does not support the Music&Video
Channel, the service becomes unavailable. However, service
charges still apply unless you cancel the Music&Video Channel
subscription.
• You cannot set or download programs while using the international
roaming service
*
. If you go overseas, deactivate the program
download before leaving Japan. When you come back to Japan,
activate the program download.
* Packet communication charges apply if setting or downloading
programs during international roaming.
• You can use mail or access an i-mode site while listening to a
Music&Video Channel program (Background playback).
Multitask Combinations→P445
• For details about Music&Video Channel, see "Mobile Phone User's
Guide [i-mode] FOMA version".
Setting Programs
Set programs are automatically downloaded at night.
• Up to 2 programs can be set.
• You need to register a site to My Menu that provides Music&Video
Channel programs.→P187
M
▶ "MUSIC" ▶ "Music&Video Ch"
Music&Video
Channel screen
"Set program"
• No programs are set by default.
After programs are set, the program titles appear.
Follow on-screen instructions to set programs
• For details, see "Mobile Phone User's Guide [i-mode] FOMA
version".
255
Music
Continue on the next page
Note
• In order to set programs with another UIM inserted, start with
confirming the program setting information from Program setting. If
checking the program setting information the programs that have
not been moved from "Distributed program" folder may be deleted.
• This is a fee-based service requiring a separate subscription. If you
have not subscribed to the service, a message indicating that you
have not subscribed to the Music&Video Channel appears.
• Selecting "Program list" on the Music&Video Channel screen
displays the list of all programs offered for the Music&Video
Channel.
Selecting "About this service" displays how to use the service and
any special cautions. Also, you can subscribe to the service from
here.
Viewing or Canceling Program Setting
Music&Video Channel screen (P254) ▶
"Set program"
Follow on-screen instructions
• For details, see "Mobile Phone User's Guide [i-mode] FOMA
version".
Note
• Canceling programs does not remove the My Menu registration.
After Specifying Programs
• appears on the Stand-by display 12 hours prior to the program
download.
• Programs are automatically downloaded at the designated
download time.
• Programs are downloaded automatically at night. appears on
the Stand-by display if the download has been successful, and
appears on the Stand-by display if the download has failed. Once
the Music&Video Channel screen is displayed, the icon disappears.
Note
• If the download is interrupted because the FOMA terminal is
out of service area or the communication is disconnected, the
download resumes automatically after 3 minutes. The attempts
will be made up to 5 times.
• If the programs are not downloaded at the download time
because the FOMA terminal is not turned on, the FOMA terminal
is out of service area, or the signal is weak, the programs will be
downloaded again at the same time on the following night.
• You cannot download the program except when the battery
is indicated as (When you attempt to download the
program, a message will appear to notify that you cannot start
downloading because of lower battery level).
• It may take a while to download programs. Make sure that the
battery level is sufficient and signal reception is strong when
downloading.
• Programs cannot be automatically downloaded in the
following cases. In each case, set the programs again on the
Music&Video Channel screen.
- If a different UIM is inserted after programs were set
- If the UIM that programs were set with is inserted in another
Music&Video Channel compatible FOMA terminal
- If the memory in the FOMA terminal is cleared
• If the download is interrupted because the signal is weak etc.,
the programs will not be automatically downloaded again until
next time. Download programs manually.
• Downloaded programs are temporarily stored in the "Distributed
program" folder in "Music&Video Ch" of "Data Box". If the channel
to which the downloaded programs belong is updated, the
programs stored in the "Distributed program" folder are deleted
and the programs can no longer be playable. The programs you
want to keep should be moved to another folder.→P259
However, some programs may not be moved.
• If you set new programs, cancel a program, or cancel the
subscription to My Menu, Music&Video Channel, or i-mode, the
programs that have not been moved from "Distributed program"
folder are deleted.
• The ring tone does not sound and the terminal does not
vibrate when the program download starts or completes. The
illumination does not light/blink either.
256
Music
Downloading Programs Manually
If the download fails, download remaining programs manually.
Music&Video Channel screen (P254) ▶ Select
a program ▶ "Yes"
• appears to a program that was failed in downloading.
Note
• If you operate on the Music&Video Channel program list in Data
Box, move the cursor to a program that failed in downloading ▶
C
[Play] ▶ select "Yes".
• Even if the download was interrupted, the program can be
played up to the chapter downloaded before the interruption.
• Programs exceeding the playback count, playback period, or
playback limit cannot be resumed downloading.
• Depending on the time, manual download may not be possible.
Playing Programs
Music&Video Channel screen (P254) ▶ Select
a program
Music&Video
Channel player
screen
a
Chapter title/artist name
b
DOLBY setting
Not displayed for moving picture programs.
c
Program title
d
Playback progress bar/elapsed time/total time
Display the playback elapsed time using a bar.
e
Currently-playing chapter number/Total chapter numbers
f
Repeat setting
OFF
ON
g
Chapter image/moving picture or program image
h
Volume
i
Control key
Display available navigation keys.
b
Key operations on the Music&Video Channel player screen
Operation Description
C
[Pause/Play] Pause/play
C
(1+ seconds) Go to the beginning of the current program
and pause
H
,
F
/
E
Adjust the volume
J
Play from the beginning of the current chapter
or play previous/next chapter
J
(Hold down) Rewind/fast forward while being held down
g
,
#
Switch the Repeat setting
0
Switch the DOLBY setting*
7
/
9
If multiple images are saved, display the
previous/next image*
8
Show/hide the chapter/program image* (If
both chapter image and program image are
saved, those images can be switched.)
I
[List] Display the Chapter list
T
[Web to] Access sites
257
Music
Continue on the next page
Operation Description
P
Quit the Music&Video Channel player
* Not available for moving picture programs.
Note
• Playback is paused in the following cases. The playback will
resume automatically after the operation completes.
- When a voice or videophone call arrives
- When i-mode mail or SMS is received (If "Receiving display" is
set to "Alarm mode")
- When an alarm sounds
• A program with playback restrictions cannot be played after the
playback count, playback limit, or playback period is exceeded.
You can check the playback count, playback limit, or playback
period in the Program information.
•
Some programs cannot be played other than in a set period time.
Broadcasting time follows the FOMA terminal time set with auto
time adjustment.
• When you attempt to play a partially downloaded program, a
confirmation asking whether to download the remaining data
appears. Select "Yes" to start downloading. Select "Play" to play
up to the downloaded chapters.
•
When you play the program data overseas, the actual playback
limit expiration date may be earlier or later than the displayed date.
Music&Video Channel Screen Sub Menu
Music&Video Channel screen (P254) ▶ Move
to the cursor to a program ▶
M
[Menu] ▶
Perform the following operations
[Move program]
Move the selected program from the "Distributed program" folder.
→P259
[Delete]
Delete the selected program.
[Program info.]
Display information about the selected program.
[Chapter list]
Display chapter list of the selected program.→P258
[Connect to URL]
Access a site if the selected program contains a URL.
Note
<Delete>
• Deleting programs does not cancel the program setting.
Programs are automatically updated until you access the
Music&Video Channel site and cancel the setting.
Music&Video Channel Player Screen Sub Menu
Music&Video Channel screen (P256) ▶
M
[Menu] ▶ Perform the following operations
[BGM]*
1
Play in background.→P272
[Expand]*
2
Display an enlarged moving picture.
[Chapter list]
Display a chapter list.
[Chapter info.]
Display information about the chapter in playback.
[Program info.]
Display information about the program in playback.
Continued on next page
258
Music
[Set repeat]
ON : Play program in playback repeatedly.
OFF : The program will not be repeated.
[DOLBY PRESETS]*
1
Set sound quality for program playback. (Dolby Mobile support)
• If "Original" is selected, you can set ON/OFF for every 3 items.
However, settings on "Sound Space for Headphones" only functions
with stereo earphone output but not function with the FOMA
terminal speaker.
[Chapter Image]*
1
Display the chapter image/program image. →P267
[Connect to URL]
Access a site if the program in playback contains a URL.
*1 Appear only for music programs.
*2 Appear only for moving picture programs.
Displaying Chapter List of Program
Select and play a chapter, or display the information.
Music&Video Channel player screen (P256) ▶
I
[List]
• appears for the chapter in playback.
•
C
[Play]: Play the selected chapter.
•
I
[Info.]: Display information about the selected chapter.
Program icons on the Music&Video Channel screen
The following icons which indicate a state of program download
or the category are displayed at the Music&Video Channel screen
or a Program list screen.
Icon Description
/ Downloaded program/Partially downloaded program
• " " is added for a played program.
• " " is added for a program than can be played only
at the set playback start time.
• "" is added for a program with playback
count/playback limit/playback period or operation
restriction at playback.
/Downloaded chapter/Chapter which failed to
download
Program which failed to update
Program to be downloaded (Not downloaded)
Downloading a program
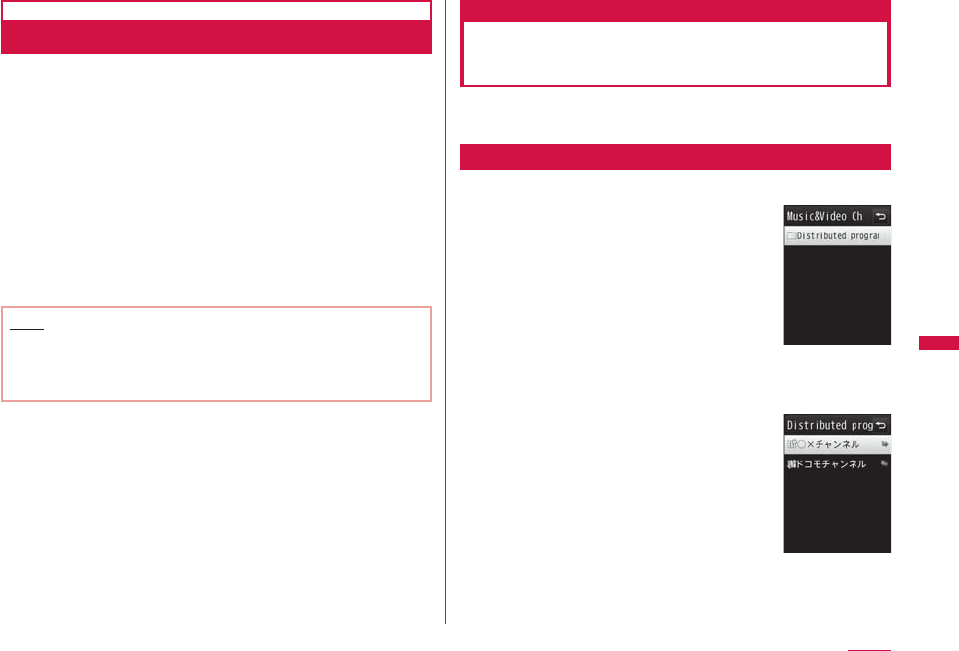
259
Music
Continue on the next page
Moving to Save Program Folder
Downloaded programs can be moved from "Distributed
program" folder to another folder so that they will not
be overwritten. Moved programs can be played from
"Music&Video Ch" of "Data Box".
• To move a program, create a destination folder in the "Music&Video
Ch" folder beforehand.→P260
• Some programs cannot be moved.
Music&Video Channel screen (P254) ▶ Move
to the cursor to a program ▶
M
[Menu] ▶
"Move program"
Select a folder ▶
I
[Move]
• Select a folder other than the "Distributed program" folder.
Note
• Downloaded programs cannot be copied.
• Partially downloaded programs cannot be moved.
• Programs can be moved only within the FOMA terminal. They
cannot be moved to a microSD card.
Operating the Music&Video
Channel from Data Box
You can play or move the distributed programs from
"Music&Video Ch" of "Data Box", or edit the program titles.
Playing a Program from Data Box
M
▶ "Data Box" ▶ "Music&Video Ch"
•
I
[New]: Create a new folder.
Folder list screen
Move the cursor to a folder ▶
C
[Open]
Program list
screen
Move the cursor to a program ▶
C
[Play]
260
Music
Folder List Screen Sub Menu
Folder list screen (P259) ▶ Move the cursor to
a folder ▶
M
[Menu] ▶ Perform the following
operations
[New folder]
Create a new folder.
• You cannot create a sub folder in a user-defined folder.
[Rename]
Change the selected folder name.
[Delete]
Delete the selected folder.
[Memory info.]
Handset memory : Display the status of storage space, etc. in
"Data Box".
External memory : Display the status of storage space, etc. of the
microSD card.
Note
• The "Distributed program" folder cannot be renamed or deleted.
Program List Screen Sub Menu
Program list screen (P259) ▶ Move the cursor
to a program ▶
M
[Menu] ▶ Perform the
following operations
•
g
[Delete]: Delete the selected program.
[Play]
Play the selected program.
[Move program]
Move the selected program from the "Distributed program" folder.
[Rename]
Change the title of the selected program.
[Delete]
This item : Delete a selected file.
Selected item : Select and delete files.
▶ Mark files to delete ▶
I
[Done] ▶ "Yes"
• Press
M
[SelAll/ClrAll] to select/clear all.
All items : Delete all files in a folder.
▶ "Yes" ▶ Enter the Terminal security code
[Program info.]
Display information about the selected program.
[Chapter list]
Open the chapter list.→P258
[New folder]
This option is not available.
Playing Music
You can play music with the FOMA terminal in one of the
following 2 ways:
• Playing music with MUSIC player
Play Chaku-Uta Full
®
songs downloaded from a site, WMA files or
SD-Audio data saved to a microSD card using a PC.
• Playing as i-motion
Play audio-only i-motion downloaded using i-mode and saved in Data
Box.→P307
You can use mail or access an i-mode site while listening to
music (Play in background).→P272
261
Music
Continue on the next page
Music Player
b
Available Chaku-Uta Full
®
file format
File Format MP4
Bit rate 8 to 128kbps
Savable capacity (FOMA
terminal) Up to approx. 150MB
The number of playlists that
can be created Up to 10 songs
b
Available SD-Audio file format
File Format MPEG-2 AAC
Bit rate (stereo) 16 to 72kbps
The number of savable songs Up to 999 songs
The number of playlists that
can be created Up to 99 songs
b
Available WMA file format
File format WMA (Windows Media Audio 9
Standard, Windows Media Audio 10
Professional)
Bit rate 8 to 192kbps
The number of savable songs Up to 1,000 songs
Saving Music Data
Downloading a Chaku-Uta Full
®
Song
• Up to approximately 150MB of Chaku-Uta Full
®
songs of up to 5MB
each can be saved.
• Downloaded Chaku-Uta Full
®
song is saved in the "i-mode" folder in
"Music" of "Data Box" or a microSD card.
Access a site that provides Chaku-Uta Full
®
songs ▶ Select a Chaku-Uta Full
®
song to
download
After the download completes, a confirmation appears.
"Save" ▶ Select save location
Play : Play the downloaded Chaku-Uta Full
®
song.
File property : Display information about the downloaded
Chaku-Uta Full
®
song.
Back : Return to the web site without saving the
Chaku-Uta Full
®
song.
• In addition, select the destination when a microSD card is
inserted on the terminal.
262
Music
Saving WMA Files in microSD Card
The following items are required to play WMA files with the
FOMA terminal:
• L-03B terminal
• FOMA USB Cable with Charge Function 01/02 (optional)
• PC (Windows Vista, Windows XP Service Pack 2 and later
(Japanese versions))
• Windows Media Player 10/11
• microSD card
* For Windows Vista, use Windows Media Player 11.
Insert microSD card into the FOMA terminal
• How to insert a microSD card→P316
M
▶ "Settings" ▶ "Others" ▶ "USB mode
setting" ▶ "MTP mode"
Connect to a PC
• For details, refer to Step 2 and 3 in "Using the FOMA Terminal
as a microSD Card Reader/Writer" (P326).
Start Windows Media Player 10/11 and save
music data into a microSD card
• For operations of Windows Media Player 10/11, see Help for
Windows Media Player 10/11.
• After music data is saved, remove FOMA USB Cable with
Charge Function 01/02 from the FOMA terminal and PC.
Napsterapplication
You can use Napster
®
application to save music data.
• Napster
®
application is available for download from the following
web site (in Japanese only).
http://www.napster.jp/
• If you have any question on Napster
®
application, visit the
following web site (in Japanese only).
http://www.napster.jp/support/
Note
• L-03B may not display or play some WMA files saved by
another FOMA terminal into a microSD card.
• If a microSD card that WMA files are transferred to using
another FOMA terminal, a PC may not recognize it even in MTP
mode. In that case, it is recommended to delete "WM" folder
and "WM_SYSTEM" folder on a microSD card using PC, etc., or
format the microSD card with L-03B. Note that if you format
microSD card, all data including music data is deleted.
Saving SD-Audio Data in microSD Card
The following items are required to play SD-Audio data with
the FOMA terminal:
• L-03B terminal
• FOMA USB Cable with Charge Function 01/02 (optional)
• PC (Windows Vista, Windows XP, Windows 2000 (Japanese
versions))
• SD-Jukebox
• An audio CD that contains music you want to save
• microSD card
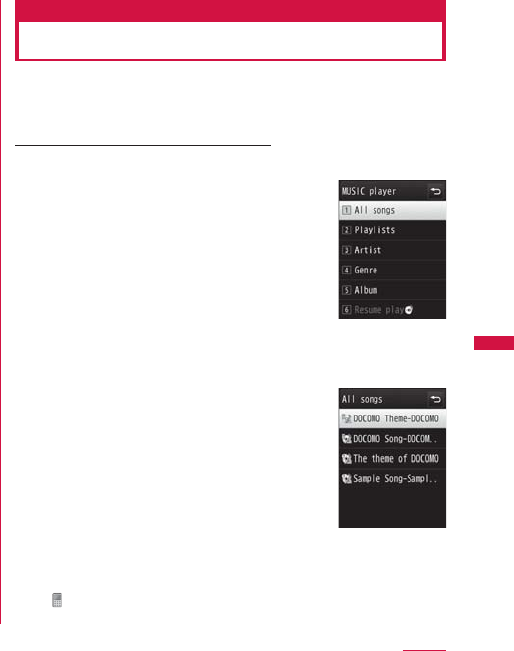
263
Music
Continue on the next page
b
SD-Jukebox
SD-Jukebox can be purchased from the following URL:
http://club.panasonic.co.jp/mall/sense/open/
(Japanese only)
SD-Jukebox works under Windows Vista, Windows XP, and
Windows 2000 (Japanese versions).
For details about the operating environment, visit the
following URL:
http://panasonic.jp/support/software/sdjb/
(Japanese only)
Insert L-03B CD-ROM (bundled with your FOMA
terminal) to a PC
Click "エンターテイメントツール (Entertainment
tools)"
Follow on-screen instructions to purchase "SD-Jukebox".
Install SD-Jukebox to a PC
For installing SD-Jukebox, see the instruction manual for
SD-Jukebox.
Insert microSD card into your FOMA terminal,
then connect to the PC
• How to insert a microSD card→P318
• Connecting to your PC→P326
Start SD-Jukebox to save music data to
microSD card
• On how to operate SD-Jukebox, see Help for SD-Jukebox.
• After music data is saved, remove the FOMA USB Cable with
Charge Function 01/02 from the FOMA terminal and PC.
MUSIC player
Playing Music Data
You can continuously play all songs saved in the FOMA
terminal and the microSD card, or only play songs specified
by artist name, genre, or album title.
Example: To play music in "All songs"
M
▶ "MUSIC" ▶ "MUSIC player"
Music screen
"All songs"
Playlists : Display, create, or play a
playlist.→P267
Artist : Sort and display music data
by artist.
Genre : Sort and display music data
by genre.
Album : Sort and display music data
by album.
Resume play : Play last played song/
playlist. (if a song is currently
played, "Now playing" is
displayed and select to
display the play screen.)
• Music data saved in the FOMA terminal
Music data list
screen (song list)
Continued on next page
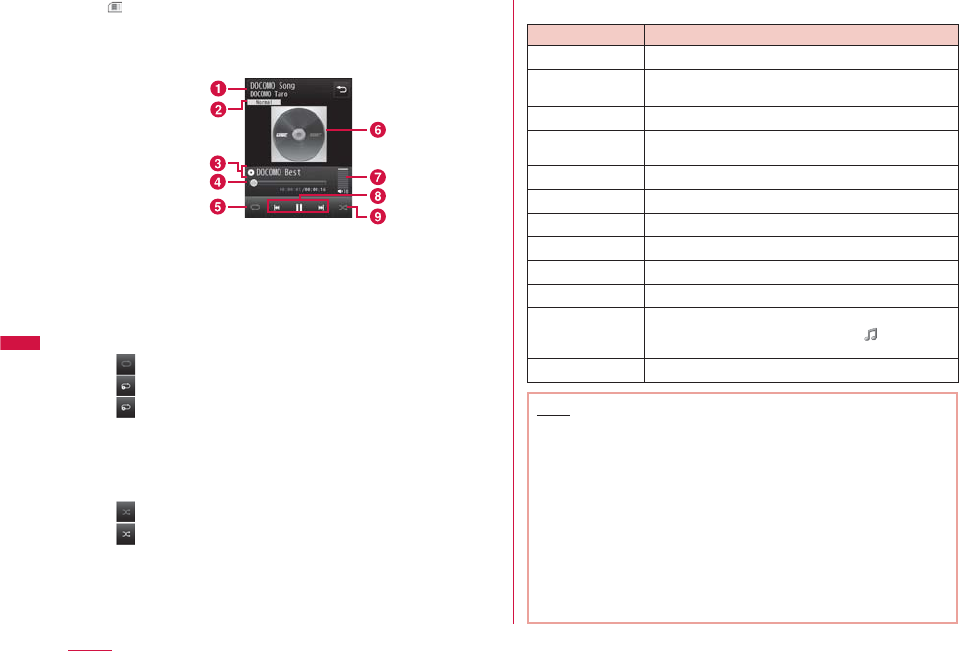
264
Music
• : Music data saved in a microSD card
Move the cursor to a music data ▶
C
[Play]
Play the selected music data in the displayed order in the music
data list.
MUSIC player
screen
a
Song title, artist name
b
DOLBY setting
c
Album name
d
Elapsed time/playback progress bar/total time
Display the playback elapsed time using a bar.
e
Repeat setting
None
Current song
Play all
f
Jacket image/lyrics
g
Volume
h
Control key
Display available navigation keys.
i
Shuffle
Shuffle Off
Shuffle On
b
Key operations on the MUSIC player screen
Operation Description
C
[Pause/Play] Pause/play
C
(1+ seconds) Go to the beginning of the current song and
pause
H
,
F
/
E
Adjust the volume
J
Play from the beginning of the current song or
play the previous/next song
J
(Hold down) Rewind/fast forward while being held down
T
,
*
Switch the Shuffle setting
g
,
#
Switch the Repeat setting
0
Switch the DOLBY setting
7
/
9
Display the previous/next image
8
Show/hide jacket image/lyrics
I
[List] Display the Music data list screen
While the list screen is displayed, appears to
the right of the song title in playback.
P
Quit MUSIC player
Note
• Playback is paused in the following cases. The playback will
resume automatically after the operation completes.
- When a voice or videophone call arrives
- When i-mode mail or SMS is received (If "Receiving display" is
set to "Alarm mode")
- When an alarm sounds
• Sound effects such as the key tone do not sound during music
data playback.
• Sorting conditions for artists, genre, and album is in accordance
with the detailed information about the music data. "Unknown" is
displayed, however, in the "Genre" field because SD-Audio does
not support "Genre" information.
• When you play the music data overseas, the actual playback limit
expiration date may be earlier or later than the displayed date.
265
Music
Continue on the next page
Music Data List Screen Sub Menu
Music data list screen (P263) ▶ Move the
cursor to a music data ▶
M
[Menu] ▶ Perform
the following operations
•
C
[Play]: Play the selected music data.
•
I
[Playlist]: Add the selected music data to a playlist.→P270
[Play]
Play the selected music data.
[Add to playlist]
Add the selected music data to a playlist.→P270
[Multiple choice]
Select and play multiple music data. Operations during playback are
the same with for a playlist.→P268
▶ Mark music data to play ▶
I
[Play]
• Press
M
[Menu] to select "Play", "Add to playlist", "Sort", "Select all"
or "Clear all".
You can add marked music data to a playlist by selecting "Add to
playlist".
[Search]
*1
Specify "Title", "Artist", "Album", "Genre", or "Year"
*2
to search music
data.
▶ Select an item ▶ Enter the item ▶
I
[Search]
• All music data that match all specified conditions are displayed.
[Sort]
Set conditions and sort music data.
[File property]
View or edit information about the selected music data.
▶ Move the cursor to an item ▶
I
[Edit] ▶ Edit the item
• Some items are not editable.
• WMA file/SD-Audio data information is not editable.
*1 Music data in Artist/Genre/Album will not be displayed in the
Music data list screen.
*2 Cannot search in SD-Audio data by "Year".
MUSIC Player Screen Sub Menu
Music/SD-Audio player screen ▶
M
[Menu] ▶
Perform the following operations
[Go to MUSIC]
Display the Music screen while playing music data.→P263
[BGM]
Play music data in background.→P272
[List]
Display the Music data list screen.→P263
[File property]
View or edit information about the music data in playback.
▶ Move the cursor to an item ▶ I[Edit] ▶ Edit the item
• Some items are not editable.
• The properties of WMA files/SD-Audio data are not editable.
[Shuffle On/Shuffle Off]
Enable or disable shuffle play.
Continued on next page
266
Music
[Set repeat]
None : The program will not be repeated.
Current song : Play music data in playback repeatedly.
Play all : Play all music data on the Music data list screen
repeatedly.
[DOLBY PRESETS]
Set sound quality for program playback. (Dolby Mobile support)
• If "DOLBY CUSTOM" is selected, you can set ON/OFF for every 3
items. However, settings on "Sound Space for Headphones" only
functions with stereo earphone output but not function with the
FOMA terminal speaker.
[Jacket image]
*
Display the jacket image or save it to Data Box.→P267
[Lyric]
*
Display the lyrics or save it to Data Box.→P267
[Set as tone]
*
Set the music data in playback as a ring tone.→P266
[Connect to URL]
*
Access a site if the music data in playback contains a URL.
* Not available for WMA files/SD-Audio data.
Setting a Chaku-Uta Full
®
Song as a Ring
Tone
MUSIC player screen (P264) ▶
M
[Menu] ▶
"Set as tone"
Select a ring tone type
Select a range to set as the ring tone
• Depending on a Chaku-Uta Full
®
song, some items cannot be
selected.
[Full song ring tone]
Set the entire Chaku-Uta Full
®
song in playback as a ring tone.
[Point ring tone]
If the Chaku-Uta Full
®
song in playback has already a range specified,
this option is available.
[Free point ring tone]
Specify and set start and end points as a range for the ring tone.
▶ Use
J
to find a starting point ▶
M
[Start] ▶ Use
J
to find an
ending point ▶
M
[End]
Note
• If selecting "Alarm tone", further select an alarm to set. (Only
alarms set to "ON" in advance can be selected.)
• Some Chaku-Uta Full
®
songs cannot be set as a ring tone.
• Music data on a microSD card cannot be set as a ring tone.
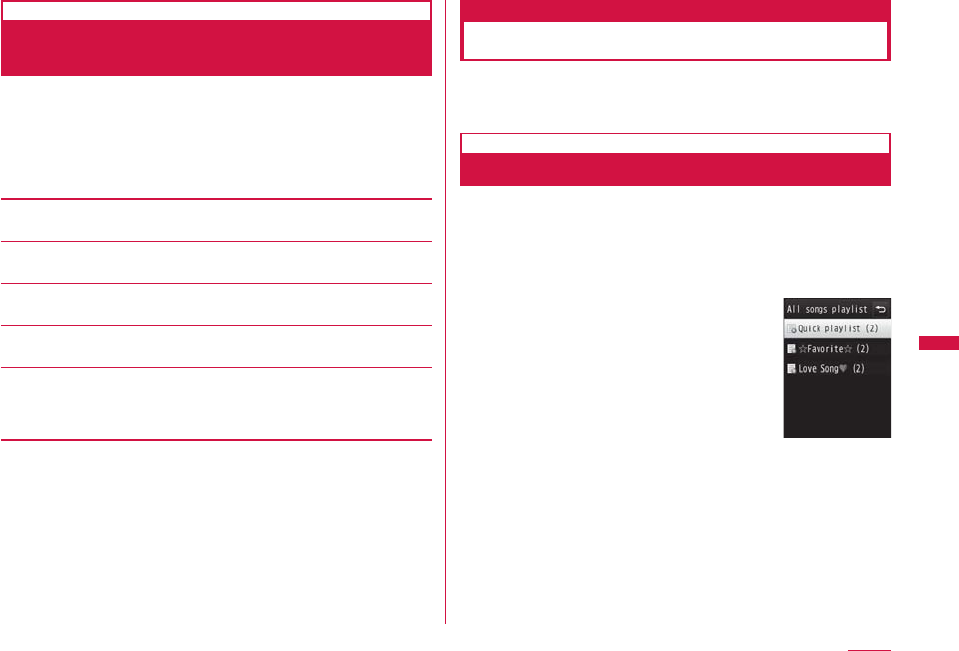
267
Music
Continue on the next page
Viewing Images or Lyrics Contained in a
Music Data
You can view and save jacket images, lyrics, chapter image
etc. contained in music data.
MUSIC player screen (P264) ▶
M
[Menu]
▶ "Jacket image"/"Lyric"/"Chapter image" ▶
Perform the following operations
[Next image]
View the next image/lyrics.
[Prev. image]
View the previous image/lyrics.
[Full view]
View an image/lyrics in full screen.
[Display On/Off]
Show/hide jacket image/chapter image or lyrics.
[Save in Databox]
*
Save the displayed image/lyrics to "i-mode" folder in "My picture" of
"Data Box".
• Not available for WMA files/SD-Audio data.
* Do not appear for "Chapter image".
Using Playlist
You can specify the order of music data to play in a playlist.
You can play any songs in the order of your choice from all
songs saved in the FOMA terminal and on the microSD card.
Creating a Playlist
Up to 10 of All songs playlist and up to 99 of SD-Audio
playlist can be saved. Up to 99 music data for each playlist
can be saved.
M
▶ "MUSIC" ▶ "MUSIC player" ▶ "Playlists"
▶ Select an item
All songs playlist : Display playlists created
on the FOMA terminal.
WMA playlist : Display WMA files
playlists.
• Playlist transferred from
PC. This playlist cannot
be created or edited on
the FOMA terminal.
SD-Audio playlist : Display SD-Audio data
playlists. Playlist list
screen
I
[New] ▶ Enter a playlist name
• Up to 30 full-pitch or half-pitch characters can be entered.
Select a playlist ▶
I
[Add] ▶ Select a folder
Continued on next page
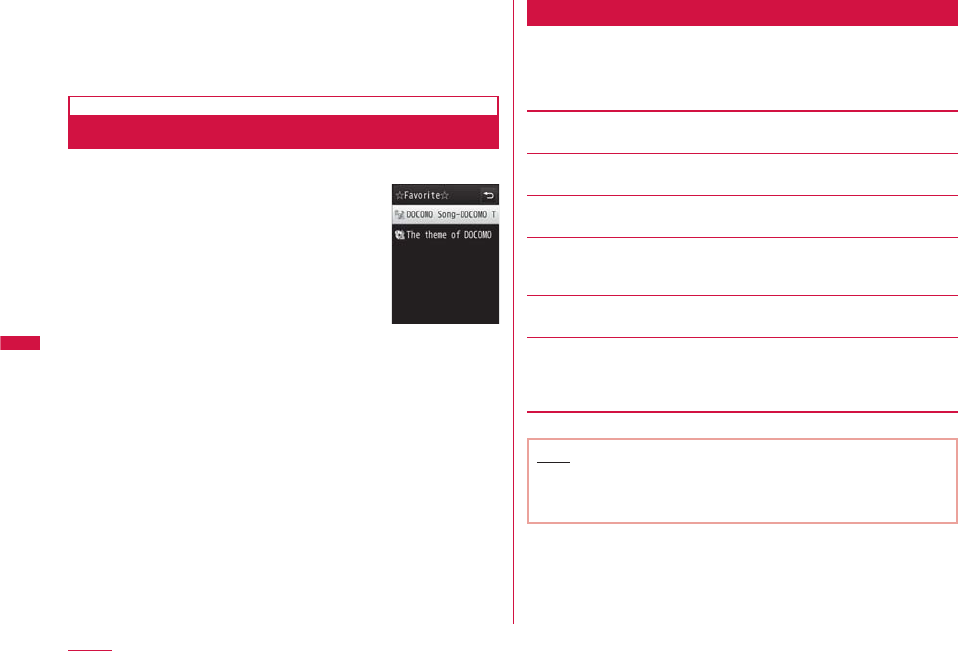
268
Music
Mark music data to save to the playlist ▶
I
[Done]
• Press
M
[Menu] to select "Sort", "File property", "Select all", or
"Clear all".
Playing a Playlist
Playlist list screen (P267) ▶ Select a playlist
Playlist music
data list screen
Move the cursor to a music data ▶
C
[Play]
Play the selected music data in the order of displayed in the
music data list.
Playlist List Screen Sub Menu
Playlist list screen (P267) ▶ Move the cursor
to a playlist ▶
M
[Menu] ▶ Perform the
following operations
[Play]
Play the selected playlist.
[New playlist]
Create a playlist.→P267
[Rename]
Change the playlist name.
[Copy playlist]
*
Copy the selected playlist and create a new playlist.
▶ "Yes" ▶ Enter the name of a new playlist
[Delete playlist]
Delete the selected playlist.
[Multiple choice]
Select and delete playlists.
▶ Mark a playlist to delete ▶
I
[Delete] ▶ "Yes"
• Press
M
[Menu] to select "Delete", "Select all", or "Clear all".
* Not available for SD-Audio playlist.
Note
• WMA playlist list screen contains no sub menu items.
<Rename/Delete playlist>
• These options are unavailable for "Quick playlist".

269
Music
Continue on the next page
Playlist Music Data List Screen Sub Menu
Playlist music data list screen (P268) ▶ Move
the cursor to a music data ▶
M
[Menu] ▶
Perform the following operations
•
I
[Add]: Add the music data to the displayed playlist.
[Play]
Play the selected music data.
[Add songs]
*1
Add music data to the displayed playlist.
Select a folder ▶ Mark music data to add ▶
I
[Done]
• Press
M
[Menu] to select "Sort", "File property", "Select all", or "Clear
all".
[Multiple choice]
Select and play multiple music data. Operations during playback are
the same with for a playlist.
▶ Mark music data to play ▶
I
[Play]
• Press
M
[Menu] to select "Play", "Delete from list"
*1
, "Sort", "Select
all" or "Clear all".
[Move]
*1
Change the order of the selected music data.
[Delete from list]
*1
Delete the selected music data from the playlist.
[Search]
Specify "Title", "Artist", "Album", "Genre", or "Year"
*2
to search music
data.
▶ Move the cursor to an item ▶ Enter the item ▶
I
[Search]
• Music data that match all specified conditions are displayed.
• On Search result screen, press
M
[Menu] to select "Play", "Add
to playlist"
*1
, "Multiple choice", "Save"
*3
, "Sort" or "File property".
Selecting "Save" deletes music data that were not found from the
playlist.
[Sort]
Sort music data by the saved information.
[File property]
View or edit information about the selected music data.
▶ Move the cursor to an item ▶
I
[Edit] ▶ Edit the item
• Some items are not editable.
• The properties of WMA files/SD-Audio data are not editable.
*1 Not available for WMA playlist.
*2 Cannot search in SD-Audio data by "Year".
*3 Do not appear for WMA playlist/SD-Audio playlist.

270
Music
Adding Music Data to a Playlist
M
▶ "MUSIC" ▶ "MUSIC player" ▶ "All songs"
Move the cursor to a music data to save ▶
I
[Playlist] ▶ Select a playlist
The music data is added to the selected playlist.
•
I
[New]: Create a new playlist with the selected music data.
b
To save multiple music data
Press
M
[Menu] ▶ "Multiple choice" ▶ mark music
data to save ▶
M
[Menu] ▶ "Add to playlist" ▶ select
a playlist.
Saving Music Data to Quick Playlist
For the music data you often listen to, you can save them to
"Quick playlist" by easy steps.
• To play the saved music data, select "Quick playlist" on the Playlist
list screen.
Music data list screen (P263) ▶ Move the
cursor to a music data to save ▶ A(for 1+
seconds)
• In Turn View Style mode, touch a music data to save for 1+
seconds.
Managing Music Data
Music data are saved in the "Music" of "Data Box".
Delete or move a Chaku-Uta Full
®
songs from Data Box.
• WMA files cannot be deleted or edited on the FOMA terminal. Use
PC for the operations.
• SD-Audio data cannot be deleted using the FOMA terminal. Use
SD-Jukebox to delete it.
M
▶ "Data Box" ▶ "Music"
Move the cursor to "i-mode"/"Movablecontents"/
a user-defined folder ▶ C[Open] ▶ Move the
cursor to a Chaku-Uta Full
®
song ▶ M[Menu]
▶ Perform the following operations
•
T
[Switch]: Switch between List view and Grid view.
•
g
[Delete]: Delete the selected Chaku-Uta Full
®
song.
• If "WMA" or "SD-Audio" folder is selected, the operation is the
same as for music data playback.→P263
[Files]
Play : Play the selected Chaku-Uta Full
®
song.
Rename : Change the selected Chaku-Uta Full
®
song name.
Reset name : Reset the display name of the selected file to
"Title" - "Artist".
File property : View or edit information about the selected
Chaku-Uta Full
®
song.
▶ Move the cursor to an item ▶
I
[Edit] ▶ Edit
the item
• Some items are not editable.
• Move the cursor to the edited item and press
M
[Init.] ▶ "Yes" to undo the edit.
Jacket image : Save images contained in a Chaku-Uta Full
®
song.
→P267
Lyric : Save lyrics contained in a Chaku-Uta Full
®
song.
→P267
271
Music
Continue on the next page
[Delete]
One : Delete a selected Chaku-Uta Full
®
song.
Selected : Select and delete Chaku-Uta Full
®
songs.
▶ Mark Chaku-Uta Full
®
songs to delete ▶
I
[Done]
▶ "Yes"
• Press
M
[SelAll/ClrAll] to select/clear all.
All : Delete all Chaku-Uta Full
®
songs in a folder.
▶ I[Done] ▶ "Yes" ▶ Enter the Terminal security
code
• Press
M
[SelAll/ClrAll] to select/clear all.
[Move]
One : Move a selected Chaku-Uta Full
®
song.
▶ Select a destination folder
Selected : Select and move Chaku-Uta Full
®
songs.
▶ Select a destination folder ▶ Mark Chaku-Uta Full
®
songs to move ▶
I
[Done]
• Press
M
[SelAll/ClrAll] to select/clear all.
All : Move all Chaku-Uta Full
®
songs in a folder.
▶ Select a destination folder ▶
I
[Done] ▶ Enter the
Terminal security code
• Press
M
[SelAll/ClrAll] to select/clear all.
[Copy]
This option is not available.
[Set as tone]
Set the selected Chaku-Uta Full
®
song as a ring tone.→P266
[Sort]
Set conditions and sort Chaku-Uta Full
®
songs.
[Memory info.]
Handset memory : Display the status of storage space, etc. in
"Data Box".
External memory : Display the status of storage space, etc. of the
microSD card.
[New folder]
Create a new folder.
[List view/Grid view]
Switch between List view and Grid view.
Note
• If the music data saved in a playlist is deleted or moved
between the FOMA terminal and a microSD card, the music
data is deleted from the playlist.
• Sub menu available when a folder is selected is the same as
"My Picture Screen Sub Menu" (P297).
<New folder>
• You cannot create a sub folder in a user-defined folder. (Up
to 2 levels of folder hierarchy can be created only in "Movable
contents" folder.)
Icons for Chaku-Uta Full
®
songs in "Data Box"
Icon Description
/ Playback count is limited (Playable)/reached
the playback count limit (Not playable)
/ Not expired (Playable)/expired (Not playable)
Files on the microSD card
272
Music
Play in background
Using Other Functions while
Listening to Music
During a music playback,
M
[Menu] ▶ "BGM"
Display the Stand-by
display during music
playback.
or appears at the
top of the screen and
music information such as
song/artist names appears
on the Stand-by display.
Icon indicating
BGM playback
Information such
as song title,
artist name
Note
• During the background playback, press
F
/
E
to adjust the
volume.
• To return to the MUSIC player screen during background
playback, press
N
▶ (MUSIC player).
• To stop the background playback, press
P
▶ "Yes".
• During background playback, i-motion set for the Stand-by
display will not be played. The default Stand-by display is
displayed instead.
• While music data on the microSD card is played in background,
the other functions may not be able to access the microSD
card. In this case, stop the background playback.

273
i-αppli
i-αppli ・・・・・・・・・・・・・・・・・・・・・・・・・・・・・・・・・・・・・・・・・・・・・・・ 274
Downloading i-αppli from Sites ・・・・・・・・・・・・・・・・・・・・・ 274
Starting i-αppli ・・・・・・・・・・・・・・・・・・・・・・・・・・・・・・・・・・・・・・ 275
Starting i-αppli Automatically ・・・・・・・・・・・・・・・・・・・・・・ 284
Starting i-αppli from a Site or Mail ・・・ Set i-αppli To 285
Setting i-αppli Stand-by Display
・・・・・・・・・・・・・・・・・・・・・・・・・・・・・ i-αppli Stand-by display 285
Viewing Various Information ・・・・・・・・・・・・・i-αppli info 286
Deleting i-αppli ・・・・・・・・・・・・・・・・・・・・・・・・・・・・・・・・・・・・・ 287
Using Various i-αppli Functions ・・・・・・・・・・・・・・・・・・・・・ 287
274
i-αppli
i-αppli
"i-αppli" is software for i-mode compatible mobile phones.
Downloading various software from i-mode sites allows
updating stock price or weather information automatically,
playing games without connecting to a network, or using the
FOMA terminal more conveniently.
• Packet communication charges apply.
• When using overseas, packet communication charges differ from
domestic charges.→P408
• For details about i-αppli, see "Mobile Phone User's Guide [i-mode]
FOMA version".
Downloading i-αppli from Sites
You can download software from a site and save it to the
FOMA terminal.
• Up to 1MB of software can be downloaded.
• Up to100 downloaded software can be saved. However, the savable
number may be reduced by the software data size.
• i-αppli does not support touch operation.
While viewing a site ▶ Select a software ▶ "Yes"
•
I
[Cancel]: Cancel downloading.
b
When "Display SW info" is set to "Display"
Software information is displayed. Press
C
[OK] ▶
"Yes" to download the software.
Download complete ▶ "Yes"
The downloaded software starts.
• Depending on the software, after the software is downloaded,
a screen to set operating condition may be displayed. The
settings can be changed later from "Software set".→P277
Note
• During download, a confirmation may appear notifying you
that the software will use the terminal data (stored data
and serial number of the terminal/UIM). Select "Yes" to start
downloading. Press
I
[Detail] to check the details of the
terminal data to be used. In this case, the terminal data is sent
to the IP (Information provider) via the Internet, and it could
be intercepted by a third party. However, this action does not
reveal your phone number, postal address, age, or gender to the
IP or others.
• If you attempt to re-download software that has already been
downloaded with a different UIM, a confirmation asking whether
to overwrite the downloaded software appears. Select "Yes" to
overwrite.
• If the maximum number of software which can be saved is
reached or if there is not enough memory space, a confirmation
for deletion of other i-αppli appears.
If there is not enough memory space, you can select i-αppli
to delete, checking the required memory space to store a new
application.
To delete i-αppli, select "Yes" ▶ mark software to delete ▶
I
[Delete] ▶ "Yes" to delete the marked software and to start
downloading.
• For Osaifu-Keitai compatible i-αppli, some i-αppli may not be
downloaded depending on the IC card data capacity even if
software storage space is available. Follow the confirmation
screen and delete the software displayed on the screen to start
download again. (Some software may not be the deletion target
depending on the type of software to download.) Some software
deletes the software itself after you start the software and
delete data in the IC card.

275
i-αppli
Continue on the next page
• If the software download fails due to weak signal reception, the
software may be saved partly. If you download again or select
the partly saved i-αppli on the Software list, the rest of the file
will be downloaded together.
• Even if the software download fails due to weak signal reception
after old software was deleted to increase the available space
on the FOMA terminal, the old software cannot be restored.
• Some software that starts immediately after being downloaded
cannot be saved.
Downloading a Mail-Connected i-αppli
Note the followings if you download a mail-connected i-αppli.
• If you download a mail-connected i-αppli, a folder for the mail-
connected i-αppli is automatically created in Inbox and Outbox.
A 0created folder takes the downloaded mail-connected i-αppli
name and it cannot be changed.
• Up to 17 (100 including all other i-αppli) mail-connected i-αppli
can be saved.
• If you attempt to download a mail-connected i-αppli, which will use
an existing folder for a mail-connected i-αppli saved in the FOMA
terminal, the attempt will be denied.
• If only a folder for a mail-connected i-αppli is left in the FOMA
terminal, and you attempt to download a mail-connected i-αppli
again which uses the same folder, the folder can be used. If the
folder is not used, you can delete it and create a new folder. A
mail-connected i-αppli cannot be downloaded if you do not create
a folder for it.
• The folder for the compatible mail-connected i-αppli cannot be
deleted with the mail-connected i-αppli left in the FOMA terminal.
The folder can be deleted when a mail-connected i-αppli is not in
the folder. In this case, folders created in both Inbox and Outbox are
deleted at a time.
• When you delete an mail-connected i-αppli, you can select whether
to delete the automatically created folder at once. However, if
protected mails are in the folder, the folder cannot be deleted.
Display SW info
Viewing i-αppli Information at Download Time
Set whether to display software information when
downloading the software.
M
▶ "i-αppli" ▶ "i-αppli settings" ▶ "Display
SW info" ▶ "Display"/"Not display"
Starting i-αppli
Stand-by display ▶
I
(for 1+ seconds)
•
I
[Switch]: Switch the view of the
Software list screen.
•
g
[
▲
]/
T
[
▼
]: Scroll to the screen to
previous/next page.
Software list
screen
b
Icons on the Software list screen
Icon Description
Standard i-αppli
i-α ppliDX
Auto start set i-αppli
i-αppli downloaded via SSL communication
i-αppli set to Stand-by display
Osaifu-Keitai compatible i-αppli
Continued on next page
276
i-αppli
Icon Description
The iC transfer service is used yet i-αppli is
not downloaded→P290
Partly saved i-αppli
Select a software
• If "Network set" of "Software set" is set to "Confirm every
session", a confirmation whether to allow the communication
appears. Select "Yes"/"No".
b
To exit an i-αppli
Press
P
▶ "Yes".
Starting software from other software
Some software can start a specified i-αppli without returning to
the Software list screen.
• If the software to be started is not saved in the FOMA terminal,
you need to download it.
• If the software to be started is not specified, follow on-screen
instructions to select a software.
If a security error occurs
If you attempt to perform operations that are not permitted for
the software, a security error is indicated and the error content is
logged in "Security error history".→P286
If a problem occurs with software
If a problem occurs with the software, you can check the
contents using the Trace info.→P286
To i-αppli creators
If software does not work as expected at creation process, you
may use the Trace info for your reference.
Note
• Some software performs communication while running. You can
change the settings in "Network set" of "Software set" not to
automatically perform communication.→P277
• If an incoming voice or videophone call arrives when the
software is running, you can answer the call pausing the
software. After the call is terminated, the previous screen
returns.
• Even when the software is running, you can receive mail or
MessageR/F. The software keeps running, and , , or ,
etc. appears at the top of the screen. To view the received mail
or MessageR/F, terminate the software.
• Images used by an i-αppli* or data you entered may be
automatically sent to the server via the Internet.
* Images used by the i-αppli include: images captured with
Camera that is started from a Camera-linked (connected)
application, images obtained using infrared communication
function of the i-αppli, images downloaded from a site or web
site, and images the i-αppli obtained from Data Box.
• You cannot start software downloaded using a different UIM.
• Depending on i-αppli, the tone may not sound.
• Depending on the software, the IP (Information provider) can
access programs saved on your FOMA terminal and directly
disable their use. In this case, the software cannot be run or
updated, however, it can still be deleted, and the software
information can still be viewed. To use the software again, the
software needs to perform communication for the software
suspend cancelation. Contact your IP.
• Depending on the software, the IP may send data to a software
saved on your FOMA terminal.
• In the event that the IP disables/re-enables the software or
sends data, your terminal performs communication and
blinks. No packet communication charges apply in this case.
277
i-αppli
Continue on the next page
Software List Screen Sub Menu
Software list screen (P275) ▶ Move the cursor
to a software ▶
M
[Menu] ▶ Perform the
following operations
[Set i-αppli To]
Set conditions to start the selected software.→P285
[Auto start time]
Set whether to start the selected software automatically, and set
the date and time to start if the auto start is specified.→P284
[Software set]
Set the selected software settings.→P277
[Software info]
Display the selected software information such as a name and
version of the i-αppli. The displayed items differ depending on the
software.
[Upgrade]
Upgrade the selected software.
[Delete]
Delete a software.→P287
Note
<Upgrade>
• During an update, a confirmation may appear notifying you
that the upgrading will use terminal data (stored data or
serial number of the terminal/UIM). Select "Yes" to start
downloading. Press
I
[Detail] to check the details of the
terminal data to be used. In this case, the terminal data is sent
to the IP (Information provider) via the Internet, and it could
be intercepted by a third party. However, this action does not
reveal your phone number, postal address, age, or gender to the
IP or others.
Setting i-αppli Operating Conditions
Set operating conditions for each software program. You can
set a software to automatically perform communication while
it is running or set separately whether to allow to browse
icon information, Phonebook, etc.
• Some items may not be changed depending on the software.
Software list screen (P275) ▶ Move cursor
to the software ▶ M[Menu] ▶ "Software
set" ▶ Perform the following operations
[Stand-by display]
Set the selected software as the Stand-by display.→P285
[Network set]
Set whether to allow communications while software is running.
[Stand-by network set]
Set whether to allow communications while i-αppli is set as the
Stand-by display.
Continued on next page
278
i-αppli
[Icon info]
Set whether to allow software to use the icons of mail, MessageR/F,
in/out of service area, battery level, or Manner mode.
[View P. book/call records]
Set whether to allow software to browse the Phonebook, redial, and
call history when the software is started.
[Change ring tone/image]
Set whether to allow software to automatically change an image or
melody set for a ring tone or the Stand-by display when the software
is started.
[Program guide key setting]
Set whether to set as i-αppli Program guide that activates from
1Seg.
• Only 1 i-αppli can be set.
Note
• Depending on the settings, the software may not connect
to the network, or Icon info (unread mail or battery level, etc.)
becomes unavailable.
<Network set>
• When set to "No", the software may not start, or real-time
information may not be provided.
• When set to "Yes", the software automatically connects to
the network. While connected, packet communication charges
apply.
<Icon info>
• When set to "Yes", information about the status of the
terminal as indicated by the presence of icons for unread mail,
messages, battery level, Manner mode, within the service area,
and out of service area may be sent to IP (Information provider)
via the Internet in the same manner as the "Phone/Terminal and
UIM ID" is sent. The icon information could be intercepted by a
third party. Software that needs icon data may not function if
set to "No".
Pre-installed i-αppli
To use the deleted pre-installed i-αppli, visit site, "WOW LG"
in iMenu for download.→P133
• i-αppli does not support touch operation.
Mingle Mangle
This is a game you set out 3 mingles (characters) of the
same type in crosswise or lengthwise direction swapping
adjacent mingles.
Software list screen (P275) ▶ "Mingle Mangle"
Press any key (Dial keys,
*
,
#
,
K
,
C
,
M
, or
Q
)
▶ Perform the following
operations
[オリジナル (Original)]
Play game by selecting a square of "7×7" or "8×8".
[探検 (Exploration)]
Save out mingles by clearing instructions set to each exploration
course. If you clear, the information is automatically saved.
[ランキング (Ranking)]
Display the ranking.
[セットアップ (Setup)]
Set sound on/off or vibrator on/off.
[ヘルプ (Help)]
Display the description of the game and how to play.
[終了 (Exit)]
Terminate the i-αppli.
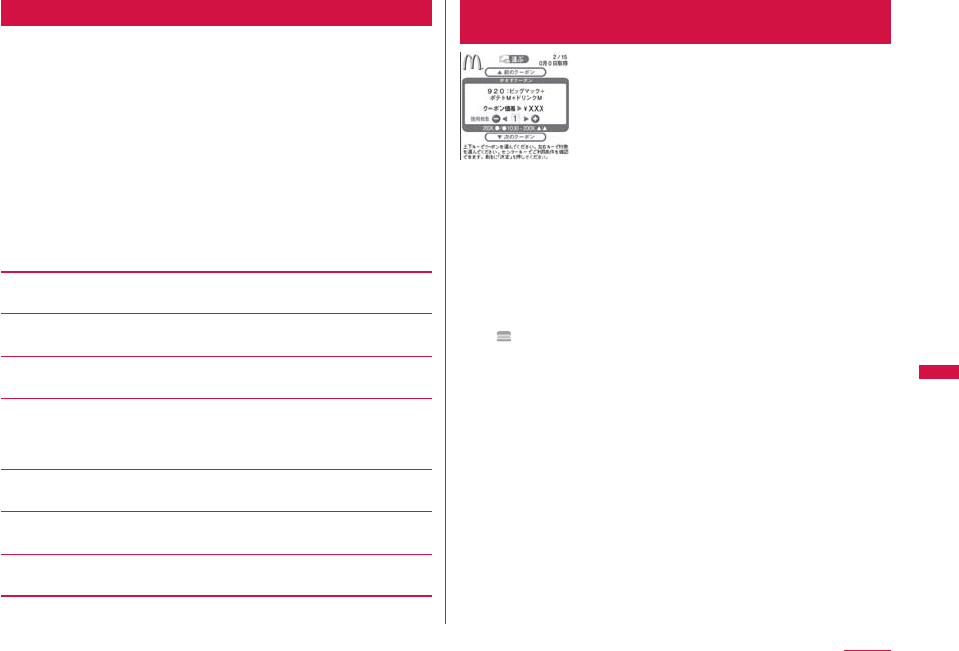
279
i-αppli
Continue on the next page
Sudoku Cafe
Enter a number from 1 to 9 in an empty cell. However, the
same number cannot be entered more than once for each
vertical or horizontal row, or for a block of 3×3 cells framed
with a thick line.
Software list screen (P275) ▶ "Sudoku Cafe"
The title screen of the game appears.
Press any key (Dial keys,
*
,
#
,
K
,
C
,
M
,
Q
)
The menu screen appears.
Perform the following operations
[チュートリアル (Tutorial)]
Learn how to play the game through practice.
[レコードモード (Record mode)]
Compete how fast you can solve a puzzle.
[カスタムモード (Custom mode)]
Create a new puzzle and play it.
[環境設定 (Environment settings)]
Choose which function to use, スキャン機能 (Scanning function) or ラ
イ ン機能 (Line function), サウンド (Sound) オン (ON)/ オフ (OFF), 振動
(Vibration) オン (ON)/ オフ (OFF), or set 背景設定 (Background).
[ランキング確認 (Ranking)]
Display the ranking.
[ヘルプ (Help)]
Display the description of the game and how to play.
[ゲーム終了 (Exit)]
Terminate the i-αppli.
マクドナルド トクするアプリ (McDonald's TOKUSURU
KEITAI Application)
* Screenshot is an example and may differ from
actual screen.
©2009 McDonald's
You can download the discount coupon "かざすクーポン" to be
used at McDonald's.
To use "かざすクーポン", subscribe to "トクするケータイサイ
ト", then select and set a coupon of your choice from the
application and hold the terminal up to a scanning device
placed at McDonald's.
•
For information about "McDonald's TOKUSURU KEITAI application",
visit the McDonald's official site, "マクドナルド トクするケータイサイト".
i-mode site: "iMenu" ▶ "メニューリスト" ▶ "グルメ/レシピ" ▶ "マクドナ
ルド トクする"
• "かざすクーポン" may not be used at some McDonald's restaurants.
Use "見せるクーポン" in an area where " かざすクーポン" cannot be
used.
• Functions or service contents for "McDonald's TOKUSURU KEITAI
application" may be changed.
• Packet communication charges apply.
Continued on next page
280
i-αppli
b
To use "かざすクーポン"
Activate this application
▼
Select a coupon and number to use
▼
Press "決定" to complete setting for the coupon information
▼
Order by holding the terminal on a scanning
function in a restaurants.
楽オク出品アプリ2 (Rakuoku Exhibition Application 2)
* Screenshot is an example and may differ from
actual screen.
"楽オク出品アプリ2 (Rakuoku Exhibition Application 2)" is a
convenient application to enable you to easily exhibit your
goods on Rakuoku at anytime and from anywhere.
With the instruction guide, even a first-time exhibitor can
use it easily. Using convenient functions such as capturing/
editing pictures, saving records, you can exhibit your goods
in shorter time than you do on a site.
• When using for the first time, you need to agree to "利用規約 (terms
of service)".
• Packet communication charges apply to use this service.
• For details about Rakuoku, see "Mobile Phone User's Guide [i-mode]
FOMA version".
• To exhibit your goods on Rakuoku, you need to subscribe to
Rakuten membership and exhibitor membership.
• For information about Rakuoku, visit the i-mode site.
i-mode site: "iMenu" ▶ "オークション"
QR code to access the site
iアプリバンキング (i-αppli Banking)
* Screenshot is an example and may differ from
actual screen.
iアプリバンキング (i-αppli banking) is an i-αppli for
conveniently using mobile banking (check the balance or
activity statement of your account, deposit or transfer
money, etc.) on the FOMA terminal. By entering password
you set when activating the i-αppli, mobile banking of up to
2 financial institutions can be used. Making a payment for
invoice or payment notice by the Pay-easy service is also
possible.
• To use mobile banking by i-αppli banking, you need to have an
account of the financial institution and subscribe to the Internet
banking service of the financial institution.
• Packet communication charges apply to use this service.
• For details about i-αppli banking, see "Mobile Phone User's Guide
[i-mode] FOMA version".
• For information about i-αppli banking, visit the i-mode site.
i-mode site: "iMenu" ▶ "メニューリスト" ▶ "モバイルバンキング" ▶
"iアプリバンキング"
281
i-αppli
Continue on the next page
QR code to access the site
モバイルSuica登録用iアプリ (Mobile Suica Setup i-αppli)
* Screenshot is an example and may differ from
actual screen.
"モバイルSuica登録用iアプリ (Mobile Suica Setup i-αppli)"
is an i-αppli provided by NTT DOCOMO. This application
enables you to make necessary initial settings before using
Osaifu-Keitai compatible service "Mobile Suica" provided by
East Japan Railway Company. After making initial settings
by this application, follow on-screen instructions to download
the Mobile Suica application from the East Japan Railway
Company site and sign up as a member.
• When using for the first time, you need to agree to "ご注意事項(必読)".
• Packet communication charges apply to use this service.
• This application can be deleted after initial settings are complete,
but the set area in the IC card remains occupied. Reset all data in
the IC card (hereafter referred to as the full format) to use the area.
• To perform the full format, visit the docomo Shop.
• If the full format is performed, all data in the IC card are deleted.
• To use the Mobile Suica service after performing the full format,
make initial settings again by this application.
• For information about Mobile Suica, visit the i-mode site.
i-mode site: "iMenu" ▶ "メニューリスト" ▶ "おサイフケータイ" ▶ "モバイ
ルSuica"
• "Mobile Suica" is a registered trademark of East Japan Railway
Company.
モバイルGoogleマップ (Mobile Google Map)
Display a map and easily search area information, shop
information, or user-created contents. In addition, switch
to the aerial photo mode or see Street View images. Also,
search transportations to the destination by searching the
route and navigate to the destination.
b
Map screen
©2009 Google - Map data ©2009 ZENRIN
b
Key operations on the Map screen
Operation Description
M
Display the menu
I
Search (shop or service information in the area,
search location and display on the map)
Continued on next page
282
i-αppli
Operation Description
K
Move a cursor
C
Context menu (address of the present location,
route to/from the location, Street View, save to
favorites, search surrounding area)
1
Zoom out
2
Switch to map/aerial photo mode
3
Zoom in
0
Display the present location
*
Save to favorites/display favorites
• When using for the first time, agree to the terms of service.
• Packet communication charges apply to use this service.
Subscription to Pake-hodai/Pake-hodai full/Pake-hodai double is
recommended.
• For details, refer to "ヘルプ (Help)" of the menu.
DCMXクレジットアプリ (DCMX Credit Appli)
* Screenshot is an example and may differ from
actual screen.
"DCMX" is a credit service supporting "iD", provided by NTT
DOCOMO. DCMX includes DCMX mini that provides up to
10,000 yen/month credit and DCMX/DCMX GOLD services
that provide more credit and DOCOMO points than DCMX
mini.
You can use mobile phone credit of DCMX mini right now by
simply sign-up from this application.
b
Application functions
Membership registration/Screening*1
▼
Card information settings
▼
Use
No need to charge.
Enjoy shopping
without signature*2
only by holding the
terminal with card
information settings
on the scanning
device at stores with
the following iD mark.
Check
Check DCMX service
contents, available
balance*3, and usage
from application.
Change
Make the model
change setting or
update the valid period
from application.
*1 The online screening is conducted at the time of subscription
for DCMX mini. For subscriptions other than DCMX mini, the
terminal is connected to the i-mode subscription page.
*2 Under certain conditions, a security code may be required.
*3 Available only for DCMX mini.
• For details on service contents or subscription procedures, visit the
i-mode site for DCMX.
i-mode site: "iMenu" ▶ "DCMX iD"
QR code to access the site
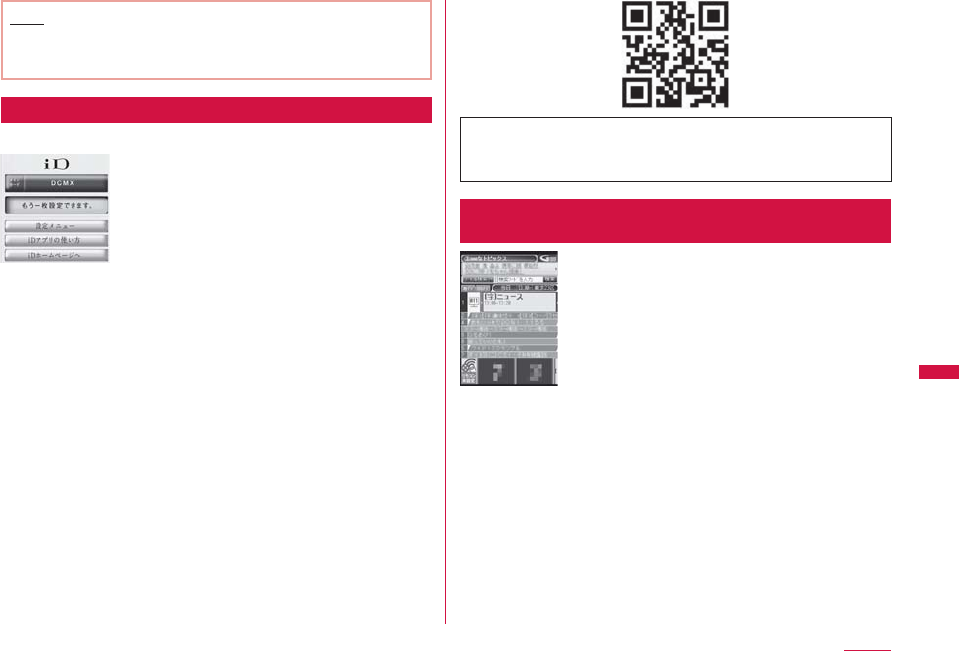
283
i-αppli
Continue on the next page
Note
• When activating this application for the first time, agree to "ご利
用上の注意 (precautions for use)" before use.
• Packet communication charges apply for settings/operations.
iD 設定アプリ (iD Appli)
b
iD appli
* Screenshot is an example and may differ from
actual screen.
"iD" is convenient electronic money using credit settlement
system. Simply by holding Osaifu-Keitai with the credit card
information set or iD compatible card on the scanning device
at stores, you can easily and conveniently do shopping.
You can register up to 2 types of credit card information on
Osaifu-Keitai, so use them according to privileges or stores.
Depending on the card issuer, cashing is also supported.
• To use iD on Osaifu-Keitai, besides subscribing to the iD compatible
card issuer, it is necessary to make the settings on iD appli or Card
application provided by a card issuer. Depending on the card, it
is necessary to finish the settings on iD appli and then make the
settings on Card application.
• The cost for iD service (annual fee, etc.) varies depending on the
card issuer.
• For information about iD, visit the i-mode site for iD.
i-mode site: "iMenu" ▶ "メニューリスト" ▶ "iD"
QR code to access the site
Cautions on Osaifu-Keitai compatible i-αppli
DOCOMO assumes no responsibility for information set on
the IC card.
Gガイド番組表リモコン (G-GUIDE Program List Remote
Controller)
* Screenshot is an example and may differ from
actual screen. An applicable channel to your
location appears.
This is a convenient application which combines a TV program
list and a Audio/Video remote controller, and is free of
monthly usage charges.
You can easily obtain the program information on the digital or
analogue terrestrial broadcasting, or BS digital broadcasting
whenever, anywhere you want. You can check the titles,
contents, as well as start/end time of the desired program.
You can activate 1Seg from the program list, and vice versa.
Programming your DVD hard disc recorder to record your
favorite program via the Internet is available. (The recorder
must support remote programming. And the initial setting has
to be made to enable this application function.)
You can search your desired programs by keyword such
as genre or your favorite actor/actress names or pick-up-
keyword on top of the main screen.
Continued on next page
284
i-αppli
You can use this application as remote controllers for
televisions, video players, or DVD players. (Not all devices
are supported.)
• For the first time use, you need to configure the settings and agree
to the license agreement.
• Packet communication charges apply.
• For overseas use, set "Set Date&Time" of the FOMA terminal to
Japan time.
•
For details about G-GUIDE Program List Remote Controller, see
"Mobile Phone User's Guide [i-mode] FOMA version".
b
Setting a timer for watching 1Seg program
You can select a program to watch from the program list of
this application and set a timer for watching the program.
Setting a timer for watching a program:
Activate this application, select a program to set a timer for,
and select "予約実行 (Set)" from "視聴予約 (Set timer)" of the
menu. After the timer setting screen appears, follow on-screen
instructions to set a timer.
b
Setting recording schedule function remotely
If your DVD recorder supports remote programming, you can
use this application via the Internet to set the recorder timer
remotely to record a TV program from the TV program time
table of this application.
The initial setting is required to enable the remote
programming function.
Making the initial setting:
a
Setup your DVD recorder for the Internet connection (Refer to the
instruction manual of your DVD recorder for the setting procedure).
b
Activate this application, select "リモート録画予約 (Remote record
schedule)" from the menu. Follow the displayed guidance to
complete the initial setting.
Setting TV program recording schedule:
Select a program to be recorded from the TV program
schedule, and select "リモート録画予約 (Remote record
schedule)" from the menu. Your DVD recorder designated
by the initial setting can be programmed via the Internet to
schedule recording the selected program.
• Packet communication charges apply.
Starting i-αppli Automatically
• Date and Time have to be set in advance to start an i-αppli
automatically.→P53
Auto start set
Setting Software Auto-start
You can set whether to start a software automatically.
M
▶ "i-αppli" ▶ "i-αppli settings" ▶
"Auto start set" ▶ "ON"/"OFF"
Auto start time
Setting Start Date/Time
Set the date and time when the software starts
automatically. This option can be set for up to 3 software.
Software list screen (P275) ▶ Move the cursor
to a software ▶
M
[Menu] ▶ "Auto start time"
▶ Perform the following operations
[Time interval set]
Start a software automatically with set intervals.
[Start time set]
Mark this if you set the time when an i-αppli automatically start.
[Time]*
Set the time and date for auto start.
285
i-αppli
Continue on the next page
[Repeat]*
Select a repeating pattern for auto start.
1 Time : The software starts automatically only once at the set
date and time.
Daily : The software starts automatically at the set time every
day.
Weekly : The software starts automatically at the set time on the
specified days of the week every week.
▶ Mark days to start automatically every week ▶
I
[Done]
* Available when "Start time set" is marked.
I
[Done]
Note
• The software will not automatically start in the following:
- The FOMA terminal power is off
- A call or communication is in progress
- Other functions are running
- Lock all (even while Terminal security code entry screen
is displayed) is set
- Omakase Lock is set
- "i-αppli" in "Data access lock" is "ON" (even while
Terminal security code entry screen is displayed)
- The Auto start time is the same as the scheduled time
for software update, an alarm, Schedule event, or To do alarm
- The i-αppli was downloaded using another UIM
- The i-αppli has "Network set" to "Confirm every session"
- The same i-αppli has a set time interval to start within
10 minutes
• Software will not start at the set time if other software is
running at that time. Also, the software may not start while
other functions are running.
• If auto start fails, appears on the Stand-by display. Selecting
the icon displays the Auto start info (P286). disappears
after the Auto start info is viewed.
Set i-αppli To
Starting i-αppli from a Site or Mail
Set whether to start a software from a site, mail, infrared
communication, bar code reader, or 1Seg data broadcasting
sites. Also, you can make settings for when holding the
FOMA terminal on the scanning device supporting the IC card
functions.
Software list screen (P275) ▶ Move the cursor
to a software ▶
M
[Menu] ▶ "Set i-αppli To"
▶ Mark items to allow to start a software ▶
I
[Done]
i-αppli Stand-by display
Setting i-αppli Stand-by Display
Set a software of the selected i-αppli as the Stand-by
display.
Software list screen (P275) ▶ Move the cursor
to a software ▶
M
[Menu] ▶ "Software set" ▶
"Stand-by display" ▶ "ON"
Continued on next page

286
i-αppli
Note
• Only 1 i-αppli can be set as Stand-by display.
• Some i-αppli cannot be set as Stand-by display.
• While on i-αppli Stand-by display, / appears on top of the
display
• Turning the FOMA terminal's power on while i-αppli Stand-by
display is set, a confirmation whether to start the i-αppli Stand-
by display appears. Selecting "No" releases the i-αppli Stand-by
display.
• If an i-αppli that performs communication is set as Stand-by
display, the i-αppli may not work correctly due to weak signal
reception.
• While Lock all is activated or i-αppli is restricted its use in Data
access lock, i-αppli Stand-by display is not displayed.
• When Stand-by i-αppli is set, the Receive results screen for
SMS does not appear, and the ring tone and vibrator for SMS
do not work.
Operating i-αppli Set as Stand-by Display
as a Regular i-αppli
Q
on i-αppli Stand-by display
i-αppli starts and becomes available to perform.
i-αppli Stand-by display release
Releasing i-αppli Stand-by Display
i-αppli running ▶
P
▶ "Cancel" ▶ "Yes"
Selecting "End" returns to the i-αppli Stand-by display.
Note
• You can also release the i-αppli Stand-by display by following:
Press
M
in Stand-by ▶ "i-αppli" ▶ "i-αppli settings" ▶ "End
stand-by display" ▶ "Cancel" ▶ "Yes"
i-αppli info
Viewing Various Information
M
▶ "i-αppli" ▶ "i-αppli info" ▶ Perform the
following operations
[Security error history]
Display the error history of the software that were terminated due to
security errors.
•
I
[Delete]: Delete the selected error history entry.
[Auto start info]
Check if software succeeded in auto start. You can view the
information and the latest date and time when the software started
for up to 3 software set for auto start.
Start ○ : The software automatically started successfully
Start × : The software failed to start automatically
Start ─ : The software has not started because the set time has
not come
[Trace info]
Display trace information on a software.
•
I
[Delete]: Delete trace information on a software.
[Standby error info]
Display error information of an i-αppli Stand-by display that did not
terminate properly.
•
I
[Delete]: Delete error information.
Note
• Untraced history or information will not be displayed.
287
i-αppli
Continue on the next page
Deleting i-αppli
Software list screen (P275) ▶ Move the cursor
to a software ▶
M
[Menu] ▶ Perform the
following operations
[Delete]
This item : Delete the selected software.
Selected items : Select and delete software.
▶ Mark software to delete ▶
I
[Delete] ▶ "Yes"
All items : Delete all software.
▶ Enter the Terminal security code ▶ "Yes"
Note
• When the i-αppli to delete is set for auto start or Stand-by
display, a confirmation whether to delete the software appears.
Select "Yes" to delete.
• Some Osaifu-Keitai compatible i-αppli delete data on the IC
card or require to delete data on IC card starting i-αppli before
the deletion, etc.
• Some Osaifu-Keitai compatible i-αppli cannot be deleted.
Using Various i-αppli Functions
You can connect to a site or use the FOMA terminal functions
while an i-αppli is running.
• You need to download the supported i-αppli in advance.
• Some i-αppli may operate the functions differently, or may be
unavailable to use some functions.
Using Camera
• When the camera is activated by i-αppli, captured images will not
be saved in "My picture" of "Data Box", however, they are saved and
used as a component of the i-αppli.
Use i-αppli to capture an image with the
camera
Using Bar Code Reader
• The camera can be used via an i-αppli to read a QR code and Japan
Article Number code.
• The read result can be used and saved by the software.
Use i-αppli to read a code
Using Infrared Communication
Use i-αppli to
perform infrared communication
Note
• You may not be able to exchange data with some devices even
if they have the infrared communication capability.
• You can also start an i-αppli by receiving i-αppli activation data
via infrared communication.
• When performing infrared communication, any connection with
sites or mail transfer will be canceled.


289
Osaifu-Keitai
Osaifu-Keitai ・・・・・・・・・・・・・・・・・・・・・・・・・・・・・・・・・・・・・・・・ 290
Starting Osaifu-Keitai Compatible i-αppli ・・・・・・・・・・・ 291
Locking IC Card Function ・・・・・・・・・・・・・・ IC card lock 292

290
Osaifu-Keitai
Osaifu-Keitai
Osaifu-Keitai is equipped with the IC card and enables you to
pay by holding the FOMA terminal on the scanning device at
shops, etc.
In addition, with this function, you can deposit electronic
money and check your balance or view usage history using
transmission. In order to use safely, security*1 is fully secure.
For details about Osaifu-Keitai, see "Mobile Phone User's
Guide [i-mode] FOMA version".
• To use Osaifu-Keitai compatible services, you need to download
Osaifu-Keitai compatible i-αppli from Osaifu-Keitai compatible
sites*2 and make the setting.
*1 Omakase Lock (P122) and the IC card lock (P292) can be
used.
*2 "iMenu" ▶ "メニューリスト (Menu List)" ▶ "おサイフケータイ
(Osaifu-Keitai)"
• Data (including electronic money, points, etc.) saved in the IC card
may be lost or altered due to the FOMA terminal malfunction (Note
that you will be asked to delete data if you leave the FOMA terminal
for repairs, etc.). For the service such as reissue, restoration,
temporary storage, or transfer of data except for the transfer by iC
transfer service, contact the provider of Osaifu-Keitai compatible
service. Make sure to use a service that provides a backup service
for important data.
• DOCOMO shall not be liable for any loss or alteration of data saved
in the IC card, or damage related to Osaifu-Keitai service caused by
any reason such as malfunction or model change.
• If the FOMA terminal is stolen or lost, immediately contact your
provider of Osaifu-Keitai compatible service about handling the
trouble.
iC Transfer Service
iC transfer service*1 enables you to transfer*2 data on the IC
card of Osaifu-Keitai to new Osaifu-Keitai collectively*3 when
replacing Osaifu-Keitai such as model change or repairing.
After transferring data on the IC card, you can easily use
Osaifu-Keitai compatible services again just by downloading*4
Osaifu-Keitai compatible i-αppli. Use the iC transfer service
at your nearby docomo Shop, etc.
For details about the iC transfer service, see "Mobile Phone
User's Guide [i-mode] FOMA version".
*1 Both the transfer source and destination mobile phone must be
the iC transfer service compatible FOMA terminals. Go to your
nearby docomo Shop, etc. for using this service.
*2 This service does not "copy" but "transfer" data. Therefore, data
on the IC card does not remain in the FOMA terminal of the
replacing source. In some cases, the iC transfer service cannot
be used. Use the backup service for Osaifu-Keitai compatible
service.
*3 Some Osaifu-Keitai compatible services are not supported by the
iC transfer service. Only the data on the IC card of the Osaifu-
Keitai compatible service that is supported by the iC transfer
service can be transferred.
*4 Packet communication charges apply for downloading i-αppli or
various settings.
291
Osaifu-Keitai
Continue on the next page
Starting Osaifu-Keitai
Compatible i-αppli
• When starting or downloading Osaifu-Keitai compatible i-αppli for
the first time, the UIM in use is registered as a owner of the IC card.
After the second time, the IC card function cannot be used without
inserting the UIM registered as the IC owner.
If you use the IC card function with another UIM, insert the UIM
that is compatible with the IC card and delete all Osaifu-Keitai
compatible i-αppli to use the IC card function.
M
▶ "Osaifu-Keitai" ▶ "IC card content"
List of Osaifu-Keitai compatible i-αppli appears. Select i-αppli
to start.
• Software list screen→P273
Note
• You can connect to i-mode and search for Osaifu-Keitai
compatible i-αppli by performing
M
▶ "Osaifu-Keitai" ▶
"Search by i-mode" ▶ "Yes".
• You can activate the DCMX credit appli by performing
M
▶
"Osaifu-Keitai" ▶ "DCMX".
Using Osaifu-Keitai
Hold the mark of the FOMA terminal on the scanning
device to use as electronic money for payment or traffic
ticket. This function can be used without starting the
software.
• The sticker is attached at the back side of the Back cover to keep
the performance of FeliCa function. Do not remove the sticker.
• Hold the mark on the center of the scanning part.
mark
Scanning part of
the scanning device
Continued on next page
292
Osaifu-Keitai
Note
• Do not subject the FOMA terminal to severe shocks when
holding the mark on the scanning device.
• If the mark held on the scanning device is not recognized, try
moving the FOMA terminal around.
• You can use Osaifu-Keitai functions by holding the mark on
the scanning device even during a call or i-mode connection, or
when the FOMA terminal is turned off (Osaifu-Keitai compatible
i-αppli cannot be activated). However, when the battery pack is
not inserted or the battery pack is not used for a long time even
if it is inserted, or the FOMA terminal is left without charging
after sounding the battery alarm, this function may be disabled.
Charge the battery pack.
• When the mark is held on the scanning device, Osaifu-Keitai
compatible i-αppli may be activated.
• You can set the FOMA terminal to light or blink the illumination
when the scanning device recognizes the FOMA terminal.
→P110
IC card lock
Locking IC Card Function
This function allows you to prevent the IC card functions
from being used by others.
Stand-by display ▶
C
(for 1+ seconds)
When the IC card lock is set, appears on the Stand-by display.
Canceling the lock
Stand-by display ▶
C
(for 1+ seconds) ▶ enter the Terminal
security code.
IC card lock set
Locking IC Card Functions when Turning
Power On/Off
M
▶ "Osaifu-Keitai" ▶ "IC card lock set" ▶
Enter the Terminal security code ▶ Perform the
following operations
[IC card lock(Power ON)]
Set whether to lock the IC card functions when the FOMA terminal is
turned on.
[IC card lock(Power OFF)]
Set whether to lock the IC card functions when the FOMA terminal is
turned off.
Note
• When removing the battery pack, the IC card function is
disabled regardless of the IC card lock setting.
• While the IC card lock is activated, downloading, upgrading, or
deleting operation may be unavailable depending on Osaifu-
Keitai compatible i-αppli.

293
Data Management
Data Box ・・・・・・・・・・・・・・・・・・・・・・・・・・・・・・・・・・・・・・・・・・・・ 294
Making Full Use of Images
Displaying Images ・・・・・・・・・・・・・・・・・・・Picture viewer 296
Editing Still Images ・・・・・・・・・・・・・・・・・・・・・・Edit image 302
Creating Slideshows ・・・・・・・・・・・・・・・・・・・・ Slide show 305
Making Full Use of Moving Pictures
Playing Moving Pictures/i-motion
・・・・・・・・・・・・・・・・・・・・・・Moving picture/i-motion player 307
Editing Moving Pictures/i-motion
・・・・・・・・・・・・・・・・・・・・・・・ Edit moving pictures/i-motion 312
Using a Playlist ・・・・・・・・・・・・・・・・・・・・・・・・・・・・・・・・・・・・・ 313
Making Full Use of Melody
Playing a Melody ・・・・・・・・・・・・・・・・・・・・・ Melody player 314
Making Full Use of Memory Card
microSD Cards ・・・・・・・・・・・・・・・・・・・・・・・・・・・・・・・・・・・・・・ 317
Using a microSD Card ・・・・・・・・・・・・・・・・・・・・・・・・・・・・・・ 321
Exchanging Personal Information between the
FOMA Terminal and a microSD Card ・・・・・・・・・・・・・・・・ 322
Managing a microSD Card ・・・・・・・・・・・・・・・・・・・・・・・・・・ 325
Using the FOMA Terminal as a microSD Card
Reader/Writer ・・・・・・・・・・・・・・・・・・・・・・・・・・・・・・・・・・・・・・・ 326
Exchanging Data via Infrared
Communication
Using Infrared Communication
・・・・・・・・・・・・・・・・・・・・・・・・・・・・・ Infrared communication 327
Sending and Receiving Data One by One
・・・・・・・・・・ Send/Receive via infrared communication 328
Sending and Receiving All Data
・・・・・・・ Send/Receive all via infrared communication 329
Using Infrared Remote Control Function ・・・・・・・・・・・・ 330
Making Full Use of Document Viewer
Viewing a Document ・・・・・・・・・・・・・・・・・・・・・・・・・・・・・・・・ 330
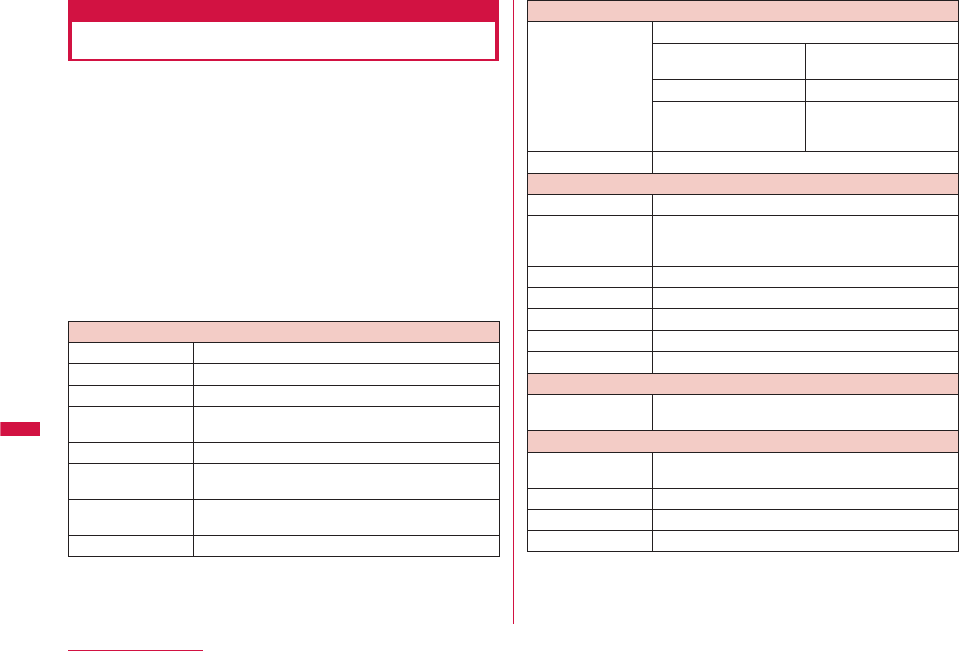
294
Data Management
Data Box
Data Box contains the items and folders shown in the
following tables. Data obtained from sites or i-mode mail are
saved to folders by category.
• Up to 18 folders each can be added to My picture, Music, i-motion,
Melody, and Kisekae Tool. Up to 10 folders can be added to
Music&Video Channel.
• Data saved in My picture, Music, i-motion, and Melody (except for
data in the "Decomail picto" folder) can be moved to other folders
within the category. Data saved in the Music&Video Channel can
be moved from the "Distributed program" folder to another folder
within the category, or can be moved among the folders other than
"Distributed program".
• Deco-mail pictograms obtained from sites or mail are directly saved
to the "Decomail picto" folder.
• Only Deco-mail pictograms can be saved in the "Deco-mail picto"
folder.
My picture
i-mode Still images, etc. obtained from sites or mails
Camera Still images captured by the Camera
Decomail picture Pre-installed pictures for Deco-mail, etc
Decomail picto Deco-mail pictograms pre-installed or
downloaded from sites or mail
Preinstalled Pre-installed still images
Item Still images that can be used for frames or
stamps
Data transfer Still images, etc. obtained via infrared
communication
Slide show User-defined slideshows, etc.
My picture
microSD Still images saved on the microSD card
Camera images Still images captured
by the Camera
Other images Still images, etc.
Decomail picto Deco-mail pictograms
that are copied from
the FOMA terminal
Search by i-mode Connect to i-mode
Music
i-mode Chaku-Uta Full
®
songs downloaded from sites
Playlists Playlists created with the FOMA terminal
or created with Windows Media Player and
forwarded from a PC
Movablecontents Chaku-Uta Full
®
saved on the microSD card
Resume play Playback of the last played music/playlist
WMA WMA files saved on the microSD card
SD-Audio SD-Audio data saved on the microSD card
Searcy by i-mode Connect to i-mode
Music&Video Ch
Distributed
program Music programs distributed from Music&Video
Channel
i-motion
i-mode Moving pictures/i-motion downloaded from
sites or mails
Camera Moving pictures captured by the Video Camera
Preinstalled Pre-installed moving pictures
Playlists Playlists created with the FOMA terminal
295
Data Management
Continue on the next page
i-motion
Data transfer Moving pictures, etc. obtained via infrared
communication
microSD Moving pictures or i-motion saved on the
microSD card
Movablecontents Copyright protected
moving pictures or
i-motion moved from
the FOMA terminal
Audio Sound-only i-motion
Video Moving pictures
captured by the Video
Camera
Searcy by i-mode Connect to i-mode
Melody
i-mode Melodies, etc. downloaded from sites or mails
Preinstalled Pre-installed melodies
Data transfer Melodies, etc. obtained via infrared
communication
microSD Melody Melodies saved on the
microSD card
Searcy by i-mode Connect to i-mode
Kisekae Tool
i-mode Kisekae Tool acquired from sites
Preinstalled Pre-installed Kisekae Tool
Searcy by i-mode Connect to i-mode
Motion Oekaki
Differences on display name, file name, and title
Still images, Flash movies, moving pictures/i-motion, and
melodies saved in the FOMA terminal have multiple names.
Display name Names that appear on list screens in Data Box
or on the Display/playback screens
File name Names that appear on a PC or other mobile
phones
Title*Names for management of L-03B (cannot be
edited)
* Still images and Flash movies do not have titles.
Icons displayed on the file list screen
Icon Description
/ Files that can be sent, or moved/cannot be
moved to a microSD card
File restricted
Files with the UIM security function activated
Files on the microSD card
Files banned from being redistributed
*
/ / /
// / / File types (JPEG/GIF/Flash/MP4 (extension:
mp4)/MP4 (extension: 3gp)/SMF/MFi/Others
(unsupported files))
* Icons that appear on the screen vary depending on the list
screen type.

296
Data Management
Picture viewer
Displaying Images
You can display still images you captured, or obtained from
sites or i-mode mails.
b
Available file formats
File format*JPEG, GIF
Pixels JPEG, Progressive JPEG: Up to 2592×1944
dots
GIF: Up to 800×600 dots
File size Up to 5MB
File extension jpg, gif
* Some files in a compatible format may not be displayed.
M
▶ "Data Box" ▶ "My picture"
•
I
[New]: Create a folder.
My picture
screen
Move the cursor to a folder ▶
C
[Open]
•
I
[Mail]: Display the Compose
message screen with the selected file
attached.
•
g
[Delete]: Delete the selected file.
•
T
[Switch]: Switch between List view
and Grid view.
• Icons displayed on the list screen
→P295
Still image file list
screen
a
Display name of the selected file
b
Type of the selected file
Move the cursor to a file ▶
C
[View]
Still image
display screen
a
Sequential number/number of saved files
Display the sequential number of the current file and the total
number of saved files in the folder.
b
Display name of the file
297
Data Management
Continue on the next page
b
Key operations on the Still image display screen
Operation Description
J
Display the previous/next file
C
[Full] Hide the soft keys and display a full image/
restore to the original display size
I
[Mail] Send the displayed image via mail→P138
F
/
E
Enlarge the image/restore to the previous ratio
T
[Zoom] Use
M
[+] to enlarge the image and
I
[−] to
restore to the previous ratio
K
Move the display position when the image is
enlarged
• The entire image and the displayed area appear
at the edge of the screen.
g
[Delete] Delete the selected file
Note
• Some images that are not captured with L-03B may not be
displayed on the Still image file list screen.
My Picture Screen Sub Menu
My picture screen (P296) ▶ Move the cursor
to a folder ▶
M
[Menu] ▶ Perform the
following operations
[Rename]
Change the name of the selected folder. Up to 30 full-pitch or half-
pitch characters can be entered.
[New folder]
Create a new folder.
• You cannot create a sub folder in the created folder.
[Delete]
One : Delete the selected folder.
▶ "Yes" ▶ Enter the Terminal security code
Selected : Select and delete folders.
▶ Mark folders to delete ▶
I
[Done] ▶ "Yes" ▶ Enter
the Terminal security code
• Press
M
[SelAll/ClrAll] to select/clear all.
All : Delete all user-defined folders
▶
I
[Done] ▶ "Yes" ▶ Enter the Terminal security code
• Press
M
[SelAll/ClrAll] to select/clear all.
[Grid view]
This option is not available.
[Sort]
Set conditions and sort files in a folder.
[Memory info.]
Handset memory : Display the status of storage space, etc. in
"Data Box".
External memory : Display the status of storage space, etc. of the
microSD card.
[Folder property]
Display the size of the selected folder and the number of files in the
folder.

298
Data Management
Still Image File List Screen Sub Menu
Still image file list screen (P296) ▶ Move the
cursor to a file ▶
M
[Menu] ▶ Perform the
following operations
[Files]
View : Display the selected file.
Edit : Edit the selected file.→P302
Rename : Change the display name of the selected file.
File property : Display the file name, size, and type, etc. of the
selected file.→P301
[Delete]
One : Delete the selected file.
Selected : Select and delete files.
▶ Mark files to delete ▶
I
[Done] ▶ "Yes"
• Press
M
[SelAll/ClrAll] to select/clear all.
All : Delete all files in the folder.
▶
I
[Done] ▶ "Yes" ▶ Enter the Terminal security code
• Press
M
[SelAll/ClrAll] to select/clear all.
[Move]
One : Move the selected file.
▶ Select a destination folder
Selected : Select and move files.
▶ Select a destination folder ▶ Mark files to move ▶
I
[Done]
• Press
M
[SelAll/ClrAll] to select/clear all.
All : Move all files in the folder.
▶ Select a destination folder ▶
I
[Done] ▶ Enter the
Terminal security code
• Press
M
[SelAll/ClrAll] to select/clear all.
[Copy]
One : Copy the selected file.
▶ Select a destination folder
Selected : Select and copy files.
▶ Select a destination folder ▶ Mark files to copy ▶
I
[Done]
• Press
M
[SelAll/ClrAll] to select/clear all.
All : Copy all files in the folder
▶ Select a destination folder ▶
I
[Done] ▶ Enter the
Terminal security code
• Press
M
[SelAll/ClrAll] to select/clear all.
[Send via]*
Mail : Create i-mode mail with the selected file attached. Go to
Step 2 in "Composing and Sending i-mode Mail" (P138).
IrDA : Send a file via infrared communication.
Picasa : Upload the selected file to Picasa.
[Set as]
Set the selected file as the Stand-by display or incoming call screen.
[Sort]
Set conditions and sort files.
[Memory info.]
Handset memory : Display the status of storage space, etc. in
"Data Box".
External memory : Display the status of storage space, etc. of the
microSD card.
[New folder]
This option is not available.
[List view/Grid view]
Switch the file display format.
299
Data Management
Continue on the next page
[Store in center]
Save files at the Data Center.→P132
* Not available for Flash movies.
Still Image Display Screen Sub Menu
Still image display screen (P296) ▶
M
[Menu]
▶ Perform the following operations
[Edit image]*
Edit the displayed file.→P302
[Delete]
Delete the displayed file.
[Edit title]
Edit the display name of the displayed file.
[File property]
Display the file name, size, and type, etc. of the selected file.→P301
[Send via]*
Mail : Create i-mode mail with the selected file attached. Go to
Step 2 in "Composing and Sending i-mode Mail" (P138).
IrDA : Send a file via infrared communication.
Picasa : Upload the selected file to Picasa.
[Full screen]
View the image in Full screen. In Full screen view, the following
operations are available.
•
C
/
Q
: Return the full screen view to the original view.
•
J
: Display the previous/next image.
[Zoom]*
Display an enlarged image. While zooming in, the following operations
are available.
•
M
[+]: Enlarge the image
•
I
[−]: Return to the previous zoom ratio
•
K
: Move the display position
•
C
/
Q
: Return the enlarged display to the original display
• The entire image and the displayed area appear at the edge of the
screen.
[Set as]
Set the displayed file as the Stand-by display or incoming call screen.
[Store in center]
Save the displayed file at the Data Center.
▶ Enter the Terminal security code ▶ "Yes"
[Motion Oekaki]
Edit the displayed file with Motion Oekaki
TM
.→P341
[View settings]
Set the image display format, zoom ratio, or interval between
slideshow frames.→P301
* Not available for Flash movies.
Note
<Picasa>
• The FOMA terminal connects to the Picasa site. Log in the site
and upload files by mail attachment. The captured image is
retained up to the compose message screen for uploading so
make sure the receiver's address.
• A file of more than 2MB cannot be uploaded.
• For details, visit Picasa site (http://picasa.google.co.jp/) via
PC, etc.
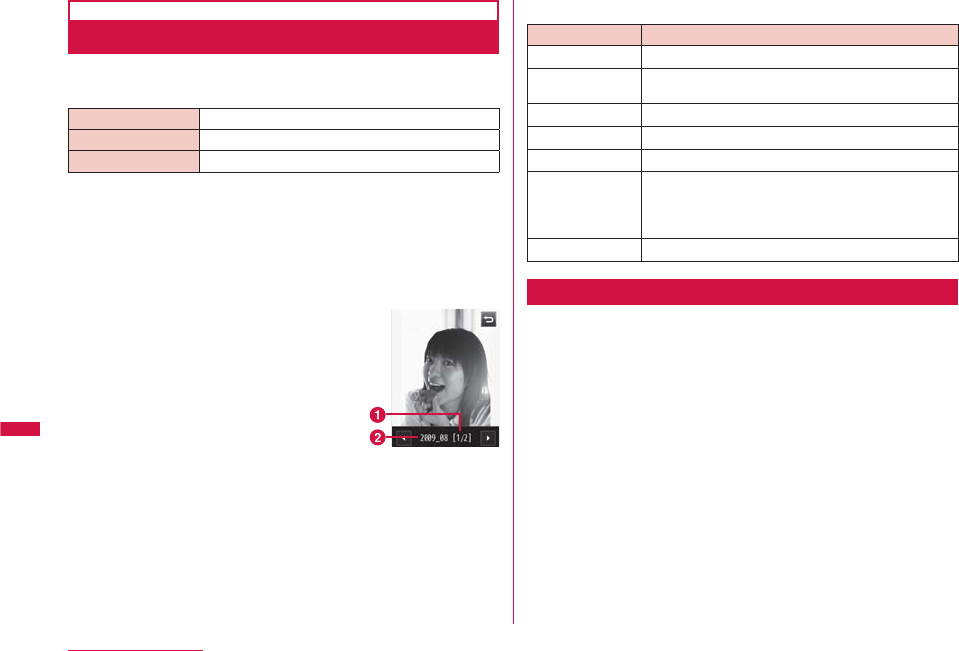
300
Data Management
Viewing Flash Movies
You can view Flash movies downloaded from sites, etc.
b
Available file formats
File format*Flash
File size Up to 100KB
File extension swf
* Some files in a compatible file format may not be played.
M
▶ "Data Box" ▶ "My picture"
Move the cursor to a folder ▶
C
[Open]
Move the cursor to a file ▶
C
[View]
Flash movie
playback screen
a
Sequential number/number of saved files
Display the sequential number of the current file and the total
number of saved files in the folder.
b
Display name of the file
b
Key operations on the Flash movie playback screen
Operation Description
J
/
H
Display the previous/next file
C
[Full] Hide the soft keys and display a full image/
restore to the original display size
I
[Mail] Send the displayed image by mail→P138
T
[Retry] Play the Flash movie from the beginning
F
/
E
Enlarge the image/restore to the previous ratio
K
Move the display position when the image is
enlarged
• The entire image and the displayed area appear
at the edge of the screen.
g
[Delete] Delete the selected file
Flash Movie Playback Screen Sub Menu
Flash movie playback screen (P300) ▶
M
[Menu]
• The Flash movie playback screen sub menu is the same as
"Still Image Display Screen Sub Menu" (P299). However, "Edit
image", "Send via", and "Zoom" are not available.
301
Data Management
Continue on the next page
Viewing Image Properties
Still image display screen (P296)/Flash movie
playback screen (P300) ▶
M
[Menu] ▶ "File
property"
•
I
[Edit]: Edit properties.
b
Properties displayed on the File property screen
Item Description
File name Display the file name
File size Display the file size
File type
*1
Display the file format
Date & Time (Saved) Display the saved date and time
Display size
*1
Display the resolution
File restriction Display whether the file is restricted
Source Display the source
Move to the microSD
*2
Display whether the file can be moved to a
microSD card
*1 Not displayed for Flash movies.
*2 Data in a microSD card will be moved to the phone; display
whether data can be moved to the phone.
Setting View of a Still Image
Set the image display format, zoom ratio, or interval between
slideshow frames.
Still image display screen (P296)/Flash movie
playback screen (P300)/Slideshow list screen
(P305) ▶
M
[Menu] ▶ "View settings" ▶
Perform the following operations
[View type]
Normal : Display the image in its original size.
Fit to screen : Display the image enlarged to fit the screen.
[Zoom type]
Normal : Zoom in the image enlarged to fit the screen.
Same magnification : Zoom in the image displayed in its original
size.
[SlideShow interval]
Set the interval between slideshow frames.
[Auto rotating]
Set whether to display the image in a direction when you captured it
with this FOMA terminal.
I
[Done]
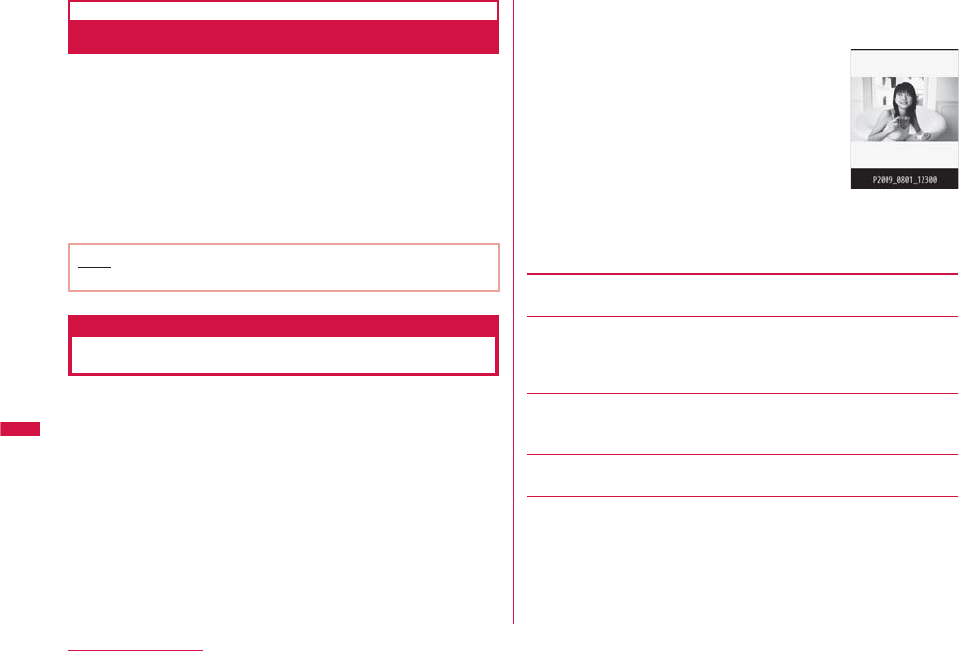
302
Data Management
Setting File Restriction
You can set the file restriction. The restricted file attached to
mail cannot be sent or forwarded from the recipient's FOMA
terminal.
Display a file to restrict ▶
M
[Menu] ▶
"File property"
The File property screen appears.
Move the cursor to the "File restriction" field ▶
I
[Edit] ▶ "File restricted"
Note
• This option cannot be changed for a file downloaded from a site.
Edit image
Editing Still Images
You can edit still images. The edited still image is saved to
the same folder as the source file.
• Only JPEG files can be edited. However, some files may not be
edited.
• Editing a still image repeatedly may reduce the image quality or
increase the file size.
Still image display screen (P294) ▶
M
[Menu]
▶ "Edit image"
Still image
edit screen
M
[Menu] ▶ Perform the following operations
[Save]
Save the edited still image. Go to Step 5.
[Rotate]
Left : Rotate the image 90 degrees counterclockwise.
Right : Rotate the image 90 degrees clockwise.
180 : Rotate the image 180 degrees.
[Mirror]
Left/Right : Flip the image horizontally.
Up/Down : Flip the image vertically.
[Resize]
Change the image size.→P301
[Crop]
Cut out a part of the image.→P302
303
Data Management
Continue on the next page
[Sketch]
Draw lines or characters.
• Press M[Menu] to change "Pen/Eraser height" or "Pen color".
Select "Eraser height" from "Pen/Eraser height" to erase a drawing
where traced with a finger, etc.
[Insert]
Add a frame, stamp, or text.
Frame : Add a frame to an image.
▶ Move the cursor to a folder ▶
C
[Open] ▶ Select a
frame
• After selecting a frame, press
M
[Menu] to select
"Change frame" or "Rotate".
Stamp : Add a stamp to an image.→P304
Text : Add text to an image.→P305
[Retouch]
Change the brightness, contrast, or color tone of an image.
▶ Use
J
to switch to the item to retouch ▶
C
[Select]
• Adjust the item with
J
.
• If selecting "Auto level" or "Auto enhance", the image is adjusted
automatically.
• If selecting "Color adjust" or "Level adjust", adjust each color with
K
.
• Pressing
M
[List] also enables you to select the item to retouch.
[Effect]
Set special effects to an image.
▶ Use
J
to switch to the item to retouch ▶
C
[Select]
• Depending on items, adjust with
J
.
• If selecting "Rotation" or "Spotlight", adjust each item with
K
.
• Pressing
M
[List] also enables you to select the item to set.
[Send via mail]
Create i-mode mail with the edited image attached.
[Undo]
Cancel the performed edit operation and restore the previous state.
C
[OK]
• Press
I
[Cancel] to cancel editing.
C
[Save]
• Press
I
[Undo] to return to the state before editing.
"New file"/"Original file"
New file : Save the edited image as a new image.
Original file : Save the edited image over the source image.
Note
<Frame>
• Available frame size: CIF (352×288), Wallpaper (800×480),
Wallpaper (400×240), QVGA (320×240), QCIF (176×144),
and Sub-QCIF (128×96).
• Only the frame size that is same as the source image size can
be set.
Changing Image Size
Still image edit screen (P302) ▶
M
[Menu] ▶
"Resize"
Select an image size
C
[OK]
Go to Step 4 in "Editing Still Images" (P303).
Continued on next page
304
Data Management
Note
• The size of a source image with vertical or horizontal side
smaller than 8 dots cannot be changed.
• If a size with different proportions than the source is selected,
the original proportions will be retained for the resized image.
Cropping an Image
Still image edit screen (P302) ▶
M
[Menu] ▶
"Crop"
Select a cropping size ▶ Use
K
to move the
frame to the area to be cropped ▶
C
[Select]
b
When "User define" is selected
Use
K
to move the cursor to start point ▶
C
[Select] ▶ use
K
to move the cursor to end
point ▶
C
[Select] to set the area to crop.
C
[OK]
Go to Step 4 in "Editing Still Images" (P303).
Note
• The size of a source image with vertical or horizontal side
smaller than 8 dots cannot be changed.
Adding a Stamp
Still image edit screen (P302) ▶
M
[Menu] ▶
"Insert" ▶ "Stamp"
Move the cursor to a folder ▶
C
[Open] ▶
Select a stamp ▶ Use
K
to move the stamp
to the position ▶
C
[OK]
b
To add another stamp
Press
M
[Menu] ▶ "Change stamp" ▶ move the cursor
to a folder ▶
C
[Open] ▶ select a stamp ▶ use
K
to
move the stamp to the position ▶
C
[OK].
b
To rotate the stamp
Press
M
[Menu] ▶ "Rotate" ▶ select from "Left"/
"Right"/"180".
I
[Done]
Go to Step 4 in "Editing Still Images" (P303).
Note
• A stamp cannot be added to a source image with vertical or
horizontal side smaller than 24 dots or larger than 640×480
dots.
305
Data Management
Continue on the next page
Adding Text
Add text to an image. You can also change the font size or
color, rotate the text, or add speech bubbles.
Still image edit screen (P302) ▶
M
[Menu] ▶
"Insert" ▶ "Text"
Enter the text to add
M
[Menu] ▶ Perform the following operations
[Edit text]
Edit the pasted text.
[Font size]
Set the font size.
[Font color]
Change the added text color.
[Rotate]
Rotate the added text.
[Comic]
Add a speech bubble.
• Some speech bubbles cannot be set depending on the image size.
Use
K
to move the cursor to the position ▶
C
[OK]
I
[Done]
Go to Step 4 in "Editing Still Images" (P303).
Note
• Text cannot be added to a source image with vertical or
horizontal side smaller than 24 dots or larger than 640×480
dots.
Slide show
Creating Slideshows
You can create slideshows with up to 20 frames using saved
still images.
• Up to 30 slideshows can be created.
• Up to 480×800 dots of still images can be used for creating the
slideshows.
M
▶ "Data Box" ▶ "My picture" ▶ Move the
cursor to "Slide show" ▶
C
[Open]
Slideshow list
screen
I
[New] ▶ Enter the display name of the file
Continued on next page
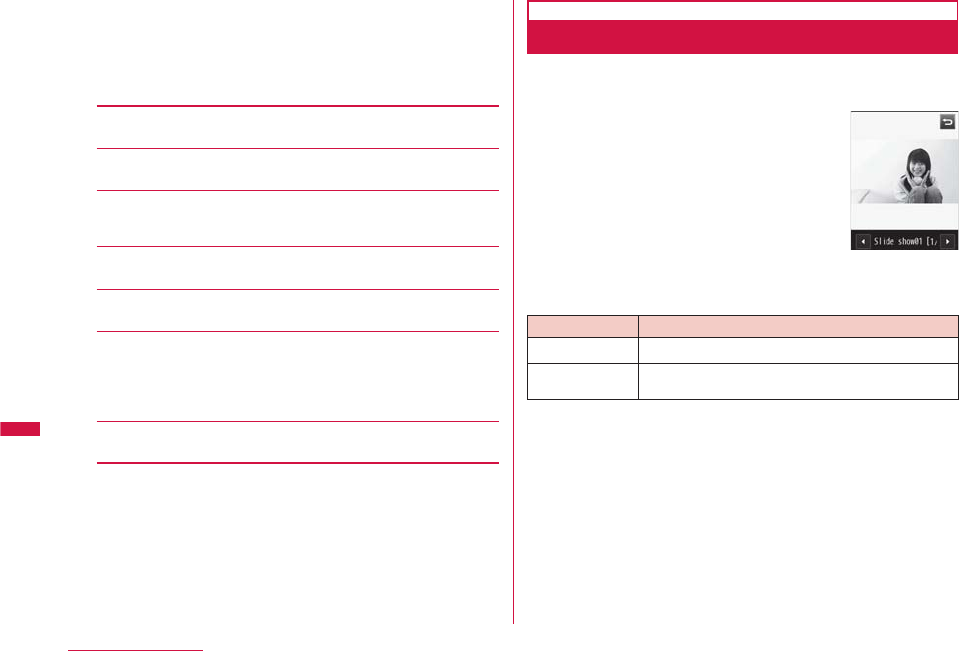
306
Data Management
C
[Add] ▶ Move the cursor to a folder ▶
C
[Open] ▶ Move the cursor to an image ▶
M
[Menu] ▶ Perform the following operations
•
I
[View]: The selected image is displayed.
•
T
[Switch]: Switch between List view and Grid view.
[Select]
Add the selected file to the slideshow.
[View]
Display the selected file.
[File property]
Display the file name, size, and type, etc. of the selected file.
→P301
[List view/Grid view]
Switch the file display format.
[Sort]
Set conditions and sort files.
[Memory info.]
Handset memory : Display the status of storage space, etc. in
"Data Box".
External memory : Display the status of storage space, etc. of
the microSD card.
[New folder]
This option is not available.
Repeat Step 3 to save images ▶
I
[Done]
b
To delete the saved image
Move the cursor to an image to delete and press
M
[Delete] ▶ "Yes".
Displaying Slideshow
Slideshow list screen (P305) ▶ Move the
cursor to a slideshow ▶
C
[View]
Slideshow display
screen
b
Key operations while viewing a slideshow
Operation Description
J
Play the previous/next slideshow
C
[Full] Hide the soft keys and display a full slideshow/
restore to the original display size
307
Data Management
Continue on the next page
Slideshow List Screen Sub Menu
Slideshow list screen (P305) ▶ Move the
cursor to a slideshow ▶
M
[Menu] ▶ Perform
the following operations
[Add images]
Add images to the selected slideshow.
[Delete]
Delete the selected slideshow.
[Edit title]
Change the display name of the selected slideshow. Up to 30 full-
pitch or half-pitch characters can be entered.
[Set as stand-by]
Set the selected slideshow as the Stand-by display.
[View settings]
Set the image display format, zoom ratio, or interval between
slideshow frames.→P299
Slideshow Display Screen Sub Menu
Slideshow display screen (P306) ▶
M
[Menu]
▶ Perform the following operations
[Delete]
Delete the displayed slideshow.
[Edit title]
Change the display name of the displayed slideshow. Up to 30 full-
pitch or half-pitch characters can be entered.
[Full screen]
View the slideshow in Full screen. (In Full screen view, the following
operations are available.)
•
C
/
Q
: Return the full screen view to the original view.
•
J
: Display the previous/next slideshow.
[Set as stand-by]
Set the displayed slideshow as the Stand-by display.
[View settings]
Set the image display format, zoom ratio, or interval between
slideshow frames.→P299
Moving picture/i-motion player
Playing Moving Pictures/i-motion
You can play moving pictures you captured, or i-motion
obtained from sites or i-mode mails.
b
Available file formats
File format*MP4 (Mobile MP4)
Encoding method MP4 file
Video: MPEG-4, H.263, and H.264
Audio: AMR, AAC, HE-AAC, and Enhanced
aacPlus
File extension mp4, 3gp
* Some files in a compatible file format may not be played.
Continued on next page
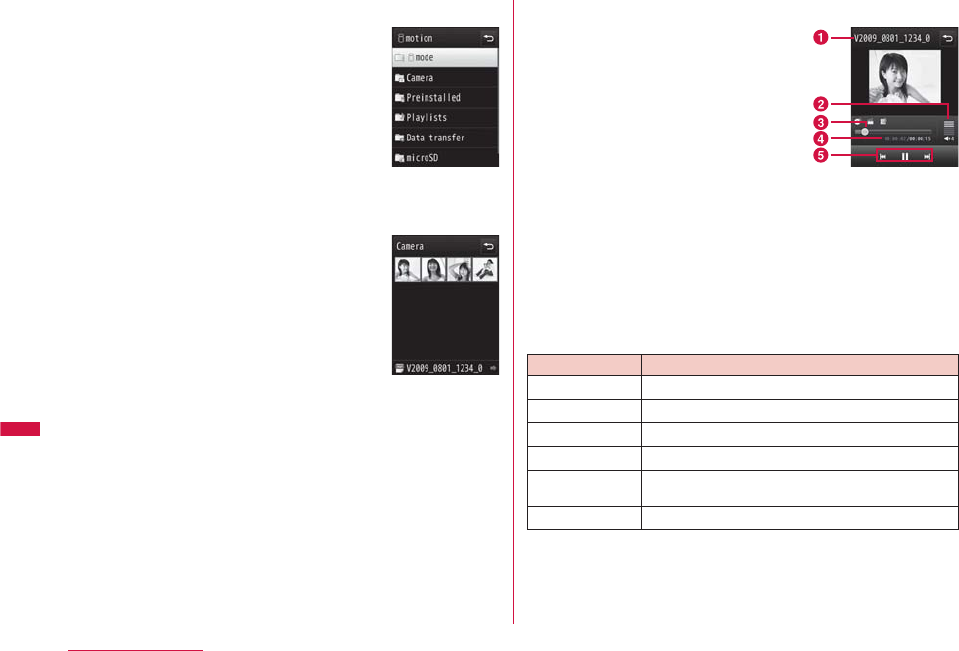
308
Data Management
M
▶ "Data Box" ▶ "i-motion"
•
I
[New]: Create a folder.
i-motion screen
Move the cursor to a folder ▶
C
[Open]
•
I
[Mail]: Display the Compose message
screen with the selected file attached.
•
g
[Delete]: Delete the selected file.
•
T
[Switch]: Switch between List view and
Grid view.
• Icons displayed on the list screen.→P295
i-motion file list
screen
Move the cursor to a file ▶
C
[Play]
•
T
[Mail]: Display the Compose
message screen with the file in
playback attached.
i-motion playback
screen
a
Display name of the file
b
Volume
c
Playback progress bar
Display the playback elapsed time.
d
Elapsed time/total time
e
Control keys
Display available navigation keys.
b
Key operations on the i-motion playback screen
Operation Description
C
[Pause/Play] Pause/Play
I
[Stop] Stop
J
Play the previous/next file
L
(Hold down) While being pressed, rewind the video/sound
R
(Hold down) While being pressed, fast forward the video/
sound
F
/
E
,
H
Adjust the volume

309
Data Management
Continue on the next page
When Link is set in ticker
After i-motion playback ends, a confirmation appears asking
whether to use Phone To/AV Phone To/Web To/Mail To. To use
the function, select an item and operate.
Note
• Some files may not be fast forwarded and rewound during
playback.
• When you fast forward or rewind i-motion during playback,
i-motion is paused.
i-motion Screen Sub Menu
i-motion screen (P308) ▶ Move the cursor to a
folder ▶
M
[Menu]
• The i-motion screen sub menu is the same as "My Picture
Screen Sub Menu" (P297).
i-motion File List Screen Sub Menu
i-motion file list screen (P308) ▶ Move the
cursor to a file ▶
M
[Menu] ▶ Perform the
following operations
[Files]
Play : Play the selected file.
Rename : Change the display name of the selected file.
Reset name : Reset the display name of the selected file to its
default title. If no title is set, "No title" is displayed.
File property : Display the file name, size, and type, etc. of the
selected file.→P311
[Delete]
One : Delete the selected file.
Selected : Select and delete files.
▶ Mark files to delete ▶
I
[Done] ▶ "Yes"
• Press
M
[SelAll/ClrAll] to select/clear all.
All : Delete all files in the folder.
▶
I
[Done] ▶ "Yes" ▶ Enter the Terminal security code
• Press
M
[SelAll/ClrAll] to select/clear all.
[Move]
One : Move the selected file.
▶ Select a destination folder
Selected : Select and move files.
▶ Select a destination folder ▶ Mark files to move ▶
I
[Done]
• Press
M
[SelAll/ClrAll] to select/clear all.
All : Move all files in the folder.
▶ Select a destination folder ▶
I
[Done] ▶ Enter the
Terminal security code
• Press
M
[SelAll/ClrAll] to select/clear all.
[Copy]
One : Copy the selected file.
▶ Select a destination folder
Selected : Select and copy files.
▶ Select a destination folder ▶ Mark files to copy ▶
I
[Done]
• Press
M
[SelAll/ClrAll] to select/clear all.
All : Copy all files in the folder
▶ Select a destination folder ▶
I
[Done] ▶ Enter the
Terminal security code
• Press
M
[SelAll/ClrAll] to select/clear all.
Continued on next page
310
Data Management
[Send via]
Mail : Create i-mode mail with the selected file attached. Go to
Step 2 in "Composing and Sending i-mode Mail" (P138).
IrDA : Send a file via infrared communication.
YouTube : Upload the selected file to YouTube
[Set as tone]
Set the selected file as a ring tone, etc.
[Set as display]
Set the selected file as the Stand-by display or incoming call screen.
[Sort]
Set conditions and sort files.
[Memory info.]
Handset memory : Display the status of storage space, etc. in
"Data Box".
External memory : Display the status of storage space, etc. of the
microSD card.
[New folder]
This option is not available.
[List view/Grid view]
Switch the file display format.
Note
<YouTube>
• The FOMA terminal connects to the YouTube site. Upload files
by mail attachment. The captured moving picture is retained up
to the compose message screen for uploading so make sure
the receiver's address.
• A file of more than 2MB cannot be uploaded.
• For details, visit YouTube site (http://www.youtube.com/) via
PC, etc.
i-motion Playback Screen Sub Menu
i-motion playback screen (P308) ▶
M
[Menu]
▶ Perform the following operations
[Send via mail]
Create i-mode mail with the selected file attached. Go to Step 2 in
"Composing and Sending i-mode Mail" (P138).
[Set as tone]
Set the file in playback as a ring tone, etc.
[Set as display]
Set the selected file as the Stand-by display or incoming call screen.
[Expand]*
Enlarge moving pictures/i-motion in the horizontal view.
• Press
Q
to restore to the original display size.
[Screen setting]*
Normal Play : Set to play a file in the vertical view.
Full screen play (hor.) : Set to enlarge and play a file in the
horizontal view.
[Chapter list]
Display the chapter list.
[Edit]
Edit the moving picture/i-motion in playback.→P312
[File property]
Display the file name, size, and type, etc. of the file in playback.
→P311
* Cannot select after playback ends.
311
Data Management
Continue on the next page
Note
• During the sub menu operation, the moving picture/i-motion is
paused.
<Set as tone/Set as display>
• The following moving pictures/i-motion cannot be set as a
Chaku-motion or incoming call screen:
- Files that were transferred to a PC or another FOMA terminal
via infrared communication or DOCOMO keitai datalink and
transferred back to the FOMA terminal
- Files that were copied or moved from the microSD card to
the FOMA terminal, including those copied or moved from the
terminal to the microSD card and copied or moved back to
the FOMA terminal (Except i-motion that supports contents
migration)
Viewing Moving Pictures/i-motion Properties
i-motion playback screen (P308) ▶
M
[Menu]
▶ "File property"
•
I
[Edit]: Edit properties.
b
Properties displayed on the File detail screen
Item Description
File name Display the file name
File size Display the file size
File type Display the file format
Date & Time (Saved)*1 Display the saved date and time
Play time Display the file playback time
Display size Display the resolution
Video Display the video format
Audio Display the sound format
• HE-AAC and Enhanced aacPlus are
displayed as AAC.
File restriction
Display whether the file is restricted→P302
Ringtone Display whether the file can be set as a
ring tone
Receive display Display whether the file can be set as the
Stand-by display or incoming call screen
Title Display the default title of the file
Creator Display creator information
Copyright Display copyright information
Description Display the file description
Source Display the source
Move to the microSD
*2
Display whether the file can be moved to a
microSD card
*1 Appear only for data in the FOMA terminal memory.
*2 Data in a microSD card will be moved to the phone; display
whether data can be moved to the phone.
312
Data Management
Edit moving pictures/i-motion
Editing Moving Pictures/i-motion
You can edit moving pictures/i-motion.
• The pre-installed files cannot be edited.
• Some files may not be edited.
• The ticker displayed on i-motion cannot be edited.
Clipping a Frame of a Moving Picture as a
Still Image
You can clip a still image from a moving picture/i-motion.
The clipped image is saved to the "Camera" folder in "My
picture" of "Data Box".
i-motion playback screen (P308) ▶ Display the
image to be clipped as a still image
• Operations during i-motion playback→P306
M
[Menu] ▶ "Edit" ▶ "Capture"
Clipping a Frame of a Moving Picture
You can clip a part of a moving picture/i-motion.
The clipped moving picture/i-motion is saved to the same
folder as the source file.
i-motion playback screen (P308) ▶
M
[Menu]
▶ "Edit" ▶ "Clipping" ▶ Perform the following
operations
[For mail short]
Clip the video from the selected start point to 500KB or smaller and
save it. This option can be selected when the video size exceeds
500KB.
[For mail long]
Clip the video from the selected start point to 2MB or smaller and
save it. This option can be selected when the video size exceeds
2MB.
[Bound]
Clip the video from the selected start point to the selected end point
and save it.
▶ Press
C
[Play] to play a moving picture/i-motion ▶ At start
point to clip,
I
[Start] ▶ At end point to clip,
I
[End]
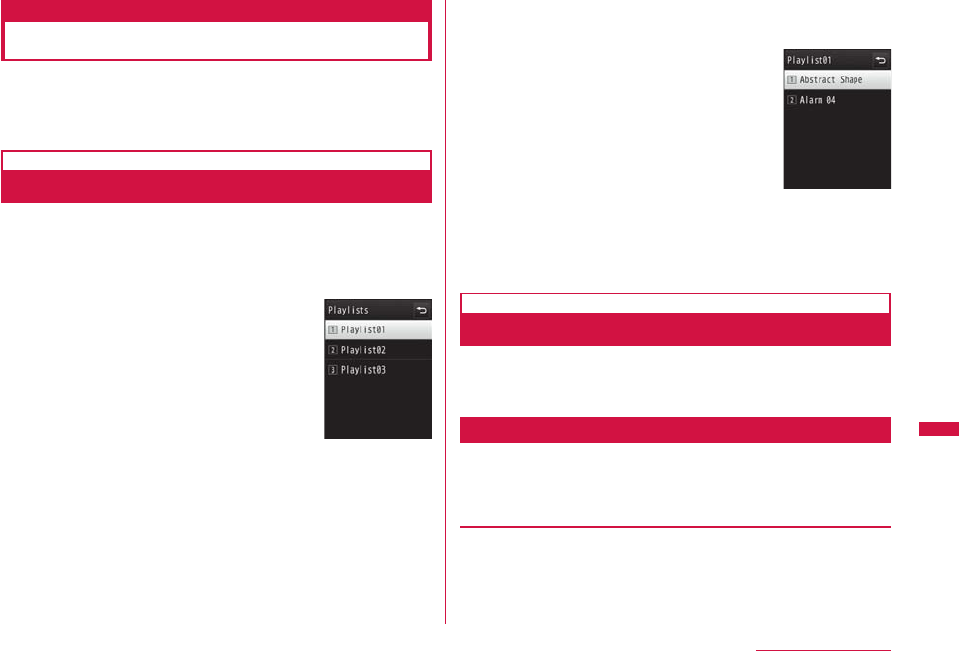
313
Data Management
Continue on the next page
Using a Playlist
The playback order of moving pictures/i-motion can be
specified in a playlist. Select your favorite moving pictures/
i-motion saved on the FOMA terminal and microSD card and
play them in your favorite order.
Creating a Playlist
Up to 10 playlists can be saved. Up to 99 moving pictures/
i-motion can be saved per playlist.
M
▶ "Data Box" ▶ "i-motion" ▶ Move the
cursor to "Playlists" ▶
C
[Open]
Playlist list screen
I
[New] ▶ Enter a playlist name
• Up to 255 full-pitch/half-pitch characters can be entered.
C
[Add] ▶ Mark moving pictures/i-motion to
save to a playlist ▶
I
[Done]
Saved moving
picture/i-motion
list screen
I
[Done]
Playing a Playlist
Playlist list screen (P313) ▶ Move the cursor
to a playlist to play ▶
C
[Play]
Playlist List Screen Sub Menu
Playlist list screen (P313) ▶ Move the cursor
to a playlist ▶
M
[Menu] ▶ Perform the
following operations
[Add i-motion to playlist]
Add moving pictures/i-motion to the selected playlist.
▶ Mark moving pictures/i-motion to add to the playlist ▶
I
[Done]
▶
I
[Done]
Continued on next page
314
Data Management
[Delete]
One : Delete the selected playlist.
Select : Select and delete playlists.
▶ Mark playlists to delete ▶
I
[Delete] ▶ "Yes"
• Press
M
[Menu] to select "Mark all" or "Unmark all".
All : Delete all playlists.
[Edit title]
Edit the selected playlist name.
Saved Moving Picture/i-motion List Screen Sub Menu
Playlist list screen (P313) ▶ Move the cursor
to a playlist ▶
M
[Menu] ▶ "Add i-motion to
playlist" ▶
M
[Menu] ▶ Perform the following
operations
[Play]
Play from the selected moving picture/i-motion.
[Change order]
Change the order of the selected moving picture/i-motion.
▶ Select a moving picture/i-motion to move ▶ Select a destination
▶ "Yes"
[Delete]
One : Delete the selected moving picture/i-motion.
Select : Select and delete moving pictures/i-motion.
▶ Mark moving pictures/i-motion to delete ▶
I
[Delete]
▶ "Yes"
• Press
M
[Menu] to select "Mark all" or "Unmark all".
All : Delete all moving pictures/i-motion.
Melody player
Playing a Melody
You can play pre-installed melodies or melodies downloaded
from sites.
b
Available file formats
File Format*SMF, MFi
File extension mid, mld
* Some files in a compatible file format may not be played.
M
▶ "Data Box" ▶ "Melody"
•
I
[New]: Create a folder.
Melody screen
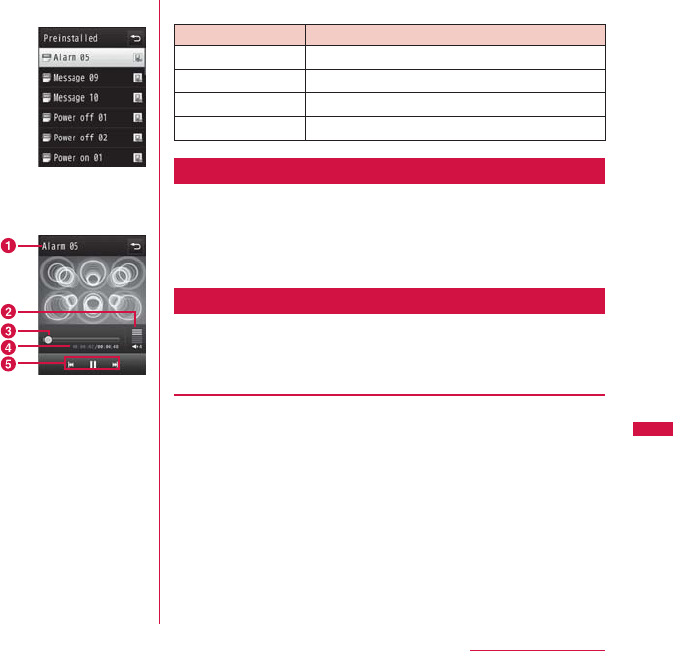
315
Data Management
Continue on the next page
Move the cursor to a folder ▶
C
[Open]
•
I
[Mail]: Display the Compose message
screen with the selected file attached.
•
g
[Delete]: Delete the selected file.
• Icons displayed on the list screen→P295
Melody file
list screen
Move the cursor to a file ▶
C
[Play]
• T[Mail]: Display the Compose
message screen with the file in
playback attached.
Melody playback
screen
a
Display name of the file
b
Volume
c
Playback progress bar
Display the playback elapsed time.
d
Elapsed time/total time
e
Control keys
Display available navigation keys.
b
Key operations on the Melody playback screen
Operation Description
C
[Pause/Play] Pause/Play
I
[Stop] Stop
J
Play the previous/next file
F
/
E
,
H
Adjust the volume
Melody Screen Sub Menu
Melody screen (P314) ▶ Move the cursor to a
folder ▶
M
[Menu]
• The Melody screen sub menu is the same as the "My Picture
Screen Sub Menu" (P297). However, "Grid view" is not available.
Melody File List Screen Sub Menu
Melody file list screen (P315) ▶ Move the
cursor to a file ▶ M[Menu] ▶ Perform the
following operations
[Files]
Play : Play the selected file.
Rename : Change the display name of the selected file.
Reset name : Reset the display name of the selected file to its
default name.
File property : Display the name, size, and type, etc. of the selected
melody.→P317
Continued on next page

316
Data Management
[Delete]
One : Delete the selected file.
Selected : Select and delete files.
▶ Mark files to delete ▶
I
[Done] ▶ "Yes"
• Press
M
[SelAll/ClrAll] to select/clear all.
All : Delete all files in the folder.
▶
I
[Done] ▶ "Yes" ▶ Enter the Terminal security code
• Press
M
[SelAll/ClrAll] to select/clear all.
[Move]
One : Move the selected file.
▶ Select a destination folder
Selected : Select and move files.
▶ Select a destination folder ▶ Mark files to move ▶
I
[Done]
• Press
M
[SelAll/ClrAll] to select/clear all.
All : Move all files in the folder.
▶ Select a destination folder ▶
I
[Done] ▶ Enter the
Terminal security code
• Press
M
[SelAll/ClrAll] to select/clear all.
[Copy]
One : Copy the selected file.
▶ Select a destination folder
Selected : Select and copy files.
▶ Select a destination folder ▶ Mark files to copy ▶
I
[Done]
• Press
M
[SelAll/ClrAll] to select/clear all.
All : Copy all files in the folder.
▶ Select a destination folder ▶
I
[Done] ▶ Enter the
Terminal security code
• Press
M
[SelAll/ClrAll] to select/clear all.
[Send via]
Mail : Create i-mode mail with the selected melody attached. Go to
Step 2 in "Composing and Sending i-mode Mail" (P138).
IrDA : Send a file via infrared communication.
[Set as]
Set the selected melody as a ring tone, etc.
[Sort]
Set conditions and sort files.
[Memory info.]
Handset memory : Display the status of storage space, etc. in
"Data Box".
External memory : Display the status of storage space, etc. of the
microSD card.
[New folder]
This option is not available.
Melody Playback Screen Sub Menu
Melody playback screen (P315) ▶
M
[Menu]
▶ Perform the following operations
[Send via mail]
Create i-mode mail with the melody in playback attached. Go to Step
2 in "Composing and Sending i-mode Mail" (P138).
[Set as tone]
Set the melody in playback as a ring tone, etc.
[File property]
Display the file name, size, and type, etc. of the melody in playback.
→P317
317
Data Management
Continue on the next page
Note
• During the sub menu operation, the melody playback is paused.
Viewing Melody Properties
Melody playback screen (P315) ▶
M
[Menu]
▶ "File property"
•
I
[Edit]: Edit properties.
b
Properties displayed on the File detail screen
Item Description
File name Display the file name
File size Display the file size
File type Display the file format
Date & Time (Saved)*1 Display the saved date and time
Play time Display the file playback duration
File restriction
Display whether the file is restricted→P302
Ringtone Display whether the file can be set as a
ring tone
Title Display the default title of the file
Source Display the source
Move to the microSD*2 Display whether the file can be moved to a
microSD card
*1 Appear only for data in the FOMA terminal memory.
*2 Data in a microSD card will be moved to the phone; display
whether data can be moved to the phone.
microSD Cards
You can save data on the FOMA terminal such as Phonebook
entries, mail, or Bookmarks to a microSD card, or can load
data on a microSD card to the FOMA terminal. Also, you can
browse data on a microSD card from the FOMA terminal.
• L-03B supports a microSD card of up to 2GB and a microSDHC
card of up to 8GB (commercially available) (as of June, 2009). For
the latest information on operations of microSD cards, including
manufacturers and capacity of cards, visit the following site
(in Japanese only). A microSD card not listed at the site may not
function.
- From i-mode "iMenu" ▶ "メニューリスト (Menu list)" ▶ "ケータイ電話
メーカー (Mobile Phone Manufacturers)" ▶ "WOW LG"
- From a PC http://jp.lgmobile.com/
Note that the information on the site shows
results of compatibility checks and the results
are not guaranteed.
• You can purchase microSD memory cards and
microSD card adapters from electric appliance
stores, etc.
QR code to
access the site

318
Data Management
Precautions on Using microSD Cards
• microSD cards formatted by another device such as a PC may not
be usable on the FOMA terminal. Use microSD cards formatted by
L-03B. Note that when formatting a microSD card, all data on the
card is deleted.→P323
• microSD cards may lose data or deform due to an accident or
failure. It is recommended that you make a copy of important data
and keep it in a separate place. DOCOMO is not responsible for loss
or alteration of any data.
• It may take a while to communicate depending on the amount of
data to transfer. Also, data may not be copied.
• Do not turn the FOMA terminal power off while data is being read or
written.
• Do not unplug the FOMA USB Cable with Charge Function 01/02
(optional) while data is being read or written, or a microSD is being
formatted. This may result in data loss.
• Never remove the microSD card while the card is being accessed
such as when data on the card is being displayed or the storage
capacity of the card is being checked.
• Do not attach labels or stickers on microSD cards. Even the
thickness of labels may cause contact failure or data corruption.
• Do not touch the contacts with your hand or metal objects.
• Do not apply strong force, do not bend or drop, and do not let the
card wet.
• Do not leave a removed microSD card within the reach of infants.
Accidental swallowing or injury may result.
• When inserting/removing a microSD card, do not place your face
close to the card because the card may eject when you suddenly
release your fingers off. Also, do not let small children touch the
card. Injury may result.
Inserting/Removing a microSD Card
Before inserting/removing a microSD card, make sure to turn
the FOMA terminal power off.
Inserting
Open the microSD card slot cover (
a
) and
rotate in the direction of the allow
b
Slowly insert a microSD card with the metal
contacts side up until it clicks
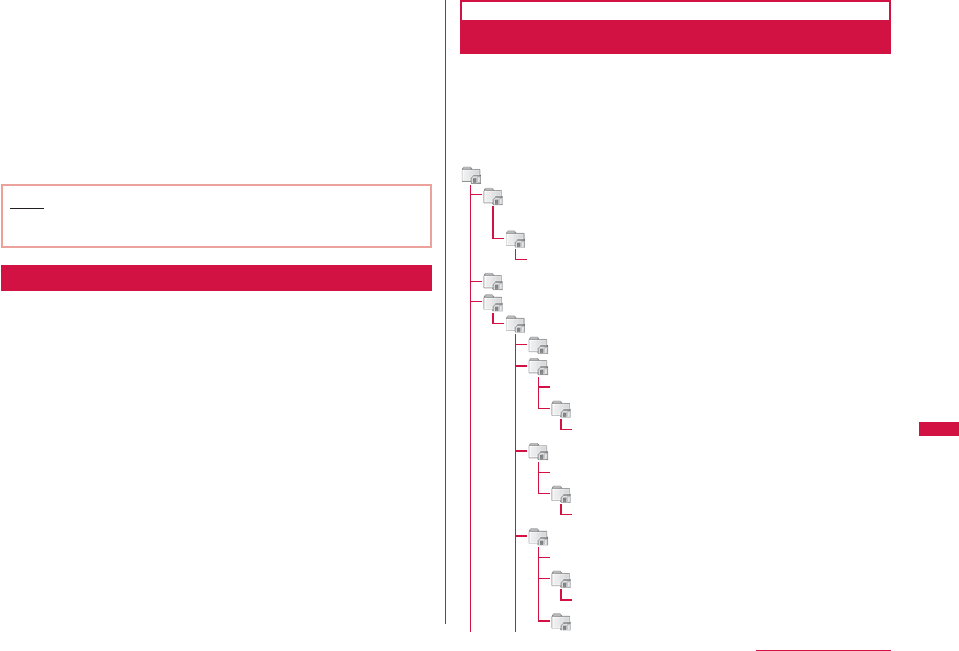
319
Data Management
Continue on the next page
Close the microSD card slot cover
Note
• Insert a microSD card properly. If the card is not inserted
properly, the card cannot be used.
Removing
Follow Step 1 in "Inserting" to open the cover
and softly push the microSD card in the
direction of the allow
The microSD card pops out slightly.
Remove the microSD card
Folder Structure on a microSD Card
When you move or copy files from the FOMA terminal to the
microSD card, or save still images or moving pictures captured
with Camera directly to the microSD card, a folder compatible
with the file type is automatically created on the microSD card.
• When you write data to the microSD card from a PC, a folder
structure and file name like the following are required:
L-03B
DCIM (Captured image, DCF-compliant JPEG, GIF other
than animation)
△△△
LGDCF
L03Baaaa.JPG/.GIF
LGeDB (Song (WMA file) management information)
PRIVATE
DOCOMO
TABLE (Management information)*1
STILL (non-DCF-compliant JPEG, GIF animation)
STILaaaa.JPG/.GIF
SUDaaa
STILaaaa.JPG/.GIF
RINGER(Melody)
RINGaaaa.MLD/.MID
RUDaaa
RINGaaaa.MLD/.MID
MMFILE (Sound-only moving picture/i-motion)
MMFaaaa.3GP
MUDaaa
MMFaaaa.3GP
WM (WMA file)*2
Continued on next page
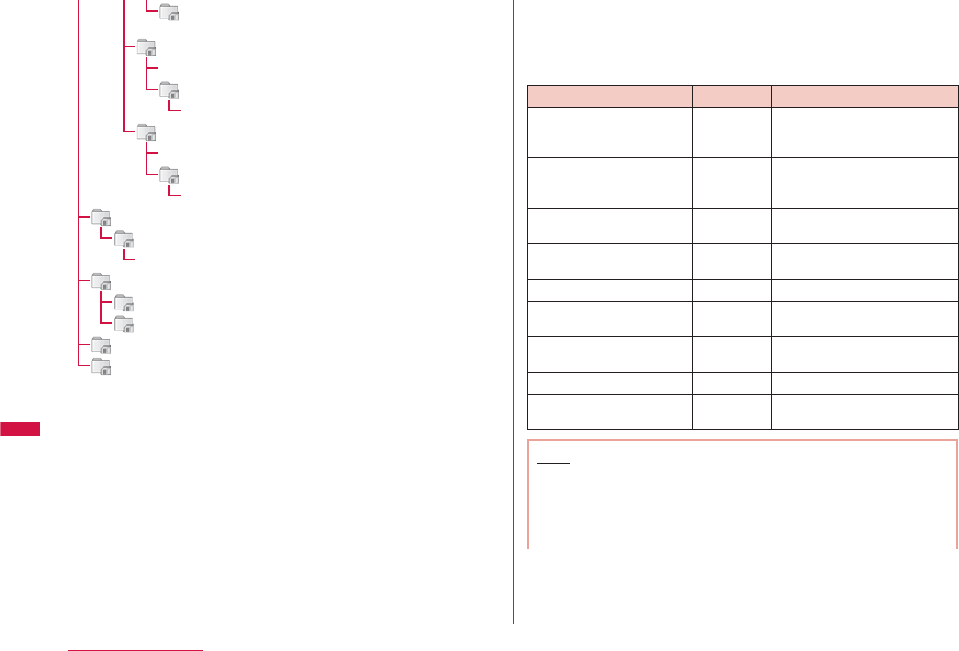
320
Data Management
WM_SYSTEM (WMA file management information
and license information)*2
DECOIMG (Deco-mail pictogram)
DIMGaaaa.JPG/.GIF
DUDaaa
DIMGaaaa.JPG/.GIF
OTHER (Others)
OTHERaaa.xxxx
OUDaaa
OTHERaaa.xxxx
SD_VIDEO (Moving picture/i-motion)
PRLaaa
MOLaaa.3GP
SD_BIND (Data supporting content migration)*2
SVC00001 (Moving picture/i-motion)
SVC00002 (Chaku-Uta Full
®
song)
SD_PIM (Personal data)
SD_AUDIO (SD-Audio-compliant music data)*2
xxxx : Extension (3- to 4-digit, half-pitch alphanumeric characters)
△△△
: 3-digit, half-pitch numeric characters between 100 and 999
(Use the same number for a folder name and file name saved
in the folder.)
aaa : 3-digit, half-pitch numeric characters between 001 and 999
aaaa : 4-digit, half-pitch numeric characters between 0001 and
0999
*1 The "TABLE" folder has sub folders that store additional
information for "DCIM", "STILL", "RINGER", "MMFILE", "DECOIMG",
"SD_VIDEO", and "OTHER".
*2 Data is encrypted and may not be viewed directly on a PC, etc.
If you delete, edit, or add files under these folders, files may not
work properly on L-03B.
b
Number of savable files on a microSD card
• The number of savable files on the microSD card varies
depending on the capacity of the microSD card.
• You can check available space on the microSD card by
accessing "Memory info." or "Memory status".→P325, P374
File Folder Number of savable items
Still image (DCF-
compliant JPEG, GIF
other than animation)
DCIM Up to 900 folders/Up to
999 files per folder
Still image (non-DCF-
compliant JPEG, GIF
animation)
STILL Up to 999 folders/Up to
999 files per folder
Melody RINGER Up to 999 folders/Up to
999 files per folder
Sound-only moving
picture/i-motion MMFILE Up to 999 folders/Up to
999 files per folder
WMA file WM Up to 1,000 files
Deco-mail pictogram DECOIMG Up to 999 folders/Up to
999 files per folder
Moving picture/i-motion SD_VIDEO Up to 999 folders/Up to
999 files per folder
Personal data SD_PIM 1 folder/65,535 files
Others OTHER Up to 999 folders/Up to
999 files per folder
Note
• In some cases, a microSD card used with this FOMA terminal
cannot be used with other microSD-compatible FOMA terminals
because the folder structure is different.
• Mails that contain Korean texts in a microSD card are not
displayed correctly on the Korean-incompatible terminal.
321
Data Management
Continue on the next page
• Depending on the PC in use, folder/file names may appear
in lower case. Also, file extensions or certain folders (hidden
folders), etc. may not appear.
• Do not delete or move folders on the microSD card using a PC.
If you do so, the folders may no longer be readable by L-03B.
Using a microSD Card
You can move or copy files saved in Data Box on the FOMA
terminal, such as still images, moving pictures or i-motion, to
the microSD card, and you can view files saved from a PC to
the microSD card on the FOMA terminal.
Viewing/Playing Files on a microSD Card
You can view/play files on the microSD card in the same way
as ones on the FOMA terminal from "Data Box".
M
▶ "Data Box" ▶ "My picture"/"Music"/
"i-motion"/"Melody" ▶ Move the cursor to
"microSD" ▶
C
[Open]
• "Displaying Images"→P296
• "Managing Music Data"→P270
• "Playing Moving Pictures/i-motion"→P307
• "Playing a Melody"→P314
Note
• Some files may not be viewed/played.
• The folder/file list screen sub menu for a microSD card is the
same as one for the FOMA terminal. However, the files cannot
be set to the Stand-by display or ring tone, sent via infrared
communication, and saved at the Data Center.
Copying/Moving Files between the FOMA
Terminal and a microSD Card
You can copy or move files between the FOMA terminal
and a microSD card by copying or moving files between the
"microSD" folder and other folders in Data Box.
Example: To move a camera image saved on the FOMA
terminal to a microSD card
M
▶ "Data Box" ▶ "My picture"
Move the cursor to a folder ▶
C
[Open]
• Select a folder other than "microSD".
Move the cursor to a file ▶
M
[Menu] ▶
"Move" ▶ "One"
"External memory"
Move the cursor to the destination folder ▶
I
[Open] ▶
C
[Select]
Continued on next page
322
Data Management
Note
• Files which can be copied/moved are JPEG/GIF image files
excluding pre-installed data, and moving pictures whose size is
QCIF or smaller, and melodies.
• Chaku-Uta Full
®
songs, or i-motion downloaded from sites
cannot be copied to a microSD card.
• Some files may not be copied/moved depending on file type or
size.
• Flash movies saved on this FOMA terminal cannot be copied/
moved to a microSD card.
• You can move transferable copyright protected i-motion or
music data saved in the FOMA terminal to a "Movablecontents"
folder in each "microSD" folder.
Exchanging Personal
Information between the FOMA
Terminal and a microSD Card
You can copy personal information between the FOMA
terminal and a microSD card, and you can back up your data
in the FOMA terminal to a microSD card.
Personal information includes the following:
- Phonebook
- Schedule
- Text memo
- To do list
- Inbox
- Outbox
- Unsent message
- Bookmark
Copying Personal Information on the FOMA
Terminal to a microSD Card
You can copy personal information saved on the FOMA
terminal to a microSD card.
Copying Data One Piece at a Time
Example: To copy a Phonebook entry
Stand-by display ▶
D
▶ Select a Phonebook
entry to copy ▶
M
[Menu] ▶ "Copy" ▶
"to microSD"
Selecting Data Type to Make Copy at a Time (Backup)
M
▶ "LifeKit" ▶ "microSD" ▶ "PIM"
I
[Backup] ▶ Select a data type to copy
Enter the Terminal security code ▶ "Yes"
b
For Phonebook
A confirmation asking whether to copy data in "Own
Number" appears.
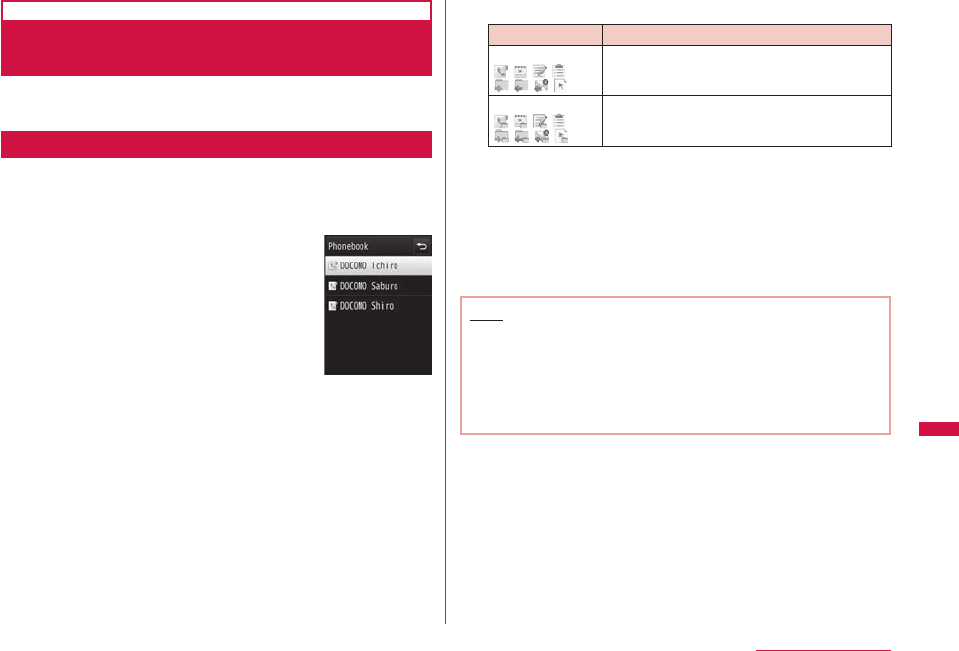
323
Data Management
Continue on the next page
Copying/Overwriting Personal Information
on a microSD Card to the FOMA Terminal
You can copy/overwrite personal information saved on a
microSD card to the FOMA terminal.
Copying Data One by One
M
▶ "LifeKit" ▶ "microSD" ▶ "PIM"
Select a data type
Data saved on the microSD card is displayed.
Personal data list
screen
(Ex.: Phonebook)
b
Icons displayed on the Personal data list screen
Icon Description
/ / / /
/ / /
Individual data (one piece of data)
Phonebook/Schedule/Memo/To do list/
Inbox/Outbox/Unsent message/Bookmark
/ / / /
/ / /
Backup data (multiple data)
Phonebook/Schedule/Memo/To do list/
Inbox/Outbox/Unsent message/Bookmark
Move the cursor to data ▶
M
[Menu]
•
C
[Select]: Display details about data.
"Copy to phone" ▶ "Yes"
b
For backup data
Select "Copy to phone" ▶ enter the Terminal security
code ▶ "Yes".
Note
• In Step 3, you can select backup data ▶ move the cursor to
data ▶ press
M
[Menu] to select "Copy to phone" or "Overwrite
to phone".
If you select "Copy to phone", you can further select "Selected
data" or "All data".
• The maximum number of data that can be saved on the FOMA
terminal can be displayed for individual data in backup data.

324
Data Management
Personal Data List Screen Sub Menu
Personal data list screen (P323) ▶ Move the
cursor to data ▶
M
[Menu] ▶ Perform the
following operations
[Rename]*
Change the display name of the selected file.
[Copy to microSD]
Copy (backup) all data of the displayed data type from the FOMA
terminal to a microSD card at a time.
▶ Enter the Terminal security code ▶ "Yes"
• For Phonebook entries, a confirmation asking whether to copy
saved data in "Own Number" appears.
[Copy to phone]*
Copy the selected data to the FOMA terminal.
• For backup data, select "Copy to phone" ▶ enter the Terminal
security code ▶ "Yes".
[Overwrite to phone]*
Overwrite the data on the FOMA terminal with the selected data.
→P324
[Multiple choice]*
Select and delete data.
▶ Mark data to delete ▶
I
[Delete] ▶ "Yes"
• Press
M
[Menu] to select "Delete", "Copy to phone", or "Select all"
or "Clear all" from "Select/Clear".
[Delete]*
Delete the selected data.
[Memory info.]
Display the status of storage space, etc. of the microSD card.
* Not displayed if there is no data on the microSD card.
Overwriting with Backup Data
You can overwrite the data on the FOMA terminal with data
backed up in advance.
• Note that selecting "Overwrite to phone" deletes all saved data on
the FOMA terminal and replaces it with the selected data from the
microSD card.
Make sure important data is not saved before selecting "Overwrite
to phone".
Personal data list screen (P323) ▶ Move
the cursor to backup data ▶
M
[Menu] ▶
"Overwrite to phone"
Enter the Terminal security code ▶ "Yes"
b
For Phonebook
A confirmation asking whether to copy data in "Own
Number" appears.
325
Data Management
Continue on the next page
Managing a microSD Card
Formatting a microSD Card
Format (initialize) a microSD card so that it can be used on
the FOMA terminal.
M
▶ "LifeKit" ▶ "microSD" ▶ "Reset microSD"
A message indicating all data will be deleted appears. Select
whether you want to continue to format.
"Yes" ▶ Enter the Terminal security code
Note
• Use this FOMA terminal to format the card.
• Note that when formatting a microSD card, all data on the card
is deleted.
Updating Data on a microSD Card
Update data on the microSD card if data cannot be displayed
correctly on the FOMA terminal after changing, adding, or
deleting data on the microSD card using another device.
M
▶ "LifeKit" ▶ "microSD" ▶ "Data update"
Mark data types to update ▶
I
[Done]
Note
• Updating data may take a while if a large amount of data is
saved on the microSD card.
• If you use another device to save data on the microSD card, the
data saved on the card may not be displayed correctly on the
FOMA terminal due to insufficient available memory space for
creating management information on the FOMA terminal.
Checking Usage Status on a microSD
Card
M
▶ "LifeKit" ▶ "microSD" ▶ "Memory info."
Note
• If the used space is not shown as "0KB" when no data is saved
on the microSD card, format the card.
• The actual available space on a microSD card is smaller than
the space printed on the card.
• Data may not be saved if there is not sufficient memory space
on the microSD card. Delete unnecessary data or insert a
microSD card with sufficient memory space to save data.
326
Data Management
Using the FOMA Terminal as a
microSD Card Reader/Writer
Connect this FOMA terminal with a microSD card inserted to
a PC and read/write data on a microSD card.
• To use a microSD card, you need a microSD card separately.
• Only a PC with Windows Vista, XP, or Windows 2000 (Japanese
versions) can be used to read/write data on a microSD card.
Operation with other OS is not guaranteed.
• To use the FOMA terminal as a microSD card reader/writer, set up
the USB mode. Before setting the USB mode, disconnect the FOMA
USB Cable with Charge Function 01/02 (optional).
M
▶ "Settings" ▶ "Others" ▶ "USB mode
setting" ▶ "microSD mode"
Open the External Connector Terminal cover of
the FOMA terminal (
a
) and insert the external
connector of the FOMA USB Cable with Charge
Function 01/02 with the front side (indicated
by a mark, label, etc.) up until it clicks (
b
)
Connect the USB connector of the FOMA USB
Cable with Charge Function 01/02 to a USB
port on a PC (
c
)
USB connector
Release button
External connector
(label side up)
Release button
Note
• When removing a microSD card or the FOMA USB Cable with
Charge Function 01/02 from a PC, be sure to perform the
procedure on safe removal for hardware from the task tray of
the PC. Removing the memory card or FOMA USB Cable with
Charge Function 01/02 without performing the proper steps
may result in data loss.
• When switching USB mode setting, disconnect the FOMA USB
Cable with Charge Function 01/02 first. When the FOMA USB
Cable with Charge Function 01/02 is connected, the USB
mode cannot be switched.
• If the FOMA USB Cable with Charge Function 01/02 is
disconnected, the USB mode setting automatically returns to
"Communication mode".
b
Important
Make sure that the FOMA terminal is correctly connected to a
PC. If it is not connected correctly, data may not only fail to be
exchanged but also be lost.
327
Data Management
Continue on the next page
Infrared communication
Using Infrared Communication
You can exchange Phonebook entries, schedule events or
bookmarks with a device supporting infrared communication.
b
Available data for transfer
Data type
Receiving
capability Sending
capability Number of
savable items
One All
items One All
items
Phonebook (Personal
information)
〇〇〇〇
Refer to P84
Schedule
〇〇〇〇
Up to 200
To Do*1
〇〇〇〇
Up to 50
Received mail
〇〇〇〇
Up to 1,000
Sent mail
〇〇〇〇
Up to 500
Unsent mail
〇〇〇〇
Image file*2
〇×〇×
Up to 2,000
Moving picture file*3
〇×〇×
Up to 1,000
Melody*4
〇×〇×
Up to 1,000
Bookmark*5
〇〇〇〇
Up to 200*6
Memo
〇〇〇〇
Up to 50
*1 If To Do tasks with alarm set are received prior to the set time,
they may not be correctly saved.
*2 Up to 5MB of data per file can be sent/received.
*3 Up to 10MB of data per file can be sent/received.
*4 Up to 100KB of data per file can be sent/received.
*5 Sent/received bookmarks may not be filtered depending on the
other party's terminal model.
*6 Up to 100 for i-mode and 100 for Full browser can be saved.
b
Save location of data received via infrared communication
Data type Save location
Phonebook Phonebook
Schedule Schedule
To Do To do list
Received mail Inbox
Sent mail Outbox
Unsent mail Unsent message
Still image "Data transfer" folder in "My picture" of "Data Box"
Moving picture "Data transfer" folder in "i-motion" of "Data Box"
Melody "Data transfer" folder in "Melody" of "Data Box"
Bookmark "Bookmark" folder in "i-mode"
"Bookmark" folder in "Full browser"
Memo Text memo
328
Data Management
Performing Infrared Communication
• Use infrared devices within a distance of approximately 20cm.
• Do not move the FOMA terminal until the data exchange completes.
• If you hold the FOMA terminal in your hand at infrared
communication, be sure to hold it securely so that it is not shaken.
Infrared port
Within approx. 20cm
15 degrees
15 degrees
Cautions on Data Transfer
• Calls, i-mode, and data communication are not available during
infrared communication because the FOMA terminal turns in the
same status as out of service area.
• Data may not be transferred depending on the other party's FOMA
terminal conditions. Depending on the other party's mobile phone
model, the filter setting of received mail or bookmarks, or group
setting of Phonebook entries may not be reflected, or the content
of Deco-mail may not be saved correctly.
• Infrared communication with infrared devices other than L-03B may
result in data not being received or displayed correctly.
• Communication may take a while depending on the amount of data
to be transferred. Also, data may not be received.
• Infrared communication may not be performed successfully under
direct sunlight or fluorescent light, or near another infrared device,
due to the possible interference.
• Attachments to i-mode mail are also forwarded. However, some
types of attachments may not be forwarded.
• If a message text contains pictographs or symbols, they may not
be displayed correctly on a recipient mobile phone or PC which is
incompatible with pictographs.
• Depending on the recipient terminal, mail subject may be received
partially.
• Infrared communication is not available when Lock all, Data access
lock is set, or when Self mode is activated.
• Mails in large size may not be sent correctly.
• When mail is forwarded, only downloaded attachments are
forwarded.
Send/Receive via infrared communication
Sending and Receiving Data One
by One
Sending a Piece of Data
• Set the receiving device to the infrared receiving mode before
sending data.
Example: To send a Phonebook entry
Stand-by display ▶
D
▶ Move the cursor to a
Phonebook entry ▶
M
[Menu] ▶ "Send Ir data"
▶ "Focused data" ▶ "Yes"
Note
• A message appears if the destination device cannot be found.
Check the distance and angle with the other party again.

329
Data Management
Continue on the next page
Receiving a Piece of Data
M
▶ "LifeKit" ▶ "Receive Ir data" ▶ "Receive"
▶ "Yes"
Perform infrared transmission operations on
the sending device
Infrared communication starts.
"Yes"
Send/Receive all via infrared communication
Sending and Receiving All Data
You can exchange all data with a PC or another FOMA
terminal at a time.
• To exchange all data, an authentication password is used to
identify the FOMA terminals of both sender and receiver correctly.
An authentication password is any 4-digit number that you selected
before infrared communication and should be entered both on the
sending and receiving devices.
Sending All Data
• Set the receiving device to the infrared receiving mode before
sending data.
Example: To send all Phonebook entries on the FOMA terminal
Stand-by display ▶
D
▶
M
[Menu] ▶ "Send Ir
data" ▶ "all in phone"
• If an image is set to a Phonebook entry, a warning indicating
that it may take a while to send appears. Select "Yes" to send.
Enter the Terminal security code ▶ Enter the
authentication password ▶ "Yes"
Infrared communication starts.
Note
• A message appears if the destination device cannot be found.
Check the distance and angle with the other party again.
• Files in "My picture" cannot be sent at a time (one file can be
sent at a time).
Receiving All Data
•
Receiving all data overwrites over the data on the FOMA terminal
and deletes all saved data including protected mails. Make sure that
important data is not saved before sending or receiving all data.
M
▶ "LifeKit" ▶ "Receive Ir data" ▶
"Receive all" ▶ "Yes"
Enter the Terminal security code ▶ Enter the
authentication password
Perform infrared transmission operations on
the sending device
Infrared communication starts.
"Yes"
330
Data Management
Using Infrared Remote Control
Function
You can use the FOMA terminal as a remote controller of an
infrared remote controlled device. An i-αppli can send remote
control signals using infrared rays.
• To use the remote controller function, download software that supports the
device. Key operations for remote control vary depending on the software.
• Some devices may not be controlled.
• Depending on the controlled device or ambient brightness, communication
may not be possible.
• While Self mode is activated, the infrared remote controller cannot be used.
Infrared Remote Control Operations
Point the Infrared port of the FOMA terminal at the remote
control sensor on a TV, etc. and operate the FOMA terminal
within approximately 4m away from the device. Depending on
the controlled device and ambient brightness, remote control
may not be possible.
Within the range of
±15 degrees
Within approx. 4m
Infrared port
Viewing a Document
Display a document file saved on microSD card.
• Save document files in "OTHER" folder or "OUDxxx (xxx are half-pitch
numbers from 0 to 9)" folder of a microSD card.→ P319
b
Available file formats
File type*Microsoft Word, Microsoft Excel, Microsoft
PowerPoint, PDF
Extension doc, xls, ppt, pdf
* Files for Word 2007, Excel 2007, and PowerPoint 2007 cannot
be displayed. Also, some files in a compatible file format may not
be displayed.
M
▶ "Media" ▶ "Document viewer" ▶ Select a
document
During zoom display,
the entire document
and the display area
are shown.
a
Page number/total number of pages
b
Display magnification
331
Data Management
Continue on the next page
b
Operation while viewing a document
Operation Description
M
/
I
/
F
/
E
/ / Zoom/restore the previous zoom ratio
J*1
, / Display previous/next page
K*2
, Slide an image Move the display position
*1 Available only in normal view.
*2 Available only in enlarged view.
Note
• Tilting the FOMA terminal to the left automatically switches
display to the horizontal view.
