LG Electronics USA L05D PCS GSM Phone with WLAN, Bluetooth and RFID User Manual DS1106 E UG indb
LG Electronics MobileComm USA, Inc. PCS GSM Phone with WLAN, Bluetooth and RFID DS1106 E UG indb
Contents
- 1. Users Manual 1
- 2. Users Manual 2
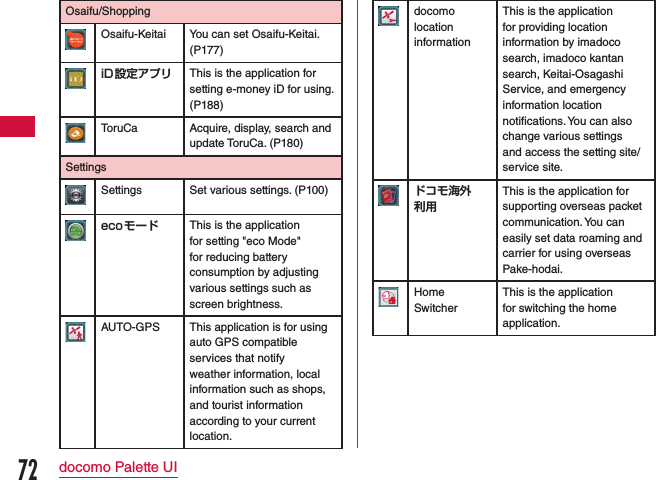
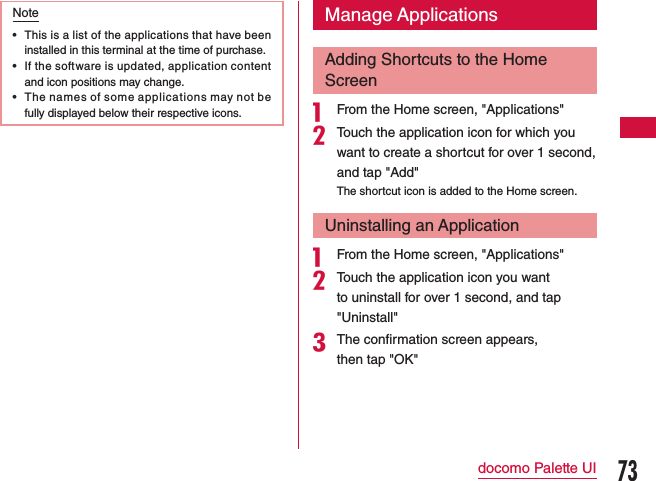
Users Manual 1


![•Depending on the location from which you make an emergency call, connection may be made to the fire department or the police of another jurisdiction. •In Japan, the 110, 119, and 118 emergency numbers cannot be dialed when UIM is not inserted, from the PIN code input screen or from the PIN unblocking key input screen. For details on PIN code, refer to "Security Code and UIM Protection" (P111).Making an international call (WORLD CALL)WORLD CALL is an international call service that enables you to make a call in Japan via the DOCOMO terminals.Customers who have subscribed to the FOMA service would also have automatically subscribed to "WORLD CALL" at the same time. (However, you can decline to use "WORLD CALL" when subscribing to the FOMA services.) •Available to make a call over 240 countries or areas.You can make an overseas call to a fixed line telephone or a mobile phone. •For information about the possible countries and carriers at overseas, refer to "Mobile Phone User's Guide [International Services]" or the DOCOMO "International Services website". •The fee of WORLD CALL will be charged together with FOMA service communication fee every month. •Subscription fee and monthly fee will not be charged. •Contact "General Inquiries" on the back of this manual for detailed information about WORLD CALL. •When using an international call service company other than DOCOMO, consult with the international call service company you use. •Depending on the carrier, the caller's number may not be notified or displayed correctly. In that case, making a call from call log is not available.Calls to fixed-line telephonea From the Home screen, "Phone" u "Dial" •The "Dial" tab appears.bEnter "010" u Country code u Area code u Recipient's phone number, and tap 80Calling / Network Services](https://usermanual.wiki/LG-Electronics-USA/L05D.Users-Manual-1/User-Guide-1685275-Page-82.png)

![Service name Monthly charge Application PageCall Notification Service Free Not requiredP106English GuidanceFree Not requiredP106Public Mode (Power OFF)Free Not required P99Note •You cannot use the network services when you are outside of the service area or in a location with no radio reception. •Deactivating a service does not mean canceling the contract of a service like the Voice Mail Service or the Call Forwarding Service. •For subscriptions and inquiries, contact "General Inquiries" provided on the last page of this manual. •In this manual, the outlines of each network service are described with menu operations of the terminal. For details, refer to "Mobile Phone User's Guide [Network Services]".Voice Mail ServiceIf you are in a location with no radio reception, the terminal is powered off, or you are unable to take the call within the preset ring time, the Voice Mail Service answers a call with a voice mail greeting and records the caller's message.Note •The message can be recorded up to 3 minutes per 1 message, up to 20 messages, and stored up to 72 hours. •If you do not answer an incoming call when the Voice Mail Service is set to "Activate", the call is saved in "Incoming history" as a missed call, and appears in the status bar. •This terminal does not record voice messages on internal memory. Use the Voice Mail Service.92Calling / Network Services](https://usermanual.wiki/LG-Electronics-USA/L05D.Users-Manual-1/User-Guide-1685275-Page-94.png)
![Setting the Call Forwarding guidance on/offa From the Home screen, "Phone"u "Dial" •The "Dial" tab appears.b"1" u "4" u "2" u "9" u •Voice guidance is played. Follow the guidance to configure the settings. For details, refer to "Mobile Phone User's Guide [Network Services]".Caller ID Notification ServiceWhen making a call, your phone number can be shown in the display of the other party's phone.Note •The Caller ID Notification Service is not available when (out of service area) is displayed. •The service is only available when the other party's phone can display the caller ID. •If an announcement requesting caller ID is heard when making a call, activate Caller ID Notification or add the "186" prefix to the phone number and call again.a From the Home screen, u "Settings" u "Call settings" u "Network service" u "Caller ID notification" •The "Caller ID notification" screen appears.Settings Set whether the other party is notified of your caller ID. Tap "Notify" to enable notification, and "Not notify" to disable notification.Settings confirmationThe current Caller ID Notification settings are displayed.98Calling / Network Services](https://usermanual.wiki/LG-Electronics-USA/L05D.Users-Manual-1/User-Guide-1685275-Page-100.png)


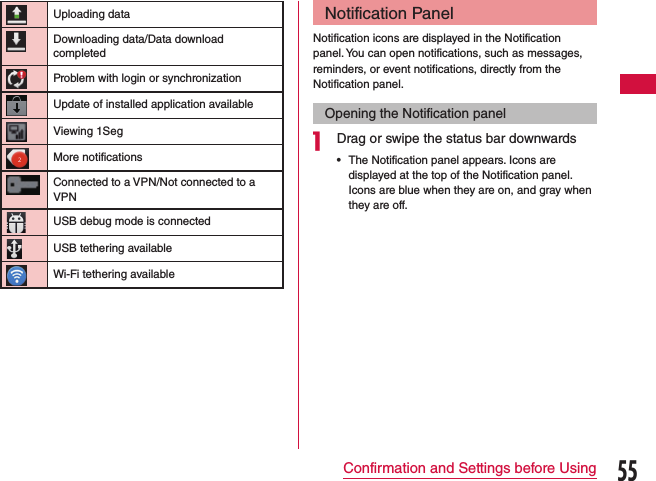
![Note •Tap u "Insert smiley" while entering a message to insert a pictogram. Although an emoticon appears on your "Enter Message" box, the pictogram is displayed if the message is received on an Android compatible phone. •To receive notification that the SMS message is received, tap u "Settings" on the "Messaging" screen, and check the "Delivery reports" checkbox. •You can also send/receive SMS messages to/from users of overseas network operators. For available countries/compatible overseas network operators, refer to "Mobile Phone User's Guide [International Services]" or the DOCOMO "International Services website". •To send SMS messages to users of overseas network operators, enter "+" u "Country code" u "Recipient's mobile phone number". Omit "0" if the recipient phone number starts with "0".You can also send an SMS message by entering "010", "Country code" and "the recipient mobile phone number". (To reply to an SMS message sent from overseas, enter "010".)Receiving/Viewing an SMS Messagea From the Home screen, "Applications" u "Messaging" •The "Messaging" screen appears.bTap one of the threads •The message appears.Note •When you receive an SMS message, appears in the status bar. To read the message, drag or swipe the status bar downwards to open the Notification panel, and tap a new message.123Mail / Internet](https://usermanual.wiki/LG-Electronics-USA/L05D.Users-Manual-1/User-Guide-1685275-Page-125.png)