LG Electronics USA L09C Cellular WCDMA Wireless Router with WiFi User Manual
LG Electronics USA Cellular WCDMA Wireless Router with WiFi Users Manual
Users Manual

'10.12 (1.1 Edition)
MFL67040003
General Inquiries
<docomo Information Center>
Loss or theft of this terminal or payment of
cumulative cost overseas
<docomo Information Center> (available 24 hours a day)
From land-line phones
<Universal number>
-81-3-6832-6600*(toll free)
International call access code for
the country you stay
* You are charged a call fee to Japan when calling from a land-line phone, etc.
-8000120-0151*
*
You might be charged a domestic call fee according to the call rate for the country you stay.
■From land-line phones
(In Japanese only)
* Unavailable from part of IP phones.
* Service available in: English, Portuguese, Chinese, Spanish, Korean.
* Unavailable from part of IP phones.
From DOCOMO mobile phones
0120-800-000 (toll free)
0120-005-250 (toll free)
(Business hours: 9:00 a.m. to 8:00 p.m.)
(Business hours: 9:00 a.m. to 8:00 p.m. (open all year round))
’10.12
L-09C
‘11.XX
L-09C
Data Communication
Device

Part 15.21 statement
" Change or Modifications that are not expressly approved
by the manufacturer could void the user's authority to
operate the equipment.
Part 15.105 statement
This equipment has been tested and found to comply with
the limits for a class B digital device, pursuant to Part 15 of
the FCC Rules. These limits are designed to provide
reasonable protection against harmful interference in a
residential installation. This equipment generates uses and
can radiate radio frequency energy and, if not installed and
used in accordance with the instructions, may cause harmful
interference to radio communications. However, there is no
guarantee that interference will not occur in a particular
installation. If this equipment does cause harmful
interference or television reception, which can be
determined by turning the equipment off and on, the user is
encouraged to try to correct the interference by one or
more of the following measures:-Reorient or relocate the
receiving antenna.-Increase the separation between the
equipment and receiver.-Connect the equipment into an
outlet on a circuit different from that to which the receiver is
connected.-Consult the dealer or an experienced radio/TV
technician for help.
This Device is not intended for the sale in U.S.A

FCC Part 15 Class B Compliance
This device and its accessories comply with part 15 of FCC
rules and ICES-003 Class B digital apparatus requirements
for Industry Canada. Operation is subject to the following
two conditions:(1) This device and its accessories may not
cause harmful interference, and (2) this device and its
accessories must accept any interference received, including
interference that may cause undesired operation.
Body-worn Operation
This device was tested for typical body-worn operations with
the Wireless Router kept 0.39 inches(1.0cm) between the
user’s body and the Wireless Router.
To comply with FCC RF exposure requirements, a minimum
separation distance of 0.39 inches(1.0cm) must be
maintained between the user’s body and the Wireless
Router.
Third-party belt-clips, holsters and similar accessories
containing metallic components should not be used.
Body-worn accessories that cannot maintain 0.39 inches(1cm)
separation distance between the user’s body and the
Wireless Router, and have not been tested for typical body-
Worn operations may not comply with FCC RF exposure
Limits and should be avoided.

20 Before Using this Terminal
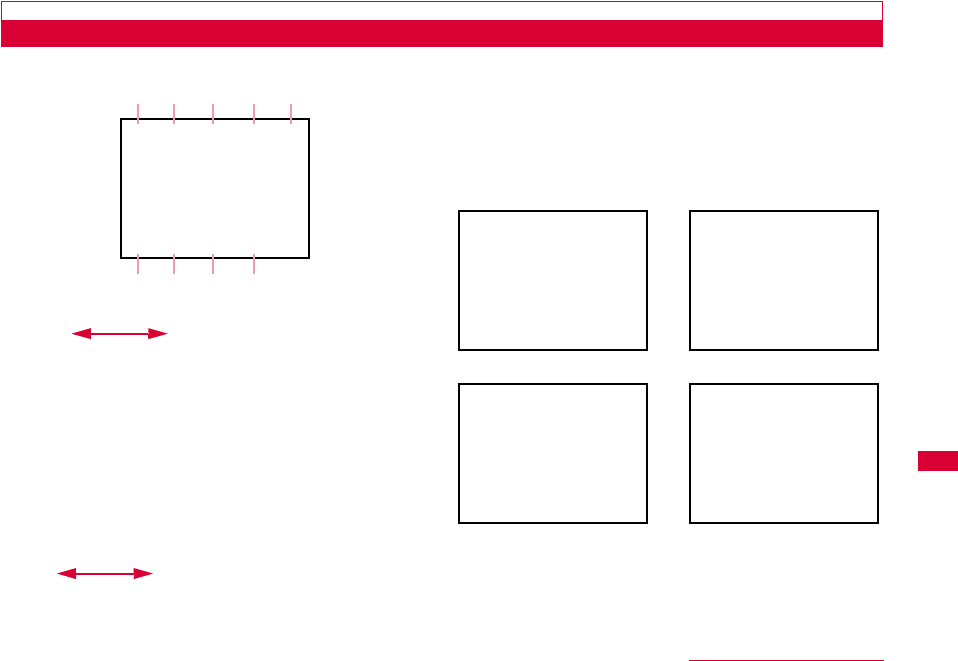
Names of Parts and Functions
aPower button
・ Press XX seconds to turn on or off.
・ You can turn on or off the display.
bDisplay→P21
cStrap attachment hole
dCharging lamp
・ This is red during charging.
eExternal connecting terminal
・ This connects to an AC adapter or USB connecting cable.
fPower saving mode button
gWPS button
hBack cover
Illustration
21
Before Using this Terminal
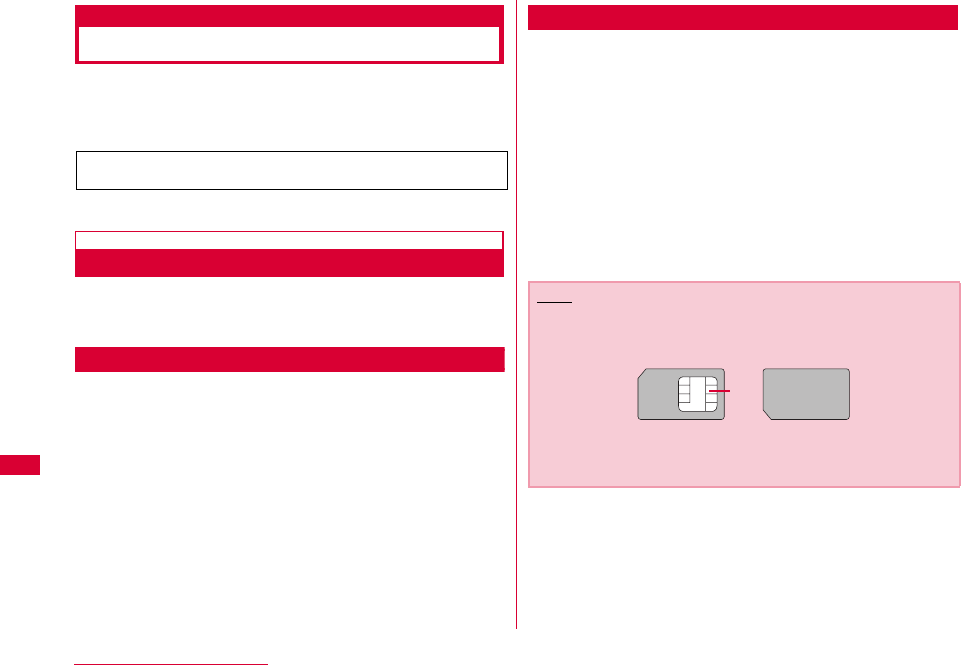
Display Overview
The signs (icons) that appear on the display indicate these states:
aLevels of radio wave reception
Strong Weak
★ ★
★: Out of service
bTypes of networks available during connection
★: LTE
★: 3G(HSDPA/HAUPA、FOMA)
cActivating global roaming
dStates of network connection
★: Connecting
★: Disconnection
★: Pending state of connection
eBattery level
High Low
★ ★
fNumber of connecting Wi-Fi terminals
gConnecting WPS
hAutomatic Wi-Fi power-off
imicroSD card has been attached
The display shows Wi-Fi states, network names, charging,
etc.
a b cc d e
fg h i
Charging Connecting Wi-Fi via WPS
Activating Wi-Fi Name of the connecting
network
Display
Display
Display
Display
Display
Wi-Fi
22 Before Using this Terminal
Using UIM
A UIM is an IC card that stores personal information such as
your phone number. Without the UIM installed in this terminal,
you cannot use data communication. For detailed information,
refer to UIM Manual.
Inserting/Removing
•Turn off the power first. Disconnect the back cover and battery
pack with the back of the terminal facing upward, and then
attach or detach the UIM. →PXX
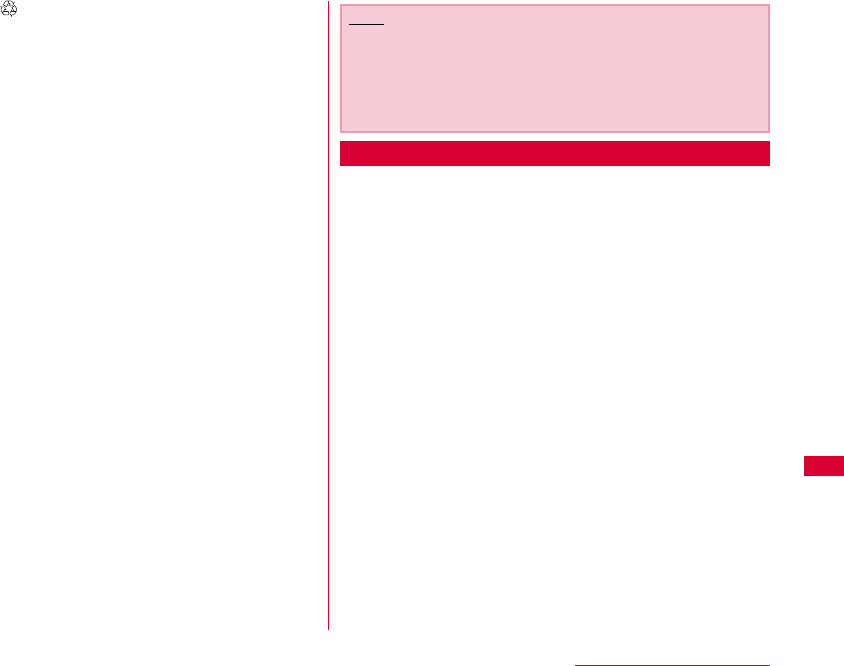
Inserting
aWith the gold IC side down, insert the UIM
below the guide.
Removing
aTo detach the UIM, slide it into the direction of
the arrow.
UIM cannot be used in this terminal. Exchange your UIM
at a docomo Shop.
Note
•Do not lose the removed UIM.
•Make sure to both sides of the UIM.
•Be careful not to scratch the UIM IC tip.
•Inserting or removing the UIM with an excessive force may
cause damage to your UIM.
IC
Illustration
Illustration

23
Before Using this Terminal
Security Code
You can set PIN1 code (Personal Identification Number)
for UIM. The default setting for the PIN1 code is "0000".
The PIN1 code is a 4 to 8-digit security code to be entered
every time this terminal is turned on for user verification to
prevent any unauthorized use by others.
■ Changing PIN1 Code
You can change the PIN1 code to any number. To
prevent any unauthorized use by third parties, change it
to your own number. If you improperly enter the PIN1
code 3 times in a row, further entry is locked
automatically (PIN1 Lock), so be sure to keep a separate
note of the numbers you set.
•Changing PIN1 Code. (→"L-09C INSTRUCTION MANUAL
(PDF)" PXX)
■ Unblocking PIN Code
The unblocking PIN code is the number in 8 digits used
to unblock the PIN1 code. Details are written in the
application of the contract (a duplicate copy) during the
subscription. You are notified of your unblocking PIN code
when purchase this terminal. If you improperly enter the
unblocking PIN code for 10 times in a row, the UIM locks
automatically.
If your UIM is set to require a PIN1 code, data
communication cannot be performed until the PIN1
code is entered. Use UIM before verifying the PIN1
code, or set (→"L-09C INSTRUCTION MANUAL (PDF)"
PXX) UIM to not verify the PIN1 code in advance.
Caution
•Do not set PIN1 code to numbers that can easily make a
guess, such as "birth date", "part of your phone number",
"numbers from address or room number", "1111" "1234",
etc. Also memo your PIN1 code and keep it well.
•Keep your PIN1 code away from being known by other
people. DOCOMO assumes no responsibility for the loss of
any of your data results from abuse of PIN1 code.
•If you forgot your PIN1 code, you (if you are the
covenanter) are required to bring your ID (driving license,
etc.) and UIM to a docomo shop.
For details, please contact "docomo Information Center" on
the back cover of this manual.
•Unblocking PIN code is written on the proposal form
handed in at time of contract in docomo shop. For
covenanter who signed the contract other than docomo
shop are required to bring your ID (driving license, etc.) and
UIM to a docomo shop, or contact "docomo Information
Center" on the back cover of this manual.
24 Before Using this Terminal
Attaching and Detaching
the Battery Pack
•Before following the steps below, turn off and close this
terminal. Hold the terminal in your hands during the steps.
Attachment
aWhile pressing the back cover in the direction
a, slide it in the direction b and hold it up in
the direction c and remove it
•If difficult to slide the back cover, hold the terminal with
both hands and slide it with both thumbs.
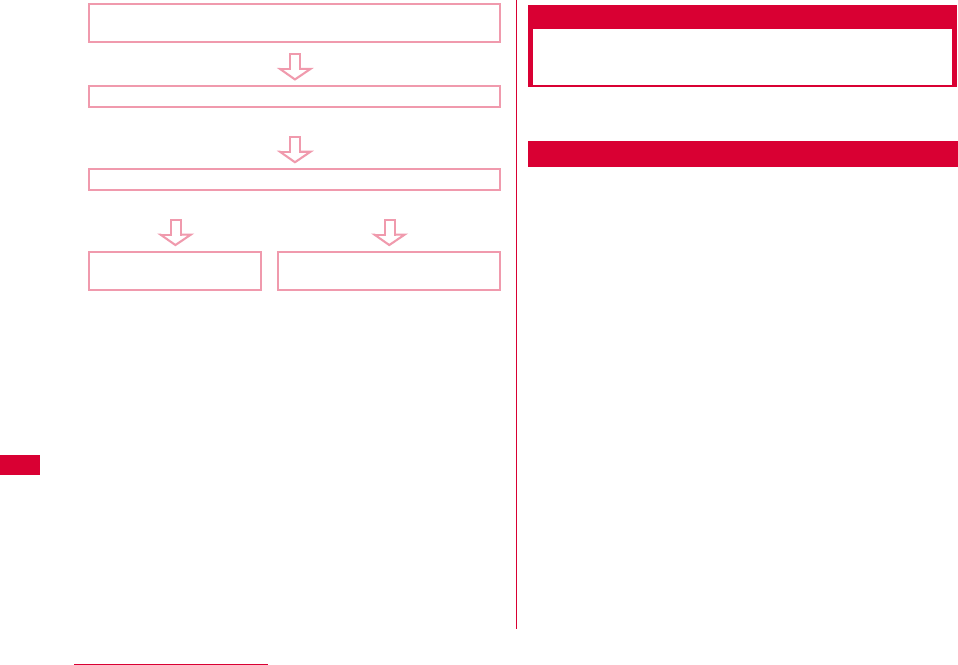
Activate L-09C Connection Software
PIN1 code Verification screen appears
Enter PIN1 Code
Incorrect entry 3 times in a row
Enter Unblocking PIN Code
OK Incorrect entry 10 times in a row
Available to set a new
PIN1 code Contact a docomo Shop
Illustration
25
Before Using this Terminal
bWith the " " side up, align the metal contacts
of the battery pack and this terminal, attach
the battery pack in the direction a, and then
push it down in the direction b
•When attaching, align the tabs of this terminal and the
depressions of the battery pack.
cAlign the back cover to the ditch of this
terminal with approx. 2mm gap kept between
the back cover and the terminal. While
pressing the back cover in the direction a,
slide it in the direction b and insert it until it
clicks
Detachment
aPushing the back cover in the direction a,
slide it in the direction b, and then lift it in the
direction c
•If difficult to slide the back cover, hold the terminal with
both hands and slide it with both thumbs.
Note
•The UIM may be damaged if you forcibly try to attach the
battery pack with the card or a microSD card in an improper
position.
•The terminal's connecting points may be damaged if you
forcibly try to attach the battery pack.
Illustration
Illustration
Illustration

26 Before Using this Terminal
bPut a finger on the battery pack from the dent
of the terminal, and while pressing the battery
pack in the direction a, lift it in the direction
b and remove it in the direction c
Illustration
28 Before Using this Terminal
microSD Card
You can store the terminal's phonebook, mails, bookmarks,
etc. into a microSD card, and vice versa. Also, you use the
terminal to view data in a microSD card.
•Up to 2G byte microSDs cards or up to 8G byte microSDHC
cards commercially available are compatible with L-09C (as of
xx, 2011).
Check the following sites for the latest details on microSD
makers or volume. You may not be able to use microSDs that
the sites do not say.
- From i-mode, 「iMenu」「メニューリスト」「ケータイ電話メー
カー」「WOW LG」
- From PC, http://jp.lgmobile.com/
The information on the sites is based on the
result of operation check. Not every piece of
information may be correct.
•A microSD card is not provided with the
terminal. If you do not have one, please buy
it at an electronics store.
Notes on when using a microSD card
•You cannot use a microSD card if it has been formatted with a
PC or another device. Use an L-09C-formatted microSD card.
Formatting deletes all data in a micoSD card. →PXXX
•microSD card cards can lose data in it or be deformed due to
some accident or failure. Please store your data somewhere
else just in case. We are not liable for the loss of your data or
any deformation.
▲
▲
▲
QR code for
site access
Illustration

29
Before Using this Terminal
•It may take a while to transfer some amount of data. Also, it
cannot be copied.
•Do not turn off the terminal during data loading or overwriting.
•During data loading or overwriting, or during microSD card
formatting, do not pull the USB connecting cable L01. Data
may be lost.
•Do not pull a microSD card when it is in use: e.g. when
displaying data in the card or checking its volume.
•Do not put any label or seal. They can cause connection failure
or data damage, though they are thin.
•Do not touch the metal terminal part with a finger or another
metal.
•Do not forcibly shock, bend, drop or wet the microSD card.
•After detaching the microSD card, keep it away from the reach
of children. They may swallow the card accidentally and get
injured.
•Some data in the microSD card may not open or play with the
terminal if they have been stored in a PC or another device.
Also, some data transferred from the terminal to the microSD
card may not open or play with another device.
Attaching and Detaching the microSD
Card
Turn off the power first. Disconnect the back cover and
battery pack with the back of the terminal facing upward,
and then attach or detach the microSD card. →PXX
Attachment
aMove the guide in the direction of "OPEN" (a)
until it clicks, and lift it in the direction (b)
bWith the metal contacts of the battery pack
down, align the contacts of the battery pack
and the terminal, and attach them
Illustration
Illustration

30 Before Using this Terminal
cPut the guide completely down (a), move it in
the direction of "LOCK" until it clicks (b) to
secure the microSD card
•When putting the guide down, hold it lightly so that the
microSD card will not go up.
Detachment
aMove the guide in the direction of "OPEN" (a)
until it clicks, and lift it in the direction (b)
bDetach the microSD
cPut the guide completely down (a) and move
it in the direction of "LOCK" until it clicks (b)
Note
•To attach the microSD card properly, check where it is
facing.
•You cannot use the microSD if you have attached it
improperly.
Illustration
Illustration
Illustration
Illustration