LG Electronics USA L1100 Single-Band PCS GSM Phone User Manual
LG Electronics USA Single-Band PCS GSM Phone Users Manual
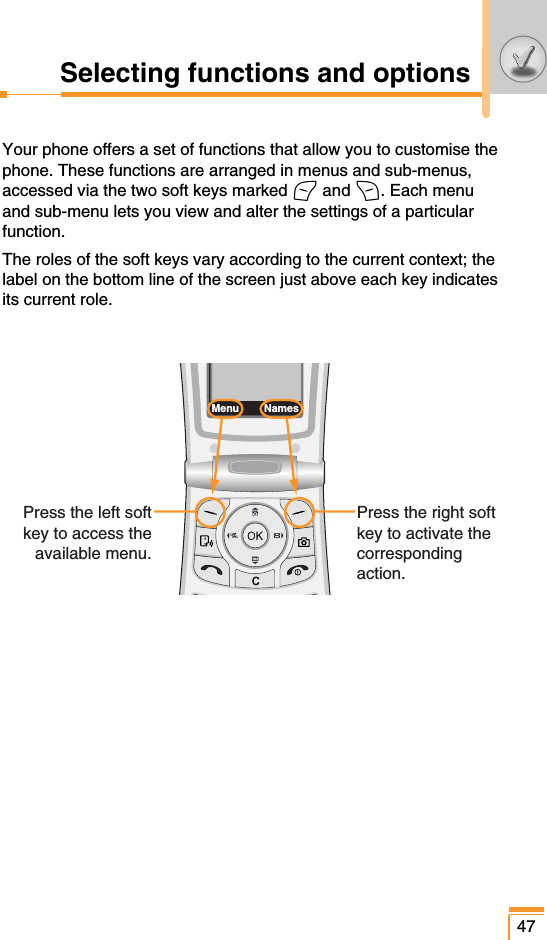
UserManual.wiki
>
LG Electronics USA
>
L1100 User Manual
Users Manual
Navigation menu
Upload a User Manual
Namespaces
Wiki Guide
HTML
PDF
Info
Views
User Manual
Discussion / Help
Navigation
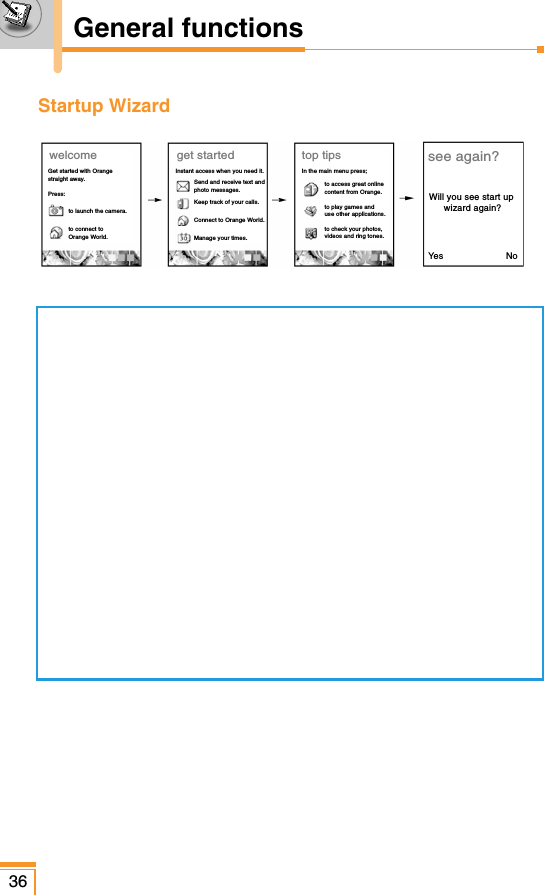
![12Your phone .............................................................................. 16• Phone components ............................................................... 16• Your phone’s features ........................................................... 17• Side of the Key ..................................................................... 18• Display information ............................................................... 18Getting started ........................................................................ 20• Installing the SIM card and the handset battery ................... 20• Charging the battery ............................................................. 21• Disconnecting the adapter .................................................... 22• Turning your phone on and off .............................................. 23• Access codes ........................................................................ 24General functions ................................................................... 26• Making and answering calls .................................................. 26• Entering text .......................................................................... 28• Address book ....................................................................... 32• In-call menu .......................................................................... 32• Multiparty or conference calls ............................................... 34• Call register............................................................................ 38• Camera ................................................................................. 42Menu tree ................................................................................. 45Selecting functions and options ........................................... 47Broswer [Menu 1] .................................................................... 48• Home [Menu 1-1] .................................................................. 49• Bookmarks [Menu 1-2] .......................................................... 49• Go to URL [Menu 1-3] ........................................................... 49• Service messages [Menu 1-4] ...............................................50Contents](https://usermanual.wiki/LG-Electronics-USA/L1100/User-Guide-404626-Page-12.png)
![13• Cache settings [Menu 1-5] .................................................... 50• Account settings [Menu 1-6] ................................................. 51• Security [Menu 1-7] ............................................................... 51Profiles [Menu 2] ..................................................................... 52Extras [Menu 3] ....................................................................... 54• Calendar [Menu 3-1] ............................................................. 54• Memo [Menu 3-2] .................................................................. 55• Alarm clock [Menu 3-3] ......................................................... 56• Voice recorder [Menu 3-4] .................................................... 56• Calculator [Menu 3-5] ............................................................ 57• Unit converter [Menu 3-6] ..................................................... 58• World time [Menu 3-7] ........................................................... 59• Activate IrDA [Menu 3-8] ....................................................... 60Orange World [Menu 4] .......................................................... 61• Orange World [Menu 4-1] ..................................................... 61• Your page [Menu 4-2] ........................................................... 61• Channel guide [Menu 4-3] .................................................... 61• Your phone [Menu 4-4] ......................................................... 61• Orange PLUS [Menu 4-5] ..................................................... 61Messages [Menu 5] ................................................................. 62• Text message [Menu 5-1] ...................................................... 62• Picture message [Menu 5-2] ................................................. 67• Answer phone [Menu 5-3] ..................................................... 73• Info messages [Menu 5-4] .................................................... 73• Templates [Menu 5-5] ........................................................... 75• Memory status [Menu 5-6] .................................................... 77](https://usermanual.wiki/LG-Electronics-USA/L1100/User-Guide-404626-Page-13.png)
![14Media album [Menu 6] ............................................................ 78• Picture [Menu 6-1] ................................................................. 78• Animation [Menu 6-2] ............................................................ 78• Sound [Menu 6-3] ................................................................. 78• Memory status [Menu 6-4] .................................................... 78Apps & Games [Menu 7] ......................................................... 79• Applications [Menu 7-1] ........................................................ 79• Games [Menu 7-2] ................................................................ 80• Download [Menu 7-3] ............................................................ 71• Information [Menu 7-4] .......................................................... 82Address book [Menu 8] .......................................................... 83• Search [Menu 8-1] ................................................................ 83• Add new [Menu 8-2] .............................................................. 84• Speed dials [Menu 8-3] ..........................................................85• Voice list [Menu 8-4] ............................................................ 86• Caller groups [Menu 8-5] ...................................................... 87• Copy all [Menu 8-6] ............................................................... 88• Delete all [Menu 8-7] ............................................................. 88• Settings [Menu 8-8] ............................................................... 88• Information [Menu 8-9] .......................................................... 89Settings [Menu 9] .................................................................... 90• Date & Time [Menu 9-1] ........................................................ 90• Display settings [Menu 9-2] ................................................... 90• Call settings [Menu 9-3] ........................................................ 92• Network settings [Menu 9-4] ................................................. 96• GPRS settings [Menu 9-5] .................................................... 97Contents](https://usermanual.wiki/LG-Electronics-USA/L1100/User-Guide-404626-Page-14.png)
![15• Security settings [Menu 9-6] ................................................. 98• Reset settings [Menu 9-7] ................................................... 102Q&A ........................................................................................ 103Safety Guidelines .................................................................. 106• FDA Consumer Update ....................................................... 106• Consumer Information on SAR ........................................... 114Accessories ........................................................................... 116Technical Data ....................................................................... 117](https://usermanual.wiki/LG-Electronics-USA/L1100/User-Guide-404626-Page-15.png)


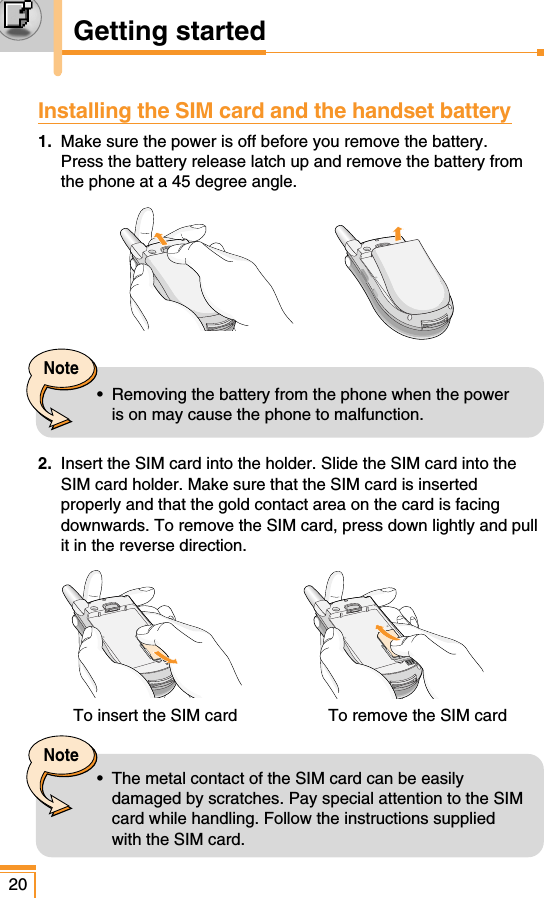


![24Getting startedAccess codesYou can use the access codes described in this section to avoidunauthorised use of your phone. The access codes (except PUKand PUK2 codes) can be changed by using the Change codesfeature [Menu 3-6-5]. PIN code (4 to 8 digits)The PIN (Personal Identification Number) code protects your SIMcard against unauthorised use. The PIN code is usually suppliedwith the SIM card. When the PIN code request is set to Enable,your phone will request the PIN code every time the phone isswitched on. When the PIN code request is set to Disable, yourphone connects to the network directly without the PIN code.PIN2 code (4 to 8 digits)The PIN2 code, supplied with some SIM cards, is required toaccess functions such as Advice of Call Charge and Fixed dialnumber. These functions are only available if supported by yourSIM card. Check with your network for further information.PUK code (4 to 8 digits)The PUK (PIN Unblocking Key) code is required to change ablocked PIN code. The PUK code may be supplied with the SIMcard. If not, contact your network operator for the code. If you losethe code, also contact your network operator.PUK2 code (4 to 8 digits)The PUK2 code, supplied with some SIM cards, is required tochange a blocked PIN2 code. If you lose the code, also contact yournetwork operator.](https://usermanual.wiki/LG-Electronics-USA/L1100/User-Guide-404626-Page-24.png)
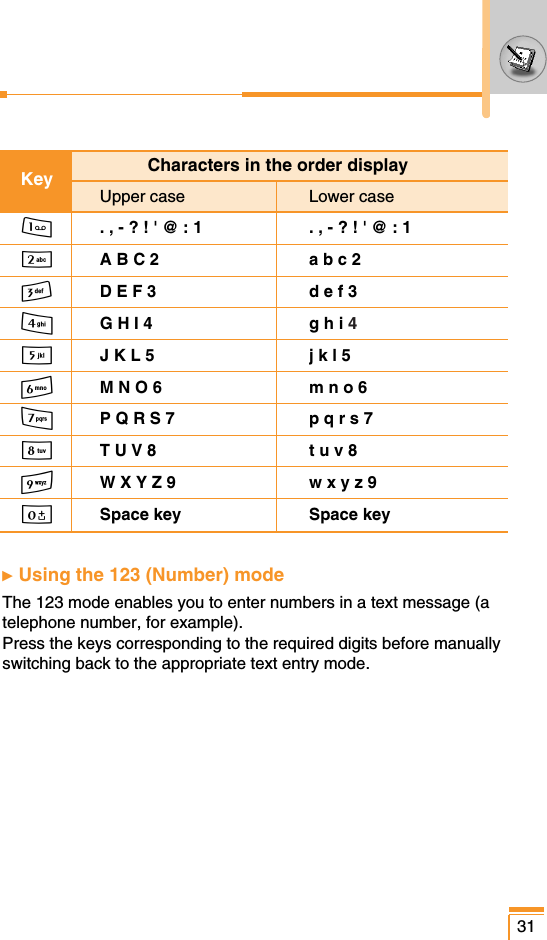
![29Changing the text input mode1. When you are in a field that allowscharacters to be entered, you will noticethe text input mode indicator in the lowerright corner of the LCD screen.2. Change the text input mode by pressing#. You can check the current text inputmode in the lower right corner of the LCDscreen.ᮣ Using the T9 mode The T9 predictive text input mode lets you enter words easily with aminimum number of key presses. As you press each key, the phonebegins to display the characters that it thinks you are typing basedon the built-in dictionary. You can also add new words in thedictionary. As new words are added, the word changes to reflect themost likely candidate from the dictionary.1. When you are in the T9 predictive text input mode, start enteringa word by pressing keys 2 to 9. Press one key per letter. – The word changes as letters are typed. Ignore what’s on thescreen until the word is typed completely.– If the word is still incorrect after typing completely, press thedown navigation key once or more to cycle through the otherword options.Example• Press 4 6 6 5 to type Good.• Press 4 6 6 3 [Down navigation key] totype Home.](https://usermanual.wiki/LG-Electronics-USA/L1100/User-Guide-404626-Page-29.png)
![30General functions– If the desired word is missing from the word choice list, add itusing the ABC mode.– You can select the language of the T9 mode. Press the leftsoft key [Option], then select T9 languages. Select thedesired language of T9 mode. You can also turn off the T9mode by selecting T9 off. The default setting on the phone isT9 enabled mode.2. Enter the whole word before editing or deleting any keystrokes.3. Complete each word with a space by pressing the 0 key.To delete letters, press C. Press and hold down to erase Centire words.ᮣ Using the ABC modeUse the 2to 9 keys to enter your text.1. Press the key labelled with the required letter:– Once for the first letter– Twice for the second letter– And so on2. To insert a space, press the 0 key once. To delete letters,press the C key. Press and hold down the C key to clearthe whole display.Note• To exit from the text input mode without saving yourinput, press E. The phone goes back to standbymode.Note• Refer to the table below for more information on thecharacters available using the alphanumeric keys.](https://usermanual.wiki/LG-Electronics-USA/L1100/User-Guide-404626-Page-30.png)
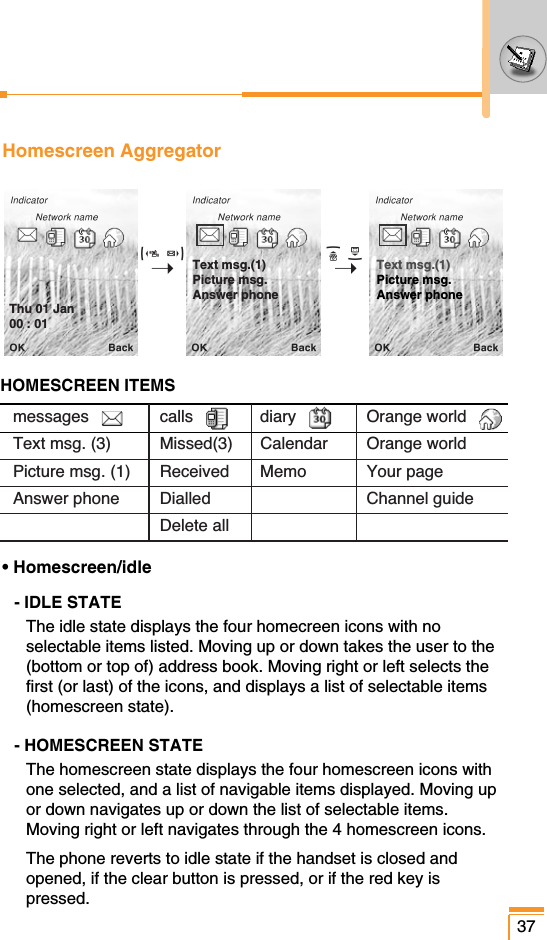
![Address bookYou can store phone numbers and their corresponding names in thememory of your SIM card.In addition, you can store up to 255 numbers and names in thephone memory.The SIM card and phone are both used in the same way in theAddress book menu. (Refer to page 39-44 for details.)In-call menuYour phone provides a number of control functions that you can useduring a call. To access these functions during a call, press the leftsoft key [Options].During a callThe menu displayed on the handset screen during a call is differentto the default main menu displayed when in standby mode, and theoptions are described below.Making a second callYou can get a number you wish to dial from the address book tomake a second call. Press the right soft key then select Search. Tosave the dialled number into the address book during a call, pressthe right soft key then select Add new.Switching between two callsTo switch between two calls, press the left soft key then selectSwap.32General functions](https://usermanual.wiki/LG-Electronics-USA/L1100/User-Guide-404626-Page-32.png)
![Answering an incoming callTo answer an incoming call when the handset is ringing, simplypress the S key. The handset is also able to warn you of anincoming call while you are already on a call. A tone sounds in theearpiece, and the display will show that a second call is waiting.This feature, known as Call waiting, is only available if yournetwork supports it. For details of how to activate and deactivate itsee Call waiting [Menu 3-3-4] on page 49. If Call waiting is activated, you can put the first call on hold andanswer the second, by pressing Sor by selecting left soft key,then Hold & Answer. You can end the current call and answer thewaiting call by selecting left soft key and then End & Answer.Rejecting an incoming callYou can reject an incoming call without answering by simplypressing the E key.During a call, you can reject an incoming call by pressing the leftsoft key [Menu] key and selecting the Conference/Reject or bypressing the E.Muting the microphoneYou can mute the microphone during a call by pressing the [Menu]key then selecting Mute on. The handset can be unmuted byselecting Mute off. When the handset is muted, the caller cannothear you, but you can still hear them.Switching DTMF tones on during a callTo turn DTMF tones on during a call, press the left soft key, andthen select DTMF on. DTMF tones can be turned off the same way.DTMF tones allow your phone to make use of an automatedswitchboard.33](https://usermanual.wiki/LG-Electronics-USA/L1100/User-Guide-404626-Page-33.png)
![Call registerYou can check the record of missed, received, and dialled calls onlyif the network supports Calling Line Identification (CLI) within theservice area. The number and name (if available) are displayed together with thedate and time at which the call was made. You can also view calltimes and costs.Press the send key (<) for a long time to enter Call register menu. Missed calls This option lets you view the last 10 unanswered calls. Afterpressing the left soft key [Option], you can also:• View the number if available and call it or save it in the addressbook.• Enter a new name for the number and save in the address book.• Send a message to this number.• Delete the call from the list.Received callsThis option lets you view the last 10 incoming calls. After pressingthe left soft key [Option], you can also:• View the number if available and call it or save it in the addressbook.• Enter a new name for the number and save in the address book.• Send a message to this number.• Delete the call from the list.38General functionsNote• You can delete all the call records from the list usingthe Delete recent calls menu.](https://usermanual.wiki/LG-Electronics-USA/L1100/User-Guide-404626-Page-38.png)
![Dialled callsThis option lets you view the last 10 outgoing calls (called orattempted). Using the [Option] key, you can also:• View the number if available and call it or save it in the addressbook. • Enter a new name for the number and save in the address book.• Send a message to this number.• Delete the call from the list.Delete recent calls Use this to delete the missed call list, received call list, or dialled calllist. You can also delete all call lists at a time selecting All calls.Call durationsUse this to view the duration of your incoming and outgoing calls.You can check each call duration at the bottom of screen whilescrolling using the up/down navigation keys. Pressing the [OK] keyor the left soft key [Reset] resets the call timer of selected call. Toprevent accidental reset, you are requested to enter the PIN2 code.39Note• You can delete all the call records from the list usingthe Delete recent calls menu.Note• You can delete all the call records from the list usingthe Delete recent calls menu.](https://usermanual.wiki/LG-Electronics-USA/L1100/User-Guide-404626-Page-39.png)
![• Last call: Length of the last call• Received calls: Length of the incoming calls• Dialled Calls: Length of the outgoing calls• All calls: Total length of all calls made or received calls since thetimer was last reset.Call costs This network service allows you to check the last call cost and thetotal call cost. The call cost is displayed on the bottom of the LCDscreen. To reset the call cost, press the left soft key [Reset] or theOK key. You are requested to enter the PIN2 code.Cost settings • Call cost’s limit: This network service allows you to limit the costof your calls to the number of charging units or units of currency.You can make or receive a call up to the specified cost limit. Youcan change the call cost’s limit after entering the PIN2 code.• Set tariff: You can set the currency type and the unit price.Contact your service providers to obtain charging unit prices. Toselect the Currency or 1 Unit in this menu, you need the PIN2code.40General functionsNote• The actual time invoiced for calls by your serviceprovide may vary, depending on network features,rounding-off for billing, etc.Note• The actual cost invoiced for calls by your serviceprovider may vary, depending on network features,rounding-off for billing, taxes, etc.](https://usermanual.wiki/LG-Electronics-USA/L1100/User-Guide-404626-Page-40.png)
![• Auto display: This network service allows you to seeautomatically the cost of your last call. If you select On in Autodisplay menu, you can see the cost of the last call when the call is released.GPRS information You can check the amount of data transferred over the networkthrough the GPRS information option. In addition, you can also view how much time you are online. (GPRS stands for General Packet Radio Service.)• WAP You can check the data volume and the time spent using WAP. On the selected menu, pressing the left soft key [Reset] or the OKkey clears the counter.• External deviceYou can check the data volume and the time spent using GPRSwith an external device such as a serial port.• Total dataYou can check the total amount of data through WAP and theexternal device.41Note• When all units have been used, no calls can be madeexcept emergency calls. Depending on the SIM card,you need the PIN2 code to set a call cost limit.](https://usermanual.wiki/LG-Electronics-USA/L1100/User-Guide-404626-Page-41.png)
![CameraThe L1100 has a built-in camera. It supports Zoom, White balance,Colour/Sepia/Grey settings, and Multi burst functions.Take picture Press the camera key (Q) in standby mode.1. Focus on the subject to capture, then press the [OK] key or thedown side key or camera hot key.2. ‘Saved’ is displayed in the top left of the captured image. Thecaptured image is then automatically saved.3. Press the [OK] key to continue taking pictures. Or press the rightsoft key [Delete] to delete the image.42General functionsNote• The remaining memory is shown in the top right of theimage. If there is insufficient memory, the image size isautomatically reduced. If the memory is full, ‘memoryfull’ is displayed and you cannot take any more picture.Create space by deleting old images.Note• In the preview mode, you can immediately go to Galleryby pressing the right soft key [Gallery].](https://usermanual.wiki/LG-Electronics-USA/L1100/User-Guide-404626-Page-42.png)
![< Options before taking a picture >Press the left soft key [Options] to set theoptions in the preview mode. You can select thedesired option by pressing the [OK]. And youwill see the current option setting value in thetop left of the preview screen. Then you can modify the desired value by pressing the left/rightnavigation keys. If you press the [OK] or left soft key [Done], theselected option value is set and return to the preview mode. You can set the following options.1. Image size: Select the desired image size to be captured. [640x480, 320x240, 160x1120, 128x160, 48x80]2. Brightness: Select the desired brightness. [-2 ~ +2]3. White balance: Select the desired white balance.[Auto/ Daylight/ Incandescent/ Cloudy/ Fluorescent ]4. Zoom: Select the zoom factor [x1, x2, x4]5. Colour effect: Select Colour/Sepia/Mono mode by using theleft/right navigation keys.6. Multi burst: Select the number of images to be captured in multiburst mode.7. Shutter sound: Select shutter sound.8. Defer settings: Return to the default factory settings.43Note• The larger the image size, the better the image quality.However, this will use more memory.](https://usermanual.wiki/LG-Electronics-USA/L1100/User-Guide-404626-Page-43.png)
![Gallery Then select image category. [All pictures / General pictures / Address book pictures] You can view, organise and send pictures saved in your phone.1. Use the navigation keys to select the picture you want a fullscreen view of.2. Press the [OK] key. You will see the name of the image on top ofthe LCD screen.3. Press the left soft key [Options] to access the followingsubmenus.• Thumbnail/Enlarge: You can view the selected image.• Send via MMS: Sends MMS picture messages using theselected image. See page( ) about writing MMS message.• Set as wallpaper: Set the selected image as wallpaper.• Slide show: Plays back every image in the selected categoryin succession, in order. To stop the slide show playback, pressthe C key.• Rename: You can change the title of the selected image.• Delete: Deletes the selected image.• Delete all: Deletes all images in the selected category.• Picture information: You can check the title, size, date andtime of the selected image.4. To go back to the Camera menu, press the right soft key [Back].Memory StatusYou can check the memory status in your phone. [total size/used size/free size]44General functions](https://usermanual.wiki/LG-Electronics-USA/L1100/User-Guide-404626-Page-44.png)
![48Broswer [Menu 1]Press the Menu key <and select Broswer using navigation keys.You can access various WAP (Wireless Application Protocol)services such as banking, news, weather reports and flightinformation. These services are specially designed for mobilephones and they are maintained by WAP service providers.Check the availability of WAP services, pricing and tariffs with yournetwork operator and/or the service provider whose service youwish to use. Service providers will also give you instructions on howto use their services.Please contact your network operator to open your Internet account.To use the Web Browser, you must indicate your phone number viathe Own number menu option (See page 44 for further details.).Once connected, the homepage is displayed. The content dependson the service provider.You can access any website page by entering its URL address. Toexit the browser at any time, press the E key. The phone willreturn to the standby mode.Navigating with the WAP browserYou can surf the Internet using either the phone keys or the WAPbrowser menu.Using the phone keysWhen surfing the Internet, the phone keys function differently tophone mode.Key DescriptionU D Scrolls each line of the content areaCReturns to the previous pageOSelects options and confirms actions](https://usermanual.wiki/LG-Electronics-USA/L1100/User-Guide-404626-Page-48.png)
![49Using the WAP browser menuThere are various menu options available when surfing the WirelessWeb.Home [Menu 1-1]Connect to a homepage. The homepage will be the site which isdefined in the activated profile. It will be defined by the serviceprovider if you have not defined it in the activated profile.Bookmarks [Menu 1-2]Set the current page as a new bookmark or move an establishedbookmark. Your phone may have some pre-installed bookmarks forsites not affiliated with LG. LG does not warrant or endorse thesesites. If you choose to access them, you should use the samesecurity or content precautions as you would with any site.E-mail server [Menu 1-2-1]• ConnectConnects to the E-mail server that you configured.• Edit addressEdit the E-mail address.Go to URL [Menu 1-3]You can connect directly to the site you want. To do this, you needto enter a specific URL.Note• The WAP browser menus may vary, depending on yourbrowser version.](https://usermanual.wiki/LG-Electronics-USA/L1100/User-Guide-404626-Page-49.png)
![50Broswer [Menu 1]Service messages [Menu 1-4]Inbox [Menu 1-4-1]You can order Push messages from WAP service providers. Pushmessages are notifications of, for example, news headlines andthey can contain a text message or the address of a WAP service.For availability and subscription, contact your WAP service provider.Service providers can update an existing Push message every timea new Push message is received. Messages can be updated even ifyou have moved them to another folder. When Push messagesexpire, they are deleted automatically.• InformationShows the information of received push messages.• LoadConnects to a specific site using the information in the receivedpush message.• DeleteDeletes the selected push message.Receive [Menu 1-4-2]You can choose whether or not you wish to receive push messages.Cache settings [Menu 1-5]The information or services you have accessed are saved in thecache memory of the phone.• Clear cacheRemoves all context saved in cache.• Check cacheSet a value whether a connection attempt is made through cacheor not.](https://usermanual.wiki/LG-Electronics-USA/L1100/User-Guide-404626-Page-50.png)
![51Account settings [Menu 1-6]For more information, consult your network operator. Each profile has submenus as follows:• Activate: Activates the selected profile.• Settings: Use this to edit and change WAP settings for theselected profile.• Rename: You can change the selected profile’s name.• Delete: Deletes the selected profile from the list.• Add new: You can add a new profile.Security [Menu 1-7]A list of the available certificates is shown.Note• The changes using these options may affect the MMSfunction.Note• A cache is a buffer memory, which is used to save datatemporarily.](https://usermanual.wiki/LG-Electronics-USA/L1100/User-Guide-404626-Page-51.png)
![52Profiles [Menu 2]In Profiles, you can adjust and customise the phone tones fordifferent events, environments, or caller groups.There are six preset profiles: Vibrate Only, Silent, General,Outdoor, Headset and Car. Each profile can be personalised.Press the Menu key (<) and select Profiles using navigationkeys.Changing the profile [Menu 2-x-1]1. A list of profiles is displayed.2. In the Profile list, scroll to the profile you want to activate andpress the left soft key [Select] or OK key.3. Then, select Activate.Customising profiles – Personalise [Menu 2-x-2]Scroll to the desired profile in the Profile list. After pressing the OKkey or the left soft key, select Personalise. The profile settingoption opens. Set the option as required.Incoming call alert: Set the alert type for incoming calls.Ringing tone: Select the desired ring tone from the list. Scrollthrough the list using up/down navigation keys. You can hear thedesired tone prior to making a selection.Ringing volume: Set the volume of the ringing tone.Message alert type: Set the alert type for messages.Message alert tone: Select the alert tone for messages.Keypad tone: Select the desired keypad tone.Key volume: Set the volume of keypad tone.Flip tone: Set the flip tone for flip open and close.Effect sound volume: Set the volume of effect sound.Power on/off volume: Set the volume of the ringing tone whenswitching the phone on/off.](https://usermanual.wiki/LG-Electronics-USA/L1100/User-Guide-404626-Page-52.png)
![53Automatic answer: (only in Headset profile and Car profile) Youcan activate the automatic answer feature. Select the time beforeanswering automatically.Customising profiles – Rename [Menu 2-x-3]You can rename a profile and give it any name you want. Vibrateonly, Headset and Car profiles cannot be renamed.1. To change the name of a profile, scroll to the profile in the profilelist and after pressing the OK key or the left soft key, selectRename.2. Key in the desired name and press the OK key or the left soft key[Save].](https://usermanual.wiki/LG-Electronics-USA/L1100/User-Guide-404626-Page-53.png)
![Press the Menu key (<) and select Extras using navigation keys.Calendar [Menu 3-1]When you enter this menu, a calendar appears. A square cursor islocated on the current date. You can move to another date usingnavigation keys. If a date is shown in a different colour, it meansthat there is a schedule or memo for that day. This function remindsyou of your schedule and memos. The phone will sound an alarmtone if you set the phone to do so.View [Menu 3-1-1]Shows the note for the chosen day. Press [Options] to delete or editthe note you selected.Edit [Menu 3-1-2]Use this to edit the schedule.Delete [Menu 3-1-3]Use this to delete the schedule.Add new [Menu 3-1-4]You can edit a maximum of 30 characters and take up to 20 notes.Calendar [Menu 3-1-5]Goes back to the calendar.Scheduler tone [Menu 3-1-6]The phone can sound an alarm tone when the scheduled date andtime for an event has been reached with this option.View all schedules [Menu 3-1-7]Shows the notes that are set for all days. Use the up/downnavigation keys to browse through the note lists.54Extras [Menu 3]](https://usermanual.wiki/LG-Electronics-USA/L1100/User-Guide-404626-Page-54.png)
![Go to date [Menu 3-1-8]Use this to jump to a specific date. Enter the date using the numerickeys and the left/right navigation keys.Delete past [Menu 3-1-9]You can delete expired schedule notes that have already beennotified.Delete all [Menu 3-1-10]Use this to delete all schedules. You are asked to confirm thisaction.Memo [Menu 3-2]You can write, edit and delete a memo on a specific date.1. Scroll to highlight Memo.2. Press the left soft key [Add].3. Input the memo and then press the left soft key [Options].The following options are available.• Save: Allows you to save the memo.• T9 languages: Select the desired language of T9 mode.• Exit editor: Allows you to exit from the memo editor.After a memo is already input in your phone,1. Select a memo.2. Press the left soft key [Select].3. Press the left soft key [Options].The following options are available.• Edit: You can edit the selected memo.• Delete: Deletes the selected memo.• Add new: You can add new meno.• Delete all: Deletes all meno.55](https://usermanual.wiki/LG-Electronics-USA/L1100/User-Guide-404626-Page-55.png)
![56Extras [Menu 3]Alarm clock [Menu 3-3]Set the alarm to ring at a specific time. In the Alarm Clock menu,the following options are available. On [Menu 3-3-1]Set the alarm time.1. Enter the menu.2. Select [On] by the left/right navigation key.3. Enter the alarm time using the numeric keys.4. Using the left/right navigation keys, select one of the alarmoptions: Once, Daily, Weekly, and Monthly.5. Alarm melody section: select the desired alarm melody using theleft/right navigation keys.Off [Menu 3-3-2]Deactivates the alarm.Voice recorder [Menu 3-4]You can record a memo. You can record up to 3 voice memos up toa maximum of 30 seconds each. You can play or delete therecorded memo or record new voice memo using the left soft key[Option] key.Record [Menu 3-4-1]1. Press and hold down key in standby mode.2. Once recording is started, the message ‘Recording...’ and theremaining time is displayed.](https://usermanual.wiki/LG-Electronics-USA/L1100/User-Guide-404626-Page-56.png)
![573. When you finish recording, press left soft key [Save].• Play: Allows you to play back all memos recorded, starting withthe most recent memo. The screen displays the Date and timewhen the memo was recorded.• Delete: Allows you to delete a specific memo.• Record new: Allows you to record a memo.• Send via multimedia message: Allows you to send viamultimedia message.• Delete all: Allows you to delete all memos. Press the left softkey [Yes] to confirm.View list [Menu 3-4-2]The phone shows the voice memo title which you have recorded bypressing in standby mode. You can Play, or Delete the recordedvoice memo.Calculator [Menu 3-5]Using this feature, you can use the phone as a calculator. Thecalculator provides the basic arithmetic functions: addition,subtraction, multiplication and division. (You can enter numbers upto the second decimal place)Note• In standby mode, you can go directly to the Voicerecorder menu by pressing the down navigation key.• If all memo locations are full, you must delete an oldmemo before recording a new one.](https://usermanual.wiki/LG-Electronics-USA/L1100/User-Guide-404626-Page-57.png)
![58Extras [Menu 3]Using the calculator [Menu 3-5-1]1. Enter the first number using the numeric keys.2. Press the corresponding navigation key to select a mathematicalfunction.3. To calculate the result, press the left soft key [Result] or OK key.4. After calculation, press the left soft key [Reset] to return to theinitial state.Unit converter [Menu 3-6]This converts any measurement from one unit to another. There are4 types that can be converted into units: Length, Surface, Weightand Volume.1. Select one of four unit types by pressing the left soft key [Unit].2. Move to the current unit section by pressing the down navigationkey.3. Select the unit you want to convert using the left/right navigationkeys.4. Move to the Convert unit section by pressing the down navigationkey.5. Select the unit you want to convert to, using the left/rightnavigation keys.6. Input numbers using the numeric keys. Conversion is calculatedautomatically.](https://usermanual.wiki/LG-Electronics-USA/L1100/User-Guide-404626-Page-58.png)
![59World time [Menu 3-7]You can check the current time of Greenwich Mean Time (GMT)and 58 major cities around the world, using the left/right navigationkeys.The screen shows the city name, current date and time. To selectthe time zone in which you are located, proceed as follows:1. Select the city corresponding to your time zone by pressing theleft/right navigation keys one or more times. The local date andtime are displayed.2. If you want to change the time display in standby mode to theselected time, press the left soft key [Options]. And select Set.Note• You can input a decimal number by pressing the key.• To erase any mistakes and clear the display, press thekey. To include a decimal point, press the key. To include a minus sign, press the key.• The time zone setting of each city in World time menumay be affected by network condition.](https://usermanual.wiki/LG-Electronics-USA/L1100/User-Guide-404626-Page-59.png)
![60Extras [Menu 3]Activate IrDA [Menu 3-8]This feature allows you to send or receive data/fax through theinfrared port. To use an infrared connection:1. Install the modem driver for receiving or sending the data/fax.2. Install the network dial-up software supplied by your networkprovider or fax application program for a fax call on your PC.3. Configure and activate an IrDA-compliant infrared port on yourPC.4. Activate the infrared feature on the phone; the symbol appears onthe right side at the bottom of the display.5. Call the network service number given to you by the serviceprovider.If there is no communication between your phone and the IrDA-compliant device within 30 seconds of activation of the feature, it isautomatically deactivated.For further details, contact your network provider.Note• PC Sync is a program for data exchange between PCand the phone by a data cable. Therefore, if you wantto use this function, you need to buy the accessory kit.For more information, you can use the PC Sync Helpfile on the CD.](https://usermanual.wiki/LG-Electronics-USA/L1100/User-Guide-404626-Page-60.png)
![61Orange World [Menu 4]The phone supports services based on Wireless ApplicationProtocal (WAP).Orange World [Menu 4-1]This menu allows you to connect directly in the WAP Orangeworld.Your page [Menu 4-2]You can access directly your page on the WAP from this menu.Channel guide [Menu 4-3]You can access directly Channel on the WAP from this menu.Your phone [Menu 4-4]Orange PLUS [Menu 4-5]All the services of sim application toolit (SAT) are available in thismenu.Note• To know the prices for all these services, consult theOrange current tariff or contact your customerengineering.](https://usermanual.wiki/LG-Electronics-USA/L1100/User-Guide-404626-Page-61.png)
![62Press the Menu key (<) and select Messages using navigationkeys.Text message [Menu 5-1]Your phone receives voice mail notification messages and ShortMessage Service (SMS) messages.Voice mail and SMS are network services. Please contact yournetwork operator for more information. When the icon appears, you have received voice mail. When the icon appears, you have received a new text message.If the message memory is full, a message is displayed, the iconflashes and you cannot receive any new messages. Use the Deleteoption in the Inbox menu to delete obsolete messages. Once there is space in the message memory, any undelivered SMSmessages will be received (provided sufficient space is available).Write message [Menu 5-1-1]You can write and edit text messages up to 6 pages. (approximately 918 characters)1. Key in your message. For details on how to enter text, refer topage 23 through 27 (Entering Text).2. After you complete the message, to select the required option,press the left soft key [Option].The following options are available.• Send to number: Enter the number or select the number fromthe address book or the recent numbers. You can send amessage up to 5 phone numbers at a time. Press the left softkey [Options]. The following options will be displayed.– Send (It only shows after a phone number is entered)– Recent numbers– SearchMessages [Menu 5]](https://usermanual.wiki/LG-Electronics-USA/L1100/User-Guide-404626-Page-62.png)
![63• Save to draft: Allows you to save the message so that it canbe sent later.• T9 languages: Select the desired language of T9 mode.• Clear text: Erases the whole text.• Exit: Allows you to exit from the Write message menu.3. You can also send attachments with the message by pressingthe right soft key [Attach], while you’re entering a message.• Symbol: You can attach special characters.• Picture: You can send and receive text messages that containpictures, known as ‘picture messages’. Several preset picturesare available in the phone and they can be replaced with newones received from other sources.• Animation: Attaching an animation in a message can be donethrough EMS (Enhanced Messaging Service). You can selectany of 15 animations in the phone.• Sound: If available, you can attach a sound available for ashort message.• Text template: You can use text templates already set in thephone.• Phone number: You can add phone numbers in the message.• Singnature: You can attach your singnature.](https://usermanual.wiki/LG-Electronics-USA/L1100/User-Guide-404626-Page-63.png)
![64Messages [Menu 5]Inbox [Menu 5-1-2]Received messages can be searched and the contents can beviewed.Received messages are displayed in date order.Press the menu key and select Messages ➞Text messages ➞Inbox.Or, you can use home screen aggregator to enter Inbox.Each received message has the following options available. Press the left soft key [Options].• ReplyReplies to the received message.Note• SIM message refers the message saved in the SIMmemory. And the network distinguishes an incomingmessage into the SIM message or just message.Icon DescriptionRead SIM messageUnread SIM messageRead messageUnread messageRead delivery reportUnread delivery report](https://usermanual.wiki/LG-Electronics-USA/L1100/User-Guide-404626-Page-64.png)
![65• ForwardForwards a received message to other recipients.• Return callCalls the sender’s phone.• ExtractExtracts a picture, animation, sound, phone number, text webpage or email address from the message. These will be saved inMy folder, Address book, or bookmarks.• DeleteDeletes the selected message from the Inbox.• View informationShows more detailed information about the selected message.Outbox [Menu 5-1-3]You can view the list and contents of sent messages in this menuand can also verify if the transmission was successful.The following options are available.• ForwardForwards the current message to other recipients.• DeleteDeletes the selected message from the Outbox.Icon DescriptionSent SIM messageSent message](https://usermanual.wiki/LG-Electronics-USA/L1100/User-Guide-404626-Page-65.png)
![66Messages [Menu 5]• View informationShows more detailed information about the selected message.Draft [Menu 5-1-4]In this menu, you can see the message list saved as draft. Scrollthrough the list using the up/down navigation keys. Each draft has the following options.• SendSends the selected message to other recipients.• DeleteDeletes the selected message.Settings [Menu 5-1-5]This menu lets you set up default SMS information.• Message typesSets the default message type between Text, Voice, Fax, Paging,X.400, E-mail and ERMES. The network can convert themessages into the selected format.• Valid periodSets the length of time for which your text messages will be savedat the SMS center while attempts are made to deliver them to therecipient. Possible values are 1 hour, 12 hours, 1 day, 1 week andthe maximum authorised by your network operator.• Delivery reportsActivates or deactivates the report function. When this function isactivated, the network informs you whether or not your messagehas been delivered.](https://usermanual.wiki/LG-Electronics-USA/L1100/User-Guide-404626-Page-66.png)
![67• Reply with same service centreAllows the recipient of your SMS message to send you a reply viayour message centre, if the service is provided by the network.• SMS centre Saves or changes the number of your SMS centre when sendingtext messages. You must obtain this number from your serviceprovider.• Bearer settingSelects GPRS or GSM. Contact your network operator or serviceprovider for information related to setting a selected bearer, pricingand connection speed.Delete all [Menu 5-1-6]You can delete all messages in the message memory.Picture message [Menu 5-2]A picture message can contain text, images, and/or sound clips.This feature can be used only if it is supported by your networkoperator or service provider. Only devices that offer compatiblePicture message or e-mail features can receive and sendmultimedia messages.Write [Menu 5-2-1]1. Key in the text message. Using the right soft key, you can inputsymbols, numbers and emoticons, or use T9 input mode.After the text message input, press the left soft key [Done].2. Add an image and/or sound. You can move to the next sectionusing the up/down navigation.](https://usermanual.wiki/LG-Electronics-USA/L1100/User-Guide-404626-Page-67.png)
![68Messages [Menu 5]3. You can add a slide by moving the cursor on , then pressingthe OK key or the left soft key [Select]. You can also add a slideusing the right soft key [Menu].4. Press the right soft key [Menu]. The following options areavailable.• Send: Supports multiple numbers and email addresses.•Preview: Displays the multimedia message you wish to send.• Save: Saves the multimedia message in draft or as a template.•Delete: Deletes the MMS message.• Settings: Sets the slide show duration or aligns the messagecontents right, left, top or bottom.•Add Slide : Adds a slide before or after the current slide.•Remove Slide: Deletes the selected slide.Inbox [Menu 5-2-2]You will be alerted when you have received messages. They will besaved in the Inbox. You can identify each message by icons. Fordetails, see the icon description below.If the phone has ‘No space for messages’, you can make space bydeleting messages, media and applications.Icon DescriptionRead multimedia messagesUnread multimedia messagesRead notified multimedia messagesUnread notified multimedia messages](https://usermanual.wiki/LG-Electronics-USA/L1100/User-Guide-404626-Page-68.png)
![69• Timer stopThe Timer stop menu is displayed when you receive a messageincluding various pictures. Usually, the pictures are sequentiallydisplayed automatically. However, if you select this menu, you cansee the next picture by pressing the left soft key [Next] manually.• Previous slideDisplays the previous page.• ReplayReplays multimedia messages.• Delete messageDeletes the current message.• Reply allReplies to all senders.• ForwardForwards the selected message to other recipients.• Save messageSaves a multimedia message in draft form or as a template.• Save itemExtracts pictures or sounds. They will be saved in My folder orAddress book.• DetailDisplays information about received messages; Sender’s address,Subject (only for Multimedia message), Message date & time,Message type, Message size.](https://usermanual.wiki/LG-Electronics-USA/L1100/User-Guide-404626-Page-69.png)
![70Messages [Menu 5]Outbox [Menu 5-2-3]Use this to see sent messages. For each sent message, you cansee the delivery status.• Timer stopUsually, the pictures are in the form of an automatic slide show.However, if you select this menu, you can see the next picture bypressing the left soft key [Next] manually.• Previous slideDisplays the previous page.• ReplayReplays the current message.• Delete messageDeletes the current message.• ForwardForwards the current message to other recipients.• Save messageSaves a multimedia message in draft form or as a template.• Save itemSaves items such as images, sound and attachments to amessage.Icon DescriptionSent](https://usermanual.wiki/LG-Electronics-USA/L1100/User-Guide-404626-Page-70.png)
![71• DetailDisplays information about the outbox messages: Subject (only for Multimedia message), Message date & time,Message type, Message size.• ReplyReplies to the current message.• Reply allReplies to all recipients of the selected message.Draft [Menu 5-2-4]Using this menu, you can preset up to five multimedia messagesthat you use most frequently. This menu shows the presetmultimedia message list.The following options are available.• SendSupports multiple member and email addresses.• PreviewTo see the draft multimedia message.• SaveSaves multimedia messages in draft form or as templates.• DeleteDeletes the message.• SettingsSelect to set the slide duration or align the message contents tothe right, left, top or bottom.](https://usermanual.wiki/LG-Electronics-USA/L1100/User-Guide-404626-Page-71.png)
![72Messages [Menu 5]• Add slideAdds a slide before or after the current slide.• Remove slideRemoves the highlighted slide.Settings [Menu 5-2-5]Via this menu, you can set up the default multimedia messageinformation.The following options are available.• Message titleEnter the message title.• Slide durationSet the duration of each slide.• AlignmentSet the alignment of messages.• Valid periodSet the duration for keeping messages on the network server.• Auto downloadOn: If you select this, messages are downloaded automatically onreceipt.Confirm: Requires you to confirm you want to download themessage.Off: Defers downloading messages.• Message centre URLEnter the address of an MMS server to use the MMS service.](https://usermanual.wiki/LG-Electronics-USA/L1100/User-Guide-404626-Page-72.png)
![73• ProfilesSee page 78 for further information.Answer phone [Menu 5-3]This menu provides you with a quick way of accessing your voicemailbox (if provided by your network). Before using this feature, youmust enter the voice server number obtained from your networkoperator.When new voice message is received, the ( )symbol will bedisplayed on the screen. Please check with your network providerfor details of their service in order to configure the handset correctly.Listen to voice mail [Menu 5-3-1]Once this option has been selected, simply press the left soft key[OK] to listen to voice messages. You can also hold down the 1 key in standby mode to listen to voice messages.Voice mail centre [Menu 5-3-2]You can input and set the voice mailbox number.Info services [Menu 5-4]Info service messages are text messages sent by the network tomobile phone users. They provide general information such asweather reports, traffic news, taxis, pharmacies, and stock prices.Each type of information is associated with a number, which can beobtained from the network operator. When you receive an infoservice message, a popup message will indicate a new messagereceipt or the info service message will be displayed directly.In standby mode, the following options are available when viewinginfo service messages.](https://usermanual.wiki/LG-Electronics-USA/L1100/User-Guide-404626-Page-73.png)
![74Messages [Menu 5]Read [Menu 5-4-1]The list of received broadcast messages can be searched and thecantents viewed.Receive [Menu 5-4-2]Use this to enable or disable the reception of broadcast messages.Alert [Menu 5-4-3]Set alert on or off for a new broadcast message.Auto display [Menu 5-4-4]If you select this option On, all received broadcast messages will beautomatically displayed.Languages [Menu 5-4-5] (Dependent to network and subscription) This option lets you select the preferred languages. Cell broadcastmessages will be displayed in the selected language. If you use alllanguages supported by the phone, select Automatic at the end ofthe list.Topics [Menu 5-4-6](Dependent to network and subscription) To create new topics, press the left soft key [Option] then selectAdd new. If you already have topics, you can cancel, edit, or deletethem by using the left soft key [Options].](https://usermanual.wiki/LG-Electronics-USA/L1100/User-Guide-404626-Page-74.png)
![75Templates [Menu 5-5]There are pre-defined messages in the list. You can view and editthe template messages or create new messages. Three types oftemplates are available: Text, Multimedia and Signature.Text [Menu 5-5-1]• EditUse this to write a new message or edit the selected templatemessage from the text template list.• DeleteDeletes the selected template message from the text template list.• Send text messageUse this to send the selected template message by SMS.• Send multimedia messageUse this to send the selected template message by MMS.• Add newUse this to create new template.Multimedia [Menu 5-5-2]• SendSends the multimedia template. Supports multiple numbers andemail addresses.• PreviewDisplays the draft multimedia message.](https://usermanual.wiki/LG-Electronics-USA/L1100/User-Guide-404626-Page-75.png)
![76Messages [Menu 5]• SaveSaves multimedia messages in draft form or as templates.• DeleteDeletes the multimedia template.• SettingsSets the timer for slide, text, or to align the message contentsright, left, top and bottom.• Add SlideAdds a slide before or after the current slide.• Remove SlideDeletes the highlighted slide.• Add ImageUse this to add an image before or after the current image.• Add SoundAdds a sound before or after the current sound.Signature [Menu 5-5-3]This option helps you to make your own Signature. Key in thename, mobile phone number, office number, Fax number, and E-mail address.• EditUse this to write a new message or edit the selected Signature.• DeleteUse this to delete the selected signature.](https://usermanual.wiki/LG-Electronics-USA/L1100/User-Guide-404626-Page-76.png)
![77• Send via text messageUse this to send the selected signature by SMS.• Send via multimedia messageSends the selected signature by MMS.Memory status [Menu 5-6]You can check the current memory status for SMS and MMS.](https://usermanual.wiki/LG-Electronics-USA/L1100/User-Guide-404626-Page-77.png)
![78Media album [Menu 6]Media album has 3 folders: Picture, Animation and Sound. You canview, delete, or control downloaded contents. You can get pictures,animation or sounds from WAP site, MMS or SMS. While you’rechecking each content, you can send it via SMS or MMS, edit ordelete it. You can set one in the Picture folder or Animation folder asthe wallpaper. For sounds, you can set the desired sound as thering tone.Picture [Menu 6-1]Animation [Menu 6-2]Sound [Menu 6-3]Memory status [Menu 6-4]](https://usermanual.wiki/LG-Electronics-USA/L1100/User-Guide-404626-Page-78.png)
![79Apps & Games [Menu 7]Java is a technology developed by Sun Microsystems. Similar to theway you would download the Java Applet using the standardNetscape or MS Internet Explorer browsers, Java MIDlet can bedownloaded using the WAP enabled phone. Depending on theservice provider, all Java based programs such as Java games canbe downloaded and run on a phone. Once downloaded, the Javaprogram can be viewed within the Applications menu where you canselect, execute, or delete. The Java program files saved in thephone are in .JAD and .JAR formats.Applications [Menu 7-1]Application menu displays the list of Java programs downloadedusing the WAP. All previous downloaded programs can be selected,deleted, or viewed in detail within the Application menu. From thelist within the Application menu, the following options are available:• Open: Open the selected program. The list includes all Javaprograms installed in the phone.Note• The JAR file is a compressed format of the Javaprogram and the JAD file is a description file thatincludes all detailed information. From the network,prior to download, you can view all detailed filedescriptions from the JAD file.Warning• Only J2ME (Java 2 Micro Edition) based programs willrun in a phone environment. The J2SE (Java 2Standard Edition) based programs will only run in a PCenvironment.](https://usermanual.wiki/LG-Electronics-USA/L1100/User-Guide-404626-Page-79.png)
![80Note• The control keys are different depending on a game.However, each one has an introduction to explain themain control keys. [ Common key function ]< : Game menu> : BackApps & Games [Menu 7]• Delete: Delete the selected program. Once deleted, you will not beable to restore the program unless it is downloaded again usingthe WAP.• Details: Display detailed information on the selected program.This includes the program name, program size, program version,vendor information and the website address or the URL.• Connect options: Some Java applications may require dataconnection to be mode. Select one of the following options.1. Ask first: You will be asked before the application makes theconnection.2. Allowed: The connection is created immediately without anotification.3. Not allowed: No connection is allowed.Games [Menu 7-2]You can enjoy the games which are supported.](https://usermanual.wiki/LG-Electronics-USA/L1100/User-Guide-404626-Page-80.png)
![81Download [Menu 7-3]When a new Java program is downloaded using the WAP, theaddress from which a download takes place is known as abookmark. The Java menu includes a bookmark list for downloadingJava programs and this bookmark list can be viewed from theDownload menu. You can connect, view, edit, delete, and add newbookmarks.• Connect: Selected address in the bookmark is used for dataconnection. After successful connection, desired Java programcan be downloaded from the list.• View: Detailed information on a bookmark can be viewed such asthe address of bookmark and title of bookmark required forconnecting to certain sites.• Edit: Selected bookmark can be edited. Editing a bookmark isdone in the order of Address ➞Title. When creating a newbookmark, same order is followed.• Delete: Selected bookmark is deleted. All bookmarks can bedeleted completely from the bookmark list screen. Deletedbookmark cannot be restored so caution is required when deletingbookmarks.• Add new: New bookmark is added. The same order used duringEdit bookmark applies to Add new bookmark. Select the Add newoption from the bookmark menu or when no bookmark exists, thenthe Add new can be selected from the bookmark list screen.](https://usermanual.wiki/LG-Electronics-USA/L1100/User-Guide-404626-Page-81.png)
![82Note• After selecting the Connect function to access the JavaMIDlet Provider’s server, you may choose one of manyJava programs to download and install into your phone.Once connected to the server, the Go button can bepressed to view the JAD information on a desiredprogram. The Get button will begin the download andinstall process. The download and install process willtake place simultaneously and once download iscomplete you can immediately run the Java program.The installed Java program can be selected to run at alater time from the Application menu.Information [Menu 7-4]Memory status [Menu 7-4-1]Shows the size of memory available for game and applicationinstallations. You can also see the whole memory status ofHandset.Java version [Menu 7-4-2]Shows the current version of Java.Apps & Games [Menu 7]](https://usermanual.wiki/LG-Electronics-USA/L1100/User-Guide-404626-Page-82.png)
![83Address book [Menu 8]You can save phone numbers and their corresponding names in thememory of your SIM card. In addition, you can save up to 255numbers and names in the phone memory.- Press the left soft key [Menu] in standby mode, then selectAddress book.- Or, press up/down navigation key in standby mode.Search [Menu 8-1]1. In standby mode, press left soft key [Menu]. Select an Addressbook and select Search. Then, you are asked to enter the startof the name that you wish to find and then, you will find the nameinstantly.2. After finding the desired name, you can make a call to thenumber by pressing the [Send] key. Or press the left key[Options] to use the following options.• View detail: To view details of the selected name.• Edit: Edits the name, number, and the listing group.• Delete: Deletes the Address book entry.• Write text msg.: Use this to write a text message to the name.• Write picture msg.: Use this to write a picture message to thename.• Copy: Use this to copy the address book entry from SIM to thephone memory or vice versa.• Voice: Records the name of the selected address book entryfor voice-activated dialling.• Main number: To show all number lists which are saved ifmore than 2 numbers saved.](https://usermanual.wiki/LG-Electronics-USA/L1100/User-Guide-404626-Page-83.png)
![Add new [Menu 8-2]You can add an Address book entry using this function.There are 2 memories: Phone memory and SIM memory. The phone memory capacity is 255 entries. You can enter up to 20characters in each name in the phone memory. The SIM cardmemory capacity depends on the SIM card.1. Open the enu first by pressing the left soft key, and Select anAddress book.2. Scroll to highlight Add new, and press [OK].3. You can add new Address book entries to SIM memory or thephone memory. • Adding new entries into SIM memoryYou can enter a name and number, and select the requiredgroup. (Depends on the SIM)• Adding new entries into the phone memoryYou can enter a name, numbers, E-mail address, memo andaddress book – photos, and select the required group.84Address book [Menu 8]](https://usermanual.wiki/LG-Electronics-USA/L1100/User-Guide-404626-Page-84.png)
![85Speed dials [Menu 8-3]You can assign any of the keys 2to 9with a name list entry.You can make a call to the number by pressing the [Send] key, orpress the left key [Options] and select Call. Or, You can call directlyby pressing this key for 2-3 seconds in standby mode1. Open the menu first by pressing the left soft key, and Select anAddress book [Menu].2. Scroll to Speed dials, then press [OK].3. To add a number to Speed dials, select <Empty> and then,press the left soft key [Add]. You can search and select the nameto press [Select] through the address book.4. You can change or delete a speed dial number, make a call,write text message, or write picture message by pressing the leftsoft key [Options] to use the following options.• Change: Changes the member list.• Delete: Deletes the member list.• Call: Makes a call to the number.• Write text msg.: Use this to write a text message to the name.• Write picture msg.: Use this to write a picture message to thename.](https://usermanual.wiki/LG-Electronics-USA/L1100/User-Guide-404626-Page-85.png)
![Voice list [Menu 8-4]You can assign a voice with a name list entry for voice-acitvateddialling.You can make a call to the number by pressing the [Send] key, orpress the left key [Options] and select Call.1. Open the menu first by pressing the left soft key, and Select anAddress book [Menu].2. Scroll to Speed dials, then press [OK].3. To add a number to Voice list, press the left soft key [Add]. You can search and select the name to press [Select] throughthe address book. After selecting a number, record a voice.4. You can play, change, or delete a voice, make a call, add new ordelete all voice lists by pressing the left soft key [Options] to usethe following options.• Play: Plays back the voice tag assigned to the phone number.• Change: Changes the voice tag assigned to the phonenumber.• Delete: Deletes the voice assigned to the phone number.• Call: Makes a call to the selected number.• Add new: Adds a new phone number for voice-activateddialling.• Delete all: Deletes all voice-activated dialling numbers.86Address book [Menu 8]Note• You can enter up to 10 phone numbers for voice dial.](https://usermanual.wiki/LG-Electronics-USA/L1100/User-Guide-404626-Page-86.png)
![Caller groups [Menu 8-5]There are 6 pre-defined groups, as well as one additional grouplabelled Others, where you can create lists.1. Open the menu first by pressing the left soft key, and Select anAddress book [Menu].2. Scroll to Caller groups, then press [OK]. Every group list will bedisplayed: Family, VIP, Friends, Colleague, Group 1, Group 2,and Others.3. Select the group name that you want to manage by pressing theleft soft key [Options]. The following options will be displayedexcept for Others.• Member list: Displays the member list in the group.• Group ring tone: Use this to select the ring tone to be usedwhen you receive a voice phone call from a person in thegroup.• Group icon: Use this to select the graphic icon to be displayedwhen you receive a call from a person in the group.• Add member: Add a member to the group.• Delete member: Delete a member from the group.• Rename: Assigns a new name to the group.87](https://usermanual.wiki/LG-Electronics-USA/L1100/User-Guide-404626-Page-87.png)
![88Copy all [Menu 8-6]You can copy/move entries from the SIM card memory to the phonememory and vice versa.• SIM to Phone : Use this to copy the entry from the SIM Card toPhone memory.• Phone to SIM : Use this to copy the entry from the Phone memoryto the SIM Card.The following options are available.– Keep original : When copying, the original dial numbers are kept.– Delete original: When copying, the original dial numbers will beerased.Delete all [Menu 8-7]You can delete all entries in SIM, Phone, and Voice list. Except forVoice list, this function requires the security code. Settings [Menu 8-8]Set memory [Menu 8-8-1]You can select the memory for the Address book feature betweenthe SIM and the phone. If you select Variable, when adding entry,the phone will ask where to save the number.Photo display [Menu 8-8-2]You can set the photo list by Photo view or List view , when yousearch the Address book. If you select Photo view, the list will beshown with photos.Address book [Menu 8]](https://usermanual.wiki/LG-Electronics-USA/L1100/User-Guide-404626-Page-88.png)
![89Information [Menu 8-9]Service dial number [Menu 8-9-1](SIM dependent)Use this to view the list of Service Dialling Numbers (SDN) assignedby your network operator (if supported by the SIM card). Suchnumbers include the emergency, directory enquiries and voice mailnumbers.1. Select the Service dial number.2. The names of the available services will be shown.3. Use the up/down navigation keys to select a service.Memory status [Menu 8-9-2] You can check the current memory status of the SIM card andphone memory.Own number [Menu 8-9-3] (SIM dependent)Use this to display your phone number in the SIM card.](https://usermanual.wiki/LG-Electronics-USA/L1100/User-Guide-404626-Page-89.png)
![90Press the Menu key (<) and select Settings using navigationkeys.Date & Time [Menu 9-1]This option lets you change the current time and date displayed.The following options are available.Set date [Menu 9-1-1]Use this to enter the day, month and year. You can change the dateformat via the Date format menu option.Date format [Menu 9-1-2]You can set the date format such as DD/MM/YYYY, MM/DD/YYYY,YYYY/MM/DD. (D: Day, M: Month, Y: Year)Set time [Menu 9-1-3]Use this to enter the current time. You can choose the time formatvia the Time format menu option.Time format [Menu 9-1-4]You can set the time format between 12 hours and 24 hours.Display settings [Menu 9-2]Many features of your phone can be customised to suit yourpreferences. All of these features are accessed via the Displaysettings menu.Wallpaper [Menu 9-2-1]Use this to set up the display on the LCD screen in the standbymode.Settings [Menu 9]](https://usermanual.wiki/LG-Electronics-USA/L1100/User-Guide-404626-Page-90.png)
![Greeting note [Menu 9-2-2]Use this to show the greeting note on the internal LCD screen in thestandby mode and external LCD. Maximum number of characterscan be shown is 15 for the internal LCD and 10 for the externalLCD.Menu colour [Menu 9-2-3]Your Phone provides you with 4 menu colour themes. Set the menucolour by scrolling and pressing the Select key.Languages [Menu 9-2-4]You can select the display language. When the language option isset to Automatic, the language is automatically selected accordingto the language of the SIM card used. English will be set if thelanguage on the SIM card is not supported by the phone.Backlight [Menu 9-2-5]Use this to select whether or not the phone uses the backlight. A small increase in standby/talk time can be achieved by turning thebacklight off.You set the backlight option for the keypad in the up/down positionindependently.LED Indication [Menu 9-2-6]Use this to set LED Indication blinking on/off, which shows whetheryour phone is power on.Network name [Menu 9-2-7]Use this to display network name you use on the LCD screen in thestandby mode.91](https://usermanual.wiki/LG-Electronics-USA/L1100/User-Guide-404626-Page-91.png)
![Call settings [Menu 9-3]To change the settings for call diverting.Call divert [Menu 9-3-1]When this network service is activated, you can direct yourincoming calls to another number, for example, to your voicemailbox number. For details, contact your network operator. Selectone of the divert options, for example, select If busy to divert voicecalls when your number is busy or when you reject incoming calls.The following options are available.• All voice calls Diverts all voice calls unconditionally.• If busyDiverts voice calls when the phone is in use.• If no replyDiverts voice calls which you do not answer.• If out of reachDiverts voice calls when the phone is switched off or out ofcoverage.• All data callsDiverts to a number with a PC connection unconditionally.• All fax calls Diverts to a number with a fax connection unconditionally.Each option has the following menu:- ActivateActivates the corresponding service.92Settings [Menu 9]](https://usermanual.wiki/LG-Electronics-USA/L1100/User-Guide-404626-Page-92.png)
![• To voice mailForwards to message centre. This function does not apply toAll data calls and All fax calls menus.• To other numberInput the number for call diverting.- CancelCancels the selected call divert.- View statusYou can check the status of the service.• Cancel allCancels all call divert settings.Answer mode [Menu 9-3-2]Select the desired mode to answer a call.• Flip openYou can receive a call simply by opening the flip.• Any keyWhen the phone rings, you can answer a call by pressing any keyexcept the key and the right soft key (>).• Only send keyYou can answer a call only by pressing the send key.Send my number [Menu 9-3-3]This network service lets you decide whether your phone number isdisplayed (On) or hidden (Off) from the person you are calling.Select Set by network to reset the phone to the setting that youhave agreed upon with your service provider.93](https://usermanual.wiki/LG-Electronics-USA/L1100/User-Guide-404626-Page-93.png)
![Call waiting [Menu 9-3-4] (Network Service)The network will notify you of a new incoming call while you have acall in progress. Select Activate to request the network to activatecall waiting, Cancel to request the network to deactivate callwaiting, or View status, to check if the function is active or not.Minute minder [Menu 9-3-5]When set to On, the phone will beep every minute during anoutgoing call to keep you informed of the length of the call.Voice dial [Menu 9-3-6]You can make a phone call by speaking a voice tag that has beenadded to a contact card. Any spoken word(s) can be a voice tag. Before using voice-activated dialling, note that:• Voice tags are not language dependent. They are dependent onthe speaker’s voice.• Voice tags are sensitive to background noise. Record them andmake calls in a quiet environment.• When recording a voice tag or making a call by saying a voicetag, the loudspeaker is in use. Hold the phone at a short distanceaway from your mouth and face so that the proximity sensor doesnot turn the loudspeaker off.• Very short names are not accepted. Use long enough names andavoid similar names for different numbers.• AutomaticUse this to enter voice-activated dialling mode whenever you slidethe keypad down.• ManualUse this to enter voice-activated dialling mode by holding the star[*/voice] key.94Settings [Menu 9]](https://usermanual.wiki/LG-Electronics-USA/L1100/User-Guide-404626-Page-94.png)
![Auto redial [Menu 9-3-7]Select On, and your phone will make a maximum of five attempts toconnect the call after an unsuccessful call attempt.Select line [Menu 9-3-8]This function is only used if Two Line Service is supported by theService Provider. If this function is supported by your serviceprovider, the following menu will be displayed.• Line 1• Line 2Closed user group [Menu 9-3-9](Network Service) This is a network service that specifies the group of people who youcan call and who can call you. For more information, contact yournetwork operator or service provider. If a group index is specified, itis used for all outgoing calls. If no group index is specified, thenetwork will use the preferential index. (A specific index is stored inthe network.)• Preset : Sets the selected CUG index.• On: You can edit the CUG index and activate it.• Off: Deletes the selected CUG.95Note• You must say the name exactly as you said when yourecorded it. This may be difficult, for example, in anoisy environment or during an emergency, so youshould not rely solely upon.](https://usermanual.wiki/LG-Electronics-USA/L1100/User-Guide-404626-Page-95.png)
![Network settings [Menu 9-4]The Network settings feature enables you to indicate whether thenetwork used when roaming (outside your home area) is selectedautomatically, manually or preferably.Automatic [Menu 9-4-1]Use this to set the phone to automatically search for and select oneof the cellular networks available in your area.The phone will default back to Automatic if it is switched off.Manual [Menu 9-4-2]If you want to select the desired network manually from a list ofnetwork. If the connection to the manually selected network is lost,Preferred [Menu 9-4-3]You can set a list of preferred networks the handset should attemptto register with first, before attempting to register to any othernetworks. This list is created from the handset’s predefined list ofknown networks.Band selection [Menu 9-4-4]Use this to set the network band between two choices, GSM900/1800 or GSM1900.96Settings [Menu 9]Note• You can select a network other than your homenetwork only if it has a valid roaming agreement withyour home network.](https://usermanual.wiki/LG-Electronics-USA/L1100/User-Guide-404626-Page-96.png)
![GPRS settings [Menu 9-5]GPRS (General Packet Radio Service) is a technology that allowsmobile phones to be used for sending and receiving data over themobile network. GPRS is a data bearer that enables wirelessaccess to data network such as the Internet. Before you can use GPRS technology;• You need to subscribe to the GPRS service. For availability andsubscription to GPRS service, contact your network operator orservice provider.• You need to save the GPRS settings for the applications usedover GPRS.Attach [Menu 9-5-1]If you select Power on and you are in a network that supportsGPRS, the phone registers to the GPRS network and sending shortmessages will be done via GPRS. Also, starting an active packetdata connection, for example, to send and receive e-mail, is quicker.If you select When needed, the phone will use a GPRS connectiononly if you start an application or action that needs it. The GPRSconnection is closed after it is no longer required by any application.External device [Menu 9-5-2]When you use Internet via GPRS by using external device, you canset the following six profiles: Rename, APN, IP address, DNS,User ID, and Password.97Note• If there is no GPRS coverage and you have chosenAutomatic, the phone will periodically try to establish aconnection.](https://usermanual.wiki/LG-Electronics-USA/L1100/User-Guide-404626-Page-97.png)
![Security settings [Menu 9-6]Various passwords are used to protect certain features of yourphone.PIN code request [Menu 9-6-1]When the PIN code request feature is enabled, you must enteryour PIN each time you switch the phone on. Consequently, anyperson who does not have your PIN cannot use your phone withoutyour approval.The following options are available:• EnableYou must enter the PIN each time the phone is switched on.• DisableThe phone connects directly to the network when you switch it on.Phone lock [Menu 9-6-2]When the Phone lock feature is enabled, the phone is locked andyou must enter the phone password each time the phone isswitched on. The password is factory set to 0000. To change thephone password, refer to the Change codes – Security codemenu option [Menu 9-6-5-1]. Once the correct password has beenentered, you can use the phone until you switch it off.The following options are available:98Settings [Menu 9]Note• Before disabling the PIN code request feature, youmust enter your PIN.](https://usermanual.wiki/LG-Electronics-USA/L1100/User-Guide-404626-Page-98.png)
![• Power On- EnableYou are required to enter the phone password when you switchthe phone on.- DisableYou do not need to enter the phone password when you switchthe phone on.- If SIM changedYour phone will request security code only when you changeyour SIM card.• ImmediatelyAfter entering the correct security code, the phone will lock aftergoing into the idle state. If you want to disable this phone lock, youshould enter the right security code after pressing the right softkey. If you power off in the phone lock state, when the phone isnext powered on, the phone is in the lock state.Call barring service [Menu 9-6-3] (Network dependent)Call barring lets you restrict the making and receiving of calls withyour phone. For this function, you need the barring password, whichyou can obtain from your service provider.The following options are available:• All outgoingNo call can be made.• Outgoing internationalInternational calls cannot be made.99](https://usermanual.wiki/LG-Electronics-USA/L1100/User-Guide-404626-Page-99.png)
![• Outgoing international except home countryWhen abroad, calls can be made only to numbers within thecurrent country and to your home country, No call can the countrywhere your home network provider is located.• All incomingNo call can be received.• Incoming when abroadCalls cannot be received when you are using your phone outsideyour home service area.• Cancel all barringsAll call barring settings are deactivated; calls can be made andreceived normally.• Change passwordUse this to set and change the call barring password obtainedfrom your service provider using this option. You must enter thecurrent password before you can specify a new one. Once youhave entered a new password, you are asked to confirm it byentering it again.100Settings [Menu 9]Note• To use Call barring service, you must input thenetwork password. When calls are barred, calls may bepossible to certain emergency numbers on somenetworks.](https://usermanual.wiki/LG-Electronics-USA/L1100/User-Guide-404626-Page-100.png)
![Fixed dial number [Menu 9-6-4] (FDN) (SIM dependent)Use this to restrict your outgoing calls to selected phone numbers, if this function is supported by your SIM card. The PIN2 code isrequired.The following options are available:• ActivateUse this to only call phone numbers saved in the address book.You must enter your PIN2 code.• CancelAllows you to call any number.• Number listUse this to view the numbers saved as fixed dial numbers.Change codes [Menu 9-6-5]The Change codes feature lets you change your current passwordto a new one. You must enter the current password before you canspecify a new one.Use this to change the access codes: Security code, PIN1 code,PIN2 code101Note• Not all SIM cards have a PIN2. If your SIM card doesnot, this menu option is not displayed.Note• PIN: Personal Identification Number](https://usermanual.wiki/LG-Electronics-USA/L1100/User-Guide-404626-Page-101.png)
![Reset settings [Menu 9-7]You can reset your phone to its default configuration.To do so, proceed, as follows.1. Select the Reset settings menu option.2. Enter the 4-digit security code.102Settings [Menu 9]Note• The security code is preset to 0000.](https://usermanual.wiki/LG-Electronics-USA/L1100/User-Guide-404626-Page-102.png)