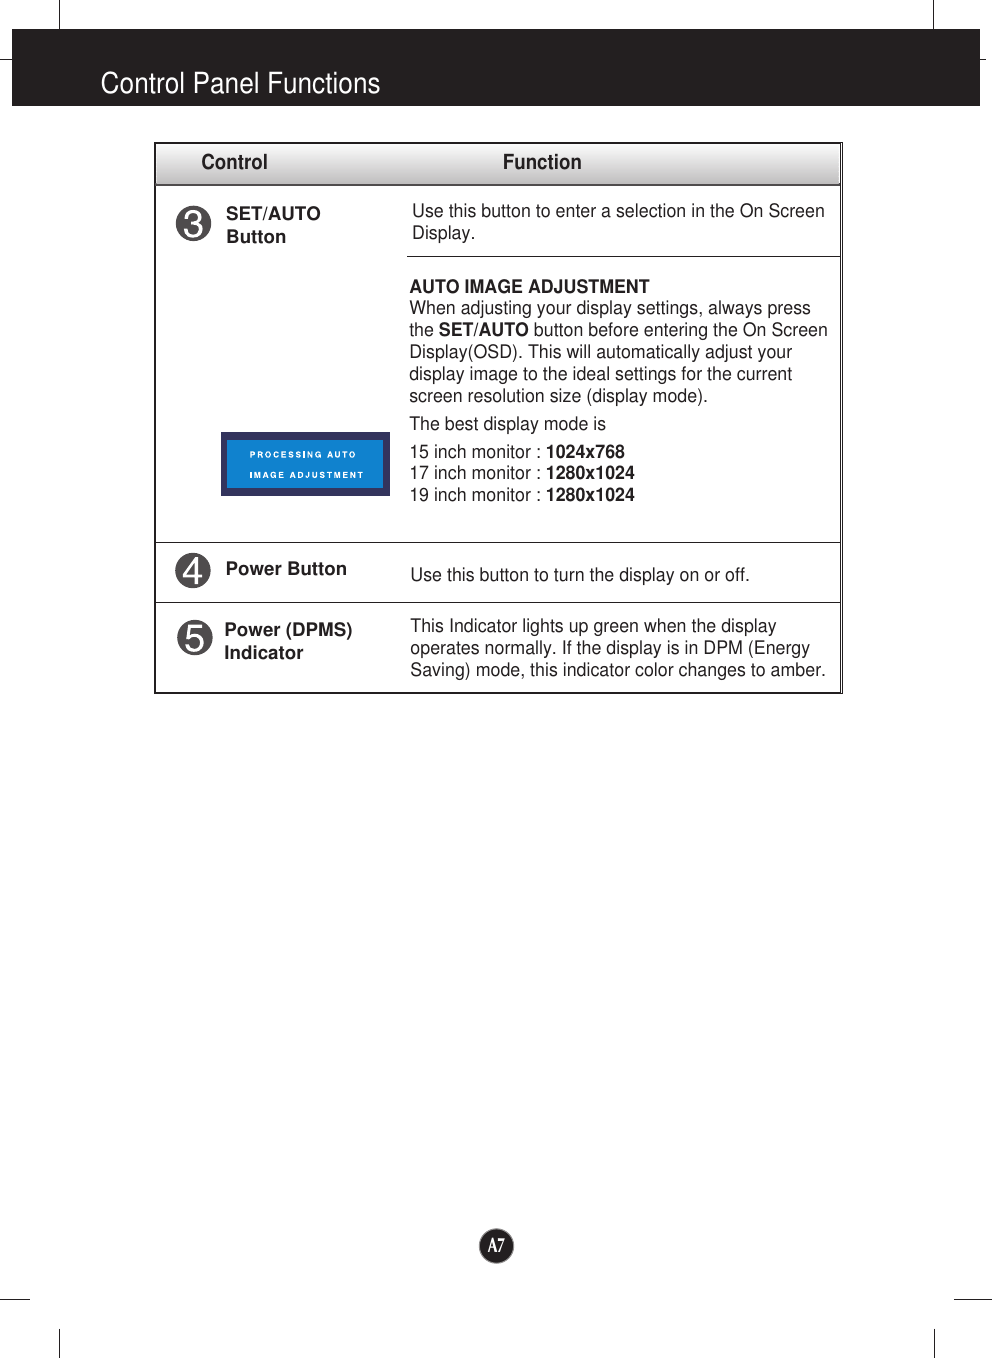
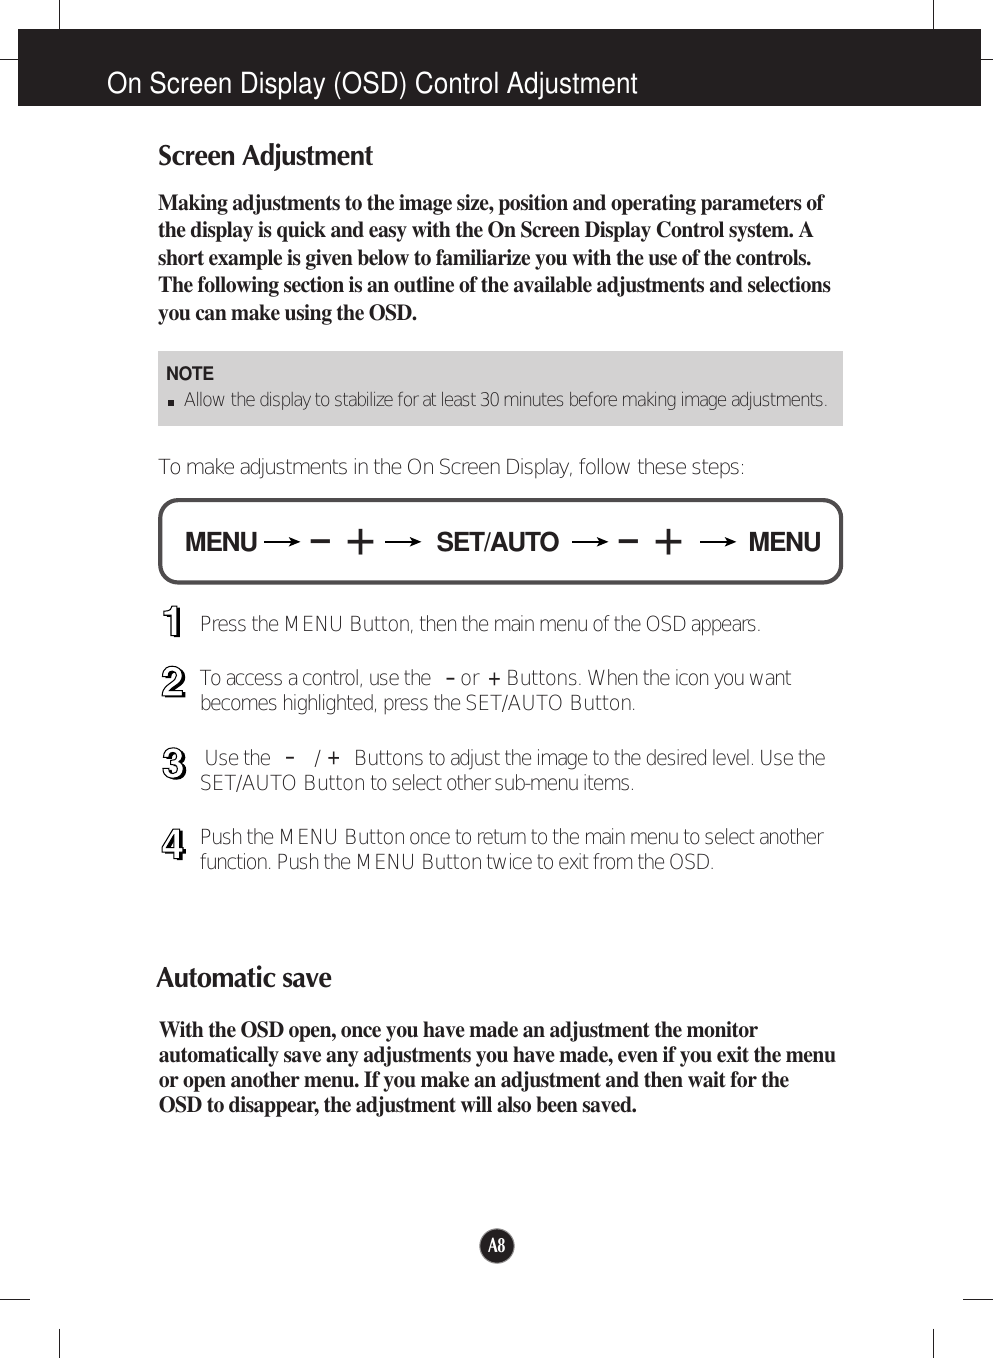
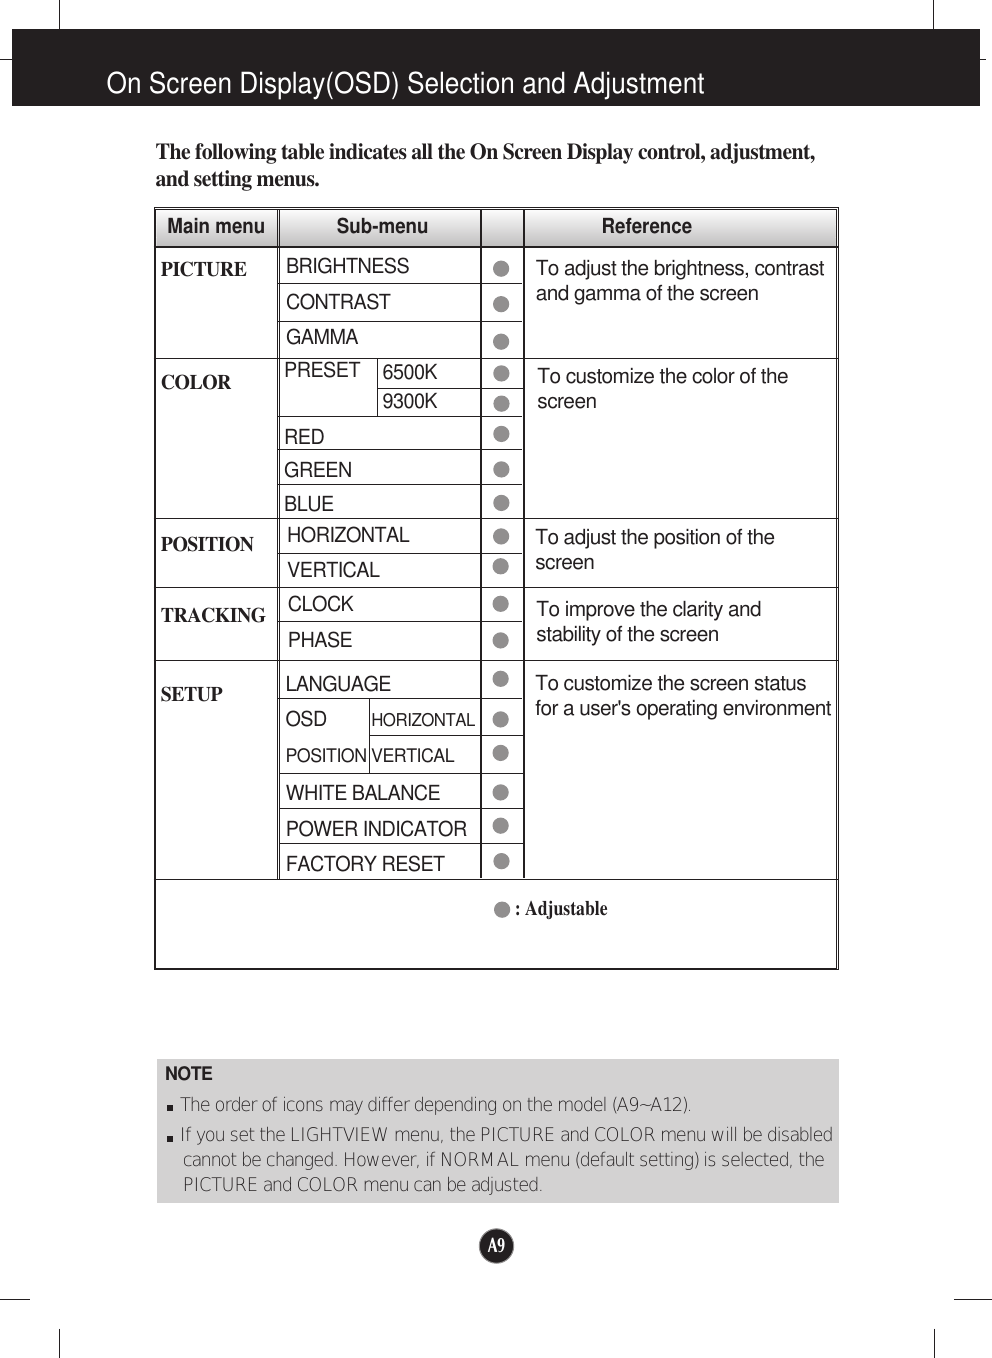
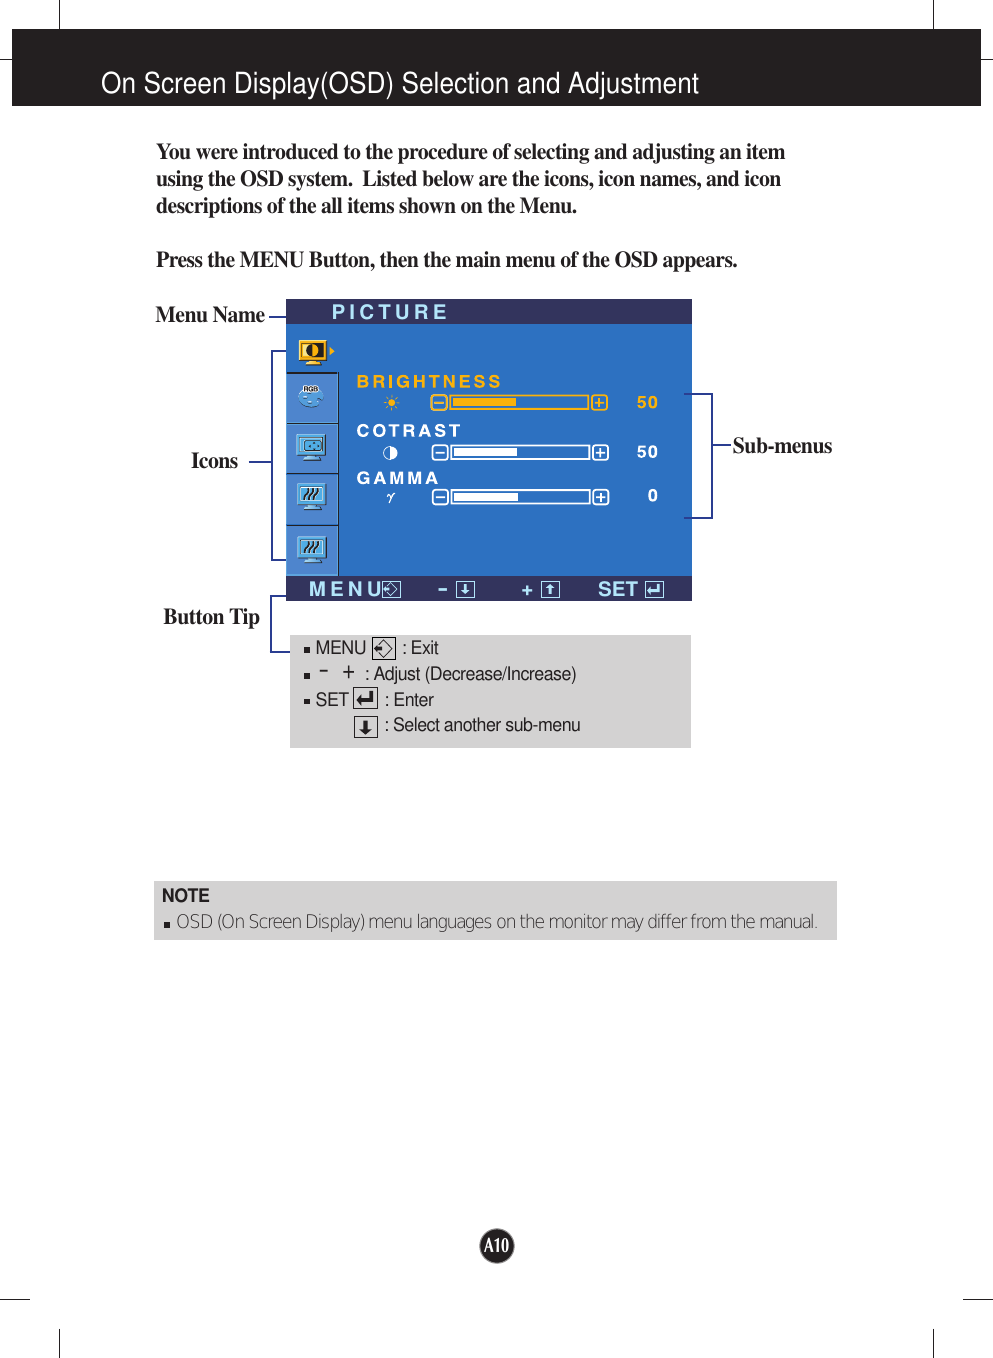
LG Electronics USA L15NP 15" LCD Monitor User Manual Microsoft PowerPoint F User s Manual

LG Electronics USA 15" LCD Monitor Microsoft PowerPoint F User s Manual

users manaul

FCC ID : BEJL15NPAPPENDIX  F :USER’S MANUAL
1FCC Compliance StatementThis equipment has been tested and found to comply withinthe limits of a Class B digital device pursuant to Part 15 ofthe FCC Rules. These limits are designed to providereasonable protection against harmful interference in aresidential installation.This equipment generates, uses, and can radiate radiofrequency energy and if not installed and used inaccordance with the instructions, may cause harmfulinterference to radio communications. However, there is noguarantee that interference will not occur in a particularinstallation.If this equipment does cause harmful interference to radioor television reception (which can be determined by turningthe equipment on and off), the user is encouraged to try tocorrect the interference by using one or more of thefollowing measures:Reorient or relocate the receiving antenna.Increase the separation between the equipment and thereceiver.Connect the equipment into an outlet on a circuitdifferent from that to which the receiver is connected.Consult the dealer or an experienced radio/TVtechnician for  help.Caution: Changes or modifications not expressly approvedby the party responsible for compliance could void theuser's (or your) authority to operate the equipment. Onlyperipherals (digital input/output devices, terminals, printers,etc.) certified to comply with the Class B limits may beattached to this monitor. Operation with non-certifiedperipherals is likely to result in interference to radio and TVreception.Only shielded signal cables may be used with this System.Canadian DOC NoticeThis Class B digital apparatus meets all requirements of theCanadian Interference-Causing Equipment Regulations.Cet appareil numérique de la classe B respecte toutes lesexigences du Règlement sur le matériel brouilleur duCanada.CE Conformity Notice (for Europe)Products with the “CE” Marking comply with the EMCDirective(89/336/EEC) and LOW VOLTAGE Directive(73/23/EEC) issued by the Commission of the EuropeanCommunity.Compiance with these directives implies conformity to thefollowing European Norms :• EN 55022:1998          ; Radio Frequency Interference• EN 55024:1998  ; Electromagnetic Immunity• EN 61000-3-2             ; Power Line Harmonics• EN 61000-3-3             ; Voltage Fluctuations• EN 60950                    ; Product SafetyLow Radiation Compliance (MPR II)This monitor meets one of the strictest guidelines availabletoday for low radiation emissions, offering the user extrashielding and an antistatic screen coating. Theseguidelines, set forth by a government agency in Sweden,limit the amount of emission allowed in the Extremely LowFrequency (ELF) and Very Low Frequency (VLF)electromagnetic range.TCO95Congratulations! You have just purchased a TCO’95 approved and labelledproduct!  Your choice has provided you with a productdeveloped for professional use.  Your purchase has alsocontributed to reducing the burden on the environment andto the further development of environmentally-adaptedelectronic products.Why do we have environmentally labelled computers? In many countries, environmental labelling has become anestablished method for encouraging the adaptation ofgoods and services to the environment.  The main problemas far as computers and other electronic equipment areconcerned is that environmentally harmful substances areused both in the products and during their manufacture.Since it has not been possible so far for the majority ofelectronic equipment to be recycled in a satisfactory way,most of these potentially damaging substances sooner orlater enter Nature.There are also other characteristics of a computer, such asenergy consumption levels, that are important from both theworking and natural environment viewpoints.  Since alltypes of conventional electricity generation have a negativeeffect on the environment (acidic- and climatic-influencingemissions, radioactive waste, etc.), it is vital to conserveenergy.  Electronic equipment in offices consumes asenormous amount of energy, since it is often routinely leftrunning continuously.What does the environmenal labelling involve?This product meets the requirements for the TCO’95 Regulatory InformationNOTICEThe regulations are applied only to the products with theID LABEL indicating specific requirements.NOTICEThe regulations are applied only to the products with theID LABEL indicating specific requirements.NOTICEThe regulations are applied only to the products with theID LABEL indicating specific requirements.
2Regulatory Information cont.NUTEKNaturskyddsföreningen Närings- och teknikutvecklingsverket SEMKOscheme, which provides for international environmentallabelling of personal computers.  The labelling scheme wasdeveloped as a joint effort by the TCO (The SwedishConfederation of Professional Employees),Naturckyddsföreningen (The Swedish Society for NatureConservation), and NUTEK (The National Board forIndustrial and Technical Development in Sweden), andSEMKO AB (an international certification agency).The requirements cover a wide range of issues:environment, ergonomics, usability, emission of electricaland magnetic fields, energy consumption and electrical andfire safety.The environmental demands concern, among other things,restriction on the presence and use of heavy metals,brominated and chlorinated flame retardants, CFCs(freons), and chlorinated solvents.  The product must beprepared for recycling, and the manufacturer is obliged tohave an environmental plan, which must be adhered to ineach country where the company implements itsoperational policy.  The energy requirements include a demand that thecomputer and/or display, after a certain period of inactivity,shall reduce its power consumption to a lower level, in oneor more stages.  The length of time to reactivate thecomputer shall be reasonable for the user.Labelled products must meet strict environmentaldemands, for example, in respect of the reduction of electricand magnetic fields, along with physical and visualergonomics and good usability.The following is a brief summary of the environmentalrequirements met by this product.  The completeenvironmental criteria document may be ordered from:TCO Development UnitLinnegatan 14,  S-11494 Stockholm, SwedenFAX +46-8 782 92 07E-mail (Internet): development@tco.seCurrent information regarding TCO’95 approved andlabelled products may also be obtained on the Internetusing the address:      http://www.tco-info.com/TCO’95 is a co-operative project between:Environmental requirementsBrominated flame retardants are present in printed circuitboards, cabling, casings, and housings, and are added todelay the spread of fire.  Up to 30% of the plastic in acomputer casing can consist of flame-retardant substances.These are related to another group of environmental toxins,PCBs, and are suspected of giving rise to similar harm,including reproductive damage in fish-eating birds andmammals.  Flame retardants have been found in humanblood, and researchers fear that they can disturb fetusdevelopment.  Bio-accumulative1TCO’95 demands require that plasticcomponents weighing more than 25 grams must notcontain flame retardants with organically bound chlorine orbromine.Lead can be found in picture tubes, display screens, solder,and capacitors.  Lead damages the nervous system and inhigher doses causes lead poisoning.  The relevant bio-accumulative TCO’95  requirement permits the inclusion oflead, as no replacement has yet been developed.Cadmium is present in rechargeable batteries and in thecolor-generating layers of certain computer displays.Cadmium damages the nervous system and is toxic in highdoses.  The relevant bio-accumulative TCO’95 requirementstates that batteries may not contain more than 25 ppm(parts per million) of cadmium.  The color-generating layersof display screens must not contain any cadmium.Mercury is sometimes found in batteries, relays andswitches. Mercury damages the nervous system and istoxic in high doses.  The relevant bio-accumulative TCO’95requirement states that batteries may not contain more than 25 ppm of mercury and that no mercury is present in any ofthe electrical or electronic components concerned with thedisplay unit.CFCs (freons) are sometimes used for washing printedcircuit boards and in the manufacture of expanded foam forpackaging.  CFCs break down ozone and thereby damagethe ozone layer in the atmosphere, causing increasedreception on Earth of ultra-violet light with consequentincreased risks of skin cancer (malignant melanoma).  Therelevant TCO’95 requirement:  Neither CFCs nor HCFCsmay be used during the manufacture of the product or itspackaging.1Bio-accumulative means that the substance accumulateswithin living organisms.Shipping PackageThe packaging material can be recycled, or you can save itto return the monitor to a service center for repair ordisposal.CFC Compounds in Distribution PackagingCushioning material used for shipping finished monitors arenot manufactured with nor do they contain any CFCcompounds.Design for Disassembly/RecyclingThese monitors have been designed for easy end-of-lifedisassembly and recycling. Fasteners are generally of thesame type for efficient disassembly. Components made ofdifferent materials can be easily separated and plasticshave been identified using intermational symbols to aid inrecycling.Monitor DisposalWARNINGIf you need to dispose of a monitor, ask a qualified servicerepresentative for the proper procedure. Improper disposalcould result in personal injury from implosion.
3TCO99Congratulations! You have just purchased a TCO’99 approved andlabelled product! Your choice has provided you witha product developed for professional use. Yourpurchase has also contributed to reducing theburden on the environment and also to the furtherdevelopment of environmentally adapted electronicsproducts.Why do we have environmentally labelledcomputers? In many countries, environmental labelling hasbecome an established method for encouraging theadaptation of goods and services to the environment.The main problem, as far as computers and otherelectronics equipment are concerned, is thatenvironmentally harmful substances are used both inthe products and during their manufacture. Since it isnot so far possible to satisfactorily recycle themajority of electronics equipment, most of thesepotentially damaging substances sooner or laterenter nature. There are also other characteristics of a computer,such as energy consumption levels, that areimportant from the viewpoints of both the work(internal) and natural (external) environments. Sinceall methods of electricity generation have a negativeeffect on the environment (e.g. acidic and climate-influencing emissions, radioactive waste), it is vital tosave energy. Electronics equipment in offices isoften left running continuously and therebyconsumes a lot of energy.What does labelling involve?This product meets the requirements for the TCO’99scheme which provides for international andenvironmental labelling of personal computers. Thelabelling scheme was developed as a joint effort bythe TCO (The Swedish Confederation ofProfessional Employees), SvenskaNaturskyddsforeningen (The Swedish Society forNature Conservation) and Statens Energimyndighet(The Swedish National Energy Administration).Approval requirements cover a wide range of issues:environment, ergonomics, usability, emission ofelectric and magnetic fields, energy consumptionand electrical and fire safety.The environmental demands impose restrictions onthe presence and use of heavy metals, brominatedand chlorinated flame retardants, CFCs (freons) andchlorinated solvents, among other things. Theproduct must be prepared for recycling and themanufacturer is obliged to have an environmentalpolicy which must be adhered to in each countrywhere the company implements its operationalpolicy.The energy requirements include a demand that thecomputer and/or display, after a certain period ofinactivity, shall reduce its power consumption to alower level in one or more stages. The length of timeto reactivate the computer shall be reasonable forthe user.Labelled products must meet strict environmentaldemands, for example, in respect of the reduction ofelectric and magnetic fields, physical and visualergonomics and good usability.Below you will find a brief summary of theenvironmental requirements met by this product. Thecomplete environmental criteria document may beordered from:TCO DevelopmentSE-114 94 Stockholm, SwedenFax: +46 8 782 92 07Email (Internet): development@tco.seCurrent information regarding TCO’99 approved andlabelled products may also be obtained via the Internet,using the address: http://www.tco-info.com/Environmental requirementsFlame retardantsFlame retardants are present in printed circuitboards, cables, wires, casings and housings. Theirpurpose is to prevent, or at least to delay the spreadof fire. Up to 30% of the plastic in a computer casingcan consist of flame retardant substances. Mostflame retardants contain bromine or chloride, andthose flame retardants are chemically related toanother group of environmental toxins, PCBs. Boththe flame retardants containing bromine or chlorideand the PCBs are suspected of giving rise to severehealth effects, including reproductive damage infish-eating birds and mammals, due to the bio-accumulative* processes. Flame retardants havebeen found in human blood and researchers fearthat disturbances in foetus development may occur.The relevant TCO’99 demand requires that plasticcomponents weighing more than 25 grams must notcontain flame retardants with organically boundbromine or chlorine. Flame retardants are allowed inthe printed circuit boards since no substitutes areavailable.Cadmium**Cadmium is present in rechargeable batteries and inthe colour-generating layers of certain computerdisplays. Cadmium damages the nervous systemand is toxic in high doses. The relevant TCO’99requirement states that batteries, the colour-generating layers of display screens and theelectrical or electronics components must not containany cadmium.Regulatory Information cont.
4Regulatory Information cont.Mercury**Mercury is sometimes found in batteries, relays andswitches. It damages the nervous system and istoxic in high doses. The relevant TCO’99requirement states that batteries may not containany mercury. It also demands that mercury is notpresent in any of the electrical or electronicscomponents associated with the labelled unit.CFCs (freons)The relevant TCO’99 requirement states that neitherCFCs nor HCFCs may be used during themanufacture and assembly of the product. CFCs(freons) are sometimes used for washing printedcircuit boards. CFCs break down ozone and therebydamage the ozone layer in the stratosphere, causingincreased reception on earth of ultraviolet light withe.g. increased risks of skin cancer (malignantmelanoma) as a consequence.Lead**Lead can be found in picture tubes, display screens,solders and capacitors. Lead damages the nervoussystem and in higher doses, causes lead poisoning.The relevant TCO’99 requirement permits theinclusion of lead since no replacement has yet beendeveloped.* Bio-accumulative is defined as substances whichaccumulate within living organisms** Lead, Cadmium and Mercury are heavy metals which areBio-accumulative.EPA (U.S.A only)ENERGYSATR is a set of power-saving guidelinesissued by the U.S. Environmental ProtectionAgency(EPA).NOM MARK (Mexico only)GOST MARKEPA  POLLUTION PREVENTERAs an ENERGY STAR Partner LGElectronics U.S.A.,Inc. hasdetermined that this product meets the ENERGY STAR guidelines forenergy efficiency.BZ03Internet Address:http://www.lg.ru»ÌÙÓχˆËÓÌ̇ˇ ÒÎÛÊ·‡ LGElectronics (095)742-77-77
Make sure to read the Important Precautions before using the product. Keep the User's Guide(CD) in an accessible place for furture reference.See the label attached on the back cover and quote this information to yourdealer when you require service.User’s GuideL1530SL1730SL1930STTTL1930SQ
A1This unit has been engineered and manufactured to ensure your personalsafety, however improper use may result in potential eletrical  shock or firehazards. In order to allow the proper operation of all safeguardsincorporated in this display, observe the following basic rules for itsinstallation, use, and servicing.On SafetyUse only the power cord supplied with the unit. In case you use another powercord, make sure that it is certified by the applicable national standards if not beingprovided by the supplier. If the power cable is faulty in any way, please contact themanufacturer or the nearest authorized repair service provider for a replacement.The power supply cord is used as the main disconnection device. Ensure that thesocket-outlet is easily accessible after installation.Operate the display only from a power source indicated in the specifications ofthis manual or listed on the display. If you are not sure what type of power supplyyou have in your home, consult with your dealer.Overloaded AC outlets and extension cords are dangerous. So are frayed powercords and broken plugs. They may result in a shock or fire hazard. Call your servicetechnician for replacement.Do not Open the Display.There are no user serviceable components inside. There are Dangerous High Voltages inside, even when the power is OFF. Contact your dealer if the display is not operating properly.To Avoid Personal Injury :Do not place the display on a sloping shelf unless properly secured.Use only a stand recommended by the manufacturer.To Prevent Fire or Hazards:Always turn the display OFF if you leave the room for more than a short periodof time. Never leave the display ON when leaving the house.Keep children from dropping or pushing objects into the display's cabinetopenings. Some internal parts carry hazardous voltages.Do not add accessories that have not been designed for this display.During a lightning storm or when the display is to be left unattended for anextended period of time, unplug it from the wall outlet.Important Precautions
A2Important PrecautionsOn InstallationDo not allow anything to rest upon or roll over the power cord, and do not placethe display where the power cord is subject to damage.Do not use this display near water such as near a bathtub, washbowl, kitchensink, laundry tub, in a wet basement, or near a swimming pool.Displays are provided with ventilation openings in the cabinet to allow the releaseof heat generated during operation. If these openings are blocked, built-up heatcan cause failures which may result in a fire hazard. Therefore, NEVER:Block the bottom ventilation slots by placing the display on a bed, sofa, rug, etc.Place the display in a built-in enclosure unless proper ventilation is provided.Cover the openings with cloth or other material.Place the display near or over a radiator or heat source.Do not rub or strike the Active Matrix LCD with anything hard as this may scratch,mar, or damage the Active Matrix LCD permanently.Do not press the LCD screen with your finger for a long time as this may causesome afterimages.Some dot defects may appear as Red, Green or Blue spots on the screen.However, this will have no impact or effect on the display performance. If possible, use the recommended resolution to obtain the best image quality foryour LCD display. If used under any mode except the recommended resolution,some scaled or processed images may appear on the screen. However, this ischaracteristic of the fixed-resolution LCD panel.On CleaningUnplug the display before cleaning the face of the display screen.Use a slightly damp (not wet) cloth. Do not use an aerosol directly on the displayscreen because over-spraying may cause electrical shock.On RepackingDo not throw away the carton and packing materials. They make an idealcontainer in which to transport the unit. When shipping the unit to anotherlocation, repack it in its original material.On DisposalThe fluorescent lamp used in this product contains a small amount of mercury. Do not dispose of this product with general household waste.Disposal of this product must be carried out in accordance to the regulations ofyour local authority.
Removing the stand base1. Place the monitor with its front facing downward on a cushion or soft cloth.2. To remove the stand base, hold the bottom of the stand with one hand and pull the base bottom latch with the other hand, as shown in the figure.A3Connecting the DisplayBefore setting up the monitor, ensure that the power to the monitor, thecomputer system, and other attached devices is turned off. Connecting the stand base1. Place the monitor with its front facing downward on a cushion or soft cloth.2. Align the hooks on the stand base with the matching slots in the base ofthe monitor.3. Insert the hooks into slots.ImportantThis illustration depicts the general model of connection. Your monitor may differ fromthe items shown in the picture.Once you connect the stand base, try not to disconnect it.Do not carry the product upside down holding only the stand base. The product mayfall and get damaged or injure your foot.In order to prevent injury, watch that your fingers are not caught when moving a sliding door or attaching/detaching a stand cover.HookBottom Latch
A4Connecting the DisplayUsing the Computer1. Open the Sliding Doorand remove the Stand Cover.2. Connect the signal cable. When attached, tighten the thumbscrews to securethe connection. 3. Connect the power cord into a proper power outlet that is easily accessible andclose to the display.Wall-outlet type*PC-outlet type*PCMACAnalog signal* Varies according to model.12Mac adapterFor Apple Macintosh use, a separate plug adapter is needed to change the 15 pin high density (3 row) D-sub VGA connector on the supplied cable to a 15 pin 2 row connector.Sliding DoorStand Cover
A5Connecting the Display6. Press        button on the front switch panel to turn the power on. Whenmonitor power is turned on, the 'Self Image Setting Function' isexecuted automatically.NOTE‘ Self Image Setting Function’? This function provides the user with optimal displaysettings.When the user connects the monitor for the first time, this function automaticallyadjusts the display to optimal settings for individual input signals. If you want to adjust themonitor while in use, or wish to manually run this function once again, push the ‘AUTO’button on the front panel of the monitor. Otherwise, you may execute the ‘FACTORYRESET’ option on the OSD adjustment menu. However, be aware that this option initializesall the menu items except ‘LANGUAGE’.5. Connect the Stand Coverand then pull down the Sliding Door.4. Connect the cables as shown in the figure to the cable holder to arrange itneatly. Cable HolderSliding DoorStand Cover
A6Control Panel FunctionsMENU SET/AUTOLightView-+Front Panel ControlsBottomButtonsUse these buttons to select or adjust functions in the OnScreen Display.MENU ButtonUse this button to enter or exit the On Screen Display.-+Control FunctionOSD LOCKED/UNLOCKEDThis function allows you to lock the current controlsettings, so that they cannot be inadvertently changed.Press and hold the MENU button for 5 seconds. Themessage "OSD LOCKED" should appear.You can unlock the OSD controls at any time by pushingthe MENU button for 5 seconds. The message "OSDUNLOCKED" should appear.LightView hot keyThis feature lets you easily select the best desiredimage condition optimized to the environment(ambient illumination, image types etc).• DAY : Bright ambient illumination• NIGHT : Dark ambient illumination• TEXT : For text images (Word processing etc.)• MOVIE : For animation images in videos or movies • PHOTO : For pictures or drawings• NORMAL: This is under normal operatingconditionsDAYNIGHT
Control Panel FunctionsA7This Indicator lights up green when the displayoperates normally. If the display is in DPM (EnergySaving) mode, this indicator color changes to amber.Use this button to turn the display on or off.Power ButtonPower (DPMS)IndicatorUse this button to enter a selection in the On Screen Display.SET/AUTOButtonAUTO IMAGE ADJUSTMENTWhen adjusting your display settings, always pressthe SET/AUTO button before entering the On ScreenDisplay(OSD). This will automatically adjust yourdisplay image to the ideal settings for the currentscreen resolution size (display mode).The best display mode is15 inch monitor : 1024x76817 inch monitor : 1280x102419 inch monitor : 1280x1024Control Function
A8On Screen Display (OSD) Control AdjustmentScreen AdjustmentMaking adjustments to the image size, position and operating parameters ofthe display is quick and easy with the On Screen Display Control system. Ashort example is given below to familiarize you with the use of the controls.The following section is an outline of the available adjustments and selectionsyou can make using the OSD.To make adjustments in the On Screen Display, follow these steps:Press the MENU Button, then the main menu of the OSD appears.To access a control, use the    or  Buttons. When the icon you wantbecomes highlighted, press the SET/AUTO Button.Use the   /      Buttons to adjust the image to the desired level. Use theSET/AUTO Button to select other sub-menu items.Push the MENU Button once to return to the main menu to select anotherfunction. Push the MENU Button twice to exit from the OSD.Automatic saveWith the OSD open, once you have made an adjustment the monitorautomatically save any adjustments you have made, even if you exit the menuor open another menu. If you make an adjustment and then wait for theOSD to disappear, the adjustment will also been saved.NOTEAllow the display to stabilize for at least 30 minutes before making image adjustments.SET/AUTOMENU MENU-+-+-+-+
A9NOTEThe order of icons may differ depending on the model (A9~A12).If you set the LIGHTVIEW menu, the PICTURE and COLOR menu will be disabledcannot be changed. However, if NORMAL menu (default setting) is selected, thePICTURE and COLOR menu can be adjusted.On Screen Display(OSD) Selection and Adjustment To adjust the brightness, contrastand gamma of the screenPICTURECOLORPOSITIONTRACKINGSETUP Main menu Sub-menu ReferenceThe following table indicates all the On Screen Display control, adjustment,and setting menus.PRESETREDGREENBLUETo adjust the position of thescreen To customize the color of thescreenTo customize the screen statusfor a user's operating environmentTo improve the clarity andstability of the screen : AdjustableBRIGHTNESSCONTRASTGAMMAHORIZONTALVERTICALCLOCKPHASEWHITE BALANCEPOWER INDICATORFACTORY RESETLANGUAGEOSD         HORIZONTALPOSITION VERTICAL6500K9300K
A10NOTEOSD (On Screen Display) menu languages on the monitor may differ from the manual.On Screen Display(OSD) Selection and Adjustment You were introduced to the procedure of selecting and adjusting an itemusing the OSD system.  Listed below are the icons, icon names, and icondescriptions of the all items shown on the Menu.Press the MENU Button, then the main menu of the OSD appears.Menu NameIconsButton TipPICTUREMENU-+SETSub-menusMENU        : Exit: Adjust (Decrease/Increase)SET        : Enter: Select another sub-menu-+
A11On Screen Display(OSD) Selection and Adjustment Main menu Sub menu DescriptionBRIGHTNESSCONTRAST GAMMATo adjust the brightness of the screen. To adjust the contrast of the screen.Set your own gamma value. : -50/0/50On the monitor, high gamma valuesdisplay whitish images and low gammavalues display high contrast images.PICTUREMENU-+SETPICTUREPRESETREDGREENBLUESelect the screen color. • 6500K: Slightly reddish white.• 9300K: Slightly bluish white.Set your own red color levels.Set your own green color levels.Set your own blue color levels.COLORHORIZONTALVERTICALTo move image left and right.To move image up and down.POSITIONMENU : Exit: Decrease: IncreaseSET : Select another sub-menu-+MENU : Exit: Decrease: IncreaseSET : Select another sub-menu-+MENU : Exit: Decrease: IncreaseSET : Select another sub-menu-+COLORMENU-+SETPOSITIONMENU-+SET
A12On Screen Display(OSD) Selection and Adjustment Main menu Sub menu DescriptionCLOCKPHASETo minimize any vertical bars or stripesvisible on the screen background.Thehorizontal screen size will also change.To adjust the focus of the display. Thisitem allows you to remove anyhorizontal noise and clear or sharpenthe image of characters.TRACKINGIf this does not improve the screen image, restore the factory default settings. If necessary, perform the white balance function again. This function will be enabled only whenthe input signal is an analog signal. MENU : Exit: Decrease: IncreaseSET : Select another sub-menu-+SETUPMENU : Exit: Adjust: AdjustSET : Select another sub-menu-+To choose the language in which thecontrol names are displayed.To adjust position of the OSD windowon the screen.LANGUAGEOSDPOSITIONWHITEBALANCEIf the output of the video card is differentthe required specifications, the colorlevel may deteriorate due to videosignal distortion. Using this function, thesignal level is adjusted to fit into thestandard output level of the video cardin order to provide the optimal image.Activate this function when white andblack colors are present in the screen.   TRACKINGMENU-+SETSETUPMENU-+SETSETUPMENU-+SETFACTORYRESETPOWERINDICATORRestore all factory default settings except"LANGUAGE." Use this function to set the powerindicator on the front side of the monitorto ON or OFF.If you set OFF, it will go off after 15seconds. If you set ON at any time, thepower indicator will automatically beturned on.Press the       button to reset immediately.
A13TroubleshootingNo image appearsCheck the following before calling for service.No image appearsIs the power cord of thedisplay connected?Is the power indicatorlight on?Is the power on and thepower indicator green?Is the power indicatoramber?Do you see an "OUTOF RANGE" messageon the screen?Do you see a "CHECKSIGNAL CABLE"message on thescreen?Do you see a "OSD LOCKED" message on the screen?Check and see if the power cord is connectedproperly to the power outlet.Press the Power button.Adjust the brightness and the contrast.If the display is in power saving mode, try movingthe mouse or pressing any key on the keyboardto bring up the screen.Make sure if the power is on. Try to turn on the PC.This message appears when the signal from thePC (video card) is out of horizontal or verticalfrequency range of the display. See the'Specifications' section of this manual andconfigure your display again.This message appears when the signal cablebetween your PC and your display is notconnected. Check the signal cable and try again.You can secure the current control settings,so that they cannot be inadvertently changed.You can unlock the OSD controls at any timeby pushing the MENU button for 5 seconds.The message "OSD UNLOCKED" shouldappear.Do you see “OSDLOCKED” when youpush MENU button?
A14TroubleshootingDisplay image is incorrectDisplay Position isincorrect.On the screenbackground, verticalbars or stripes arevisible.Any horizontal noiseappearing in anyimage or charactersare not clearlyportrayed.The screen color ismono or abnormal.The screen blinks.Press the SET/AUTO button to automaticallyadjust your display image to the ideal setting. If the results are unsatisfactory, adjust the imageposition using the H position and V positionicon in the on screen display.Check Control Panel --> Display --> Settingsand see if the frequency or the resolution werechanged. If yes, readjust the video card to therecommend resolution.Press the SET/AUTO button to automaticallyadjust your display image to the ideal setting.If the results are unsatisfactory, decrease thevertical bars or stripes using the CLOCK icon inthe on screen display.Press the SET/AUTO button to automaticallyadjust your display image to the ideal setting.If the results are unsatisfactory, decrease thehorizontal bars using the PHASE icon in the onscreen display.Check Control Panel --> Display --> Settingsand adjust the display to the recommendedresolution or adjust the display image to the idealsetting. Set the color setting higher than 24 bits(true color).Check if the signal cable is properly connectedand use a screwdriver to fasten if necessary.Make sure the video card is properly inserted inthe slot.Set the color setting higher than 24 bits (truecolor) at Control Panel - Settings.Check if the screen is set to interlace mode and ifyes, change it to the recommend resolution.Make sure the power voltage is high enough, Ithas to be higher than AC100-240V 50/60Hz.
A15TroubleshootingHave you installed the display driver?Have you installed thedisplay driver?Do you see an"Unrecognized monitor,Plug&Play (VESA DDC)monitor found"message?Be sure to install the display driver from thedisplay driver CD (or diskette) that comes withyour display. Or, you can also download thedriver from our web site: http://www.lge.com.Make sure to check if the video card supportsPlug&Play function.PICTURE and COLOR menus can not be activated from the OSD menu.Are you unable toactivated the PICTUREor COLOR menusfrom the OSD menu?Ensure that the NORMAL setting is selectedfor LIGHTVIEW. If LIGHTVIEW is set toDAY TEXT/MOVIE/PHOTO, NIGHTTEXT/MOVIE/PHOTO, the PICTURE andCOLOR menus will not function. To make anadjustment, set LIGHTVIEW to NORMAL.
A16SpecificationsL1530S TNOTEInformation in this document is subject to change without notice.15 inches (38.1cm) Flat Panel Active matrix-TFT LCD Anti-Glare coating15 inches viewable0.297 mm pixel pitchHorizontal Freq. 30 - 63kHz (Automatic)Vertical Freq. 56 - 75Hz (Automatic)Input Form Separate TTL, Positive/NegativeSignal Input 15 pin D-Sub ConnectorInput Form RGB Analog (0.7Vp-p/75ohm)Max VESA 1024 x 768@75Hz Recommend VESA 1024 x 768@60HzDDC 2BNormal :25WStand-by/Suspend≤1WDPMS Off ≤1WWidth 36.75 cm / 14.47 inchesHeight 36.67cm / 14.44 inchesDepth 18.99 cm / 7.48 inchesNet 3.6 kg (7.94 lbs)Tilt -5˚~30˚AC 100-240V~ 50/60Hz 0.6AOperating ConditionsTemperature 10˚C to 35 ˚CHumidity 10 % to 80 % non-CondensingStorage ConditionsTemperature -20˚C to 60 ˚CHumidity 5 % to 95 % non-CondensingAttached(     ), Detachable ( O )Attached(     ), Detachable ( O )Wall-outlet type or PC-outlet typeDisplaySync InputVideo InputResolutionPlug&PlayPowerConsumptionDimensions&Weight(with tilt stand)Tilt RangePower InputEnvironmentalConditionsTilt StandSignal cablePower cord
A17SpecificationsL1730S TNOTEInformation in this document is subject to change without notice.17 inches (43.2cm) Flat Panel Active matrix-TFT LCD Anti-Glare coating17 inches viewable0.264 mm pixel pitchHorizontal Freq. 30 - 83kHz (Automatic)Vertical Freq. 56 - 75Hz (Automatic)Input Form Separate TTL, Positive/NegativeComposite TTL, Positive/NegativeSOG (Sync On Green) Signal Input 15 pin D-Sub ConnectorInput Form RGB Analog (0.7Vp-p/75ohm)Max VESA 1280 x 1024@75Hz Recommend VESA 1280 x 1024@60HzDDC 2BNormal :43WStand-by/Suspend≤1WDPMS Off ≤1WWidth 39.80 cm / 15.67 inchesHeight 40.33 cm / 15.88 inchesDepth 22.00 cm / 8.66 inchesNet 4.90 kg (10.80 lbs)Tilt -5˚~30˚AC 100-240V~ 50/60Hz 1.0AOperating ConditionsTemperature 10˚C to 35 ˚CHumidity 10 % to 80 % non-CondensingStorage ConditionsTemperature -20˚C to 60 ˚CHumidity 5 % to 95 % non-CondensingAttached(     ), Detachable ( O  )Attached(     ), Detachable ( O )Wall-outlet type or PC-outlet typeDisplaySync InputVideo InputResolutionPlug&PlayPowerConsumptionDimensions&Weight(with tilt stand)Tilt RangePower InputEnvironmentalConditionsTilt StandSignal cablePower cord
A18SpecificationsL1930S T    /L1930SQNOTEInformation in this document is subject to change without notice.19 inches (48.18cm) Flat Panel Active matrix-TFT LCD Anti-Glare coating19 inches viewable0.294mm pixel pitchHorizontal Freq. 30 - 83kHz (Automatic)Vertical Freq. 56 - 75Hz (Automatic)Input Form Separate TTL, Positive/NegativeComposite TTL, Positive/NegativeSOG (Sync On Green) Signal Input 15 pin D-Sub ConnectorInput Form RGB Analog (0.7Vp-p/75ohm)Max VESA 1280 x 1024@75Hz Recommend VESA 1280 x 1024@60HzDDC 2BNormal :45WStand-by/Suspend≤1WDPMS Off ≤1WWidth 44.44 cm / 17.50inchesHeight 43.83 cm / 17.25 inchesDepth 50.83 cm / 20.01 inchesNet 8.3 kg (18.29 lbs)Tilt -5˚~30˚Swivel 300˚AC 100-240V~ 50/60Hz 1.0AOperating ConditionsTemperature 10˚C to 35 ˚CHumidity 10 % to 80 % non-CondensingStorage ConditionsTemperature -20˚C to 60 ˚CHumidity 5 % to 95 % non-CondensingAttached(     ), Detachable ( O )Attached(     ), Detachable ( O )Wall-outlet type or PC-outlet typeDisplaySync InputVideo InputResolutionPlug&PlayPowerConsumptionDimensions&Weight(with tilt stand)Tilt RangePower InputEnvironmentalConditionsTilt StandSignal cablePower cord
A19SpecificationsPreset Modes (Resolution)15 inch monitor17 inch monitorDisplay Modes (Resolution) Horizontal Freq. (kHz) Vertical Freq. (Hz)1234567891011121314640 x 350720 x 400640 x 480640 x 480640 x 480640 x 480800 x 600800 x 600800 x 600800 x 600832 x 6241024 x 7681024 x 7681024 x 76831.46831.46831.46935.00037.86137.50035.15637.87948.07746.87549.72548.36356.47660.02370706066.6772.87556.2560727575607075VGAVGAVGAVESAVESAVESAVESAVESAVESAVESAMACVESAVESAVESADisplay Modes (Resolution) Horizontal Freq. (kHz) Vertical Freq. (Hz)12345678910111213640 x 350720 x 400640 x 480640 x 480800 x 600800 x 600832 x 6241024 x 7681024 x 7681152 x 8701152 x 9001280 x 10241280 x 102431.46931.46831.46937.50037.87946.87549.72548.36360.02368.68161.80563.98179.97670706075607575607575656075VGAVGAVGAVESAVESAVESAMACVESAVESAMACVESAVESAVESA
A20SpecificationsPreset Modes (Resolution)IndicatorNormalStand-by/SuspendDPMS OffgreenamberamberLED ColorMODE19 inch monitorDisplay Modes (Resolution) Horizontal Freq. (kHz) Vertical Freq. (Hz)12345678910111213640 x 350720 x 400640 x 480640 x 480800 x 600800 x 600832 x 6241024 x 7681024 x 7681152 x 8701152 x 9001280 x 10241280 x 102431.46931.46831.46937.50037.87946.87549.72548.36360.02368.68161.80563.98179.97670706075607575607575656075VGAVGAVGAVESAVESAVESAMACVESAVESAMACVESAVESAVESA
A21How to Install the VESA Standard wall mountingThis monitor meets VESA-compliant mounting interface padspecifications.1. Remove the Sliding Doorand Stand Cover.2.Please the monitor on a piece of cloth or other soft surface with thefront side facing downward.3.Separate the stand base using a screwdriver as shown in the picture.4.Install the VESA standrad wall mounting.VESA wall mountingConnected to another object (stand typeand wall-mounted type. This monitoraccepts a VESA-compliant mountinginterface pad.-optional)For further information, refer to the VESAWall Mounting Instruction Guide.Kensington Security Slot- optionalConnected to a locking cable that can be purchasedseparately at most computerstoresSliding DoorStand Cover
Digitally yours

Navigation menu