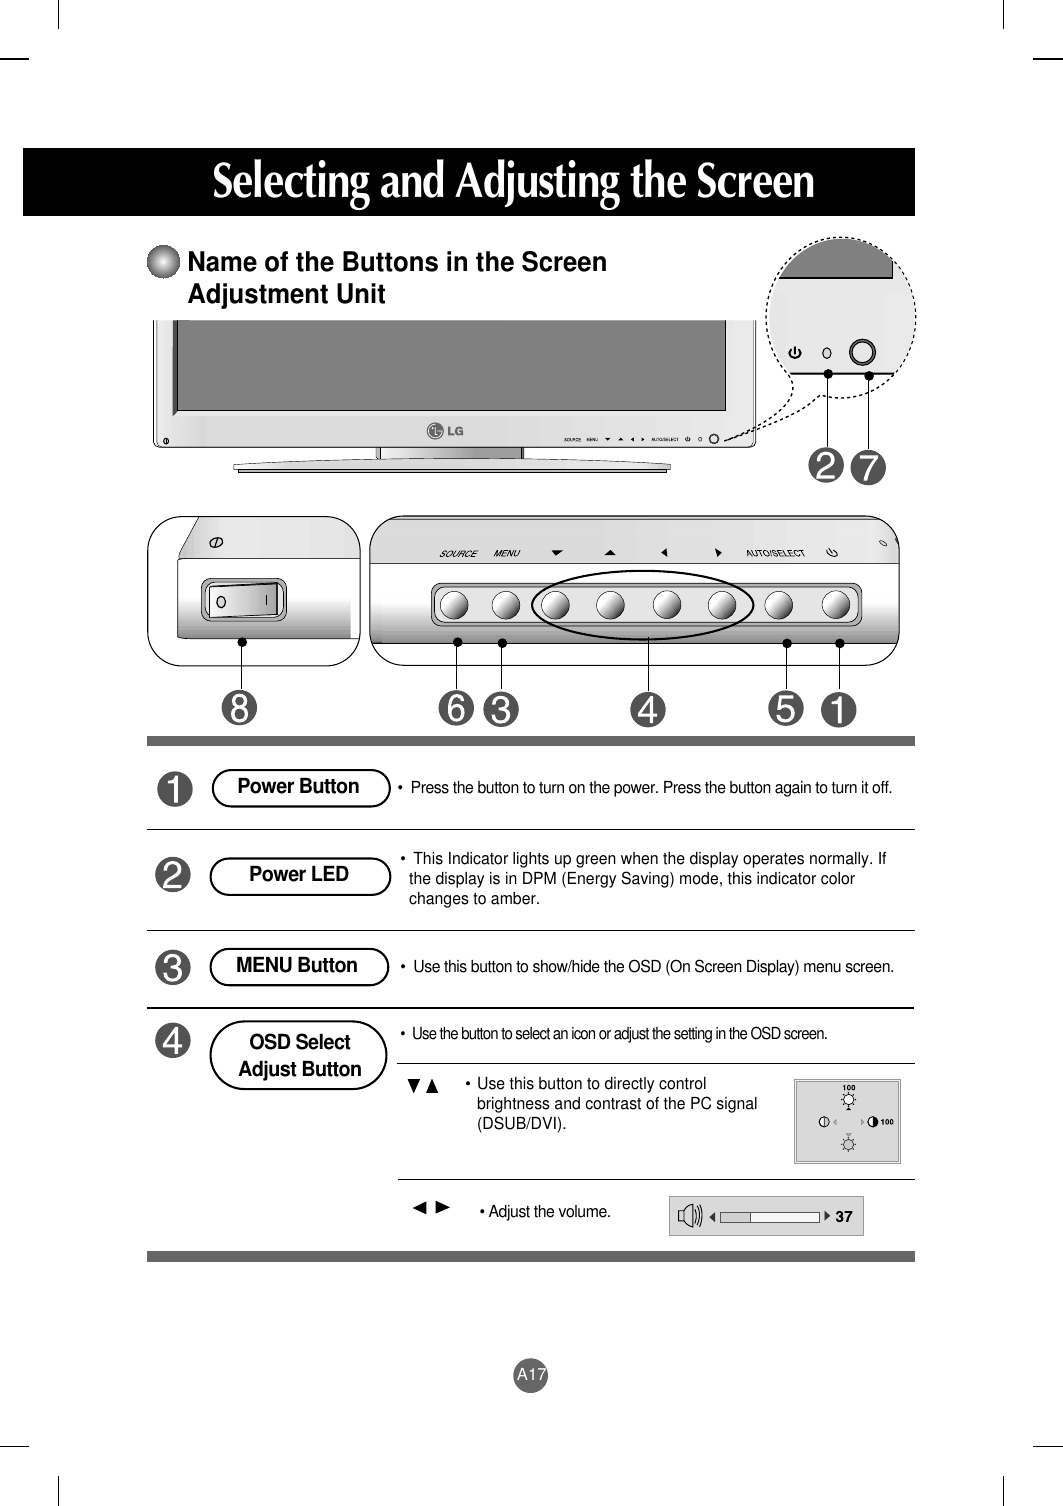
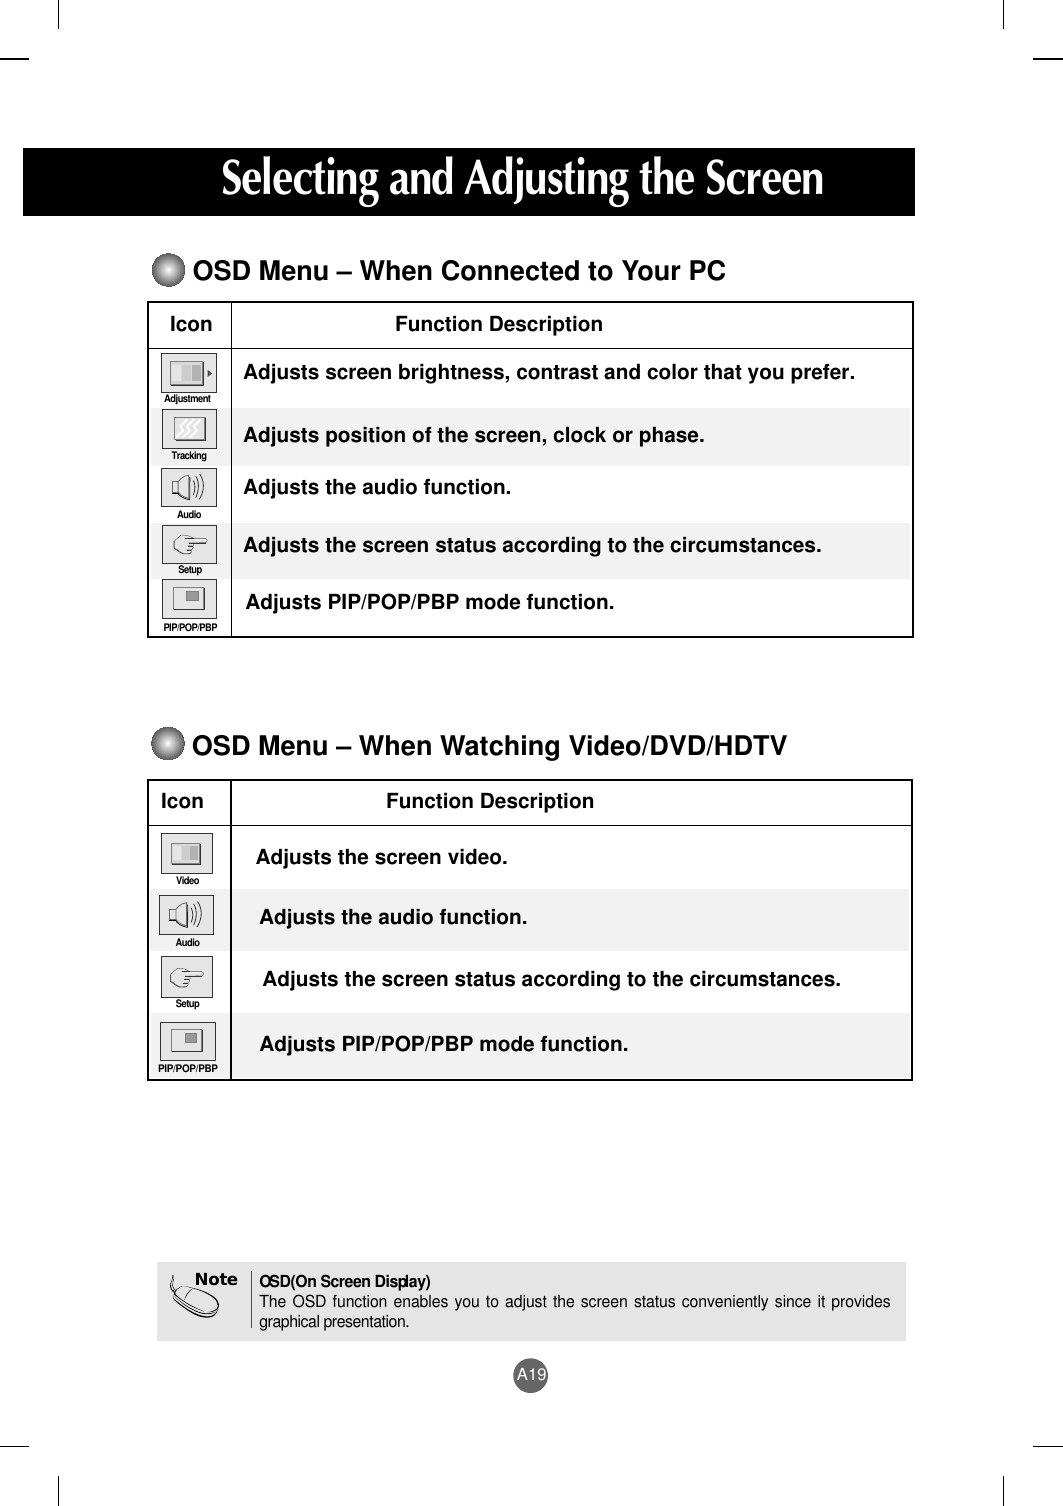
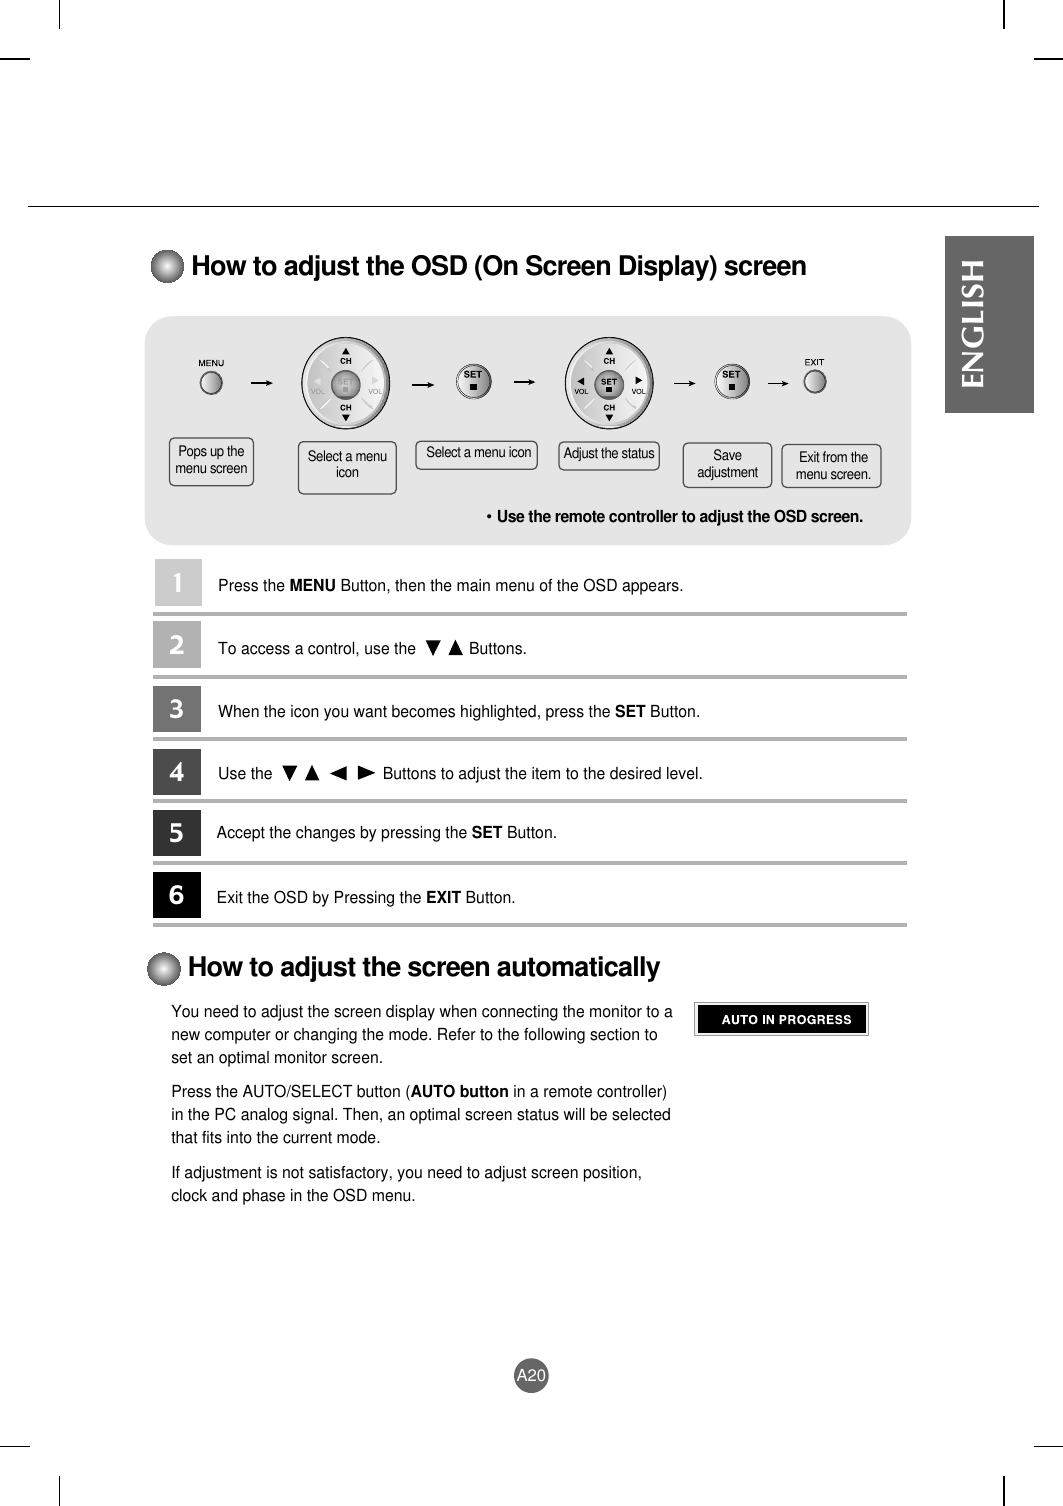
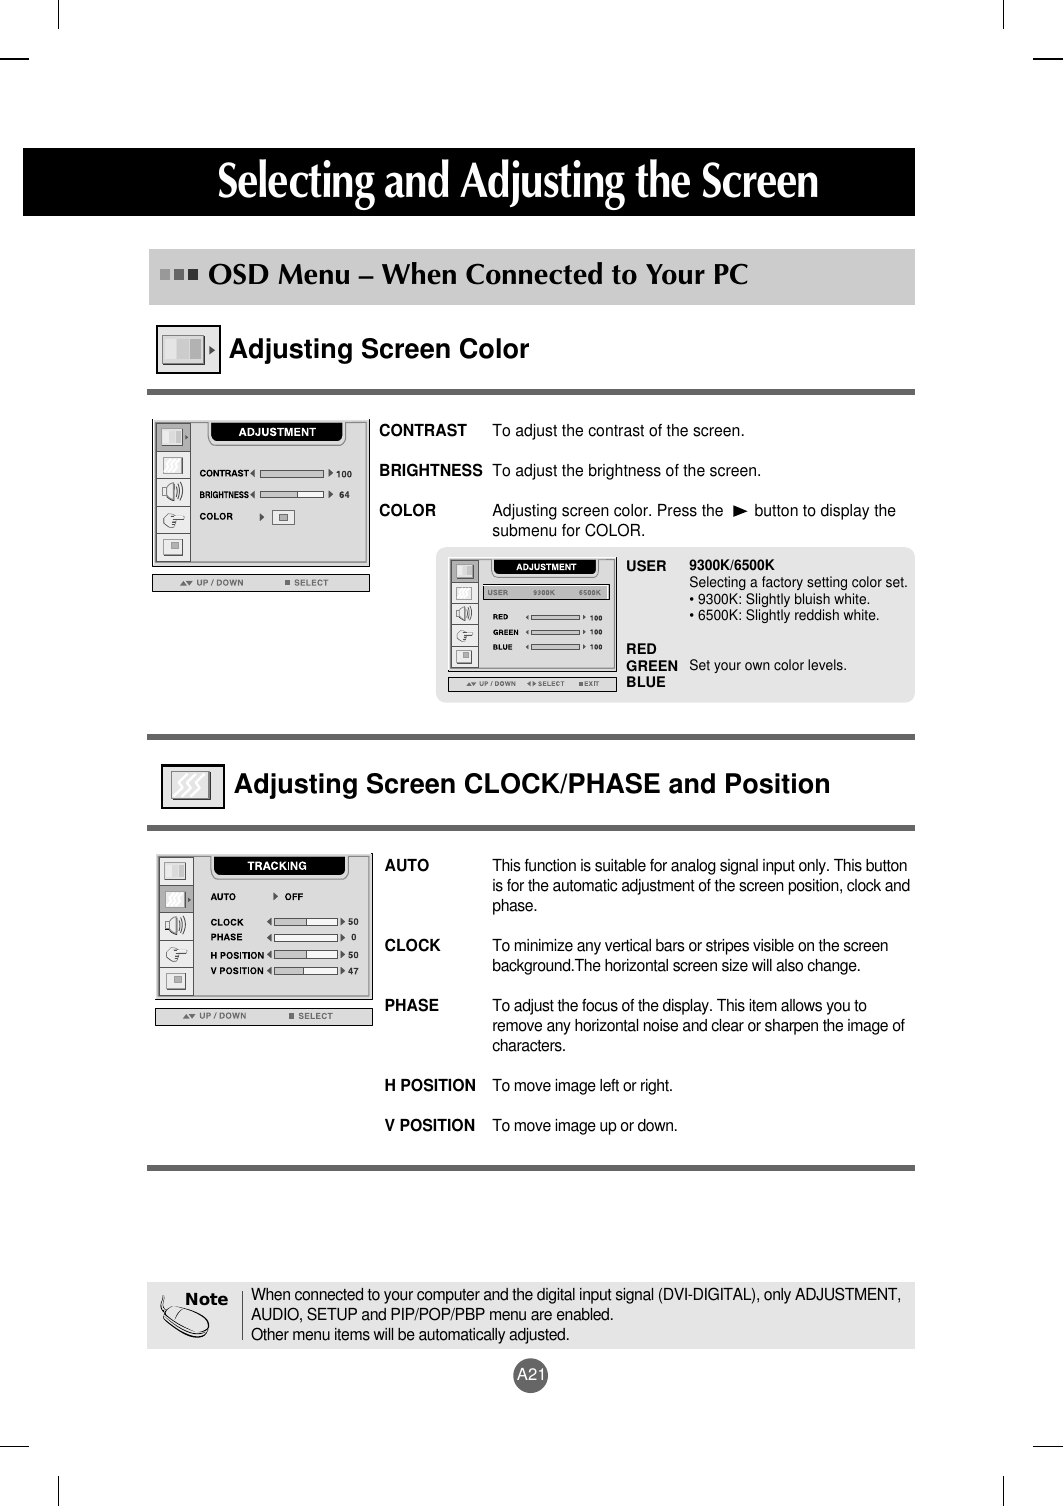
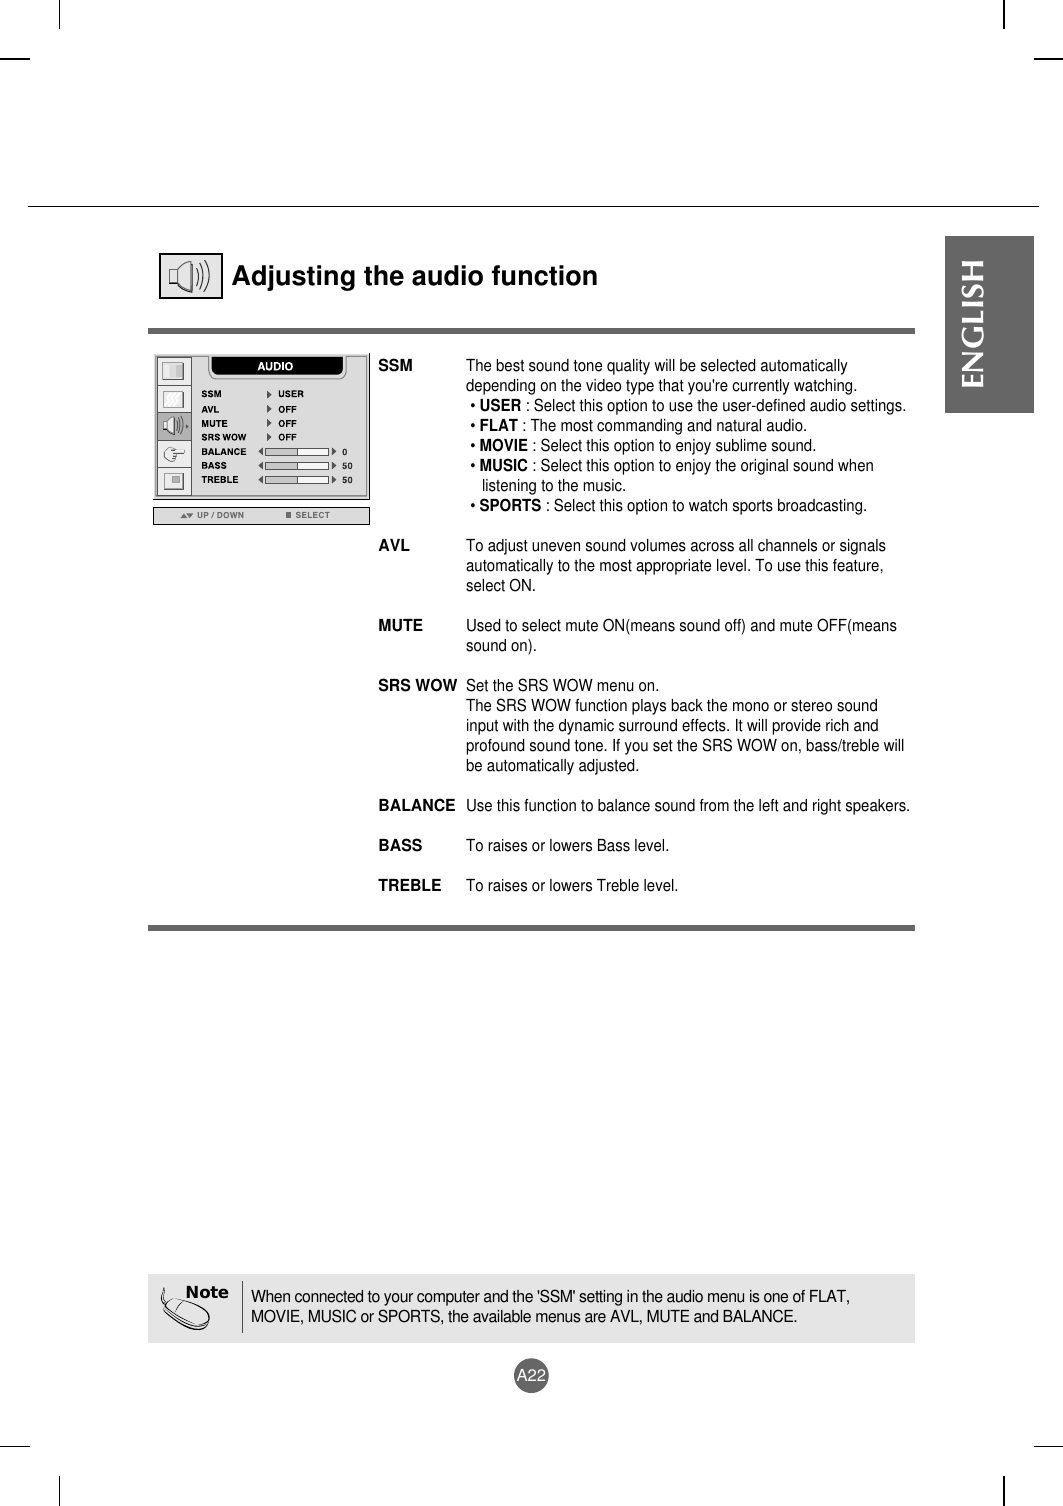
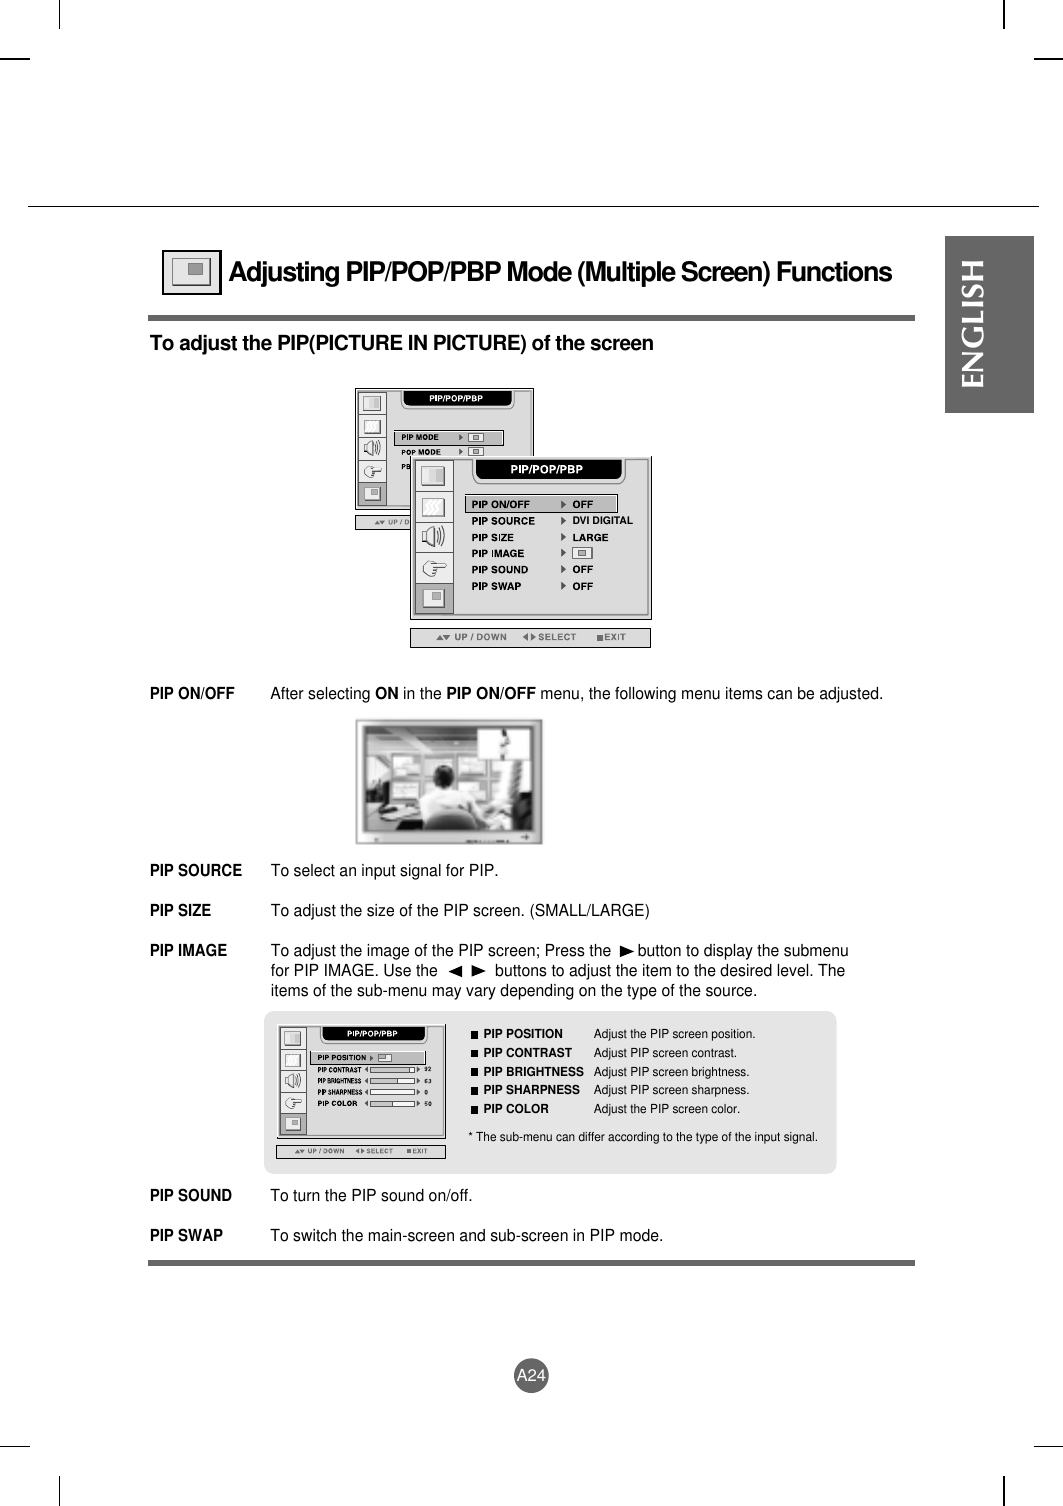
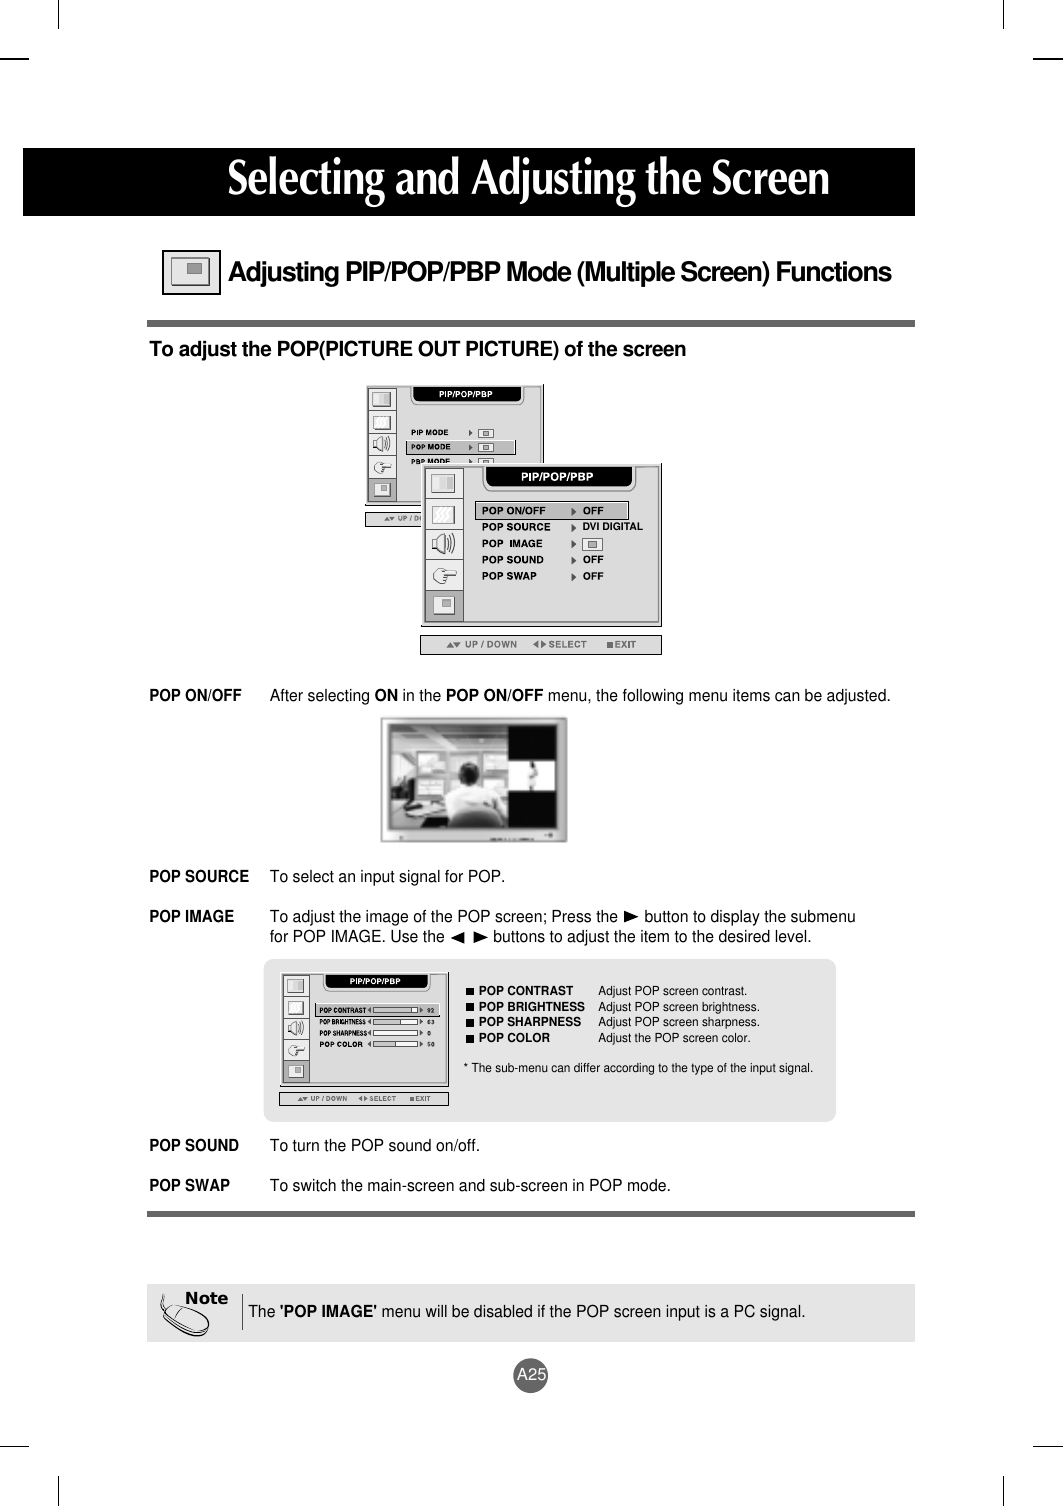
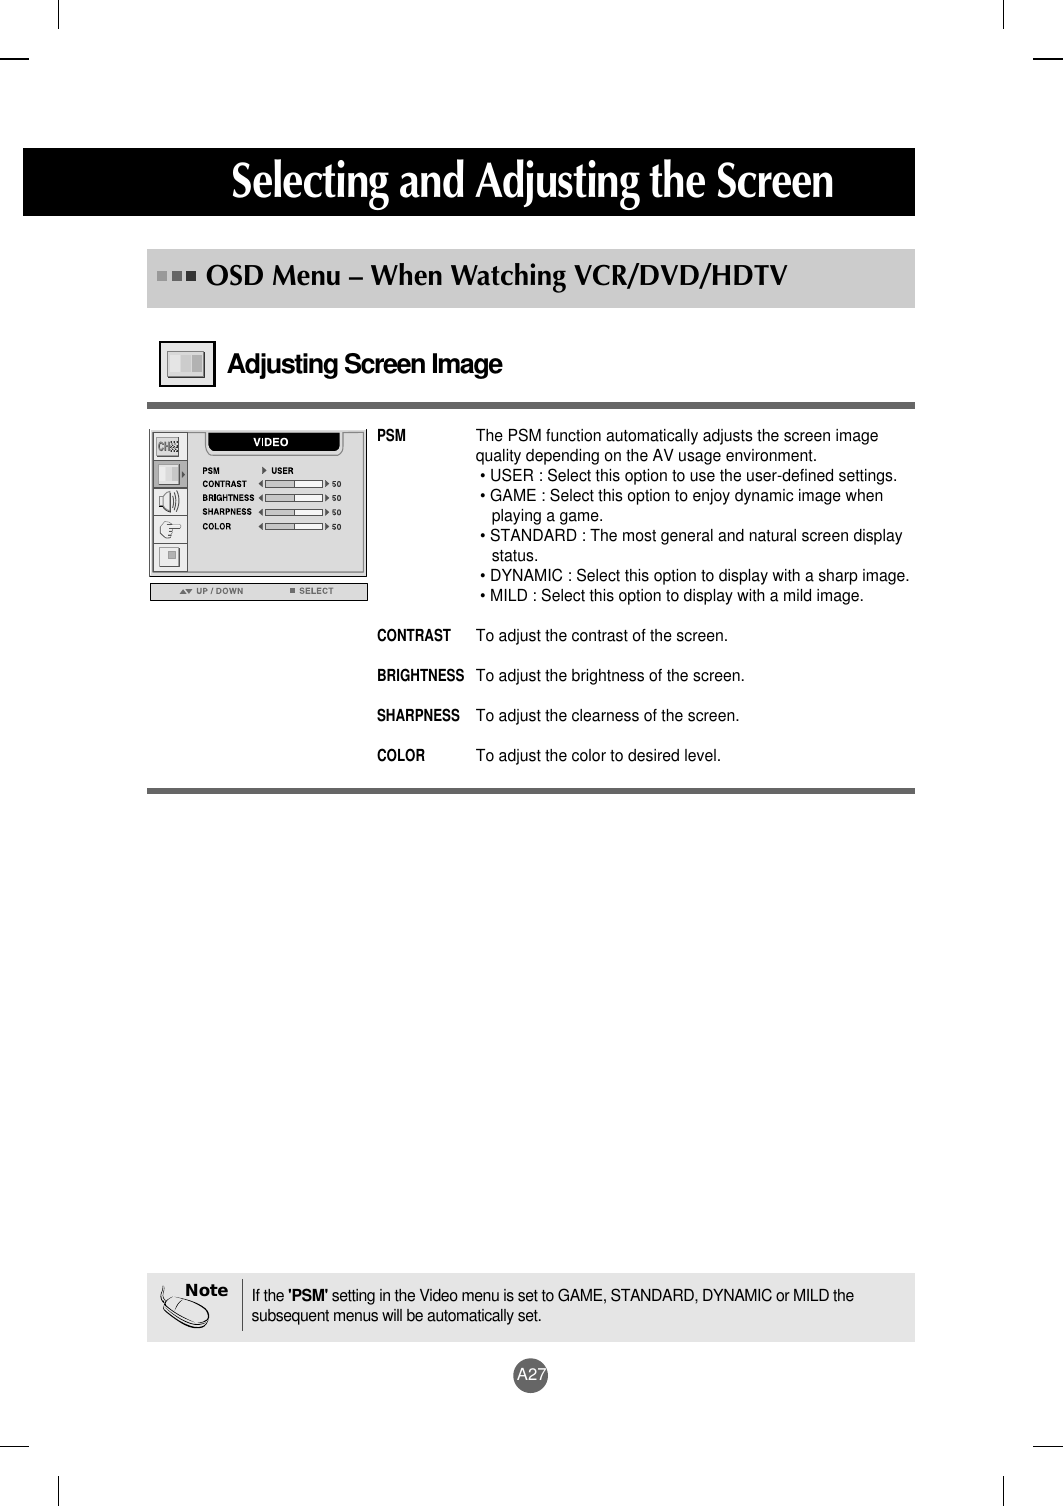
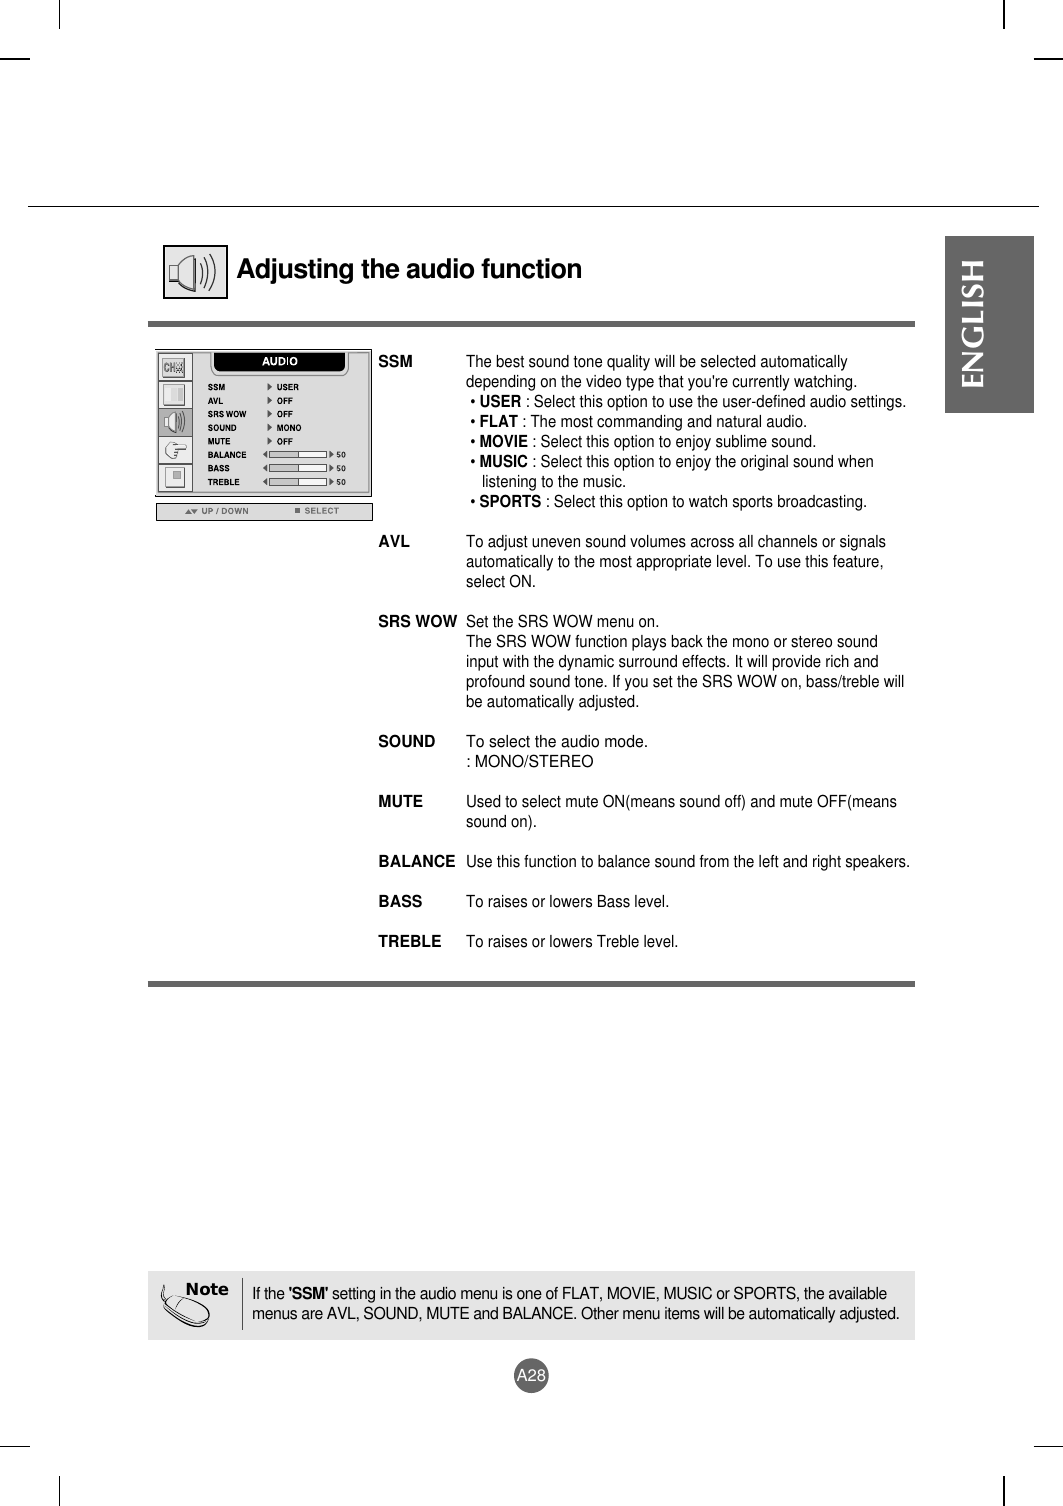
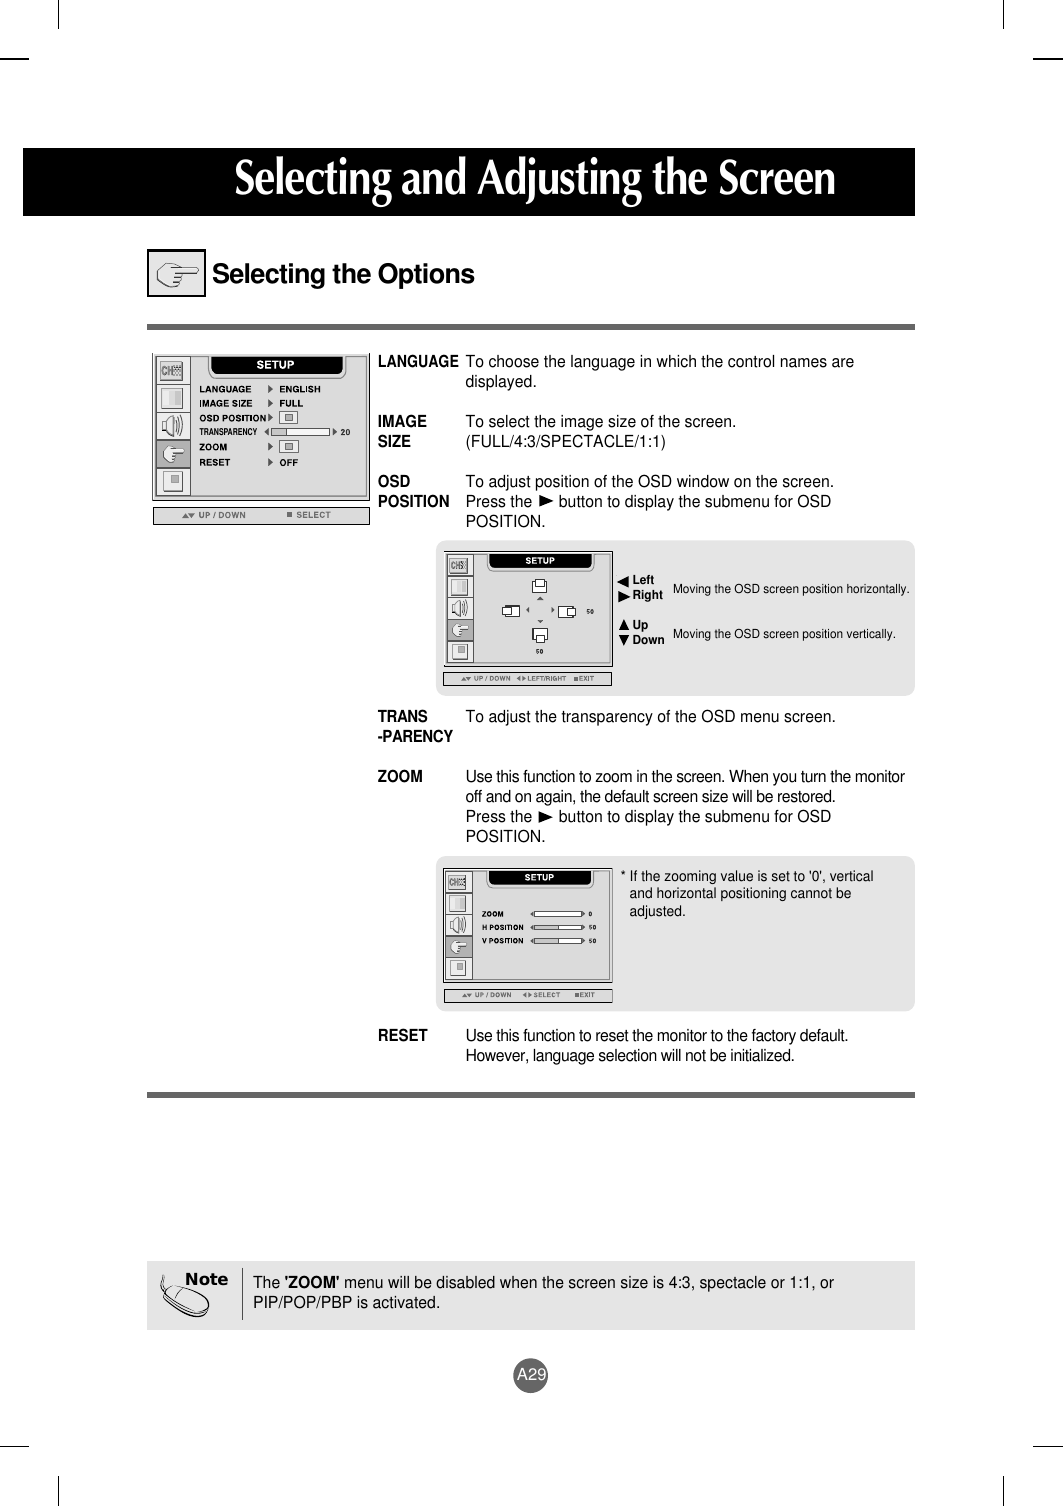
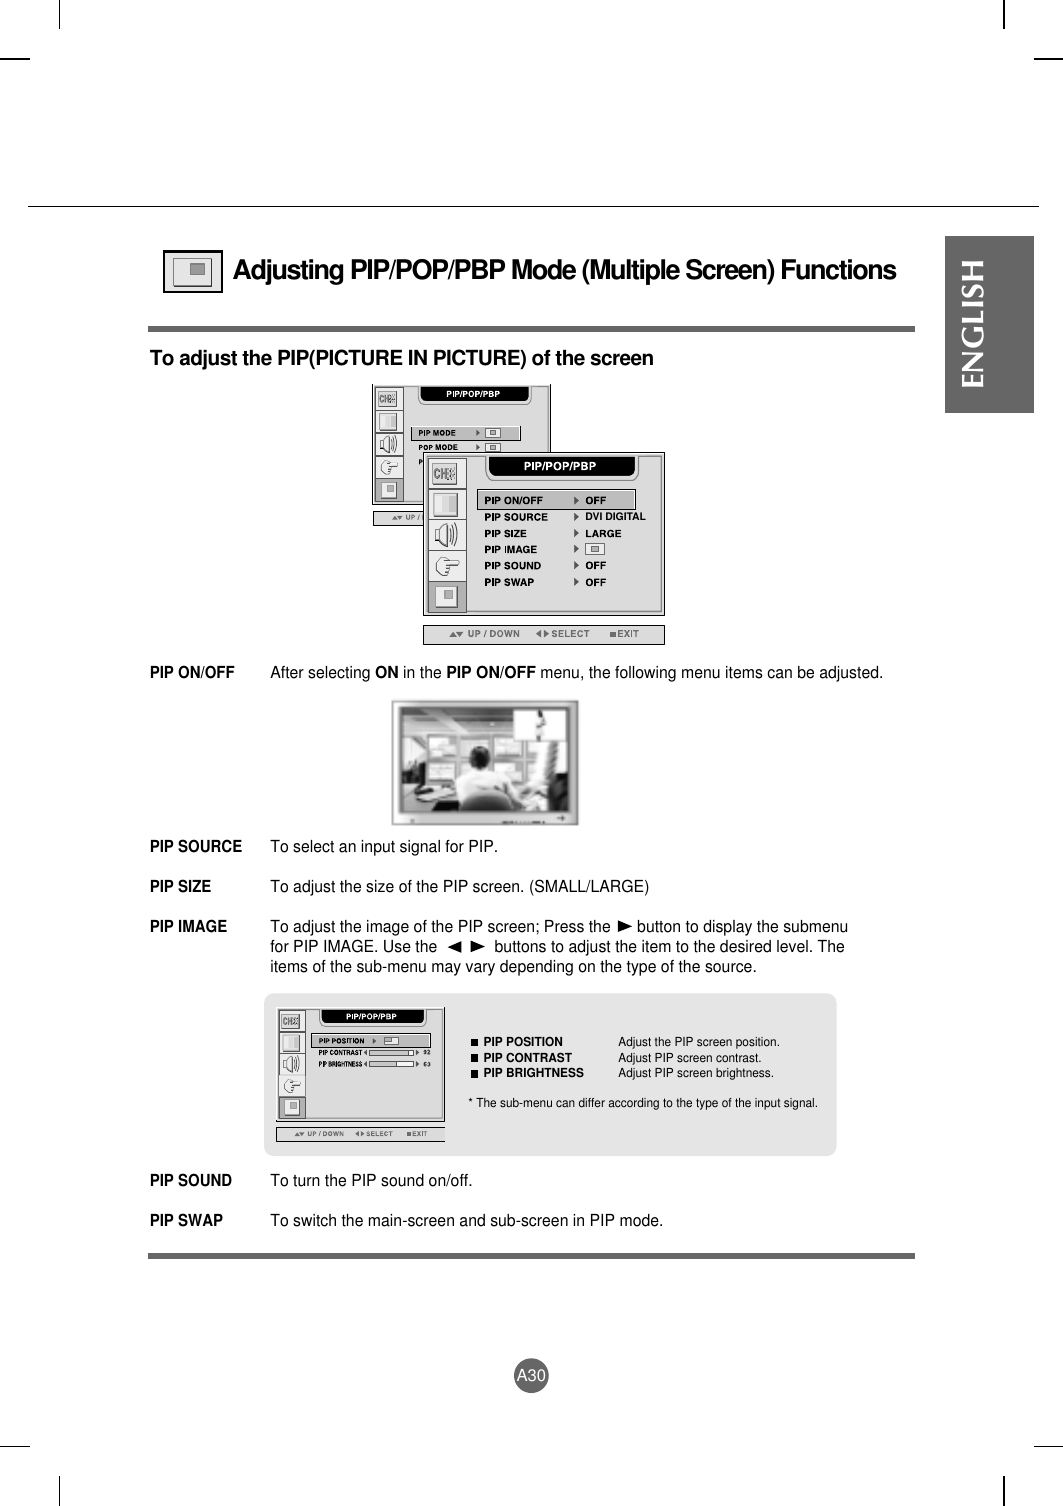
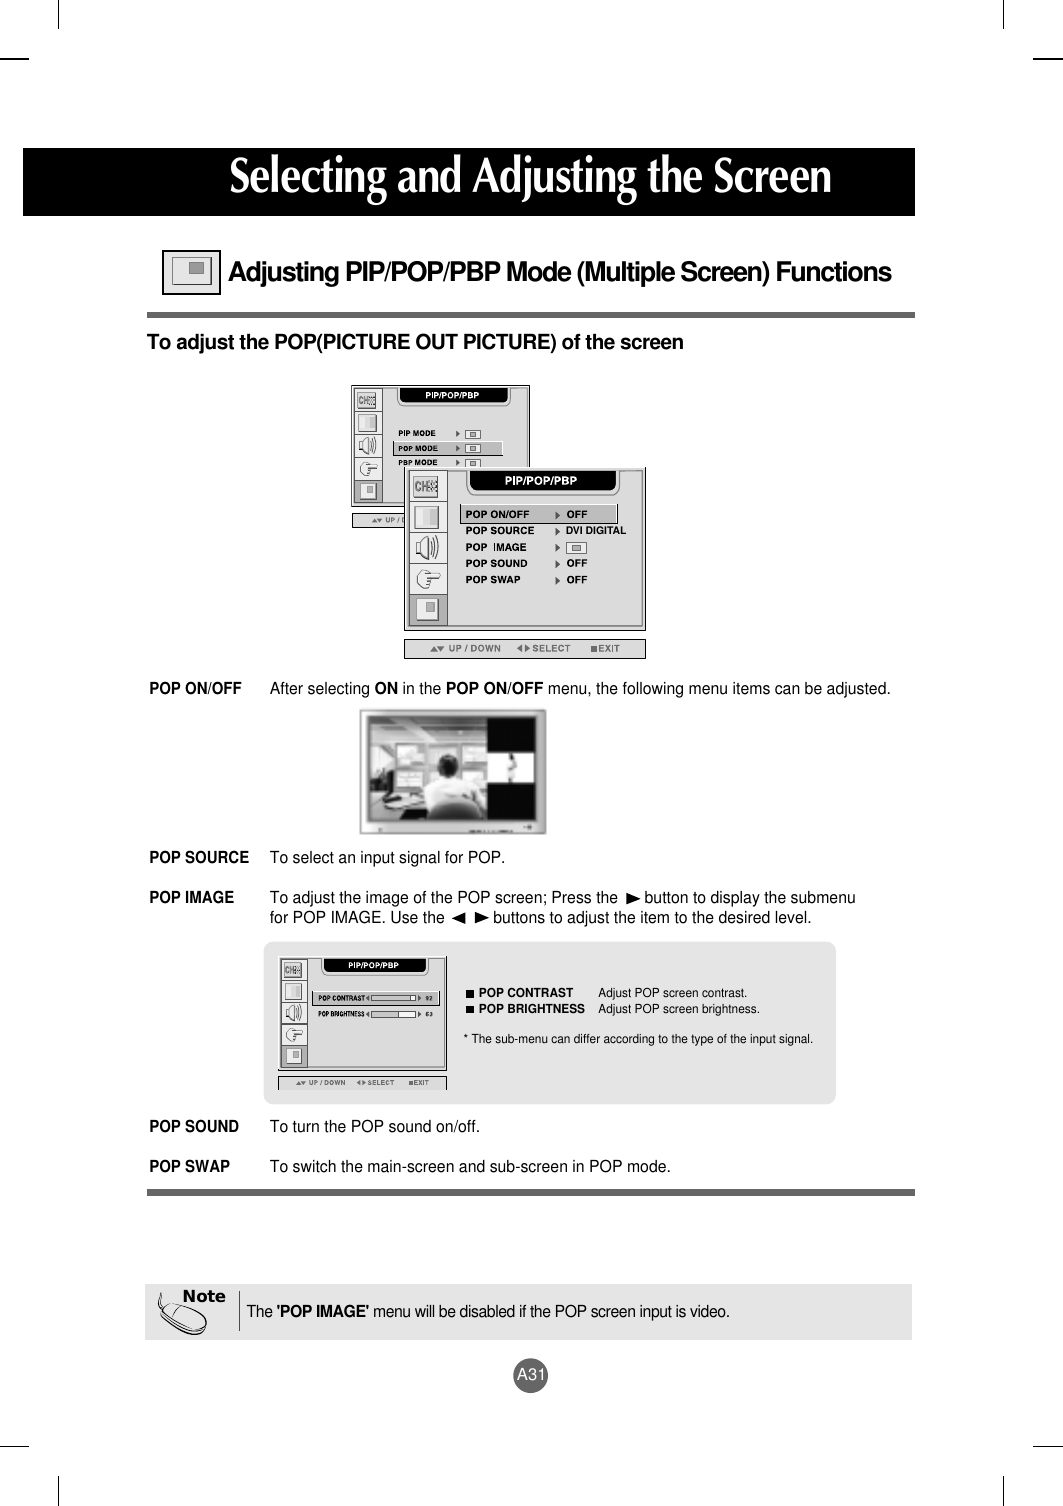
LG Electronics USA L4200AL 42" LCD Monitor User Manual Microsoft PowerPoint F User s Manual
LG Electronics USA 42" LCD Monitor Microsoft PowerPoint F User s Manual
UserManual.wiki
>
LG Electronics USA
>
L4200AL User Manual
users manual
Navigation menu
Upload a User Manual
Namespaces
Wiki Guide
HTML
PDF
Info
Views
User Manual
Discussion / Help
Navigation


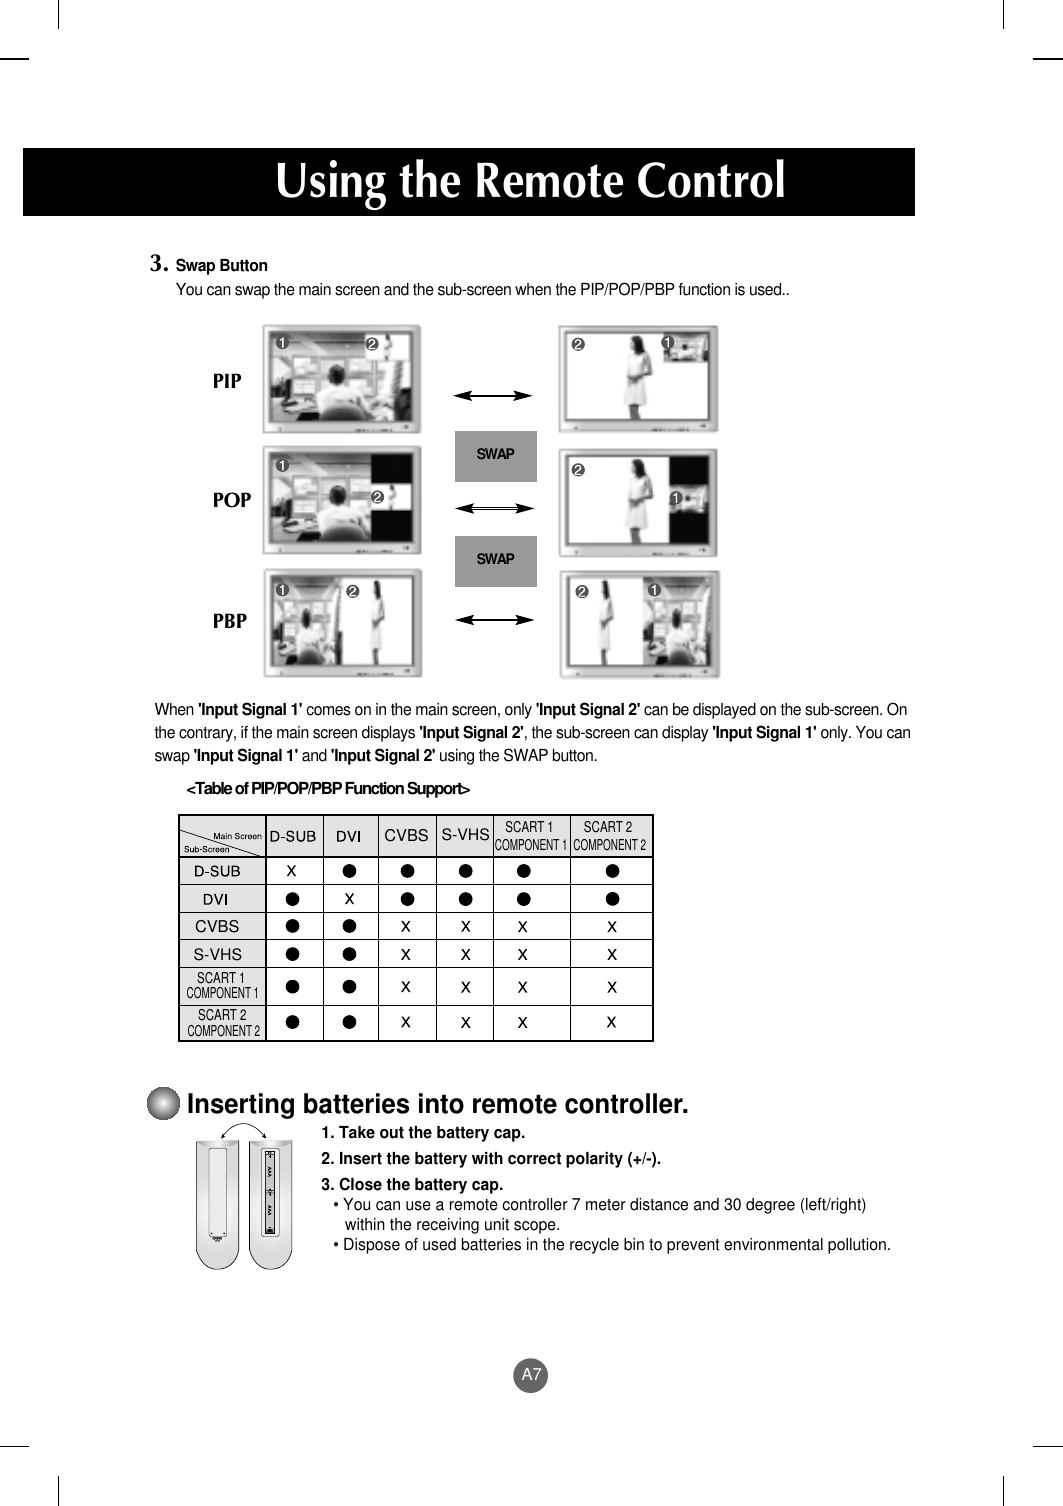
![A6ENGLISH*BRT.W1. PIP (Picture in Picture) ButtonThe sub-screen moves to the next mode whenever you press this button.: SMALL -> LARGE -> OFF2. POP (Picture out Picture) ButtonThe sub-screen moves to the next mode whenever you press this button.: POP ON -> PBP(FULL) -> PBP(4:3) -> OFFIf you press the button once,the following Input SignalWindow will appear. Selectthe signal type you wantusing the button.This button will be enabled onlywhen you selected the AV signal.The signal type will be changedwith the followaing order. Set thesignal type you want.[Case 1]POP ON PBP (FULL) PBP (4:3)•Input Select Button•AV Button[Case 1]VIDEO1 VIDEO2 SCART1 SCART 2 [Case 2]VIDEO1 VIDEO2 COMPONENT1 COMPONENT2 DVI DIGITALDSUB ANALOGVIDEO1(CVBS)VIDEO2(S-Video)SCART 1SCART 2[Case 2]DVI DIGITALDSUB ANALOGVIDEO1(CVBS)VIDEO2(S-Video)COMPONENT 1COMPONENT 2](https://usermanual.wiki/LG-Electronics-USA/L4200AL/User-Guide-393282-Page-13.png)
![A9Rear ViewRS-232C Serial portsPC signal inputsConnect the audio cable to the *LINE OUT jack of the PC sound card.AV Input portsConnect the power cordBack Cap- Open the back cap beforeyou install the monitor.INOUTVideoVideoName and Function of the Parts*LINE OUTA terminal used to connect to the speaker including a built-in amplifier (Amp). Make sure that the connecting terminal of the PC sound card is checked before connecting. If the Audio Out of PC sound card has only Speaker Out, reduce the PC volume. If the Audio Out of the PC sound card supports both Speaker Out and Line Out, convert to Line Out usingthe card jumper of the program (Refer to the Sound Card Manual).[Case 1][Case 2]](https://usermanual.wiki/LG-Electronics-USA/L4200AL/User-Guide-393282-Page-16.png)
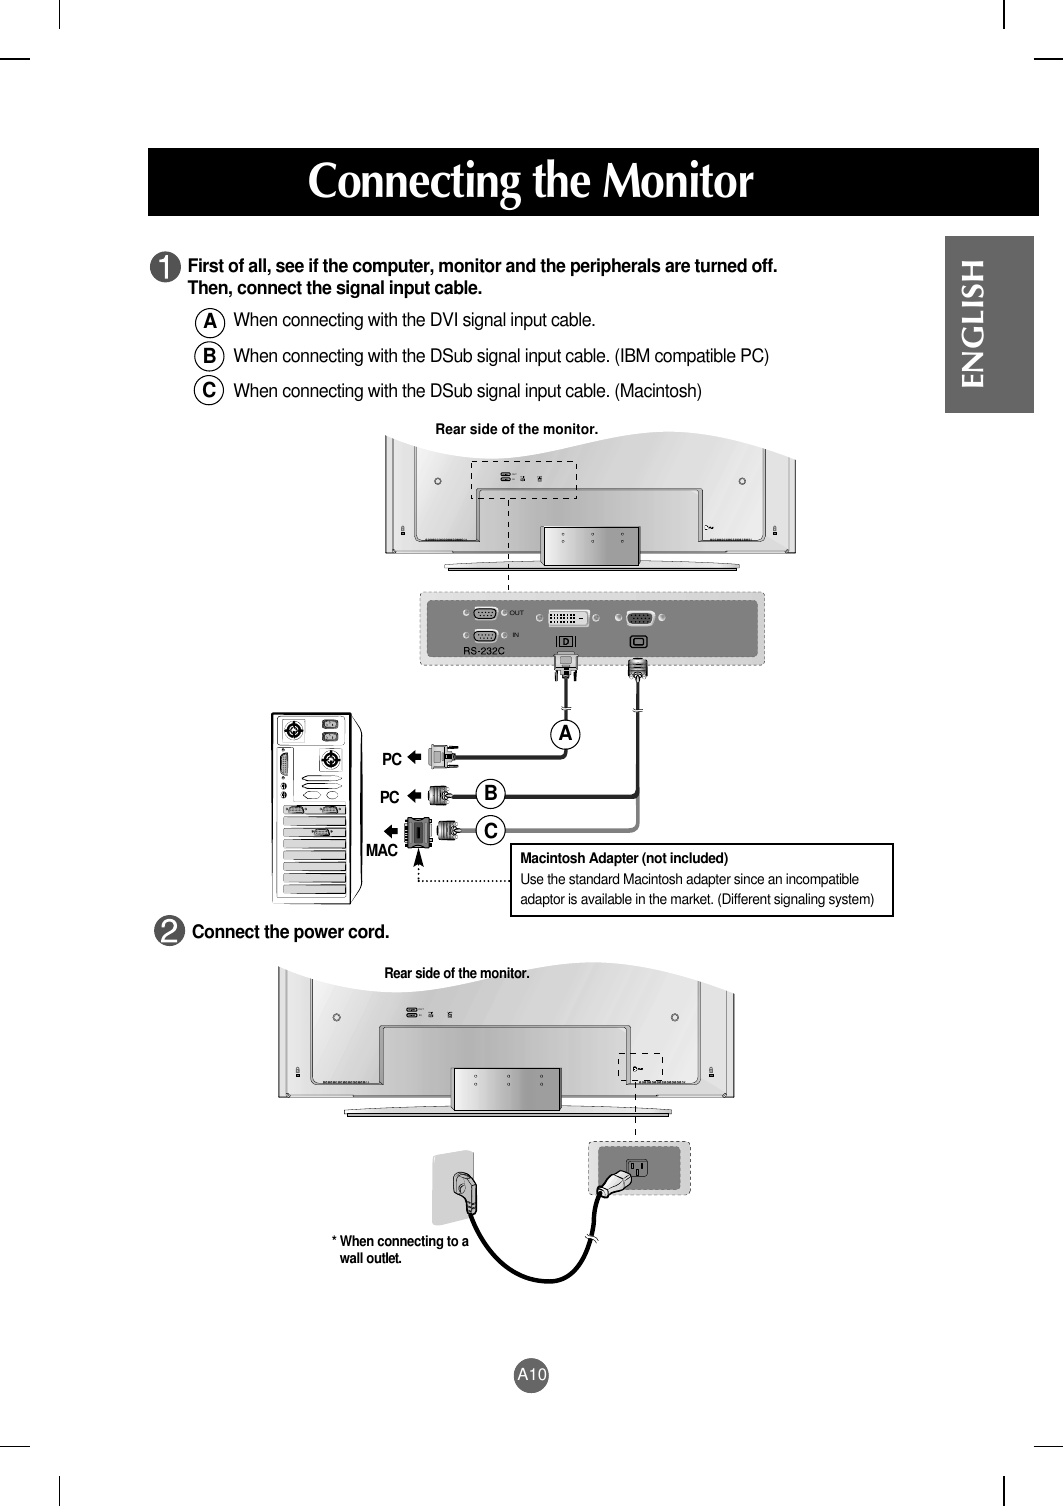
![A11Connecting the MonitorWhen connecting with a DVI-D signal input cable.• Select DVI DIGITAL: DVI-D digital signal.When connecting with a D-Sub signal input cable.• Select DSUB ANALOG: 15-pin D-Sub analog signalSelect an input signal.Press the Input Select button on the remote controller to select the input signal. Or, press the SOURCE button at the front side of the monitor.How to connect to two computers.Connect the signal cables (DVI and D-Sub) to each computer.Press the Input Select button in a remote controller to select the computer to use.* Directly connect to a grounded power outlet on the wall or a power bar with a ground wire.NoteTurn on power by pressing the power button on the monitor. If the system is notpowered up, check if the main power switch is in the 'on' position. Turn on the PC. Main Power Switch Power buttonBABA[Case 1]DVI DIGITALDSUB ANALOGVIDEO1(CVBS)VIDEO2(S-Video)SCART 1SCART 2[Case 2]DVI DIGITALDSUB ANALOGVIDEO1(CVBS)VIDEO2(S-Video)COMPONENT 1COMPONENT 2](https://usermanual.wiki/LG-Electronics-USA/L4200AL/User-Guide-393282-Page-18.png)
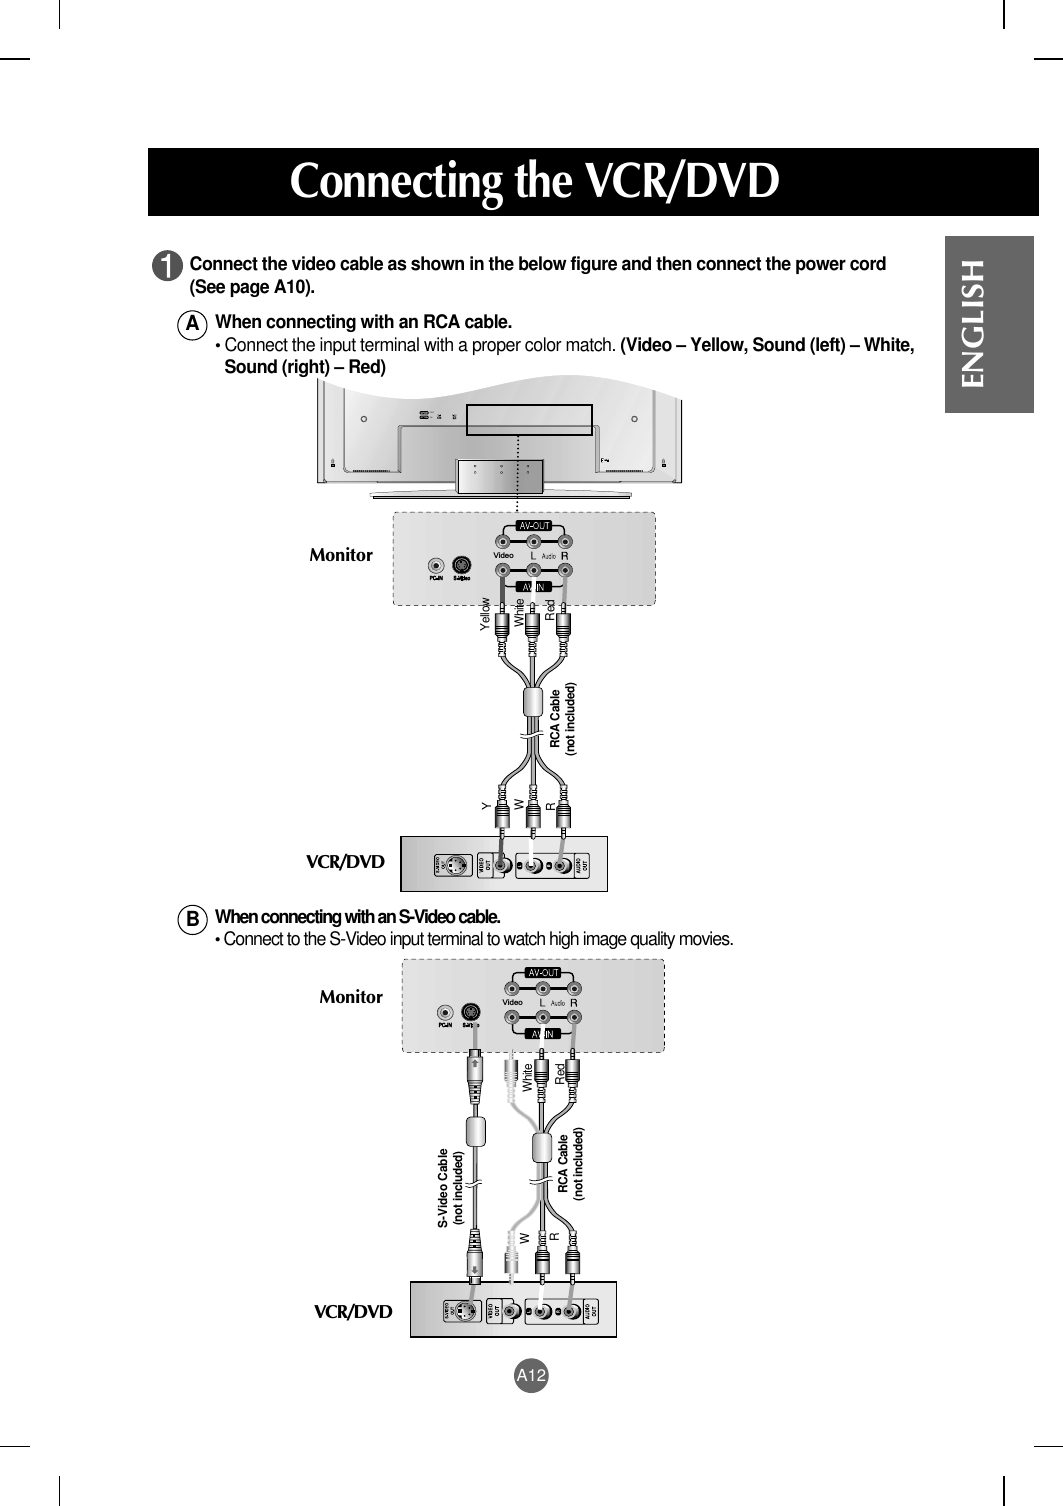
![A13When connecting with an RCA cable.• Select VIDEO 1 (CVBS)When connecting with an S-Video cable.• Select VIDEO 2 (S-Video)When connecting with a SCART cable.• Select SCART 1 / SCART 2Select an input signal.Press the Input Select button on the remote controller to select the input signal. Or, pressthe SOURCE button at the front side of the monitor.BCAWhen connecting with a SCART cable.CGAUDIOLDRVideoSCART Cable(not included)MonitorVCR/DVDConnecting the VCR/DVD[Case 1]DVI DIGITALDSUB ANALOGVIDEO1(CVBS)VIDEO2(S-Video)SCART 1SCART 2Note](https://usermanual.wiki/LG-Electronics-USA/L4200AL/User-Guide-393282-Page-20.png)
![A14ENGLISHConnecting the DVD(480i)DVI DIGITALDSUB ANALOGVIDEO1(CVBS)VIDEO2(S-Video)COMPONENT 1COMPONENT 2VideoWhen connecting with a DVD/audio cable.• Select COMPONENT 1 / COMPONENT 2Select an input signal.Press the Input Select button on the remote controller to select theinput signal. Or, press the SOURCE button at the front side of themonitor.Connect the video/audio cable as shown in the below figure and then, connect thepower cord (See page A10).• Connect the input terminal with a proper color match. •MonitorDVDRedRedBlueGreenWhiteRedRedBlueGreenWhiteAudio Cable(not included)DVD Cable(not included)[Case 2]](https://usermanual.wiki/LG-Electronics-USA/L4200AL/User-Guide-393282-Page-21.png)
![A15Connecting the HDTV(720p/1080i)When connecting with an HDTV/audio cable.• Select COMPONENT 1 / COMPONENT 2Select an input signal.Press the Input Select button on the remote controller to select the input signal.Or, press the SOURCE button at the front side of the monitor.* The HDTV terminal also supports SDTV (480i/480p).VideoConnect the video/audio cable as shown in the below figure and then, connect thepower cord (See page A10).• Connect the input terminal with a proper color match. •MonitorHDTV ReceiverRedRedBlueGreenWhiteRedRedBlueGreenWhiteAudio Cable(not included)HDTV Cable(not included)DVI DIGITALDSUB ANALOGVIDEO1(CVBS)VIDEO2(S-Video)COMPONENT 1COMPONENT 2[Case 2]](https://usermanual.wiki/LG-Electronics-USA/L4200AL/User-Guide-393282-Page-22.png)
![A18ENGLISHName of the Buttons in the Screen Adjustment Unit[For DSUB signal]•Select the icon to adjust on the OSD screen.•If you press the [AUTO/SELECT] button, automatic screenadjustment will be started.[Other signals that DSUB]•The current signal and mode information will be displayed.AUTO/SELECT Button• OSD is locked • OSD is unlocked.Use this button to lock/unlock OSD screen adjustment.(Activated when pressed together longer than 5 seconds.)DVI DIGITAL DVI digital signalDSUB ANALOG 15-pin D-Sub analog signalVIDEO1(CVBS) Composite videoVIDEO2(S-Video) S-VideoSCART 1/ 2 CompositeCOMPONENT 1/ 2 YPbPr (YCbCr)• Select the input signal SOURCE ButtonOSD Lock/Unlock ButtonMenu button +•The unit that receives the signal from the remote controller.•Use this button to turn on/off the monitor.Main Power Switch[Case 1]DVI DIGITALDSUB ANALOGVIDEO1(CVBS)VIDEO2(S-Video)SCART 1SCART 2[Case 2]DVI DIGITALDSUB ANALOGVIDEO1(CVBS)VIDEO2(S-Video)COMPONENT 1COMPONENT 2](https://usermanual.wiki/LG-Electronics-USA/L4200AL/User-Guide-393282-Page-25.png)


![A41SpecificationsWidthxHeightxDepth[1] 105.7 cm(41.61 inches) x 69.70 cm(27.44 inches) x 29.45 cm(11.59 inches)[2] 105.7 cm(41.61 inches) x 65.30 cm(25.71 inches) x 11.91 cm(4.69 inches)[3] 125.9 cm(49.57 inches) x 69.70 cm(27.44 inches) x 29.45 cm(11.59 inches)[4] 125.9 cm(49.57 inches) x 65.30 cm(25.71 inches) x 11.91 cm(4.69 inches)Net[1] 34.65kg (76.39 lbs) [2] 30.25kg (66.69 lbs)[3] 37.25kg (82.12 lbs) [4] 32.85kg (72.42 lbs)Operating ConditionsTemperature 10˚C to 35 ˚CHumidity 10 % to 80 % non-CondensingStorage ConditionsTemperature -20˚C to 60 ˚CHumidity 5 % to 95 % non-CondensingDimensions&WeightEnvironmentalConditionsKensington Security Slot- optionalConnected to a locking cable that can be purchasedseparately at most computer stores[1] WH[2] WH[3] WHDDDD[4] WH](https://usermanual.wiki/LG-Electronics-USA/L4200AL/User-Guide-393282-Page-48.png)