LG Electronics USA LAN8910NHHD Car AVN with Bluetooth User Manual LAN8910NHHD ENG HMC format
LG Electronics USA Car AVN with Bluetooth LAN8910NHHD ENG HMC format
UserManual.wiki
>
LG Electronics USA
>
LAN8910NHHD User Manual
User manual
Navigation menu
Upload a User Manual
Namespaces
Wiki Guide
HTML
PDF
Info
Views
User Manual
Discussion / Help
Navigation
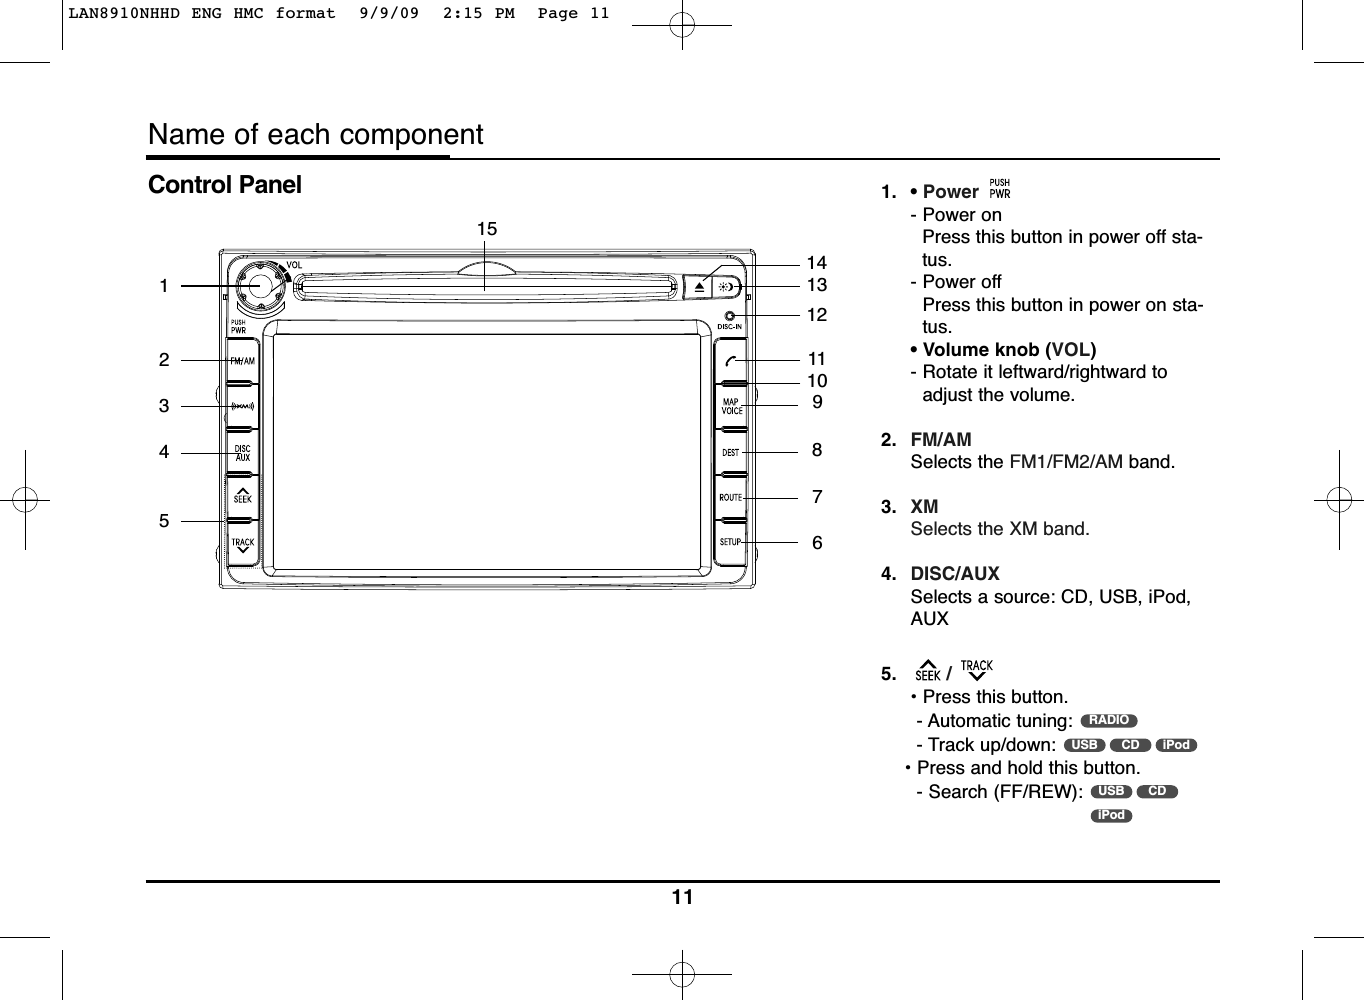
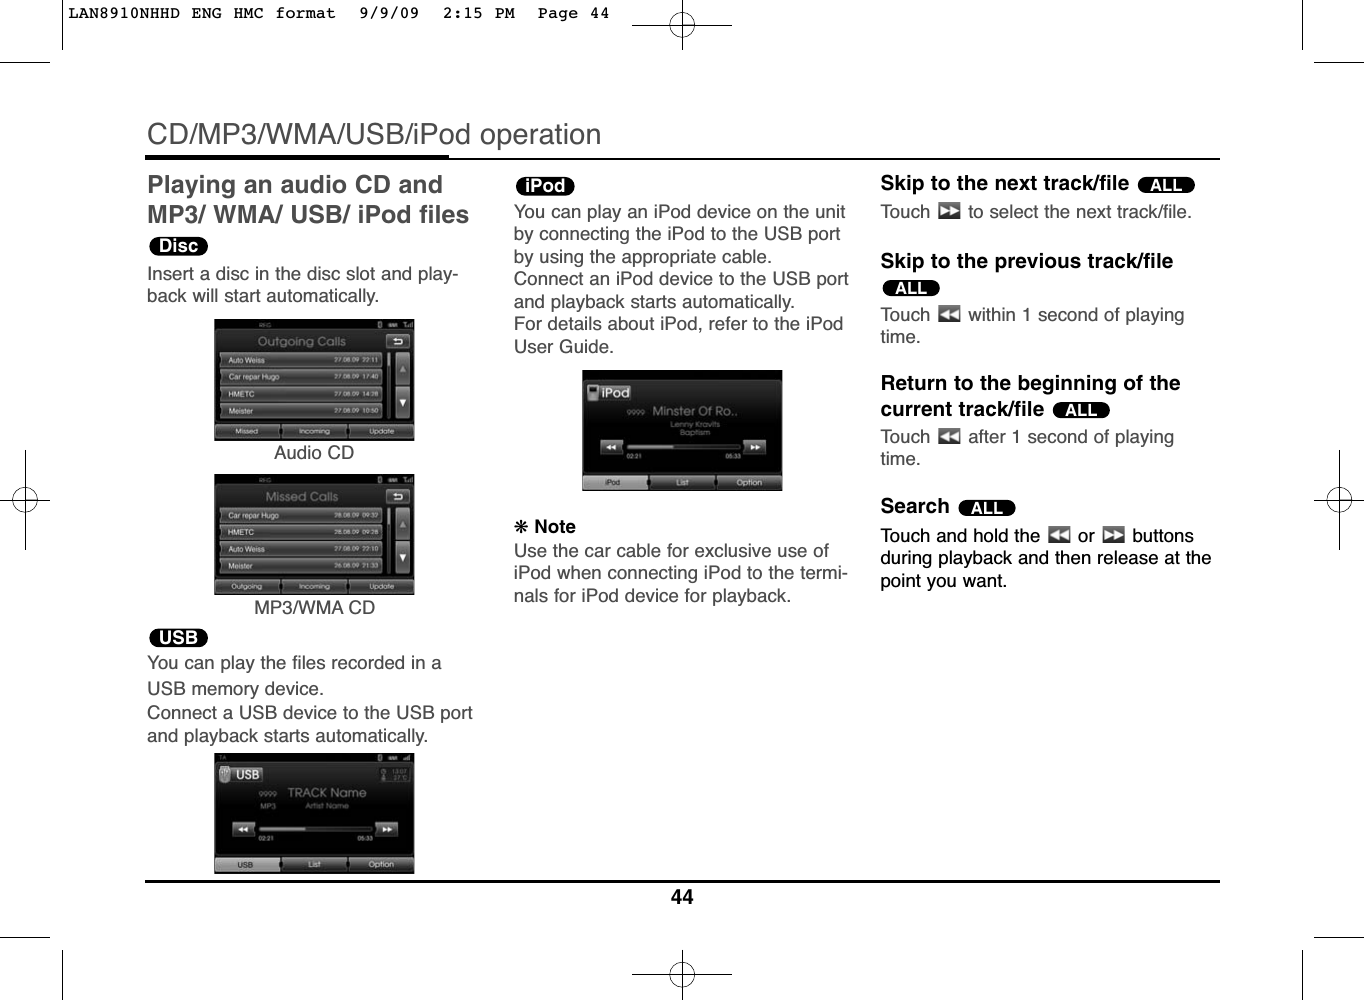
![Start-up screen1. The navigation system starts whenthe ignition switch is placed in theACC or ON position.2. When the start-up screen is dis-played, touch [Language] to set thelanguage used in the system.3. Touch the preferred language.4. When the start-up screen is dis-played, read the caution carefullyand then touch the [Agree].❋ NoteThe start-up screen is displayed onlyonce on the screen after the ignitionswitch is placed in the ACC or ON posi-tion.Turning the unit onPress on the control panel in poweroff status.❋ NoteWhen you insert the disc in the discslot, the unit is turned on automatically.Turning the unit offPress on the control panel in poweron status.Inserting a discInsert a disc in the disc slot and play-back starts automatically.Ejecting a discPress Zon the control panel.The disc is ejected from the loadingslot.❋ NoteIf the ejected disc is not removed inapproximately 10 seconds, the disc isautomatically inserted again into theloading slot.Adjusting the volumeRotate the volume knob (VOL) on thecontrol panel.❋ NoteWhen you turn the unit off, the currentvolume level is automatically memo-rized. Whenever you turn the unit backon, it operates at the 14Basic operationLAN8910NHHD ENG HMC format 9/9/09 2:15 PM Page 14](https://usermanual.wiki/LG-Electronics-USA/LAN8910NHHD/User-Guide-1170554-Page-14.png)
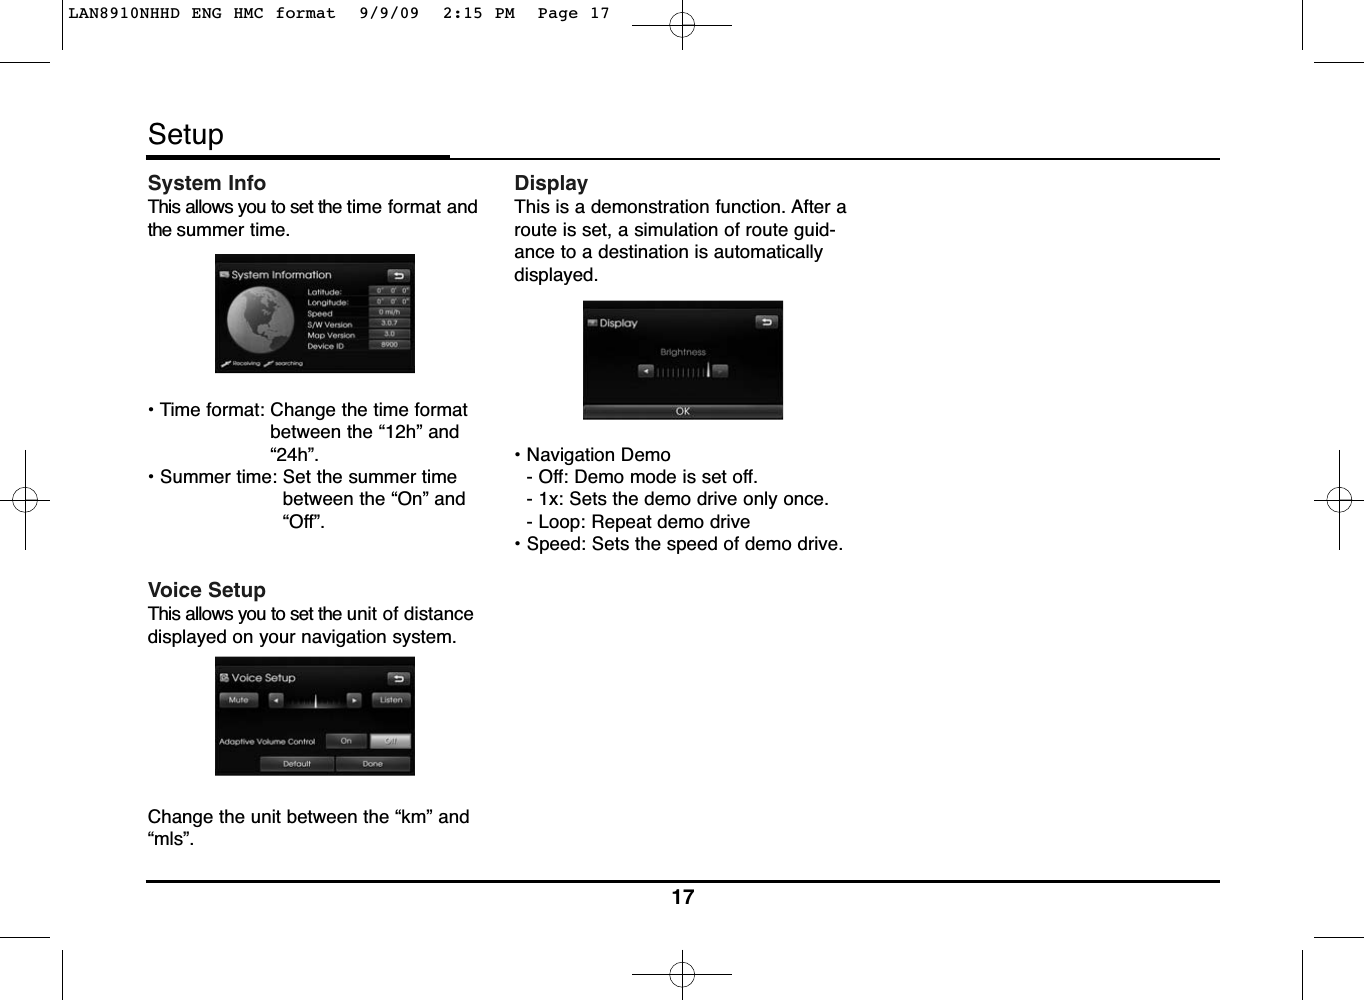
![General operations ofSETUP menuThe navigation system can be cus-tomized to make it easier for you to use:Main, Navigation, My Places, SystemInfo, Voice Setup, Display1. Turn the unit on.2. Press SETUP on the control panel. 3. Touch the desired option.4. Touchthe desired settings thentouch [Done]to confirm your selec-tion. ❋ NoteTouch to return to the previousscreen. Press MAP VOICE to return tothe current location map screen.MainThere are three kinds of screen menus.KeyboardThis allows you to view the pairedBluetooth device list.LanguageThis allows you to search for Bluetoothdevices. (Page 39)Factory DefaultsThis allows you to use when you connectyour unit and bluetooth phone by usingyour bluetooth phone settings. (Page40)NavigatonThere are five kinds of screen menus.My PlacesThis allows you to change the languageused in the system.Touch the language button you want.Use or to scroll up or down if nec-essary.16SetupLAN8910NHHD ENG HMC format 9/9/09 2:15 PM Page 16](https://usermanual.wiki/LG-Electronics-USA/LAN8910NHHD/User-Guide-1170554-Page-16.png)
![What is GPS?The Global Positioning System (GPS) isa satellite-based navigation systemmade up of a network of 24 satellitesplaced into orbit by the U.S. Departmentof Defense. GPS was originally intended for militaryapplications, but in the 1980s, the gov-ernment made the system available forcivilian use. GPS works in any weather conditions,anywhere in the world, 24 hours a day. There are no subscription fees or setupcharges to use GPS.About satellite signalsYour unit must acquire satellite signalsto operate. If you are indoors, near tallbuildings or trees, or in a parkinggarage, the unit cannot acquire satellites.Acquiring satellite signalsBefore the unit can find your currentlocation and navigate a route, you mustdo the following:1.Go outside to an area free from tall obstructions.2.Turn on the unit. Acquiring satellite signals can take afew minutes.Initial navigation screenAfter the ignition switch is placed in theACC or ON position, when you enter anavigation mode for the first time, thecaution screen is displayed on thescreen. Read the caution carefully andthen touch the [Agree].Indicators of the mapscreenHow to view a map screenThe navigation system displays variousinformation on the screen.•:Indicates the direction of the map.Touch to switch the orientation of themap.•:Indicates the current vehicle locationand the direction of travel.•:Touch [Menu] to access the mapmenu.18Getting started with navigation GPSGPS GPSGPSLAN8910NHHD ENG HMC format 9/9/09 2:15 PM Page 18](https://usermanual.wiki/LG-Electronics-USA/LAN8910NHHD/User-Guide-1170554-Page-18.png)
![•:Indicates the scale of the map.•:Indicates the arriving time, distanceand remaining time to the destination.•:Appears on the upper right corner ofthe screen when a route is set.Indicates the distance to the nextguide point and the turning directionat that guide point.•:Indicates the speed limit on the roadthat you’re driving now.Changing the scale of a map1. Touch on the map screen.2. Touch [+] to view the map in detail.Touch [-] to view the map a widerarea.50 m n100 m n 200 m n 300 m n500 m n 750 m n 1 km n 2 km n5 km n 10 km n 20 km n 50 km n100 km n 200 km n 500 km3. Touch to view automaticallythe map in detail.The indicator is displayed onthe map screen.To cancel it, touch .19Getting started with navigation LAN8910NHHD ENG HMC format 9/9/09 2:15 PM Page 19](https://usermanual.wiki/LG-Electronics-USA/LAN8910NHHD/User-Guide-1170554-Page-19.png)
![Navigation menu overview General operations of destina-tion menu1. Turn the unit on.2. Press NAV on the control. The navi-gation menu appears on the screen.3. Touch [Navigation], [Advanced] or[Favourites] to select the desiredoption.4. Touch the preferred setting method.• Address: Finds a destination bysetting an address. (Page 23)• Last Dest.: Sets a destination to alocation that you have lastly set.(Page 24)• Address Book: Sets a destinationto a location stored in the addressbook. (Page 24)• POI: Searches for a destinationfrom various categories of busi-nesses or locations. (Page 24-26)• Parking: Sets a parking as yourdestination. (Page 28)• Continue/Stop Guidance: Sets theguidance to On/Off. (Page 28)• GPS Input: Sets a latitude and alongitude as your destination.(Page 27)• Using Map: Searches for a destina-tion by scrolling the map. (Page 28)• Tour Planner: Adds new destina-tion or waypoint. (Page 29-30)• Store Dest.: Stores your destina-tion in the address book. (Page 31)• Store Pos.: Stores your position inthe address book. (Page 31)• Home 1/ Work2/ 3~12: You can seta home location, work location oretc you want for the place youreturn to most often. (Page 32)20Finding a destination by using navigation menu[Advanced] menu[Favourites] menuLAN8910NHHD ENG HMC format 9/9/09 2:15 PM Page 20](https://usermanual.wiki/LG-Electronics-USA/LAN8910NHHD/User-Guide-1170554-Page-20.png)
![Address SearchYou can find the destination by search-ing the address.1. Press [NAV] > Touch [Address].2. Set the preferred country.If the country has already been set,follow the step 3.3. Set the preferred city name and thentouch [Ok].4. Touch the city in the list.5. Set the part characters of streetname and then touch [Ok].6. Touch the street in the list.7. Touch the house number and thentouch [Ok].8. Set the route options and then touch[Ok].Refer to the “Route Options” on thepage 36.9. Touch [Start].• If you want to store your destina-tion in the address book, touch[Store]. And input the name of yourdestination then touch [Ok]. • If you want to view the map of yourdestination, touch [Show Map] then[Start].10. Touch the preferred route, thentouch [Start].Drive in accordance with the screenand voice information.21Finding a destination by using navigation menuLAN8910NHHD ENG HMC format 9/9/09 2:15 PM Page 21](https://usermanual.wiki/LG-Electronics-USA/LAN8910NHHD/User-Guide-1170554-Page-21.png)
![Last destinationYou can find the destination to a loca-tion that you have lastly set as the des-tination. Up to 50 last destinations areautomatically stored. If the number oflast destinations exceed 50, the oldestone is replaced by the new one.1. Press [NAV] > Touch [Last Dest.].2. Touch the preferred last destinationfrom the list.3. Touch the preferred route, thentouch [Start].Drive in accordance with the screenand voice information.Address BookYou can find the destination to a loca-tion stored in the Address Book. To uti-lize this function more effectively, desti-nations that you often travel to shouldbe stored in advance.First of all, store in the Address Book bysearching the address. Refer to the[Address Search] on the page 23.1. Press [NAV] > Touch [AddressBook].2. Touch the preferred destination fromthe list.3. Touch the preferred route, thentouch [Start].Drive in accordance with the screenand voice information.POI (Point of Interest)You can find a destination from variouscategories of businesses or locations.1. Press [NAV] > Touch [POI].2. Touch one of the main category.• Near position: Sets a POI locatednear the current vehicle position.(Page 25)• Near destination: Sets a POI locat-ed near the selected destination.(Page 26)• In City: Sets a POI located in thecity. (Page 26)• Name: Sets a POI by the name ofthe facility. (Page 26)• Kia Service: Sets a facility of theKia service. (Page 26)• Phone Number: If you know thetelephone number of the facility,use this to find the entering thenumber. (Page 26)22Finding a destination by using navigation menuLAN8910NHHD ENG HMC format 9/9/09 2:15 PM Page 22](https://usermanual.wiki/LG-Electronics-USA/LAN8910NHHD/User-Guide-1170554-Page-22.png)
![Near position1. Press [NAV] > Touch [POI] > [Nearposition].2. Touch one of the subcategory.(For example: Emergency)3. Touch one of the subcategory in nextlevel. (For example: Hospital)4. Touch the preferred POI.5. Touch [Ok] after confirming the loca-tion of the displayed POI.If you want to call on the telephone,touch [ ]. It is available only whenthe bluetooth is active.6. Touch [Start].7. Touch the preferred route.8. Touch [Start].Drive in accordance with the screenand voice information.23Finding a destination by using navigation menuLAN8910NHHD ENG HMC format 9/9/09 2:15 PM Page 23](https://usermanual.wiki/LG-Electronics-USA/LAN8910NHHD/User-Guide-1170554-Page-23.png)
![Near Destination1. Press [NAV] > Touch [POI] > [NearDestination].2. Follow steps 2-8 on the page 25(Near position).In City1. Press [NAV] > Touch [POI] > [In City].2. Set the part characters of city nameand then touch [Ok].3. Touch the city in the list.4. Follow steps 2-8 on the page 25(Near position).Name1. Press [NAV] > Touch [POI] > [Name].2. Input the part characters of the facili-ty name and then touch [Ok].3. Follow steps 4-8 on the page 25(Near position).Kia service1. Press [NAV] > Touch [POI] > [Kiaservice].2. Follow steps 4-8 on the page 25(Near position).Phone Number1. Press [NAV] > Touch [POI] > [PhoneNumber].2. Input the phone number and thentouch [Ok].3. Touch the preferred phone numberfrom the list.4. Touch [Ok] after confirming the loca-tion of the displayed POI.If you want to call on the telephone,touch [ ]. It is available only whenthe bluetooth is active.5. Follow steps 6-8 on the page 25(Near position).24Finding a destination by using navigation menuLAN8910NHHD ENG HMC format 9/9/09 2:15 PM Page 24](https://usermanual.wiki/LG-Electronics-USA/LAN8910NHHD/User-Guide-1170554-Page-24.png)
![GPS InputYou can find the destination by inputtingthe coordinates of latitude and longi-tude.1. Press [NAV] > Touch [Advanced] >[GPS input].2. Touch [Latitude].3. Input the coordinates of latitude bytouching the degree. (For example:49°)4. Input the coordinates of latitude bytouching the minutes. (For example:58’)5. Input the coordinates of latitude bytouching the seconds. (For example:29’’)6. Touch [Ok].7. Input the coordinates of longitude.Refer to the steps 2-6. (For example: 8°, 42’, 31’’)8. When the settings are completed,touch [Start].9. Follow steps 7-8 on the page 25(Near position).❋ NoteIf you make a mistake while touching,touch to erase one digit at a time.25Finding a destination by using navigation menuLAN8910NHHD ENG HMC format 9/9/09 2:15 PM Page 25](https://usermanual.wiki/LG-Electronics-USA/LAN8910NHHD/User-Guide-1170554-Page-25.png)
![ParkingYou can find the destination by search-ing the parking facility.1. Press [NAV] > Touch [Parking].2. Touch a preferred facility.3. Follow steps 4-8 on the page 25(Near position).Continue Guidance/ StopGuidanceIf you no longer need to travel to yourdestination or if you want to changeyour destination, press [NAV] > touch[Stop Guidance]. If you continue to trav-el to your destination again, touch[Continue Guidance].Using MapThis allows you search for a destinationby scrolling the map.1. Press [NAV] > Touch [Advanced] >[Using Map].2. Scroll the map, place the crosspointer over the preferred location.3. Touch [Start].4. Touch the preferred route, thentouch [Start].Drive in accordance with the screenand voice information.26Finding a destination by using navigation menuLAN8910NHHD ENG HMC format 9/9/09 2:15 PM Page 26](https://usermanual.wiki/LG-Electronics-USA/LAN8910NHHD/User-Guide-1170554-Page-26.png)
![Tour PlannerThe tour planner allows you to travelthrough the searched routes by settinga destination or waypoint.You can set a total of 4 destination orwaypoint .- New Tour: Sets a tour.- Load Tour: Displays the tourist.- Show Tour: Displays tourist set lastly.Setting a tour1. Press [NAV] > Touch [Advanced] >[Tour Planner].2. Touch [New Tour].3. Touch [Yes].4. Set a destination by using the navi-gation menu. (Refer to the page 22.)The destination you set is displayed.5. Touch [Add Tourpoint].6. Set a waypoint by using the[Navigation], [Advanced], and[Favourites] menu. (Refer to the page 22.)If you need an additional waypoint, setit by touching [Add Tourpoint] again.7. Touch [Start].If you would like to save thesearched routes, touch [Yes].Otherwise, touch [No].8. Input a name, then touch [Ok].The searched routes are stored inthe [Load Tour] automatically.9. Drive in accordance with the screenand voice information.27Finding a destination by using navigation menuLAN8910NHHD ENG HMC format 9/9/09 2:15 PM Page 27](https://usermanual.wiki/LG-Electronics-USA/LAN8910NHHD/User-Guide-1170554-Page-27.png)
![Editing/deleting a destination orwaypointYou can modify or delete the destinationor waypoint already set.1. Press [NAV] > Touch [Advanced] >[Tour Planner] > [Load Tour].2. Touch the desired tourist.3. Touch [Edit Tourist].4. Touch the desired options.[Tourist sort]: Changes the order ofthe destination andwaypoint already set.(Follow Steps 5-6)[Tourpoint Delete]: Deletes the way-point. (FollowSteps 7-9)[Tourist Delete]: Deletes the tourist.(Follow Steps 10-11)5. Touch [Tourist sort] and then touch[Ok] after changing the order.6. Follow steps 7-9 on the page 29(Setting a tour).7. Touch [Tourpoint Delete] to deletethe waypoint. 8. Touch the desired waypoint.9. Follow steps 7-9 on the page 29(Setting a tour).10. Touch [Tourist Delete] to delete thetourist you set. 11. Touch the desired tourist. 28Finding a destination by using navigation menuLAN8910NHHD ENG HMC format 9/9/09 2:15 PM Page 28](https://usermanual.wiki/LG-Electronics-USA/LAN8910NHHD/User-Guide-1170554-Page-28.png)
![Store DestinationDestinations that you often visit can bestored in the Address Book. The storeddestinations can be easily retrieved toset them as a destination or waypoint.This is available only when the destina-tions have been set already.1. Press [NAV] > Touch [Advanced] >[Store Dest.]2. Input the name of the destinationthen touch [Ok].The destination is stored in theAddress Book automatically. (Page24)Store PositionThe current vehicle position can bestored in the Address Book. 1. Press [NAV] > Touch [Advanced] >[Store Dest.]2. Input the name of the current posi-tion then touch [Ok].The current vehicle position isstored in the Address Book automat-ically. (Page 24)29Finding a destination by using navigation menuLAN8910NHHD ENG HMC format 9/9/09 2:15 PM Page 29](https://usermanual.wiki/LG-Electronics-USA/LAN8910NHHD/User-Guide-1170554-Page-29.png)
![Home 1/ Work2/ 3~12If your home location, work location andfavourite locations are already stored inthe Address Book, it can be easilyretrieved to set the route to your homelocation, work location and favouritelocations.Storing your home1. Press [NAV] > Touch [AddressBook].2. Touch after confirming the pre-ferred location.3. Touch [Favourites].4. If you want to set the location toyour home, touch [Home 1].5. Touch [Ok].❋ Note• The procedure to store your worklocation and favourite locations issame as the one for storing yourhome.• New information placed in the samestorage position overwrites the olddata.Finding your home1. Press [NAV] > Touch [Favourites].2. Touch [Home 1].3. Touch the preferred route, thentouch [Start].Drive in accordance with the screenand voice information.❋ NoteThe procedure to find your work loca-tion and favourite locations is same asthe one for finding your home.30Finding a destination by using navigation menuLAN8910NHHD ENG HMC format 9/9/09 2:15 PM Page 30](https://usermanual.wiki/LG-Electronics-USA/LAN8910NHHD/User-Guide-1170554-Page-30.png)
![Map menu overview General operations of mapmenu1. Turn the unit on.2. Press MAP. The map screenappears.3. Touch [Menu].4. Touch [View], [Route] or [Traffic] toselect the desired option.5. Touch the preferred setting method.For details, refer to the page 34-38.31Using the map menu[View] menu[Route] menu[Traffic] menuLAN8910NHHD ENG HMC format 9/9/09 2:15 PM Page 31](https://usermanual.wiki/LG-Electronics-USA/LAN8910NHHD/User-Guide-1170554-Page-31.png)
![POI categorySome landmarks in the surroundingarea can be displayed as icons on thescreen.This allows you to display or hide thelandmark icons by type.1. Press [MAP] > Touch [Menu] >[View] > [POI category].2. Touch the desired icons.The icon display settings toggle onand off each time you touch theicon. The indicator of the selectedicon illuminates.3. Touch [OK].The activated landmark icons aredisplayed on the map.2D/ 3DThe map view can be changed between2D and 3D.- 2D: Displays the map in a 2-dimen-sional environment similar to aroad map.- 3D: Displays the view from an elevat-ed perspective. It is easy to recog-nize an image of the routebecause it provides a panoramicview over a long distance.1. Press [MAP] > Touch [Menu] >[View] > [2D/3D].2. Touch [2D/3D] again to switch to the2D screen.32Using the map menuLAN8910NHHD ENG HMC format 9/9/09 2:15 PM Page 32](https://usermanual.wiki/LG-Electronics-USA/LAN8910NHHD/User-Guide-1170554-Page-32.png)
![Split screen/ Full screenThe map view can be changed betweensplit screen and full screen.1. Press [MAP] > Touch [Menu] >[View] > [Split screen].2. To switch to the full screen mode,touch [Menu] > [View] > [Fullscreen].Store PositionThe current vehicle position can bestored in the Address Book. 1. Press [MAP] > Touch [Menu] >[Route] > [Store position]. 2. Input the name of the current posi-tion then touch [Ok].The current vehicle position isstored in the Address Book automat-ically. (Page 24)Tour PlannerThe tour planner allows you to travelthrough the searched routes by settinga destination or waypoint.1. Press [MAP] > Touch [Menu] >[Route] > [Tour Planner]. 2. Refer to “Tour Planner” on the pages29-30.33Using the map menuSplit screenFull screenLAN8910NHHD ENG HMC format 9/9/09 2:15 PM Page 33](https://usermanual.wiki/LG-Electronics-USA/LAN8910NHHD/User-Guide-1170554-Page-33.png)
![Route OptionsYou can modify the route conditions orconfirm the route information. Set theappropriate route condition according toyour purpose.1. Press [MAP] > Touch [Menu] >[Route] > [Route Options]. 2. Touch the preferred setting item.• Route: If you don’t set the [Plandifferent routes] in the setupmenu, set the route optionto Fast, Short or Eco.• TMC: - Auto: When the TMC event isfound on current route, thenavigation system searchesthe detour route automati-cally without any announce-ment.- Off: Cancels the TMC function.- On: When the TMC event is foundon current route, the naviga-tion system displays the pop-up screen of the event infor-mation.• Toll Road - Use: Includes the use of tollroads.- Avoid: Enables the avoid of tollroads.• Tunnel- Use: Includes the use of tunnel.- Avoid: Enables the avoid of tun-nel.• Main road- Use: Includes the use of mainroad.- Avoid: Enables the avoid of mainroad.• Ferry- Use: Includes the use of ferries.- Avoid: Enables the avoid of fer-ries.3. Press [Ok].When the current location mapscreen or route setting screen is dis-played, the system recalculates aroute with the set conditions.❋ Note• Always stop the vehicle in a safe localbefore modifying the route conditions.• Modifying the route conditions whiledriving may cause an accident.34Using the map menuLAN8910NHHD ENG HMC format 9/9/09 2:15 PM Page 34](https://usermanual.wiki/LG-Electronics-USA/LAN8910NHHD/User-Guide-1170554-Page-34.png)
![DetourIf you want to make a detour due to traf-fic conditions, you can use the detourfunction to calculate an alternative routefrom the vehicle location to the destina-tion.1. Press [MAP] > Touch [Menu] >[Route] > [Detour]. 2. Touch [Short] or [Longer] to set aroute which take a detour as the dis-tance you select.- Blue: Original route- Red: Detour route3. Touch [Start].4. Touch the preferred route, thentouch [Start].Drive in accordance with the screenand voice information.❋ NoteIf you need not to take a detour whenyou are navigating a route , touch[Menu] > [Route] > [Detour] > [Delete]. Info NearbyThe list of traffic information around thecurrent vehicle position is displayed.1. Press [MAP] > Touch [Menu] >[Traffic] > [Info Nearby]. 2. Touch the desired option to checkthe detailed information. 3. Touch [Show Map] after checking it. 4. Touch [Zoom+] to view the map indetail.Touch [Zoom-] to view the map awider area.5. Touch to return to the previousscreen. Press MAP to return to thecurrent location map screen.35Using the map menuLAN8910NHHD ENG HMC format 9/9/09 2:15 PM Page 35](https://usermanual.wiki/LG-Electronics-USA/LAN8910NHHD/User-Guide-1170554-Page-35.png)
![Info on RouteThe list of traffic information found onthe recommended route from the cur-rent vehicle position to the destination isdisplayed.A detour route to avoid the event issearched from the current vehicle posi-tion to the destination. Also, you cancheck the detailed information about thedisplayed events.1. Press [MAP] > Touch [Menu] >[Traffic] > [Info on Route].2. Touch the desired option to checkthe detailed information. 3. If you need to take a detour, touch[Detour].❋ NoteTouch [Show Map], if you want toview the position about the eventfound on the route. Touch toreturn to the previous screen. PressMAP to return to the current locationmap screen.5. Touch the preferred route.6. Touch [Start].Drive in accordance with the screenand voice information.36Using the map menuLAN8910NHHD ENG HMC format 9/9/09 2:15 PM Page 36](https://usermanual.wiki/LG-Electronics-USA/LAN8910NHHD/User-Guide-1170554-Page-36.png)
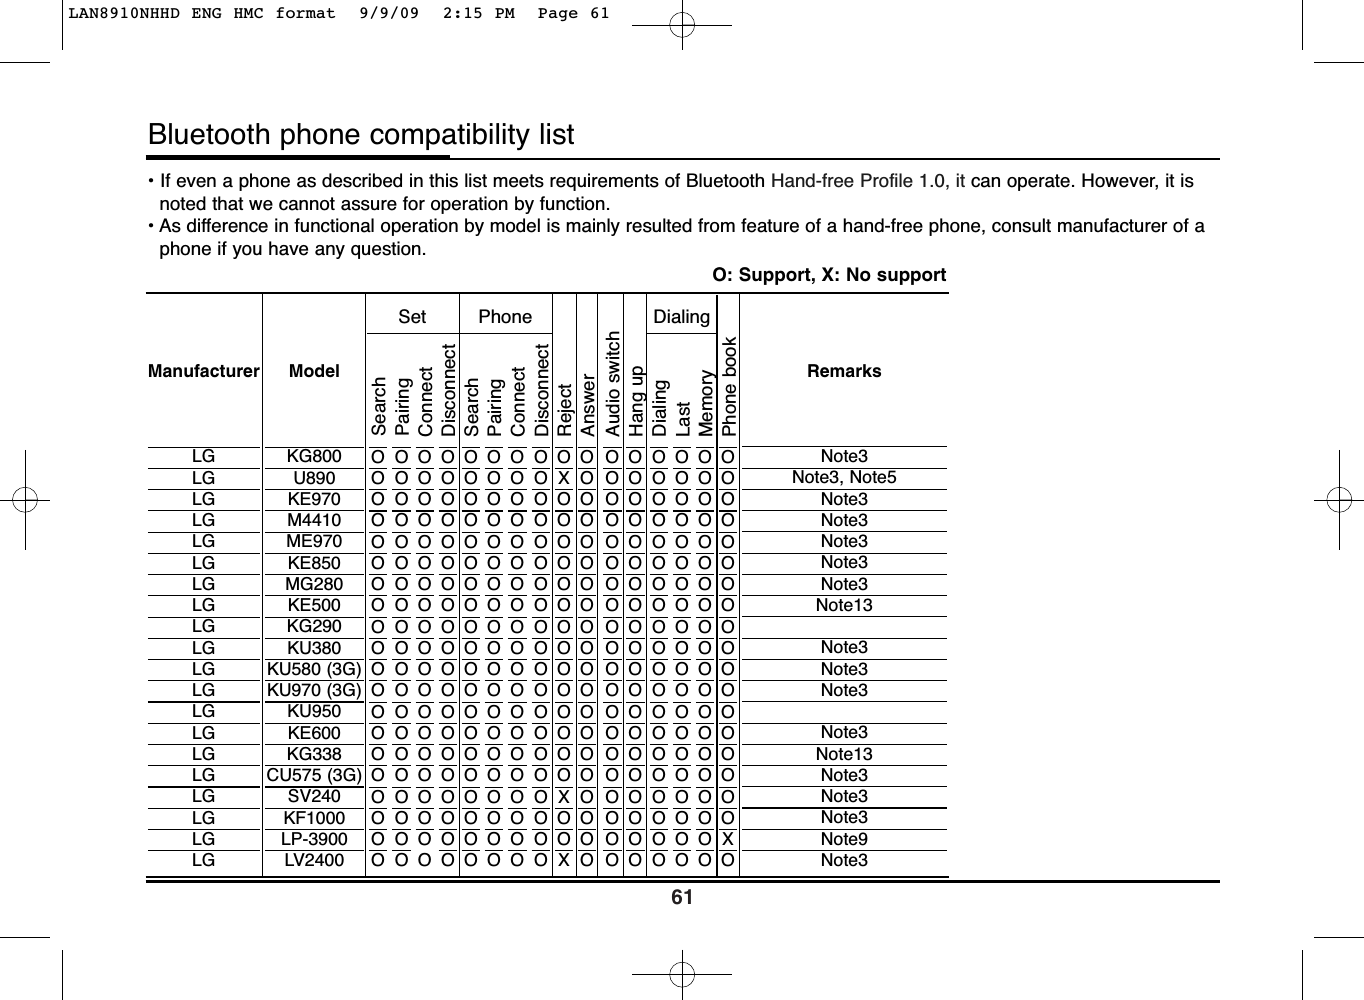
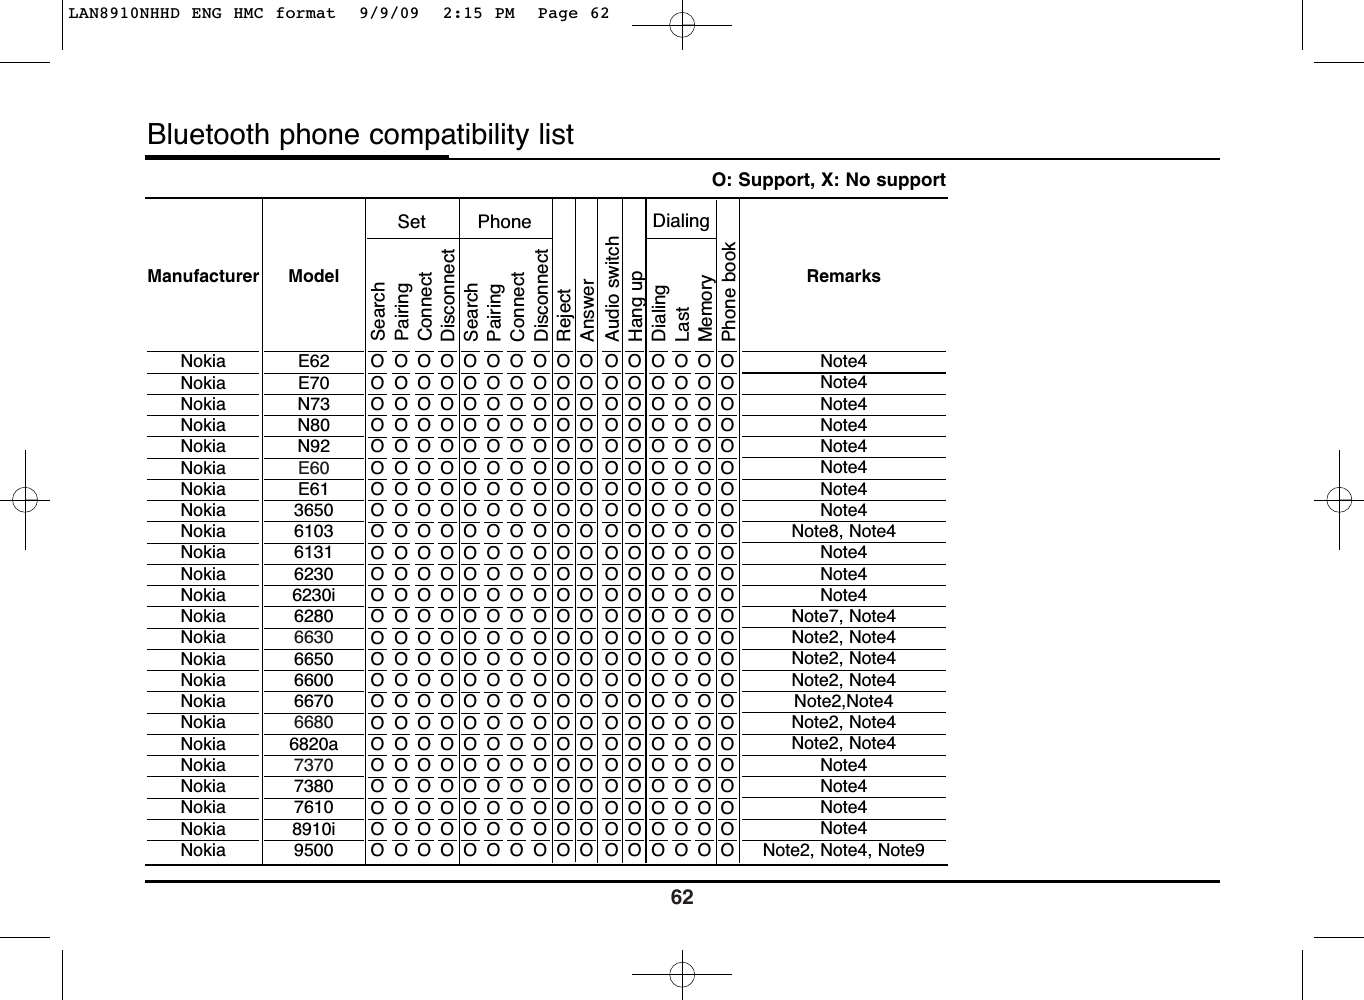
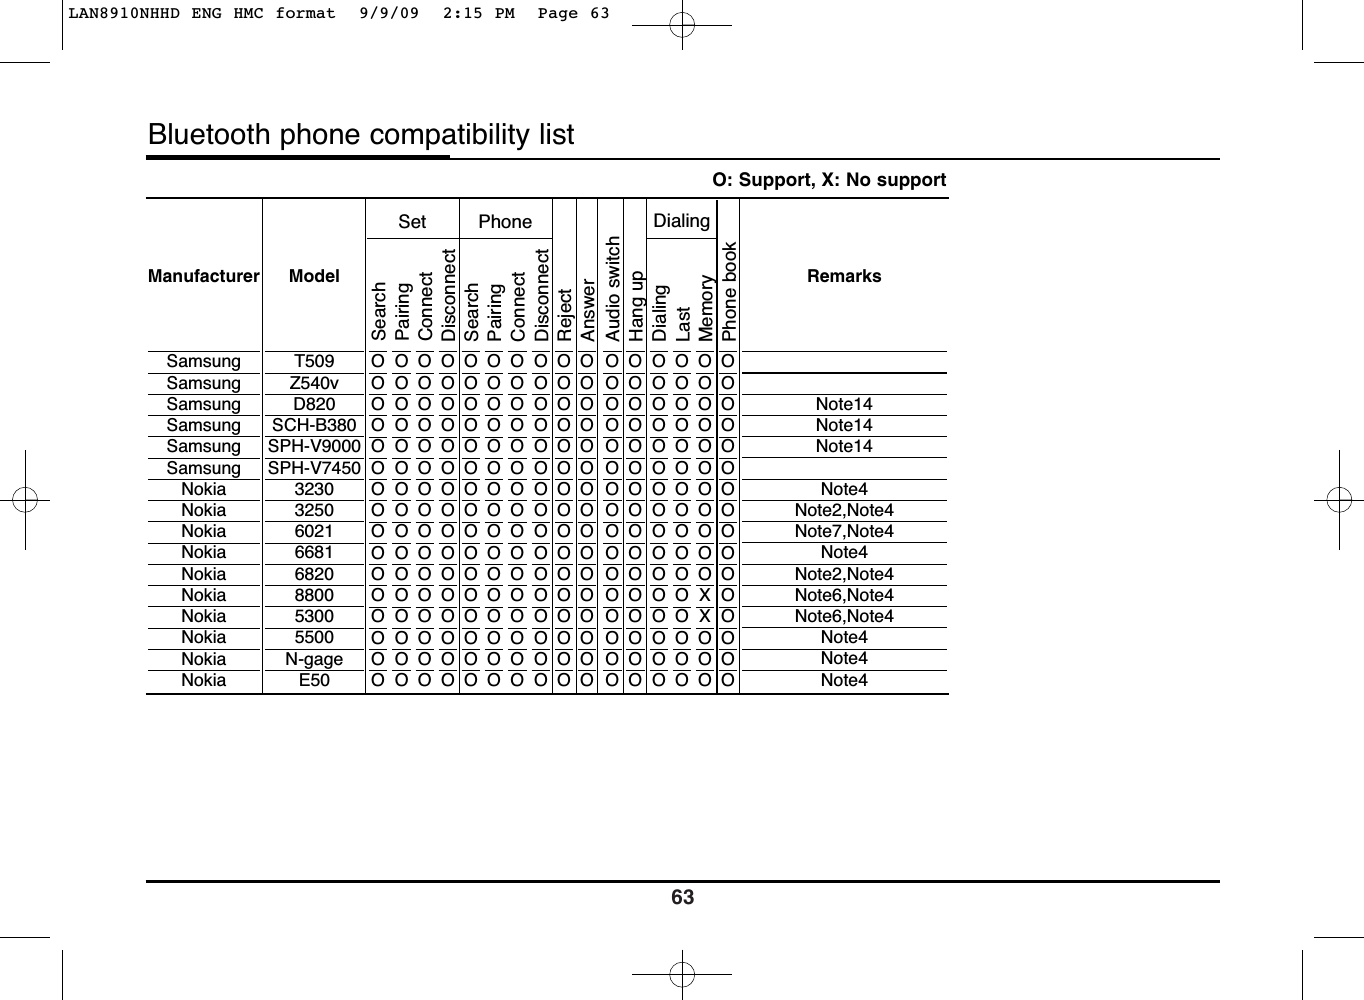
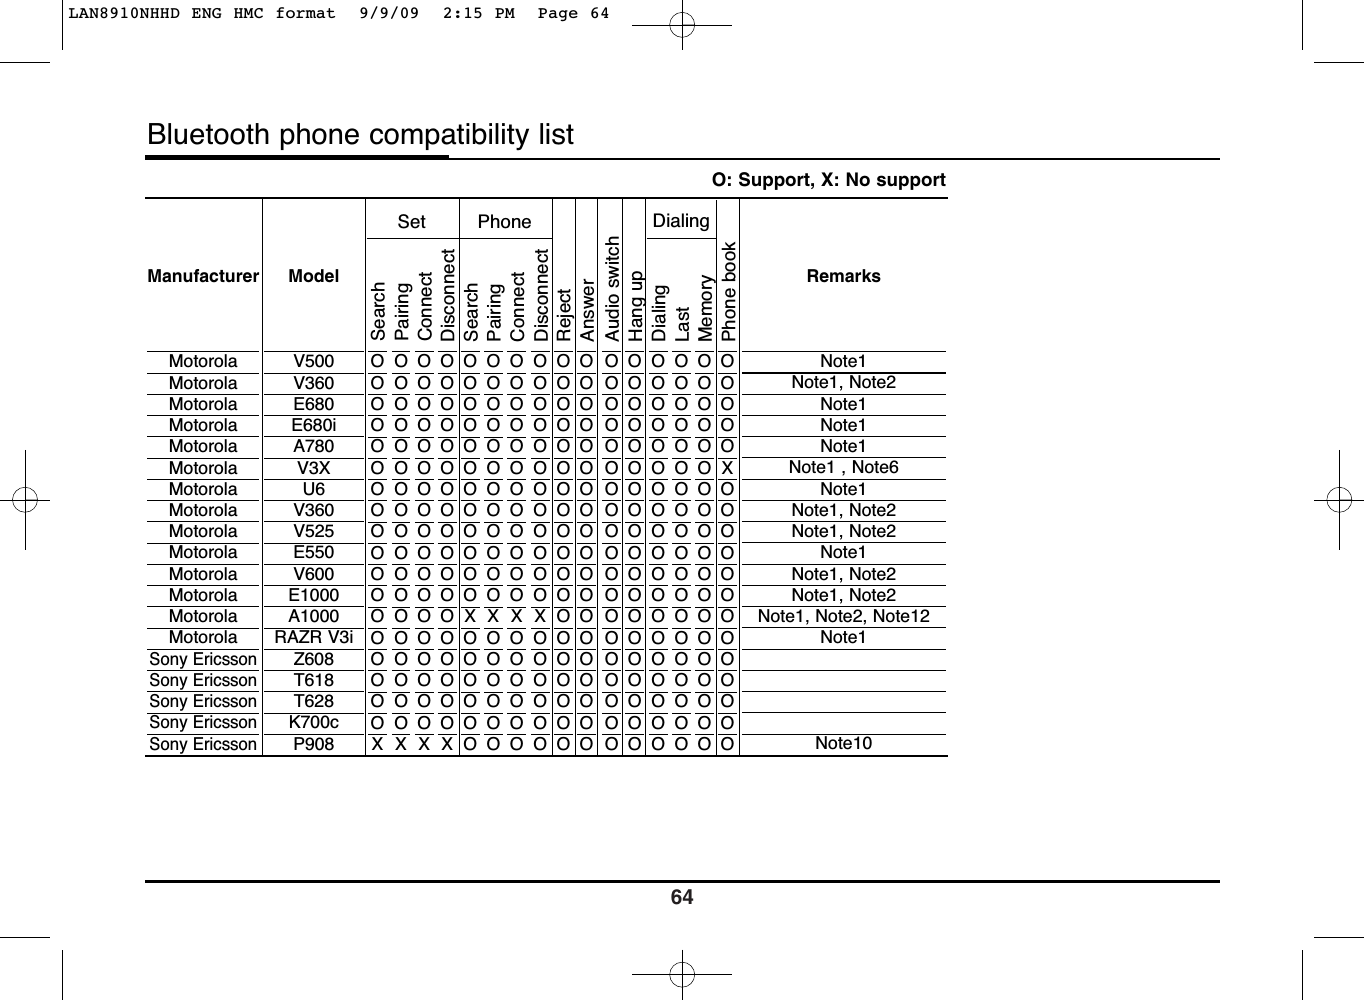
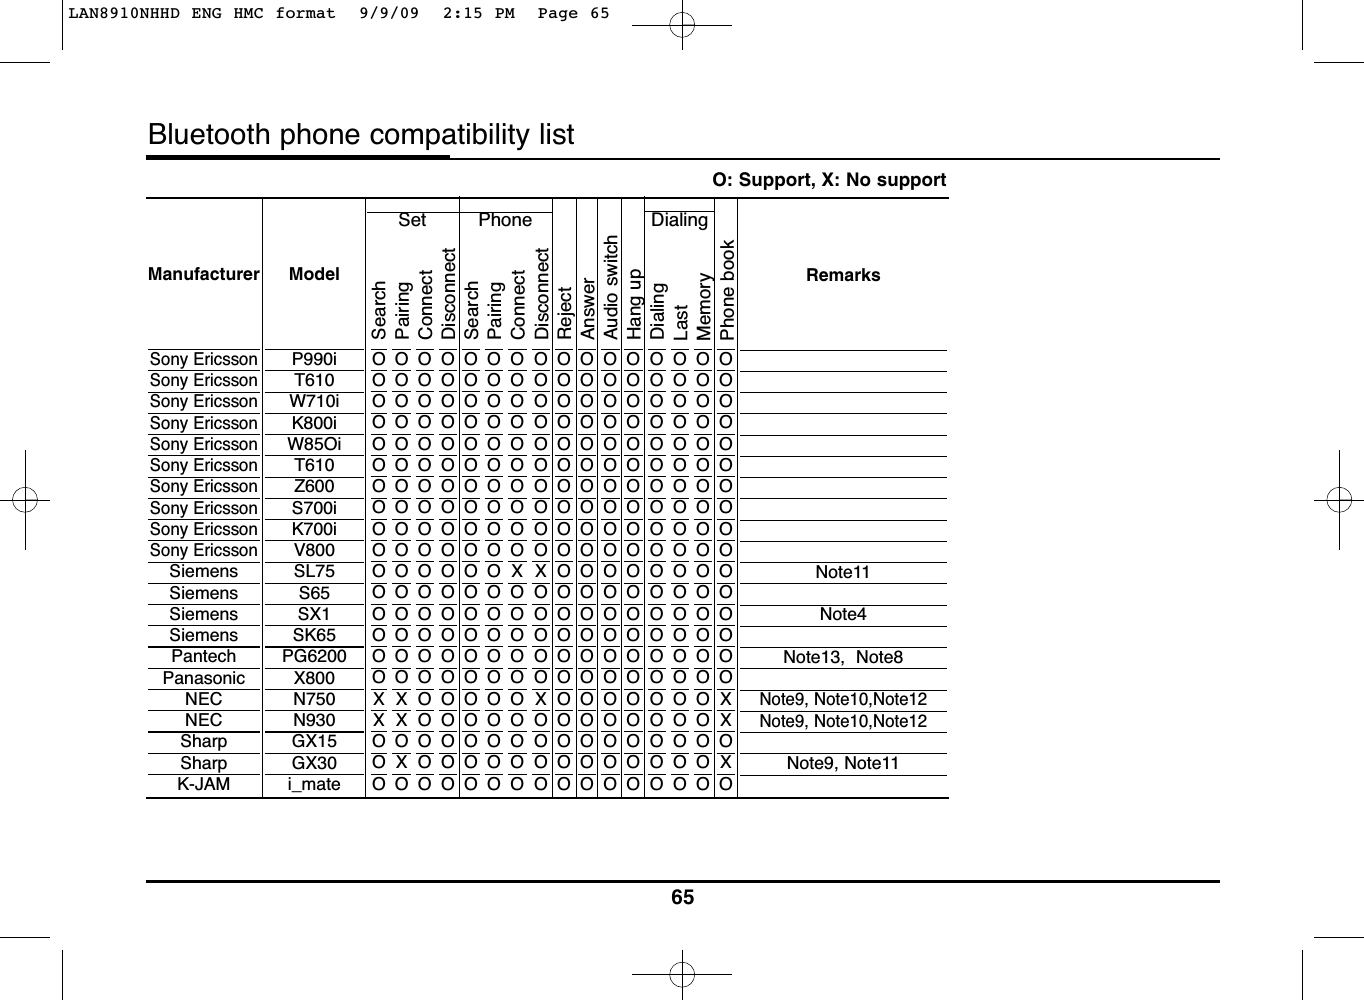
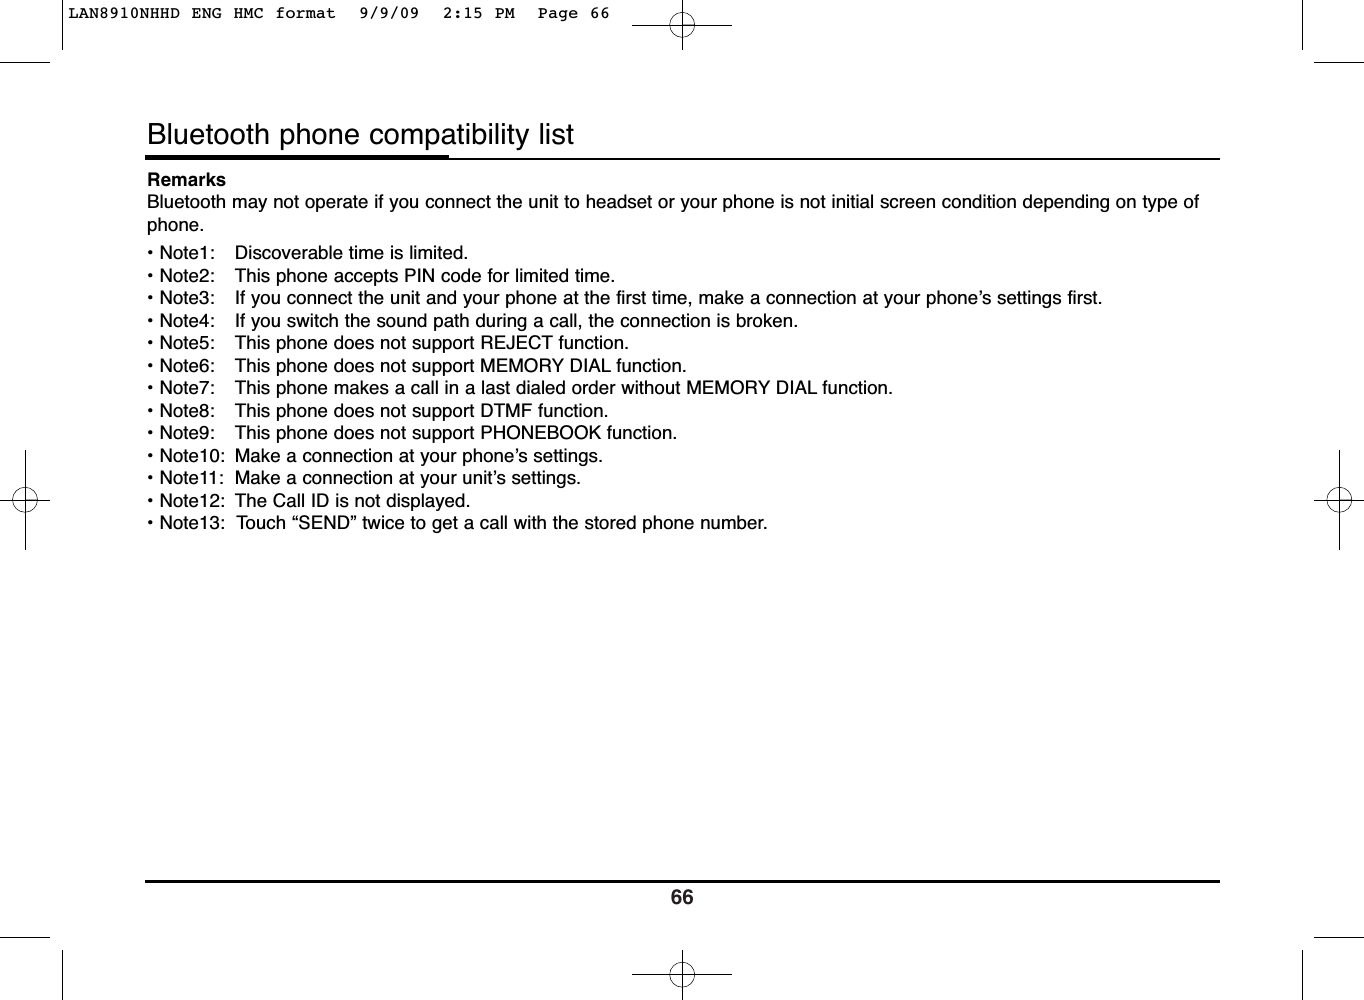
![Understanding Bluetooth wireless technologyBluetooth wireless technology establish-es a wireless link between two devices,such as your phone and the unit.The first time you use two devicestogether you must connect them byestablishing a relationship using a PIN code. After theinitial connecting, the two devices canconnect automatically each time youturn them on.❋ Note• There may be restrictions on usingBluetooth technology in some loca-tions.• Due to the variety of Bluetooth phonesand their firmware version, your devicemay respond differently when perform-ing over Bluetooth. • As difference in functional operation bymodel is mainly resulted from featureof a hands-free phone, consult manu-facturer of a phone if you have anyquestion.Connecting your unit andbluetooth phoneTo connect using the unit settings (1)1. Press on the control panel.2. Touch [Bluetooth]. 3. Touch [Search for BluetoothDevices].If you want to cancel, touch[Cancel].4. Touch a bluetooth phone you desirefrom the “Bluetooth Devices” screen.5. Input the passkey (Default: 0000)showed on the screen in your phonewhen the pop-up screen is displayedon the screen.When it is successfully connected,the Bluetooth main screen appearson the screen.When it is not connected, the con-nection failure message appears onthe screen.37Bluetooth wireless technologyLAN8910NHHD ENG HMC format 9/9/09 2:15 PM Page 37](https://usermanual.wiki/LG-Electronics-USA/LAN8910NHHD/User-Guide-1170554-Page-37.png)
![To connect using the unit settings (2)1. Press on the control panel.2. Press [Search for BluetoothDevices].3. Follow steps 4-5 on the page 39.❋NoteIf you touch on the control panelagain after connected via Bluetoothwireless technology, the Bluetooth mainscreen appears on the screen.To connect using the phone settings Your phone’s Bluetooth feature may beset to off by default. To use theBluetooth feature, Bluetooth must beturned on in your phone. Refer to yourphone’s user guide.1. Enable the phone’s Bluetooth com-ponent. This might be in a menucalled Settings, Bluetooth,Connections, or Hands-free.2. Press [ ] > Touch [Bluetooth] >[External Device Authorization].If you want to cancel, touch [Cancel].3. Initiate a search for Bluetoothdevices. These settings might belocated in a menu called Bluetooth,Connections, or Hands-free.4. Select the your device from the listof phone.5. Input the passkey (Default: 0000)showed on the screen in your phonewhen the pop-up screen is displayedon the screen.When it is successfully connected,the [Bluetooth] screen appears onthe screen.❋Note• It works the same as the wired head-set for mobile phone. The headsetfunctionality is for telephone conversa-tion. It is not for listening to music.• Unlike the hands-free functionality,Headset connection will allow only twofunctions “answering calls” and “mak-ing a call from the latest call”. Also thecaller’s number is not displayed whenanswering calls.• If connecting through a Bluetoothphone, the hands-free connection orheadset connection may not operatedepending on the type of the phone. 38Bluetooth wireless technologyLAN8910NHHD ENG HMC format 9/9/09 2:15 PM Page 38](https://usermanual.wiki/LG-Electronics-USA/LAN8910NHHD/User-Guide-1170554-Page-38.png)
![Disconnecting/Connectingagain the bluetooth phone1. Touch [View Bluetooth Device list] onthe “Bluetooth” screen. 2. Touch the connected phone. Andthen touch [Yes].Your phone is disconnected and themark disappears.3. Touch the disconnected phone againto connect your phone. And thentouch [Yes].The mark appears again.Deleting a connected phoneIf you no longer need to use a connect-ed phone, you can delete it.1. Touch [View Bluetooth Device list] onthe the “Bluetooth” screen. 2. Touch on the right-hand side of thedevice name of the phone you want todelete. 3. Touch [Yes].• The connected phone is deleted.• When not deleting a connectedphone, touch [No].Changing the passkeyYou can change the passkey.1. Input the passkey using thekeypad, and .2. Touch [OK].39Bluetooth wireless technologyLAN8910NHHD ENG HMC format 9/9/09 2:15 PM Page 39](https://usermanual.wiki/LG-Electronics-USA/LAN8910NHHD/User-Guide-1170554-Page-39.png)
![Making a call by enteringphone numberThe most basic way to make a call is tosimply dial the number.Connect your unit and bluetooth phonebefore you make a call.1. Press the button on the controlpanel.The Bluetooth main screen appearson the screen.2. Input the phone number you want tocall by touching the number buttons.And then touch .3. Touch [Hang up] to finish the tele-phone conversations.❋Note• If you make a mistake while dialing,touch to erase one digit at atime. If you want to erase all digits at atime, touch and hold .• Touch for long to make a call froma latest call.• If you want to make an internationaltelephone call, touch [0] for long, theninput the phone number.• The user’s recent call history appliesonly to the hands-free connection.(Making a call from a recent call withthe headset connection depends on thecall history of the Bluetooth phone.)• The headset connection allows onlymaking a call from a recent call.Switching the sound pathduring a callYou can hear sound through the speak-er of unit and phone by touching[Transfer Call]/ [Transfer call back].Switching the microphoneon/offYou can switch the microphone on/off bytouching [Microphone off]/ [Microphoneon].Answering calls1. When you receive a call, your phonerings and the “Incoming Call” pop-upscreen is displayed on the screen.2. Touch [Accept] to answer the call. If you want to reject a call, touch[Refuse]. ❋Note• If the Call-ID service is available, thecaller’s phone number is displayed.• If the phone number is in the phonebook, phone book entry’s name is dis-played.• If the incoming call is from a numberstored in your Contacts, the entry’sname is displayed. The caller’s phonenumber may also be displayed, ifavailable.• If “Rejecting” function is unusable,then the phone connected to thedevice does not support the rejectingcalls function. 40Bluetooth wireless technologyLAN8910NHHD ENG HMC format 9/9/09 2:15 PM Page 40](https://usermanual.wiki/LG-Electronics-USA/LAN8910NHHD/User-Guide-1170554-Page-40.png)
![Using your Phone BookYou can use the phonebook entriesstored on the memory of phone support-ing PBAP (Phone Book Access Profile)profile.After connecting your unit and bluetoothphone via Bluetooth wireless technolo-gy, the numbers in your phone’s phonebook is transferred automatically intophone book.Calling a number in the phonebookAfter finding the entry in the phone bookyou want to call, you can select thenumber and make a call.1. Press on the control panel. Andthen touch [Phonebook].2. Touch a phone book entry you wantto call.Touching or switches to thenext or previous page in the list.3. Touch [Hang up] to finish the tele-phone conversations.Searching the phonebook entryby alphabetIf there are many entries in the phonebook list, it can be useful to displaythem in the alphabetical order for easiersearching.1. Touch [Search by name] on the“Phonebook” screen.2. Input the first letter of the entry inthe phone book list you want tosearch by using the keypad, thentouch [OK].3. Touch a phone book entry you wantto call.Touching or switches to thenext or previous page in the list.4. Touch [Hang up] to finish the tele-phone conversations.41Bluetooth wireless technologyLAN8910NHHD ENG HMC format 9/9/09 2:15 PM Page 41](https://usermanual.wiki/LG-Electronics-USA/LAN8910NHHD/User-Guide-1170554-Page-41.png)
![Using your Calling listYou can use the calling list stored on thememory of phone supporting PBAP(Phone Book Access Profile) profile.After connecting your unit and bluetoothphone via Bluetooth wireless technolo-gy, the numbers in your phone’s[Outgoing Calls], [Missed Calls], and[Incoming Calls] list is transferred auto-matically into calling list.Calling a number in the callinglistAfter finding the entry you want to call inthe [Outgoing Calls], [Missed Calls], or[Incoming Calls] list, you can select thenumber and make a call.1. Press on the control panel. Andthen touch [Calling lists].2. Touch [Outgoing], [Missed], or[Incoming].3. Touch the entry you want to call.Updating the calling listYou can update the numbers in yourphone’s [Outgoing Calls], [MissedCalls], or [Incoming Calls] list into call-ing list.1. Press on the control panel. Andthen touch [Calling lists].2. Touch [Outgoing], [Missed], or[Incoming], then touch [Update].3. The updated calling lists are downloaded.42Bluetooth wireless technologyOutgoing CallsMissed CallsIncoming CallsLAN8910NHHD ENG HMC format 9/9/09 2:15 PM Page 42](https://usermanual.wiki/LG-Electronics-USA/LAN8910NHHD/User-Guide-1170554-Page-42.png)
![Making a call with speeddial numbersYou can use the phonebook entriesstored on the memory of phone support-ing PBAP (Phone Book Access Profile)profile.You can easily store up 12 phone num-bers and later recall them the touch of aspeed dial number.Registering phone numbers tothe speed dial list1. Press on the control panel. Andthen touch [Speed dial].2. Touch and hold one of speed dialnumbers (1-12). (For example: 1)Touching or switches to thenext or previous page in the list.3. Touch one of categories you want toassign to speed dial number. (For example: Phone book)4. Touch one of phone numbers youwant to assign to speed dial number. 5. Input the name by using the keypad,then touch [OK].The name (phone number) is storedin memory. The next time you touchthe same name, the name (phonenumber) is recalled from memory.Calling a number in the speeddial list1. Press on the control panel. Andthen touch [Speed dial].2. Touch one of speed dial numbers tomake a call.3. Touch [Hang up] to finish the tele-phone conversations.❋ NoteMake sure that the speed dial function-ality in the Bluetooth phone is enabledbefore using.43Bluetooth wireless technologyLAN8910NHHD ENG HMC format 9/9/09 2:15 PM Page 43](https://usermanual.wiki/LG-Electronics-USA/LAN8910NHHD/User-Guide-1170554-Page-43.png)
![Intro scan The first 10 seconds of each tracks/filesare played.1. Touch [Option] during playback.2. Touch [SCAN Start].3. Touch [SCAN Stop] to cancel theintro scan.RepeatThe current selected tracks/files areplayed repeatedly.1. Touch [Option] during playback.2. Touch [Repeat] repeatedly.• [REPEAT Off] : Plays repeatedly alltracks within thedisc.• [REPEAT Track] : Plays repeatedlythe current track.• [REPEAT Off]: Plays repeatedly allfiles within the discor USB.• [REPEAT Track]: Plays repeatedlythe current file.• [REPEAT Folder]: Plays repeatedlyall files within thecurrent folder.• REPEAT Off: Plays repeatedly allfiles within the iPod.• REPEAT On: Plays repeatedly thecurrent file.iPodDisc - MP3/WMAUSBDisc - Audio CDALLDisc - MP3/WMAUSBDisc - Audio CD45CD/MP3/WMA/USB/iPod operationExample: Audio CDExample: Audio CDLAN8910NHHD ENG HMC format 9/9/09 2:15 PM Page 45](https://usermanual.wiki/LG-Electronics-USA/LAN8910NHHD/User-Guide-1170554-Page-45.png)
![ShuffleAll of the tracks/files are played ran-domly.1. Touch [Option] during playback.2. Touch [SHUFFLE] repeatedly.• [SHUFFLE All]: Plays randomly allfiles within the disc.• [SHUFFLE Off]: Cancels SHUFFLEplay.• [SHUFFLE Off]: Cancels SHUFFLEplay.• [SHUFFLE Folder]: The unit playsrandomly allfiles within cur-rent folder.• [SHUFFLE All]: The unit plays ran-domly all files withinthe disc or USB.• [SHUFFLE Off]: Cancels SHUFFLEplay.• [SHUFFLE All]: The unit plays ran-domly all files withinthe iPod.• [SHUFFLE Album]: The unit playsrandomly allfiles within cur-rent album.iPodDisc - MP3/WMAUSBDisc - Audio CDALL46CD/MP3/WMA/USB/iPod operationLAN8910NHHD ENG HMC format 9/9/09 2:15 PM Page 46](https://usermanual.wiki/LG-Electronics-USA/LAN8910NHHD/User-Guide-1170554-Page-46.png)
![Locating a folder/file usingthe listYou can listen to music by displayingthe track/folder/file list.1. Touch the [List] button during play-back.2. In case of Audio CD, touch the fileyou want.In case of MP3/WMA file, touch thefolder button you want. If there is nofolder, touch the file you want.3. The selected track/file is played.❋ Note• In case of MP3/WMA file, touch thebutton to move to upper folder.• Touch the or buttons to selectthe list you want to view.• If you want to move to the playlistscreen, touch .Searching music You can search iPod for playlist, artistnames, album titles, Genre, songs,composer, audiobooks, podcasts.For details about iPod, refer to the iPodUser Guide.1. Touch [List] during playback.2. Touch the desired item.• [Playlist]: Plays the songs in the[Playlist].• [Artists]: Plays the songs in the[Artists].• [Albums]: Plays the songs in the[Albums].• [Genres]: Plays the songs in the[Genres].• [Songs]: Plays the songs in the[Songs].• [Composers]: Plays the songs inthe [Composers].• [Audiobooks]: Plays the songs/chapters in the[Audiobooks].• [Podcast]: Plays the songs/chaptersin the [Podcast].❋ Note• If you want to to move to upper folder,touch .• Touch the or buttons to selectthe list you want to view.• If you want to move to the playlistscreen, touch .iPodDisc - MP3/WMAUSBDisc - Audio CD47CD/MP3/WMA/USB/iPod operationExample: Audio CDAudio CD MP3/WMA fileLAN8910NHHD ENG HMC format 9/9/09 2:15 PM Page 47](https://usermanual.wiki/LG-Electronics-USA/LAN8910NHHD/User-Guide-1170554-Page-47.png)
![Setting audiobook playspeed Setting the play speed only affectsaudiobooks purchased from the iTunesstore or audible.com.For details about iPod, refer to the iPodUser Guide.1. Touch [Option] when you listen tosongs/ chapters in the [Audiobook].2. Touch [Audiobook] repeatedly.• [Audiobook Normal]:Plays the audiobooks with originalspeed.• [Audiobook Fast]:Plays the audiobooks with fastspeed.• [Audiobook Slow]: Plays the audiobooks with slowspeed.❋ NoteIf you want to move to the playlistscreen, touch .iPod48CD/MP3/WMA/USB/iPod operationUSB device requirement• This unit supports only USB Flash Driveand USB External HDD with FAT16 orFAT32 format.• Do not extract the USB device duringoperation (play, etc.).• Regular back up is recommended toprevent data loss.• If you use a USB extension cable orUSB HUB, the USB device may not berecognized.• Some USB devices may not work withthis unit.• Digital camera and mobile phone are notsupported.• This unit is not supported when the totalnumber of files is 10000 or more.Compatible USB devices• Devices which require additional pro-gram installation when you have con-nected it to a computer, are not support-ed.• MP3 player: Flash type MP3 playerThe MP3 player requiring installation of adriver is not supported.• USB Flash Drive: Devices that supportUSB2.0 or USB1.1 .LAN8910NHHD ENG HMC format 9/9/09 2:15 PM Page 48](https://usermanual.wiki/LG-Electronics-USA/LAN8910NHHD/User-Guide-1170554-Page-48.png)
![Listening to the radio sta-tions1. Press the “RADIO” button to selectthe radio.2. Press the “RADIO” repeatedly toselect a band.The mode switches as follows. FM t AM t FM...❋ NoteTo select the FM/AM by touching thescreen Touch on the screen toselect the AM and then touch . 3. Auto tuning:Touch / on the screen. Orpress v / V on the control panel.- When a station is received, search-ing stops.Manual tuning:Rotate the Jog dial leftward/ right-ward on the control panel.- The frequencies move up anddown step by step.Storing and recalling stationsYou can easily store up to 12 presetstations for later recall at the touch of abutton.1.Select the band (FM, AM) you want tostore a station into.2.Select the desired frequency. 3.Touch [Presets] on the screen.4.Touch and hold one of the preset but-tons.The preset station information will bedisplayed.The selected preset station has beenstored in memory.If you move to the previous/nextpage, touch / .5.Repeat steps 1 and 4 to preset otherstations.Next time, if you touch the preset but-tons, the station is recalled from thememory.❋ NoteWhen a station is preset on the presetstation button number on which anotherstation of the same band has alreadybeen preset, the previously preset sta-tion is automatically erased.50Radio operationLAN8910NHHD ENG HMC format 9/9/09 2:15 PM Page 50](https://usermanual.wiki/LG-Electronics-USA/LAN8910NHHD/User-Guide-1170554-Page-50.png)
![AS (Auto search memory)This is only available for AM reception.This function lets you automaticallystore the strong broadcast frequencies.1. Select the band to AM.2. Touch [Option] on the screen.3. Touch [Autostore] on the screen.Local stations with the strong sig-nals are searched and stored auto-matically in the list menu. And thenthe list menu appears on the screen.4. Touch the broadcast frequency youwant.To scan broadcast frequen-ciesThe first 10 seconds of each broadcastfrequency are played.1. Touch [Option] on the screen inAM/FM mode.2. Touch [Scan Start] on the screen.3. Touch [Scan Stop] to cancel it.TA (Traffic announcement) TA function allows the unit to switch totraffic announcement (TA) from the cur-rent source (Another FM station, CD, orother connected components).1. Touch [Option] on the screen inAM/FM mode.2. Touch [TA Off]/ [TA On] on thescreen.[TA On]: Traffic programs andannouncements can beautomatically receivedusing TP/TA features.[TA Off]: Traffic programs andannouncements can not bereceived.51Radio operationLAN8910NHHD ENG HMC format 9/9/09 2:15 PM Page 51](https://usermanual.wiki/LG-Electronics-USA/LAN8910NHHD/User-Guide-1170554-Page-51.png)
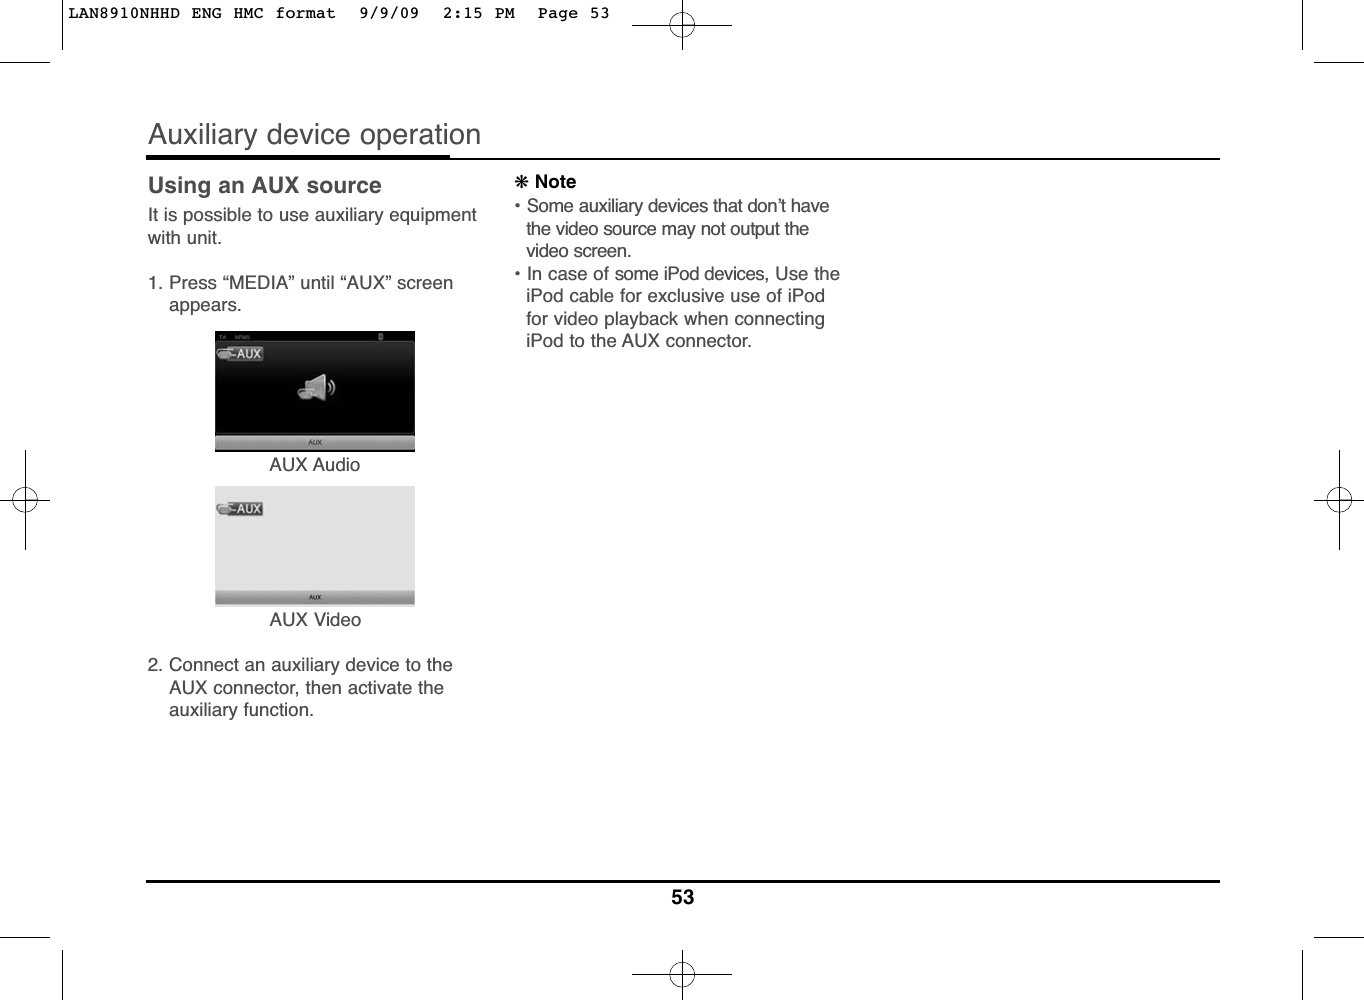
![NEWSThis function allows the unit to switch tonews from the current source (AnotherFM station, CD, or other connectedcomponents).1. Touch [Option] on the screen inAM/FM mode.2. Touch [NEWS Off]/ [NEWS On] onthe screen.[NEWS On]: News can be automati-cally received.[NEWS Off]: News can not bereceived.REGION Auto/OffThis is only available for FM reception.1. Select the band to FM.2. Touch [Option] on the screen.3. Touch [REGION Auto]/ [REGIONOff] on the screen.[REGION Auto]: The unit switches to another station,within the same network, broadcast-ing the same program when thereceiving signals from the currentstation become weak.[REGION Off]: The unit switches to another station,within the same network when thereceiving signals from the currentstation become weak. (This mode,the program may differ from the onecurrently received.)52Radio operationLAN8910NHHD ENG HMC format 9/9/09 2:15 PM Page 52](https://usermanual.wiki/LG-Electronics-USA/LAN8910NHHD/User-Guide-1170554-Page-52.png)
![Voice recognitionVoice recognition allows hands-freeoperation of the AV system (RADIO,CD, USB, iPod), navigation and othersystems equipped on this vehicle, suchas the phone.❋ NoteTo get the best recognition performanceout of voice recognition, observe the fol-lowing:• Keep the interior of the vehicle asquiet as possible. Close the windowsto eliminate the surrounding noises(traffic noises, vibration sounds, etc.),which may prevent the system fromrecognizing the voice commands cor-rectly.• Wait until a beep sounds beforespeaking a command. Otherwise, thecommand will not be recognized prop-erly.• Speak in a natural voice without paus-ing between words.Giving voice commands1. Press on the steering wheelremote control.2. After the beep sounds, say “Help”.All commands shall be listed whichare presented in active fields.❋ Note• If the command is not recognized, thesystem announces, 1 st time, [Pardon[and 2nd time [Please, repeat].• If you want to cancel the voice recog-nition, press one more time orpress the any button or touch screensay [Cancel].• If you want to adjust the volume of thesystem feedback, press or on the steering wheel remote controlor use the volume knob ( ) on thecontrol while the system is making anannouncement.How to say numbersVoice recognition requires a certain wayto say numbers in voice commands.Refer to the following examples.(General rule: Either “zero” or “oh” canbe used for “0”.)FrequencySay frequency number according to thefollowing example.“Frequency ninety five dot four”/ “Ninety five dot four mega-hertz”Phone numberSay phone number according to the fol-lowing example.0-1-0-2-0-0-5-2 (Single digit)+54Voice recognition systemLAN8910NHHD ENG HMC format 9/9/09 2:15 PM Page 54](https://usermanual.wiki/LG-Electronics-USA/LAN8910NHHD/User-Guide-1170554-Page-54.png)