LG Electronics USA LDU810 Cellular CDMA/EVDO USB Modem User Manual LGCM Manual 20090707
LG Electronics USA Cellular CDMA/EVDO USB Modem LGCM Manual 20090707
UserManual.wiki
>
LG Electronics USA
>
LDU810 User Manual
User Manual
Navigation menu
Upload a User Manual
Namespaces
Wiki Guide
HTML
PDF
Info
Views
User Manual
Discussion / Help
Navigation

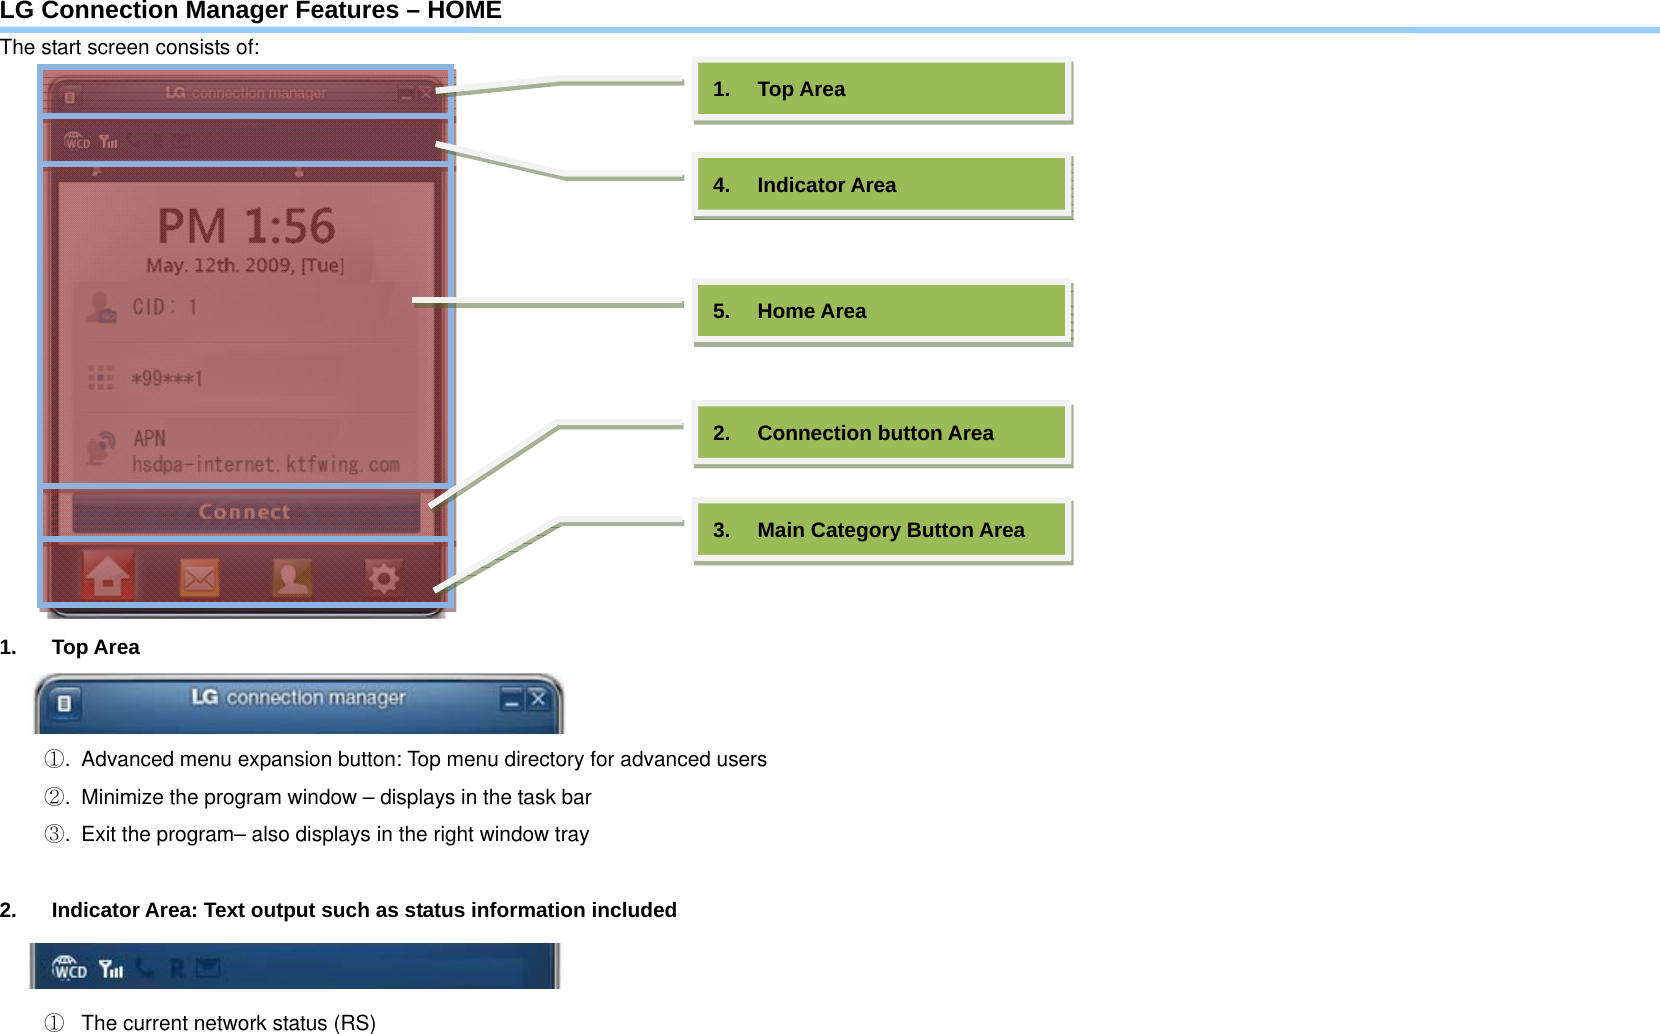
![⑤ New message notice – The icon displays if a new message arrives or there exists an unread message. ⑥ Connection time – displays the time point it is connected to the Internet. ⑦ Indicates the amount of packets in use in the current Internet connection. 3. Home Area ① Displays the registration number. ② Displays the phone number of the connected modem. ③ Displays the current time and date. ④ Displays the value of network settings 4. Connection button area ① Connect / Disconnect button provided. ② Displays the current version and last update date. 5. Main Category Button Area Main button Description [HOME] Launches and operates in the Home screen. [SMS] Launches and operates in the SMS screen. [Address book] Launches and operates in the Address Book screen.](https://usermanual.wiki/LG-Electronics-USA/LDU810/User-Guide-1220460-Page-7.png)
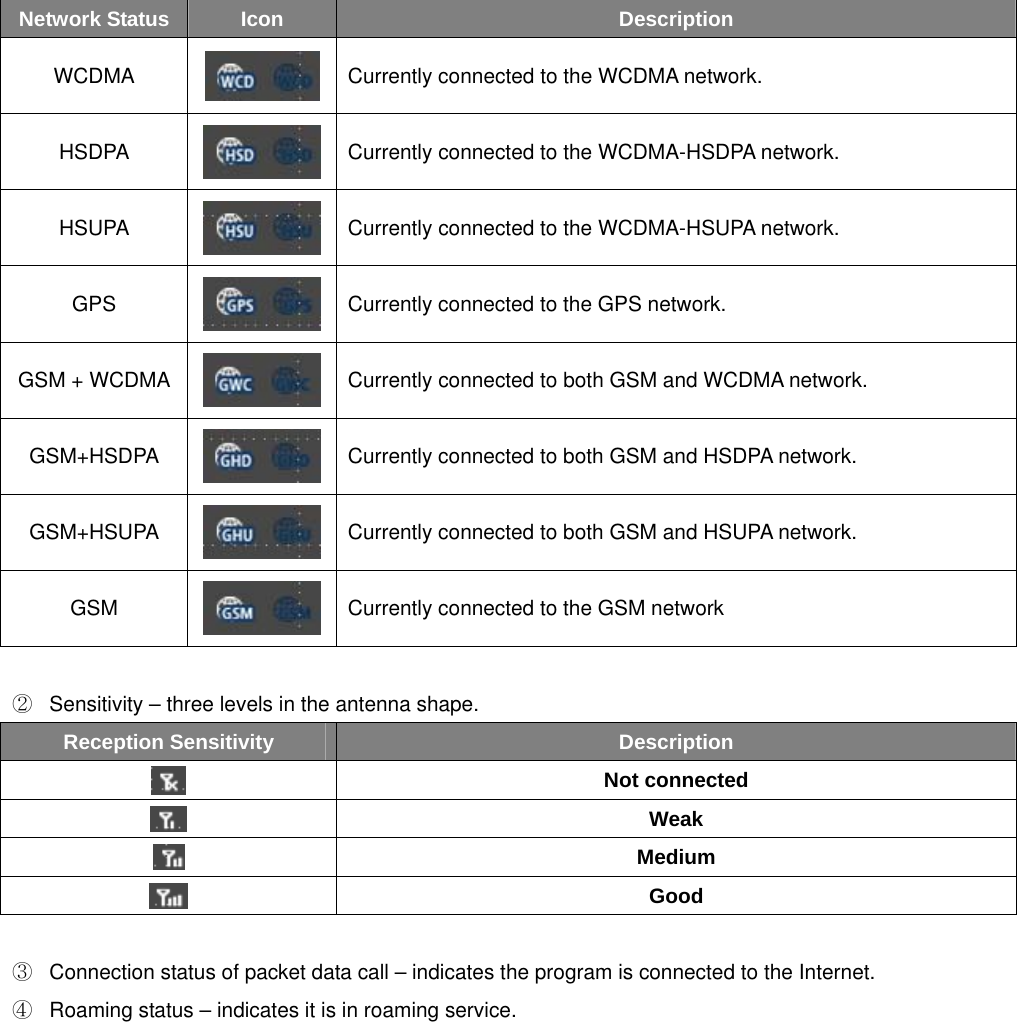
![[Settings] Button for configuring the settings of LG Connection Manager](https://usermanual.wiki/LG-Electronics-USA/LDU810/User-Guide-1220460-Page-8.png)
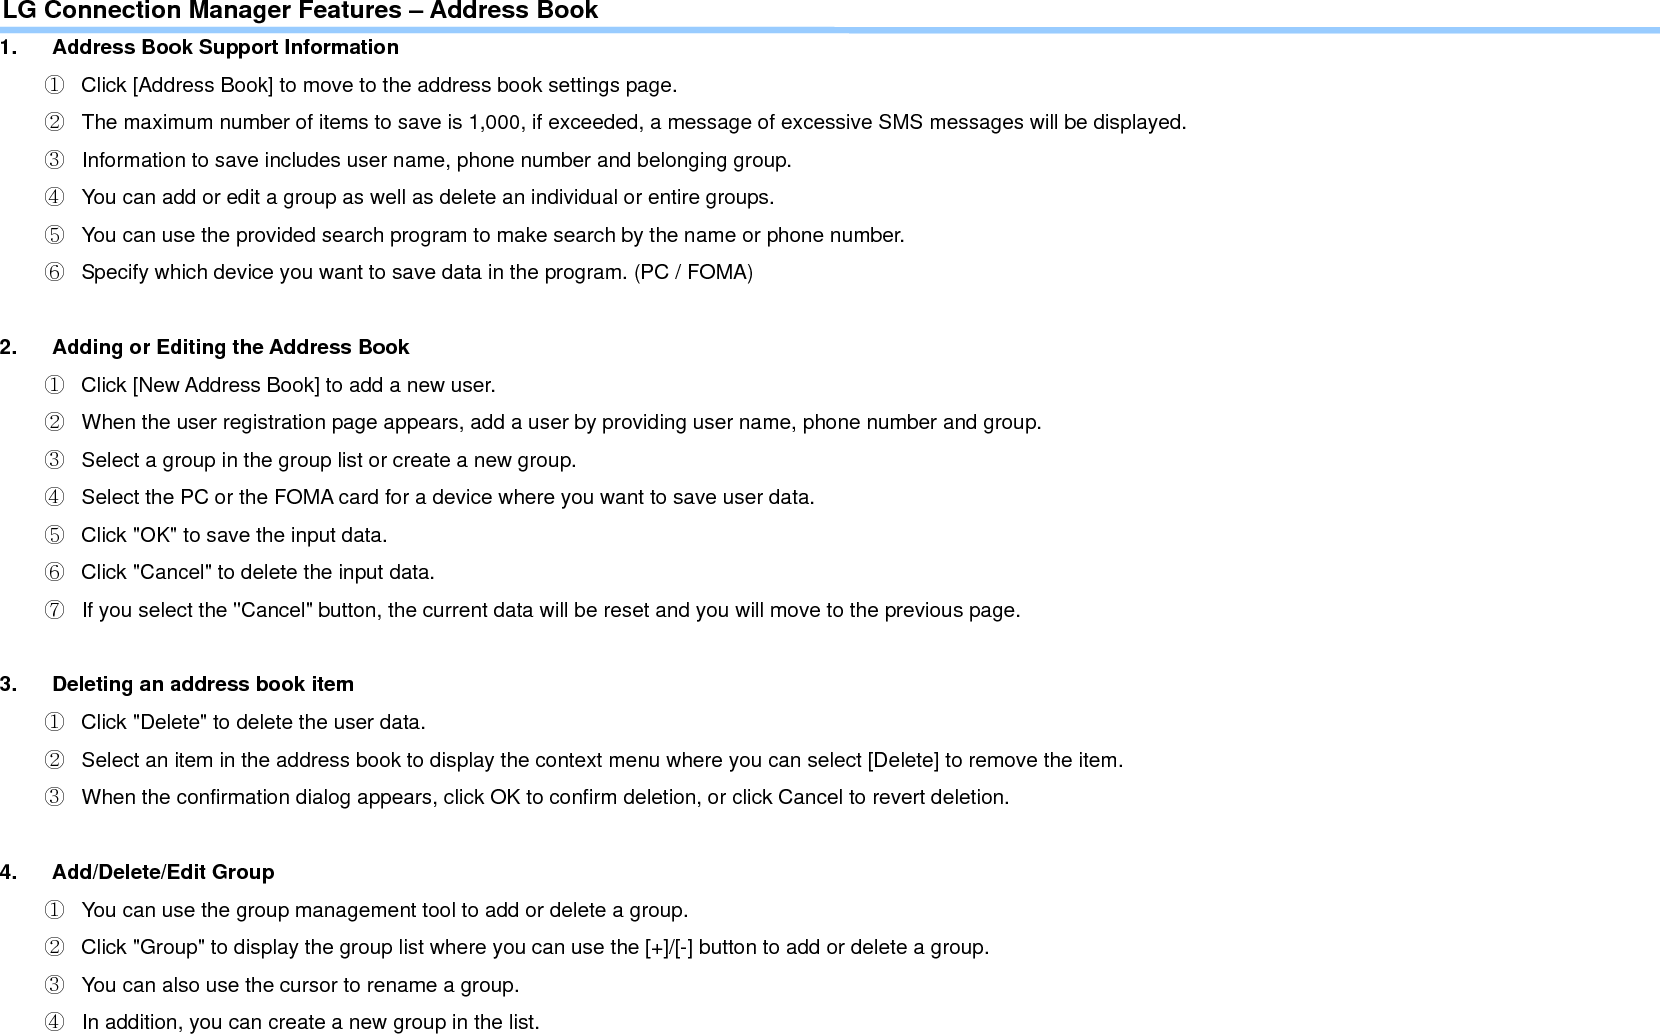
![LG Connection Manager Features – Address Book 1. Address Book Support Information ① Click [Address Book] to move to the address book settings page. ② The maximum number of items to save is 1,000, if exceeded, a message of excessive SMS messages will be displayed. ③ Information to save includes user name, phone number and belonging group. ④ You can add or edit a group as well as delete an individual or entire groups. ⑤ You can use the provided search program to make search by the name or phone number. ⑥ Specify which device you want to save data in the program. (PC / FOMA) 2. Adding or Editing the Address Book ① Click [New Address Book] to add a new user. ② When the user registration page appears, add a user by providing user name, phone number and group. ③ Select a group in the group list or create a new group. ④ Select the PC or the FOMA card for a device where you want to save user data. ⑤ Click "OK" to save the input data. ⑥ Click "Cancel" to delete the input data. ⑦ If you select the "Cancel" button, the current data will be reset and you will move to the previous page. 3. Deleting an address book item ① Click "Delete" to delete the user data. ② Select an item in the address book to display the context menu where you can select [Delete] to remove the item. ③ When the confirmation dialog appears, click OK to confirm deletion, or click Cancel to revert deletion. 4. Add/Delete/Edit Group ① You can use the group management tool to add or delete a group. ② Click "Group" to display the group list where you can use the [+]/[-] button to add or delete a group. ③ You can also use the cursor to rename a group. ④ In addition, you can create a new group in the list.](https://usermanual.wiki/LG-Electronics-USA/LDU810/User-Guide-1220460-Page-9.png)
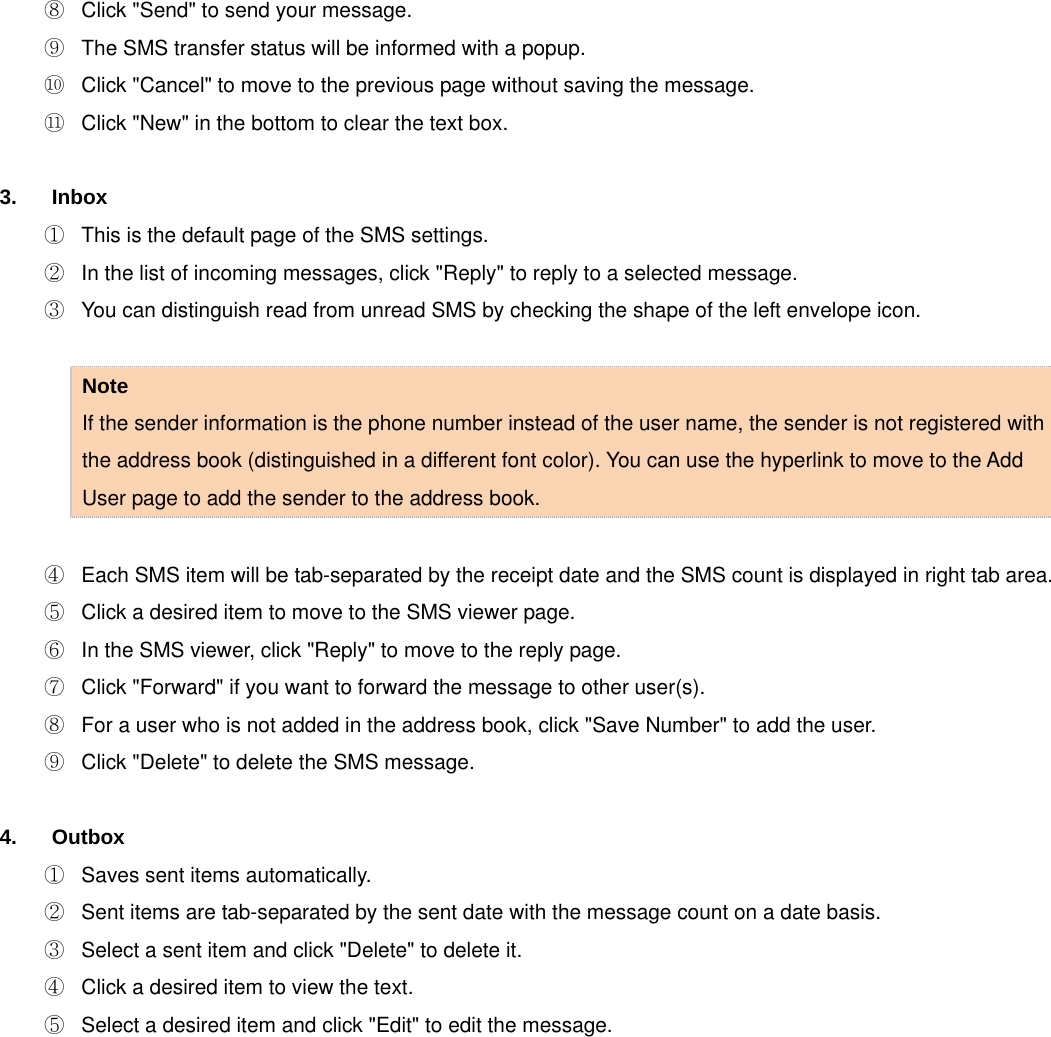
![LG Connection Manager Features – SMS 1. SMS Support Information ① Click [SMS] to move to the SMS settings page. ② The maximum count to save items is 1,000, which is based on a sum of items in each message box. ③ LG Connection Manager provides a total of 4 message boxes: Inbox Saves the incoming SMS messages. Outbox Saves the outgoing SMS messages. Drafts Temporarily saves items to send. USIM Card Box You can view messages in the USIM card.](https://usermanual.wiki/LG-Electronics-USA/LDU810/User-Guide-1220460-Page-11.png)
![Note You can use the toolbox to navigate through the boxes. 2. Sending SMS ① Click [New SMS] to send a message. ② When the Sending SMS page appears, provide a message in the text box. ③ Provide a name or phone number in the applicable input box. ④ If you select a name that is already registered with the address book, the other information will be provided accordingly. ⑤ Click [Address Book] to open the address book where you select an item. ⑥ The maximum size of a text string in the text box is 160 byte. ⑦ You can use the sender information checkbox to choose not to display the sender information. 1 2 3 Addr.. 5New Send Cancel 8](https://usermanual.wiki/LG-Electronics-USA/LDU810/User-Guide-1220460-Page-12.png)
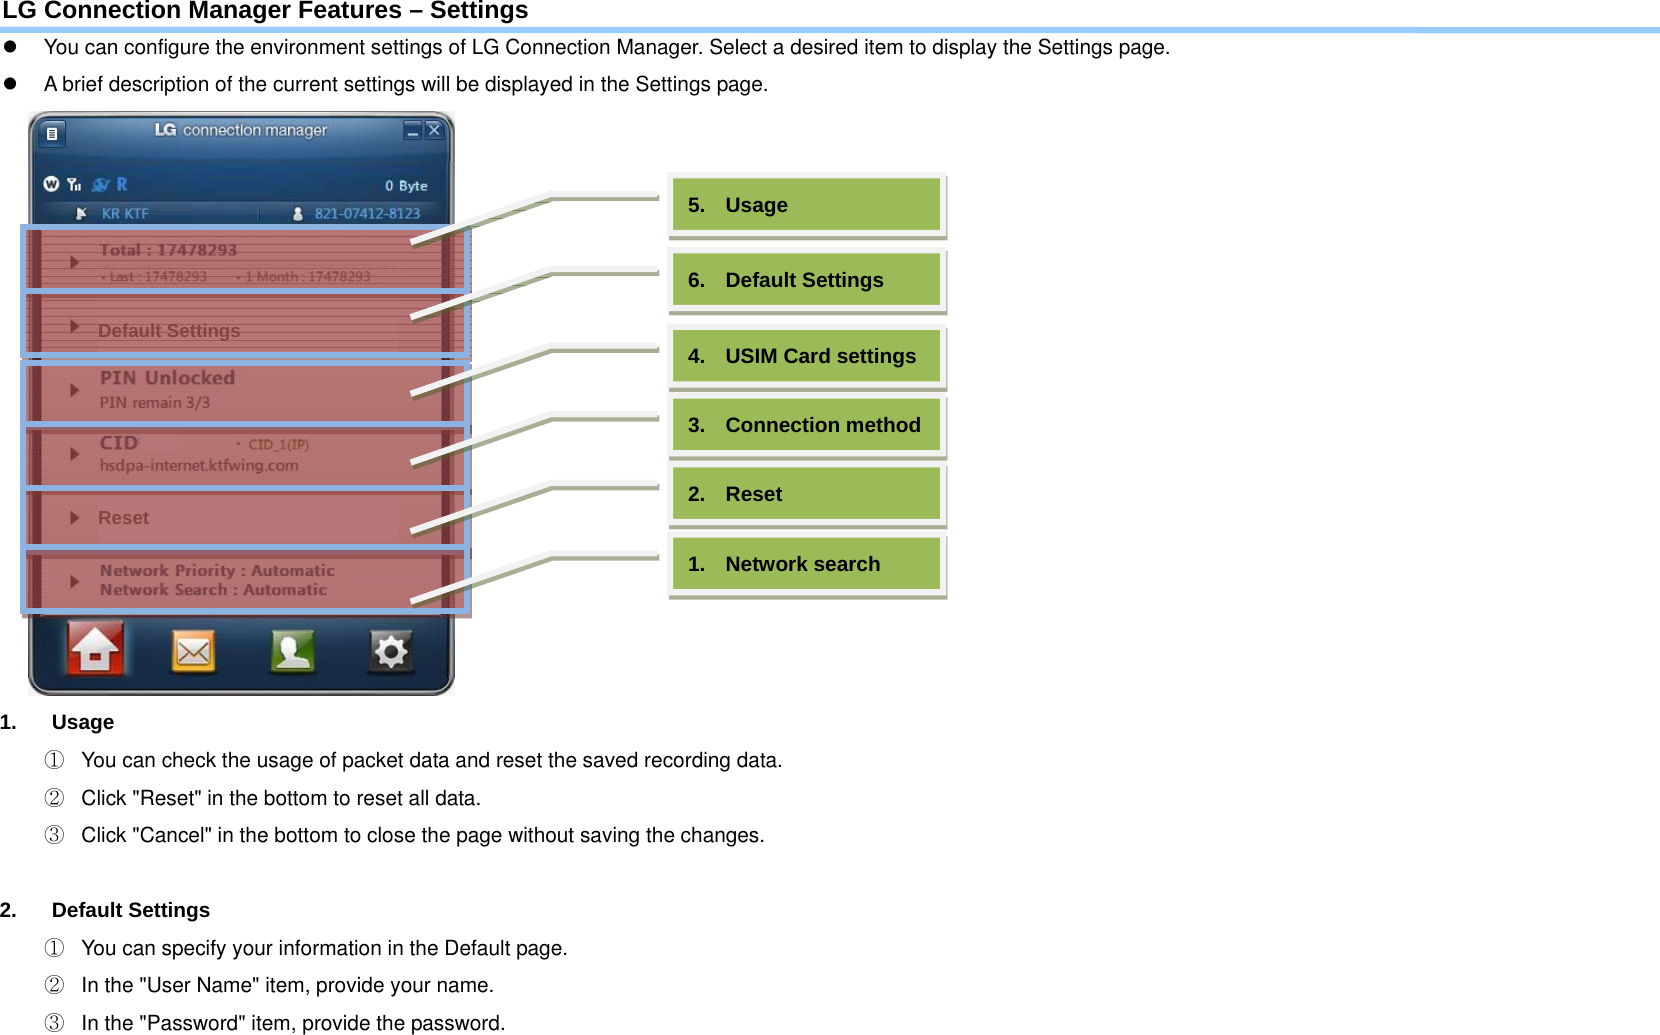
![④ In the "Dial" item, the default is set to [*99***5#] that you can change if necessary. ⑤ In [SMS Center Address], provide an IP address. ⑥ Click "OK" to save your settings and close the page. ⑦ Click "Cancel" to close the page without saving the changes. ⑧ Click "Reset" to restore the default. 3. USIM Card Settings ① In the Settings page, click a USIM Card setting item to display the applicable page. ② You can choose to lock the USIM card. ③ Select an item in [PIN Mode]. You can select [PIN Lock] or [PIN Unlock] regarding use of the lock. ④ Enter a code in [PIN Code]. Notes ① You can enter the code up to 3 times. ② If you fail to enter a valid code in 3 consecutive times, the screen will switch to PUK mode. ③ You must enter a valid code to release the PIN lock. ④ The input and output of the code will be displayed in text. ⑤ Click "OK" to save your settings and close the slide. ⑥ Click "Cancel" to close the slide without saving the changes. 4. Connection Method ① In the Settings page, click the Connection Method item to display the applicable page. ② You can specify the connection method. ③ Use the toolbox to specify a number between 1 and 10 for each [CID num] item. CID Access Point name(APN) 1 Unassigned](https://usermanual.wiki/LG-Electronics-USA/LDU810/User-Guide-1220460-Page-16.png)
![2 Unassigned 3 Unassigned 4 ~ 10 Unassigned ④ Use the toolbox to set the [Connection Method=PDP]. Specify for both [PPP Type] and [IP Type]. (Data Call Type included) ⑤ Enter a value for [APN registration = station]. ⑥ Click "OK" to save your settings. ⑦ Click [Reset] to restore the default. ⑧ Click "Cancel" to close the slide without saving the changes. 5. Reset LG Modem ① You can make settings directly in the Settings page without an additional sliding page. ② Used if you need to reset all data in the terminal. 6. Network Search ① Click the network priority area in the bottom of the Settings page to move to the applicable page. ② You can set the priority of the network search. ③ Use the toolbox to select one of the 4 search methods. ④ Select a desired method. Preferred Network Search ① Auto Search ② GSM Preferred Search ③ 3G Preferred Search Network Search ① Auto Search ② Manual Search Network information ① If you select Manual Search, the search result will be displayed. ⑤ Click "OK" to save your settings. ⑥ Click "Cancel" to close the page without saving the changes.](https://usermanual.wiki/LG-Electronics-USA/LDU810/User-Guide-1220460-Page-17.png)