LG Electronics USA LNM1780NCUM CAR NAVIGATION User Manual UM PE EU ADDC ACA9 C778 C99D C6A9 ENG indd
LG Electronics USA CAR NAVIGATION UM PE EU ADDC ACA9 C778 C99D C6A9 ENG indd
User Manual

CAR NAVIGATION SYSTEM SIMPLE MANUAL
ENGLISH
DEUTSCH
FRANAIS
ESPAOL
ITALIANO
NEDERLANDS
䦪䦭䦫䦫䦤䦢䦣
SVENSKA
PORTUGUS
DANSK
ETINA
POLSKI
SLOVENINA
TRKE
KOREAN
NORSK
MAGYAR
2
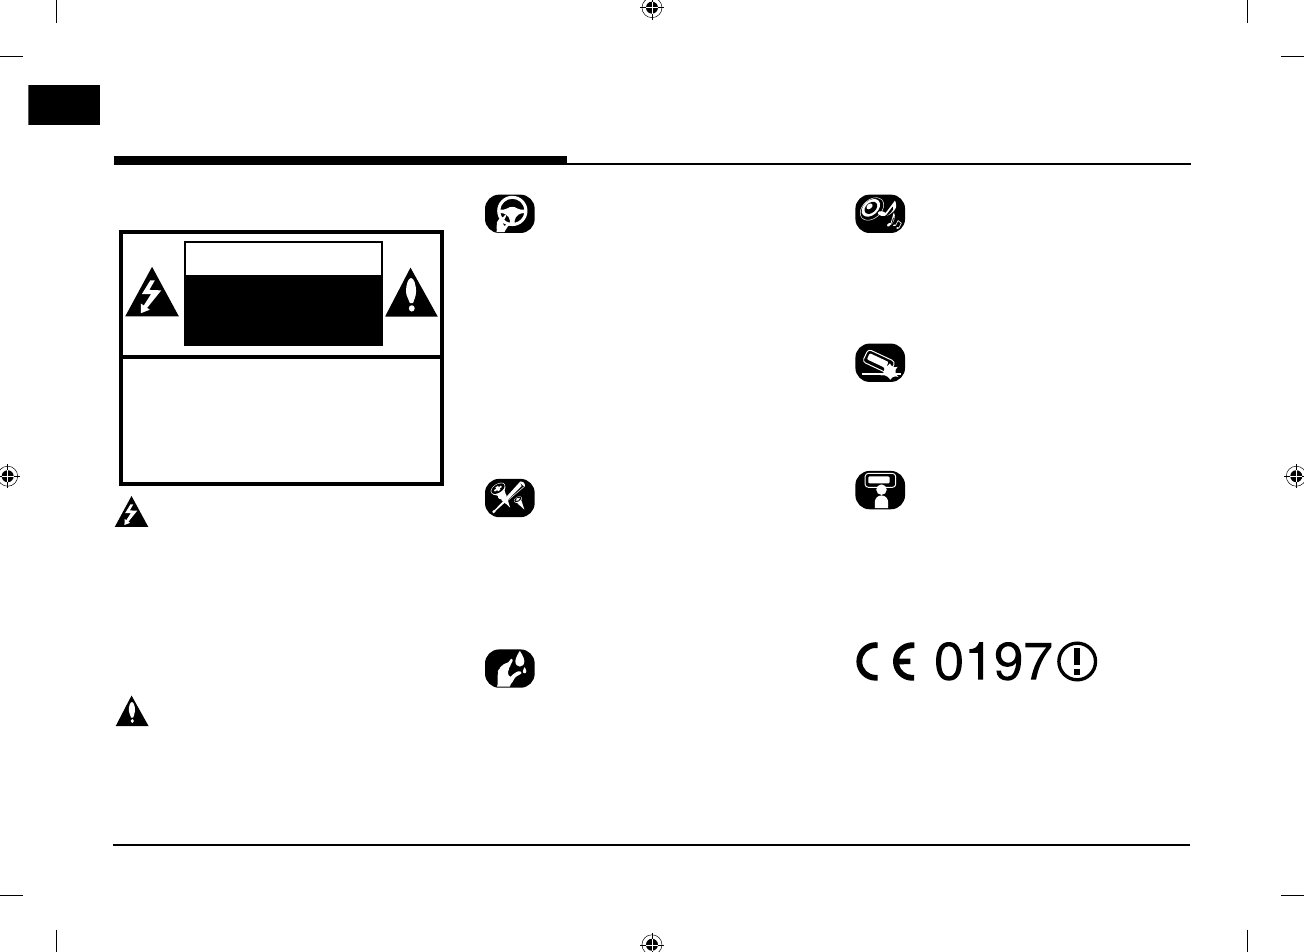
Safety Notes
CAUTION
RISK OF ELECTRIC
SHOCK
DO NOT OPEN
CAUTION: TO REDUCE THE RISK OF
ELECTRIC SHOCK, DO NOT REMOVE THE
COVER (OR BACK). NO USER SERVICEABLE
PARTS INSIDE. REFER SERVICING TO
QUALIFIED SERVICE PERSONNEL.
The lightning flash with the arrowhead symbol
within an equilateral triangle is intended
to alert the user about the presence of
uninsulated dangerous voltage within the
product䳓s enclosure that may be of sufficient
magnitude to constitute a risk of electric
shock.
The exclamation point within an equilateral
triangle is intended to alert the user to
the presence of important operating and
maintenance (servicing) instructions in the
literature accompanying the appliance.
Always operate the vehicle in a safe manner.
Do not be distracted by the vehicle while
driving and always be fully aware of all driving
conditions. Do not change settings or any
functions.
Pull over in a safe and legal manner before
attempting such operations.
To promote safety, certain functions are
disabled unless the parking brake is on.
To reduce the risk of electric shock, do not
remove the cover or back of this product.
There are no user-serviceable parts inside.
Refer servicing to qualified service personnel.
To reduce the risk of fire or electric shock,
do not expose this product to dripping or
splashing water, rain, or moisture.
When driving your vehicle, be sure to keep the
volume of the unit low enough to allow you to
hear sounds coming from the outside.
Do not drop it and avoid heavy impacts at
anytime.
The driver should not watch the monitor while
driving. If the driver watches the monitor while
driving, it may lead to carelessness and cause
an accident.
Precautions for safety
Precautions for safety

3
Precautions for safety 2
Safety Notes . . . . . . . . . . . . . . . . . . . . . . . . . . . .2
Table of contents 3
Name of each component 4
Head unit . . . . . . . . . . . . . . . . . . . . . . . . . . . . . . .4
Steering wheel remote control . . . . . . . . . . . . .6
Radio operation 7
Listening to AM radio . . . . . . . . . . . . . . . . . . . . .7
Listening to DAB(option)/FM . . . . . . . . . . . . . . .7
USB Operation 8
Playing USB music . . . . . . . . . . . . . . . . . . . . . . . .8
iPod Operation 10
Playing iPod . . . . . . . . . . . . . . . . . . . . . . . . . . . .10
Bluetooth® audio 11
Playing Bluetooth audio . . . . . . . . . . . . . . . . . .11
Searching for destination 12
Address Search . . . . . . . . . . . . . . . . . . . . . . . . .12
POI (Points of interest). . . . . . . . . . . . . . . . . . .12
Kia service . . . . . . . . . . . . . . . . . . . . . . . . . . . . .13
Coordinates . . . . . . . . . . . . . . . . . . . . . . . . . . . .13
Previous destinations . . . . . . . . . . . . . . . . . . . .14
Address book . . . . . . . . . . . . . . . . . . . . . . . . . . .14
Load tour . . . . . . . . . . . . . . . . . . . . . . . . . . . . . .14
My POI . . . . . . . . . . . . . . . . . . . . . . . . . . . . . . . .15
Home, Office, Favourites . . . . . . . . . . . . . . . . .16
Bluetooth® Wireless Technology 17
Pairing and connecting the unit and a
Bluetooth phone . . . . . . . . . . . . . . . . . . . . . . . .17
Making a call by entering phone number . . . .18
Making a call by redialling . . . . . . . . . . . . . . . .18
Answering/Rejecting a call . . . . . . . . . . . . . . . .18
Switching call to the mobile phone . . . . . . . . .18
Ending a call . . . . . . . . . . . . . . . . . . . . . . . . . . . .18
Using the menu during a phone call . . . . . . . .19
Callin g list . . . . . . . . . . . . . . . . . . . . . . . . . . . . . .19
Contacts . . . . . . . . . . . . . . . . . . . . . . . . . . . . . . .19
Favourites . . . . . . . . . . . . . . . . . . . . . . . . . . . . .20
Connected Services 21
Before using Connected Services . . . . . . . . . .21
Features . . . . . . . . . . . . . . . . . . . . . . . . . . . . . . .22
Specification 25
Table of contents
Table of contents
4
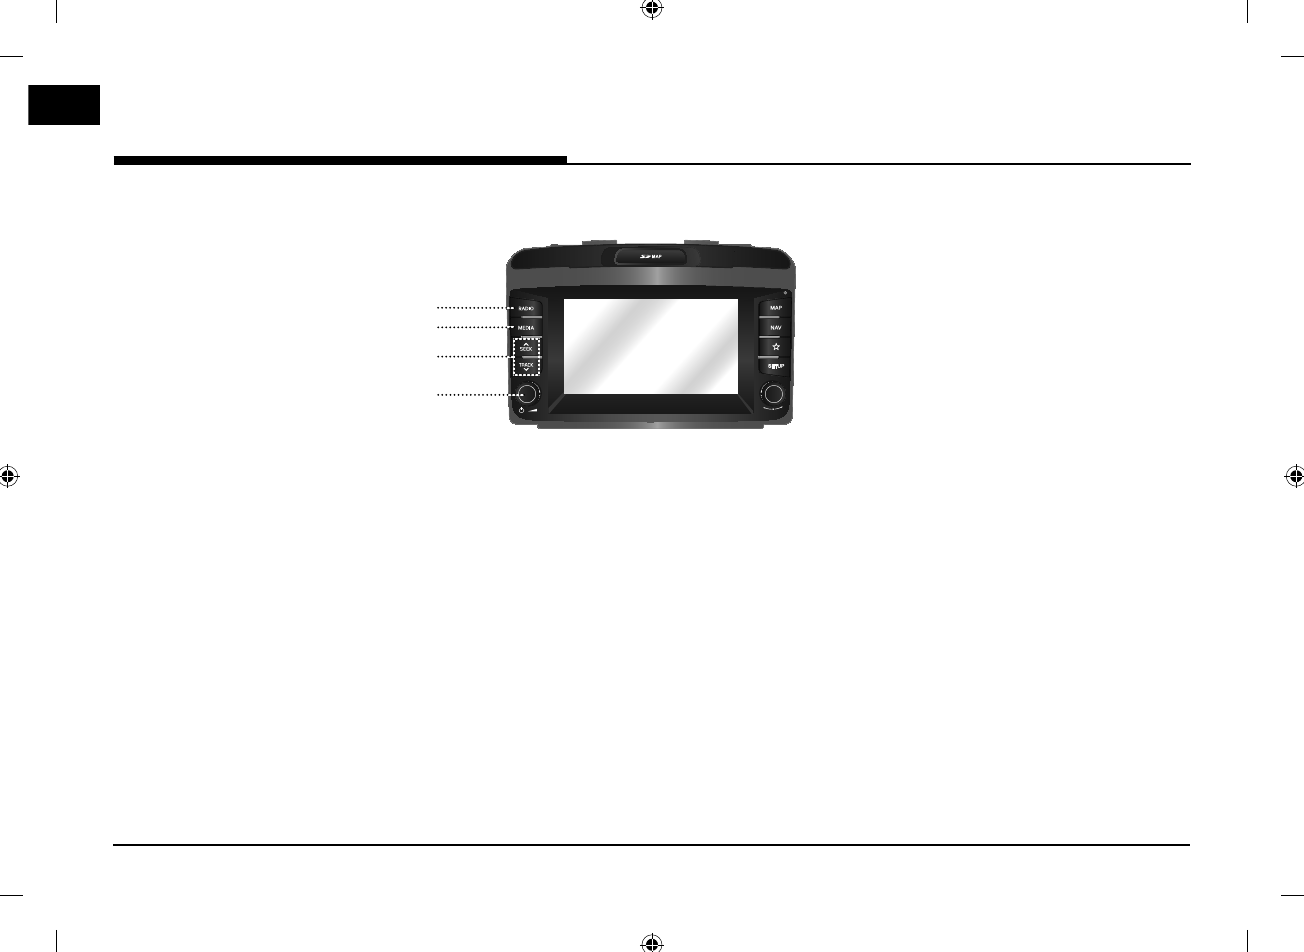
Name of each component
Head unit
1
2
3
4
1. RADIO button
Converts to the last played radio mode
(DAB(option)/FM,AM).
2. MEDIA button
If the playable media source is one, it
moves to the corresponding screen. If the
playable media sources are more than two,
it moves to the [Media] screen you can
select a media source. ([USB Music]/ [USB
Image]/ [iPod]/ [Apple CarPlay]/ [AUX]/
[Bluetooth Audio]/ [Android Auto])
3. WSEEK/TRACKS button
When it is pressed shortly
䳜 AM mode: plays previous/next available
frequency.
䳜 DAB(option)/FM mode: plays previous/
next available station existion within
[List] menu. (If there is no or one
station in [List] menu, the 䳖Auto tuning䳗
function is executed.)
䳜 MEDIA mode: plays previous/next file.
When it is pressed and held
䳜 AM mode: plays previous/next available
frequency.
䳜 DAB(option)/FM mode: plays previous/
next available station existing within
[List] menu.
䳜 MEDIA mode (except for Bluetooth,
AUX and Android Auto): rewinds of fast
forwards the file.
4. 䳜 1 button
Power on
Press this button in system OFF status.
Power off
Press and hold this button in power ON
status.
䳜 Volume control knob (-)
Turn counter clockwise or clockwise to
control volume.
䳜 AV on/off
Press this button to turn AV on or off in
power on status.
Name of each component
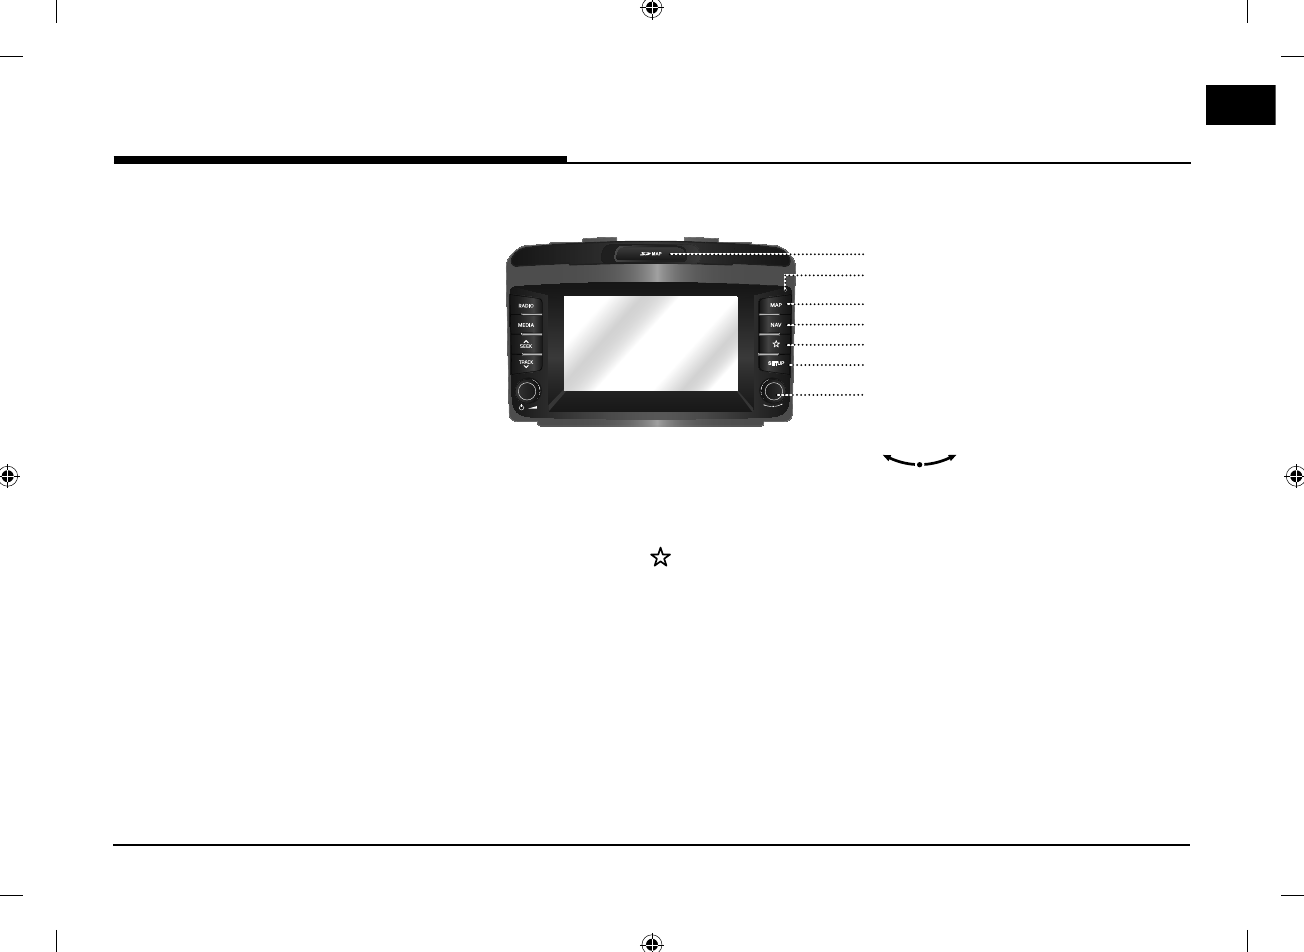
5
7
6
8
9
10
11
5
Name of each component
5. Cover for protecting SD card (SD
card insert slot)
Insert the SD card into the slot.
6. Reset hole
Press with thin object to reset the unit
when it does not operate normally.
7. MAP button
Press to display the map screen of the
current location.
Press to repeat the voice guidance on
the map screen. (Voice guidance for road
names and numbers is not supported in
some countries.)
8. NAV
Press to move to the navigation menu
screen.
9. Custom button ( )
Press to go to the [Custom button
settings] menu. After setting, press to use
desired function.
10. SETUP button
Press to go to the [Settings] menu.
11. button
AM mode: turn left/right to tune
manually.
DAB(option)/FM mode: turn left/right
to search for a desired station and then
press it.
MEDIA mode (except for Bluetooth, AUX,
Apple CarPlay and Android Auto): turn
left/right to search for the desired file
and press it.
Navigation mode: turn left/right to
change the map scale on the map screen.
6
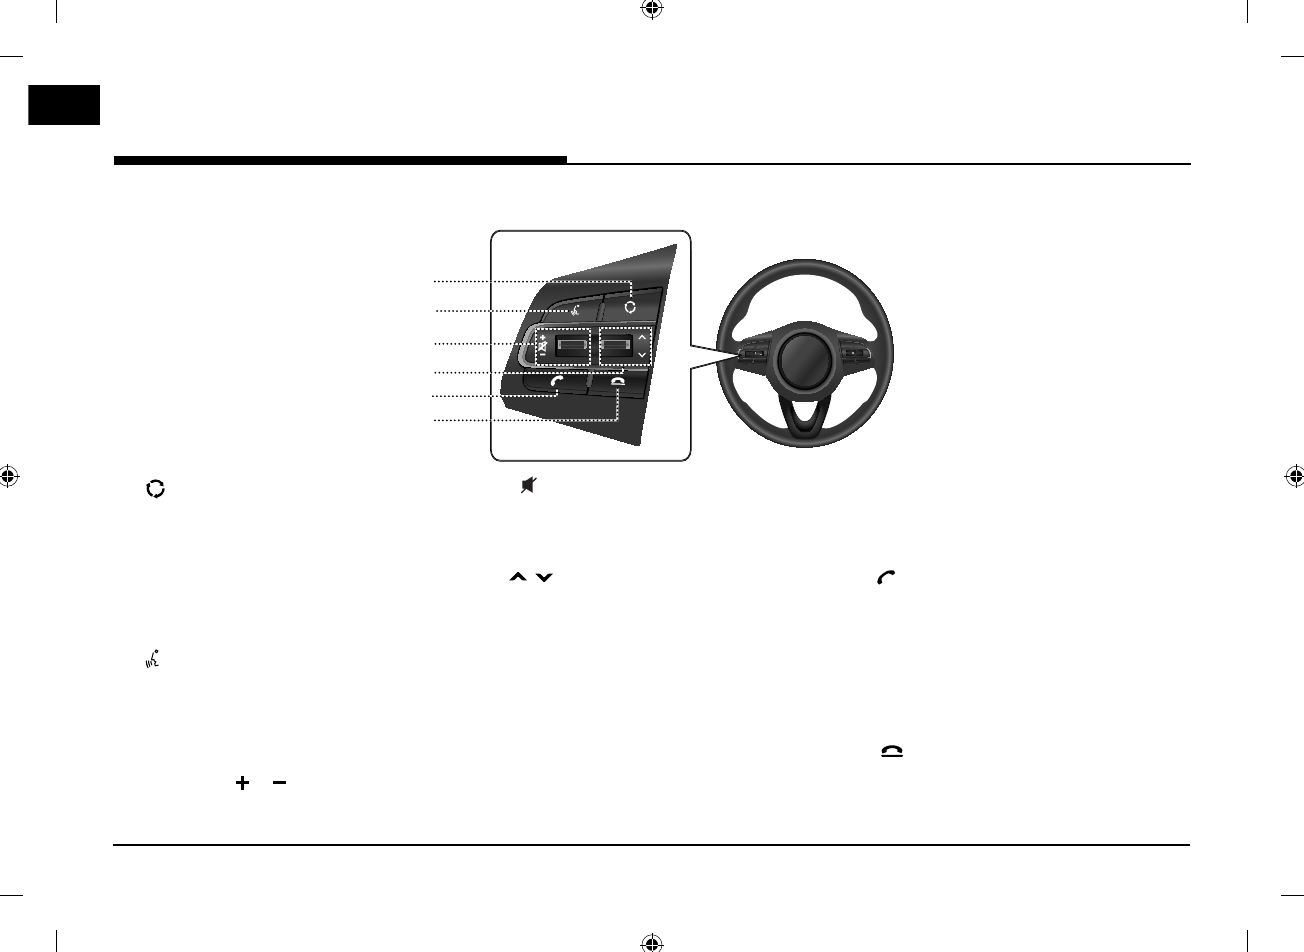
Steering wheel remote control
5
6
4
1
2
3
Name of each component
1. button
䳜 Each time this button is pressed, the
Radio or Media mode is changed. You can
select the modes to toggle in settings.
䳜 If the media is not connected, it is
changed in the order DAB(option)/FM →
AM → DAB(option)/FM.
2. button
Press to switch to voice recognition mode
when the phone supporting Android
Auto/Apple CarPlay function is connected.
To cancel it, press the button again.
3. 䳜 Volume ( / ) button
Increases or decreases the volume level.
䳜 button
Press to mute the sound. (It will be paused
in some media modes.)
4. / button
When it is pressed shortly
䳜 Radio (DAB(option)/FM, AM) mode: plays
previous/next favourites.
䳜 MEDIA mode: plays previous/next file.
When it is pressed and held
䳜 AM mode: plays previous/next available
frequency.
䳜 DAB(option)/FM
mode
:
plays previous/
next stations.
䳜 MEDIA mode (except for Bluetooth,
AUX and Android Auto): rewinds or fast
forwards the file.
5. button
Press to operate Bluetooth Hands-Free
function.
䳜 Press to accept a call.
䳜 Press to make a call from last calls.
䳜 Press and hold for redialling.
6. button
䳜 Press to end the phone call during a call.
䳜 Press to reject the call in the incoming call
screen.
7
Radio operation
Listening to AM radio
1. Press "RADIO" on the head unit.
2. Press [AM] on the screen.
The AM screen of the most recent listened
station is displayed.
Note
Each time the 䳖RADIO䳗 button on the head unit
is pressed, the mode is changed in the order
AM → DAB(option)/FM → AM.
3. Auto tuning:
Press [
W
SEEK
/
TRACK
S
] on the head
unit.
Plays previous/next available station.
Manual tuning:
Turn 䳖䳗 (counter)clockwise.
The frequency moves up and down
accordingly.
Favourites tuning:
Press [Favourites]. Press the favourites
numbers of the desired broadcast station.
Listening to DAB(option)/FM
1. Press "RADIO" on the head unit.
2. Press [DAB/FM] or [FM] on the screen.
The DAB(option)/FM screen of the most
recent listened station is displayed.
Note
Each time the "RADIO" button on the head unit
is pressed, the mode is changed in the order
DAB(option)/FM → AM → DAB(option)/FM.
3. Auto tuning (When there are no or one
station in [List] menu):
䳜 Press [
W
SEEK
/
TRACK
S
] on the head
unit.
Plays previous/next available station.
List tuning (When there are two or more
stations in [List] menu):
䳜 Press [
W
SEEK
/
TRACK
S
] on the head
unit.
Plays previous/next available station
existing within [List] menu.
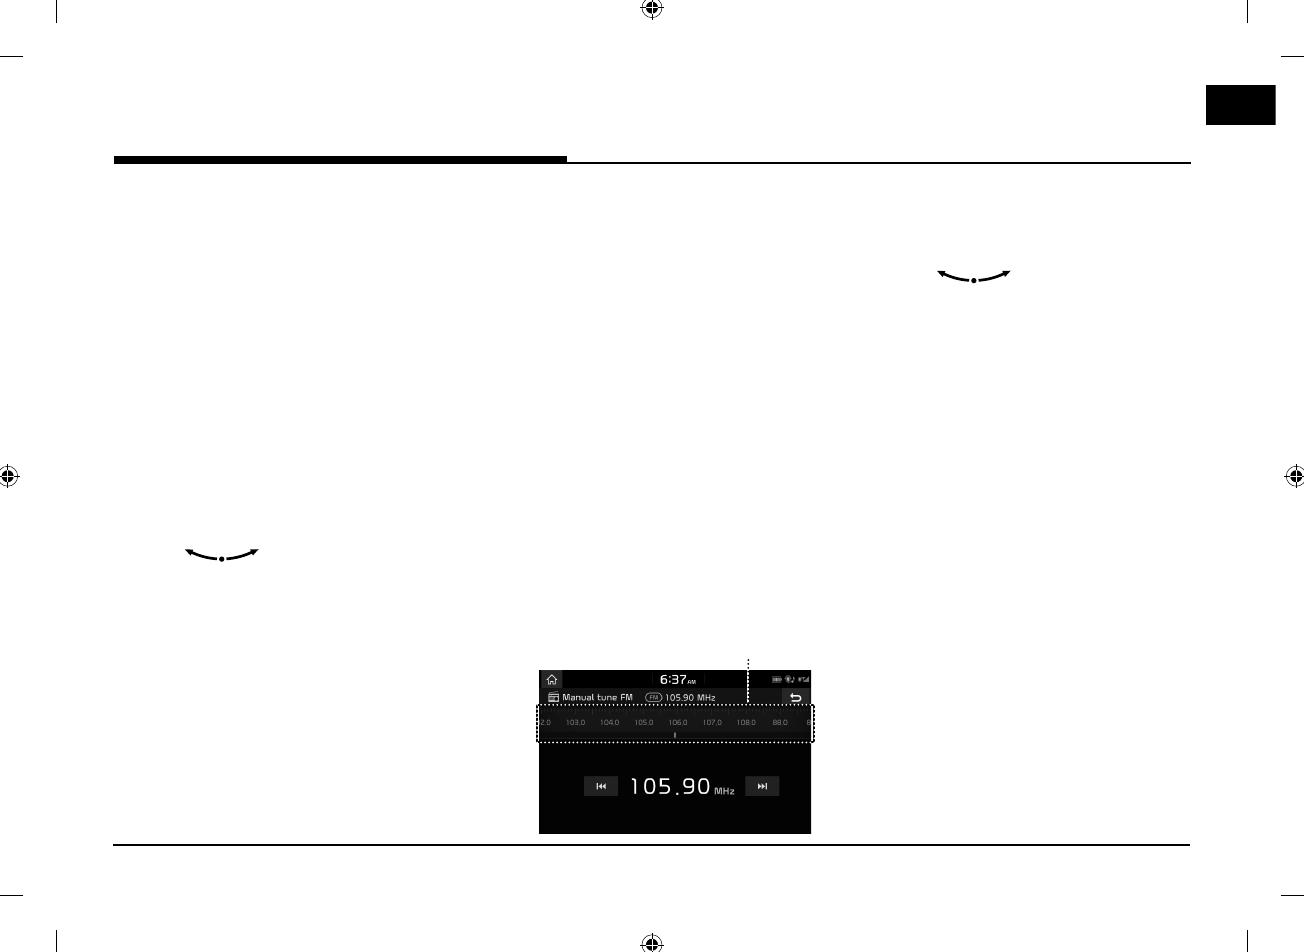
Manual tuning:
䳜 On the FM mode, press [Menu] > [Manual
tune FM].
Station bar
Drag the station bar to the left/right to
find the radio station that you want.
Press [
C
/
V
].
䳜 Turn 䳖䳗 to the left/right and
then press it when the desired station is
displayed in a highlighted colour.
Favourites:
䳜 Press [Favourites]. Press the favourites
numbers of the desired broadcast
station.
䳜 Press [
S/W
] on the steering wheel
remote control.
Radio operation

8
USB Operation
Playing USB music
You can play music files stored in a USB
memory device.
Connect a USB device to the USB port and
playback starts automatically.
Note
To play USB music while a different source is
playing, press [MEDIA] > [USB Music].
Pause
You can pause the playing file.
Press [M] during playback.
Press [
d
] to play it again.
Skip
You can play the previous or next file.
Position Description
Screen 䳜 Press [
C
/
V
].
䳜 Pressing [
C
] after 3
seconds of playback time
plays the current file from
the beginning.
Head unit 䳜 Press [
W
SEEK
/
TRACK
S
].
䳜 Pressing [TRACK
S
] after
3 seconds of playback time
plays the current file from
the beginning.
Search
You can fast rewind/forward to a specific point
of a file.
Position Description
Screen Press and hold [C
/
V] and
then release at the point you
want.
Head unit Press and hold [
W
SEEK
/
TRACK
S
] and then release at
the point you want.
USB Operation
9
USB Operation
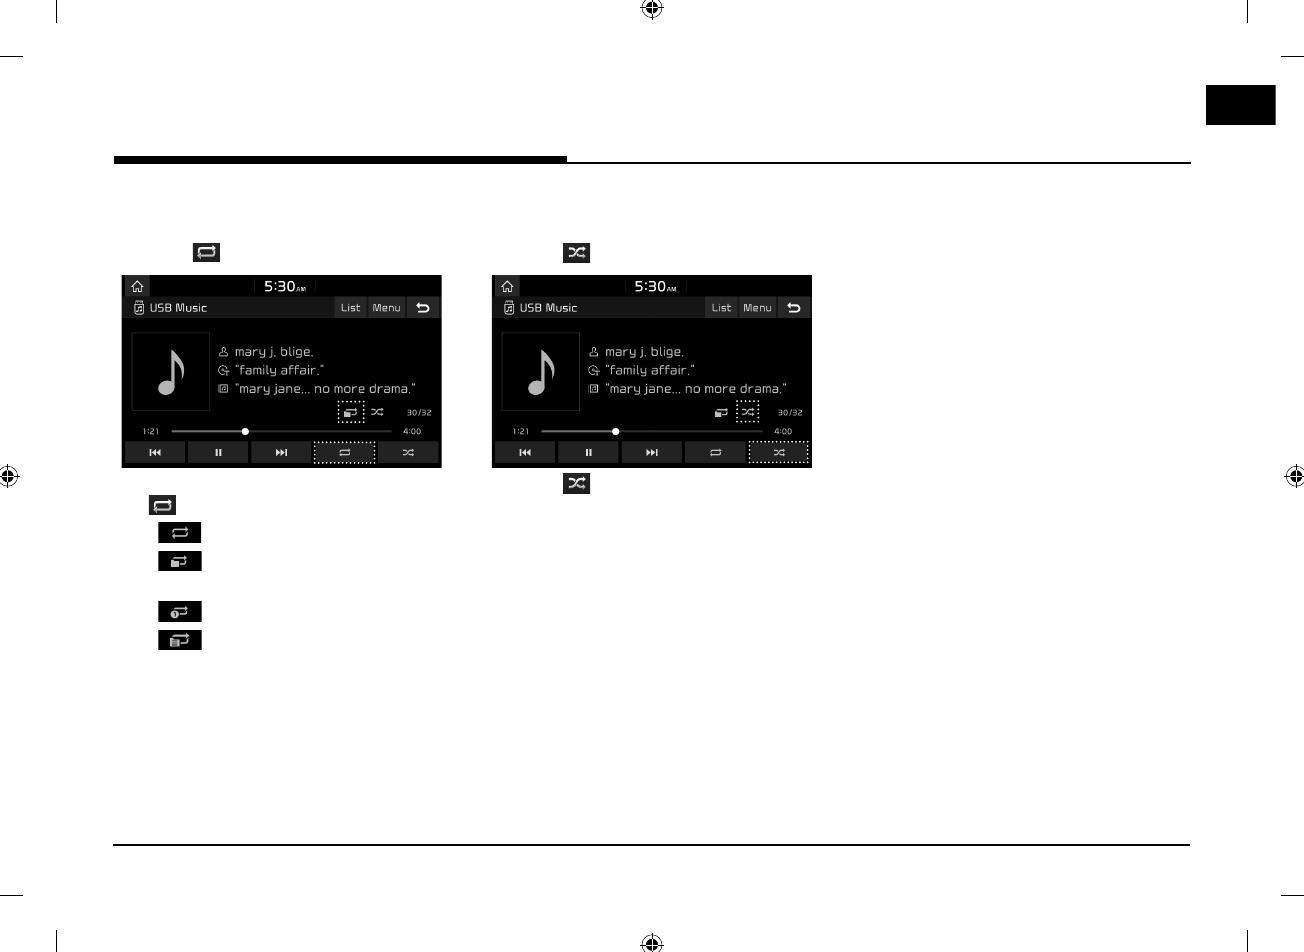
Repeat
You can play a set of files repeatedly.
1. Press [ ].
2. Select the desired mode by pressing
[] repeatedly.
䳜 [ ]: Plays all files sequentially.
䳜 [ ]: Repeats all files within the
current folder.
䳜 [ ]: Repeats the current file, only.
䳜 [ ]: Plays the files sequentially
within the [Artist], [Song], [Album], or
[Recently added].
Shuffle
You can play files in random order.
1. Press [ ].
2. Press [ ] again to turn shuffle off.
10
iPod Operation
Playing iPod
1. Use iPod exclusive cable to connect iPod to
USB connector.
2. Press [MEDIA].
To play iPod while a different source is
playing, press [MEDIA] > [iPod].
Pause
You can pause the playing file. For details refer
to page 8 (䳖Pause䳗).
Skip
You can play the previous or next file. For
details refer to page 8 (䳖Skip䳗).
Search
You can fast rewind/forward to a specific point
of a file. For details refer to page 8 (䳖Search䳗).
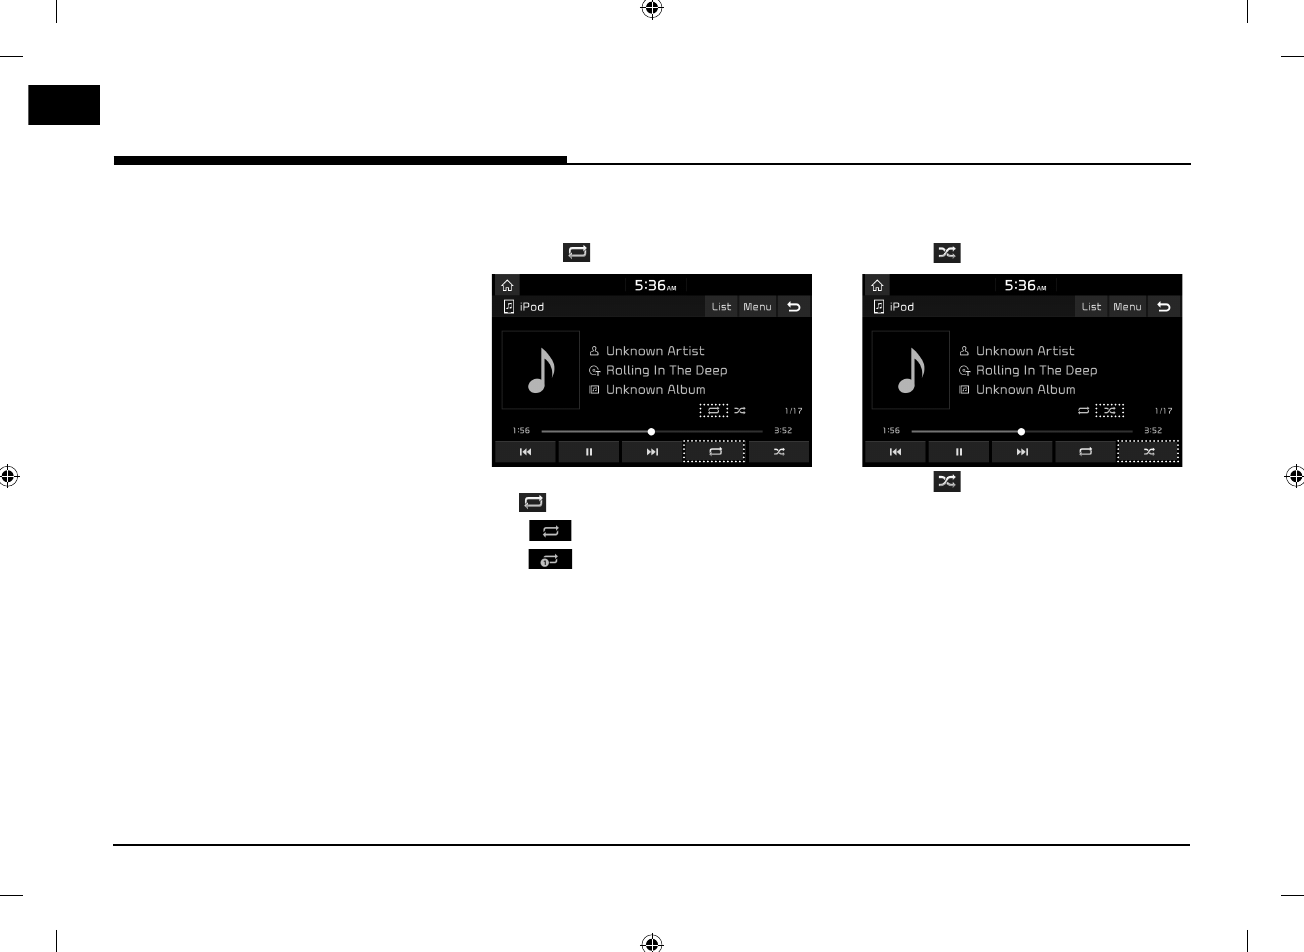
Repeat
You can play a set of files repeatedly.
1. Press [ ].
2. Select the desired mode by pressing
[] repeatedly.
䳜 [ ]: Plays all files sequentially.
䳜 [ ]: Repeats the current file, only.
Shuffle
You can play files in random order.
1. Press [ ].
2. Press [ ] again to turn shuffle off.
iPod Operation
11
Bluetooth® audio
Playing Bluetooth audio
䳜 Music stored in the mobile phone can be
played in the car through Bluetooth audio
streaming.
䳜 Bluetooth audio can be played only when a
Bluetooth phone or Bluetooth audio device
has been connected. To play Bluetooth audio,
connect the Bluetooth phone to the car
system. For more information on connecting
Bluetooth, please refer to the owner䳓s
manual [Pairing and connecting the unit and
a Bluetooth phone] on page 17.
䳜 If Bluetooth is disconnected while playing
Bluetooth audio, the audio stream will be
interrupted.
䳜 The audio streaming function may not be
supported in some mobile phones. Only one
function can be used at a time. You can
not use the Bluetooth hands-free and the
Bluetooth audio function at the same time.
For example, if you convert to the Bluetooth
hands-free while playing Bluetooth audio, the
music stream is paused.
䳜 Playing music from the car is not possible
when there are no music files saved in the
mobile phone.
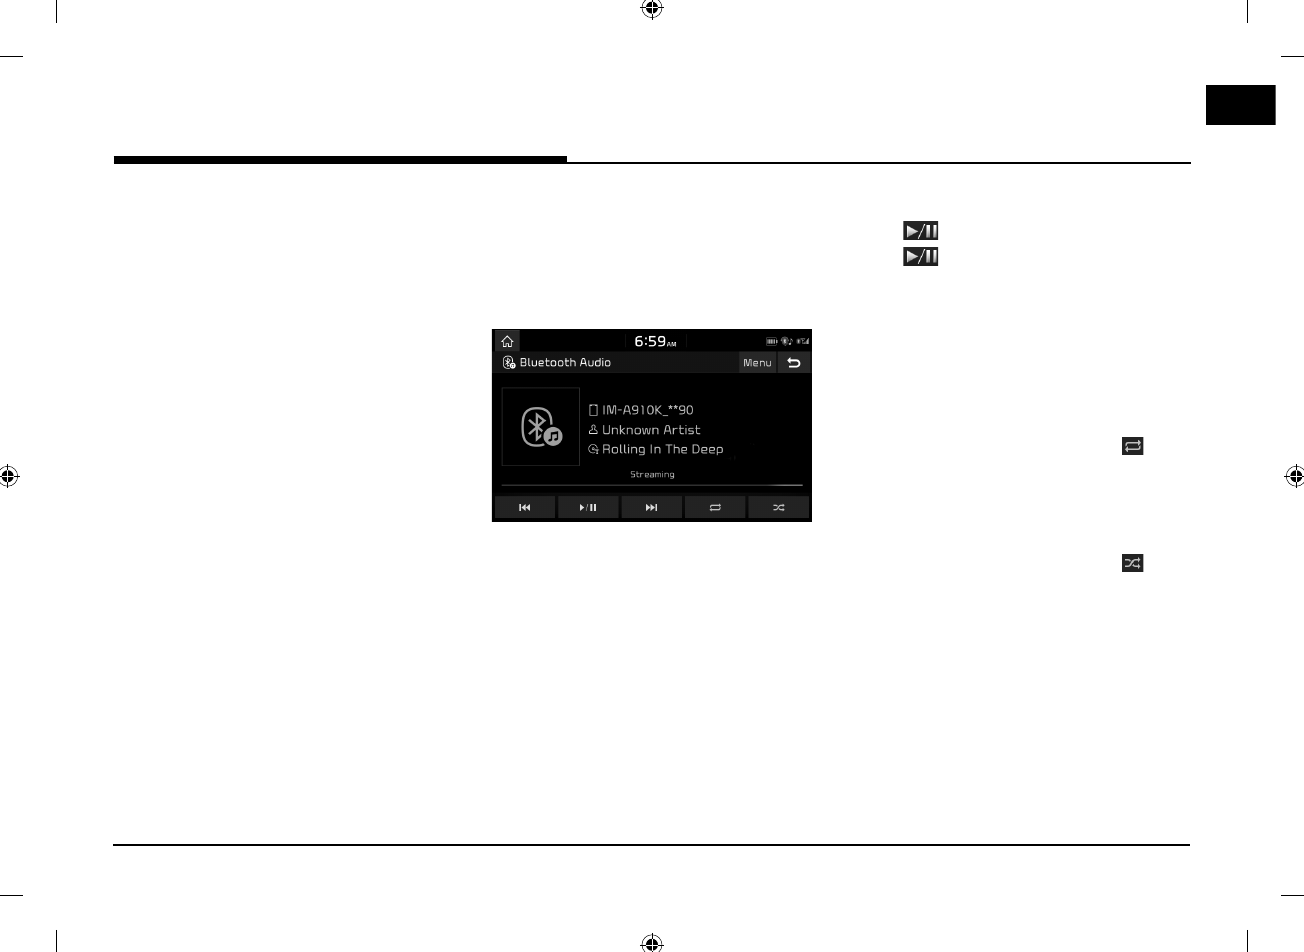
Starting the Bluetooth audio
1. Connect your Bluetooth device to the head
unit.
2. Press [MEDIA].
The Bluetooth audio screen is displayed.
Note
To play Bluetooth audio while a different
source is playing, press [MEDIA] > [Bluetooth
Audio].
Pause
Press [ ] during playback.
Press [ ] to play it again.
Skip
You can play the previous or next file.
For details refer to page 8 (䳖Skip䳗).
Repeat
You can play a set of files repeatedly.
Select the desired mode by pressing [ ]
repeatedly.
Shuffle
You can play files in random order.
Select the desired mode by pressing [ ]
repeatedly.
Note
These features may not be supported in some
Bluetooth devices.
Bluetooth® audio
12
Searching for destination
Address Search
You can find the destination by searching for
an address.
1. Press [NAV] > [Address].
2. Enter the name of the Country, City/
Postcode, Street/No., House number or
Intersection corresponding to the desired
destination.
3. Press [Set as destination].
4. Press [Start guidance].
Note
The destination is saved in the [Previous
destinations] menu automatically. (Page 14)
POI (Points of interest)
You can set a POI as destination using different
search methods.
1. Press [NAV] > [POI].
2. Tap on one of the search methods.
䳜 [Along route]: finds POI along route.
䳜 [Near current position]: finds POI near
current vehicle position.
䳜 [Near destination]: finds POI near
selected destination.
䳜 [Near scroll mark]: Search for POI䳓s
around the current cursor when the map
scrolled.
䳜 [Name]: finds POI by the name of the
facility.
䳜 [Near city centre]: finds POI located in a
specific city.
Searching for destination
13
Searching for destination
Kia service
You can set the facilities of Kia dealers as
destination.
Near current position
You can obtain search results near your
current position.
1. Press [NAV] > [Kia service] > [Near current
position].
䳜 Press [Distance], [Name] or [Category]
to arrange the list in distance, name or
category order.
2. Press the preferred item from the list.
3. Follow the steps 3-4 of the 䳖Address
Search䳗 on page 12.
Name
You can search for a Kia dealers by entering its
name using the keypad.
1. Press [NAV] > [Kia service] > [Name].
2. Select the preferred country.
3. Enter the dealer name and press [OK].
4. Press the preferred item from the list.
5. Follow the steps 3-4 of the 䳖Address
Search䳗 on page 12.
Note
The information for the dealers facilities
may not correspond with a result of map
information, since the information can be
provided up to date.
Coordinates
You can find a destination by entering the
coordinates of latitude and longitude.
1. Press [NAV] > [Coordinates].
2. Press [D˚M䤎S˝], [D˚M䤎] or [Decimal].
3. Enter the coordinates and press [OK].
4. Follow the steps 3-4 of the 䳖Address
Search䳗 on page 12.
14
Searching for destination
Previous destinations
You can select one of the locations you have
previously searched for as a destination,
tourpoint and start point.
1. Press [NAV] > [Previous destinations].
䳜 Press [Date], [Name] or [Category]
to arrange the list in date, name or
category order.
䳜 Press [Menu] > [Delete] to delete the
previous destinations. Select the desired
item, then press [Delete] > [Yes].
[Mark all]: Marks all items.
[Unmark all]: Unmarks all items.
2. Press the preferred item from the list.
3. Follow the steps 3-4 of the 䳖Address
Search䳗 on page 12.
Address book
You can select destination from a location
saved in the [Address book] menu. To utilize
this function more effectively, destinations
that you often travel to should be saved in
advance.
First of all, store in the [Address book] menu
through destination search function.
1. Press [NAV] > [Address book].
䳜 Press [Date], [Name] or [Category]
to arrange the list in date, name or
category order.
2. Press the preferred item from the list.
3. Follow the steps 3-4 of the 䳖Address
Search䳗 on page 12.
Load tour
This function can be used to set a route with
several tour points.
You can find the destination to a location saved
in the [Load tour] menu. To utilize this function
more effectively, destinations that you often
travel to should be saved in advance.
Searching for tour
1. Press [NAV] > [Load tour].
䳜 Press [Date] or [Name] to arrange the
list in date or name order.
2. Select the desired item.
3. Press [OK] > [Start guidance].
15
Searching for destination
Deleting the tour
1. Press [Menu] > [Delete] in load tour list.
2. Select the desired item, then press [Delete]
> [Yes].
䳜 Press [Date] or [Name] to arrange the
list in date or name order.
䳜 [Mark all]: Marks all items.
䳜 [Unmark all]: Unmarks all items.
My POI
This function is used to import personal POI
data including the map information (position,
name...) saved in USB memory device.
Afterwards the data can be selected as
destination through the My POI menu.
Note
Supported POI group formats
䳜 POI group format: 䳖.kml䳗/ 䳖.gpx䳗
Importing the POI data
1. Store the POI file including map
information (position, name...) from web
map in USB memory device.
2. Connect the USB device to the USB port.
3. Press [NAV] > [My POI] > [ ].
Or press [SETUP] > [Navigation] > [My
data] > [Import My POI from USB].
4. Press [Yes].
The list of POI groups are displayed.
5. Select the desired POI file.
䳜 Press [Mark all] to select all POI groups.
䳜 Press [Unmark all] to unmark all POI
groups.
6. Press [Import].
The POI groups is imported.
16
Searching for destination
Notes
䳜 If data stored to the USB use a different
coordinate system with the current system,
the importing position might be different
from existing one.
䳜 Make sure that the POI data is normally
imported.
Finding a destination by My POI
1. Press [NAV] > [My POI].
2. Select the POI group.
The list of POI is displayed.
3. Press the preferred item from the list.
4. Follow the steps 3-4 of the 䳖Address
Search䳗 on page 12.
Note
The destination is saved in the [Previous
destinations] menu automatically. (Page 14)
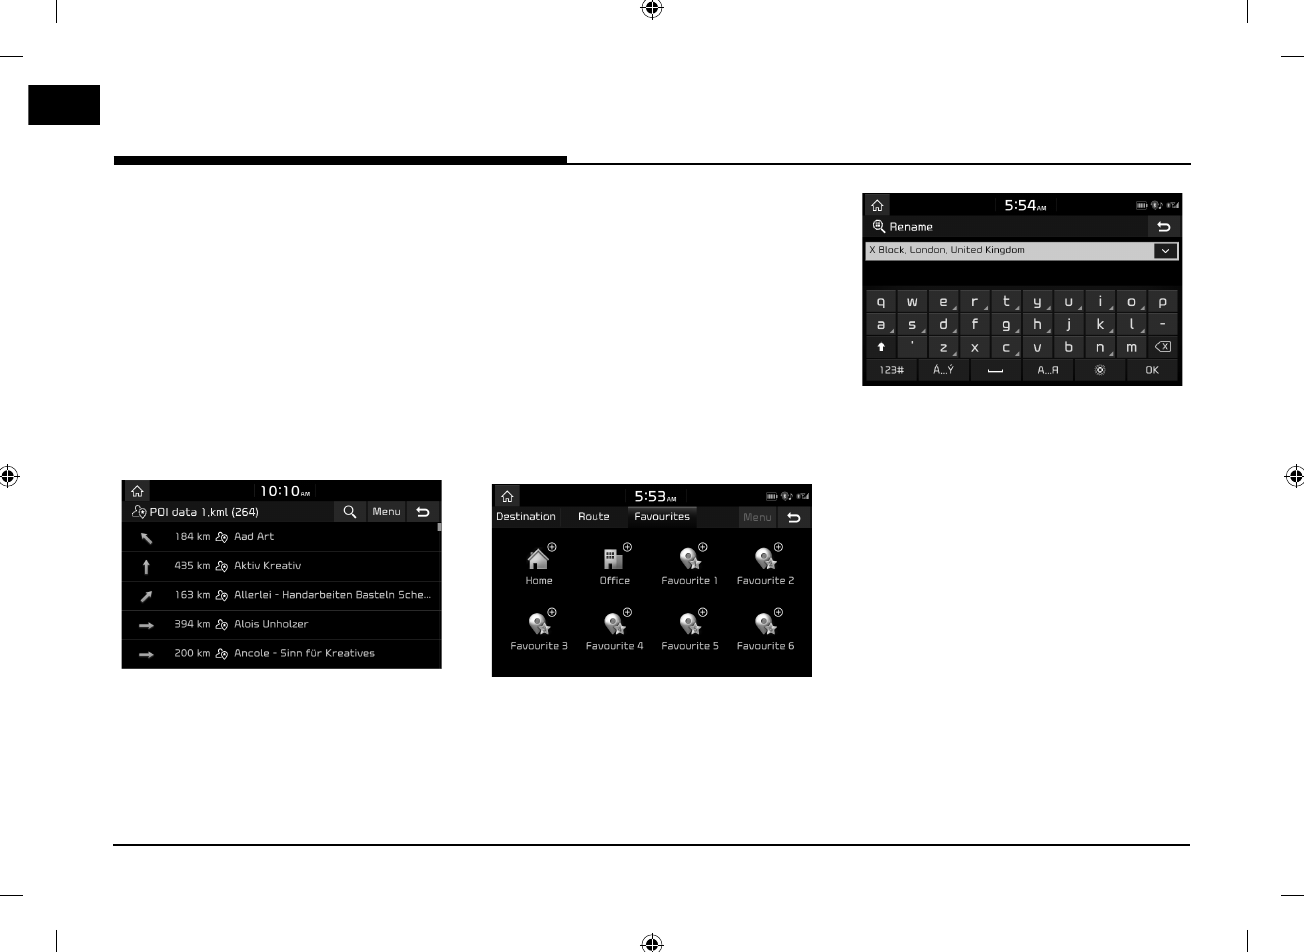
Home, Office, Favourites
If your home location, office location, and
favourite locations have been already in the
[Favourites] menu they can be easily retrieved
by tapping on them.
First of all, store home, office or favourites
in the [Favourites] menu through destination
search function.
Registering Home, Office or
Favourites
1. Press [NAV] > [Favourites].
2. Press [Home], [Office], or [Favourite (1~6)].
3. Select the desired position through
destination search function.
4. Press [OK] when the destination search is
complete.
5. Input the desired name and press [OK].
It is saved in the [Favourites] menu
automatically.
Finding your Home, Office, or
Favourite place
1. Press [NAV] > [Favourites] > [Home],
[Office], or favourite place.
2. Follow the steps 3-4 of the 䳖Address
Search䳗 on page 12.

17
Bluetooth® Wireless Technology
Pairing and connecting the
unit and a Bluetooth phone
To use the Bluetooth feature, make sure the
Bluetooth on your phone is turned on. Refer to
your phone䳓s user guide.
When no phones have been paired
1.
Press [ ] > [All menus] > [Phone]. Or
press [ ] on the steering wheel remote
control.
䳜 [Cancel]: Cancels Bluetooth connection.
2. In your phone, initiate a search for
Bluetooth devices. (The default device
name is KIA MOTORS.)
3. 1) If the SSP (Secure Simple Pairing) is not
supported, enter the passkey on your
Bluetooth device. (The default passkey
is 0000.)
2) If the SSP (Secure Simple Pairing) is
supported, press [Yes] on the pop-up
screen of your Bluetooth device.
(The pop-up screen may differ from the
actual information of the Bluetooth
device.)
4. Bluetooth device is connected.
The mobile phone contacts and the calling
list are downloaded.
When the connection fails, failure message
is displayed on the screen.
When a phone is already paired
1.
Press [ ] > [All menus] > [Phone]. Or press
[] on the steering wheel remote control.
2. Press the device from the Bluetooth device
list pop-up screen.
If you want to pair additional device, press
[Add new]. Follow the steps 3-4 of 䳖When
no phones have been paired䳗.
When pairing additional device
1. i) When using [SETUP] button, press
[SETUP] > [Bluetooth] > [Bluetooth
connections].
ii) When using [ ] button, press [ ].
2. i) Select the device you want to connect.
ii) If there is no device you want to
connect, press [Add new].
3. In your phone, initiate a search for
Bluetooth devices. (The default device
name is KIA MOTORS.)
4. i) If the SSP (Secure Simple Pairing) is not
supported, enter the passkey on your
Bluetooth device. (The default passkey
is 0000.)
ii) If the SSP (Secure Simple Pairing) is
supported, press [Yes] on the pop-up
screen of your Bluetooth device.
(The pop-up screen may differ from
the actual information of the Bluetooth
device.)
Bluetooth® Wireless Technology
18
Bluetooth® Wireless Technology
5. Bluetooth device is connected.
The mobile phone contacts and the calling
list are downloaded.
When the connection fails, failure message
is displayed on the screen.
Making a call by entering
phone number
Connect your unit and Bluetooth phone before
making a call.
1. Enter the phone number using the keypad
on the phone screen.
2. Press [ ] on the phone screen or [ ] on
the steering wheel remote control.
Note
If you press the wrong number, press [ ] to
delete one digit of the entered number.
Making a call by redialling
Press and hold [ ] on the phone screen or
[ ] on the steering wheel remote control.
Note
Redialling is not possible when there is no
number in the dialled calls list.
Answering/Rejecting a call
1. If there is an incoming call, a popup
message will appear.
2. Press [Accept] in the popup message or
[] on the steering wheel remote control.
To reject a call, select [Reject] in the popup
message or [ ] on the steering wheel
remote control.
Notes
䳜 If the Call-ID service is available, the caller䳓s
phone number is displayed.
䳜 If caller䳓s phone number is saved in the phone
book, the caller䳓s name is displayed on the
unit.
䳜 Upon receiving a call, the [Reject] function
may not be supported in some mobile
phones.
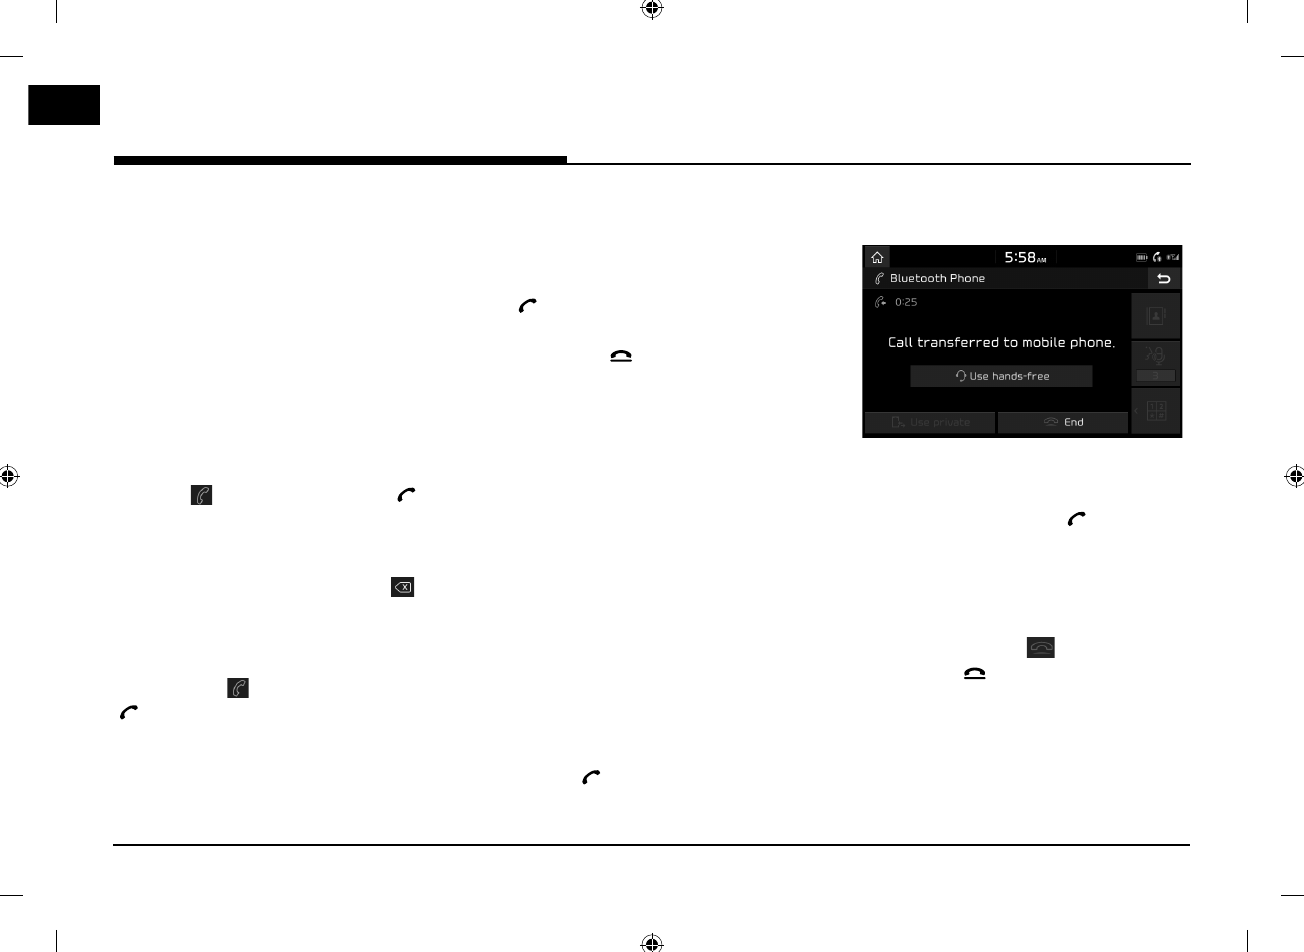
Switching call to the mobile
phone
1.
If you want to switch the call to the mobile
phone while talking on the car hands-free,
press [Use private] on the screen or press
and hold [ ] on the steering wheel remote
control.
As shown below, the call is switched to the
mobile phone.
2. If you want to switch the call to the car
hands-free while talking on the mobile
phone, press [Use hands-free] on the
screen or press and hold [ ] on the
steering wheel remote control.
The call is switched to the car hands-free.
Ending a call
1. To end a call, press [ ] on the phone
screen or [ ] on the steering wheel
remote control.
2. The call is ended.
19
Bluetooth® Wireless Technology
Using the menu during a
phone call
When making a call, you can use the following
menu items.
A
D
C
B
E
Position Description
A
Switches a voice call from the
car hands-free to the mobile
phone.
B
Ends a call.
C
Moves to a screen for entering
ARS numbers.
D
Displays the Mic volume
settings. You can adjust the
in-call volume that the other
party hears.
E
Displays the contacts list.
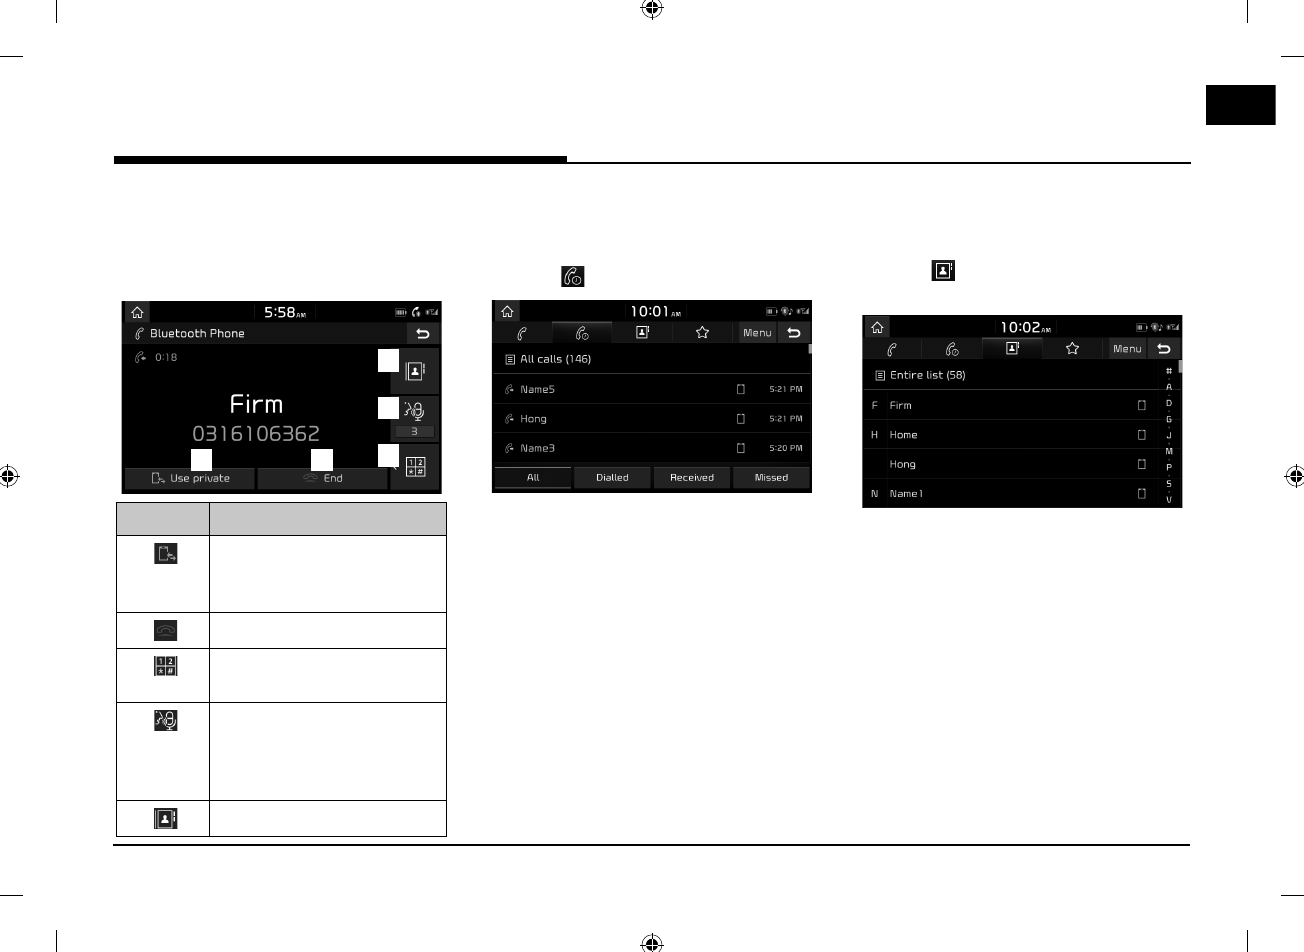
Callin g list
Making a call from calling list
1. Press [ ] on the phone screen.
2. Press [All], [Dialled], [Received], or
[Missed].
䳜 [All]: Displays all calling list.
䳜 [Dialled]: Displays the outgoing calling list.
䳜 [Received]: Displays the incoming calling
list.
䳜 [Missed]: Displays the missed calling list.
3. Press the entry you want to call.
Note
The calling list may not be saved in some
mobile phones.
Contacts
Making a call from contacts
1. Press [ ] on the phone screen.
The contacts are displayed on the screen.
2. Select the contact you want to call from
the list of contacts.
20
Bluetooth® Wireless Technology
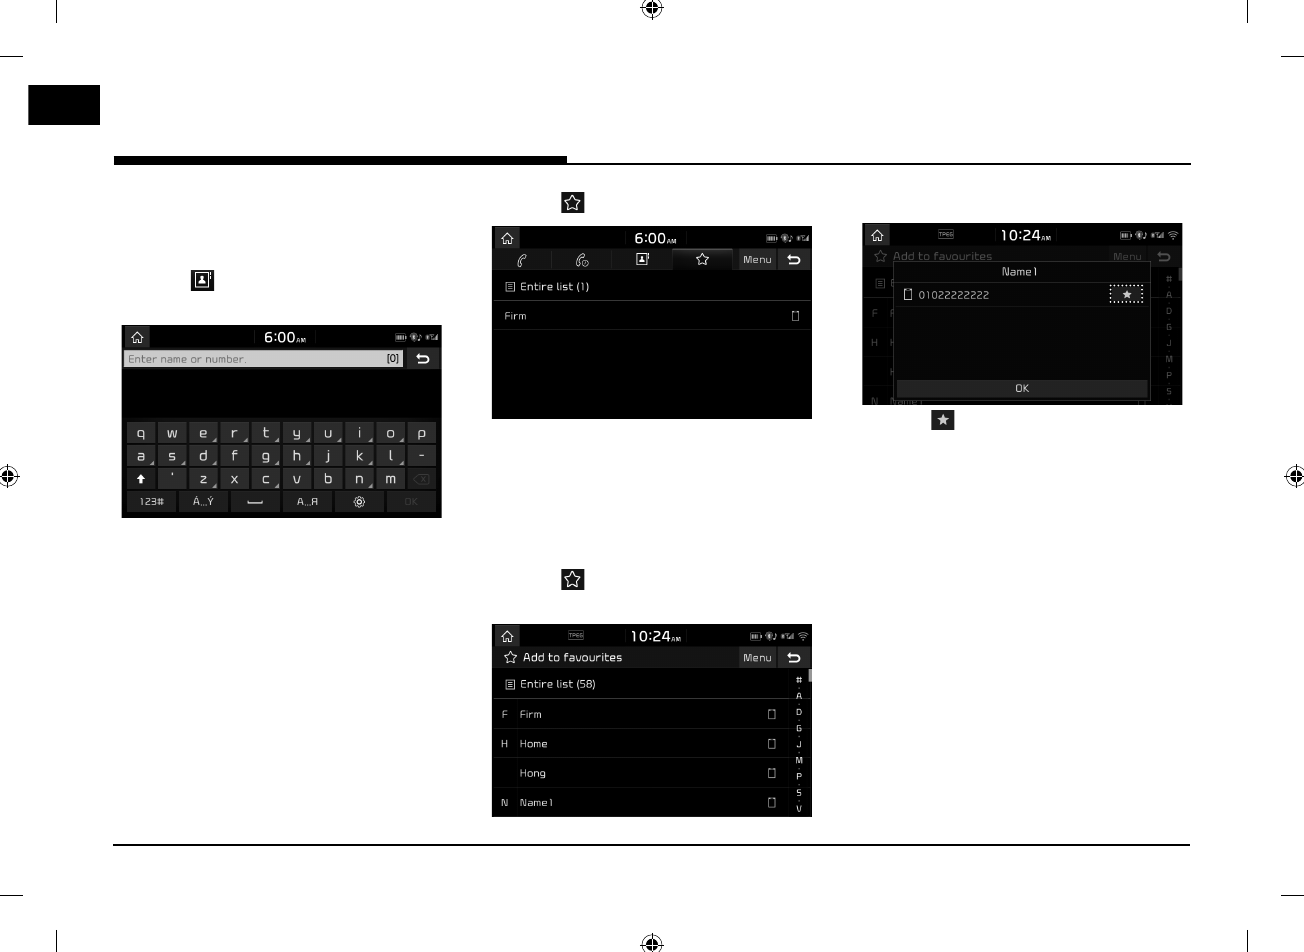
Searching by name or number
You can search contacts for the name or
number that you enter.
1. Press [ ] > [Menu] > [Search] on the
phone screen.
2. Enter the name or number, press [OK].
3. Select the contact you want to call.
Favourites
Calling Favourites
If the phone number has already been stored
in the Favourites, it can be easily called by
tapping on it.
First of all, add the phone number in the
Favourites. Refer to the 䳖Adding as a
Favourite䳗 on page 20.
1. Press [ ] on the phone screen.
<Favourites screen>
2. Select the desired favourite.
Adding as a Favourite
Up to 20 contacts can be added to [Favourites]
menu.
1. Press [ ] > [Add new] on the phone
screen.
2. Select one of the contacts.
3. Press [ ] > [OK].
Note
If the phone numbers have already been
stored in the Favourites, you can add or delete
them by pressing [Menu] > [Edit].
21
Connected Services
Before using Connected
Services
What is Connected Services?
Connected Services use TomTom LIVE Service
to allow users to receive additional information
in their car navigation system through the
mobile phone network.
Traffic
Delivers the most accurate traffic information
every two minutes. If you set the destination,
you can have recommendation to recalculate
the route according to the traffic condition.
Weather information
Delivers weather information and forecast for
five days, and delivers weather information of
the major European cities on the map.
Speed Camera Alerts
Delivers camera alerts with accurate and
timely speed warnings.
Live POI (Points of interest)
Delivers POI search results based on the real
time location information.
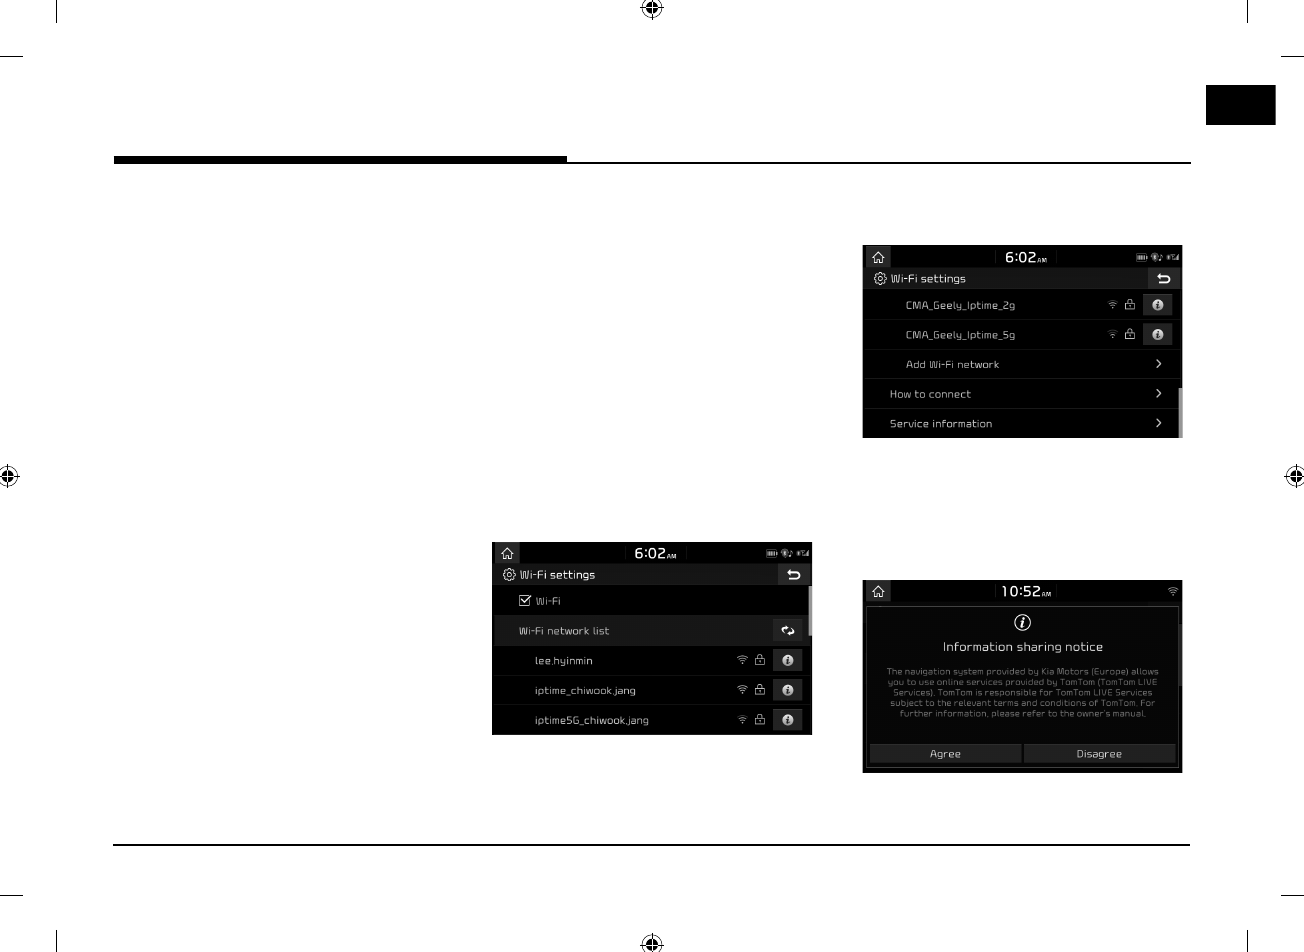
Connecting phone for using
Connected Services
1. Activate a Wi-Fi hotspot on your mobile
phone, and search for Wi-Fi networks. (For
details refer to your mobile phone's user
manual.)
Note
By creating a Wi-Fi Hotspot, you may incur
additional data charges depending on your
data plan, particularly when roaming. The
battery of the mobile phone may drain
quickly so consider charging the phone
while using Connected Services.
2. Press [SETUP] > [Wi-Fi].
3. Press [Wi-Fi].
4. Press [Wi-Fi network list]. Select the
desired Network. (If you want to connect
the Wi-Fi Network manually, press [Add
Wi-Fi network].
Especially, you can connect a hidden Wi-Fi
Network.)
Note
When you connect the Network for the first
time, the information sharing notice screen
is displayed. Read carefully and then press
[Agree].
Connected Services
22
Connected Services
Features
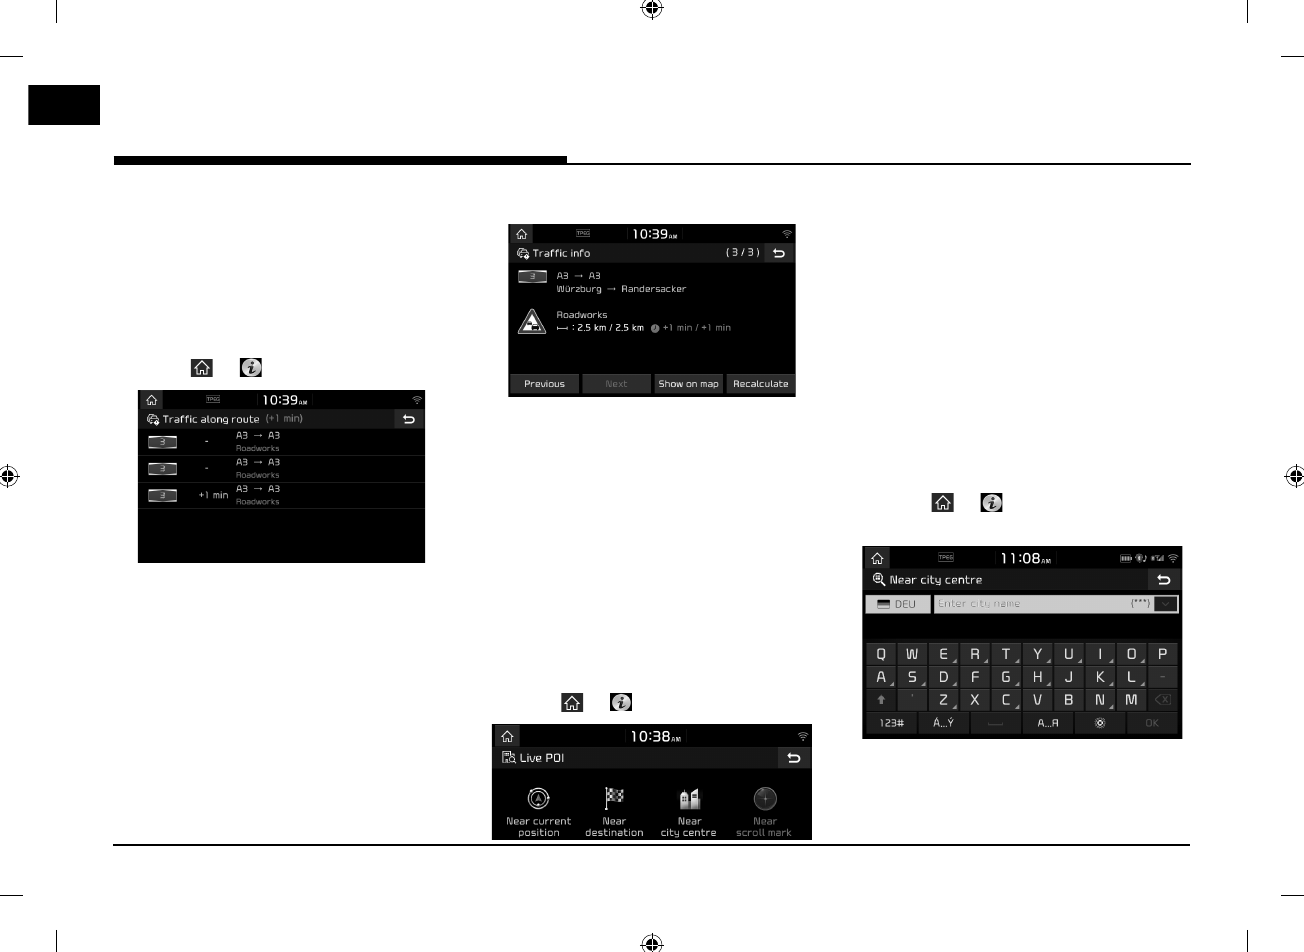
Traffic
The current traffic/road event information is
basically displayed on the traffic information
list. This feature may not be supported
depending on condition.
1. Press [ ] > [ ] > [Traffic].
䳜 It is displayed only when there is traffic
information along route after a route is
set.
䳜 The total delay time will be displayed
on title. This can be different from sum
of each delay times due to rounding-
off.
2. Press the desired items.
䳜 [Previous]/[Next]: Toggles through
different traffic events.
䳜 [Show on map]: Displays map screen for
selected area.
䳜 [Recalculate]: Recalculates the route by
reflecting traffic information.
Live POI (Points of interest)
You can set a POI as destination using different
search methods.
Searching for POI by [Near current
position] or [Near destination]
1. Press [ ] > [ ] > [Live POI].
2. Press [Near current position] or [Near
destination].
䳜 [Near current position]: Searches POI
near current vehicle position.
䳜 [Near destination]: Searches POI near
selected destination.
3. Enter the desired POI (Points of interest)
name and press [OK].
4. Select the desired destination.
5. Follow the steps 3-4 of the 䳖Address
Search䳗 on page 12.
Searching for POI by [Near city centre]
1. Press [ ] > [ ] > [Live POI] > [Near city
centre].
2. Enter the desired city name and press
[OK].
3. Enter the desired POI (Points of interest)
name and press [OK].
23
Connected Services
4. Select the desired destination.
5. Follow the steps 3-4 of the 䳖Address
Search䳗 on page 12.
Searching for POI by [Near scroll mark]
1. Perform a long press on the desired map
area. The selected point will be centred
on the screen and the scroll mark will be
displayed.
2. Press [ (Custom button: information)] >
[Live POI] > [Near scroll mark].
3. Enter the desired POI (Points of interest)
name and press [OK].
4. Select the desired destination.
5. Follow the steps 3-4 of the 䳖Address
Search䳗 on page 12.
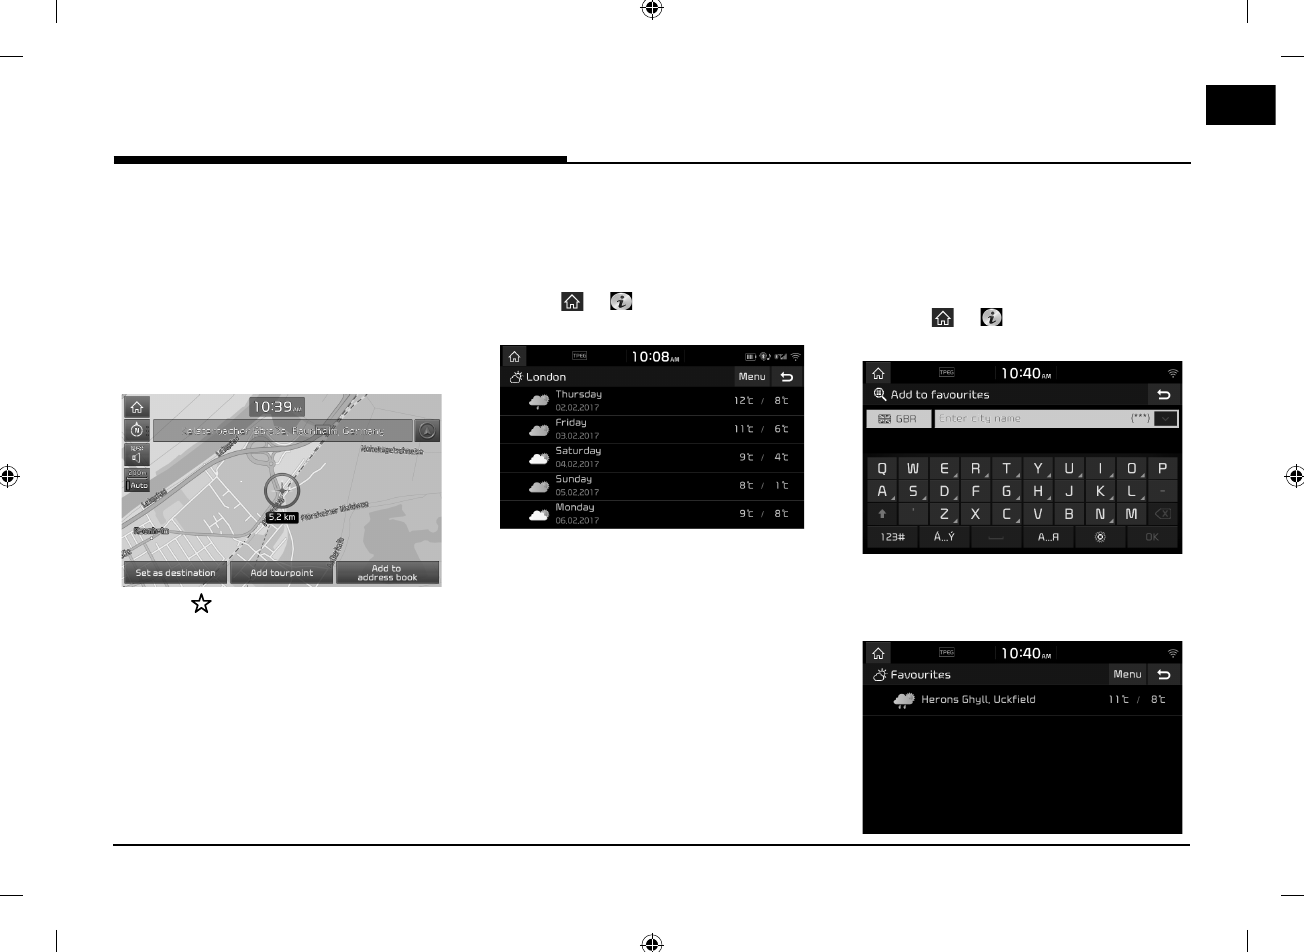
Weather
This provides weather forecast for the next
day including the current day, for the current
position and destination.
1. Press [ ] > [ ] > [Weather] > [Current
position] or [Destination].
䳜 [Current position]: Displays weather
information in your current position.
䳜 [Destination]: Displays weather
information in your destination.
2. Press the desired list for more weather
information.
Setting Favourites
If your favourite locations have already been
saved in the [Favourites] menu, you can check
weather information for favourite locations
easily.
1. Press [ ] > [ ] > [Weather] >
[Favourites] > [Menu] > [Add].
2. Search the city name and select the
desired city.
3. Press [Add to favourites].
24
Connected Services
4. Press the desired list for more weather
information.
Note
You can also add the current position or
destination as favourites.
Press [ ] > [ ] > [Weather] > [Current
position] or [Destination] > [Menu] > [Add].
Deleting Favourites
1. Press [ ] > [ ] > [Weather] >
[Favourites] > [Menu] > [Delete].
2. Select the desired item, then press [Delete]
> [Yes].
䳜 [Mark all]: Marks all items.
䳜 [Unmark all]: Unmarks all items.
Speed Camera Alerts
1. Press [SETUP] > [Navigation] > [Guidance].
2. Press [Camera alert] or [Danger zone
alert].
The using notice screen is displayed. Read
carefully and then press [Agree] to use the
function.
Notes
䳜 The [Camera alert] or [Danger zone alert] is
displayed only when the Wi-Fi Network has
been connected.
䳜 According to the country legislation, the
[Camera alert] might be changed to [Danger
zone alert].
䳜 According to the country legislation, the
[Camera alert] or [Danger zone alert] might
not be available.
3. Press [MAP].
The alert for speed camera appears about
10 seconds or 100 m before the camera
point of arrival.
Notes
䳜 Depending on the region and the type of
speed camera, the image might differ.
䳜 You can request the related information
update by pressing the speed camera
information icon.
- When the camera alert appears but there
is no speed camera, you can report to
TomTom to delete the camera information
by pressing the speed camera image.
- When the speed camera appears but
there is no camera alert, you can report
to TomTom by pressing the speed camera
report button.
25
Specification
Specification
Common
Power Supply
DC 12 V
Operating Power DC 9 V ~ DC 16 V
Current Consumption
Maximum 14 A (Internal
amplifier)
Maximum 5 A (External
amplifier)
Dark Current Maximum 0.5 mA
Operating Temperature
-20 C ~ +70 C
Storage Temperature -40 C ~ +85 C
Dimensions
(Head unit)
255.9
mm (W) X
163.8
mm (H)
X
190.4
mm (D)
Weight (Head unit) 2.06 kg
Bluetooth
Supported Profile HFP 1.6, A2DP 1.2,
AVRCP 1.5, PBAP 1.1
Supported Bluetooth
Specification 3.0
Frequency Range 2402 MHz ~ 2480 MHz
Output (Class2) 1.0 dBm
Number of Channels 79
DAB
Tuning Range 5 A (174.928 MHz) ~ 13F
(239.200 MHz)
Sensitivity Range -95 dBm ~ 3 dBm
Adjacent Channel
Selectivity 35 dB
Far Off Selectivity 45 dB
Radio
AM
Tuning range 522 kHz ~ 1620 kHz
Usable Sensitivity 35 dBuV
Signal-to-noise ratio Minimum 45 dB
FM
Tuning range 87.50 MHz ~ 108.00 MHz
Usable Sensitivity 10 dBuV
Signal-to-noise ratio Minimum 50 dB
TFT-LCD
Screen Size 203.2 mm (8 inches)
176.4 (W) x 99.36 (H) mm
(Active area)
Resolution 384,000 pixel
Operating Method TFT (Thin Film Transistor)
Viewing Angle
R/L/U/D 89 (Typ)
Internal Lighting LED
䳜 Designs and specifications are subject to change without prior notice.
FCC approval
This device complies with part 15 of the FCC Rules. Operation is subject to the following two conditions: (1) This
device may not cause harmful interference, and (2) this device must accept any interference received, including
interference that may cause undesired operation.
This equipment has been tested and found to comply with the limits for a digital device, pursuant to part 15 of the
FCC Rules. These limits are designed to provide reasonable protection against harmful interference in a residential
installation. This equipment generates, uses and can radiate radio frequency energy and, if not installed and used in
accordance with the instructions, may cause harmful interference to radio communications. However, there is no
guarantee that interference will not occur in a particular installation. If this equipment does cause harmful
interference to radio or television reception, which can be determined by turning the equipment off and on, the user
is encouraged to try to correct the interference by one or more of the following measures:
Reorient or relocate the receiving antenna.
Increase the separation between the equipment and receiver.
Connect the equipment into an outlet on a circuit different from that to which the receiver is connected.
Consult the dealer or an experienced radio/TV technician for help.
Changes or modifications not expressly approved by the party responsible for compliance could void the user's
authority to operate the equipment.
This device should be installed and operated with minimum 20 cm between the radiator and your body.

P/N: MFLXXXXXXXX
Support - Hotline
Web Site: http://www.navigation.com/kia
International Toll Free Number: 00800 18 23 53 22
Telephone number for all other countries (or if Toll Free
numbers are not supported): +31 555 384 245